

Page 1

UserGuide
ThinkPadT440p
Page 2

Note:Beforeusingthisinformationandtheproductitsupports,besuretoreadandunderstandthefollowing:
•Safety,Warranty,andSetupGuide
•RegulatoryNotice
•“Importantsafetyinformation”onpagevi
•AppendixE“Notices”onpage159
ThelatestSafety,Warranty,andSetupGuideandtheRegulatoryNoticeareavailableontheLenovoSupport
Websiteat:
http://www.lenovo.com/ThinkPadUserGuides
FirstEdition(September2013)
©CopyrightLenovo2013.
LIMITEDANDRESTRICTEDRIGHTSNOTICE:IfdataorsoftwareisdeliveredpursuantaGeneralServicesAdministration
“GSA”contract,use,reproduction,ordisclosureissubjecttorestrictionssetforthinContractNo.GS-35F-05925.
Page 3

Contents
Readthisrst..............v
Importantsafetyinformation..........vi
Conditionsthatrequireimmediateaction..vii
Safetyguidelines............vii
Chapter1.Productoverview......1
Locatingcomputercontrols,connectors,and
indicators..................1
Frontview................1
Right-sideview..............3
Left-sideview..............5
Bottomview...............6
Rearview................7
Statusindicators.............8
Locatingimportantproductinformation......9
Machinetypeandmodelinformation.....9
FCCIDandICCerticationinformation....9
CerticateofAuthenticityinformation....10
GenuineMicrosoftlabel.........11
Features.................11
Specications...............13
Operatingenvironment...........13
Lenovoprograms.............14
AccessingLenovoprogramsontheWindows
7operatingsystem...........14
AccessingLenovoprogramsontheWindows
8operatingsystem...........15
Lenovoprogramoverview........16
Chapter2.Usingyourcomputer...19
Registeringyourcomputer..........19
Frequentlyaskedquestions.........19
Specialkeys...............21
Functionkeysandkeycombinations....21
Windowskey.............22
UsingtheThinkPadpointingdevice......22
Powermanagement............24
Checkingthebatterystatus........24
Usingtheacpoweradapter........25
Chargingthebattery..........25
Maximizingthebatterylife........26
Managingthebatterypower.......26
Power-savingmodes..........26
Connectingtothenetwork..........27
Ethernetconnections..........27
Wirelessconnections..........27
Presentationsandmultimedia.........31
Changingdisplaysettings........31
Connectingaprojectororanexternal
monitor................31
Settingupapresentation.........34
Usingdualdisplays...........34
UsingtheNVIDIAOptimusGraphicsfeature...35
Usingaudiofeatures............35
Usingthecamera.............35
Usingtheopticaldrive...........36
Usingaashmediacard...........36
Chapter3.Youandyourcomputer..39
Accessibilityandcomfort..........39
Ergonomicinformation..........39
Comfort...............40
Accessibilityinformation.........40
Travelingwithyourcomputer.........41
Traveltips...............41
Travelaccessories...........42
Chapter4.Security..........43
Usingpasswords..............43
Typingpasswords...........43
Power-onpassword...........43
Supervisorpassword..........44
Harddiskpasswords..........45
Harddisksecurity.............47
Settingthesecuritychip...........48
Usingthengerprintreader..........49
Noticeondeletingdatafromyourharddiskdrive
orsolid-statedrive.............52
Usingrewalls...............53
Protectingdataagainstviruses........53
Chapter5.Recoveryoverview....55
RecoveryoverviewfortheWindows7operating
system..................55
Creatingandusingrecoverymedia.....55
Performingbackupandrecoveryoperations.56
UsingtheRescueandRecoveryworkspace.57
Creatingandusingarescuemedium....58
Reinstallingpreinstalledprogramsanddevice
drivers................59
Solvingrecoveryproblems........60
RecoveryoverviewfortheWindows8operating
system..................60
Refreshingyourcomputer........60
©CopyrightLenovo2013
i
Page 4

Resettingyourcomputertothefactorydefault
settings................60
Usingtheadvancedstartupoptions....61
RecoveringyouroperatingsystemifWindows
8failstostart.............61
Creatingandusingrecoverymedia.....61
Chapter6.Replacingdevices.....63
Staticelectricityprevention..........63
Replacingthebatterypack..........63
Replacingthebasecoverassembly......65
InstallingorreplacingtheSIMcard.......66
Replacingtheharddiskdriveorsolid-statedrive.67
Replacingamemorymodule.........70
ReplacingtheM.2wirelessLANcard......72
InstallingorreplacingtheM.2wirelessWAN
card...................76
ReplacingtheUltrabaydevice........79
Replacingthebackupbattery.........82
Replacingthekeyboard...........84
Chapter7.Enhancingyour
computer...............91
FindingThinkPadoptions..........91
ThinkPaddockingstations..........91
Locatingcontrolsandconnectorsonthe
ThinkPaddockingstations........91
AttachingaThinkPaddockingstation....96
DetachingaThinkPaddockingstation...97
Connectingexternaldisplaystoadocking
station................98
Securityfeatures............99
Chapter8.Advanced
conguration............101
Installinganewoperatingsystem.......101
InstallingtheWindows7operatingsystem..101
InstallingtheWindows8operatingsystem..102
Installingdevicedrivers...........103
UsingtheThinkPadSetupprogram......103
Mainmenu..............104
Congmenu..............104
DateandTimemenu..........109
Securitymenu.............109
Startupmenu.............114
Restartmenu.............115
UpdatingtheUEFIBIOS.........115
Usingsystemmanagement..........116
Settingmanagementfeatures.......116
Chapter9.Preventingproblems..119
Generaltipsforpreventingproblems......119
Makingsuredevicedriversarecurrent.....120
Takingcareofyourcomputer.........121
Cleaningthecoverofyourcomputer....122
Chapter10.Troubleshooting
computerproblems.........125
Diagnosingproblems............125
Troubleshooting..............125
Computerstopsresponding.......125
Spillsonthekeyboard..........126
Errormessages............126
Errorswithoutmessages.........128
Beeperrors..............128
Memorymoduleproblems........129
Networkingproblems..........129
Problemswiththekeyboardandotherpointing
devices................131
Problemswiththedisplayandmultimedia
devices................132
Fingerprintreaderproblems........135
Batteryandpowerproblems.......135
Problemswithdrivesandotherstorage
devices................138
Asoftwareproblem...........139
Problemswithportsandconnectors....140
Chapter11.Gettingsupport....141
BeforeyoucontactLenovo..........141
Gettinghelpandservice...........141
Usingdiagnosticprograms........142
LenovoSupportWebsite.........142
CallingLenovo.............142
Purchasingadditionalservices........143
AppendixA.Regulatory
Information.............145
Wirelessrelatedinformation.........145
LocationsoftheUltraConnect™wireless
antennas...............146
Locatingwirelessregulatorynotices....147
Exportclassicationnotice..........147
Electronicemissionnotices..........147
FederalCommunicationsCommission
DeclarationofConformity........147
IndustryCanadaClassBemissioncompliance
statement...............147
EuropeanUnion-Compliancetothe
ElectromagneticCompatibilityDirective...148
GermanClassBcompliancestatement...148
KoreaClassBcompliancestatement....149
JapanVCCIClassBcompliancestatement..149
Japancompliancestatementforproducts
whichconnecttothepowermainswith
iiUserGuide
Page 5

ratedcurrentlessthanorequalto20Aper
phase................149
Lenovoproductserviceinformationfor
Taiwan................149
Eurasiancompliancemark..........149
AppendixB.WEEEandrecycling
statements.............151
ImportantWEEEinformation.........151
RecyclinginformationforJapan........151
BatteryrecyclinginformationforBrazil.....152
BatteryrecyclinginformationforTaiwan.....152
BatteryrecyclinginformationfortheEuropean
Union..................153
BatteryrecyclinginformationfortheUnitedStates
andCanada................153
AppendixC.RestrictionofHazardous
SubstancesDirective(RoHS)....155
EuropeanUnionRoHS...........155
ChinaRoHS................155
IndiaRoHS................155
TurkishRoHS...............155
UkraineRoHS...............156
AppendixD.ENERGYSTARmodel
information.............157
AppendixE.Notices.........159
Trademarks................160
©CopyrightLenovo2013
iii
Page 6

ivUserGuide
Page 7

Readthisrst
Besuretofollowtheimportanttipsgivenheretogetthemostuseandenjoymentoutofyourcomputer.
Failuretodosomightleadtodiscomfortorinjury,orcauseyourcomputertofail.
Protectyourselffromtheheatthatyourcomputergenerates.
Whenyourcomputeristurnedonorthebatteryischarging,thebase,thepalm
rest,andsomeotherpartsmaybecomehot.Thetemperaturetheyreach
dependsontheamountofsystemactivityandthelevelofchargeinthebattery.
Extendedcontactwithyourbody,eventhroughclothing,couldcause
discomfortorevenaskinburn.
•Avoidkeepingyourhands,yourlap,oranyotherpartofyourbodyin
contactwithahotsectionofthecomputerforanyextendedtime.
•Periodicallytakehandsfromusingthekeyboardbyliftingyourhandsfrom
thepalmrest.
Protectyourselffromtheheatgeneratedbytheacpoweradapter.
Whentheacpoweradapterisconnectedtoanelectricaloutletandyour
computer,itgeneratesheat.
Extendedcontactwithyourbody,eventhroughclothing,maycauseaskin
burn.
•Donotplacetheacpoweradapterincontactwithanypartofyourbody
whileitisinuse.
•Neveruseittowarmyourbody.
Preventyourcomputerfromgettingwet.
Protectthecablesfrombeingdamaged.
Toavoidspillsandthedangerofelectricalshock,keepliquidsawayfromyour
computer.
Applyingstrongforcetocablesmaydamageorbreakthem.
Routecommunicationlines,orthecablesofanacpoweradapter,amouse,a
keyboard,aprinter,oranyotherelectronicdevice,sothattheycannotbewalked
on,trippedover,pinchedbyyourcomputerorotherobjects,orinanyway
subjectedtotreatmentthatcouldinterferewiththeoperationofyourcomputer.
©CopyrightLenovo2013
v
Page 8
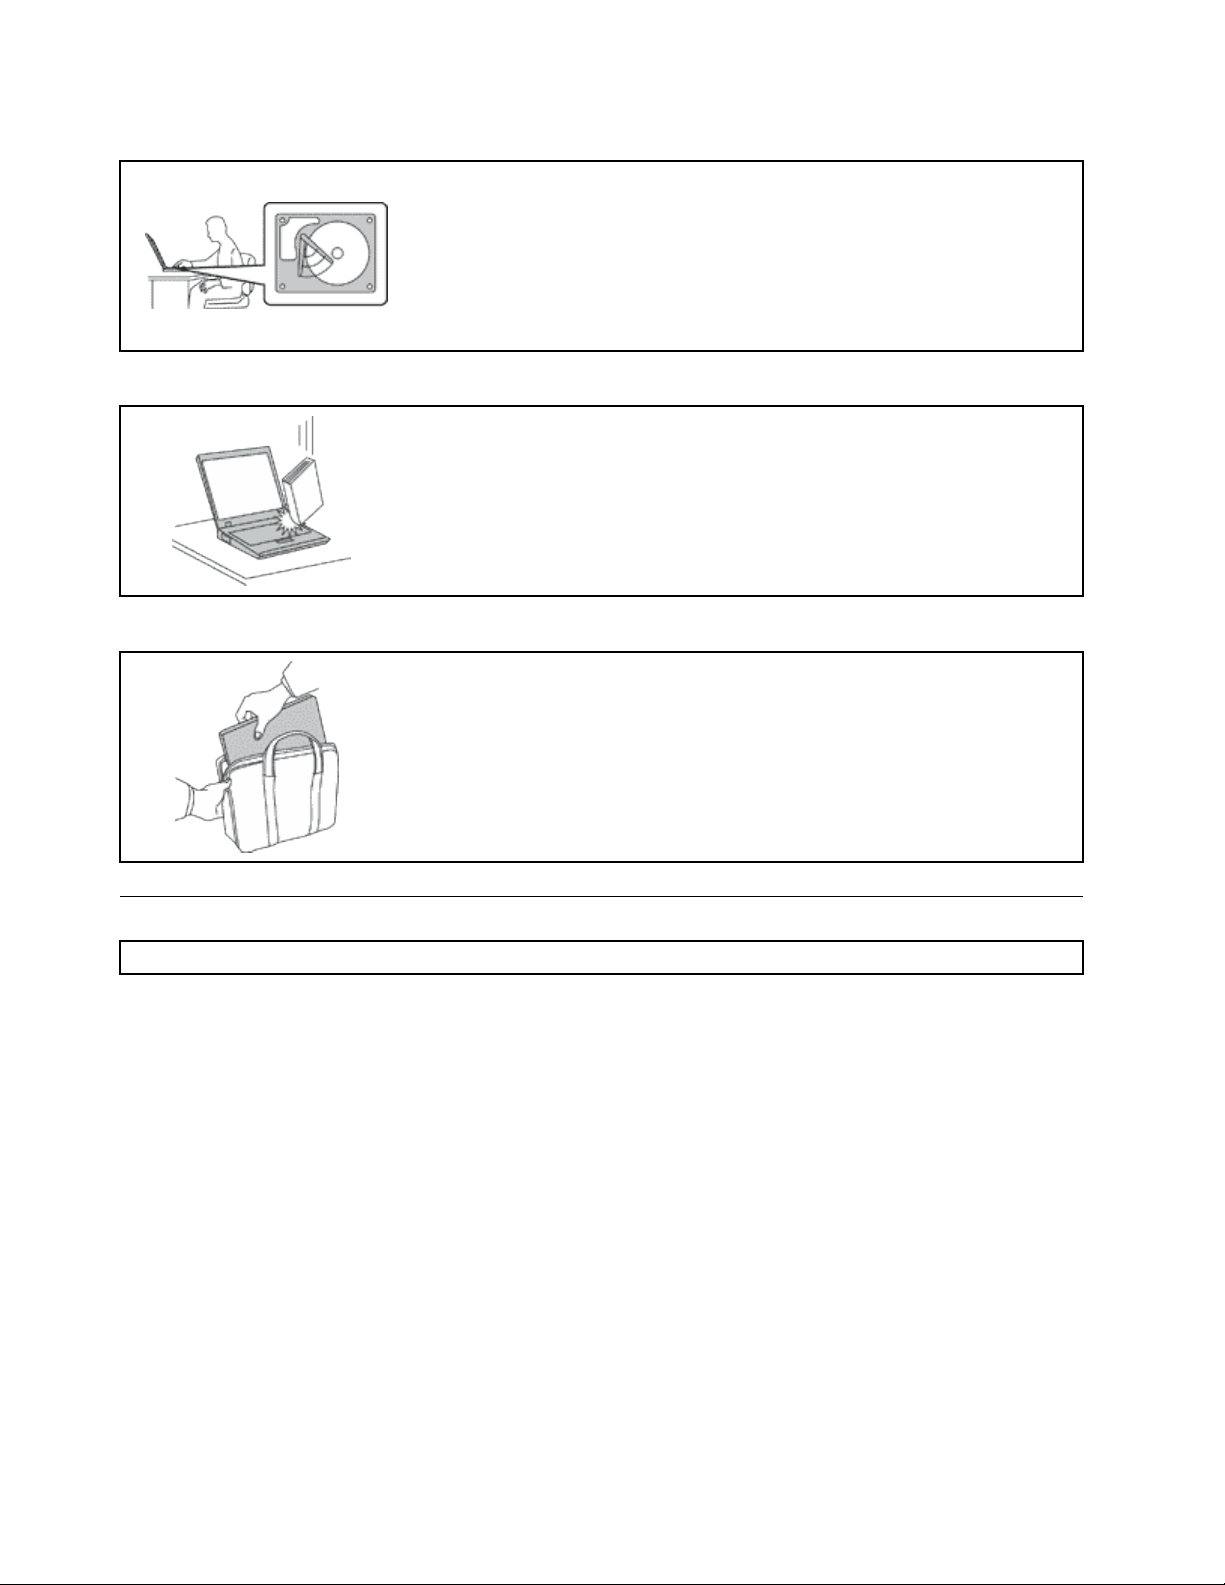
Protectyourcomputeranddatawhenmovingit.
Beforemovingacomputerequippedwithaharddiskdrive,dooneofthe
following,andmakesurethatthepowerbuttonisofforisblinking:
•Turnitoff.
•Putitinsleepmode.
•Putitinhibernationmode.
Thiswillhelptopreventdamagetothecomputer,andpossiblelossofdata.
Handleyourcomputergently.
Donotdrop,bump,scratch,twist,hit,vibrate,push,orplaceheavyobjectson
yourcomputer,display,orexternaldevices.
Carryyourcomputercarefully.
•Useaqualitycarryingcasethatprovidesadequatecushioningandprotection.
•Donotpackyourcomputerinatightlypackedsuitcaseorbag.
•Beforeputtingyourcomputerinacarryingcase,makesurethatitisoff,insleep
mode,orinhibernationmode.Donotputacomputerinacarryingcasewhileit
isturnedon.
Importantsafetyinformation
Note:Readtheimportantsafetyinformationrst.
Thisinformationcanhelpyousafelyuseyournotebookcomputer.Followandretainallinformationincluded
withyourcomputer.Theinformationinthisdocumentdoesnotalterthetermsofyourpurchaseagreement
ortheLenovo
andSetupGuidethatcomeswithyourcomputer.
Customersafetyisimportant.Ourproductsaredevelopedtobesafeandeffective.However,personal
computersareelectronicdevices.Powercords,poweradapters,andotherfeaturescancreatepotential
safetyrisksthatcanresultinphysicalinjuryorpropertydamage,especiallyifmisused.T oreducethese
risks,followtheinstructionsincludedwithyourproduct,observeallwarningsontheproductandinthe
operatinginstructions,andreviewtheinformationincludedinthisdocumentcarefully.Bycarefullyfollowing
theinformationcontainedinthisdocumentandprovidedwithyourproduct,youcanhelpprotectyourself
fromhazardsandcreateasafercomputerworkenvironment.
Note:Thisinformationincludesreferencestopoweradaptersandbatteries.Inadditiontonotebook
computers,someproducts(suchasspeakersandmonitors)shipwithexternalpoweradapters.Ifyouhave
suchaproduct,thisinformationappliestoyourproduct.Inaddition,computerproductscontainacoin-sized
internalbatterythatprovidespowertothesystemclockevenwhenthecomputerisunplugged,sothe
batterysafetyinformationappliestoallcomputerproducts.
®
LimitedWarranty.Formoreinformation,see“WarrantyInformation”intheSafety,Warranty,
viUserGuide
Page 9

Conditionsthatrequireimmediateaction
Productscanbecomedamagedduetomisuseorneglect.Someproductdamageisseriousenough
thattheproductshouldnotbeusedagainuntilithasbeeninspectedand,ifnecessary,repairedby
anauthorizedservicer.
Aswithanyelectronicdevice,paycloseattentiontotheproductwhenitisturnedon.Onveryrare
occasions,youmightnoticeanodororseeapuffofsmokeorsparksventfromyourproduct.Oryou
mighthearsoundslikepopping,crackingorhissing.Theseconditionsmightmerelymeanthatan
internalelectroniccomponenthasfailedinasafeandcontrolledmanner .Or,theymightindicate
apotentialsafetyissue.However,donottakerisksorattempttodiagnosethesituationyourself.
ContacttheCustomerSupportCenterforfurtherguidance.ForalistofServiceandSupportphone
numbers,seethefollowingWebsite:
http://www.lenovo.com/support/phone
Frequentlyinspectyourcomputeranditscomponentsfordamageorwearorsignsofdanger.Ifyou
haveanyquestionabouttheconditionofacomponent,donotusetheproduct.ContacttheCustomer
SupportCenterortheproductmanufacturerforinstructionsonhowtoinspecttheproductand
haveitrepaired,ifnecessary.
Intheunlikelyeventthatyounoticeanyofthefollowingconditions,orifyouhaveanysafetyconcerns
withyourproduct,stopusingtheproductandunplugitfromthepowersourceandtelecommunication
linesuntilyoucanspeaktotheCustomerSupportCenterforfurtherguidance.
•Powercords,plugs,poweradapters,extensioncords,surgeprotectors,orpowersuppliesthatare
cracked,broken,ordamaged.
•Signsofoverheating,smoke,sparks,orre.
•Damagetoabattery(suchascracks,dents,orcreases),dischargefromabattery,orabuildupofforeign
substancesonthebattery.
•Acracking,hissingorpoppingsound,orstrongodorthatcomesfromtheproduct.
•Signsthatliquidhasbeenspilledoranobjecthasfallenontothecomputerproduct,thepowercordor
poweradapter.
•Thecomputerproduct,powercord,orpoweradapterhasbeenexposedtowater.
•Theproducthasbeendroppedordamagedinanyway.
•Theproductdoesnotoperatenormallywhenyoufollowtheoperatinginstructions.
Note:Ifyounoticetheseconditionswithaproduct(suchasanextensioncord)thatisnotmanufacturedfor
orbyLenovo,stopusingthatproductuntilyoucancontacttheproductmanufacturerforfurtherinstructions,
oruntilyougetasuitablereplacement.
Safetyguidelines
Alwaysobservethefollowingprecautionstoreducetheriskofinjuryandpropertydamage.
Serviceandupgrades
DonotattempttoserviceaproductyourselfunlessinstructedtodosobytheCustomerSupportCenteror
yourdocumentation.OnlyuseaServiceProviderwhoisapprovedtorepairyourparticularproduct.
Note:Somecomputerpartscanbeupgradedorreplacedbythecustomer.Upgradestypicallyare
referredtoasoptions.ReplacementpartsapprovedforcustomerinstallationarereferredtoasCustomer
ReplaceableUnits,orCRUs.Lenovoprovidesdocumentationwithinstructionswhenitisappropriatefor
customerstoinstalloptionsorreplaceCRUs.Youmustcloselyfollowallinstructionswheninstallingor
replacingparts.TheOffstateofapowerindicatordoesnotnecessarilymeanthatvoltagelevelsinsidea
©CopyrightLenovo2013
vii
Page 10
productarezero.Beforeyouremovethecoversfromaproductequippedwithapowercord,alwaysmake
surethatthepoweristurnedoffandthattheproductisunpluggedfromanypowersource.Ifyouhave
anyquestionsorconcerns,contacttheCustomerSupportCenter.
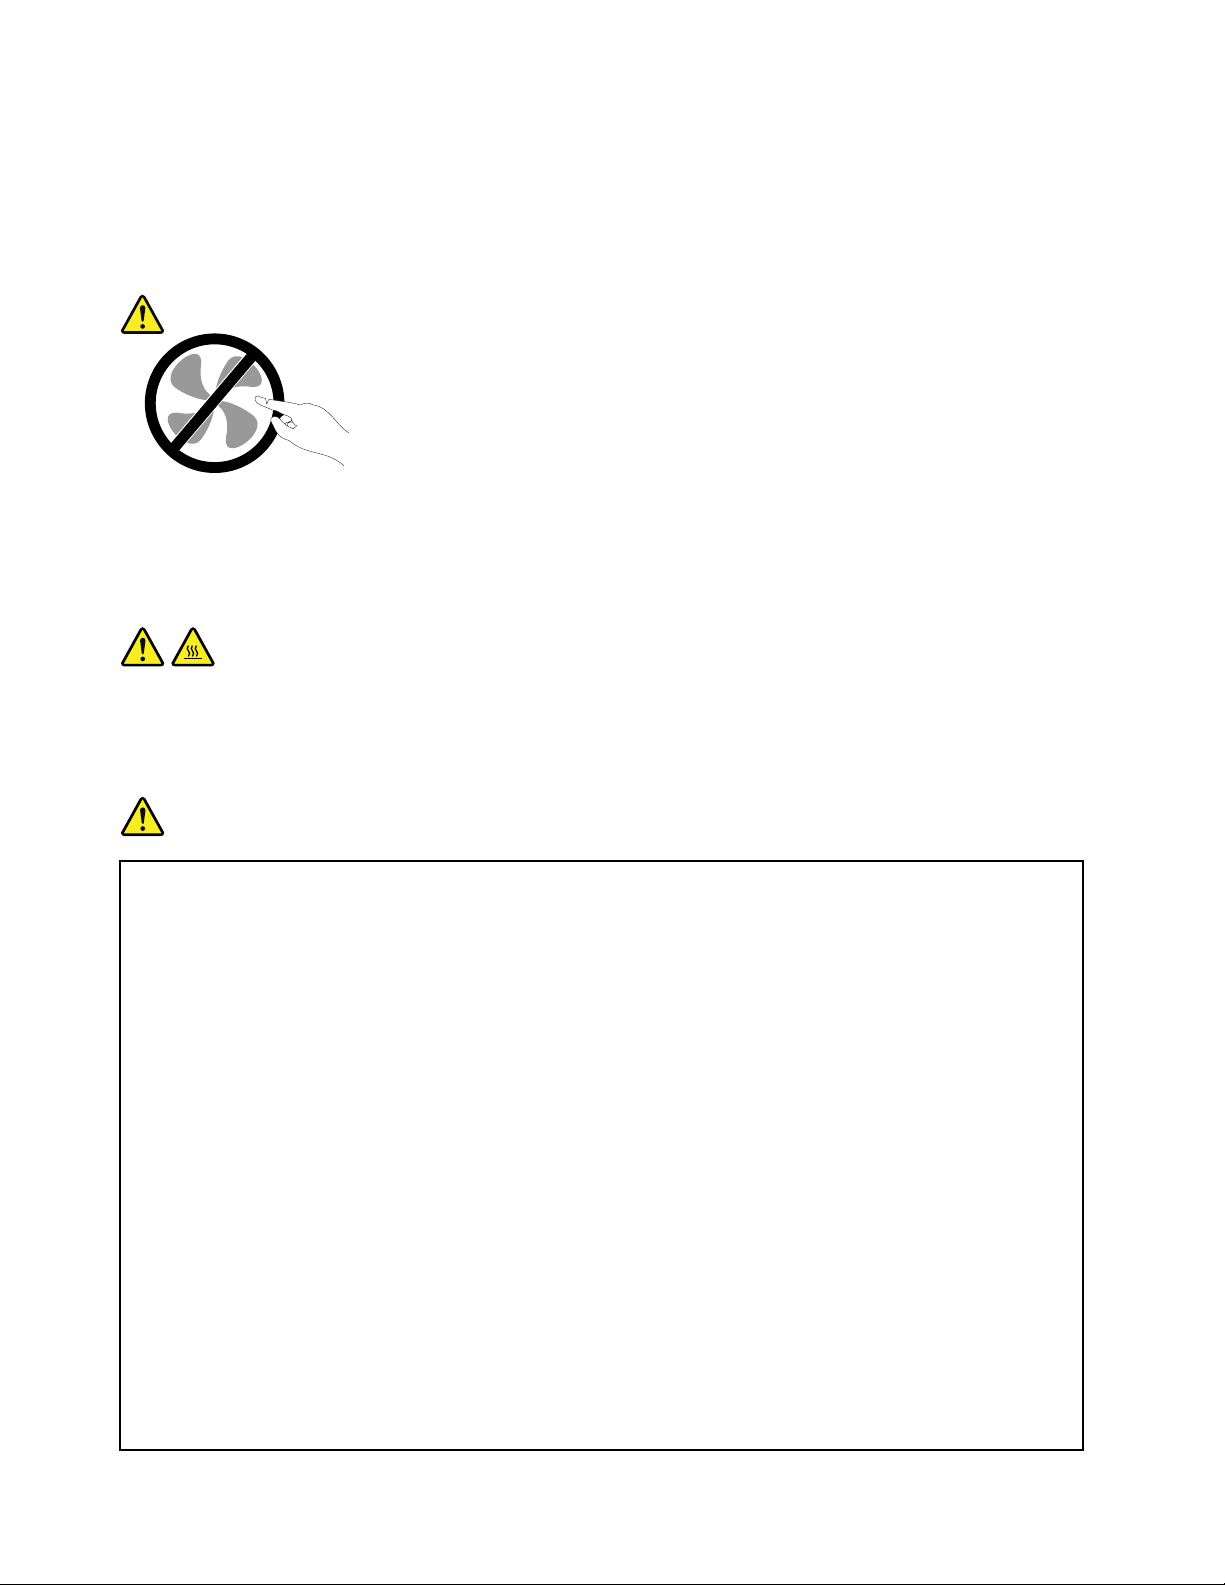
Althoughtherearenomovingpartsinyourcomputerafterthepowercordhasbeendisconnected,the
followingwarningsarerequiredforyoursafety.
CAUTION:
Hazardousmovingparts.Keepngersandotherbodypartsaway.
CAUTION:
BeforereplacinganyCRUs,turnoffthecomputerandwaitthreetoveminutestoletthecomputer
coolbeforeopeningthecover.
Powercordsandpoweradapters
DANGER
Useonlythepowercordsandpoweradapterssuppliedbytheproductmanufacturer.
Thepowercordsshallbesafetyapproved.ForGermany,itshallbeH05VV-F ,3G,0.75mm
better.Forothercountries,thesuitabletypesshallbeusedaccordingly.
Neverwrapapowercordaroundapoweradapterorotherobject.Doingsocanstressthecordin
waysthatcancausethecordtofray,crack,orcrimp.Thiscanpresentasafetyhazard.
Alwaysroutepowercordssothattheywillnotbewalkedon,trippedover,orpinchedbyobjects.
Protectpowercordsandpoweradaptersfromliquids.Forinstance,donotleaveyourpowercord
orpoweradapternearsinks,tubs,toilets,oronoorsthatarecleanedwithliquidcleansers.
Liquidscancauseashortcircuit,particularlyifthepowercordorpoweradapterhasbeenstressed
bymisuse.Liquidsalsocancausegradualcorrosionofpowercordterminalsand/ortheconnector
terminalsonapoweradapter,whichcaneventuallyresultinoverheating.
Alwaysconnectpowercordsandsignalcablesinthecorrectorderandensurethatallpowercord
connectorsaresecurelyandcompletelypluggedintoreceptacles.
Donotuseanypoweradapterthatshowscorrosionattheacinputpinsorshowssignsof
overheating(suchasdeformedplastic)attheacinputpinsoranywhereonthepoweradapter.
2
,or
Donotuseanypowercordswheretheelectricalcontactsoneitherendshowsignsofcorrosionor
overheatingorwherethepowercordappearstohavebeendamagedinanyway.
viiiUserGuide
Page 11

Topreventpossibleoverheating,donotcoverthepoweradapterwithclothingorotherobjects
whenthepoweradapterispluggedintoanelectricaloutlet.
Extensioncordsandrelateddevices
Ensurethatextensioncords,surgeprotectors,uninterruptiblepowersupplies,andpowerstripsthatyouuse
areratedtohandletheelectricalrequirementsoftheproduct.Neveroverloadthesedevices.Ifpowerstrips
areused,theloadshouldnotexceedthepowerstripinputrating.Consultanelectricianformoreinformation
ifyouhavequestionsaboutpowerloads,powerrequirements,andinputratings.
Plugsandoutlets
DANGER
Ifareceptacle(poweroutlet)thatyouintendtousewithyourcomputerequipmentappearstobe
damagedorcorroded,donotusetheoutletuntilitisreplacedbyaqualiedelectrician.
Donotbendormodifytheplug.Iftheplugisdamaged,contactthemanufacturertoobtain
areplacement.
Donotshareanelectricaloutletwithotherhomeorcommercialappliancesthatdrawlargeamounts
ofelectricity;otherwise,unstablevoltagemightdamageyourcomputer,data,orattacheddevices.
Someproductsareequippedwithathree-prongedplug.Thisplugtsonlyintoagrounded
electricaloutlet.Thisisasafetyfeature.Donotdefeatthissafetyfeaturebytryingtoinsertitinto
anon-groundedoutlet.Ifyoucannotinserttheplugintotheoutlet,contactanelectricianforan
approvedoutletadapterortoreplacetheoutletwithonethatenablesthissafetyfeature.Never
overloadanelectricaloutlet.Theoverallsystemloadshouldnotexceed80percentofthebranch
circuitrating.Consultanelectricianformoreinformationifyouhavequestionsaboutpowerloads
andbranchcircuitratings.
Besurethatthepoweroutletyouareusingisproperlywired,easilyaccessible,andlocatedclose
totheequipment.Donotfullyextendpowercordsinawaythatwillstressthecords.
Besurethatthepoweroutletprovidesthecorrectvoltageandcurrentfortheproductyouare
installing.
Carefullyconnectanddisconnecttheequipmentfromtheelectricaloutlet.
Powersupplystatement
DANGER
Neverremovethecoveronapowersupplyoranypartthathasthefollowinglabelattached.
©CopyrightLenovo2013
ix
Page 12

Hazardousvoltage,current,andenergylevelsarepresentinsideanycomponentthathasthislabel
attached.Therearenoserviceablepartsinsidethesecomponents.Ifyoususpectaproblemwith
oneoftheseparts,contactaservicetechnician.
Externaldevices
CAUTION:
DonotconnectordisconnectanyexternaldevicecablesotherthanUSBcableswhilethecomputer
powerison;otherwise,youmightdamageyourcomputer.T oavoidpossibledamagetoattached
devices,waitatleastvesecondsafterthecomputerisshutdowntodisconnectexternaldevices.
Generalbatterynotice
DANGER
PersonalcomputersmanufacturedbyLenovocontainacoincellbatterytoprovidepowerto
thesystemclock.Inaddition,manymobileproducts,suchasnotebookcomputers,utilizea
rechargeablebatterypacktoprovidesystempowerwheninportablemode.Batteriessuppliedby
Lenovoforusewithyourproducthavebeentestedforcompatibilityandshouldonlybereplaced
withapprovedparts.
Neverattempttoopenorserviceanybattery.Donotcrush,puncture,orincineratebatteriesor
shortcircuitthemetalcontacts.Donotexposethebatterytowaterorotherliquids.Onlyrecharge
thebatterypackstrictlyaccordingtoinstructionsincludedintheproductdocumentation.
Batteryabuseormishandlingcancausethebatterytooverheat,whichcancausegassesorame
to“vent”fromthebatterypackorcoincell.Ifyourbatteryisdamaged,orifyounoticeany
dischargefromyourbatteryorthebuildupofforeignmaterialsonthebatteryleads,stopusingthe
batteryandobtainareplacementfromthebatterymanufacturer.
Batteriescandegradewhentheyareleftunusedforlongperiodsoftime.Forsomerechargeable
batteries(particularlyLithiumIonbatteries),leavingabatteryunusedinadischargedstatecould
increasetheriskofabatteryshortcircuit,whichcouldshortenthelifeofthebatteryandalsocan
poseasafetyhazard.DonotletrechargeableLithium-Ionbatteriescompletelydischargeorstore
thesebatteriesinadischargedstate.
Noticeforlithiumcoincellbattery
DANGER
Dangerofexplosionifbatteryisincorrectlyreplaced.
Donot:
•Throworimmerseintowater
•Heattomorethan100°C(212°F)
•Repairordisassemble
Disposeofthebatteryasrequiredbylocalordinancesorregulations.
ThefollowingstatementappliestousersinthestateofCalifornia,U.S.A.
CaliforniaPerchlorateInformation:
xUserGuide
Page 13

Productscontainingmanganesedioxidelithiumcoincellbatteriesmaycontainperchlorate.
PerchlorateMaterial-specialhandlingmayapply,See
www.dtsc.ca.gov/hazardouswaste/perchlorate
Rechargeablebatterynotice
DANGER
Donotattempttodisassembleormodifythebatterypack.Attemptingtodosocancausean
explosion,orliquidleakagefromthebatterypack.Abatterypackotherthantheonespeciedby
Lenovo,oradisassembledormodiedbatterypackisnotcoveredbythewarranty.
Iftherechargeablebatterypackisincorrectlyreplaced,thereisdangerofanexplosion.Thebattery
packcontainsasmallamountofharmfulsubstances.T oavoidpossibleinjury:
•ReplaceonlywithabatteryofthetyperecommendedbyLenovo.
•Keepthebatterypackawayfromre.
•Donotexposeittowaterorrain.
•Donotattempttodisassembleit.
•Donotshort-circuitit.
•Keepitawayfromchildren.
•Donotdropthebatterypack.
Donotputthebatterypackintrashthatisdisposedofinlandlls.Whendisposingofthebattery,
complywithlocalordinancesorregulations.
Thebatterypackshouldbestoredatroomtemperature,chargedtoapproximately30to50%
ofcapacity.Werecommendthatbatterypackbechargedaboutonceperyeartoprevent
overdischarge.
Heatandproductventilation
DANGER
Computers,acpoweradapters,andmanyaccessoriescangenerateheatwhenturnedonandwhen
batteriesarecharging.Notebookcomputerscangenerateasignicantamountofheatduetotheir
compactsize.Alwaysfollowthesebasicprecautions:
•Whenyourcomputeristurnedonorthebatteryischarging,thebase,thepalmrest,andsome
otherpartsmaybecomehot.Avoidkeepingyourhands,yourlap,oranyotherpartofyour
bodyincontactwithahotsectionofthecomputerforanyextendedlengthoftime.Whenyou
usethekeyboard,avoidkeepingyourpalmsonthepalmrestforaprolongedperiodoftime.
Yourcomputergeneratessomeheatduringnormaloperation.Theamountofheatdependson
theamountofsystemactivityandthebatterychargelevel.Extendedcontactwithyourbody,
eventhroughclothing,couldcausediscomfortorevenaskinburn.Periodicallytakebreaks
fromusingthekeyboardbyliftingyourhandsfromthepalmrest;andbecarefulnottouse
thekeyboardforanyextendedlengthoftime.
•Donotoperateyourcomputerorchargethebatterynearammablematerialsorinexplosive
environments.
©CopyrightLenovo2013
xi
Page 14

•Ventilationslots,fansand/orheatsinksareprovidedwiththeproductforsafety,comfort,and
reliableoperation.Thesefeaturesmightinadvertentlybecomeblockedbyplacingtheproducton
abed,sofa,carpet,orotherexiblesurface.Neverblock,cover,ordisablethesefeatures.
•Whentheacpoweradapterisconnectedtoanelectricaloutletandyourcomputer,itgenerates
heat.Donotplacetheadapterincontactwithanypartofyourbodywhileusingit.Neverusethe
acpoweradaptertowarmyourbody.Extendedcontactwithyourbody,eventhroughclothing,
maycauseaskinburn.
Foryoursafety,alwaysfollowthesebasicprecautionswithyourcomputer:
•Keepthecoverclosedwheneverthecomputerispluggedin.
•Regularlyinspecttheoutsideofthecomputerfordustaccumulation.
•Removedustfromventsandanyperforationsinthebezel.Morefrequentcleaningsmightbe
requiredforcomputersindustyorhigh-trafcareas.
•Donotrestrictorblockanyventilationopenings.
•Donotoperateyourcomputerinsidefurniture,asthismightincreasetheriskofoverheating.
•Airowtemperaturesintothecomputershouldnotexceed35°C(95°F).
Electricalcurrentsafetyinformation
DANGER
Electriccurrentfrompower,telephone,andcommunicationcablesishazardous.
Toavoidashockhazard:
•Donotuseyourcomputerduringalightningstorm.
•Donotconnectordisconnectanycablesorperforminstallation,maintenance,orreconguration
ofthisproductduringanelectricalstorm.
•Connectallpowercordstoaproperlywiredandgroundedelectricaloutlet.
•Connecttoproperlywiredoutletsanyequipmentthatwillbeattachedtothisproduct.
•Wheneverpossible,useonehandonlytoconnectordisconnectsignalcables.
•Neverturnonanyequipmentwhenthereisevidenceofre,water,orstructuraldamage.
•Donotuseyourcomputeruntilallinternalpartsenclosuresarefastenedintoplace.Neveruse
thecomputerwheninternalpartsandcircuitsareexposed.
DANGER
Connectanddisconnectcablesasdescribedinthefollowingprocedureswheninstalling,moving,
oropeningcoversonthisproductorattacheddevices.
Toconnect:
1.TurneverythingOFF.
2.First,attachallcablestodevices.
3.Attachsignalcablestoconnectors.
4.Attachpowercordstooutlets.
5.TurndevicesON.
Todisconnect:
1.TurneverythingOFF.
2.First,removepowercordsfromoutlets.
3.Removesignalcablesfromconnectors.
4.Removeallcablesfromdevices.
xiiUserGuide
Page 15

Thepowercordmustbedisconnectedfromthewalloutletorreceptaclebeforeinstallingallother
electricalcablesconnectedtothecomputer.
Thepowercordmaybereconnectedtothewalloutletorreceptacleonlyafterallotherelectrical
cableshavebeenconnectedtothecomputer.
Lasercompliancestatement
CAUTION:
Whenlaserproducts(suchasCD-ROMs,DVDdrives,beropticdevices,ortransmitters)are
installed,notethefollowing:
•Donotremovethecovers.Removingthecoversofthelaserproductcouldresultinexposureto
hazardouslaserradiation.Therearenoserviceablepartsinsidethedevice.
•Useofcontrolsoradjustmentsorperformanceofproceduresotherthanthosespeciedherein
mightresultinhazardousradiationexposure.
DANGER
SomelaserproductscontainanembeddedClass3AorClass3Blaserdiode.Notethefollowing:
Laserradiationwhenopen.Donotstareintothebeam,donotviewdirectlywithoptical
instruments,andavoiddirectexposuretothebeam.
Liquidcrystaldisplay(LCD)notice
CAUTION:
Theliquidcrystaldisplay(LCD)ismadeofglass,androughhandlingordroppingthecomputercan
causetheLCDtobreak.IftheLCDbreaksandtheinternaluidgetsintoyoureyesoronyour
hands,immediatelywashtheaffectedareaswithwaterforatleast15minutes;ifanysymptomsare
presentafterwashing,getmedicalcare.
Note:Forproductswithmercury-containinguorescentlamps(forexample,non-LED),theuorescentlamp
intheliquidcrystaldisplay(LCD)containsmercury;disposeofaccordingtolocal,state,orfederallaws.
Usingheadphonesorearphones
Ifyourcomputerhasbothaheadphoneconnectorandanaudio-outconnector,alwaysusetheheadphone
connectorforheadphones(alsocalledaheadset)orearphones.
CAUTION:
Excessivesoundpressurefromearphonesandheadphonescancausehearingloss.Adjustmentof
theequalizertomaximumincreasestheearphoneandheadphoneoutputvoltageandthesound
pressurelevel.Therefore,toprotectyourhearing,adjusttheequalizertoanappropriatelevel.
Excessiveuseofheadphonesorearphonesforalongperiodoftimeathighvolumecanbedangerousifthe
outputoftheheadphoneorearphoneconnectorsdonotcomplywithspecicationsofEN50332-2.The
headphoneoutputconnectorofyourcomputercomplieswithEN50332-2Subclause7.Thisspecication
limitsthecomputer’smaximumwidebandtrueRMSoutputvoltageto150mV.Tohelpprotectagainst
hearingloss,ensurethattheheadphonesorearphonesyouusealsocomplywithEN50332-2(Clause7
limits)forawidebandcharacteristicvoltageof75mV.UsingheadphonesthatdonotcomplywithEN
50332-2canbedangerousduetoexcessivesoundpressurelevels.
©CopyrightLenovo2013
xiii
Page 16

IfyourLenovocomputercamewithheadphonesorearphonesinthepackage,asaset,thecombinationof
theheadphonesorearphonesandthecomputeralreadycomplieswiththespecicationsofEN50332-1.
Ifdifferentheadphonesorearphonesareused,ensurethattheycomplywithEN50332-1(Clause6.5
LimitationValues).UsingheadphonesthatdonotcomplywithEN50332-1canbedangerousdueto
excessivesoundpressurelevels.
Additionalsafetyinformation
DANGER
Plasticbagscanbedangerous.Keepplasticbagsawayfrombabiesandchildrentoavoiddanger
ofsuffocation.
NoticeforusersintheU.S.A.
Manypersonalcomputerproductsandaccessoriescontaincords,cablesorwires,suchaspowercordsor
cordstoconnecttheaccessorytoapersonalcomputer.Ifthisproducthassuchacord,cableorwire,then
thefollowingwarningapplies:
WARNING:Handlingthecordonthisproductorcordsassociatedwithaccessoriessoldwiththisproduct
willexposeyoutolead,achemicalknowntotheStateofCaliforniatocausecancer,andbirthdefectsor
otherreproductiveharm.Washhandsafterhandling.
Savetheseinstructions.
xivUserGuide
Page 17
Chapter1.Productoverview
Thischapterprovidesinformationaboutthelocationsofconnectors,locationsofimportantproductlabels,
computerfeatures,specications,operatingenvironment,andpreinstalledprograms.
•“Locatingcomputercontrols,connectors,andindicators”onpage1
•“Locatingimportantproductinformation”onpage9
•“Features”onpage11
•“Specications”onpage13
•“Operatingenvironment”onpage13
•“Lenovoprograms”onpage14
Locatingcomputercontrols,connectors,andindicators
Thissectionintroducesthecomputerhardwarefeaturestogiveyouthebasicinformationyouwillneed
tostartusingthecomputer.
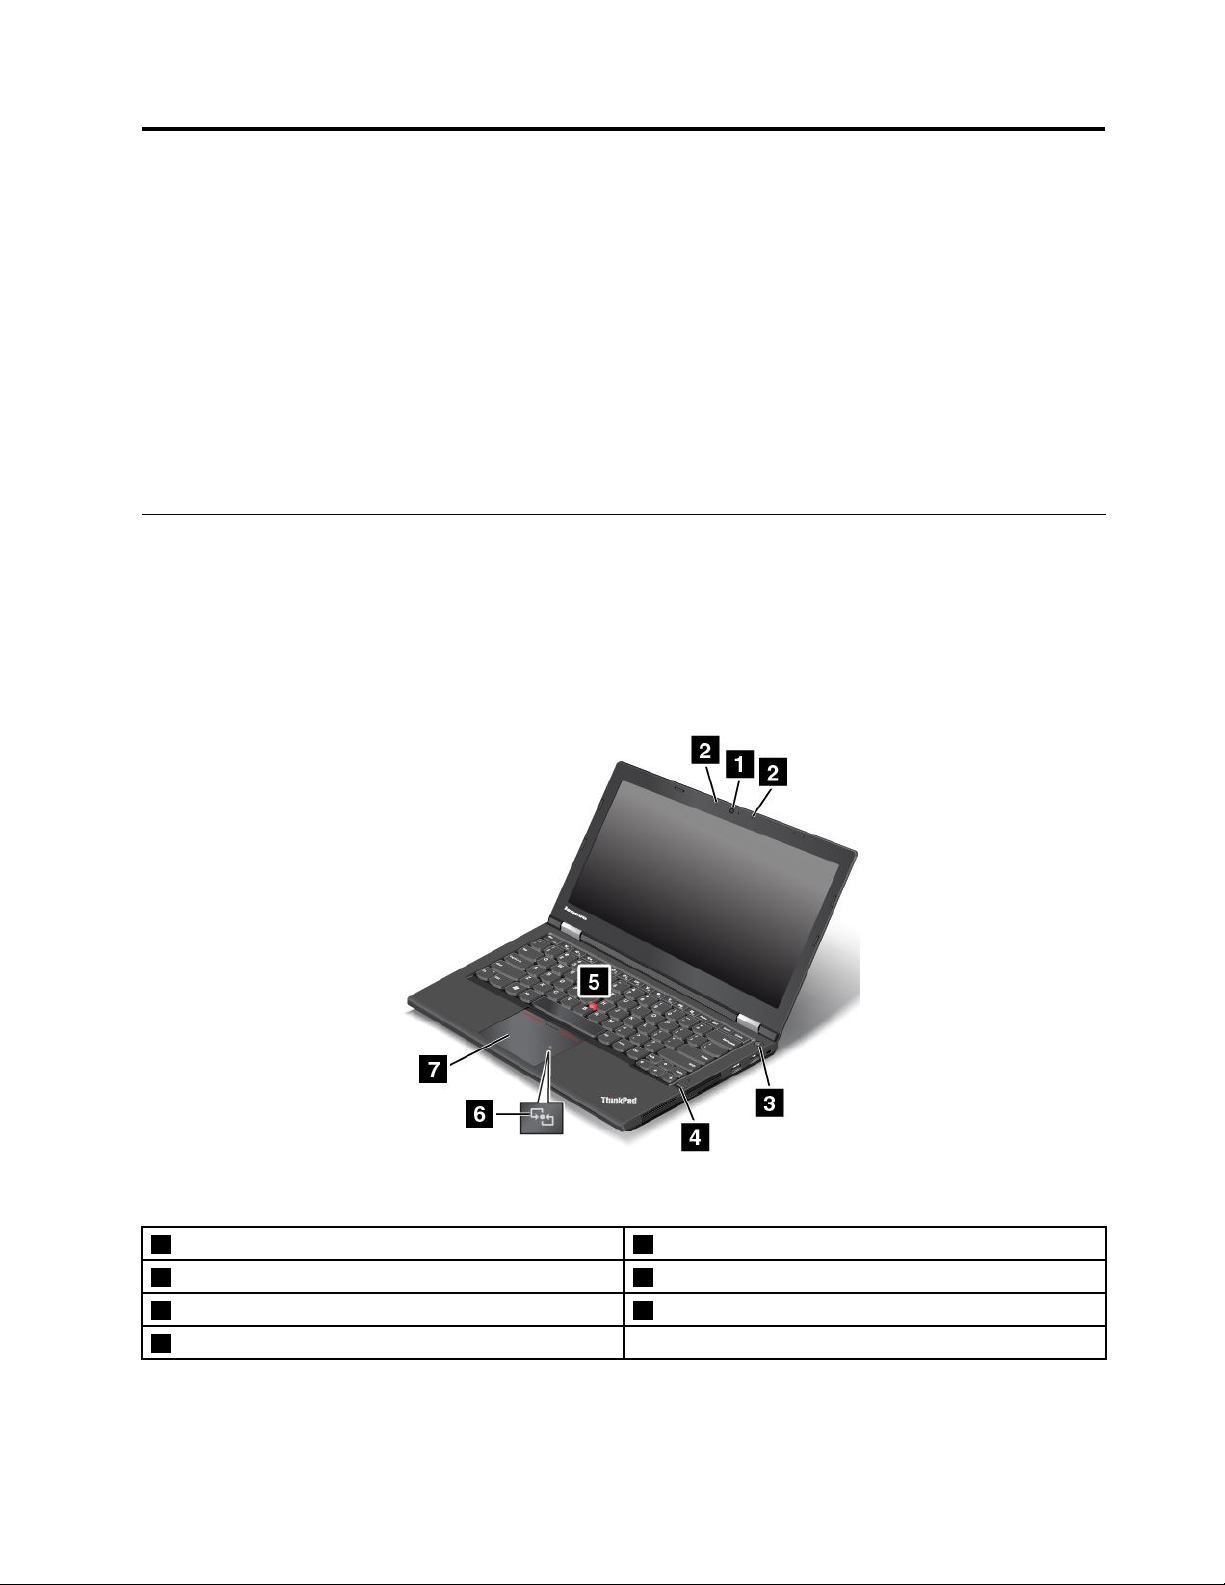
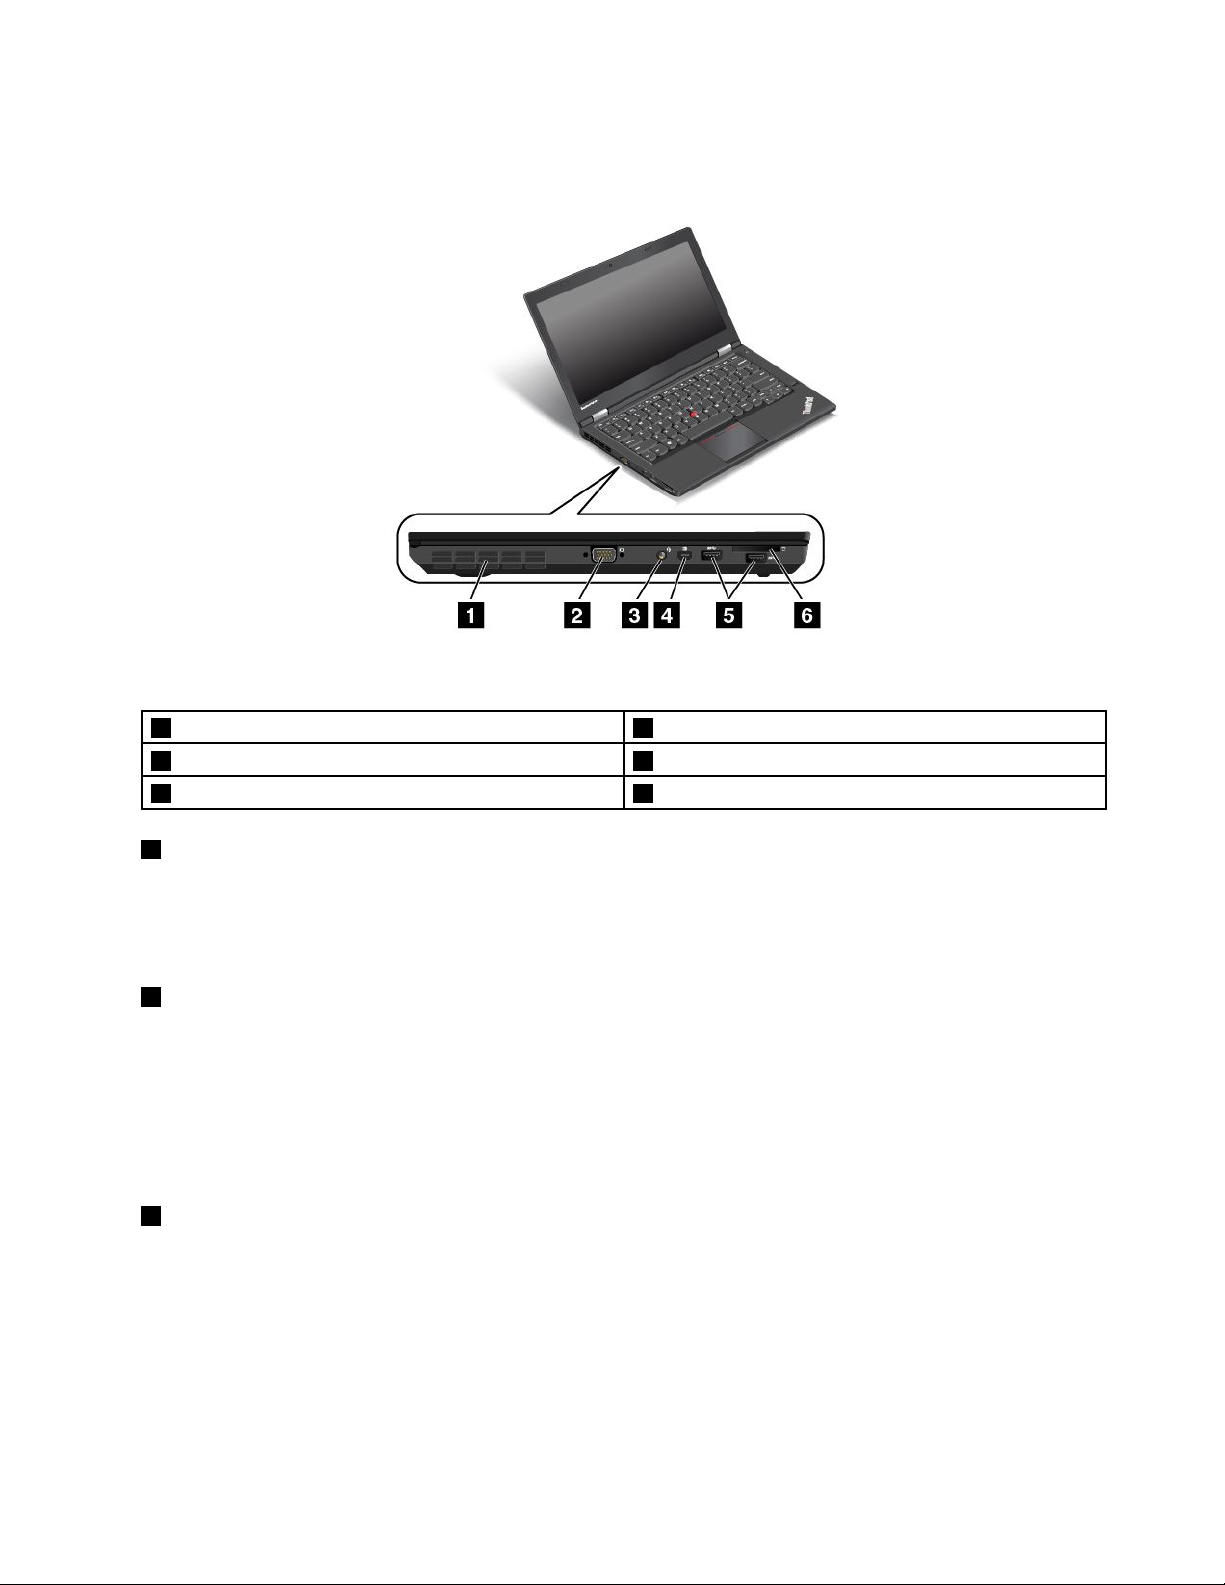
Frontview
Figure1.Frontview
1Camera(onsomemodels)
2Microphones
3Powerbutton7ThinkPad
4Fingerprintreader(onsomemodels)
©CopyrightLenovo2013
5T rackPoint
6NFClogo(onsomemodels)
®
pointingstick
®
trackpad
1
Page 18

1Camera(onsomemodels)
Usethecameratotakepicturesorholdavideoconference.Formoreinformation,see“Usingthecamera”
onpage35.
2Microphones
Themicrophonescapturesoundandvoicewhenusedwithaprogramcapableofhandlingaudio.
3Powerbutton
Usethepowerbuttontoturnonthecomputer.
Toturnoffthecomputer,usetheStartmenushutdownoptionontheMicrosoft
®
Windows
®
7operating
system.FortheMicrosoftWindows8operatingsystem,movethecursortothetop-rightorbottom-right
cornerofthescreentodisplaythecharms.ThenclickSettings➙Power➙Shutdown.
Ifyourcomputerstopsrespondingandyoucannotturnitoff,pressandholdthepowerbuttonforfour
secondsormore.Ifthecomputerstillisnotresponding,removetheacpoweradapterandthebattery
toresetthecomputer.
Youalsocanprogramthepowerbuttonsothatbypressingthepowerbuttonyoucanturnoffthecomputer
orputthecomputerintosleeporhibernationmode.Toachievethis,youneedtochangeyourpowerplan
settings.Toaccesspowerplansettings,dothefollowing:
•ForWindows7:StartthePowerManagerprogramandthenclickthePowerPlantab.Forinstructionson
howtostartthePowerManagerprogram,see“AccessingLenovoprogramsontheWindows7operating
system”onpage14
.
•ForWindows8:ClickthebatterystatusiconfromtheWindowsnoticationareaandclickMorepower
options.ThenclickChoosewhatthepowerbuttonsdo.
4Fingerprintreader(onsomemodels)
Fingerprintauthenticationtechnologyprovidesasimpleandsecureuseraccessbyassociatingyour
ngerprintwithpasswords.Formoreinformation,see“Usingthengerprintreader”onpage49
.
ThinkPadpointingdevice
5T rackPointpointingstick
7ThinkPadtrackpad
ThekeyboardcontainstheLenovouniqueThinkPadpointingdevices.Pointing,selecting,anddraggingare
allpartofasingleprocessthatyoucanperformwithoutmovingyourngersfromatypingposition.For
moreinformation,see“UsingtheThinkPadpointingdevice”onpage22
.
6NFClogo(onsomemodels)
IfthereisaNearFieldCommunication(NFC)logoonthetrackpadofyourcomputer,itindicatesthatyour
computersupportstheNFCfeature.Formoreinformation,see“UsingtheNFCconnection”onpage31
2UserGuide
.
Page 19
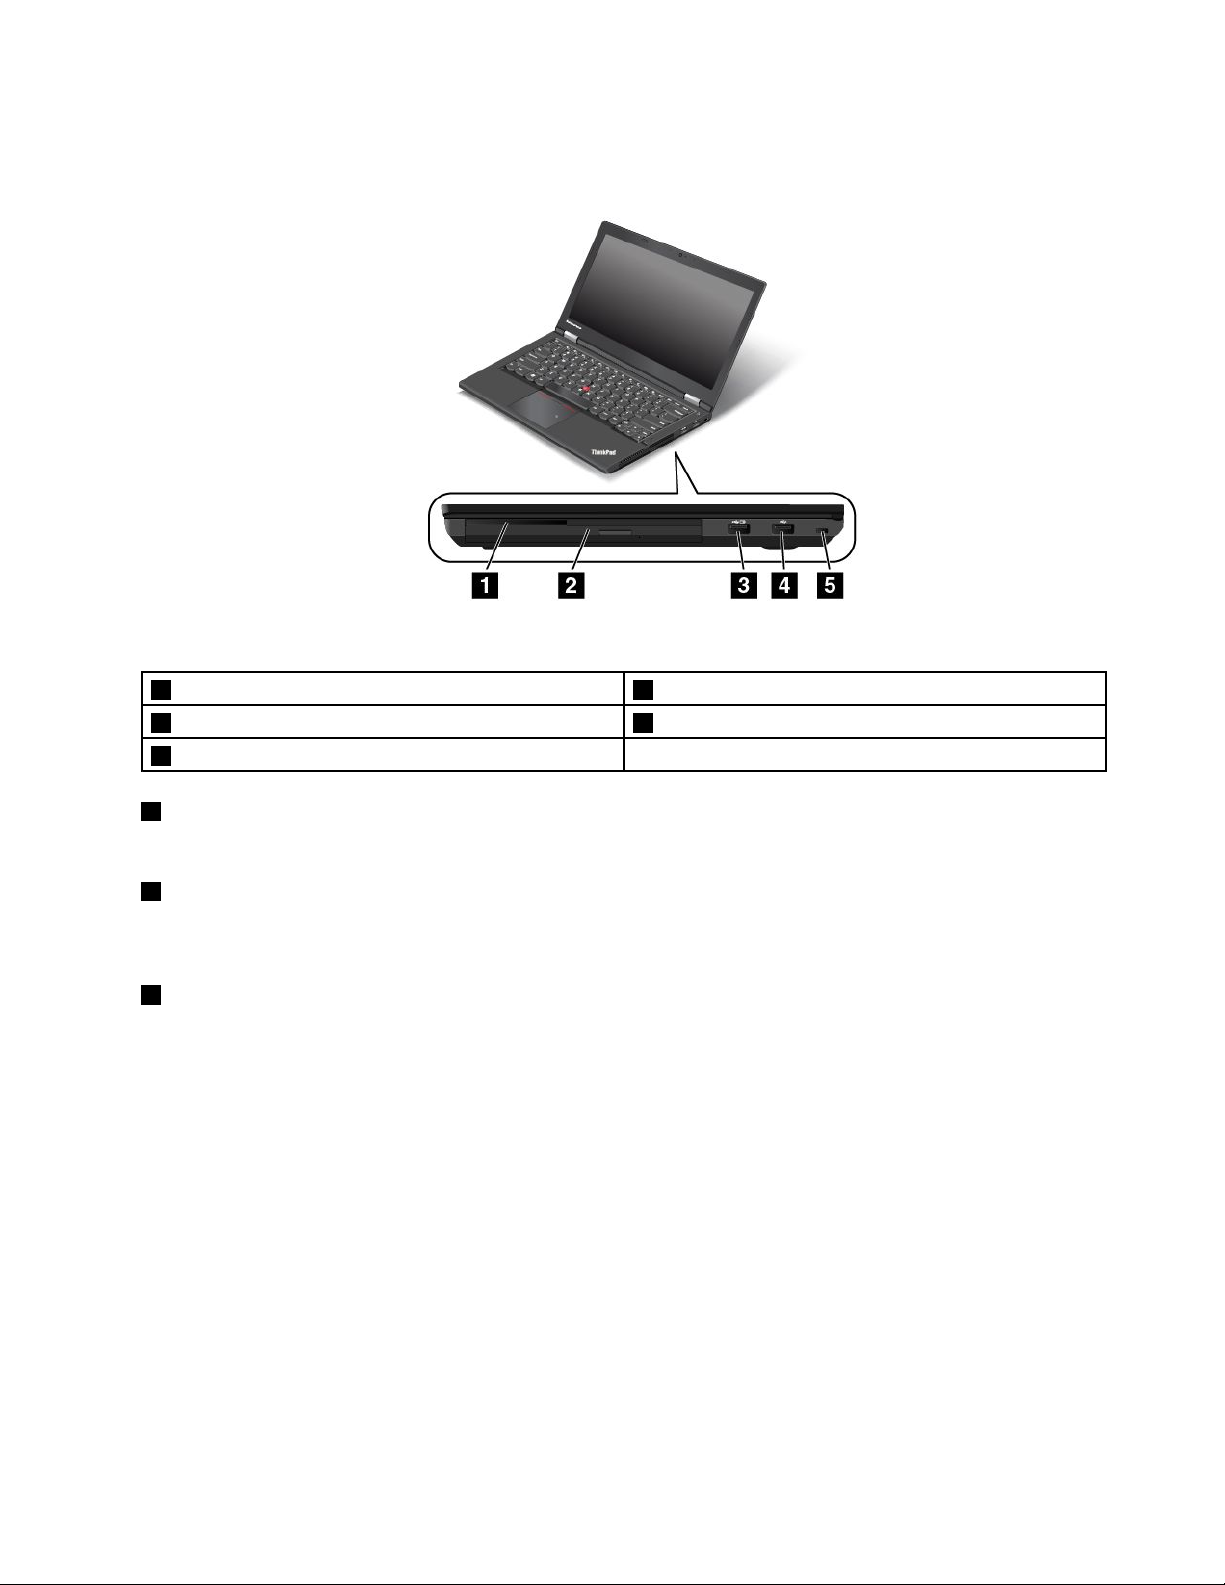
Right-sideview
Figure2.Right-sideview
1Smartcardslot(onsomemodels)4USBconnector
2SerialUltrabay™Enhancedbay5Security-lockslot
3AlwaysOnUSBconnector
1Smartcardslot(onsomemodels)
Yourcomputermighthaveasmartcardslot.
2SerialUltrabayEnhancedbay
YourcomputerhasabayforSerialUltrabayEnhanceddevices.Forsomemodels,anopticaldriveisinstalled
inthebay.Forcertainmodels,asecondaryharddiskdriveisinstalled.
3AlwaysOnUSBconnector
Bydefault,theAlwaysOnUniversalSerialBus(USB)connectorenablesyoutochargesomemobiledigital
devicesandsmartphonesinthefollowingsituations:
•Whenyourcomputerisonorinsleepmode
•Whenyourcomputerisinhibernationmodeoristurnedoff,butconnectedtoacpower
Ifyouwanttochargethesedeviceswhenthecomputerisinhibernationmodeoristurnedoff,andthe
computerisnotconnectedtoacpower,dothefollowing:
•ForWindows7:StartthePowerManagerprogramandclicktheGlobalPowerSettingstab.Then
selecttheEnableUSBchargefromthecomputerbatteryevenwhenthecomputerisoffcheck
box,andclickOKorApply.
•ForWindows8:PresstheWindowskeytogototheStartscreen.ClickLenovoSettings➙Power.Then
selecttheEnableUSBchargefromthecomputerbatteryevenwhenthecomputerisoffcheckbox.
Attention:WhenyouattachaUSBcabletothisconnector,ensurethattheUSBmarkisfacingupward.
Otherwisetheconnectormightbedamaged.
Chapter1.Productoverview3
Page 20

4USBconnector
TheUSBconnectorisusedforconnectingUSB-compatibledevices,suchasaUSBprinteroradigital
camera.
Attention:WhenyouattachaUSBcabletothisconnector,ensurethattheUSBmarkisfacingupward.
Otherwisetheconnectormightbedamaged.
5Security-lockslot
Toprotectyourcomputerfromtheft,youcanpurchaseasecuritycablelockthattsthesecurity-lock
slottolockthecomputertoastationaryobject.
Note:Y ouareresponsibleforevaluating,selecting,andimplementingthelockingdeviceandsecurity
feature.Lenovomakesnocomments,judgments,orwarrantiesaboutthefunction,quality,orperformance
ofthelockingdeviceandsecurityfeature.
4UserGuide
Page 21
Left-sideview
Figure3.Left-sideview
1Fanlouvers4MiniDisplayPortconnector
2VGAconnector5USB3.0connectors
3Audioconnector6Mediacardreaderslot
1Fanlouvers
Thefanlouversandinternalfanenableairtocirculateinthecomputerandtoensurepropercooling,
especiallythecoolingofthemicroprocessor.
Note:Toensureproperairow,donotplaceanyobstaclesinfrontofthefanlouvers.
2VGAconnector
UsetheVideoGraphicsArray(VGA)connectortoconnectthecomputertoaVGA-compatiblevideodevice,
suchasaVGAmonitor.
Note:Ifyouattachthecomputertoadockingstation,usetheVGAconnectoronthedockingstation,
nottheoneonthecomputer.
Formoreinformation,see“Usinganexternalmonitor”onpage31
3Audioconnector
.
Connectheadphonesoraheadsetthathasa3.5-mm(0.14-inch),4-poleplugtotheaudioconnectorto
listentothesoundfromthecomputer.
Notes:
•Ifyouareusingaheadsetwithafunctionswitch,forexample,aheadsetforaniPhonemobiledigital
device,donotpressthisswitchwhileusingtheheadset.Ifyoupresstheswitch,theheadsetmicrophone
willbedisabled,andtheintegratedmicrophonesonthecomputerwillbeenabledinstead.
Chapter1.Productoverview5
Page 22
•Theaudioconnectordoesnotsupportaconventionalmicrophone.Formoreinformation,see“Using
audiofeatures”onpage35.
4MiniDisplayPortconnector
UsetheminiDisplayPortconnectortoconnectyourcomputertoacompatibleprojector,externalmonitor,or
high-denitiontelevision.Formoreinformation,see“UsingtheminiDisplayPortconnector”onpage34
5USB3.0connectors
TheUSB3.0connectorsareusedforconnectingUSB-compatibledevices,suchasaUSBprinteror
adigitalcamera.
Attention:WhenyouattachaUSBcabletothisconnector,ensurethattheUSBmarkisfacingupward.
Otherwisetheconnectormightbedamaged.
6Mediacardreaderslot
Insertyourashmediacardintothisslottoreadthedataonthecard.
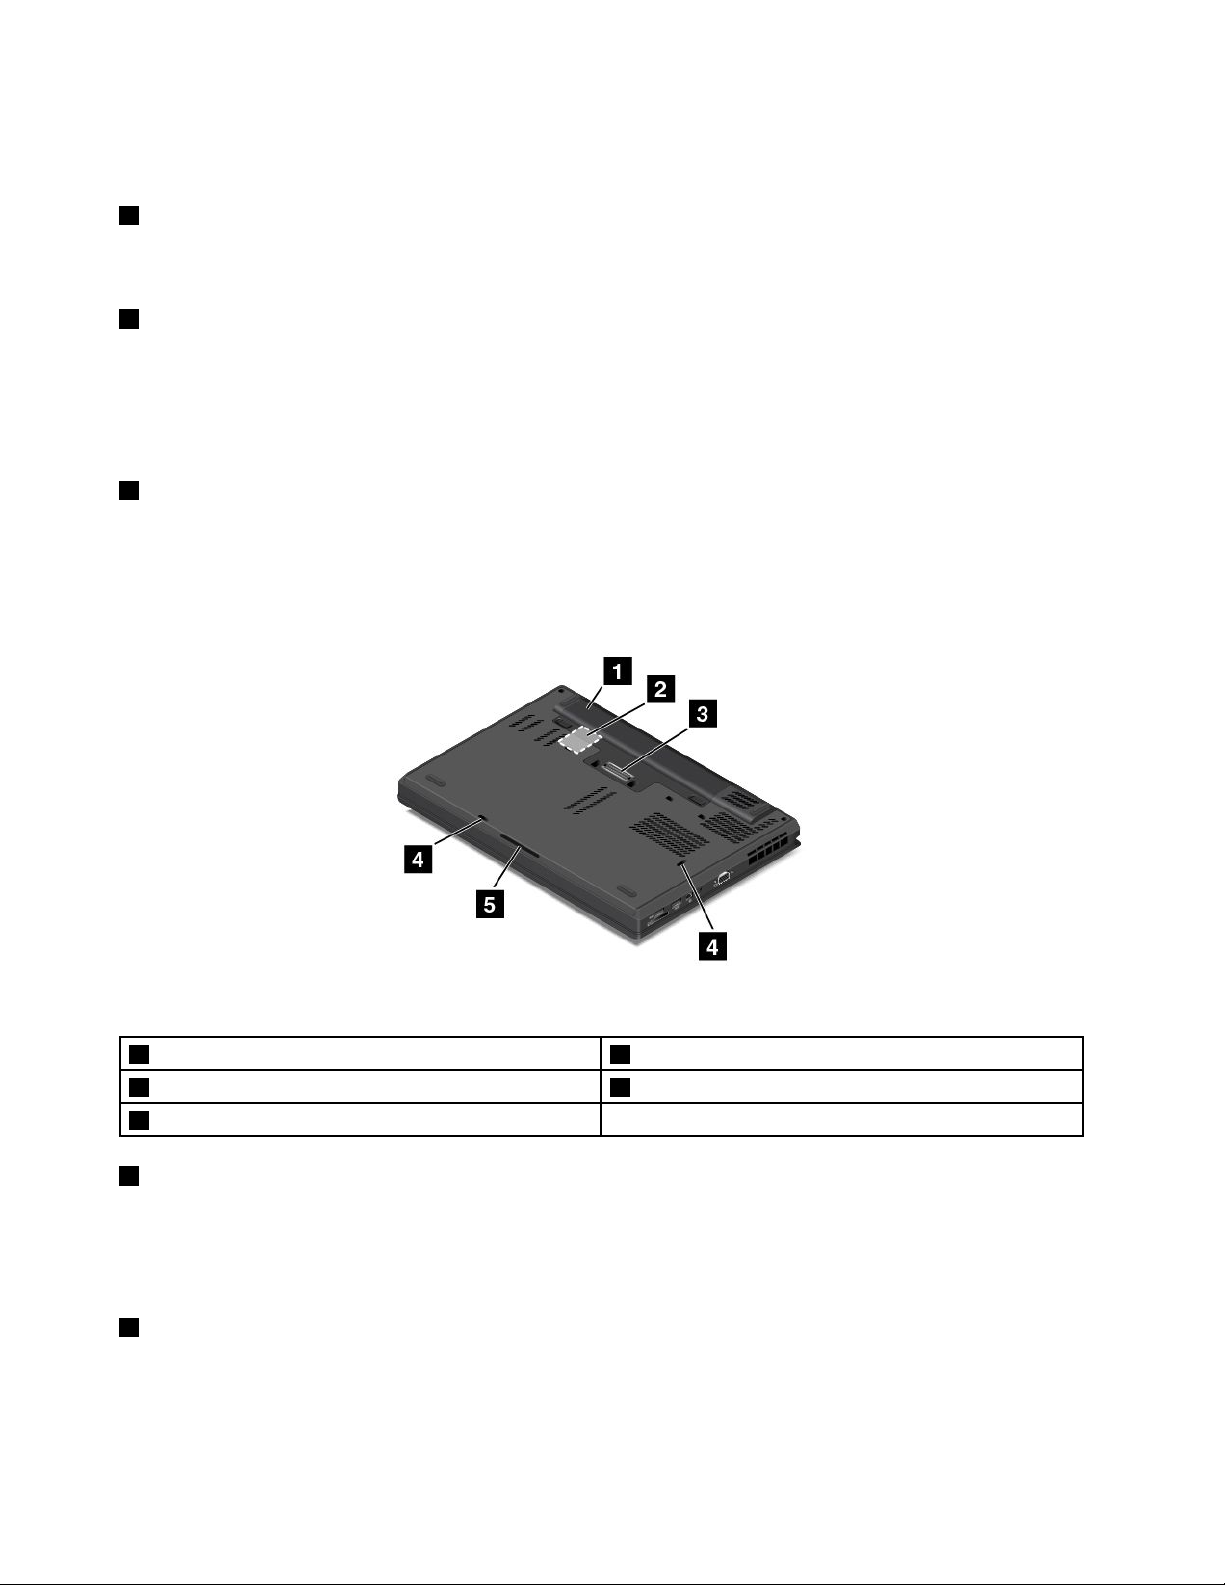
Bottomview
.
Figure4.Bottomview
1Batterypack4Keyboarddrainageholes
2SIMcardslot5Speakers
3Dockingstationconnector
1Batterypack
Usethecomputerwiththebatterypowerwheneveracpowerisunavailable.
YoucanusethePowerManagerprogramtoadjustyourpowersettingsasneeded.Fordetailedinformation,
seethehelpinformationsystemofthePowerManagerprogram.
2SIMcardslot
IfyourcomputersupportsthewirelessWideAreaNetwork(wirelessWAN)feature,aSubscriberIdentication
Module(SIM)cardmightberequiredtoestablishwirelessWANconnections.Dependingonthecountryor
regionofdelivery,theSIMcardmightbealreadyinstalledintheSIMcardslot.Formoreinformation,see
“InstallingorreplacingtheSIMcard”onpage66.
6UserGuide
Page 23
3Dockingstationconnector
Youcanusetheconnectortoconnectthecomputertoasupporteddockingstationtoextendthecomputer
capabilitieswhenyouareattheofceorathome.Formoreinformationaboutthesupporteddocking
stations,see“ThinkPaddockingstations”onpage91.
4Keyboarddrainageholes
Thekeyboarddrainageholescanhelpdrainoutliquidfromyourcomputerifyouaccidentallyspillwateror
drinkoverthekeyboard.
5Speakers
Yourcomputerisequippedwithapairofstereospeakers.
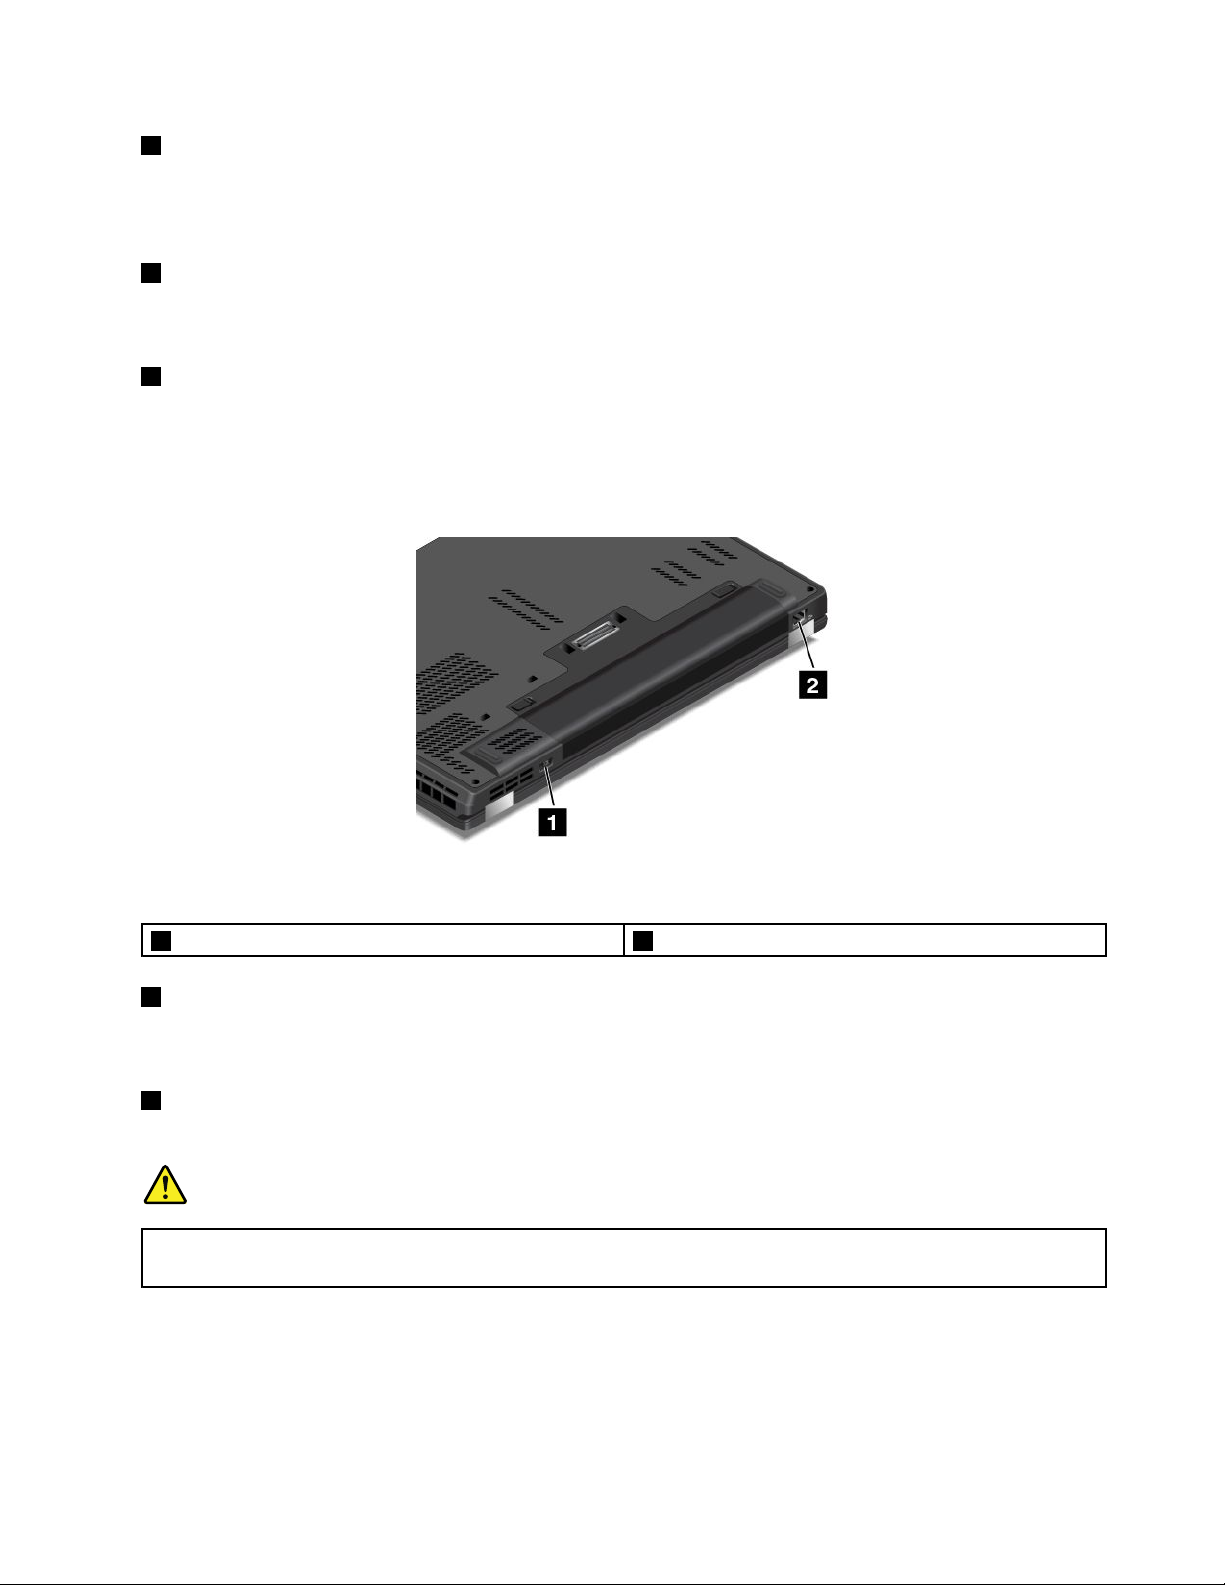
Rearview
Figure5.Rearview
1Powerconnector2Ethernetconnector
1Powerconnector
Connecttheacpoweradaptertothepowerconnectortoprovideacpowertothecomputerandcharge
thebattery.
2Ethernetconnector
Connectthecomputertoalocalareanetwork(LAN)withtheEthernetconnector.
DANGER
Toavoidtheriskofelectricalshock,donotconnectthetelephonecabletotheEthernetconnector.
YoucanonlyconnectanEthernetcabletothisconnector.
TheEthernetconnectorhastwoindicatorsthatshowthestatusofthenetworkconnection.Whenthetop-left
indicatorissolidgreen,itindicatesthatthecomputerconnectstoaLANandasessionwiththenetworkis
available.Whenthetop-rightindicatorblinksyellow,itindicatesthatdataisbeingtransmitted.
Note:Ifyouattachthecomputertoadockingstation,usetheEthernetconnectoronthedockingstationto
connecttoaLAN,nottheoneonthecomputer.
Chapter1.Productoverview7
Page 24
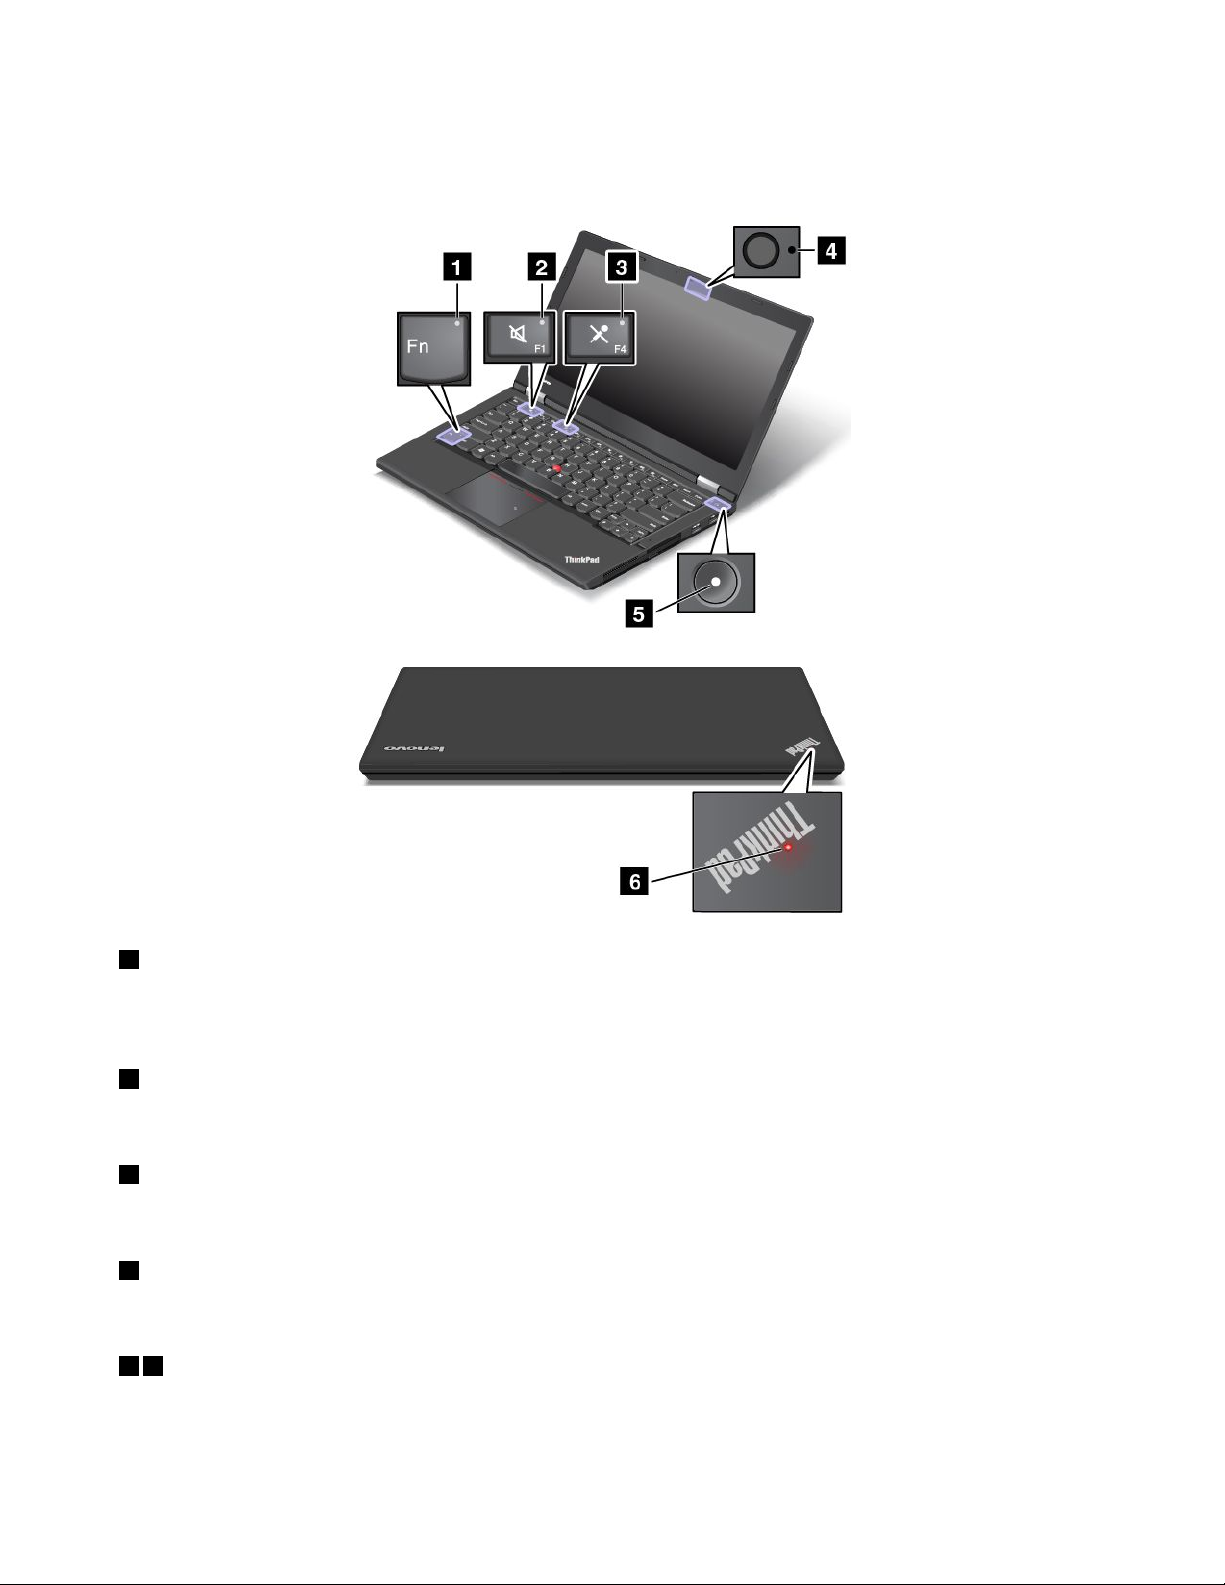
Statusindicators
Thestatusindicatorsshowthecurrentstatusofyourcomputer.
1FnLockindicator
TheFnLockindicatorshowsthestatusofFnLockfunction.Formoreinformation,see“Specialkeys”
onpage21.
2Speakermuteindicator
Whenthespeakermuteindicatorison,thespeakersaremuted.
3Microphonemuteindicator
Whenthemicrophonemuteindicatorison,themicrophonesaremuted.
4Camerastatusindicator
Whenthecamerastatusindicatorison,thecameraisinuse.
56Systemstatusindicators
TheindicatorintheThinkPadlogoandtheindicatorinthecenterofthepowerbuttonshowthesystem
statusofthecomputer.
8UserGuide
Page 25
•Blinksforthreetimes:Thecomputerisinitiallyconnectedtopower.
•On:Thecomputerison(innormalmode).
•Blinksfast:Thecomputerisenteringsleeporhibernationmode.
•Blinksslowly:Thecomputerisinsleepmode.
•Off:Thecomputerisofforinhibernationmode.
Locatingimportantproductinformation
Thissectionprovidesinformationtohelpyoulocatethemachinetypeandmodellabel,theFCCIDandIC
Certicationlabel,theWindowsCerticateofAuthenticitylabel,andtheGenuineMicrosoftlabel.
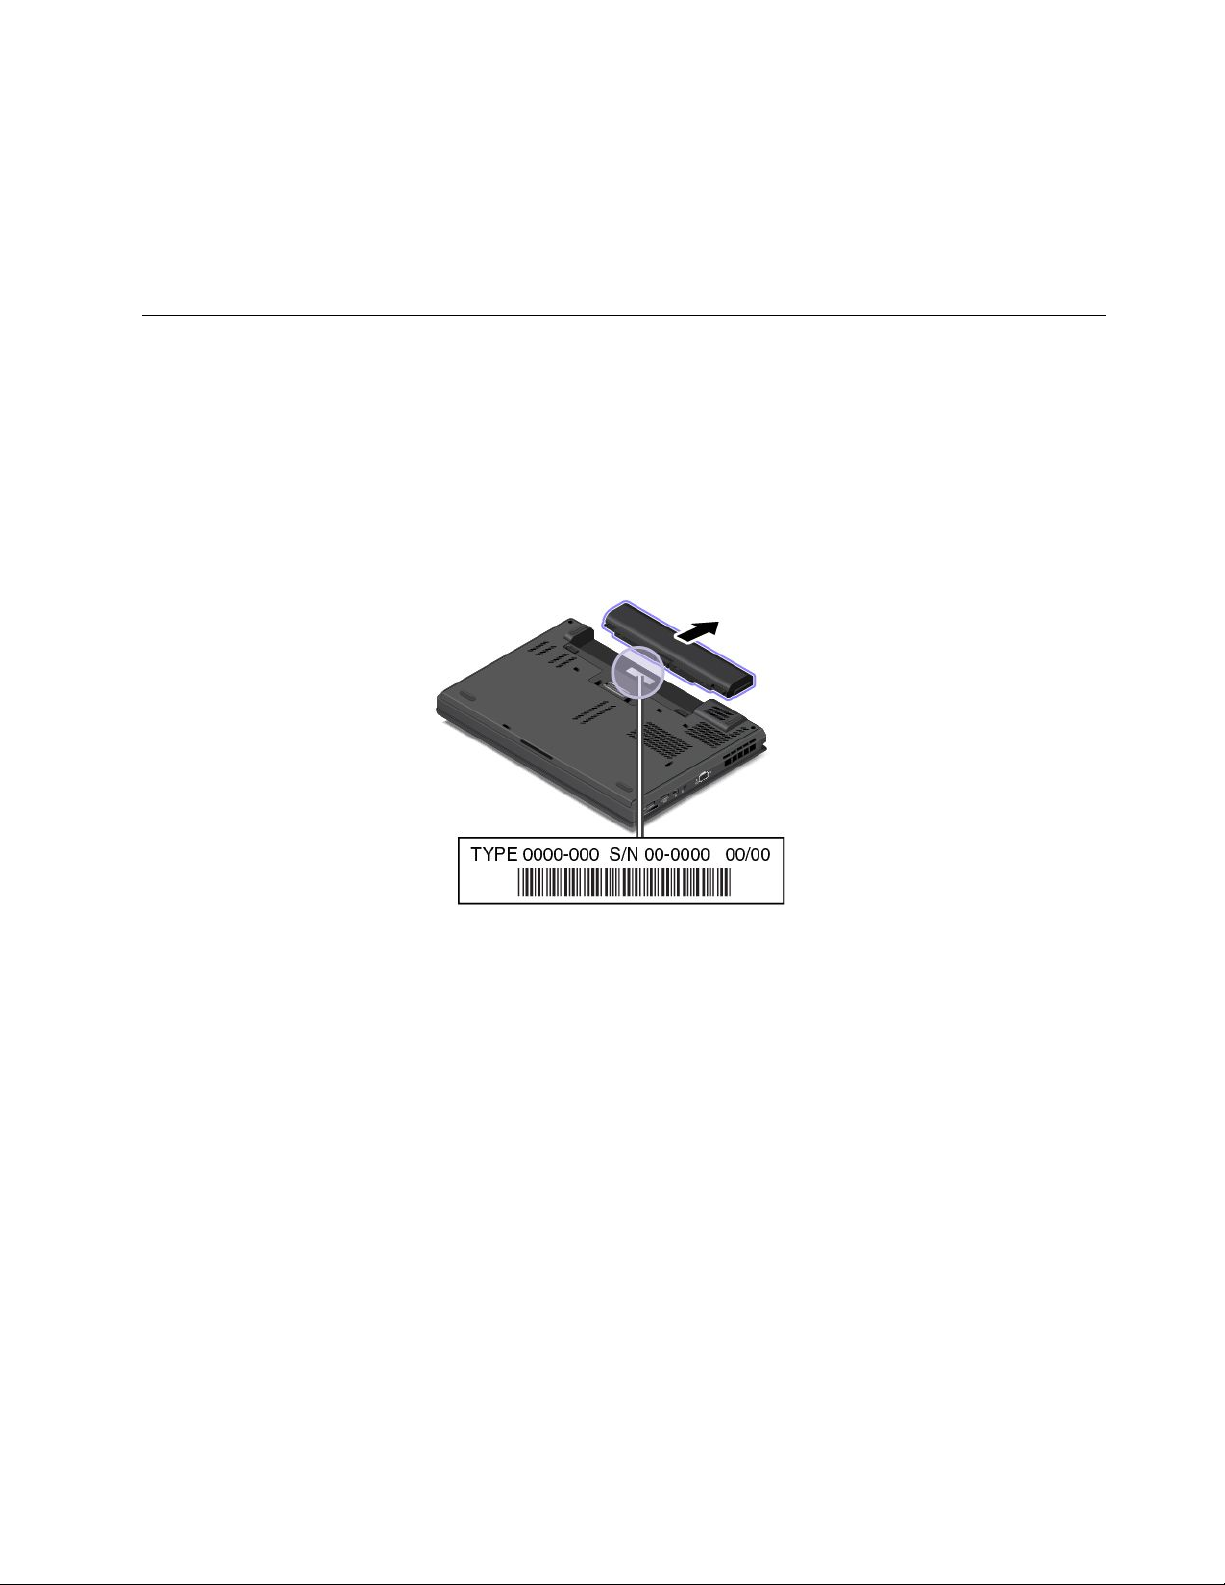
Machinetypeandmodelinformation
Themachinetypeandmodellabelidentiesyourcomputer.WhenyoucontactLenovoforhelp,themachine
typeandmodelinformationhelpssupporttechnicianstoidentifyyourcomputerandprovidefasterservice.
Thefollowinggureshowsthelocationofthemachinetypeandmodelofyourcomputer:
FCCIDandICCerticationinformation
ThereisnoFCCIDorICCerticationnumberforthewirelesscommunicationcardsshownontheenclosure
ofthecomputer.TheFCCIDandICCerticationnumberlabelisafxedonthecardinstalledinthewireless
communicationcardslotofthecomputer.Lenovoprovidesyoutheinformationaboutthelocationofthe
FCCIDandICCerticationnumberlabelonthecomputerbackcoverassembly.
ThefollowinggureshowstheinformationaboutthelocationsoftheFCCIDandICCerticationnumber
labels.
Chapter1.Productoverview9
Page 26
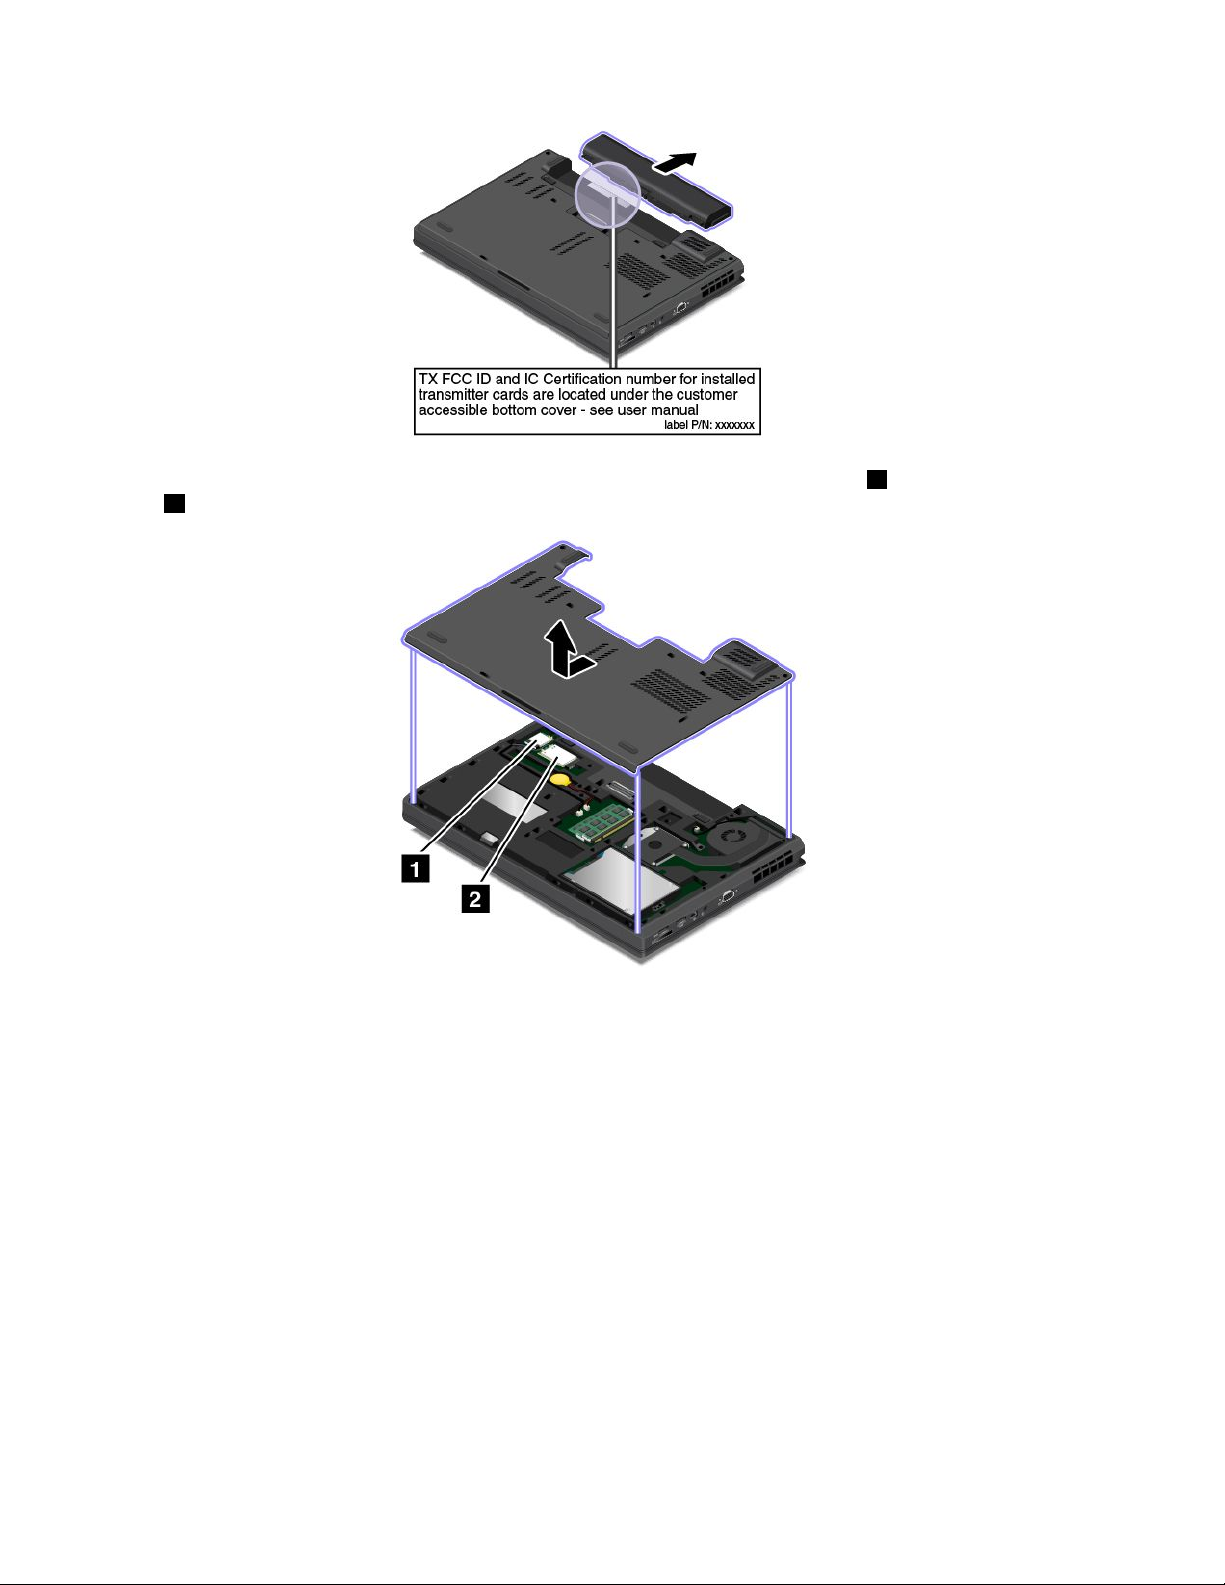
TheFCCIDandICCerticationnumberlabelsareafxedonthewirelessLANcard1andwirelessWAN
card2installedonyourcomputer.
Note:UseonlyLenovo-authorizedwirelesscommunicationcardsforthecomputer.Ifyouinstallan
unauthorizedwirelesscommunicationcardthatisnotapprovedforuseinyourcomputer,anerrormessage
willbedisplayedandthecomputerwillbeepwhenyouturnonthecomputer.
CerticateofAuthenticityinformation
TheCerticateofAuthenticitylabelisprovidedonmodelsthatarelicensedtouseaWindows7operating
system.ThelicensedWindowsversionandproductkeyassociatedwiththecomputerareprintedon
thislabel.Recordthisinformationandkeepitinasafeplace.Youmightneedthesenumberstostart
yourcomputerorreinstalltheWindows7operatingsystem.Dependingonthemodel,theCerticateof
Authenticitylabelcanbeonthecomputercover,underthebattery,oronthepoweradapter.
FormoreinformationabouttheCerticateofAuthenticitylabel,goto:
http://www.microsoft.com/en-us/howtotell/Hardware.aspx
10UserGuide
Page 27

ThefollowinggureshowsthelocationoftheCerticateofAuthenticitylabelonthecomputercover:
GenuineMicrosoftlabel
TheGenuineMicrosoftlabelisprovidedonmodelsthatarelicensedtouseaWindows8operatingsystem.
TheversionoftheWindows8operatingsystemisprintedonthelabel.Ifyourcomputermodelislicensedto
usetheWindows8Prooperatingsystem,thatlicensealsopermitsyoutousetheWindows7Professional
operatingsysteminplaceoftheWindows8Prooperatingsystemifyouprefer.Lenovocomputersthatare
licensedforusewithaWindows8operatingsystemareshippedwiththeWindows8licensekeydigitally
encodedintothecomputerhardware.Dependingonthecomputermodel,theGenuineMicrosoftlabelcan
beonthecomputercover,underthebattery,oronthepoweradapter.
FormoreinformationabouttheGenuineMicrosoftlabel,goto:
http://www.microsoft.com/en-us/howtotell/Hardware.aspx
ThefollowinggureshowsthelocationoftheGenuineMicrosoftlabelonthecomputercover:
Features
Thistopicprovidesinformationaboutthecomputerfeatures.
Microprocessor
•Toviewthemicroprocessorinformationofyourcomputer,dothefollowing:
–ForWindows7:ClickStart,right-clickComputer,andthenclickProperties.
–ForWindows8:Fromthedesktop,movethecursortothetop-rightorbottom-rightcornerofthe
screentodisplaythecharms.ThenclickSettings➙PCinfo.
Memory
•Doubledatarate3lowvoltagesynchronousdynamicrandomaccessmemory(DDR3LVSDRAM)
Chapter1.Productoverview11
Page 28

Storagedevice
Dependingonthemodel:
•2.5-inchformfactor,9.5-mmheightharddiskdrive
•2.5-inchformfactor,7-mmheightharddiskdrive
•2.5-inchformfactor,7-mmheightsolid-statedrive
•M.2solid-statedriveforcachingonly
Display
•Colordisplaywiththethin-lmtransistor(TFT)technology
•Displaysize:355.6mm(14inches)
•Displayresolution:1920-by-1080,1600–by-900,or1280–by-720
•Brightnesscontrol
•Camera(onsomemodels)
•Microphones
Keyboard
•6-rowbacklitkeyboard
•Functionkeys
•ThinkPadpointingdevice
Interface
•4-in-1mediacardreader
•Audioconnector
•AlwaysonUSBconnector
•Dockingstationconnector
•Ethernetconnector
•MiniDisplayPortconnector
•SerialUltrabayEnhancedbay
•Smartcardreader(onsomemodels)
•USB2.0connector
•USB3.0connectors
•VGAconnector
GPSandwirelessfeatures
•GlobalPositioningSystem(GPS)satellitereceiver(onsomemodels)
•Bluetooth
•WirelessLAN
•WirelessWAN(onsomemodels)
•NFC(onsomemodels)
Securityfeature
•Fingerprintreader(onsomemodels)
12UserGuide
Page 29

Specications
Size
•Width:335mm(13.2inches)
•Depth:229mm(9inches)
•Height:29.95mm(1.18inches)
Heatoutput
•65W(222Btu/hr)maximum
•95W(324Btu/hr)maximum
•135W(460Btu/hr)maximum
Powersource(acpoweradapter)
•Sine-waveinputat50to60Hz
•Inputratingoftheacpoweradapter:100to240Vac,50to60Hz
Batterystatus
•Forthepercentageofthebatterypowerremaining,checkthebatterystatusiconintheWindows
noticationarea.
Operatingenvironment
Thissectionprovidesinformationabouttheoperatingenvironmentofthecomputer.
Environment
•Maximumaltitudewithoutpressurization:3048m(10000ft)
•Temperature
–Ataltitudesupto2438m(8000ft)
–Operating:5.0°Cto35.0°C(41°Fto95°F)
–Storage:5.0°Cto43.0°C(41°Fto109°F)
–Ataltitudesabove2438m(8000ft)
Maximumtemperaturewhenoperatingundertheunpressurizedcondition:31.3°C(88°F)
Note:Whenyouchargethebattery,itstemperaturemustbeatleast10°C(50°F).
•Relativehumidity:
–Operating:8%to95%atwetbulb:23℃(73℉)
–Storage:5%to95%atwetbulb:27℃(81℉)
Ifpossible,placeyourcomputerinawell-ventilatedanddryareawithoutdirectexposuretosunshine.
Attention:Keepelectricalappliancessuchasanelectricfan,radio,high-poweredspeakers,airconditioner,
andmicrowaveovenawayfromyourcomputer.Thestrongmagneticeldsgeneratedbyelectrical
appliancescandamagethemonitoranddataontheharddiskdriveorsolid-statedrive.
Donotplaceanybeveragesontopoforbesidethecomputerorotherattacheddevices.Ifliquidisspilledon
orinthecomputeroranattacheddevice,ashortcircuitorotherdamagemightoccur.
Chapter1.Productoverview13
Page 30

Donoteatorsmokeoveryourkeyboard.Particlesthatfallintoyourkeyboardcancausedamage.
Lenovoprograms
YourcomputercomeswithLenovoprogramstohelpyouworkeasilyandsecurely.Theavailableprograms
mightvarydependingonthepreinstalledWindowsoperatingsystem.
TolearnmoreabouttheprogramsandothercomputingsolutionsofferedbyLenovo,goto:
http://www.lenovo.com/support.
AccessingLenovoprogramsontheWindows7operatingsystem
OntheWindows7operatingsystem,youcanaccessLenovoprogramsfromeithertheLenovo
ThinkVantage
®
ToolsprogramorfromControlPanel.
AccessingLenovoprogramsfromtheLenovoThinkVantageT oolsprogram
ToaccessLenovoprogramsfromtheLenovoThinkVantageToolsprogram,clickStart➙AllPrograms➙
LenovoThinkVantageT ools.Thendouble-clickaprogramicontoaccesstheprogram.
Note:IfaprogramiconisdimmedinthenavigationwindowoftheLenovoThinkVantageToolsprogram,it
indicatesthatyouneedtomanuallyinstalltheprogram.Toinstalltheprogram,double-clicktheprogram
icon.Then,followtheinstructionsonthescreen.Whentheinstallationprocesscompletes,theprogram
iconwillbeactivated.
ThefollowingtableliststheprogramsintheLenovoThinkVantageToolsprogram.
Note:Dependingonthemodel,someoftheprogramsmightnotbeavailable.
Table1.ProgramsintheLenovoThinkVantageToolsprogram
ProgramIconname
AccessConnections™InternetConnections
ActiveProtectionSystem™
ClientSecuritySolutionEnhancedSecurity
CommunicationsUtilityWebConferencing
FingerprintManagerProFingerprintReader
LenovoSolutionCenterSystemHealthandDiagnostics
MobileBroadbandConnect3GMobileBroadband
PasswordManagerPasswordVault
PowerManager
RecoveryMediaFactoryRecoveryDisks
RescueandRecovery
SystemUpdate
®
AirbagProtection
PowerControls
EnhancedBackupandRestore
UpdateandDrivers
AccessingLenovoprogramsfromControlPanel
ToaccessLenovoprogramsfromControlPanel,clickStart➙ControlPanel.Thendependingonthe
programyouwanttoaccess,clickthecorrespondingsectionandthenclickthecorrespondinggreentext.
Note:IfyoudonotndtheprogramyouneedinControlPanel,openthenavigationwindowoftheLenovo
ThinkVantageToolsprogramanddouble-clickthedimmedicontoinstalltheprogramyouneed.Then,
14UserGuide
Page 31

followtheinstructionsonthescreen.Whentheinstallationprocesscompletes,theprogramiconwillbe
activated,andyoucanndtheprograminControlPanel.
Thefollowingtableliststheprograms,thecorrespondingsectionsandgreentextsinControlPanel.
Note:Dependingonthemodel,someoftheprogramsmightnotbeavailable.
Table2.ProgramsinControlPanel
Program
AccessConnections
ActiveProtectionSystemSystemandSecurity
ClientSecuritySolutionSystemandSecurityLenovo-EnhancedSecurity
CommunicationsUtilityHardwareandSoundLenovo-WebConferencing
FingerprintManagerPro
LenovoSolutionCenterSystemandSecurityLenovo-SystemHealthand
MessageCenterPlus
MobileBroadbandConnect
PasswordManager
PowerManager
ControlPanelsectionGreentextinControlPanel
NetworkandInternet
HardwareandSound
SystemandSecurity
HardwareandSound
Programs
NetworkandInternet
SystemandSecurity
UserAccountsandFamilySafety
HardwareandSound
Lenovo-InternetConnections
Lenovo-AirbagProtection
Lenovo-FingerprintManagerPro
or
Lenovo-NotebookFingerprint
Reader
Diagnostics
MessagesfromLenovo
Lenovo-3GMobileBroadband
Lenovo-PasswordVault
Lenovo-PowerControls
SystemandSecurity
RecoveryMedia
SystemUpdateSystemandSecurity
RescueandRecovery
SystemandSecurity
SystemandSecurity
Lenovo-FactoryRecoveryDisks
Lenovo-UpdateandDrivers
Lenovo-EnhancedBackupand
Restore
AccessingLenovoprogramsontheWindows8operatingsystem
ToaccessLenovoprogramsontheWindows8operatingsystem,presstheWindowskeytogototheStart
screenandthenclickaLenovoprogramtolaunchit.
Ifyoucannotndtheprogramyouneed,movethecursortothetop-rightorbottom-rightcornerofthe
screentodisplaythecharms.ThenclicktheSearchcharmandsearchforthedesiredprogram.
YourcomputersupportsthefollowingLenovoprograms:
•ActiveProtectionSystem
•FingerprintManagerPro
•LenovoCompanion
•LenovoMobileAccess
Chapter1.Productoverview15
Page 32

•LenovoQuickCast
•LenovoQuickControl
•LenovoQuickDisplay
•LenovoSettings
•LenovoSolutionCenter
•LenovoSupport
•LenovoThinkVantageTools
•PasswordManager
•SystemUpdate
Note:ThePasswordManagerprogramisnotpreinstalledonWindows8computers.Youcandownloadthe
PasswordManagerprogramfromtheLenovoSupportWebsitehttp://www.lenovo.com/support.
Lenovoprogramoverview
ThistopicprovidesinformationaboutsomeLenovoprograms.
Note:Dependingonthemodel,someoftheprogramsmightnotbeavailable.
•AccessConnections
TheAccessConnectionsprogramisaconnectivityassistantprogramforcreatingandmanaginglocation
proles.EachlocationprolestoresallthenetworkandInternetcongurationsettingsneededfor
connectingtoanetworkinfrastructurefromaspeciclocationsuchasahomeoranofce.
Byswitchingbetweenlocationprolesasyoumoveyourcomputerfromplacetoplace,youcanquickly
andeasilyconnecttoanetworkwithnoneedtorecongureyoursettingsmanuallyandrestartthe
computereachtime.
•ActiveProtectionSystem
TheActiveProtectionSystemprogramprotectsyourharddiskdrivewhentheshocksensorinsideyour
computerdetectsaconditionthatcoulddamagethedrive,suchassystemtilt,excessivevibration,or
shock.Theharddiskdriveislessvulnerabletodamagewhenitisnotoperating.Thisisbecausewhen
theharddiskdriveisnotoperating,thesystemstopsitfromspinning,andmightalsomovetheread
andwriteheadsofthedrivetoareasthatdonotcontaindata.Assoonastheshocksensorsenses
thattheenvironmentisstableagain(minimalchangeinsystemtilt,vibration,orshock),itturnsthe
harddiskdriveon.
•ClientSecuritySolution
TheClientSecuritySolutionprogramprotectsyourcomputerbysecuringclientdataanddeecting
securitybreachattempts.Italsocanhelpmanageyourpasswords,recoveraforgottenpassword,
monitorsecuritysettingsonyourcomputer,andsuggesthowtoenhanceyourcomputersecurity.
•CommunicationsUtility
TheCommunicationsUtilityprogramenablesyoutoconguresettingsfortheintegratedcameraand
audiodevices.
•FingerprintManagerPro
Ifyourcomputercomeswithangerprintreader,theFingerprintManagerProprogramenablesyou
toenrollyourngerprintandassociateitwithyourWindowspassword.Asaresult,thengerprint
authenticationcanreplaceyourpasswordandenablesimpleandsecureuseraccess.
•LenovoCompanion
ThroughtheLenovoCompanionprogram,youcangettheinformationabouttheaccessoriesforyour
computer,viewblogsandarticlesaboutyourcomputer,andcheckforotherrecommendedprograms.
16UserGuide
Page 33

•LenovoMobileAccess
TheLenovoMobileAccessprogramenablesyoutomanageyourmobilebroadbandconnection.You
cancreateanaccount,addmoneytotheaccount,andpurchasemobilebroadbandsessionsusing
youraccount.
•LenovoQuickCast
TheLenovoQuickCastprogramprovidesyouwithaquickandeasywaytosendlesanduniform
resourcelocators(URLs)betweentwodevices.
•LenovoQuickControl
TheLenovoQuickControlprogramenablesyoutocontrolyourcomputerremotelythroughyour
smartphone,suchascontrollingthecursor,changingprojectionsettings,andmanagingforeground
applicationsandwindows.
•LenovoQuickDisplay
TheLenovoQuickDisplayprogramenablesyoutoestablishaconnectionbetweenyourcomputeranda
Wi-Fidisplayprojector.Thisprovidesyouwithaquickandeasywaytomakepresentations.
•LenovoSettings
TheLenovoSettingsprogramenablesyoutoenhanceyourcomputingexperiencebyturningyour
computerintoaportablehotspot,conguringcameraandaudiosettings,optimizingyourpowersettings,
andcreatingandmanagingmultiplenetworkproles.
•LenovoSolutionCenter
TheLenovoSolutionCenterprogramenablesyoutotroubleshootandresolvecomputerproblems.It
combinesdiagnostictests,systeminformationcollection,securitystatus,andsupportinformation,along
withhintsandtipsforoptimalsystemperformance.
•LenovoSupport
TheLenovoSupportprogramenablesyoutoregisteryourcomputerwithLenovo,checkthecomputer
healthconditionandbatterystatus,downloadandviewusermanualsforyourcomputer,getthewarranty
informationofyourcomputer,andexplorehelpandsupportinformation.
•LenovoThinkVantageTools
TheLenovoThinkVantageT oolsprogramhelpsyouworkmoreeasilyandsecurelybyprovidingeasy
accesstovariousprograms,suchasFingerprintManagerPro,LenovoSolutionCenter,andsoon.
•MessageCenterPlus
TheMessageCenterPlusprogramautomaticallydisplaysmessagestoinformyouaboutimportantnotices
fromLenovo,suchasalertsonsystemupdatesandalertsonconditionsthatrequireyourattention.
•MobileBroadbandConnect
TheMobileBroadbandConnectprogramenablesyourcomputertoconnecttothemobilebroadband
networkthroughasupportedwirelessWANcard.
•PasswordManager
ThePasswordManagerprogramautomaticallycapturesandllsinauthenticationinformationfor
WindowsprogramsandWebsites.
•PowerManager
ThePowerManagerprogramprovidesconvenient,exible,andcompletepowermanagementforyour
computer.Itenablesyoutoadjustyourcomputerpowersettingstoachievethebestbalancebetween
performanceandpowersaving.
•RecoveryMedia
TheRecoveryMediaprogramenablesyoutorestorethecontentsoftheharddiskdrivetothefactory
defaultsettings.
Chapter1.Productoverview17
Page 34

•RescueandRecovery
TheRescueandRecoveryprogramisaone-buttonrecoveryandrestoresolution.Itincludesasetof
self-recoverytoolstohelpyoudiagnosecomputerproblems,gethelp,andrecoverfromsystemcrashes,
evenifyoucannotstarttheWindowsoperatingsystem.
•SystemUpdate
TheSystemUpdateprogramenablesyoutokeepthesoftwareonyourcomputerup-to-dateby
downloadingandinstallingsoftwareupdatepackages(Lenovoprograms,devicedrivers,UEFIBIOS
updates,andotherthird-partyprograms).
18UserGuide
Page 35

Chapter2.Usingyourcomputer
Thischapterprovidesinformationonusingsomeofthecomputercomponents.
•“Registeringyourcomputer”onpage19
•“Frequentlyaskedquestions”onpage19
•“Specialkeys”onpage21
•“UsingtheThinkPadpointingdevice”onpage22
•“Powermanagement”onpage24
•“Connectingtothenetwork”onpage27
•“UsingtheNFCconnection”onpage31
•“Presentationsandmultimedia”onpage31
•“Usingaudiofeatures”onpage35
•“Usingthecamera”onpage35
•“Usingaashmediacard”onpage36
Registeringyourcomputer
Whenyouregisteryourcomputer,informationisenteredintoadatabase,whichenablesLenovotocontact
youincaseofarecallorothersevereproblem.Inaddition,somelocationsofferextendedprivilegesand
servicestoregisteredusers.
WhenyouregisteryourcomputerwithLenovo,youalsowillreceivethefollowingbenets:
•QuickerservicewhenyoucallLenovoforhelp
•Automaticnoticationoffreesoftwareandspecialpromotionaloffers
ToregisteryourcomputerwithLenovo,dooneofthefollowing:
•Gotohttp://www.lenovo.com/registerandfollowtheinstructionsonthescreentoregisteryourcomputer.
•ConnectyourcomputertotheInternetandregisteryourcomputerthroughapreinstalledregistration
program:
–ForWindows7:ThepreinstalledLenovoProductRegistrationprogramlaunchesautomaticallyafteryou
haveusedyourcomputerforatime.Followtheinstructionsonthescreentoregisteryourcomputer.
–ForWindows8:OpentheLenovoSupportprogram.ThenclickRegistrationandfollowtheinstructions
onthescreentoregisteryourcomputer.
Frequentlyaskedquestions
ThistopicprovidesafewtipsthatwillhelpyouoptimizetheuseofyourThinkPadnotebookcomputers.
Toensurethatyoureceivethebestperformancefromyourcomputer,browsethefollowingWebpagetond
informationsuchasaidsfortroubleshootingandanswerstofrequentlyaskedquestions:
http://www.lenovo.com/support/faq
CanIgetmyuserguideinanotherlanguage?
•Todownloadtheuserguideinanotherlanguage,goto:
http://www.lenovo.com/ThinkPadUserGuides
©CopyrightLenovo2013
19
Page 36

HowdoIusebatterypowermoreeffectivelywhenIamonthego?
•Toconservepower,ortosuspendoperationwithoutexitingprogramsorsavingles,see“Power-saving
modes”onpage26
.
•Toachievethebestbalancebetweenperformanceandpowersaving,changepowerplansettings.
See“Managingthebatterypower”onpage26.
•Ifyourcomputerwillbeturnedoffforanextendedperiodoftime,youcanpreventbatterypowerfrom
drainingbyremovingthebattery.
HowdoIsecurelydisposeofdatastoredontheharddiskdriveorsolid-statedrive?
•StudyChapter4“Security”onpage43
tondouthowyoucanprotectyourcomputerfromtheftand
unauthorizeduse.
•UsethePasswordManagerprogramtoprotectthedatastoredonyourcomputer.Fordetails,seethe
helpinformationsystemoftheprogram.
•Beforeyoudisposeofthedataontheharddiskdriveorthesolid-statedrive,besuretoreadthetopic
“Noticeondeletingdatafromyourharddiskdriveorsolid-statedrive”onpage52.
HowdoIgetconnectedindifferentlocations?
•Totroubleshootawirelessnetworkingissue,gotohttp://www.lenovo.com/support/faq.
•TakeadvantageofthenetworkingfeaturesprovidedbytheAccessConnectionsprogram(onthe
Windows7operatingsystem)orLocationAwarenessintheLenovoSettingsprogram(ontheWindows8
operatingsystem).
•Tolearnmoreaboutusingthewirelessfeaturesofyourcomputer,referto“Wirelessconnections”on
page27.
•Totravelmorecondently,besuretocheckthetipsin“Travelingwithyourcomputer”onpage41.
•PressF8toenableordisablethewirelessfeatures.
HowdoIgivepresentationsorattachanexternalmonitor?
•Ensurethatyoufollowtheprocedureinthetopic“Usinganexternalmonitor”onpage31.
•WiththeExtenddesktopfunction,youcandisplayoutputonboththecomputerdisplayandtheexternal
monitor.See“Usingdualdisplays”onpage34
.
Ihavebeenusingthecomputerforsometimealready,anditisgettingslower .WhatshouldIdo?
•Followthe“Generaltipsforpreventingproblems”onpage119.
•Diagnoseproblemsyourselfbyusingthepreinstalleddiagnosticsoftware.See“Diagnosingproblems”on
page125
.
•Recoverytoolalsoisprovidedonyourcomputerharddiskdriveorsolid-statedrive.Formoreinformation,
seeChapter5“Recoveryoverview”onpage55.
Printthefollowingsectionsandkeepthemwithyourcomputerincaseyouareunabletoaccessthis
onlinehelpwhennecessary.
•“Installinganewoperatingsystem”onpage101
•“Computerstopsresponding”onpage125
•“Powerproblems”onpage136
20UserGuide
Page 37

Specialkeys
Yourcomputerhasseveralspecialkeystohelpyouworkeasilyandeffectively.
Functionkeysandkeycombinations
Thekeyboardhasseveralfunctionkeys,whichconsistoftheFnkey1andthefunctionkeys2.
•+EnablesordisablestheFnLockfunction.
WhentheFnLockfunctionisdisabled:TheFnLockindicatorisoff(defaultmode).Toinitiatethe
specialfunctionofeachkey,pressthefunctionkeysdirectly.ToinputF1–F12,pressFnandthe
correspondingfunctionkey.
WhentheFnLockfunctionisenabled:TheFnLockindicatorison.ToinputF1–F12,pressthefunction
keysdirectly.Toinitiatethespecialfunctionofeachkey,pressFnandthecorrespondingfunctionkey.
•
Ifyoumutethesoundandturnoffyourcomputer,thesoundwillremainmutedwhenyouturnonyour
computeragain.T oturnonthesound,pressF2orF3.
•
•
•Mutesorunmutesthemicrophones.Whenthemicrophonesaremuted,theindicatorontheF4
keyison.
•Darkensthedisplay.
•Brightensthedisplay.
•Switchesthedisplayoutputlocationbetweenthecomputerdisplayandtheexternalmonitor.
•
Mutesorunmutesthespeakers.Whenthespeakersaremuted,theindicatorontheF1keyison.
Decreasesthespeakervolume.
Increasesthespeakervolume.
Enablesordisablesthewirelessfeatures.
Chapter2.Usingyourcomputer21
Page 38

•ForWindows7:OpensControlPanel.ForWindows8:OpenstheSettingscharm.
•
•Viewsalltheprogramsthatyouhaveopened.
•ForWindows7:OpensComputer.ForWindows8:Viewsalltheprograms.
•Fn+Spacebar:Controlsthekeyboardbacklight.
Therearethreemodesforthekeyboardbacklight:Off,Low,andHigh.PressFn+Spacebartochange
themodesofthekeyboardbacklight.
•Fn+B:HasthesamefunctionastheBreakkeyonaconventionalkeyboard.
•Fn+K:HasthesamefunctionastheScrLKkeyontheconventionalkeyboard.
•Fn+P:HasthesamefunctionasthePausekeyontheconventionalkeyboard.
•Fn+S:HasthesamefunctionastheSysRqkeyontheconventionalkeyboard.
ForWindows7:OpensWindowsSearch.ForWindows8:OpenstheSearchcharm.
Windowskey
OntheWindows7operatingsystem,presstheWindowskey1toopentheStartmenu.OntheWindows8
operatingsystem,presstheWindowskeytoswitchbetweenthecurrentworkspaceandtheStartscreen.
YoualsocanusetheWindowskeytogetherwithanotherkeytoachieveotherfunctions.Formore
information,refertothehelpinformationsystemoftheWindowsoperatingsystem.
UsingtheThinkPadpointingdevice
TheThinkPadpointingdeviceconsistsofapointingstick1onthekeyboardandthetrackpad2.The
wholetrackpadisanactiveareasensitivetongermovement.Theleftclickzones3andrightclickzones
5workastheleftandrightmousebuttonsonaconventionalmouse.Thescrollzone4enablesyouto
scrollWebpagesordocumentsinanydirection.
22UserGuide
Page 39

UsingtheT rackPointpointingstick
TousetheTrackPointpointingstick,applypressuretothenonslipcaponthepointingstickinanydirection
paralleltothekeyboard.Thenyoucanmovethecursor.Butthepointingstickitselfdoesnotmove.The
speedatwhichthecursormovesdependsonthepressureyouapplytothepointingstick.
Usingthemulti-touchtrackpad
TheThinkPadtrackpadofyourcomputersupportsmulti-touchwithwhichyoucanzoomin,zoomout,or
scrollonthescreenwhilebrowsingtheInternetorreadingoreditingadocument.
CustomizingtheThinkPadpointingdevice
YoucancustomizetheThinkPadpointingdevicetoachievetheextendedfunctionsoftheThinkPad
pointingdevice.
TocustomizetheThinkPadpointingdevice,dothefollowing:
1.GotoControlPanel.
2.ClickHardwareandSound➙Mouse➙ThinkPad.
3.Followtheinstructionsonthescreen.
Chapter2.Usingyourcomputer23
Page 40

Replacingthecap
Thecap1ontheendoftheT rackPointpointingstickisremovable.Afteryouusethecapforaperiod
oftime,youcanreplacethecapwithanewone.
Note:TheTrackPointcapusedinyourcomputerhasgroovesaasshowninthefollowingillustration.
EnsurethatyoureplacetheTrackPointcapwithacorrectonethathassuchgrooves.
Powermanagement
Whenyouneedtouseyourcomputerawayfromelectricaloutlets,youdependonbatterypowertokeep
yourcomputerrunning.Differentcomputercomponentsconsumepoweratdifferentrates.Themoreyou
usethepower-intensivecomponents,thefasteryouconsumebatterypower.
SpendmoretimeunpluggedwithThinkPadbatteries.Mobilityhasrevolutionizedbusinessbyenabling
youtotakeyourworkwhereveryougo.WithThinkPadbatteries,youwillbeabletoworklongerwithout
beingtiedtoanelectricaloutlet.
Checkingthebatterystatus
ThebatterystatusiconintheWindowsnoticationareadisplaysthepercentageofbatterypowerremaining.
Therateatwhichyouusebatterypowerdetermineshowlongyoucanusethebatteryofyourcomputer
betweencharges.Becauseofdifferentuserhabitsandneeds,itisdifculttopredicthowlongabattery
chargewilllast.Therearetwomainfactors:
•Howmuchenergyisstoredinthebatterywhenyoubegintowork.
•Thewayyouuseyourcomputer.Forexample:
–Howoftenyouaccesstheharddiskdriveorsolid-statedrive.
–Howbrightyoumakethecomputerdisplay.
–Howoftenyouusethewirelessfeatures.
Tocheckfordetailedbatterystatusinformation,dothefollowing:
•ForWindows7:StartthePowerManagerprogramandclicktheBatterytab.
•ForWindows8,dooneofthefollowing:
–StarttheLenovoSupportprogramandclickBatteryHealth
–StarttheLenovoSettingsprogramandclickPower.
24UserGuide
Page 41

EnablingthebatteryalarmontheWindows7operatingsystem
FortheWindows7operatingsystem,youcanprogramyourcomputersothatwhenthebatterypowerfalls
belowacertainlevel,threeeventsoccur:thealarmgoesoff,amessageisdisplayed,andtheLCDis
turnedoff.
Toenablethebatteryalarm,dothefollowing:
1.StartthePowerManagerprogram.
2.ClicktheGlobalPowerSettingstab.
3.ForLowbatteryalarmorCriticallylowbatteryalarm,setthepercentageofthepowerlevelandset
theaction.
Note:Ifyourcomputerenterssleeporhibernationmodewhenthebatteryislow,butthealarmmessage
hasnotyetbeendisplayed,themessagewillbedisplayedwhenthecomputerresumes.Toresumenormal
operation,whenthemessageisdisplayed,clickOK.
Usingtheacpoweradapter
Thepowertorunyourcomputercancomeeitherfromthelithium-ion(Li-ion)battery,orfromacpower
throughtheacpoweradapter.Whileyouuseacpower,thebatterychargesautomatically.
Theacpoweradapterthatcomeswithyourcomputerhastwobasiccomponents:
•Thetransformerpackthatconvertsacpowerforusewiththecomputer.
•Thepowercordthatplugsintotheacoutletandintothetransformerpack.
Attention:Usinganimproperpowercordmightcauseseveredamagetoyourcomputer.
Connectingtheacpoweradapter
Toconnecttheacpoweradapter,dothefollowing:
Note:Ensurethatyouperformtheactionsintheorderinwhichtheyarelisted.
1.Plugtheacpoweradapterintoanelectricaloutlet.
2.Connectthepowercordtothetransformerpack.
3.Connecttheacpoweradaptertotheacpowerconnectorofthecomputer.
Tipsforusingtheacpoweradapter
•Whentheacpoweradapterisnotinuse,disconnectitfromtheelectricaloutlet.
•Donotbindthepowercordtightlyaroundtheacpoweradaptertransformerpackwhenitisconnectedto
thetransformer.
•Beforeyouchargethebattery,makesurethatitstemperatureisatleast10°C(50°F).
•Youcanchargethebatterywhentheacpoweradapterisconnectedtothecomputer.Y ouneedto
chargethebatteryinanyofthefollowingsituations:
–WhenthebatteryiconintheWindowsnoticationareashowsalowpercentageofbatterypower
remaining.
–Whenthebatteryhasnotbeenusedforalongtime
Chargingthebattery
Whenyoucheckbatterystatusandndthatthepercentageofpowerremainingisloworwhenthepower
alarmalertsyouthattheremainingpowerislow,youneedtochargeyourbattery.
Chapter2.Usingyourcomputer25
Page 42

Ifanacoutletisconvenient,plugtheacpoweradapterintoit,andthenconnecttheacpoweradaptertothe
computer.Thebatterywillbefullychargedinaboutthreetosixhours.Thechargingtimeisaffectedbythe
batterysizeandthephysicalenvironment.Y oucancheckthebatterychargingstatusatanytimethroughthe
batterystatusiconintheWindowsnoticationarea.
Note:Tomaximizethelifeofthebattery,thecomputerdoesnotstartrechargingthebatteryiftheremaining
powerisgreaterthan95%.
Maximizingthebatterylife
Tomaximizethelifeofthebattery,dothefollowing:
•Usethebatteryuntilthechargeiscompletelydepleted.
•Rechargethebatterycompletelybeforeusingit.Youcanseewhetherthebatteryisfullychargedfromthe
batterystatusiconintheWindowsnoticationarea.
•Alwaysusepower-savingmodes,suchassleepmode,andhibernationmode.
Managingthebatterypower
Toachievethebestbalancebetweenperformanceandpowersaving,adjustyourpowerplansettings.
Toaccesspowerplansettings,dothefollowing:
•ForWindows7:StartthePowerManagerprogramandthenclickthePowerPlantab.Forinstructionson
howtostartthePowerManagerprogram,see“AccessingLenovoprogramsontheWindows7operating
system”onpage14
•ForWindows8:Right-clickthebatterystatusiconfromtheWindowsnoticationareaandclickPower
Options.ThenclickChangeplansettingsnexttoyourpowerplan.
.
Formoreinformation,refertothehelpinformationsystemoftheprogram.
Power-savingmodes
Thereareseveralmodesthatyoucanuseatanytimetoconservepower.Thissectionintroduceseach
modeandgivestipsontheeffectiveuseofbatterypower.
•Screenblankmode(forWindows7only)
Thecomputerdisplayrequiresconsiderablebatterypower.Toturnoffthepowertothedisplayand
makethecomputerenterscreenblankmode,right-clickthebatterygaugeiconfromtheWindows
noticationareaandselectPoweroffdisplay.
•Sleepmode
Insleepmode,yourworkissavedtomemory,andthenthesolid-statedriveortheharddiskdriveandthe
computerdisplayareturnedoff.Whenyourcomputerwakesup,yourworkisrestoredwithinseconds.
Dependingonthemodel,yourcomputermightsupportthe30DayStandbyfunction.Whenthisfunction
isenabled,thecomputerconsumesevenlesspowerinsleepmodeandtakesonlysecondstoresume
normaloperationwhenyoupressthepowerbutton.Formoreinformationaboutthe30DayStandby
function,dothefollowing:
–ForWindows7:RefertothehelpinformationsystemofthePowerManagerprogram.Forinstructions
onhowtostartthePowerManagerprogram,see“Lenovoprograms”onpage14.
–ForWindows8:OpentheLenovoSettingsprogramandclickPower➙30DayStandby.
Toputyourcomputerintosleepmode,dothefollowing:
–ForWindows7:UsetheStartmenushutdownoption.
–ForWindows8:Movethecursortothebottomrightcornerofthescreentobringupthecharms.
ThenclickSettings➙Power➙Sleep.
26UserGuide
Page 43

•Hibernationmode
Byusingthismode,youcanturnoffyourcomputercompletelywithoutsavinglesorexitingfromany
programsthatarerunning.Whenthecomputerentershibernationmode,allopenprograms,folders,and
lesaresavedtotheharddiskdriveorsolid-statedrive,andthenthecomputerturnsoff.
Ifyouputyourcomputerintohibernationmodewiththewake-upfunctiondisabled,thecomputerdoes
notconsumeanypower.Thewake-upfunctionisdisabledbydefault.Ifyouputyourcomputerinto
hibernationmodewiththewake-upfunctionenabled,thecomputerconsumesasmallamountofpower.
Toenablethewake-upfunction,dothefollowing:
1.GotoControlPanelandclickSystemandSecurity.
2.ClickAdministrativeTools.
3.ClickTaskScheduler.Ifyouarepromptedforanadministratorpasswordorconrmation,typethe
passwordorprovideconrmation.
4.Fromtheleftpane,selectthetaskfolderforwhichyouwanttoenablethewake-upfunction.The
scheduledtasksaredisplayed.
5.Clickascheduledtask,andthenclicktheConditionstab.
6.InthePowersection,selectthecheckboxforWakethecomputertorunthistask.
Toputthecomputerintohibernationmode,changeyourpowerplansettingsbydoingthefollowing:
–ForWindows7:StartthePowerManagerprogramandthenclickthePowerPlantab.Thenfollow
theinstructionsonthescreen.ForinstructionsonhowtostartthePowerManagerprogram,see
“Lenovoprograms”onpage14
–ForWindows8:Right-clickthebatterystatusiconfromtheWindowsnoticationareaandclick
PowerOptions.ThenclickChangeplansettingsthatisnexttoyourpowerplan.Thenfollowthe
instructionsonthescreen.
•Wirelessoff
Whenyouarenotusingthewirelessfeatures,suchasBluetoothorwirelessLAN,turnthemoff.This
willhelpconservepower.Toturnoffthewirelessfeatures,pressF8.
.
Connectingtothenetwork
YourcomputerhasoneormorenetworkcardsthatenableyoutoconnectyourcomputertotheInternet
orothernetworkconnections.
Ethernetconnections
Youcanconnectyourcomputertoalocalnetworkorabroadbandconnectionbyusingthebuilt-inEthernet
featureofthecomputer.
DANGER
YourcomputerhasanEthernetconnector.Toavoidtheriskofelectricalshock,donotconnect
thetelephonecabletotheEthernetconnector.
Wirelessconnections
Wirelessconnectionisthetransferofdatawithouttheuseofcablesbutbymeansofradiowavesonly.
Attention:
•Ifyouwanttousethewirelessfeaturesonanairplane,checkthewirelessserviceswiththeairlinebefore
boardingtheairplane.
Chapter2.Usingyourcomputer27
Page 44

•Iftherearerestrictionsontheuseofcomputerwirelessfeaturesonanairplane,youneedtodisablethe
wirelessfeaturesofyourcomputerbeforeboarding.
Dependingonthewirelessdevicesinstalledonyourcomputer,youmightbeabletousethefollowing
wirelessnetworks:
•WirelessLANconnection
•WirelessWANconnection
•Bluetoothconnection
•NFCconnection
UsingthewirelessLANconnection
Awirelesslocalareanetwork(LAN)coversarelativelysmallgeographicarea,suchasanofcebuildingora
house.Devicesbasedonthe802.11standardscanconnecttothistypeofnetwork.
Yourcomputercomeswithabuilt-inwirelessnetworkcardandacongurationutilitytohelpyouestablish
wirelessconnectionsandmonitortheconnectionstatus.Thisenablesyoutostayconnectedtoyournetwork
whileyouareattheofce,inameetingroom,orathome,withnoneedforawiredconnection.
ToestablishawirelessLANconnection,dothefollowing:
ForWindows7:
1.PressF8andenablethewirelessfeature.
2.ClickthewirelessnetworkconnectionstatusiconintheWindowsnoticationarea.Alistofavailable
wirelessnetworksisdisplayed.
3.Double-clickanetworktoconnecttoit.Providerequiredinformationifneeded.
ForWindows8:
1.PressF8todisplaythelistofavailablewirelessnetworks.EnsurethattheAirplanemodeissettooff.
2.Double-clickanetworktoconnecttoit.Providerequiredinformationifneeded.
Ifyouneedtoconnecttodifferentwirelessnetworksindifferentlocations,usethefollowingsoftwareto
managemultiplenetworkprolessothatthecomputerautomaticallyconnectstoanavailablenetworkwhen
thelocationchanges:
•ForWindows7:UsetheAccessConnectionsprogram.Formoreinformation,see“AccessingLenovo
programsontheWindows7operatingsystem”onpage14
•ForWindows8:OpentheLenovoSettingsprogramandclickLocationAwareness.Formoreinformation,
see“AccessingLenovoprogramsontheWindows8operatingsystem”onpage15.
TipsforusingthewirelessLANfeature
Toachievethebestconnection,usethefollowingguidelines:
•PlaceyourcomputersothatthereareasfewobstaclesaspossiblebetweenthewirelessLANaccess
pointandthecomputer.
•Openyourcomputerlidtoanangleofslightlymorethan90degrees.
•Ifyouusethewirelessfeature(the802.11standards)ofyourcomputersimultaneouslywithaBluetooth
option,thedatatransmissionspeedcanbedelayedandtheperformanceofthewirelessfeaturecanbe
degraded.
.
28UserGuide
Page 45

CheckingthewirelessLANconnectionstatus
YoucancheckthewirelessLANconnectionstatusthroughthewirelessnetworkconnectionstatusiconin
theWindowsnoticationarea.Themorebarsencompassed,thebetterthesignalis.
FortheWindows7operatingsystem,youalsocanchecktheAccessConnectionsgauge,theAccess
Connectionsstatusicon,ortheAccessConnectionswirelessstatusiconintheWindowsnoticationarea.
AccessConnectionsgaugestatus:
•Powertothewirelessradioisoffornosignal.
•Powertothewirelessradioison.Thesignalstrengthofthewirelessconnectionispoor.To
improvesignalstrength,moveyourcomputerclosertothewirelessaccesspoint.
•Powertothewirelessradioison.Thesignalstrengthofthewirelessconnection
ismarginal.
•Powertothewirelessradioison.Thesignalstrengthofthewirelessconnection
isexcellent.
AccessConnectionsiconstatus:
•Nolocationproleisactiveornoneexists.
Currentlocationproleisdisconnected.
•
•Currentlocationproleisconnected.
Wirelessstatusiconstatus
•Powertothewirelessradioisoff.
•Powertothewirelessradioison.Noassociation.
•Powertothewirelessradioison.Nosignal.
Powertothewirelessradioison.Thesignalstrengthofthewirelessconnectionisexcellent.
•
•Powertothewirelessradioison.Thesignalstrengthofthewirelessconnectionismarginal.
•Powertothewirelessradioison.Thesignalstrengthofthewirelessconnectionispoor.Toimprove
signalstrength,moveyourcomputerclosertothewirelessaccesspoint.
UsingthewirelessWANconnection
WirelessWideAreaNetwork(wirelessWAN)whichusescellularnetworksfordatatransmission,enables
youtoestablishwirelessconnectionsoverremotepublicorprivatenetworks.Theseconnectionscanbe
maintainedoveralargegeographicalarea,suchasacityoranentirecountry,byuseofmultipleantenna
sitesorsatellitesystemsmaintainedbywirelessserviceproviders.
SomeThinkPadnotebookcomputerscomewithabuilt-inwirelessWANcardintegratedwithsomewireless
WANtechnologies,suchas1xEV-DO,HSPA,3G,GPRS,orLTE.Byusingthebuilt-inwirelessWANcardand
thecongurationutilitythatcomeswithyourcomputer,youcanestablishwirelessWANconnectionsand
monitortheconnectionstatus.
Note:ThewirelessWANserviceisprovidedbyauthorizedserviceprovidersinsomecountries.
TipsforusingthewirelessWANfeature
Toachievethebestconnection,usethefollowingguidelines:
•Keepyourcomputerawayfromyourbody.
Chapter2.Usingyourcomputer29
Page 46

•Placeyourcomputeronaatsurfaceandopenyourcomputerlidtoanangleofslightlymorethan
90degrees.
•Placeyourcomputerawayfromconcreteorbrickwallsthatmightdampencellularsignals.
•Bestreceptionwillbeavailablenearwindowsandotherlocationswherecellularphonereceptionisthe
strongest.
CheckingthewirelessWANconnectionstatus
YoucancheckthewirelessWANconnectionstatusthroughthewirelessnetworkconnectionstatusiconin
theWindowsnoticationarea.Themorebarsencompassed,thebetterthesignalis.
FortheWindows7operatingsystem,youalsocanchecktheAccessConnectionsgauge,theAccess
Connectionsstatusicon,ortheAccessConnectionswirelessstatusiconintheWindowsnoticationarea.
AccessConnectionsgaugestatus:
•
•Weaksignal
•Mediumsignal
•Strongsignal
AccessConnectionsiconstatus:
•
•
•Currentlocationproleisconnected.
Wirelessstatusiconstatus:
•
•
•Nosignal
•Weaksignal
•
•
Nosignal
Nolocationproleisactiveornoneexists.
Currentlocationproleisdisconnected.
PowertotheWANradioisoff
Noassociation
Mediumsignal
Strongsignal
UsingtheBluetoothconnection
Bluetoothcanconnectdevicesashortdistancefromoneanother,andiscommonlyusedforconnecting
peripheraldevicestoacomputer,transferringdatabetweenhand-helddevicesandapersonalcomputer,or
remotelycontrollingandcommunicatingwithdevicessuchasmobilephones.
Dependingonthemodel,yourcomputermightsupporttheBluetoothfeature.Totransferdatathrough
theBluetoothfeature,dothefollowing:
1.EnsurethattheBluetoothfeatureisenabled.IfyouareusingtheWindows8operatingsystem,the
integratedBluetoothfeatureisenabledbydefault.IfyouareusingtheWindows7operatingsystem,to
enabletheBluetoothfeature,pressF8thenfollowtheinstructionsonthescreen.
2.Right-clickthedatathatyouwanttosend.
3.SelectSendTo➙BluetoothDevices.
4.SelectaBluetoothdevice,andthenfollowtheinstructionsonthescreen.
30UserGuide
Page 47

Note:Ifyouusethewirelessfeature(the802.11standards)ofyourcomputersimultaneouslywitha
Bluetoothoption,thedatatransmissionspeedcanbedelayedandtheperformanceofthewirelessfeature
canbedegraded.
Formoreinformation,refertotheWindowshelpinformationsystemandtheBluetoothhelpinformation
system.
UsingtheNFCconnection
NFCisahigh-frequencyandshort-rangewirelesscommunicationstechnology.Dependingonthe
model,yourcomputercomeswithanNFCcard.ByusingtheNFCfeature,youcanestablishtheradio
communicationsbetweenyourcomputerandanotherNFC-enableddeviceoveradistancenomorethana
fewcentimeters.
BeforeyouusetheNFCfeature,ensurethattheNFCfeatureisenabled.ToenabletheNFCfeatureon
theWindows8operatingsystem,dothefollowing:
1.FromtheStartscreen,clickLenovoSettings➙MobileHotspot.
2.IntheEnableNFCarea,slidetotherighttoenabletheNFCfeature.
YoucanusetheNFCfeaturewithNFCsupportedprograms,suchasLenovoQuickDisplayprogram,the
LenovoQuickControlprogram,ortheLenovoQuickCastprogram.
Presentationsandmultimedia
Youcanconnectyourcomputertoaprojectortogivepresentationsoryoucanconnectyourcomputer
toanexternalmonitortoexpandyourworkspace.
Changingdisplaysettings
Youcanchangethedisplaysettings,suchasthedisplayresolution,fontsize,andsoon.
Tochangethedisplaysettings,dothefollowing:
1.OpenControlPanelandclickAppearanceandPersonalization.
2.ClickDisplayforfurtherconguration.
3.ClickApply.Thechangewilltakeeffectafteryoulogoff.
Connectingaprojectororanexternalmonitor
Thistopicprovidesinformationaboutconnectingaprojectororanexternalmonitor.
Usinganexternalmonitor
Note:Whenyouconnectanexternalmonitor,avideointerfacecablewithaferritecoreisrequired.
Yourcomputercansupportamaximumvideoresolutionofupto1920x1200(withanexternalmonitor
connectedtotheVGAconnector)orupto2560x1600(withanexternalmonitorconnectedtothemini
DisplayPortconnector),providedthattheexternalmonitoralsosupportsthatresolution.Formore
informationabouttheexternalmonitor,refertothemanualsprovidedwiththeexternalmonitor.
Youcansetanyresolutionforeitherthecomputerdisplayortheexternalmonitor.Whenyouusebothatthe
sametime,theresolutionofbothisthesame.Ifyousetahigherresolutionforthecomputerdisplay,you
canseeonlypartofthescreenatatime.YoucanseeotherpartsbymovingtheimagewiththeTrackPoint
pointingdeviceoranotherpointingdevice.
Chapter2.Usingyourcomputer31
Page 48

Youcanmovethedisplayoutputtothecomputerdisplay,theexternalmonitor,orbothintheDisplay
Settingswindow.
Connectinganexternalmonitor
Toconnectanexternalmonitor,dothefollowing:
1.ConnecttheexternalmonitortotheVGAconnectorortheminiDisplayPortconnectorofyourcomputer.
2.Connecttheexternalmonitortoanelectricaloutlet.
3.T urnontheexternalmonitor.
4.ChangethedisplayoutputlocationbypressingF7.Thisenablesyoutoswitchbetweenviewingoutput
ontheexternalmonitor,thecomputermonitor,orbothmonitors.
Note:Ifyourcomputercannotdetecttheexternalmonitor,right-clickonthedesktop,thenselectScreen
resolution.ClicktheDetectbutton.
Settingtheexternalmonitortype
Tosettheexternalmonitortype,dothefollowing:
1.Connecttheexternalmonitortoyourcomputer,andthenconnectthemonitortoanelectricaloutlet.
2.T urnontheexternalmonitor.
3.Right-clickonthedesktop,andclickScreenresolution.
Note:Ifyourcomputercannotdetecttheexternalmonitor,clicktheDetectbutton.
4.SelecttheexternalmonitorandsetResolution.
5.ClickAdvancedSettings.
6.ClicktheMonitortab.Checkthemonitorinformationtomakesurethatthemonitortypeiscorrect.Ifit
is,clickOKtoclosethewindow;otherwiseproceedwiththefollowingsteps.
7.Ifmorethantwomonitortypesaredisplayed,selectGenericPnPMonitororGenericNon-PnP
Monitor.
8.ClickProperties.Ifyouarepromptedforanadministratorpasswordorconrmation,typethepassword
orprovideconrmation.
9.ClicktheDrivertab.
10.ClickUpdateDriver.
11.ClickBrowsemycomputerfordriversoftware,andthenclickLetmepickfromalistofdevice
driversonmycomputer.
12.CleartheShowcompatiblehardwarecheckbox.
13.Selectthecorrectmanufacturerandmodelfortheexternalmonitor.Ifyoucannotndyourmonitoron
thelist,stoptheinstallationofthisdriverandusethedrivershippedwithyourmonitor.
14.Afterupdatingthedriver,clickClose.
15.FortheWindows7operatingsystem,tochangethecolorsettings,right-clickonthedesktop,andclick
Screenresolution.ClickAdvancedSettings,selecttheMonitortab,thensetColors.
16.ClickOK.
Considerationsforconnectinganexternalmonitor
•Wheninstallinganoperatingsystem,youmustinstallthedisplaydriverforyourmonitorthatisprovided
withthecomputer,andthemonitorINFlethatisprovidedwiththeexternalmonitor.
•Ifyousetaresolutionhigherthantheresolutionyouareusingonthecomputermonitor,andusean
externalmonitorthatdoesnotsupportthatresolution,takeadvantageofthevirtualscreenfunction,
whichenablesyoutodisplayonlyapartofthehigh-resolutionscreenimageyourcomputerproduces.
32UserGuide
Page 49

YoucanseeotherpartsoftheimagebymovingthescreenwiththeTrackPointpointingdeviceoranother
pointingdevice.
•Iftheexternalmonitoryouareusingisoutdated,theresolutionandtherefreshratemightbelimited.
UsingaDVImonitor
Ifyourcomputerhasoneofthefollowingoptionaldockingstations,youcanuseaDigitalVisualInterface
(DVI)monitorthroughtheDVIconnectorofthatunit:
•ThinkPadProDock
•ThinkPadUltraDock
Notes:
•ThescreenmodethatcanbeuseddependsonthespecicationsoftheDVImonitor.
•BeforeyouconnectaDVImonitor,makesurethatthecomputerisconnectedtotheexpansionunitand
worksproperly.
ToconnectaDVImonitor,dothefollowing:
1.T urnoffthecomputer.
2.ConnectaDVImonitortotheDVIconnectoroftheexpansionunit,andthenconnectthemonitor
toanelectricaloutlet.
3.T urnontheDVImonitorandthecomputer.
IfthecomputeroutputdoesnotappearontheDVImonitor,dothefollowing:
•ForWindows7:
1.PressCtrl+Alt+F12.TheIntelGraphicsandMediaControlPanelwindowopens.
2.SelectAdvancedModeandclickOK.
3.SelectMultipleDisplays.
4.IntheOperatingModeeld,selectoneofthefollowingoptionsdependingonyourneedsandfollow
theinstructionsonthescreentocompleteothercongurations.
–SingleDisplay:Dependingonyourconguration,thecomputeroutputisdisplayedeitheronthe
computerdisplayortheDVImonitor.
–CloneDisplays:Thesamecomputeroutputisdisplayedonboththecomputerdisplayand
theDVImonitor.
–ExtendedDesktop:Differentcomputeroutputisdisplayedonthecomputerdisplayandthe
DVImonitor.
•ForWindows8:
1.Movethecursortothetop-rightorbottom-rightcornerofthescreenandclicktheDevicescharm.
2.ClickSecondscreenandselectDuplicate,Extend,orSecondScreenOnly.
ConsiderationsforconnectingaDVImonitor
ConnectaDVImonitortotheexpansionunit,andturnonthemonitorbeforeyouturnonthecomputer.
Otherwisethesystemcannotrecognizethatthemonitorisconnected.IftheoptionforenablingtheDVI
monitorintheDisplayPropertieswindowisnotdisplayed,tryclosingthewindowandopeningitagain.Ifthe
optionstillisnotdisplayed,makesurethattheconnectorofthemonitorisattachedrmly,andrepeatthe
procedureforconnectingthemonitor.
Chapter2.Usingyourcomputer33
Page 50

UsingtheminiDisplayPortconnector
YourcomputerhasaminiDisplayPortconnector,whichisadigitaldisplayinterfaceforconnectionto
variousexternaldevices,suchasCathodeRayTube(CRT)monitors,LCDmonitors,projectors,oreven
high-denitiontelevisions.Thiscompactconnectorenablesaplug-and-playsetupandsupportsadapters
thatcanplugintoDVI,VGA,orHigh-DenitionMultimediaInterface(HDMI)connectors.
TheminiDisplayPortconnectorofyourcomputersupportsaudioaswellasvideostreaming.
Settingupapresentation
Todisplayinformationandmakepresentations,youcanconnectadataprojectortoyourcomputerthrough
theVGAconnectoronyourcomputer.
Note:Itmaytakeseveralsecondsbeforetheprojectordisplaystheimage.Ifyoudonotseeyourdesktop
displayedafter60seconds,trypressingF7toswitchbetweendifferentdisplayoutputlocations.
Yourprojectormighthaveoneormoreaudio-inputconnectors.Toprojectsound,youneedtoattach
thecomboaudioconnectoronyourcomputertotheseconnectors,usinganaudiocable(commercially
available).
Usingdualdisplays
ThissectionintroducestheDuplicateandExtenddesktopfunctionsthatenableyoutodisplayoutputon
boththecomputerdisplayandanexternalmonitor.
UsingtheDuplicateorExtenddesktopfunction
WiththeDuplicatedesktopfunction,youcandisplaythesameoutputonboththecomputerdisplayand
anexternaldisplay.YoualsocandisplaydifferentdesktopimagesoneachmonitorwiththeExtend
desktopfunction.
YoucanusetheDuplicateorExtenddesktopfunctionwithoutchanginganysettings.Ifthefunctiondoes
notwork,refertothefollowingtopiconhowtoenabletheDuplicateorExtenddesktopfunction.
EnablingtheDuplicateorExtenddesktopfunction
ToenabletheDuplicateorExtenddesktopfunction,dothefollowing:
1.Connecttheexternalmonitortoyourcomputer.Thenconnectthemonitortoanelectricaloutlet.
2.T urnontheexternalmonitor.
3.PressF7,thenselectDuplicateorExtend.
Tochangetheresolutionforeachmonitor,dothefollowing:
1.Right-clickonthedesktop,andclickScreenresolution.
2.ClicktheMonitor-1icon,whichisfortheprimarydisplay(thecomputerdisplaybydefault).
3.Settheresolutionfortheprimarydisplay.
4.ClicktheMonitor-2icon,whichisforthesecondarydisplay(theexternaldisplaybydefault).
5.Settheresolutionforthesecondarydisplay.
6.ClickAdvancedsettingsandsetupthecolorqualityontheMonitortab.
7.ClickOKtoapplythechanges.
ConsiderationsforusingtheExtenddesktopfunction
•InExtenddesktopmode,onlytheprimarydisplayshowsDOSfull-screenandtheotherdisplayis
blackedout.
34UserGuide
Page 51

•IfyourcomputerhastheIntelgraphicscard,youcandesignatetheprimarydisplaybydoingthefollowing:
1.Right-clickonthedesktopandselectScreenResolution.
2.ClickthedesireddisplayimageandselecttheMakethismymaindisplaycheckbox.
3.ClickOK.
•WhenanapplicationusingDirectDraworDirect3Disrunninginfull-screenmode,onlytheprimarydisplay
showstheoutput.
•YoucannotusethedisplayswitchingfunctionwhenyouareinExtenddesktopmode.
UsingtheNVIDIAOptimusGraphicsfeature
SomeThinkPadnotebookcomputerssupportNVIDIAOptimusGraphics.
Toachievethebestbalancebetweenthecomputerperformanceandalongbatterylife,dependingonthe
graphicsqualitydemandoftherunningprogramandpowerplansettingsthatyouuse,theNVIDIAOptimus
GraphicsfeatureautomaticallyswitchesbetweenHighPerformanceGraphicsandEnergySavingGraphics,
withnoneedtorestartyourcomputer,closeprograms,orintervenemanually.
Note:TheNVIDIAOptimusGraphicsfeatureisonlysupportedontheWindows7operatingsystem.
Usingaudiofeatures
Yourcomputerisequippedwiththefollowingitems:
•Microphones
•Speakers
•Comboaudioconnector,3.5mm(0.14inch)indiameter
Yourcomputeralsohasanaudiochipthatenablesyoutoenjoyvariousmultimediaaudiofeatures,such
asthefollowing:
•PlaybackofMIDIandMP3les
•RecordingandplaybackofPCMandWAVles
•Recordingfromvarioussoundsources,suchasaheadsetattached
Thefollowingtableshowswhichfunctionsoftheaudiodevicesattachedtotheconnectorsonyourcomputer
ordockingstationaresupported.
Table3.Audiofeaturelist
Connector
Comboaudioconnector
Headsetwitha3.5mm
(0.14–inch)4-poleplug
Headphoneand
microphonefunctions
supported
ConventionalheadphoneConventionalmicrophone
Headphonefunction
supported
Notsupported
Tocongurethemicrophoneforoptimalsoundrecording,usetheRealtekHDAudioManagerprogram.To
starttheprogram,gotoControlPanelandclickHardwareandSound➙RealtekHDAudioManager.
Usingthecamera
Ifyourcomputerhasacamera,youcanusethecameratopreviewyourvideoimageandtakeasnapshot
ofyourcurrentimage.
Chapter2.Usingyourcomputer35
Page 52

Tostartthecamera,dothefollowing:
•ForWindows7:StarttheCommunicationsUtilityprogram.See“AccessingLenovoprogramsonthe
Windows7operatingsystem”onpage14
•ForWindows8:ClickCamerafromtheStartscreen.
Whenthecameraisstarted,thegreencamera-in-useindicatorturnson.
Youalsocanusetheintegratedcamerawithotherprogramsthatprovidefeaturessuchasphotographing,
videocapturing,andvideoconferencing.Tousetheintegratedcamerawithotherprograms,openoneofthe
programsandstartthephotographing,videocapturing,orvideoconferencingfunction.Then,thecamera
willstartautomaticallyandthegreencamera-in-useindicatorwillturnon.Formoreinformationaboutusing
thecamerawithaprogram,refertothehelpinformationsystemoftheprogram.
Conguringcamerasettings
Youcancongurethecamerasettingstomeetyourneeds,suchasadjustingthequalityofthevideooutput.
Tocongurethecamerasettings,dothefollowing:
•ForWindows7:StarttheCommunicationsUtilityprogramandcongurethecamerasettingsasdesired.
•ForWindows8,dooneofthefollowing:
–Congurethecamerasettingsdirectlyfromtheprogramthatisusingthecamera.Fordetails,seethe
helpinformationsystemoftheprogram.
–ClickLenovoSettingsfromtheStartscreen.ThenclickCamera.Followtheinstructionsonthe
screentocongurethecamerasettingsasdesired.
.
Usingtheopticaldrive
Note:Y ourcomputersupportsDVD-ROMDriveandMultiBurnerDrive.
DVD-ROMDrive
ThisdrivecanreadDVD-ROMdiscsandalltypesofCDs,suchasCD-ROMdiscs,CD-RWdiscs,CD-R
discs,andaudioCDs.Thisdrivehasnorecordingcapability.
MultiBurnerdrive
ThisdrivecanreadDVD-ROMdiscs,DVD-Rdiscs,DVD-RAMdiscs,DVD-RWdiscs,andalltypesofCDs,
suchasCD-ROMdiscs,CD-RWdiscs,CD-Rdiscs,andaudioCDs.Inaddition,itcanrecordonDVD-R
discs,DVD-RWdiscs,typeIIDVD-RAMdiscs,CD-RWstandardandhighspeeddiscs,andCD-Rdiscs.
Usingaashmediacard
Yourcomputermighthaveamediacardreaderslotorasmartcardslot.Itsupportsthefollowingcards:
•MultiMediaCard(MMC)
•SecureDigitaleXtended-Capacity(SDXC)card
•SecureDigital(SD)card
•SecureDigitalHigh-Capacity(SDHC)card
Note:YourcomputerdoesnotsupporttheCPRMfeaturefortheSDcard.
Attention:Whiletransferringdatatoorfromaashmediacard,suchasanSDcard,donotputyour
computerintosleeporhibernationmodebeforethedatatransfercompletes.Otherwise,yourdatacould
becomedamaged.
36UserGuide
Page 53

Insertingaashmediacard
Attention:Beforeyoustartinstallingacard,touchametaltableoragroundedmetalobject.Thisaction
reducesanystaticelectricityfromyourbody.Thestaticelectricitycoulddamagethecard.
Toinsertaashmediacard,dothefollowing:
1.Ensurethatthecardiscorrectlyoriented.
2.Insertthecardrmlyintothe4-in-1mediacardreaderslotorsmartcardslot.
Iftheplug-and-playfeatureisnotenabledfortheinstalledashmediacard,dothefollowingtoenable
thefeature:
1.OpenControlPanel.
2.ClickHardwareandSound.
3.ClickDeviceManager.Ifyouarepromptedforanadministratorpasswordorconrmation,typethe
passwordorprovideconrmation.
4.FromtheActionmenu,selectAddlegacyhardware.TheAddHardwareWizardstarts.
5.Followtheinstructionsonthescreen.
Removingaashmediacard
Attention:
•Stopalltheactivitiesinvolvingthecardbeforeremovingit.Otherwise,dataonthecardmightbe
damagedorlost.
•Donotremoveacardwhilethecomputerisinsleepmodeorhibernationmode.Otherwise,thesystem
mightnotrespondwhenyoutrytoresumeoperation.
Toremoveaashmediacard,dothefollowing:
1.ClickthetriangulariconintheWindowsnoticationareatoshowhiddenicons.Then,right-clickthe
SafelyRemoveHardwareandEjectMediaicon.
2.Selecttheitemyouwanttoremovetostopthecard.
3.Pressthecardtoejectitfromyourcomputer.
4.Removethecardandstoreitsafelyforfutureuse.
Note:IfyoudonotremovethecardfromyourcomputerafteryouejectthecardfromtheWindowsoperating
system,thecardcannolongerbeaccessed.T oaccessthecard,youmustremoveitrst,theninsertitagain.
Chapter2.Usingyourcomputer37
Page 54

38UserGuide
Page 55

Chapter3.Youandyourcomputer
Thischapterprovidesinformationaboutaccessibility,comfort,andtravelingwithyourcomputer.
•“Accessibilityandcomfort”onpage39
•“Travelingwithyourcomputer”onpage41
Accessibilityandcomfort
Goodergonomicpracticeisimportanttogetthemostfromyourpersonalcomputerandtoavoiddiscomfort.
Arrangeyourworkplaceandtheequipmentyouusetosuityourindividualneedsandthekindofwork
thatyouperform.Inaddition,usehealthyworkhabitstomaximizeyourperformanceandcomfortwhile
usingyourcomputer.
Thefollowingtopicsprovideinformationaboutarrangingyourworkarea,settingupyourcomputer
equipment,andestablishinghealthyworkhabits.
Lenovoiscommittedtoprovidingthelatestinformationandtechnologytoourcustomerswithdisabilities.
Refertoouraccessibilityinformationwhichoutlinesoureffortsinthisarea.See“Accessibilityinformation”
onpage40
Ergonomicinformation
Workinginthevirtualofcemightmeanadaptingtofrequentchangesinyourenvironment.Forexample,
adaptingtothesurroundinglightsources,properseating,andtheplacementofyourcomputerhardware,
canhelpyouimproveyourperformanceandachievegreatercomfort.
.
Thefollowingexampleshowssomeoneinaconventionalsetting.Evenwhennotinsuchasetting,youcan
followmanyofthesetips.Developgoodhabits,andtheywillserveyouwell.
Generalposture:Makeminormodicationsinyourworkingposturetodetertheonsetofdiscomfortcaused
bylongperiodsofworkinginthesameposition.Frequent,shortbreaksfromyourworkalsohelptoprevent
minordiscomfortassociatedwithyourworkingposture.
©CopyrightLenovo2013
39
Page 56

Display:Positionthedisplaytomaintainacomfortableviewingdistanceof510-760mm(20-30inches).
Avoidglareorreectionsonthedisplayfromoverheadlightingoroutsidesourcesoflight.Keepthedisplay
screencleanandsetthebrightnesstolevelsthatenableyoutoseethescreenclearly.PressF5orF6
toadjustdisplaybrightness.
Headposition:Keepyourheadandneckinacomfortableandneutral(vertical,orupright)position.
Chair:Useachairthatgivesyougoodbacksupportandseatheightadjustment.Usechairadjustmentsto
bestsuityourdesiredposture.
Armandhandposition:Ifavailable,usechairarmrestsoranareaonyourworkingsurfacetoprovide
weightsupportforyourarms.Keepyourforearms,wrists,andhandsinarelaxedandneutral(horizontal)
position.Typewithasofttouchwithoutpoundingthekeys.
Legposition:Keepyourthighsparalleltotheoorandyourfeetatontheoororonafootrest.
Whatifyouaretraveling?
Itmightnotbepossibletoobservethebestergonomicpracticeswhenyouareusingyourcomputerwhile
onthemoveorinacasualsetting.Regardlessofthesetting,trytoobserveasmanyofthesetipsas
possible.Sittingproperlyandusingadequatelighting,forexample,willhelpyoumaintaindesirablelevels
ofcomfortandperformance.
Questionsaboutvision?
ThevisualdisplayscreensofThinkPadnotebookcomputersaredesignedtomeetthehigheststandards
andtoprovideyouwithclear,crispimagesandlarge,brightdisplaysthatareeasytosee,yeteasyonthe
eyes.Ofcourse,anyconcentratedandsustainedvisualactivitycanbetiring.Ifyouhavequestionsoneye
fatigueorvisualdiscomfort,consultavisioncarespecialistforadvice.
Comfort
Observethefollowingguidelinestoachievegreatercomfortandimproveperformance.
Activesittingandrestbreaks:Thelongeryousitandworkwithyourcomputer,themoreimportantitisto
observeyourworkingposture.Follow“Ergonomicinformation”onpage39andpractice“activesitting”to
avoiddiscomfortassociatedwithyourworkingpostures.Makingminorvoluntaryposturalchangesand
takingshortfrequentworkbreaksarethekeyingredientsforhealthycomputing.Y ourcomputerislightand
mobile;youcaneasilyrepositionyourworkingsurfacetoaccommodatemanyposturemodications.
Workareasetupoptions:Familiarizeyourselfwithallofyourofcefurnituresothatyouknowhowtoadjust
yourworksurface,seat,andotherworktoolstoaccommodateyourpreferencesforcomfort.Ifyourwork
areaisnotinanofcesetting,besuretotakespecialnoteofemployingactivesittingandtakingworkbreaks.
ManyThinkPadproductsolutionsareavailabletohelpyoumodifyandexpandyourcomputertobestsuit
yourneeds.Youcanndsomeoftheseoptionsathttp://www.lenovo.com/accessories/services/index.html.
Exploreyouroptionsfordockingsolutionsandexternalproductsthatprovidetheadjustabilityandfeatures
thatyouwant.
Accessibilityinformation
Lenovoiscommittedtoprovidingpeoplewithdisabilitiesgreateraccesstoinformationandtechnology.
Asaresult,thefollowinginformationprovideswaystohelpusersthathavehearing,vision,andmobility
limitationsgetthemostoutoftheircomputerexperience.
40UserGuide
Page 57

Assistivetechnologiesenableuserstoaccessinformationinthemostappropriateway.Someofthese
technologiesarealreadyprovidedinyouroperatingsystem.Otherscanbepurchasedthroughvendors,or
accessedthroughtheWorldWideWebhttp://www.lenovo.com/healthycomputing.
Assistivetechnologies
SomeaccessibilitytechnologiesareavailablethroughtheAccessibilityOptionsprogram.Depending
onyouroperatingsystem,thenumberofaccessibilityoptionsavailablevaries.Ingeneral,accessibility
optionsenhancethewayuserswithhearing,vision,ormobilitylimitationsnavigateandusetheircomputer.
Forexample,someusersmightnothavethenemotorskillsrequiredtouseamouseorselectkey
combinations.Otherusersmightrequirelargerfontsorhigh-contrastdisplaymodes.Insomecases,
magniersandbuilt-inspeechsynthesizersareavailable.Fordetailedinformationabouteachofthese
features,consulttheMicrosofthelpinformationsystem.
TousetheAccessibilityOptionsprogram,openControlPanelandclickEaseofAccess➙Easeof
AccessCenter.
Screen-readertechnologies
Screen-readertechnologiesareprimarilyfocusedonsoftwareprograminterfaces,helpinformationsystems,
andavarietyofonlinedocuments.However,inthecasewhereascreenreadercannotreaddocuments,
thedocumentmustrstgothroughaconversionprocess.OnesolutionconvertsAdobePDFlesintoa
formatthatisreadbythescreen-readerprograms.ThissolutionisaWeb-basedserviceprovidedbyAdobe
SystemsIncorporated.Throughhttp://access.adobe.com,AdobePDFdocumentscanbeconvertedto
HTMLorplaintextinmanylanguages.OneconversionoptionconvertsPDFdocumentsontheInternet.A
secondoptionenablesuserstosubmittheURLofanAdobePDFlethroughe-mailtoconvertittoHTMLor
ASCIItext.AdobePDFlesonalocalharddiskdrive,localCD-ROM,orLANalsocanbeconvertedby
attachingtheAdobePDFletoane-mailmessage.
Travelingwithyourcomputer
Thistopicprovidesinformationtohelpyouworkwithyourcomputerwhenyouaretraveling.
Traveltips
Usethefollowingtraveltipstotravelmorecondentlyandefcientlywithyourcomputer.
•Althoughitissafetoallowyourcomputertogothroughthex-raymachinesatairportsecuritystations,it
isimportanttokeepyoureyesonthecomputeratalltimestopreventtheft.
•Considerbringinganelectricaladapterforuseinanairplaneorautomobile.
•Ifyoucarryanacpoweradapter,detachtheaccordfromittoavoiddamagingthecord.
Traveltipsonairplanes
Ifyoucarryyourcomputerintoanairplane,takenoteofthefollowingtips:
•Ifyouintendtouseyourcomputerorwirelessservices(suchasInternetandBluetooth),checkwiththe
airlineforrestrictionsandavailabilityofservicesbeforeboardingtheairplane.Iftherearerestrictions
ontheuseofcomputerswithwirelessfeaturesontheairplane,youmustabidebythoserestrictions.If
necessary,disablewirelessfeaturesbeforeboarding.
•Becarefulabouttheseatinfrontofyouonairplanes.Angleyourcomputerlidsothatitdoesnotget
caughtwhenthepersoninfrontofyouleansback.
•Whentakingoff,remembertoturnoffyourcomputerorputitintohibernationmode.
Chapter3.Y ouandyourcomputer41
Page 58

Travelaccessories
Thefollowingisachecklistofitemstoconsiderpackingwhenyouaregoingtotravel:
•ThinkPadacpoweradapter
•MiniDisplayPorttoHDMIadapter
•Externalmouse,ifyouareaccustomedtousingone
•Ethernetcable
•Aqualitycarryingcasethatprovidesadequatecushionandprotection
•Externalstoragedevice
Ifyouaretravelingtoanothercountry,youmightwanttoconsideranacpoweradapterforthecountryto
whichyouaretraveling.
Topurchasetravelaccessories,gotohttp://www.lenovo.com/accessories.
42UserGuide
Page 59

Chapter4.Security
Thischapterprovidesinformationabouthowtoprotectyourcomputerfromtheftandunauthorizeduse.
•“Usingpasswords”onpage43
•“Harddisksecurity”onpage47
•“Settingthesecuritychip”onpage48
•“Usingthengerprintreader”onpage49
•“Noticeondeletingdatafromyourharddiskdriveorsolid-statedrive”onpage52
•“Usingrewalls”onpage53
•“Protectingdataagainstviruses”onpage53
Usingpasswords
Youcanhelppreventyourcomputerfromunauthorizedusebyusingpasswords.Onceyousetapassword,
apromptisdisplayedonthescreeneachtimeyouturnonthecomputer.Enteryourpasswordattheprompt.
Youcannotusethecomputerunlessyoutypethecorrectpassword.
Ifyouhavesetapower-onpassword,asupervisorpassword,oraharddiskpassword,itunlocks
automaticallywhenthecomputerresumesfromsleepmode.
Note:IfaWindowspasswordhasbeenset,youwillbepromptedtoenterit.
Typingpasswords
Whenthisiconisdisplayed,typeapower-onpasswordorasupervisorpassword.
Whenthisiconisdisplayed,typeauserharddiskpassword.Totypeamasterharddiskpassword,
pressF1.Whentheiconchangesto,typethemasterharddiskpassword
Note:Toreturntotheicon,pressF1again.
Power-onpassword
Youcansetapower-onpasswordtohelpprotectyourcomputeragainstaccessbyunauthorizedusers.
Ifyousetapower-onpassword,thepasswordpromptisdisplayedonthescreenwheneveryouturnonthe
computer.Youmustenterthecorrectpasswordtostartusingthecomputer.
Setting,changing,orremovingapower-onpassword
Beforeyoustart,printtheseinstructions.
Toset,change,orremoveapower-onpassword,dothefollowing:
1.Restartthecomputer.Whenthelogoscreenisdisplayed,pressF1tostarttheThinkPadSetupprogram.
2.SelectSecurity➙Password➙Power-onPasswordbyusingthedirectionalkeys.
©CopyrightLenovo2013
43
Page 60

3.Dependingonyourneed,dooneofthefollowing:
•Tosetapassword,dothefollowing:
a.IntheEnterNewPasswordeld,typeadesiredpasswordandpressEnter.
b.IntheConrmNewPasswordeld,retypethepasswordandpressEnter.
•Tochangeapassword,dothefollowing:
a.IntheEnterCurrentPasswordeld,typethecurrentpower-onpasswordandpressEnter.
b.IntheEnterNewPasswordeld,typethenewpower-onpasswordandpressEnter;thenretype
thepasswordintheConrmNewPasswordeldandPressEnter.
•Toremoveapassword,dothefollowing:
a.IntheEnterCurrentPasswordeld,typethecurrentpower-onpasswordandpressEnter.
b.LeavetheEnterNewPasswordandConrmNewPasswordeldsblank.PressEntertwice.
4.ASetupNoticewindowisdisplayed.PressEntertocontinue.
5.PressF10.ASetupConrmationwindowisdisplayed.SelectYestosavethecongurationchanges
andexit.
Note:Y oumightwanttorecordyourpasswordandstoreitinasafeplace.Otherwise,ifyouforgetthe
password,youhavetotakeyourcomputertoaLenovoreselleroramarketingrepresentativetohave
thepasswordcanceled.
Supervisorpassword
ThesupervisorpasswordprotectsthesysteminformationstoredintheThinkPadSetupprogram.Ifyouhave
setasupervisorpassword,noonecanchangethecongurationofthecomputerwithoutthepassword.It
providesthefollowingsecurityfeatures:
•Ifonlyasupervisorpasswordisset,apasswordpromptisdisplayedwhenyoutrytostarttheThinkPad
Setupprogram.UnauthorizeduserscannotaccesstheThinkPadSetupprogramwithoutthepassword.
•Thesystemadministratorcanusethesupervisorpasswordtoaccessacomputereveniftheuserofthat
computerhassetapower-onpassword.Thesupervisorpasswordoverridesthepower-onpassword.
•Ifbothasupervisorpasswordandapower-onpasswordareset,youcandothefollowingonlyifyou
havethesupervisorpassword:
–Changingordeletingthepower-onpassword
–Changingordeletingthesupervisorpassword
–Changingdateandtime
–Specifyingtheminimumlengthforpower-onpasswordandharddiskpassword
–Changingthesettingforthesecuritychip
–Erasingthengerprintdata
–Enablingordisablingthefollowingfeatures:
–WakeonLANandFlashoverLAN
–LockUEFIBIOSSettings
–Passwordatunattendedboot
–BootDeviceListF12Option
–BootOrderLock
–FlashBIOSUpdatingbyEnd-Users
–Internalnetworkdevice
44UserGuide
Page 61

–Internalwirelessdevice
–InternalBluetoothdevice
–InternalNetworkOptionROM
–InternalwirelessWANdevice
–Securitymode
–Fingerprintreaderpriority
Notes:
•ThesystemadministratorcansetthesamesupervisorpasswordonmanyThinkPadnotebookcomputers
tomakeadministrationeasier.
•WhenLockUEFIBIOSSettingsoptionisenabled,allBIOSsettingscannotbechanged.Tochange
thesettings,asupervisorpasswordisrequired.
Setting,changing,orremovingasupervisorpassword
Beforeyoustart,printtheseinstructions.
Onlyasystemadministratorcanset,change,orremoveasupervisorpassword.Toset,change,orremovea
supervisorpassword,dothefollowing:
1.Restartthecomputer.Whenthelogoscreenisdisplayed,pressF1tostarttheThinkPadSetupprogram.
2.SelectSecurity➙Password➙SupervisorPasswordbyusingthedirectionalkeys.
3.Dependingonyourneeds,dooneofthefollowing:
•Tosetapassword,dothefollowing:
a.IntheEnterNewPasswordeld,typeadesiredpasswordandpressEnter.
b.IntheConrmNewPasswordeld,retypethepasswordandpressEnter.
•Tochangeapassword,dothefollowing:
a.IntheEnterCurrentPasswordeld,typethecurrentsupervisorpasswordandpressEnter.
b.IntheEnterNewPasswordeld,typethenewsupervisorpasswordandpressEnter;thenretype
thepasswordintheConrmNewPasswordeldandpressEnter.
•Toremoveapassword,dothefollowing:
a.IntheEnterCurrentPasswordeld,typethecurrentsupervisorpasswordandpressEnter.
b.LeavetheEnterNewPasswordandConrmNewPasswordeldsblank.PressEntertwice.
4.ASetupNoticewindowisdisplayed.PressEntertocontinue.
5.PressF10.ASetupConrmationwindowisdisplayed.SelectYestosavethecongurationchanges
andexit.
Note:Y oumightwanttorecordyourpasswordandstoreitinasafeplace.Thenexttimeyouopenthe
ThinkPadSetupprogram,youwillbepromptedtotypeyoursupervisorpasswordtoproceed.Ifyouforget
yoursupervisorpassword,Lenovocannotresetyourpassword.YoumusttakeyourcomputertoaLenovo
reselleroraLenovomarketingrepresentativetohavethesystemboardreplaced.Proofofpurchaseis
required,andafeewillbechargedforpartsandservice.
Harddiskpasswords
Thefollowingtwotypesofharddiskpasswordscanhelpprotecttheinformationstoredontheharddiskdrive:
•Userharddiskpassword
Chapter4.Security45
Page 62

Ifauserharddiskpasswordhasbeenset,butnomasterharddiskpasswordhasbeen,theusermust
entertheuserharddiskpasswordtoaccesslesandapplicationsontheharddiskdrive.
•Masterharddiskpassword
Themasterharddiskpasswordalsorequiresauserharddiskpassword.Themasterharddiskpassword
isusuallysetandusedbyasystemadministrator.Itenablestheadministratortoaccessanyharddisk
driveinasystemlikeamasterkey.Theadministratorsetsthemasterpassword;thenassignsauser
passwordforeachcomputerinthenetwork.Theusercanthenchangetheuserpasswordasdesired,but
theadministratorstillcangetaccessbyusingthemasterpassword.
Whenamasterharddiskpasswordisset,onlytheadministratorcanremovetheuserharddiskpassword.
Settingaharddiskpassword
Beforeyoustart,printtheseinstructions.
Tosetaharddiskpassword,dothefollowing:
1.Restartthecomputer.Whenthelogoscreenisdisplayed,pressF1tostarttheThinkPadSetupprogram.
2.SelectSecurity➙Password➙HarddiskXPasswordbyusingthedirectionalkeys.
3.Apasswordwindowisdisplayed.YouarepromptedtoselectUserorUser+Master.SelectUserif
youwanttosetonlyoneharddiskpassword.SelectUser+Masterifyouwanttosetauserharddisk
passwordandamasterharddiskpassword,forexampleifyouareanadministratororasupervisor.
•IfyouselectUser,dothefollowing:
a.Whenawindowfortypingthenewpasswordopens,typeyournewpasswordintheEnterNew
PasswordeldandpressEnter.
b.IntheConrmNewPasswordeld,retypethepasswordyoujustenteredandpressEnter.
•IfyouselectUser+Master,dothefollowing:
a.First,setauserharddiskpassword.Whenamessagewindowpromptsyoutosettheuserhard
diskpassword,pressEntertocontinue.TypeyournewuserharddiskpasswordintheEnter
NewPasswordeldandpressEnter.RetypethepasswordintheConrmNewPassword
eldandpressEnter.
b.Then,setamasterharddiskpassword.Whenamessagewindowpromptsyoutosetthemaster
harddiskpassword,pressEntertocontinue.Typeyournewmasterharddiskpasswordinthe
EnterNewPasswordeldandpressEnter.RetypethepasswordintheConrmNewPassword
eldandpressEnter.
4.ASetupNoticewindowisdisplayed.PressEntertocontinue.
5.PressF10.ASetupConrmationwindowisdisplayed.SelectYestosavethecongurationchanges
andexit.
Thenexttimeyouturnonyourcomputer,typetheuserormasterharddiskpasswordtostartyourcomputer
andaccesstheoperatingsystem.
Changingorremovingaharddiskpassword
Tochangeorremovetheharddiskpassword,dothefollowing:
•IfyouareinUser+Masterharddiskmode,youcanselecteitherUserHDPorMasterHDPtochange
thepassword,dependingonyourneeds.
–IfyouselectUserHDPmode,followthefollowingstepstochangetheuserharddiskpassword:
1.T ypethecurrentuserharddiskpasswordintheEnterCurrentPasswordeldandpressEnter.
2.T ypethenewpasswordintheEnterNewPasswordeldandpressEnter;thenretypethe
passwordintheConrmNewPasswordeldandpressEnter.
46UserGuide
Page 63

3.ASetupNoticewindowisdisplayed.PressEnteragaintocontinue.Theuserharddiskpassword
ischanged.
Note:TheharddiskpasswordcannotberemovedinUserHDPmode.
–IfyouselectMasterHDPmode,followthefollowingstepstochangethemasterharddiskpassword:
1.T ypethecurrentmasterharddiskpasswordintheEnterCurrentPasswordeldandpressEnter.
2.T ypethenewmasterharddiskpasswordintheEnterNewPasswordeldandpressEnter;then
retypethenewpasswordyoujustenteredintheConrmNewPasswordeldandpressEnter.
3.ASetupNoticewindowisdisplayed.PressEntertocontinue.Themasterharddiskpasswordis
changed.
Note:IfyouleavetheEnterNewPasswordandConrmNewPasswordeldsblankandpressEnter
twice,boththeuserandmasterharddiskpasswordswillberemoved.
•IfyouareinUserharddiskmode,followthefollowingstepstochangetheuserharddiskpassword:
1.T ypeyourpasswordtostarttheThinkPadSetupprogram.Formoreinformation,see“Settingahard
diskpassword”onpage46.
2.T ypethecurrentuserharddiskpasswordintheEnterCurrentPasswordeldandpressEnter.
3.T ypethenewpasswordintheEnterNewPasswordeldandpressEnter;thenretypethenew
passwordintheConrmNewPasswordeldandpressEnter.
4.ASetupNoticewindowisdisplayed.PressEnteragaintocontinue.Theuserharddiskpasswordis
changed.
Note:IfyouleavetheEnterNewPasswordandConrmNewPasswordeldsblankandpressEnter
twice,theuserharddiskpasswordwillberemoved.
Tipsonusingtheharddiskpasswords
•YoucansettheminimumlengthofaharddiskpasswordthroughtheSecuritymenu.
•Ifyousetaharddiskpasswordofoversevencharacters,theharddiskdrivecanbeusedonlywitha
computerthatcanrecognizeaharddiskpasswordofoversevencharacters.Ifyoutheninstallthe
harddiskdriveinacomputerthatcannotrecognizeaharddiskpasswordthatcontainsmorethan
sevencharacters,youcannotaccessthedrive.
•Recordyourpasswordandstoreitinasafeplace.Ifyouforgettheuserharddiskpassword,orbothuser
andmasterharddiskpasswords,Lenovocannotresetyourpasswordsorrecoverdatafromtheharddisk
drive.YoumusttakeyourcomputertoaLenovoreselleroramarketingrepresentativetohavethehard
diskdrivereplaced.Proofofpurchaseisrequired,andafeewillbechargedforpartsandservice.
Harddisksecurity
Toprotectpasswordsfromunauthorizedsecurityattacks,refertothefollowingtipstomaximizesecurity:
•Setapower-onpasswordaswellasaharddiskpasswordforyourinternalsolid-statedriveorharddisk
drive.Refertotheproceduresin“Power-onpassword”onpage43and“Harddiskpasswords”onpage
45.Forsecurity,alongerpasswordisrecommended.
•ToprovidereliablesecurityfortheUEFIBIOS,usethesecuritychipandasecurityapplicationwitha
TrustedPlatformModulemanagementfeature.Referto“Settingthesecuritychip”onpage48.
Note:Dependingonthemodel,yourcomputermightsupporttheTPMmanagementfeature.
•IfaDiskEncryptionharddiskdriveandEncryptionsolid-statedriveisinstalledinyourcomputer,besure
toprotectthecontentsofyourcomputermemoryfromunauthorizedaccessesbyuseofdriveencryption
software,suchasMicrosoftWindowsBitLocker
®
DriveEncryption,whichissupportedintheUltimateand
Chapter4.Security47
Page 64

EnterpriseeditionsoftheWindows7operatingsystemandWindows8operatingsystem.See“Using
WindowsBitLockerDriveEncryption”onpage48.
•Beforeyoudisposeof,sell,orhandoveryourcomputer,deletedatastoredonit.Formoreinformation,
referto“Noticeondeletingdatafromyourharddiskdriveorsolid-statedrive”onpage52.
TheharddiskdrivebuiltintoyourcomputercanbeprotectedbytheUEFIBIOS.
UsingWindowsBitLockerDriveEncryption
Tohelpprotectyourcomputeragainstunauthorizedaccess,usethedriveencryptionsoftware,suchas
WindowsBitLockerDriveEncryption.
WindowsBitLockerDriveEncryptionisanintegralsecurityfeatureofWindows7andWindows8operating
systems.ItissupportedintheUltimateandEnterpriseeditionsoftheWindows7andProfessionaland
EnterpriseeditionsoftheWindows8operatingsystem.Itcanhelpyouprotecttheoperatingsystemand
datastoredonyourcomputer,evenifyourcomputerislostorstolen.BitLockerworksbyencryptingalluser
andsystemles,includingtheswapandhibernationles.
BitLockerusesaTrustedPlatformModuletoprovideenhancedprotectionforyourdataandtoensureearly
bootcomponentintegrity.AcompatibleTPMisdenedasaV1.2TPM.
TochecktheBitLockerstatus,gotoControlPanel,andclickSystemandSecurity➙BitLockerDrive
Encryption.
FormoreinformationaboutWindowsBitLockerDriveEncryption,seethehelpinformationsystemofthe
Windowsoperatingsystem,orsearchfor“MicrosoftWindowsBitLockerDriveEncryptionStep-by-Step
Guide”ontheMicrosoftWebsite.
DiskEncryptionharddiskdriveandEncryptionsolid-statedrive
SomemodelscontaintheDiskEncryptionharddiskdriveorEncryptionsolid-statedrive.Thisfeaturehelps
toprotectyourcomputeragainstsecurityattacksonmedia,NANDash,ordevicecontrollersbyuseofa
hardwareencryptionchip.Fortheefcientuseoftheencryptionfeature,setaharddiskpasswordforthe
internalstoragedevice.
Settingthesecuritychip
Strictsecurityrequirementsareimposedonnetworkclientcomputersthattransfercondentialinformation
electronically.Dependingontheoptionsyouordered,yourcomputermighthaveanembeddedsecuritychip,
acryptographicmicroprocessor.WiththesecuritychipandClientSecuritySolution,youcandothefollowing:
•Protectyourdataandsystem
•Strengthenaccesscontrols
•Securecommunications
Settingthesecuritychip
ThechoicesofferedontheSecurityChipsubmenuundertheSecuritymenuofThinkPadSetupareas
follows:
•SecurityChip:Activate,inactivate,ordisablethesecuritychip.
•SecurityReportingOptions:Enableordisableeachsecurityreportingoption.
•ClearSecurityChip:Cleartheencryptionkey.
Beforeyoustart,printtheseinstructions.
48UserGuide
Page 65

TosetanitemontheSecurityChipsubmenu,dothefollowing:
1.Restartthecomputer.Whenthelogoscreenisdisplayed,pressF1tostarttheThinkPadSetupprogram.
2.SelectSecurity➙SecurityChipbyusingthedirectionalkeys.
3.PressEnter.TheSecurityChipsubmenuopens.
4.Movetoanitemyouwanttosetbyusingthedirectionalkeys.Whentheitemishighlighted,pressEnter.
5.Setotheritemsthatyouwanttoset.
6.PressF10.ASetupConrmationwindowisdisplayed.SelectYestosavethecongurationchanges
andexit.
Tosetthesecuritychip,youhavetostartClientSecuritySolution,andfollowtheinstructionsonthescreen.
Note:IfClientSecuritySolutionisnotpreinstalledonyourcomputer,downloadandinstallitfrom
http://www.lenovo.com/support.Thenfollowtheinstructionsonthescreen.
Tipsonusingthesecuritychip
•EnsurethatthesupervisorpasswordhasbeensetinThinkPadSetup.Otherwiseanyonecanchangethe
settingsforthesecuritychip.
•IfyouareusingClientSecuritySolution,handlethesecuritychipbydoingthefollowing:
–Donotclearthesecuritychip.Ifyoudo,thefunctionsassignedtothekeyswillbeerased.
–Donotdisablethesecuritychip.Ifyoudo,ClientSecuritySolutionwillnotwork.
•Ifthesecuritychipisremovedorreplaced,oranewonehasbeenadded,thecomputerwillnotstart.You
willhearfourcyclesoffourbeepseach,oryouwillseeerrormessage0176or0192.
•Ifthesecuritychipisinactiveordisabled,theClearSecurityChipoptionwillnotbedisplayed.
•Whenyouclearthesecuritychip,turnoffyourcomputerandthenturnitonagainafteryousetthe
securitychiptoActive.Otherwise,theClearSecurityChipoptionisnotdisplayed.
Usingthengerprintreader
Dependingonthemodel,yourcomputermighthaveangerprintreader.Fingerprintauthenticationcan
replaceyourpasswords,suchastheWindowspassword,power-onpassword,andharddiskpassword.In
thisway,youcanlogontoyourcomputersimplyandsecurely.
Toenablengerprintauthentication,enrollyourngerprintsrst.Duringtheenrollment,thengerprintsare
associatedwiththeWindowspasswordautomatically.T oassociateyourngerprintswithyourpower-on
passwordandharddiskpassword,manuallycreateaconnection.
Enrollingyourngerprints
Toenrollyourngerprints,dothefollowing:
1.StarttheFingerprintManagerProprogram.ForinstructionsonhowtostarttheFingerprintManagerPro
program,see“Lenovoprograms”onpage14.
2.EntertheWindowspasswordasrequired.
3.Clicktheiconforthengerthatyouwanttoenroll,andconstantlyswipeyourcorrespondingnger
acrossthengerprintreaderuntiltheenrollmentcompletes.Formoreinformation,see“Swipingyour
ngeroverthengerprintreader”onpage50.
4.ClickFinish.Yourngerprintisenrolledsuccessfully.
Note:Itisrecommendedthatyouenrollmorethanonengerprintincaseofanyinjuriestoyourngers.
Chapter4.Security49
Page 66

Swipingyourngeroverthengerprintreader
Toswipeyourngeroverthengerprintreader,dothefollowing:
1.Placethetopjointofyourngeronthesensor.
2.Applylightpressureandswipeyourngertowardyouacrossthereaderinonesmoothmotion.Donot
liftyourngerwhenyouareswipingit.
50UserGuide
Page 67

Indicatorbehaviorofthengerprintreader
IndicatorbehaviorDescription
Green
Amber
Thengerprintreaderisreadyforswiping.
Thengerprintcannotbeauthenticated.
Associatingyourngerprintswithyourpower-onpasswordandharddiskpassword
Toassociateyourngerprintswithyourpower-onpasswordandharddiskpassword,dothefollowing:
1.T urnoffandthenturnonthecomputer.
2.Whenprompted,swipeyourngeroverthengerprintreader.
3.Enteryourpower-onpassword,harddiskpassword,orbothasrequired.Theconnectioniscreated.
Whenyoustartthecomputeragain,youcanuseyourngerprintstologontothecomputerwithnoneedto
enteryourWindowspassword,power-onpassword,andharddiskpassword.
Attention:Ifyoualwaysuseyourngerprinttologontothecomputer,youmightforgetyourpasswords.
Writedownyourpasswords,andkeeptheminasafeplace.Ifyouforgetyourpower-onpassword,youmust
takeyourcomputertoaLenovoauthorizedserviceroramarketingrepresentativetohavethepassword
canceled.Ifyouforgetyourharddiskpassword,Lenovocannotresetyourpasswordorrecoverdata
fromtheharddiskdrive.YoumusttakeyourcomputertoaLenovoauthorizedserviceroramarketing
representativetohavetheharddiskdrivereplaced.Proofofpurchaseisrequired,andafeewillbecharged
forpartsandservice.
Settingthengerprintreader
YoucansetthengerprintreaderintheFingerprintManagerProprogram.Youalsocanchangesome
advancedsettingsintheThinkPadSetupprogram.
TochangethesettingsintheFingerprintManagerProprogram,clickSettingsontheprogrammain
interface.TochangethesettingsintheThinkPadSetupprogram,see“UsingtheThinkPadSetupprogram”
onpage103
.
YoucansetthefollowingcongurationsintheThinkPadSetupprogram:
•PredesktopAuthentication:Enablesordisablesngerprintauthenticationbeforetheoperatingsystem
isloaded.
•ReaderPriority:Denesthepriorityforthengerprintreadersifanexternalngerprintreaderisattached.
Chapter4.Security51
Page 68

•SecurityMode:Speciesthesettingsofthesecuritymode.
•PasswordAuthentication:Enablesordisablesthepasswordauthentication.
Note:ThisitemisdisplayedonlyifHighsecuritymodeisenabled.
•ResetFingerprintData:Selectthisitemtoeraseallofthengerprintdatastoredineithertheinternal
orexternalngerprintreader.
Maintainingthengerprintreader
Thefollowingactionscoulddamagethengerprintreaderorcauseitnottoworkproperly:
•Scratchingthesurfaceofthereaderwithahard,pointedobject.
•Scrapingthesurfaceofthereaderwithyourngernailoranythinghard.
•Usingortouchingthereaderwithadirtynger.
Ifyounoticeanyofthefollowingconditions,gentlycleanthesurfaceofthereaderwithadry,soft,lint-free
cloth:
•Thesurfaceofthereaderisdirtyorstained.
•Thesurfaceofthereaderiswet.
•Thereaderoftenfailstoenrollorauthenticateyourngerprint.
Ifyourngerhasanyofthefollowingconditions,youmightnotbeabletoregisterorauthenticateit:
•Yourngeriswrinkled.
•Yourngerisrough,dry,orinjured.
•Yourngerisdry.
•Yourngerisstainedwithdirt,mud,oroil.
•Thesurfaceofyourngerisdifferentfromwhenyouenrolledyourngerprint.
•Yourngeriswet.
•Angerisusedthathasnotbeenenrolled.
Toimprovethesituation,trythefollowing:
•Cleanorwipeyourhandstoremoveanyexcessdirtormoisturefromthengers.
•Enrollanduseadifferentngerforauthentication.
•Ifyourhandsaredry,applylotiontothem.
Formoreinformationonhowtousethengerprintreader,refertothehelpsystemoftheFingerprint
ManagerProprogram.
Noticeondeletingdatafromyourharddiskdriveorsolid-statedrive
Someofthedatastoredontheharddiskdriveorsolid-statedrivemightbesensitive.Handingyour
computerovertosomeoneelsewithoutdeletingtheloadedsoftware,suchasoperatingsystemsand
applicationsoftware,mightevenviolatelicenseagreements.Besuretodeletedatastoredontheharddisk
driveorsolid-statedrivebeforeyoudisposeof,sell,orhandoveryourcomputer.
Youcanusethefollowingmethodstodeletedatafromtheharddiskdriveorsolid-statedrive:
•MovingthedatatotheRecycleBin,andthenemptyingtheRecycleBin.
•Deletingthedata.
52UserGuide
Page 69

•Formattingyourharddiskdriveorsolid-statedrive,usingthesoftwareforinitializingit.
•UsingtherecoveryprogramprovidedbyLenovotobringtheharddiskdriveorsolid-statedrivebackto
thefactorydefaultsettings.
Theseoperations,however,onlychangethelelocationofthedata;theydonotdeletethedataitself.In
otherwords,thedataretrievalprocessingisdisabledunderanoperatingsystemsuchasWindows.The
dataisstillthere,eventhoughitseemstobelost.Thus,itissometimespossibletoreadthedatabyuseof
specialsoftwarefordatarecovery.Thereisariskthatpeopleofbadfaithmightreadandmisusethecritical
dataonharddiskdrivesorsolid-statedrivesforunexpectedpurposes.
Topreventleakageofdata,itisimportantthatyoudeleteallthedatafromtheharddiskdrivewhenyou
disposeof,sell,orhandoveryourcomputer.Youcandestroythedataphysicallybysmashingtheharddisk
drivewithahammer,ormagneticallybymeansofstrongmagneticpower,thusmakingthedataunreadable.
Butitisrecommendedthatyouusethesoftware(payware)orservice(payservice)developedforthat
purpose.Theprocessmighttakeseveralhours.
Fordisposingofdataontheharddiskdriveorsolid-statedrive,LenovoprovidestheSecureDataDisposal™
tool.Gotohttp://www.lenovo.com/supporttodownloadthetool.
IfanEncryptionsolid-statedriveoraDiskEncryptionharddiskdriveissupportedandinstalledinyour
computer,youcanlogicallydisposeofallthedataonthedriveinashorttimebyerasingthecryptographic
key.Thedataencryptedwiththeoldkeyisnotphysicallyerasedbutremainsonthedrive;however,it
cannotbedecryptedwithouttheoldkey.ThisfeatureisenabledbyThinkPadSetupMenuExtensionUtility
andisavailableasamenuiteminThinkPadSetup.
Usingrewalls
Ifyoursystemispreinstalledwitharewallprogram,itprotectsagainstcomputerInternetsecuritythreats,
unauthorizedaccesses,intrusions,andInternetattacks.Italsoprotectsyourprivacy.
Formoreinformationabouthowtousetherewallprogram,refertothehelpinformationsystemthat
comeswiththeprogram.
Protectingdataagainstviruses
Yourcomputerispreinstalledwithanantivirusprogramsoyoucandetectandeliminateviruses.The
antivirusprogramisdesignedtohelpyoudetectandeliminateviruses.
Lenovoprovidesafullversionofantivirussoftwareonyourcomputerwithafree30-daysubscription.After
30days,youmustrenewthelicensetocontinuereceivingtheantivirussoftwareupdates.
Formoreinformationabouthowtouseyourantivirussoftware,refertothehelpinformationsystemof
yourantivirussoftware.
Chapter4.Security53
Page 70

54UserGuide
Page 71

Chapter5.Recoveryoverview
Thischapterprovidesinformationabouttherecoverysolutions.
•“RecoveryoverviewfortheWindows7operatingsystem”onpage55
•“RecoveryoverviewfortheWindows8operatingsystem”onpage60
RecoveryoverviewfortheWindows7operatingsystem
ThissectionprovidesinformationabouttherecoverysolutionsprovidedbyLenovoontheWindows7
operatingsystem.
Notes:
•Thereareavarietyofmethodstochoosefromwhenconsideringhowtorecoverintheeventofa
software-relatedorhardware-relatedproblem.Somemethodsvarydependingonthetypeofyour
operatingsystem.
•Theproductontherecoverymediamightbeusedonlyforthefollowingpurposes:
–Restoretheproductpreinstalledonyourcomputer
–Reinstalltheproduct
–ModifytheproductusingtheAdditionalFiles
Topreventpotentialperformancerisksorunexpectedbehaviorthatmightbecausedbythenewharddisk
drivetechnology,itisrecommendedthatyouuseoneofthefollowingback-upsoftwareprograms:
•ThinkVantageRescueandRecoveryversion4.3orlater
•SymantecNortonGhostversion15orlater
TostarttheSymantecNortonGhostprogram,dothefollowing:
1.ClickStart➙Run.TheRunwindowopens.
2.T ypecmdintheeld.ThenclickOK.
3.T ypeghost-align=1mbandpressEnter.
•AcronisTrueImage2010orlater
•ParagonBackup&Recovery10Suiteorlater,ParagonBackup&Recovery10Homeorlater
Creatingandusingrecoverymedia
Youcanuserecoverymediatorestoretheharddiskdrivetothefactorydefaultsettings.Recoverymedia
areusefulifyoutransferthecomputertoanotherarea,sellthecomputer,recyclethecomputer,orputthe
computerinanoperationalstateafterallothermethodsofrecoveryhavefailed.Asaprecautionarymeasure,
itisimportanttocreaterecoverymediaasearlyaspossible.
Note:Therecoveryoperationsyoucanperformusingrecoverymediavarydependingontheoperating
systemfromwhichtherecoverymediawerecreated.Therecoverymediamightcontainabootmedium
andadatamedium.YourMicrosoftWindowslicensepermitsyoutocreateonlyonedatamedium,soitis
importantthatyoustoretherecoverymediainasafeplaceafteryouhavemadethem.
Creatingrecoverymedia
Thissectionprovidesinstructionsonhowtocreaterecoverymedia.
©CopyrightLenovo2013
55
Page 72

Note:OntheWindows7operatingsystem,youcancreaterecoverymediausingdiscsorexternalUSB
storagedevices.
TocreaterecoverymediaontheWindows7operatingsystem,clickStart➙AllPrograms➙Lenovo
ThinkVantageTools➙FactoryRecoveryDisks.Then,followtheinstructionsonthescreen.
Usingrecoverymedia
OntheWindows7operatingsystem,youcanuserecoverymediatorestorethecomputertothefactory
defaultsettingsonly.Youcanuserecoverymediatoputthecomputerinanoperationalstateafterall
othermethodsofrecoveryhavefailed.
Attention:Whenyouuserecoverymediatorestorethecomputertothefactorydefaultsettings,alltheles
currentlyontheharddiskdrivewillbedeletedandreplacedbythefactorydefaultsettings.
TouserecoverymediaontheWindows7operatingsystem,dothefollowing:
1.Dependingonthetypeofyourrecoverymedia,connectthebootmedium(memorykeyorotherUSB
storagedevice)tothecomputer,orinsertthebootdiscintotheopticaldrive.
2.RepeatedlypressandreleasetheF12keywhenturningonthecomputer.WhentheBootMenuwindow
opens,releasetheF12key.
3.SelectthedesiredstartupdeviceandpressEnter.Therestoreprocessbegins.
4.Followtheinstructionsonthescreentocompletetheoperation.
Notes:
1.Afterrestoringyourcomputertothefactorydefaultsettings,youmighthavetoreinstalldevicedrivers
forsomedevices.See“Reinstallingpreinstalledprogramsanddevicedrivers”onpage59
2.SomecomputerscomewithMicrosoftOfceorMicrosoftWorkspreinstalled.Ifyouneedtorecover
orreinstallyourMicrosoftOfceorMicrosoftWorksprograms,youmustusetheMicrosoftOfceCD
orMicrosoftWorksCD.ThesediscsareprovidedonlywithcomputerspreinstalledwithMicrosoft
OfceorMicrosoftWorks.
.
Performingbackupandrecoveryoperations
TheRescueandRecoveryprogramenablesyoutobackupallyourharddiskdrivecontentsincludingthe
operatingsystem,datales,softwareprograms,andpersonalsettings.Youcandesignatewherethe
RescueandRecoveryprogramstoresthebackup:
•Inaprotectedareaofyourharddiskdrive
•Onthesecondaryharddiskdriveifasecondaryharddiskdriveisinstalledinyourcomputer
•OnanattachedexternalUSBharddiskdrive
•Onanetworkdrive
•Onrecordablediscs(arecordableopticaldriveisrequiredforthisoption)
Afteryouhavebackedupthecontentsontheharddiskdrive,youcanrestorethecompletecontentsofthe
harddiskdrive,restoreonlytheselectedles,orrestoreonlytheWindowsoperatingsystemandprograms.
Performingabackupoperation
ToperformabackupoperationusingtheRescueandRecoveryprogramontheWindows7operating
system,dothefollowing:
1.FromtheWindowsdesktop,clickStart➙AllPrograms➙LenovoThinkVantageT ools➙Enhanced
BackupandRestore.TheRescueandRecoveryprogramopens.
2.IntheRescueandRecoverymainwindow,clicktheLaunchadvancedRescueandRecoveryarrow.
56UserGuide
Page 73

3.ClickBackupyourharddriveandselectbackupoperationoptions.Then,followtheinstructionson
thescreentocompletethebackupoperation.
Performingarecoveryoperation
ToperformarecoveryoperationusingtheRescueandRecoveryprogramontheWindows7operating
system,dothefollowing:
1.FromtheWindowsdesktop,clickStart➙AllPrograms➙LenovoThinkVantageT ools➙Enhanced
BackupandRestore.TheRescueandRecoveryprogramopens.
2.IntheRescueandRecoverymainwindow,clicktheLaunchadvancedRescueandRecoveryarrow.
3.ClicktheRestoreyoursystemfromabackupicon.
4.Followtheinstructionsonthescreentocompletetherecoveryoperation.
UsingtheRescueandRecoveryworkspace
TheRescueandRecoveryworkspaceresidesinaprotected,hiddenareaofyourharddiskdrivethat
operatesindependentlyfromtheWindowsoperatingsystem.Itenablesyoutoperformrecoveryoperations
evenifyoucannotstarttheWindowsoperatingsystem.Youcanperformthefollowingrecoveryoperations
fromtheRescueandRecoveryworkspace:
•Rescuelesfromyourharddiskdriveorfromabackup
TheRescueandRecoveryworkspaceenablesyoutolocatelesonyourharddiskdriveandtransfer
themtoanetworkdriveorotherrecordablemedia,suchasaUSBdeviceoradisc.Thissolutionis
availableevenifyoudidnotbackupyourlesorifchangesweremadetothelessinceyourlastbackup
operation.YoualsocanrescueindividuallesfromaRescueandRecoverybackuplocatedonyourlocal
harddiskdrive,aUSBdevice,oranetworkdrive.
•RestoreyourharddiskdrivefromaRescueandRecoverybackup
IfyouhavebackedupyourharddiskdriveusingtheRescueandRecoveryprogram,youcanrestorethe
harddiskdrivefromaRescueandRecoverybackup,evenifyoucannotstarttheWindowsoperating
system.
•Restoreyourharddiskdrivetothefactorydefaultsettings
TheRescueandRecoveryworkspaceenablesyoutorestorethecompletecontentsofyourharddiskdrive
tothefactorydefaultsettings.Ifyouhavemultiplepartitionsonyourharddiskdrive,youhavetheoption
torestorethefactorydefaultsettingstotheC:partitionandleavetheotherpartitionsintact.Becausethe
RescueandRecoveryworkspaceoperatesindependentlyfromtheWindowsoperatingsystem,youcan
restorethefactorydefaultsettingsevenifyoucannotstarttheWindowsoperatingsystem.
Attention:IfyourestoretheharddiskdrivefromaRescueandRecoverybackuporrestoretheharddisk
drivetothefactorydefaultsettings,alllesontheprimaryharddiskdrivepartition(usuallydriveC:)willbe
deletedintherecoveryprocess.Ifpossible,makecopiesofimportantles.Ifyouareunabletostartthe
Windowsoperatingsystem,youcanusetherescuelesfeatureoftheRescueandRecoveryworkspaceto
copylesfromyourharddiskdrivetoothermedia.
TostarttheRescueandRecoveryworkspace,dothefollowing:
1.Makesurethatthecomputeristurnedoff.
2.RepeatedlypressandreleasetheF11keywhenturningonthecomputer.Whenyouhearbeepsor
seealogoscreen,releasetheF11key.
3.IfyouhavesetaRescueandRecoverypassword,typeyourpasswordwhenprompted.TheRescue
andRecoveryworkspaceopensafterashortdelay.
Note:IftheRescueandRecoveryworkspacefailstoopen,see“Solvingrecoveryproblems”onpage60
4.Dooneofthefollowing:
Chapter5.Recoveryoverview57
.
Page 74

•Torescuelesfromyourharddiskdriveorfromabackup,clickRescuelesandfollowthe
instructionsonthescreen.
•TorestoreyourharddiskdrivefromaRescueandRecoverybackuportorestoreyourharddiskdrive
tothefactorydefaultsettings,clickRestoreyoursystemandfollowtheinstructionsonthescreen.
FormoreinformationaboutthefeaturesoftheRescueandRecoveryworkspace,clickHelp.
Notes:
1.Afterrestoringyourharddiskdrivetothefactorydefaultsettings,youmighthavetoreinstalldevice
driversforsomedevices.See“Reinstallingpreinstalledprogramsanddevicedrivers”onpage59.
2.SomecomputerscomewithMicrosoftOfceorMicrosoftWorkspreinstalled.Ifyouneedtorecover
orreinstallyourMicrosoftOfceorMicrosoftWorksprograms,youmustusetheMicrosoftOfceCD
orMicrosoftWorksCD.ThesediscsareprovidedonlywithcomputerspreinstalledwithMicrosoft
OfceorMicrosoftWorks.
Creatingandusingarescuemedium
Witharescuemedium,suchasadiscoraUSBharddiskdrive,youcanrecoverthecomputerfromfailures
thatpreventyoufromgainingaccesstotheRescueandRecoveryworkspaceonyourharddiskdrive.
Notes:
1.Therecoveryoperationsyoucanperformusingarescuemediumvarydependingontheoperating
system.
2.Therescuedisccanbestartedinalltypesofopticaldrives.
Creatingarescuemedium
TocreatearescuemediumontheWindows7operatingsystem,dothefollowing:
1.FromtheWindowsdesktop,clickStart➙AllPrograms➙LenovoThinkVantageT ools➙Enhanced
BackupandRestore.TheRescueandRecoveryprogramopens.
2.IntheRescueandRecoverymainwindow,clicktheLaunchadvancedRescueandRecoveryarrow.
3.ClicktheCreateRescueMediaicon.TheCreateRescueandRecoveryMediawindowopens.
4.IntheRescueMediaarea,selectthetypeoftherescuemediumyouwanttocreate.Youcancreatea
rescuemediumusingadisc,aUSBharddiskdrive,orasecondaryinternalharddiskdrive.
5.ClickOKandfollowtheinstructionsonthescreentocreatearescuemedium.
Usingarescuemedium
Thissectionprovidesinstructionsonhowtousetherescuemediumyouhavecreated.
•Ifyouhavecreatedarescuemediumusingadisc,usethefollowinginstructionstousetherescuemedium:
1.T urnoffyourcomputer.
2.RepeatedlypressandreleasetheF12keywhenturningonthecomputer.WhentheBootMenu
windowisdisplayed,releasetheF12key.
3.IntheBootMenuwindow,selectthedesiredopticaldriveastherstbootdevice.Then,insertthe
rescuediscintotheopticaldriveandpressEnter.Therescuemediumstarts.
•IfyouhavecreatedarescuemediumusingaUSBharddiskdrive,usethefollowinginstructionsto
usetherescuemedium:
1.AttachtheUSBharddiskdrivetooneoftheUSBconnectorsonyourcomputer.
2.RepeatedlypressandreleasetheF12keywhenturningonthecomputer.WhentheBootMenu
windowopens,releasetheF12key.
58UserGuide
Page 75

3.IntheBootMenuwindow,selecttheUSBharddiskdriveastherstbootdeviceandpressEnter.
Therescuemediumstarts.
•Ifyouhavecreatedarescuemediumusingthesecondaryinternalharddiskdrive,setthesecondary
internalharddiskdriveastherstbootdeviceinthestartupdevicesequencetostarttherescuemedium.
Whentherescuemediumstarts,theRescueandRecoveryworkspaceopens.Thehelpinformationfor
eachfeatureisavailablefromtheRescueandRecoveryworkspace.Followtheinstructionstocomplete
therecoveryprocess.
Reinstallingpreinstalledprogramsanddevicedrivers
Yourcomputerhasprovisionsthatenableyoutoreinstallselectedfactory-installedprogramsanddevice
drivers.
Reinstallingpreinstalledprograms
Toreinstallselectedprograms,dothefollowing:
1.T urnonyourcomputer.
2.GototheC:\SWTOOL Sdirectory.
3.OpentheAPPSfolder.Thefoldercontainsseveralsubfoldersnamedforthevariouspreinstalled
applications.
4.Openthesubfolderfortheprogramyouarereinstalling.
5.Double-clickSetup,andthenfollowtheon-screenstepstoreinstalltheprogram.
Reinstallingpreinstalleddevicedrivers
Attention:Whenyoureinstalldevicedrivers,youarechangingthecurrentcongurationofyourcomputer.
Reinstalldevicedriversonlywhenitisnecessarytocorrectaproblemwithyourcomputer.
Toreinstalladevicedriverforafactory-installeddevice,dothefollowing:
1.T urnonyourcomputer.
2.GototheC:\SWTOOL Sdirectory.
3.OpentheDRIVERSfolder.Thefoldercontainsseveralsubfoldersnamedforthevariousdevices
installedinyourcomputer(forexample,AUDIOandVIDEO).
4.Openthesubfolderforthedevice.
5.Reinstallthedevicedriverbyoneofthefollowingmethods:
•Inthesubfolderforthedevice,lookforatextle(alewiththeextension.txt).Thetextlecontains
informationonhowtoreinstallthatdevicedriver.
•Ifthesubfolderforthedevicecontainsaleofsetupinformation(alewiththeextension.inf),you
canusetheAddNewHardwareprogram(intheWindowsControlPanel)toreinstallthedevicedriver.
Notalldevicedriverscanbereinstalledbyuseofthisprogram.IntheAddNewHardwareprogram,
whenpromptedforthedevicedriveryouwanttoinstall,clickHaveDiskandBrowse.Thenselect
thedevicedriverlefromthedevicesubfolder.
•Inthesubfolderforthedevice,lookfortheexecutablele(alewiththeextension.exe).Double-click
thele,andfollowtheinstructionsonthescreen.
Attention:Ifyouneedupdateddevicedriversforyourcomputer,donotdownloadthemfromtheWindows
UpdateWebsite.ObtainthemfromLenovo.Formoreinformation,see“Makingsuredevicedriversare
current”onpage120
.
Chapter5.Recoveryoverview59
Page 76

Solvingrecoveryproblems
IfyouareunabletoaccesstheRescueandRecoveryworkspaceortheWindowsenvironment,doone
ofthefollowing:
•UsearescuemediumtostarttheRescueandRecoveryworkspace.See“Creatingandusingarescue
medium”onpage58
•Userecoverymediaifallothermethodsofrecoveryhavefailedandyouneedtorestoretheharddisk
drivetothefactorydefaultsettings.See“Performingbackupandrecoveryoperations”onpage56.
Note:IfyouareunabletoaccesstheRescueandRecoveryworkspaceortheWindowsenvironmentfrom
arescuemediumorrecoverymedia,youmightnothavetherescuedevice(aninternalharddiskdrive,a
disc,aUSBharddiskdrive,orotherexternaldevices)setastherstbootdeviceinthestartupdevice
sequence.Y oumustrstmakesurethatyourrescuedeviceissetastherstbootdeviceinthestartup
devicesequenceintheSetupUtilityprogram.See“Startupmenu”onpage114fordetailedinformation
abouttemporarilyorpermanentlychangingthestartupdevicesequence.Formoreinformationaboutthe
SetupUtilityprogram,see“UsingtheThinkPadSetupprogram”onpage103.
Itisimportanttocreatearescuemediumandasetofrecoverymediaasearlyaspossibleandstorethem
inasafeplaceforfutureuse.
.
RecoveryoverviewfortheWindows8operatingsystem
ThissectionprovidesinformationabouttherecoverysolutionsfortheWindows8operatingsystem.
AWindowsrecoveryimageispreinstalledintherecoverypartitiononyourcomputer.TheWindowsrecovery
imageenablesyoutorefreshyourcomputer,orresetyourcomputertothefactorydefaultsettings.
YoucancreaterecoverymediaasbackupsorreplacementfortheWindowsrecoveryimage.Withthe
recoverymedia,youcantroubleshootandxtheproblemsonyourcomputerevenifyoucannotstartthe
Windows8operatingsystem.Itisrecommendedthatyoucreaterecoverymediaasearlyaspossible.For
moreinformation,see“Creatingandusingrecoverymedia”onpage61.
Refreshingyourcomputer
Ifyourcomputerdoesnotperformwellandtheproblemmightbecausedbyarecentlyinstalledprogram,
youcanrefreshyourcomputerwithoutlosingyourpersonallesorchangingyoursettings.
Attention:Ifyourefreshyourcomputer,theprogramsthatcamewithyourcomputerandtheprogramsthat
youinstalledfromWindowsStorewillbereinstalled,butallotherprogramswillberemoved.
Torefreshyourcomputer,dothefollowing:
1.Moveyourcursortothetop-rightorbottom-rightcornerofthescreentodisplaythecharms.Click
Settings➙ChangePCsettings➙General.
2.IntheRefreshyourPCwithoutaffectingyourlessection,clickGetstarted.
3.Followtheinstructionsonthescreentorefreshyourcomputer.
Resettingyourcomputertothefactorydefaultsettings
Ifyouwanttorecycleyourcomputerorjuststartover,youcanresetyourcomputertothefactorydefault
settings.Resettingthecomputerwillreinstalltheoperatingsystem,reinstallalltheprogramsthatcamewith
yourcomputer,andresetallthesettingstothefactorydefaultsettings.
Attention:Ifyouresetthecomputertothefactorydefaultsettings,allyourpersonallesandsettingswillbe
deleted.Toavoiddataloss,makeabackupcopyofallthedatathatyouwanttokeep.
60UserGuide
Page 77

Toresetyourcomputertothefactorydefaultsettings,dothefollowing:
1.Moveyourcursortothetop-rightorbottom-rightcornerofthescreentodisplaythecharms.Click
Settings➙ChangePCsettings➙General.
2.IntheRemoveeverythingandreinstallWindowssection,clickGetstarted.ThenclickNextto
conrmtheoperation.
3.Dependingonyourneeds,dooneofthefollowing:
•Toperformaquickformat,clickJustremovemylestostarttheprocess.Theprocesswilltake
severalminutes.
•Toperformacompleteformat,clickFullycleanthedrivetostarttheprocess.Theprocesswill
takeseveralhours.
4.Followtheinstructionsonthescreentoresetyourcomputertothefactorydefaultsettings.
Usingtheadvancedstartupoptions
Withtheadvancedstartupoptions,youcanchangethermwaresettingsofthecomputer,changethe
startupsettingsoftheWindowsoperatingsystem,startthecomputerfromanexternaldevice,orrestorethe
Windowsoperatingsystemfromasystemimage.
Tousetheadvancedstartupoptions,dothefollowing:
1.Moveyourcursortothetop-rightorbottom-rightcornerofthescreentodisplaythecharms.Click
Settings➙ChangePCsettings➙General.
2.IntheAdvancedstartupsection,clickRestartnow➙Troubleshoot➙Advancedoptions.
3.Selectadesiredstartupoption,thenfollowtheinstructionsonthescreen.
RecoveringyouroperatingsystemifWindows8failstostart
TheWindowsrecoveryenvironmentonyourcomputeriscapableofoperatingindependentlyfromthe
Windows8operatingsystem.Thisenablesyoutorecoverorrepairtheoperatingsystemevenifthe
Windows8operatingsystemfailstostart.
Aftertwoconsecutivefailedbootattempts,theWindowsrecoveryenvironmentstartsautomatically.Then
youcanchooserepairandrecoveryoptionsbyfollowingtheinstructionsonthescreen.
Note:Ensurethatyourcomputerisconnectedtoacpowerduringtherecoveryprocess.
Creatingandusingrecoverymedia
YoucancreaterecoverymediaasbackupsfortheWindowsrecoveryenvironmentandtheWindows
recoveryimage.Ifyoucannotstartthecomputer,youcanuserecoverymediatotroubleshootandxthe
problemsonyourcomputer.
Itisrecommendedthatyoucreaterecoverymediaasearlyaspossible.Onceyoucreaterecoverymedia,
keeptheminasafeplaceanddonotusethemtostoreotherdata.
Creatingrecoverymedia
Tocreaterecoverymedia,youneedaUSBdrivewithatleast8GBofstorage.TherequiredUSBcapacity
dependsonthesizeoftherecoveryimage.
Attention:CreatingrecoverymediawilldeleteanythingstoredontheUSBdrive.Toavoiddataloss,makea
backupcopyofallthedatathatyouwanttokeep.
Tocreaterecoverymedia,dothefollowing:
Chapter5.Recoveryoverview61
Page 78

Note:Ensurethatyourcomputerisconnectedtoacpower.
1.Moveyourcursortothetop-rightorbottom-rightcornerofthescreentodisplaythecharms,and
clickSearch.
2.T yperecoveryintheSearcheldandclickSettings.ThenclickCreatearecoverydrive.
3.ClickYesintheUserAccountControlwindowtoallowtheRecoveryMediaCreatorprogramtostart.
4.EnsurethatyouselecttheCopytherecoverypartitionfromthePCtotherecoverydrive.option.
ThenclickNext.
Important:IfyoucleartheCopytherecoverypartitionfromthePCtotherecoverydrive.option,
youwillcreaterecoverymediawithouttherecoverypartitioncontent.Youstillcanstartthecomputer
fromtherecoverymedia,butyoumightbeunabletorecoveryourcomputeriftherecoverypartitionon
yourcomputerisdamaged.
5.ConnectaproperUSBdrivethenclickNext.
6.ClickCreateintheRecoveryDrivewindow.Thecreationoftherecoverymediastarts.
7.Whenthecreationoftherecoverymedianishes,dooneofthefollowing:
•Tokeeptherecoverypartitiononyourcomputer,clickFinish.
•Todeletetherecoverypartitiononyourcomputer,clickDeletetherecoverypartition.
Attention:Ifyoudeletetherecoverypartitiononyourcomputer,dokeeptherecoverymediaina
safeplace.TheWindowsrecoveryimagewillnotbestoredinyourcomputeranymore,andyouwill
needtherecoverymediatorefreshorresetyourcomputer.
8.RemovetheUSBdrive.Therecoverymediaarecreatedsuccessfully.
Usingrecoverymedia
Ifyoucannotstartyourcomputer,orifyoucannotstarttheWindowsrecoveryimageonyourcomputer,use
recoverymediatorecoveryourcomputer.
Touserecoverymedia,dothefollowing:
Note:Ensurethatyourcomputerisconnectedtoacpower.
1.T urnonorrestartthecomputer.BeforetheWindowsoperatingsystemstarts,repeatedlypressF12.The
BootMenuwindowopens.
2.Selecttherecoverydriveasthebootdevice.
3.Selectapreferredlanguageandthenselectapreferredkeyboardlayout.
4.ClickTroubleshoottodisplaytheoptionalrecoverysolutions.
5.Selectacorrespondingrecoverysolutionaccordingtoyoursituation.Forexample,selectResetyour
PCifyouwanttoresetyourcomputertothefactorydefaultsettings.
FormoreinformationabouttherecoverysolutionsprovidedbytheWindows8operatingsystem,goto:
http://go.microsoft.com/fwlink/?LinkID=263800
62UserGuide
Page 79

Chapter6.Replacingdevices
Thischaptercontainsthefollowingitems:
•“Staticelectricityprevention”onpage63
•“Replacingthebatterypack”onpage63
•“InstallingorreplacingtheSIMcard”onpage66
•“Replacingtheharddiskdriveorsolid-statedrive”onpage67
•“Replacingamemorymodule”onpage70
•“ReplacingtheM.2wirelessLANcard”onpage72
•“InstallingorreplacingtheM.2wirelessWANcard”onpage76
•“ReplacingtheUltrabaydevice”onpage79
•“Replacingthekeyboard”onpage84
•“Replacingthebackupbattery”onpage82
Staticelectricityprevention
Staticelectricity,althoughharmlesstoyou,canseriouslydamagecomputercomponentsandoptions.
Improperhandlingofstatic-sensitivepartscancausedamagetothepart.Whenyouunpackanoptionor
aCRU,donotopenthestatic-protectivepackagethatcontainsthepartuntiltheinstructionsdirectyou
toinstallthepart.
WhenyouhandleoptionsorCRUs,orperformanyworkinsidethecomputer,takethefollowingprecautions
toavoidstatic-electricitydamage:
•Limityourmovement.Movementcancausestaticelectricitytobuilduparoundyou.
•Alwayshandlecomponentscarefully.Handleadapters,memorymodules,andothercircuitboardsbythe
edges.Nevertouchexposedcircuitry.
•Preventothersfromtouchingcomponents.
•Whenyouinstallastatic-sensitiveoptionorCRU,touchthestatic-protectivepackagethatcontainsthe
parttoametalexpansion-slotcoverorotherunpaintedmetalsurfaceonthecomputerforatleasttwo
seconds.Thisreducesstaticelectricityinthepackageandyourbody.
•Whenpossible,removethestatic-sensitivepartfromthestatic-protectivepackageandinstallthepart
withoutsettingitdown.Whenthisisnotpossible,placethestatic-protectivepackageonasmooth,
levelsurfaceandplacethepartonthepackage.
•Donotplacethepartonthecomputercoverorothermetalsurface.
Replacingthebatterypack
Beforeyoustart,printtheseinstructions.
ThissystemsupportsonlybatteriesspeciallydesignedforthisspecicsystemandmanufacturedbyLenovo
oranauthorizedbuilder.Thesystemdoesnotsupportunauthorizedbatteriesorbatteriesdesignedforother
systems.Ifanunauthorizedbatteryorabatterydesignedforanothersystemisinstalled,thesystemwillnot
chargeandthefollowingmessagewillbedisplayed:
“Thebatteryinstalledisnotsupportedbythissystemandwillnotcharge.Pleasereplacethebattery
withthecorrectLenovobatteryforthissystem.”
©CopyrightLenovo2013
63
Page 80

Attention:Lenovohasnoresponsibilityfortheperformanceorsafetyofunauthorizedbatteries,and
providesnowarrantiesforfailuresordamagearisingoutoftheiruse.
DANGER
Iftherechargeablebatterypackisincorrectlyreplaced,thereisdangerofanexplosion.Thebattery
packcontainsasmallamountofharmfulsubstances.T oavoidpossibleinjury:
•ReplaceonlywithabatteryofthetyperecommendedbyLenovo.
•Keepthebatterypackawayfromre.
•Donotexposeittoexcessiveheat.
•Donotexposeittowaterorrain.
•Donotshort-circuitit.
•Donotdrop,crush,puncture,orsubjecttostrongforces.Batteryabuseormishandlingcan
causethebatterytooverheat,whichcancausegassesorameto“vent”fromthebattery
packorcoincell.
Toreplacethebatterypack,dothefollowing:
1.T urnoffthecomputer,thendisconnecttheacpoweradapterandallcablesfromthecomputer.
2.Closethecomputerlidandturnoverthecomputer.
3.Unlockthebatterylatchesbyslidingthemtotheunlockedpositions1.Removethebatterypack2.
64UserGuide
Page 81

4.Insertanewbatterypackuntilitclicksintoplace.
Afterthereplacement,turnoverthecomputerandconnecttheacpoweradapterandallcablestothe
computer.
Replacingthebasecoverassembly
Beforeyoustart,printtheseinstructions.
Toreplacethebasecoverassembly,dothefollowing:
1.T urnoffthecomputer,thendisconnecttheacpoweradapterandallcablesfromthecomputer.
2.Removethebatterypack.See“Replacingthebatterypack”onpage63.
3.Loosenthescrews1thatsecurethebasecoverassembly.Thenremovethebasecoverassemblyas
shownbythearrow
2.
4.Installthenewbasecoverassembly1andtightenthescrews2.
Chapter6.Replacingdevices65
Page 82

5.Installthebatterypack.See“Replacingthebatterypack”onpage63.
6.T urnoverthecomputerandconnecttheacpoweradapterandallcables.
Note:Ifyouremovethebasecoverassemblywhenyourcomputerhasthebatterypackinstalledoris
connectedtoacpower,theremightbeariskofshortcircuits.Besides,thecomputerwillnotstartafter
youreinstallthebasecoverassembly.Tostartthecomputer,disconnecttheacpoweradapterandthen
reconnectittothecomputer.
InstallingorreplacingtheSIMcard
Beforeyoustart,printtheseinstructions.
SIMcardisasmallplasticcardwithanIntegratedCircuit(IC)chipmountedononesideofthecard.
IfyourcomputersupportswirelessWANconnections,yourcomputermightrequireaSIMcardtoestablish
wirelessWANconnections.Dependingonthecountryorregionofdelivery,youmightneedtopurchase
aSIMcardoraSIMcardmightalreadybeinstalledinyourcomputerorispartoftheshippingcontents
thatcomewithyourcomputer.
ToinstallorreplacetheSIMcard,dothefollowing:
1.T urnoffthecomputer,thendisconnecttheacpoweradapterandallcablesfromthecomputer.
2.Removethebatterypack.See“Replacingthebatterypack”onpage63.
3.LocatetheSIMcardslotinsidethebatterycompartment.IftherealreadyisaSIMcardintheslot,gently
pullthecardoutoftheslot.
66UserGuide
Page 83

4.InsertthenewSIMcardintotheslot.
Note:EnsurethatyouinserttheSIMcardallthewayintotheslot.
5.Installthebatterypack.See“Replacingthebatterypack”onpage63.
6.T urnoverthecomputerandconnecttheacpoweradapterandallcables.
Replacingtheharddiskdriveorsolid-statedrive
Beforeyoustart,printtheseinstructions.
Attention:Theharddiskdriveorsolid-statedriveisverysensitive.Incorrecthandlingcancausedamage
andpermanentlossofdata.Observethefollowingguidelines:
•Replacetheharddiskdriveorsolid-statedriveonlyifyouupgradeitorhaveitrepaired.Theconnectors
andslotoftheharddiskdriveorsolid-statedrivearenotdesignedforfrequentchangesorreplacement.
•Donotdroptheharddiskorsolid-statedriveorsubjectittophysicalshocks.Puttheharddiskdriveor
solid-statedriveonamaterial,suchassoftcloth,thatabsorbsanyphysicalshocks.
•Donotapplypressuretothecoveroftheharddiskdriveorsolid-statedrive.
•Donottouchtheconnector.
•Beforeremovingtheharddiskdriveorsolid-statedrive,makeabackupcopyofalltheinformation
onit,andthenturnoffthecomputer.
•Neverremovetheharddiskdriveorsolid-statedrivewhilethecomputerisoperating,insleepmode,
orinhibernationmode.
Chapter6.Replacingdevices67
Page 84

Toreplacetheharddiskdriveorsolid-statedrive,dothefollowing:
1.T urnoffthecomputer,thendisconnecttheacpoweradapterandallcablesfromthecomputer.
2.Removethebatterypack.See“Replacingthebatterypack”onpage63.
3.Loosenthescrews1thatsecurethebasecoverassembly.Thenremovethebasecoverassemblyas
shownbythearrow2.
4.Removethescrewthatsecurestheharddiskdriveorsolid-statedrive.
5.Removetheharddiskdriveorsolid-statedrivewithbracket.
68UserGuide
Page 85

6.Detachthebracketfromtheharddiskdriveorsolid-statedrive.Thenattachthebrackettothenewhard
diskdriveorsolid-statedrive.
7.Installthenewharddiskdriveorsolid-statedrivewithbracket.
8.Installthescrewtosecuretheharddiskdriveorsolid-statedrive.
Chapter6.Replacingdevices69
Page 86

9.Installthebasecoverassembly1andtightenthescrews2.
10.Installthebatterypack.See“Replacingthebatterypack”onpage63.
11.T urnoverthecomputerandconnecttheacpoweradapterandallcables.
Replacingamemorymodule
Beforeyoustart,printtheseinstructions.
Increasingmemorycapacityisaneffectivewaytomakeprogramsrunfaster.Youcanincreasememory
capacitybyreplacingoraddingamemorymodule.
Note:Theoperatingspeedofthememorymodulehasdependencyonthesystemconguration.Insome
conditions,thememorymoduleinyourcomputermightnotbeabletooperateatthemaximumspeed.
Attention:Beforehandlingamemorymodule,touchametalobjecttoreduceanystaticelectricityfrom
yourbody.Thestaticelectricitycoulddamagethememorymodule.
Toreplaceamemorymodule,dothefollowing:
1.T urnoffthecomputer,thendisconnecttheacpoweradapterandallcablesfromthecomputer.
2.Removethebatterypack.See“Replacingthebatterypack”onpage63.
70UserGuide
Page 87

3.Loosenthescrews1thatsecurethebasecoverassembly.Thenremovethebasecoverassemblyas
shownbythearrow2.
4.Openthelatchesonbothsidesoftheslotatthesametime1,andthenremovethememorymodule2.
Savetheremovedmemorymoduleforfutureuse.
Chapter6.Replacingdevices71
Page 88

5.Placethenotchedendofthenewmemorymoduletowardthecontactedgesideofthememoryslot,
andinsertthememorymodule1intotheslotatanangleofabout20degrees.Pivotthememory
moduledownwarduntilitsnapsintoplace2.Ensurethatthememorymoduleisrmlyinstalledin
theslotandcannotbemovedeasily.
Attention:
•Donottouchthecontactedgeofthememorymodule.Otherwisethememorymodulemightbe
damaged.
•Ifyouinstallonlyonememorymodule,ensurethatyouinstallitintothebottomslot,whichisthe
primaryslot.
6.Installthebasecoverassembly1andtightenthescrews2.
7.Installthebatterypack.See“Replacingthebatterypack”onpage63.
8.T urnoverthecomputerandconnecttheacpoweradapterandallcables.
ReplacingtheM.2wirelessLANcard
Beforeyoustart,printtheseinstructions.
72UserGuide
Page 89

DANGER
Duringelectricalstorms,donotconnectthecabletoordisconnectitfromthetelephoneoutlet
onthewall.
DANGER
Electriccurrentfrompower,telephone,andcommunicationcablesishazardous.T oavoidshock
hazard,disconnectthecablesbeforeopeningthecoverofthisslot.
Attention:Beforehandlingacard,touchametaltableoragroundedmetalobject.Thisactionreducesany
staticelectricityfromyourbody.Staticelectricitycoulddamagethecard.
ToreplacetheM.2wirelessLANcard,dothefollowing:
1.T urnoffthecomputer,thendisconnecttheacpoweradapterandallcablesfromthecomputer.
2.Removethebatterypack.See“Replacingthebatterypack”onpage63.
3.Loosenthescrews1thatsecurethebasecoverassembly.Thenremovethebasecoverassemblyas
shownbythearrow2.
Chapter6.Replacingdevices73
Page 90

4.Ifatoolisprovidedwiththenewcardtohelpyoudisconnectcables,usethetooltodisconnectthe
cablesfromtheoldcard.Ifnosuchatoolisprovided,holdthecableconnectorwithyourngersand
gentlydisconnecteachcablefromtheoldcard.
5.Removethescrew.Thecardisreleasedfromthesecuredpositionandpivotsupward.
6.CarefullyremovethewirelessLANcardoutoftheslot.
74UserGuide
Page 91

7.AlignthenotchededgeofthenewwirelessLANcardwiththekeyintheslot.Thencarefullyinsertthe
cardintotheslotatanangleofabout20degrees.
8.PivotthenewwirelessLANcarddownward1,andtheninstallthescrewtosecurethecardinplace2.
9.ConnecttheantennacablestothenewwirelessLANcard.Ensurethatyouattachthegraycabletothe
mainconnectoronthecard,andtheblackcabletotheauxiliaryconnectoronthecard.
10.Installthebasecoverassembly1andtightenthescrews2.
Chapter6.Replacingdevices75
Page 92

11.Installthebatterypack.See“Replacingthebatterypack”onpage63.
12.T urnoverthecomputerandconnecttheacpoweradapterandallcables.
InstallingorreplacingtheM.2wirelessWANcard
Beforeyoustart,printtheseinstructions.
DANGER
Duringelectricalstorms,donotconnectthecabletoordisconnectitfromthetelephoneoutlet
onthewall.
DANGER
Electriccurrentfrompower,telephone,andcommunicationcablesishazardous.T oavoidshock
hazard,disconnectthecablesbeforeopeningthecoverofthisslot.
Attention:Beforehandlingacard,touchametaltableoragroundedmetalobject.Thisactionreducesany
staticelectricityfromyourbody.Staticelectricitycoulddamagethecard.
ToinstallorreplacetheM.2wirelessWANcard,dothefollowing:
1.T urnoffthecomputer,thendisconnecttheacpoweradapterandallcablesfromthecomputer.
2.Removethebatterypack.See“Replacingthebatterypack”onpage63.
3.Loosenthescrews1thatsecurethebasecoverassembly.Thenremovethebasecoverassemblyas
shownbythearrow2.
76UserGuide
Page 93

4.IfyourcomputeralreadyisinstalledwithawirelessWANcard,removeit.Ifatoolisprovidedwiththe
newcardtohelpyoudisconnectcables,usethetooltodisconnectthecablesfromtheoldcard.If
nosuchatoolisprovided,holdthecableconnectorwithyourngersandgentlydisconnecteach
cablefromtheoldcard.
5.Removethescrew.Thecardisreleasedfromthesecuredpositionandpivotsupward.
Chapter6.Replacingdevices77
Page 94

6.CarefullyremovethewirelessWANcardoutoftheslot.
7.AlignthenotchededgeofthenewwirelessWANcardwiththekeyintheslot.Thencarefullyinsertthe
cardintotheslotatanangleofabout20degrees.
8.PivotthenewwirelessWANcarddownward1andtheninstallthescrewtosecurethecardinplace2.
78UserGuide
Page 95

9.ConnecttheantennacablestothenewwirelessWANcard.Ensurethatyouconnecttheredcableto
themainconnectoronthecard,andthebluecabletotheauxiliaryconnectoronthecard.
10.Installthebasecoverassembly1andtightenthescrews2.
11.Installthebatterypack.See“Replacingthebatterypack”onpage63.
12.T urnoverthecomputerandconnecttheacpoweradapterandallcables.
ReplacingtheUltrabaydevice
Beforeyoustart,printtheseinstructions.
ToreplacetheUltrabaydevice,dothefollowing:
1.T urnoffthecomputer,thendisconnecttheacpoweradapterandallcablesfromthecomputer.
2.Removethebatterypack.See“Replacingthebatterypack”onpage63.
3.Loosenthescrews1thatsecurethebasecoverassembly.Thenremovethebasecoverassemblyas
shownbythearrow2.
Chapter6.Replacingdevices79
Page 96

4.RemovethescrewthatsecurestheUltrabaydevice.
5.RemovetheUltrabaydevice.
6.InsertthenewUltrabaydeviceintothebay.
80UserGuide
Page 97

7.InstallthescrewtosecurethenewUltrabaydevice.
8.Reinstallthebasecoverassembly.See“Replacingthebasecoverassembly”onpage65.
9.Installthebasecoverassembly1andtightenthescrews2.
10.T urnoverthecomputerandconnecttheacpoweradapterandallcables.
Chapter6.Replacingdevices81
Page 98

Replacingthebackupbattery
Beforeyoustart,printtheseinstructions.
DANGER
Ifthebackupbatteryisincorrectlyreplaced,thereisdangerofanexplosion.Thebackupbattery
containsasmallamountofharmfulsubstances.Toavoidpossibleinjury:
•ReplaceonlywithabatteryofthetyperecommendedbyLenovo.
•Keepthebatterypackawayfromre.
•Donotexposeittoexcessiveheat.
•Donotexposeittowaterorrain.
•Donotshort-circuitit.
•Donotdrop,crush,puncture,orsubjecttostrongforces.Batteryabuseormishandlingcan
causethebatterytooverheat,whichcancausegassesorameto“vent”fromthebattery
packorcoincell.
Toreplacethebackupbattery,dothefollowing:
1.T urnoffthecomputer,thendisconnecttheacpoweradapterandallcablesfromthecomputer.
2.Loosenthescrews1thatsecurethebasecoverassembly.Thenremovethebasecoverassemblyas
shownbythearrow
2.
3.Removethebasecoverassembly.See“Replacingthebasecoverassembly”onpage65.
4.Detachtheconnector1,andthenremovethebackupbattery2.
82UserGuide
Page 99

5.Installthenewbackupbattery1andattachtheconnector2.
6.Installthebasecoverassembly1andtightenthescrews2.
7.Installthebatterypack.See“Replacingthebatterypack”onpage63.
8.T urnoverthecomputerandconnecttheacpoweradapterandallcables.
Chapter6.Replacingdevices83
Page 100

Replacingthekeyboard
Beforeyoustart,printtheseinstructions.
DANGER
Duringelectricalstorms,donotconnectthecabletoordisconnectitfromthetelephoneoutlet
onthewall.
DANGER
Electriccurrentfrompower,telephone,andcommunicationcablesishazardous.T oavoidshock
hazard,disconnectthecablesbeforeopeningthecoverofthisslot.
Toremovethekeyboard,dothefollowing:
1.T urnoffthecomputer,thendisconnecttheacpoweradapterandallcablesfromthecomputer.
2.Removethebatterypack.See“Replacingthebatterypack”onpage63.
3.Findthekeyboardmulti-toolintheshippingpackageofthenewkeyboard.
84UserGuide
 Loading...