


LenovoS400zandS405z
UserGuide
MachineTypes:10HB,10HD,and10K2

Note:Beforeusingthisinformationandtheproductitsupports,besuretoreadandunderstandthe“Read
thisfirst:Importantsafetyinformation”onpageiii
andAppendixF“Notices”onpage83.
FirstEdition(October2015)
©CopyrightLenovo2015.
LIMITEDANDRESTRICTEDRIGHTSNOTICE:IfdataorsoftwareisdeliveredpursuantaGeneralServicesAdministration
“GSA”contract,use,reproduction,ordisclosureissubjecttorestrictionssetforthinContractNo.GS-35F-05925.

Contents
Readthisfirst:Importantsafety
information..............iii
Beforeusingthismanual............iii
Serviceandupgrades.............iii
Staticelectricityprevention...........iv
Powercordsandpoweradapters........iv
Extensioncordsandrelateddevices.......v
PolyvinylChloride(PVC)cableandcordnotice...v
Plugsandoutlets...............v
Externaldevices...............v
Heatandproductventilation..........v
Operatingenvironment............vi
Lasercompliancestatement..........vi
Powersupplystatement...........vii
Cleaningandmaintenance..........vii
Glasspartsnotice.............vii
Tip-overhazardpreventionnotice.......vii
Chapter1.Productoverview......1
Hardwarelocations..............1
Frontview................1
Rearview................3
Computercomponents..........5
Partsonthesystemboard.........7
Machinetypeandmodellabel........9
Features..................9
Specifications...............12
Programs.................12
Accessingaprogramonyourcomputer...12
AnintroductiontoLenovoprograms....13
Chapter2.Usingyourcomputer...15
Adjustingthecomputerstand.........15
Adjustingtheframestand........16
Adjustingthemonitorstand........17
Registeringyourcomputer..........17
Settingthecomputervolume.........18
AddinganicontotheWindowsnotificationarea.18
Usingadisc................18
Guidelinesaboutusingtheopticaldrive...18
Handlingandstoringadisc........18
Playingandremovingadisc.......19
Recordingadisc............19
Connectingtoanetwork...........20
ConnectingtoanEthernetLAN......20
ConnectingtoawirelessLAN.......20
ConnectingtoaBluetooth-enableddevice..20
Chapter3.Y ouandyourcomputer..21
Arrangingyourworkspace..........21
Glareandlighting............21
Aircirculation.............21
Electricaloutletlocationsandcablelengths.21
Comfort...............21
Accessibilityinformation...........22
Cleaningyourcomputer...........25
Maintenance...............25
Basicmaintenancetips.........25
Goodmaintenancepractices.......25
Keepingyourcomputercurrent......26
Movingyourcomputer...........27
Chapter4.Security..........29
Lockingyourcomputer...........29
AttachingaKensington-stylecablelock...30
Viewingandchangingsecuritysettingsinthe
SetupUtilityprogram............30
Preventingunauthorizedaccesstoyour
computer.................30
Usingandunderstandingfirewalls.......31
Protectingdataagainstviruses........31
ComputraceAgentsoftwareembeddedin
firmware.................31
Chapter5.Advancedconfiguration..33
UsingtheSetupUtilityprogram........33
StartingtheSetupUtilityprogram.....33
Enablingordisablingadevice.......33
EnablingordisablingtheAutomaticPowerOn
features...............33
EnablingordisablingErPLPScompliance
mode................34
EnablingordisablingtheConfiguration
ChangeDetectionfeature........34
UsingBIOSpasswords.........35
Selectingastartupdevice........36
ExitingtheSetupUtilityprogram......36
UpdatingtheBIOS.............37
Chapter6.T roubleshooting,
diagnostics,andrecovery......39
Basicprocedureforresolvingcomputer
problems.................39
Troubleshooting..............39
Startupproblems............39
©CopyrightLenovo2015
i

Audioproblems............40
CDproblems.............41
DVDproblems.............41
Intermittentproblems..........42
Storagedriveproblems.........42
Screenproblems............43
Networkingproblems..........43
Performanceproblems..........45
Serialconnectorcannotbeaccessed....47
MyUSBconnectorscannotbeaccessed..47
Softwareanddriverproblems.......47
Diagnostics................48
LenovoSolutionCenter.........48
Recoveryinformation............48
RecoveryinformationforWindows7....48
RecoveryinformationforWindows10....49
Chapter7.Installingorreplacing
hardware...............51
Handlingstatic-sensitivedevices.......51
Installingorreplacinghardware........51
Installingexternaloptions........51
Replacingthecomputerstand.......52
Removingthecomputercover.......54
Replacingthefeet...........55
Replacingthestoragedrive........56
Replacingtheopticaldrive........57
Replacingtheopticaldrivebracket.....58
Replacingthesystemboardshield.....59
Replacingamemorymodule.......60
Replacingthecoin-cellbattery......61
Completingthepartsreplacement.....62
Chapter8.Gettinginformation,help,
andservice..............65
Informationresources............65
Accessingtheuserguideinvarious
languages...............65
Windowshelpsystem..........65
Safetyandwarranty...........65
LenovoWebsite............65
LenovoSupportWebsite.........66
Frequentlyaskedquestions........66
Helpandservice..............66
Callingforservice............66
Purchasingadditionalservices......67
AppendixA.Regulatory
information..............69
Exportclassificationnotice..........69
Electronicemissionsnotices.........69
FederalCommunicationsCommission
DeclarationofConformity........69
Eurasiancompliancemark..........71
Brazilaudionotice.............71
Mexicowireless-radiocomplianceinformation..71
Additionalregulatoryinformation.......71
AppendixB.WEEEandrecycling
information..............73
ImportantWEEEinformation.........73
RecyclinginformationforJapan........73
RecyclinginformationforBrazil........74
BatteryrecyclinginformationforTaiwan.....74
BatteryrecyclinginformationfortheEuropean
Union..................74
AppendixC.RestrictionofHazardous
SubstancesDirective(RoHS).....77
EuropeanUnionRoHS...........77
ChinaRoHS................77
TurkishRoHS...............77
UkraineRoHS...............78
IndiaRoHS................78
AppendixD.ChinaEnergyLabel...79
AppendixE.ENERGYSTARmodel
information..............81
AppendixF .Notices..........83
Trademarks................84
iiLenovoS400zandS405zUserGuide
Readthisfirst:Importantsafetyinformation
Thischaptercontainsthesafetyinformationthatyoumustbefamiliarwith.
Beforeusingthismanual
CAUTION:
Beforeusingthismanual,besuretoreadandunderstandalltherelatedsafetyinformationforthis
product.RefertotheinformationinthissectionandthesafetyinformationintheSafety,Warranty,and
SetupGuidethatyoureceivedwiththisproduct.Readingandunderstandingthissafetyinformation
reducestheriskofpersonalinjuryanddamagetoyourproduct.
IfyounolongerhaveacopyoftheSafety,Warranty,andSetupGuide,youcanobtainaPortableDocument
Format(PDF)versionfromtheLenovo
®
SupportWebsiteathttp://www.lenovo.com/UserManuals.The
LenovoSupportWebsitealsoprovidestheSafety,Warranty,andSetupGuideandthisUserGuidein
additionallanguages.
Serviceandupgrades
DonotattempttoserviceaproductyourselfunlessinstructedtodosobytheCustomerSupportCenteror
yourdocumentation.OnlyuseaServiceProviderwhoisapprovedtorepairyourparticularproduct.
Note:Somecomputerpartscanbeupgradedorreplacedbythecustomer.Upgradestypicallyare
referredtoasoptions.ReplacementpartsapprovedforcustomerinstallationarereferredtoasCustomer
ReplaceableUnits,orCRUs.Lenovoprovidesdocumentationwithinstructionswhenitisappropriatefor
customerstoinstalloptionsorreplaceCRUs.Youmustcloselyfollowallinstructionswheninstallingor
replacingparts.TheOffstateofapowerindicatordoesnotnecessarilymeanthatvoltagelevelsinsidea
productarezero.Beforeyouremovethecoversfromaproductequippedwithapowercord,alwaysensure
thatthepoweristurnedoffandthattheproductisunpluggedfromanypowersource.Formoreinformation
onCRUs,refertoChapter7“Installingorreplacinghardware”onpage51
.Ifyouhaveanyquestionsor
concerns,contacttheCustomerSupportCenter.
Althoughtherearenomovingpartsinyourcomputerafterthepowercordhasbeendisconnected,the
followingwarningsarerequiredforyoursafety.
CAUTION:
Hazardousmovingparts.Keepfingersandotherbodypartsaway.
CAUTION:
Beforeyouopenthecomputercover,turnoffthecomputerandwaitseveralminutesuntilthe
computeriscool.
©CopyrightLenovo2015
iii

Staticelectricityprevention
Staticelectricity,althoughharmlesstoyou,canseriouslydamagecomputercomponentsandoptions.
Improperhandlingofstatic-sensitivepartscancausedamagetothepart.Whenyouunpackanoption
orCRU,donotopenthestatic-protectivepackagecontainingthepartuntiltheinstructionsdirectyou
toinstallit.
WhenyouhandleoptionsorCRUs,orperformanyworkinsidethecomputer,takethefollowingprecautions
toavoidstatic-electricitydamage:
•Limityourmovement.Movementcancausestaticelectricitytobuilduparoundyou.
•Alwayshandlecomponentscarefully.Handleadapters,memorymodules,andothercircuitboardsbythe
edges.Nevertouchexposedcircuitry.
•Preventothersfromtouchingcomponents.
•Whenyouinstallastatic-sensitiveoptionorCRU,touchthestatic-protectivepackagecontainingthe
parttoametalexpansion-slotcoverorotherunpaintedmetalsurfaceonthecomputerforatleasttwo
seconds.Thisreducesstaticelectricityinthepackageandyourbody.
•Whenpossible,removethestatic-sensitivepartfromthestatic-protectivepackagingandinstallthepart
withoutsettingitdown.Whenthisisnotpossible,placethestatic-protectivepackagingonasmooth,
levelsurfaceandplacethepartonit.
•Donotplacethepartonthecomputercoverorothermetalsurface.
Powercordsandpoweradapters
Useonlythepowercordsandpoweradapterssuppliedbytheproductmanufacturer.Donotusetheac
powercordforotherdevices.
Thepowercordsshallbesafetyapproved.ForGermany,itshallbeH05VV-F,3G,0.75mm
2
,orbetter.For
othercountries,thesuitabletypesshallbeusedaccordingly.
Neverwrapapowercordaroundapoweradapterorotherobject.Doingsocanstressthecordinwaysthat
cancausethecordtofray,crack,orcrimp.Thiscanpresentasafetyhazard.
Alwaysroutepowercordssothattheywillnotbewalkedon,trippedover,orpinchedbyobjects.
Protectpowercordandpoweradaptersfromliquids.Forinstance,donotleaveyourpowercordorpower
adapternearsinks,tubs,toilets,oronfloorsthatarecleanedwithliquidcleansers.Liquidscancausea
shortcircuit,particularlyifthepowercordorpoweradapterhasbeenstressedbymisuse.Liquidsalsocan
causegradualcorrosionofpowercordterminalsand/ortheconnectorterminalsonapoweradapter,
whichcaneventuallyresultinoverheating.
Ensurethatallpowercordconnectorsaresecurelyandcompletelypluggedintoreceptacles.
Donotuseanypoweradapterthatshowscorrosionattheacinputpinsorshowssignsofoverheating(such
asdeformedplastic)attheacinputoranywhereonthepoweradapter.
Donotuseanypowercordswheretheelectricalcontactsoneitherendshowsignsofcorrosionor
overheatingorwherethepowercordappearstohavebeendamagedinanyway.
ivLenovoS400zandS405zUserGuide

Extensioncordsandrelateddevices
Ensurethatextensioncords,surgeprotectors,uninterruptiblepowersupplies,andpowerstripsthatyouuse
areratedtohandletheelectricalrequirementsoftheproduct.Neveroverloadthesedevices.Ifpowerstrips
areused,theloadshouldnotexceedthepowerstripinputrating.Consultanelectricianformoreinformation
ifyouhavequestionsaboutpowerloads,powerrequirements,andinputratings.
PolyvinylChloride(PVC)cableandcordnotice
Manypersonalcomputerproductsandaccessoriescontaincords,cablesorwires,suchaspowercordsor
cordstoconnecttheaccessorytoapersonalcomputer.Ifthisproducthassuchacord,cableorwire,then
thefollowingwarningapplies:
WARNING:Handlingthecordonthisproductorcordsassociatedwithaccessoriessoldwiththisproduct
willexposeyoutolead,achemicalknowntotheStateofCaliforniatocausecancer,andbirthdefectsor
otherreproductiveharm.Washhandsafterhandling.
Plugsandoutlets
Ifareceptacle(poweroutlet)thatyouintendtousewithyourcomputerequipmentappearstobedamaged
orcorroded,donotusetheoutletuntilitisreplacedbyaqualifiedelectrician.
Donotbendormodifytheplug.Iftheplugisdamaged,contactthemanufacturertoobtainareplacement.
Donotshareanelectricaloutletwithotherhomeorcommercialappliancesthatdrawlargeamountsof
electricity;otherwise,unstablevoltagemightdamageyourcomputer,data,orconnecteddevices.
Someproductsareequippedwithathree-prongedplug.Thisplugfitsonlyintoagroundedelectricaloutlet.
Thisisasafetyfeature.Donotdefeatthissafetyfeaturebytryingtoinsertitintoanon-groundedoutlet.If
youcannotinserttheplugintotheoutlet,contactanelectricianforanapprovedoutletadapterortoreplace
theoutletwithonethatenablesthissafetyfeature.Neveroverloadanelectricaloutlet.Theoverallsystem
loadshouldnotexceed80percentofthebranchcircuitrating.Consultanelectricianformoreinformation
ifyouhavequestionsaboutpowerloadsandbranchcircuitratings.
Besurethatthepoweroutletyouareusingisproperlywired,easilyaccessible,andlocatedclosetothe
equipment.Donotfullyextendpowercordsinawaythatwillstressthecords.
Besurethatthepoweroutletprovidesthecorrectvoltageandcurrentfortheproductyouareinstalling.
Carefullyconnectanddisconnecttheequipmentfromtheelectricaloutlet.
Externaldevices
DonotconnectordisconnectanyexternaldevicecablesotherthanUniversalSerialBus(USB)cableswhile
thecomputerpowerison;otherwise,youmightdamageyourcomputer.T oavoidpossibledamageto
connecteddevices,waitatleastfivesecondsafterthecomputerisshutdowntodisconnectexternaldevices.
Heatandproductventilation
Computers,poweradapters,andmanyaccessoriescangenerateheatwhenturnedonandwhenbatteries
arecharging.Alwaysfollowthesebasicprecautions:
•Donotleaveyourcomputer,poweradapter,oraccessoriesincontactwithyourlaporanypartofyour
bodyforanextendedperiodwhentheproductsarefunctioningorwhenthebatteryischarging.Your
©CopyrightLenovo2015
v

computer,poweradapter,andmanyaccessoriesproducesomeheatduringnormaloperation.Extended
contactwiththebodycouldcausediscomfortor,potentially,askinburn.
•Donotchargethebatteryoroperateyourcomputer,poweradapter,oraccessoriesnearflammable
materialsorinexplosiveenvironments.
•Ventilationslots,fans,andheatsinksareprovidedwiththeproductforsafety,comfort,andreliable
operation.Thesefeaturesmightinadvertentlybecomeblockedbyplacingtheproductonabed,sofa,
carpet,orotherflexiblesurface.Neverblock,cover,ordisablethesefeatures.
Inspectyourdesktopcomputerfordustaccumulationatleastonceeverythreemonths.Beforeinspecting
yourcomputer,turnoffthepowerandunplugthecomputer'spowercordfromtheelectricaloutlet;then
removeanydustfromventsandperforationsinthebezel.Ifyounoticeexternaldustaccumulation,then
examineandremovedustfromtheinsideofthecomputerincludingheatsinkinletfins,powersupplyvents,
andfans.Alwaysturnoffandunplugthecomputerbeforeopeningthecover.Ifpossible,avoidoperating
yourcomputerwithintwofeetofhigh-trafficareas.Ifyoumustoperateyourcomputerinornearahigh-traffic
area,inspectand,ifnecessary,cleanyourcomputermorefrequently.
Foryoursafetyandtomaintainoptimumcomputerperformance,alwaysfollowthesebasicprecautions
withyourdesktopcomputer:
•Keepthecoverclosedwheneverthecomputerispluggedin.
•Regularlyinspecttheoutsideofthecomputerfordustaccumulation.
•Removedustfromventsandanyperforationsinthebezel.Morefrequentcleaningsmightberequiredfor
computersindustyorhigh-trafficareas.
•Donotrestrictorblockanyventilationopenings.
•Donotstoreoroperateyourcomputerinsidefurniture,asthismightincreasetheriskofoverheating.
•Airflowtemperaturesintothecomputershouldnotexceed35°C(95°F).
•Donotinstallairfiltrationdevices.Theymayinterferewithpropercooling.
Operatingenvironment
Theoptimalenvironmentinwhichtouseyourcomputeris10°C–35°C(50°F–95°F)withhumidityranging
between35%and80%.Ifyourcomputerisstoredortransportedintemperatureslessthan10°C(50°F),
allowthecoldcomputertoriseslowlytoanoptimaloperatingtemperatureof10°C–35°C(50°F–95°F)before
use.Thisprocesscouldtaketwohoursinextremeconditions.Failuretoallowyourcomputertorisetoan
optimaloperatingtemperaturebeforeusecouldresultinirreparabledamagetoyourcomputer.
Ifpossible,placeyourcomputerinawell-ventilatedanddryareawithoutdirectexposuretosunshine.
Keepelectricalappliancessuchasanelectricfan,radio,high-poweredspeakers,airconditioner,and
microwaveovenawayfromyourcomputerbecausethestrongmagneticfieldsgeneratedbythese
appliancescandamagethemonitoranddataonthestoragedrive.
Donotplaceanybeveragesontopoforbesidethecomputerorotherconnecteddevices.Ifliquidisspilled
onorinthecomputeroraconnecteddevice,ashortcircuitorotherdamagemightoccur.
Donoteatorsmokeoveryourkeyboard.Particlesthatfallintoyourkeyboardcancausedamage.
Lasercompliancestatement
viLenovoS400zandS405zUserGuide
CAUTION:
Whenlaserproducts(suchasCD-ROMs,DVDdrives,fiberopticdevices,ortransmitters)are
installed,notethefollowing:
•Donotremovethecovers.Removingthecoversofthelaserproductcouldresultinexposureto
hazardouslaserradiation.Therearenoserviceablepartsinsidethedevice.
•Useofcontrolsoradjustmentsorperformanceofproceduresotherthanthosespecifiedherein
mightresultinhazardousradiationexposure.
DANGER
SomelaserproductscontainanembeddedClass3AorClass3Blaserdiode.Notethefollowing:
Laserradiationwhenopen.Donotstareintothebeam,donotviewdirectlywithoptical
instruments,andavoiddirectexposuretothebeam.
Powersupplystatement
Neverremovethecoveronapowersupplyoranypartthathasthefollowinglabelattached.
Hazardousvoltage,current,andenergylevelsarepresentinsideanycomponentthathasthislabelattached.
Therearenoserviceablepartsinsidethesecomponents.Ifyoususpectaproblemwithoneoftheseparts,
contactaservicetechnician.
Cleaningandmaintenance
Keepyourcomputerandworkspaceclean.Shutdownthecomputerandthendisconnectthepower
cordbeforecleaningthecomputer.Donotsprayanyliquiddetergentdirectlyonthecomputeroruse
anydetergentcontainingflammablematerialtocleanthecomputer.Spraythedetergentonasoftcloth
andthenwipethecomputersurfaces.
Glasspartsnotice
CAUTION:
Somepartsofyourproductmaybemadeofglass.Thisglasscouldbreakiftheproductisdropped
onahardsurfaceorreceivesasubstantialimpact.Ifglassbreaks,donottouchorattempttoremove
it.Stopusingyourproductuntiltheglassisreplacedbytrainedservicepersonnel.
Tip-overhazardpreventionnotice
•Placethecomputeronasturdyandlowbase,oranchorthefurnitureandpositionthecomputeras
farbackonthefurnitureaspossible.
•Keepremotecontrols,toys,andotheritemsthatmightattractchildrenoffthecomputer.
•Keepthecomputer,cables,andcordsoutofthereachofchildren.
©CopyrightLenovo2015
vii

•Supervisechildreninroomswherethesesafetytipshavenotbeenfollowed.
viiiLenovoS400zandS405zUserGuide

Chapter1.Productoverview
Thischapterprovidesinformationaboutthefollowingtopics:
•“Hardwarelocations”onpage1
•“Features”onpage9
•“Specifications”onpage12
•“Programs”onpage12
Hardwarelocations
Thissectionprovidesinformationaboutthelocationsofyourcomputerhardware.
Note:Thecomputerhardwaremightlookslightlydifferentfromtheillustrations.
Frontview
Figure1.Frontview
1Integratedmicrophone2Integratedcameraactivityindicator
3Integratedcamerashieldcontrolslider4Integratedcamera
5Opticaldriveeject/closebutton6Opticaldriveactivityindicator
7Powerbutton
•Integratedcamera
Usedtotakepicturesorholdavideoconference.
©CopyrightLenovo2015
1

•Integratedcameraactivityindicator
Whentheindicatorison,thecameraisinuse.
•Integratedcamerashieldcontrolslider
Usedtodisabletheintegratedcameraphysically.
•Integratedmicrophone
Usedtorecordsoundsorusespeech-recognitionsoftwarewithoutusingamicrophone.
•Opticaldriveactivityindicator
Whentheindicatorison,theopticaldriveisinuse.
•Opticaldriveeject/closebutton
Usedtoejectthetrayoftheopticaldriveoutofthedrive.Afteryouinsertadiscintothetray,press
theeject/closebuttontoclosethetray.
•Powerbutton
Usedtoturnonyourcomputer.Y oualsocanusethepowerbuttontoturnoffyourcomputeronlywhen
youcannotuseanyMicrosoft
®
Windows
®
shutdownproceduretoturnoffyourcomputer.
2LenovoS400zandS405zUserGuide

Rearview
Figure2.Rearview
1Security-lockslot2USB3.0connectors(2)
3Cardreaderslot
4Headsetconnector
5USB2.0connectors(3)
6HDMI
TM
-outconnector
7Ethernetconnector8acpoweradapterconnector
9Internalspeakers(2)
•acpoweradapterconnector
Usedtoconnecttheacpoweradaptertoyourcomputerforpowersupply.
•Cardreaderslot
Usedtoholdacard-shapedstoragemediumsothatthecardreadercanreadthedataonthestorage
medium.
•Ethernetconnector
UsedtoconnectanEthernetcableforaLAN.
Note:TooperatethecomputerwithinFederalCommunicationsCommission(FCC)ClassBlimits,usea
Category5eorbetterEthernetcable.
Chapter1.Productoverview3

•HDMI-outconnector
Usedtosenduncompressedhigh-definitionvideoandmultichanneldigitalaudiosignalsfromthe
computertoahigh-performancemonitororanotherexternaldevicethatusesaHigh-DefinitionMultimedia
Interface(HDMI)connector.
•Headsetconnector
Usedtoconnectaheadsetorheadphonestoyourcomputer.
•Internalspeaker
Usedtolistentothesoundsfromyourcomputerwithoutusingaheadsetorheadphones.
•Security-lockslot
Forinformation,see“AttachingaKensington-stylecablelock”onpage30
.
•USB2.0connector
UsedtoconnectadevicethatrequiresaUSB2.0connection,suchasakeyboard,amouse,ascanner,a
printer,orapersonaldigitalassistant(PDA).
•USB3.0connector
UsedtoconnectadevicethatrequiresaUSB2.0orUSB3.0connection,suchasakeyboard,amouse,a
scanner,aprinter,oraPDA.
4LenovoS400zandS405zUserGuide
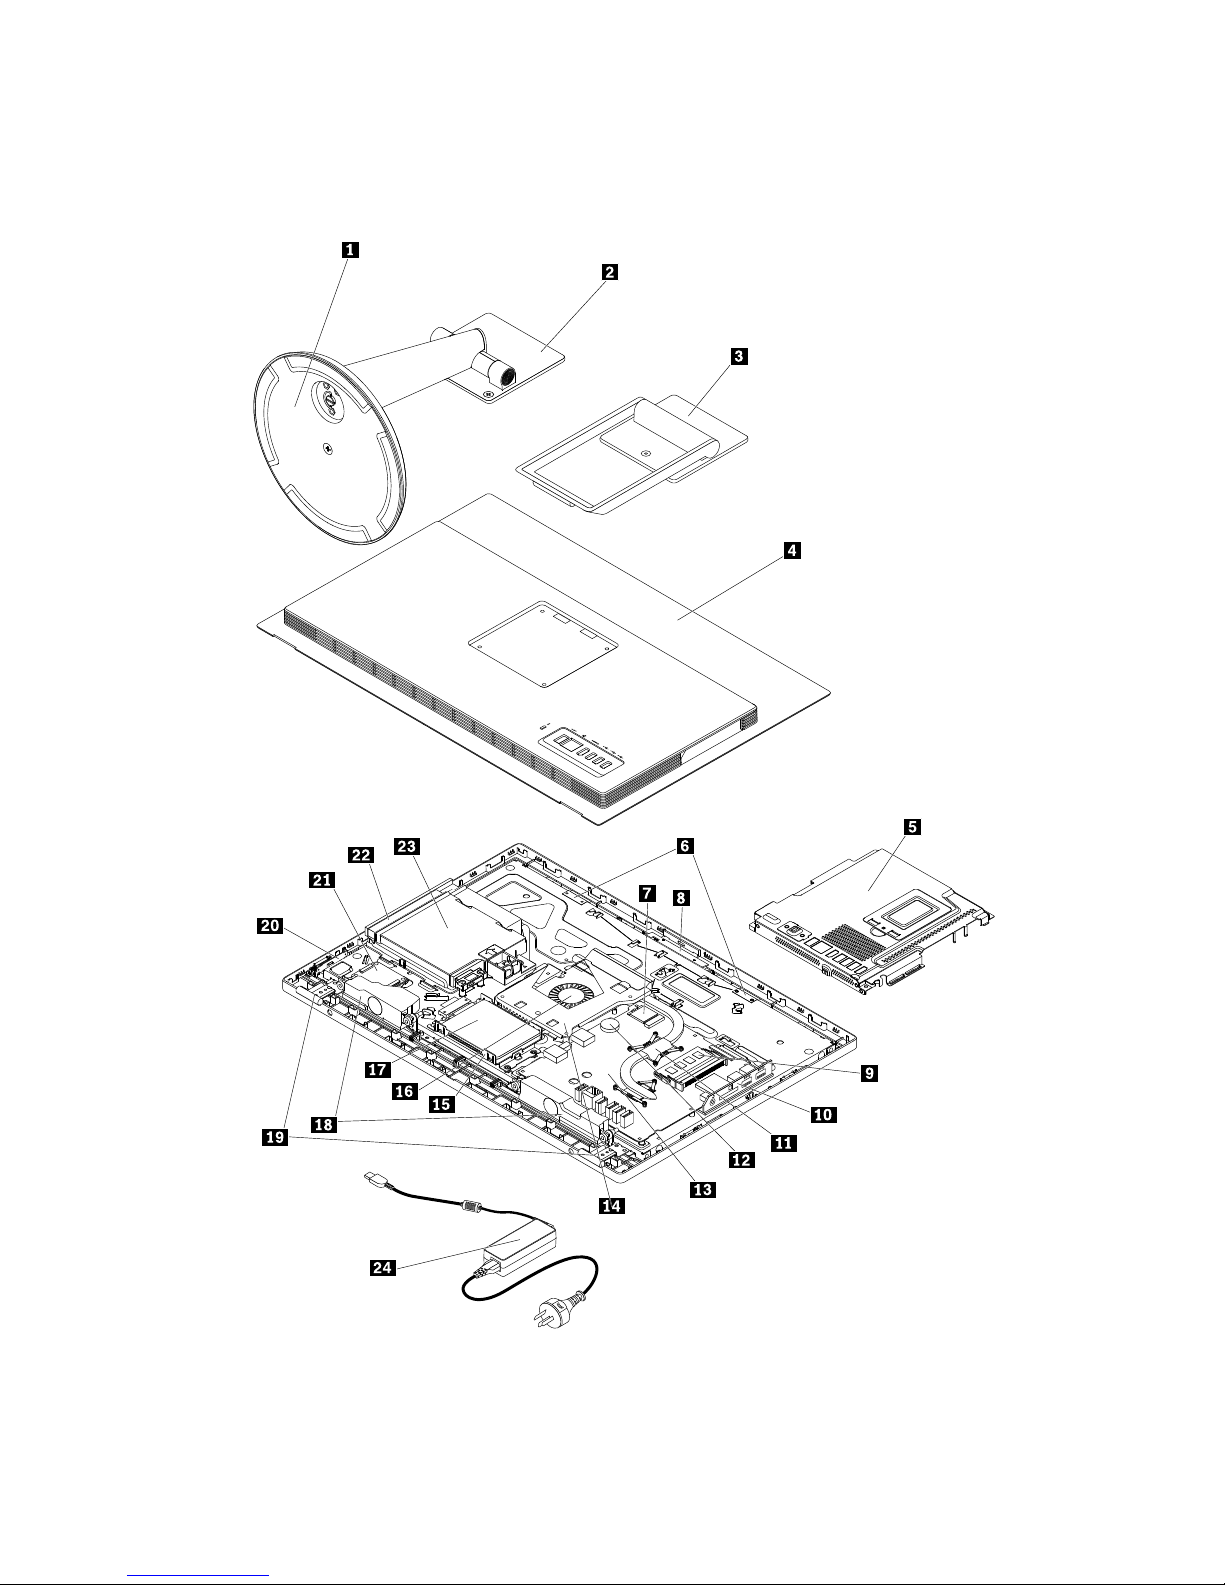
Computercomponents
Note:Dependingonyourcomputermodel,someofthefollowingcomponentsmightnotbeavailable.
Figure3.Computercomponents
Chapter1.Productoverview5
1Monitorstandbase2Monitorstand
3Framestand
4Computercover
5Systemboardshield6Wi-Fiantennas(2)
7Wi-Ficard8Integratedcamera
9Memorymodule
10SideI/Obracket
11Heatsink
12Coin-cellbattery
13Systemboard14VESA
®
mountbracket
15Storagedrivebracket16Systemfan
17Storagedrive18Internalspeakers(2)
19Feet(2)
20Powerbuttonboard
21Converterboard22Opticaldrive
23Opticaldrivebracket
24acpoweradapter
6LenovoS400zandS405zUserGuide
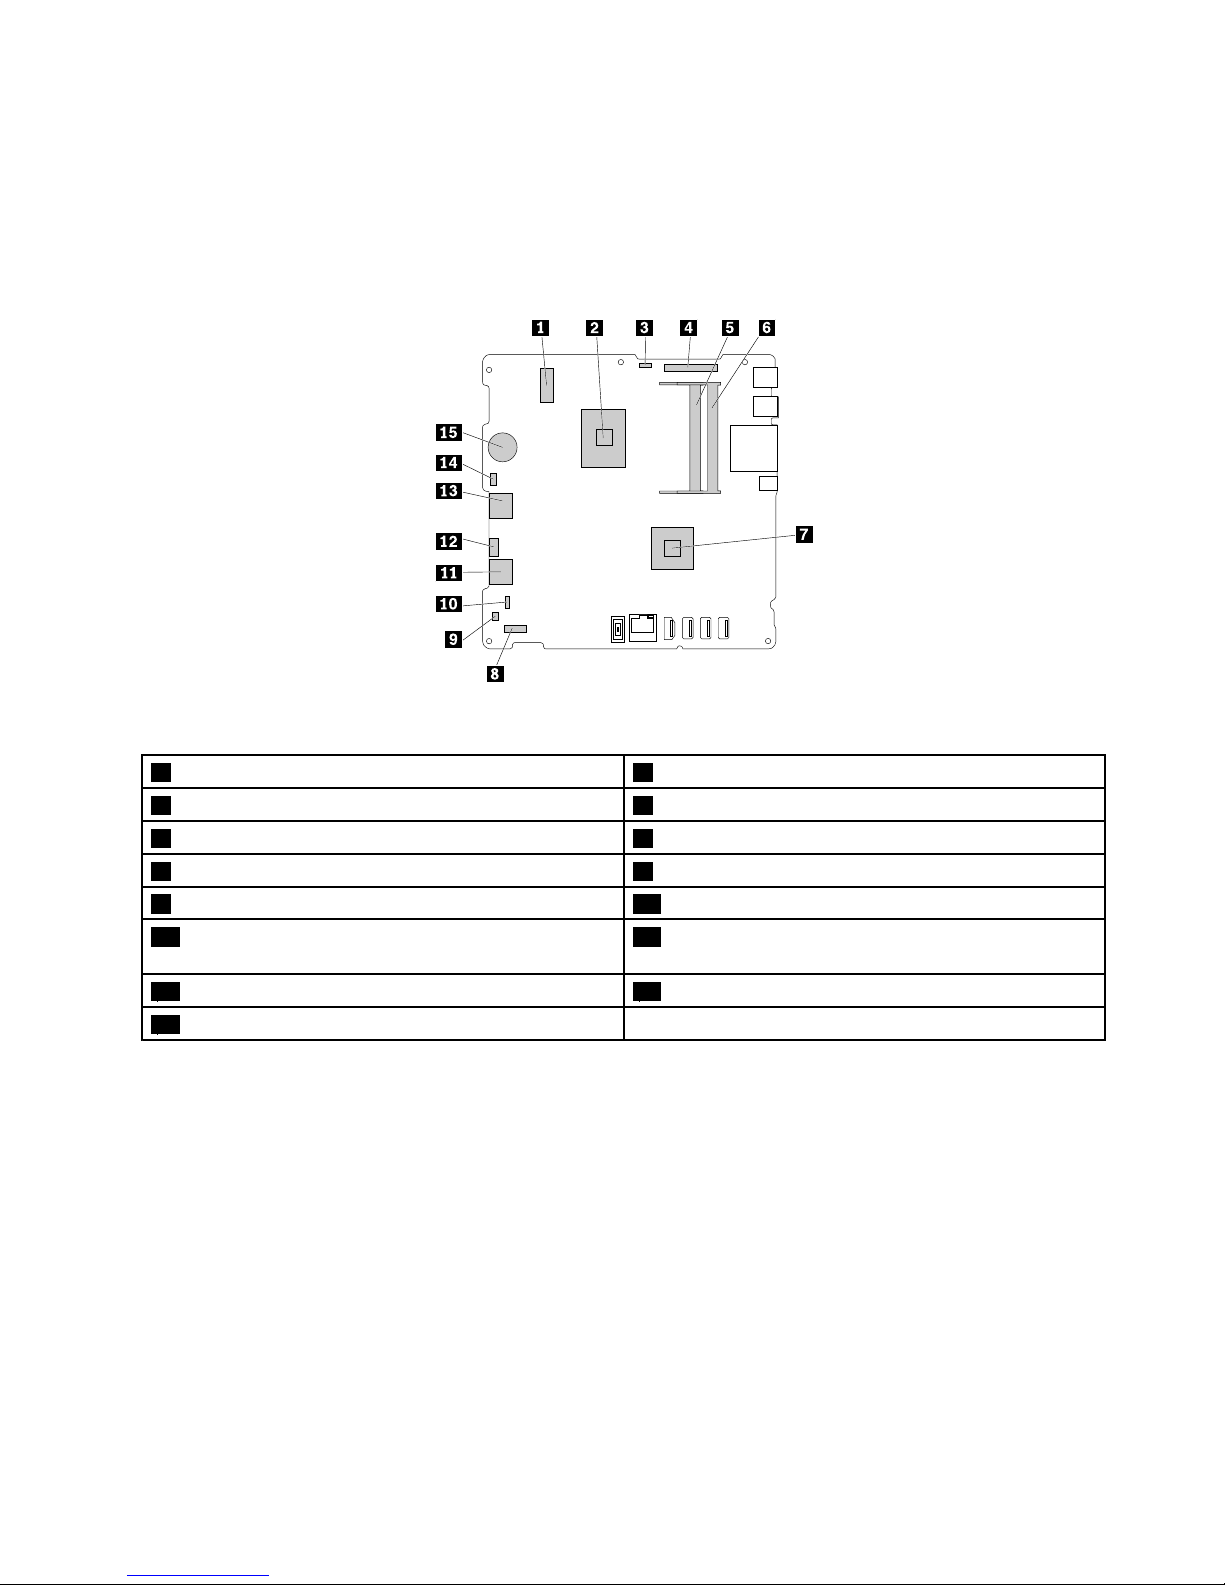
Partsonthesystemboard
Note:Forthepartsthataredisplayedonthefollowingtwofiguresbutnotintroducedinthecorresponding
tables,see“Frontview”onpage1and“Rearview”onpage3.
ForS400z
Figure4.Partsonthesystemboard(S400z)
1M.2Wi-Ficardslot2Microprocessor
3Integratedcameraconnector
4LCDpanelconnector
5Memoryslot16Memoryslot2
7Graphicsprocessorunit(GPU)(somemodels)8Converterboardconnector
9Internalspeakerconnector10Powerbuttonboardconnector
11SA TAconnector1(connectingtothestoragedrive)12SATApowerconnector(connectingtothestorage
driveandopticaldrive)
13SA TAconnector2(connectingtotheopticaldrive)14Systemfanconnector
15Coin-cellbattery
Chapter1.Productoverview7
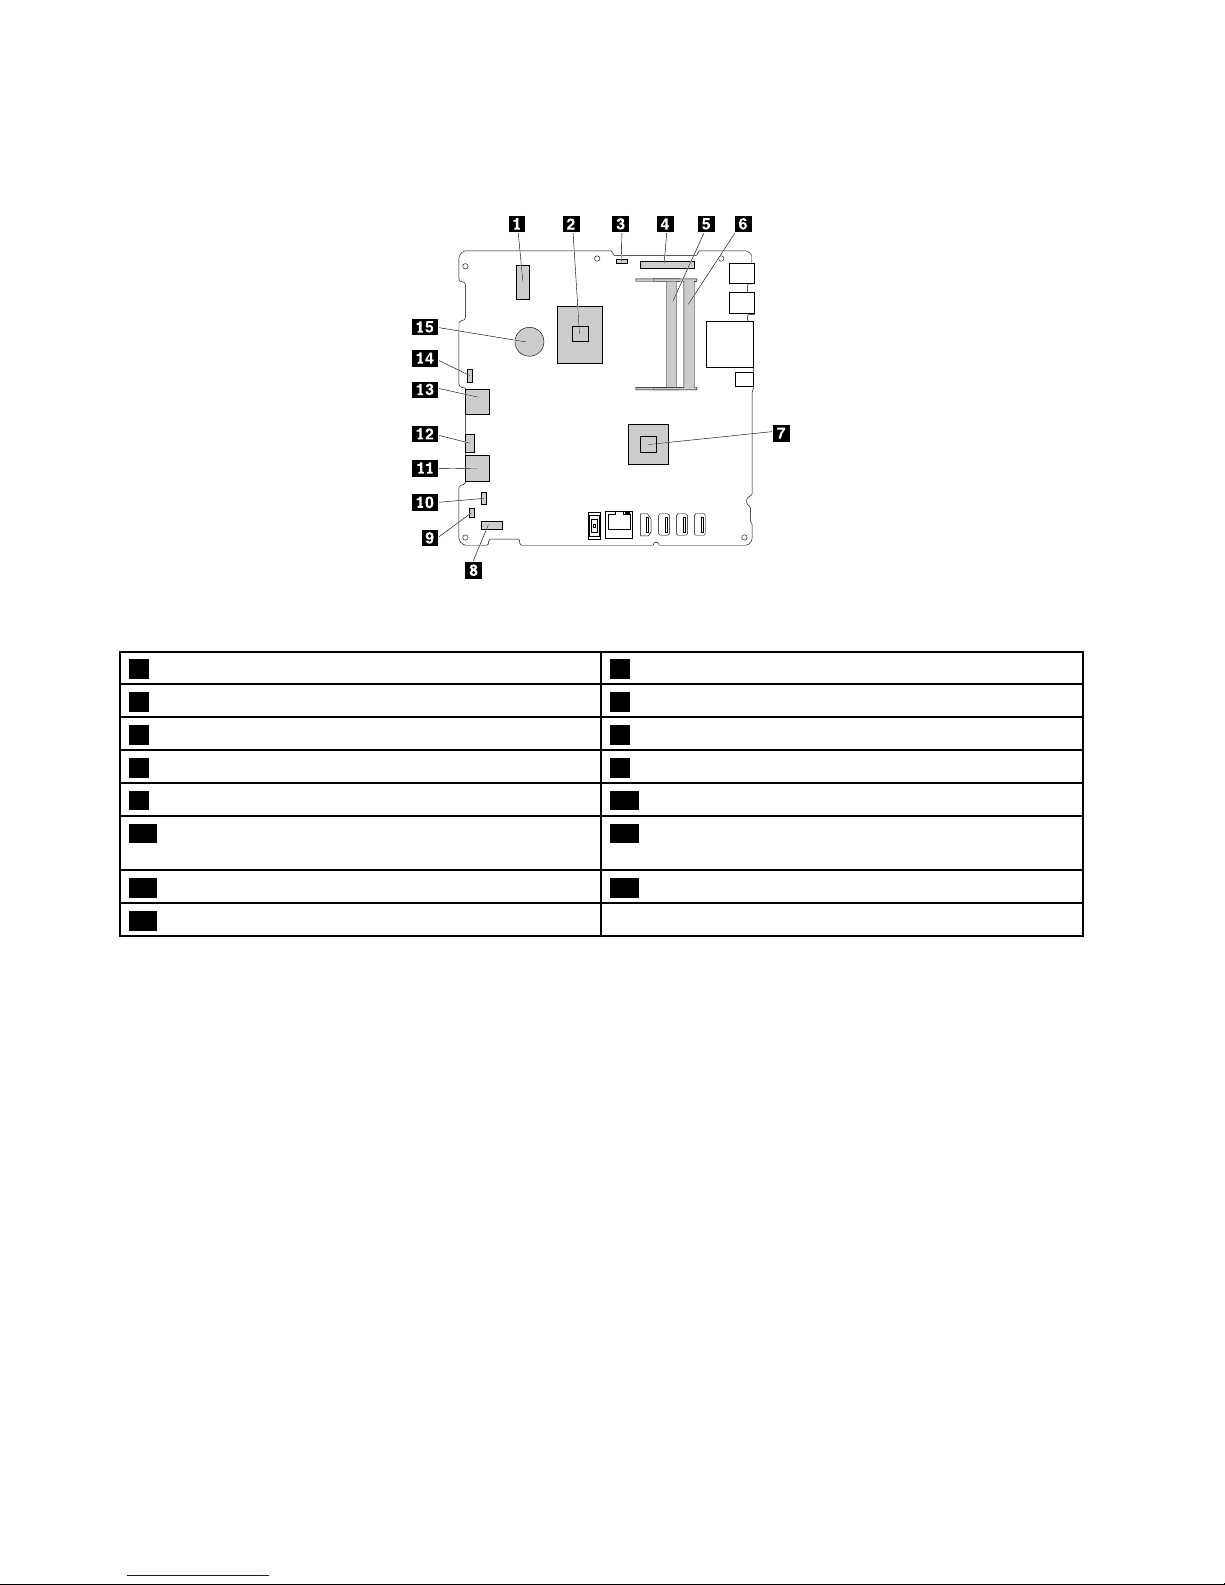
ForS405z
Figure5.Partsonthesystemboard(S405z)
1M.2Wi-Ficardslot2Microprocessor
3Integratedcameraconnector
4LCDpanelconnector
5Memoryslot16Memoryslot2
7GPU(somemodels)8Converterboardconnector
9Internalspeakerconnector10Powerbuttonboardconnector
11SA TAconnector1(connectingtothestoragedrive)12SATApowerconnector(connectingtothestorage
driveandopticaldrive)
13SA TAconnector2(connectingtotheopticaldrive)14Systemfanconnector
15Coin-cellbattery
8LenovoS400zandS405zUserGuide
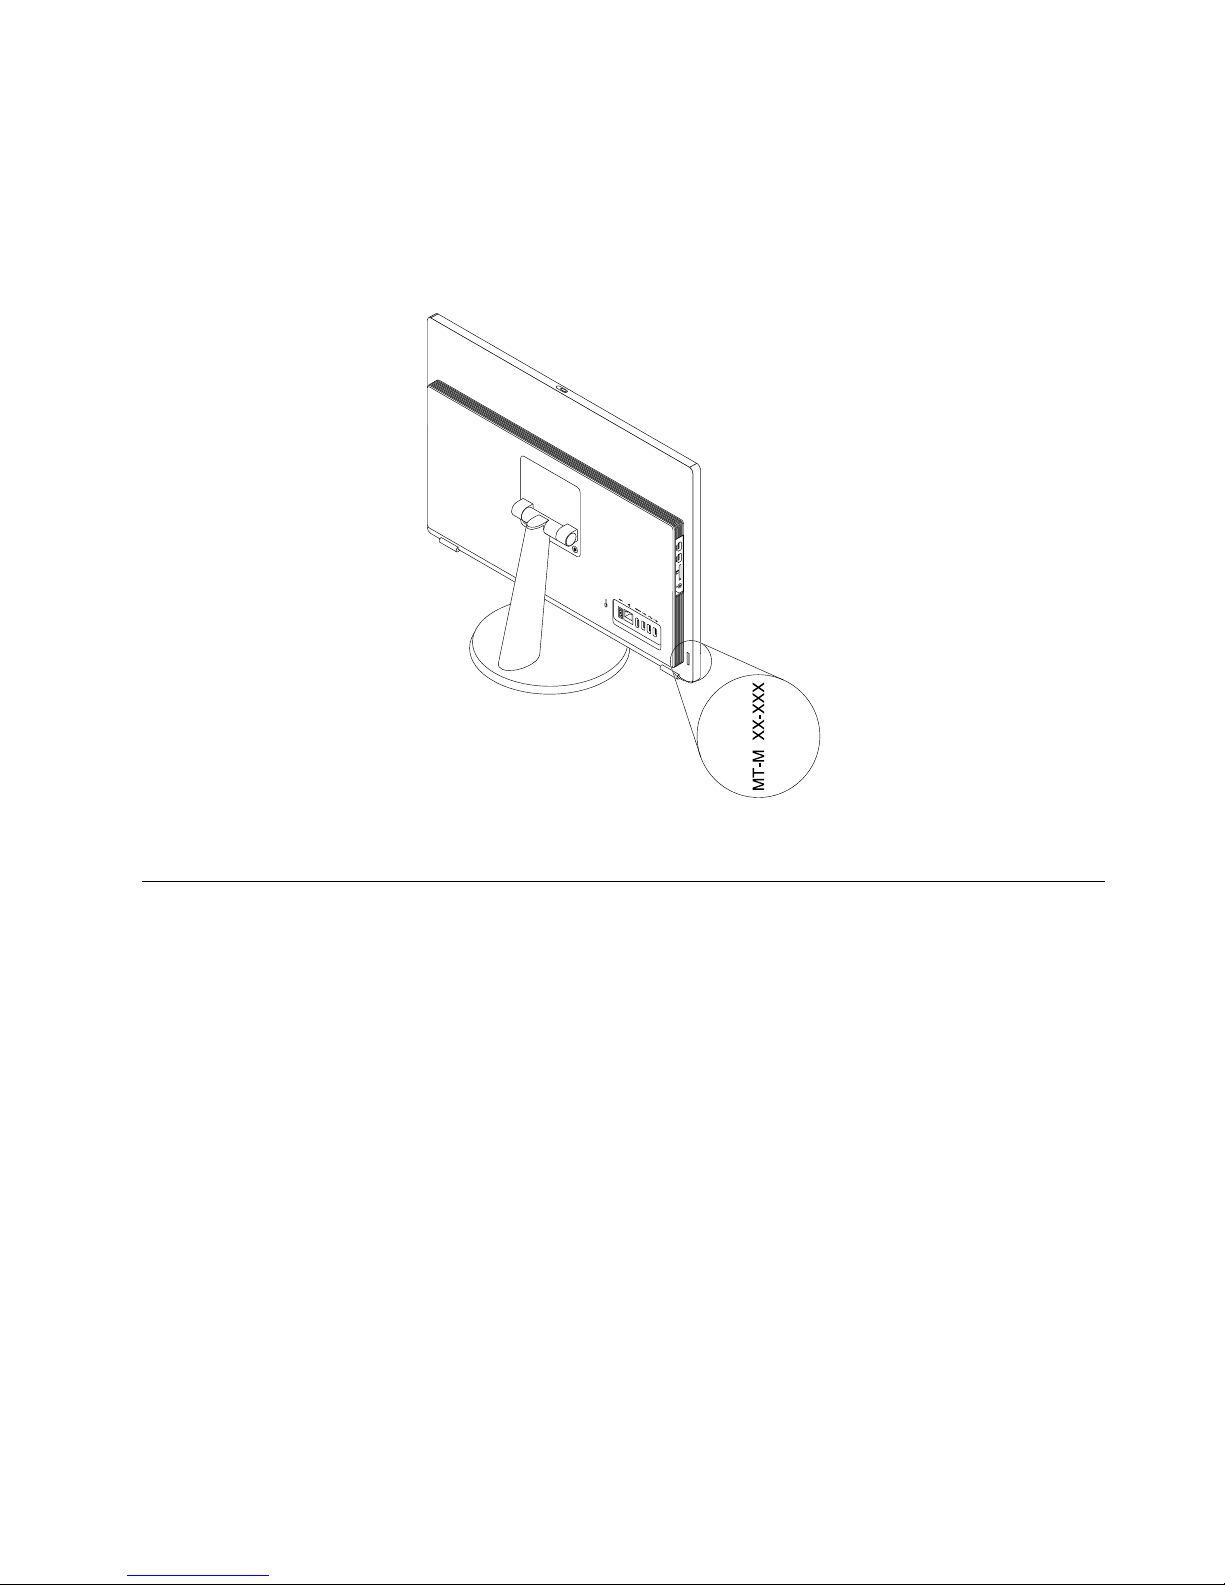
Machinetypeandmodellabel
Themachinetypeandmodellabelidentifiesyourcomputer.WhenyoucontactLenovoforhelp,themachine
typeandmodelinformationhelpssupporttechnicianstoidentifyyourcomputerandprovidefasterservice.
Themachinetypeandmodellabelisattachedontherearofyourcomputerasshown.
Figure6.Machinetypeandmodellabel
Features
Thecomputerfeaturesintroducedinthissectionapplytovariousmodels.
Informationaboutyourcomputer
•Toviewbasicinformation(suchasmicroprocessorandmemoryinformation)aboutyourcomputer,
dothefollowing:
1.ClicktheStartbuttontoopentheStartmenu.
2.DependingonyourWindowsversion,dooneofthefollowing:
–ForWindows7:Right-clickComputer,andthenclickProperties.
–ForWindows10:ClickSettings➙System➙About.
•Toviewdetailedinformationaboutthedevices(suchastheopticaldriveandnetworkadapters)onyour
computer,dothefollowing:
1.DependingonyourWindowsversion,dooneofthefollowing:
–ForWindows7:ClicktheStartbuttontoopentheStartmenu.Right-clickComputer,andthen
clickProperties.
–ForWindows10:Right-clicktheStartbuttontoopentheStartcontextmenu.
2.ClickDeviceManager.Typetheadministratorpasswordorprovideconfirmationifprompted.
Chapter1.Productoverview9

Preinstalledoperatingsystem
YourcomputerispreinstalledwithWindows7orWindows10operatingsystem.Additionaloperating
systemsmightbeidentifiedbyLenovoascompatiblewithyourcomputer.T odetermineifanoperating
systemhasbeencertifiedortestedforcompatibility,checktheWebsiteoftheoperatingsystemprovider.
Powersupply
Yourcomputercomeswitha90-wattor120-wattacpoweradapter.
Storagedrives
Yourcomputersupportsonestoragedrive(harddiskdrive,hybriddrive,orsolid-statedrive).
Toviewtheamountofstoragedrivespace,dothefollowing:
1.DependingonyourWindowsversion,dooneofthefollowing:
•ForWindows7:ClicktheStartbuttontoopentheStartmenu.Right-clickComputer,andthenclick
Manage.
•ForWindows10:Right-clicktheStartbuttontoopentheStartcontextmenu.
2.ClickDiskManagement.
Videofeatures
TheintegratedgraphicscardsupportstheHDMI-outconnector.
Audiofeatures
Theintegratedaudiocardsupportsthefollowingaudioconnectorsanddevicesonyourcomputer:
•Headsetconnector
•Integratedmicrophone
•Internalspeaker
Input/Output(I/O)features
•Cardreaderslot
•Ethernetconnector
•HDMI-outconnector
•Headsetconnector
•USBconnector
Expansion
•Cardreader
•Memoryslot
•Opticaldrive
•Storagedrivebay
Networkfeatures
•EthernetLAN
TheintegratednetworkinterfacecardsupportstheEthernetconnectoronyourcomputer.
•WirelessLAN
•Bluetooth
10LenovoS400zandS405zUserGuide

Securityfeatures
Formoreinformation,seeChapter4“Security”onpage29.
Systemmanagementfeatures
•Abilitytostorepower-onself-test(POST)hardwaretestresults
•DesktopManagementInterface(DMI)
DesktopManagementInterfaceprovidesacommonpathforuserstoaccessinformationaboutall
aspectsofacomputer.Theinformationincludesprocessortype,installationdate,connectedprintersand
otherperipherals,powersources,maintenancehistory,andsoon.
•ErPLPScompliancemode
Theenergy-relatedproductsdirective(ErP)lowestpowerstate(LPS)compliancemodereducesthe
consumptionofelectricitywhenyourcomputerisinsleeporoffmode.Formoreinformation,see
“EnablingordisablingErPLPScompliancemode”onpage34.
•Intel
®
StandardManageability
IntelStandardManageabilityishardware-andfirmware-basedtechnologythatmakescomputerseasier
andlessexpensiveforbusinessestomonitor,maintain,update,upgrade,andrepair.
•IntelMatrixStorageManager
IntelMatrixStorageManagerisadevicedriverthatprovidessupportforSerialAdvancedTechnology
Attachment(SATA)RedundantArrayofIndependentDisks(RAID)5arraysandSATARAID10arrayson
specificIntelchipsetsystemboardstoenhanceharddiskperformance.
•PrebootExecutionEnvironment(PXE)
PrebootExecutionEnvironmentenablescomputerstostartthroughanetworkinterfaceindependentof
datastoragedrives(suchasharddiskdrives)orinstalledoperatingsystems.
•SystemManagement(SM)BasicInput/OutputSystem(BIOS)andSMsoftware
TheSMBIOSspecificationdefinesdatastructuresandaccessmethodsthatcanbeusedtoread
managementdatastoredintheBIOSofacomputer.
•WakeonLAN
WakeonLANisanEthernetcomputernetworkingstandardthatallowsacomputertobeturnedon
orwokenupbyanetworkmessage.Themessageusuallyissentbyaprogramrunningonanother
computeronthesameLAN.
•WakeonRing
WakeonRing,sometimesreferredtoasWakeonModem,isaspecificationthatallowssupported
computersanddevicestoresumefromsleeporhibernationmode.
•WindowsManagementInstrumentation(WMI)
WindowsManagementInstrumentationisasetofextensionstotheWindowsDriverModel.Itprovidesan
operatingsysteminterfacethroughwhichinstrumentedcomponentsprovideinformationandnotification.
Chapter1.Productoverview11

Specifications
Thissectionliststhephysicalspecificationsforyourcomputer.
Dimensions(withoutacomputerstand)
Width:535.2mm(21.1inches)
Height:375.7mm(14.8inches)
Depth:40.2mm(1.6inches)
Weight(withoutthepackage)
Maximumconfigurationasshipped:7.3kg(16.1lb)
Environment
•Airtemperature:
Operating:From10°C(50°F)to35°C(95°F)
Storageinoriginalshippingpackage:From-40°C(-40°F)to60°C(140°F)
Storagewithoutpackage:From-10°C(14°F)to60°C(140°F)
•Humidity:
Operating:20%–80%(non-condensing)
Storage:20%–90%(non-condensing)
•Altitude:
Operating:From-15.2m(-50ft)to3048m(10000ft)
Storage:From-15.2m(-50ft)to10668m(35000ft)
Electricalinput
Inputvoltage:From100Vacto240Vac
Inputfrequency:50/60Hz
Programs
Thissectionprovidesinformationabouttheprogramsonyourcomputer.
Accessingaprogramonyourcomputer
Note:ForWindows7,dependingonyourcomputermodel,someoftheLenovoprogramsmightbereadyto
beinstalled,soyouneedtoinstallthemmanually.Then,youcanaccessandusetheseprograms.
Toaccessaprogramonyourcomputer,dooneofthefollowing:
•FromWindowsSearch:
1.DependingonyourWindowsversion,dooneofthefollowing:
–ForWindows7:ClicktheStartbuttontoopentheStartmenu,andthentypetheprogramname
intothesearchbox.
–ForWindows10:TypetheprogramnameintothesearchboxnexttotheStartbutton.
2.Inthesearchresults,clickthenameofthedesiredprogramtolaunchtheprogram.
•FromtheStartmenuorControlPanel:
1.ClicktheStartbuttontoopentheStartmenu.Then,clickthenameofthedesiredprogramto
launchtheprogram.
12LenovoS400zandS405zUserGuide

2.Iftheprogramnameisnotdisplayed,clickAllProgramsforWindows7orAllappsforWindows
10todisplaytheprogramlist.Fromthelistorafolderinthelist,clickthenameofthedesired
programtolaunchtheprogram.
3.IftheprogramnameisnotdisplayedontheStartmenu,accesstheprogramfromControlPanel.
a.DependingonyourWindowsversion,dooneofthefollowing:
–ForWindows7:ClickControlPanelontheStartmenu.
–ForWindows10:Right-clicktheStartbuttontoopentheStartcontextmenu,andthenclick
ControlPanel.
b.ViewControlPanelusingLargeiconsorSmallicons,andthenclickthenameofthedesired
programtolaunchtheprogram.
AnintroductiontoLenovoprograms
ThissectionprovidesinformationaboutthemajorLenovoprogramsavailableonyouroperatingsystem.
Note:Dependingonyourcomputermodel,someofthefollowingprogramsmightnotbeavailable.
•ForWindows10only:
–LenovoCompanion
Yourcomputer’sbestfeaturesandcapabilitiesshouldbeeasytoaccessandunderstand.WithLenovo
Companion,theyare.UseLenovoCompaniontodothefollowing:
–Optimizeyourcomputer’sperformance,monitoryourcomputer’shealth,andmanageupdates.
–Accessyouruserguide,checkwarrantystatus,andviewaccessoriescustomizedforyourcomputer.
–Readhow-toarticles,exploreLenovoforums,andstayup-to-dateontechnologynewswitharticles
andblogsfromtrustedsources.
LenovoCompanionisfilledwithexclusiveLenovocontenttohelpyoulearnmoreaboutwhatyou
candowithyourcomputer.
–LenovoSettings
TheLenovoSettingsprogramistheonestopshopforyoutocontrolhardwarefeatures,sensors
andprogramsonyourcomputer.LenovoSettingsenablesyoutooptimizedeviceperformanceby
customizingkeyfunctions,suchaspowerplans,audio,camera,andnetworks.
•ForWindows7andWindows10:
–DriverandApplicationInstallation
Note:TheDriverandApplicationInstallationprogrammightnotbeavailableonsomeWindows
10computermodels.
–ForWindows7:TheDriverandApplicationInstallationprogramprovidesregularaccesstodevice
driverandsoftwareupdatesforyourcomputer.TheprogramgathersinformationfromtheLenovo
HelpCenteraboutnewupdatesforyourcomputer,thensortsanddisplaystheupdatesfor
downloadandinstallation.Youhavecompletecontrolofwhichupdatestodownloadandinstall.
–ForWindows10:TheDriverandApplicationInstallationprogramonlyenablesyoutoinstallor
reinstalldevicedriversandprogramslocally.
–LenovoBluetoothLock
TheLenovoBluetoothLockprogramenablesyoutouseaBluetoothdevice(suchasyoursmartphone)
asaproximity-basedunitforlockingorunlockingyourcomputerautomatically.Bydetectingthe
distancebetweenyourcomputerandthepredefinedBluetoothdevicethatyouarecarrying,theLenovo
BluetoothLockprogramautomaticallylocksyourcomputerwhenyouwalkawayandunlocksyour
computerwhenyoucomeback.Thisisasimplewaytoprotectyourcomputeragainstunauthorized
accessincasethatyouforgettolockyourcomputer.
Chapter1.Productoverview13

–LenovoRescueSystem
Note:TheLenovoRescueSystemprogrammightnotbeavailableonsomeWindows10computer
models.
TheLenovoRescueSystemprogramisaone-buttonrecoveryandrestoresolution.Itincludesaset
ofself-recoverytoolstohelpyoudiagnosecomputerproblems,gethelp,andrecoverfromsystem
crashes,evenifyoucannotstarttheWindowsoperatingsystem.
–LenovoSolutionCenter
TheLenovoSolutionCenterprogramenablesyoutotroubleshootandresolvecomputerproblems.It
combinesdiagnostictests,systeminformationcollection,securitystatus,andsupportinformation,
alongwithhintsandtipsformaximumsystemperformance.
–SHAREitorLenovoSHAREit
TheSHAREitorLenovoSHAREitprogramprovidesaquickandeasywaytosharefilesandfolders
amongcomputers,smartphones,tablets,orsmartTVswiththeAndroidortheWindowsoperating
systeminstalled.SHAREitorLenovoSHAREitusesanytypeofnetworkorevennonetworkatallto
sharefilesandfolders.
14LenovoS400zandS405zUserGuide

Chapter2.Usingyourcomputer
Thischaptercontainsthefollowingtopics:
•“Adjustingthecomputerstand”onpage15
•“Registeringyourcomputer”onpage17
•“Settingthecomputervolume”onpage18
•“AddinganicontotheWindowsnotificationarea”onpage18
•“Usingadisc”onpage18
•“Connectingtoanetwork”onpage20
Adjustingthecomputerstand
Youcanusethecomputerstandtoadjustthecomputertoapositioncomfortableforyou.
Note:Thecomputerstandisavailableonlyonsomemodels.
©CopyrightLenovo2015
15

Adjustingtheframestand
Pulltheframestandopen.Then,youcanadjusttheangleofthecomputerbetween15°and40°totherear
asshown.
CAUTION:
Ensurethattheangleisatleast15°fromtheverticalposition;otherwise,thecomputermightbe
unstableandtipover.
Figure7.Adjustingtheframestand
16LenovoS400zandS405zUserGuide
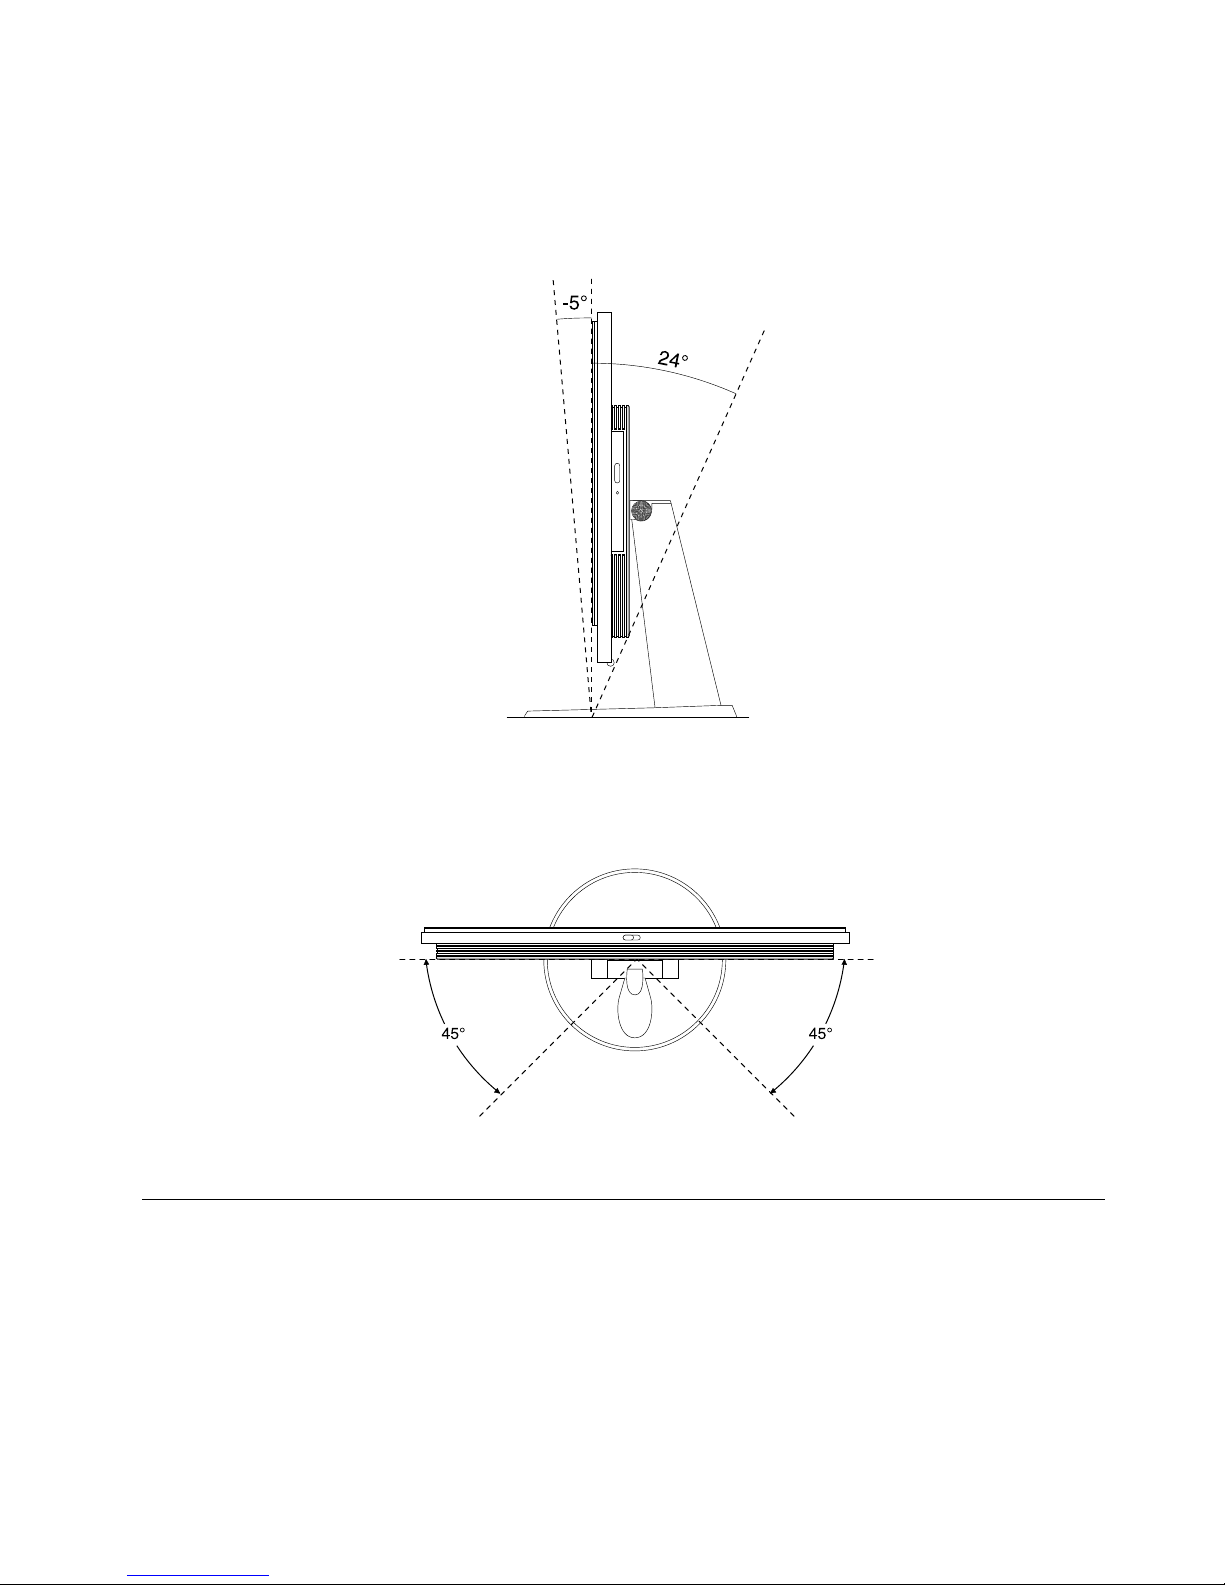
Adjustingthemonitorstand
Youcanusethemonitorstandtoadjustthecomputerbydoingthefollowing:
•Youcanadjusttheverticalpositionofthecomputerbetween5°tothefrontand24°totherearasshown.
Figure8.Adjustingtheverticalpositionofthecomputertothefrontortotherear
•Youcanadjusttheangleofthecomputerbetween45°totheleftand45°totherightasshown.
Figure9.Adjustingthecomputertotheleftortotheright
Registeringyourcomputer
WhenyouregisteryourcomputerwithLenovo,youenterrequiredinformationintoaLenovodatabase.The
informationenablesLenovotocontactyouwhenthereisarecallorothersevereproblemandprovide
quickerservicewhenyoucallLenovoforhelp.Inaddition,somelocationsofferextendedprivilegesand
servicestoregisteredusers.
ToregisteryourcomputerwithLenovo,ensurethatyourcomputerisconnectedtotheInternet.Then,goto
http://www.lenovo.com/registerandfollowtheinstructionsonthescreen.
Chapter2.Usingyourcomputer17

Settingthecomputervolume
Tosetthecomputervolume,dothefollowing:
1.ClickthevolumeiconintheWindowsnotificationareaonthetaskbar.
Note:IfthevolumeiconisnotdisplayedintheWindowsnotificationarea,addtheicontothe
notificationarea.See“AddinganicontotheWindowsnotificationarea”onpage18
.
2.Followtheinstructionsonthescreentoadjustthevolume.Clickthespeakericontomutetheaudio.
AddinganicontotheWindowsnotificationarea
ToaddanicontotheWindowsnotificationarea,dothefollowing:
1.Clickthearrownexttothenotificationareatoviewhiddenicons.Then,clickthedesirediconand
dragittothenotificationarea.
2.Iftheiconisnotdisplayed,turnontheicon.
a.ClicktheStartbuttontoopentheStartmenu.
b.DependingonyourWindowsversion,dooneofthefollowing:
•ForWindows7:ClickControlPanel.ViewControlPanelusingLargeiconsorSmallicons,and
thenclickNotificationAreaIcons➙T urnsystemiconsonoroff.
•ForWindows10:ClickSettings➙System➙Notifications&actions➙T urnsystemicons
onoroff.
c.Turnonthedesiredicon.
3.IftheiconisstillnotdisplayedintheWindowsnotificationarea,repeatstep1.
Usingadisc
Thissectionprovidesinformationaboutusingadiscandtheopticaldrive.
Guidelinesaboutusingtheopticaldrive
Whenusingtheopticaldrive,followtheseguidelines:
•Donotplacethecomputerinalocationwherethedriveisexposedtoanyofthefollowingconditions:
–Hightemperature
–Highhumidity
–Excessivedust
–Excessivevibrationorsuddenshock
–Aninclinedsurface
–Directsunlight
•Donotinsertanyobjectotherthanadiscintothedrive.
•Donotinsertdamageddiscsintothedrive.Warped,scratched,ordirtydiscscandamagethedrive.
•Beforemovingthecomputer,removethediscfromthedrive.
Handlingandstoringadisc
Whenhandlingandstoringadisc,followtheseguidelines:
•Holdthediscbyitsedges.Donottouchthesurfaceofthesidethatisnotlabeled.
18LenovoS400zandS405zUserGuide

•Toremovedustorfingerprints,wipethediscwithaclean,softclothfromthecentertotheoutside.Wiping
thediscinacirculardirectionmightcauselossofdata.
•Donotwriteorstickpaperonthedisc.
•Donotscratchormarkthedisc.
•Donotplaceorstorethediscindirectsunlight.
•Donotusebenzene,thinners,orothercleanerstocleanthedisc.
•Donotdroporbendthedisc.
Playingandremovingadisc
Toplayadisc,dothefollowing:
1.Withthecomputeron,presstheeject/closebuttononthefrontoftheopticaldrive.Thetrayslides
outofthedrive.
2.Insertadiscintothetray.Someopticaldrivehasasnaphubinthecenterofthetray.Ifyourdrivehasa
snaphub,supportthetraywithonehandandthenpushcenterofthediscuntilitsnapsintoplace.
3.Presstheeject/closebuttonagainorgentlypushthetrayforwardtoclosethetray.Thediscplayer
programstartsautomatically.Formoreinformation,refertothehelpsystemofthediscplayerprogram.
Toremoveadiscfromtheopticaldrive,dothefollowing:
1.Withthecomputeron,presstheeject/closebuttononthefrontoftheopticaldrive.Thetrayslides
outofthedrive.
2.Carefullyremovethediscfromthetray.
3.Presstheeject/closebuttonagainorgentlypushthetrayforwardtoclosethetray.
Note:Ifthetraydoesnotslideoutofthedrivewhenyoupresstheeject/closebutton,turnoffyourcomputer.
Then,insertastraightenedpaperclipintotheemergency-ejectholeadjacenttotheeject/closebutton.
Usetheemergencyejectonlyinanemergency.
Recordingadisc
Ifyouropticaldrivesupportsrecording,youcanrecordadisc.
RecordingadiscusingWindowstools
TorecordadiscusingWindowstools,dooneofthefollowing:
•BurnadiscusingtheAutoPlaywindow.
1.Ensurethatthediscisplayedautomatically.
a.ClicktheStartbuttontoopentheStartmenu.
b.DependingonyourWindowsversion,dooneofthefollowing:
–ForWindows7:ClickControlPanel.ViewControlPanelusingLargeiconsorSmallicons,
andthenclickAutoPlay.
–ForWindows10:ClickSettings➙Devices➙AutoPlay.
c.SelectorturnonUseAutoPlayforallmediaanddevices.
2.Insertarecordablediscintotheopticaldrivethatsupportsrecording.TheAutoPlaywindowopens.
3.Followtheinstructionsonthescreen.
•BurnadiscusingWindowsMedia
®
Player.
1.Insertarecordablediscintotheopticaldrivethatsupportsrecording.
2.OpenWindowsMediaPlayer.See“Accessingaprogramonyourcomputer”onpage12.
Chapter2.Usingyourcomputer19
 Loading...