

Page 1

ThinkCentreM73
UserGuide
MachineTypes:10AX,10AY,10DK,10DL,10DM,and10DN
Page 2

Note:Beforeusingthisinformationandtheproductitsupports,besuretoreadandunderstandthe
“Importantsafetyinformation”onpagev
andAppendixA“Notices”onpage129.
ThirdEdition(June2014)
©CopyrightLenovo2013,2014.
LIMITEDANDRESTRICTEDRIGHTSNOTICE:IfdataorsoftwareisdeliveredpursuantaGeneralServicesAdministration
“GSA”contract,use,reproduction,ordisclosureissubjecttorestrictionssetforthinContractNo.GS-35F-05925.
Page 3

Contents
Importantsafetyinformation......v
Serviceandupgrades.............v
Staticelectricityprevention...........v
Powercordsandpoweradapters........vi
Extensioncordsandrelateddevices.......vi
Plugsandoutlets..............vii
Externaldevices..............vii
Generalbatterynotice............vii
Rechargeablebatterynotice.........viii
Heatandproductventilation.........viii
Operatingenvironment............ix
Lasercompliancestatement..........ix
Powersupplystatement............x
Cleaningandmaintenance...........x
Chapter1.Productoverview......1
Features..................1
Specifications................4
Lenovoprograms..............4
AccessingLenovoprogramsontheWindows
7operatingsystem............4
AccessingLenovoprogramsontheWindows
8orWindows8.1operatingsystem.....5
AnintroductiontoLenovoprograms.....6
Locations..................8
Locatingconnectors,controls,andindicators
onthefrontofyourcomputer........8
Locatingconnectorsontherearofyour
computer...............10
Locatingcomponents..........12
Locatingpartsonthesystemboard....13
Machinetypeandmodellabel.......14
Chapter2.Usingyourcomputer...15
Frequentlyaskedquestions.........15
NavigatingamongscreensontheWindows8and
Windows8.1operatingsystems........16
NavigatingonWindows8........16
NavigatingonWindows8.1........17
AccessingControlPanelontheWindows8or
Windows8.1operatingsystem........18
Usingthekeyboard.............19
UsingWindowsshortcutkeys.......19
Usingafingerprintreader........19
Usingthewheelmouse...........20
Adjustingaudio..............20
Aboutyourcomputeraudio........20
Settingthevolumefromthedesktop....20
SettingthevolumefromControlPanel...21
UsingCDsandDVDs............21
HandlingandstoringCDandDVDmedia..22
PlayingaCDorDVD..........22
RecordingaCDorDVD.........22
Chapter3.Y ouandyourcomputer..25
Accessibilityandcomfort..........25
Arrangingyourworkspace........25
Comfort...............25
Glareandlighting............26
Aircirculation.............26
Electricaloutletsandcablelengths.....26
Accessibilityinformation.........26
Registeringyourcomputer..........30
Movingyourcomputertoanothercountryor
region..................30
Chapter4.Security..........31
Securityfeatures..............31
AttachingaKensington-stylecablelock.....32
Usingpasswords..............32
BIOSpasswords............32
Windowspasswords..........33
Configuringthefingerprintreader.......33
Usingandunderstandingfirewalls.......33
Protectingdataagainstviruses........33
Chapter5.Installingorreplacing
hardware...............35
Handlingstatic-sensitivedevices.......35
Installingorreplacinghardware........35
Installingexternaloptions........35
Installingorremovingtheacpoweradapter.36
Installingorremovingtheverticalstand...37
InstallingorremovingtheVESAmount
bracket................39
Installingorremovingtheacpoweradapter
bracket................41
Replacingtheopticaldrive........43
Replacingthesecondaryharddiskdrive...48
InstallingorremovingtheI/Obox.....54
Removingthecomputercover.......57
Installingorremovingtheharddiskdrive
assembly...............59
Installingorreplacingamemorymodule...61
Replacingthebattery..........62
ReplacingthePowerbuttonboard.....64
©CopyrightLenovo2013,2014
i
Page 4

ReplacingtheWi-Ficardmodule......65
InstallingorremovingthefrontWi-Fi
antenna...............67
InstallingorremovingtherearWi-Fiantenna.69
Replacingtheinternalspeaker.......71
Replacingthecoverpresenceswitch....73
Replacingthesystemfan.........75
Replacingthethermalmodule.......77
Replacingthemicroprocessor.......79
Replacingthekeyboardormouse.....81
Completingthepartsreplacement.....82
ICEthermalalert..............98
ExitingtheSetupUtilityprogram.......98
Chapter8.Updatingsystem
programs...............99
Usingsystemprograms...........99
Updating(flashing)theBIOSfromadisc....99
Updating(flashing)theBIOSfromyouroperating
system..................100
RecoveringfromaPOST/BIOSupdatefailure..100
Recoveringfromasystemimagefailure.....101
Chapter6.Recoveryinformation...85
RecoveryinformationfortheWindows7operating
system..................85
Creatingandusingrecoverymedia.....85
Performingbackupandrecoveryoperations.86
UsingtheRescueandRecoveryworkspace.87
Creatingandusingarescuemedium....88
Reinstallingpreinstalledapplicationsand
devicedrivers.............89
Reinstallingsoftwareprograms......90
Reinstallingdevicedrivers........90
Solvingrecoveryproblems........90
RecoveryinformationfortheWindows8or
Windows8.1operatingsystem........91
Refreshingyourcomputer........91
Resettingyourcomputertothefactorydefault
settings................91
Usingtheadvancedstartupoptions....91
RecoveringyouroperatingsystemifWindows
8orWindows8.1failstostart.......92
Chapter7.UsingtheSetupUtility
program................93
StartingtheSetupUtilityprogram.......93
Viewingandchangingsettings........93
Usingpasswords..............93
Passwordconsiderations.........94
Power-OnPassword..........94
AdministratorPassword.........94
HardDiskPassword...........94
Setting,changing,anddeletingapassword.94
Erasinglostorforgottenpasswords(clearing
CMOS)................95
Enablingordisablingadevice........95
Selectingastartupdevice..........96
Selectingatemporarystartupdevice....96
Selectingorchangingthestartupdevice
sequence...............96
EnablingErPLPScompliancemode......96
ICEperformancemode...........97
Chapter9.Preventingproblems..103
Keepingyourcomputercurrent........103
Gettingthelatestdevicedriversforyour
computer...............103
Updatingyouroperatingsystem......103
UsingSystemUpdate..........104
Cleaningandmaintenance..........104
Basics................104
Cleaningyourcomputer.........105
Goodmaintenancepractices.......106
Movingyourcomputer...........106
Chapter10.T roubleshootingand
diagnostics.............107
Basictroubleshooting............107
Troubleshootingprocedure..........108
Troubleshooting..............108
Audioproblems............109
CDproblems.............110
DVDproblems.............111
Intermittentproblems..........113
Keyboard,mouse,orpointingdevice
problems...............113
Monitorproblems............115
Networkingproblems..........117
Optionproblems............119
Performanceandlockupproblems.....120
Printerproblems............122
Serialconnectorproblems........122
Softwareproblems...........123
USBproblems.............124
LenovoSolutionCenter...........124
Chapter11.Gettinginformation,help,
andservice.............125
Informationresources............125
LenovoThinkVantageT ools........125
HelpandSupport............125
SafetyandWarranty...........125
LenovoWebsite............125
iiThinkCentreM73UserGuide
Page 5

LenovoSupportWebsite.........126
Helpandservice..............126
Usingthedocumentationanddiagnostic
program...............126
Callingforservice............126
Usingotherservices..........127
Purchasingadditionalservices......127
AppendixA.Notices.........129
Trademarks................130
AppendixB.Regulatory
information.............131
Exportclassificationnotice..........131
Electronicemissionsnotices.........131
FederalCommunicationsCommission
DeclarationofConformity........131
Eurasiancompliancemark..........133
Brazilregulatorynotice...........133
Mexicoregulatorynotice...........133
Additionalregulatoryinformation.......133
AppendixC.WEEEandrecycling
information.............135
ImportantWEEEinformation.........135
RecyclinginformationforJapan........135
RecyclinginformationforBrazil........136
BatteryrecyclinginformationforT aiwan.....136
BatteryrecyclinginformationfortheEuropean
Union..................136
AppendixD.RestrictionofHazardous
SubstancesDirective(RoHS)....139
EuropeanUnionRoHS...........139
ChinaRoHS................139
TurkishRoHS...............139
UkraineRoHS...............140
IndiaRoHS................140
AppendixE.ChinaEnergyLabel..141
AppendixF.ENERGYSTARmodel
information.............143
Index.................145
©CopyrightLenovo2013,2014
iii
Page 6

ivThinkCentreM73UserGuide
Page 7
Importantsafetyinformation
CAUTION:
Beforeusingthismanual,besuretoreadandunderstandalltherelatedsafetyinformationforthis
product.RefertotheinformationinthissectionandthesafetyinformationintheSafety,Warranty,and
SetupGuidethatyoureceivedwiththisproduct.Readingandunderstandingthissafetyinformation
reducestheriskofpersonalinjuryanddamagetoyourproduct.
IfyounolongerhaveacopyoftheSafety,Warranty,andSetupGuide,youcanobtainaPortableDocument
Format(PDF)versionfromtheLenovo
SupportWebsitealsoprovidestheSafety,Warranty,andSetupGuideandthisUserGuideinadditional
languages.
®
SupportWebsiteathttp://www.lenovo.com/support.TheLenovo
Serviceandupgrades
DonotattempttoserviceaproductyourselfunlessinstructedtodosobytheCustomerSupportCenteror
yourdocumentation.OnlyuseaServiceProviderwhoisapprovedtorepairyourparticularproduct.
Note:Somecomputerpartscanbeupgradedorreplacedbythecustomer.Upgradestypicallyare
referredtoasoptions.ReplacementpartsapprovedforcustomerinstallationarereferredtoasCustomer
ReplaceableUnits,orCRUs.Lenovoprovidesdocumentationwithinstructionswhenitisappropriatefor
customerstoinstalloptionsorreplaceCRUs.Youmustcloselyfollowallinstructionswheninstallingor
replacingparts.TheOffstateofapowerindicatordoesnotnecessarilymeanthatvoltagelevelsinsidea
productarezero.Beforeyouremovethecoversfromaproductequippedwithapowercord,alwaysmake
surethatthepoweristurnedoffandthattheproductisunpluggedfromanypowersource.Formore
informationonCRUs,refertoChapter5“Installingorreplacinghardware”onpage35
questionsorconcerns,contacttheCustomerSupportCenter.
Althoughtherearenomovingpartsinyourcomputerafterthepowercordhasbeendisconnected,the
followingwarningsarerequiredforyoursafety.
CAUTION:
.Ifyouhaveany
Hazardousmovingparts.Keepfingersandotherbodypartsaway.
CAUTION:
Beforeyouopenthecomputercover,turnoffthecomputerandwaitseveralminutesuntilthe
computeriscool.
Staticelectricityprevention
Staticelectricity,althoughharmlesstoyou,canseriouslydamagecomputercomponentsandoptions.
Improperhandlingofstatic-sensitivepartscancausedamagetothepart.Whenyouunpackanoption
©CopyrightLenovo2013,2014
v
Page 8

orCRU,donotopenthestatic-protectivepackagecontainingthepartuntiltheinstructionsdirectyou
toinstallit.
WhenyouhandleoptionsorCRUs,orperformanyworkinsidethecomputer,takethefollowingprecautions
toavoidstatic-electricitydamage:
•Limityourmovement.Movementcancausestaticelectricitytobuilduparoundyou.
•Alwayshandlecomponentscarefully.Handleadapters,memorymodules,andothercircuitboardsbythe
edges.Nevertouchexposedcircuitry.
•Preventothersfromtouchingcomponents.
•Whenyouinstallastatic-sensitiveoptionorCRU,touchthestatic-protectivepackagecontainingthe
parttoametalexpansion-slotcoverorotherunpaintedmetalsurfaceonthecomputerforatleasttwo
seconds.Thisreducesstaticelectricityinthepackageandyourbody.
•Whenpossible,removethestatic-sensitivepartfromthestatic-protectivepackagingandinstallthepart
withoutsettingitdown.Whenthisisnotpossible,placethestatic-protectivepackagingonasmooth,
levelsurfaceandplacethepartonit.
•Donotplacethepartonthecomputercoverorothermetalsurface.
Powercordsandpoweradapters
Useonlythepowercordsandpoweradapterssuppliedbytheproductmanufacturer.
Thepowercordsshallbesafetyapproved.ForGermany,itshallbeH05VV-F,3G,0.75mm
othercountries,thesuitabletypesshallbeusedaccordingly.
Neverwrapapowercordaroundapoweradapterorotherobject.Doingsocanstressthecordinwaysthat
cancausethecordtofray,crack,orcrimp.Thiscanpresentasafetyhazard.
Alwaysroutepowercordssothattheywillnotbewalkedon,trippedover,orpinchedbyobjects.
Protectpowercordandpoweradaptersfromliquids.Forinstance,donotleaveyourpowercordorpower
adapternearsinks,tubs,toilets,oronfloorsthatarecleanedwithliquidcleansers.Liquidscancausea
shortcircuit,particularlyifthepowercordorpoweradapterhasbeenstressedbymisuse.Liquidsalsocan
causegradualcorrosionofpowercordterminalsand/ortheconnectorterminalsonapoweradapter,
whichcaneventuallyresultinoverheating.
Ensurethatallpowercordconnectorsaresecurelyandcompletelypluggedintoreceptacles.
Donotuseanypoweradapterthatshowscorrosionattheacinputpinsorshowssignsofoverheating(such
asdeformedplastic)attheacinputoranywhereonthepoweradapter.
Donotuseanypowercordswheretheelectricalcontactsoneitherendshowsignsofcorrosionor
overheatingorwherethepowercordappearstohavebeendamagedinanyway.
2
,orbetter.For
Extensioncordsandrelateddevices
Ensurethatextensioncords,surgeprotectors,uninterruptiblepowersupplies,andpowerstripsthatyouuse
areratedtohandletheelectricalrequirementsoftheproduct.Neveroverloadthesedevices.Ifpowerstrips
areused,theloadshouldnotexceedthepowerstripinputrating.Consultanelectricianformoreinformation
ifyouhavequestionsaboutpowerloads,powerrequirements,andinputratings.
viThinkCentreM73UserGuide
Page 9

Plugsandoutlets
Ifareceptacle(poweroutlet)thatyouintendtousewithyourcomputerequipmentappearstobedamaged
orcorroded,donotusetheoutletuntilitisreplacedbyaqualifiedelectrician.
Donotbendormodifytheplug.Iftheplugisdamaged,contactthemanufacturertoobtainareplacement.
Donotshareanelectricaloutletwithotherhomeorcommercialappliancesthatdrawlargeamountsof
electricity;otherwise,unstablevoltagemightdamageyourcomputer,data,orattacheddevices.
Someproductsareequippedwithathree-prongedplug.Thisplugfitsonlyintoagroundedelectricaloutlet.
Thisisasafetyfeature.Donotdefeatthissafetyfeaturebytryingtoinsertitintoanon-groundedoutlet.If
youcannotinserttheplugintotheoutlet,contactanelectricianforanapprovedoutletadapterortoreplace
theoutletwithonethatenablesthissafetyfeature.Neveroverloadanelectricaloutlet.Theoverallsystem
loadshouldnotexceed80percentofthebranchcircuitrating.Consultanelectricianformoreinformation
ifyouhavequestionsaboutpowerloadsandbranchcircuitratings.
Besurethatthepoweroutletyouareusingisproperlywired,easilyaccessible,andlocatedclosetothe
equipment.Donotfullyextendpowercordsinawaythatwillstressthecords.
Besurethatthepoweroutletprovidesthecorrectvoltageandcurrentfortheproductyouareinstalling.
Carefullyconnectanddisconnecttheequipmentfromtheelectricaloutlet.
Externaldevices
DonotconnectordisconnectanyexternaldevicecablesotherthanUniversalSerialBus(USB)and1394
cableswhilethecomputerpowerison;otherwise,youmightdamageyourcomputer.Toavoidpossible
damagetoattacheddevices,waitatleastfivesecondsafterthecomputerisshutdowntodisconnect
externaldevices.
Generalbatterynotice
DANGER
PersonalcomputersmanufacturedbyLenovomightcontainacoincellbatteryandarechargeable
batterypacktothesystem.BatteriessuppliedbyLenovoforusewithyourproducthavebeen
testedforcompatibilityandshouldonlybereplacedwithapprovedparts.
Neverattempttoopenorserviceanybattery.Donotcrush,puncture,orincineratebatteriesor
shortcircuitthemetalcontacts.Donotexposethebatterytowaterorotherliquids.Onlyrecharge
thebatterypackstrictlyaccordingtoinstructionsincludedintheproductdocumentation.
Batteryabuseormishandlingcancausethebatterytooverheat,whichcancausegassesorflame
to“vent”fromthebatterypackorcoincell.Ifyourbatteryisdamaged,orifyounoticeany
dischargefromyourbatteryorthebuildupofforeignmaterialsonthebatteryleads,stopusingthe
batteryandobtainareplacementfromthebatterymanufacturer.
Batteriescandegradewhentheyareleftunusedforlongperiodsoftime.Forsomerechargeable
batteries(particularlyLithiumIonbatteries),leavingabatteryunusedinadischargedstatecould
increasetheriskofabatteryshortcircuit,whichcouldshortenthelifeofthebatteryandalsocan
©CopyrightLenovo2013,2014
vii
Page 10

poseasafetyhazard.DonotletrechargeableLithium-Ionbatteriescompletelydischargeorstore
thesebatteriesinadischargedstate.
Rechargeablebatterynotice
DANGER
Donotattempttodisassembleormodifythebatterypack.Attemptingtodosocancausean
explosion,orliquidleakagefromthebatterypack.Abatterypackotherthantheonespecifiedby
Lenovo,oradisassembledormodifiedbatterypackisnotcoveredbythewarranty.
Iftherechargeablebatterypackisincorrectlyreplaced,thereisdangerofanexplosion.Thebattery
packcontainsasmallamountofharmfulsubstances.Toavoidpossibleinjury:
•ReplaceonlywithabatteryofthetyperecommendedbyLenovo.
•Keepthebatterypackawayfromfire.
•Donotexposeittowaterorrain.
•Donotattempttodisassembleit.
•Donotshort-circuitit.
•Keepitawayfromchildren.
•Donotdropthebatterypack.
Donotputthebatterypackintrashthatisdisposedofinlandfills.Whendisposingofthebattery,
complywithlocalordinancesorregulations.
Thebatterypackshouldbestoredatroomtemperature,chargedtoapproximately30to50%
ofcapacity.Werecommendthatbatterypackbechargedaboutonceperyeartoprevent
overdischarge.
Heatandproductventilation
Computers,poweradapters,andmanyaccessoriescangenerateheatwhenturnedonandwhenbatteries
arecharging.Alwaysfollowthesebasicprecautions:
•Donotleaveyourcomputer,poweradapter,oraccessoriesincontactwithyourlaporanypartofyour
bodyforanextendedperiodwhentheproductsarefunctioningorwhenthebatteryischarging.Y our
computer,poweradapter,andmanyaccessoriesproducesomeheatduringnormaloperation.Extended
contactwiththebodycouldcausediscomfortor,potentially,askinburn.
•Donotchargethebatteryoroperateyourcomputer,poweradapter,oraccessoriesnearflammable
materialsorinexplosiveenvironments.
•Ventilationslots,fans,andheatsinksareprovidedwiththeproductforsafety,comfort,andreliable
operation.Thesefeaturesmightinadvertentlybecomeblockedbyplacingtheproductonabed,sofa,
carpet,orotherflexiblesurface.Neverblock,cover,ordisablethesefeatures.
Inspectyourdesktopcomputerfordustaccumulationatleastonceeverythreemonths.Beforeinspecting
yourcomputer,turnoffthepowerandunplugthecomputer'spowercordfromtheelectricaloutlet;then
removeanydustfromventsandperforationsinthebezel.Ifyounoticeexternaldustaccumulation,then
examineandremovedustfromtheinsideofthecomputerincludingheatsinkinletfins,powersupplyvents,
andfans.Alwaysturnoffandunplugthecomputerbeforeopeningthecover.Ifpossible,avoidoperating
yourcomputerwithintwofeetofhigh-trafficareas.Ifyoumustoperateyourcomputerinornearahigh-traffic
area,inspectand,ifnecessary,cleanyourcomputermorefrequently.
viiiThinkCentreM73UserGuide
Page 11

Foryoursafetyandtomaintainoptimumcomputerperformance,alwaysfollowthesebasicprecautions
withyourdesktopcomputer:
•Keepthecoverclosedwheneverthecomputerispluggedin.
•Regularlyinspecttheoutsideofthecomputerfordustaccumulation.
•Removedustfromventsandanyperforationsinthebezel.Morefrequentcleaningsmightberequiredfor
computersindustyorhigh-trafficareas.
•Donotrestrictorblockanyventilationopenings.
•Donotstoreoroperateyourcomputerinsidefurniture,asthismightincreasetheriskofoverheating.
•Airflowtemperaturesintothecomputershouldnotexceed35°C(95°F).
•Donotinstallairfiltrationdevices.Theymayinterferewithpropercooling.
Operatingenvironment
Theoptimalenvironmentinwhichtouseyourcomputeris10°C-35°C(50°F-95°F)withhumidityranging
between35%and80%.Ifyourcomputerisstoredortransportedintemperatureslessthan10°C(50°F),
allowthecoldcomputertoriseslowlytoanoptimaloperatingtemperatureof10°C-35°C(50°F-95°F)before
use.Thisprocesscouldtaketwohoursinextremeconditions.Failuretoallowyourcomputertorisetoan
optimaloperatingtemperaturebeforeusecouldresultinirreparabledamagetoyourcomputer.
Ifpossible,placeyourcomputerinawell-ventilatedanddryareawithoutdirectexposuretosunshine.
Keepelectricalappliancessuchasanelectricfan,radio,high-poweredspeakers,airconditioner,and
microwaveovenawayfromyourcomputerbecausethestrongmagneticfieldsgeneratedbythese
appliancescandamagethemonitoranddataontheharddiskdrive.
Donotplaceanybeveragesontopoforbesidethecomputerorotherattacheddevices.Ifliquidisspilledon
orinthecomputeroranattacheddevice,ashortcircuitorotherdamagemightoccur.
Donoteatorsmokeoveryourkeyboard.Particlesthatfallintoyourkeyboardcancausedamage.
Lasercompliancestatement
CAUTION:
Whenlaserproducts(suchasCD-ROMs,DVDdrives,fiberopticdevices,ortransmitters)are
installed,notethefollowing:
•Donotremovethecovers.Removingthecoversofthelaserproductcouldresultinexposureto
hazardouslaserradiation.Therearenoserviceablepartsinsidethedevice.
•Useofcontrolsoradjustmentsorperformanceofproceduresotherthanthosespecifiedherein
mightresultinhazardousradiationexposure.
DANGER
SomelaserproductscontainanembeddedClass3AorClass3Blaserdiode.Notethefollowing:
Laserradiationwhenopen.Donotstareintothebeam,donotviewdirectlywithoptical
instruments,andavoiddirectexposuretothebeam.
©CopyrightLenovo2013,2014
ix
Page 12

Powersupplystatement
Neverremovethecoveronapowersupplyoranypartthathasthefollowinglabelattached.
Hazardousvoltage,current,andenergylevelsarepresentinsideanycomponentthathasthislabelattached.
Therearenoserviceablepartsinsidethesecomponents.Ifyoususpectaproblemwithoneoftheseparts,
contactaservicetechnician.
Cleaningandmaintenance
Keepyourcomputerandworkspaceclean.Shutdownthecomputerandthendisconnectthepower
cordbeforecleaningthecomputer.Donotsprayanyliquiddetergentdirectlyonthecomputeroruse
anydetergentcontainingflammablematerialtocleanthecomputer.Spraythedetergentonasoftcloth
andthenwipethecomputersurfaces.
xThinkCentreM73UserGuide
Page 13

Chapter1.Productoverview
Thischapterprovidesinformationaboutthecomputerfeatures,specifications,softwareprogramsprovided
byLenovo,andlocationsofconnectors,components,partsonthesystemboard,andinternaldrives.
Features
Thissectionintroducesthecomputerfeatures.Theinformationcoversavarietyofmodels.
Toviewtheinformationaboutyourspecificmodel,dooneofthefollowing:
•GointotheSetupUtilityprogrambyfollowingtheinstructionsinChapter7“UsingtheSetupUtility
program”onpage93
•OntheMicrosoft
toviewtheinformation.
•OntheMicrosoftWindows8orWindows8.1operatingsystem,gotothedesktopandmoveyourpointer
tothetop-rightorbottom-rightcornerofthescreentodisplaythecharms.ThenclickSettings➙PC
infotoviewtheinformation.
Microprocessor
Toviewthemicroprocessorinformationofyourcomputer,dothefollowing:
•OntheMicrosoftWindows7operationsystem,clickStart,right-clickComputer,andselectProperties
toviewtheinformation.
•OntheMicrosoftWindows8orWindows8.1operatingsystem,gotothedesktopandmoveyourpointer
tothetop-rightorbottom-rightcornerofthescreentodisplaythecharms.ThenclickSettings➙PC
infotoviewtheinformation.
.Then,selectMain➙SystemSummarytoviewtheinformation.
®
Windows
®
7operationsystem,clickStart,right-clickComputer,andselectProperties
Memory
Yourcomputersupportsuptotwodoubledatarate3smalloutlinedualinlinememorymodules(DDR3
SODIMMs).
Internaldrives
•ExternalOpticaldrive:DVD-ROMorDVD-R(optional)
•Hybriddrive(optional)
•SerialAdvancedT echnologyAttachment(SATA)harddiskdrive
•Solid-statedrive(optional)
Videosubsystem
•IntegratedgraphicsforaVideoGraphicsArray(VGA)connectorandaDisplayPort®connector
Audiosubsystem
•Integratedhigh-definition(HD)audio
•Microphoneconnectorandheadsetconnector(alsoknownasaudiojack)onthefrontpanel
•Internalspeaker
Connectivity
©CopyrightLenovo2013,2014
1
Page 14

•100/1000MbpsintegratedEthernetcontroller
•Wi-Ficardmodule(optional)
•Wi-FiwithBluetoothmodule(optional)
Systemmanagementfeatures
•Abilitytostorepower-onself-test(POST)hardwaretestresults
•DesktopManagementInterface(DMI)
DesktopManagementInterfaceprovidesacommonpathforuserstoaccessinformationaboutall
aspectsofacomputer,includingprocessortype,installationdate,attachedprintersandotherperipherals,
powersources,andmaintenancehistory.
•ErPLPScompliancemode
Theenergy-relatedproductsdirective(ErP)lowestpowerstate(LPS)compliancemodereducesthe
consumptionofelectricitywhenyourcomputerisinsleeporoffmode.Formoreinformation,see
“EnablingErPLPScompliancemode”onpage96.
•Intel
®
StandardManageability
IntelStandardManageabilityishardwareandfirmwaretechnologythatbuildscertainfunctionality
intocomputersinordertomakethemeasierandlessexpensiveforbusinessestomonitor,maintain,
update,upgrade,andrepair.
•PrebootExecutionEnvironment(PXE)
ThePrebootExecutionEnvironmentisanenvironmenttostartcomputersusinganetworkinterface
independentofdatastoragedevices(suchastheharddiskdrive)orinstalledoperatingsystems.
•IntelligentCoolingEngine(ICE)
TheIntelligentCoolingEngineisasystemthermalmanagementsolutionthatenablesyourcomputer
torunwithbetterthermalandacousticperformance.TheICEfunctionalsomonitorsthethermal
performanceofyourcomputertoidentifythermalproblems.Formoreinformation,see“ICEperformance
mode”onpage97
and“ICEthermalalert”onpage98.
•SystemManagement(SM)BasicInput/OutputSystem(BIOS)andSMsoftware
TheSMBIOSspecificationdefinesdatastructuresandaccessmethodsinaBIOSthatallowsauseror
applicationtostoreandretrieveinformationspecificaboutthecomputerinquestion.
•WakeonLAN
WakeonLANisanEthernetcomputernetworkingstandardthatallowsacomputertobeturnedon
orwokenupbyanetworkmessage.Themessageisusuallysentbyaprogramrunningonanother
computeronthesamelocalareanetwork.
•WindowsManagementInstrumentation(WMI)
WindowsManagementInstrumentationisasetofextensionstotheWindowsDriverModel.Itprovidesan
operatingsysteminterfacethroughwhichinstrumentedcomponentsprovideinformationandnotification.
2ThinkCentreM73UserGuide
Page 15

Input/Output(I/O)features
•OneDisplayPortconnector
•OneEthernetconnector
•Oneoptionalconnector(forinstallingaserialconnectororaUSB2.0connector)
•OneVGAmonitorconnector
•ThreeUniversalSerialBus(USB)2.0connectors(ontherearpanel)
•TwoUSB3.0connectors(onthefrontpanel)
•Twoaudioconnectorsonthefrontpanel(microphoneconnectorandheadsetconnector)
Formoreinformation,see“Locatingconnectors,controls,andindicatorsonthefrontofyourcomputer”on
page8
and“Locatingconnectorsontherearofyourcomputer”onpage10.
Expansion
•Oneexternalopticaldrivebox(optional,supportinganopticaldriveorasecondaryharddiskdrive)
•Oneharddiskdrivebay
•OneminiPCIExpresscardslot
Powersupply
Yourcomputercomeswitha65-wattacpoweradapter.
Securityfeatures
•Abilitytoenableordisableadevice
•AbilitytoenableanddisableUSBconnectorsindividually
•ComputraceAgentsoftwareembeddedinfirmware
•Coverpresenceswitch(alsocalledintrusionswitch)
•Keyboardwithfingerprintreader(shippedwithsomemodels)
•Power-onpassword(POP),administratorpassword,andharddiskdrivepasswordtodeterunauthorized
useofyourcomputer
•Startupsequencecontrol
•Startupwithoutkeyboardormouse
•SupportforaKensington-stylecablelock
Formoreinformation,seeChapter4“Security”onpage31
.
Preinstalledsoftwareprograms
Yourcomputerispreinstalledwithsoftwareprogramstohelpyouworkmoreeasilyandsecurely.Formore
information,see“Lenovoprograms”onpage4.
Preinstalledoperatingsystem
Yourcomputerispreinstalledwithoneofthefollowingoperatingsystems:
•MicrosoftWindows7operatingsystem
•MicrosoftWindows8operatingsystem
•MicrosoftWindows8.1operatingsystem
Chapter1.Productoverview3
Page 16

Operatingsystem(s),certifiedortestedforcompatibility
•Linux
®
1
Specifications
Thissectionliststhephysicalspecificationsforyourcomputer.
Dimensions
Width:179mm(7.05inches)
Height:34.5mm(1.36inches)
Depth:182mm(7.17inches)
Weight
Maximumconfigurationasshipped:4.86kg(10.71lb)(withpackage)
Maximumconfigurationasshipped:4.14kg(9.13lb)(withoutpackage)
Environment
•Airtemperature:
Operating:10°Cto35°C(50°Fto95°F)
Storageinoriginalshippingpackage:-40°Cto60°C(-40°Fto140°F)
Storagewithoutpackage:-10°Cto60°C(14°Fto140°F)
•Humidity:
Operating:20%to80%(non-condensing)
Storage:20%to90%(non-condensing)
•Altitude:
Operating:-15.2to3048m(-50to10000ft)
Storage:-15.2to10668m(-50to35000ft)
Electricalinput
Theacpoweradapterinputvoltage:100to240Vac
Inputfrequency:50/60Hz
(variesbymodeltype)
Lenovoprograms
YourcomputercomeswithLenovoprogramstohelpyouworkmoreeasilyandsecurely.Dependingon
theWindowsoperatingsystempreinstalled,theprogramsmightvary.
AccessingLenovoprogramsontheWindows7operatingsystem
YoucanaccessLenovoprogramsontheWindows7operatingsystemthroughWindowsSearchorfrom
ControlPanel.TheiconnamedisplayedinthesearchresultorControlPanelmightbedifferentfromthe
programname.YoucanfindtheprogrambyitsprogramnameoriconnameasshownintheLenovo
programsavailableontheWindows7operatingsystemtable.
1.Theoperatingsystem(s)listedherearebeingcertifiedortestedforcompatibilityatthetimethispublicationgoesto
press.AdditionaloperatingsystemsmightbeidentifiedbyLenovoascompatiblewithyourcomputerfollowingthe
publicationofthismanual.Thislistissubjecttochange.Todetermineifanoperatingsystemhasbeencertifiedor
testedforcompatibility,checktheWebsiteoftheoperatingsystemvendor.
4ThinkCentreM73UserGuide
Page 17

Note:Ifyoudonotfindtheprogramyouneed,opentheLenovoThinkVantage
®
Toolsprogramtofindthe
dimmediconfortheprogram.Thendouble-clicktheicontoinstalltheprogram.
ToaccessLenovoprogramsthroughWindowsSearch,dothefollowing:
1.ClicktheStartbuttonandthentypetheprogramnameortheiconnameintothesearchbox.
2.Locatetheprogrambytheprogramnameortheiconnameandthenclicktheprogramtolaunchit.
ToaccessLenovoprogramsfromControlPanel,dothefollowing:
Note:SomeLenovoprogramsmightnotbedisplayedinControlPanel.Tofindtheseprograms,use
WindowsSearch.
1.ClickStart➙ControlPanel.ChangetheviewofControlPanelfromCategorytoLargeiconsorSmall
icons.
2.Locatetheprogrambytheiconnameandthenclicktheprogramtolaunchit.
ThefollowingtableliststheprogramsavailableontheWindows7operatingsystem.
Note:Dependingonyourcomputermodel,someoftheLenovoprogramsmightnotbeavailable.
Table1.LenovoprogramsavailableontheWindows7operatingsystem
ProgramnameIconname
CommunicationsUtilityLenovo-WebConferencing
FingerprintManagerProor
ThinkVantageFingerprintSoftware
LenovoBluetoothLockLenovoBluetoothLock
LenovoReachLenovoReach
LenovoSHAREitLenovoSHAREit
LenovoSolutionCenterLenovo-SystemHealthandDiagnostics
LenovoThinkVantageToolsLenovoThinkvantageTools
PasswordManagerLenovo-PasswordVault
PCCloudManagerPCCloudManager
PowerManager
RecoveryMedia
RescueandRecovery
SystemUpdate
ViewManagementUtilityLenovo-ViewManagementUtility
®
Lenovo-FingerprintManagerProorLenovo-FingerprintReader
Lenovo-PowerControls
Lenovo-FactoryRecoveryDisksorCreateRecoveryMedia
Lenovo-EnhancedBackupandRestore
Lenovo-UpdateandDrivers
AccessingLenovoprogramsontheWindows8orWindows8.1operating system
IfyourcomputerispreinstalledwiththeWindows8orWindows8.1operatingsystem,youcanaccess
Lenovoprogramsbydoingoneofthefollowing:
•OntheWindows8operatingsystem,presstheWindowskeytogototheStartscreen.ClickaLenovo
programtolaunchit.Ifyoucannotfindtheprogramyouneed,movethepointertothebottom-rightcorner
ofthescreentodisplaythecharms.ThenclicktheSearchcharmtosearchforthedesiredprogram.
Chapter1.Productoverview5
Page 18

•OntheWindows8.1operatingsystem,presstheWindowskeytogototheStartscreen.Clicka
Lenovoprogramtolaunchit.Ifyoucannotfindtheprogramyouneed,clickthearrowiconinthe
bottom-leftcornerofthescreentogototheAppsscreen.Findthedesiredprogramintheappslistor
searchforitinthesearchboxinthetop-rightcornerofthescreen.
Dependingonyourcomputermodel,yourcomputersupportssomeofthefollowingLenovoprograms:
•FingerprintManagerProorThinkVantageFingerprintSoftware
•LenovoBluetoothLock(Windows8.1only)
•LenovoCompanion
•LenovoReach
•LenovoSettings
•LenovoSHAREit
•LenovoSolutionCenter
•LenovoSupport
•LenovoT ools
•PasswordManager
•PowerManager
•PCCloudManager(Windows8.1only)
•SystemUpdate
AnintroductiontoLenovoprograms
ThistopicprovidesabriefintroductiontosomeLenovoprograms.
Note:Dependingonyourcomputermodel,someoftheprogramsmightnotbeavailable.
•CommunicationsUtility(Windows7)
TheCommunicationsUtilityprogramprovidesacentrallocationforintegratedcameraandmicrophone
settings.ItcontrolsadvancedsettingsfortheintegratedmicrophoneandcameratooptimizeWeb
conferencingandVoiceoverIP(VOIP)experience.
•FingerprintManagerProorThinkVantageFingerprintSoftware(Windows7,Windows8,and
Windows8.1)
Theintegratedfingerprintreaderprovidedonsomekeyboardsenablesyoutoenrollyourfingerprint
andassociateitwithyourpower-onpassword,harddiskpassword,andWindowspassword.Asa
result,fingerprintauthenticationcanreplacepasswordsandenablesimpleandsecureuseraccess.A
fingerprintreaderkeyboardisavailablewithselectcomputersorcanbepurchasedforcomputersthat
supportthisoption.
•LenovoBluetoothLock(Windows7andWindows8.1)
TheLenovoBluetoothLockprogramenablesyoutouseaBluetoothdevice(suchasyoursmartphone)as
aproximity-basedunitforlockingorunlockingyourcomputerautomatically.Bydetectingthedistance
betweenyourcomputerandthepredefinedBluetoothdevicethatyouarecarrying,theLenovoBluetooth
Lockprogramautomaticallylocksyourcomputerwhenyouwalkawayandunlocksyourcomputerwhen
youcomeback.Thisisasimplewaytoprotectyourcomputeragainstunauthorizedaccessincase
thatyouforgettolockyourcomputer.
•LenovoCompanion(Windows8andWindows8.1)
ThroughtheLenovoCompanionprogram,youcangettheinformationabouttheaccessoriesforyour
computer,viewblogsandarticlesaboutyourcomputer,andcheckforotherrecommendedprograms.
6ThinkCentreM73UserGuide
Page 19

•LenovoReach(Windows7,Windows8,andWindows8.1)
UsetheLenovoReachprogramtoenhanceyourcloudexperience.LenovoReachkeepsyouconnected
atalltimesandenablesyoutoaccessallyourfavoriteitemsfrompersonalcomputers,smartphones,or
tablets.WithLenovoReach,youcanaddyourfavoriteWebservicestoyourclouddesktop;staylogged
intoWebsiteswiththecloudpasswordmanager;andaccess,edit,andshareyourfilesfromanywhere.
•LenovoSettings(Window8andWindows8.1)
UsetheLenovoSettingsprogramtoenhanceyourcomputingexperience.Youcanturnyourcomputer
intoaportablehotspot,configurecameraandaudiosettings,optimizeyourpowerplansettings,and
createandmanagemultiplenetworkprofiles.
•LenovoSHAREit(Windows7,Windows8,andWindows8.1)
TheLenovoSHAREitprogramprovidesaquickandeasywaytosharefilesandfoldersamongcomputers,
smartphones,tablets,orsmartTVswiththeAndroidortheWindowsoperatingsysteminstalled.SHAREit
usesanytypeofnetworkorevennonetworkatalltosharefilesandfolders.
•LenovoSolutionCenter(Windows7,Windows8,andWindows8.1)
TheLenovoSolutionCenterprogramenablesyoutotroubleshootandresolvecomputerproblems.It
combinesdiagnostictests,systeminformationcollection,securitystatus,andsupportinformation,along
withhintsandtipsformaximumsystemperformance.
•LenovoSupport(Windows8andWindows8.1)
TheLenovoSupportprogramenablesyoutoregisteryourcomputerwithLenovo,checkthecomputer
healthconditionandbatterystatus,downloadandviewusermanualsforyourcomputer,getthewarranty
informationofyourcomputer,andexplorehelpandsupportinformation.
•LenovoThinkVantageT ools(Windows7)
TheLenovoThinkVantageT oolsprogramguidesyoutoahostofinformationsourcesandprovideseasy
accesstovarioustoolstohelpyouworkmoreeasilyandsecurely.
•LenovoTools(Windows8andWindows8.1)
TheLenovoToolsprogramguidesyoutoahostofinformationsourcesandprovideseasyaccessto
varioustoolstohelpyouworkmoreeasilyandsecurely.
•PasswordManager(Windows7,Windows8,andWindows8.1)
ThePasswordManagerprogramautomaticallycapturesandfillsinauthenticationinformationfor
WindowsprogramsandWebsites.
•PCCloudManager(Windows7andWindows8.1)
ThePCCloudManager(PCM)programisabrowser-basedsolutionforclient-computermanagement.
ThePCMprogramhastwocomponents:PCMServerandPCMClient.PCMServerisinstalledonthe
computer,wheretheadministratorperformsmanagementwork,suchaspowermanagementandsecurity
management.PCMClientisinstalledontheclientcomputerstobemanaged.Theadministratorcanlog
intoPCMServertomanagecomputerswithPCMClientinstalled,throughtheInternetWebbrowser.
•PowerManager(Windows7,Windows8,andWindows8.1)
ThePowerManagerprogramprovidesconvenient,flexible,andcompletepowermanagementforyour
computer.Itenablesyoutoadjustyourcomputerpowersettingstoachievethebestbalancebetween
performanceandpowersaving.
•RecoveryMedia(Windows7)
TheRecoveryMediaprogramenablesyoutorestorethecontentsoftheharddiskdrivetothefactory
defaultsettings.
•RescueandRecovery(Windows7)
TheRescueandRecoveryprogramisaone-buttonrecoveryandrestoresolutionthatincludesasetof
self-recoverytoolstohelpyoudiagnosecomputerproblems,gethelp,andrecoverfromsystemcrashes,
evenifyoucannotstarttheWindowsoperatingsystem.
Chapter1.Productoverview7
Page 20

•SystemUpdate(Windows7,Windows8,andWindows8.1)
TheSystemUpdateprogramhelpsyoukeepthesoftwareonyourcomputerup-to-datebydownloading
andinstallingsoftwareupdatepackages(Lenovoprograms,devicedrivers,UEFIBIOSupdates,and
otherthirdpartyprograms).
•ViewManagementUtility(Windows7)
TheViewManagementUtilityprogramenablesyoutoeasilyorganizeyouropenwindows.Itdividesyour
screenintomultiplepartsandthenresizesandpositionsopenwindowsintodifferentpartstomakethe
bestuseofyourdesktop.Theprogramalsoisabletoworkacrossmultiplemonitorstoimproveyour
productivity.
Locations
Thissectionprovidesinformationtohelpyoulocatetheconnectorsonthefrontandrearofyourcomputer,
partsonthesystemboard,andcomponentsandinternaldrivesinyourcomputer.
Note:Thecomponentsinyourcomputermightlookslightlydifferentfromtheillustrations.
Locatingconnectors,controls,andindicatorsonthefrontofyour computer
Figure1“Frontconnector,control,andindicatorlocations”onpage9showsthelocationsoftheconnectors,
controls,andindicatorsonthefrontofyourcomputer.
8ThinkCentreM73UserGuide
Page 21
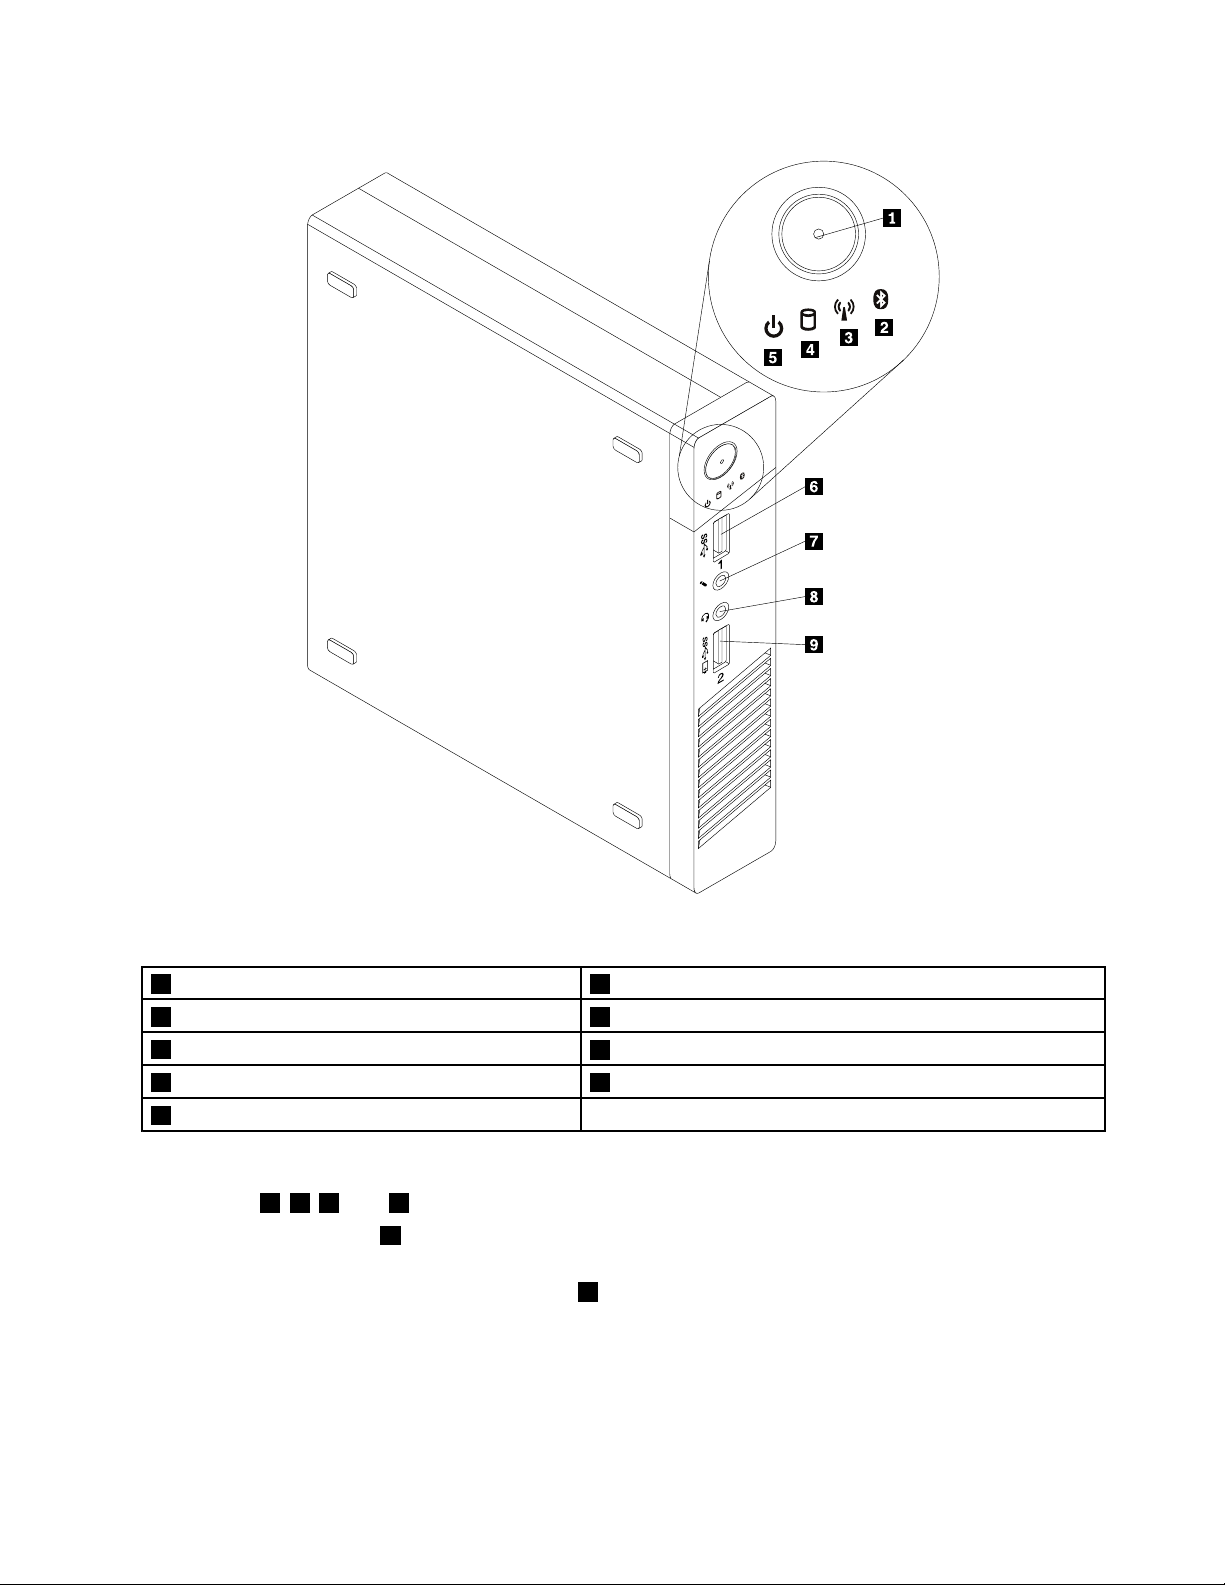
Figure1.Frontconnector,control,andindicatorlocations
1Powerbutton2Bluetoothactivityindicator
3Wirelessactivityindicator4Harddiskdriveactivityindicator
5Powerindicator
7Microphoneconnector8Headsetconnector
9AlwaysOnUSB3.0connector
6USB3.0connector
Notes:
•Indicators2,3,4,and5arevisibleonlywhentheyarelit.
•Theheadsetconnector
8supportsamicrophone-integratedheadsetanddoesnotsupporta
conventionalmicrophone.
•Bydefault,theAlwaysOnUSB3.0connector9enablesyoutochargesomemobiledigitaldevicesand
smartphoneswhenyourcomputerisinsleeporhibernationmodeorispoweredoff.
Chapter1.Productoverview9
Page 22
Locatingconnectorsontherearofyourcomputer
Figure2“Rearconnectorlocations”onpage10showsthelocationsoftheconnectorsontherearofyour
computer.Someconnectorsontherearofyourcomputerarecolor-codedtohelpyoudeterminewhereto
connectthecablesonyourcomputer.
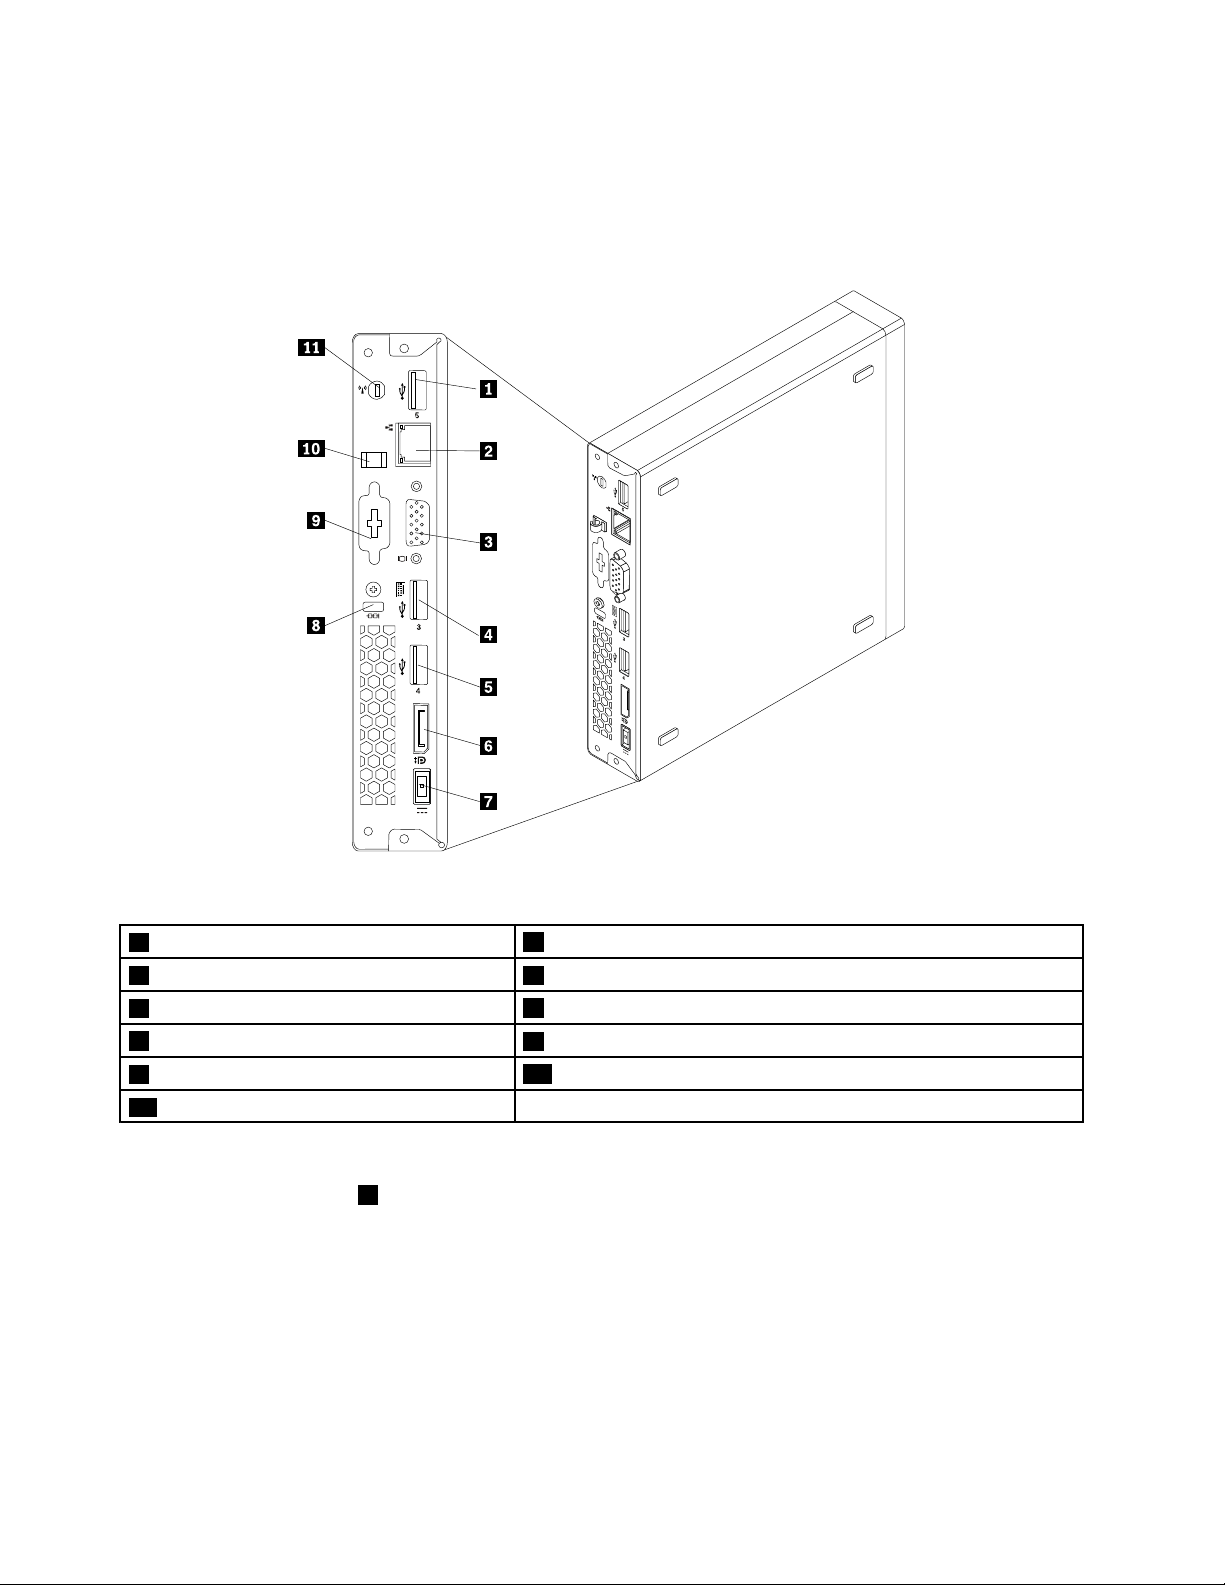
Figure2.Rearconnectorlocations
1USB2.0connector
3VGAmonitorconnector4USB2.0connector
5USB2.0connector
7acpoweradapterconnector
9Optionalconnector
11Wi-Fiantennaslot
2Ethernetconnector
6DisplayPortconnector
8Security-lockslot
10acpoweradaptercableloop
Notes:
•TheUSB2.0connector
4supportsthesmartpoweronfeaturethatenablesyoutoturnonthecomputer
orwakeitupfromS4hibernationmodebypressingAlt+Ponthekeyboard.Youcanenableordisable
thesmartpoweronfeaturefromtheSetupUtilityprogram.Fordetailedinformation,see“Enablingor
disablingadevice”onpage95
.
•Ifyourcomputerisinstalledwithagraphicscard,ensurethatyouusethemonitorconnectorsonthe
graphicscard.
10ThinkCentreM73UserGuide
Page 23

ConnectorDescription
DisplayPortconnector
Usedtoattachahigh-performancemonitor,adirect-drivemonitor,orotherdevices
thatuseaDisplayPortconnector.
Note:TheDisplayPortconnectorisnotapplicableonsomemodels.Ifyour
computerhasagraphicscardinstalled,besuretouseamonitorconnectoron
thegraphicscard.
Ethernetconnector
UsedtoattachanEthernetcableforalocalareanetwork(LAN).
Note:TooperatethecomputerwithinFCCClassBlimits,useaCategory5Ethernet
cable.
OptionalconnectorUsedtoinstallaserialconnectororaUSB2.0connector.
Note:Ifyouusetheoptionalconnectorforinstallingaserialconnector,theserial
connectorandtheadjacentVGAmonitorconnectormightinterferewitheachother
whenconnectingcables.Toavoidtheinterference,ensurethatyouusetheserial
connectorconvertcablethatcomeswiththecomputerwhenyouconnectadevice
totheserialconnector.
USB2.0connectorUsedtoattachadevicethatrequiresaUSB2.0connection,suchasakeyboard,a
mouse,ascanner,aprinter,orapersonaldigitalassistant(PDA).
USB3.0connectorUsedtoattachadevicethatrequiresaUSB2.0or3.0connection,suchasa
keyboard,amouse,ascanner,aprinter,orapersonaldigitalassistant(PDA).A
USB3.0connectorprovideshightransmissionspeedstoreducethetimethatis
requiredfordatatransmission.
VGAmonitorconnectorUsedtoattachaVGAmonitororotherdevicesthatuseaVGAmonitorconnector.
Note:TheVGAconnectorisnotapplicableonsomemodels.Ifyourcomputerhas
agraphicscardinstalled,besuretouseamonitorconnectoronthegraphicscard.
Chapter1.Productoverview11
Page 24
Locatingcomponents
Figure3“Componentlocations”onpage12showsthelocationsofthevariouscomponentsinyour
computer.Toremovethecomputercover,see“Removingthecomputercover”onpage57.
Figure3.Componentlocations
12ThinkCentreM73UserGuide
Page 25
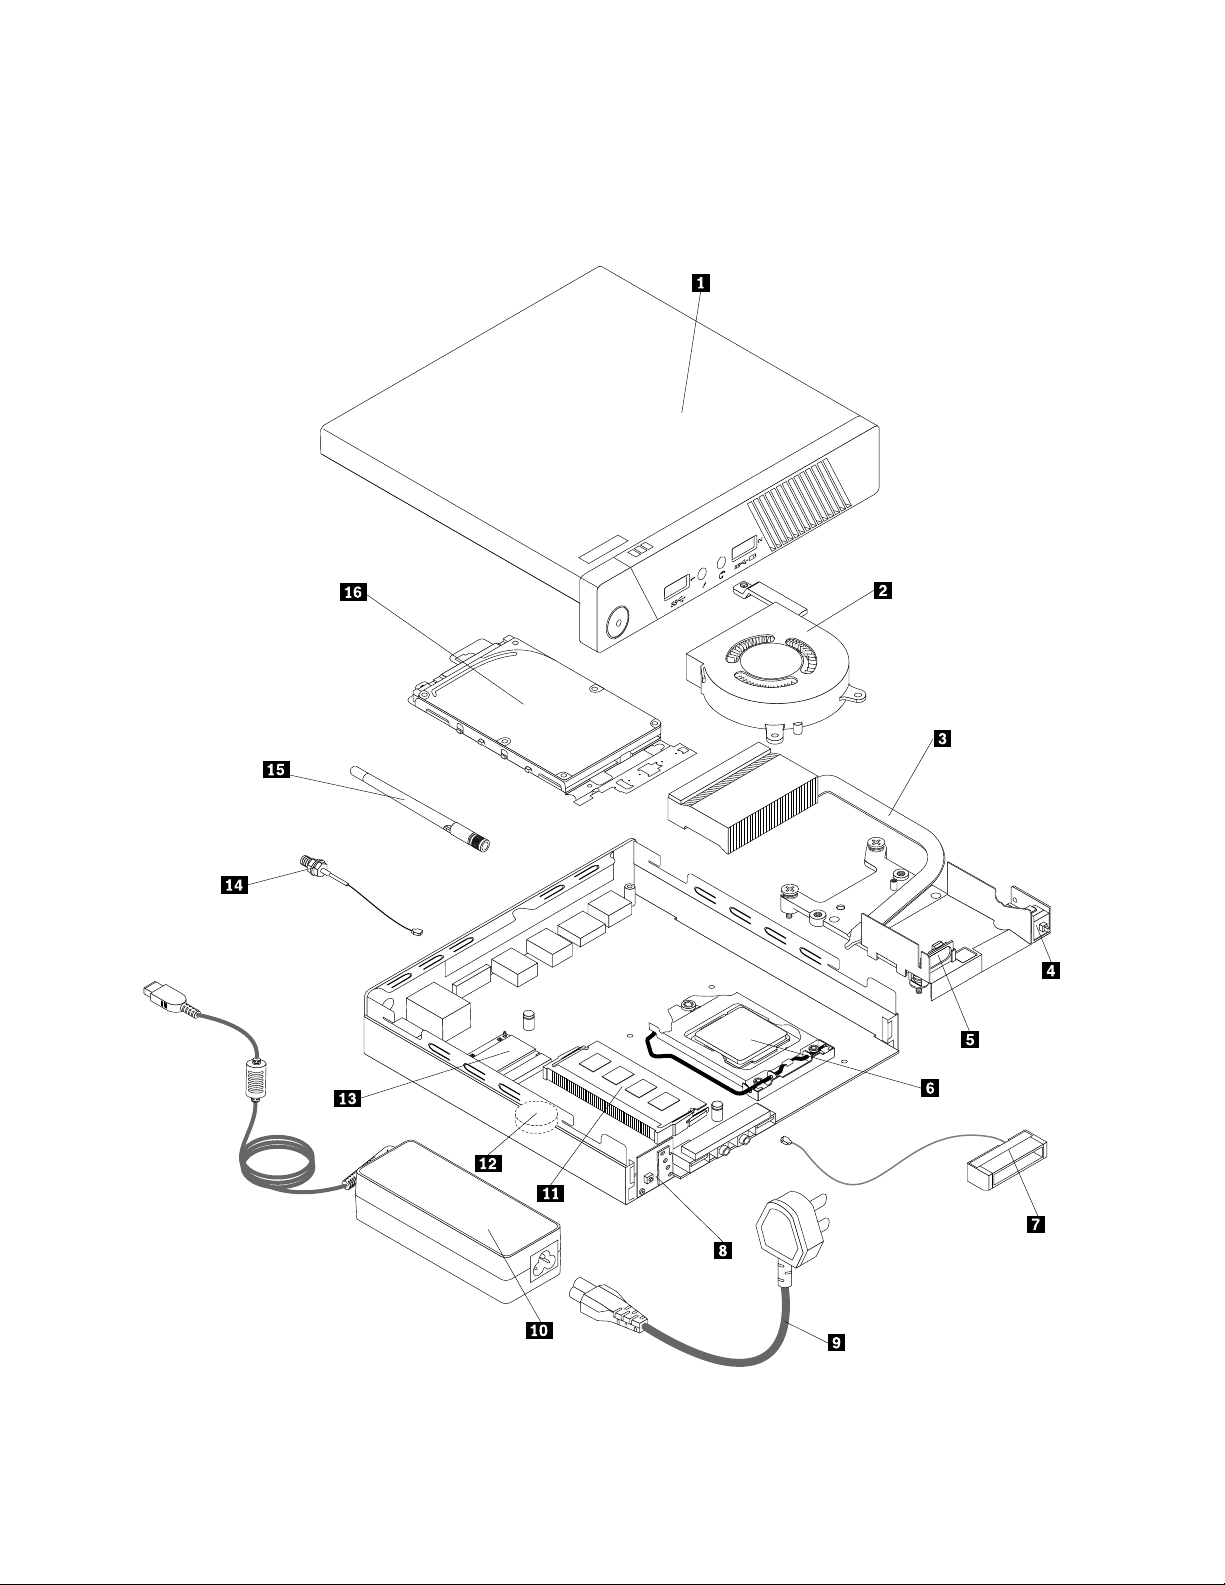
1Computercover2Systemfan
3Thermalmodule
5Internalspeaker6Microprocessor
7FrontWi-Fiantenna8Powerbuttonboard
9Powercord10acpoweradapter
11Memorymodules12Battery
13Wi-Ficardmodule14RearWi-Fiantennacable
15RearWi-Fiantenna
4Coverpresenceswitch(intrusionswitch)
16Harddiskdriveassembly(withaharddiskdriveorsolid-state
driveinstalled)
Locatingpartsonthesystemboard
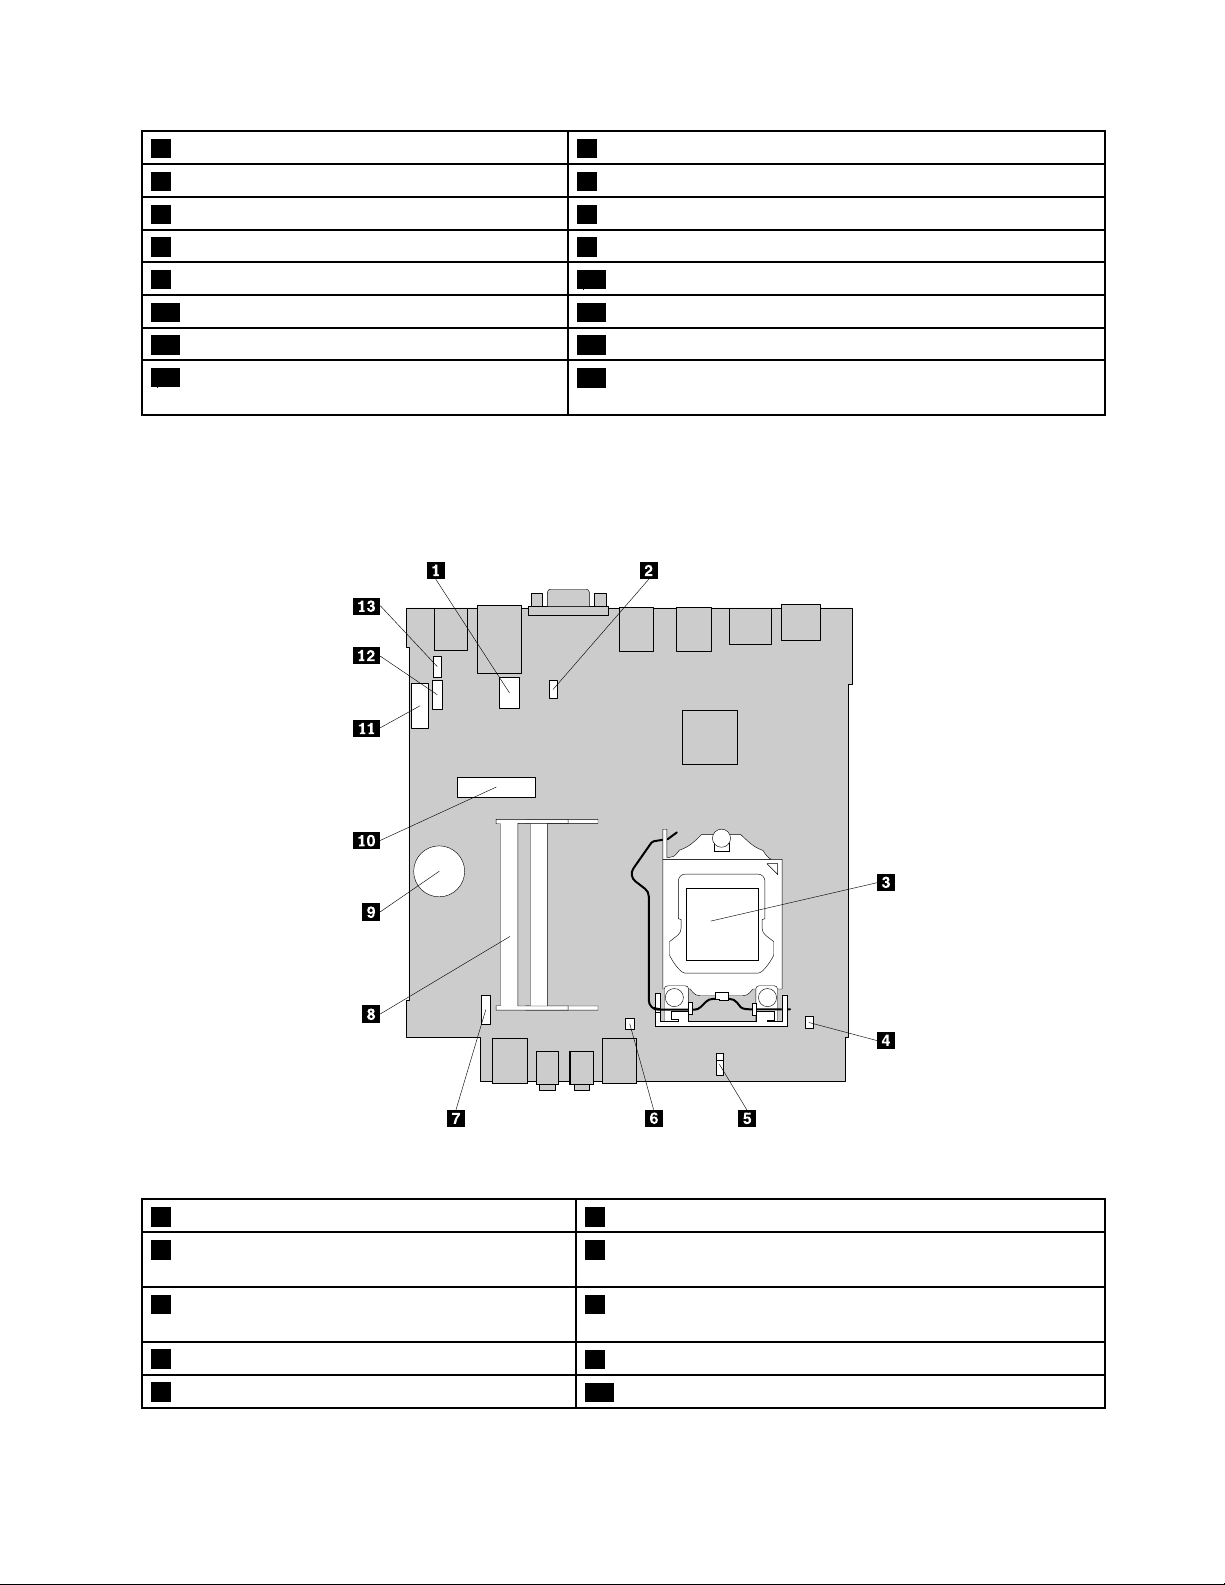
Figure4“Systemboardpartlocations”onpage13showsthelocationsofthepartsonthesystemboard.
Figure4.Systemboardpartlocations
1Serial(COM1)connector2Systemfanconnector
3Microprocessor
4Coverpresenceswitchconnector(intrusionswitch
connector)
5ClearCMOS(ComplementaryMetalOxide
6Internalspeakerconnector
Semiconductor)/Recoveryjumper
7Powerbuttonboardcableconnector
9Battery
8Memoryslots(2)
10MiniPCIExpresscardslot
Chapter1.Productoverview13
Page 26
11SATA3.0connector
13OptionalUSB2.0connector
12Harddiskdrivepowerconnector
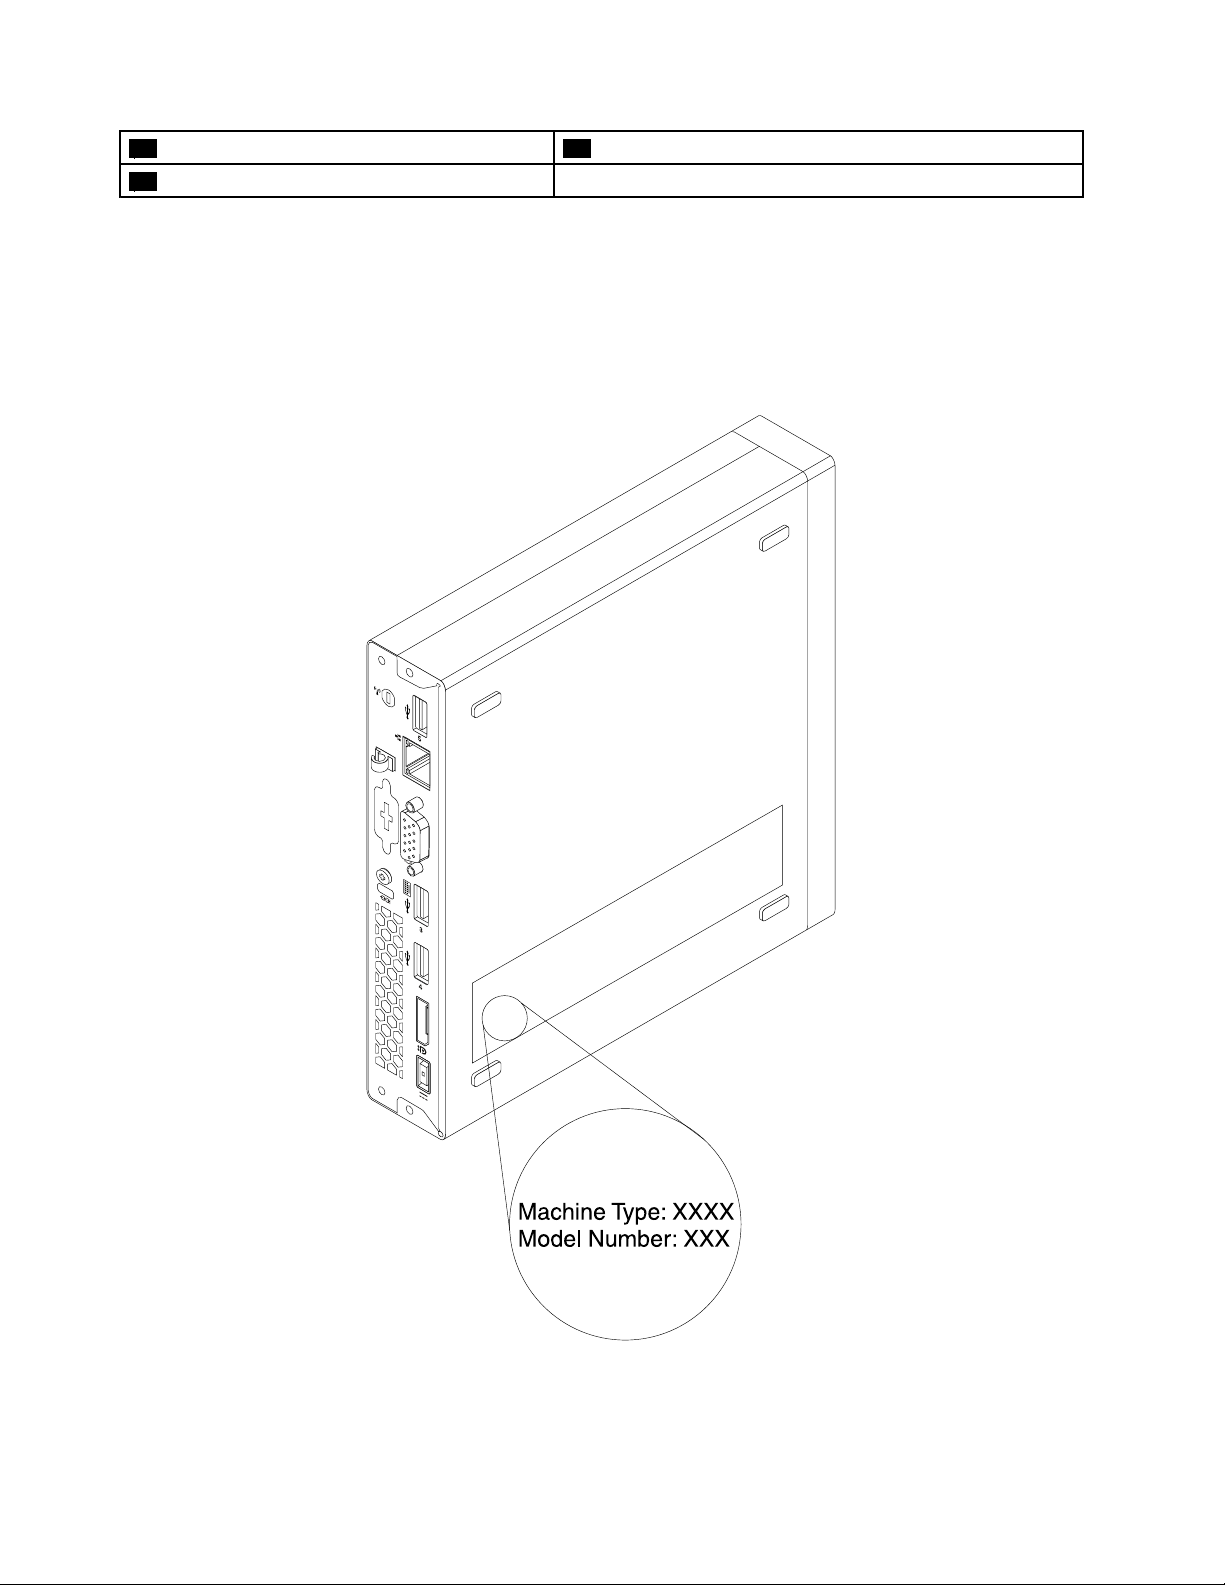
Machinetypeandmodellabel
Themachinetypeandmodellabelidentifiesyourcomputer.WhenyoucontactLenovoforhelp,themachine
typeandmodelinformationhelpssupporttechnicianstoidentifyyourcomputerandprovidefasterservice.
Thefollowingisasampleofthemachinetypeandmodellabel.
Figure5.Machinetypeandmodellabel
14ThinkCentreM73UserGuide
Page 27

Chapter2.Usingyourcomputer
Thischapterprovidesinformationonusingsomeofthecomputercomponents.
Frequentlyaskedquestions
Thefollowingareafewtipsthatwillhelpyouoptimizetheuseofyourcomputer.
CanIgetmyuserguideinanotherlanguage?
TheuserguideisavailableinvariouslanguagesontheLenovoSupportWebsiteat:
http://www.lenovo.com/UserManuals
Wherearemyrecoverydiscs?
Lenovoprovidesaprogramthatenablesyoutocreaterecoverydiscs.Fordetailsaboutcreatingrecovery
discs,see“Creatingrecoverymedia”onpage86
Additionally,incaseofaharddiskfailure,youcanorderProductRecoverydiscsfromtheLenovoCustomer
SupportCenter.ForinformationaboutcontactingtheCustomerSupportCenter,seeChapter11“Getting
information,help,andservice”onpage125.BeforeusingtheProductRecoverydiscs,refertothe
documentationthatcomeswiththediscs.
Attention:AProductRecoverydiscpackagemightcontainmultiplediscs.Makesureyouhaveallofthe
discsreadybeforestartingtherecoveryprocess.Duringtherecoveryprocess,youmightbeprompted
tochangediscs.
.
WherecanIfindhelpabouttheWindowsoperatingsystem?
TheWindowsHelpandSupportinformationsystemprovidesyouwithdetailedinformationaboutusingthe
Windowsoperatingsystemtohelpyougetthemostofyourcomputer.ToaccesstheWindowsHelpand
Supportinformationsystem,dooneofthefollowing:
•OntheWindows7operatingsystem,clickStart➙HelpandSupport.
•OntheWindows8orWindows8.1operatingsystem,moveyourpointertothetop-rightorbottom-right
cornerofthescreentodisplaythecharms.ThenclickSettings➙Help.Additionally,theWindows8.1
operatingsystemprovidesaHelp+TipsapplicationthatyoucanopenfromtheStartscreenorApps
screen.
CanIchangetheWindows8.1startupbehaviortoopeneitherthedesktoportheStartscreen?
OntheWindows8.1operatingsystem,youcansetthecomputertoopeneitherthedesktoportheStart
screenbydefault.T osetthedefaultstartupscreen,dothefollowing:
1.Onthedesktop,moveyourpointertothetaskbaratthebottomofthescreenandright-clickonthe
taskbar.
2.ClickProperties.TheTaskbarandNavigationpropertieswindowisdisplayed.
3.OntheNavigationtab,locatetheStartscreensection,andthendooneofthefollowing:
•Tosetthedesktopasyourdefaultstartupscreen,selectWhenIsigninorcloseallappsona
screen,gotothedesktopinsteadofStartsoacheckisvisible.
•TosettheStartscreenasyourdefaultstartupscreen,removethecheckfromtheWhenIsigninor
closeallappsonthescreen,gotodesktopinsteadofStartcheckbox.
4.ClickOKtosavethenewsetting.
ThisfeatureisnotavailableontheWindows8operatingsystem.
©CopyrightLenovo2013,2014
15
Page 28

NavigatingamongscreensontheWindows8andWindows8.1operating systems
Thissectionprovidesinstructionsonhowtonavigateamongthedesktop,theStartscreen,andapplications
thatwereopenedfromtheStartscreenontheWindows8andWindows8.1operatingsystems.Fordetailed
instructions,see“NavigatingonWindows8”onpage16
or“NavigatingonWindows8.1”onpage17.
NavigatingonWindows8
Tonavigateamongthedesktop,theStartscreen,andapplicationsthatwereopenedfromtheStartscreen
ontheWindows8operatingsystem,dooneofthefollowing:
•FromtheStartscreen,dooneofthefollowingtonavigatetothemostrecentlyaccessedworkspace
(application,PCsettings,ordesktop):
–Usingapointingdevice:Movethepointertotheextremebottom-leftcornerofthescreenuntilasmall
representationoftheworkspaceisdisplayed;thenclicktherepresentation.
–Usingatouchscreen:Swipeinandoutontheleftedgeofthescreen.Representationsofallavailable
workspacesaredisplayedalongtheleftedgeofthescreen.Taptherepresentationoftheworkspaceat
thebottom.
Note:Therepresentationofaworkspaceisdisplayedonlyifyouhaveatleastoneactiveworkspacein
thebackgroundofthesystem.
•FromthedesktoporanyotherworkspacethatisopenedfromtheStartscreen,dooneofthefollowingto
navigatetotheStartscreen:
–Usingapointingdevice:Movethepointertotheextremebottom-leftcornerofthescreenuntilasmall
representationoftheStartscreenisdisplayed;thenclicktherepresentation.
–Usingatouchscreen:Dooneofthefollowing:
–Swipeinandoutontheleftedgeofthescreen.Representationsofallavailableworkspacesare
displayedalongtheleftedgeofthescreen.TaptherepresentationoftheStartscreenatthebottom.
–Swipeinfromtherightedgeofthescreentodisplaythecharms;thentapStart.
•Fromanyworkspace(Startscreen,desktop,PCsettings,orapplicationopenedfromtheStartscreen),
useanyofthefollowingprocedurestogotoanotherworkspacethatyouhavepreviouslyopened:
–Tonavigatetoapreviouslyaccessedworkspace(application,PCsettings,ordesktop),dooneofthe
following:
–Usingapointingdevice:
1.Dooneofthefollowing:
•Movethepointertotheextremetop-leftcornerofthescreenandthenmovethepointer
downwardalongtheleftedgeofthescreen.
•Movethepointertotheextremebottom-leftcornerofthescreenandthenmovethepointer
upwardalongtheleftedgeofthescreen.
Representationsofallavailableworkspacesaredisplayedalongtheleftedgeofthescreen.
Note:OnlyactiveworkspacesthatyouhaveaccessedduringthecurrentWindowssession
aredisplayedalongtheleftedge.Ifyoucloseanactiveworkspace,itsrepresentationdoes
notdisplayalongtheleftedgeofthescreen.
2.Clicktherepresentation.
–Usingatouchscreen:
•Method1
16ThinkCentreM73UserGuide
Page 29

1.Swipeinandoutontheleftedgeofthescreen.Representationsofallavailableworkspaces
aredisplayedalongtheleftedgeofthescreen.
2.T apthedesiredworkspace.
•Method2
1.Swipeinfromtheleftedgeofthescreentonavigatetothenextavailableworkspace.
2.Repeatstep1untilyounavigatetothedesiredworkspace.
–Tonavigatetothemostrecentlyaccessedworkspace(application,PCsettings,ordesktop),doone
ofthefollowing:
–Usingapointingdevice:Movethepointertotheextremetop-leftcornerofthescreenuntilasmall
representationoftheworkspaceisdisplayed;thenclicktherepresentation.
–Usingatouchscreen:Swipeinfromtheleftedgeofthescreen.
ForinformationaboutusingotherfeaturesoftheWindows8operatingsystem,refertotheWindowsHelp
andSupportinformationsystem.Formoreinformation,see“HelpandSupport”onpage125
.
NavigatingonWindows8.1
Tonavigateamongthedesktop,theStartscreen,andapplicationsthatwereopenedfromtheStartscreen
ontheWindows8.1operatingsystem,dooneofthefollowing:
•FromtheStartscreen,dooneofthefollowingtonavigatetothemostrecentlyaccessedworkspace
(application,setting,ordesktop):
–Usingapointingdevice:Movethepointertotheextremebottom-leftcornerofthescreenuntilthe
Windowsscreen-controlicon
–Usingatouchscreen:Swipeinandoutontheleftedgeofthescreen.Representationsofallavailable
workspacesaredisplayedalongtheleftedgeofthescreen.TaptheWindowsscreen-controlicon
atthebottom.
Note:TheWindowsscreen-controlicon
inthebackgroundofthesystem.
•FromthedesktoporanyotherworkspacethatisopenedfromtheStartscreen,dooneofthefollowingto
navigatetotheStartscreen:
–Usingapointingdevice:
–Fromthedesktop,clicktheWindowsscreen-controliconinthebottom-leftcornerofthescreen.
–Fromanyotherworkspace,movethepointertotheextremebottom-leftcornerofthescreenuntil
theWindowsscreen-controliconisdisplayed;thenclicktheicon.
–Usingatouchscreen:Dooneofthefollowing:
–Fromthedesktop,taptheWindowsscreen-controliconinthebottom-leftcornerofthescreen.
–Fromanyotherworkspace,dooneofthefollowing:
•Swipeinandoutontheleftedgeofthescreen.Representationsofallavailableworkspaces
aredisplayedalongtheleftedgeofthescreen.TaptheWindowsscreen-controliconat
thebottom.
•Swipeinfromtherightedgeofthescreentodisplaythecharms;thentapStart.
•Fromanyworkspace(Startscreen,desktop,PCsettings,orapplicationopenedfromtheStartscreen),
useanyofthefollowingprocedurestogotoanotherworkspacethatyouhavepreviouslyopened:
isdisplayed;thenclicktheicon.
isdisplayedonlyifyouhaveatleastoneactiveworkspace
–Tonavigatetoapreviouslyaccessedworkspace(application,setting,ordesktop),dooneofthe
following:
Chapter2.Usingyourcomputer17
Page 30

–Usingapointingdevice:
1.Dooneofthefollowing:
•Movethepointertotheextremetop-leftcornerofthescreenandthenmovethepointer
downwardalongtheleftedgeofthescreen.
•Movethepointertotheextremebottom-leftcornerofthescreenandthenmovethepointer
upwardalongtheleftedgeofthescreen.
Representationsofallavailableworkspacesaredisplayedalongtheleftedgeofthescreen.
Note:OnlyactiveworkspacesthatyouhaveaccessedduringthecurrentWindowssession
aredisplayedalongtheleftedge.Ifyoucloseanactiveworkspace,itsrepresentationdoes
notdisplayalongtheleftedgeofthescreen.
2.Clicktherepresentation.
–Usingatouchscreen:
•Method1
1.Swipeinandoutontheleftedgeofthescreen.Representationsofallavailableworkspaces
aredisplayedalongtheleftedgeofthescreen.
2.T apthedesiredworkspace.
•Method2
1.Swipeinfromtheleftedgeofthescreentonavigatetothenextavailableworkspace.
2.Repeatstep1untilyounavigatetothedesiredworkspace.
–Tonavigatetothemostrecentlyaccessedworkspace(application,PCsettings,ordesktop),doone
ofthefollowing:
–Usingapointingdevice:Movethepointertotheextremetop-leftcornerofthescreenuntilthe
Windowsscreen-controliconisdisplayed;thenclicktheicon.
–Usingatouchscreen:Swipeinfromtheleftedgeofthescreen.
ForinformationaboutusingotherfeaturesoftheWindows8.1operatingsystem,opentheHelp+Tips
applicationfromtheStartscreenorAppsscreen,orrefertotheWindowsHelpandSupportinformation
system.Formoreinformation,see“HelpandSupport”onpage125.
AccessingControlPanelontheWindows8orWindows8.1operating system
OntheWindowsoperatingsystem,youcanviewandchangecomputersettingsthroughControlPanel.To
accessControlPanelontheWindows8orWindows8.1operatingsystem,dooneofthefollowing:
•Fromthedesktop
1.Movethepointertothetop-rightorbottom-rightcornerofthescreentodisplaythecharms.
2.ClickSettings.
3.ClickControlPanel.
•FromtheStartscreen
–ForWindows8:
1.Movethepointertothetop-rightorbottom-rightcornerofthescreentodisplaythecharms.
2.ClickSearch.
3.OntheAppsscreen,scrolltotherightside,andclickControlPanelintheWindowsSystem
section.
18ThinkCentreM73UserGuide
Page 31

–ForWindows8.1:
1.Clickthearrowiconinthebottom-leftcornerofthescreentogototheAppsscreen.
2.Scrolltotherightside,andclickControlPanelintheWindowsSystemsection.
Usingthekeyboard
Dependingonyourmodel,yourcomputercomeswitheitherastandardkeyboardorafingerprintreader
keyboard.TheMicrosoftWindowsshortcutkeysareprovidedonbothkeyboardtypes.
Thissectionprovidesinformationaboutthefollowingtopics:
•“UsingWindowsshortcutkeys”onpage19
•“Usingafingerprintreader”onpage19
UsingWindowsshortcutkeys
Boththestandardkeyboardandthefingerprintreaderkeyboardprovidethreekeysyoucanusewithyour
MicrosoftWindowsoperatingsystem.
•ThetwoWindowslogokeysarelocatedbesidetheAltkeyoneithersideofthespacebar.Theyfeature
theWindowslogo.OntheWindows7operatingsystem,presstheWindowskeytoopentheStart
menu.OntheWindows8orWindows8.1operatingsystem,presstheWindowskey
betweenthecurrentworkspaceandtheStartscreen.ThestyleoftheWindowslogovariesdepending
onthekeyboardtype.
•Thecontext-menukeyislocatednexttotheCtrlkeyontherightsideoftheSpacebar.Pressingthe
context-menukeyopensthecontextmenufortheactiveprogram,icon,orobject.
toswitch
Note:YoucanusethemouseortheUpandDownarrowkeystohighlightmenuselections.OntheWindows
7operatingsystem,youcanclosetheStartmenuorthecontextmenubyclickingthemouseorpressingEsc.
Usingafingerprintreader
Theintegratedfingerprintreaderprovidedonsomekeyboardsenablesyoutoenrollyourfingerprintand
associateitwithyourpower-onpassword,harddiskpassword,andWindowspassword.Asaresult,
fingerprintauthenticationcanreplacepasswordsandenablesimpleandsecureuseraccess.Afingerprint
readerkeyboardisavailablewithselectcomputersorcanbepurchasedforcomputersthatsupportthis
option.
ToopenFingerprintManagerProorThinkVantageFingerprintSoftwareandusethefingerprintreader,
dothefollowing:
•OntheWindows7operatingsystem,see“AccessingLenovoprogramsontheWindows7operating
system”onpage4
•OntheWindows8.1operatingsystem,see“AccessingLenovoprogramsontheWindows8orWindows
8.1operatingsystem”onpage5
Followtheon-screeninstruction.Formoreinformationaboutusingthefingerprintreader,refertothehelp
systemofFingerprintManagerProorThinkVantageFingerprintSoftware.
.
.
Chapter2.Usingyourcomputer19
Page 32

Usingthewheelmouse
Thewheelmousehasthefollowingcontrols:
1PrimarymousebuttonUsethisbuttontoselectorstartaprogramormenuitem.
2Wheel
3Secondarymousebutton
Youcanswitchthefunctionoftheprimaryandsecondarymousebuttonsandchangeotherdefaultbehavior
throughthemousepropertiesfunctionintheWindowsControlPanel.
Usethewheeltocontrolthescrollingactionofthemouse.Thedirectioninwhichyou
rotatethewheelcontrolsthedirectionofthescrollingaction.
Usethisbuttontodisplayamenufortheactiveprogram,icon,orobject.
Adjustingaudio
Soundisanimportantpartofthecomputerexperience.Yourcomputerhasadigitalaudiocontrollerbuilt
intothesystemboard.Somemodelsalsohaveahigh-performanceaudioadapterinstalledinoneofthePCI
cardslots.
Aboutyourcomputeraudio
Ifafactory-installed,high-performanceaudioadapterisinstalledinyourcomputer,thesystem-board
audioconnectorsontherearofthecomputeraretypicallydisabled;usetheconnectorsprovidedonthe
audioadapter.
Eachaudiosolutionprovidesatleastthreeaudioconnectors:audioline-inconnector,audioline-out
connector,andMicrophoneconnector.Onsomemodels,afourthconnectorisprovidedfortheattachment
ofunpoweredstereospeakers(speakersthatdonotrequireanacpowersource).Theaudioadapter
providesyouwiththeabilitytorecordandplaybacksoundandmusic,aswellastoenjoysoundwith
multimediaapplicationsandworkwithspeech-recognitionsoftware.
Optionally,youcanconnectasetofpoweredstereospeakerstotheaudioline-outconnectortoenjoy
bettersoundwithmultimediaapplications.
Settingthevolumefromthedesktop
Thedesktopvolumecontrolisaccessiblethroughthevolumeiconinthetaskbar,whichislocatedatthe
bottom-rightcorneroftheWindowsdesktop.Clickthevolumeiconandmovethesliderupordownto
controlthevolume,orclicktheMuteicontoturntheaudiooff.Ifthevolumeiconisnotinthetaskbar,see
“Addingthevolumeicontothetaskbar”onpage20.
Addingthevolumeicontothetaskbar
ToaddthevolumeicontothetaskbarontheWindows7operatingsystem,dothefollowing:
20ThinkCentreM73UserGuide
Page 33

1.FromtheWindowsdesktop,clickStart➙ControlPanel➙AppearanceandPersonalization.
2.IntheT askbarandStartMenusection,clickCustomizeiconsonthetaskbar.
3.ClickT urnsystemiconsonoroffandchangethevolumebehaviorsfromOfftoOn.
4.ClickOKtosavethenewsettings.
ToaddthevolumeicontothetaskbarontheWindows8orWindows8.1operatingsystem,dothefollowing:
1.OpenControlPanel,andclickAppearanceandPersonalization.
Note:FordetailedinformationonhowtoopenControlPanelonWindows8andWindows8.1,see
“AccessingControlPanelontheWindows8orWindows8.1operatingsystem”onpage18.
2.Dooneofthefollowing:
•ForWindows8:
IntheT askbarsection,clickCustomizeiconsonthetaskbar.
•ForWindows8.1:
IntheT askbarandNavigationsection,clickCustomizeiconsonthetaskbar.
3.ClickT urnsystemiconsonoroffandchangethevolumebehaviorfromOfftoOn.
4.ClickOKtosavethenewsettings.
SettingthevolumefromControlPanel
YoucansetthecomputervolumefromControlPanel.T osetthecomputervolumefromControlPanel,
dothefollowing:
1.OntheWindows7operatingsystem,clickStart➙ControlPanel➙HardwareandSound.Onthe
Windows8orWindows8.1operatingsystem,openControlPanel,andclickHardwareandSound.
Note:FordetailedinformationonhowtoopenControlPanelonWindows8andWindows8.1,see
“AccessingControlPanelontheWindows8orWindows8.1operatingsystem”onpage18
2.IntheSoundsection,clickAdjustsystemvolume.
3.Movetheslidersupordowntoraiseorlowerthevolumeofyourcomputer.
UsingCDsandDVDs
YourcomputermighthaveaDVDROMdriveorrecordableDVDdriveinstalled.DVDdrivesuse
industry-standard,12cm(4.75-inch)CDmediaorDVDmedia.IfyourcomputercomeswithaDVDdrive,
thedrivecanreadDVD-ROMdiscs,DVD-Rdiscs,DVD-RAMdiscs,DVD-RWdiscs,andalltypesofCDs,
suchasCD-ROMdiscs,CD-RWdiscs,CD-Rdiscs,andaudioCDs.IfyouhavearecordableDVDdrive,
itcanalsorecordonDVD-Rdiscs,DVD-RWdiscs,typeIIDVD-RAMdiscs,CD-RWstandardandhigh
speeddiscs,andCD-Rdiscs.
FollowtheseguidelineswhenusingtheDVDdrive:
•Donotplacethecomputerinalocationwherethedriveisexposedtothefollowing:
–Hightemperature
–Highhumidity
–Excessivedust
–Excessivevibrationorsuddenshock
–Aninclinedsurface
–Directsunlight
.
Chapter2.Usingyourcomputer21
Page 34

•DonotinsertanyobjectotherthanaCDorDVDintothedrive.
•Beforemovingthecomputer,removetheCDorDVDfromthedrive.
HandlingandstoringCDandDVDmedia
CDandDVDmediaaredurableandreliable,buttheydorequiresomecareandspecialhandling.When
handlingandstoringaCDorDVD,followtheseguidelines:
•Holdthediscbyitsedges.Donottouchthesurfaceofthesidethatisnotlabeled.
•Toremovedustorfingerprints,wipethediscwithaclean,softclothfromthecentertotheoutside.Wiping
thediscinacirculardirectionmightcauselossofdata.
•Donotwriteorstickpaperonthedisc.
•Donotscratchormarkthedisc.
•Donotplaceorstorethediscindirectsunlight.
•Donotusebenzene,thinners,orothercleanerstocleanthedisc.
•Donotdroporbendthedisc.
•Donotinsertdamageddiscsintothedrive.Warped,scratched,ordirtydiscscandamagethedrive.
PlayingaCDorDVD
IfyourcomputercomeswithaDVDdrive,youcanlistentoaudioCDsorwatchDVDmovies.Toplaya
CDorDVD,dothefollowing:
1.PresstheEject/LoadbuttonontheDVDdrivetoopenthetray.
2.Withthetrayfullyextended,inserttheCDorDVDintothetray.SomeDVDdriveshaveasnaphubinthe
centerofthetray.Ifyourdrivehasasnaphub,supportthetraywithonehandandthenpushonthe
centeroftheCDorDVDuntilitsnapsintoplace.
3.PresstheEject/Loadbuttonagainorgentlypushthetrayforwardtoclosethetray.TheCDorDVD
playerprogramstartsautomatically.Foradditionalinformation,refertotheCDorDVDplayerprogram
helpsystem.
ToremoveaCDorDVDfromtheDVDdrive,dothefollowing:
1.Withthecomputeron,presstheEject/Loadbutton.Whenthetrayslidesoutautomatically,carefully
removethedisc.
2.ClosethetraybypressingtheEject/Loadbuttonorbygentlypushingthetrayforward.
Note:IfthetraydoesnotslideoutofthedrivewhenyoupresstheEject/Loadbutton,insertastraightened
paperclipintotheemergency-ejectholelocatedonthefrontoftheDVDdrive.Besurethedriveispowered
offwhenusingtheemergencyeject.UsetheEject/Loadbuttoninsteadoftheemergencyejectexcept
inanemergency.
RecordingaCDorDVD
IfyourcomputercomeswitharecordableDVDdrive,youcanusethedrivetorecordCDsorDVDs.
TorecordaCDorDVD,dooneofthefollowing:
•OntheWindows7operatingsystem,youhaveeithertheCorelDVDMovieFactoryLenovoEditionprogram
orthePower2Goprograminstalledonyourcomputer.
–ToruntheCorelDVDMovieFactoryLenovoEditionprogram,clickStart➙AllPrograms➙Corel
DVDMovieFactoryLenovoEdition➙CorelDVDMovieFactoryLenovoEdition.Followthe
instructionsonthescreen.
22ThinkCentreM73UserGuide
Page 35

–TorunthePower2Goprogram,clickStart➙AllPrograms➙PowerDVDCreate➙Power2Go.
Followtheinstructionsonthescreen.
•OntheWindows8operatingsystem,runthePower2Goprogrambydoingthefollowing:
1.Movethepointertothetop-rightorbottom-rightcornerofthescreentodisplaythecharms.Then
clickSearchandtypePower2Go.
2.ClickPower2Gointheleftpaneltoopentheprogram.
3.Followtheinstructionsonthescreen.
•OntheWindows8.1operatingsystem,runthePower2Goprogrambydoingthefollowing:
1.Onthestartscreen,clickthearrowiconinthebottom-leftcornertogototheAppsscreen.Then
typePower2Gointhesearchboxinthetop-rightcornerofthescreen.
2.ClickPower2Gointhesearchresulttoopentheprogram.
3.Followtheinstructionsonthescreen.
YoualsocanuseWindowsMedia
andSupport”onpage125.
®
PlayertorecordCDsanddataDVDs.Formoreinformation,see“Help
Chapter2.Usingyourcomputer23
Page 36

24ThinkCentreM73UserGuide
Page 37

Chapter3.Youandyourcomputer
Thischapterprovidesinformationaboutaccessibility,comfort,andrelocatingyourcomputertoother
countriesorregions.
Accessibilityandcomfort
Goodergonomicpracticeisimportanttogetthemostfromyourpersonalcomputerandtoavoiddiscomfort.
Arrangeyourworkplaceandtheequipmentyouusetosuityourindividualneedsandthekindofwork
thatyouperform.Inaddition,usehealthyworkhabitstomaximizeyourperformanceandcomfortwhile
usingyourcomputer.
Thefollowingtopicsprovideinformationaboutarrangingyourworkarea,settingupyourcomputer
equipment,andestablishinghealthyworkhabits.
Arrangingyourworkspace
Togetthemostfromyourcomputer,arrangeboththeequipmentyouuseandyourworkareatosuityour
needsandthekindofworkyoudo.Y ourcomfortisofforemostimportance,butlightsources,aircirculation,
andthelocationofelectricaloutletscanalsoaffectthewayyouarrangeyourworkspace.
Comfort
Althoughnosingleworkingpositionisidealforeveryone,hereareafewguidelinestohelpyoufinda
positionthatsuitsyoubest.
Sittinginthesamepositionforalongtimecancausefatigue.Thebackrestandseatofyourchairshould
adjustindependentlyandprovidegoodsupport.Theseatshouldhaveacurvedfronttorelievepressureon
thethighs.Adjusttheseatsothatyourthighsareparalleltothefloorandyourfeetareeitherflatonthe
floororonafootrest.
Whenusingthekeyboard,keepyourforearmsparalleltothefloorandyourwristsinacomfortableposition.
Usealighttouchonthekeyboardandyourhandsandfingersrelaxed.Changetheangleofthekeyboard
formaximumcomfortbyadjustingthepositionofthekeyboardfeet.
Adjustthemonitorsothetopofthescreenisat,orslightlybelow,eyelevel.Placethemonitorata
comfortableviewingdistance,usually51to61cm(20to24inches),andpositionitsoyoucanviewit
withouthavingtotwistyourbody.Also,positionotherequipmentyouuseregularly,suchasthetelephoneor
amouse,withineasyreach.
©CopyrightLenovo2013,2014
25
Page 38

Glareandlighting
Positionthemonitortominimizeglareandreflectionsfromoverheadlights,windows,andotherlightsources.
Reflectedlightfromshinysurfacescancauseannoyingreflectionsonyourmonitorscreen.Placethe
monitoratrightanglestowindowsandotherlightsources,whenpossible.Reduceoverheadlighting,if
necessary,byturningofflightsorusinglowerwattagebulbs.Ifyouinstallthemonitornearawindow,use
curtainsorblindstoblockthesunlight.Youcanadjustthebrightnessandcontrastcontrolsonthemonitor
astheroomlightingchangesthroughouttheday.
Whereitisimpossibletoavoidreflectionsortoadjustthelighting,anantiglarefilterplacedoverthescreen
mightbehelpful.However,thesefiltersmightaffecttheclarityoftheimageonthescreen;trythemonlyafter
youhaveexhaustedothermethodsofreducingglare.
Dustbuildupcompoundsproblemsassociatedwithglare.Remembertocleanyourmonitorscreen
periodicallyusingasoftclothasdirectedinyourmonitordocumentation.
Aircirculation
Yourcomputerandmonitorproduceheat.Thecomputerhasafanthatpullsinfreshairandforcesouthot
air.Themonitorletshotairescapethroughvents.Blockingtheairventscancauseoverheating,whichmight
resultinamalfunctionordamage.Placethecomputerandmonitorsothatnothingblockstheairvents;
usually,51mm(2inches)ofairspaceissufficient.Also,makesuretheventedairisnotblowingonpeople.
Electricaloutletsandcablelengths
Thelocationofelectricaloutlets,thelengthofpowercordsandcablesthatconnecttothemonitor,printer,
andotherdevicesmightdeterminethefinalplacementofyourcomputer.
Whenarrangingyourworkspace:
•Avoidtheuseofextensioncords.Whenpossible,plugthecomputerpowercorddirectlyintoanelectrical
outlet.
•Keeppowercordsandcablesneatlyroutedawayfromwalkwaysandotherareaswheretheymight
getkickedaccidentally.
Formoreinformationaboutpowercords,see“Powercordsandpoweradapters”onpagevi.
Accessibilityinformation
Lenovoiscommittedtoprovidingpeoplewithdisabilitiesgreateraccesstoinformationandtechnology.
Sometechnologiesarealreadyprovidedinyouroperatingsystem.Otherscanbepurchasedthrough
vendors.
UsersalsocanusetheEaseofAccessCenterprovidedintheWindowsoperatingsystemtoconfiguretheir
computerstosuittheirphysicalandcognitiveneeds.TheEaseofAccessCenterisacentrallocationthat
youcanusetoconfiguretheaccessibilitysettingsandprogramsavailableintheWindowsoperatingsystem.
TousetheEaseofAccessCenter,openControlPanelandclickEaseofAccess➙EaseofAccessCenter.
Thefollowinginformationprovideswaystohelpuserswhohavehearing,vision,andmobilitylimitationsget
themostoutoftheircomputerexperience.
On-screennotification
On-screennotificationhelpshearing-impairedpeoplebeawareofthestatusoftheircomputer.On-screen
notificationreplacessoundswithvisualcuesortextcaptionstoindicatethatactivityishappeningonthe
computer.Asaresult,systemalertsarenoticeableevenwhentheyarenotheard.Forexample,whenyou
26ThinkCentreM73UserGuide
Page 39

selectoneobjectwithyourkeyboard,theobjectishighlighted.Whenyoumovethepointertooneobject
withyourmouse,theintroductorytextoftheobjectisdisplayed.
Touseon-screennotification,openControlPanel,clickEaseofAccess➙EaseofAccessCenter,and
thenclickUsetextorvisualalternativesforsounds.
Audionotification
Audionotificationhelpsvisuallyimpairedpeopleorpeoplewithweaksightbeawareofthestatusoftheir
computer.
Touseaudionotification,openControlPanel,clickEaseofAccess➙EaseofAccessCenter➙Usethe
computerwithoutadisplay,andthenselectTurnonAudioDescription.
Narrator
Narratorisascreenreaderthatreadswhatisdisplayedonthescreenaloudanddescribeseventslike
errormessages.
ToopenNarrator,dothefollowing:
•ForWindows7:ClicktheStartbutton.Then,typeNarratorintothesearchfield.Inthelistofresults,
clickNarrator.
•ForWindows8orWindows8.1:Moveyourpointertothetop-rightorbottom-rightcornerofthescreen
todisplaythecharmsandclickSearch.Then,typeNarratorintothesearchfield.Inthelistofresults,
clickNarrator.
FormoreinformationabouthowtouseandconfigureNarrator,seetheWindowsHelpandSupport
informationsystem.
Screen-readertechnologies
Screen-readertechnologiesareprimarilyfocusedonsoftwareprograminterfaces,helpinformationsystems,
andavarietyofonlinedocuments.Foradditionalinformationaboutscreenreaders,seethefollowing:
•UsingPDFswithscreenreaders:
http://www.adobe.com/accessibility.html?promoid=DJGVE
•UsingtheJAWSscreenreader:
http://www.freedomscientific.com/jaws-hq.asp
•UsingtheNVDAscreenreader:
http://www.nvaccess.org/
SpeechRecognition
SpeechRecognitionenablesyoutocontrolyourcomputerbyvoice.
Usingonlyyourvoice,youcanstartprograms,openmenus,clickbuttonsandotherobjectsonthescreen,
dictatetextintodocuments,andwriteandsende-mails.Everythingyoudowiththekeyboardandmouse
canbedonewithonlyyourvoice.
ToopenSpeechRecognition,dothefollowing:
•ForWindows7:ClicktheStartbutton.Then,typeSpeechRecognitionintothesearchfield.Inthelist
ofresults,clickSpeechRecognition.
•ForWindows8orWindows8.1:Moveyourpointertothetop-rightorbottom-rightcornerofthescreen
todisplaythecharmsandclickSearch.Then,typeSpeechRecognitionintothesearchfield.Inthelist
ofresults,clickSpeechRecognition.
Chapter3.Y ouandyourcomputer27
Page 40

FormoreinformationabouthowtouseandconfigureSpeechRecognition,seetheWindowsHelpand
Supportinformationsystem.
Customizabletextsize
Dependingonyourpreference,youcanchangeonlythetextsizeinsteadofchangingthesizeofeverything
onthedesktop.Tochangethetextsize,openControlPanelandclickAppearancesandPersonalization➙
Display.Then,gotoChangeonlythetextsizeandsetatextsizethatmeetsyourneeds.
Magnifier
YourcomputerisequippedwiththeMicrosoftMagnifiertohelpvisuallyimpairedpeopleusethecomputer
morecomfortably.Magnifierisausefulutilitythatenlargestheentirescreenorpartofthescreensothatyou
canseethewordsandimagesbetter.Y oucanopenMagnifierfromtheEaseofAccessCenter.
ToopenMagnifier,dothefollowing:
•ForWindows7:ClicktheStartbutton,clickAllPrograms➙Accessories➙EaseofAccess,and
thenclickMagnifier.
•ForWindows8orWindows8.1:Moveyourpointertothetop-rightorbottom-rightcornerofthescreen
todisplaythecharmsandclickSearch.Then,typeMagnierintothesearchfield.Inthelistofresults,
clickMagnifier.
FormoreinformationabouthowtouseandconfigureMagnifier,seetheWindowsHelpandSupport
informationsystem.
Note:Fortouch-screencomputermodels,youalsocanzoominandzoomoutbyusingtouchgestures
insteadofthekeyboard.See“Zoom”onpage28
.
Zoom
Youcanusethezoomfeaturetoenlargeorreducethesizeoftext,pictures,maps,orotherobjects.
•Fromthekeyboard:
–Zoomin:PresstheWindowslogokey+theplus-signkey(+)toenlargethesizeoftext,pictures,
maps,orotherobjects.
–Zoomout:PresstheWindowslogokey+theminus-sign(-)keytoreducethesizeoftext,pictures,
maps,orotherobjects.
•Fromthetouchscreen:
–Zoomin:Movetwofingersfartherapartonthetouchscreentoenlargethesizeoftext,pictures,
maps,orotherobjects.
–Zoomout:Movetwofingersclosertogetheronthetouchscreentoreducethesizeoftext,pictures,
maps,orotherobjects.
Screenresolution
Youcanmakeyourdocumentseasiertoreadbyadjustingthescreenresolutionofyourcomputer.Toadjust
thescreenresolution,rightclickanywhereonthedesktop,clickScreenresolution,andthenadjustthe
settingsasyouprefer.
Note:Settingtoolowofaresolutionmightpreventsomeitemsfromfittingonthescreen.
Foralternativesonincreasingthesizeoftextandotherobjects,seethefollowing:
•“Customizabletextsize”onpage28
•“Magnifier”onpage28
28ThinkCentreM73UserGuide
Page 41

•“Zoom”onpage28
EaseofAccesskeyboardshortcuts
Thefollowingtablecontainskeyboardshortcutsthatcanhelpmakeyourcomputereasiertouse.
KeyboardshortcutFunction
Windowslogokey+U
RightShiftforeightseconds
ShiftfivetimesTurnStickyKeysonoroff
NumLockforfivesecondsTurnToggleKeysonoroff
LeftAlt+LeftShift+NumLock
LeftAlt+LeftShift+PrtScn(orPrtSc)TurnHighContrastonoroff
OpentheEaseofAccessCenter
TurnFilterKeysonoroff
TurnMouseKeysonoroff
Formoreinformation,gotohttp://windows.microsoft.com/,andthentypeanyofthefollowingkeywords
forsearching:keyboardshortcuts,keycombinations,shortcutkeys.
On-ScreenKeyboard
Ifyouprefertotypeorenterdataintoyourcomputerwithoutusingaphysicalkeyboard,youcanuse
On-ScreenKeyboard.On-ScreenKeyboarddisplaysavisualkeyboardwithallthestandardkeys.Youcan
selectkeysusingthemouseoranotherpointingdevice,oryoucantaptoselectthekeysifyourcomputer
supportsmulti-touchscreen.
ToopenOn-ScreenKeyboard,dothefollowing:
•ForWindows7:ClicktheStartbutton.Then,typeOn-ScreenKeyboardintothesearchfield.Inthelistof
results,clickOn-ScreenKeyboard.
•ForWindows8orWindows8.1:Moveyourpointertothetop-rightorbottom-rightcornerofthescreento
displaythecharmsandclickSearch.Then,typeOn-ScreenKeyboardintothesearchfield.Inthelistof
results,clickOn-ScreenKeyboard.
FormoreinformationabouthowtouseandconfigureOn-ScreenKeyboard,seetheWindowsHelpand
Supportinformationsystem.
Personalizedkeyboard
Thetactilebumpsonthekeyboardprovideareferencepointfromwhichyoucaneasilylocateallkeyson
thekeyboardwithoutvisualassistance.
Toadjustyourkeyboardsettings,openControlPanel,clickEaseofAccess➙EaseofAccessCenter,
andthenclickMakethekeyboardeasiertouse.
Industry-standardconnectors
Yourcomputerprovidesindustry-standardconnectorsthatenableyoutoconnectassistivedevices,
ifneeded.
Formoreinformationaboutthelocationandfunctionoftheconnectors,see“Locatingconnectors,controls,
andindicatorsonthefrontofyourcomputer”onpage8
and“Locatingconnectorsontherearofyour
computer”onpage10.
Chapter3.Y ouandyourcomputer29
Page 42

TTY/TDDconversionmodem
Yourcomputersupportstheuseofthetexttelephone(TTY)orthetelecommunicationsdeviceforthe
deaf(TDD)conversionmodem.ThemodemmustbeconnectedbetweenyourcomputerandaTTY/TDD
telephone.Then,youcantypeamessageonyourcomputerandsendittothetelephone.
Documentationinaccessibleformats
Lenovoprovideselectronicdocumentationinaccessibleformats.Lenovoelectronicdocumentation,suchas
properlytaggedPDFfilesorHyperT extMarkupLanguage(HTML)files,isdevelopedtoensurethatvisually
impaireduserscanreadthedocumentationthroughascreenreader.Eachimageinthedocumentationalso
includesadequatealternativetexttoexplaintheimagesothatvisuallyimpaireduserscanunderstandthe
imagewhentheyuseascreenreader.
Registeringyourcomputer
Whenyouregisteryourcomputer,informationisenteredintoadatabase,whichenablesLenovotocontact
youincaseofarecallorothersevereproblem.AfteryouregisteryourcomputerwithLenovo,youwillreceive
quickerservicewhenyoucallLenovoforhelp.Inaddition,somelocationsofferextendedprivilegesand
servicestoregisteredusers.
ToregisteryourcomputerwithLenovo,dooneofthefollowing:
•Gotohttp://www.lenovo.com/registerandfollowtheinstructionsonthescreentoregisteryourcomputer.
•ConnectyourcomputertotheInternetandregisteryourcomputerthroughapreinstalledregistration
program:
–ForWindows7:ThepreinstalledLenovoProductRegistrationprogramlaunchesautomaticallyafteryou
haveusedyourcomputerforatime.Followtheinstructionsonthescreentoregisteryourcomputer.
–ForWindows8orWindows8.1:OntheStartscreen,opentheLenovoSupportprogram.Thenclick
Registrationandfollowtheinstructionsonthescreentoregisteryourcomputer.
Movingyourcomputertoanothercountryorregion
Whenyoumoveyourcomputertoanothercountryorregion,youmusttakelocalelectricalstandards
intoconsideration.
Ifyourelocateyourcomputertoacountryorregionthatusesanelectricaloutletstyledifferentfromthe
typeyouarecurrentlyusing,youwillhavetopurchaseeitherelectricalplugadaptersornewpowercords.
YoucanorderpowercordsdirectlyfromLenovo.
Forpowercordinformationandpartnumbers,goto:
http://www.lenovo.com/powercordnotice
30ThinkCentreM73UserGuide
Page 43

Chapter4.Security
Thischapterprovidesinformationabouthowtoprotectyourcomputerfromtheftandunauthorizeduse.
Securityfeatures
Thefollowingsecurityfeaturesareavailableonyourcomputer:
•ComputraceAgentsoftwareembeddedinfirmware
TheComputraceAgentsoftwareisanITassetmanagementandcomputertheftrecoverysolution.
Thesoftwaredetectsifchangeshavebeenmadeonthecomputer,suchashardware,software,or
thecomputercall-inlocation.
Note:YoumighthavetopurchaseasubscriptiontoactivatetheComputraceAgentsoftware.
•Coverpresenceswitch(alsocalledintrusionswitch)
Thecoverpresenceswitchpreventsyourcomputerfromloggingintotheoperatingsystemwhenthe
computercoverisnotproperlyinstalledorclosed.Toenablethecoverpresenceswitchconnector
onthesystemboard,tothefollowing:
1.StarttheSetupUtilityprogram.See“StartingtheSetupUtilityprogram”onpage93.
2.SettheAdministratorPassword.See“Setting,changing,anddeletingapassword”onpage94.
3.FromtheSecuritysubmenu,selectChassisIntrusionDetection➙Enabled.Thecoverpresence
switchconnectoronthesystemboardisenabled.
Whenthecoverpresenceswitchdetectsthatyourcomputercoverisnotproperlyinstalledorclosed
whenyouturnonthecomputer,anerrormessagewillbedisplayed.T obypasstheerrormessageand
logintotheoperatingsystem,dothefollowing:
1.Properlyinstallorcloseyourcomputercover.See“Completingthepartsreplacement”onpage82.
2.PressF1toentertheSetupUtilityprogram.ThenpressF10tosaveandexittheSetupUtility
program.Theerrormessagewillnotbedisplayedagain.
•AbilitytoenableanddisabledevicesandUSBconnectors
Formoreinformation,see“Enablingordisablingadevice”onpage95.
•Integratedfingerprintreader(availableonsomemodels)
Dependingonthemodelsofyourcomputer,thekeyboardmayhaveanintegratedfingerprintreader.
ByenrollingyourfingerprintandassociatingitwithaPower-onPassword,aHardDiskPassword,or
bothpasswordsbeforehand,youcanstartthecomputer,logontothesystem,andentertheSetup
Utilityprogrambyswipingyourfingeroverthereader,withouttypingapassword.Thusfingerprint
authenticationcanreplacepasswordsandenablesimpleandsecureuseraccess.
•Startupsequencecontrol
Formoreinformation,see“Selectingorchangingthestartupdevicesequence”onpage96
•Startupwithoutkeyboardormouse
Yourcomputerisabletologintotheoperatingsystemwithoutkeyboardormouseconnected.
.
©CopyrightLenovo2013,2014
31
Page 44

AttachingaKensington-stylecablelock
YoucanuseaKensington-stylecablelocktosecureyourcomputertoadesk,table,orothernon-permanent
fixture.Thecablelockattachestothesecurity-lockslotattherearofyourcomputerandisoperatedwitha
keyorcombinationdependingonthetypeselected.Thecablelockalsolocksthebuttonsusedtoopenthe
computercover.Thisisthesametypeoflockusedwithmanynotebookcomputers.Youcanordersucha
cablelockdirectlyfromLenovobysearchingforKensingtonat:
http://www.lenovo.com/support
Figure6.Kensington-stylecablelock
Usingpasswords
YoucansetavarietyofpasswordsthroughtheMicrosoftWindowsoperatingsystemandthroughtheBIOS
ofyourcomputertohelpdeterunauthorizeduseofyourcomputer.
BIOSpasswords
YoucanusetheBIOSSetupUtilityprogramtosetpasswordstopreventunauthorizedaccesstoyour
computeranddata.Thefollowingtypesofpasswordsareavailable:
•Power-OnPassword:WhenaPower-OnPasswordisset,youarepromptedtotypeavalidpassword
eachtimethecomputeristurnedon.Thecomputercannotbeuseduntilthevalidpasswordistyped
in.Formoreinformation,see“Power-OnPassword”onpage94
•HardDiskPassword:SettingaHardDiskPasswordpreventsunauthorizedaccesstothedataonthehard
diskdrive.WhenaHardDiskPasswordisset,youarepromptedtotypeavalidpasswordeachtimeyou
trytoaccesstheharddiskdrive.Formoreinformation,see“HardDiskPassword”onpage94
•AdministratorPassword:SettinganAdministratorPassworddetersunauthorizedusersfromchanging
configurationsettings.Ifyouareresponsibleformaintainingtheconfigurationsettingsofseveral
32ThinkCentreM73UserGuide
.
.
Page 45

computers,youmightwanttosetanAdministratorPassword.Formoreinformation,see“Administrator
Password”onpage94
Youdonothavetosetanypasswordstouseyourcomputer.However,usingpasswordsimproves
computingsecurity.
.
Windowspasswords
DependingonyourversionoftheWindowsoperatingsystem,youcanusepasswordsforavarietyof
features,includingcontrollingloginaccess,accesstosharedresources,networkaccess,andindividualuser
settings.Formoreinformation,see“HelpandSupport”onpage125
.
Configuringthefingerprintreader
Ifyourkeyboardhasafingerprintreader,youcanconfigurethefingerprintreaderintheSetupUtilityprogram.
TheFingerprintSetupsubmenuundertheSecuritymenuoftheSetupUtilityprogramprovidesthe
followingoptions:
•PrebootAuthentication:enablesordisablesthefingerprintauthenticationforaccessingtheBIOS.
•EraseFingerprintData:clearsthefingerprintdatastoredinafingerprintreader.
Toconfigurethefingerprintreader,dothefollowing:
1.StarttheSetupUtilityprogram.See“StartingtheSetupUtilityprogram”onpage93.
2.FromtheSetupUtilityprogrammainmenu,selectSecurity➙FingerprintSetup,andpressEnter.
TheFingerprintSetupwindowopens.
3.SelectPrebootAuthenticationorEraseFingerprintDataasdesired,andpressEnter.
4.SelectthedesiredsettingsandpressEnter.
5.PressF10tosavechangesandexittheSetupUtilityprogram.PressEnterwhenpromptedtoconfirm
theexit.
Usingandunderstandingfirewalls
Afirewallcanbehardware,software,oracombinationofbothdependingonthelevelofsecurityrequired.
Firewallsworkonasetofrulestodeterminewhichinboundandoutboundconnectionsareauthorized.If
yourcomputerispreinstalledwithafirewallprogram,ithelpsprotectagainstcomputerInternetsecurity
threats,unauthorizedaccess,intrusions,andInternetattacks.Italsoprotectsyourprivacy.Formore
informationabouthowtousethefirewallprogram,refertothehelpsystemofyourfirewallprogram.
TheWindowsoperatingsystempreinstalledonyourcomputerprovidestheWindowsFirewall.Fordetailson
usingtheWindowsFirewall,referto“HelpandSupport”onpage125
.
Protectingdataagainstviruses
Yourcomputerispreinstalledwithanantivirusprogramtohelpyouguardagainst,detect,andeliminate
viruses.
Lenovoprovidesafullversionofantivirussoftwareonyourcomputerwithafree30-daysubscription.After
30days,youmustrenewthelicensetocontinuereceivingtheantivirussoftwareupdates.
Note:Virusdefinitionfilesmustbekeptup-to-datetoguardagainstnewviruses.
Chapter4.Security33
Page 46

Formoreinformationabouthowtouseyourantivirussoftware,refertothehelpsystemofyourantivirus
software.
34ThinkCentreM73UserGuide
Page 47

Chapter5.Installingorreplacinghardware
Thischapterprovidesinstructionsonhowtoinstallorreplacehardwareforyourcomputer.
Handlingstatic-sensitivedevices
Donotopenthestatic-protectivepackagecontainingthenewpartuntilthedefectiveparthasbeenremoved
fromthecomputerandyouarereadytoinstallthenewpart.Staticelectricity,althoughharmlesstoyou,can
seriouslydamagecomputercomponentsandparts.
Whenyouhandlepartsandothercomputercomponents,taketheseprecautionstoavoidstatic-electricity
damage:
•Limityourmovement.Movementcancausestaticelectricitytobuilduparoundyou.
•Alwayshandlepartsandothercomputercomponentscarefully.HandlePCIcards,memorymodules,
systemboards,andmicroprocessorsbytheedges.Nevertouchanyexposedcircuitry.
•Preventothersfromtouchingthepartsandothercomputercomponents.
•Beforeyoureplaceanewpart,touchthestatic-protectivepackagecontainingtheparttoametal
expansion-slotcoverorotherunpaintedmetalsurfaceonthecomputerforatleasttwoseconds.This
reducesstaticelectricityfromthepackageandyourbody.
•Whenpossible,removethenewpartfromthestatic-protectivepackaging,andinstallitdirectlyinthe
computerwithoutsettingthepartdown.Whenthisisnotpossible,placethestatic-protectivepackage
thatthepartcameinonasmooth,levelsurfaceandplacethepartonit.
•Donotplacethepartonthecomputercoverorothermetalsurface.
Installingorreplacinghardware
Thissectionprovidesinstructionsonhowtoinstallorreplacehardwareforyourcomputer.Y oucanexpand
thecapabilitiesofyourcomputerandmaintainyourcomputerbyinstallingorreplacinghardware.
Attention:
Donotopenyourcomputerorattemptanyrepairbeforereadingandunderstandingthe“Importantsafetyinformation”
onpagev.
Notes:
•UseonlycomputerpartsprovidedbyLenovo.
•Wheninstallingorreplacinganoption,usetheappropriateinstructionsinthissectionalongwiththe
instructionsthatcomewiththeoption.
Installingexternaloptions
Youcanconnectexternaloptionstoyourcomputer,suchasexternalspeakers,aprinter,orascanner.For
someexternaloptions,youmustinstalladditionalsoftwareinadditiontomakingthephysicalconnection.
Wheninstallinganexternaloption,see“Locatingconnectors,controls,andindicatorsonthefrontofyour
computer”onpage8and“Locatingconnectorsontherearofyourcomputer”onpage10toidentifythe
requiredconnector.Then,usetheinstructionsthatcomewiththeoptiontohelpyoumaketheconnection
andinstallanysoftwareordevicedriversthatarerequiredfortheoption.
©CopyrightLenovo2013,2014
35
Page 48

Installingorremovingtheacpoweradapter
Attention:
Donotopenyourcomputerorattemptanyrepairbeforereadingandunderstandingthe“Importantsafetyinformation”
onpagev.
Thissectionprovidesinstructionsonhowtoinstallorremovetheacpoweradapter.
Toinstalltheacpoweradapter,connecttheacpoweradaptertotheacpoweradapterconnectoratthe
rearofyourcomputerandaworkableelectricaloutlet.Securethepowercordintothepoweradapter
cableloopattherearofthecomputerasshown.
Figure7.Connectingtheacpoweradapter
Toremovetheacpoweradapter,dothefollowing:
1.T urnoffthecomputeranddisconnectallpowercordsfromelectricaloutlets.
36ThinkCentreM73UserGuide
Page 49

2.Removethepowercordfromtheacpoweradaptercableloopattherearofthecomputerandthen
disconnecttheacpoweradapterfromthecomputer.
Figure8.Disconnectingtheacpoweradapter
Whattodonext:
•Toworkwithanotherpieceofhardware,gototheappropriatesection.
Installingorremovingtheverticalstand
Attention:
Donotopenyourcomputerorattemptanyrepairbeforereadingandunderstandingthe“Importantsafetyinformation”
onpagev
Thissectionprovidesinstructionsonhowtoinstallorremovetheverticalstand.
Note:TheverticalstandandVideoElectronicsStandardsAssociation(VESA
parts.IfyourcomputercomeswiththeVESAmountbracketinstalled,ensurethatyouremovetheVESA
mountbracketbeforeyouinstalltheverticalstand.ToremovetheVESAmountbracket,see“Installingor
removingtheVESAmountbracket”onpage39.
.
®
)mountbracketareoptional
Chapter5.Installingorreplacinghardware37
Page 50

Toinstalltheverticalstand,dothefollowing:
1.T urnoffthecomputer.
2.Aligntherearofthecomputerwiththerearoftheverticalstandandpositionthecomputeronthe
verticalstandasshown.
Figure9.Installingtheverticalstand
Toremovetheverticalstand,dothefollowing:
1.T urnoffthecomputer.
38ThinkCentreM73UserGuide
Page 51

2.Liftthecomputertoremoveitfromtheverticalstand.
Figure10.Removingthecomputerfromtheverticalstand
InstallingorremovingtheVESAmountbracket
Attention:
Donotopenyourcomputerorattemptanyrepairbeforereadingandunderstandingthe“Importantsafetyinformation”
onpagev.
ThissectionprovidesinstructionsonhowtoinstallorremovetheVESAmountbracket.
Note:TheVESAmountbracketisonlyavailableonsomemodels.
ToinstalltheVESAmountbracket,dothefollowing:
1.T urnoffthecomputeranddisconnectallpowercordsfromelectricaloutlets.
Chapter5.Installingorreplacinghardware39
Page 52
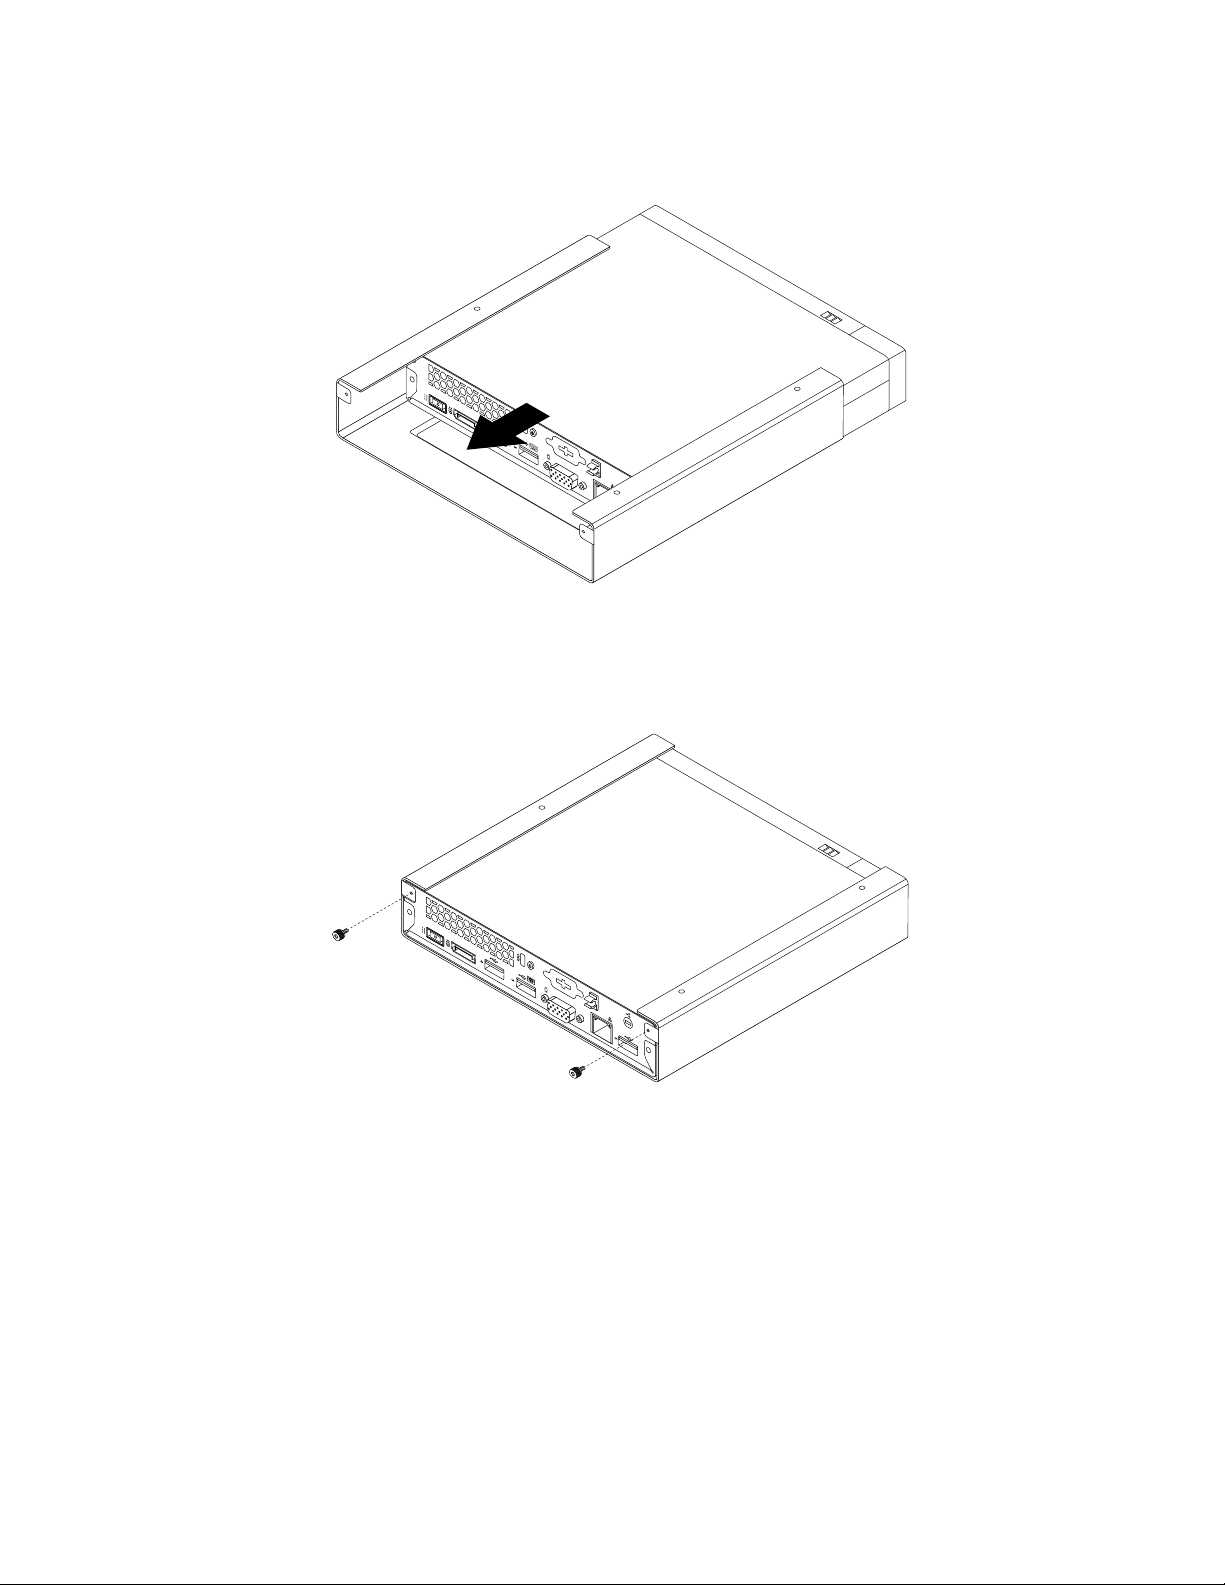
2.SlidethecomputerintotheVESAmountbracket.
Figure11.InstallingtheVESAmountbracket
3.InstallthetwoscrewstosecuretheVESAmountbrackettothecomputer.
Figure12.InstallingthescrewsthatsecuretheVESAmountbracket
ToremovetheVESAmountbracket,dothefollowing:
1.T urnoffthecomputeranddisconnectallpowercordsfromtheelectricaloutlets.
40ThinkCentreM73UserGuide
Page 53

2.RemovethetwoscrewsthatsecuretheVESAmountbrackettothecomputer.
Figure13.RemovingthescrewsthatsecuretheVESAmountbracket
3.SlidethecomputerfromthefrontoftheVESAmountbrackettoremovetheVESAmountbracket
fromthecomputer.
Figure14.RemovingtheVESAmountbracket
Installingorremovingtheacpoweradapterbracket
Attention:
Donotopenyourcomputerorattemptanyrepairbeforereadingandunderstandingthe“Importantsafetyinformation”
onpagev.
Thissectionprovidesinstructionsonhowtoinstallorremovetheacpoweradapterbracket.
Note:Theacpoweradapterbracketisonlyavailableonsomemodels.
Toremovetheacpoweradapterbracket,dothefollowing:
Chapter5.Installingorreplacinghardware41
Page 54

1.T urnoffthecomputeranddisconnectallpowercordsfromelectricaloutlets.
2.Pullthetab1andthenslidetheacpoweradapterbracketasshowntoremoveitfromtheVESA
mountbracket.
Figure15.Removingtheacpoweradapterbracket
42ThinkCentreM73UserGuide
Page 55

ToinstalltheacpoweradapterbrackettotheVESAmountbracket,alignthetwotabsontheacpower
adapterbracketwiththeslotsintheVESAmountbracket,andthenslidetheacpoweradapterbracket
asshowntoinstallitontheVESAmountbracket.
Figure16.Installingtheacpoweradapterbracket
Replacingtheopticaldrive
Attention:
Donotopenyourcomputerorattemptanyrepairbeforereadingandunderstandingthe“Importantsafetyinformation”
onpagev
Thissectionprovidesinstructionsonhowtoreplacetheopticaldrive.
Note:Theopticaldriveisonlyavailableonsomemodels.
Toreplacetheopticaldrive,dothefollowing:
1.T urnoffthecomputeranddisconnectallpowercordsfromelectricaloutlets.
2.DisconnecttheopticaldrivecablefromtheUSBconnectoronthecomputer.
.
Chapter5.Installingorreplacinghardware43
Page 56

3.RemovethescrewthatsecurestheopticaldriveboxontheVESAmountbracketandthenslidethe
opticaldriveboxtoremoveitfromtheVESAmountbracket.
Figure17.Removingtheopticaldrivebox
4.Removethescrewthatsecurestheopticaldriveintheopticaldrivebox.Usethescrewdrivertoslide
theopticaldriveforwardandthenremovetheopticaldrivefromtheopticaldrivebox.
Figure18.Removingtheopticaldrivefromtheopticaldrivebox
44ThinkCentreM73UserGuide
Page 57

5.Removethetwoscrewsthatsecuretheopticaldrivemetalplateandthenremovethemetalplate
fromtheopticaldrive.
Figure19.Removingtheopticaldrivemetalplate
6.Alignthetwoscrewholesintheopticaldrivemetalplatewiththecorrespondingholesinthenewoptical
driveandtheninstallthetwoscrewstosecurethemetalplateonthenewopticaldrive.
Figure20.Installingtheopticaldrivemetalplate
Chapter5.Installingorreplacinghardware45
Page 58

7.Slidethenewopticaldriveintotheopticaldriveboxuntilitsnapsintoposition.
Figure21.Installingtheopticaldriveintotheopticaldrivebox
8.Installthescrewthatsecurestheopticaldriveintheopticaldrivebox.
Figure22.Installingthescrewthatsecurestheopticaldrive
46ThinkCentreM73UserGuide
Page 59

9.AlignthescrewholesintheopticaldriveboxwiththetwoscrewsontheVESAmountbracketandthen
slidetheopticaldriveboxtoinstallitontheVESAmountbracket.
Figure23.Installingtheopticaldrivebox
Chapter5.Installingorreplacinghardware47
Page 60

10.InstallthescrewthatsecurestheopticaldriveboxontheVESAmountbracket.
Figure24.Installingthescrewthatsecurestheopticaldrivebox
11.ConnecttheopticaldrivecabletoaUSBconnectoronthecomputer.See“Locatingconnectorsonthe
rearofyourcomputer”onpage10.
Whattodonext:
•Toworkwithanotherpieceofhardware,gototheappropriatesection.
•Tocompletetheinstallationorreplacement,goto“Completingthepartsreplacement”onpage82.
Replacingthesecondaryharddiskdrive
Attention:
Donotopenyourcomputerorattemptanyrepairbeforereadingandunderstandingthe“Importantsafetyinformation”
onpagev.
Thissectionprovidesinstructionsonhowtoreplacethesecondaryharddiskdrive.
Note:Thesecondaryharddiskdriveisonlyavailableonsomemodels.
Toreplacethesecondaryharddiskdrive,dothefollowing:
1.T urnoffthecomputeranddisconnectallpowercordsfromelectricaloutlets.
2.DisconnectthesecondaryharddiskdrivecablefromtheUSBconnectoronthecomputer.
48ThinkCentreM73UserGuide
Page 61

3.RemovethescrewthatsecurestheopticaldriveboxontheVESAmountbracketandthenslidethe
opticaldriveboxasshowntoremoveitfromtheVESAmountbracket.
Figure25.Removingtheopticaldrivebox
4.Slidethereleasebuttonontheopticaldriveboxandthenremovethesecondaryharddiskdriveadapter
fromtheopticaldrivebox.
Figure26.Removingthesecondaryharddiskdriveadapterfromtheopticaldrivebox
Chapter5.Installingorreplacinghardware49
Page 62

5.Flexthesidesoftheharddiskdriveadapterbracketandthenpivottheharddiskdriveadapterto
removetheadapterfromtheadapterbracket.
Figure27.Removingtheharddiskdriveadapterfromtheadapterbracket
6.T oremovetheharddiskdrivefromtheadapter,lifttheadapterretaininglatch.Slidetheharddiskdrive
towardstheretaininglatchandthenlifttheharddiskdriveoutoftheadapter.
Figure28.Removingthesecondaryharddiskdrivefromtheadapter
7.Installthefourscrewstothenewharddiskdrive.
Figure29.Installingthefourscrewstotheharddiskdrive
50ThinkCentreM73UserGuide
Page 63

8.Installthenewharddiskdriveintotheadapterasshown.Then,lowertheadapterretaininglatchuntil
itsnapsintoposition.
Figure30.Installinganewharddiskdriveintotheadapter
9.Positiontheadapterintotheadapterbracketandthenpivottheadapterdownwarduntilitsnapsinto
position.
Figure31.Installingtheharddiskdriveadapterintotheadapterbracket
Chapter5.Installingorreplacinghardware51
Page 64

10.Slidetheadapterbracketintotheopticaldriveboxuntilitsnapsintoposition.
Figure32.Installingtheadapterbracketintotheopticaldrivebox
52ThinkCentreM73UserGuide
Page 65

11.AlignthescrewholesintheopticaldriveboxwiththetwoscrewsontheVESAmountbracketandthen
slidetheopticaldriveboxtoinstallitontheVESAmountbracket.
Figure33.Installingtheopticaldrivebox
Chapter5.Installingorreplacinghardware53
Page 66

12.InstallthescrewthatsecurestheopticaldriveboxontheVESAmountbracket.
Figure34.Installingthescrewthatsecurestheopticaldrivebox
13.ConnectthesecondaryharddiskdrivecabletoaUSBconnectoronthecomputer.See“Locating
connectorsontherearofyourcomputer”onpage10.
Whattodonext:
•Toworkwithanotherpieceofhardware,gototheappropriatesection.
•Tocompletetheinstallationorreplacement,goto“Completingthepartsreplacement”onpage82.
InstallingorremovingtheI/Obox
Attention:
Donotopenyourcomputerorattemptanyrepairbeforereadingandunderstandingthe“Importantsafetyinformation”
onpagev.
ThissectionprovidesinstructionsonhowtoinstallorremovetheI/Obox.
Note:TheI/Oboxisonlyavailableonsomemodels.
TheI/Oboxprovidesthefollowingconnectorsforconnectingtoexternaldevices:
•FourUSB2.0connectors(twoonthefrontandtwoontherear)
•Oneserialport
•TwoPS/2connectors(oneforkeyboardandoneformouse)
ToremovetheI/Obox,dothefollowing:
1.T urnoffthecomputeranddisconnectallpowercordsfromelectricaloutlets.
2.DisconnecttheI/OboxcablefromtheUSBconnectoronthecomputer.
54ThinkCentreM73UserGuide
Page 67

3.RemovethescrewthatsecurestheI/OboxontheVESAmountbracketandthenslidetheI/Oboxas
showntoremoveitfromtheVESAmountbracket.
Figure35.RemovingtheI/Obox
ToinstalltheI/Obox,dothefollowing:
1.T urnoffthecomputeranddisconnectallpowercordsfromelectricaloutlets.
Chapter5.Installingorreplacinghardware55
Page 68

2.AlignthetwoholesintheI/OboxwiththetwoscrewsontheVESAmountbracketandthenslidetheI/O
boxasshowntoinstallitontheVESAmountbracket.
Figure36.InstallingtheI/Obox
56ThinkCentreM73UserGuide
Page 69

3.InstallthescrewtosecuretheI/OboxontheVESAmountbracket.
Figure37.InstallingthescrewtosecuretheI/Obox
4.ConnecttheI/OboxcabletoaUSBconnectorontherearofyourcomputer.See“Locatingconnectors
ontherearofyourcomputer”onpage10.
Removingthecomputercover
Attention:
Donotopenyourcomputerorattemptanyrepairbeforereadingandunderstandingthe“Importantsafetyinformation”
onpagev
Thissectionprovidesinstructionsonhowtoremovethecomputercover.
CAUTION:
Beforeyouopenthecomputercover,turnoffthecomputerandwaitseveralminutesuntilthe
computeriscool.
Toremovethecomputercover,dothefollowing:
1.Removeanymediafromthedrivesandturnoffallattacheddevicesandthecomputer.
2.Disconnectallpowercordsfromelectricaloutlets.
3.Disconnectthepowercord,Input/Outputcables,andanyothercablesthatareconnectedtothe
4.Removeanylockingdevicethatsecuresthecomputercover,suchasaKensington-stylecablelock.
.
computer.
See“AttachingaKensington-stylecablelock”onpage32.
Chapter5.Installingorreplacinghardware57
Page 70

5.Removethescrewthatsecuresthecomputercover.
Figure38.Removingthecomputercoverscrew
58ThinkCentreM73UserGuide
Page 71

6.Slidethecomputercovertothefrontofthecomputerasmallamount.Then,liftthecomputercoverto
removeitfromthecomputer.
Figure39.Removingthecomputercover
Installingorremovingtheharddiskdriveassembly
Attention:
Donotopenyourcomputerorattemptanyrepairbeforereadingandunderstandingthe“Importantsafetyinformation”
onpagev.
Thissectionprovidesinstructionsonhowtoinstallorremovetheharddiskdriveassembly.
Toremovetheharddiskdriveassembly,dothefollowing:
1.T urnoffthecomputeranddisconnectallpowercordsfromelectricaloutlets.
2.Removethecomputercover.See“Removingthecomputercover”onpage57.
3.Locatetheharddiskdrive.See“Locatingcomponents”onpage12.
4.Disconnectthesignalcableandthepowercablefromtheharddiskdrive.
Chapter5.Installingorreplacinghardware59
Page 72

5.Removethetwoscrewsthatsecuretheharddiskdriveassembly.Slidetheharddiskdriveassemblyas
shown,andthenlifttheharddiskdriveassemblytoremoveitfromthecomputer.
Figure40.Removingtheharddiskdriveassembly
Toinstalltheharddiskdriveassembly,dothefollowing:
1.Positiontheharddiskdriveassemblyonthesystemboardsothatthetwoholesintheharddiskdrive
bracketarealignedwiththestandoffsonthesystemboard.Slidetheharddiskdriveassemblyasshown
untilthetwoscrewholes1arealignedwiththecorrespondingscrewpostsonthesystemboard.
Figure41.Installingtheharddiskdriveassembly
60ThinkCentreM73UserGuide
Page 73

2.Installthetwoscrewstosecuretheharddiskdriveassembly.
Figure42.Installingthescrewstosecuretheharddiskdriveassembly
3.Connectthesignalcableandthepowercabletotheharddiskdrive.
Whattodonext:
•Toworkwithanotherpieceofhardware,gototheappropriatesection.
•Tocompletetheinstallationorreplacement,goto“Completingthepartsreplacement”onpage82
.
Installingorreplacingamemorymodule
Attention:
Donotopenyourcomputerorattemptanyrepairbeforereadingandunderstandingthe“Importantsafetyinformation”
onpagev.
Thissectionprovidesinstructionsonhowtoinstallorreplaceamemorymodule.
YourcomputerhastwoslotsforinstallingorreplacingDDR3SODIMMsthatprovideuptoamaximumof
16GBsystemmemory.Wheninstallingorreplacingamemorymodule,use2GB,4GB,or8GBDDR3
SODIMMsinanycombinationuptoamaximumof16GB.
Toinstallorreplaceamemorymodule,dothefollowing:
1.T urnoffthecomputeranddisconnectallpowercordsfromelectricaloutlets.
2.Removethecomputercover.See“Removingthecomputercover”onpage57.
3.Locatethememoryslots.See“Locatingpartsonthesystemboard”onpage13.
4.Removetheharddiskdriveassemblytogetaccesstothememoryslots.See“Installingorremovingthe
harddiskdriveassembly”onpage59.
Chapter5.Installingorreplacinghardware61
Page 74

5.Ifyouarereplacinganoldmemorymodule,opentheretainingclipsandgentlypullthememorymodule
outofthememoryslot.
Figure43.Removingthememorymodule
6.Insertthenotchedend2ofthenewmemorymoduleintotheslot1.Pressthememorymodule
firmlyandpivotthememorymoduleuntilitsnapsintoplace.Makesurethatthememorymoduleis
securedintheslotanddoesnotmoveeasily.
Figure44.Installingamemorymodule
7.Reinstalltheharddiskdriveassembly.See“Installingorremovingtheharddiskdriveassembly”
onpage59.
Whattodonext:
•Toworkwithanotherpieceofhardware,gototheappropriatesection.
•Tocompletetheinstallationorreplacement,goto“Completingthepartsreplacement”onpage82.
Replacingthebattery
Attention:
Donotopenyourcomputerorattemptanyrepairbeforereadingandunderstandingthe“Importantsafetyinformation”
onpagev.
62ThinkCentreM73UserGuide
Page 75

Yourcomputerhasaspecialtypeofmemorythatmaintainsthedate,time,andsettingsforbuilt-infeatures,
suchasparallel-connectorassignments(configuration).Abatterykeepsthisinformationactivewhenyou
turnoffthecomputer.
Thebatterynormallyrequiresnochargingormaintenancethroughoutitslife;however,nobatterylasts
forever.Ifthebatteryfails,thedate,time,andconfigurationinformation(includingpasswords)arelost.An
errormessageisdisplayedwhenyouturnonthecomputer.
Refertothe“Lithiumcoincellbatterynotice”intheSafety,Warranty,andSetupGuideforinformationabout
replacinganddisposingofthebattery.
Toreplacethebattery,dothefollowing:
1.T urnoffthecomputeranddisconnectallpowercordsfromelectricaloutlets.
2.Removethecomputercover.See“Removingthecomputercover”onpage57.
3.Locatethebattery.See“Locatingpartsonthesystemboard”onpage13.
4.Removetheharddiskdriveassemblytogetaccesstothebattery.See“Installingorremovingthe
harddiskdriveassembly”onpage59.
5.Removetheoldbattery.
Figure45.Removingtheoldbattery
6.Installanewbattery.
Figure46.Installinganewbattery
7.Reinstalltheharddiskdriveassembly.See“Installingorremovingtheharddiskdriveassembly”
onpage59.
8.Reinstallthecomputercoverandconnectthecables.See“Completingthepartsreplacement”on
page82.
Note:Whenthecomputeristurnedonforthefirsttimeafterreplacingthebattery,anerrormessage
mightbedisplayed.Thisisnormalafterreplacingthebattery.
9.T urnonthecomputerandallattacheddevices.
Chapter5.Installingorreplacinghardware63
Page 76

10.UsetheSetupUtilityprogramtosetthedate,time,andanypasswords.SeeChapter7“UsingtheSetup
Utilityprogram”onpage93
.
ReplacingthePowerbuttonboard
Attention:
Donotopenyourcomputerorattemptanyrepairbeforereadingandunderstandingthe“Importantsafetyinformation”
onpagev.
ThissectionprovidesinstructionsonhowtoreplacethePowerbuttonboard.
ToreplacethePowerbuttonboard,dothefollowing:
1.T urnoffthecomputeranddisconnectallpowercordsfromelectricaloutlets.
2.Removethecomputercover.See“Removingthecomputercover”onpage57.
3.LocatethePowerbuttonboard.See“Locatingcomponents”onpage12.
4.Removetheharddiskdriveassembly.See“Installingorremovingtheharddiskdriveassembly”on
page59.
5.DisconnectthePowerbuttonboardcablefromthecorrespondingconnectoronthesystemboard.
6.RemovethescrewthatsecuresthePowerbuttonboardtothecomputer,andthenpullthePower
buttonboardtoremoveitfromthecomputer.
Figure47.RemovingthePowerbuttonboard
64ThinkCentreM73UserGuide
Page 77

7.Alignthehole1inthenewPowerbuttonboardwiththetab2onthecomputerandpositionthenew
Powerbuttonboardinthecomputer.Then,installthescrewtosecurethenewPowerbuttonboard
onthechassis.
Figure48.InstallingthePowerbuttonboard
8.ConnectthePowerbuttonboardcabletothePowerbuttonboardcableconnectoronthesystemboard.
See“Locatingpartsonthesystemboard”onpage13.
9.Reinstalltheharddiskdriveassembly.See“Installingorremovingtheharddiskdriveassembly”
onpage59.
Whattodonext:
•Toworkwithanotherpieceofhardware,gototheappropriatesection.
•Tocompletetheinstallationorreplacement,goto“Completingthepartsreplacement”onpage82.
ReplacingtheWi-Ficardmodule
Attention:
Donotopenyourcomputerorattemptanyrepairbeforereadingandunderstandingthe“Importantsafetyinformation”
onpagev
ThissectionprovidesinstructionsonhowtoreplacetheWi-Ficardmodule.
Note:TheWi-Ficardmoduleisonlyavailableinsomemodels.
ToreplacetheWi-Ficardmodule,dothefollowing:
1.T urnoffthecomputeranddisconnectallpowercordsfromelectricaloutlets.
2.Removethecomputercover.See“Removingthecomputercover”onpage57.
.
Chapter5.Installingorreplacinghardware65
Page 78

3.Removetheharddiskdriveassembly.See“Installingorremovingtheharddiskdriveassembly”on
page59.
4.LocatetheWi-Ficardmoduleinthecomputer.See“Locatingcomponents”onpage12.
5.DisconnecttheWi-FiantennacablesfromtheWi-Ficardmodule.
Figure49.RemovingtheWi-Ficardmodulecables
6.CarefullypivottheWi-Ficardmoduleuptoreleaseitfromtheplasticpostthatsecuresit.Then,pullthe
Wi-FicardmoduletoremoveitfromtheminiPCIExpresscardslot.
Note:DonotoverpivottheWi-Ficardmodule.
Figure50.RemovingtheWi-Ficardmodule
7.InsertthenewWi-FicardmoduleintotheminiPCIExpresscardslot.Then,pivottheWi-Ficardmodule
downwarduntilitsnapsintopositionandissecuredbytheplasticpost.
Note:DonottouchthenotchededgeoftheWi-Ficardmodule.
Figure51.InstallingtheWi-Ficardmodule
8.ConnecttheWi-FiantennacablestotheWi-Ficardmodule.
Figure52.ConnectingtheWi-Fiantennacables
9.Reinstalltheharddiskdriveassembly.See“Installingorremovingtheharddiskdriveassembly”
onpage59.
66ThinkCentreM73UserGuide
Page 79

Whattodonext:
•Toworkwithanotherpieceofhardware,gototheappropriatesection.
•Tocompletetheinstallationorreplacement,goto“Completingthepartsreplacement”onpage82.
InstallingorremovingthefrontWi-Fiantenna
Attention:
Donotopenyourcomputerorattemptanyrepairbeforereadingandunderstandingthe“Importantsafetyinformation”
onpagev.
ThissectionprovidesinstructionsonhowtoinstallorremovethefrontWi-Fiantenna.
Note:ThefrontWi-Fiantennaisonlyavailableonsomemodels.
ToinstallthefrontWi-Fiantenna,dothefollowing:
1.T urnoffthecomputeranddisconnectallpowercordsfromelectricaloutlets.
2.Removethecomputercover.See“Removingthecomputercover”onpage57.
3.Removetheharddiskdriveassembly.See“Installingorremovingtheharddiskdriveassembly”on
page59.
4.PeeloffthepaperthatprotectsthestickeronthebottomofthefrontWi-Fiantenna.
Figure53.Peelingoffthepaperthatprotectsthesticker
5.AlignthetwosmallcolumnsonthebottomofthefrontWi-Fiantennawiththetwoholesintheharddisk
drivebracketasshown.Then,stickthefrontWi-Fiantennaontotheharddiskdrivebracket.
Figure54.StickingthefrontWi-Fiantenna
Chapter5.Installingorreplacinghardware67
Page 80

6.RoutethefrontWi-Fiantennacablethroughthefivehooksintheharddiskdrivebracketasshown.
Figure55.RoutingthefrontWi-Fiantennacable
7.Reinstalltheharddiskdriveassemblywithoutconnectingthesignalcableandpowercable.See
“Installingorremovingtheharddiskdriveassembly”onpage59.
8.RoutethefrontWi-Fiantennacableasshown,andthenconnectittotheWi-Ficardmodule.
Figure56.InstallingthefrontWi-Fiantennacable
9.Reconnectthesignalcableandpowercabletotheharddiskdrive.
ToremovetherearWi-Fiantenna,dothefollowing:
1.T urnoffthecomputeranddisconnectallpowercordsfromelectricaloutlets.
2.Disconnectthesignalcableandpowercablefromtheharddiskdrive.
3.DisconnectthefrontWi-FiantennacablefromtheWi-Ficardmodule.
4.Removetheharddiskdriveassembly.See“Installingorremovingtheharddiskdriveassembly”on
page59
.
68ThinkCentreM73UserGuide
Page 81

5.ReleasethefrontWi-Fiantennacablefromthehooksontheharddiskdrivebracket.Then,unstickthe
frontWi-Fiantennafromtheharddiskdrivebracket.
Figure57.RemovingthefrontWi-Fiantennacable
Whattodonext:
•Toworkwithanotherpieceofhardware,gototheappropriatesection.
•Tocompletetheinstallationorreplacement,goto“Completingthepartsreplacement”onpage82.
InstallingorremovingtherearWi-Fiantenna
Attention:
Donotopenyourcomputerorattemptanyrepairbeforereadingandunderstandingthe“Importantsafetyinformation”
onpagev
ThissectionprovidesinstructionsonhowtoinstallorremovetherearWi-Fiantenna.
Note:TherearWi-Fiantennaisonlyavailableonsomemodels.
ToinstalltherearWi-Fiantenna,dothefollowing:
1.T urnoffthecomputeranddisconnectallpowercordsfromelectricaloutlets.
2.InstalltherearWi-FiantennatotherearWi-Fiantennacableconnectorattachedontherearofthe
.
computer.
Chapter5.Installingorreplacinghardware69
Page 82

3.Adjusttheangleoftherearantennatolowertheriskofbreakingtheantennabyaccident.
Figure58.InstallingtherearWi-Fiantenna
ToremovetherearWi-Fiantenna,dothefollowing:
1.T urnoffthecomputeranddisconnectallpowercordsfromelectricaloutlets.
2.StraightentherearWi-Fiantennasothatitcanbemoreeasilytwisted.
3.HoldthethickerendoftherearWi-FiantennaandunscrewtheWi-Fiantennafromtherearofthe
computer.
Figure59.RemovingtherearWi-Fiantenna
Whattodonext:
•Toworkwithanotherpieceofhardware,gototheappropriatesection.
•Tocompletetheinstallationorreplacement,goto“Completingthepartsreplacement”onpage82.
70ThinkCentreM73UserGuide
Page 83

Replacingtheinternalspeaker
Attention:
Donotopenyourcomputerorattemptanyrepairbeforereadingandunderstandingthe“Importantsafetyinformation”
onpagev.
Thissectionprovidesinstructionsonhowtoreplacetheinternalspeaker.
Toreplacetheinternalspeaker,dothefollowing:
1.T urnoffthecomputeranddisconnectallpowercordsfromelectricaloutlets.
2.Removethecomputercover.See“Removingthecomputercover”onpage57.
3.Locatetheinternalspeakerinthecomputer.See“Locatingpartsonthesystemboard”onpage13.
4.Removetheharddiskdriveassembly.See“Installingorremovingtheharddiskdriveassembly”on
page59.
5.Disconnecttheinternalspeakercablefromthesystemboard..
6.Releasetheinternalspeakercablefromtheretainingcliponthesideofthethermalmodulebracket.
Figure60.Releasingtheinternalspeakercable
Chapter5.Installingorreplacinghardware71
Page 84

7.Pressthetab1thatsecurestheinternalspeakerasshownandthenlifttheinternalspeakeroutof
theinternalspeakerholder.
Figure61.Removingtheinternalspeaker
8.Pressthetab1asshownandinsertthenewinternalspeakerintotheinternalspeakerholderuntilthe
newinternalspeakersnapsintopositionandissecuredbythetab1.
Figure62.Installingtheinternalspeaker
72ThinkCentreM73UserGuide
Page 85

9.Securethecableofthenewinternalspeakerintheretainingcliponthesideofthethermalmodule
bracket.
Figure63.Securingtheinternalspeakercable
10.Connectthecableofthenewinternalspeakertotheinternalspeakerconnectoronthesystemboard.
See“Locatingpartsonthesystemboard”onpage13.
11.Reinstalltheharddiskdriveassembly.See“Installingorremovingtheharddiskdriveassembly”
onpage59.
Whattodonext:
•Toworkwithanotherpieceofhardware,gototheappropriatesection.
•Tocompletetheinstallationorreplacement,goto“Completingthepartsreplacement”onpage82.
Replacingthecoverpresenceswitch
Attention:
Donotopenyourcomputerorattemptanyrepairbeforereadingandunderstandingthe“Importantsafetyinformation”
onpagev.
Thissectionprovidesinstructionsonhowtoreplacethecoverpresenceswitch(alsoknownasintrusion
switch).
Toreplacethecoverpresenceswitch,dothefollowing:
1.T urnoffthecomputeranddisconnectallpowercordsfromelectricaloutlets.
2.Removethecomputercover.See“Removingthecomputercover”onpage57.
3.Locatethecoverpresenceswitchinthecomputer.See“Locatingcomponents”onpage12.
4.Disconnectthecoverpresenceswitchcablefromthesystemboard.
Chapter5.Installingorreplacinghardware73
Page 86

5.Pullthecoverpresenceswitchtoremoveitfromtheheatsinkbracket.
Figure64.Removingthecoverpresenceswitch
6.Attachthenewcoverpresenceswitchtothethermalmodule.
Figure65.Installingthecoverpresenceswitch
7.Connectthecableofthenewcoverpresenceswitchtothecoverpresenceswitchconnectoronthe
systemboard.See“Locatingpartsonthesystemboard”onpage13.
74ThinkCentreM73UserGuide
Page 87

Whattodonext:
•Toworkwithanotherpieceofhardware,gototheappropriatesection.
•Tocompletetheinstallationorreplacement,goto“Completingthepartsreplacement”onpage82.
Replacingthesystemfan
Attention:
Donotopenyourcomputerorattemptanyrepairbeforereadingandunderstandingthe“Importantsafetyinformation”
onpagev.
Thissectionprovidesinstructionsonhowtoreplacethesystemfan.
CAUTION:
Hazardousmovingparts.Keepfingersandotherbodypartsaway.
Toreplacethesystemfan,dothefollowing:
1.T urnoffthecomputeranddisconnectallpowercordsfromelectricaloutlets.
2.Removethecomputercover.See“Removingthecomputercover”onpage57.
3.Locatethesystemfaninthecomputer.See“Locatingcomponents”onpage12.
4.Disconnectthesystemfancablefromthesystemboard.
Chapter5.Installingorreplacinghardware75
Page 88

5.Removethethreescrewsthatsecurethesystemfantothethermalmodule,andthenliftthesystem
fantoremoveitfromthecomputer.
Figure66.Removingthesystemfan
76ThinkCentreM73UserGuide
Page 89

6.Positionthenewsystemfanonthechassissothatthethreescrewholesinthenewsystemfanare
alignedwiththescrewpostsonthethermalmodule.Then,installthethreescrewstosecurethe
systemfantothecomputer.
Figure67.Installingthesystemfan
7.Connectthecableofthenewsystemfantothesystemfanconnectoronthesystemboard.See
“Locatingpartsonthesystemboard”onpage13.
Whattodonext:
•Toworkwithanotherpieceofhardware,gototheappropriatesection.
•Tocompletetheinstallationorreplacement,goto“Completingthepartsreplacement”onpage82.
Replacingthethermalmodule
Attention:
Donotopenyourcomputerorattemptanyrepairbeforereadingandunderstandingthe“Importantsafetyinformation”
onpagev.
Thissectionprovidesinstructionsonhowtoreplacethethermalmodule.
CAUTION:
Thethermalmodulemightbeveryhot.Beforeyouopenthecomputercover,turnoffthecomputer
andwaitseveralminutesuntilthecomputeriscool.
Toreplacethethermalmodule,dothefollowing:
1.T urnoffthecomputeranddisconnectallpowercordsfromelectricaloutlets.
2.Removethecomputercover.See“Removingthecomputercover”onpage57.
Chapter5.Installingorreplacinghardware77
Page 90

3.Locatethethermalmoduleinthecomputer.See“Locatingcomponents”onpage12.
4.Removetheinternalspeaker.See“Replacingtheinternalspeaker”onpage71.
5.Removethecoverpresenceswitch.See“Replacingthecoverpresenceswitch”onpage73.
6.Removethesystemfan.See“Locatingcomponents”onpage12.
7.Followthefollowingsequencetoremovethefourscrewsthatsecurethethermalmoduletothesystem
board:
a.Partiallyremovescrew1,thenfullyremovescrew2,andthenfullyremovescrew1.
b.Partiallyremovescrew3,thenfullyremovescrew4,andthenfullyremovescrew3.
Liftandpullthethermalmoduletoremoveitfromthesystemboard.
Notes:
•Carefullyremovethefourscrewsfromthesystemboardtoavoidanypossibledamagetothesystem
board.Thefourscrewscannotberemovedfromthethermalmodule.
•Donottouchthethermalgreasewhilehandlingthethermalmodule.
Figure68.Removingthethermalmodule
78ThinkCentreM73UserGuide
Page 91

8.installthenewthermalmoduleintothechassisasshown.Ensurethatthefourscrewsonthenew
thermalmodulearealignedwithcorrespondingholesinthesystemboard.
Figure69.Positioningthenewthermalmodule
9.Followtheclockwisesequenceof2,4,1,and3toinstallthefourscrewstosecurethenewthermal
module.Donotover-tightenthescrews.
10.Reinstallthecoverpresenceswitch.See“Replacingthecoverpresenceswitch”onpage73.
11.Reinstalltheinternalspeaker.See“Replacingtheinternalspeaker”onpage71.
Whattodonext:
•Toworkwithanotherpieceofhardware,gototheappropriatesection.
•Tocompletetheinstallationorreplacement,goto“Completingthepartsreplacement”onpage82.
Replacingthemicroprocessor
Attention:
Donotopenyourcomputerorattemptanyrepairbeforereadingandunderstandingthe“Importantsafetyinformation”
onpagev.
Thissectionprovidesinstructionsonhowtoreplacethemicroprocessor.
CAUTION:
Thethermalmodulemightbeveryhot.Beforeyouopenthecomputercover,turnoffthecomputer
andwaitseveralminutesuntilthecomputeriscool.
Toreplacethemicroprocessor,dothefollowing:
1.T urnoffthecomputeranddisconnectallpowercordsfromelectricaloutlets.
2.Removethecomputercover.See“Removingthecomputercover”onpage57.
3.Removethethermalmodule.See“Replacingthethermalmodule”onpage77.
Note:Placethethermalmoduleonitssidesothatthethermalgreaseonthebottomofitdoesnot
getincontactwithanything.
Chapter5.Installingorreplacinghardware79
Page 92

4.Liftthesmallhandle1andopentheretainer2toaccessthemicroprocessor3.
Figure70.Accessingthemicroprocessor
5.Liftthemicroprocessorstraightupandoutofthemicroprocessorsocket.
Notes:
•Yourmicroprocessorandsocketmightlookdifferentfromtheoneillustrated.
•Touchonlytheedgesofthemicroprocessor.Donottouchthegoldcontactsonthebottom.
•Donotdropanythingontothemicroprocessorsocketwhileitisexposed.Thesocketpinsmustbe
keptascleanaspossible.
Figure71.Removingthemicroprocessor
6.Ensurethatthesmallhandleisintheraisedpositionandthemicroprocessorretainerisfullyopen.
7.Removetheprotectivecoverthatprotectsthegoldcontactsofthenewmicroprocessor.
80ThinkCentreM73UserGuide
Page 93

8.Notetheorientationofthenewmicroprocessor.Holdthenewmicroprocessorbyitsedgesandalign
thenotches
1onitwiththetabs2inthemicroprocessorsocket.Then,carefullylowerthenew
microprocessorstraightdownintothemicroprocessorsocket.
Note:Thesmalltriangle3ononecornerofthenewmicroprocessoristhemicroprocessororientation
indicator.Thenewmicroprocessorisinthecorrectorientationwhenthisindicatorpointstothebeveled
corner4ofthemicroprocessorsocket.
Figure72.Installingthemicroprocessor
9.Closethemicroprocessorretainerandlockitintopositionwiththesmallhandletosecurethenew
microprocessorinthesocket.
10.Reinstallthethermalmodule.See“Replacingthethermalmodule”onpage77.
Whattodonext:
•Toworkwithanotherpieceofhardware,gototheappropriatesection.
•Tocompletethereplacement,goto“Completingthepartsreplacement”onpage82
.
Replacingthekeyboardormouse
Attention:
Donotopenyourcomputerorattemptanyrepairbeforereadingandunderstandingthe“Importantsafetyinformation”
onpagev.
Thissectionprovidesinstructionsonhowtoreplacethekeyboardormouse.
Toreplacethekeyboardormouse,dothefollowing:
1.Disconnecttheoldkeyboardcableormousecablefromthecomputer.
Chapter5.Installingorreplacinghardware81
Page 94

2.ConnectanewkeyboardormousetooneoftheUSBconnectorsonthecomputer.Dependingonwhere
youwanttoconnectthenewkeyboardormouse,see“Locatingconnectors,controls,andindicatorson
thefrontofyourcomputer”onpage8or“Locatingconnectorsontherearofyourcomputer”onpage10.
Figure73.ConnectingtheUSBkeyboardormouse
Whattodonext:
•Toworkwithanotherpieceofhardware,gototheappropriatesection.
•Tocompletetheinstallationorreplacement,goto“Completingthepartsreplacement”onpage82.
Completingthepartsreplacement
Aftercompletingtheinstallationorreplacementforallparts,youneedtoreinstallthecomputercoverand
reconnectcables.Dependingonthepartsyouinstalledorreplaced,youmightneedtoconfirmtheupdated
informationintheSetupUtilityprogram.RefertoChapter7“UsingtheSetupUtilityprogram”onpage93
.
Toreinstallthecomputercoverandreconnectcablestoyourcomputer,dothefollowing:
1.Ensurethatallcomponentshavebeenreassembledcorrectlyandthatnotoolsorloosescrewsareleft
insideyourcomputer.See“Locatingcomponents”onpage12
inyourcomputer.
2.Beforereinstallingthecomputercover,ensurethatthecablesareroutedcorrectly.Keepcablesclearof
thehingesandsidesofthecomputerchassistoavoidinterferencewithreinstallingthecomputercover.
forthelocationsofvariouscomponents
82ThinkCentreM73UserGuide
Page 95

3.Positionthecomputercoveronthechassisandthenpushthecovertotherearofthecomputeruntil
itsnapsintoposition.
Figure74.Installingthecomputercover
Chapter5.Installingorreplacinghardware83
Page 96

4.Installthescrewtosecurethecomputercover.
Figure75.Installingthecomputercoverscrew
5.IfthereisaKensington-stylecablelockavailable,lockthecomputer.See“AttachingaKensington-style
cablelock”onpage32
6.Reconnecttheexternalcablesandpowercordstothecomputer.See“Locatingconnectorsonthe
rearofyourcomputer”onpage10.
7.T oupdateyourconfiguration,refertoChapter7“UsingtheSetupUtilityprogram”onpage93.
.
Note:Inmostareasoftheworld,LenovorequiresthereturnofthedefectiveCustomerReplaceableUnit
(CRU).InformationaboutthiswillcomewiththeCRUorwillcomeafewdaysaftertheCRUarrives.
Obtainingdevicedrivers
Youcanobtaindevicedriversthatarenotpreinstalledinyouroperatingsystemsat
http://www.lenovo.com/support.Installationinstructionsareprovidedinreadmefileswiththedevice-driver
files.
84ThinkCentreM73UserGuide
Page 97

Chapter6.Recoveryinformation
ThischapterprovidesinformationabouttherecoverysolutionsprovidedbyLenovo.
•“RecoveryinformationfortheWindows7operatingsystem”onpage85
•“RecoveryinformationfortheWindows8orWindows8.1operatingsystem”onpage91
RecoveryinformationfortheWindows7operatingsystem
Thissectioncontainsthefollowingtopics:
•Creatingandusingrecoverymedia
•Performingbackupandrecoveryoperations
•UsingtheRescueandRecoveryworkspace
•Creatingandusingarescuemedium
•Installingorreinstallingdevicedrivers
•Solvingrecoveryproblems
Notes:
1.TherecoveryinformationinthischapteronlyappliestothecomputersthathavetheRescueand
RecoveryprogramortheProductRecoveryprograminstalled.IftheEnhancedBackupandRestore
iconintheLenovoThinkVantageToolsprogramisdimmed,itindicatesthatyouneedtoinstall
theRescueandRecoveryprogrammanuallybeforeenablingitsfeatures.T oinstalltheRescueand
Recoveryprogram,dothefollowing:
a.ClickStart➙AllPrograms➙LenovoThinkVantageTools,anddouble-clickEnhancedBackup
andRestore.
b.Followtheinstructionsonthescreen.
c.Whentheinstallationprocesscompletes,theEnhancedBackupandRestoreiconisactivated.
2.Thereareavarietyofmethodstochoosefromwhenconsideringhowtorecoverintheeventofa
software-orhardware-relatedproblem.Somemethodsvarydependingonthetypeofoperatingsystem
thatisinstalled.
3.Theproductontherecoverymediamaybeusedonlyforthefollowingpurposes:
•Restoretheproductpreinstalledonyourcomputer
•Reinstalltheproduct
•ModifytheproductusingtheAdditionalFiles
Creatingandusingrecoverymedia
Youcanuserecoverymediatorestoretheharddiskdrivetothefactorydefaultstate.Recoverymediaare
usefulifyoutransferthecomputertoanotherarea,sellthecomputer,recyclethecomputer,orputthe
computerinanoperationalstateafterallothermethodsofrecoveryhavefailed.Asaprecautionarymeasure,
itisimportanttocreaterecoverymediaasearlyaspossible.
Note:Therecoveryoperationsyoucanperformusingrecoverymediavarydependingontheoperating
systemfromwhichtherecoverymediawerecreated.Therecoverymediamightcontainabootmedium
andadatamedium.YourMicrosoftWindowslicensepermitsyoutocreateonlyonedatamedium,soitis
importantthatyoustoretherecoverymediainasafeplaceafteryouhavemadethem.
©CopyrightLenovo2013,2014
85
Page 98

Creatingrecoverymedia
Thissectionprovidesinstructionsonhowtocreaterecoverymedia.
Note:OntheWindows7operatingsystem,youcancreaterecoverymediausingdiscsorexternalUSB
storagedevices.
TocreaterecoverymediaontheWindows7operatingsystem,clickStart➙AllPrograms➙Lenovo
ThinkVantageT ools➙FactoryRecoveryDisks.Then,followtheinstructionsonthescreen.
Usingrecoverymedia
Thissectionprovidesinstructionsonhowtouserecoverymedia.
OntheWindows7operatingsystem,youcanuserecoverymediatorestorethecontentsoftheharddisk
drivetothefactorydefaultstate.Also,youcanuserecoverymediatoputthecomputerinanoperational
stateafterallothermethodsofharddiskdriverecoveryhavefailed.
Attention:Whenyouuserecoverymediatorestorethecontentsoftheharddisktothefactorydefaultstate,
allthefilescurrentlyontheharddiskdrivewillbedeletedandreplacedbythefactorydefaultfiles.
TouserecoverymediaontheWindows7operatingsystem,dothefollowing:
1.Dependingonthetypeofyourrecoverymedia,connectthebootmedium(memorykeyorotherUSB
storagedevice)tothecomputer,orinsertthebootdiscintotheopticaldrive.
2.RepeatedlypressandreleasetheF12keywhenturningonthecomputer.WhenthePleaseselect
bootdevicewindowopens,releasetheF12key.
3.SelectthedesiredstartupdeviceandpressEnter.Therestoreprocessbegins.
4.Followtheinstructionsonthescreentocompletetheoperation.
Note:Afterrestoringyourcomputerharddiskdrivetothefactorydefaultstate,youmighthavetoreinstall
devicedriversforsomedevices.See“Reinstallingdevicedrivers”onpage90.
Performingbackupandrecoveryoperations
TheRescueandRecoveryprogramenablesyoutobackupallyourharddiskdrivecontentsincludingthe
operatingsystem,datafiles,softwareprograms,andpersonalsettings.Youcandesignatewherethe
RescueandRecoveryprogramstoresthebackup:
•Inaprotectedareaofyourharddiskdrive
•Onthesecondaryharddiskdriveifasecondaryharddiskdriveisinstalledinyourcomputer
•OnanattachedexternalUSBharddiskdrive
•Onanetworkdrive
•Onrecordablediscs(arecordableopticaldriveisrequiredforthisoption)
Afteryouhavebackedupthecontentsoftheharddiskdrive,youcanrestorethecompletecontentsofthe
harddiskdrive,restoreselectedfilesonly,orrestoretheWindowsoperatingsystemandapplicationsonly
whilekeepingtheotherdataonyourharddiskdrive.
Performingabackupoperation
ThissectionprovidesinstructionsonhowtoperformabackupoperationusingtheRescueandRecovery
program.
ToperformabackupoperationusingtheRescueandRecoveryprogramontheWindows7operating
system,dothefollowing:
86ThinkCentreM73UserGuide
Page 99

1.FromtheWindowsdesktop,clickStart➙AllPrograms➙LenovoThinkVantageTools➙Enhanced
BackupandRestore.TheRescueandRecoveryprogramopens.
2.IntheRescueandRecoverymainwindow,clicktheLaunchadvancedRescueandRecoveryarrow.
3.ClickBackupyourharddriveandselectbackupoperationoptions.Then,followtheinstructionson
thescreentocompletethebackupoperation.
Performingarecoveryoperation
ThissectionprovidesinstructionsonhowtoperformarecoveryoperationusingtheRescueandRecovery
program.
ToperformarecoveryoperationusingtheRescueandRecoveryprogramontheWindows7operating
system,dothefollowing:
1.FromtheWindowsdesktop,clickStart➙AllPrograms➙LenovoThinkVantageTools➙Enhanced
BackupandRestore.TheRescueandRecoveryprogramopens.
2.IntheRescueandRecoverymainwindow,clicktheLaunchadvancedRescueandRecoveryarrow.
3.ClicktheRestoreyoursystemfromabackupicon.
4.Followtheinstructionsonthescreentocompletetherecoveryoperation.
FormoreinformationaboutperformingarecoveryoperationfromtheRescueandRecoveryworkspace,see
“UsingtheRescueandRecoveryworkspace”onpage87.
UsingtheRescueandRecoveryworkspace
TheRescueandRecoveryworkspaceresidesinaprotected,hiddenareaofyourharddiskdrivethat
operatesindependentlyfromtheWindowsoperatingsystem.Thisenablesyoutoperformrecovery
operationsevenifyoucannotstarttheWindowsoperatingsystem.Youcanperformthefollowingrecovery
operationsfromtheRescueandRecoveryworkspace:
•Rescuefilesfromyourharddiskdriveorfromabackup:TheRescueandRecoveryworkspaceenables
youtolocatefilesonyourharddiskdriveandtransferthemtoanetworkdriveorotherrecordablemedia,
suchasaUSBdeviceoradisc.Thissolutionisavailableevenifyoudidnotbackupyourfilesorif
changesweremadetothefilessinceyourlastbackupoperation.Y oucanalsorescueindividualfilesfrom
aRescueandRecoverybackuplocatedonyourlocalharddiskdrive,aUSBdevice,oranetworkdrive.
•RestoreyourharddiskdrivefromaRescueandRecoverybackup:Ifyouhavebackedupyourharddisk
driveusingtheRescueandRecoveryprogram,youcanrestoretheharddiskdrivefromaRescueand
Recoverybackup,evenifyoucannotstarttheWindowsoperatingsystem.
•Restoreyourharddiskdrivetothefactorydefaultstate:TheRescueandRecoveryworkspaceenables
youtorestorethecompletecontentsofyourharddiskdrivetothefactorydefaultstate.Ifyouhave
multiplepartitionsonyourharddiskdrive,youhavetheoptiontorestoretheC:partitionandleavethe
otherpartitionsintact.BecausetheRescueandRecoveryworkspaceoperatesindependentlyfrom
theWindowsoperatingsystem,youcanrestoretheharddiskdrivetothefactorydefaultstateevenif
youcannotstarttheWindowsoperatingsystem.
Attention:IfyourestoretheharddiskdrivefromaRescueandRecoverybackuporrestoretheharddisk
drivetothefactorydefaultsettings,allfilesontheprimaryharddiskdrivepartition(usuallydriveC:)willbe
deletedintherecoveryprocess.Ifpossible,makecopiesofimportantfiles.Ifyouareunabletostartthe
Windowsoperatingsystem,youcanusetherescuefilesfeatureoftheRescueandRecoveryworkspaceto
copyfilesfromyourharddiskdrivetoothermedia.
TostarttheRescueandRecoveryworkspace,dothefollowing:
1.Makesurethecomputeristurnedoff.
Chapter6.Recoveryinformation87
Page 100

2.T urnonyourcomputer.Whenyouseethelogoscreen,pressEnter,andthenpressF11toenterthe
RescueandRecoveryworkspace.
3.IfyouhavesetaRescueandRecoverypassword,typeyourpasswordwhenprompted.TheRescue
andRecoveryworkspaceopensafterashortdelay.
Note:IftheRescueandRecoveryworkspacefailstoopen,see“Solvingrecoveryproblems”onpage90
4.Dooneofthefollowing:
•Torescuefilesfromyourharddiskdrive,clickRescuefilesandfollowtheinstructionsonthescreen.
•TorestoreyourharddiskdrivefromaRescueandRecoverybackuportorestoreyourharddiskdrive
tothefactorydefaultsettings,clickFullRestoreandfollowtheinstructionsonthescreen.
FormoreinformationaboutthefeaturesoftheRescueandRecoveryworkspace,clickHelp.
Note:Afterrestoringyourharddiskdrivetothefactorydefaultstate,youmighthavetoreinstalldevice
driversforsomedevices.See“Reinstallingdevicedrivers”onpage90.
Creatingandusingarescuemedium
Witharescuemedium,suchasadiscoraUSBharddiskdrive,youcanrecoverthecomputerfromfailures
thatpreventyoufromgainingaccesstotheRescueandRecoveryworkspaceonyourharddiskdrive.
Notes:
•Therecoveryoperationsyoucanperformusingarescuemediumvarydependingontheoperatingsystem.
•Therescuedisccanbestartedinalltypesofopticaldrives.
Creatingarescuemedium
Thissectionprovidesinstructionsonhowtocreatearescuemedium.
.
TocreatearescuemediumontheWindows7operatingsystem,dothefollowing:
1.FromtheWindowsdesktop,clickStart➙AllPrograms➙LenovoThinkVantageTools➙Enhanced
BackupandRestore.TheRescueandRecoveryprogramopens.
2.IntheRescueandRecoverymainwindow,clicktheLaunchadvancedRescueandRecoveryarrow.
3.ClicktheCreateRescueMediaicon.TheCreateRescueandRecoveryMediawindowopens.
4.IntheRescueMediaarea,selectthetypeoftherescuemediumyouwanttocreate.Youcancreatea
rescuemediumusingadisc,aUSBharddiskdrive,orasecondaryinternalharddiskdrive.
5.ClickOKandfollowtheinstructionsonthescreentocreatearescuemedium.
Usingarescuemedium
Thissectionprovidesinstructionsonhowtousetherescuemediumyouhavecreated.
•Ifyouhavecreatedarescuemediumusingadisc,usethefollowinginstructionstousetherescuemedium:
1.T urnoffyourcomputer.
2.RepeatedlypressandreleasetheF12keywhenturningonthecomputer.WhenthePleaseselect
bootdevicewindowopens,releasetheF12key.
3.InthePleaseselectbootdevicewindow,selectthedesiredopticaldriveasthefirstbootdevice.
Then,inserttherescuediscintotheopticaldriveandpressEnter.Therescuemediumstarts.
•IfyouhavecreatedarescuemediumusingaUSBharddiskdrive,usethefollowinginstructionsto
usetherescuemedium:
1.AttachtheUSBharddiskdrivetooneoftheUSBconnectorsonyourcomputer.
88ThinkCentreM73UserGuide
 Loading...