

Lenovo G770 10372, G770, 10372GU, 10372UU, 10372XU User Manual
...
Lenovo G770
User Guide V1.0
Read the safety notices and important tips in the
included manuals before using your computer.

Notes
•
Before using the product, be sure to read Lenovo Safety and General
Information Guide first.
•
Some instructions in this guide may assume that you are using
Windows® 7. If you are using other Windows operating system, some
operations may be slightly different. If you are using other operating
systems, some operations may not apply to you.
•
The features described in this guide are common to most models.
Some features may not be available on your computer and/or your
computer may include features that are not described in this user
guide.
•
The illustrations in this manual may differ from the actual product.
Please refer to the actual product.
Regulatory Notice
•
To refer to it, go to http://consumersupport.lenovo.com/ and click
User guides and manuals.
First Edition (March 2011)
© Copyright Lenovo 2011.
LENOVO products, data, computer software, and services have been developed exclusively at private
expense and are sold to governmental entities as commercial items as defined by 48 C.F.R. 2.101 with
limited and restricted rights to use, reproduction and disclosure. LIMITED AND RESTRICTED
RIGHTS NOTICE: If products, data, computer software, or services are delivered pursuant a General
Services Administration “GSA” contract, use, reproduction, or disclosure is subject to restrictions set
forth in Contract No. GS-35F-05925.

i
Chapter 1. Getting to know your
computer................................... 1
Top view..........................................1
Left-side view .................................3
Right-side view...............................4
Front view .......................................5
Bottom view ....................................6
Chapter 2. Learning the
basics........................................7
First use............................................7
Using AC adapter and battery .....9
Using the touchpad......................11
Using the keyboard......................12
Connecting external devices.......14
Special keys and buttons.............17
System status indicators..............18
Securing your computer..............19
Switchable Graphics in two modes
(on select models).........................20
Chapter 3. Connecting to the
Internet ....................................22
Wired connection.........................22
Wireless connection.....................24
Chapter 4. OneKey Rescue
system .....................................26
OneKey Rescue system ............... 26
Chapter 5. Troubleshooting...29
Frequently asked questions........ 29
Troubleshooting........................... 31
Appendix A. CRU
instructions.............................35
Replacing the battery pack ......... 35
Replacing the hard disk drive.... 36
Replacing memory.......................40
Removing the optical drive........ 43
Trademarks.............................45
Contents

1
Chapter 1. Getting to know your computer
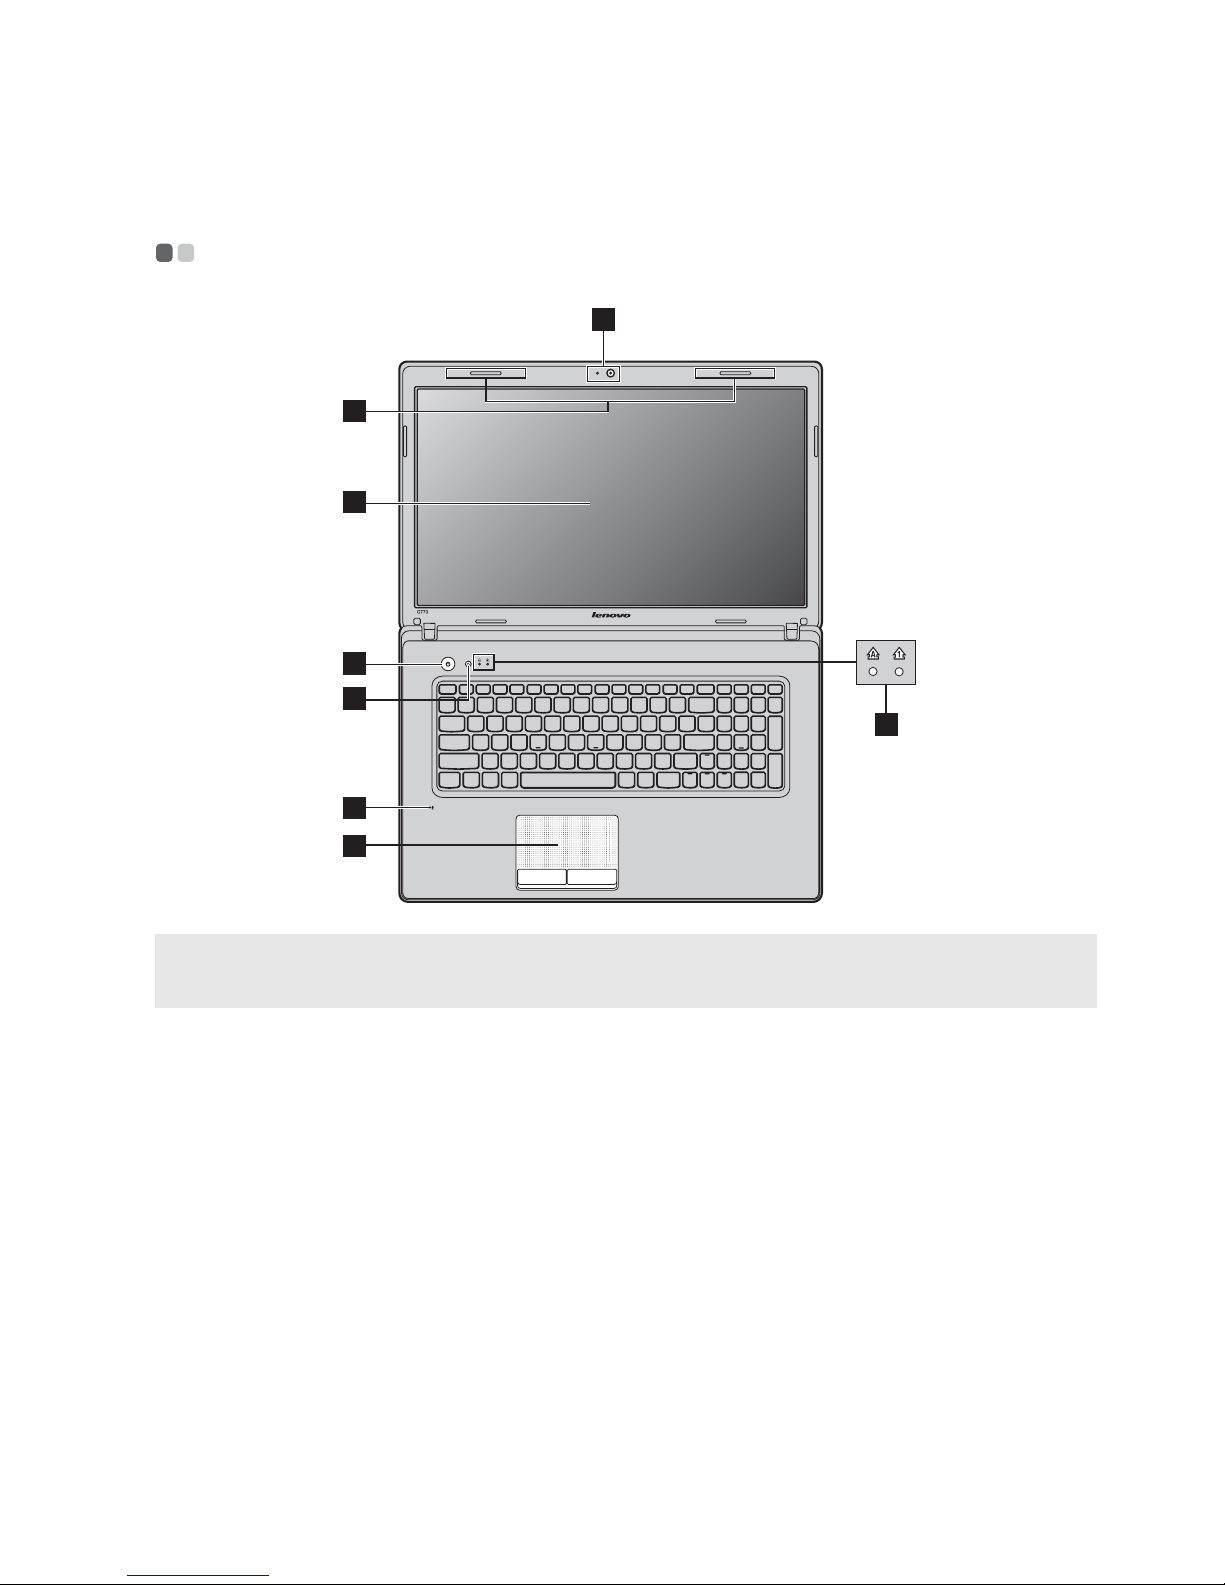
Top view - - - - - - - - - - - - - - - - - - - - - - - - - - - - - - - - - - - - - - - - - - - - - - - - - - - - - - - - - - - - - - - - - - - - - - - - - - - - - - - - - - - - - - - - - - - - - - - - - - -
Note: The illustrations in this manual may differ from the actual product. Please refer to the
actual product.
Attention:
• Do NOT open the display panel beyond 130 degrees. When closing the display panel, be
careful NOT to leave pens or any other objects in between the display panel and the
keyboard. Otherwise, the display panel may be damaged.
8
1
2
3
6
5
4
7

2
Chapter 1. Getting to know your computer
Integrated
camera
Use the camera for video communication.
Wireless module
antennas
The built-in antennas ensure optimal reception of wireless
radio.
Computer display
The LCD display with LED backlight provides brilliant
visual output.
Power button
Press this button to turn on the computer.
OneKey Rescue
system button
Press this button to open OneKey Rescue system (If
OneKey Rescue system has been preinstalled) when the
computer is powered off.
Note: For details, see “OneKey Rescue system” on page 26.
Built-in
microphone
The built-in microphone (with noise reduction) can be
used for video conferencing, voice narration, or simple
audio recordings.
Touchpad
The touchpad functions as a conventional mouse.
Note: For details, see “Using the touchpad” on page 11.
System status
indicators
For details, see “System status indicators” on page 18.
a
b
c
d
e
f
g
h
Chapter 1. Getting to know your computer
3
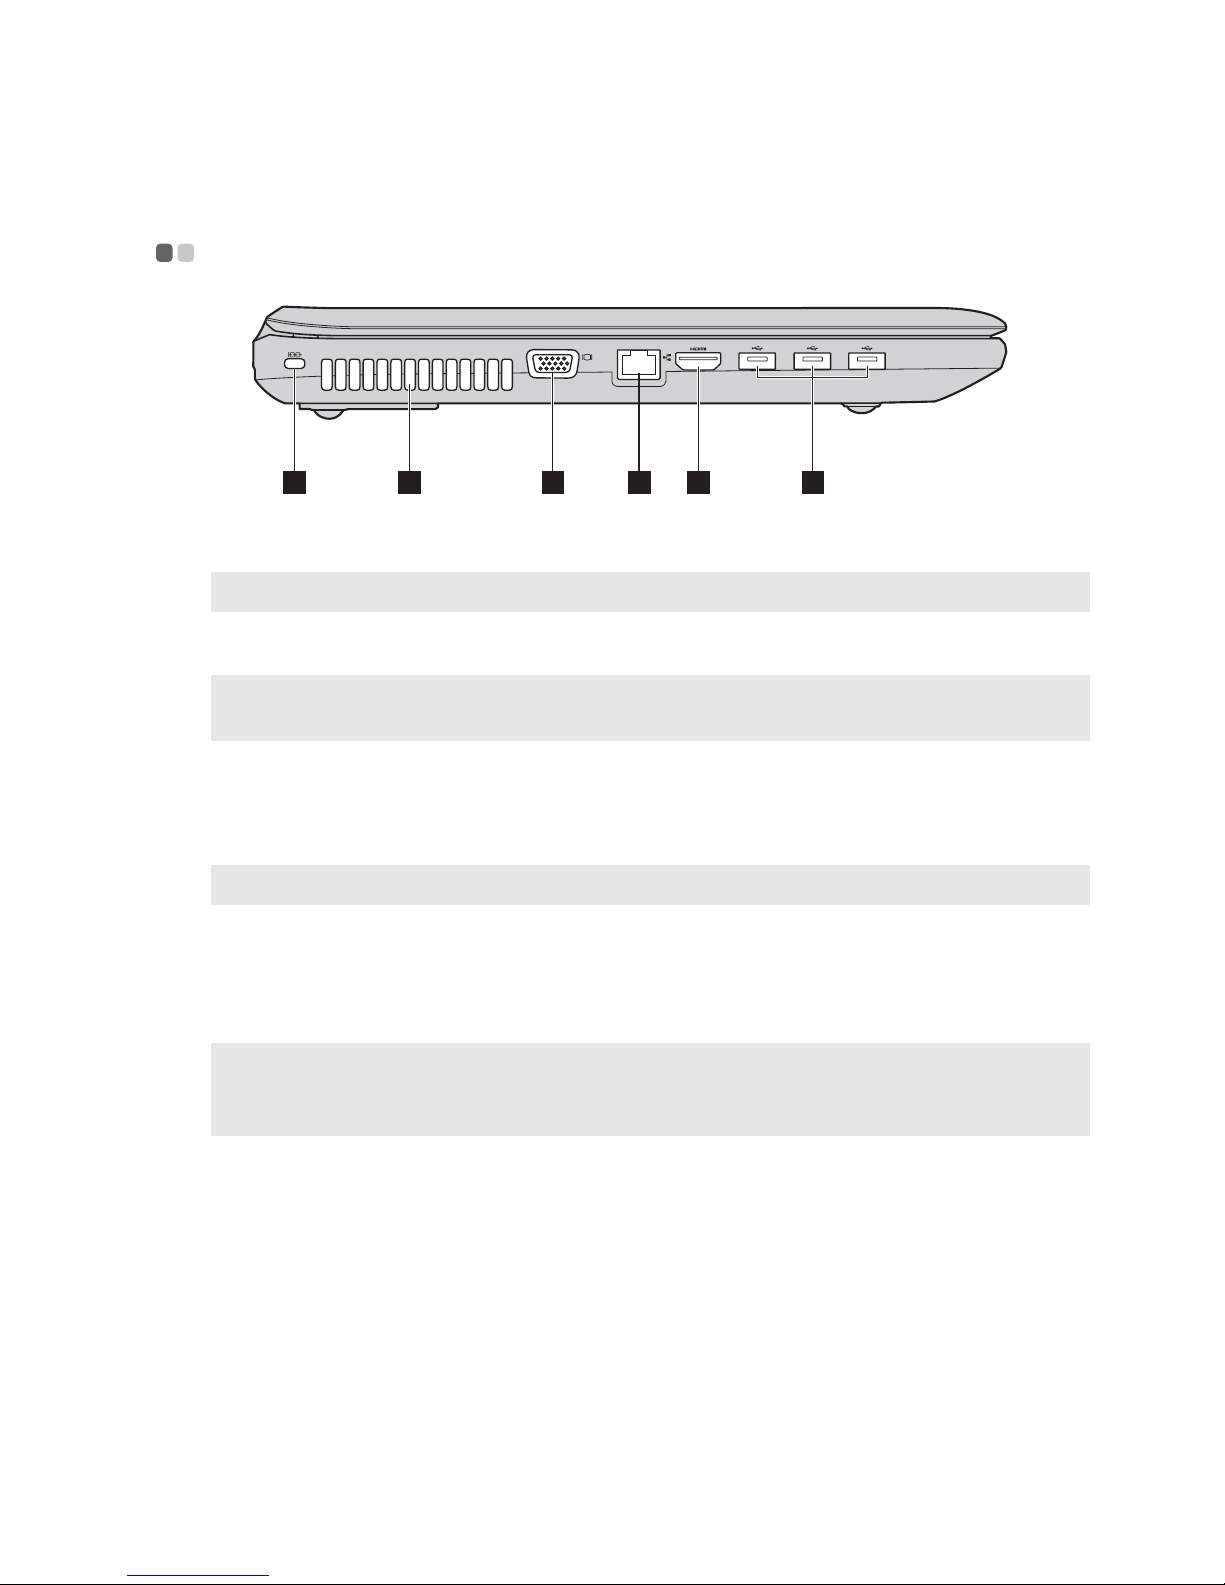
Left-side view - - - - - - - - - - - - - - - - - - - - - - - - - - - - - - - - - - - - - - - - - - - - - - - - - - - - - - - - - - - - - - - - - - - - - - - - - - - - - - - - - - - - - -
Kensington slot
Attach a security lock (not supplied) here.
Note: For details, see “Attaching a security lock (not supplied)” on page 19.
Fan louvers
Dissipate internal heat.
Note: Make sure that none of the fan louvers are blocked or else overheating of the
computer may occur.
VGA port
Connects to external display devices.
RJ-45 port
This port connects the computer to an Ethernet network.
Note: For details, see “Wired connection” on page 22.
HDMI port
Connects to devices with HDMI input such as a TV or a
display.
USB port
Connect to USB devices.
Notes:
• The blue port supports USB 3.0 (on select models).
• For details, see “Connecting USB devices” on page 15.
1 3 4 5 62
a
b
c
d
e
f
4
Chapter 1. Getting to know your computer
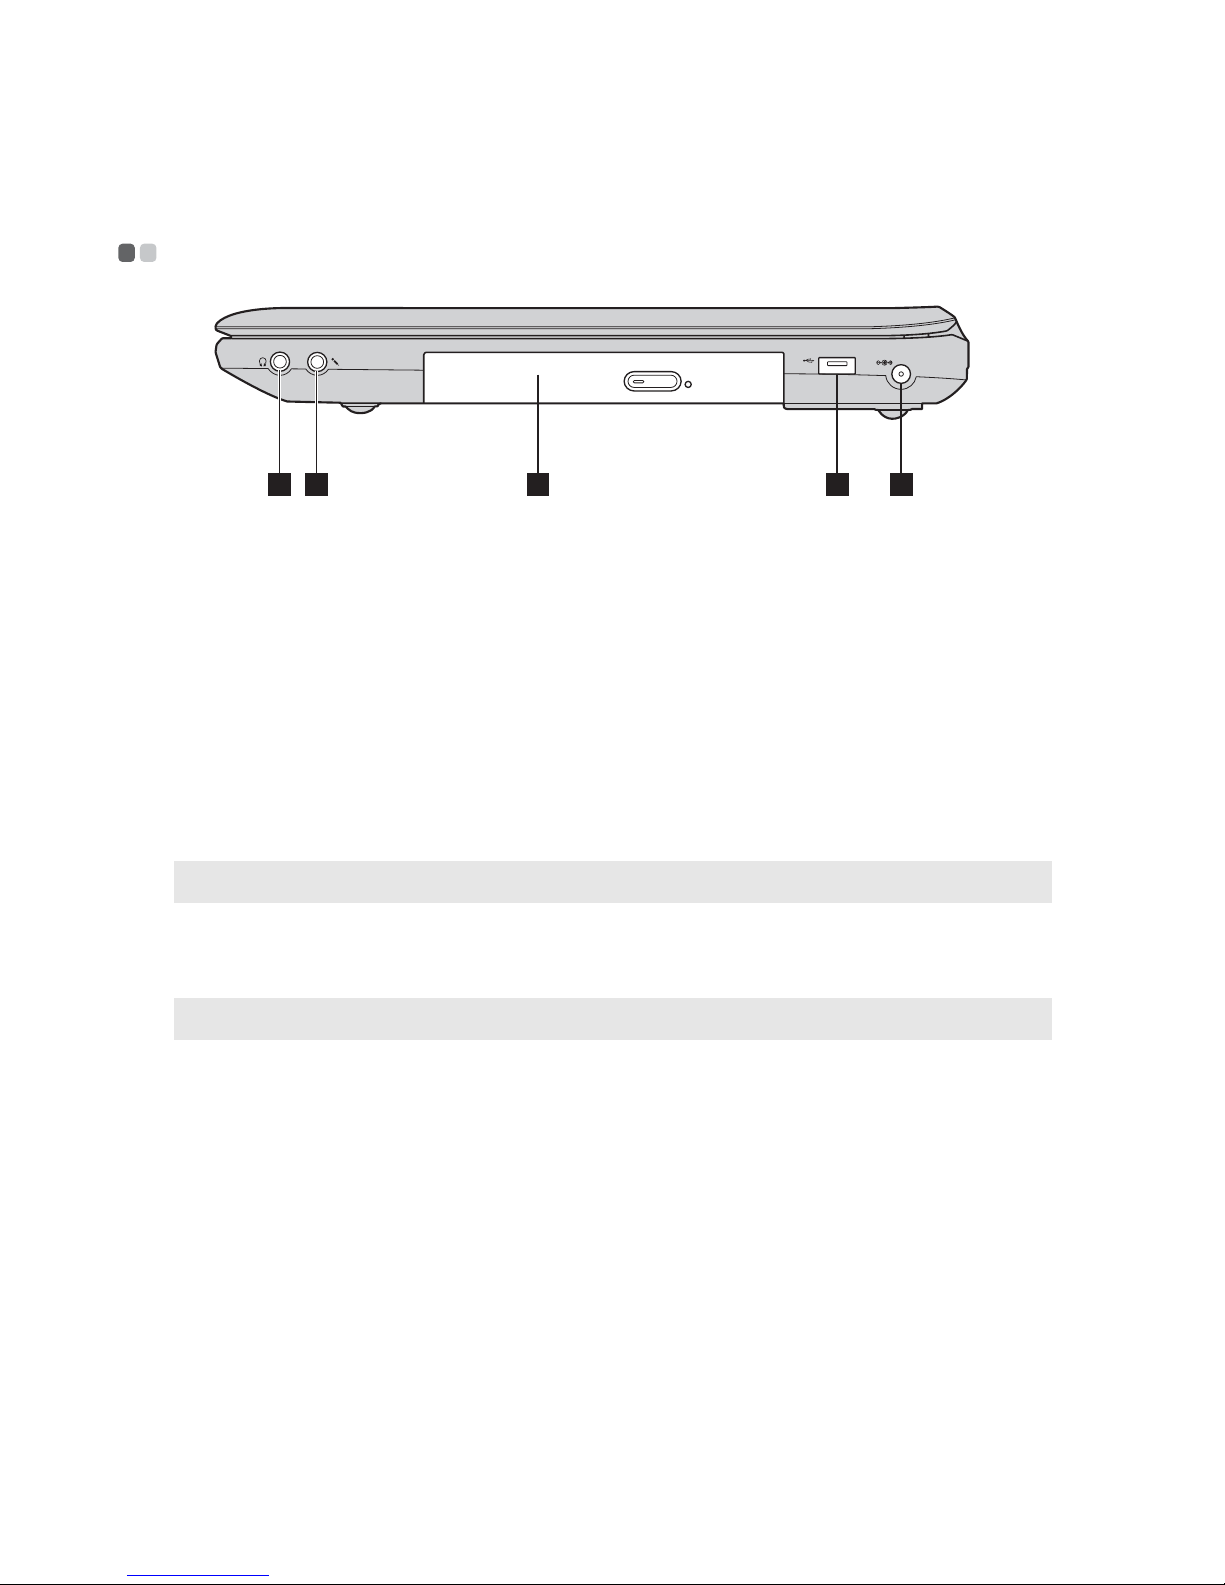
Right-side view - - - - - - - - - - - - - - - - - - - - - - - - - - - - - - - - - - - - - - - - - - - - - - - - - - - - - - - - - - - - - - - - - - - - - - - - - - - - - - - - - -
Headphone jack
Connects to external headphones.
Attention:
• Listening to music at high volume over extended periods of time may damage your
hearing.
Microphone jack
Connects to external microphones.
Optical drive
Reads/Burns optical disks.
USB port
Connects to USB devices.
Note: For details, see “Connecting USB devices” on page 15.
AC power adapter
jack
Connect the AC adapter here.
Note: For details, see “Using AC adapter and battery” on page 9.
1 3 4 52
a
b
c
d
e
Chapter 1. Getting to know your computer
5
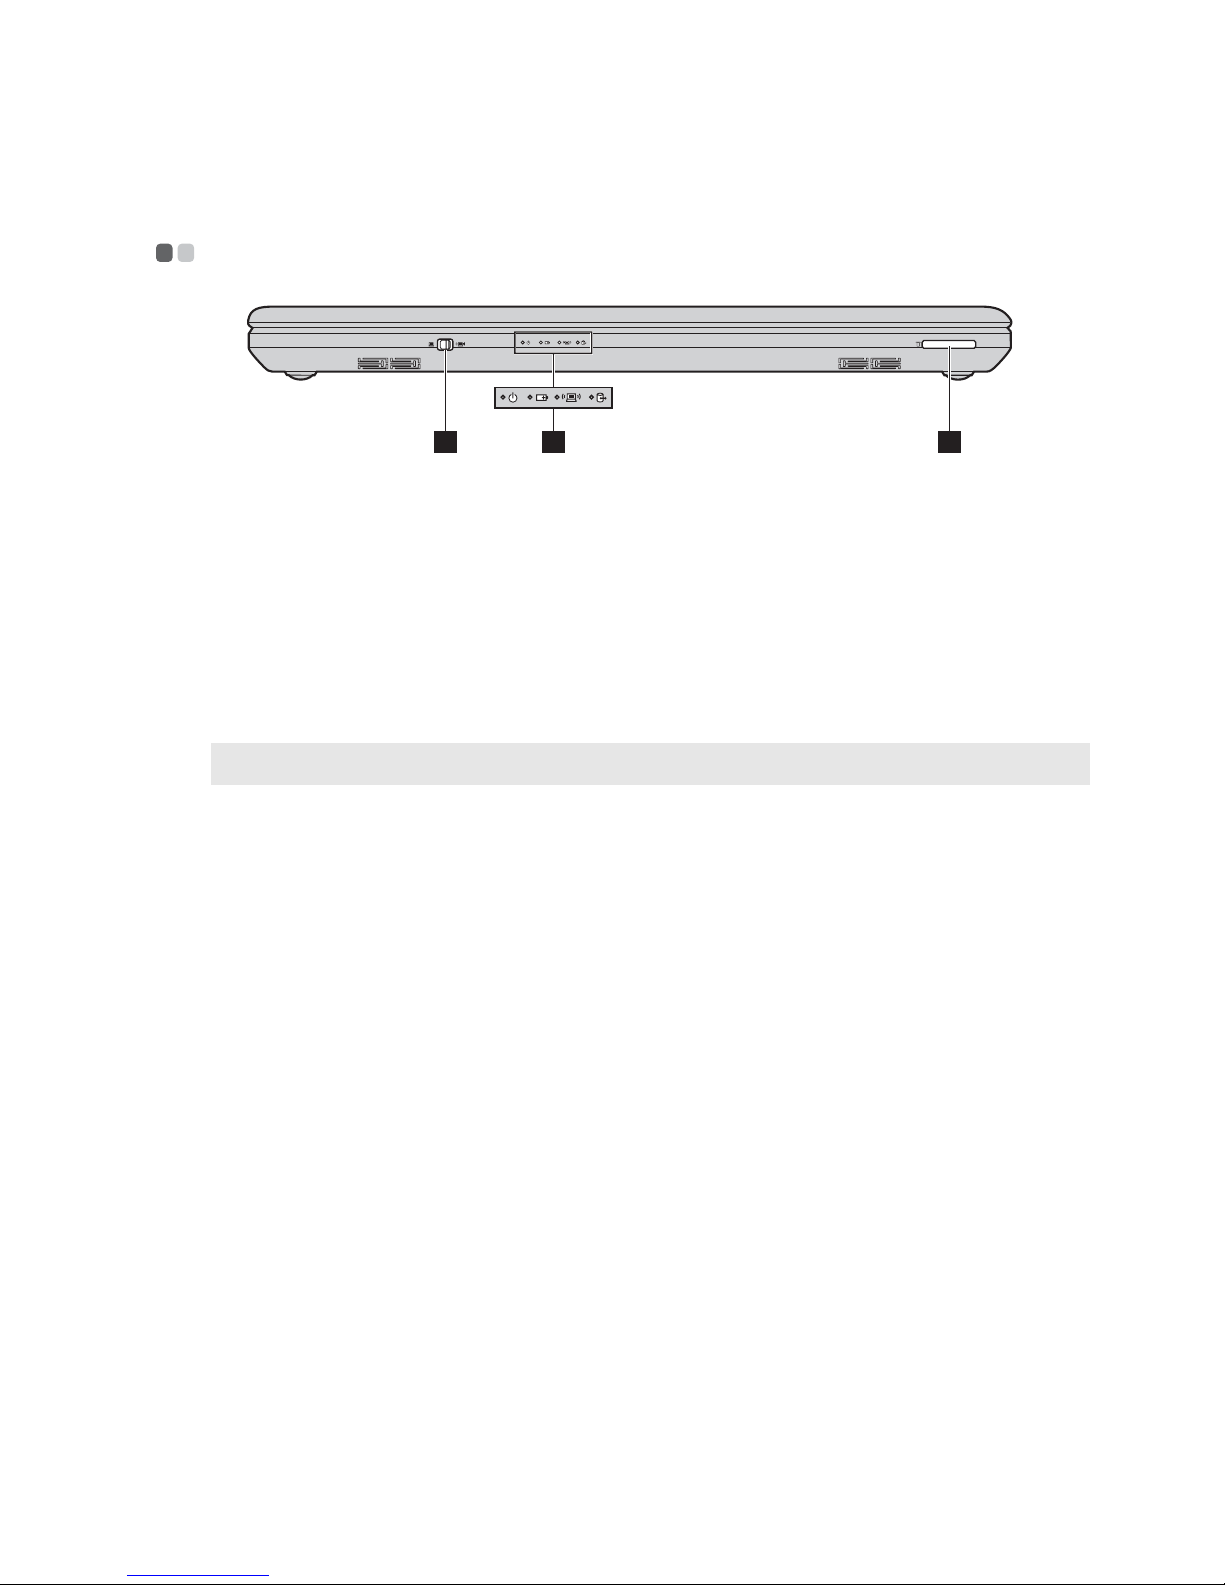
Front view - - - - - - - - - - - - - - - - - - - - - - - - - - - - - - - - - - - - - - - - - - - - - - - - - - - - - - - - - - - - - - - - - - - - - - - - - - - - - - - - - - - - - - - - - - - - - - -
Integrated
wireless device
switch (on select
models)
Use this switch to turn on/off the wireless radio of all
wireless devices on your computer.
System status
indicators
For details, see “System status indicators” on page 18.
Memory card slot
Insert memory cards (not supplied) here.
Note: For details, see “Using memory cards (not supplied)” on page 14.
3
2
1
a
b
c
6
Chapter 1. Getting to know your computer
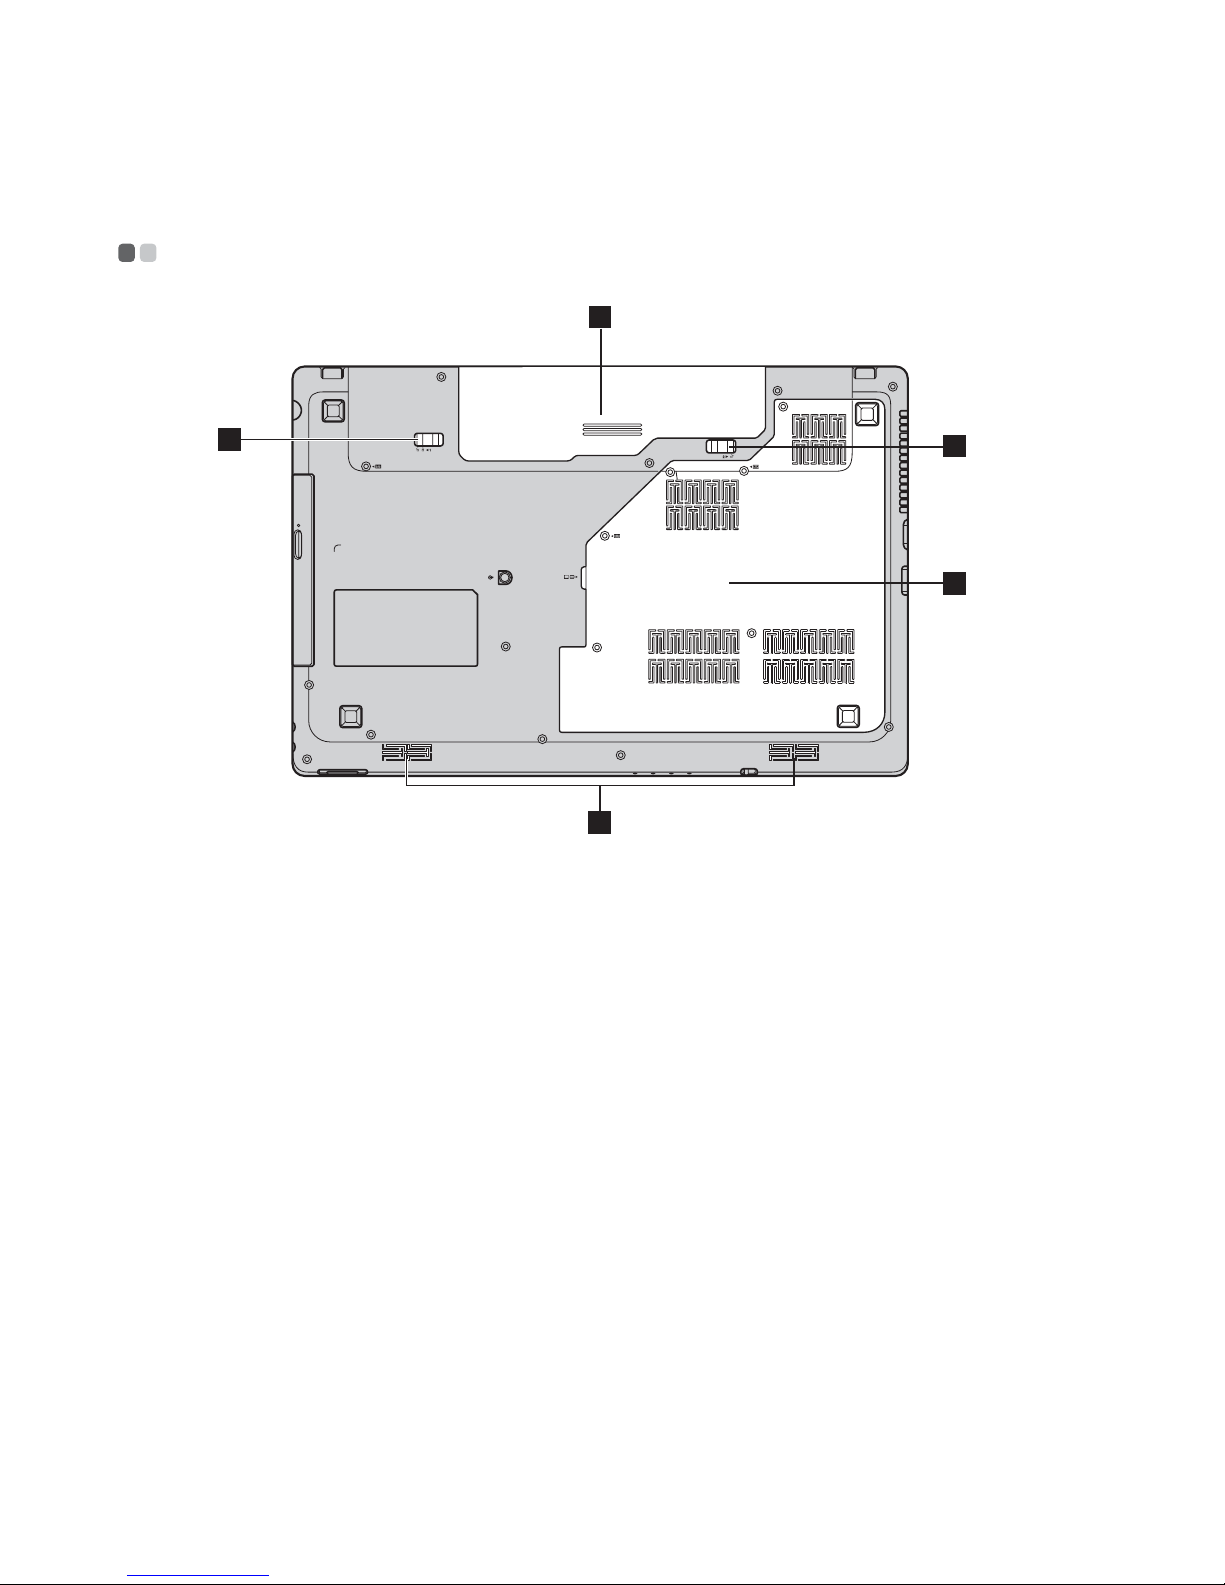
Bottom view - - - - - - - - - - - - - - - - - - - - - - - - - - - - - - - - - - - - - - - - - - - - - - - - - - - - - - - - - - - - - - - - - - - - - - - - - - - - - - - - - - - - - - - - - -
Battery pack
For details, see “Using AC adapter and battery” on page
9.
Battery latch manual
The manual battery latch is used to keep the battery pack
secured in place.
Battery latch spring loaded
The spring-loaded battery latch keeps the battery pack
secured in place.
Hard disk drive/
Memory/Central
processing unit/
Mini PCI Express
Card slot
compartment
Speakers
The stereo speakers provide rich and powerful sound.
1
2
3
4
5
a
b
c
d
e

Chapter 2. Learning the basics
7
Chapter 2. Learning the basics
First use
- - - - - - - - - - - - - - - - - - - - - - - - - - - - - - - - - - - - - - - - - - - - - - - - - - - - - - - - - - - - - - - - - - - - - - - - - - - - - - - - - - - - - - - - - - - - - - - - - - - - - - -
Reading the manuals
Read the supplied manuals before using your computer.
Conncting to the power
The supplied battery pack is not fully charged at purchase.
To charge the battery and begin using your computer, insert the battery pack
and connect the computer to an electrical outlet. The battery is automatically
charged while the computer is running on AC power.
Installing the battery pack
Refer to the supplied Setup Poster to install the battery pack.
Connecting the computer to an electrical outlet
1
Connect the power cord to the AC adapter.
2
Connect the AC adapter to the AC power adapter jack of the computer
firmly.
3
Plug the power cord into an electrical outlet.
Turning on the computer
Press the power button to turn on the computer.
Configuring the operating system
You may need to configure the operating system when it is first used. The
configuration process may include the procedures below.
• Accepting the end user license agreement
• Configuring the Internet connection
• Registering the operating system
• Creating a user account

8
Chapter 2. Learning the basics
Putting your computer into sleep state or shutting it down
When you finish working with your computer, you can put it into sleep state
or shut it down.
Putting your computer into sleep state
If you will be away from your computer for only a short time, put the
computer into sleep state.
When the computer is in sleep state, you can quickly wake it to resume use,
and bypass the startup process.
To put the computer into sleep state, do one of the following.
• Click and select Sleep from the Start menu.
• Press Fn + F1.
To wake the computer, do one of the following.
• Press the power button.
• Press any key on the keyboard.
Shutting down your computer
If you are not going to use your computer for a day or two, shut it down.
To shut down your computer, click and select Shut down from the Start
menu.
Note: Wait until the power indicator light starts blinking (indicating that the computer is in
sleep state) before you move your computer. Moving your computer while the hard
disk is spinning can damage the hard disk, causing loss of data.

Chapter 2. Learning the basics
9
Using AC adapter and battery
- - - - - - - - - - - - - - - - - - - - - - - - - - - - - - - - - - - - - - - - - - - - - - - - - - - - - - - - - -
Checking battery status
You can determine the percentage of battery power remaining by checking
the battery icon in the notification area.
Charging the battery
When you find that the battery power is low, you need to charge the battery
or replace it with a fully charged one.
You need to charge the battery in any of the following situations:
• When you purchase a new battery
• If the battery status indicator starts blinking
• If the battery has not been used for a long time
Note: As each computer user has different habits and needs, it is difficult to predict how
long a battery charge will last. There are two main factors:
• The amount of energy stored in the battery when you commence work.
• The way you use your computer: for example, how often you access the hard
disk drive and how bright you make the computer display.
Notes:
• You are advised to insert the battery pack when using your computer to prevent small
particles from entering the inside of your computer.
• To increase the life of the battery pack, the computer does not start recharging the
battery immediately after it drops from fully charged.
• Charge the battery at a temperature between 50 °F and 86 °F (10 °C-30 °C).
• Full charge or discharge is not required.

10
Chapter 2. Learning the basics
Removing the battery pack
If you are not going to use the computer for an extended period of time, or if
you need to send your computer to Lenovo for service, etc. remove the
battery pack from the computer. Before removing the battery pack, make
sure the computer has been shut down.
Handling the battery
If the rechargeable battery pack is replaced with an incorrect type, there may
be danger of an explosion. The battery pack contains a small amount of
harmful substances. To avoid possible injury and detriment to the
environment, pay attention to the following points:
• Replace only with a battery of the type recommended by Lenovo.
• Keep the battery pack away from fire.
• Do not expose the battery pack to water or rain.
• Do not attempt to disassemble the battery pack.
• Do not short-circuit the battery pack.
• Keep the battery pack away from children.
• Do not put the battery pack in trash that is disposed of in landfills. When
disposing of the battery, comply with local ordinances or regulations and
your company’s safety standards.
Chapter 2. Learning the basics
11
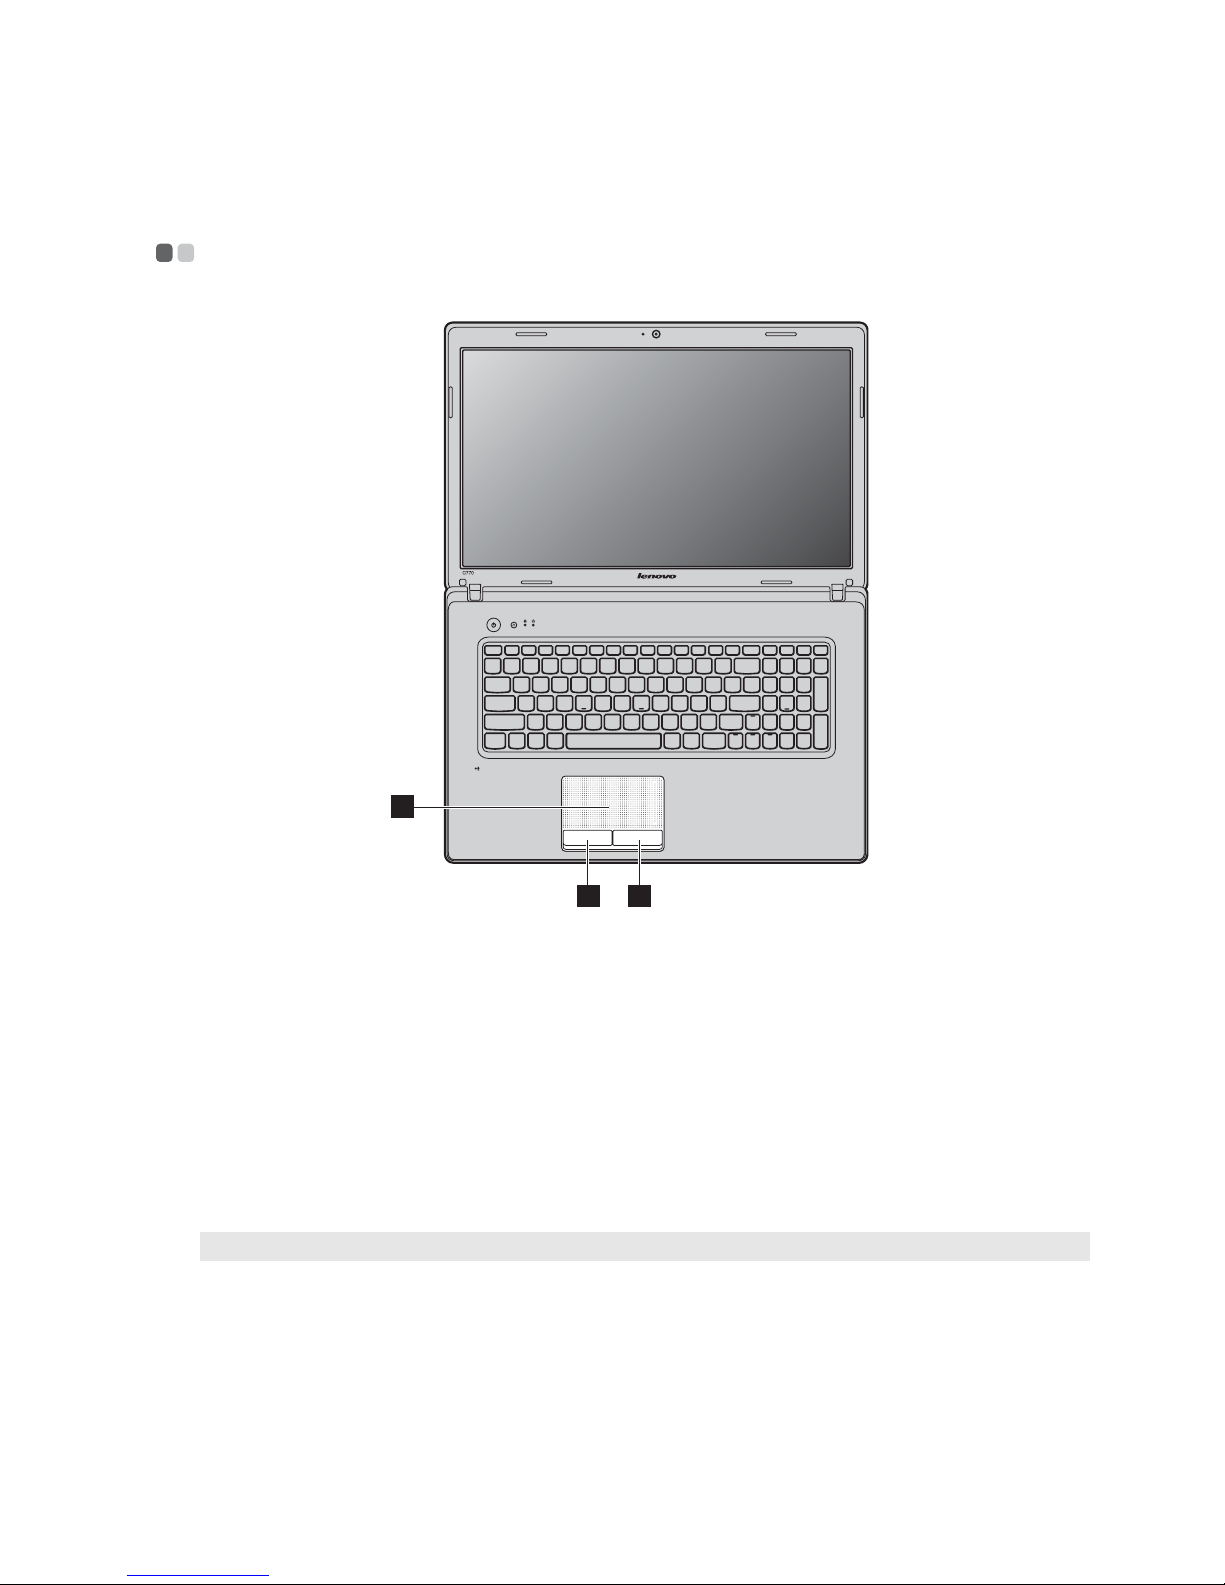
Using the touchpad
- - - - - - - - - - - - - - - - - - - - - - - - - - - - - - - - - - - - - - - - - - - - - - - - - - - - - - - - - - - - - - - - - - - - - - - - - - - - - - -
Touchpad
To move the cursor on the screen, slide your
fingertip over the pad in the direction in which
you want the cursor to move.
Left click button
The function corresponds to that of the left
mouse button on a conventional mouse.
Right click button
The function corresponds to that of the right
mouse button on a conventional mouse.
Note: You can enable/disable the touchpad using Fn + F6.
2
3
1
a
b
c
12
Chapter 2. Learning the basics
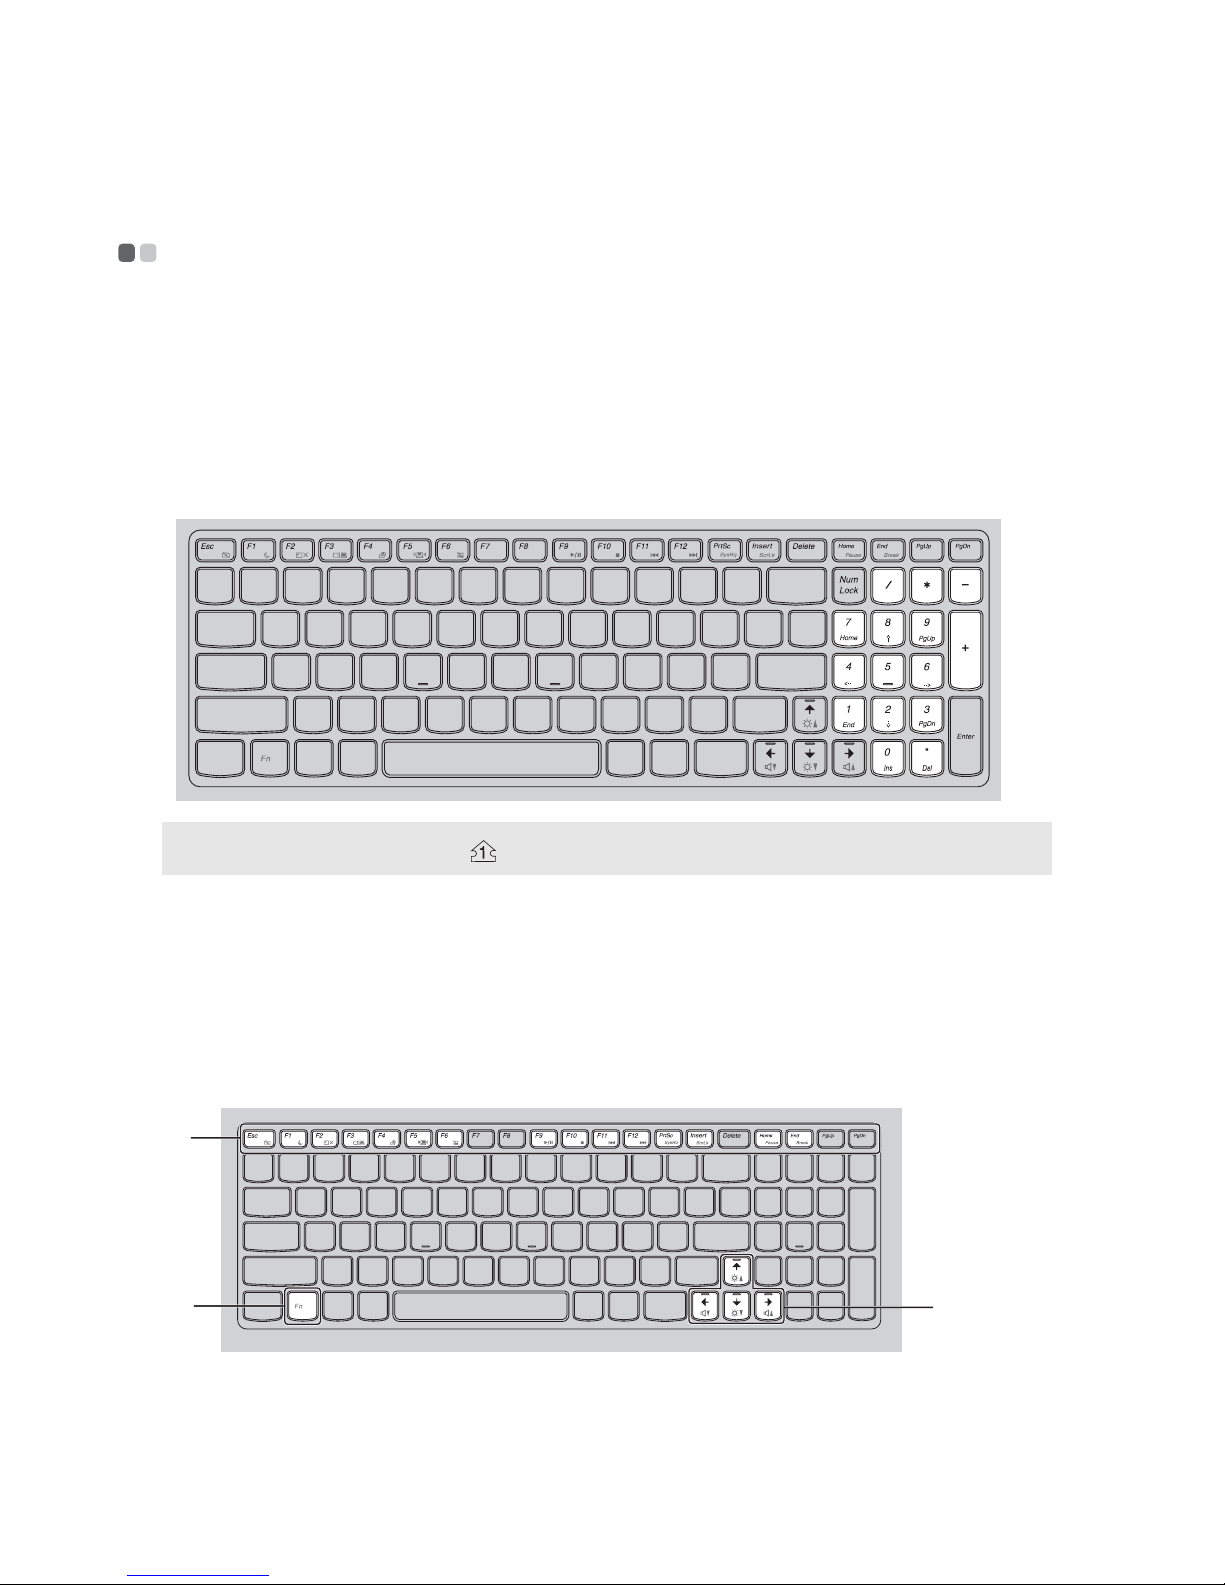
Using the keyboard
- - - - - - - - - - - - - - - - - - - - - - - - - - - - - - - - - - - - - - - - - - - - - - - - - - - - - - - - - - - - - - - - - - - - - - - - - - - - - - - -
Your computer has a numeric keypad and function keys incorporated in its
standard keyboard.
Numeric keypad
The keyboard has a separate numeric keypad. To enable or disable the
numeric keypad, press the Num Lock key.
Function key combinations
Through the use of the function keys, you can change operational features
instantly. To use this function, press and hold Fn ; then press one of the
function keys .
Note: The Num lock indicator will light on if the numeric keypad is enabled.
a
b
b
a
b
 Loading...