

Lenovo IdeaPad S10-3t, 065137U, 06513EU, 06514FU, 06517HU User Manual
...
Lenovo
IdeaPad
S10-3t
S10-3t UserGuide V1.0 cover_1-4
User Guide V1.0

Notes
•
Before using this information and the product it supports, be sure to read Important safety
information on page iii and Notices in Appendix E first.
Some instructions in this guide may assume that you are using Windows® 7. If you are using
•
other Windows operating system, some operations may be slightly different. If you are using
other operating systems, some operations may not apply to you, and thus shouldn't affect your
use of this computer.
•
The features described in this guide are common to most models. Some features may not be
available on your computer and/or your computer may include features that are not described in
this user guide.
First Edition (November 2009)
© Copyright Lenovo 2009
LENOVO products, data, computer software, and services have been developed exclusively at private expense
and are sold to governmental entities as commercial items as defined by 48 C.F.R. 2.101 with limited and
restricted rights to use, reproduction and disclosure. LIMITED AND RESTRICTED RIGHTS NOTICE: If
products, data, computer software, or services are delivered pursuant a General Services Administration “GSA”
contract, use, reproduction, or disclosure is subject to restrictions set forth in Contract No. GS-35F-05925.

Dear user,
Thank you for purchasing your new Lenovo notebook computer!
Before using this product, make sure to read this user guide carefully.
We are pleased that you have chosen Lenovo for your mobile computing
needs. To help you master the usage of your new computer quickly, we
have prepared this user guide. In this manual you will find information on
the system configuration, basic operating instructions, and important
notices. We have done our best to avoid any errors in making sure that the
information provided in this manual is accurate and reliable. However, due
to the short length of the user guide it is impossible to cover all topics in
great depth. For this reason, we apologize for any omissions you might
find.
Lenovo is always trying to improve the performance and reliability of its
products. For that reason, the hardware and software components shown
within the user guide might not perfectly match those of your system.
However, any inconsistencies between what is described in the user guide
and the operations of your computer should not substantially affect your
use.
Thank you for your cooperation.

Explanation of hard disk capacity
Dear user,
While using your computer, you may find that the nominal hard disk
capacity indicated is somewhat different from the disk capacity
displayed by the operating system. For example, a nominal 40GB hard
disk will appear as less than 40GB in the operating system. This
discrepancy is not an error in hard disk installation nor any other
problem, but a normal phenomenon for computers. This phenomenon is
primarily due to the following reasons:
I. Different standards used by the manufacturer and operating
system when calculating hard disk capacity
Hard disk manufacturers use a radix of 1000, i.e., 1G = 1,000MB, 1MB =
1,000KB, 1KB = 1,000 bytes. However, when identifying hard disk capacity,
operating systems use a radix of 1024, i.e., 1GB = 1,024MB, 1MB = 1,024KB,
1KB = 1,024 bytes. The standard adopted by your computer is that of the
hard disk manufacturers. Since the standards adopted by the hard disk
manufacturer and operating system are different, the hard disk capacity
displayed by the operating system will be different from the nominal hard
disk capacity.
For example, if the hard disk is nominally X G, even when it is completely
empty, the capacity displayed by the operating system will be:
X × 1000 × 1000 × 1000/ (1024 × 1024 × 1024) ≈ X × 0.931 G

In addition, if a portion of the hard disk space has been used for some
specific purpose, then the capacity indicated by the operating system will
be even less than X × 0.931 G.
II. A portion of the hard disk space is used for specific purposes
Lenovo computers may come with preinstalled OneKey Rescue system, so
the hard disk has a special portion partitioned before delivery, which is
used to store hard disk mirror and OneKey Rescue system program files.
The size of the reserved space for this partition varies according to the
model, operating system and software of the computer. For the sake of
safety, this partition is not apparent, which is commonly referred to as a
“hidden partition”.
In addition, after the hard disk is partitioned or formatted, the system will
assign a certain amount of hard disk space for the system files.
For the above reasons, the available hard disk space indicated by the
operating system is always less than the computer’s nominal hard disk
capacity.


i
Important safety information...... iii
Important safety information ....iii
Chapter 1. Getting to know your
computer....................................... 1
Top view........................................1
Left-side view ...............................5
Right-side view.............................6
Front view .....................................7
Bottom view..................................8
Chapter 2. Learning the
basics .......................................... 10
First use........................................10
Using AC adapter and
battery..........................................13
Using the touchpad....................16
Using the keyboard....................17
Special keys and buttons...........20
System status indicators............21
Securing your computer............22
Connecting external devices.....25
Using the computer in the
tablet mode..................................28
Using Lenovo Quick Start.........33
Chapter 3. Using the Internet .....35
Wired connection .......................35
Wireless connection ...................37
Chapter 4. OneKey Rescue
system..........................................44
OneKey Rescue system .............44
Chapter 5. Troubleshooting .......47
Frequently Asked Questions ....47
Troubleshooting .........................50
Chapter 6. Upgrading and
replacing devices ........................58
Replacing the battery.................58
Replacing memory.....................60
Replacing the hard disk
drive .............................................64
Appendix A. Getting help and
service..........................................69
Getting help on the Web ...........70
Calling the customer support
center............................................70
Getting help around the
world............................................73
Lenovo warranty service
telephone numbers.....................73
Contents

ii
Contents
Appendix B. Use, and care
information.................................. 74
Caring for your computer ........ 74
Accessibility and comfort ......... 80
Maintenance ............................... 82
Appendix C. Lenovo limited
warranty ...................................... 87
Warranty information ............... 97
Appendix D. Customer
replaceable units (CRUs)......... 101
Appendix E. Notices................. 103
Notices....................................... 103
ENERGY STAR model
information............................... 106
Wireless related
information............................... 108
TV tuner information .............. 112
Electronic emissions notices... 115
WEEE and recycling
statements ................................. 122
Turkish statement of
compliance................................ 122
EU WEEE statements .............. 123
Japan recycling statements..... 124
Notice for users in the
U.S.A.......................................... 126
Notice on deleting data from your
hard disk ................................... 126
Appendix F. Features and
Specifications........................... 128
Trademarks............................... 130
Index.......................................... 131

iii
Important safety information
Important safety information - - - - - - - - - - - - - - - - - - - - - - - - - - - - - - - - - - - - - - - - -
This information can help you safely use your notebook personal
computer. Follow and retain all information included with your computer.
The information in this document does not alter the terms of your purchase
agreement or the Lenovo Limited Warranty. For more information, see
“Appendix C. Lenovo limited warranty” on page 87.
Read this first
Personal computers are electronic devices. Power cords, power adapters,
and other features can create potential safety risks that can result in
physical injury or property damage, especially if misused.
The safety risks are categorized as follows:
Danger:
Physical injury or even death may be caused.
Attention:
Property damage or even minor injury may be caused.
To protect yourself from hazards and create a safer computer work
environment, follow the instructions hereafter.
iv
Important safety information
Unpack
Inspect the covers of the computer and the AC adapter, especially
parts with the following labels attached for any crack or damage.
Danger:
• Hazardous voltage, current, and energy levels are present
inside any component that has this label attached.

Important safety information
v
Working place
Do NOT use the computer in humid places such as a bathroom.
Keep the computer and other parts away from liquids.
Danger:
• An electric shock may be caused by spilled liquid.
Do NOT use the computer during a lightning storm.
Attention:
• Lightning storms may damage the computer and result in an
electric shock.
Ensure your computer and other components maintain good
ventilation.
Danger:
• Placing the working computer or other parts on a bed, sofa or
other flexible surface may block the ventilation slots causing
overheating of your computer or other parts and increases the
risk of fire.
Turn off wireless devices where they may cause interference, such as in
a hospital or at an airport.

vi
Important safety information
Correct usage procedures
Use ONLY the power cord, power adapter and battery pack shipped
with the computer. Never use these devices with another product.
Be sure the power outlet is suitable for the plug and provides the
correct voltage and current for the product you are using.
Danger:
• An unsuitable power supply may damage your computer and
can cause an electric shock or fire.
Do NOT use a power outlet, power cord, power adapter or battery
pack that appears to be damaged or corroded.
Do NOT share an electrical outlet with other home or commercial
appliances that draw large amounts of electricity.
If power strips are used, the load should NOT exceed the power strip’s
input rating. Unplug the power cord if there are any cracking, hissing,
or popping sounds, or if a strong odor comes from the computer.
Danger:
• Overloading the power supply may cause unstable voltages
which might damage the computer, data, attached devices, or
even cause a fire.

Important safety information
vii
Do NOT wrap the power cord around the power adapter or other
objects.
Do NOT squeeze or pinch the cord, or place heavy objects on it.
Attention:
• Stressing the cord may cause the cord to fray, crack or crimp
which may present a safety hazard.
Avoid keeping your hands, your lap, or any other part of your body in
contact with a hot section of the working computer for any extended
length of time.
Attention:
• Extended contact with your body, even through clothing, could
cause discomfort or even a skin burn.
Do not drop, bump, scratch, hit or place heavy objects on the liquid
crystal display (LCD) of your computer.
Attention:
• Direct contact with liquid crystal material from a broken LCD is
hazardous; if contact occurs, rinse with large amount of running
water for more than 15 minutes.

viii
Important safety information
Service and upgrades
Do NOT attempt to service a product yourself unless instructed to do
so by the customer support center or your documentation.
Attention:
• DO NOT take risks or attempt to diagnose the situation
yourself. Contact the customer support center for further
guidance. For a list of service and support phone numbers,
go to http://consumersupport.lenovo.com.
Lenovo provides documentation with instructions when it is
appropriate for customers to install options or replace units (CRUs).
Closely follow all instructions when installing or replacing parts.
Disconnect the attached power cords, battery pack, and all the cables
before you open the device covers, unless instructed otherwise in the
installation and configuration procedures.
Keep the covers closed whenever the computer is plugged in.
1
Chapter 1. Getting to know your computer
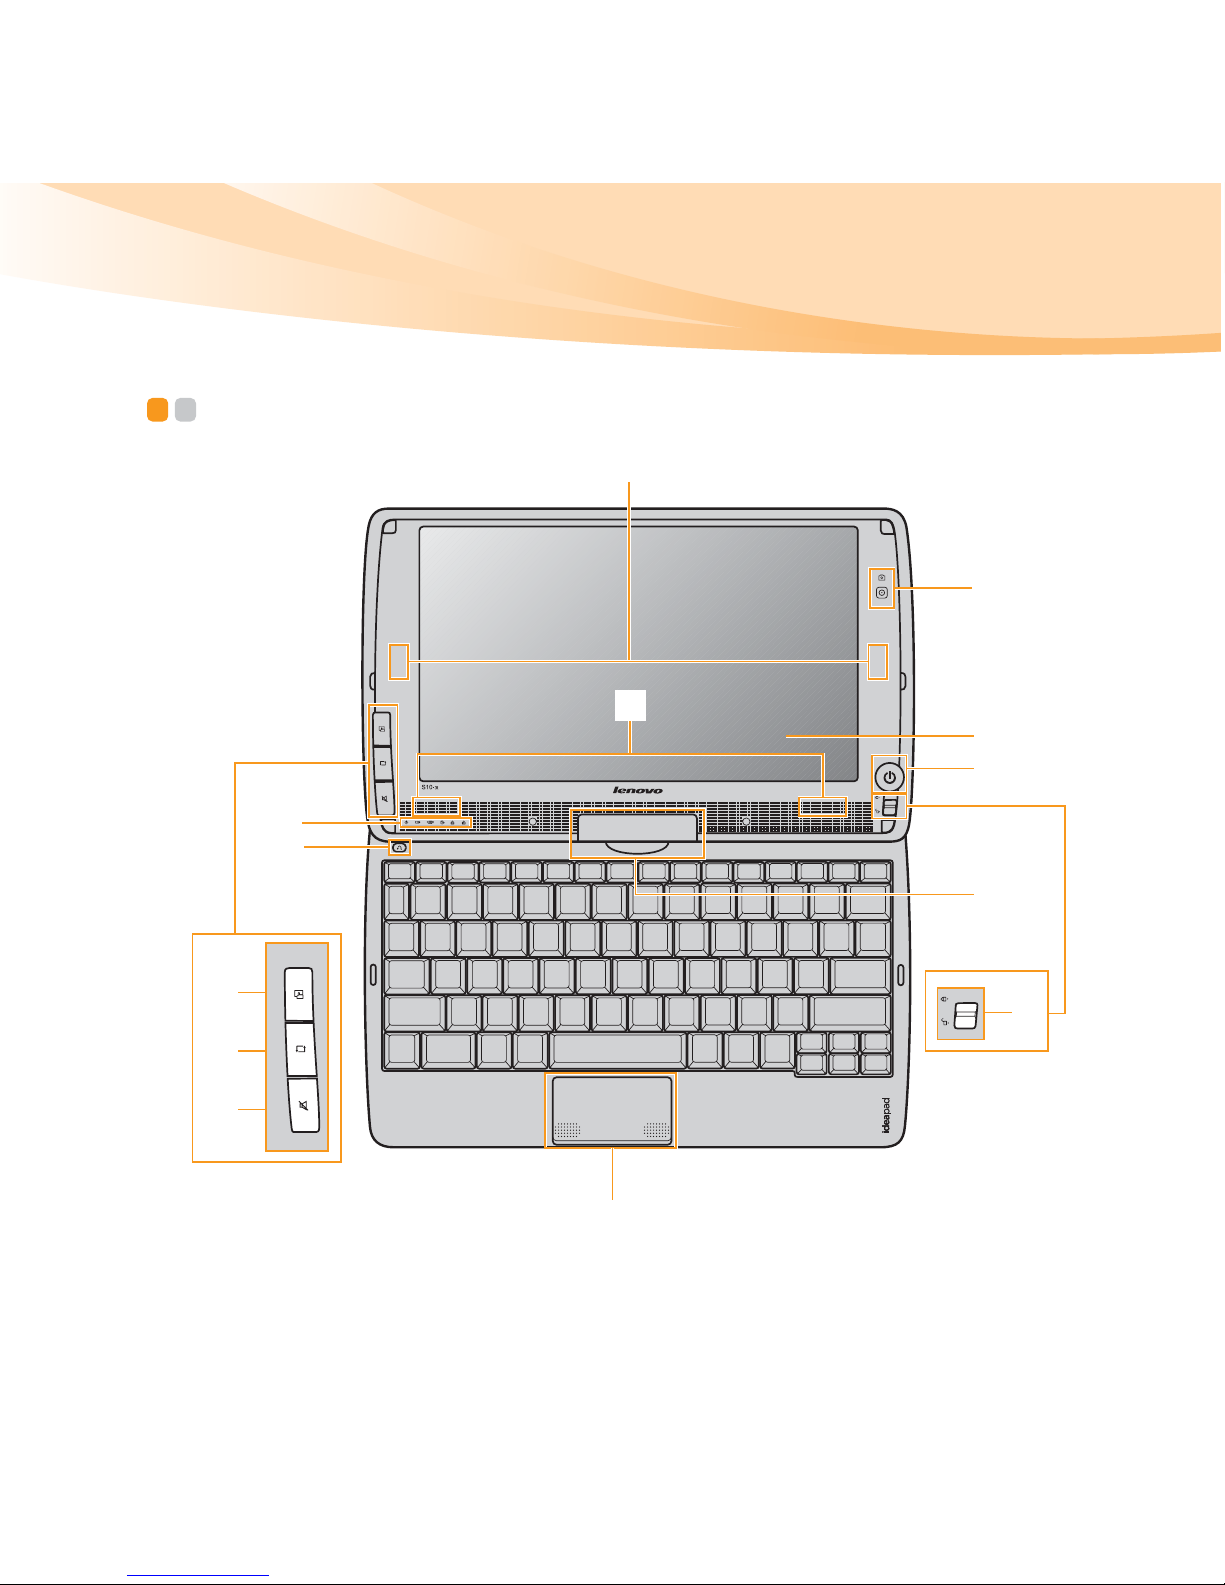
Top view - - - - - - - - - - - - - - - - - - - - - - - - - - - - - - - - - - - - - - - - - - - - - - - - - - - - - - - - - - - - - - - - - - - - - - - - - - - - - - - - - - - - - - - - - - -
k
g
l
h
i
j
d
m
a
b
c
f
e
2
Chapter 1. Getting to know your computer
Note: The illustrations in this manual may differ from the actual product. Please refer to
the actual product.
Attention:
• Do NOT open the display panel beyond 180 degrees. When closing the display
panel, be careful NOT to leave pens or any other objects in between the display
panel and the keyboard. Otherwise, the display panel may be damaged.
e

Chapter 1. Getting to know your computer
3
NaturalTouch
button
Press this button to launch Lenovo NaturalTouch. *
* Lenovo NaturalTouch is an all-in-one entertainment
solution which provides intuitive access to multimedia
files on your computer.
Screen rotation
button
Press this button to rotate the screen content.
* This button functions when the computer is in tablet
mode.
Mute button
Press this button to mute/unmute the sound.
Power button
lock
Power button will be disabled, when the lock is slid to .
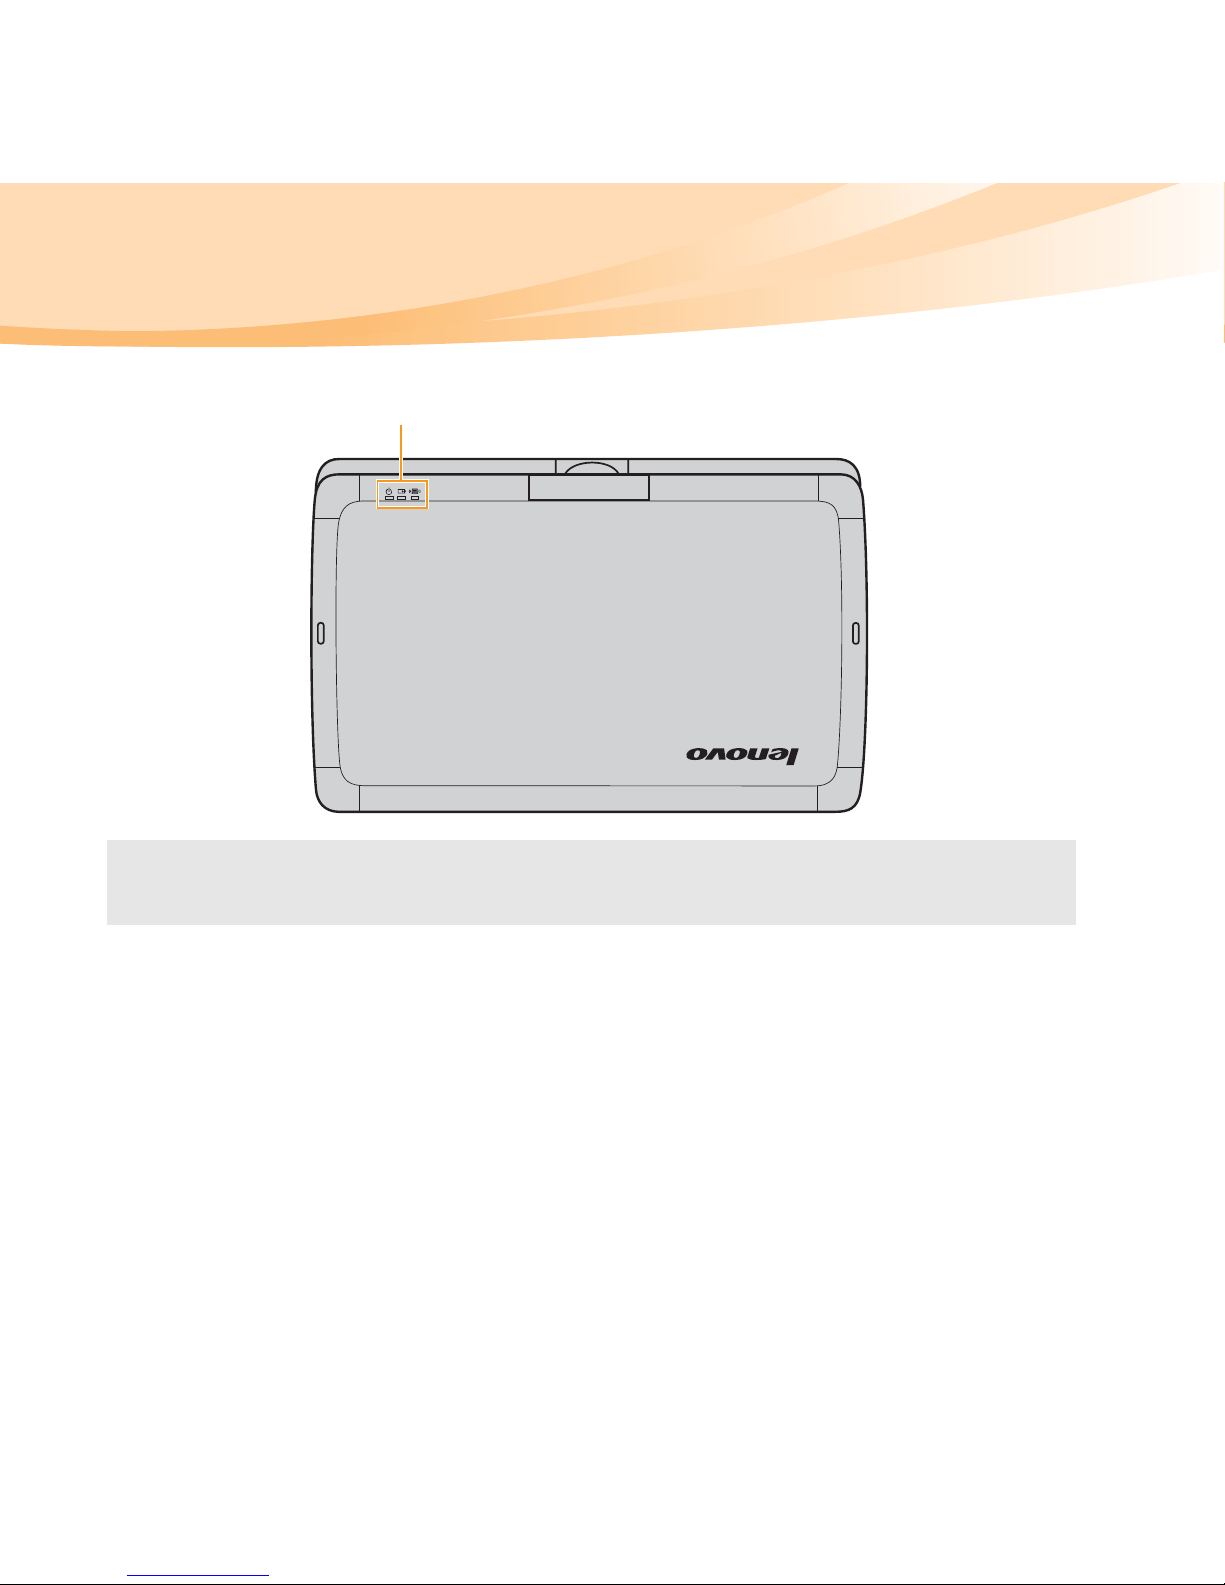
System status
indicators
For details, see “System status indicators” on page 21.
OneKey Rescue
system button
Press this button to open OneKey Rescue system (If
OneKey Rescue system has been preinstalled) when the
computer is powered off.
Note: For details, see “Chapter 4. OneKey Rescue system” on page 44.
Integrated
camera
Use the camera for video communication.
Computer
display
The LCD display with LED backlight provides brilliant
visual output.
Power button
Press this button to turn on the computer.
Rotation hinge
The rotation hinge allows you to switch between the
notebook mode and the tablet mode.
10

4
Chapter 1. Getting to know your computer
Wireless module
antennas (select
models only)
The built-in antennas ensure optimal reception of wireless
radio.
Speakers
The stereo speakers provide rich and powerful sound.
One-piece
touchpad
The touchpad functions as a conventional mouse with builtin left-click and right-click buttons.
Note: For details, see “Using the touchpad” on page 16.
11
12
13
Chapter 1. Getting to know your computer
5
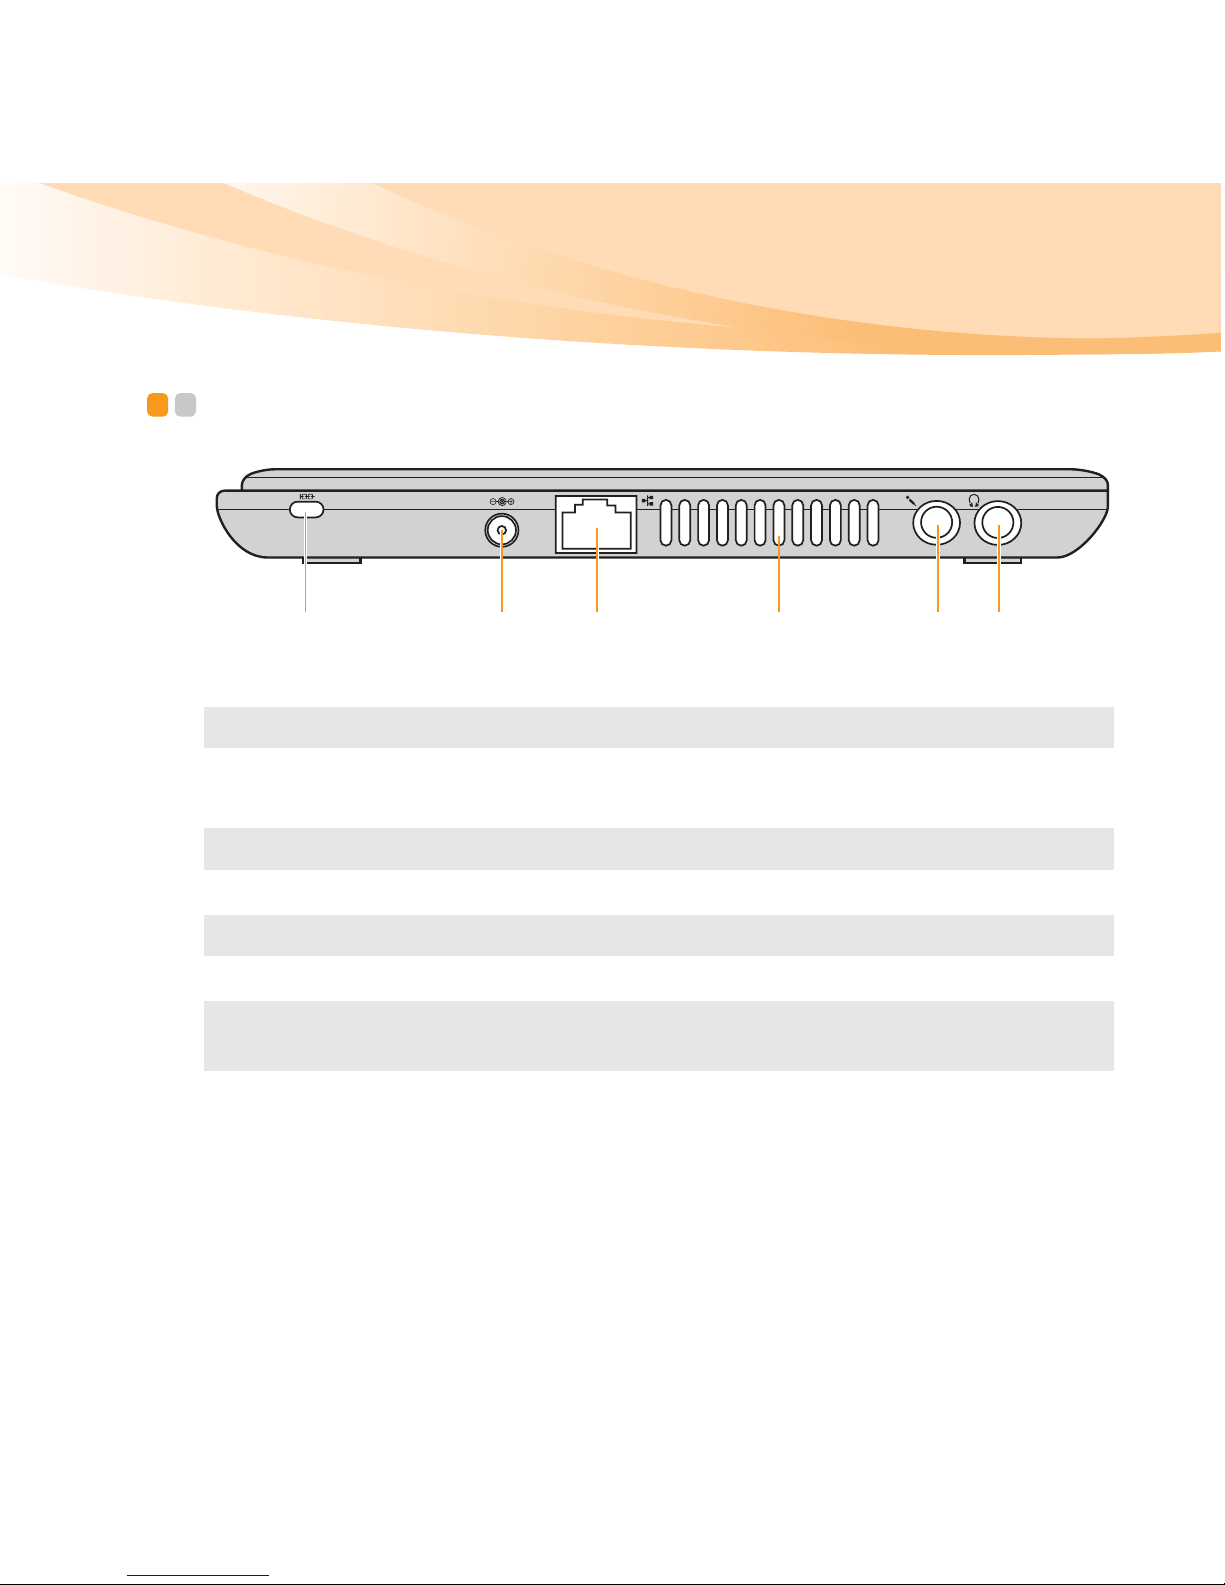
Left-side view - - - - - - - - - - - - - - - - - - - - - - - - - - - - - - - - - - - - - - - - - - - - - - - - - - - - - - - - - - - - - - - - - - - - - - - - - - - - - -
Kensington slot
Attach a security lock (not supplied) here.
Note: For details, see “Attaching a security lock (not supplied)” on page 22.
AC power adapter
jack
Connect the AC adapter here.
Note: For details, see “Using AC adapter and battery” on page 13.
RJ-45 port
This port connects the computer to an Ethernet network.
Note: For details, see “Wired connection” on page 35.
Fan louvers
Dissipate internal heat.
Note: Make sure that none of the fan louvers are blocked or else overheating of the
computer may occur.
Microphone jack
Connects to external microphones.
Headphone jack
Connects to external headphones.
Attention:
• Listening to music at high volume over extended periods of time may
damage your hearing.
a b c
d
e f
6
Chapter 1. Getting to know your computer
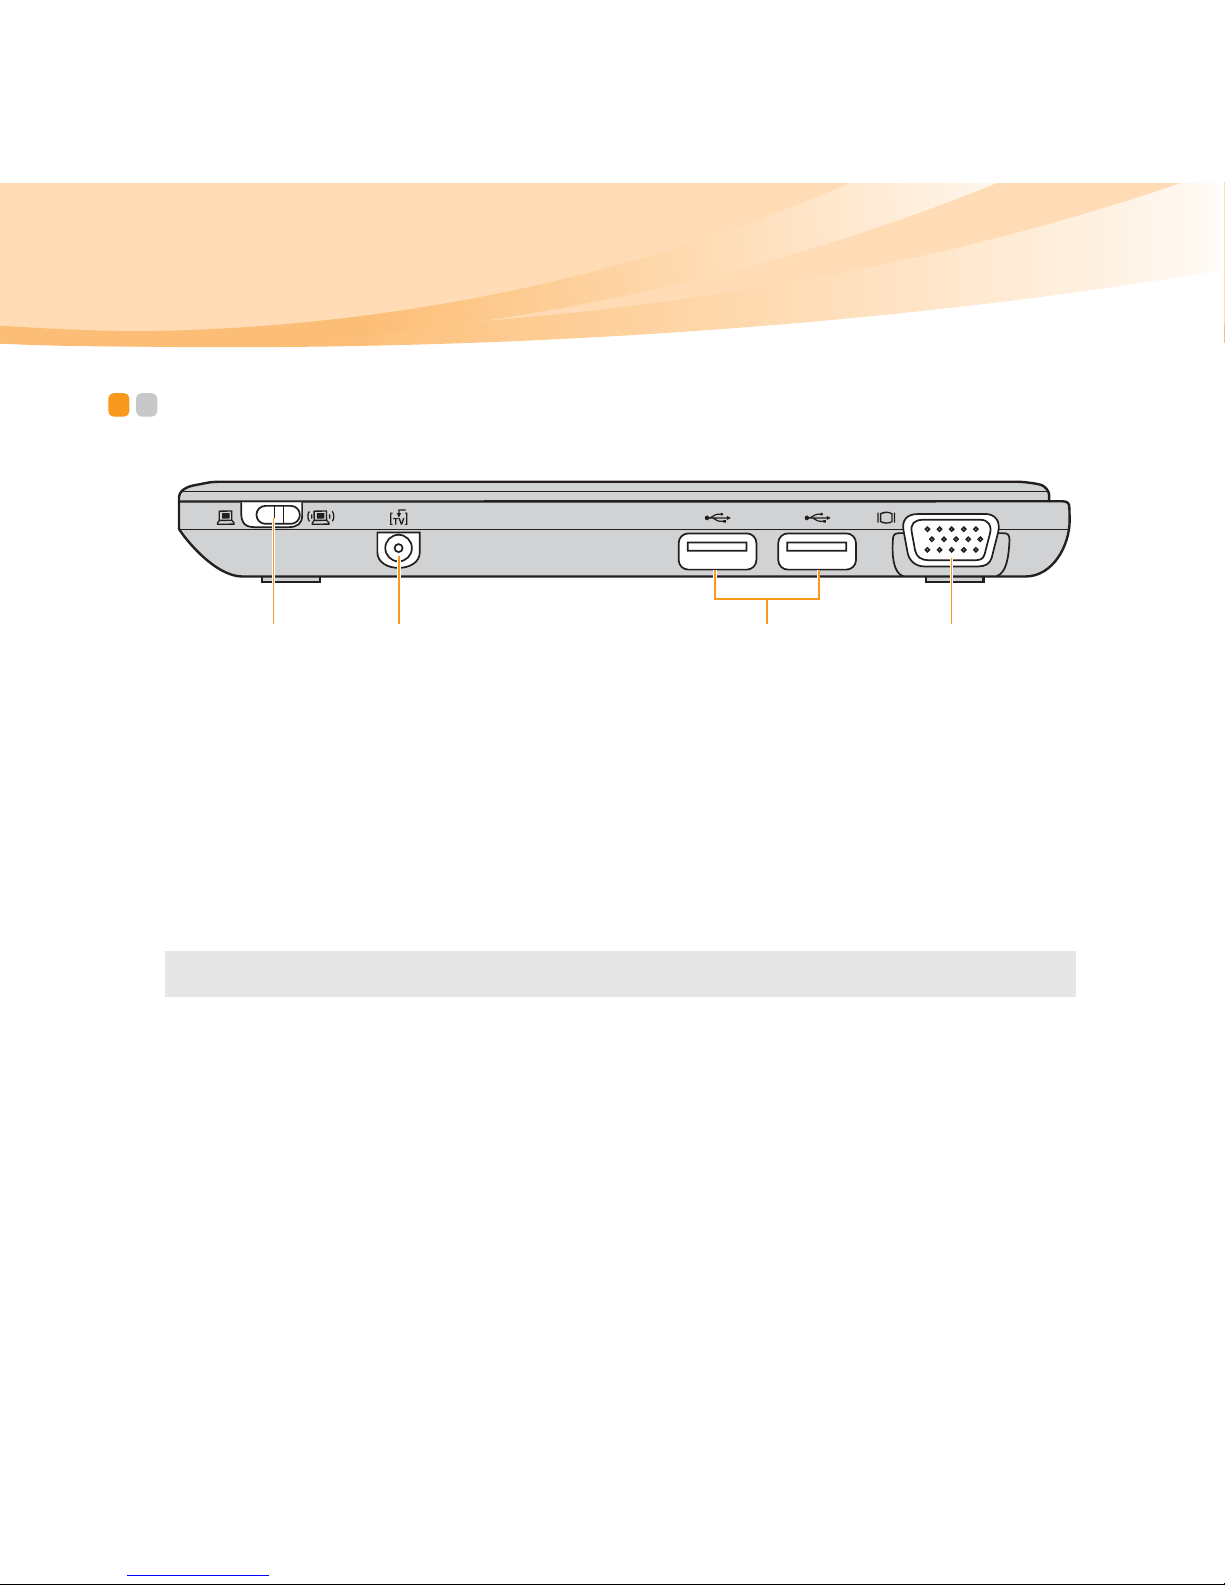
Right-side view - - - - - - - - - - - - - - - - - - - - - - - - - - - - - - - - - - - - - - - - - - - - - - - - - - - - - - - - - - - - - - - - - - - - - - - - - -
Integrated
wireless device
switch
Use this switch to turn on/off the wireless radio of all
wireless devices on your computer.
TV-in jack
(select models
only)
Attach an external TV antenna here.
USB port
Connects to USB devices.
Note: For details, see “Connecting a universal serial bus (USB) device” on page 27.
VGA port
Connects to external display devices.
a b c d

Chapter 1. Getting to know your computer
7
Front view - - - - - - - - - - - - - - - - - - - - - - - - - - - - - - - - - - - - - - - - - - - - - - - - - - - - - - - - - - - - - - - - - - - - - - - - - - - - - - - - - - - - - - -
Built-in
microphone
The built-in microphone (with noise reduction) can be used
for video conferencing, voice narration, or simple audio
recordings.
Memory card slot
Insert memory cards (not supplied) here.
Note: For details, see “Using memory cards (not supplied)” on page 25.
a b
8
Chapter 1. Getting to know your computer
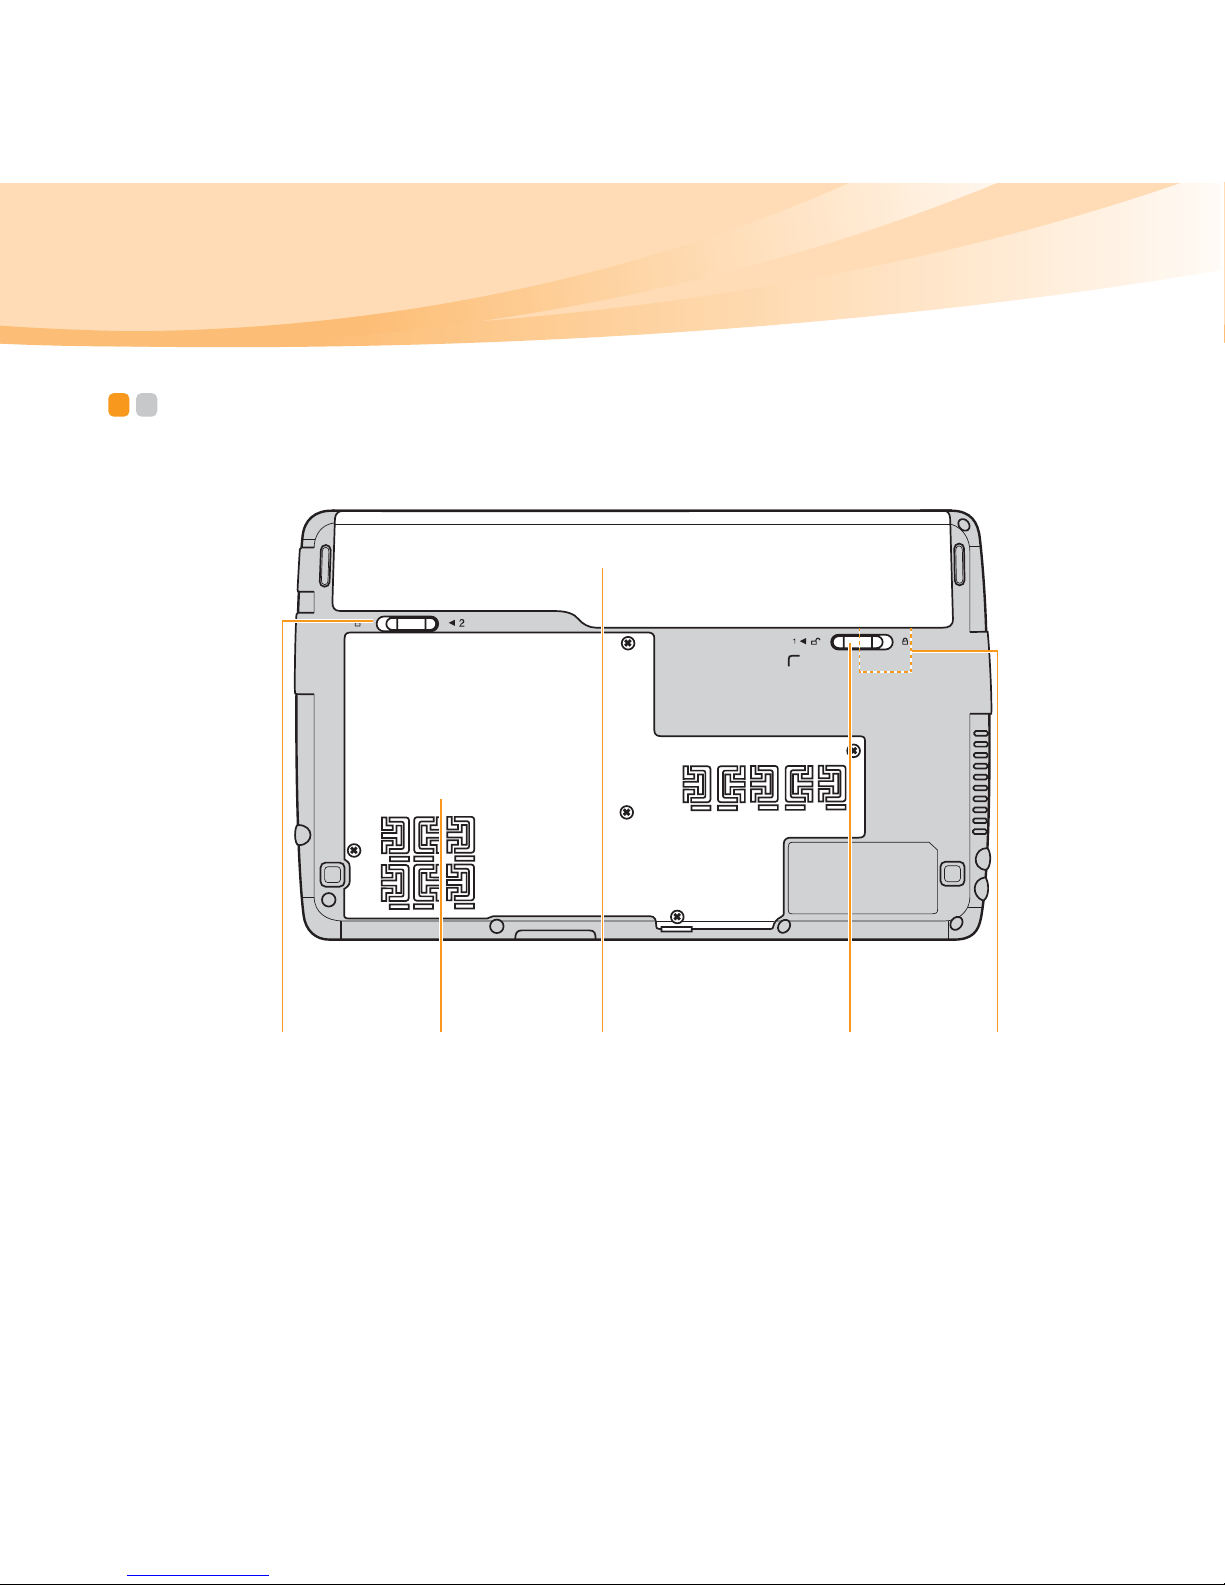
Bottom view - - - - - - - - - - - - - - - - - - - - - - - - - - - - - - - - - - - - - - - - - - - - - - - - - - - - - - - - - - - - - - - - - - - - - - - - - - - - - - - - - -
a b c ed

Chapter 1. Getting to know your computer
9
Battery latch spring loaded
The spring-loaded battery latch keeps the battery pack
secured in place.
Hard disk/
Memory/Mini PCI
Express Card slot
compartment
Battery pack
For details, see “Using AC adapter and battery” on page 13.
Battery latch manual
The manual battery latch is used to keep the battery pack
secured in place.
SIM card slot
(select models
only)
Insert a SIM card (not supplied) for using Mobile
Broadband.
Notes:
• After removing the battery pack, you can insert a SIM card into this slot.
• For details, see “Using Mobile Broadband (select models only)” on page 39.

10
Chapter 2. Learning the basics
First use
- - - - - - - - - - - - - - - - - - - - - - - - - - - - - - - - - - - - - - - - - - - - - - - - - - - - - - - - - - - - - - - - - - - - - - - - - - - - - - - - - - - - - - - - - - - - - - -
Reading the manuals
Read the supplied manuals before using your computer.
Connecting to the power
The supplied battery pack is not fully charged at purchase.
To charge the battery and begin using your computer, insert the battery
pack and connect the computer to an electrical outlet. The battery is
automatically charged while the computer is running on AC power.
Installing the battery pack
Refer to the supplied Setup Poster to install the battery pack.
Connecting the computer to an electrical outlet
1
Connect the power cord to the AC adapter.
2
Connect the AC adapter to the AC power adapter jack of the computer.
3
Plug the power cord into an electrical outlet.

Chapter 2. Learning the basics
11
Turning on the computer
Press the power button to turn on the computer.
Configuring the operating system
You may need to configure the operating system when it is first used. The
configuration process may include the procedures below.
• Accepting the end user license agreement
• Configuring the Internet connection
• Registering the operating system
• Creating a user account
Putting your computer into sleep state or shutting it down
When you finish working with your computer, you can put it into sleep
state or shut it down.
Putting your computer into sleep state
If you will be away from your computer for only a short time, put the
computer into sleep state.
When the computer is in sleep state, you can quickly wake it to resume use,
and bypass the startup process.

12
Chapter 2. Learning the basics
To put the computer into sleep state, do one of the following.
•Click and select Sleep from the Start menu.
•Press Fn + F1.
To wake the computer, do one of the following.
• Press the power button.
• Press any key on the keyboard.
Shutting down your computer
If you are not going to use your computer for a day or two, shut it down.
To shut down your computer, click and select Shut down from the Start
menu.
Note: Wait until the power indicator light starts blinking (indicating that
the computer is in sleep state) before you move your computer.
Moving your computer while the hard disk is spinning can damage
the hard disk, causing loss of data.

Chapter 2. Learning the basics
13
Using AC adapter and battery - - - - - - - - - - - - - - - - - - - - - - - - - - - - - - - - - - - - - - - - - - - - - - -
Checking battery status
You can determine the percentage of battery power remaining by checking
the battery icon in the notification area.
Charging the battery
When you find that the battery power is low, you need to charge the
battery or replace it with a fully charged one.
You need to charge the battery in any of the following situations:
• When you purchase a new battery
• If the battery status indicator starts blinking
• If the battery has not been used for a long time
Note: As each computer user has different habits and needs, it is difficult to predict
how long a battery charge will last. There are two main factors:
• The amount of energy stored in the battery when you commence work.
• The way you use your computer: for example, how often you access the
hard disk drive and how bright you make the computer display.

14
Chapter 2. Learning the basics
Removing the battery pack
If you are not going to use the computer for an extended period of time, or
if you need to send your computer to Lenovo for service, etc. remove the
battery pack from the computer. Before removing the battery pack, make
sure the computer has been shut down.
Notes:
• You are advised to insert the battery pack when using your computer to prevent
small particles from entering the inside of your computer.
• To increase the life of the battery pack, the computer does not start recharging
the battery immediately after it drops from fully charged.
• Charge the battery at a temperature between 50 °F and 80 °F (10 °C-30 °C).
• Full charge or discharge is not required.

Chapter 2. Learning the basics
15
Handling the battery
If the rechargeable battery pack is replaced with an incorrect type, there may
be danger of an explosion. The battery pack contains a small amount of
harmful substances. To avoid possible injury and detriment to the
environment, pay attention to the following points:
• Replace only with a battery of the type recommended by Lenovo.
• Keep the battery pack away from fire.
• Do not expose the battery pack to water or rain.
• Do not attempt to disassemble the battery pack.
• Do not short-circuit the battery pack.
• Keep the battery pack away from children.
• Do not put the battery pack in trash that is disposed of in landfills. When
disposing of the battery, comply with local ordinances or regulations and
your company’s safety standards.
16
Chapter 2. Learning the basics
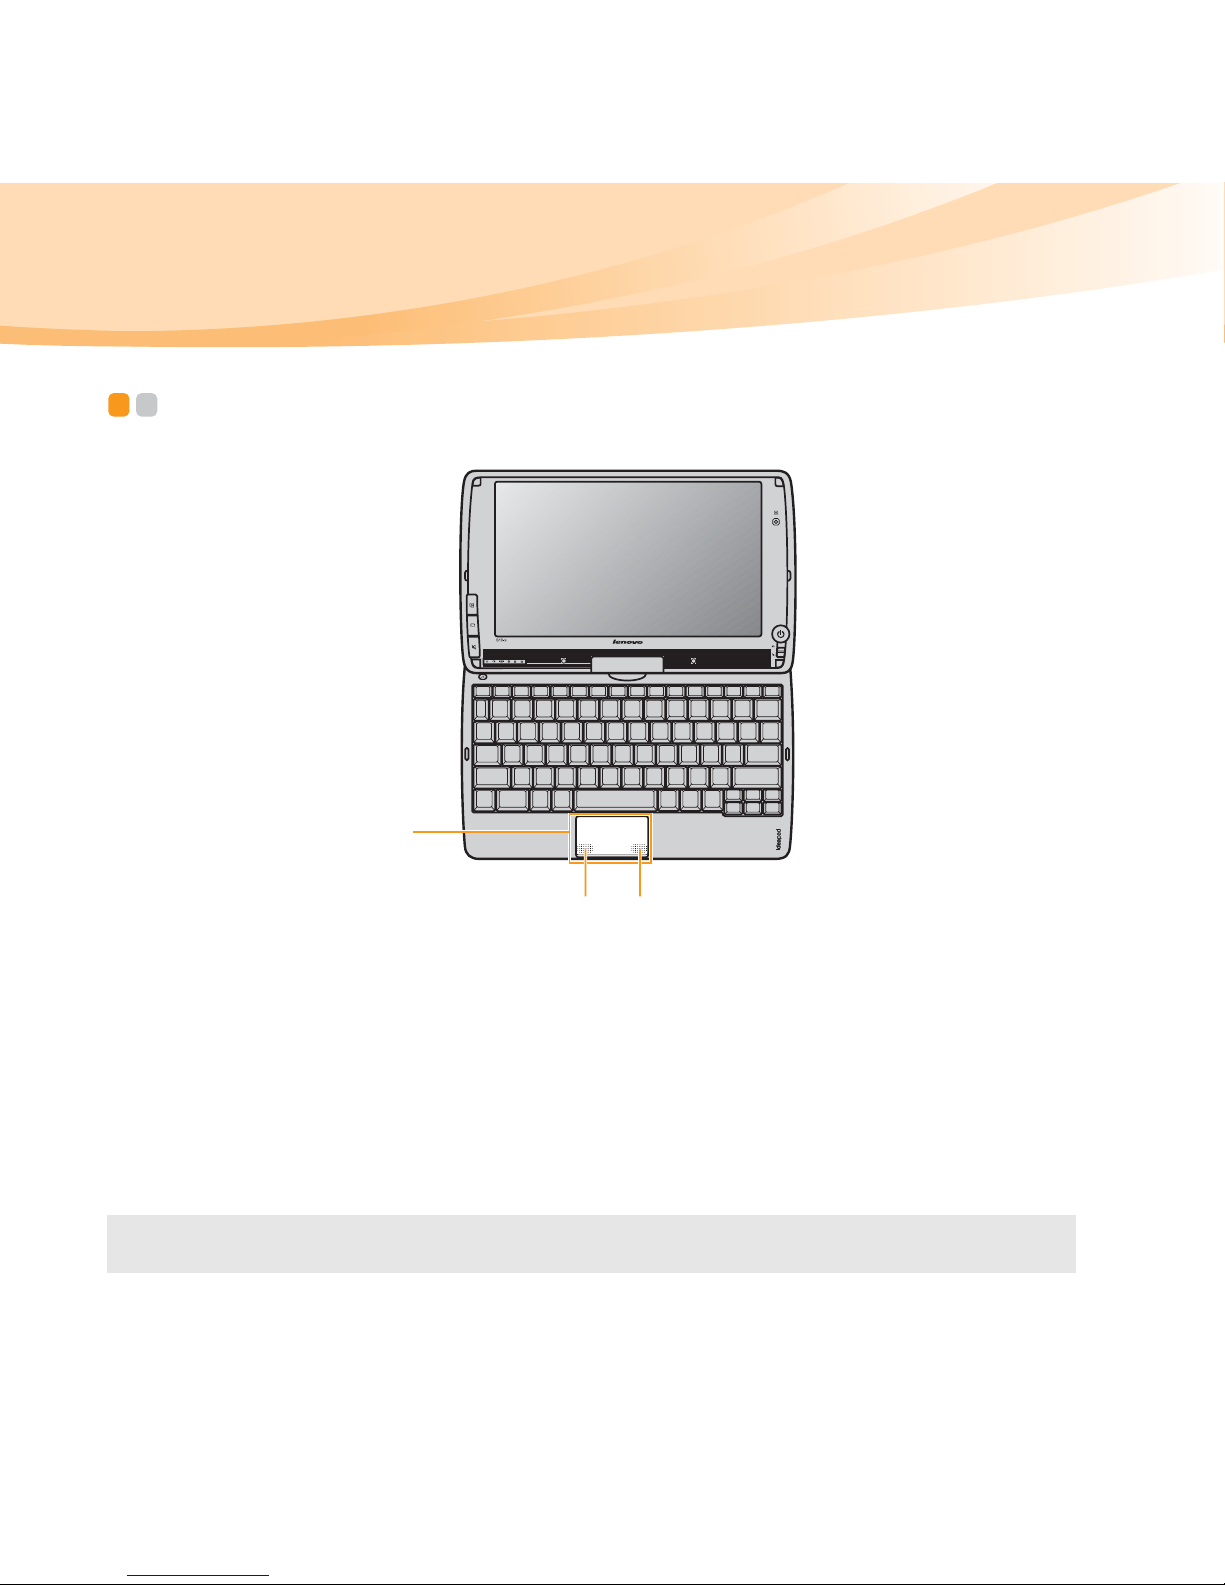
Using the touchpad - - - - - - - - - - - - - - - - - - - - - - - - - - - - - - - - - - - - - - - - - - - - - - - - - - - - - - - - - - - - - - - - - - - - -
One-piece touchpad
To move the cursor on the screen, slide your
fingertip on the pad in the direction in which you
want the cursor to move.
Bottom left area
The function corresponds to that of the left mouse
button on a conventional mouse, which can be
implemented by clicking this area.
Bottom right area
The function corresponds to that of the right mouse
button on a conventional mouse, which can be
implemented by clicking this area.
Note: You can enable/disable the touchpad using Fn+F6.
a
b
c
 Loading...