

Lennox XC20-036-230-01, XC20-060-230-01, XC20-024-230-01, XC20-048-230-01 Installation And Service Procedure
Page 1
INSTALLATION AND SERVICE
PROCEDURE
Service Literature
Elite Series
Corp. 1407-L10
August 25, 2015
IMPORTANT
XC20 units have refrigerant piping requirements that are
unique to this unit. Size and install the refrigerant piping
per table 2 (page 14) to ensure proper unit operation.
IMPORTANT:
Before applying any power (main or low voltage) to the outdoor
unit, confirm that the iComfort Wi-Fi® or iComfort® S30
thermostat has software Version 2.1 or higher installed.
(Reference the iComfort Wi-Fi® or iComfort® S30 thermostat
manual.)
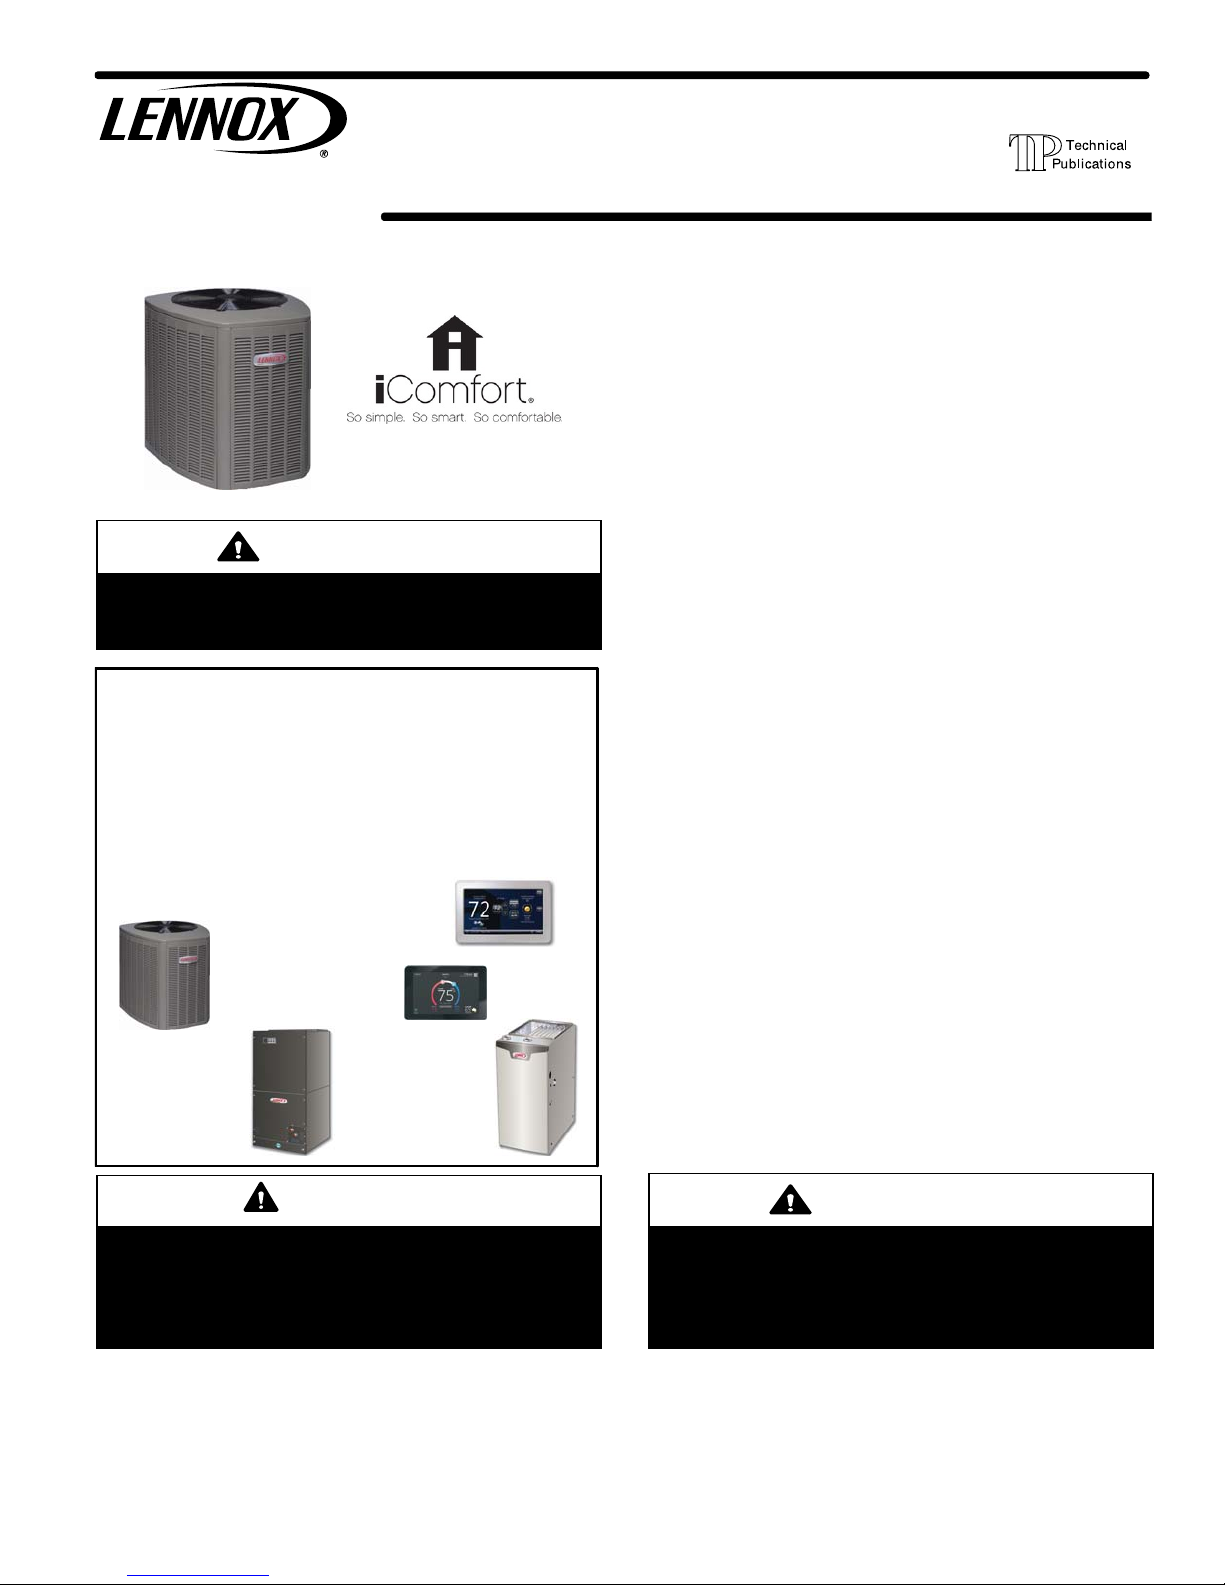
This unit is an integral component of a system that requires an
iComfort Wi-Fi
iComfort
XC20
®
®
or iComfort® S30 thermostat and
-enabled air handler or furnace.
iComfort Wi-Fi
thermostat
iComfort
®
thermostat
S30
iComfort
air handler or
furnace
®
®
-enabled
XC20
®
XC20 Units
TABLE OF CONTENTS
I. OVERVIEW
Model Number Identification 2....................
Typical Serial Number Identification 2..............
Specifications 2.................................
Electrical Data 3................................
Unit Dimensions 4..............................
Typical Unit Parts Arrangement 5.................
Operating Service Valves 7.......................
General 7.....................................
II. INSTALLATION
Unit Placement 9...............................
Removing and Installing Panels 12.................
New or Replacement Line Set 13..................
Brazing Connections 16...........................
Flushing the System 19...........................
Leak Testing the System 21.......................
Evacuating the System 21.........................
Electrical 24.....................................
Servicing Unit Delivered Void of Charge 29..........
Unit Start-Up 29.................................
III. SYSTEM OPERATION AND SERVICE
7-Segment Alert and System Status Codes 30.......
Outdoor Control Push-Button Operation 38..........
Configuring Unit 42...............................
Reconfiguring Outdoor Control using iComfort Wi-Fi
iComfort
System Overview 43.............................
Maintenance 44..................................
Unit Wiring Diagrams 45..........................
Factory Wiring Diagrams 48.......................
Unit Sequence of Operations 50...................
Component Testing 53............................
System Refrigerant 75............................
Appendix - Charging Sticker ....................
®
S30 Thermostat 43.....................
®
or
WARNING
Improper installation, adjustment, alteration, service or
maintenance can cause personal injury, loss of life, or
damage to property. Installation and service must be
performed by a licensed professional installer (or
equivalent) or a service agency.
IMPORTANT
The Clean Air Act of 1990 bans the intentional venting of
refrigerant (CFCs, HCFCs AND HFCs) as of July 1, 1992.
Approved methods of recovery, recycling or reclaiming
must be followed. Fines and/or incarceration may be
levied for noncompliance.
1
2015 Lennox Industries Inc.
Page 2
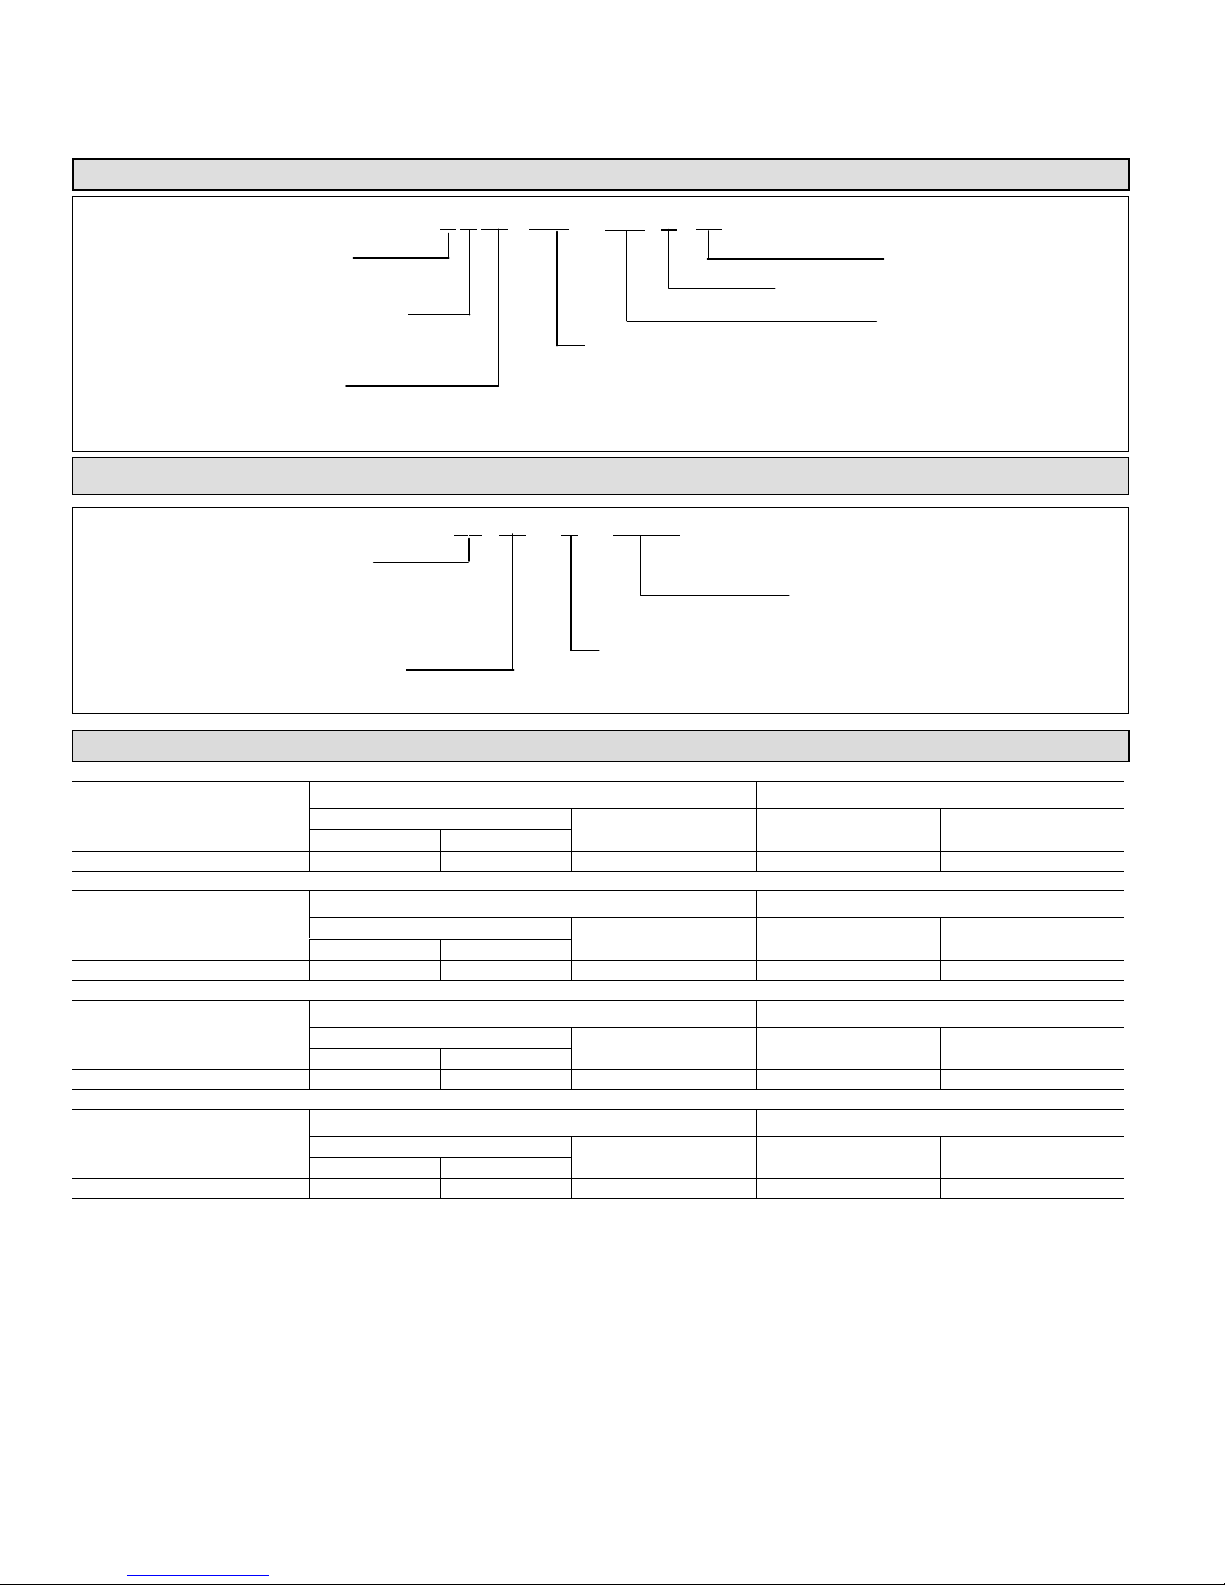
Model Number Identification
I. OVERVIEW
Refrigerant Type
X = R-410A
Unit Type
C = AIR CONDITIONER
C 20 036
X
− −
230
Nominal Cooling Capacity
A
-02
Minor Revision Number
Ratings Revision Level
Voltage
230 = 208/230V-1ph-60hz
024 = 2 tons
Series
036 = 3 tons
048 = 4 tons
060 = 5 tons
Typical Serial Number Identification
Location Code
19 = Saltillo, Mexico
58 = Marshalltown, IA
Year Code
08 = 2008
09 = 2009
10 = 2010
8 09 C
5
05716
5 (or 6) Digit Unique Number
Month Code
A = January
B = February
C = March
Specifications
Unit Outdoor Fan
Model Number
XC20-024-230-01 72 65 7 lbs, 5 oz 4 22
Sound Rating Number (dB)
Maximum Minimum
1
Factory Refrigerant
Charge
2
Number of Blades Diameter - inches.
Unit Outdoor Fan
Model Number
XC20-036-230-01 75 67 8 lbs, 6 oz 4 22
Model Number
XC20-048-230-01 77 68 10 lbs, 7 oz 4 22
Model Number
XC20-060-230-01 77 69 12 lbs, 1 oz 3 26
1
Tested according to AHRI Standard 270-2008 test conditions.
2
Factory refrigerant charge is sufficient for refrigerant line lengths up to 15 feet.
Sound Rating Number (dB)
Maximum Minimum
Sound Rating Number (dB)
Maximum Minimum
Sound Rating Number (dB)
Maximum Minimum
1
Unit Outdoor Fan
1
Unit Outdoor Fan
1
Factory Refrigerant
Factory Refrigerant
Factory Refrigerant
Charge
Charge
Charge
2
2
2
Number of Blades Diameter - inches.
Number of Blades Diameter - inches.
Number of Blades Diameter - inches.
XC20
2
Page 3
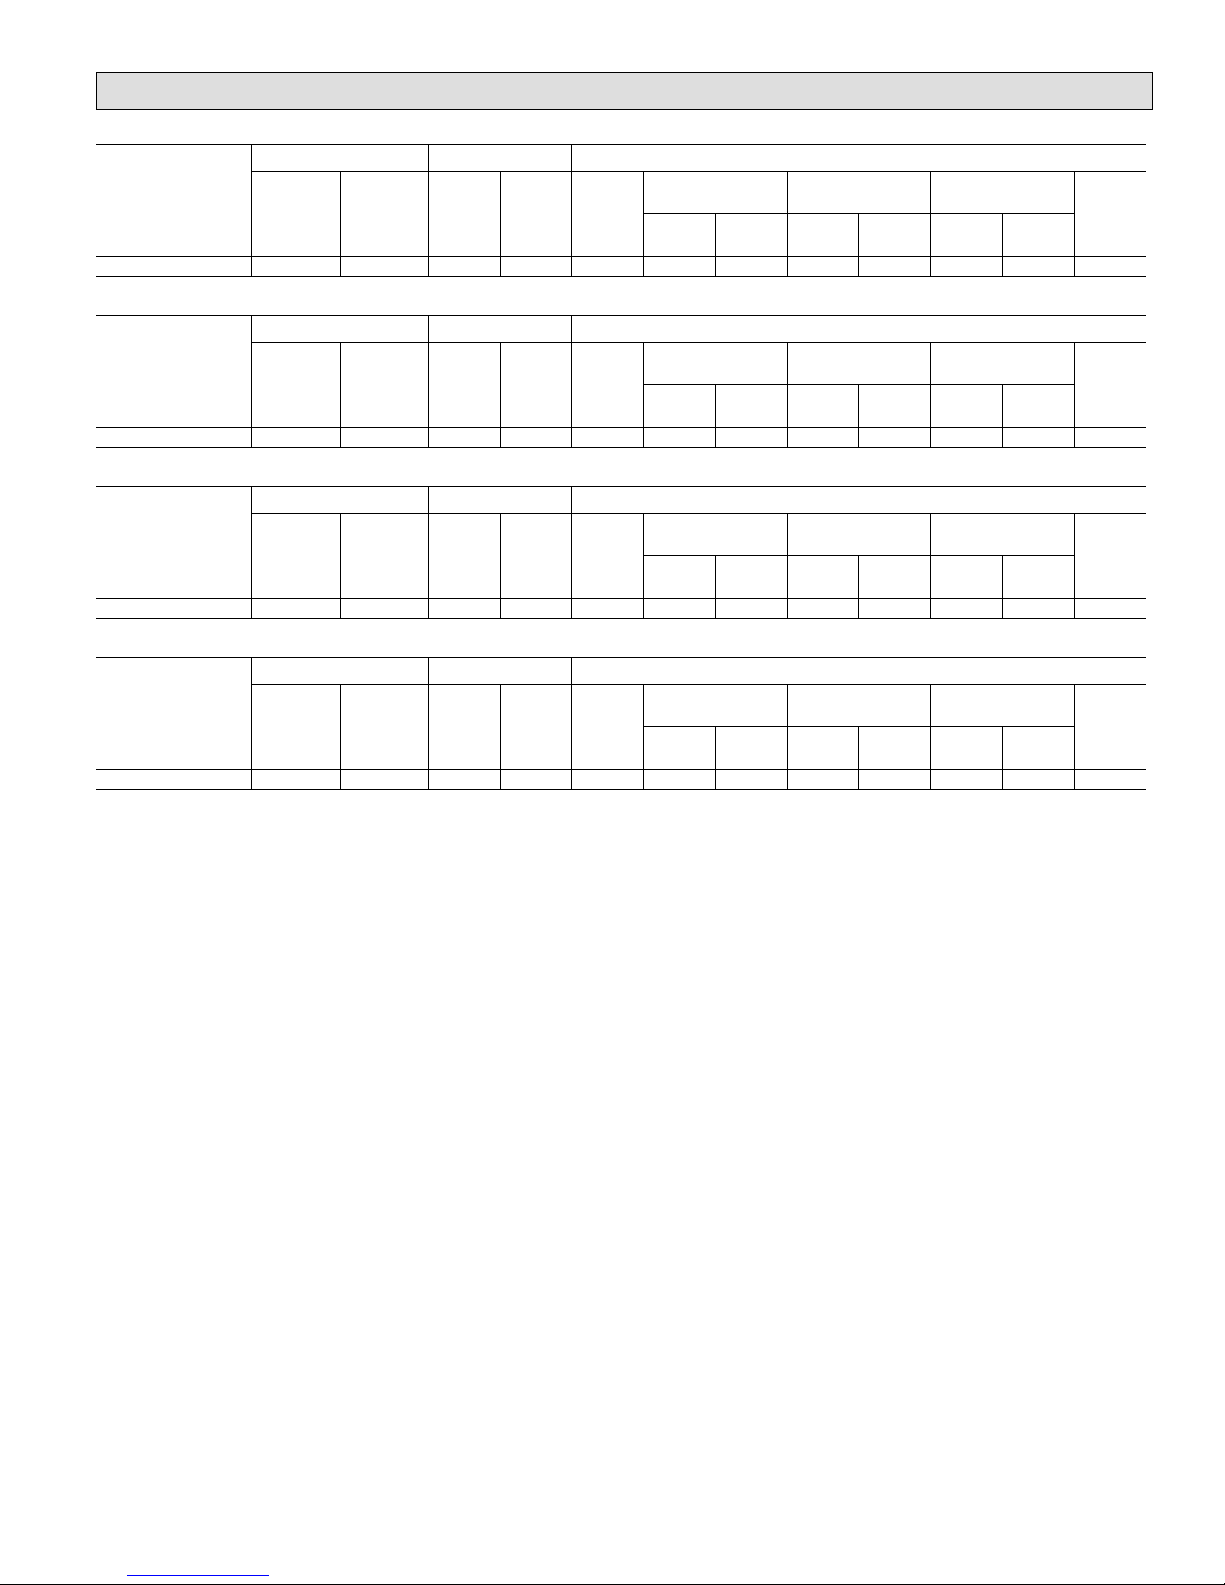
Electrical Data
208/230V-60 Hz-1 Ph
Unit Compressor Outdoor Fan (RPM varies with compressor RPM)
Model Number
Maximum
Over-
current
Protection
(amps)
1
Minimum
Circuity
Ampacity
XC20-024-230-01 30 19.1 13.0 13.0 1/6 2600 1500 700 400 60 25 2.8
Unit Compressor Outdoor Fan (RPM varies with compressor RPM)
Model Number
Maximum
Over-
current
Protection
(amps)
1
Minimum
Circuity
Ampacity
XC20-036-230-01 30 20.6 14.2 13.0 1/4 3600 3100 700 600 115 80 2.8
Unit Compressor Outdoor Fan (RPM varies with compressor RPM)
Model Number
Maximum
Over-
current
Protection
(amps)
1
Minimum
Circuity
Ampacity
XC20-048-230-01 50 29.1 21.0 20.0 1/3 4000 3000 800 600 160 70 2.8
Unit Compressor Outdoor Fan (RPM varies with compressor RPM)
Model Number
Maximum
Over-
current
Protection
(amps)
1
Minimum
Circuity
Ampacity
XC20-060-230-01 50 29.3 21.2 20.0 1/3 4325 2900 865 600 195 80 2.8
1
HACR type circuit breaker or fuse.
2
Refer to National or Canadian Electrical Code manual to determine wire, fuse and disconnect size requirements.
Rated
Load
Amps
2
(RLA)
Locked
Rotor
Amps
(LRA)
Motor
HP
CFM RPM WATTS
MAX MIN MAX MIN MAX MIN
Load
Amps
(FLA)
208/230V-60 Hz-1 Ph
Rated
Load
Amps
2
(RLA)
Locked
Rotor
Amps
(LRA)
Motor
HP
CFM RPM WATTS
MAX MIN MAX MIN MAX MIN
Load
Amps
(FLA)
208/230V-60 Hz-1 Ph
Rated
Load
Amps
2
(RLA)
Locked
Rotor
Amps
(LRA)
Motor
HP
CFM RPM WATTS
MAX MIN MAX MIN MAX MIN
Load
Amps
(FLA)
208/230V-60 Hz-1 Ph
Rated
Load
Amps
2
(RLA)
Locked
Rotor
Amps
(LRA)
Motor
HP
CFM RPM WATTS
MAX MIN MAX MIN MAX MIN
Load
Amps
(FLA)
Full
Full
Full
Full
XC20
3
Page 4
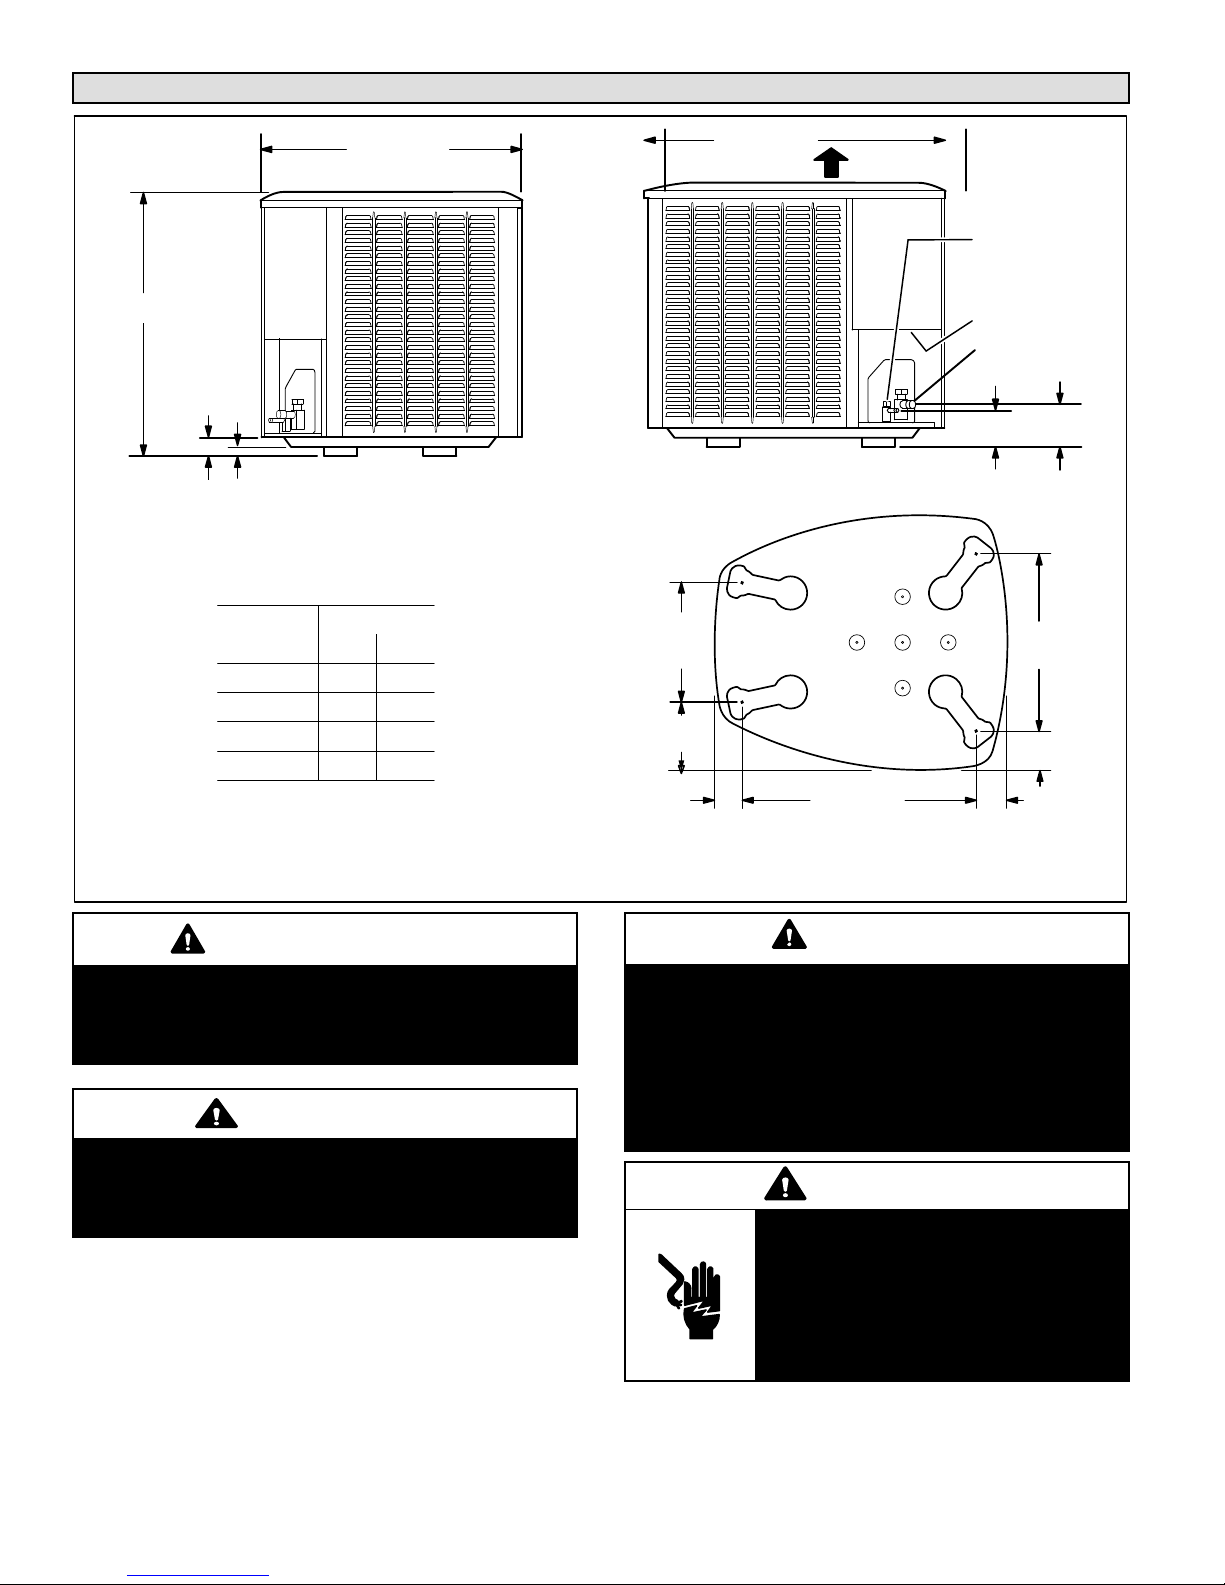
Unit Dimensions -- Inches (mm)
35−1/2 (902)
A
2 (51)
39−3/8 (1000)
DISCHARGE AIR
LIQUID LINE
CONNECTION
ELECTRICAL
INLETS
SUCTION LINE
CONNECTION
4−1/4(108)
4−3/4
(121)
SIDE VIEW
1 (25)
Model No.
XC20−024 39 991
XC20−036 39 991
XC20−048 45 1143
XC20−060 45 1143
END VIEW
in. mm
UNIT SUPPORT
FEET
A
16−7/8
(429)
8−3/4
(222)
3−1/8
(79)
26−7/8
(683)
)3−3/4 (95
30−3/4 (781)
4−5/8
(117)
IMPORTANT
This unit must be matched with an indoor coil as
specified in Lennox Product Specification bulletin.
Coils previously charged with HCFC-22 must be
flushed.
CAUTION
As with any mechanical equipment, contact with sharp
sheet metal edges can result in personal injury. Take care
while handling this equipment and use protective
clothing.
BASE WITH ELONGATED LEGS
WARNING
Electric Shock Hazard. Can cause injury or death. Unit
must be grounded in accordance with national and local
codes.
Line voltage is present at all components when unit is not
in operation on units with single‐pole contactors.
Disconnect all remote electric power supplies before
opening access panel. Unit may have multiple power
supplies.
WARNING
Electrical Hazard
High Voltage
Wait 5 Minutes
Electrical components may hold charge. Do
not remove this panel or service this area for
5 minutes after the power has been
removed.
XC20
4
Page 5

Typical Unit Parts Arrangement
OUTDOOR
CONTROL
INVERTER REACTOR
CONTROL PANEL FOR
XC20-024 AND -036
DC INVERTER
CONTROL
GROUND LUG
CONTACTOR-SPST
OUTDOOR CONTROL
INVERTER REACTOR
CONTROL PANEL FOR
XC20-048 AND -060
DC INVERTER
CONTROL
INVERTER NOISE FILTER
GROUND LUG
CONTACTOR-SPST
Figure 1. Control Panel Components
XC20
5
Page 6
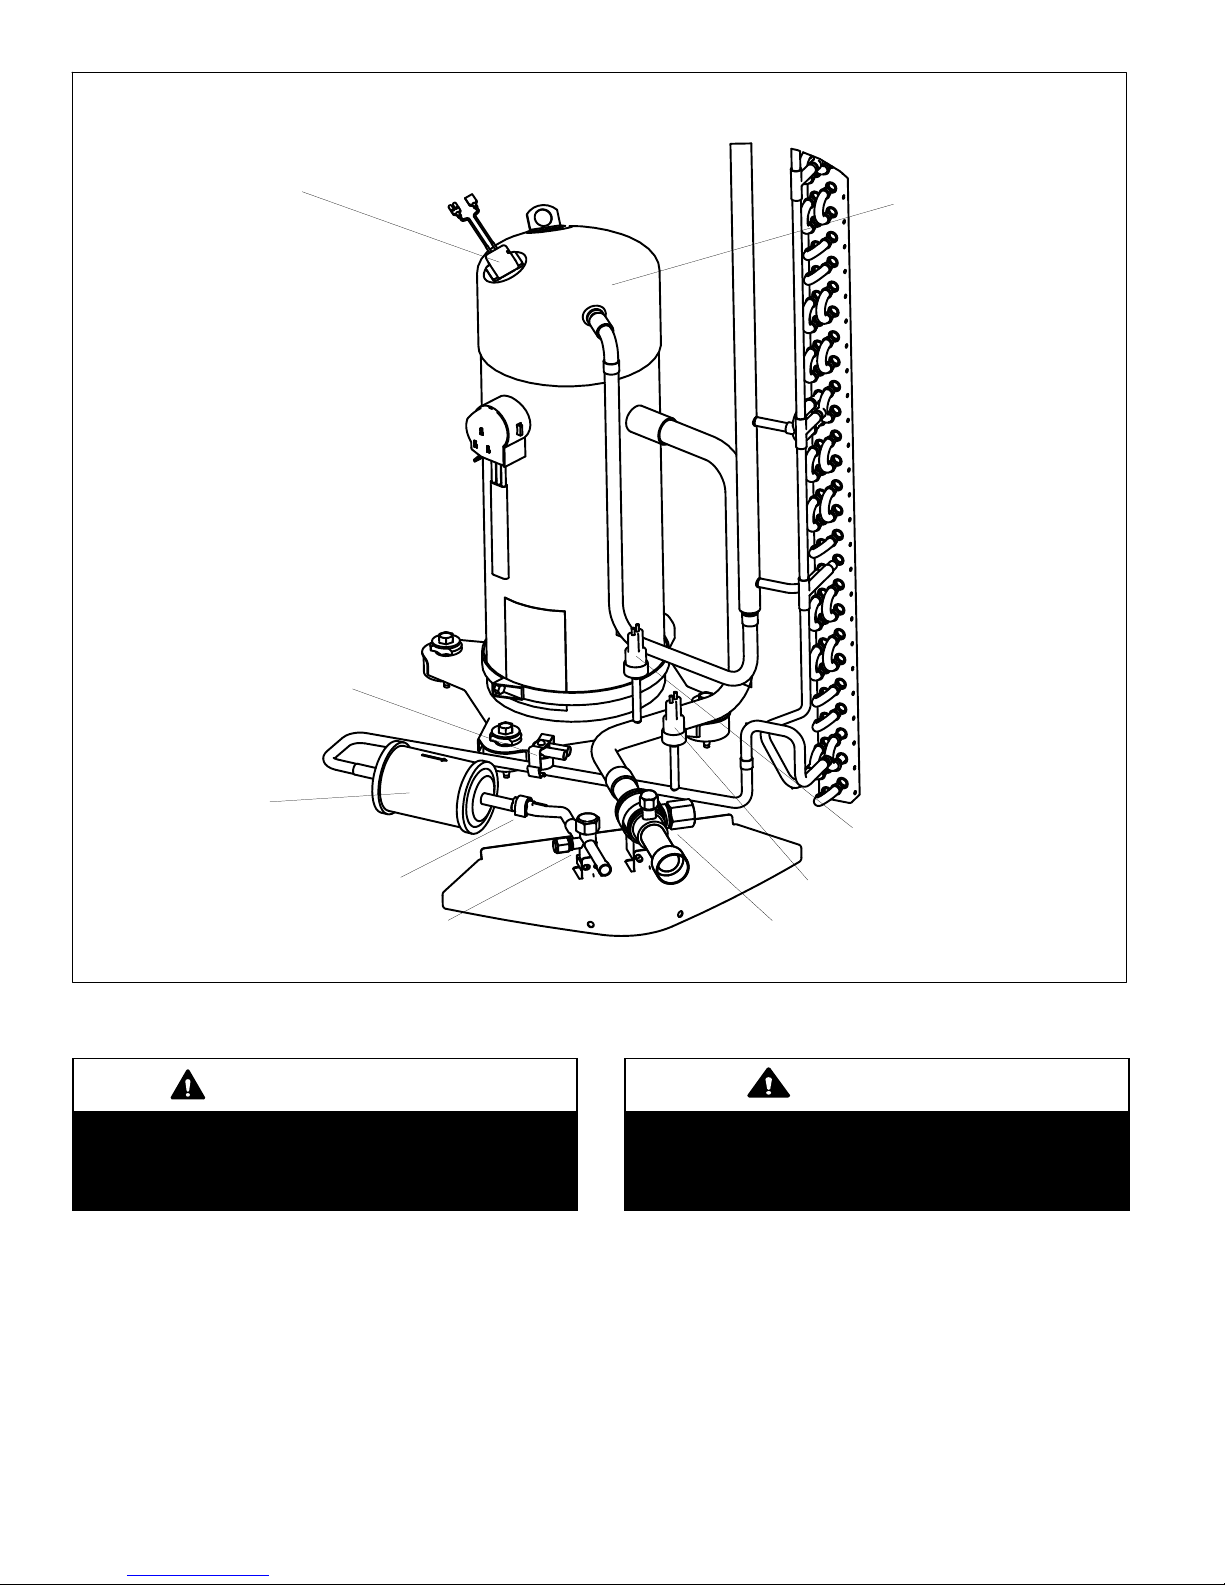
COMPRESSOR TOP CAP
SWITCH (THERMAL)
Typical Plumbing Components
COMPRESSOR
CRANKCASE HEATER THERMOSTAT
(S40) OPENS AT 70ºF, CLOSES AT 50ºF
(ONE WAY - HFC-410A)
DRIER
LIQUID LINE SENSOR
SERVICE VALVE
Figure 2. Plumbing Component Locations
IMPORTANT
This unit must be matched with an indoor coil as
specified in Lennox Product Specification bulletin.
Coils previously charged with HCFC-22 must be
flushed.
LOW PRESSURE
SWITCH
HIGH PRESSURE
SERVICE VALVE
SWITCH
CAUTION
As with any mechanical equipment, contact with sharp
sheet metal edges can result in personal injury. Take care
while handling this equipment and use protective
clothing.
XC20
6
Page 7
WARNING
Electric Shock Hazard. Can cause injury
or death. Unit must be grounded in
accordance with national and local
codes.
Line voltage is present at all components
when unit is not in operation on units with
single‐pole contactors. Disconnect all
remote electric power supplies before
opening access panel. Unit may have
multiple power supplies.
General
These instructions are intended as a general guide and do
not supersede local codes in any way. Consult authorities
who have jurisdiction before installation.
The XC20 is a high-efficiency residential split-system air
conditioner, which features a variable-capacity scroll com
pressor and uses HFC-410A refrigerant. Units are
available in 2, 3, 4 and 5-ton sizes. The series is designed
for use with an expansion valve (approved for use with
HFC-410A) in the indoor unit only.
USING MANIFOLD GAUGE SET
When checking the system charge, only use a manifold
gauge set that features low loss anti-blow back fittings.
Manifold gauge set used with HFC-410A refrigerant sys
tems must be capable of handling higher system operating
pressures. The gauges should be rated for use with pres
sures of 0 - 800 psig on the high side and a low side of 30”
vacuum to 250 psig, with dampened speed to 500 psi.
Gauge hoses must be rated for use at or up to 800 psig of
pressure with a 4000 psig burst rating.
Table 1. Torque Requirements
Parts Recommended Torque
Service valve cap 8 ft.- lb. 11 NM
Sheet metal screws 16 in.- lb. 2 NM
Machine screws #10 28 in.- lb. 3 NM
Compressor bolts 90 in.- lb. 10 NM
Gauge port seal cap 8 ft.- lb. 11 NM
TORQUE REQUIREMENTS
When servicing or repairing HVAC components, ensure
the fasteners are appropriately tightened. Table 1 lists
torque values for fasteners.
Operating Service Valves
The liquid and vapor line service valves are used for re
moving refrigerant, flushing, leak testing, evacuating,
checking charge and charging.
Each valve is equipped with a service port which has a fac
tory-installed valve stem. Figure 3 provides information on
how to access and operating both angle and ball service
valves.
IMPORTANT
Only use hex wrenches of sufficient hardness (50Rc Rockwell Harness Scale minimum). Fully insert the
wrench into the valve stem recess.
Service valve stems are factory-torqued (from 9 ft-lbs for
small valves, to 25 ft-lbs for large valves) to prevent
refrigerant loss during shipping and handling. Using a
hex wrench rated at less than 50Rc risks rounding or
breaking off the wrench, or stripping the valve stem
recess.
See the Lennox Service and Application Note #C-08-1
for further details and information.
WARNING
The State of California has determined that this product
may contain or produce a chemical or chemicals, in very
low doses, which may cause serious illness or death. It
may also cause cancer, birth defects, or reproductive
harm.
IMPORTANT
To prevent stripping of the various caps used, the
appropriately sized wrench should be used and fitted
snugly over the cap before tightening.
XC20
7
Page 8
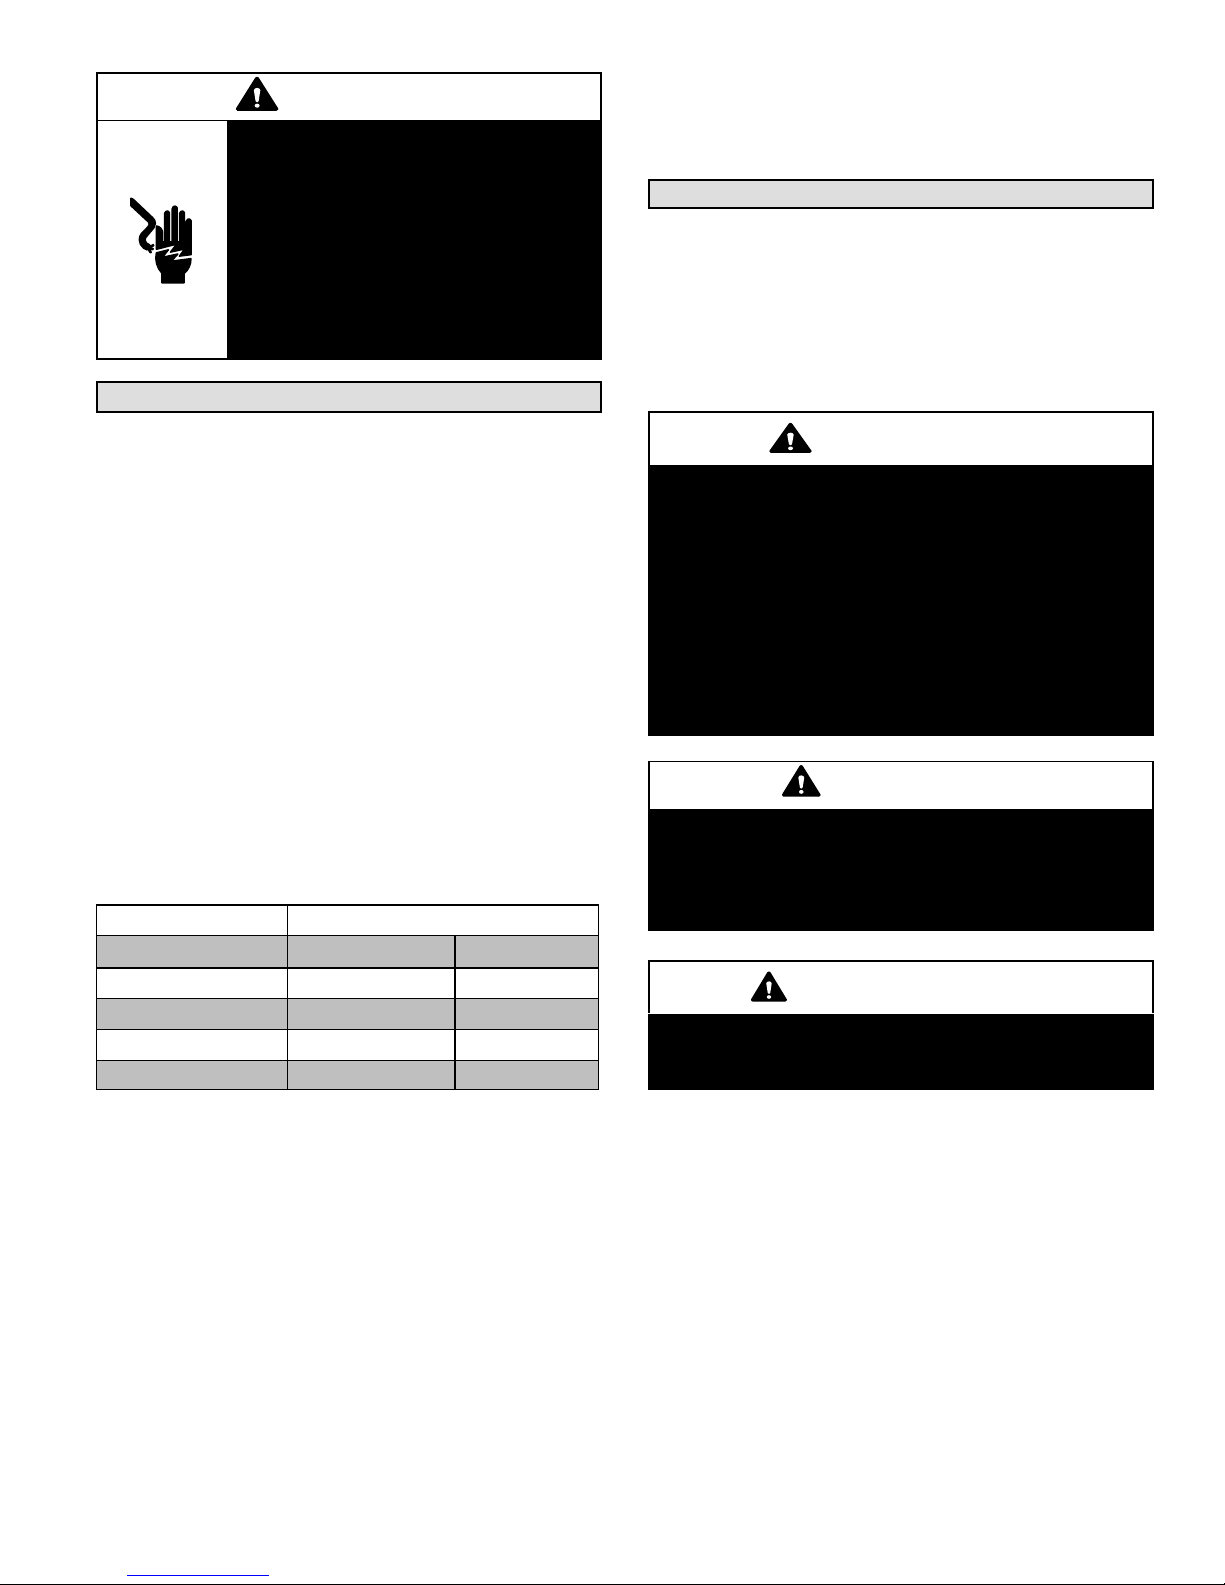
SERVICE VALVES
ANGLE AND BALL
Operating Angle–Type Service Valve:
1. Remove stem cap with an appropriately sized wrench.
2. Use a service wrench with a hex-head extension (3/16” for liquid line valve sizes and 5/16” for vapor line valve sizes) to back
the stem out counterclockwise as far as it will go.
SERVICE PORT CAP
SERVICE PORT CORE
(VALVE STEM SHOWN
CLOSED) INSERT HEX
WRENCH HERE
TO INDOOR
UNIT
(VALVE STEM SHOWN OPEN)
INSERT HEX WRENCH HERE
STEM CAP
TO OUTDOOR UNIT
ANGLE-TYPE SERVICE VALVE
(BACK-SEATED OPENED)
When service valve is OPEN, the service port is
open to line set, indoor and outdoor unit.
Operating Ball Type Service Valve:
1. Remove stem cap with an appropriately sized wrench.
2. Use an appropriately sized wrenched to open. To open valve,
rotate stem counterclockwise 90°. To close, rotate stem
clockwise 90°.
TO INDOOR UNIT
TO OPEN ROTATE STEM
COUNTERCLOCKWISE 90°.
TO CLOSE ROTATE STEM
CLOCKWISE 90°.
SERVICE PORT
SERVICE PORT
SERVICE PORT
CORE
CAP
TO OUTDOOR
UNIT
BALL (SHOWN
CLOSED)
VALV E
STEM
STEM CAP
ANGLE-TYPE SERVICE VALVE
(FRONT-SEATED CLOSED)
When service valve is CLOSED, the service port is open
to the line set and indoor unit.
To Access Service Port:
A service port cap protects the service port core from contamination and
serves as the primary leak seal.
1. Remove service port cap with an appropriately sized wrench.
2. Connect gauge set to service port.
3. When testing is completed, replace service port cap and tighten as
follows:
D With torque wrench: Finger tighten and
torque cap per table 1.
D Without torque wrench: Finger tighten and
use an appropriately sized wrench to turn
an additional 1/6 turn clockwise.
10
9
8
Reinstall Stem Cap:
Stem cap protects the valve stem from damage and serves as the
primary seal. Replace the stem cap and tighten as follows:
D With Torque Wrench: Finger tighten and then
torque cap per table 1.
D Without Torque Wrench: Finger tighten and
use an appropriately sized wrench to turn an
additional 1/12 turn clockwise.
10
9
8
11
11
7
7
12
6
12
6
1/6 TURN
1
2
4
5
1/12 TURN
1
4
5
3
2
3
NOTE - A label with specific torque requirements may be affixed to the stem cap. If the label is present, use the specified torque.
Figure 3. Angle and Ball-Type Service Valves
XC20
8
Page 9
II. INSTALLATION
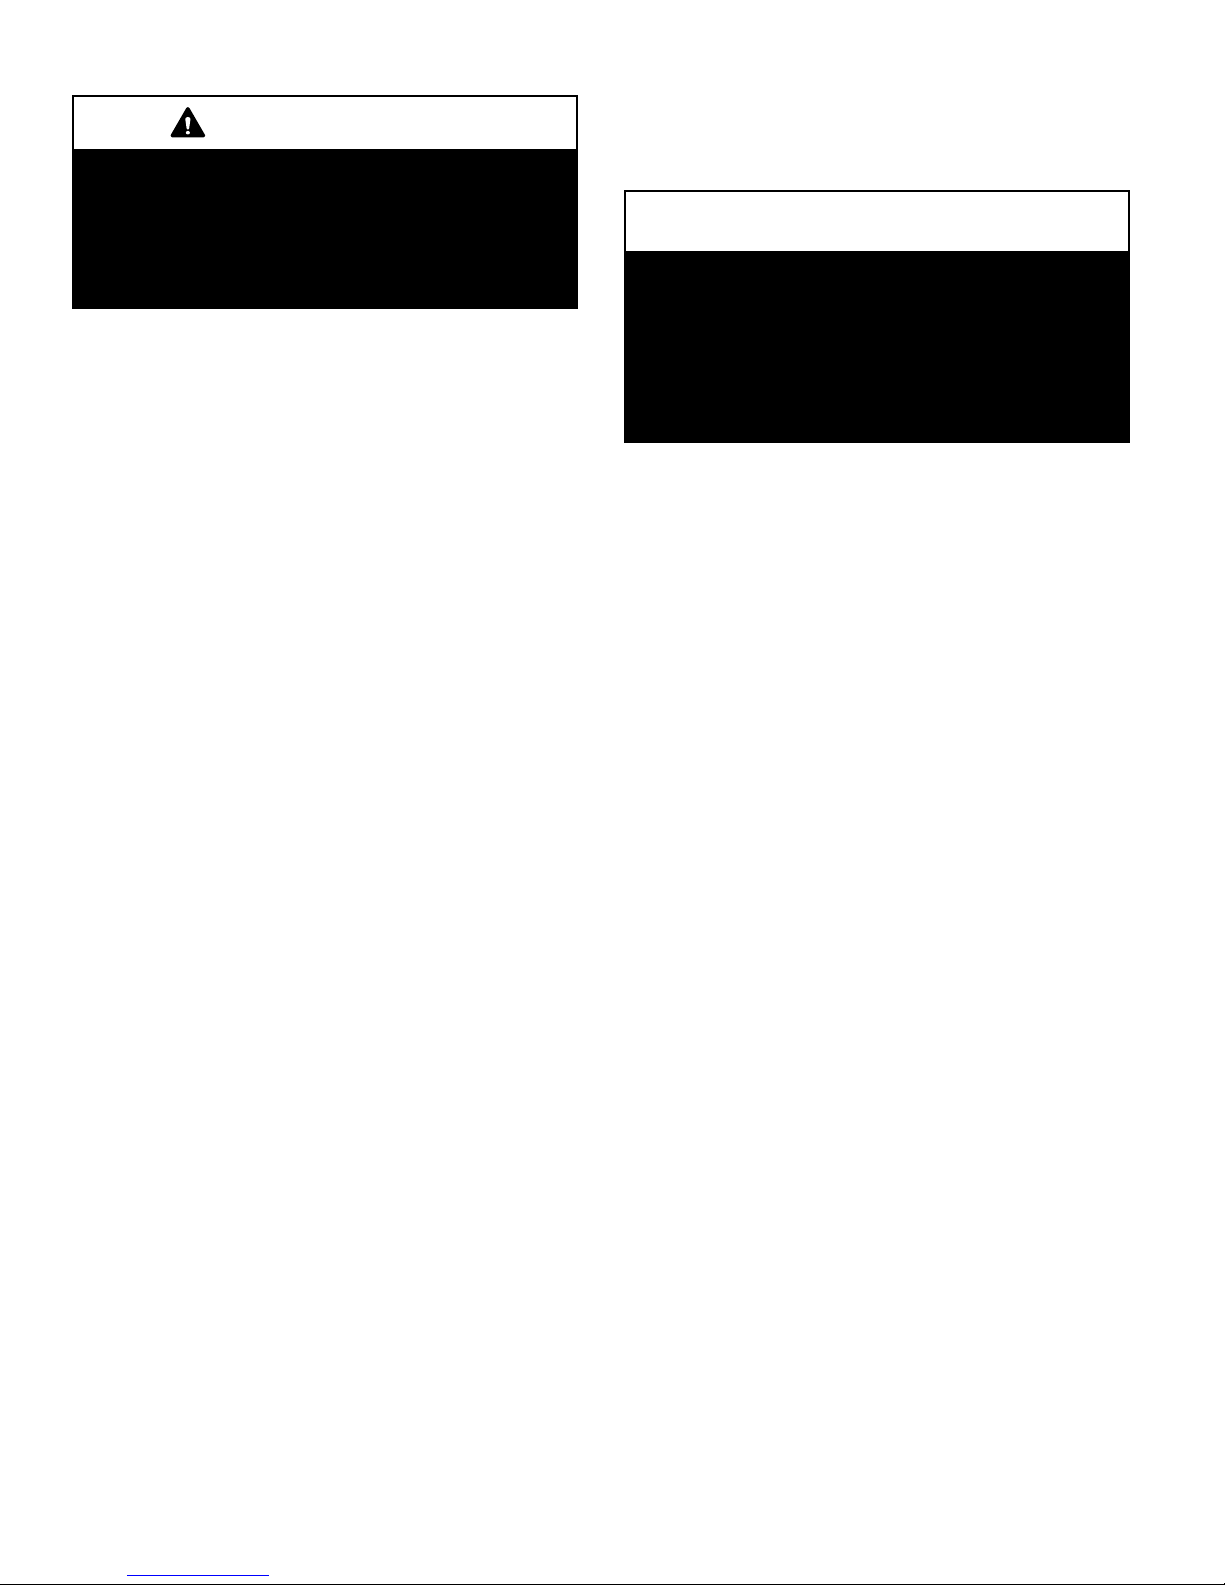
Unit Placement
CAUTION
This unit may weigh up to 320 lbs. It could take more than
two people to lift this product. Take proper precautions
when lifting heavy objects.
See Unit Dimensions on page 4 for sizing mounting slab,
platforms or supports. Refer to figure 4 for mandatory
installation clearance requirements.
POSITIONING CONSIDERATIONS
Consider the following when positioning the unit:
D Some localities are adopting sound ordinances based
on the unit sound level registered from the adjacent
property, not from the installation property. Install the
unit as far as possible from the property line.
D When possible, do not install the unit directly outside
a window. Glass has a very high level of sound trans
mission. For proper placement of unit in relation to a
window see figure 5, detail A.
PLACING UNIT ON SLAB
When installing unit at grade level, the top of the slab
should be high enough above grade so that water from
higher ground will not collect around the unit. The slab
should have a slope tolerance as described in figure 5, de
tail B.
NOTE - If necessary for stability, anchor unit to slab as de
scribed in figure 5, detail D.
ELEVATING THE UNIT
Units are outfitted with elongated support feet as illustrated
in figure 5, detail C.
If additional elevation is necessary, raise the unit by ex
tending the height of the unit support feet. Use a 2-inch
(50.8mm) Schedule 40 female threaded adapter to raise
the height of the unit.
The specified coupling will fit snugly into the recessed por
tion of the feet. Use additional 2-inch (50.8mm) Schedule
40 male threaded adaptors which can be threaded into the
female threaded adaptors to make additional adjustments
to the level of the unit.
NOTE - Keep the height of extenders short enough to en
sure a sturdy installation. If it is necessary to extend the
height further than what is stable, consider a different type
of field-fabricated framework that is sturdy enough for
greater heights.
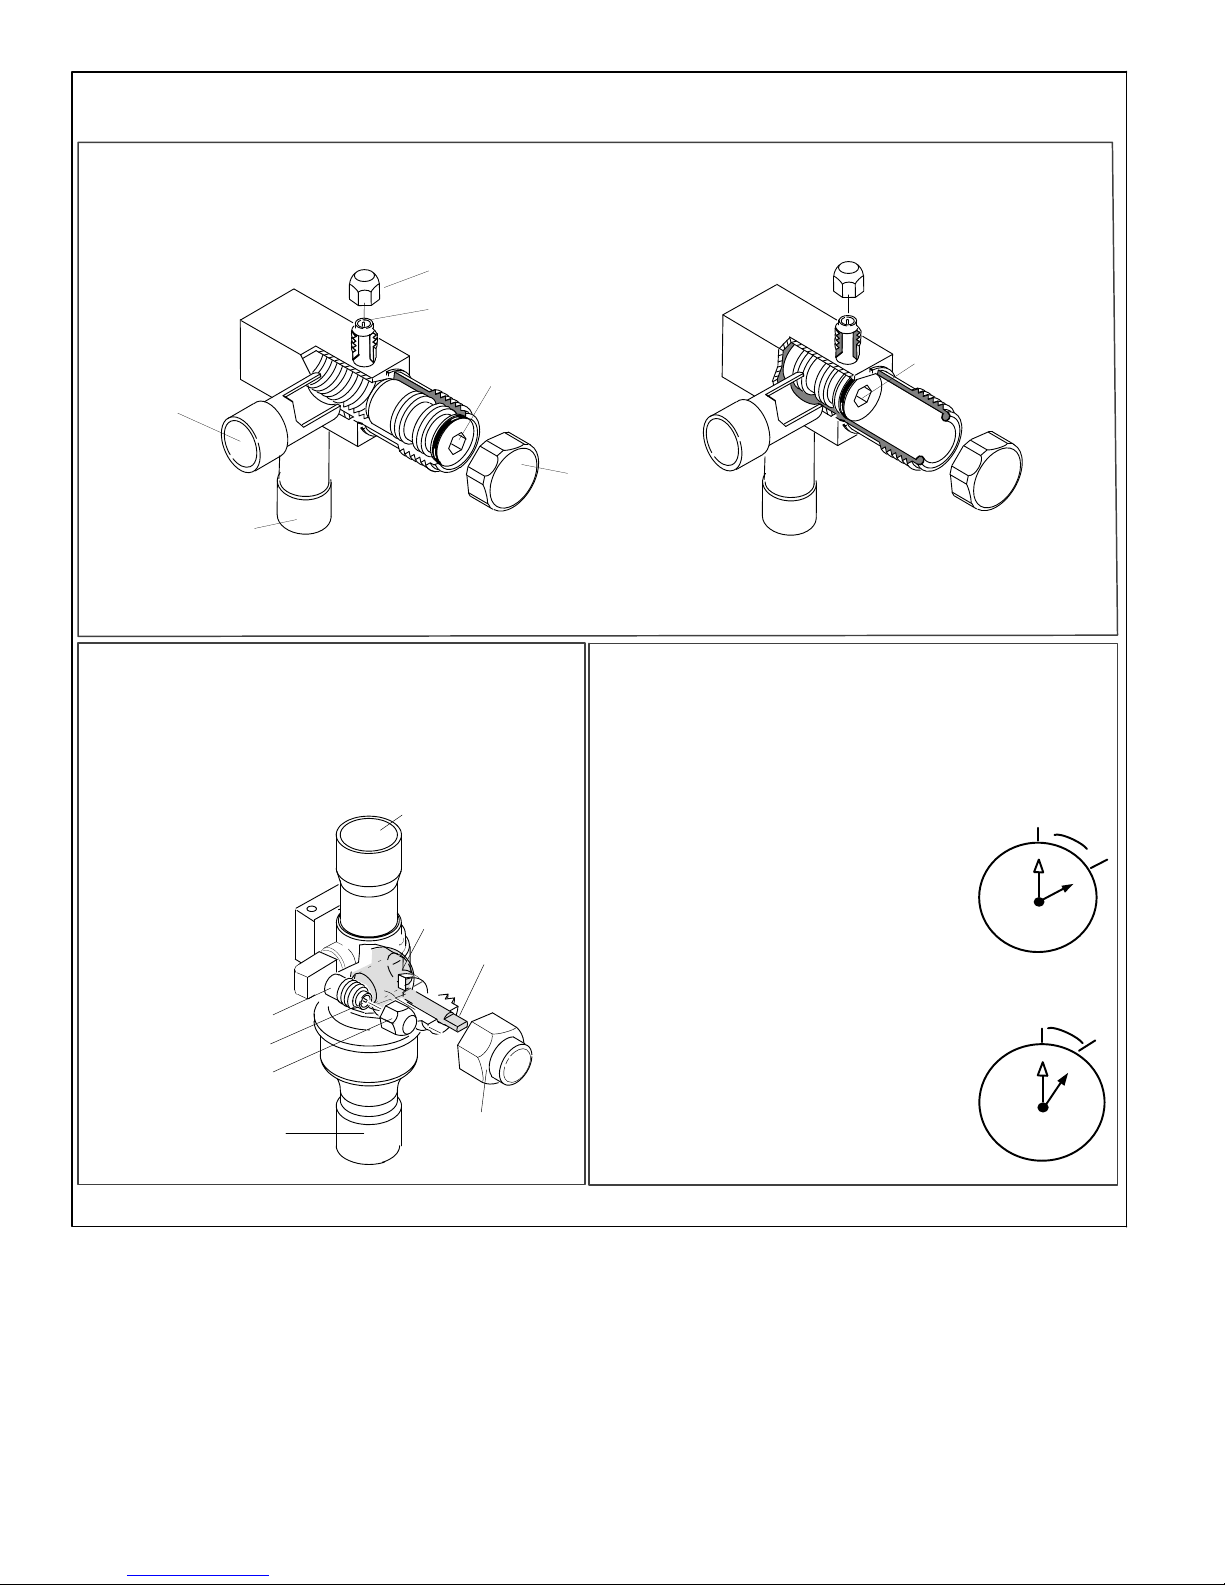
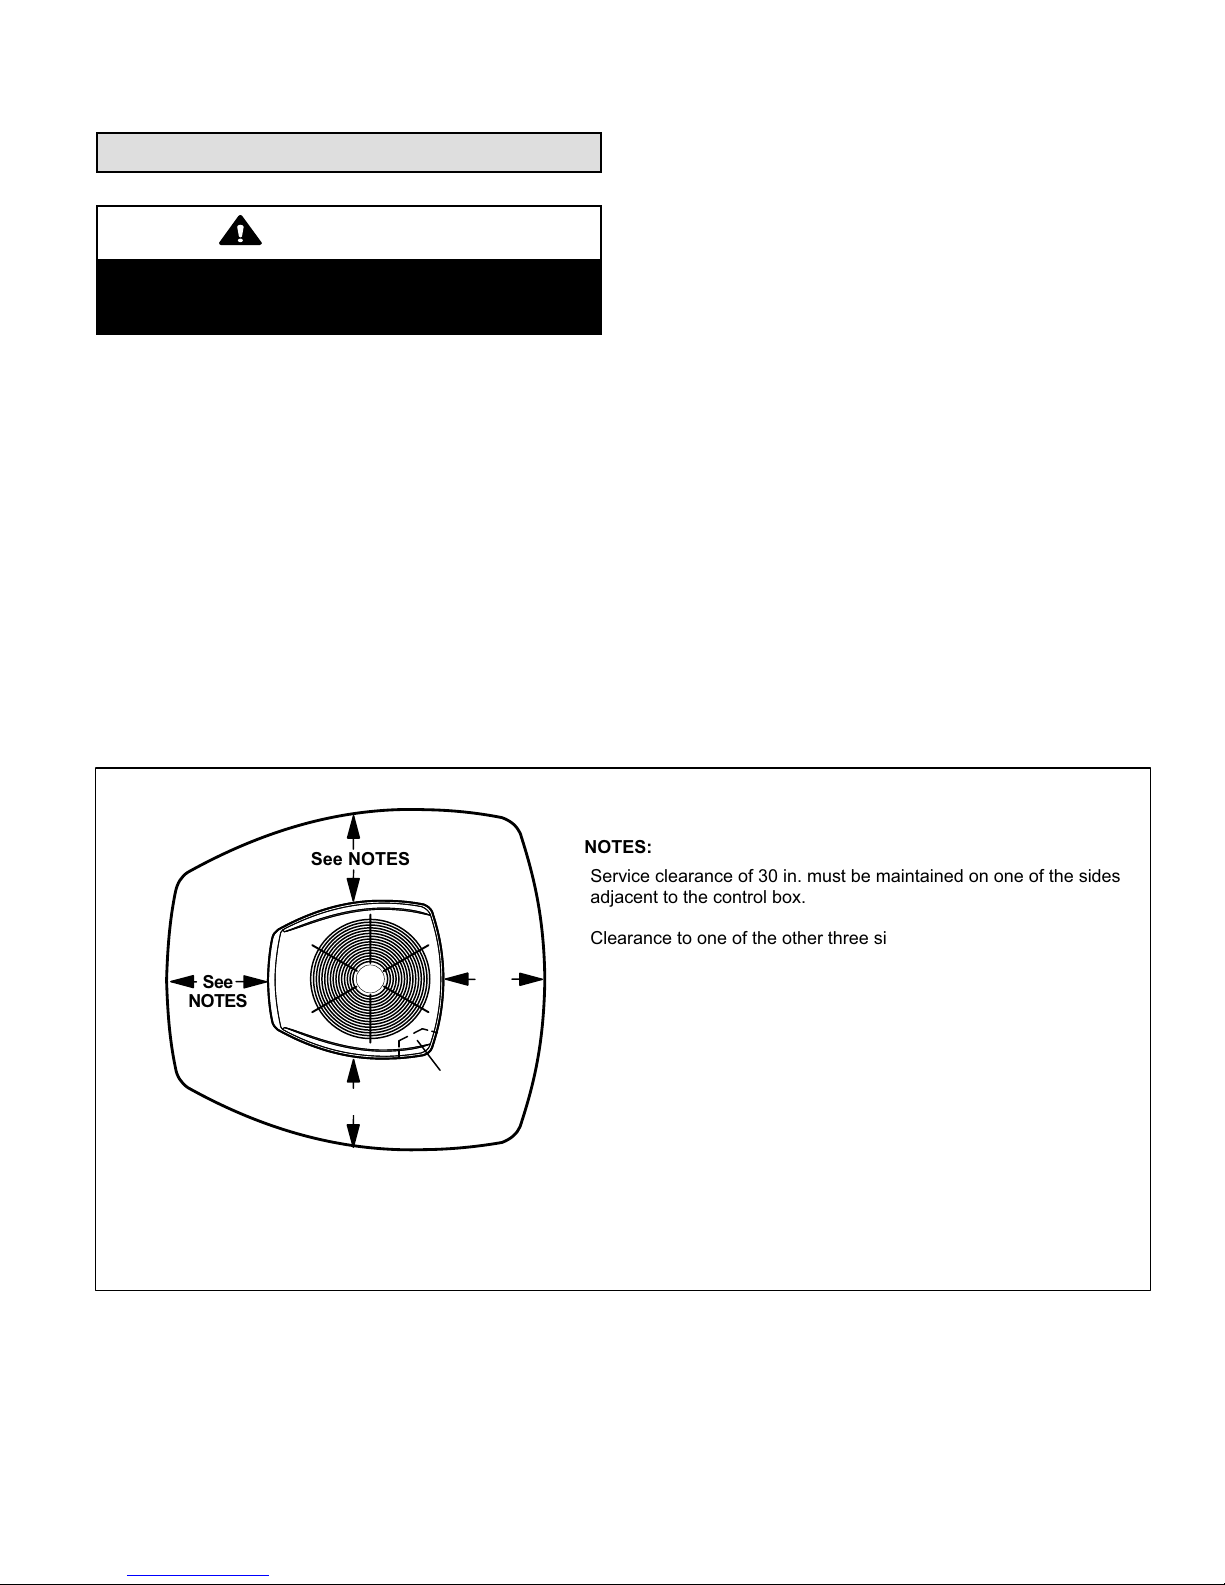
NOTES:
Service clearance of 30 in. must be maintained on one of the sides
adjacent to the control box.
Clearance to one of the other three sides must be 36 in.
Clearance to one of the remaining two sides may be 12 in. and the
final side may be 6 in.
A clearance of 24 in. must be maintained between two units.
48 in. clearance required on top of unit.
See
NOTES
See NOTES
See NOTES
See
NOTES
Control
Box
NOTICE: Specific applications may require adjustment of the listed installation clearances to provide protection for
the unit from physical damage or to avoid conditions which limit operating efficiency. (Example: Clearances may
have to be increased to prevent snow or ice from falling on the top of the unit. Additional clearances may also be
required to prevent air recirculation when the unit is installed under a deck or in another tight space.)
Figure 4. Installation Clearances
XC20
9
Page 10
STABILIZING UNIT ON UNEVEN SURFACES
IMPORTANT
Unit Stabilizer Bracket Use (field-provided):
Always use stabilizers when unit is raised above the
factory height. (Elevated units could become unstable in
gusty wind conditions.)
Stabilizers may be used on factory height units when
mounted on unstable an uneven surface.
1. Remove the louvered panel from each side to expose
the unit base.
2. Install the brackets as illustrated in figure 5, detail D us
ing conventional practices.
3. Replace the panels after installation is complete.
ROOF MOUNTING
Locate the unit above a load-bearing wall or area of the roof
that can adequately support the unit. Consult local codes
for rooftop applications.
NOTICE
Roof Damage!
This system contains both refrigerant and oil. Some
rubber roofing material may absorb oil and cause the
rubber to swell when it comes into contact with oil. The
rubber will then bubble and could cause leaks. Protect
the roof surface to avoid exposure to refrigerant and oil
during service and installation. Failure to follow this
notice could result in damage to roof surface.
XC20
10
Page 11
DETAIL A DETAIL B
INSTALL UNIT LEVEL OR, IF ON A SLOPE, MAINTAIN SLOPE
TOLERANCE OF 2 DEGREES (OR 2 INCHES PER 5 FEET [50 MM PER 1.5
M]) AWAY FROM BUILDING STRUCTURE.
Install unit away from windows.
TWO 90° ELBOWS INSTALLED IN LINE SET
WILL REDUCE LINE SET VIBRATION.
GROUND LEVEL
Slab Mounting at Ground Level
Outside Unit Placement
BUILDING
STRUCTURE
MOUNTING
SLAB
DETAIL C
BASE
LEG DETAIL
2” (50.8MM) SCH 40
FEMALE THREADED
USE ADDITIONAL 2” SCH 40 MALE THREADED ADAPT
ERS WHICH CAN BE THREADED INTO THE FEMALE
THREADED ADAPTERS TO MAKE ADDITIONAL AD
JUSTMENTS TO THE LEVEL OF THE UNIT.
Elevated Slab Mounting using Feet
ADAPTER
2” (50.8MM) SCH 40
MALE THREADED
ADAPTER
Extenders
DETAIL D
Slab Side Mounting
#10 1/2” LONG SELF-DRILLING
SHEET METAL SCREWS
STABILIZING BRACKET (18 GAUGE
METAL — 2” WIDTH; HEIGHT AS
#10 1-1/4” LONG HEX HEAD
SCREW AND FLAT WASHER
CONCRETE SLAB — USE TWO PLASTIC
ANCHORS (HOLE DRILL 1/4”)
WOOD OR PLASTIC SLAB — NO PLASTIC ANCHOR
(HOLE DRILL 1/8”)
REQUIRED)
CORNER POST
MINIMUM ONE
Deck Top Mounting
STABILIZING BRACKET (18 GAUGE METAL
— 2” (50.8MM) WIDTH; HEIGHT AS
REQUIRED); BEND TO FORM RIGHT ANGLE
SAME FASTENERS AS
SLAB SIDE MOUNTING.
ONE BRACKET PER SIDE (MIN.); FOR EXTRA STABILITY, TWO
BRACKETS PER SIDE, 2” (50.8MM) FROM EACH CORNER.
PER SIDE
FOR EXTRA
STABILITY
Stabilizing Unit on Uneven Surfaces
IMPORTANT - To help stabilize an outdoor unit, some installations may require strap
ping the unit to the pad using brackets and anchors commonly available in the
marketplace.
COIL
BASE PAN
Figure 5. Placement and Slab Mounting
XC20
11
Page 12
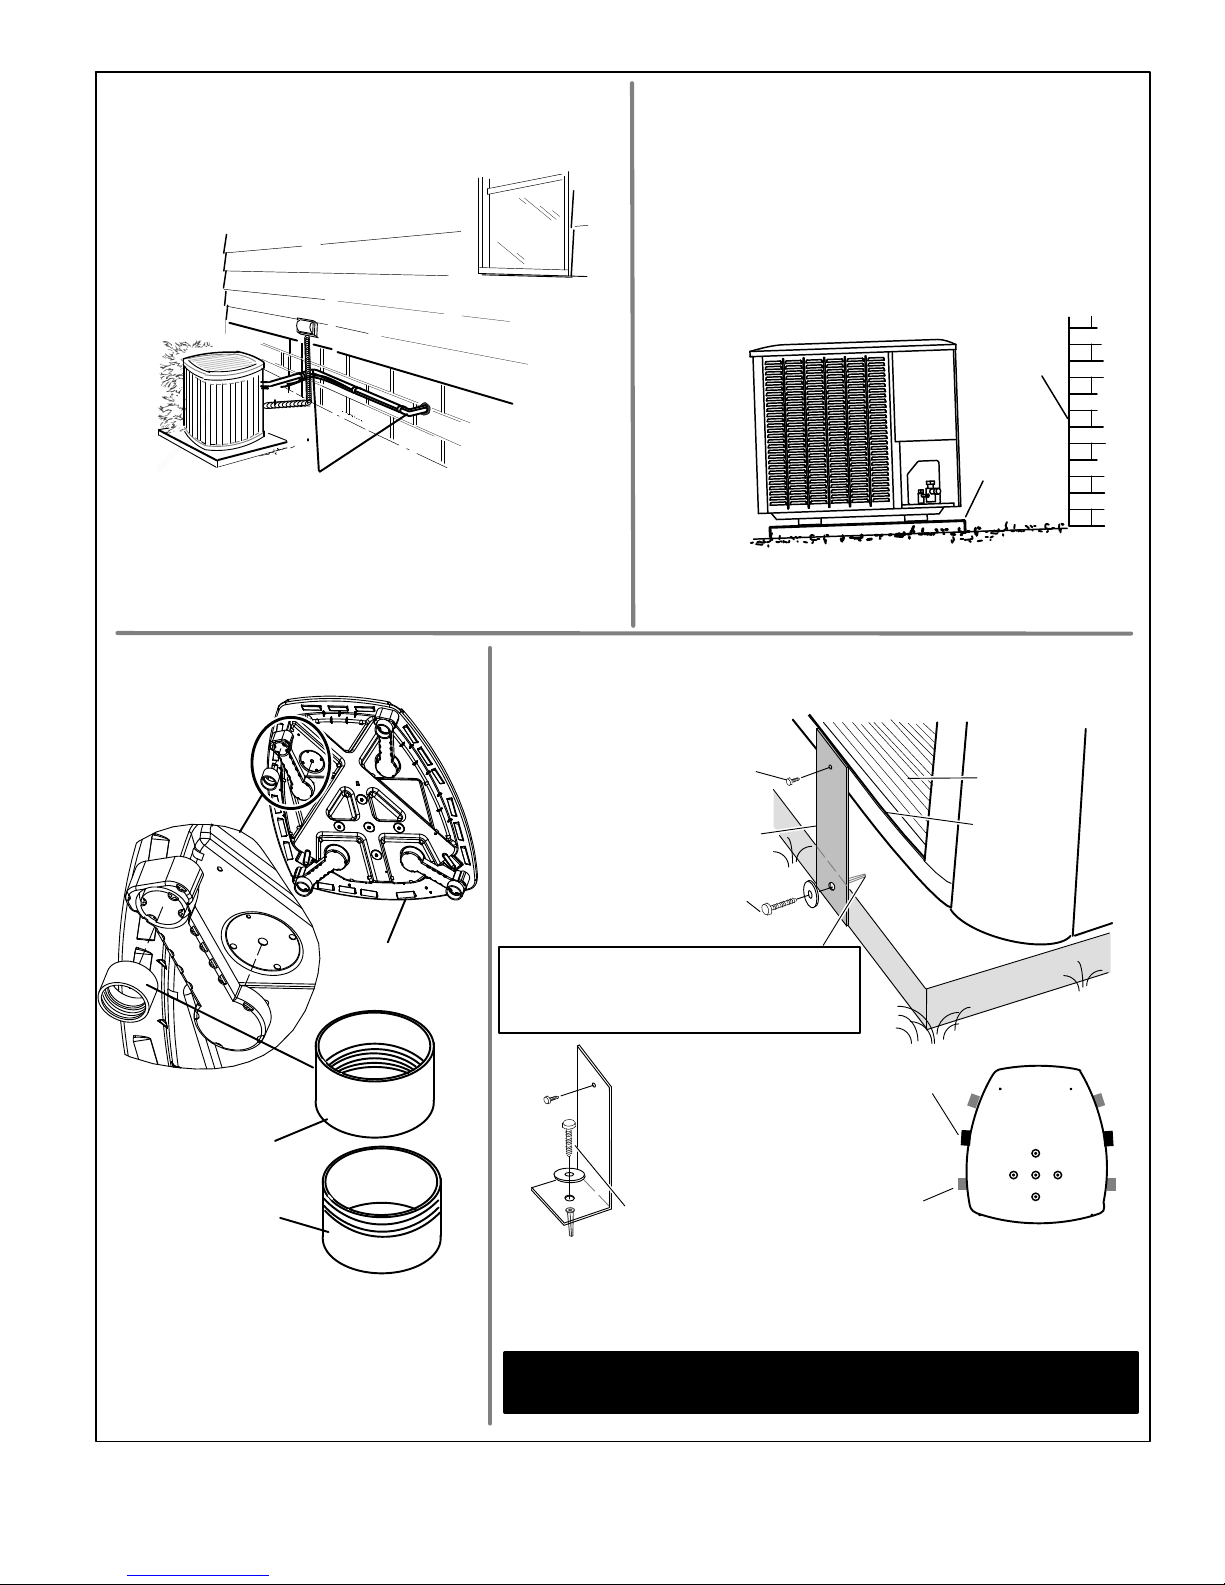
Removing and Installing Panels
LOUVERED PANEL REMOVAL
Remove the louvered panels as follows:
1. Remove two screws, allowing the panel to swing open slight
ly.
2. Hold the panel firmly throughout this procedure. Rotate bot
tom corner of panel away from hinged corner post until lower
three tabs clear the slots as illustrated in Detail B.
3. Move panel down until lip of upper tab clears the top slot in
corner post as illustrated in Detail A.
LOUVERED PANEL INSTALLATION
Position the panel almost parallel with the unit as illustrated in
Detail D with the screw side as close to the unit as possible.
Then, in a continuous motion:
1. Slightly rotate and guide the lip of the top tab inward as
illustrated in Detail A and C; then upward into the top slot
of the hinge corner post.
2. Rotate the panel until it is completely vertical to fully en
gage all of the tabs.
3. Holding the panel's hinged side firmly in place, close the
right-hand side of the panel, aligning the screw holes.
4. When panel is correctly positioned and aligned, insert the
screws and tighten.
IMPORTANT
ALIGNMENT AND NOT DESIGNED TO SUPPORT WEIGHT OF PANEL.
PANEL SHOWN SLIGHTLY ROTATED TO ALLOW TOP TAB TO EXIT (OR
ENTER) TOP SLOT FOR REMOVING (OR INSTALLING) PANEL.
! DO NOT ALLOW PANELS TO HANG ON UNIT BY TOP TAB. TAB IS FOR
SCREW
LIP
HOLES
Detail A
Detail B
ROTATE IN THIS DIRECTION;
ANGLE MAY BE TOO
EXTREME
THEN DOWN TO REMOVE
SIDE TO MAINTAIN FULLY-ENGAGED TABS
PANEL
HOLD DOOR FIRMLY TO THE HINGED
Detail C
MAINTAIN MINIMUM PANEL ANGLE (AS CLOSE TO PARALLEL
WITH THE UNIT AS POSSIBLE) WHILE INSTALLING PANEL.
Figure 6. Removing and Installing Panels
PREFERRED ANGLE
FOR INSTALLATION
XC20
12
Page 13
New or Replacement Line Set
REFRIGERANT LINE SET
This section provides information on installation or replace
ment of existing line set. If new or replacement line set is
not being installed then proceed to Brazing Connections on
page 16.
IMPORTANT
Lennox highly recommends changing line set when
converting the existing system from HCFC-22 to
HFC-410A If that is not possible and the line set is the
proper size as referenced in table 2, use the procedure
outlined under Flushing the System on page 19.
If refrigerant lines are routed through a wall, seal and isolate
the opening so vibration is not transmitted to the building.
Pay close attention to line set isolation during installation of
any HVAC system. When properly isolated from building
structures (walls, ceilings, floors), the refrigerant lines will
not create unnecessary vibration and subsequent sounds.
See figure 7 for recommended installation practices. Also,
consider the following when placing and installing a high-
efficiency outdoor unit.
Liquid lines that meter the refrigerant, such as RFC1 liquid
lines, must not be used in this application. Existing line set
of proper size may be reused. If system was previously
charged with HCFC-22 refrigerant, then existing line set
must be flushed (see Flushing the System on page 19).
IMPORTANT
Mineral oils are not compatible with HFC-410A. If oil
must be added, it must be a Polyol ester oil.
IMPORTANT !
If this unit is being matched with an approved line set
or indoor unit coil that was previously charged with
mineral oil, or if it is being matched with a coil which
was manufactured before January of 1999, the coil
and line set must be flushed prior to installation.
Take care to empty all existing traps. Polyol ester
(POE) oils are used in Lennox units charged with
HFC-410A refrigerant. Residual mineral oil can act as
an insulator, preventing proper heat transfer. It can
also clog the expansion device and reduce system
performance and capacity.
Failure to properly flush the system per the XC20
Installation and Service Procedures will void the
warranty.
WARNING
Refrigerant can be harmful if it is inhaled.
Refrigerant must be used and recovered
responsibly.
Failure to follow this warning may result in personal
injury or death.
WARNING
Fire, Explosion and Personal Safety
Hazard. Failure to follow this warning
could result in damage, personal inju
ry or death.
Never use oxygen to pressurize or
purge refrigeration lines. Oxygen,
when exposed to a spark or open
flame, can cause fire and/or an ex
plosion, that could result in property
damage, personal injury or death.
WARNING
When using a high pressure gas such
as nitrogen to pressurize a
refrigeration or air conditioning
system, use a regulator that can
control the pressure down to 1 or 2
psig (6.9 to 13.8 kPa).
Recommended POE oils are Mobil EAL ARCTIC 22 CC or
ICI EMKARATEt RL32CF.
WARNING
Danger of fire. Bleeding the refrigerant
charge from only the high side may
result in the low side shell and suction
tubing being pressurized. Application
of a brazing torch while pressurized
may result in ignition of the refrigerant
and oil mixture - check the high and
low pressures before unbrazing.
IMPORTANT !
Some scroll compressors have an internal vacuum
protector that will unload scrolls when suction pres
sure goes below 20 psig. A hissing sound will be
heard when the compressor is running unloaded.
Protector will reset when low pressure in system is
raised above 40 psig. DO NOT REPLACE COMPRES
SOR.
The XC20 is a variable-capacity cooling system utilizing
variable-speed compressor technology. With the variablespeed compressor and variable pumping capacity,
additional consideration must be given to refrigerant piping
sizing and application. The following guidelines are to be
used exclusively for the XC20 systems.
XC20
13
Page 14
COOLING SYSTEM (HFC410A)
D Total equivalent length equals 180 feet (all piping and
fittings included).
NOTE - This is a general guide. Lengths may be more or
less, depending on remaining system design factors.
D Maximum linear (actual) length = 150 feet.
D Maximum linear liquid lift = 60 feet.
NOTE - Maximum lifts are dependent on total length, num
ber of elbows, and other factors that contribute to total
pressure drop.
D Maximum linear length of vapor riser = 60 feet.
D Size vertical vapor riser per table 2.
D Line set lengths up to 50 linear feet: Use rated line
sizes listed in table 2.
D Line set lengths between 51 and 150 linear feet:
Crankcase heater and nonbleed port TXV factory-in
stalled. No additional components required. Vertical
vapor riser must be sized to the vapor riser listed in
table 3 on systems with line sets longer than 51 feet.
Use tables 3 and 4 to determine the correct liquid and
vapor line sizes.
D Line set lengths over 150 linear feet: Not recom
mended.
D Additional oil is not required for systems with line
lengths up to 150 feet.
NOTE - Recommended POE oils are Mobil EAL ARCTIC
22 CC or ICI EMKARATEt RL32CF.
SUCTION TRAPS
In systems with the outdoor unit 5 to 60 feet above the in
door unit, one trap must be installed at the bottom of the
suction riser.
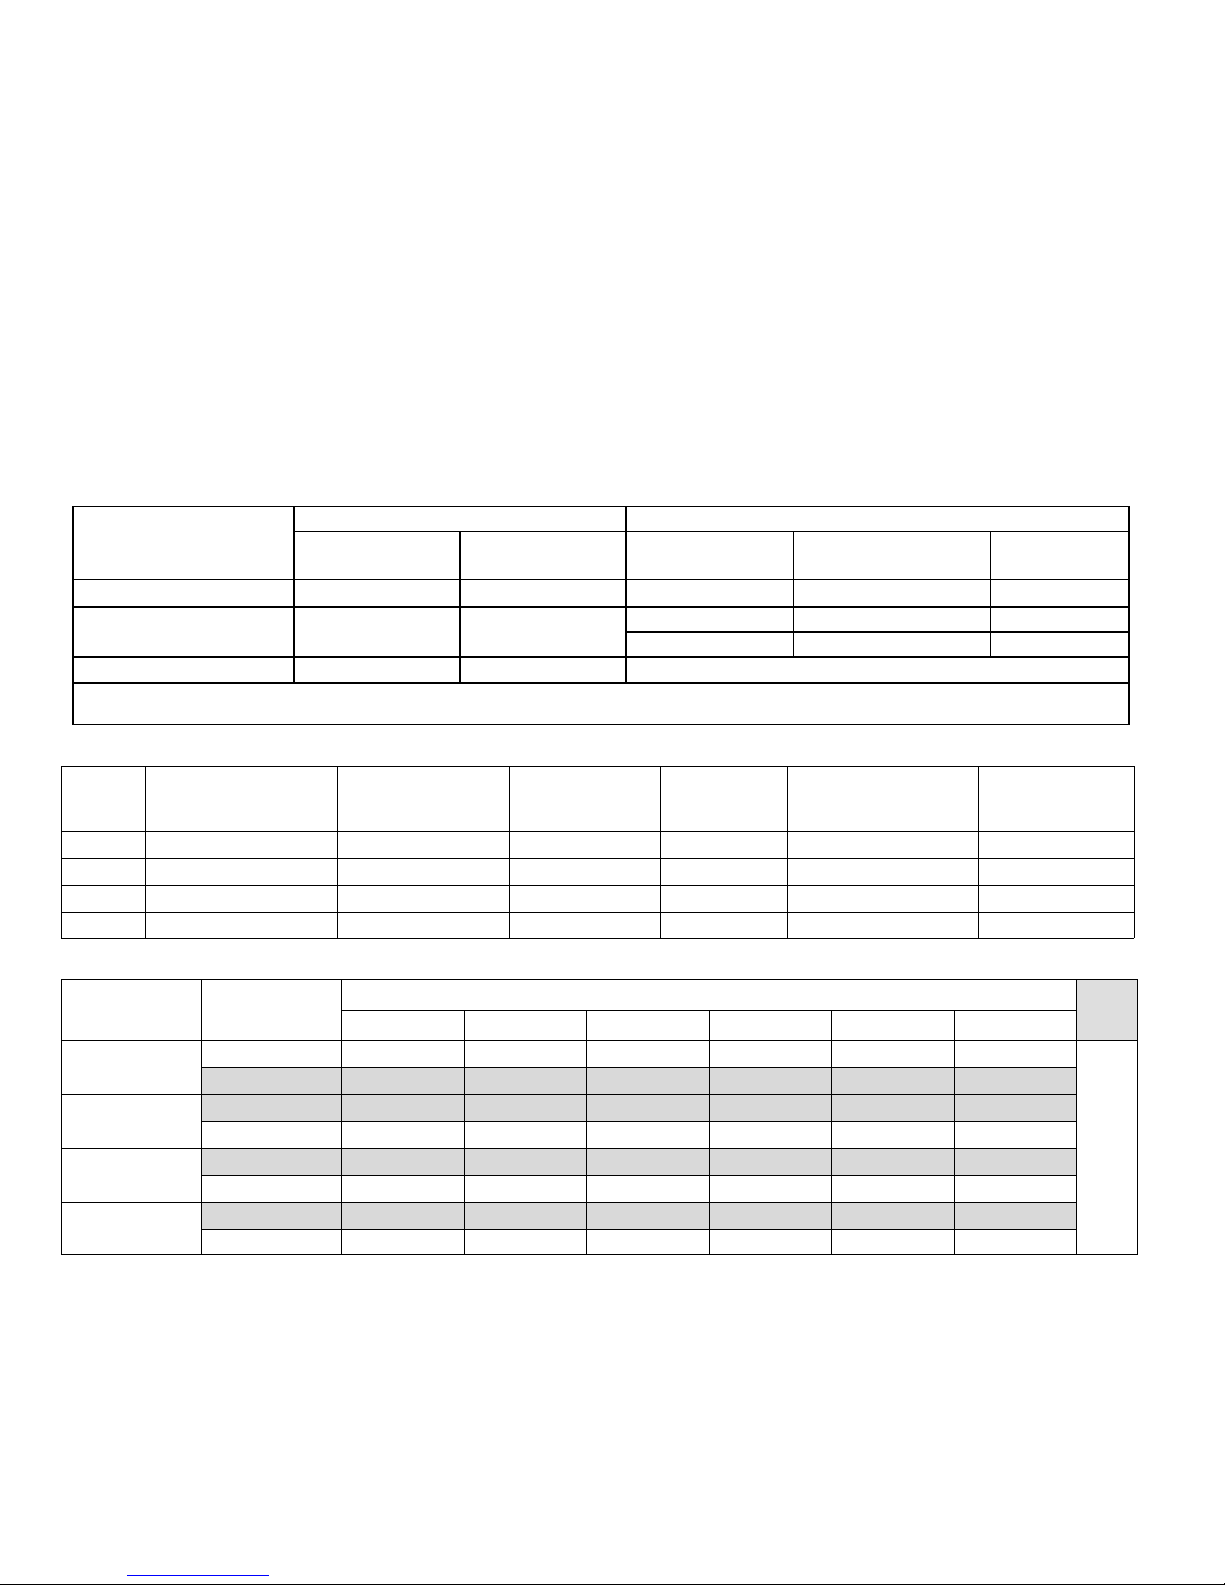
Table 2. Standard Refrigerant Line Set — Up to 50 Linear Feet
Valve Size Connections Recommended Line Sets
Model Number (-xx*)
XC20-024-230-XX 3/8” (10 mm) 3/4” (19 mm) L15-41-30 30 feet (9.1 m) 89J60
XC20-036-230-XX
XC20-048-230-XX
XC20-060-230-XX 3/8” (10 mm) 1-1/8” (29 mm) ** Field-fabricated
* Applicable to all minor revision numbers unless otherwise specified.
** Some applications may require a field-provided 1-1/8” to 7/8” adapter.
Liquid Line Suction Line
3/8” (10 mm) 7/8” (22 mm)
L15 Line Set
Model
L15-65-40 40 feet (12.2 m) 89J61
L15-65-50 50 feet (15.2 m) 89J62
Line Set Length
Catalog
Number
Table 3. XC20 Line Set Guidelines — 51 to 150 Linear Feet in Length
Model
024 180 150 60 60 3/4” 5/8”
036 180 150 60 60 7/8” 3/4”
048 180 150 60 60 7/8” 7/8”
060 180 150 60 60 7/8” 7/8”
Maximum Total
Equivalent Length (ft)
Maximum Linear
(actual) Length (ft)
Maximum Vapor
Riser (ft)
Maximum
Linear Liquid
Lift (ft)
Preferred Vapor Line
Sizes for Horizontal
Runs
Required Vapor
Riser Size
Table 4. Liquid Line Diameter Selection Table
Total Linear Length (feet)
Unit
024
036
048
060
Line Size
5/16” 25 50 55 48 40 33
3/8” 25 50 60 60 60 60
3/8” 25 50 60 56 51 45
1/2” 25 50 60 60 60 60
3/8” 25 50 50 41 31 22
1/2” 25 50 60 60 60 60
3/8” 25 50 36 22 8 NR
1/2”
25 50 75 100 125 150
25
50 60 60 60 59
Note Shaded rows indicate rated liquid line size.
1. Find your unit on the left side of the table.
2. Start with the rated liquid line size (shaded row) for the outdoor unit.
3. Select the actual total linear length of your system shown at the top of the table.
4. The elevation listed in the table is the maximum allowed for the liquid line listed.
5. Consider the larger liquid line size shown in the table if the elevation does not meet your requirements.
Max. Elevation
(ft)
XC20
14
Page 15
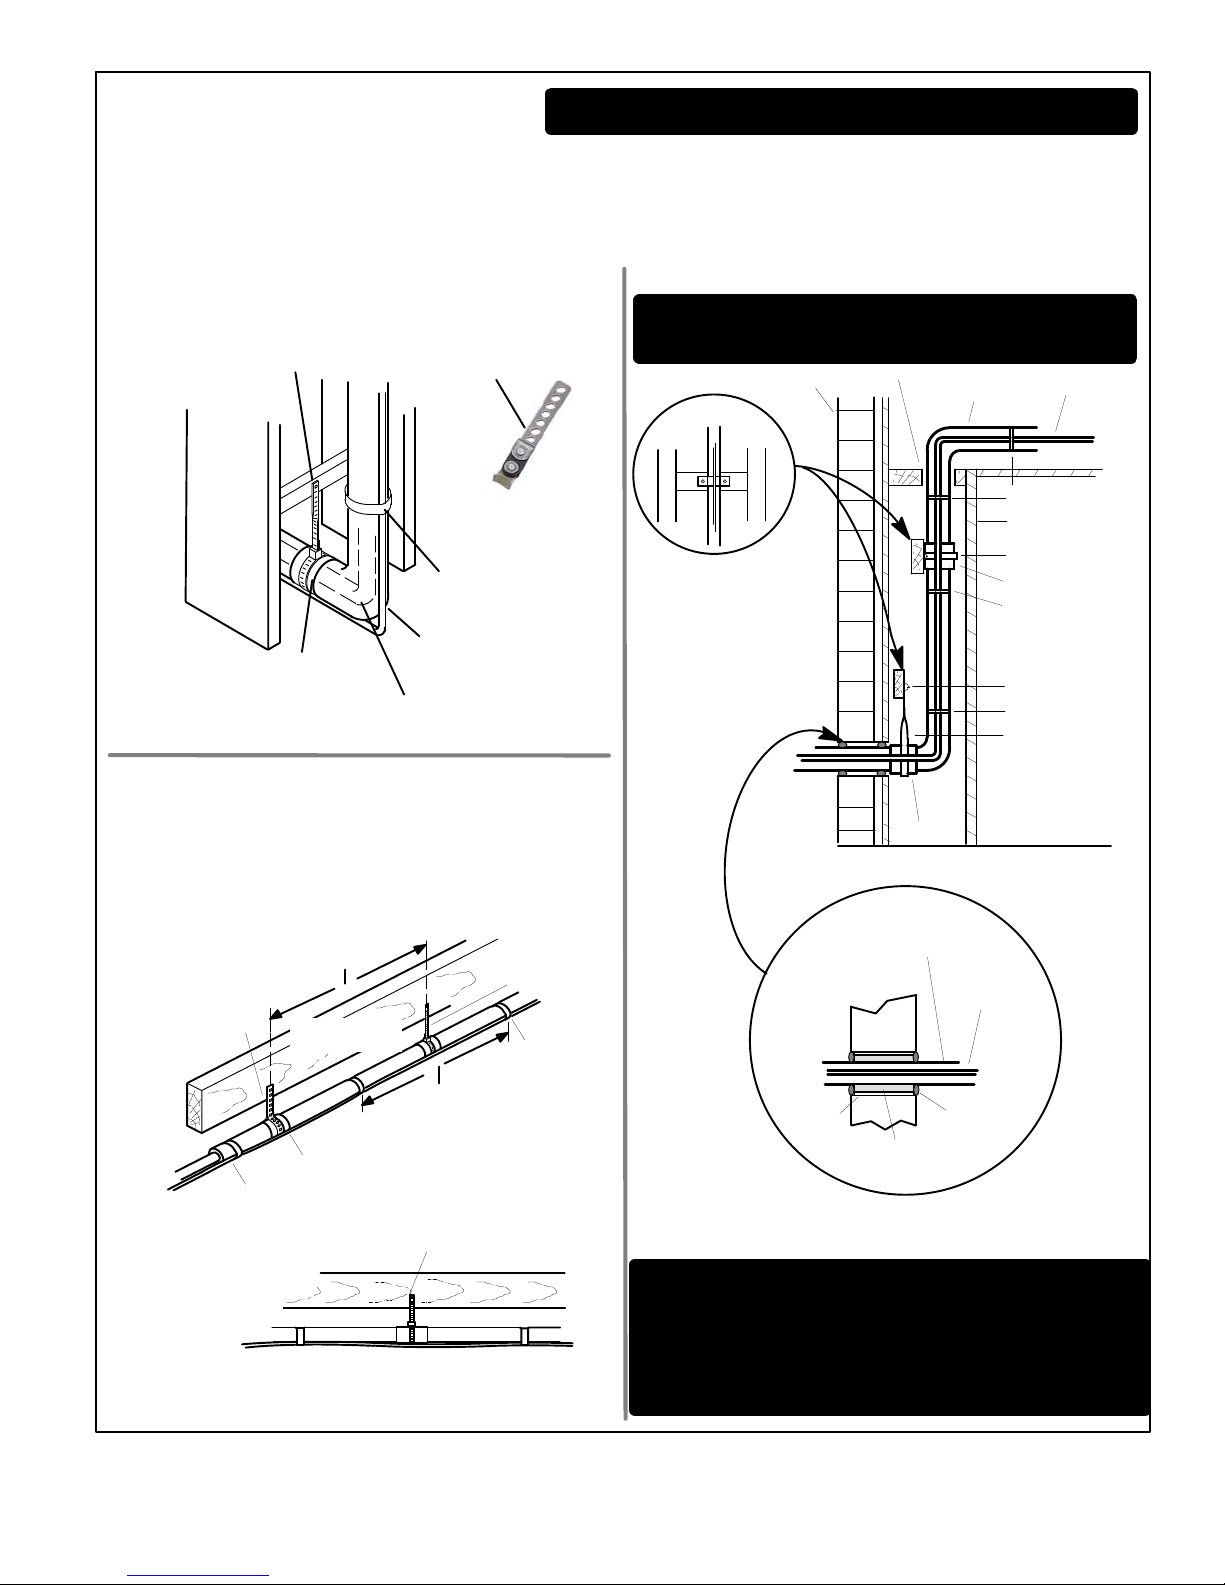
LINE SET
INSTALLATION
LINE SET ISOLATION — THE FOLLOWING ILLUSTRATIONS ARE EXAM
PLES OF PROPER REFRIGERANT LINE SET ISOLATION:
REFRIGERANT LINE SET — TRANSITION
FROM VERTICAL TO HORIZONTAL
ANCHORED HEAVY NYLON
WIRE TIE OR AUTOMOTIVE
MUFFLER‐TYPE HANGER
AUTOMOTIVE
MUFFLER‐TYPE HANGER
IMPORTANT - Refrigerant lines must not contact structure.
REFRIGERANT LINE SET — INSTALLING
VERTICAL RUNS (NEW CONSTRUCTION SHOWN)
NOTE - INSULATE LIQUID LINE WHEN IT IS ROUTED THROUGH AREAS
WHERE THE SURROUNDING AMBIENT TEMPERATURE COULD BECOME
HIGHER THAN THE TEMPERATURE OF THE LIQUID LINE OR WHEN
PRESSURE DROP IS EQUAL TO OR GREATER THAN 20 PSIG.
IMPORTANT - Refrigerant lines must not contact
wall
OUTSIDE WALL
VAPOR LINE
LIQUID LINE
WALL
STUD
STRAP LIQUID LINE TO
VAPOR LINE
LIQUID LINE
NON-CORROSIVE
METAL SLEEVE
VAPOR LINE - WRAPPED
IN ARMAFLEX
REFRIGERANT LINE SET — INSTALLING
HORIZONTAL RUNS
TO HANG LINE SET FROM JOIST OR RAFTER, USE EITHER METAL
STRAPPING MATERIAL OR ANCHORED HEAVY NYLON WIRE TIES.
WIRE TIE (AROUND
VAPOR LINE ONLY)
8 FEET (2.43 METERS)
STRAPPING
MATERIAL (AROUND
VAPOR LINE ONLY)
TAPE OR
WIRE TIE
FLOOR JOIST OR
ROOF RAFTER
8 FEET (2.43 METERS)
NON-CORROSIVE
METAL SLEEVE
STRAP THE VAPOR LINE TO THE
JOIST OR RAFTER AT 8 FEET (2.43
METERS) INTERVALS THEN STRAP
THE LIQUID LINE TO THE VAPOR LINE.
TAPE OR
WIRE TIE
WIRE TIE
INSIDE WALL
WOOD BLOCK
BETWEEN
STUDS
SLEEVE
VAPOR LINE WRAPPED
WITH ARMAFLEX
OUTSIDE
WALL
PVC
PIPE
FIBERGLASS
INSULATION
NOTE - SIMILAR INSTALLATION PRACTICES SHOULD BE USED IF
LINE SET IS TO BE INSTALLED ON EXTERIOR OF OUTSIDE WALL.
CAULK
STRAP
NON-CORROSIVE
METAL SLEEVE
WIRE TIE
WOOD BLOCK
WIRE TIE
STRAP
LIQUID
LINE
FLOOR JOIST OR
ROOF RAFTER
WARNING - Polyol ester (POE) oils used with
HFC-410A refrigerant absorb moisture very quickly.
It is very important that the refrigerant system be kept
closed as much as possible. DO NOT remove line set
caps or service valve stub caps until you are ready to
make connections.
Figure 7. Line Set Installation
XC20
15
Page 16
Brazing Connections
Use the procedures outlined in figures 8 and 9 for brazing
line set connections to service valves.
WARNING
IMPORTANT
Allow braze joint to cool before removing the wet rag
from the service valve. Temperatures above 250ºF can
damage valve seals.
Danger of fire. Bleeding the refrigerant
charge from only the high side may result
in pressurization of the low side shell and
suction tubing. Application of a brazing
torch to a pressurized system may result
in ignition of the refrigerant and oil mixture
- Check the high and low pressures
before applying heat.
CAUTION
Brazing alloys and flux contain materials which are
hazardous to your health.
Avoid breathing vapors or fumes from brazing
operations. Perform operations only in well-ventilated
areas.
Wear gloves and protective goggles or face shield to
protect against burns.
Wash hands with soap and water after handling brazing
alloys and flux.
WARNING
Fire, Explosion and Personal Safety
Hazard.
Failure to follow this warning could re
sult in damage, personal injury or death.
Never use oxygen to pressurize or
purge refrigeration lines. Oxygen, when
exposed to a spark or open flame, can
cause a fire and/or an explosion, that
could result in property damage, per
sonal injury or death.
XC20
16
Page 17
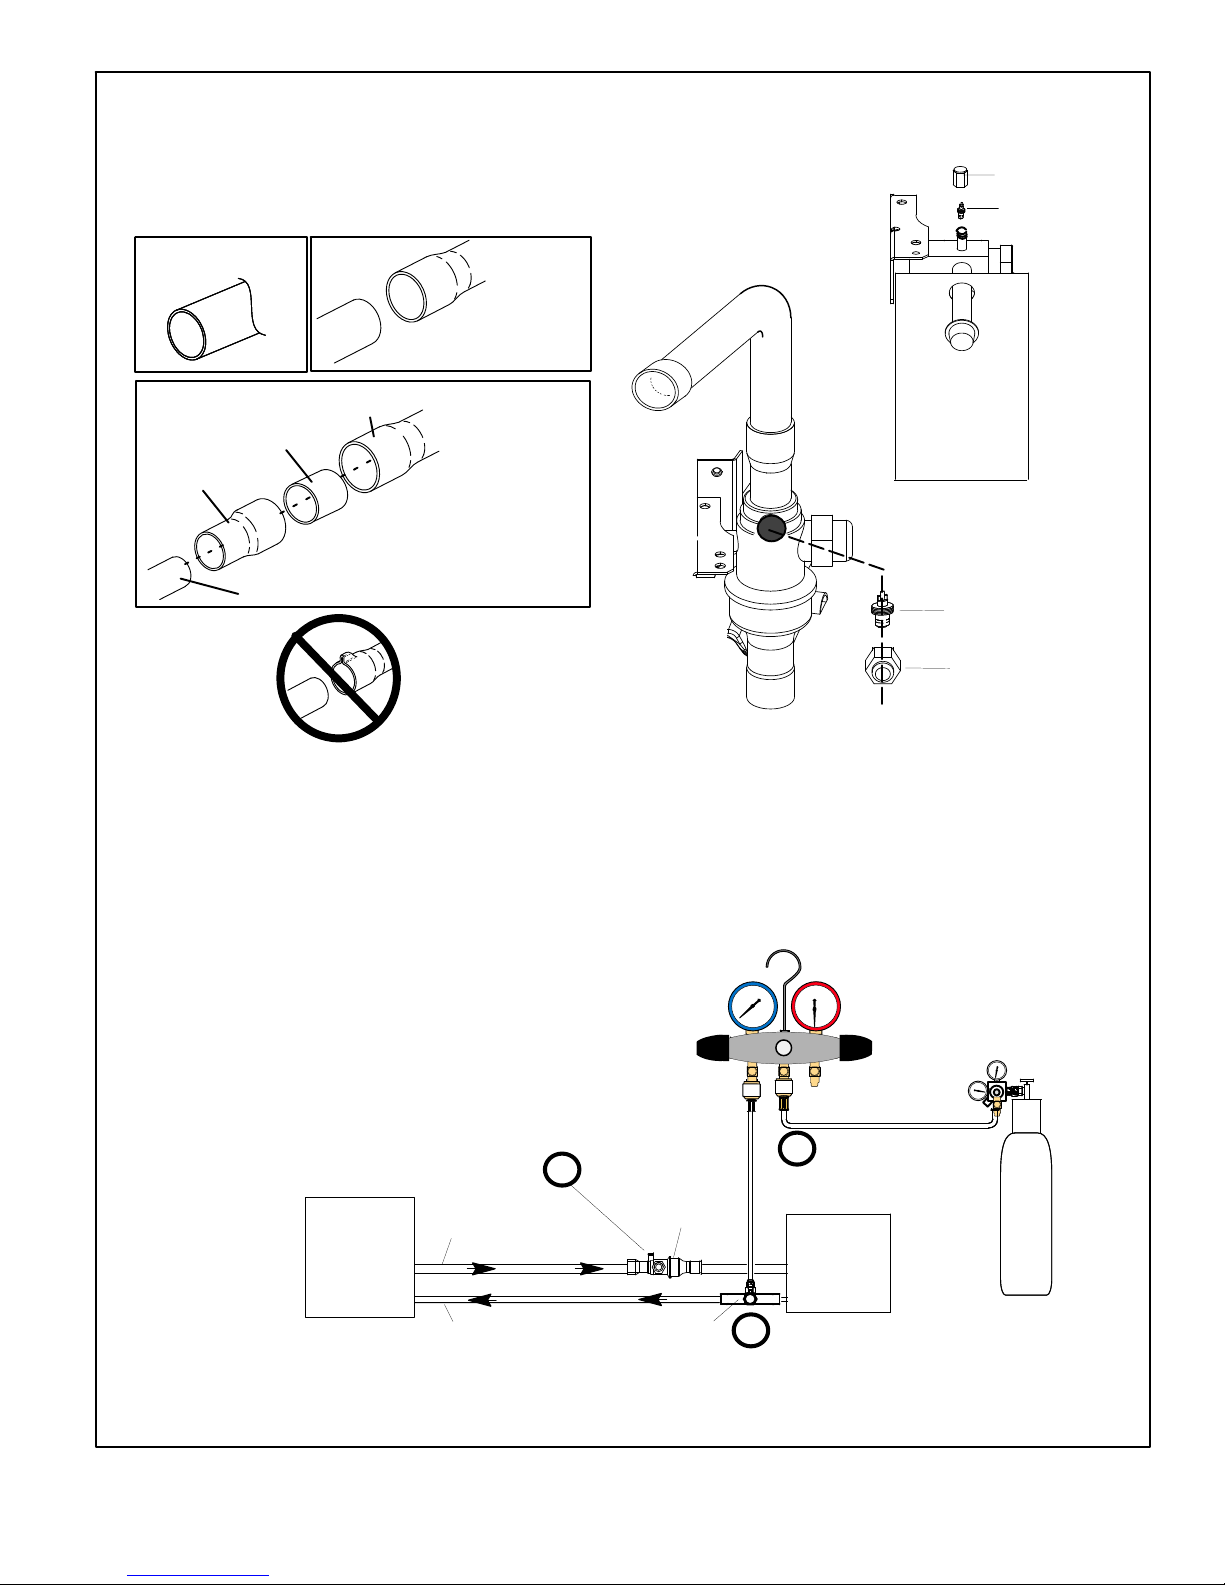
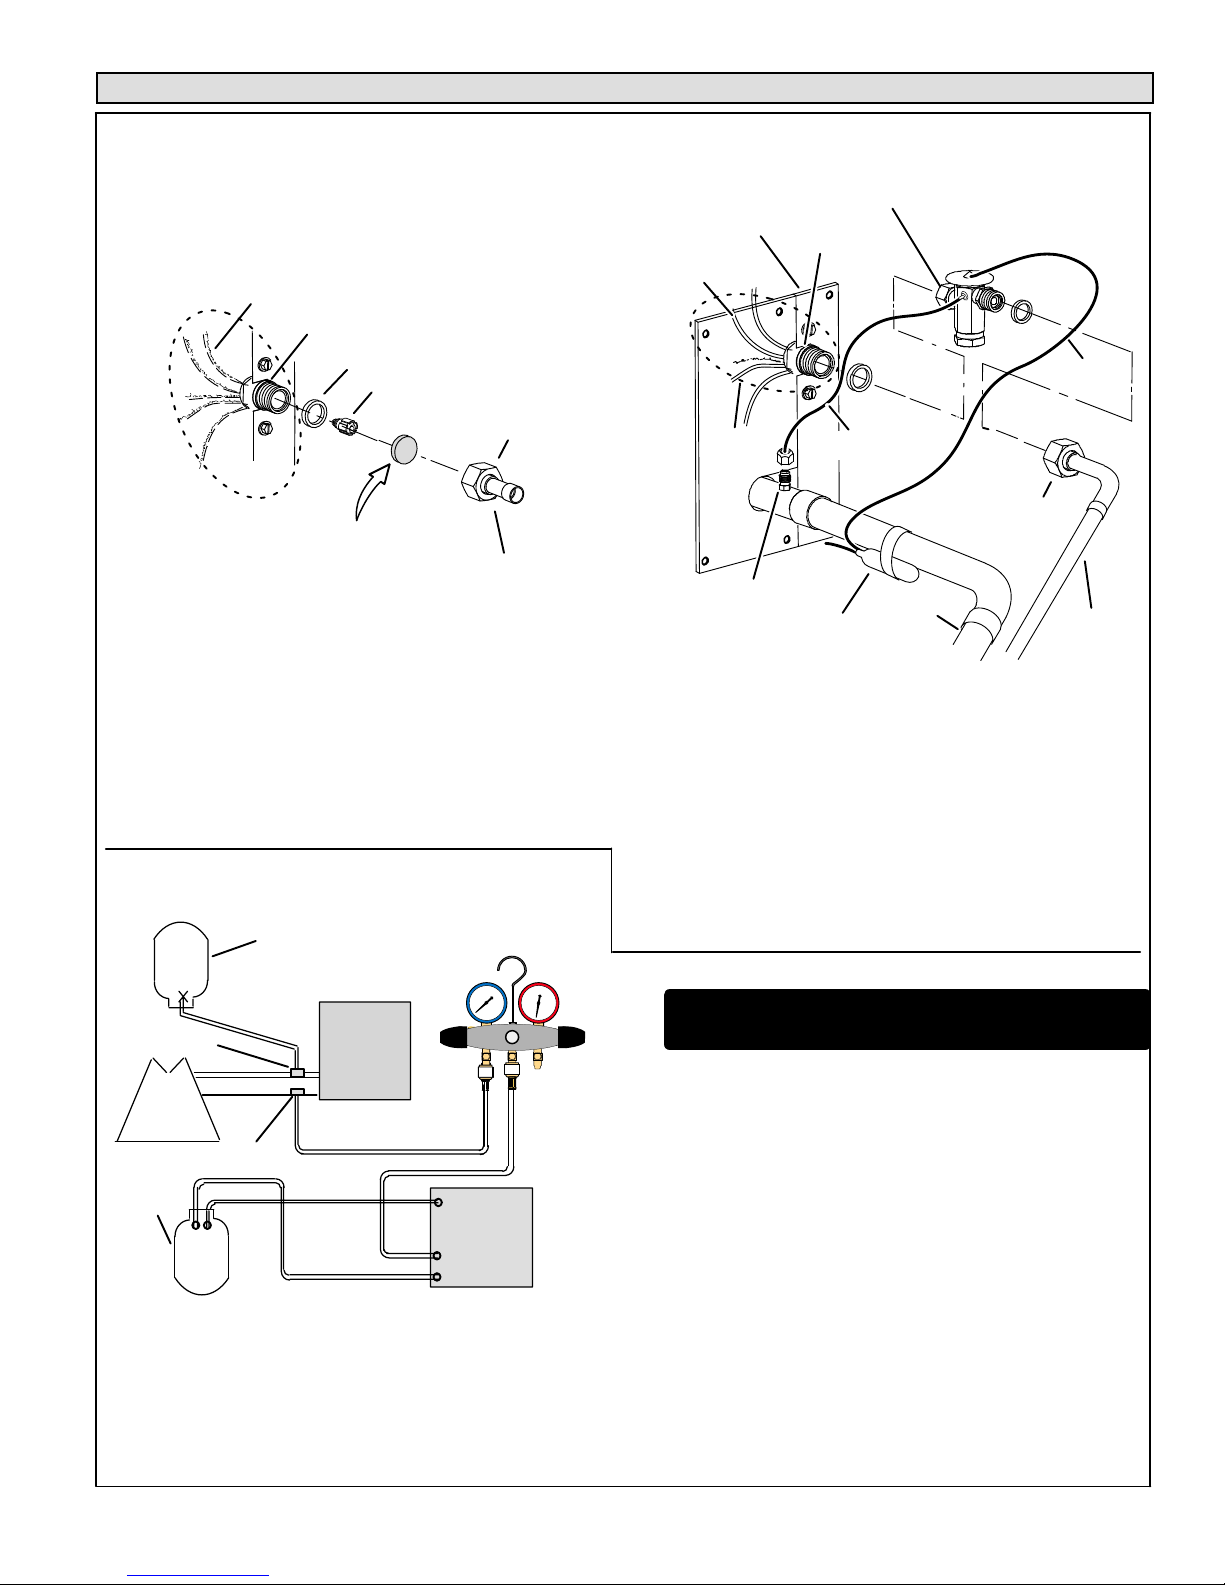
PIPING PANEL REMOVAL AND LINE SET
PREPARATION
1
Remove piping panel for easier access to service valves. Cut ends
of the refrigerant lines square (free from nicks or dents) and debur
the ends. The pipe must remain round. Do not crimp end of the line.
CUT AND DEBUR
LINE SET SIZE MATCHES
SERVICE VALVE CONNECTION
SERVICE VALVE
COPPER TUBE
REDUCER
STUB
CONNECTION
LINE SET SIZE IS SMALLER
THAN CONNECTION
CAP AND CORE REMOVAL
Remove service cap and core from both the suction and liquid line
2
service ports.
SERVICE PORT CAP
SERVICE PORT
CORE
LIQUID LINE SERVICE VALVE
REFRIGERANT LINE
DO NOT CRIMP SERVICE
VALVE CONNECTOR WHEN
PIPE IS SMALLER THAN
CONNECTION
ATTACH THE MANIFOLD GAUGE SET FOR BRAZING
LIQUID AND SUCTION LINE SERVICE VALVES
3
A. Connect gauge set low pressure side to liquid line
service valve (service port).
B. Connect gauge set center port to bottle of nitrogen
with regulator.
C. With valve core removed from the suction line service
port, nitrogen flow will have an exit point.
SUCTION SERVICE PORT MUST BE OPEN AND
SERVICE PORT CORE REMOVED TO ALLOW
EXIT POINT FOR NITROGEN FLOW
SUCTION LINE
INDOOR
UNIT
C
SUCTION LINE
SERVICE VALVE
SUCTION LINE SERVICE
VALV E
LOW
ATTACH
GAUGES
B
OUTDOOR
UNIT
HIGH
SERVICE PORT
CORE
SERVICE
PORT CAP
LIQUID LINE
LIQUID LINE SERVICE
VALV E
A
Figure 8. Brazing Procedures
17
NITROGEN
XC20
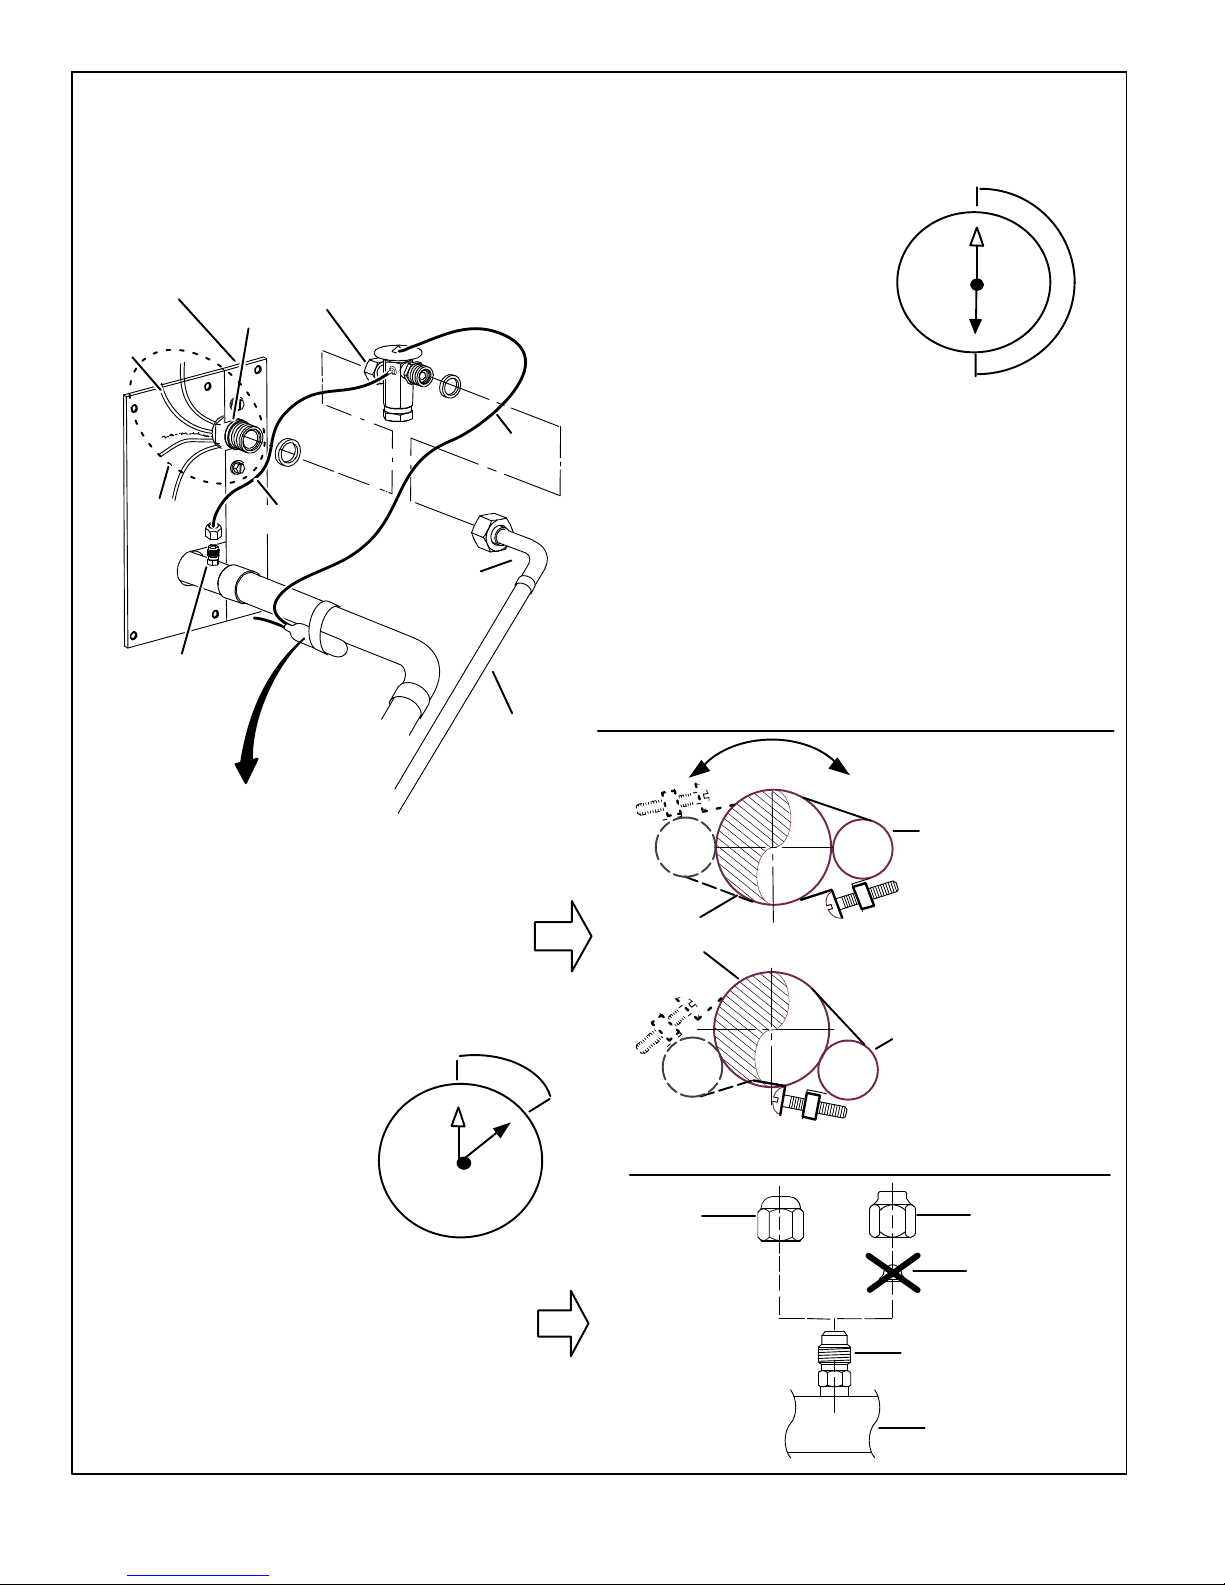
Page 18
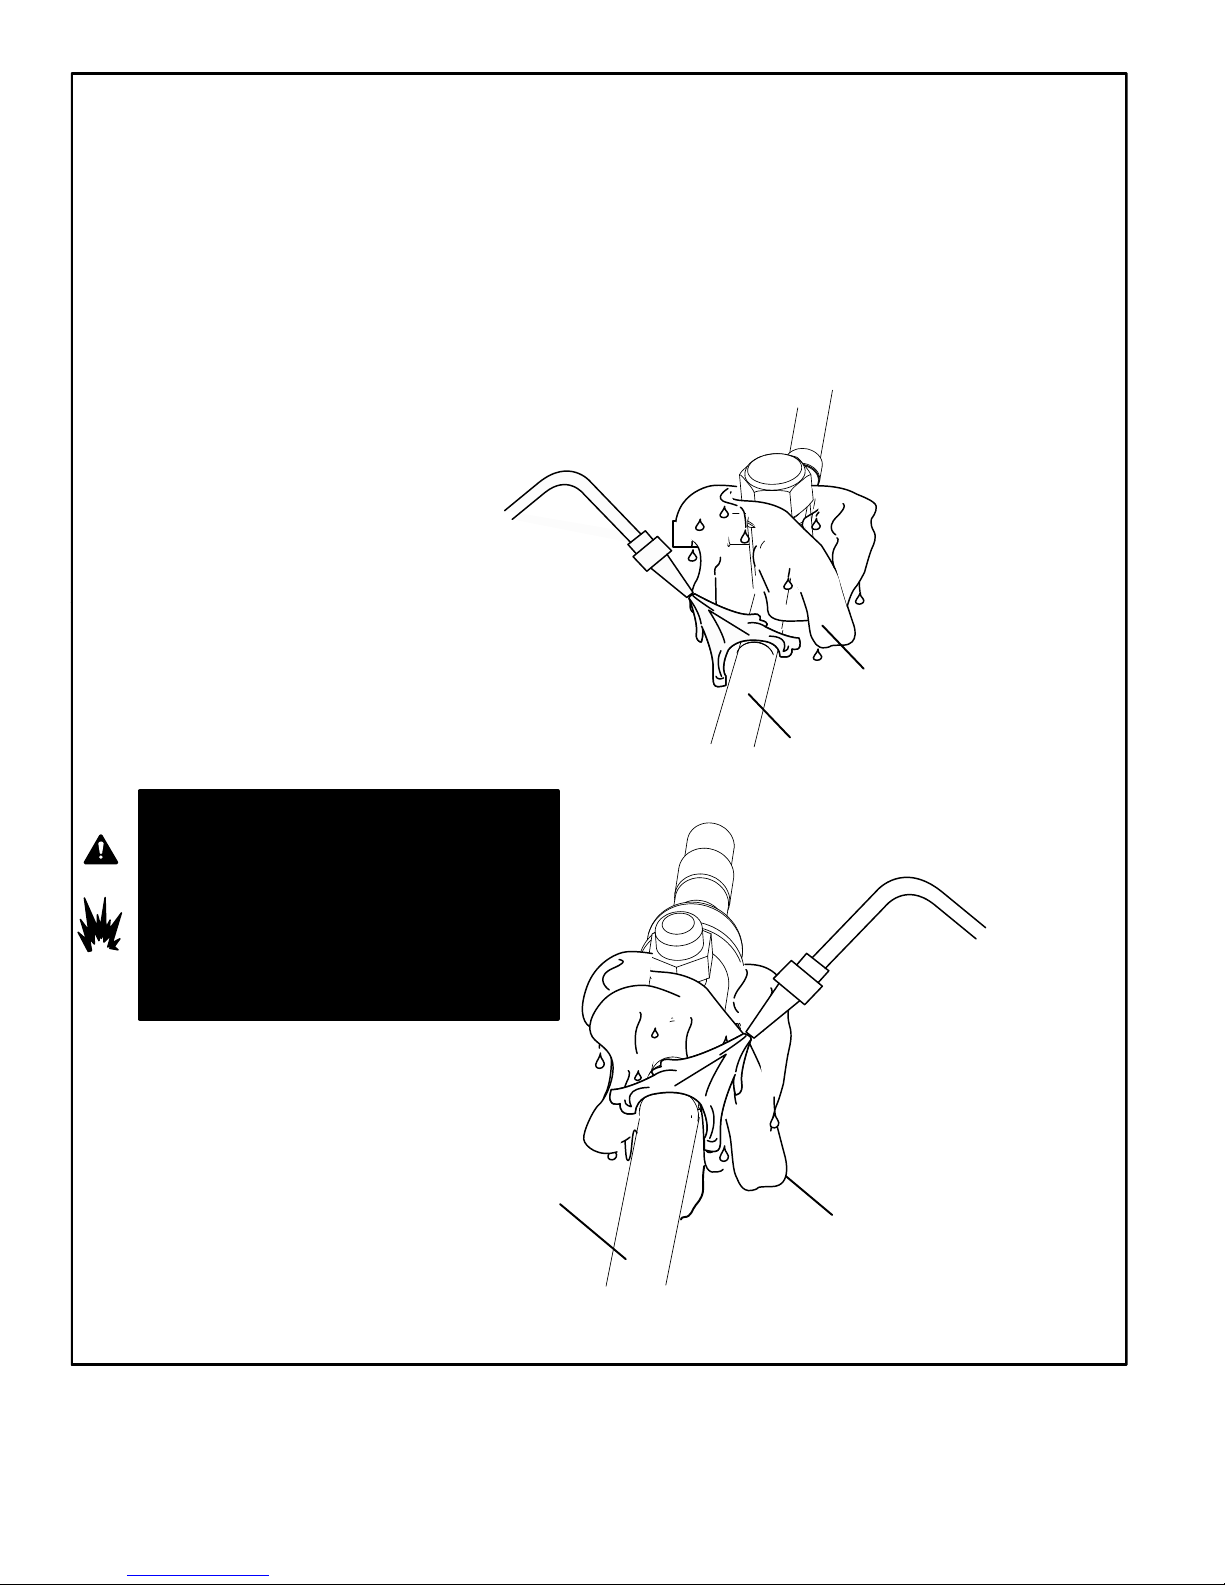
WRAP SERVICE VALVES
To help protect service valve seals during brazing, wrap water-saturated cloths around service valve bodies and copper tube stubs. Use
4
additional water-saturated cloths underneath the valve body to protect the base paint.
FLOW NITROGEN
Flow regulated nitrogen (at 1 to 2 psig) through the refrigeration gauge set into the valve stem port connection on the liquid service valve
5
and out of the suction / vapor valve stem port. See steps 3A, 3B and 3C on manifold gauge set connections.
BRAZE LINE SET
Wrap both service valves with water-saturated cloths as illustrated here and as mentioned in step 4, before brazing to line set. Cloths
6
must remain water-saturated throughout the brazing and cool-down process.
LIQUID LINE SERVICE VALVE
WHEN BRAZING LINE SET TO
SERVICE VALVES, POINT FLAME
AWAY FROM SERVICE VALVE.
IMPORTANT - Allow braze joint to cool. Apply additional
water-saturated cloths to help cool brazed joint. Do not
remove water-saturated cloths until piping has cooled.
Temperatures above 250ºF will damage valve seals.
LIQUID LINE
WATER-SATURATED
CLOTH
WARNING
FIRE, PERSONAL INJURY, OR PROPERTY DAMAGE
may result if you do not wrap a water-saturated cloth
around both liquid and suction line service valve bodies
and copper tube stub while brazing the line set! The braze,
when complete, must be quenched with water to absorb
any residual heat.
Do not open service valves until refrigerant lines and
indoor coil have been leak-tested and evacuated.
Refer to Installation and Service Procedures manual
found on DAVENET.
SUCTION LINE
PREPARATION FOR NEXT STEP
Disconnect manifold gauge set from service ports after all connections have been brazed. Apply additional water-saturated cloths to both
7
service valves to cool piping. Once piping is cool, remove all water-saturated cloths.
SUCTION LINE SERVICE
VALV E
SERVICE VALVES, POINT FLAME
WATER-SATURATED
CLOTH
WHEN BRAZING LINE SET TO
AWAY FROM SERVICE VALVE.
Figure 9. Brazing Procedures (Continued)
XC20
18
Page 19
Flushing the System
LINE SET AND INDOOR COIL (1 OF 2)
TYPICAL EXISTING EXPANSION VALVE
REMOVAL PROCEDURE (UNCASED COIL
1B
TWO PIECE PATCH PLATE
TYPICAL EXISTING FIXED ORIFICE
REMOVAL PROCEDURE (UNCASED COIL
1A
DISTRIBUTOR
ASSEMBLY
A. ON FULLY CASED COILS, REMOVE THE COIL ACCESS AND PLUMBING
PANELS.
B. REMOVE ANY SHIPPING CLAMPS HOLDING THE LIQUID LINE AND DIS
TRIBUTOR ASSEMBLY.
C. USING TWO WRENCHES, DISCONNECT LIQUID LINE FROM LIQUID LINE
ORIFICE HOUSING. TAKE CARE NOT TO TWIST OR DAMAGE DISTRIBU
TOR TUBES DURING THIS PROCESS.
D. REMOVE AND DISCARD FIXED ORIFICE, VALVE STEM ASSEMBLY (IF
PRESENT) AND TEFLON
E. USE A FIELD-PROVIDED FITTING TO TEMPORARILY RECONNECT THE
LIQUID LINE TO THE INDOOR UNIT'S LIQUID LINE ORIFICE HOUSING.
SHOWN)
DISTRIBUTOR TUBES
REMOVE AND DISCARD
WHITE TEFLON
LIQUID LINE ORIFICE HOUSING
TEFLON® RING
FIXED ORIFICE
BRASS NUT
®
(IF PRESENT)
®
WASHER AS ILLUSTRATED ABOVE.
SEAL
LIQUID LINE ASSEMBLY
(INCLUDES STRAINER)
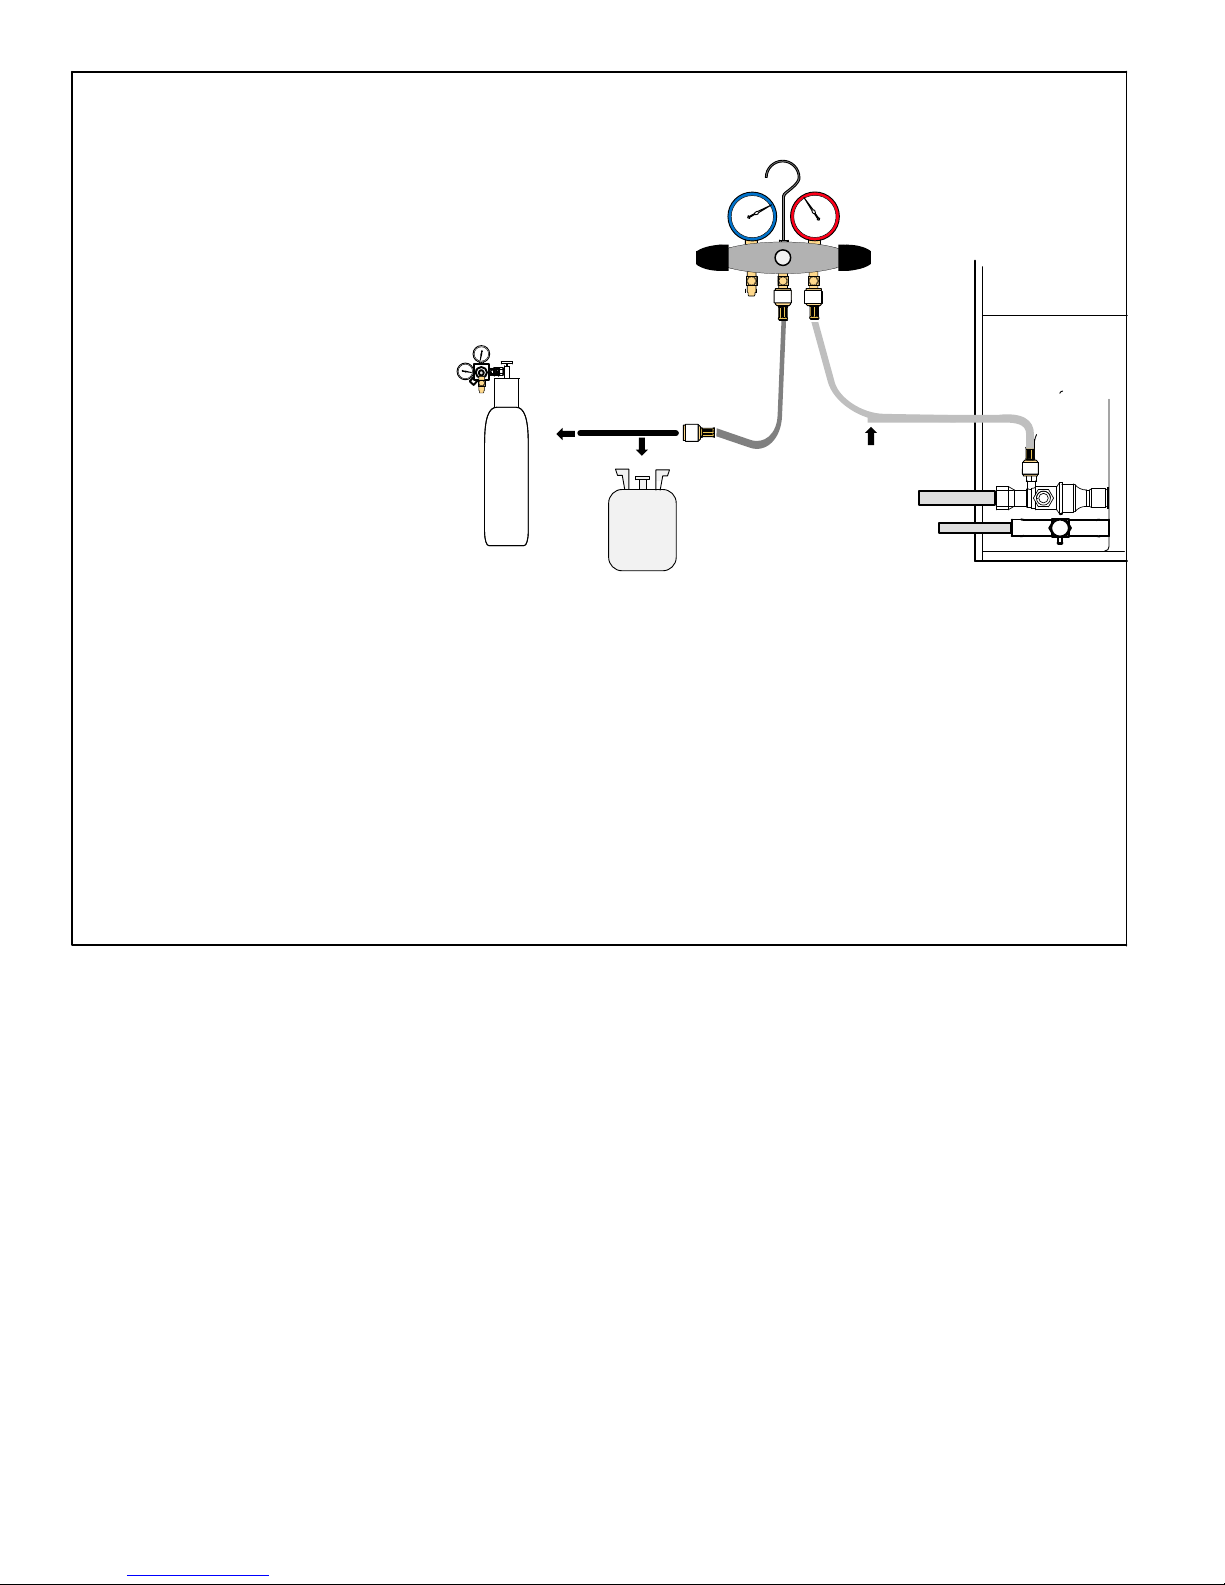
CONNECT GAUGES AND EQUIPMENT FOR
FLUSHING PROCEDURE
2
INV ERT ED HCFC-22
CYLINDER CONTAINS
CLE AN HCFC-22* TO BE
USED FOR FLUSHING.
A
1
VAPOR LINE
SERVICE VALVE
EXISTING
INDOOR
UNIT
LIQUID LINE SERVICE
RECOVERY
CYLINDER
VALV E
VAPOR
LIQUID
NEW
OUTDOOR
UNIT
B
OPENED
C
D
A. INVERTED HCFC-22 CYLINDER WITH CLEAN REFRIGERANT* TO THE
VAPOR SERVICE VALVE.
B. HCFC-22 GAUGE SET (LOW SIDE) TO THE LIQUID LINE VALVE.
C. HCFC-22 GAUGE SET CENTER PORT TO INLET ON THE RECOVERY
MACHINE WITH AN EMPTY RECOVERY TANK TO THE GAUGE SET.
D. CONNECT RECOVERY TANK TO RECOVERY MACHINE PER MACHINE
INSTRUCTIONS.
*IMPORTANT - Clean refrigerant is any refrigerant in a system that has not had compressor burn out. If the system
has experienced burn out, it is recommended that the existing line set and indoor coil be replaced.
RECOVERY MACHINE
MANIFOLD
LOW
TANK
RETURN
INLET
DISCHARGE
GAUGE
CLOSED
(UNCASED COIL ONLY)
OR
HIGH
SHOWN)
LIQUID LINE
DISTRIBUTOR
TUBES
DISTRIBUTOR
ASSEMBLY
MALE EQUALIZER
LINE FITTING
SENSING BULB
A. ON FULLY CASED COILS, REMOVE THE COIL ACCESS AND PLUMBING
PANELS.
B. REMOVE ANY SHIPPING CLAMPS HOLDING THE LIQUID LINE AND DIS
TRIBUTOR ASSEMBLY.
C. DISCONNECT THE EQUALIZER LINE FROM THE CHECK EXPANSION
VALVE EQUALIZER LINE FITTING ON THE VAPOR LINE.
D. REMOVE THE VAPOR LINE SENSING BULB.
E. DISCONNECT THE LIQUID LINE FROM THE CHECK EXPANSION VALVE
AT THE LIQUID LINE ASSEMBLY.
F. DISCONNECT THE CHECK EXPANSION VALVE FROM THE LIQUID LINE
ORIFICE HOUSING. DO NOT TO TWIST OR DAMAGE DISTRIBUTOR
TUBES DURING THIS PROCESS.
G. REMOVE AND DISCARD CHECK EXPANSION VALVE AND THE TWO TEF
H. USE A FIELD-PROVIDED FITTING TO TEMPORARILY RECONNECT THE
®
RINGS.
LON
LIQUID LINE TO THE INDOOR UNIT'S LIQUID LINE ORIFICE HOUSING.
ORIFICE
HOUSING
EQUALIZER
LINE
STUB END
TEFLON
RING
VAPOR
CHECK
EXPANSION
VALV E
®
LIQUID LINE
ASSEMBLY WITH
BRASS NUT
LINE
TEFLON
RING
FLUSHING LINE SET
3
CAUTION -This procedure should not be performed on systems
which contain contaminants (Example, compressor burn out).
THE LINE SET AND INDOOR UNIT COIL MUST BE FLUSHED WITH AT
LEAST THE SAME AMOUNT OF CLEAN REFRIGERANT* THAT PRE
VIOUSLY CHARGED THE SYSTEM. CHECK THE CHARGE IN THE
FLUSHING CYLINDER BEFORE PROCEEDING.
B
A. SET THE RECOVERY MACHINE FOR LIQUID RECOVERY AND
START THE RECOVERY MACHINE. OPEN THE GAUGE SET
VALVES TO ALLOW THE RECOVERY MACHINE TO PULL A VACU
UM ON THE EXISTING SYSTEM LINE SET AND INDOOR UNIT COIL.
B. INVERT THE CYLINDER OF CLEAN HCFC-22* AND OPEN ITS
VALVE TO ALLOW LIQUID REFRIGERANT TO FLOW INTO THE SYS
TEM THROUGH THE VAPOR LINE VALVE. ALLOW THE REFRIGER
ANT TO PASS FROM THE CYLINDER AND THROUGH THE LINE SET
AND THE INDOOR UNIT COIL BEFORE IT ENTERS THE RECOVERY
MACHINE.
C. AFTER ALL OF THE LIQUID REFRIGERANT HAS BEEN RECOV
ERED, SWITCH THE RECOVERY MACHINE TO VAPOR RECOVERY
SO THAT ALL OF THE HCFC-22 VAPOR IS RECOVERED. ALLOW
THE RECOVERY MACHINE TO PULL SYSTEM DOWN TO 0.
D. CLOSE THE VALVE ON THE INVERTED HCFC-22 DRUM AND THE
GAUGE SET VALVES. PUMP THE REMAINING REFRIGERANT OUT
OF THE RECOVERY MACHINE AND TURN OFF THE MACHINE.
®
SENSING
LINE
LIQUID
LINE
XC20
19
Page 20
FLUSHING LINE SET AND INDOOR COIL (2 OF 2)
TYPICAL NEW CHECK EXPANSION VALVE INSTALLATION PROCEDURE
THIS OUTDOOR UNIT IS DESIGNED FOR USE IN SYSTEMS THAT USE A CHECK EXPANSION VALVE METERING DEVICE. SEE LENNOX XC20
PRODUCT SPECIFICATIONS FOR APPROVED EXPANSION VALVE KIT MATCH-UPS AND APPLICATION INFORMATION.
4
THE EXPANSION VALVE UNIT CAN BE INSTALLED INTERNAL OR
EXTERNAL TO THE INDOOR COIL. IN APPLICATIONS WHERE AN
TWO PIECE
PATCH PLATE
(UNCASED
COIL ONLY)
DISTRIBUTOR
TUBES
DISTRIBUTOR
ASSEMBLY
MALE EQUALIZER LINE
FITTING (SEE
EQUALIZER LINE
INSTALLATION FOR
FURTHER DETAILS)
SENSING BULB INSULATION IS REQUIRED
IF MOUNTED EXTERNAL TO THE COIL
CASING. SEE SENSING BULB
INSTALLATION FOR BULB POSITIONING.
(Uncased Coil Shown)
LIQUID LINE
ORIFICE
HOUSING
STUB
END
TEFLON
RING
EQUALIZER
LINE
EXPANSION
VALV E
®
LIQUID LINE
ASSEMBLY WITH
BRASS NUT
VAPOR
LINE
UNCASED COIL IS BEING INSTALLED IN A FIELD-PROVIDED
PLENUM, INSTALL THE CHECK EXPANSION VALVE IN A MANNER
THAT WILL PROVIDE ACCESS FOR FIELD SERVICING OF THE
EXPANSION VALVE. REFER TO BELOW ILLUSTRATION FOR
REFERENCE DURING INSTALLATION OF EXPANSION VALVE
UNIT.
®
TEFLON
RING
A. REMOVE THE FIELD-PROVIDED FITTING THAT TEMPORARILY RECON
NECTED THE LIQUID LINE TO THE INDOOR UNIT'S DISTRIBUTOR AS
SENSING
LINE
LIQUID LINE
SEMBLY.
B. INSTALL ONE OF THE PROVIDED TEFLON
STUBBED END OF THE EXPANSION VALVE AND LIGHTLY LUBRICATE
THE CONNECTOR THREADS AND EXPOSE SURFACE OF THE TEFLON
RING WITH REFRIGERANT OIL.
C. ATTACH THE STUBBED END OF THE EXPANSION VALVE TO THE LIQUID
LINE ORIFICE HOUSING. FINGER TIGHTEN AND USE AN APPROPRIATELY
SIZED WRENCH TO TURN AN ADDITIONAL 1/2 TURN CLOCKWISE AS IL
LUSTRATED IN THE FIGURE ABOVE, OR 20 FT-LB.
D. PLACE THE REMAINING TEFLON
OF THE EXPANSION VALVE. LIGHTLY LUBRICATE CONNECTOR
THREADS AND EXPOSE SURFACE OF THE TEFLON
FRIGERANT OIL.
E. ATTACH THE LIQUID LINE ASSEMBLY TO THE EXPANSION VALVE. FIN
GER TIGHTEN AND USE AN APPROPRIATELY SIZED WRENCH TO TURN
AN ADDITIONAL 1/2 TURN CLOCKWISE AS ILLUSTRATED IN THE FIGURE
ABOVE OR 20 FT-LB.
9 O'CLOCK TO
3 O'CLOCK
BULB
12
®
BULB
9
WASHER AROUND THE OTHER END
12
11
10
8
7
6
®
RINGS AROUND THE
®
ON LINES SMALLER THAN
7/8”, MOUNT SENSING
BULB BETWEEN THE 9
AND 3 O'CLOCK
POSITIONS.
SENSING BULB INSTALLATION
VAPOR LINE
A. ATTACH THE VAPOR LINE SENSING BULB IN THE PROPER
ORIENTATION AS ILLUSTRATED TO THE RIGHT USING THE
CLAMP AND SCREWS PROVIDED.
NOTE - CONFIRM PROPER THERMAL CONTACT BETWEEN
VAPOR LINE AND CHECK EXPANSION BULB BEFORE INSU
LATING THE SENSING BULB ONCE INSTALLED.
B. CONNECT THE EQUALIZER LINE
FROM THE EXPANSION VALVE TO
THE EQUALIZER VAPOR PORT ON
THE VAPOR LINE. FINGER
TIGHTEN THE FLARE NUT PLUS
1/8 TURN (7 FT-LBS) AS ILLUS
TRATED BELOW.
9
10
11
12
1
8
7
5
6
1/8 TURN
2
3
4
VAPOR LINE
BULB
FLARE SEAL CAP
ON 7/8” AND LARGER LINES,
MOUNT SENSING BULB AT
EITHER THE 4 OR 8 O'CLOCK
POSITION. NEVER MOUNT
12
BULB
NOTE - NEVER MOUNT THE SENSING BULB ON
BOTTOM OF LINE.
THE SENSING BULB ON
BOTTOM OF LINE.
FLARE NUT
1/2 TURN
1
2
3
4
5
®
RING WITH RE
EQUALIZER LINE INSTALLATION
REMOVE AND DISCARD EITHER THE FLARE SEAL CAP OR FLARE
NUT WITH COPPER FLARE SEAL BONNET FROM THE EQUALIZER
LINE PORT ON THE VAPOR LINE AS ILLUSTRATED IN THE FIGURE
TO THE RIGHT.
XC20
20
OR
COPPER FLARE
SEAL BONNET
MALE BRASS EQUALIZER
LINE FITTING
VAPOR LINE
Page 21
IMPORTANT
Leak Testing the System
The Environmental Protection Agency (EPA) prohibits
the intentional venting of HFC refrigerants during
maintenance, service, repair and disposal of appliance.
Approved methods of recovery, recycling or reclaiming
must be followed.
IMPORTANT
If this unit is being matched with an approved line set
or indoor unit coil which was previously charged with
mineral oil, or if it is being matched with a coil which was
manufactured before January of 1999, the coil and line
set must be flushed prior to installation. Take care to
empty all existing traps. Polyol ester (POE) oils are
used in Lennox units charged with HFC-410A
refrigerant. Residual mineral oil can act as an insulator,
preventing proper heat transfer. It can also clog the
expansion device, and reduce the system
performance and capacity.
Failure to properly flush the system per the instructions
below will void the warranty.
IMPORTANT
Leak detector must be capable of sensing HFC
refrigerant.
WARNING
Refrigerant can be harmful if it is inhaled. Refrigerant
must be used and recovered responsibly.
Failure to follow this warning may result in personal injury
or death.
XC20
21
Page 22
LEAK TEST
LINE SET AND INDOOR COIL
NOTE - NORMALLY, THE HIGH PRESSURE HOSE IS CONNECTED TO THE LIQUID LINE
PORT. HOWEVER, CONNECTING IT TO THE VAPOR PORT BETTER PROTECTS THE
MANIFOLD GAUGE SET FROM HIGH PRESSURE DAMAGE.
LOW
HIGH
CONNECT GAUGE SET
A. CONNECT AN HFC-410A MANIFOLD GAUGE SET HIGH PRESSURE
1
2
HOSE TO THE VAPOR VALVE SERVICE PORT.
B. WITH BOTH MANIFOLD VALVES CLOSED, CONNECT THE CYLINDER
OF HFC-410A REFRIGERANT TO THE CENTER PORT OF THE
MANIFOLD GAUGE SET.
NOTE - LATER IN THE PROCEDURE,
THE HFC-410A CONTAINER WILL BE
REPLACED BY THE NITROGEN
CONTAINER.
NITROGEN
TEST FOR LEAKS
AFTER THE LINE SET HAS BEEN CONNECTED TO THE INDOOR AND OUTDOOR UNITS, CHECK THE LINE SET CON
NECTIONS AND INDOOR UNIT FOR LEAKS. USE THE FOLLOWING PROCEDURE TO TEST FOR LEAKS:
A. WITH BOTH MANIFOLD VALVES CLOSED, CONNECT THE CYLINDER OF HFC-410A REFRIGERANT TO THE CENTER PORT OF THE
MANIFOLD GAUGE SET. OPEN THE VALVE ON THE HFC-410A CYLINDER (VAPOR ONLY).
B. OPEN THE HIGH PRESSURE SIDE OF THE MANIFOLD TO ALLOW HFC-410A INTO THE LINE SET AND INDOOR UNIT. WEIGH IN A TRACE
AMOUNT OF HFC-410A [A TRACE AMOUNT IS A MAXIMUM OF TWO OUNCES (57 G) REFRIGERANT OR THREE POUNDS (31 KPA) PRES
SURE]. CLOSE THE VALVE ON THE HFC-410A CYLINDER AND THE VALVE ON THE HIGH PRESSURE SIDE OF THE MANIFOLD GAUGE
SET. DISCONNECT THE HFC-410A CYLINDER.
C. CONNECT A CYLINDER OF DRY NITROGEN WITH A PRESSURE REGULATING VALVE TO THE CENTER PORT OF THE MANIFOLD
GAUGE SET.
D. ADJUST DRY NITROGEN PRESSURE TO 150 PSIG (1034 KPA). OPEN THE VALVE ON THE HIGH SIDE OF THE MANIFOLD GAUGE SET IN
ORDER TO PRESSURIZE THE LINE SET AND THE INDOOR UNIT.
E. AFTER A FEW MINUTES, OPEN ONE OF THE SERVICE VALVE PORTS AND VERIFY THAT THE REFRIGERANT ADDED TO THE SYSTEM
EARLIER IS MEASURABLE WITH A LEAK DETECTOR.
F. AFTER LEAK TESTING, DISCONNECT GAUGES FROM SERVICE PORTS.
HFC-410A
B
MANIFOLD GAUGE SET
TO VAPOR
SERVICE VALVE
OUTDOOR UNIT
A
XC20
Figure 10. System Leak Test
22
Page 23

Evacuating the System
LINE SET AND INDOOR COIL
CONNECT GAUGE SET
1
NOTE - REMOVE CORES FROM SERVICE VALVES (IF
NOT ALREADY DONE).
A. CONNECT LOW SIDE OF MANIFOLD
GAUGE SET WITH 1/4 SAE IN-LINE TEE TO
VAPOR LINE SERVICE VALVE.
B. CONNECT HIGH SIDE OF MANIFOLD
GAUGE SET TO LIQUID LINE SERVICE
VALVE.
C. CONNECT MICRON GAUGE TO AN
AVAILABLE CONNECTOR ON THE 1/4 SAE
IN-LINE TEE.
D. CONNECT THE VACUUM PUMP (WITH
VACUUM GAUGE) TO THE CENTER PORT
OF THE MANIFOLD GAUGE SET. THE
CENTER PORT LINE IS USED LATER FOR
BOTH THE AND NITROGEN
CONTAINERS.
OUTDOOR
UNIT
A
A34000 1/4 SAE TEE WITH
SWIVEL COUPLER
500
C
MICRON
GAUGE
LOW
TO VAPOR
SERVICE VALVE
MANIFOLD
GAUGE SET
HIGH
HFC-410A
VACUUM PUMP
B
TO LIQUID LINE
SERVICE VALVE
D
NITROGEN
EVACUATE THE SYSTEM
A. OPEN BOTH MANIFOLD VALVES AND START THE VACUUM PUMP.
2
B. EVACUATE THE LINE SET AND INDOOR UNIT TO AN ABSOLUTE PRESSURE OF 23,000 MICRONS (29.01 INCHES OF MERCURY).
NOTE - DURING THE EARLY STAGES OF EVACUATION, IT IS DESIRABLE TO CLOSE THE MANIFOLD GAUGE VALVE AT LEAST ONCE. A
RAPID RISE IN PRESSURE INDICATES A RELATIVELY LARGE LEAK. IF THIS OCCURS, REPEAT THE LEAK TESTING PROCEDURE.
NOTE - THE TERM ABSOLUTE PRESSURE REFERS TO THE TOTAL ACTUAL PRESSURE (ABOVE ABSOLUTE ZERO) WITHIN A GIVEN
VOLUME OR SYSTEM. ABSOLUTE PRESSURE IN A VACUUM IS EQUAL TO ATMOSPHERIC PRESSURE MINUS VACUUM PRESSURE.
C. WHEN THE ABSOLUTE PRESSURE REACHES 23,000 MICRONS (29.01 INCHES OF MERCURY), CLOSE THE MANIFOLD GAUGE VALVES, TURN
OFF THE VACUUM PUMP AND DISCONNECT THE MANIFOLD GAUGE CENTER PORT HOSE FROM VACUUM PUMP. ATTACH THE MANIFOLD
CENTER PORT HOSE TO A DRY NITROGEN CYLINDER WITH PRESSURE REGULATOR SET TO 150 PSIG (1034 KPA) AND PURGE THE HOSE.
OPEN THE MANIFOLD GAUGE VALVES TO BREAK THE VACUUM IN THE LINE SET AND INDOOR UNIT. CLOSE THE MANIFOLD GAUGE VALVES.
D. SHUT OFF THE DRY NITROGEN CYLINDER AND REMOVE THE MANIFOLD GAUGE HOSE FROM THE CYLINDER. OPEN THE MANIFOLD
GAUGE VALVES TO RELEASE THE DRY NITROGEN FROM THE LINE SET AND INDOOR UNIT.
E. RECONNECT THE MANIFOLD GAUGE TO THE VACUUM PUMP, TURN THE PUMP ON, AND CONTINUE TO EVACUATE THE LINE SET AND IN
DOOR UNIT UNTIL THE ABSOLUTE PRESSURE DOES NOT RISE ABOVE 500 MICRONS (29.9 INCHES OF MERCURY) WITHIN A 20-MINUTE
PERIOD AFTER SHUTTING OFF THE VACUUM PUMP AND CLOSING THE MANIFOLD GAUGE VALVES.
F. WHEN THE ABSOLUTE PRESSURE REQUIREMENT ABOVE HAS BEEN MET, DISCONNECT THE MANIFOLD HOSE FROM THE VACUUM PUMP
AND CONNECT IT TO AN UPRIGHT CYLINDER OF HFC-410A REFRIGERANT. OPEN THE MANIFOLD GAUGE VALVE 1 TO 2 PSIG IN ORDER TO
RELEASE THE VACUUM IN THE LINE SET AND INDOOR UNIT.
G. PERFORM THE FOLLOWING:
1. Close manifold gauge valves.
2
. Shut off HFC-410A cylinder.
. Reinstall service valve cores by removing manifold hose from service valve. Quickly install cores with core
3
tool while maintaining a positive system pressure.
. Replace the stem caps and secure finger tight, then tighten an additional one-sixth (1/6) of a turn as illus
4
trated.
RECOMMEND
MINIMUM 3/8” HOSE
11
10
9
8
7
12
6
1/6 TURN
1
2
3
4
5
Figure 11. Evacuating System
XC20
23
Page 24

IMPORTANT
Load Shedding
Use a thermocouple or thermistor electronic vacuum
gauge that is calibrated in microns. Use an instrument
capable of accurately measuring down to 50 microns.
WARNING
Danger of Equipment Damage. Avoid deep vacuum
operation. Do not use compressors to evacuate a
system. Extremely low vacuums can cause internal
arcing and compressor failure. Damage caused by
deep vacuum operation will void warranty.
Evacuating the system of non-condensables is critical for
proper operation of the unit. Non-condensables are
defined as any gas that will not condense under temperat
ures and pressures present during operation of an air
conditioning system. Non-condensables combine with re
frigerant to produce substances that corrode copper piping
and compressor parts.
Electrical
In the U.S.A., wiring must conform with current local codes
and the current National Electric Code (NEC). In Canada,
wiring must conform with current local codes and the current
Canadian Electrical Code (CEC).
Refer to the furnace or air handler installation instructions
for additional wiring application diagrams. Refer to unit
nameplate for minimum circuit ampacity and maximum
over-current protection size.
24VAC TRANSFORMER
Use the transformer provided with the furnace or air hand
ler for low‐voltage control power (24VAC - 40 VA
minimum).
Utility Load Shedding Mode ACTIVATED
(Utility Cycled Unit OFF) – The normally closed set of
contacts in the utility load shedding control receiver OPEN.
This removes 24VAC from the coil of the field-provided re
lay (catalog # 69J79). The relay contacts close (terminal 7
to terminal 2), completing the circuit between terminals R
and L on the outdoor control. The 24VAC input to terminal L
activates the load-shedding mode in the outdoor control,
cycling the outdoor unit OFF. The 7-Segment display on
the outdoor control displays a load shedding alert code
(E600) and an alert appears on the display of the iComfort
®
thermostat. The customer receives email notifica
Wi-Fi
tions when the alert occurs, if the option to receive
notifications is selected.
Utility Load-Shedding Mode DEACTIVATED
(Normal Equipment Operation) – When load shedding
mode is not required, the contacts in the utility load control
receiver are closed. This provides 24VAC to the coil of the
field-provided relay (catalog # 69J79).The relay contacts
OPEN (terminal 7 to terminal 2) removing 24VAC from the
L terminal on the outdoor control. This deactivates the
load-shedding mode in the outdoor control. The outdoor
unit returns to normal operation and alert code clears once
load-shedding mode is deactivated.
For more information, see the Load-Shedding Feature Wir
ing Diagram on page 47.
SIZE CIRCUIT AND INSTALL DISCONNECT
SWITCH
1
REFER TO THE UNIT NAMEPLATE FOR MINIMUM CIRCUIT AMPACITY,
AND MAXIMUM FUSE OR CIRCUIT BREAKER (HACR PER NEC).
INSTALL POWER WIRING AND PROPERLY SIZED DISCONNECT
SWITCH.
MAIN FUSE BOX/
BREAKER PANEL
DISCONNECT
SWITCH
NOTE - UNITS ARE APPROVED FOR USE ONLY WITH COPPER
CONDUCTORS. GROUND UNIT AT DISCONNECT SWITCH OR TO AN
EARTH GROUND.
Figure 12. Electrical Installation
INSTALL THERMOSTAT
INSTALL ROOM THERMOSTAT (ORDERED SEPARATELY) ON AN
INSIDE WALL, APPROXIMATELY IN THE CENTER OF THE
2
CONDITIONED AREA AND 5 FEET (1.5M) FROM THE FLOOR. IT
SHOULD NOT BE INSTALLED ON AN OUTSIDE WALL OR WHERE IT
CAN BE AFFECTED BY SUNLIGHT OR DRAFTS.
THERMOSTAT
5 FEET
(1.5M)
NOTE - 24VAC, CLASS II CIRCUIT CONNECTIONS ARE MADE IN THE CON
TROL BOX.
XC20
24
Page 25

ROUTE CONTROL WIRES
Maximum length of wiring (18 gauge) for all connections on the RSBus is 1500 feet (457 meters). Wires should be color-coded, with
3
a temperature rating of 95
field-provided field-installed grommet installed in electrical inlet.
The iComfort Wi-Fi
iComfort® control and four wires between the outdoor unit and the furnace/air handler iComfort® control. When a thermostat cable
with more than four wires is used, the extra wires must be properly connected to avoid electrical noise (see below).
Use a wire nut to bundle the four unused wires at each end of the cable. Each bundle should also include an additional wire that should
be connected on each end to the C terminal as shown in the figure below.
º
F (35ºC) minimum, and solid-core (Class II Rated Wiring). All low voltage wiring must enter unit through
®
or iComf ort® S30 thermostats require four thermostat wires between the thermostat and the furnace / air handler
OUTDOOR UNIT
PROVIDED RAST
6-PIN CONNECTOR
CONNECTS TO
RAST 6-PIN
CONNECTOR
ROUTE CONTROL
WIRING THROUGH
GROMMET AND
SECURE WITH
CABLE TIE
Single Wire To
C Terminal
Unused Wires
GROMMET AND
CABLE TIE.
INDOOR CONTROL
Indoor Control
CONNECT CONDUIT
TO CUTOUT AND
ROUTE HIGH
VOLTAGE WIRING
USE WATERTIGHT
CONDUIT FOR HIGH
VOLTAGE
Single Wire To C Terminal
Unused Wires
ROUTE HIGH VOLTAGE AND GROUND WIRES
Any excess high voltage field wiring should be trimmed and secured away from any low voltage field wiring. To facilitate a conduit, a
4
cutout is located on the bottom of the control box. Connect conduit to the control box using a proper conduit fitting.
Figure 13. Electrical Installation (Continued)
XC20
25
Page 26

CAUTION
Electrostatic discharge can affect electronic components. Take precautions
ELECTROSTATIC DISCHARGE
(ESD)
Precautions and Procedures
STEP 3 -- ELECTRICAL (Continued) -- Outdoor Control Unit
during unit installation and service to protect the unit's electronic controls.
Precautions will help to avoid control exposure to electrostatic discharge by
putting the unit, the control and the technician at the same electrostatic potential.
Neutralize electrostatic charge by touching hand and all tools on an unpainted
unit surface before performing any service procedure.
NOTE - The green LED located on the outdoor control flashes
when communication occurs between the outdoor control and
either the thermostat or the inverter.
XC20
WHEN THE UNIT IS IN PUMP-DOWN MODE, IS SHOWN ON
TO ACTIVATE PUMP-DOWN MODE, REFER TO PUMP-DOWN
Figure 14. Outdoor Unit Control
26
7-SEGMENT
PUSH
BUTTON
THE 7-SEGMENT DISPLAY.
CYCLE SEQUENCE ON PAGE 39.
DISPLAY
Page 27

TABLE 5
Outdoor Control Terminal Designations and Input /Outputs (see figure 14 for terminal locations)
Designator Description Input Output Common
O
O OUT
LO PS Low pressure switch N/A 5ma @18VAC N/A
LO PS Low pressure switch sensing connection 5ma @18VAC N/A N/A
Hi PS High pressure switch N/A 24VAC nominal N/A
Hi PS High pressure switch sensing connection 24VAC nominal N/A N/A
TP
TP Top cap thermostat switch sensing connection 24VAC nominal N/A N/A
Cntctr
Cntctr Contactor common N/A 24VAC common
Fan PWM PWM fan output N/A
COM PWM fan common connection N/A N/A
Fan Park
Unused on XC20, for heat pump applications
only.
Unused on XC20, for heat pump applications
only.
Top cap thermostat switch (in series with the HI
PS)
Control (inverter power) contactor switched out
put (in series with the HI PS and TC)
PWM fan parking spot for unused terminal, not
connected.
N/A
N/A N/A 24VAC common
N/A 24VAC nominal N/A
N/A
N/A N/A N/A
Switched 24VAC
nominal
Switched 24VAC
Nominal
1097% duty cycle,
1923 VDC peak
N/A
N/A
N/A
Fan PWM com
mon
P2 Terminal Designations
O
Y1 Y1 emergency input
C 24VAC nominal power return. N/A N/A 24VAC common
i Low data line. Data Data N/A
i+ High data line. Data Data N/A
R 24VAC nominal power input.
DF OEM test N/A N/A N/A
TOUT
TST
Unused on XC20, for heat pump applications
only.
26Vdc transistor output to Lennox factory OEM
tester
OEM test pin.
In each terminal box:
P2 Terminal 1 TEST
P2 Terminal 2 TOUT
P2 Terminal 3 DF
P2 Terminal 4 R
24VAC nominal from ther
mostat and loaded to draw
17ma at 30VAC
24VAC nominal from ther
mostat and loaded to draw
17ma at 30VAC
24VAC nominal board main
power input.
N/A N/A N/A
24VAC nominal 17ma @
30VAC
N/A N/A
N/A N/A
N/A N/A
N/A N/A
XC20
27
Page 28

Table 5 continued.
Outdoor Control Terminal Designations and Input /Outputs
WARNING - Electric Shock Hazard. Can cause injury or death. Unit must be grounded in accordance with national and
local codes. The 4 pins in P6 have the potential of transferring up to 250 volts to the unit cabinet ground.
Designator Description Input Output Common
Outdoor control
communication
transmit pin.
Inverter common.
P6 - Pin 1 Tx
P6 - Pin 2
Inverter
Common
Transmit data to inverter, connects to
Rx of inverter.
Inverter common
NOTE - This is a signal reference point
and not an earth ground.
Outdoor control
communication
receive pin.
P6 - Pin 3 Rx
Receive data from the inverter.
Connects to Tx of inverter.
P6 - Pin 4 Inv 5V Inverter 5VDC volts. Inverter 5VDC volts
LIQ
Liquid line temperature sensor sup
ply.
N/A N/A N/A
• Pin 1 to pin 2 should read 4.5 to 5.5
VDC when not communicating.
• Pin 3 to pin 2 should read 4.5 to 5.5
VDC when not communicating.
• Pin 4 to pin 2 should read 4.5 to 5.5
VDC.
NOTE - Communication signals switch off
and on rapidly. This may cause volt meter
readings to fluctuate. This is normal.
Communication signals will switch
between this 5V and common (Pin 2).
LIQ Liquid line temperature sensor return. N/A N/A N/A
AMB
AMB
COIL
COIL
Pump Down
Outdoor ambient temperature sensor
supply.
Outdoor ambient temperature sensor
return.
Outdoor coil temperature sensor sup
ply.
Outdoor coil temperature sensor re
turn.
To initiate pump-down function, place jumper in
the ON position. (See PUMP-DOWN MODE
OPERATION on page 37.)
1. Place the jumper in the ON position to
activate pump-down mode.
2. Place the jumper in the OFF position to
deactivate pump-down mode.
NOTE -If the pump-down jumper is in the ON
position during power-up, it is ignored.
NOTE - The outdoor control stays in pump-down
mode for five minutes, after which the outdoor
control initiates a compressor shutdown
sequence.
N/A N/A N/A
N/A N/A N/A
N/A N/A N/A
N/A N/A N/A
PUMP
DOWN
ON
OFF
PUMP
DOWN
ON
OFF
24VAC input to L en
L Load-shedding input
ergizes load shed
N/A N/A
ding feature.
Load-shedding input reference. Refer
C
to wiring of load-shedding terminals
N/A N/A
located on page 47.
24VAC
common
XC20
28
Page 29

Servicing Units Delivered Void of Charge
If the outdoor unit is void of refrigerant, clean the system us
ing the procedure described below.
1. Leak test the system using the procedure outlined on
page 22.
2. Evacuate the system using procedure outlined on
page 23.
3. Use nitrogen to break the vacuum and install a new fil
ter drier in the system.
4. Evacuate the system again using procedure outlined
on page 23.
5. Weigh in refrigerant using procedure outlined in figure
56.
6. Monitor the system to determine the amount of mois
ture remaining in the oil. It may be necessary to replace
the filter drier several times to achieve the required dry
ness level. If system dryness is not verified, the
compressor will fail in the future.
Unit Start-Up
IMPORTANT
1. Rotate fan to check for binding.
2. Inspect all factory- and field-installed wiring for loose
connections.
3. After evacuation is complete, open both the liquid and
vapor line service valves to release the refrigerant
charge contained in outdoor unit into the system.
4. Replace the stem caps and tighten to the value listed
in table 1.
5. Check voltage supply at the disconnect switch. The
voltage must be within the range listed on the unit's
nameplate. If not, do not start the equipment until you
have consulted with the power company and the
voltage condition has been corrected.
6. Set the thermostat for a cooling demand. Turn on
power to the indoor unit and close the outdoor unit dis
connect switch to start the unit.
7. Recheck voltage while the unit is running. Power must
be within range shown on the nameplate.
If unit is equipped with a crankcase heater, it should be
energized 24 hours before unit start-up to prevent
compressor damage as a result of slugging.
8. Check system for sufficient refrigerant by using the
procedures listed in the System Refrigerant section on
page 75.
XC20
29
Page 30

III. SYSTEM OPERATION AND SERVICE
7-Segment Alert and System Status Codes
Alert codes are displayed using the 7-segment display loc
ated on the outdoor control.
NOTE - System fault and lockout codes take precedence
over system status codes (cooling, heating operating per
centages or defrost/dehumidification).
The 7-segment will display an abnormal condition (error
code) when detected in the system. A list of the codes are
shown in table 6.
RESETTING ALERT CODES
Alert codes can be reset manually or automatically:
1. Manual Reset
Manual reset can be achieved by one of the following
methods:
Table 6. Outdoor Control 7-Segment Display Alert Codes and Inverter LED Flash Codes
NOTE - System fault and lockout codes take precedence over system status codes (cooling, heating operating percentages or defrost/dehumidification).
Only the latest active fault or lockout codes are displayed (if present). If no fault or lockout codes are active, then system status codes are displayed. Alert
codes are also displayed on the iComfort Wi-Fi
Inverter LED Flash
Alert
Codes
N/A N/A ON OFF N/A XC/XP 20-024 and -036 only: Indicates inverter is operating normally.
N/A N/A ON ON N/A XC/XP 20-048 and -060 only: Indicates inverter is operating normally.
N/A N/A OFF OFF N/A Indicates inverter is NOT energized.
E 105 N/A N/A N/A Moderate
E 120 N/A N/A N/A Moderate
E 124 N/A N/A N/A Critical
E 125 N/A N/A N/A Critical
E 131 N/A N/A N/A Critical
E 132 N/A N/A N/A Critical Internal software error. Replace outdoor control.
E 180 N/A N/A N/A Critical
Inverter
Code
Code (number of
flashes)
Red LED Green LED
XC20
®
or iComfort
Priority Alarm Description Possible Causes and Clearing Alarm
®
S30 thermostat.
The outdoor control has
lost communication with
either the thermostat or in
door unit.
There is a delay in the out
door unit responding to the
system.
The iComfort WiFi® or
iComfort
has lost communication
with the outdoor unit for
more than 3 minutes.
There is a hardware prob
lem with the outdoor con
trol.
The outdoor unit control
parameters are corrupted.
The outdoor unit ambient
temperature sensor has
malfunctioned. As a result
the outdoor unit control will
not perform low ambient
cooling.
®
S30 thermostat
• Disconnecting R wire from the outdoor control R
terminal.
• Turning the indoor unit off and back on again
After power up, all currently displayed codes are
cleared.
2. Automatic Reset
After an alert is detected, the outdoor control continues
to monitor the unit's system and compressor opera
tions. When/if conditions return to normal, the alert
code is turned off automatically.
NOTE - Error codes can be recalled by following in
formation shown in the table on page 37.
Equipment is unable to communicate. Indicates nu
merous message errors. In most cases errors are re
lated to electrical noise. Make sure high voltage power
is separated from RSBus. Check for miswired and/or
loose connections between the stat, indoor unit and
outdoor unit. Check for a high voltage source of noise
close to the system. Fault clears after communication
is restored.
Typically, this alarm/code does not cause any issues
and clears on its own. The alarm/code is usually
caused by a delay in the outdoor unit responding to the
thermostat. Check all wiring connections. Cleared
after unresponsive device responds to any inquiry.
Equipment lost communication with the thermostat.
Check the wiring connections and resistance, then
cycle the system power. This alarm stops all associ
ated HVAC operations and waits for a signal from the
non-communicating unit. The alarm / fault clears after
communication is reestablished.
There is a control hardware problem. Replace the out
door control if the problem prevents operation and is
persistent. The alarm / fault is cleared 300 seconds after
the fault recovers.
Reconfigure the system. Replace the control if heating or
cooling is not available.
Valid temperature reading is lost during normal opera
tion and after outdoor control recognized sensors.
Compare outdoor sensor resistance to temperature/
resistance charts in unit installation instructions. Re
place sensor pack if necessary. At the beginning of
(any) configuration, furnace or airhandler control de
tects the presence of the sensor(s). If detected (reading
in range), appropriate feature is shown in the iComfort
®
WiFi
or iComfort® S30 thermostat About screen. The
alarm / fault clears upon configuration, or when normal
values are sensed.
30
Page 31

Table 6. Outdoor Control 7-Segment Display Alert Codes and Inverter LED Flash Codes
NOTE - System fault and lockout codes take precedence over system status codes (cooling, heating operating percentages or defrost/dehumidification).
Only the latest active fault or lockout codes are displayed (if present). If no fault or lockout codes are active, then system status codes are displayed. Alert
codes are also displayed on the iComfort Wi-Fi
Inverter LED Flash
Alert
Codes
Inverter
Code
Code (number of
flashes)
Red LED Green LED
E 345 N/A N/A N/A Critical
E 409 N/A N/A N/A Moderate
E 410 N/A N/A N/A Moderate
E 411 N/A N/A N/A Critical
E 412 N/A N/A N/A Moderate
E 413 N/A N/A N/A Critical
E 416 N/A N/A N/A
®
thermostat.
Priority Alarm Description Possible Causes and Clearing Alarm
Issue: Broken R50 will make the control board think re
versing valve output is always off regardless of state of re
lay. (Supplier issue - We have found our functional test fix
Heat Pump or Air Conditioner
Alert Code - The "O" relay on
the outdoor board has failed.
Either the pilot relay contacts
did not close, the relay coil
did not energize or the circuit
that confirms this operational
sequence is not sensing
properly.
ture can bend over MOV2 and crush it into R50.There are
cut-outs in the plate of the fixture to let the two relays pass
through as the plate with pogo pins is moved to the board
to make contact with the terminals. There is a pocket
milled out in the plate to let MOV2 pass, but if MOV2 is not
straight up, it could catch the plate outside the pocket and
be bent down to the board. Lennox is enlarging the cutouts in the plate so MOV2 will clear the fixture. Corrective
action completed on August 29,2013.
Corrective Actions: Short term fix: Converted the sys
tem back to a 24 volt system to get unit operating. Long
term: Replace outdoor control.
Secondary voltage is below 18VAC. After 10 minutes, op
Outdoor control secondary
voltage is 18VAC or less.
eration is discontinued. Check the indoor line voltage and
transformer output voltage. The alarm clears after the
voltage is higher than 20VAC for 2 seconds or after a
power reset.
Unit pressure is below the lower limit. The system is shut
down. The low pressure switch closes above 90PSIG and
The outdoor unit cycled off
due to low pressure switch
opening.
opens below 40PSIG. Confirm that the system is properly
charged with refrigerant. Check TXV, indoor unit blower
motor, dirty filters or clogged refrigerant filter. Confirm that
the evaporator coil is clean. The alarm clears after the
pressure switch opens or after a power reset.
Low pressure switch error count reached 5 strikes. The
The low pressure switch has
opened 5 times within one
hour. As a result, the outdoor
unit is locked out
.
low pressure switch opens at 40PSIG and resets at
90PSIG. Confirm that the system is properly charged with
refrigerant. Check for clogged TXV, blockage to indoor
unit blower motor, dirty filters or clogged refrigerant filter.
Confirm that the evaporator coil is clean. The alarm clears
after a power reset.
Unit pressure is above the upper limit. System is shut
down. The high pressure switch opens at 590PSIG and
closes at 418PSIG. Confirm that the system is properly
The outdoor unit high pres
sure switch has opened.
charged with refrigerant. Check for clogged TXV, block
age to indoor unit blower motor, clogged refrigerant filter.
Confirm that the outdoor unit is clean. The alarm clears
after the pressure switch closes or a power reset.
For heating, indoor CFM may be set too low. For zoning
system, zone CFM may be set too low.
Open high pressure switch error count reached 5 strikes.
System is shut down. The high pressure switch for
HFC410A opens at 590PSIG and closes at 418PSIG.
The high pressure switch has
opened 5 times within one
hour. As a result, the outdoor
unit is locked out
.
Confirm that the system is properly charged with refriger
ant. Check condenser fan motor, for clogged TXV, for
blockage to indoor unit blower motor, for stuck reversing
valve or clogged refrigerant filter. Confirm that the out
door unit is clean. The alarm clears after a power reset.
For heating, indoor CFM may be set too low. For zoning
system, zone CFM may be set too low.
Coil sensor being detected open or shorted, or temperat
ure is out of coil sensor range. Outdoor unit control will not
Moderate
/ Critical
The outdoor coil sensor has
malfunctioned. As a result
the outdoor unit control will
not perform defrost.
perform demand or time/temperature defrost operation.
System is still able heat and cool. Check the resistance of
the coil sensor and compare to temperature resistance
chart. Replace coil sensor if needed. The alarm clears
when outdoor unit control detects proper coil sensor
readings or after a power reset.
XC20
31
Page 32

Table 6. Outdoor Control 7-Segment Display Alert Codes and Inverter LED Flash Codes
NOTE - System fault and lockout codes take precedence over system status codes (cooling, heating operating percentages or defrost/dehumidification).
Only the latest active fault or lockout codes are displayed (if present). If no fault or lockout codes are active, then system status codes are displayed. Alert
codes are also displayed on the iComfort Wi-Fi
Inverter LED Flash
Alert
Codes
Inverter
Code
Code (number of
flashes)
Red LED Green LED
E 422 N/A N/A N/A Moderate
E 423 40 4 flashes OFF
E 424 N/A N/A N/A Moderate
E 425 N/A N/A N/A Minor
E 426 N/A N/A N/A Critical Excessive inverter alarms
E 427 21 2 flashes 1 flash
E 428 22 2 flashes 2 flashes
E 429 23 2 flashes 3 flashes
®
thermostat.
Priority Alarm Description Possible Causes and Clearing Alarm
Issue: One of the wires from the top cap switch had pulled
Compressor top cap switch
exceeding thermal limit.
off one of the TP terminals on the outdoor control board.
Corrective Action: Reconnected wire onto top cap ter
minal.
Moderate /
Critical
The inverter has detected a
circuit problem.
Control locks out after 10 strikes within an hour. To clear,
disconnect power to outdoor unit and restart.
In normal operation, after outdoor control recognizes
sensors, the alarm is sent if valid temperature reading is
lost. Compare liquid line sensor resistance to temperat
ure/resistance charts in unit installation instructions. Re
The liquid line temperature
sensor has malfunctioned.
place sensor pack if necessary. At the beginning of (any)
configuration, furnace or airhandler control detects the
presence of the sensor(s). If detected (reading in range),
appropriate feature is shown in the iComfort WiFi
mostat About screen. The alarm / fault clears upon con
figuration, or when normal values are sensed.
Outdoor control has in
creased minimum com
pressor speed to allow for
proper oil return due to low
ambient temperature. NOTE -
Minimum speed adjustments
begin at 45°F and increase to
Outdoor ambient temperature is below system limit. Con
trol attempts to run at lowest allowed compressor speed
to allow for proper oil return. Automatically clears when
outdoor ambient temperature rises above limit for more
than 5 minutes.
100% minimum at 17°F.
After ten faults within one hour, control is locked out, indic
ating poor system operation. Review history of alarms to
resolve system setup. Check condenser fan motor, TXV,
indoor unit blower motor, over-charge, undercharge, or
clogged refrigerant filter.
To clear error, disconnect power to outdoor unit and re
start. Inverter alarms 12 to 14 and 53 do not count toward
this lock out condition.
The inverter has detected a DC peak fault condition. If condition (55A or higher) is detec
Moderate /
Critical
ted, outdoor unit compressor and fan stop. Anti-short cycle is initiated. If peak current
(55A or higher) occurs 10 times within an hour, system is locked out. Indicates high pres
sure, condenser fan failure, locked compressor rotor or overcharge. To clear, disconnect
power to outdoor unit and restart.
If condition is detected, is detected, outdoor unit com
pressor and fan stop. Antishort cycle is initiated. If condi
tion occurs 5 times within an hour, system is locked out.
Indicates high pressure, condenser fan failure or over
charge.
Moderate /
Critical
The inverter has detected a
high main input current con
.
dition
To clear, disconnect power to outdoor unit and restart.
Issues:
(1) If DC link power in inverter does not rise above 180
VDC for 2- and 3-ton models, 250 VDC for 4- and 5-ton
models, within 30 seconds, the outdoor control will dis
play a moderate code.
(2) Capacitors on inverter do not properly charge.
Corrective Actions:
(1) check for proper main power to outdoor unit and for
any loose electrical connections.
(2) Outdoor control boards with part # 103686-03 have
software update to delay the de-energizing of the revers
ing valve by four seconds when coming out of defrost.
Moderate /
Critical
On a call for compressor op
eration, if DC link power in in
verter does not rise above
180 VDC for 2 and 3 ton mod
els, 250 VDC for 4 and 5 ton
models, within 30 seconds,
the control will display a mod
erate code. If condition is de
tected, outdoor unit will stop
(Compressor and fan). Antishort cycles is initiated. If
condition occurs 10 times
within a 60 minute rolling time
period, system will lock out
and display a critical code.
®
ther
XC20
32
Page 33

Table 6. Outdoor Control 7-Segment Display Alert Codes and Inverter LED Flash Codes
NOTE - System fault and lockout codes take precedence over system status codes (cooling, heating operating percentages or defrost/dehumidification).
Only the latest active fault or lockout codes are displayed (if present). If no fault or lockout codes are active, then system status codes are displayed. Alert
codes are also displayed on the iComfort Wi-Fi
Inverter LED Flash
Alert
Codes
Inverter
Code
Code (number of
flashes)
Red LED Green LED
E 430 26 2 flashes 6 flashes
E 431 27 2 flashes 7 flashes
E 432 28 2 flashes 8 flashes
E 433 29 2 flashes 9 flashes
E 434 53 5 flashes 3 flashes
E 435 60 6 flashes OFF
®
thermostat.
Priority Alarm Description Possible Causes and Clearing Alarm
If condition is detected, outdoor unit compressor and fan
stop. Antishort cycle is initiated. If condition occurs 10
times within an hour, system is locked out.
Moderate /
Critical
Compressor start failure.
Indicates poor connection at compressor harness, im
proper winding resistance, locked compressor rotor, or
flooded compressor.
To clear, disconnect power to outdoor unit and restart.
Issues:
(1) Indicates power interruption, brownout, poor electrical
connection or loose inverter input wire.
(2) System testing was set up and code was generated
when the reversing valve is de-energized coming out of
defrost (code appears with or without 30 compressor
delay).
Corrective Actions:
(1) Check for proper main power to outdoor unit and for
any loose electrical connections.
(2) Outdoor control boards with part # 103686-03 have
software update to delay the de-energizing of the revers
ing valve by four seconds when coming out of defrost.
Moderate /
Critical
Error occurs when PFC de
tects an over-current condi
tion of 100A, the control will
display a moderate code. If
condition is detected, out
door unit will stop (Com
pressor and fan). Anti-short
cycle is initiated. Inverter is
unavailable to communicate
with the outdoor control for 3
minutes. If condition occurs
10 times within a 60 minute
rolling time period, system
will lock out and display a crit
ical code.
Error occurs when the DC link capacitor voltage is greater
Moderate
/ Critical
The inverter has detected a
DC link high voltage condi
tion.
than 480VDC. If condition is detected, outdoor unit com
pressor and fan stop. Antishort cycle is initiated. If condi
tion occurs 10 times within an hour, system is locked out.
System stops. To clear, disconnect power to outdoor unit
and restart.
Error occurs when compressor peak phase current is
greater than 28A. Inverter issues code 14 first and slows
Moderate
/ Critical
The inverter has detected a
compressor over-current
condition
.
down to try to reduce the current. If the current remains
high, outdoor unit compressor and fan stop. Antishort
cycle is initiated. If condition occurs five times within an
hour, system is locked out. To clear disconnect power to
outdoor unit and restart.
Outdoor control has lost
communications with the
Issues:
(1) Loose electrical connections.
(2) Interruption of main power to inverter.
Corrective Actions:
(1) Check all electrical connections.
(2) Check for proper main power to inverter.
Moderate /
Critical
inverter for greater than 3
minutes. Outdoor control
will stop all compressor de
mands, recycle power to
the inverter by de-energiz
ing the contactor for 2
minutes. If this occurs 3
time in one thermostat call,
the outdoor unit will locked
out and display a critical
code.
When this error occurs, the outdoor control cycles power
Moderate /
Critical
Inverter internal error.
to the inverter by opening the contactor for two minutes.
Check that the EEPROM is properly seated. After power
is cycled to the inverter 3 times, the outdoor unit is locked
out
.
XC20
33
Page 34

Table 6. Outdoor Control 7-Segment Display Alert Codes and Inverter LED Flash Codes
NOTE - System fault and lockout codes take precedence over system status codes (cooling, heating operating percentages or defrost/dehumidification).
Only the latest active fault or lockout codes are displayed (if present). If no fault or lockout codes are active, then system status codes are displayed. Alert
codes are also displayed on the iComfort Wi-Fi
Inverter LED Flash
Alert
Codes
E 436 62 6 flashes 2 flashes
E 437 65 6 flashes 5 flashes
E 438 73 7 flashes 3 flashes
E 439 12 1 flash 2 flashes Moderate
E 440 13 1 flash 3 flashes Moderate
Inverter
Code
Code (number of
flashes)
Red LED Green LED
®
thermostat.
Priority Alarm Description Possible Causes and Clearing Alarm
Inverter heat sink temperat
ure exceeded limit. Occurs
Moderate /
Critical
Moderate /
Critical
Moderate /
Critical
when the heat sink temper
ature exceeds the inverter
limit. Inverter issues code
13 first, then slows down to
allow the heat sink to cool. If
temperature remains high,
outdoor unit stops (com
pressor and fan). Anti-short
cycle is initiated. If condition
occurs 5 times within an
hour, system is locked out.
To clear, disconnect power
to outdoor unit and restart.
Heat sink temperature
sensor fault has occurred
(temperature less than 4ºF
or greater than 264ºF after
10 minutes of operation)
The inverter has detected a
PFC over current condition.
This would be caused by a
high load condition, high
pressure, or outdoor fan fail
ure.Outdoor control will dis
play the code when the in
verter has the error. After 3
minutes, the inverter will re
set and the compressor will
turn on again. If it happens
10 times within a 60 minute
rolling time period, the OD
control will lock out opera
tion of the outdoor unit and
display a critical code.
Compressor slowdown due
to high input current.
Heat sink temperature is
approaching limit. The
compressor speed auto
matically slows to reduce
heat sink temperature. The
control sets indoor CFM
and outdoor RPM to values
according to demand per
centage rather than the ac
tual Hz. Alarm is automatic
ally cleared.
Issue: Feedback from supplier tear down of inverter in
dicates that the screws that hold the inverter to the invert
er board were loose causing poor contact between these
two components.
Corrective Action: Tighten screws that hold the heat
sink to the inverter control board.
NOTE: Wait five minutes to all capacitor to discharge be
fore checking screws.
Occurs when the temperature sensor detects a temperat
ure less than 0.4ºF or greater than 264ºF after 10 minutes
of operation. If condition is detected, outdoor unit will stop
(compressor and fan). Antishort cycle is initiated. If con
dition occurs 5 times within an hour, system will lock out.
To clear disconnect power to outdoor unit and restart. If
.
problem persists, replace inverter.
Issue: Possible issue is system running at high pres
sures. Check for high pressure trips or other alert codes in
room thermostat and outdoor control.
Input current is approaching a high limit. Compressor
speed automatically slows. The control continues send
ing the inverter speed demanded by the thermostat. The
control sets indoor CFM and outdoor RPM to values ac
cording to demand percentage rather than the actual Hz.
Alarm is automatically cleared.
Issue: Feedback from supplier tear down of inverter in
dicates that the screws that hold the inverter to the invert
er board were loose causing poor contact between these
two components.
Corrective action: Tighten screws that hold the heat sink
to the inverter control board.
NOTE: Wait 5 minutes to all capacitor to discharge before
checking screws.
XC20
34
Page 35

Table 6. Outdoor Control 7-Segment Display Alert Codes and Inverter LED Flash Codes
NOTE - System fault and lockout codes take precedence over system status codes (cooling, heating operating percentages or defrost/dehumidification).
Only the latest active fault or lockout codes are displayed (if present). If no fault or lockout codes are active, then system status codes are displayed. Alert
codes are also displayed on the iComfort Wi-Fi
Inverter LED Flash
Alert
Codes
E 441 14 1 flash 4 flashes Moderate
E 442 N/A N/A N/A Critical
E 443 N/A N/A N/A Critical
E 600 N/A N/A N/A Critical
E 601 N/A N/A N/A Critical
Inverter
Code
Code (number of
flashes)
Red LED Green LED
®
thermostat.
Priority Alarm Description Possible Causes and Clearing Alarm
Compressor slowdown due
to high compressor current.
Compressor current is ap
proaching limit. The com
pressor speed automatic
ally slows. The control sets
indoor CFM and outdoor
RPM to values according to
demand percentage rather
than the actual Hz. Alarm is
automatically cleared..
The top cap switch has
opened five times within
one hour. As a result, the
outdoor unit is locked out
Incorrect appliance unit
size code selected.
Compressor has been
cycled OFF on utility load
shedding.
Outdoor unit has been
cycled OFF on low temper
ature protection.
Issue: Possible issue is system running at high pres
sures. Check for high pressure trips or other alert codes in
room thermostat and outdoor control.
When compressor thermal protection sensor opens five
times within one hour, outdoor stops working. To clear,
disconnect power to outdoor unit and restart.
.
Check for proper configuring of unit size codes for out
door unit in configuration guide or in installation instruc
tions. If replacing inverter, verify inverter model matches
unit size. The alarm/fault clears after the correct match is
detected following a reset. Remove the thermostat from
the system while applying power and reprogramming.
Load shedding function: Provides a method for a local
utility company to limit the maximum power level usage of
the outdoor unit. The feature is activated by applying 24
volts AC power to the L and C terminals on the outdoor
control.
Low temperature protection: Outdoor unit will not operate
when the outdoor temperature is at or below 4°F
(20°C). If the unit is operating and the outdoor temper
ature drops below 4°F (20°C), the unit continues to op
erate until the room thermostat is satisfied or the outdoor
temperature drops to 15°F (26°C). Outdoor unit ambi
ent sensor provides temperature readings.
XC20
35
Page 36

POWER-UP / RESET:
7-SEGMENT POWER-UP DISPLAY STRING
FIRMWARE VERSION: During initial power-up or reset, the
first item displayed is the outdoor control firmware version.
Example to the right shows firmware version 2.3.
UNIT TYPE: The next item displayed is the self discovery
unit type. AC = air conditioner and HP = heat pump. If the
unit type cannot be determined, three bars appear.
UNIT NOMINAL CAPACITY: The next item to be displayed
is the self-discovery unit nominal capacity. Valid capacities
are 24 for 2-ton, 36 for 3-ton, 48 for 4-ton and 60 for 5-ton
units. If the unit type cannot be determined, three bars ap
pear.
UNIT CODE: The next item to be displayed is the self discov
ery unit code. (may be a single character or two characters).
If the unit code cannot be determined, three bars appear.
UNIT CODE
UNIT TYPE, SIZE AND MODEL
NOT PROGRAMMED
2-TON HEAT PUMP, XP20-024
3-TON HEAT PUMP, XP20-036
4-TON HEAT PUMP, XP20-048
5-TON HEAT PUMP, XP20-060
.
OR
THROUGH
(These are just examples of firmware version, unit type,
.
FIRMWARE
VERSION
unit nominal capacity and unit codes.)
7-SEGMENT POWER-UP DISPLAY STRING EXAMPLE
UNIT
TYPE
OR
UNIT
CAPACITY
OR
UNIT
CODE
OR
.
IDLE MODE
2-TON AIR CONDITIONER, XC20-024
3-TON AIR CONDITIONER, XC20-036
4-TON AIR CONDITIONER, XC20-048
5-TON AIR CONDITIONER, XC20-060
Figure 15. Outdoor Control 7-Segment Unit Status Displays
XC20
36
Page 37

Table 7. Outdoor Control 7-Segment Unit Status Displays
Description Example of Display
Idle Mode: Decimal point flashes at 1 Hz.
Soft Disable Mode: Top and bottom horizontal line and decimal
point flash at 1 Hz.
If indoor or outdoor control displays Soft Disable code:
1) Confirm proper wiring between all devices (thermostat, indoor
and outdoor).
2) Cycle power to the control that is displaying the Soft Disable
code.
3) Put the room thermostat through Setup.
4) Go to Setup/System Devices/Thermostat/Edit/push Reset.
5) Go to Setup/System Devices/Thermostat/Edit/push Reset All.
If the room thermostat detects a new device or a device that is
not communicating, it sends a Soft Disable. When this occurs,
Alarm 10 is activated and the room thermostat sends a Soft Dis
able command to the offending device on the bus (outdoor con
trol, IFC, AHC, EIM or Damper Control Module).
O.E.M. Test Mode
Anti-Short Cycle Delay
Cooling Cycle: Shows current percentage of maximum cooling
capacity. Example to the right indicates a cooling demand of 50
percent and a outdoor fan speed of 700 RPM.
Idle Mode: Decimal point flashes at 1 Hz (0.5 second on, 0.5 second off).
Display OFF.
Soft Disable Mode: Top and bottom horizontal line and decimal point flash
at 1 Hz (0.5 second on, 0.5 second off).
The iComfort control in Soft Disable Mode is indicated by the following:
• On AHC, IFC and outdoor controls, Soft Disable Mode is indicated by
flashing double horizontal lines on the 7-segment display.
• On the Damper Control Module and EIM, the green LED will blink 3 sec
onds on and 1 second off.
All segments flashing at 2 Hz (unless error is detected). NOTE - Control
should be replaced.
The middle line flashes at 1 Hz for 2 seconds, followed by a 2-second dis
play of the number of minutes left on the timer (value is rounded up: 2 min.
1 sec. is displayed as 3). If activated, the anti-short cycle delay time remain
ing is displayed (default is 300 sec./5 min.).
The demand percentage is displayed first, followed by a pause, then the
outdoor fan speed and the ambient temperature.
pause pause
Diagnostic recall: Shows the last 10 stored diagnostic error
codes.
Fault memory clears
Active error in outdoor control Idle mode: Show all active
error(s) codes.
Active error in run mode: Show current status and all active
error(s) codes.
Outdoor Ambient Temperature (OAT): Any time OAT is within
operating range, value is displayed if unit is in diagnostic and
non-diagnostic modes.
Outdoor Coil Temperature (OCT): Any time OCT is sensed in
operating range, value is displayed if unit is in diagnostic mode
or manually enabled for non-diagnostic modes.
Liquid Line Temperature (LIQ): Any time LIQ is sensed in oper
ating range, value is displayed if unit is in diagnostic mode or
manually enabled for non-diagnostic modes.
Pump-Down Mode: While the unit is in pump-down mode,
is displayed repeatedly. Errors are shown if they exist.
If first error is , second pause pause
Next codes (up to 10) are shown using same method.
If there are no error codes stored: pause . After the fault memory
is cleared, the following string flashes every 0.5 seconds:
pause
Following display string is repeated if Error E 125 and E 201 are present:
pause
Following display string is repeated if Error E 440 is present while outdoor
fan speed at 700RPM:
pause
Following display string is repeated if cooling is active with outdoor fan
speed set at 650 RPM and OAT is 104
º
F:
pause pause pause
Following display string is repeated if heat is active with outdoor fan speed
set at 550 RPM and OCT is 25
º
F:
pause pause pause
Following display string is repeated if cooling is active with outdoor fan
speed set at 650 RPM and LIQ is 105
º
F:
pause pause pause
Following display string is repeated:
pause
pause pause pause
XC20
37
Page 38

PUSH−BUTTON OPERATION
Allows field access to Diagnostic, Fan, Defrost and Error Code Re
call modes.
Outdoor control must be in
IDLE mode (no heating or
cooling operation).
NOTE - See table 6 for explanation of codes.
To enter mode options, push and hold button next to 7seg
ment display until DASH symbol appears. Immediately re
lease the button. Once dash starts flashing, proceed to
next step.
Push and hold button until the selection stops flashing, then release button. The 7 seg
ment display shows the selected mode and the control performs the selected function.
Push and hold button until mode
selection displays on the 7seg
_
ment display (, , , or
). Immediately release the button,
proceed to next step.
_
Figure 16. Push-Button Operation
Unit Selection Code for Outdoor Control
If the single-character display shows three (3) horizontal lines, the unit selection code needs to be programmed. Press and hold the button until the
menu option is displayed, release button. The singlecharacter display displays the selected mode per example in figure 15 on page 36. When the desired
unit selection code appears, press and hold the button until it stops flashing, then release.
Unit Code Unit Type Unit Model
2-ton heat pump XP20-024
3-ton heat pump XP20-036
4-ton heat pump XP20-048
5-ton heat pump XP20-060
2-ton air conditioner XC20-024
3-ton air conditioner XC20-036
4-ton air conditioner XC20-048
5-ton air conditioner XC20-060
XC20
38
Page 39

Idle mode — System is energized with no demand — Decimal flashes at 1 Hertz > 0.5 second ON, 0.5 second OFF.
Display
Symbol or
Character
Displayed
during start-up
or power
recycling.
.
Display Fan Test and Display String Option
Display string shows outdoor control firmware version > pause> or unit >pause>unit capacity in BTUs>pause >unit code. If 3
horizontal bars are displayed during any sequence of this display string, it indicates that the specific parameter is not configured.
Idle mode — decimal flashes at 1 Hertz > 0.5 second ON, 0.5 second OFF
or Indicates either cooling () or heating () mode and demand percentage.
Error Code Recall Mode (NOTE - control must be in idle mode)
—
—
—
Code displays when system is in defrost mode. To enter defrost mode, unit must be running in heating mode, outdoor ambient must
be below 65F and outdoor coil temperature must be below defrost termination temperature.
Control must be in Idle mode: To enter fan test option - mode, push and hold button
until solid – appears, release button. Display begins flashing. Within 10 seconds, push and
Indicates outdoor fan RPM speed.
in the display string represents the
ambient temperature in F at the
sensor on the outdoor unit. In display
configuration mode, it also repres
ents the option for enabling both coil
and liquid line temperature on the
7-segment display string.
To enter error code recall mode, push and hold button until solid appears, then release button. Control displays up to 10 error codes stored
in memory. If is displayed, there are no stored error codes.
To exit error code recall mode, push and hold button until solid three horizontal bars appear, then release button. Note - Error codes are not
cleared.
To clear error codes stored in memory, continue to hold button while the 3 horizontal bars are displayed. Release button when solid is
displayed.
Push and hold for one (1) second, release button. 7-Segment displays
and exits error recall mode.
hold button until required symbol
in 10 seconds, push and hold button until display stops flashing, release button. Control
outputs DC voltage on PWM and COM terminals. Outdoor fan cycles ON for 10 minutes at
490 RPM. To exit test – Push and hold button until three horizontal bars display. Release
button, outdoor fan cycles OFF.
Control can be in Idle or demand mode: To enter display configuration option - mode, push
and hold button until solid – appears, release button. Display begins flashing. Within 10 sec
onds, push and hold button until required symbol
flashing. Within 10 seconds, push and hold button until display stops flashing, release button.
Display shows error () code(s), ambient (), outdoor coil () and liquid () temperatures in
Fahrenheit.
NOTE - If button is not pushed in the 10-second time period, the control exits the test mode. If
this occurs, test mode must be repeated.
displays, release button. Display begins flashing. With
displays, release button. Display begins
FIELD TEST MODE OPERATION
The field test mode allows the unit to be put into diagnostic
mode and allows the installer to perform multiple tests on
the control / unit.
Diagnostic Mode
Diagnostic mode is only available when the system is idle
or during an active / suspended call for heating or cooling.
Diagnostic mode is terminated when the exit command is
given, the button is pressed and released without entering
the diagnostic menu or 10 minutes has passed, whichever
comes first.
When this mode is selected all installed temperature
sensor valves (non-open and non-short) are shown on the
7-segment display. The following system status codes are
displayed:
D Cooling
D Percentage demand operation
D Outdoor fan RPM
D Active error codes
Outdoor Fan Mode
Diagnostic mode is only available while the system is in idle
mode. This mode can be exited with the proper command
or after 10 minutes has passed.
In diagnostic mode, the control energizes the outdoor fan
at the highest speed. The control continuously displays the
fan RPM on the 7-segment display.
PUMP-DOWN MODE OPERATION
1. Turn room thermostat OFF.
2. Install a set of refrigerant gauges on the system to
monitor the pressure.
NOTE - All operation monitoring devices: High pressure
switch, low pressure switch and compressor internal vacu
um protection remain active in the system. This will prevent
the compressor from recovering all the system refrigerant
into the outdoor unit.
NOTE - If the pump-down jumper is in the ON position dur
ing power-up, it is ignored.
3. Move the Pump-Down jumper (page 26 for location)
from the OFF position to the ON position.
XC20
39
Page 40

6. Monitor the low-side pressure at the outdoor unit. The
internal vacuum protection in the compressor and/or
PUMP DOWN
ON
OFF
PUMP DOWN
ON
OFF
one of the pressure switches prevents full recovery of
the refrigerant into the outdoor unit. When the system
reaches this condition, the suction line service valve
should be shut off and the Pump-Down Jumper
moved back to the OFF position.
Figure 17. Pump-Down Jumper
4. Shut off the liquid line service valve to stop the flow of
refrigerant into the indoor coil.
NOTE - The outdoor control will stay in pump-down mode
for five minutes
, after which the outdoor control initiates a
compressor shutdown sequence.
5. After a three-second delay, the compressor and out
door fan will ramp up to 100% capacity. (Indoor fan will
remain OFF.)
7. Use a refrigerant recovery machine to recover the re
maining refrigerant on the indoor side of the system.
Table 8. Field Test, Diagnostic Recall and Program Menu Options
Display
No Change - idle (*)
Solid .
Solid
Solid
Solid
Solid
String
*No change indicates the display will continue to show whatever is currently being displayed for normal operations.
**Note once the error history is deleted it cannot be recovered. After the history is deleted, the unit will reset itself.
Display and action (normal operation)
No Change - idle (*)
Enter or exit field test and program mode.
Puts unit in diagnostic mode. (Displays ambient, coil, liquid sensor temperatures and any active error codes.)
Clears error history (**)
Enter diagnostic recall mode. Displays up to 10 error codes in memory.
Starts outdoor fan.
Enter unit code programming.
Table 9. Normal Operation Character Display String
Display
.
Display and action (normal operation) Display and action (configuration and test mode)
Idle mode — decimal flashes at 1 Hertz > 0.5 second ON, 0.5 second OFF
Cooling operation. Shows and the cooling demand percentage. Example: pause pause
Fan RPM. Shows and the current fan RPM. Example: pause pause
in the display string represents the active error code(s) in the outdoor unit.
Example: pause pause pause pause pause
in the display string represents the outdoor ambient temperature in F at the outdoor sensor on the outdoor unit.
Example: pause pause
If enabled, in the display string represents the outdoor coil temperature in F at the sensor on the outdoor unit.
Example: pause pause pause pause. Air conditioning units do not require an outdoor coil sensor. A 10K
resistor, across pins 5 and 6 on the outdoor control sensor harness, prevents false outdoor coil sensor codes. The 10K resistor
causes the 7-segment display to show a constant 77ºF coil (c) temperature value.
If enabled, in the display string represents the outdoor liquid line temperature in F at the sensor on the outdoor unit.
Example: pause pause pause pause pause pause
COOLING AT
50% DEMAND
BY DEFAULT, COOLING OR HEATING, DEMAND, OUTDOOR FAN RPM, ACTIVE ERROR CODES
displays when system is in pump down mode.
TYPICAL 7-SEGMENT ACTIVE COOLING OR HEATING DEMAND DISPLAY STRING
OUTDOOR
FAN RPM
AND OUTDOOR AMBIENT TEMPERATURE ARE DISPLAYED.
ACTIVE ERROR
CODE (IF PRESENT)
OUTDOOR
AMBIENT AIR
TEMP
STRING REVERTS BACK TO DEFAULT (SEE FIGURE 19 TO ENABLE)
OUTDOOR
COIL TEMP(*)
OUTDOOR COIL AND LIQUID LINE TEMPERATURES CAN BE
MANUALLY ENABLED. IF SYSTEM POWER IS RECYCLED, DISPLAY
OUTDOOR LIQUID
LINE TEMP
* Air conditioning units do not require an outdoor coil sensor. A 10K resistor, across pins 5 and 6 on the outdoor control sensor harness, prevents
false outdoor coil sensor codes. The 10K resistor causes the 7-segment display to show a constant 77ºF coil (c) temperature value.
Figure 18. Typical 7-Segment Demand Display String
XC20
40
Page 41

How to enable liquid line temperature information on a 7-segment display
Both coil and liquid line temperatures can be enabled for display
either during normal demand operation or while in idle mode.
NOTE - If system power is recycled, display string reverts back to
default. Repeat the procedure which enables the outdoor coil and
liquid line temperature information. All temperatures are dis
played in Fahrenheit.
Yes
To enable temperature display, push
and hold button next to 7-segment
display until dash symbol appears
and immediately release button.
Once dash starts flashing, proceed
to next step.
Push and hold the button until the solid
appears on the 7-segment display.
Then, immediately release the button.
During thermostat demand of the outdoor control, the 7-segment display shows the cooling or heating (percent demand), fan RPM, error codes if present, and
outdoor ambient, Coil and liquid line temperatures need to be manually enabled to be displayed.
PERCENTAGE OF
MAXIMUM CAPACITY
NOTE - The coil and liquid line temperature readings are temporarily shown on the outdoor 7-segment display when the iComfort Wi-Fi® diagnostic screen is
accessed.
FAN RPM
_
ACTIVE ERRORS
Outdoor control is either in IDLE
mode or heating / cooling
demand)
_
ONLY
OUTDOOR
Push and hold button until the
flashing
release button. The display shows
the coil and liquid line temperature if
there is an active demand running.
AMBIENT
stops flashing then
OUTDOOR COIL
TEMP (*)
Wait until unit returns
to a active demand or
idle mode.
OUTDOOR LIQUID
LINE TEMP
Figure 19. Enabling Liquid Line Temperature Information
XC20
41
Page 42

Configuring Unit
When installing a replacement outdoor control, the unit selection code may have to be manually assigned using the 7-seg
ment display and push button on the control. The unit code sets unit type, capacity and outdoor fan RPM.
Configuring Unit Selection Code
Power-up - Unit selection code (two-digit number) displayed
represents unit size code (outdoor unit capacity).
During initial power-up, firmware version, unit type, unit capacity
and unit selection code will appear on the 7-segment display.
If three horizontal bars are shown in the 7-segment display
during power-up, the outdoor control did not store the last
configuration setting. If this happens, the configuration se
quence for that setting must be repeated.
−
−
−
To enter unit selection
mode, push and hold the
button next to the 7-segment
display until dash symbol
appears and immediately
release button. Once dash
starts flashing, proceed to
next step.
Push and hold button until the solid
sequence is displayed on the
7-segment display then immediately
release the button. This
configuration sequence allows the
installer to select unit selection code
(number combination) that matches
the outdoor unit type and inverter.
Press and hold the button during
the cycling display.
NOTE - Either the PU sequence
will repeat 5 times and if a
selection is not made the control
will return to idle mode.
Yes
_
_
UNIT SELECTION
CODE
NOT
SELECTED
Outdoor control is in IDLE mode
(No heating or cooling demand)
No
Turn room thermostat
to OFF
1. When the correct unit section code is displayed, release but
ton immediately. [Display flashes.]
2. Push and hold button until selection stops flashing during
one of the three cycles. [Release push button]
3. If selection is not made during those three cycles the control
returns to idle mode.
UNIT SELECTION
CODES
17
2-TON HEAT PUMP (XP20-024)
19
3-TON HEAT PUMP (XP20-036)
21
4-TON HEAT PUMP (XP20-048)
22
5-TON HEAT PUMP (XP20-060)
24
2-TON AIR CONDITIONER (XC20-024)
26
3-TON AIR CONDITIONER (XC20-036)
28
4-TON AIR CONDITIONER (XC20-048)
29
5-TON AIR CONDITIONER (XC20-060)
UNIT
SELECTED
NOT
SELECTED
SELECTED
If three horizontal bars display in any
part of the 7-segment display string
during power-up, the outdoor
control did not store the unit
selection code. If this occurs, the
configuration sequence for that
section of the display string must be
repeated.
−
−
−
Figure 20. Configuring Unit Selection Code
XC20
FIRMWARE
VERSION
The outdoor control stores the unit type, automatically exits the con
figuration mode and resets.
EXAMPLE 7-SEGMENT DISPLAY STRING
.
UNIT
TYPE
UNIT
CAPACITY
UNIT
CODE
(NO DEMAND)
.
IDLE MODE
42
Page 43

Reconfiguring Outdoor Control using
®
iComfort Wi-Fi
or iComfort S30
Thermostat
If any component of the HVAC system is changed, e.g. re
placing an outdoor sensor, reconfiguring the system is
required. To begin reconfiguring a system, select the
Setup tab.
System Overview
Refer to the applicable Thermostat Installer Setup Guide
for configuration procedures.
IMPORTANT
Some scroll compressors have internal vacuum
protector that will unload the scrolls when suction
pressure goes below 20 psig. A hissing sound will be
heard when the compressor is running unloaded.
Protector will reset when low pressure in system is raised
above 40 psig. DO NOT REPLACE COMPRESSOR.
The outdoor control provides the following functions:
D Internal switching of outputs.
D Compressor anti-short-cycle delay (adjustable
through the thermostat interface.
D Five-strike lockout function.
D High (S4) and low (S87) pressure switches.
D Ambient (RT13) and liquid line (RT36) temperatures
monitoring and protection.
COMPRESSOR PROTECTION — FIVE-STRIKE
LOCKOUT
The five-strike lockout function is designed to protect the
compressor from damage. The five-strike feature is used
for both high (S4) and low (S87) pressure switches.
Resetting Five-Strike Lockout
Once the condition has been rectified, power to the outdoor
control R terminal must be cycled OFF.
Diagnostic Information
The following diagnostic information is available through
the thermostat's user interface. Refer to the applicable In
staller System Setup Guide.
D Compressor anti-short-cycle delay timer status
D Cooling rate
D Compressor shift delay timer status
D High pressure switch status
D Low pressure switch status
D Compressor top cap switch status
D Liquid line temperature
D Outdoor ambient temperature
D Outdoor fan RPM
D Compressor active alarm
D Compressor Hz
D Inverter compressor short cycle
D Heat sink temperature
Installer Test
Verify the proper operation of the system by running the In
staller Test feature through the thermostat interface. Refer
to the applicable Installer System Setup Guide.
COMPRESSOR SHORT CYCLING DELAY
The outdoor control protects the compressor from:
D Short cycling (five minutes) during initial power-up.
D Interruption in power to the unit.
D Pressure or sensor trips.
D Delay after demand is removed.
The delay is set by default for 300 seconds (five minutes)
but can be changed through the thermostat interface.
Available settings are 60, 120, 180, 240 and 300 seconds.
CRANKCASE HEATER (HR1)
Compressors in all units are equipped with a 40-watt bellyband-type crankcase heater. HR1 prevents liquid from
accumulating in the compressor. HR1 is controlled by the
crankcase heater thermostat.
CRANKCASE HEATER THERMOSTAT (S40)
Thermostat S40 controls the crankcase heater in all units.
S40 is located on the liquid line. When liquid line temperat
ure drops below 50°F, thermostat S40 closes, energizing
HR1. The thermostat opens, de-energizing HR1, once li
quid line temperature reaches 70°F.
XC20
43
Page 44

Maintenance
Outdoor Unit
Maintenance and service must be performed by a qualified
installer or service agency. At the beginning of each cooling
season, the system should be checked as follows:
1. Clean and inspect outdoor coil (may be flushed with a
water hose). Ensure power is off before cleaning.
2. Outdoor unit fan motor is factory-lubricated and
sealed. No further lubrication is needed.
3. Visually inspect all connecting lines, joints and coils for
evidence of oil leaks.
4. Check all wiring for loose connections.
5. Check for correct voltage at unit (unit operating).
6. Check amp draw on outdoor fan motor.
7. Inspect drain holes in coil compartment base and clean
if necessary.
NOTE - If insufficient heating or cooling occurs, the unit
should be gauged and refrigerant charge should be
checked.
Outdoor Coil
It may be necessary to flush the outdoor coil more fre
quently if it is exposed to substances which are corrosive or
which block airflow across the coil (e.g., pet urine, cotton
wood seeds, fertilizers, fluids that may contain high levels
of corrosive chemicals such as salts)
D Outdoor Coil — The outdoor coil may be flushed with
a water hose.
D Outdoor Coil (Coastal Area) — Moist air in ocean loca
tions can carry salt, which is corrosive to most metal.
Units that are located near the ocean require frequent
inspections and maintenance. These inspections will
determine the necessary need to wash the unit includ
ing the outdoor coil. Consult your installing contractor
for proper intervals/procedures for your geographic
area or service contract.
Indoor Unit
1. Clean or change filters.
2. Lennox blower motors are factory-lubricated and per
manently sealed. No more lubrication is needed.
3. Adjust blower speed for cooling. Measure the pressure
drop over the coil to determine the correct blower CFM.
Refer to the unit information service manual for pressure
drop tables and procedure.
4. Check all wiring for loose connections.
5. Check for correct voltage at unit. (blower operating)
6. Check amp draw on blower motor.
Indoor Coil
1. Clean coil if necessary.
2. Check connecting lines, joints and coil for evidence of
oil leaks.
3. Check condensate line and clean if necessary.
Locations with Possibility of Heavy Snow or
Freezing Rain Accumulation
Heavy snow and/or freezing rain can interfere with the per
formance of the outdoor fan assembly. Lennox
recommends use of the optional snow guard (X8782) in
these areas.
Figure 21. Snow Guard Top Cover — X8782
XC20
44
Page 45

Unit Wiring Diagrams
Figure 22. Typical Unit Wiring (XC20-024 and -036)
XC20
45
Page 46

Figure 23. Typical Unit Wiring (XC20-048 and -060)
XC20
46
Page 47

XC20 or XP20 iComfort Outdoor Unit
Wiring Detail with Utility Load Shedding
XC20 OUTDOOR CONTROL
NOTE - For more information on Load-Shedding feature, see Electrical on page 24.
Figure 24. Load-Shedding Feature Wiring Diagram
XC20
47
Page 48

Factory Wiring Diagrams
Figure 25. Typical Factory Wiring (XC20-024 and -036)
XC20
48
Page 49

Figure 26. Typical Factory Wiring (XC20-048 and -060)
XC20
49
Page 50

Unit Sequence of Operation
The following figures illustrate the overall unit sequence of operation along with the operation of various pressure switches
and temperature sensors. The figures also illustrate the use of the compressor anti-short-cycle function in relation to unit
Status, unit Fault and lockout LED Codes and unit system operation interactions.
On 24 VAC power-up or outdoor reset, the outdoor control shall perform the following tasks:
1. Start the anti-short cycle 3-minute delay in the outdoor control.
2. Check status of the temperature sensor and pressure devices.
3. If the outdoor control does not detect any error codes, outdoor control sends 24 volts out on the
CNTCTR terminals to pull in the contactor coil. (Note - These checks take about 60 seconds.)
4. The contactor contacts pull IN and main power is applied to the compressor inverter.
From idle mode
No
Room thermostat sends a cooling percentage of
maximum capacity demand to the main control
board in the outdoor unit.
Yes
All switches closed
and sensors in operat
ing range.
Yes
Outdoor Control
1. Sends a demand to the compressor
inverter to start and run the
compressor up to the requested
pumping capacity (Frequency in
hertz).
2. Outputs a DC voltage on the DAN
PWM and COM terminals to start
and run the outdoor fan motor at the
demand RPM.
3. Sends a communication signal into
the indoor unit to start and run the
supply fan motor at the demand air
volume (CFM).
Check for status or
fault codes in the
No
outdoor control or
room thermostat.
(NOTE - Refer to low
pressure and high
pressure switch flow
charts for sequence
of operation.
Diagnostic Screen
1. View the AIR CONDITIONING screen
for current compressor frequency in
hertz.
2. View the OUTDOOR CONTROL
7-Segment display to read the RPM of
the outdoor fan motor.
3. View the AIR HANDLER screen for
actual CFM of the indoor blower
motor.
Figure 27. 24 Volt Power-Up or Outdoor Reset
XC20
50
Page 51

Y1 DEMAND
LOW
PRESSURE
SWITCH (S87)
CLOSED
CONTACTOR
ENERGIZED
INITIAL TRIP
SWITCH IS
IGNORED FOR
90 SECONDS
OPEN
OPEN
CONTACTOR
DE-ENERGIZED
ANTI-SHORT
CYCLE TIMER
BEGINS
INCREMENT
5-STRIKE
COUNTER
LED ALERT
CODE / OR
MODERATE
ALERT 410
DISPLAYED
LOW
PRESSURE
SWITCH (S87)
The thermostat terminates demand when the contactor
1.
CLOSED
SWITCH IS CLOSED OR OUTDOOR
AMBIENT TEMPERATURE IS 15ºF
OR BELOW
3
is de-energized. If demand is satisfied when alarm is
not active, the 5-strike counter resets.
2. Lockouts can be reset by cycling power off to the out
door control (A175) R terminal.
3. The low pressure switch is ignored by the system when
the outdoor temperature is below 15°F.
5-STRIKE
COUNTER
REACHES 5
1
WITHIN A SINGLE
Y1 DEMAND
LOW
PRESSURE
SWITCH (S87)
LOCKOUT
SERVICE
REQUIRED
OPEN
CLOSED
LED ALERT
CODE / OR
CRITICAL
ALERT 411
DISPLAYED
LED ALERT
CODE / OR
MODERATE
ALERT 410
DISPLAYED
SERVICE
REQUIRED
2
ANTI-SHORT
CYCLE TIMER
ENDS
CONTACTOR
ENERGIZED
LOW
PRESSURE
SWITCH (S87)
2
WAITING FOR
PRESSURE
SWITCH TO
CLOSE
CLOSED
Figure 28. Low Pressure Switch (S87) Sequence of Operation (All Versions)
NORMAL
OPERATION
XC20
51
Page 52

Y1 DEMAND
OPEN
HIGH
PRESSURE
SWITCH (S4)
OPEN
CONTACTOR
DE-ENERGIZED
ANTI-SHORT
CYCLE TIMER
BEGINS
INCREMENT
5-STRIKE
COUNTER
CLOSED
HIGH
PRESSURE
SWITCH (S4)
1. The thermostat terminates demand when the contactor is
TOP CAP
SWITCH (S173)
CLOSED
CLOSED
de-energized. If demand is satisfied when alarm is not active, the
5-strike counter resets.
2. Lockouts can be reset by cycling power off to the outdoor control
(A175) R terminal.
5-STRIKE
COUNTER
REACHES 5
1
WITHIN A SINGLE
Y1 DEMAND
CONTACTOR
ENERGIZED
SERVICE
REQUIRED
2
OPEN
LED ALERT
CODE / OR
MODERATE
ALERT 412
DISPLAYED
ANTI-SHORT
CYCLE TIMER
ENDS
HIGH
PRESSURE
SWITCH (S4)
WAITING FOR
PRESSURE
SWITCH TO
CLOSE
CLOSED
CLOSED
HIGH
PRESSURE
SWITCH (S4)
LOCKOUT
LED ALERT
CODE / OR
CRITICAL
ALERT 413
CLEARED
LED ALERT
MODERATE
DISPLAYED
CODE / OR
ALERT 412
SERVICE
REQUIRED
2
NORMAL
OPERATION
Figure 29. High Pressure Switch (S4) Sequence of Operation (All Versions)
XC20
52
Page 53

Component Testing
Component Testing Table of Contents
Verifying High Pressure and Low Pressure Switch Oper
ation 53.........................................
Compressor Operation, Checkout and Status / Error
Line Filter (Electromagnetic Compatibility Circuit - EMC)
Operations, Checkout and Status / Error Codes 63...
Outdoor Fan Operation and Checkout 64...........
Codes 56.......................................
Crankcase Heater, Checkout and Status /
Error Codes
59..................................
Compressor Sound Cover 60......................
Liquid Filter Drier (Heat Pumps only) 60.............
Ferrites 65......................................
Outdoor Control Operation, Checkout and Status / Error
Codes 66.......................................
Unit Sensor Operations, Checkout and Status / Error
Codes 67.......................................
Top Cap Switch Operation, Checkout and Status / Error
Codes 61.......................................
DC Inverter Control Operation, Checkout and Status /
Error Codes 70..................................
Reactor Operations, Checkout and Status /
Error Codes 62..................................
Emergency 24VAC Operation 75...................
Verifying High and Low Pressure Switch Operation
OPERATION :
The unit's pressure switches (LO PS - S87 and HI PS - S4) are factory-wired into the control on the LO-PS and HI-PS termin
als, respectively.
Low Pressure Switch (LO-PS) — See figure 28 for low pressure switch sequence of operation.
High Pressure Switch (HI-PS) — See figure 29 for high pressure switch sequence of operation.
Pressure Switch Event Settings
The following pressures are the auto-reset event value triggers for low and high pressure thresholds:
D High Pressure (auto-reset) - trip at 590 psig; reset at 418.
D Low Pressure (auto-reset) - trip at 40 psig; reset at 90.
CHECKOUT
Using a multimeter set to ohms with the terminals disconnected from the control board, check the resistance between the
two terminals of the pressure switch. If the resistance reading is 0 ohms, the switch is closed.
Figure 30. Verifying High Pressure and Low Pressure Switch Operation
53
S4
HIGH
PRESSURE
SWITCH
S87
LOW
PRESSURE
SWITCH
XC20
Page 54

Y1 DEMAND
LOW
PRESSURE
SWITCH (S87)
CLOSED
CONTACTOR
ENERGIZED
INITIAL TRIP
SWITCH IS
IGNORED FOR
90 SECONDS
OPEN
OPEN
CONTACTOR
DE-ENERGIZED
ANTI-SHORT
CYCLE TIMER
BEGINS
INCREMENT
5-STRIKE
COUNTER
LED ALERT
CODE / OR
MODERATE
ALERT 410
DISPLAYED
LOW
PRESSURE
SWITCH (S87)
CLOSED
SWITCH IS CLOSED OR OUTDOOR
AMBIENT TEMPERATURE IS 15ºF
1. The thermostat will terminate demand when the contactor is
de-energized. If demand is satisfied when alarm is not active, the
5-strike counter will reset.
2. Lockouts can be reset by cycling power off to the outdoor control's
(A175) R terminal.
3. The low pressure switch is ignored by the system when the outdoor
temperature is below 15°F.
5-STRIKE
COUNTER
REACHES 5
1
WITHIN A SINGLE
Y1 DEMAND
LOW
PRESSURE
SWITCH (S87)
LOCKOUT
OR BELOW
3
XC20
SERVICE
REQUIRED
OPEN
ANTI-SHORT
CYCLE TIMER
ENDS
LED ALERT
CODE / OR
CRITICAL
ALERT 411
SERVICE
REQUIRED
2
DISPLAYED
CONTACTOR
ENERGIZED
LOW
PRESSURE
SWITCH (S87)
CLOSED
LED ALERT
CODE / OR
MODERATE
ALERT 410
DISPLAYED
2
WAITING FOR
PRESSURE
SWITCH TO
CLOSED
CLOSE
Figure 31. Low Pressure Switch (S87) Sequence of Operation (All Versions)
54
NORMAL
OPERATION
Page 55

Y1 DEMAND
OPEN
HIGH
PRESSURE
SWITCH (S4)
OPEN
CONTACTOR
DE-ENERGIZED
ANTI-SHORT
CYCLE TIMER
BEGINS
INCREMENT
5-STRIKE
COUNTER
1
CLOSED
HIGH
PRESSURE
SWITCH (S4)
1. The thermostat will terminate demand when the contactor is
de-energized. If demand is satisfied when alarm is not active, the
5-strike counter will reset.
2. Lockouts can be reset by cycling power off to the outdoor control's
(A175) R terminal.
5-STRIKE
COUNTER
REACHES 5
WITHIN A SINGLE
Y1 DEMAND
TOP CAP
SWITCH (S173)
CLOSED
CLOSED
CONTACTOR
ENERGIZED
SERVICE
REQUIRED
2
OPEN
LED ALERT
CODE / OR
MODERATE
ALERT 412
DISPLAYED
ANTI-SHORT
CYCLE TIMER
ENDS
HIGH
PRESSURE
SWITCH (S4)
WAITING FOR
PRESSURE
SWITCH TO
CLOSE
CLOSED
CLOSED
HIGH
PRESSURE
SWITCH (S4)
LOCKOUT
LED ALERT
CODE / OR
CRITICAL
ALERT 413
CLEARED
LED ALERT
CODE / OR
MODERATE
ALERT 412
DISPLAYED
SERVICE
REQUIRED
2
NORMAL
OPERATION
Figure 32. High Pressure Switch (S4) Sequence of Operation (All Versions)
XC20
55
Page 56

High and Low Pressure Switch Errors
System fault and lockout codes take precedence over system status codes (cooling, heating operating percentages or defrost/dehumidification). Only
Table 10. Outdoor Control 7-Segment Display Alert Codes - High and Low Pressure Switches
the latest active fault or lockout codes are displayed (if present). If no fault or lockout codes are active, then system status codes are displayed. Alert
codes are also displayed on the iComfort Wi-Fi
Alert
Codes
E 410 Moderate
E 411 Critical
E 412 Moderate
E 413 Critical
Priority Alarm Description Possible Causes and Clearing Alarm
The outdoor unit cycled off due to
low pressure switch opening.
The low pressure switch has
opened 5 times within one hour. As
a result, the outdoor unit is locked
out
.
The outdoor unit high pressure
switch has opened.
The high pressure switch has
opened 5 times within one hour. As
a result, the outdoor unit is locked
out
.
NOTE - Unused on XC20. Used for
heat pump applications only.
®
thermostat.
Unit pressure is below the lower limit. The system is shutdown. The low pressure
switch closes above 90PSIG and opens below 40PSIG. Confirm that the system is
properly charged with refrigerant. Check TXV, indoor unit blower motor, dirty filters
or clogged refrigerant filter. Confirm that the evaporator coil is clean. The alarm
clears after the pressure switch opens or after a power reset.
Low pressure switch error count reached 5 strikes. The low pressure switch for
HFC410A opens at 40PSIG and resets at 90PSIG. Confirm that the system is prop
erly charged with refrigerant. Check for clogged TXV, blockage to indoor unit blower
motor, dirty filters or clogged refrigerant filter. Confirm that the evaporator coil is
clean. The alarm clears after a power reset.
Unit pressure is above the upper limit. System is shut down. The high pressure
switch opens at 590PSIG and closes at 418PSIG. Confirm that the system is prop
erly charged with refrigerant. Check for clogged TXV, blockage to indoor unit blower
motor, clogged refrigerant filter. Confirm that the outdoor unit is clean. The alarm
clears after the pressure switch closes or a power reset.
For heating, indoor CFM may be set too low. For zoning system, zone CFM may be
set too low.
Open high pressure switch error count reached 5 strikes. System is shut down. The
high pressure switch for HFC410A will open at 590PSIG and close at 418PSIG.
Confirm that the system is properly charged with refrigerant. Check condenser fan
motor, clogged TXV, blockage to indoor unit blower motor, stuck reversing valve or
clogged refrigerant filter. Confirm that the outdoor unit is clean. The alarm clears
after a power reset.
For heating, indoor CFM may be set too low. For zoning system, zone CFM may be
set too low.
Compressor Operation, Checkout and Status / Error Codes
OPERATION:
The compressor is a 380VAC three-phase variable-capacity scroll compressor that is approved for use with HFC410A refri
gerant. The compressor, when connected to an inverter, is capable of operating in a running frequency range from 22 hertz
up to a maximum of 70 Hertz (maximum hertz is dependent on compressor size). The compressor speed is determined by
demand from the room thermostat.
CHECKOUT:
0.657
0.657
0.723
0.587
Figure 33. Compressor Operation, Checkout and Status/Error Codes
IMPORTANT: If compressor replacement is required, remove the compressor through the top of the unit. Removal through
the access panel is not possible.
0.657 0.657
0.657
0.657
0.723 0.723
0.587 0.587
XC20
56
Page 57

STATUS CODES:
When the compressor is running, the 7segment display on the outdoor control sends the current compressor demand (as a
percentage) to the room thermostat. (Example: C 5 0 – compressor is running at 50% of maximum speed.)
Figure 34. Compressor Operation, Checkout and Status/Error Codes
ERROR CODES:
Table 11. Outdoor Control 7-Segment Display Alert Codes - Compressor
System fault and lockout codes take precedence over system status codes (cooling, heating operating percentages or defrost/dehumidification). Only
the latest active fault or lockout codes are displayed (if present). If no fault or lockout codes are active, then system status codes are displayed. Alert
codes are also displayed on the iComfort Wi-Fi
Inverter LED Flash
Alert
Codes
E 430 26 2 flashes 6 flashes
E 433 29 2 flashes 9 flashes
E 439 12 1 flash 2 flashes Moderate
Inverter
Code
Code (number of
flashes)
Red LED Green LED
®
thermostat..
Priority Alarm Description Possible Causes and Clearing Alarm
If condition is detected, outdoor unit compressor and fan stop.
Antishort cycle is initiated. If condition occurs 10 times within an
Moderate /
Critical
Moderate /
Critical
Compressor start
failure
.
The inverter has de
tected a compressor
over-current condi
tion
.
Compressor slow
down due to high in
put current.
hour, system is locked out.
Indicates poor connection at compressor harness, improper
winding resistance, locked compressor rotor, or flooded com
pressor.
To clear, disconnect power to outdoor unit and restart.
Error occurs when compressor peak phase current is greater
than 28A. Inverter issues code 14 first and slows down to try to
reduce the current. If the current remains high, outdoor unit com
pressor and fan stop. Antishort cycle is initiated. If condition oc
curs 5 times within an hour, system is locked out. To clear discon
nect power to outdoor unit and restart.
Input current is approaching a high limit. Compressor speed
automatically slows. The control continues sending the inverter
speed demanded by the thermostat. The control sets indoor
CFM and outdoor RPM to values according to demand percent
age rather than the actual Hz. Alarm is automatically clear.
XC20
57
Page 58

System fault and lockout codes take precedence over system status codes (cooling, heating operating percentages or defrost/dehumidification). Only
Table 11. Outdoor Control 7-Segment Display Alert Codes - Compressor
the latest active fault or lockout codes are displayed (if present). If no fault or lockout codes are active, then system status codes are displayed. Alert
codes are also displayed on the iComfort Wi-Fi
Inverter LED Flash
Alert
Codes
E 440 13 1 flash 3 flashes Moderate
E 441 14 1 flash 4 flashes Moderate
E 600 N/A N/A N/A Critical
Inverter
Code
Code (number of
flashes)
Red LED Green LED
®
thermostat..
Priority Alarm Description Possible Causes and Clearing Alarm
Heat sink temperat
ure is approaching
limit. The com
pressor speed auto
matically slows to
reduce heat sink
temperature. The
control sets indoor
CFM and outdoor
RPM to values ac
cording to demand
percentage rather
than the actual Hz.
Alarm is automatic
ally cleared.
Compressor slow
down due to high
compressor current.
Compressor current
is approaching limit.
The compressor
speed automatically
slows. The control
sets indoor CFM
and outdoor RPM to
values according to
demand percentage
rather than the actu
al Hz. Alarm is auto
matically cleared..
Compressor has
been cycled OFF by
utility load-shedding
function.
Issue: Feedback from supplier tear down of inverter indicates
that the screws that hold the inverter to the inverter board were
loose causing poor contact between these two components.
Corrective action: Tighten screws that hold the heat sink to the
inverter control board.
NOTE: Wait 5 minutes to all capacitor to discharge before check
ing screws.
Issue: Possible issue is system running at high pressures.
Check for high pressure trips or other alert codes in room ther
mostat and outdoor control.
Load-shedding function: Provides a method for a local utility
company to limit the maximum power level usage of the outdoor
unit. The feature is activated by applying 24 volts AC power to
the L and C terminals on the outdoor control.
XC20
58
Page 59

Crankcase Heater, Checkout and Status / Error Codes
OPERATION:
CRANKCASE HEATER (HR1)
Compressors in all units are equipped with a 40 watt belly-band type crankcase heater. The heater prevents liquid from
accumulating in the compressor. The heater is controlled by the crankcase heater thermostat.
CRANKCASE HEATER THERMOSTAT (S40)
Crankcase heater thermostat S40 controls the crankcase heater in all units and is located on the liquid line (see figure 2 for
location).
1. When liquid line temperature drops below 50°F the thermostat closes which results in the heater being energized.
2. When liquid line temperature rises above 70°F the thermostat opens which results in the heater being de-energized.
Belly-Band Crankcase Heater -
240VAC, 40 Watts
Crankcase Heater Thermostat
Figure 35. Belly-Band Crankcase Heater Thermostat
CHECKOUT:
Belly-Band Crankcase Heater: Using meter set on ohms, check crankcase heater resistance. If resistance is 0 ohms or
infinite, replace the crankcase heater.
Figure 36. Checking Belly-Band Crankcase Heater
Crankcase Heater Thermostat: As the detected temperature changes, the resistance across the sensor changes. Table
15 on page 69 shows how the resistance varies as the temperature changes for this sensor.
NOTE - When checking the ohms across a sensor, be aware that a sensor showing a resistance value that is not
range shown in table 15 on page 69, may be performing as designed. However, if a shorted or open circuit is detected, the
sensor is faulty; the sensor needs to be replaced.
within the
XC20
59
Page 60

Figure 37. Checking Crankcase Heater Thermostat
STATUS CODE:
None
ERROR CODES:
None
Compressor Sound Cover
All units come with a soft-sided polyethylene molded outer shell compressor sound cover. The cover helps reduce any un
wanted operating sounds from the compressor. The cover features a hook/loop closure system for ease of
installation on the compressor.
Figure 38. Compressor Sound Cover
Liquid Line Filter Drier
A filter drier designed for all XC20 series model units is factory-installed in the liquid line. The filter drier is designed to remove
moisture and foreign matter, which can lead to compressor failure.
Figure 39. Liquid Line Filter Drier
XC20
60
Page 61

Top Cap Switch Operation, Checkout and Status / Error Codes
OPERATION:
Top Cap Thermal Sensor Switch (S173)
Some units are equipped with a compressor-mounted normally closed temperature switch that prevents compressor dam
age due to overheating caused by internal friction. The switch is located on top of the compressor casing. This switch senses
the compressor casing temperature and opens at 239-257°F to shut off compressor operation. The auto-reset switch closes
when the compressor casing temperature falls to 151-187°F, and the compressor is re-energized. This is a single-pole,
single-throw (SPST) bi-metallic switch.
COMPRESSOR TOP CAP SWITCH
(SPST BI-METALIC SWITCH,
NORMALLY OPENS AT 239-257ºF,
AND CLOSES AT 151-187ºF
SWITCH COVER
TOP OF COMPRESS0R
Figure 40. Top Cap Thermal Sensor Switch
CHECKOUT:
Using a multimeter set to ohms, with the terminals disconnected from the system, check the resistance between the two
terminals of the top cap switch. If the meter display does not change, the switch is open. If the meter display goes to infinite,
the switch is closed.
Figure 41. Verifying Top Cap Thermal Sensor Switch
STATUS:
None
XC20
61
Page 62

ERROR:
NOTE - System fault and lockout codes take precedence over system status codes (cooling, heating operating percentages or defrost/dehumidification).
Only the latest active fault or lockout codes are displayed (if present). If no fault or lockout codes are active, then system status codes are displayed. Alert
codes are also displayed on the iComfort Wi-Fi
Alert
Codes
E 422 Moderate
E 442 Critical
Priority Alarm Description Possible Causes and Clearing Alarm
Compressor top cap switch ex
ceeding thermal limit.
The top cap switch has opened 5
times within one hour. As a result,
the outdoor unit is locked out
®
thermostat.
Issue: One of the wires from the top cap switch had pulled off one of the TP termin
als on the outdoor control board.
Corrective Action: Reconnected wire onto top cap terminal.
When compressor thermal protection sensor opens 5 times within 1 hour, outdoor stops
working. To clear, disconnect power to outdoor unit and restart.
.
Reactor Operations, Checkout and Status / Error Codes
OPERATION:
Reactor (Inductor or choke) is a passive twoterminal electrical component that stores energy in its magnetic field. Reactors
are one of the basic components used in electronics where current and voltage change with time, due to the ability of induct
ors to delay and reshape alternating currents.
CHECKOUT:
Main Power ON – Voltage IN reactor should be the same as the voltage OUT. With main power OFF and reactor disconnec
ted from system; resistance between leads should be the same (brown IN to brown OUT, blue IN to blue OUT).
STATUS CODES:
None
ERROR CODES:
None
Table 12. Outdoor Control 7-Segment Display Alert Codes - Top Cap Switch
Voltage “IN” same as Voltage “OUT”
Figure 42. XC/XP 20-024 and -036 Reactor
208/240
Voltage
“IN”
Figure 43. XC/XP 20-048 and -060 Reactor
XC20
208/240
Voltage
“OUT”
62
Page 63

Line Filter (Electromagnetic Compatibility Circuit - EMC) Operations, Checkout and Status /
Error Codes
OPERATION:
The line filter reduces the unintentional conducted emission from the equipment, to a level sufficient to pass regulatory
limits (such as FCC part 15).
The filter is rated at 208/230 volt, 30 amp maximum, 60 Hertz.
NOTE - The 2- and 3-ton inverters have the EMC builtin. The 4- and 5-ton units have an external device (see illustration
below).
NOTE - A line filter is an electronic filter which is placed between electronic equipment and an external power source in order
to attenuate conducted radio frequency interference (RFI). RFI is also known as electromagnetic interference (EMI).
CHECKOUT:
Voltage IN should read the same value as the Voltage OUT. With filter isolated from system, resistance between L1 and L2
should be the same as resistance between N1 and N2.
STATUS CODES:
None
ERROR CODES:
None
L2
208/240
Voltage IN
N1
L1
208/240
Voltage OUT
N2
Figure 44. XC20 4- and 5-ton filter board (EMC)
XC20
63
Page 64

Outdoor Fan Operation and Checkout
OPERATION:
These units use an integrated control and motor that is programmed for variable-capacity operation. The fan speed is
controlled by the iComfort Wi-Fi
CHECKOUT:
VAC Voltage Check
Check for 208/240 VAC power at inverter contactor (red wires) (see figure 45).
With unit operating, check for main VAC to motor and outdoor control VDC output to motor:
1. No voltage present – Check main power
2. Voltage present – Perform DC volt checks (19 -23 VDC between FAN PWM and COM) (see figure 45)
®
or iComfort® S30 thermostat.
.
Perform DC volt checks (19 -23
VDC between FAN PWM and
COM).
Figure 45. VAC Voltage Check
XC20
64
Page 65

VDC Voltage Check:
Check for VDC out of Fan PWM and COM. VDC output reading is determined by the percentage of room thermostat de
mand.
1. No voltage present – Remove wires from control and check for VDC. If there is no voltage present, then replace out
door control.
2. Voltage present – Perform a 9-volt battery test on motor (see figure 46).
BLACK LEAD
CONNECT B4 FAN MOTOR BLACK
COMMON WIRE TO 9V BATTERY
NEGATIVE TERMINAL
NEGATIVE TERMINAL POSITIVE TERMINAL
FULLY CHARGED 9V BATTERY
BROWN LEAD
CONNECT B4 FAN MOTOR WIRE
TO 9V BATTERY POSITIVE
V
TERMINAL
Figure 46. VDC Voltage Check
STATUS OR ERROR CODES:
There is no feedback from the outdoor fan motor to the outdoor control therefore no status or error codes are displayed on
either the outdoor control or iComfort Wi-Fi
®
or iComfort® S30 room thermostat.
NOTE - If the outdoor fan does not operate at the correct RPM, or does not start, the system will shut be down by other
protection components such as the high and low pressure switches which will generate error code(s).
Ferrites
Electronic cabling and wires, by virtue of their lengthtowidth ratios, are perfect natural antennas. In the presence of
highspeed microprocessor signals, cables will conduct, radiate, and receive unwanted highfrequency signals. Use an in
sertion-loss device, such as a ferrite suppressor as shown below, to control radio-frequency (RF) interference.
Ferrites are consistently stable over time and
over wide temperature ranges, and provide RF
suppression without causing large current
losses.
Figure 47. Ferrites
XC20
65
Page 66

Outdoor Control Operation, Checkout and Status / Error Codes
OPERATION:
The outdoor control is a microprocessor-based device for use with variable-capacity compressors up to 5-tons in capacity
operating on 24VAC residential power. The outdoor control integrates the functionality of maintaining compressor speed,
demand, defrost and fan PWM controls. The outdoor control is self-configuring. During start-up the outdoor control selects
one of two configurations variable-capacity air conditioner or variable-capacity heat pump.
7-SEGMENT
DISPLAY
PUSH
BUTTON
NOTE - The green LED located on the outdoor control flashes when
communication occurs between the outdoor control and either the
thermostat or the inverter.
WHEN UNIT IS IN PUMP-DOWN MODE, WILL BE DISPLAYED
TO ACTIVATE PUMP-DOWN MODE, REFER TO PUMP-DOWN
ON 7-SEGMENT.
CYCLE SEQUENCE ON PAGE 39.
Figure 48. Outdoor Control Unit
STATUS CODES:
Table 13. Outdoor Control 7-Segment Display Alert Codes - Outdoor Control Status
NOTE - System fault and lockout codes take precedence over system status codes (cooling, heating operating percentages or defrost/dehumidification).
Only the latest active fault or lockout codes are displayed (if present). If no fault or lockout codes are active, then system status codes are displayed. Alert
codes are also displayed on the iComfort Wi-Fi
Alert Codes Priority Alarm Description Possible Causes and Clearing Alarm
Compressor has
E 600 Critical
E 601 Critical
been cycled OFF on
utility load shedding.
Outdoor unit has
been cycled OFF on
low temperature
protection.
®
or iComfort
Load shedding function: Provides a method for a local utility company to limit the maximum power
level usage of the outdoor unit. The feature is activated by applying 24 volts AC power to the L and C
terminals on the outdoor control.
Low temperature Protection: Outdoor unit will not operate when the outdoor temperature is at or
below 4°F (20°C). If the unit is operating and the outdoor temperature drops below 4°F (20°C),
the unit will continue to operate until the room thermostat is satisfied or the outdoor temperature
drops to 15°F (26°C). (Outdoor unit ambient sensor provides temperature readings.)
®
S30 thermostat.
XC20
66
Page 67

ERROR CODES:
NOTE - System fault and lockout codes take precedence over system status codes (cooling, heating operating percentages or defrost/dehumidification).
Only the latest active fault or lockout codes are displayed (if present). If no fault or lockout codes are active, then system status codes are displayed. Alert
codes are also displayed on the iComfort Wi-Fi
Alert
Codes
E 105 Moderate
E 120 Moderate
E 124 Critical
E 125 Critical
E 131 Critical
E 132 Critical Internal software error. Replace outdoor control.
Priority Alarm Description Possible Causes and Clearing Alarm
The outdoor control has lost com
munication with either the thermo
stat or indoor unit.
There is a delay in the outdoor unit
responding to the system.
The iComfort WiFi® thermostat has
lost communication with the outdoor
unit for more than 3 minutes.
There is a hardware problem with
the outdoor control.
The outdoor unit control parameters
are corrupted
®
or iComfort
®
S30 thermostat.
Equipment is unable to communicate. Indicates numerous message errors. In most
cases errors are related to electrical noise. Make sure high voltage power is separated
from RSBus. Check for miswired and/or loose connections between the stat, indoor
unit and outdoor unit. Check for a high voltage source of noise close to the system. Fault
clears after communication is restored.
Typically, this alarm/code does not cause any issues and will clear on its own. The alarm
/ code is usually caused by a delay in the outdoor unit responding to the thermostat.
Check all wiring connections. Cleared after unresponsive device responds to any in
quiry.
Equipment lost communication with the thermostat. Check the wiring connections, ohm
wires and cycle power. The alarm stops all associated HVAC operations and waits for
a heartbeat message from the unit that's not communicating. The alarm / fault clears
after communication is reestablished.
There is a control hardware problem. Replace the outdoor control if the problem pre
vents operation and is persistent. The alarm / fault is cleared 300 seconds after the fault
recovers.
Reconfigure the system. Replace the control if heating or cooling is not available.
Unit Sensor Operations, Checkout and Status / Error Codes
OPERATION
Pins 5 and 6 (No Sensor)
There is no sensor located on positions 5 and 6 of the connector. A resistor installed between pins 5 and 6 on the cable
harness provides continuity for this circuit. This resistor (location shown in figure 50) provides resistance value between
Table 14. Outdoor Control 7-Segment Display Alert Codes - Outdoor Control Errors
314669 and 3779 ohms
the coil temperature sensor is out of range or faulty (see table 15 on page 69). If resistor is damaged or missing, order re
placement harness assembly (101334-05).
Ambient temperatures, as read by the ambient temperature sensor (shown in figure 50) which are below -35°F (-37°C) or
above 120°F (48°C) trigger a fault condition. If the ambient sensor is open, shorted, or out of the temperature range of the
sensor, the control does not perform demand defrost operation. The control reverts to time/temperature defrost operation
and displays the appropriate alert code (see table 15 on page 69). Heating and cooling operation is allowed in this fault
condition.
Liquid line temperatures below -40°F (-40°C) or above 140°F (60°C) trigger a fault condition and result in the appropriate
alarm code (see table15 on page 69). The outdoor control uses the liquid line sensor to change the fan speed, allowing
cooling operation at lowered ambient temperatures.
. If the resistor becomes damaged or lost, the outdoor control generates a false error code indicating
Ambient Temperature Sensor (RT13)
Liquid Line Temperature Sensor (RT36)
XC20
67
Page 68

SENSOR
NONE
TEMP RANGE ºF
(ºC)
N/A
RESISTANCE VALUES
RANGE (OHMS)
314669 and 3779
PIN# / WIRE
SLEEVE COLOR
6 AND 5
OUTDOOR
AMBIENT
LIQUID LINE
OUTDOOR
AMBIENT
LIQUID LINE
-40 (-40) TO
140 (60)
BLACK WIRES WITH
BLACK SLEEVE
BLACK WIRES WITH
YELL0W SLEEVE
336,000 to 2,487 (see
table 15 on page 69 for
exact temperature to
ohm readings).
10 K OHM RESISTOR
4 AND 3
(BLACK)
2 AND 1
(YELLOW)
TEMPERATURE
SENSOR HARNESS
Figure 49. Temperature Sensor Specifications
CHECKOUT
Sensors connect to the outdoor control through a field‐replaceable harness assembly that plugs into the outdoor control.
Through the sensors, the control detects outdoor ambient, coil and liquid temperature fault conditions. As the detected tem
perature changes, the resistance across the sensor changes. Check sensor operation by reading ohms across pins shown
in figure 49.
NOTE - When checking the ohms across a sensor, be aware that a sensor showing a resistance value that is not
within the
range shown in figure 49, may be performing as designed. However, if a shorted or open circuit is detected, then the sensor
may be faulty and the sensor harness will need to be replaced.
XC20
OUTDOOR AMBIENT
TEMPERATURE
SENSOR
LIQUID LINE SENSOR
CRANKCASE HEATER
THERMOSTAT (S40) OPENS AT
70ºF, CLOSES AT 50ºF
Figure 50. Temperature Sensor Locations
68
Page 69

Degrees Fahr
enheit
136.3 2680 56.8 16657 21.6 44154 -11.3 123152
133.1 2859 56.0 16973 21.0 44851 -11.9 125787
130.1 3040 55.3 17293 20.5 45560 -12.6 128508
127.3 3223 54.6 17616 20.0 46281 -13.2 131320
124.7 3407 53.9 17942 19.4 47014 -13.9 134227
122.1 3592 53.2 18273 18.9 47759 -14.5 137234
119.7 3779 52.5 18607 18.4 48517 -15.2 140347
117.5 3968 51.9 18945 17.8 49289 -15.9 143571
115.3 4159 51.2 19287 17.3 50074 -16.5 146913
113.2 4351 50.5 19633 16.8 50873 -17.2 150378
111.2 4544 49.9 19982 16.3 51686 -17.9 153974
109.3 4740 49.2 20336 15.7 52514 -18.6 157708
107.4 4937 48.5 20695 15.2 53356 -19.3 161588
105.6 5136 47.9 21057 14.7 54215 -20.1 165624
103.9 5336 47.3 21424 14.1 55089 -20.8 169824
102.3 5539 46.6 21795 13.6 55979 -21.5 174200
100.6 5743 46.0 22171 13.1 56887 -22.3 178762
99.1 5949 45.4 22551 12.5 57811 -23.0 183522
97.6 6157 44.7 22936 12.0 58754 -23.8 188493
96.1 6367 44.1 23326 11.5 59715 -24.6 193691
94.7 6578 43.5 23720 11.0 60694 -25.4 199130
93.3 6792 42.9 24120 10.4 61693 -26.2 204829
92.0 7007 42.3 24525 9.9 62712 -27.0 210805
90.6 7225 41.7 24934 9.3 63752 -27.8 217080
89.4 7444 41.1 25349 8.8 64812 -28.7 223677
88.1 7666 40.5 25769 8.3 65895 -29.5 230621
86.9 7890 39.9 26195 7.7 67000 -30.4 237941
85.7 8115 39.3 26626 7.2 68128 -31.3 245667
84.5 8343 38.7 27063 6.7 69281 -32.2 253834
83.4 8573 38.1 27505 6.1 70458 -33.2 262482
82.3 8806 37.5 27954 5.6 71661 -34.1 271655
81.2 9040 37.0 28408 5.0 72890 -35.1 281400
80.1 9277 36.4 28868 4.5 74147 -36.1 291774
79.0 9516 35.8 29335 3.9 75431 -37.1 302840
78.0 9757 35.2 29808 3.4 76745 -38.2 314669
77.0 10001 34.7 30288 2.8 78090 -39.2 327343
76.0 10247 34.1 30774 2.3 79465
75.0 10496 33.5 31267 1.7 80873
74.1 10747 33.0 31766 1.2 82314
73.1 11000 32.4 32273 0.6 83790
72.2 11256 31.9 32787 0.0 85302
71.3 11515 31.3 33309 -0.5 86852
70.4 11776 30.7 33837 -1.1 88440
69.5 12040 30.2 34374 -1.7 90068
68.6 12306 29.6 34918 -2.2 91738
67.7 12575 29.1 35471 -2.8 93452
66.9 12847 28.6 36031 -3.4 95211
66.0 13122 28.0 36600 -4.0 97016
65.2 13400 27.5 37177 -4.6 98870
64.4 13681 26.9 37764 -5.2 100775
63.6 13964 26.4 38359 -5.7 102733
62.8 14251 25.8 38963 -6.3 104746
62.0 14540 25.3 39577 -6.9 106817
61.2 14833 24.8 40200 -7.5 108948
60.5 15129 24.2 40833 -8.2 11114 1
59.7 15428 23.7 41476 -8.8 113400
59.0 15730 23.2 42130 -9.4 115727
58.2 16036 22.6 42794 -10.0 118126
57.5 16345 22.1 43468 -10.6 120600
Resistance
Degrees Fahr
enheit
Resistance
Degrees Fahr
enheit
Resistance
Degrees Fahr
enheit
Resistance
Table 15. Ambient and Liquid Line Sensors Temperature / Resistance Range
XC20
69
Page 70

ERROR CCOCODES:
Table 16. Outdoor Control 7-Segment Display Alert Codes - Outdoor Control Errors
NOTE - System fault and lockout codes take precedence over system status codes (cooling, heating operating percentages
or defrost/dehumidification). Only the latest active fault or lockout codes are displayed (if present). If no fault or lockout codes
®
or iComfort® S30
are active, then system status codes are displayed. Alert codes are also displayed on the iComfort Wi-Fi
thermostat.
Alert
Codes
E 180 Critical
E 416
E 424 Moderate Faulty outdoor liquid line sensor Sensor is open or shorted. Replace the sensor.
Priority Alarm Description Possible Causes and Clearing Alarm
During normal operation, after the outdoor control recognizes sensors, the alarm will
be sent only if valid temperature reading is lost. Compare outdoor sensor resistance to
temperature/resistance charts in unit installation instructions. Replace sensor pack if
necessary. At the beginning of (any) configuration, furnace or air-handler control will
detect the presence of the sensor(s). If detected (reading in range), appropriate
feature will be set as 'installed' and shown in the iComfort Wi-Fi
screen. The alarm / fault will clear upon configuration, or sensing normal values.
Coil sensor is detected as open or shorted, or temperature is out of coil sensor range.
Outdoor unit control will not perform demand or time/temperature defrost operation.
System will still heat or cool. Check the resistance of the coil sensor and compare to
temperature resistance chart. Replace coil sensor if needed. The alarm clears when
outdoor unit control detects proper coil sensor readings or after a power reset.
Moderate /
Critical
The iComfort Wi-Fi® thermostat has
found a problem with the outdoor
unit's ambient temperature sensor.
The outdoor coil sensor is either
open, short-circuited or the
temperature is out of sensor range.
As a result the outdoor unit control
will not perform defrost.
®
thermostat 'About'
DC Inverter Control Operation, Checkout, Status / Error Codes
OPERATION OF COMPONENTS:
Electromagnetic compatibility circuit (EMC): EMC ensures the correct operation of different equipment items which use or
respond to electromagnetic phenomena. It also helps to negate the effects of interference. NOTE - The 2- and 3-ton inverter
has an EMC builtin. The 4- and 5-ton units have an external inverter.
CONVERTER:
Converts AC (alternating current) to DC (direct current).
POWER FACTOR CORRECTION (PFC) CIRCUIT:
The PFC module is an integrated part of the outdoor inverter that monitors the DC bus for high, low and abnormal voltage
conditions. If any of these conditions are detected, the PFC function and compressor will stop.
INTELLIGENT (INVERTER) POWER MODULE (IPM):
The IPM converts DC power into AC power. The control method is known as pulse width modulation (PWM). This means the
DC is switched on and off very quickly (chopped) by the transistor switches to make simulated AC at required frequency and
voltage.
COMMUNICATION CONTROL CIRCUIT:
Receives and sends message between the inverter and the outdoor control.
Power Factor Correction Circuit
Converter
Intelligent Power Module
Communication Control
Electromagnetic Compatibility Circuits
Figure 51. 2- and 3-Ton Unit Inverter
XC20
70
Page 71

Heat Sink
Converter
Power Factor
Correction
Circuit
Intelligent Power Module
Communication Control
Figure 52. 4- and 5-Ton Unit Inverter
STATUS CODES:
Table 17. Outdoor Control 7-Segment Display Alert Codes and Inverter LED Flash Codes
NOTE - System fault and lockout codes take precedence over system status codes (cooling, heating operating percentages or defrost/de
humidification). Only the latest active fault or lockout codes are displayed (if present). If no fault or lockout codes are active, then system
status codes are displayed. Alert codes are also displayed on the iComfort Wi-Fi
Inverter LED Flash
Alert
Codes
N/A ON OFF N/A XC 20-024 and -036 only: Indicates inverter is operating normally.
N/A ON ON N/A XC 20-048 and -060 only: Indicates inverter is operating normally.
N/A OFF OFF N/A Indicates inverter is NOT energized.
Code (number of
flashes)
Red LED
Green
LED
Priority Alarm Description Possible Causes and Clearing Alarm
®
or iComfort® S30 thermostat.
ERROR CODES:
Table 18. Outdoor Control 7-Segment Display Alert Codes and Inverter LED Flash Codes
NOTE - System fault and lockout codes take precedence over system status codes (cooling, heating operating percentages or defrost/dehumidification).
Only the latest active fault or lockout codes are displayed (if present). If no fault or lockout codes are active, then system status codes are displayed. Alert
codes are also displayed on the iComfort Wi-Fi
Inverter LED Flash
Alert
Codes
E 423 40 4 flashes OFF
E 426 N/A N/A N/A Critical Excessive inverter alarms
Inverter
Code
Code (number of
flashes)
Red LED Green LED
®
or iComfort
Priority Alarm Description Possible Causes and Clearing Alarm
Moderate
/ Critical
®
S30 thermostat.
The inverter has detected a
circuit problem.
Control will lock out after 10 strikes within an hour. To
clear disconnect power to outdoor unit and restart.
After ten faults within one hour, control will lock out.
Indicates poor system operation. Review history of
alarms to resolve system setup. Check condenser fan
motor, TXV, indoor unit blower motor, stuck reversing
valve, over-charge, undercharge, and clogged refriger
ant filter.
To clear error, disconnect power to outdoor unit and re
start. Inverter alarms 12 to 14 and 53 do not count to
wards this lock out condition.
XC20
71
Page 72

NOTE - System fault and lockout codes take precedence over system status codes (cooling, heating operating percentages or defrost/dehumidification).
Table 18. Outdoor Control 7-Segment Display Alert Codes and Inverter LED Flash Codes
Only the latest active fault or lockout codes are displayed (if present). If no fault or lockout codes are active, then system status codes are displayed. Alert
codes are also displayed on the iComfort Wi-Fi
®
or iComfort
Inverter LED Flash
Alert
Codes
Inverter
Code
Code (number of
flashes)
Priority Alarm Description Possible Causes and Clearing Alarm
Red LED Green LED
E 427 21 2 flashes 1 flash
E 428 22 2 flashes 2 flashes
E 429 23 2 flashes 3 flashes
E 430 26 2 flashes 6 flashes
E 431 27 2 flashes 7 flashes
E 432 28 2 flashes 8 flashes
Moderate
/ Critical
Moderate
/ Critical
Moderate
/ Critical
Moderate
/ Critical
Moderate
/ Critical
Moderate
/ Critical
®
S30 thermostat.
The inverter has detected a
DC peak fault condition
.
The inverter has detected a
high main input current con
.
dition
On a call for compressor op
eration, if DC link power in in
verter does not rise above
180 VDC for 2 and 3 ton mod
els, 250 VDC for 4 and 5 ton
models, within 30 seconds,
the control will display a mod
erate code. If condition is de
tected, outdoor unit will stop
(Compressor and fan). Antishort cycles is initiated. If
condition occurs 10 times
within a 60 minute rolling time
period, system will lock out
and display a critical code.
Compressor start failure.
Error occurs when PFC de
tects an over-current condi
tion of 100A, the control will
display a moderate code. If
condition is detected, out
door unit will stop (Com
pressor and fan). Anti-short
cycle is initiated. Inverter is
unavailable to communicate
with the outdoor control for 3
minutes. If condition occurs
10 times within a 60 minute
rolling time period, system
will lock out and display a crit
ical code.
The inverter has detected a
DC link high voltage condi
tion.
If condition (55A or higher) is detected, outdoor unit will
stop (compressor and fan). Antishort cycle is initiated. If
peak current (55A or higher) occurs 10 times within an
hour, system will lock out.
Indicates high pressure, condenser fan failure, locked
compressor rotor or overcharge.
To clear, disconnect power to outdoor unit and restart.
If condition is detected, outdoor unit will stop (compressor
and fan). Antishort cycle is initiated. If condition occurs 5
times within an hour, system will lock out.
Indicates high pressure, condenser fan failure or over
charge. To clear, disconnect power to outdoor unit and
restart.
Issues:
(1) If DC link power in inverter does not rise above 180
VDC for 2- and 3-ton models, 250 VDC for 4- and 5-ton
models, within 30 seconds, the outdoor control will dis
play a moderate code.
(2) Capacitors on inverter do not properly charge.
Corrective Actions:
(1) check for proper main power to outdoor unit and for
any loose electrical connections.
(2) Outdoor control boards with part # 103686-03 have
software update to delay the de-energizing of the revers
ing valve by four seconds when coming out of defrost.
If condition is detected, outdoor unit will stop (compressor
and fan). Antishort cycle is initiated. If condition occurs
10 times within an hour, system will lock out.
Indicates poor connection at compressor harness, im
proper winding resistance, locked compressor rotor, or
flooded compressor.
To clear, disconnect power to outdoor unit and restart.
Issues:
(1) Indicates power interruption, brownout, poor electrical
connection or loose inverter input wire.
(2) System testing was set up and code was generated
when the reversing valve is de-energized coming out of
defrost (code appears with or without 30 compressor
delay).
Corrective Actions:
(1) Check for proper main power to outdoor unit and for
any loose electrical connections.
(2) Outdoor control boards with part # 103686-03 have
software update to delay the de-energizing of the revers
ing valve by four seconds when coming out of defrost.
Error occurs when the DC link capacitor voltage is greater
than 480VDC. If condition is detected, outdoor unit will
stop (compressor and fan). Antishort cycle is initiated. If
condition occurs 10 times within an hour, system will lock
out. System will stop. To clear, disconnect power to out
door unit and restart.
XC20
72
Page 73

NOTE - System fault and lockout codes take precedence over system status codes (cooling, heating operating percentages or defrost/dehumidification).
Table 18. Outdoor Control 7-Segment Display Alert Codes and Inverter LED Flash Codes
Only the latest active fault or lockout codes are displayed (if present). If no fault or lockout codes are active, then system status codes are displayed. Alert
codes are also displayed on the iComfort Wi-Fi
Inverter LED Flash
Alert
Codes
E 433 29 2 flashes 9 flashes
E 434 53 5 flashes 3 flashes
E 435 60 6 flashes OFF
E 436 62 6 flashes 2 flashes
E 437 65 6 flashes 5 flashes
E 438 73 7 flashes 3 flashes
Inverter
Code
Code (number of
flashes)
Red LED Green LED
®
or iComfort
Priority Alarm Description Possible Causes and Clearing Alarm
Moderate
/ Critical
Moderate /
Critical
Moderate
/ Critical
Moderate /
Critical
Moderate
/ Critical
Moderate /
Critical
®
S30 thermostat.
The inverter has detected a
compressor over-current
condition.
Outdoor control has lost com
munications with the inverter
for greater than 3 minutes.
Outdoor control will stop all
compressor demands, re
cycle power to the inverter by
de-energizing the contactor
for 2 minutes. If this occurs 3
time in one thermostat call,
the outdoor unit will locked
out and display a critical
code.
Inverter internal error.
Inverter heat sink temperat
ure exceeded limit. Occurs
when the heat sink temperat
ure exceeds the inverter limit.
Inverter issues code 13 first,
then slows down to allow the
heat sink to cool. If temperat
ure remains high, outdoor
unit stops (compressor and
fan). Anti-short cycle is initi
ated. If condition occurs 5
times within an hour, system
is locked out. To clear, dis
connect power to outdoor
unit and restart.
Heat sink temperature
sensor fault has occurred
(temperature less than 4 ºF or
greater than 264ºF after 10
minutes of operation).
The inverter has detected a
PFC over current condition.
This would be caused by a
high load condition, high
pressure, or outdoor fan fail
ure.Outdoor control will dis
play the code when the in
verter has the error. After 3
minutes, the inverter will re
set and the compressor will
turn on again. If it happens
10 times within a 60 minute
rolling time period, the OD
control will lock out operation
of the outdoor unit and dis
play a critical code.
Error occurs when compressor peak phase current is
greater than 28A. Inverter will issue code 14 first and slow
down to try to reduce the current. If the current remains
high, outdoor unit will stop (compressor and fan).
Antishort cycle is initiated. If condition occurs 5 times
within an hour, system will lock out. To clear disconnect
power to outdoor unit and restart.
Issues:
(1) Loose electrical connections.
(2) Interruption of main power to inverter.
Corrective Actions:
(1) Check all electrical connections.
(2) Check for proper main power to inverter.
When this error occurs, the outdoor control will cycle
power to the inverter by opening the contactor for 2
minutes. Check that the EEPROM is properly seated.
After power is cycled to the inverter 3 times, the outdoor
unit is locked out.
Issue: Feedback from supplier tear down of inverter in
dicates that the screws that hold the inverter to the invert
er board were loose causing poor contact between these
two components.
Corrective Action: Tighten screws that hold the heat
sink to the inverter control board.
NOTE: Wait five minutes to all capacitor to discharge be
fore checking screws.
This occurs when the temperature sensor detects a tem
perature less than 0.4ºF or greater than 264ºF after 10
minutes of operation. If condition is detected, outdoor unit
will stop (compressor and fan). Antishort cycle is initi
ated. If condition occurs 5 times within an hour, system
will lock out. To clear disconnect power to outdoor unit
and restart. If problem persists, replace inverter.
Issue: Possible issue is system running at high pres
sures. Check for high pressure trips or other alert codes in
room thermostat and outdoor control.
XC20
73
Page 74

NOTE - System fault and lockout codes take precedence over system status codes (cooling, heating operating percentages or defrost/dehumidification).
Table 18. Outdoor Control 7-Segment Display Alert Codes and Inverter LED Flash Codes
Only the latest active fault or lockout codes are displayed (if present). If no fault or lockout codes are active, then system status codes are displayed. Alert
codes are also displayed on the iComfort Wi-Fi
Inverter LED Flash
Alert
Codes
E 439 12 1 flash 2 flashes Moderate
E 440 13 1 flash 3 flashes Moderate
E 441 14 1 flash 4 flashes Moderate
Inverter
Code
Code (number of
flashes)
Red LED Green LED
®
or iComfort
Priority Alarm Description Possible Causes and Clearing Alarm
®
S30 thermostat.
Compressor slowdown due
to high input current.
Heat sink temperature is ap
proaching limit. The com
pressor speed automatically
slows to reduce heat sink
temperature. The control
sets indoor CFM and outdoor
RPM to values according to
demand percentage rather
than the actual Hz. Alarm is
automatically cleared.
Compressor slowdown due
to high compressor current.
Compressor current is ap
proaching limit. The com
pressor speed automatically
slows. The control sets in
door CFM and outdoor RPM
to values according to de
mand percentage rather than
the actual Hz. Alarm is auto
matically cleared..
Input current is approaching a high limit. Compressor
speed will automatically slow down. The control contin
ues sending the inverter speed demanded by the thermo
stat. The control will set indoor CFM and outdoor RPM to
values according to demand percentage rather than the
actual Hz. Alarm is automatically clear.
Issue: Feedback from supplier tear down of inverter in
dicates that the screws that hold the inverter to the invert
er board were loose causing poor contact between these
two components.
Corrective action: Tighten screws that hold the heat sink
to the inverter control board.
NOTE: Wait 5 minutes to all capacitor to discharge before
checking screws.
Issue: Possible issue is system running at high pres
sures. Check for high pressure trips or other alert codes in
room thermostat and outdoor control.
XC20
74
Page 75

Emergency 24VAC System Operation
The Y terminal located on the outdoor control allows the outdoor unit to be cycled ON and OFF using 24VAC inputs. The
outdoor unit will operate at 100% capacity in this configuration.
The following wiring diagrams display the wiring changes needed to switch a full communicating system to a non-communic
ating system with the XC20 running in emergency mode (24VAC inputs to outdoor unit).
iComfort Wi-Fi or iComfort S30
Thermostat,
Communicating Air Handler and XC20
Communicating Air
Handler or
Furnance
iComfort ® Wi-Fi
or iComfort® S30
THERMOSTAT
XC20 UNIT
RSBus
24VAC Thermostat
C
R
Y
NOTE 1 and 2
NOTES:
1. Move one wire on both
indoor and outdoor controls
from terminals i+ to Y1 for
24VAC operation on air
conditioner and indoor unit.
2. Disconnect the i- wire from
terminal strip and tape.
3. Do not disconnect wires
form the XC20 R and C
terminals, both are required.
Communicating Air
Handler or
Furnance
(Non−Communicating Mode)
Emergency 24VAC
XC20 UNIT
NOTE 3
Figure 53. Emergency 24VAC System Operation
System Refrigerant
IMPORTANT !
The system must be operating at full capacity during
charging. Increase (heat) or decrease (cooling) the
thermostat setting by 5°F to create system demand.
Confirm outdoor unit running capacity on the
display on the outdoor control. Value should be
100%.
This section outlines the procedures to:
1. Connect a gauge set for testing and charging as illustrated in fig
ure 54.
2. Check and adjust indoor airflow as described in figure 55.
3. Add or remove refrigerant using the weigh-in method shown in
figure 56.
4. Verify the charge using the subcooling method described in fig
ure 57.
IMPORTANT: Unit must be operating at 100% input to be charged
properly.
ADDING OR REMOVING REFRIGERANT
This system uses HFC-410A refrigerant which operates at much
higher pressures than HCFC-22. The pre-installed liquid line filter
drier is approved for use with HFC-410A only. Do not replace it with
components designed for use with HCFC-22.
INDOOR AIRFLOW CHECK
Check airflow using the Delta-T (DT) process using the illustration in
figure 55.
The diagnostic screen on the thermostat or outdoor control 7-seg
ment display shows indoor and outdoor motor CFMs or RPMs.
XC20
75
Page 76

MANIFOLD GAUGE SET
LOW
HIGH
GAUGE SET
CONNECTIONS FOR TESTING AND CHARGING
REFRIGERANT TANK
CHARGE IN
LIQUID PHASE
DIGITAL SCALE
D
TEMPERATURE
SENSOR
A. CLOSE MANIFOLD GAUGE SET VALVES AND CONNECT THE CENTER HOSE TO A CYLINDER OF HFC-410A SET FOR LIQUID PHASE CHARGING.
B. CONNECT THE MANIFOLD GAUGE SET'S LOW PRESSURE SIDE TO THE SUCTION LINE SERVICE PORT.
C. CONNECT THE MANIFOLD GAUGE SET'S HIGH PRESSURE SIDE TO THE LIQUID LINE SERVICE PORT.
D. POSITION TEMPERATURE SENSOR ON LIQUID LINE NEAR LIQUID LINE SERVICE PORT.
A
TO LIQUID
LINE SERVICE
PORT
C
SUCTION LINE
TEMPERATURE SENSOR
(LIQUID LINE)
Figure 54. Gauge Set Connections
OUTDOOR UNIT
B
TEMPERATURE OF AIR
ENTERING INDOOR COIL ºF
AIRFLOW
INDOOR COIL
A
DRY
BULB
C
53º
ALL TEMPERATURES ARE
EXPRESSED IN ºF
ASSUME DT = 15 AND A TEMP. = 72º, BELOW C TEMPERATURES REQUIRE ACTION:
Cº T
53º 19 – 15 = 4 INCREASE THE AIRFLOW
58º 14 – 15 = -1 (WITHIN +3º RANGE) NO CHANGE
62º 10 – 15 = -5 DECREASE THE AIRFLOW
T
DROP
19º
AIR
FLOW
– DT = ºF ACTION
DROP
INDOOR
COIL
AIR
FLOW
B
64º
WET
BULB
A
72º
DRY BULB
DT
80 24 24 24 23 23 22 22 22 20 19 18 17 16 15
78 23 23 23 22 22 21 21 20 19 18 17 16 15 14
76 22 22 22 21 21 20 19 19 18 17 16 15 14 13
74 21 21 21 20 19 19 18 17 16 16 15 14 13 12
DRY-BULB
72 20 20 19 18 17 17 16 15 15 14 13 12 11 10
70 19 19 18 18 17 17 16 15 15 14 13 12 11 10
WET-BULB ºF
57 58 59 60 61 62 63 64 65 66 67 68 69 70
B
1. DETERMINE THE DESIRED DT — MEASURE ENTERING AIR
TEMPERATURE USING DRY BULB (A) AND WET BULB (B).
DT IS THE INTERSECTING VALUE OF A AND B IN THE
TABLE (SEE TRIANGLE).
2. FIND TEMPERATURE DROP ACROSS COIL
THE DRY BULB AIR TEMPERATURE ENTERING AND LEAV
ING THE COIL (A AND C). TEMPERATURE DROP FORMULA:
) = A MINUS C.
(T
DROP
3. DETERMINE IF FAN NEEDS ADJUSTMENT — IF THE DIF
FERENCE BETWEEN THE MEASURED T
SIRED DT (T
NEEDED. SEE EXAMPLE AT LEFT:
4. ADJUST THE FAN SPEED — SEE INDOOR UNIT INSTRUC
TIONS TO INCREASE/DECREASE FAN SPEED.
NOTE - CHANGING AIR FLOW AFFECTS ALL TEMPERA
TURES; RECHECK TEMPERATURES TO CONFIRM THAT THE
TEMPERATURE DROP AND DT ARE WITHIN +
–DT) IS WITHIN +3º, NO ADJUSTMENT IS
DROP
— MEASURE
AND THE DE
DROP
3º.
Figure 55. Checking Indoor Airflow over Evaporator Coil using Delta-T Chart
XC20
76
Page 77

Use the WEIGH-IN method for adding initial refrigerant charge, and then use SUBCOOLING method for for verifying refrigerant charge.
WEIGH-IN
64ºF (17.7ºC) and Below
Amount specified
on nameplate
SUBCOOLING
HEATING
SATº
LIQº –
SCº =
CHARGING METHOD
Adjust amount for variation in
line set length and liquid line
diameter using table below.
+
Set Diameter
USE
COOLING
MODE
60ºF
(15ºC)
USE
MODE
Liquid Line
5/16”
3/8”
1/2”
1. THE DIAGNOSTIC SCREEN ON THE THERMOSTAT OR OUTDOOR CONTROL 7-SEGMENT DISPLAY WILL SHOW INDOOR AND
OUTDOOR MOTOR CFMS OR RPMS.
2. MEASURE OUTDOOR AMBIENT TEMPERATURE; DETERMINE WHETHER TO USE COOLING MODE OR HEATING MODE TO
CHECK CHARGE.
3. CONNECT GAUGE SET.
4. CHECK LIQUID AND VAPOR LINE PRESSURES. COMPARE PRESSURES WITH EITHER HEAT OR COOLING MODE NORMAL
OPERATING PRESSURES IN THE APPLICABLE CHARGING STICKER, NORMAL OPERATING PRESSURES, HIGH STAGE.
NOTE
DIFFERENCES MAY MEAN IMPROPER CHARGE OR OTHER SYSTEM PROBLEM.
5. SET THERMOSTAT FOR HEAT/COOL DEMAND, DEPENDING ON MODE BEING USED:
USING COOLING MODE — WHEN THE OUTDOOR AMBIENT TEMPERATURE IS 60°F (15°C) AND ABOVE. TARGET
SUBCOOLING VALUES (SECOND STAGE - HIGH CAPACITY) IN APPLICABLE CHARGING STICKER ARE BASED ON 70 TO
80°F (21-27°C) INDOOR RETURN AIR TEMPERATURE; IF NECESSARY, OPERATE HEATING TO REACH THAT
TEMPERATURE RANGE; THEN SET THERMOSTAT TO COOLING MODE SETPOINT TO 68ºF (20ºC) WHICH SHOULD CALL
FOR SECOND-STAGE (HIGH STAGE) COOLING. WHEN PRESSURES HAVE STABILIZED, CONTINUE WITH STEP 6.
USING HEATING MODE — WHEN THE OUTDOOR AMBIENT TEMPERATURE IS BELOW 60°F (15°C). TARGET
SUBCOOLING VALUES (SECOND-STAGE - HIGH CAPACITY) IN APPLICABLE CHARGING STICKER ARE BASED ON 65-75°F
(18-24°C) INDOOR RETURN AIR TEMPERATURE; IF NECESSARY, OPERATE COOLING TO REACH THAT TEMPERATURE
RANGE; THEN SET THERMOSTAT TO HEATING MODE SETPOINT TO 77ºF (25ºC) WHICH SHOULD CALL FOR
SECOND-STAGE (HIGH STAGE) HEATING. WHEN PRESSURES HAVE STABILIZED, CONTINUE WITH STEP 6.
6. READ THE LIQUID LINE TEMPERATURE; RECORD IN THE LIQº SPACE.
7. READ THE LIQUID LINE PRESSURE; THEN FIND ITS CORRESPONDING TEMPERATURE IN THE TEMPERATURE/ PRESSURE
CHART LISTED IN THE APPLICABLE CHARGING STICKER AND RECORD IT IN THE SATº SPACE.
8. SUBTRACT LIQº TEMPERATURE FROM SATº TEMPERATURE TO DETERMINE SUBCOOLING; RECORD IT IN SCº SPACE.
9. COMPARE SCº RESULTS WITH APPLICABLE CHARGING STICKER, BEING SURE TO NOTE ANY ADDITIONAL CHARGE FOR
LINE SET AND/OR MATCH-UP.
10. IF SUBCOOLING VALUE IS GREATER THAN SHOWN IN APPLICABLE CHARGING STICKER FOR THE APPLICABLE UNIT,
REMOVE REFRIGERANT; IF LESS THAN SHOWN, ADD REFRIGERANT.
11. IF REFRIGERANT IS ADDED OR REMOVED, REPEAT STEPS 6 THROUGH 10 TO VERIFY CHARGE.
12. DISCONNECT GAUGE SET AND RE-INSTALL BOTH THE LIQUID AND SUCTION SERVICE VALVE CAPS.
(ounces per foot)
- THE REFERENCE TABLE IS A GENERAL GUIDE. EXPECT MINOR PRESSURE VARIATIONS. SIGNIFICANT
NOTE - Insulate liquid line when it is routed through areas where
the surrounding ambient temperature could become higher than
the temperature of the liquid line or when pressure drop is equal
Total charge
=
HFC-410A
to or greater than 20 psig.
NOTE - The nameplate is shown for illustration purposes only. Go to
actual nameplate on outdoor unit for charge information.
Charging Formula for Liquid Line Charge Adjustments
[(Line set oz./ft. x total length) (factory charge for line set)] = charge adjustment
0.40
0.60
Example: Units are factorycharged for 15 feet (4.6 meters) of 3/8" line set.
Factory charge for 3/8" is 0.60 oz/ft x 15 = 9.0 ounces.
1.00
Figure 56. Using HFC-410A Weigh-In Method
CHARGING METHOD
(All charging MUST be performed while system is operating
either at maximum speed or 100% demand.)
Figure 57. Using HFC-410A Subcooling Method - High Speed (High Capacity)
Table 19. HFC-410A Temperature (°F) - Pressure (Psig)
°F Psig °F Psig °F Psig °F Psig °F Psig °F Psig °F Psig °F Psig
32 100.8 48 137.1 63 178.5 79 231.6 94 290.8 11 0 365.0
33 102.9 49 139.6 64 181.6 80 235.3 95 295.1 111 370.0 126 451.8 142 552.3
34 105.0 50 142.2 65 184.3 81 239.0 96 299.4 11 2 375.1 127 457.6 143 559.1
35 107.1 51 144.8 66 187.7 82 242.7 97 303.8 11 3 380.2 128 463.5 144 565.9
36 109.2 52 147.4 67 190.9 83 246.5 98 308.2 11 4 385.4 129 469.5 145 572.8
37 111.4 53 150.1 68 194.1 84 250.3 99 312.7 11 5 390.7 130 475.6 146 579.8
38 113.6 54 152.8 69 197.3 85 254.1 100 317.2 11 6 396.0 131 481.6 147 586.8
39 115.8 55 155.5 70 200.6 86 258.0 101 321.8 11 7 401.3 132 487.8 148 593.8
40 118.0 56 158.2 71 203.9 87 262.0 102 326.4 11 8 406.7 133 494.0 149 601.0
41 120.3 57 161.0 72 207.2 88 266.0 103 331.0 11 9 412.2 134 500.2 150 608.1
42 122.6 58 163.9 73 210.6 89 270.0 104 335.7 120 417.7 135 506.5 151 615.4
43 125.0 59 166.7 74 214.0 90 274.1 105 340.5 121 423.2 136 512.9 152 622.7
44 127.3 60 169.6 75 217.4 91 278.2 106 345.3 122 428.8 137 519.3 153 630.1
45 129.7 61 172.6 76 220.9 92 282.3 107 350.1 123 434.5 138 525.8 154 637.5
46 132.2 62 175.4 77 224.4 93 286.5 108 355.0 124 440.2 139 532.4 155 645.0
47 134.6 78 228.0 109 360.0 140 539.0
77
125 445.9
141 545.6
XC20
Page 78

XC20 — HFC-410A CHARGING INFORMATION
FOR COMPLETE CHARGING DETAILS, REFER TO THE OUTDOOR UNIT INSTALLATION AND SERVICE PROCEDURE (CORP 1407-L10).
IMPORTANT !
Room thermostat must be turned down at least 5°F from set point so charging occurs with
system operating at 100% capacity. Seven-segment display on outdoor control will show
outdoor unit running capacity.
The unit is factory‐charged with the amount of HFC-410A refrigerant indicated on the unit rating
plate. This charge is based on a matching indoor coil and outdoor coil with 15 feet (4.6 m) line
set. The outdoor unit should be charged during warm weather. However, applications arise in
which charging must occur in the colder months. The method of charging is determined by the
outdoor ambient temperature. Before charging the unit, determine the liquid line temperature
and the outdoor ambient temperature.
Charge Using the Weigh-In Method — Outdoor Temperature < 64ºF (17.7ºC)
If the system is void of refrigerant, or if the outdoor ambient temperature is 64°F (17.7°C) and below,
the refrigerant charge should be weighed into the unit. Do this after any leaks have been repaired.
NOTE - See system Installation Instructions to calculate charge required for longer line sets.
1. Recover the refrigerant from the unit.
2. Conduct a leak check, then evacuate the system as shown in the installation instructions.
3. Weigh in the unit nameplate charge.
If weighing facilities are not available, or if you are charging the unit during warm weather,
follow one of the other procedures outlined below.
Charge Using The Subcooling Method — Outdoor Temperature > 65ºF (18.3ºC)
When the outdoor ambient temperature is
65ºF (18.3ºC) and above, use the
subcooling method to charge the unit. It
may be necessary to restrict the air flow
through the outdoor coil to achieve
pressures in the 325-375 psig (2240-2485
kPa) range. These higher pressures are
necessary for checking the charge. Block
equal sections of air intake panels and
move obstructions sideways until the liquid
pressure is in the 325-375 psig (2240-2485
kPa) range. See figure 1.
Block coil one side at a time with
cardboard/plastic until proper testing
pressures are reached.
Figure 1. Blocking Outdoor Coil
CARDBOARD
OR PLASTIC
SHEET
1. With the manifold gauge connected to the liquid line service port, allow the unit pressures
to stabilize, then, use a digital thermometer to record the liquid line temperature.
2. At the same time, record the liquid line pressure reading.
3. Use a temperature/pressure chart for HFC-410A to determine the saturation temperature
for the liquid line pressure reading.
4. Subtract the liquid line temperature from the saturation temperature (according to the
chart) to determine subcooling (Saturation temperature - Liquid line temperature =
Subcooling Value).
5. Compare the subcooling value with those in table 1. If subcooling is greater than shown,
recover some refrigerant. If subcooling is less than shown, add refrigerant.
Charge Using Normal Operating Pressures/Approach or Subcooling Methods
(High Capacity) —Outdoor Temperature >65ºF (18.3ºC)
When the outdoor ambient temperature is 65ºF (18.3ºC) and above, use the approach or
subcooling methods to charge the system. For best results, indoor temperature should be 70°F
(21°C) to 80°F (26°C). Monitor system pressures while charging.
1. Record outdoor ambient temperature using a digital thermometer.
2. Attach high pressure gauge set and operate unit for several minutes to allow system
pressures to stabilize.
3. Compare stabilized pressures with those provided in table 3, “Normal Operating
Pressures.” Minor variations are to be expected; significant differences could mean that
the system is not properly charged or that a problem exists with some component in the
system. Pressures higher than those listed indicate that the system is overcharged.
Pressures lower than those listed indicate that the system is undercharged. Verify adjusted
charge using the approach method.
4. Use the same digital thermometer used to check outdoor ambient temperature to check
liquid line temperature. Verify the unit charge using the approach method.
5. The difference between the liquid and ambient temperatures should match values given
in table 2. If the values don't agree with the those in table 2, add refrigerant to lower the
approach temperature or recover refrigerant from the system to increase the approach
temperature.
Using the Normal Operating Pressures Table
Table 3 may be used to help perform maintenance checks. This table is not a procedure for
charging the system and any minor variations in the pressures may be expected due to
differences in installations. However, significant deviations could mean that the system is not
properly charged or that a problem exists with some component in the system.
Charging Temperatures and Pressures – High Speed Only
XC20 Model -024 -036 -048 -060
Table 1 - Subcooling Values (High Capacity)
Saturation Temperature minus Liquid Line Temperature ºF (ºC) + 1ºF (0.5ºC)
Temp. °F (°C)
9 (5) 13 (7.2) 12 (6.7) 7 (3.9)
Table 2 - Approach Values (High Capacity)
Liquid Line Temperature minus Outdoor Ambient Temperature ºF (ºC) + 1ºF (0.5ºC)
Temp. °F (°C)
5 (2.8) 4 (2.2) 6 (3.3) 8 (4.4)
Table 3 - Normal Operating Pressures (Liquid +10 & Suction +5 psig)
Air
Temperature
Entering
Outside Coil
The values below are typical pressures; indoor evaporator match-up, in
door air quantity, and evaporator load will cause the pressures to vary.
Liquid Line Pressure / Vapor Line Pressure
65 (18.3) 235 / 139 247 / 141 247 / 137 238 / 133
70 (21.1) 252 / 140 262 / 142 267 / 139 255 / 134
75 (23.9) 272 / 141 284 / 143 288 / 139 274 / 135
80 (26.6) 293 / 142 304 / 144 310 / 140 295 / 136
85 (29.4) 316 / 144 327 / 145 332 / 142 316 / 137
90 (32.2) 340 / 144 350 / 146 358 / 143 338 / 138
95 (35.0) 364 / 145 375 / 147 383 / 143 362 / 139
100 (37.7) 390 / 146 400 / 148 410 / 144 388 / 141
105 (40.6) 417 / 147 426 / 149 437 / 145 415 / 142
110 (43.3) 445 / 149 457 / 150 467 / 146 442 / 143
115 (46.1) 474 / 150 487 / 150 497 / 148 470 / 144
 Loading...