

Lennox Relax series, Eco Relax series Owner's Manual
RELAX
ECO RELAX
MULTI RELAX
OWNERS MANUAL
FRANÇAIS
ESPAÑOL
ENGLISH
PORTUGUÊS
NEDERLANDS
DEUTSCH


ENGLISH

CONTENTS
SAFETY PRECAUTIONS .......................................................................................... 1
PARTS NAMES ......................................................................................................... 4
MANUAL OPERATION.............................................................................................. 5
OPTIMAL OPERATION............................................................................................. 5
ADJUSTING AIR FLOW DIRECTION ....................................................................... 6
HOW THE AIR CONDITIONER WORKS ................................................................... 7
REMOTE CONTROLLER SPECIFICATIONS ........................................................... 8
INTRODUCTION OF FUNCTION BUTTONS ON THE REMOTE CONTROLLER.... 8
NAMES AND FUNCTIONS OF INDICATORS ON REMOTE CONTROLLER .......... 9
OPERATING THE REMOTE CONTROLLER.......................................................... 10
MAINTENANCE....................................................................................................... 12
OPERATION TIPS ................................................................................................... 14
TROUBLESHOOTING TIPS.................................................................................... 16
Read This Manual
Inside you will find many helpful hints on how to use and maintain your air conditioner
properly. Just a little preventative care on your part can save you a great deal of time
and money over the life of your air conditioner. You'll find many answers to common
problems in the chart of troubleshooting tips. If you review the chart of
Troubleshooting Tips first, you may not need to call for service.
CAUTION
• Contact an authorised service technician for repair or maintenance of this unit.
Contact the installer for installation of this unit.
• The air conditioner is not intended for use by young children or invalids without
supervision.
• Young children should be supervised to ensure that they do not play with the air
conditioner.
• If the power cord is to be replaced, replacement work shall be performed by
authorised personnel only.
• Installation work must be performed in accordance with the national wiring
standards by authorised personnel only.
1
Safety Precautions
To prevent injury to the user or other people and property damage, the following
instructions must be followed.
Incorrect operation due to ignoring of instructions may cause harm or damage. The
seriousness is classified by the following indications.
WARNING
This symbol indicates the possibility of death or serious injury.
CAUTION
This symbol indicates the possibility of injury or damage to property.
Meanings of symbols used in this manual are as shown below.
[
Never do this.
Always do this.
[ Connect with the power
properly.
[ Do not operate or stop the
unit by inserting or pulling
out the power plug.
[ Do not damage or use an unspecified
power cord.
• Otherwise, it may cause
electric shock or fire due to
excess heat generation.
• It may cause electric shock
or fire due to heat
generation.
• It may cause electric shock or fire.
[ Do not modify power cord
length or share the outlet
with other appliances
[ Do not operate with wet
hands or in damp
environment.
[ Do not direct airflow at room
occupants only.
•
It may cause electric shock or
fire due to heat generation.
• It may cause electric shock.
• This could damage your health.
[ Always ensure effective
earthing.
[ Do not allow water to run
into electric parts.
[ Always install circuit breaker and a
dedicated power circuit.
•
No earthing m ay cause electric
shock.
• It may cause failure of
machine or electric shock.
• No installation may cause fire and
electric shock.
[ Disconnect the power if
strange sounds, smell, or
smoke comes from it.
[ Do not use the socket if it
is loose or damaged.
[ Do not open the unit during
operation.
•
It may cause fire and electric
shock.
• It may cause fire and electric
shock.
• It may cause electric shock.
[ Keep firearms away.
[ Do not use the power cord
close to heating
appliances.
[ Do not use the power cord near
flammable gas or combustibles, such
as gasoline, benzene, thinner, etc.
• It may cause fire.
• It may cause fire and electric
shock.
• It may cause an explosion or fire.
[ Ventilate room before operating air conditioner if there is a
gas leakage from another appliance.
[ Do not disassemble or modify unit.
• It may cause explosion, fire and, burns.
• It may cause failure and electric shock.
WARNING

2
[ When the air filter is to be
removed, do not touch the
metal parts of the unit.
[ Do not clean the air
conditioner with water.
[ Ventilate the room well when
used together with a stove, etc.
• It may cause an injury.
• Water may enter the unit and
degrade the insulation. It may
cause an electric shock.
• An oxygen shortage may occur.
[ When the unit is to be cleaned,
switch off, and turn off the
circuit breaker.
[ Do not put a pet or house
plant where it will be exposed
to direct air flow.
[ Do not use for special
purposes.
• Do not clean unit when power
is on as it may cause fire and
electric shock, it may cause an
injury.
• This could injure the pet or
plant.
• Do not use this air conditioner
to preserve precision devices,
food, pets, plants, and art
objects.
It may cause deterioration of
quality, etc.
[ Stop operation and close the
window in storm or hurricane.
[ Hold the plug by the head of
the power plug when taking it
out.
[ Turn off the main power switch
when not using the unit for a
long time.
• Operation with windows
opened may cause wetting of
indoor and soaking of
household furniture.
• Failue to do so may cause
electric shock and damage.
• It may cause failure of product
or fire.
[ Do not place obstacles around
air-inlets or inside of air-outlet.
[ Ensure that the installation
bracket of the outdoor
appliance is not damaged due
to prolonged exposure.
[ Always insert the filters
securely. Clean filter once
every two weeks.
• It may cause failure of
appliance or accident.
• If bracket is damaged, there is
concern of damage due to
falling of unit.
• Operation without filters may
cause failure.
[ Do not use strong detergent
such as wax or thinner. Use a
soft cloth for cleaning.
[ Do not place heavy object on
the power cord and take care
so that the cord is not
compressed.
[ Do not drink water drained from
air conditioner.
• Appearance may be
deteriorated due to change of
product color or scratching of
its surface.
• There is danger of fire or
electric shock.
• It contains contaminants and
could make you sick.
[ Use caution when unpacking and installing.
Sharp edges could cause injury.
[ If water enters the unit, turn the unit off at the power
outlet and switch off the circuit breaker. Isolate supply
by taking the power-plug out and contact a qualified
service technician.
CAUTION
3
Prior to Operation
1. Contact an installation specialist for install ati o n.
2. Make sure the unit is grounded efficiently.
3. Do not use a damaged or non-standard power cord.
4. Do not share the same outlet with other applianc es.
5. Do not use an extension cord.
6. Do not start/stop operation by shutting off the power supply.
Usage
1. Exposure to direct airflow for an extended period of time could be hazardous to your health. Do
not expose occupants, pets, or plants to direct air flo w for extended periods of time.
2. Due to the possibility of oxygen deficiency, ventilate the room when used together with stoves or
other heating devices.
3. Do not use this air conditioner for non-s pe cified special purposes (e.g. Preserving precision
devices, food, pets, plants, and art objects). Usage in such a manner could harm such property.
Cleaning and maintenance
1. Do not touch the metal parts of the unit when re mo vi ng the filte r. Injuries can occur when handling
sharp metal edges.
2. Do not use water to clean inside the ai r co ndi tio n er . E xp os ur e to wat er c an d es t r o y th e ins ul ation,
leading to possible electric shock.
3. When cleaning the unit, first make sur e that th e po we r and circ uit br ea ke r ar e tu r ne d of f.
Service
For repair and maintenance, contact your authorised service dealer.
Operating temperature
Mode
Temperature
Cooling operation Heating operation Drying operation
Room temperature 17 ºC ~ 32 ºC 17 ºC ~ 30 ºC 17 ºC ~ 32 ºC
Outdoor temperature
18 ºC ~ 43 ºC -7 ºC ~ 24 ºC 18 ºC ~ 43 ºC
CAUTION:
1. If air conditioner is used outside of the ab ov e co n ditions, certain safety protection features may
come into operation and cause the unit to function abnormally.
2. Room relative humidity less than 80%. If the air conditioner operates in excess of this figure,
the surface of the air conditioner may attract condensation. Please sets the vertical air flow
louver to its maximum angle (vertically to the floor), and set HIGH fan mode.
3. Optimum performance will be achieved within these operating temperature.
4
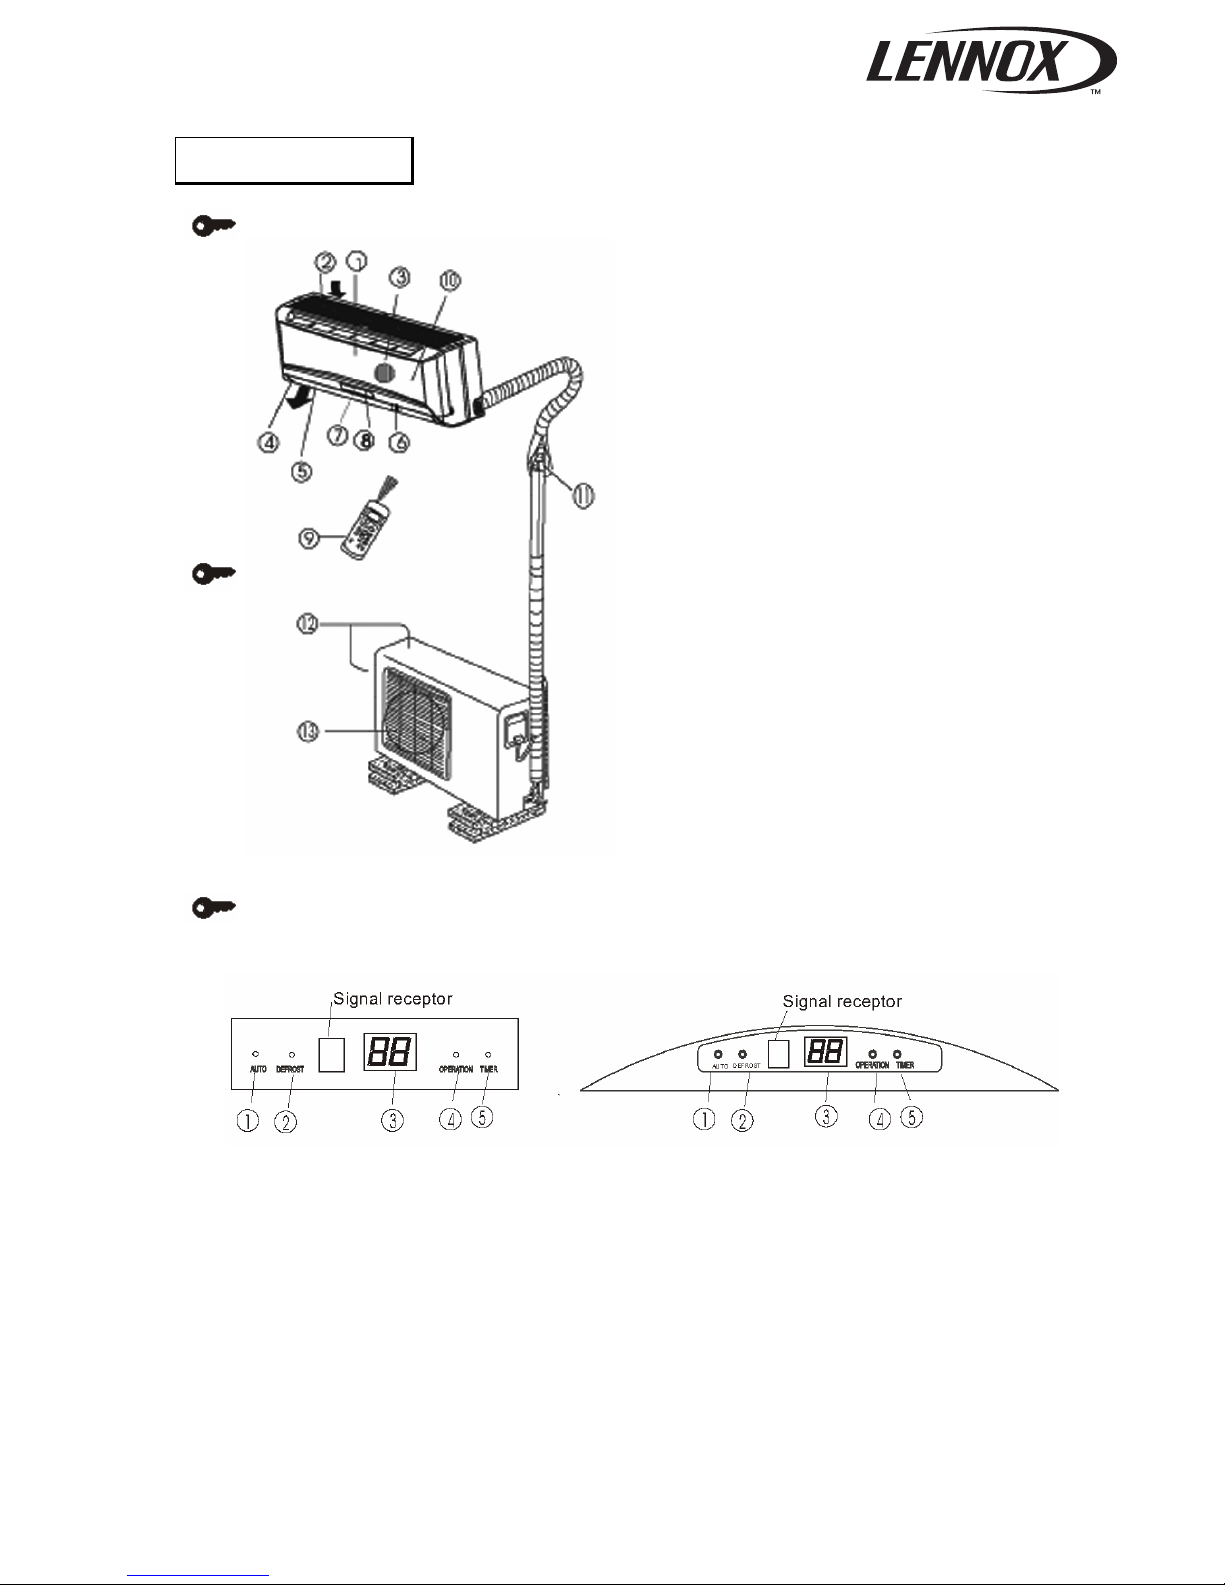
PARTS NAMES
Indoor unit
Outdoor unit
Indoor unit
1. Front panel
2. Air inlet
3. Air filter
4. Air outlet
5. Horizontal air flow grille
6. Vertical air flow louver
7. Display panel
8. Remote controller signal receiver
9. Remote controller
10. Manual control button
Outdoor unit
11. Connecting pipe, drain hos e
12. Air inlet (side and rear)
13. Air outlet
The operation indicator lights flash rapidly
(five times per second.) when safety
protection features come into operation.
Note:
All the pictures in this manual are for
explanation purpose only. They may be slightly
different from the air conditioner you
purchased(depend on model). The actual
shape shall prevail.
Function indicators on indoor unit display panel
The display panel of indoor unit will look like one of the following pictures:
1. AUTO indicator
This indicator illuminates when the air conditioner is in AUTO operation.
2. DEFROST indicator (For Cooling & Heating models only)
This indicator illuminates when the air conditioner starts defrosting automatically or when the
warm air control feature is activated in heating operation.
3. TEMPERATURE indicator
Displays the temperature settings when the air conditioner is operational.
4. OPERATION indicator
This indicator flashes after power is on and illuminates when the unit is in operation.
5. TIMER indicator
This indicator illuminates when TIMER is set ON/OFF.
5
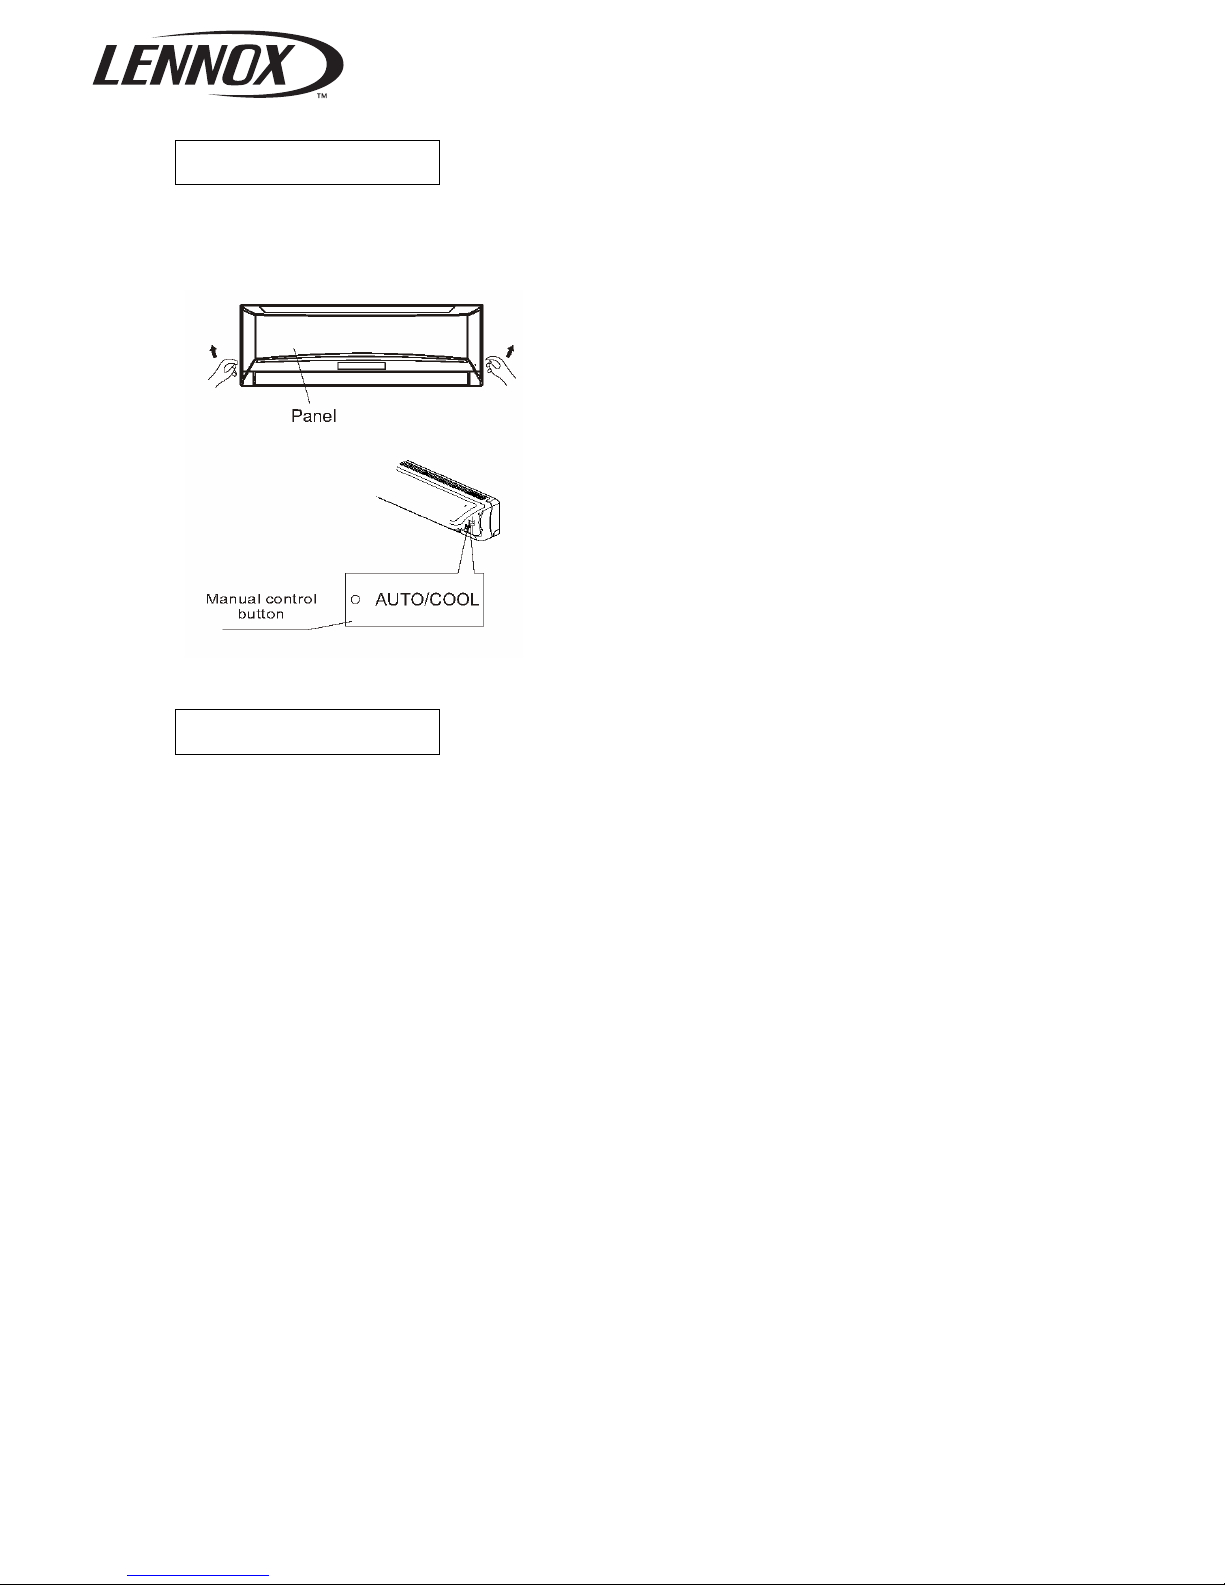
MANUAL OPERATION
Manual operation can be used temporarily in case you can not find the remote controller or its
batteries are exhausted.
1. Open and lift the front panel up to an angle until it
remains fixed with a clicking sound.
2. One press of the manual control button will lead to the
forced AUTO operation.
3. Close the panel firmly to its original position.
CAUTION:
• Once you push the manual button, the operation mode is
shifted in an order as: AUTO, COOL, OFF.
• Push the button twice, the unit will operate in forced
COOL mode. This is used for testing purposes only.
• Third press will stop the operation and turn off the air
conditioner operation.
• To restore the remote controller operation, use the
remote controller directly.
OPTIMAL OPERATION
To achieve optimal performance, please note the following:
• Adjust the air flow directi o n co rr ectl y so t ha t it is not di re ct ed on p eople .
• Adjust the temperature to achieve the highest comfort level. Do not adjust the unit to excessive
temperature levels.
• Close doors and wind ow s on C OO L or HEAT mo d es , or pe rf ormance may be reduced.
• Use TIMER ON button on the remote controller to select a time you want to start your air
conditioner.
• Do not put any object near air inlet or air outlet, as the efficiency of the air conditioner may be
reduced and the air conditioner may stop running.
• Clean the air filter periodically, otherwise cooling or heating performance may be reduced.
• Do not operate unit with horizontal louvre in closed position.
6
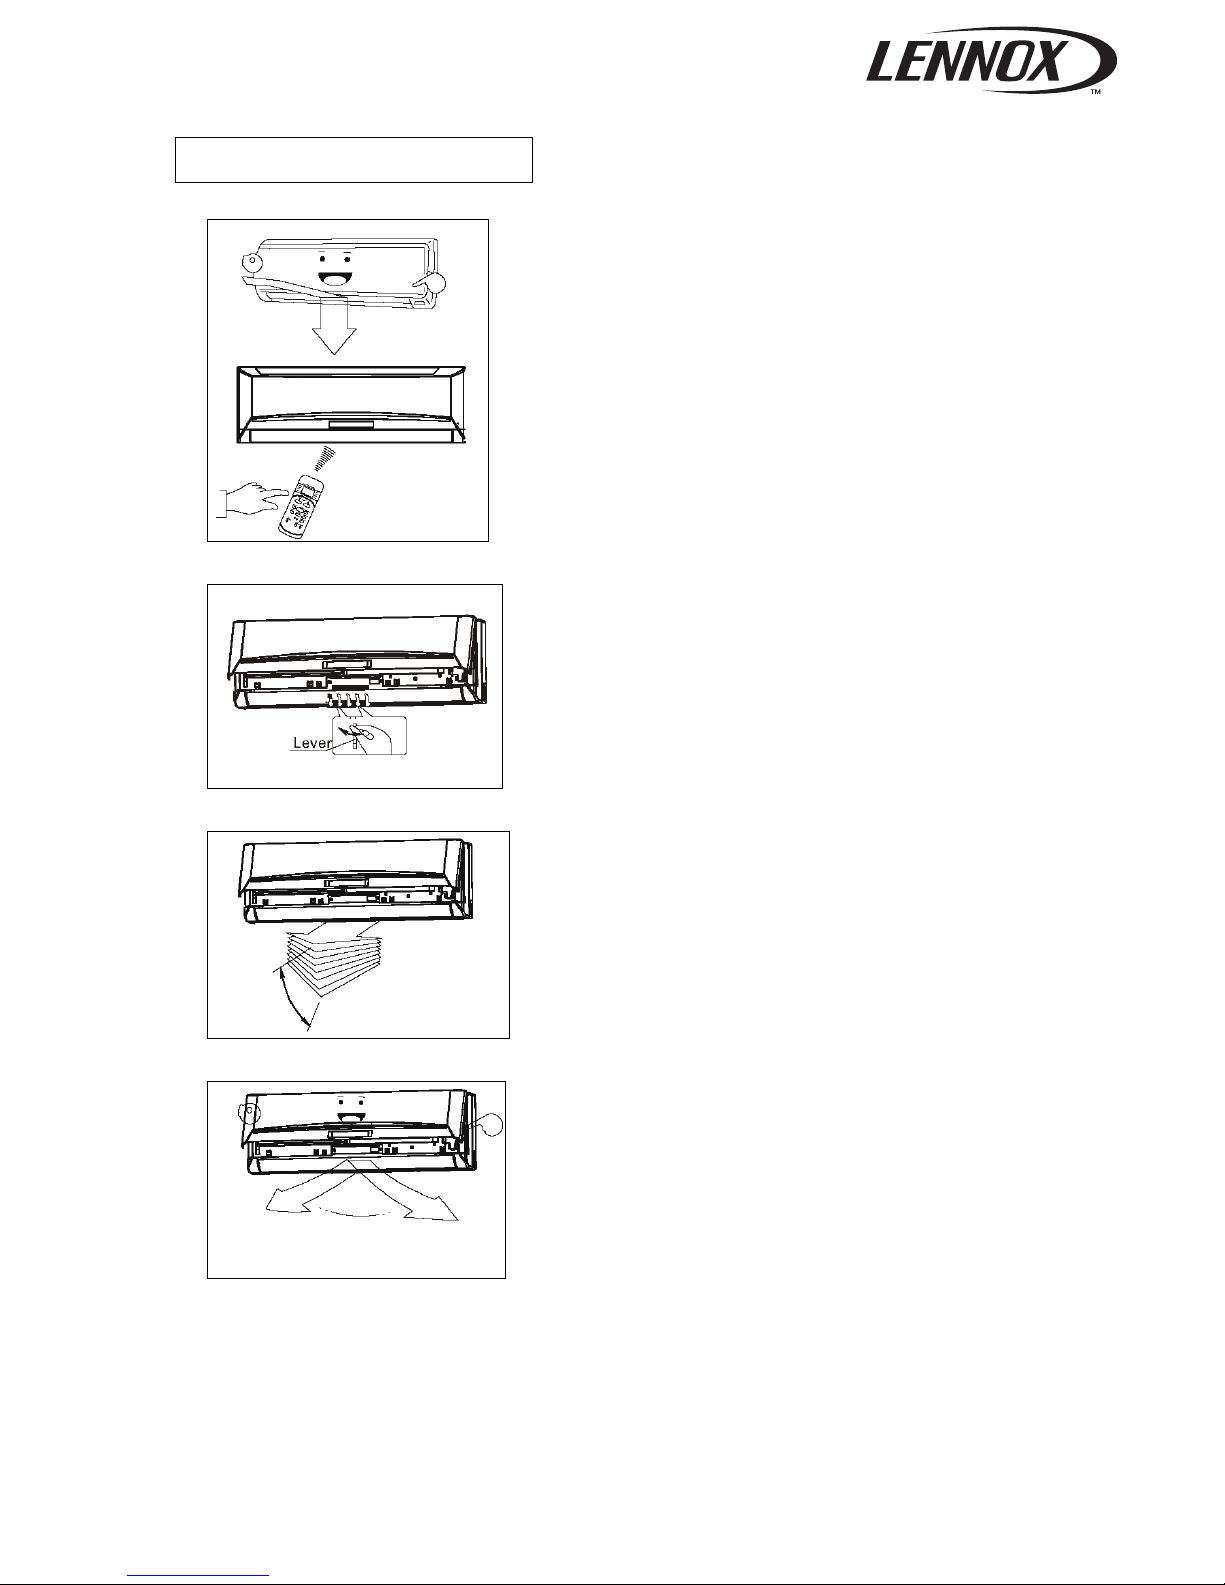
ADJUSTING AIR FLOW DIRECTION
• Adjust the air flow dir ecti o n pr o perly otherwise, it might
cause discomfort or cause uneven room temperatures.
• Adjust the horizontal louver using the remote controller.
• Adjust the vertical louver manually.
Adjusting the Vertical Air Flow Direction (up - down)
The air conditioner automaticall y adj ust s th e ve rtical air flow
direction in accordance with the operating m od e.
To set the vertical air flow direction
Perform this function while the unit is in operation.
Keep pressing the AIR DIRECTION button on the remote
controller to move the louver to the desired direction.
• Adjust the vertical air flow direction to the desired
direction.
• In subsequent operations, the vertical air flow is
automatically set in the direction to which you adjusted the
louver by pressing the AIR DIRECTION button.
To set the horizontal air flow direction (l ef t - righ t)
Adjust the vertical louver manually usin g th e l ev er on t he left
or right side of the vertical louver arm (Depending on model).
Take care not to catch fingers on the fan, horizontal louver or
to damage vertical louvers. When the air conditioner is in
operation and the horizontal louver is in a specific position,
move the lever at left (or right, depending on model) end of
the air outlet to the desired position.
To automatically swing the air flow direction (up - down)
Perform this function while the air conditioner is in operation.
• Press the SWING button on the remote controller.
• To stop the function, press the SWING button again.
Press AIR DIRECTION button to lock louver in desired
position.

7
HOW THE AIR CONDITIONER WORKS
AUTOMATIC OPERATION
• When you set the air conditioner in AUTO mode, it will
automatically select cooling, heating (cooling/heating models
only), or fan only operation dependi n g on what tem p er ature
you have selected and the room temperat ur e.
• The air conditioner will control room temperature
automatically round the temperature point set by you.
• If the AUTO mode is uncomfortable, you can select desired
conditions manually.
SLEEP OPERATION
When you push SLEEP button during cooling, heating (cooling
only type without),or AUTO operation , the air conditioner will
automatically increase (cooling) or dec r e as e (he ating) 1 per
hour. The set temperature will be steady 2 hours later. The fan
speed will be automatically controlled .
Note: The unit will be automatically turned off after 7
hours when on SLEEP operation.
DRYING OPERATION
• The dry mode will automatically select the drying operation
based on the difference between the set temperature and
the actual room temperature.
• The temperature is regulated while dehumidifying by
repeating turning on and off of the cooling op er ati o n or fa n
only. The fan speed is LOW.
• The AIR DIRECTION and SWING buttons will be disabled when the air conditioner is not in
operation (including when the TIMER ON is set).
• Do not operate the air c on di tio ne r for l ong pe riods with the air flow direction set downward in
cooling or dry mode. Otherwise, condensation may occur on the surface of the horizontal louver
causing moisture to drop on to the floor or on furnishings.
• Do not move the horizo nt al louv er ma nu all y. Alw a ys u se th e AIR DI RECTION or SWING button.
If you move this louver manually, it may malfunction during operation. If the louver malfunctions,
stop the airconditioner once and restar t i t.
• When the air conditioner is started immediately after it was stopped, the horizontal louver might
not move for approximately 10 seconds.
• Open angle of the horizontal louver should not be set too small, as COOLING or HEATING
performance may be impaired due to too restricted air flow area.
• Do not operate unit with horizontal louver in closed position.
• When the air conditioner is connected to power (initial power), the horizontal louver may
generate a sound for 10 seconds, this is a normal operation.
CAUTION
8
Remote Controller
Remote Controller Specifications
Model R51D/E, R51D/CE
Rated Voltage 3.0V (Alkaline dry batteries LR03 X 2)
Lowest Voltage of CPU
Emitting Signal
2.0V
Reaching Distance
Signal Range
8 m (when using 3.0 voltage, it Gets 11 m)
Environment -5 ºC ~ 60 ºC
Introduction of Function Buttons on the Remote Controller
Figure 1
SET TEMPERATURE (ºC)
AUTO
FAN
COOL
HIGH
DRY
MED
HEAT
LOW
TEMP.
MODE
ON/OFF
FAN SPEED
SWING
ECONOMIC
TIMER ON
RESET
LOCK
TIMER OFF
AIR DIRECTION
POWERFUL
1. TEMP ButtonT: Press the button to decrease the indoor temperature setting.
2. TEMP ButtonS: Press the button to increase the indoor temperature setting.
3. ON/OFF Button: Push this button to start the unit operation. Push the button again to stop the unit
operation.
4. MODE Select Button: Each time you push the button, a mode is selected in a sequence that
goes from AUTO COOL DRY HEAT and FAN, as the following figure indicates:
J AUTO J COOL J DRY J HEAT J FAN –
NOTE: COOL only model has no HEAT featur e.
5. SWING Button: Push this button, the louver would swing up and down automatically. Push again
to stop it .
6. RESET Button: When the RESET button is pushed , all of th e cu rr en t set tin gs are c an celled and
the control will return to the initial settings. (Use a 1mm little round stick to push the button.)
7. AIR DIRECTION Button: Push this button, the lou ve r can b e fixe d at a d esi re d a ngl e. The louver
swing(upward or downward) to a certain angle for each press. When the louver swing at an angle
which would affect the cooling and heating efficiency of the air conditioner, it would automatically
change the swing direction (upward or downward).
8. SPEED Button: This button is used for setting Fan Speed in the sequence that goes from AUTO
LOW MED to HIGH, then back to Auto.
9. TIMER ON Button: Press this button to preset the time ON (start to operate). Each press will
increase the time ON setting in 30 minutes increments. When the setting time displays 10:00,
each press will increase the time ON setting in 60 minutes increments. To cancel the time ON
program, simply adjust the time ON to 0:00.
 Loading...