

Lennox LNFS2610, LNIV2610, LNFS3510, LNIV3510, LNFS5110 Installation Manual
...
For MODELS –
FIXED SPEED INVERTERS
LNFS2610 LNIV2610
LNFS3510 LNIV3510
LNFS5110 LNIV5010
Australia 13 23 50 New Zealand 0800 653 330
Web www.lennoxaus.com.au
INSTALLATION MANUAL
FOR ROOM
AIR CONDITIONER
(Split Wall-Mounted Type)
E963_Lennox Split Wall Mounted Installation Manual 12pp A5_4.indd 12-1E963_Lennox Split Wall Mounted Installation Manual 12pp A5_4.indd 12-1 23/01/12 9:28 AM23/01/12 9:28 AM
2 3
SAFETY PRECAUTIONS SELECT THE BEST LOCATION
• Please read this installation manual completely before
installing the product.
• If the power cord is damaged, replacement work shall be
performed by authorized personnel only.
• Installation work must be performed in accordance with
the national wiring Standards by authorized personnel
only.
• Contact an authorized service technician for repair,
maintenance or installation of this unit.
• This appliance is not intended for use by persons
(including children) with reduced physical, sensory or
mental capabilities, or lack of experience and knowledge,
unless they have been given supervision or instruction
concerning use of the appliance by a person responsible
for their safety.
• Children should be supervised to ensure that they do not
play with the appliance.
• All the pictures in the instructions are for explanation
purposes only. The actual shape should prevail.
• The design and specifi cations are subject to change
without prior notice for product improvement. Consult
with the sales agency or manufacturer for details.
• The seriousness is classifi ed by the following indications:
WARNING
This symbol indicates
the possibility of death or
serious injury
CAUTION
This symbol indicates
the possibility of injury or
damage to property
Indoor Unit
• Avoid locating the unit near a heat source.
• Remove any obstacles blocking the air circulation.
• Choose a location where air circulation in the room is
good.
• Choose a place where drainage can be easily done.
• Find a place where noise prevention or reduction is taken
into consideration.
• Do not install the unit near the doorway.
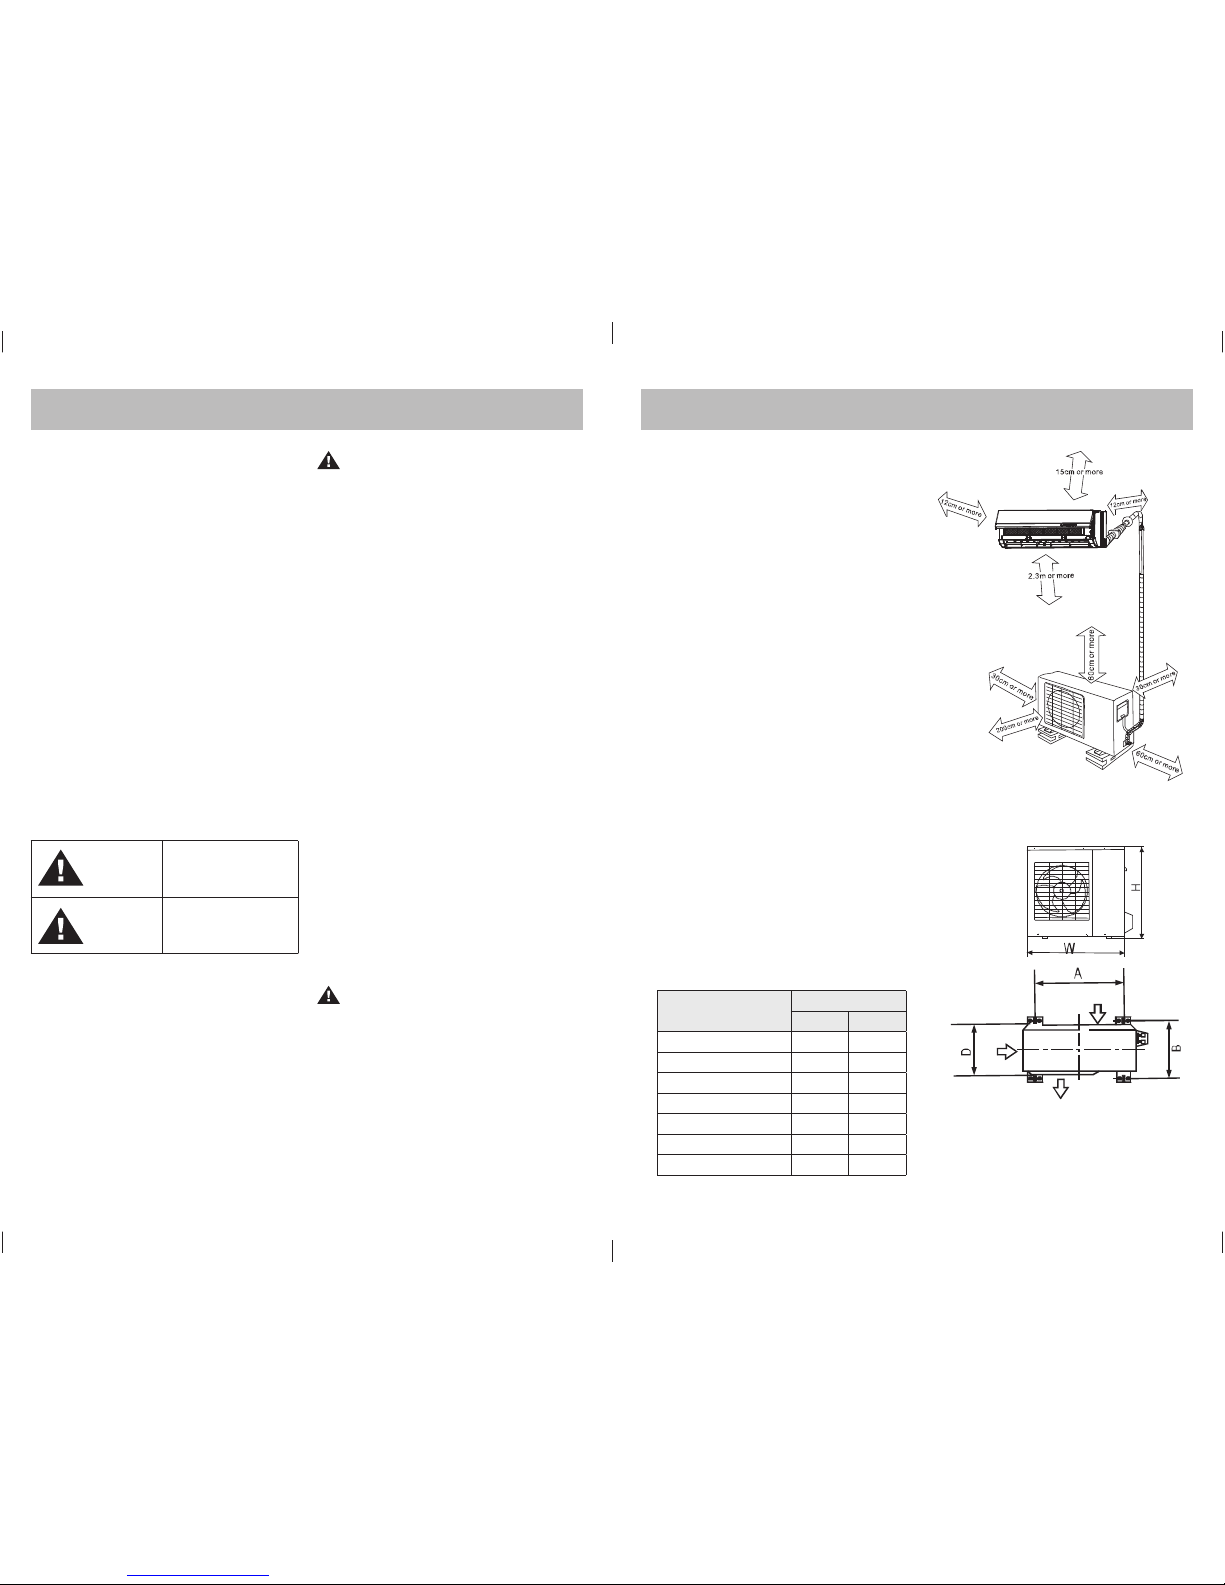
• Ensure the free spaces indicated by arrows from the
wall, ceiling, fence or other obstacles are observed.
• Avoid any direct sunlight. If not possible, sunlight
protection should be considered.
Outdoor Unit
• If an awning is built over the unit to prevent direct
sunlight or rain, be careful that heat radiation from the
condenser is not obstructed.
• Be aware that animals or plants may be affected by the
discharge of hot air from the unit.
• Keep free the spaces indicated by the diagram arrows
from the wall, ceiling, fence or other obstacles.
• Do not place any obstacles near the unit which may
cause a short circuit of the discharged air.
Installation of outdoor unit
• Anchor the outdoor unit with a bolt and nut ∅10 or ∅8
tightly and horizontally on concrete or a rigid mount.
NOTE: The outdoor unit you have purchased should
be like one of the following. Install the outdoor unit
according to the dimensions as indicated below:
Outdoor unit dimensions
(W x H x D) mm
Mounting dimensions
A (mm) B (mm)
670 x 540 x 250 481 276
760 x 590 x 285 530 290
775 x 545 x 310 600 320
700 x 540 x 240 458 250
845 x 700 x 320 560 335
780 x 540 x 250 549 276
685 x 430 x 260 460 276
WARNING
1) Install strictly in accordance with these instructions.
If installation is not done properly, water leakage, an
electric shock and a fi re may occur.
2) Only use the supplied accessories and authorised parts
for installation. Failure to do so may cause the unit to fail
and cause water leakage, electrical shock or fi re.
3) Install in a suitable location which can comfortably hold
the unit’s weight. If not installed properly, the set will fall
and cause damage or injury.
4) For all electrical work, follow the requisite national
wiring regulations and these installation instructions. An
independent circuit and single outlet must be used. If
electrical circuit capacity is insuffi cient or electrical work
is defective, it may cause an electric shock or fi re.
5) Use the specifi ed cable, connect tightly and clamp the
cable so that the terminal is not impacted by any force.
If the connection or fi xing is not adequate, it will cause
overheating or a fi re at the connection point.
6) Wiring routing must be properly arranged so that control
board cover is fi xed securely. If control board cover is not
fi xed perfectly, it will cause overheating at connection
point of terminal and result in fi re or electric shock.
7) When doing piping connections, take care not to let
gases other than the specifi ed refrigerant go into
the refrigeration cycle. Otherwise, it will cause lower
capacity, abnormally high pressure in the refrigeration
cycle and result in an explosion and personal injury.
8) Do not modify the length of the power supply cord or use
an extension cord. Do not share the single outlet with
other electrical appliances. Doing so will cause fi re or
electric shock.
CAUTION
1) This equipment must be earthed and installed with an
earth leakage current breaker. It may cause an electric
shock if grounding is not done correctly.
2) Do not install the unit in a place where leakage of a
fl ammable gas may occur. If gas leaks and accumulates
near the unit, it may cause a fi re.
3) Carry out drainage piping as specifi ed in these
installation instructions. If drainage is not done correctly,
water may enter the room and damage the furniture.
Air outlet
Air inlet
Air inlet
E963_Lennox Split Wall Mounted Installation Manual 12pp A5_5.indd 2-3E963_Lennox Split Wall Mounted Installation Manual 12pp A5_5.indd 2-3 2/02/12 9:44 AM2/02/12 9:44 AM
 Loading...