

Page 1

*2P1210* *P506053-01*
2010 Lennox Industries Inc.
Dallas, Texas, USA
HOMEOWNER’S MANUAL
icomfort Touch® Thermostat
Touch Screen Programmable Communicating Thermostat
CONTROLS
506053−01
12/10
Supersedes 10/10
General
The icomfort Touch® thermostat is shipped complete with mounting
hardware, installation and setup instructions, warranty information, and
a Homeowner’s Manual.
Most operational information is contained in the thermostat’s HELP
screens, however this Homeowner’s Manual provides general information and tips on how to access the HELP screens.
Litho U.S.A.
Page 2

506053−01 12/10
Page 2
Table of Contents
icomfort Touch® Thermostat 2. . . . . . . . . . . . . . . . . . . . . . . . . . . . . .
Thermostat Lock−out 2. . . . . . . . . . . . . . . . . . . . . . . . . . . . . . . . . . . .
Start up 3. . . . . . . . . . . . . . . . . . . . . . . . . . . . . . . . . . . . . . . . . . . . . . .
User Dashboard and HELP 4. . . . . . . . . . . . . . . . . . . . . . . . . . . . . . .
User Settings 6. . . . . . . . . . . . . . . . . . . . . . . . . . . . . . . . . . . . . . . . . .
Setting time and date 8. . . . . . . . . . . . . . . . . . . . . . . . . . . . . . . . . . . .
Setting indoor temperature 9. . . . . . . . . . . . . . . . . . . . . . . . . . . . . . .
Setting humidity controls 11. . . . . . . . . . . . . . . . . . . . . . . . . . . . . . . . .
Setting a custom program (scheduling) 13. . . . . . . . . . . . . . . . . . . . .
Display outdoor temp. and indoor humidity on HOME screen 16. . .
Alerts 17. . . . . . . . . . . . . . . . . . . . . . . . . . . . . . . . . . . . . . . . . . . . . . . . .
WARNING
Do not switch system to cool if the outdoor temperature is below
45°F (7°C). This can damage the cooling system.
NOTICE
Use this thermostat only as described in this manual.
icomfort Touch® Thermostat
The communicating icomfort Touch® thermostat is an electronic 7−day
universal multi-stage programmable touch screen thermostat with color
display. It also offers enhanced capabilities which include humidification
measurement and control, dew point adjustment control, dehumidifica-
tion measurement and control, Humiditrol® Enhanced Dehumidification
Accessory (EDA) capability, and equipment maintenance reminders.
The thermostat’s autochangeover mode permits control of heating, cooling, humidification, and dehumidification without user involvement.
The thermostat stores system parameters in nonvolatile memory (retains data when electrical power fails or is turned off), and includes onboard help screens. The thermostat supports heat pumps or non−heat
pump units, with up to 4 stage heat / 2 stage compressor operation. (2
stages of heat pump heating and 2 stages of auxiliary backup heat are
provided. Also, 2 stages of emergency heat are provided).
Indoor Air Quality is supported with time-based notification of consumables including media filters, UVC bulbs, humidifier pads, and PureAir
catalyst service / replacement.
Thermostat Lock−out
A lock" icon at the bottom
center screen (shown in the
picture), indicates the thermostat is either partially− or fully−
locked. Partially−locked, any
user can adjust the temperature up or down to set a hold"
for a selectable time.
Fully−locked, no one can make any changes to the thermostat’s settings.
To unlock, press and hold the lock" icon for 5 seconds.
To lock the thermostat, access Screen lock−out" through the User Preferences described on Page 6.
Page 3
icomfort Touch 7−Day Programmable Communicating Thermostat
Page 3
Start up
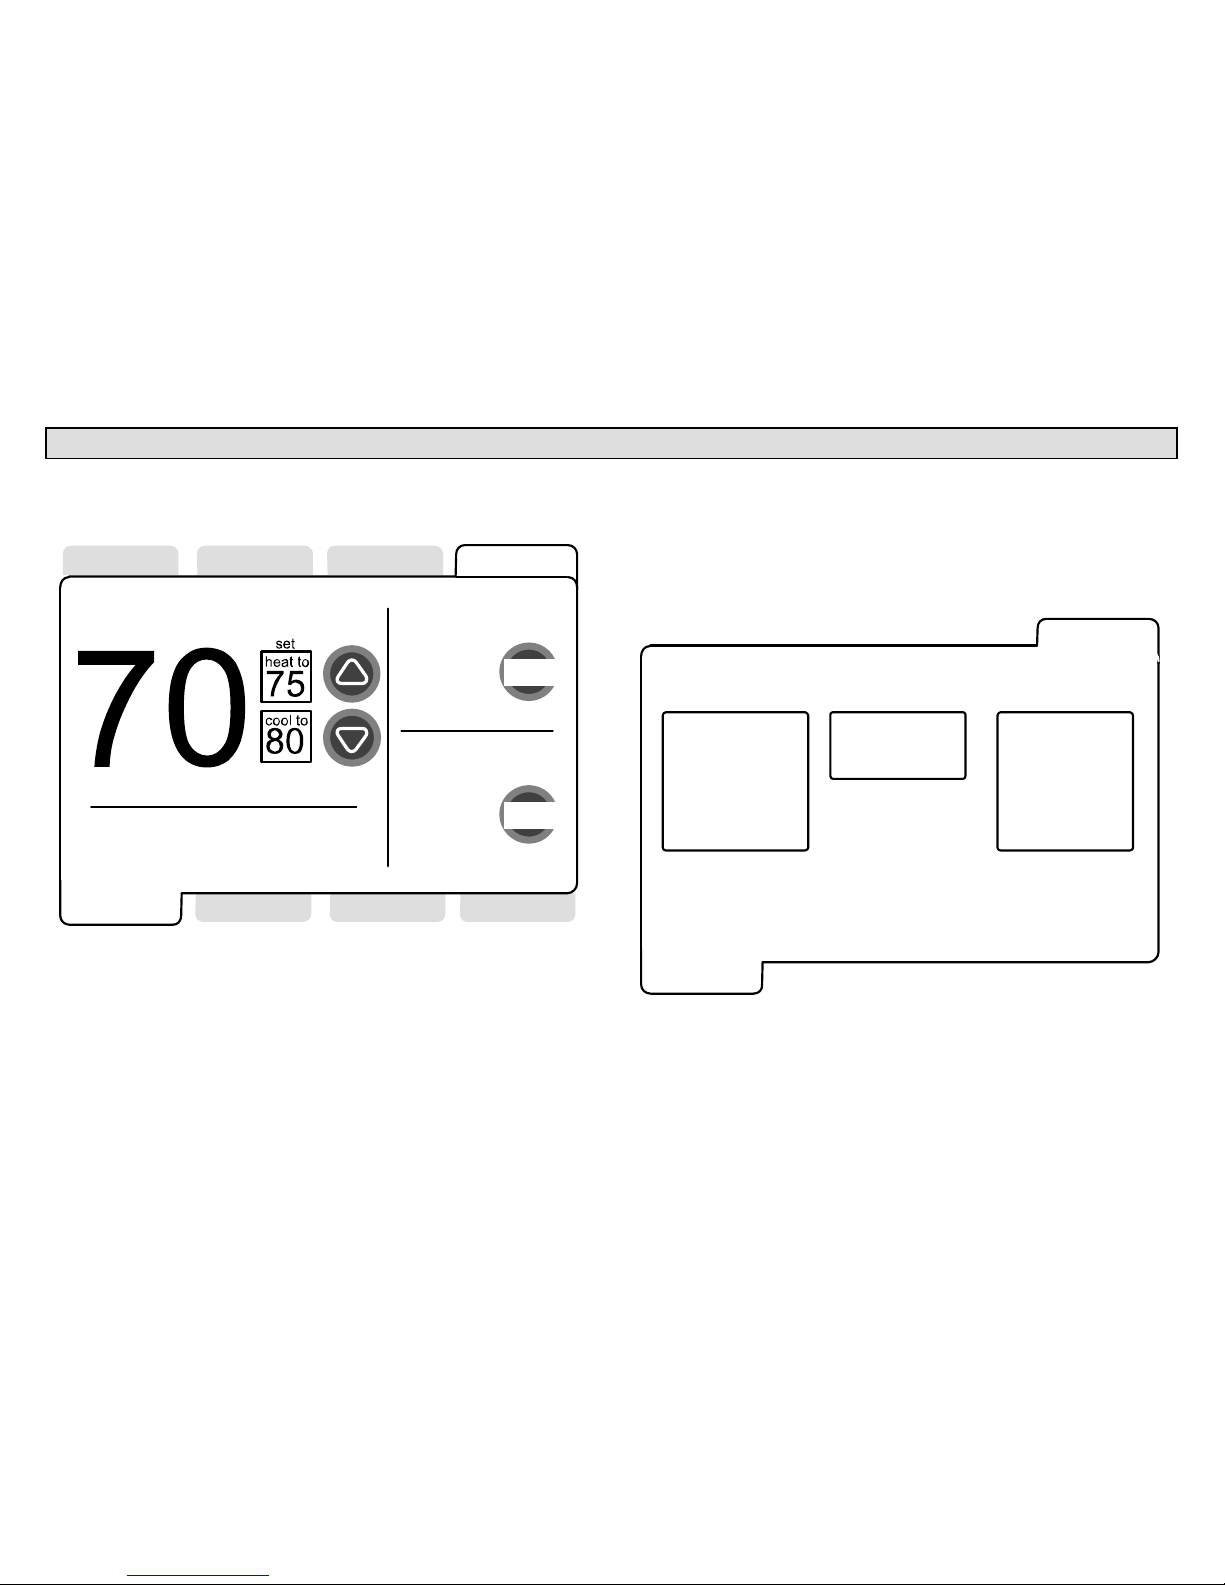
In event of power failureIf a power failure is experienced, when the
power comes back on, the screen will show a DISCOVERY BAR (shown
below) while the thermostat reboots. When the reboot is complete, the
HOME screen will return.
SYSTEM DISCOVERY IN PROGRESS
01.60.00.9999
After the thermostat and your system are fully connected and powered
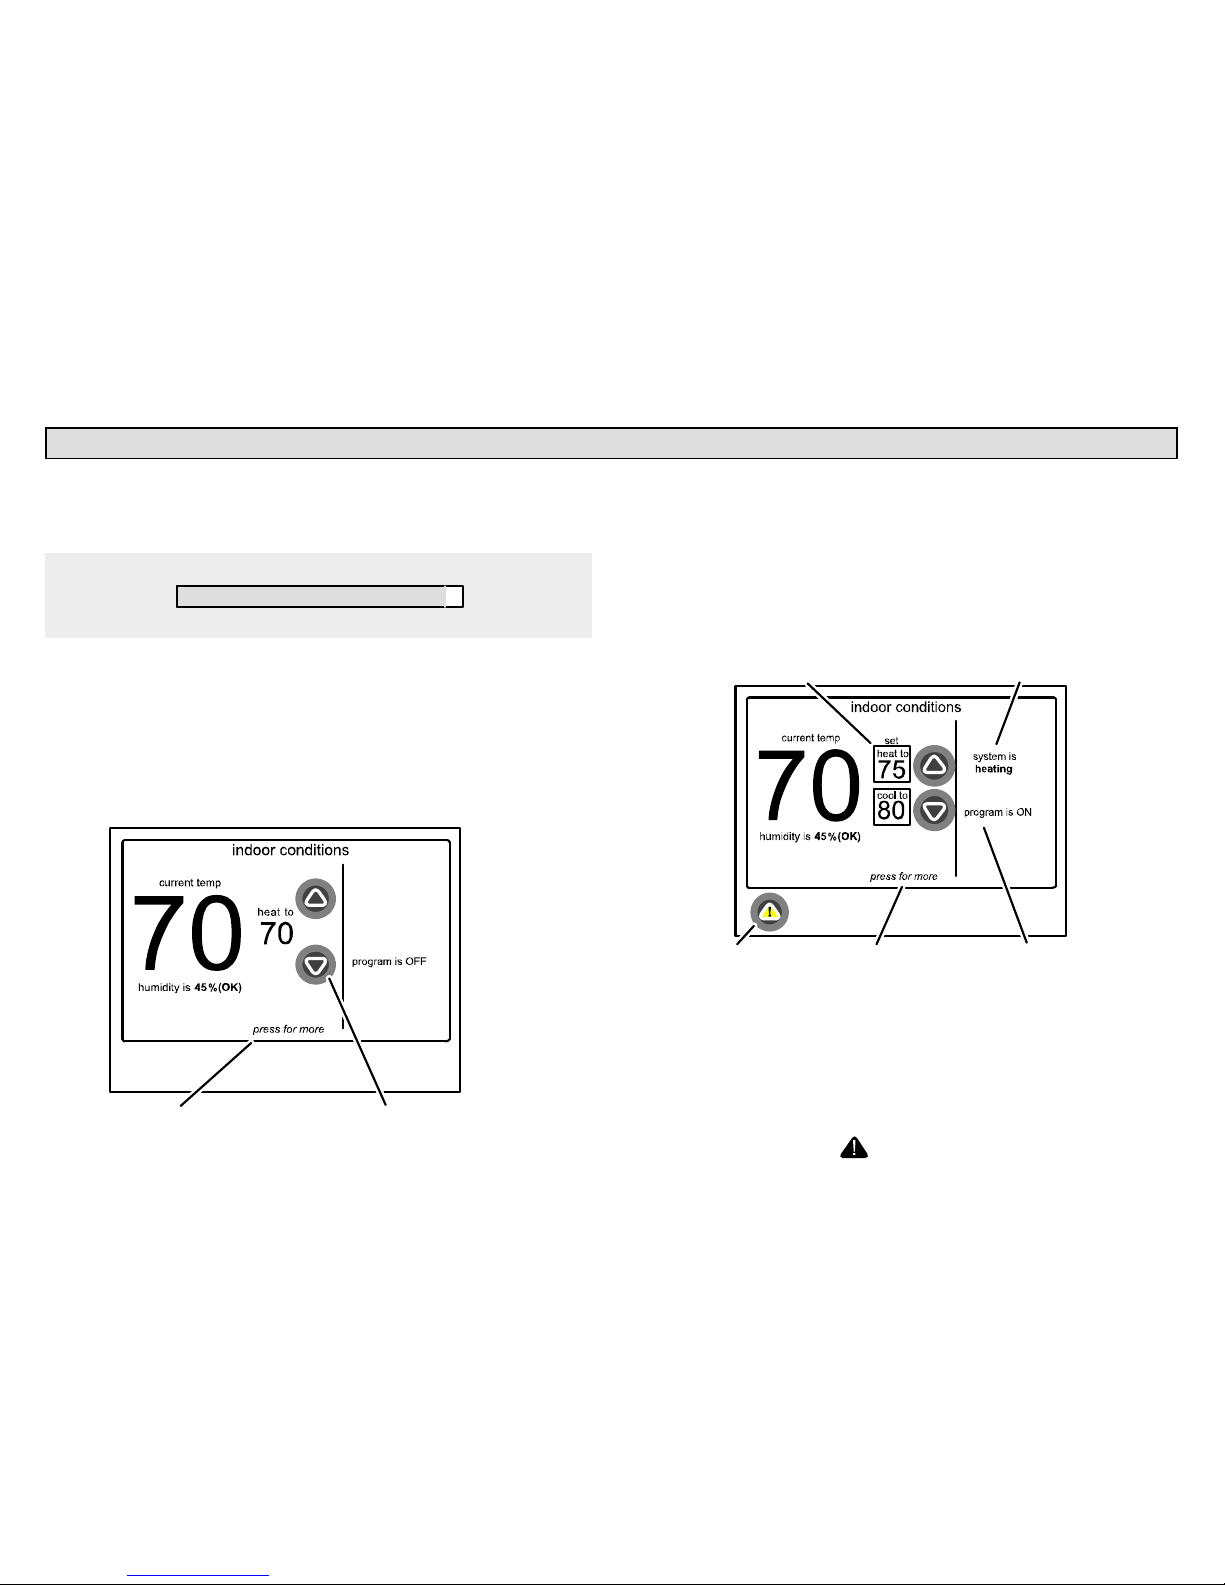
on, the icomfort Touch Home screen is displayed. Figure 1 shows one
of the more basic displays. Note that it’s program is OFF, that the current
and heat to" temperatures are the same (system is not running) and
there are no alerts.
From this screen you may manually adjust the temperature setting using
the up/down arrows, or access the User dashboard" screen (figure 3) by
pressing the home screen in the press for more area.
press to go to user dashboard use arrows to change temperature
Figure 1. Home screen − not programmed, not running
The Home screen shown in figure 2 reflects a more complex display.
Note that it’s program is ON, that it is set to either heat or cool as necessary, and that the current" and set " temperatures are different (therefore, the system is running). In the example, notice also that there are
service alerts present.
program is ONalerts are active press for more
both ’heat to’ and ’cool to’ are programmed to come on as necessary
system is currently ON
and is heating
Figure 2. Home screen − programmed, running − active alerts
From this screen you may still adjust temperature settings, but when you
do so, you will be prompted to set a specific time to allow the change to
remain in effect. The user may also access the dashboard" by pressing
the screen in the press for more area, and view active service alerts by
pressing the screen on the icon.
Page 4
506053−01 12/10
Page 4
User Dashboard and HELP Screens
The user dashboard allows you to set the system to operate the way you
want it to operate. From the dashboard, you can access indoor settings
(shown in figure 3), programs, indoor humidity, alerts and HELP.
system settings
fan settings
heat & cool
cool only
heat only
off
auto
on
circulate
temperature settings
system is
heating
program is ON
current temp
indoor
settings
indoor
humidity
alerts
programs HOME
HELP
select
select
weather
zones
Figure 3. User dashboard − indoor settings
HELP screens guide you through all your setup procedures. This manual does not detail all the HELP available. Use the on−board HELP to get
answers to all your setup questions.
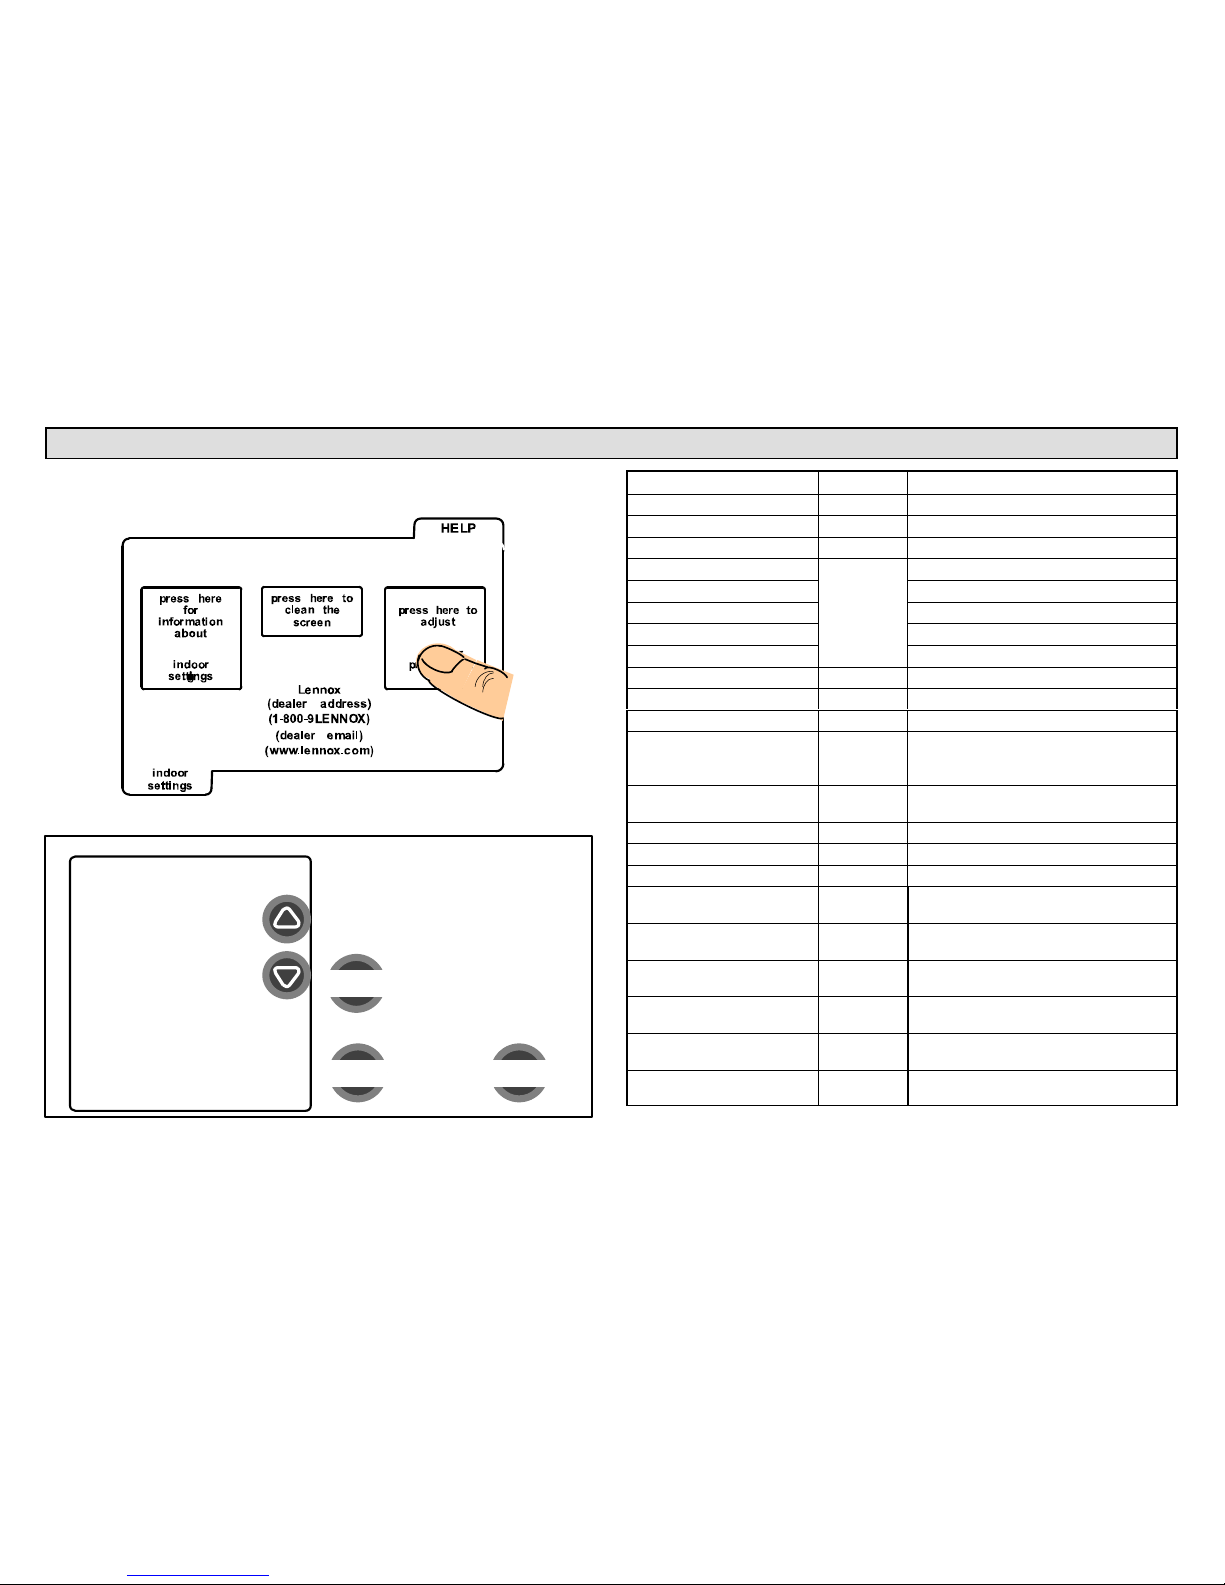
Press HELP tab in the top right corner; the User help access" screen
(figure 4) appears. From this screen, you can access help related to the
previously displayed screen, you can deactivate the pressscreen temporarily for cleaning the screen, and you can access the user settings
option to make adjustments such as Fahrenheit/Celsius, 12Hr/24Hr display, etc. (see Page 6).
press here for
information about
indoor settings
press here to
clean the screen
press here to
adjust
user preferences
Lennox
(dealer address)
(1−800−9 LENNOX)
(dealer email)
(www.lennox.com)
HELP
indoor
settings
Figure 4. User help access
Page 5
icomfort Touch 7−Day Programmable Communicating Thermostat
Page 5
User Dashboard and HELP Screens (continued)
Clean screen
Press the ’press here to clean the screen’ box. A 30−second timer appears and the screen is not sensitive to touch during the countdown.
Clean the screen using a mild lens cleaning solution and soft cloth.
OK TO CLEAN SCREEN
30
Figure 5. Clean screen
HELP screens
For this example, the indoor settings page is open. Press the press
here for information about indoor settings" box (as shown in figure 4)
to access HELP.
If multiple pages" of help are available, the first page of help will appear
(as shown in figure 6). Multiple presses will scroll through the available
pages of help. (The example shows only two of the available pages.)
User preferences
The third box in the user help access screen (figure 4) is press here to
adjust user preferences". This allows the user to change many settings
in the thermostat. Details are provided in the follow pages (see Page 6).
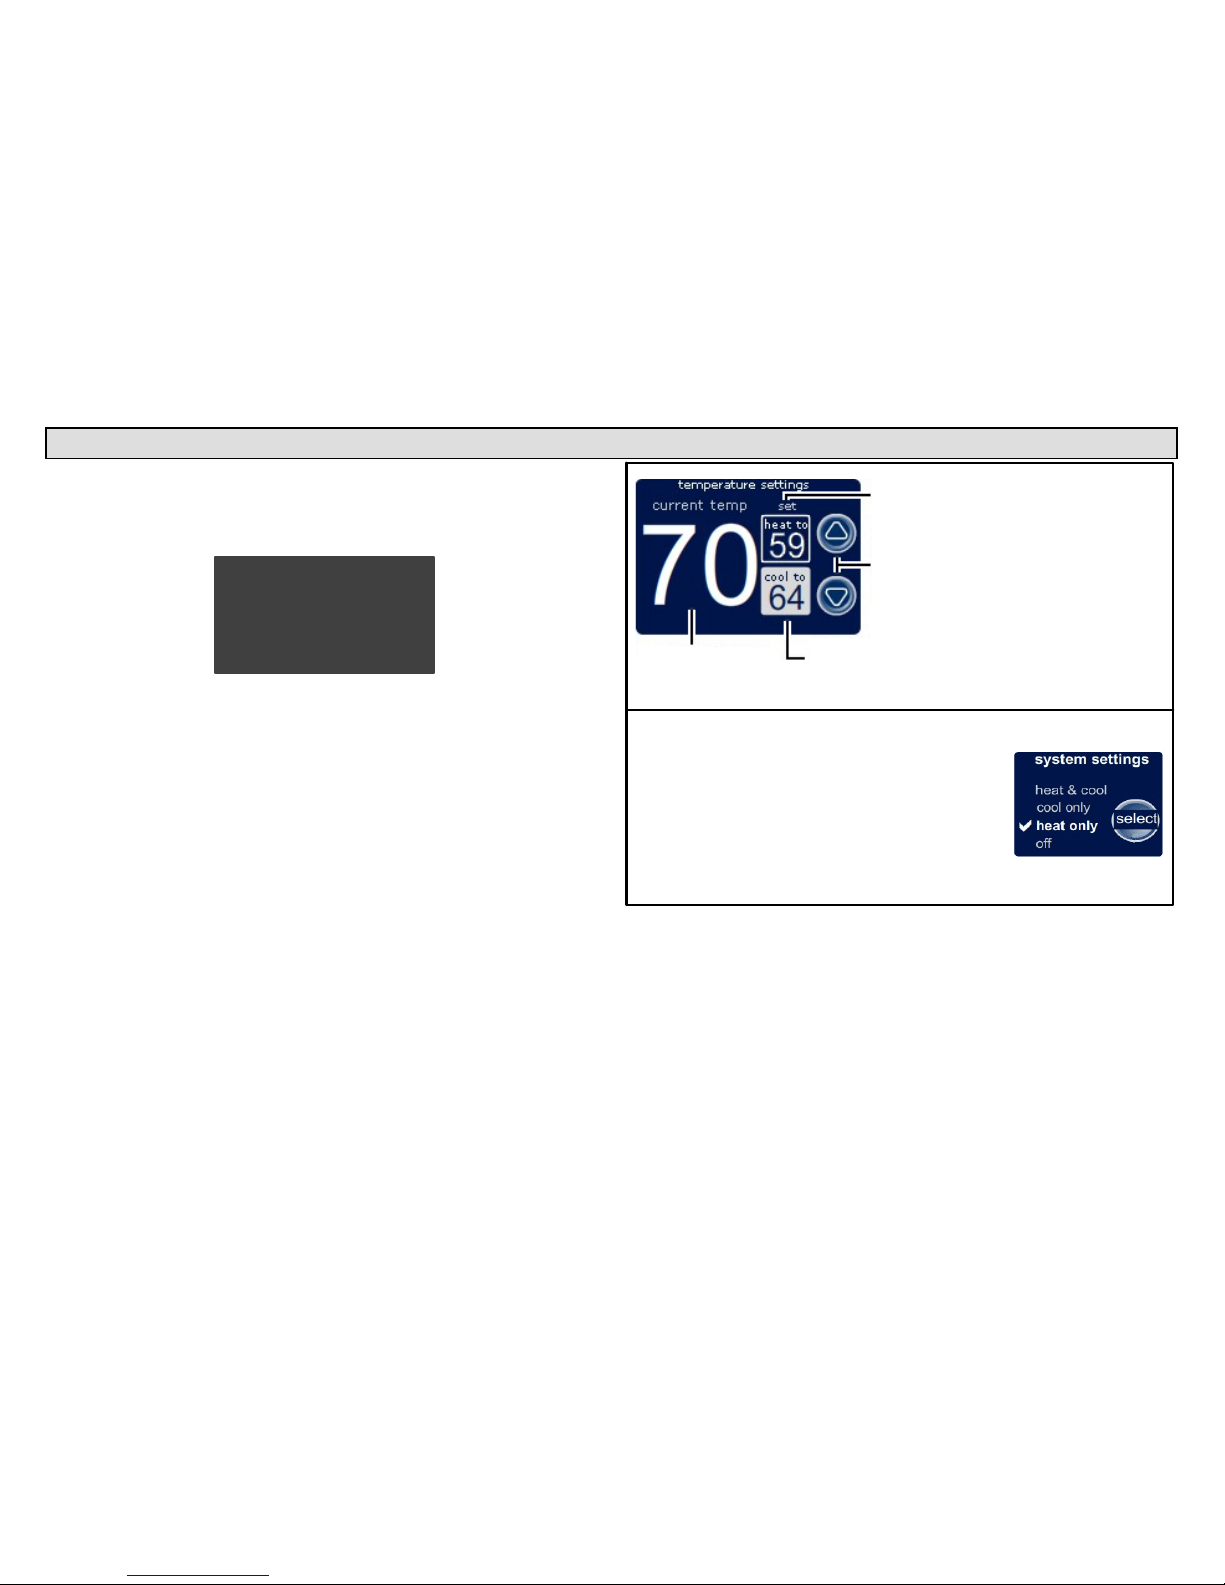
System settings indicate how the
temperature is controlled in your home
select" allows you to toggle between options
− heat & cool − system switches between
heating and cooling automatically based upon
indoor temperature
− heat only − system provides heating only
− cool only − system provides cooling only
− off − system is off
(HELP 1 of 7)
press anywhere
on the screen
for the next help
item; NOTE −
not all HELP
pages are
shown in this
example.
page 1
page 6
Shows the current
temperature in
the room
Prese inside the framed
area to select the heat or
cool settings
Desired heat
and cool settings
up/down"
arrows allow you
to change the
selected (heat or
cool) desired
setting
Figure 6. Typical HELP screens (indoor settings shown)
Page 6
506053−01 12/10
Page 6
User Preferences
Press inside the press here to adjust user preferences" box to access the User Settings screen. A complete list is available on Page 6.
Figure 7. Setting user preferences
To change a user setting,
highlight a setting on the left
and then press ’modify’.
modify
back done
user settings
Time and Date
Daylight Saving
Time
Circulate Fan ON
time
Dealer Name
Dealer Address
Dealer Phone Number
Figure 8. User settings
setting default variables
Time and Date (Time/date elements screen)
Daylight Saving Time Enabled Enabled, Disabled
Circulate Fan ON Time 35% 15 to 45% (in 1% increments)
Dealer Name
(these may
show in-
staller input
data but
owner may
change)
(Typewriter input screen)
Dealer Address (Typewriter input screen)
Dealer Phone (Typewriter input screen)
Dealer Email (Typewriter input screen)
Dealer Website (Typewriter input screen)
Language Displayed English English
Temperature Display Scale (F) (F) Fahrenheit, (C) Celsius
Clock Format 12H 12 Hour, 24 Hour
Screen Lock−out Unlocked
Unlocked,
Partially Locked,
Fully Locked
Backlight Setting Always On
Power Save,
Always On
Backlight Intensity 100% 20 to 100% (in 20% increments)
Outdoor Temp Display Disabled Disabled, Enabled
Indoor Humidity Display Enabled Disabled, Enabled
Filter 1 Timer Disabled
Disabled, 3 Months, 6 Months, 12
Months, 24 Months, Custom Time
Filter 2 Timer Disabled
Disabled, 3 Months, 6 Months, 12
Months, 24 Months, Custom Time
Humidifier Pad Timer Disabled
Disabled, 3 Months, 6 Months, 12
Months, 24 Months, Custom Time
UV Bulb Timer Disabled
Disabled, 3 Months, 6 Months, 12
Months, 24 Months, Custom Time
Maintenance Timer Disabled
Disabled, 3 Months, 6 Months, 12
Months, 24 Months, Custom Time
PureAir Timer Disabled
Disabled, 3 Months, 6 Months, 12
Months, 24 Months, Custom Time
Page 7

icomfort Touch 7−Day Programmable Communicating Thermostat
Page 7
User Preferences (continued)
Most of the user preferences are modified using one of two methods.
One uses a typewriter−style keyboard for entering text for screens such
as Dealer Name as shown below. (For Time and Date, see Page 8).
indoor
settings
indoor
humidity
alerts
programs HOME
HELPweather
zones
*
=
r
Lennox dealer name
Dealer Name
21
qwe
43658709
ityu po
f
@!
asd
$#^%(&)
kghj l
v
−
zxc
_
/
+
.
bnm
space
back
space
symbols
CAPS
ON
cancel
save
Figure 9. Typewriter" input tool
Another input tool uses a menu of options and a select to toggle between
settings. An example of this is the Daylight Saving Time screen shown
below.
indoor
settings
indoor
humidity
alerts
programs HOME
HELP
cancel
weather
zones
Daylight Saving Time
save
Disabled
Enabled
select
Figure 10. Option select" input tool
Page 8

506053−01 12/10
Page 8
Setting time and date
To input Time and Date information, use the arrows to highlight that variable (figure 11); then use modify to proceed to the Time and Date"
screen (figure 12).
To change a user setting,
highlight a setting on the left
and then press ’modify’.
modify
back done
user settings
Time and Date
Daylight Saving
Time
Circulate Fan ON
time
Dealer Name
Dealer Address
Dealer Phone
Number
HELP
indoor
settings
Figure 11. User setting selection screen
When the Time and Date" screen appears (figure 12), enter the correct
date as follows:
Press one of the time and date boxes − the text will change to white
type in a dark box (for example, press the 10 box in figure 12).
Press the up/down arrows to change the data.
Press other boxes and adjust with the arrows for all time and date
information. When time and date are correct, press save to save
the changes and return to User setting selection screen" (figure
11) .
HELP
indoor
settings
(Time and Date)
save
10 :43 AM
Apr 15 2010
cancel
adjust
Figure 12. Set current time and date
Return to Home screen
When all the user preferences are complete, press done. The HELP
screen (figure 11) will go away and the Home screen (similar to figures 1
or 2 on Page 3) will return.
Page 9

icomfort Touch 7−Day Programmable Communicating Thermostat
Page 9
Setting/adjusting indoor temperature from HOME screen
Temperature changes may be made from the HOME screen at any time,
if the homeowner wishes.
Program NOT on
If the program is NOT on, change temperature by pressing an up or down
arrow until the heat to" (or cool to") number is at the desired temperature. This setting will remain until you decide to change it again.
use arrows to
change temperature
Figure 13. Adjusting temperature without program running
Program ON
If the program is ON, change temperature by pressing an up or down arrow until the heat to" (or cool to") number is at the desired temperature.
While doing so, the set hold menu appears, giving a list of options you
can choose. Make your selections as described in figure 14.
use arrows to change
temperature
select a set hold period
for the changed temperature
press set when temperature and hold period
are selected
Figure 14. Adjusting temperature with program running
After a hold is set, the set hold options and buttons will disappear and a
message will state when the hold expires, along with a cancel option
should you choose to revert back to the program (figure 15).
Figure 15. HOLD reminder
Page 10

506053−01 12/10
Page 10
Setting/adjusting indoor temperature from HOME screen (continued)
Indoor settings screen
In addition to making temperature adjustments, you may wish to make
other changes to how your system works. From the HOME screen,
press the screen near press for more.
Figure 16. Accessing Indoor settings screen
The indoor settings screen (figure 17) opens. From this screen, you may
make temperature changes or select other system or fan settings. Use
either of the select buttons to scroll through the available options. With
this screen displayed, pressing either arrow key brings up the set hold
menu as described before (see figure 14).
Fan settings are controlled by the program, however, when changed using this screen, the program is overridden until the next program event.
The system settings heat & cool option allows the system to automatically switch between heating and cooling as the indoor temperature
changes. The other options, cool only and heat only allow only that portion of the system to satisfy a corresponding cool/heat demand.
system settings
fan settings
heat & cool
cool only
heat only
off
auto
on
circulate
temperature settings
system is
heating
program is ON
current temp
indoor
settings
indoor
humidity
alerts
programs HOME
HELP
select
select
weather
zones
Figure 17. Indoor settings
Page 11

icomfort Touch 7−Day Programmable Communicating Thermostat
Page 11
Setting humidity controls
NOTICE
Humidifier and dehumidifier controls must be setup by the installer or these controls will not be visible. If your system has one
or both of these features and the controls are not visible, contact
your Lennox dealer for proper setup.
To adjust humidity controls (either to humidify or dehumidify) select the
indoor humidity tab (figure 18). Some systems may have a humidifier and
some may have a dehumidifier, while still other systems may have both.
You can control either or both from this screen.
Use select to tell the system which humidity control you want to address.
Remember that the humidify" control only operates while heating and
dehumidify" only operates while cooling. Also, use select to turn the humidification/dehumidification OFF.
Use switch to change which operation you want to change. As shown in
figure 18, the humidifier will be controlled. As shown in figure 19, the dehumidifier will be controlled.
indoor
humidity
system settings
humidify / de−humidify
de−humidify
humidify
off
switch
select
HELP
humidifier settings
are shown
press switch button
at right to show
dehumidifier settings
current indoor
humidity level is 45%
(OK)
heating
comfort
range
50
40
40
set to
45
Figure 18. Humidifier controls
Page 12

506053−01 12/10
Page 12
Setting humidity controls (continued)
The number inside the right−pointing arrow ("45" in figure 19) indicates
the sensed humidity level. The number inside the left−pointing arrow
("40") is your current humidity setting.
If your system is configured to both humidify and dehumidify and you
have selected humidify/de−humidify, press switch to toggle between the
humidifier and dehumidifier controls.
Use the up/down arrows to adjust the control to your preferred level of
humidity. Figure 19 shows the dehumidifier control which is adjustable
between 40 and 60% relative humidity (RH.
indoor
humidity
system settings
humidify / de−humidify
de−humidify
humidify
off
switch
select
HELP
dehumidifier settings
are shown
press switch button
at right to show
humidifier settings
current indoor
humidity level is 45%
(OK)
cooling
comfort
range
50
40
40
set to
45
Figure 19. Dehumidifier controls
Press switch to toggle to the humidifier settings. Use the up/down arrows to adjust the control to your preferred level of humidity. Figure 20
shows the humidifier control which is adjustable between 15 and 45%
relative humidity (RH.
The industry standards for humidification and dehumidification are
shown in the figures as heating comfort range" and cooling comfort
range".
indoor
humidity
system settings
humidify / de−humidify
de−humidify
humidify
off
switch
select
HELP
humidifier settings
are shown
press switch button
at right to show
dehumidifier settings
current indoor
humidity level is 45%
(OK)
heating
comfort
range
50
40
35
set to
45
Figure 20. Humidifier controls
Page 13

icomfort Touch 7−Day Programmable Communicating Thermostat
Page 13
Setting up a custom program
On the Home screen, press the press for more area to go to the dashboard; then press the program tab. Using this screen (figure 21), you
can select program ON or OFF, view /edit the current program (figure
22), or you can restore the original energy saving program. If you select
restore, a confirm screen will appear as shown in the lower half of figure
21.
program ON
program OFF
select
press select to turn the program schedule ON or OFF
do you want to view or
edit the current program?
view/edit
do you want to restore the original
energy saving program??
restore
please press confirm" to restore the schedule to the
default energy saving program.
confirm
pressing confirm will erase
any saved custom schedules
cancel
Figure 21. Accessing the program screen
The original energy saving program will always remain in memory and
can be restored at any time.
To program your own schedule, press view/edit − a screen similar to fig-
ure 22 will appear. Shown below is the energy efficient heating and cooling schedule and is the same for every day of the week. Press new to
begin a new schedule.
the following program settings have been saved
press a program to edit it
press NEW to create a program
mon, tue,
wed, thur,
fri, sat,
sun
heat __
cool
time __
6:00AM8:00AM5:00PM10:00
PM
70
78
fan __ auto auto auto auto
70
78
62
85
62
82
program ON
program OFF
select new
press to edit
HOME
HELP
press to edit
Figure 22. Energy efficient heating & cooling schedule
Page 14

506053−01 12/10
Page 14
Setting up a custom program (continued)
The new schedule screen (figure 23) gives you the option of scheduling
by groups of days or for specific days. Examples of how you may customize your program include:
All 7 days use a common schedule (like the default).
Monday through Friday use one common schedule and weekends
use a second common schedule.
Monday through Friday use a common schedule and Saturday and
Sunday each use a unique schedule.
All 7 day use a unique schedule.
Saturday and Sunday use a common schedule and weekdays
each use a unique schedule.
Select any box. Notice that the next button appears along with text to in-
dicate the selection (sat, sun in the example). Press next to continue.
select the days you want to schedule
all 7 days
cancel
press next to edit the schedule for
sat, sun
mon − fri sat, sun
mon tue wed thu fri sat sun
set schedules for a group of days
OR
set schedules for a specific day
next
NOTE − This text
and button will not
appear until a box
is selected
HOME
HELP
Figure 23. New (custom) schedule screen
Page 15

icomfort Touch 7−Day Programmable Communicating Thermostat
Page 15
Setting up a custom program (continued)
Press any of the boxes to highlight it (e.g., 8:00 AM box in figure 24).
Then use the up/down arrows to change the selected box.
Repeat with all boxes to select your preferred comfort levels, event start
times, and fan operation mode.
Skipping an event
Using figure 24 as an example, if you wanted the same settings to be in
effect from 6:00 AM until 5:00 PM, rather than change all the 8:00 AM settings to match the 6:00 AM settings, simply press and hold the 8:00 AM
button until all the settings and the boxes grey out". Effectively, this
changes the thermostat from a 4−event−per−day to a 3−event−per−day
thermostat.
To turn the event back on, press and hold the same time button until the
boxes and settings are solid again.
After making any changes to this screen, a save button will appear.
Press save to exit the screen and save your changes to a new custom
program file.
8:00
AM
6:00
AM
5:00
PM
10:00
PM
auto auto auto auto
70 62 70 62
time
heat
temp
cool
temp
fan
schedule for mon, tue, wed, thu, fri
press and hold a time
button to turn an
individual setting on/off
78 85 78 82
cancelsave
HOME
HELP
Figure 24. Edit the schedule
Page 16

506053−01 12/10
Page 16
Displaying outdoor temperature and indoor humidity on Home screen
Figure 25. Outside temp and indoor humidity display ON
To have the Home screen display outside temperature and the indoor humidity as shown in figure 25, press the press for more area to go to the
dashboard; then press the HELP tab (figure 26); then press the press
here to adjust user preferences box.
press here
for
information
about indoor
settings.
press here to
clean the
screen
press here
to adjust
user
preferences
Lennox
(dealer address)
1−800−9−LENNOX
(dealer email)
www.lennox.com
Figure 26. HELP screenuser preferences
Using the arrows (see figure 27), scroll to Outdoor Temp Display and
press modify; then press select to toggle between Off" or On". Press
save. Change Indoor Humidity Display similarly. Press done when fin-
ished.
To change a user setting,
highlight a setting on the
left and then press ’modify’.
modify
done
User Settings
Backlight Setting
Backllight Intensity
Outdoor Temp
Display
Indoor Humidity
Display
cancel
Off
On
Outdoor Temp Display
save
select
back
Figure 27. Turn on outdoor temp display on Home screen
Page 17

icomfort Touch 7−Day Programmable Communicating Thermostat
Page 17
Alerts
Press the Home screen alert icon or the alerts tab in the dashboard
to view active system or device active alerts. If a critical alert is present
(see figure 28), press service info for information about who and where
to contact (see figure 29).
alerts
HELP
service info
next alert
ALERT 1 OF 4
Moderate Alert
Code: 180
AIR HANDLER
reports:
Problem
9/14/09
3:24 PM
Figure 28. Alerts
Lennox HVAC Repair
1234 Alpha Ln.
1−800−LENNOX
lennoxrepairman@example.com
www.lennoxrepairman.com
Press the back button to return to
the previous screen.
back
Figure 29. Service info example
If an alert occurs during normal operation, a window similar to figure 30
may appear. A critical alert may require a service call, while a reminder
alert may alert you to perform a routing service, such as replacing the
filter.
Critical Alert Code: 31
THERMOSTAT reports:
Communication Problem
9/14/09
1:57 PM
critical alert
close
service info
Reminder
Service Alert Code: 0
SYSTEM reports:
Filter 2 Timer Expired
2 Occurrences
9/16/09
9:33 AM
service alert
close
service info
clear
remind later
Figure 30. Alert window examples
Page 18

506053−01 12/10
Page 18
Alerts (continued)
A critical alert (red icon) identifies a problem that can prevent the system from working properly or at all, and if allowed to run, could cause
damage to the system. You MUST call for service immediately.
A service alert (yellow icon), alerts you to service, or call the dealer to
service, one or more of the following: Filters, Humidifier Pad, UV Light,
PureAir Air Purification system, and Maintenance.
The service alerts will be displayed in the alert screen with more option
buttons on the right side of the screen (see figure 31). Service reminders
will always follow critical alerts.
alerts
HELP
service info
clear
remind later
Alert 4 of 5
Service Alert Code: 0
SYSTEM reports:
Filter 2 Timer Expired
2 Occurrences
9/16/09
9:33 AM
next alert
Figure 31. Typical alert screen
Using remind later"
You may choose remind later and then use select to pick from the options list (see figure 32). When you press set, the screen changes to confirm your selection. Press done to clear and return to the alerts screen.
set date and time for
next reminder
1 day
1 week
1 month
3 months
custom time
Alert 4 of 5
Service Alert Code: 0
SYSTEM reports:
Filter 2 Timer Expired
2 Occurrences
10/16/09
9:33 AM
select
cancelset
Alert 4 of 5
Service Alert Code: 0
SYSTEM reports:
Filter 2 Timer Expired
2 Occurrences
9/16/09
9:33 AM
done
remind later
set for:
10/23/09 9:33 AM
Figure 32. Remind later options
Page 19

icomfort Touch 7−Day Programmable Communicating Thermostat
Page 19
Alerts (continued)
When the alerts screen returns, the remind later option will will be replaced by the edit date option and the selected reminder date will appear
next to the option (see figure 33).
alerts
HELP
service info
clear
edit date
Alert 4 of 5
Service Alert Code: 0
SYSTEM reports:
Filter 2 Timer Expired
2 Occurrences
10/16/09
9:33 AM
next alert
edit reminder
date
10/23/09
Figure 33. Edit reminder option
Use Setting custom time" screen (figure 34) to set an exact date and
time for the reminder to appear. Press in one of the boxes to highlight it
and use the up/down arrows to change the value in that box. Repeat for
all boxes. When desired reminder is displayed, press set.
After selecting a time period and pressing set, the Remind later con-
firmation" screen (figure 32) appears.
2 :33 PM
Oct 25 2009
Alert 4 of 5
Service Alert Code: 0
SYSTEM reports:
Filter 2 Timer Expired
2 Occurrences
10/16/09
9:33 AM
cancel
set
set date and time for
next reminder
Figure 34. Setting custom time for alert
Page 20

506053−01 12/10
Page 20
Alerts (continued)
Using clear"
Press clear (not available if Critical Alert) to request clearing of a service
reminder. If you answer no to the Action taken confirmation" screen (fig-
ure 35), the alert is not cleared. Action must be taken, either to perform
the maintenance required, or instead of clearing, you may edit the time to
again be reminded as described under Using remind later".
yes no
(Replace Filter 2)
Was action taken?
Figure 35. Action taken confirmation
If you confirm action was taken, the Set new alert date" screen (figure
36) appears. You may chose from the list of options or set a custom time
(see figure 34).
set date and time for next
reminder
disabled
3 months
6 months
12 months
24 months
custom time
Alert 4 of 5
Service Alert Code: 0
SYSTEM reports:
Filter 2 Timer Expired
2 Occurrences
10/16/09
9:33 AM
select
cancelset
Alert 4 of 5
Service Alert Code: 0
SYSTEM reports:
Filter 2 Timer Expired
2 Occurrences
9/16/09
9:33 AM
done
alert cleared
Figure 36. Set new alert date
Press done to return to the device alert screen (figure 31, page 18).
Date Revision description
09−2010 Standardized product nomenclature.
Add unlock section on page 2
Add turning on outdoor temp and indoor humidity display
12−2010 Add icomfort logo and update registered trademarks.
 Loading...