

Lennox icomfort Touch Thermostat, icomfort Touch Homeowner's Manual

*2P1210* *P506053-01*
2010 Lennox Industries Inc.
Dallas, Texas, USA
HOMEOWNER’S MANUAL
icomfort Touch® Thermostat
Touch Screen Programmable Communicating Thermostat
CONTROLS
506053−01
12/10
Supersedes 10/10
General
The icomfort Touch® thermostat is shipped complete with mounting
hardware, installation and setup instructions, warranty information, and
a Homeowner’s Manual.
Most operational information is contained in the thermostat’s HELP
screens, however this Homeowner’s Manual provides general information and tips on how to access the HELP screens.
Litho U.S.A.

506053−01 12/10
Page 2
Table of Contents
icomfort Touch® Thermostat 2. . . . . . . . . . . . . . . . . . . . . . . . . . . . . .
Thermostat Lock−out 2. . . . . . . . . . . . . . . . . . . . . . . . . . . . . . . . . . . .
Start up 3. . . . . . . . . . . . . . . . . . . . . . . . . . . . . . . . . . . . . . . . . . . . . . .
User Dashboard and HELP 4. . . . . . . . . . . . . . . . . . . . . . . . . . . . . . .
User Settings 6. . . . . . . . . . . . . . . . . . . . . . . . . . . . . . . . . . . . . . . . . .
Setting time and date 8. . . . . . . . . . . . . . . . . . . . . . . . . . . . . . . . . . . .
Setting indoor temperature 9. . . . . . . . . . . . . . . . . . . . . . . . . . . . . . .
Setting humidity controls 11. . . . . . . . . . . . . . . . . . . . . . . . . . . . . . . . .
Setting a custom program (scheduling) 13. . . . . . . . . . . . . . . . . . . . .
Display outdoor temp. and indoor humidity on HOME screen 16. . .
Alerts 17. . . . . . . . . . . . . . . . . . . . . . . . . . . . . . . . . . . . . . . . . . . . . . . . .
WARNING
Do not switch system to cool if the outdoor temperature is below
45°F (7°C). This can damage the cooling system.
NOTICE
Use this thermostat only as described in this manual.
icomfort Touch® Thermostat
The communicating icomfort Touch® thermostat is an electronic 7−day
universal multi-stage programmable touch screen thermostat with color
display. It also offers enhanced capabilities which include humidification
measurement and control, dew point adjustment control, dehumidifica-
tion measurement and control, Humiditrol® Enhanced Dehumidification
Accessory (EDA) capability, and equipment maintenance reminders.
The thermostat’s autochangeover mode permits control of heating, cooling, humidification, and dehumidification without user involvement.
The thermostat stores system parameters in nonvolatile memory (retains data when electrical power fails or is turned off), and includes onboard help screens. The thermostat supports heat pumps or non−heat
pump units, with up to 4 stage heat / 2 stage compressor operation. (2
stages of heat pump heating and 2 stages of auxiliary backup heat are
provided. Also, 2 stages of emergency heat are provided).
Indoor Air Quality is supported with time-based notification of consumables including media filters, UVC bulbs, humidifier pads, and PureAir
catalyst service / replacement.
Thermostat Lock−out
A lock" icon at the bottom
center screen (shown in the
picture), indicates the thermostat is either partially− or fully−
locked. Partially−locked, any
user can adjust the temperature up or down to set a hold"
for a selectable time.
Fully−locked, no one can make any changes to the thermostat’s settings.
To unlock, press and hold the lock" icon for 5 seconds.
To lock the thermostat, access Screen lock−out" through the User Preferences described on Page 6.
icomfort Touch 7−Day Programmable Communicating Thermostat
Page 3
Start up
In event of power failureIf a power failure is experienced, when the
power comes back on, the screen will show a DISCOVERY BAR (shown
below) while the thermostat reboots. When the reboot is complete, the
HOME screen will return.
SYSTEM DISCOVERY IN PROGRESS
01.60.00.9999
After the thermostat and your system are fully connected and powered
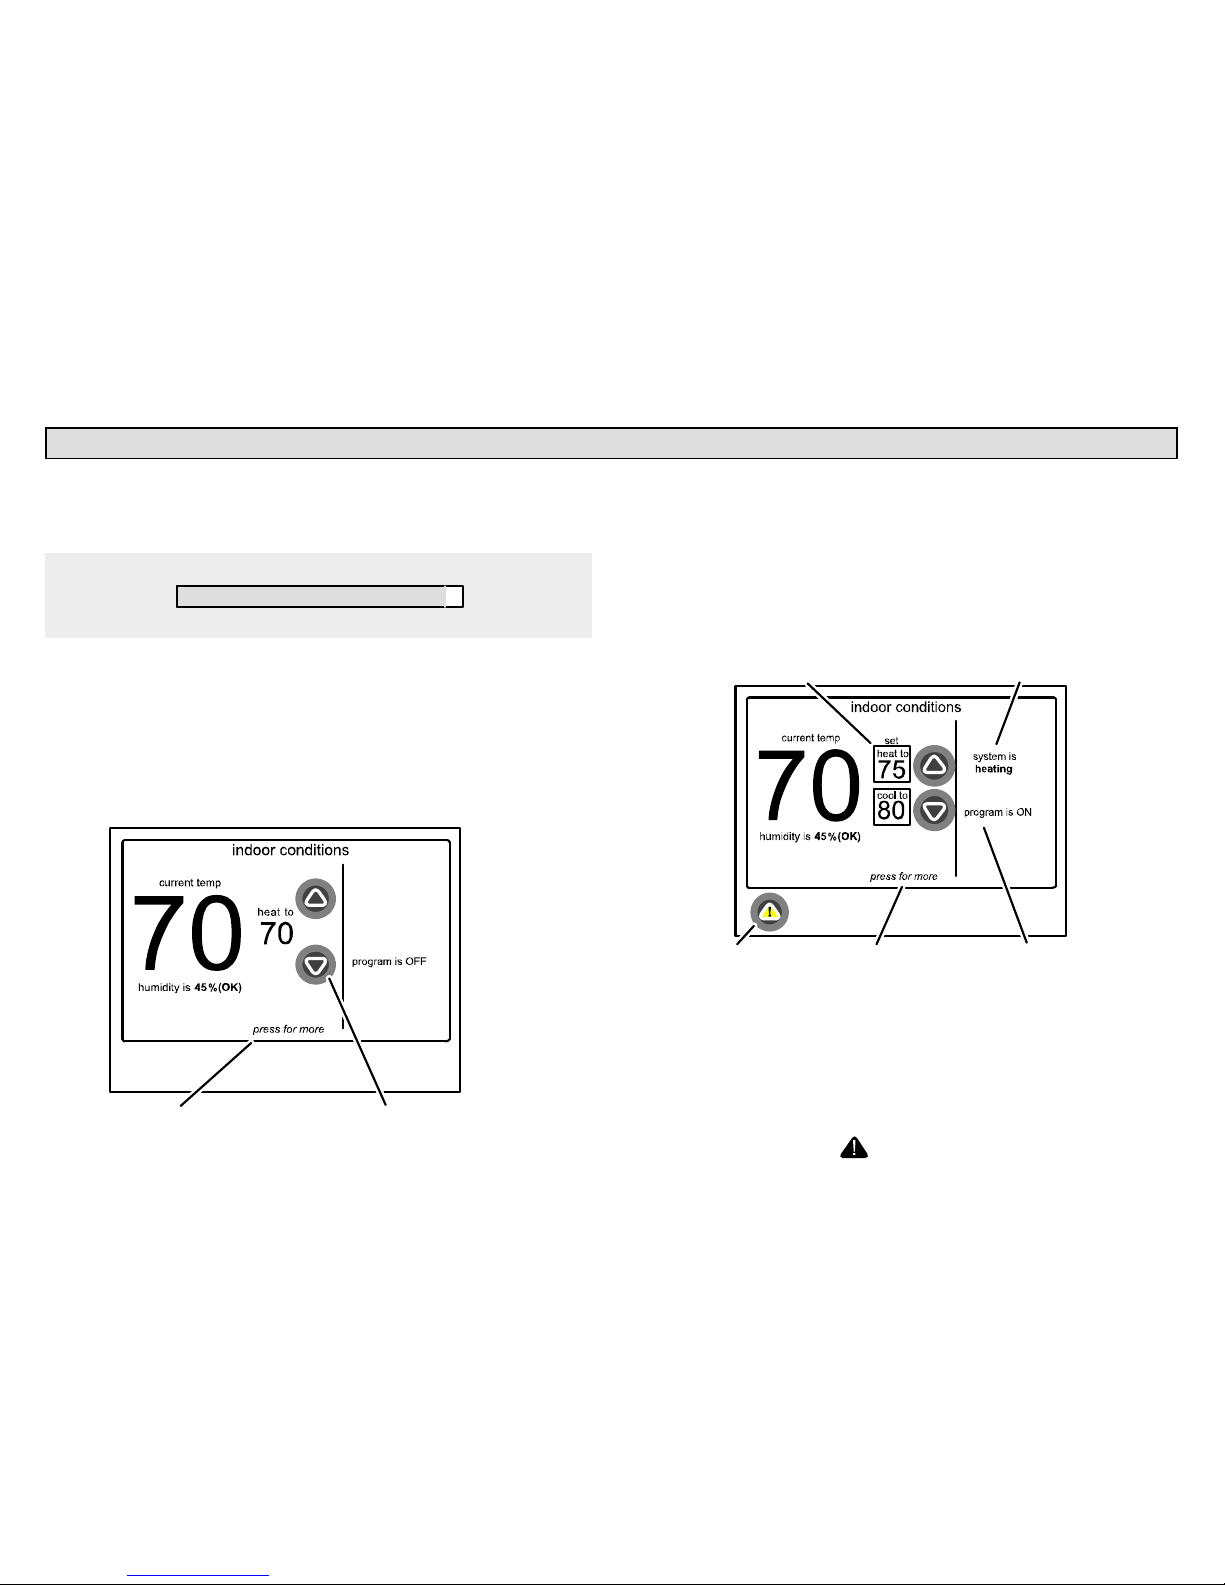
on, the icomfort Touch Home screen is displayed. Figure 1 shows one
of the more basic displays. Note that it’s program is OFF, that the current
and heat to" temperatures are the same (system is not running) and
there are no alerts.
From this screen you may manually adjust the temperature setting using
the up/down arrows, or access the User dashboard" screen (figure 3) by
pressing the home screen in the press for more area.
press to go to user dashboard use arrows to change temperature
Figure 1. Home screen − not programmed, not running
The Home screen shown in figure 2 reflects a more complex display.
Note that it’s program is ON, that it is set to either heat or cool as necessary, and that the current" and set " temperatures are different (therefore, the system is running). In the example, notice also that there are
service alerts present.
program is ONalerts are active press for more
both ’heat to’ and ’cool to’ are programmed to come on as necessary
system is currently ON
and is heating
Figure 2. Home screen − programmed, running − active alerts
From this screen you may still adjust temperature settings, but when you
do so, you will be prompted to set a specific time to allow the change to
remain in effect. The user may also access the dashboard" by pressing
the screen in the press for more area, and view active service alerts by
pressing the screen on the icon.
506053−01 12/10
Page 4
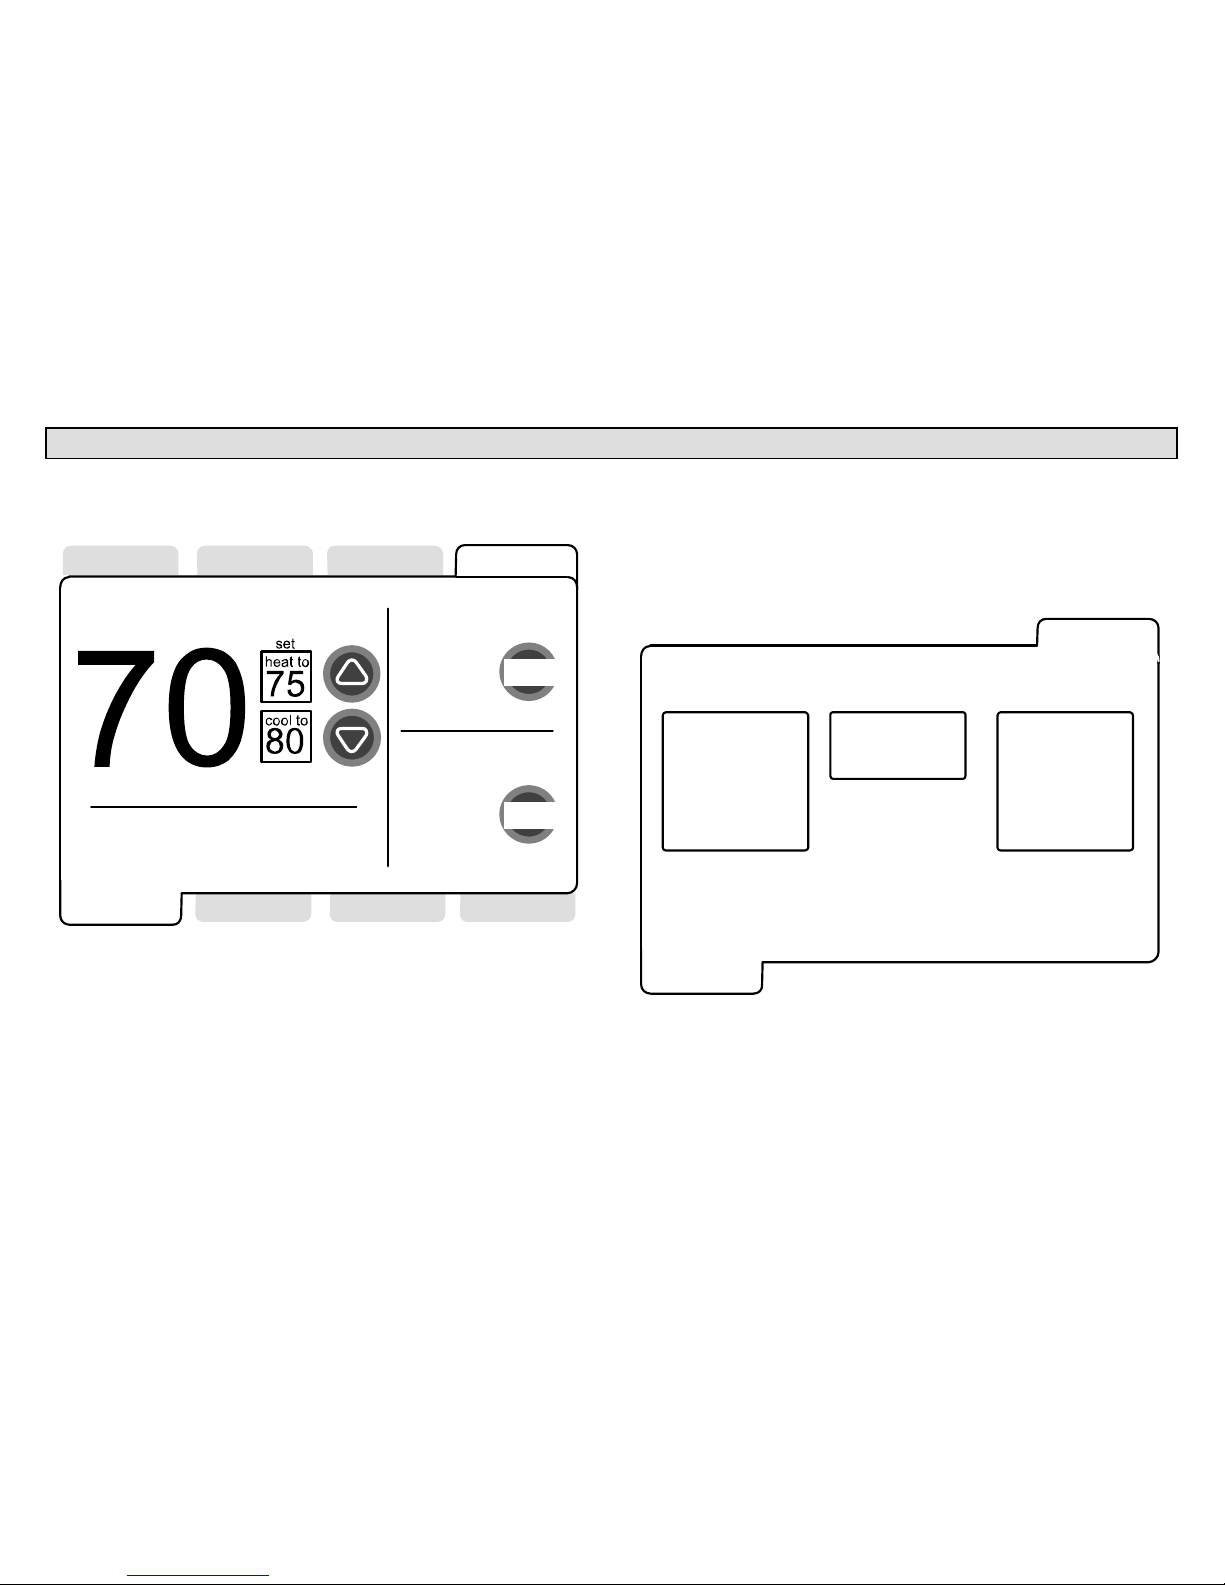
User Dashboard and HELP Screens
The user dashboard allows you to set the system to operate the way you
want it to operate. From the dashboard, you can access indoor settings
(shown in figure 3), programs, indoor humidity, alerts and HELP.
system settings
fan settings
heat & cool
cool only
heat only
off
auto
on
circulate
temperature settings
system is
heating
program is ON
current temp
indoor
settings
indoor
humidity
alerts
programs HOME
HELP
select
select
weather
zones
Figure 3. User dashboard − indoor settings
HELP screens guide you through all your setup procedures. This manual does not detail all the HELP available. Use the on−board HELP to get
answers to all your setup questions.
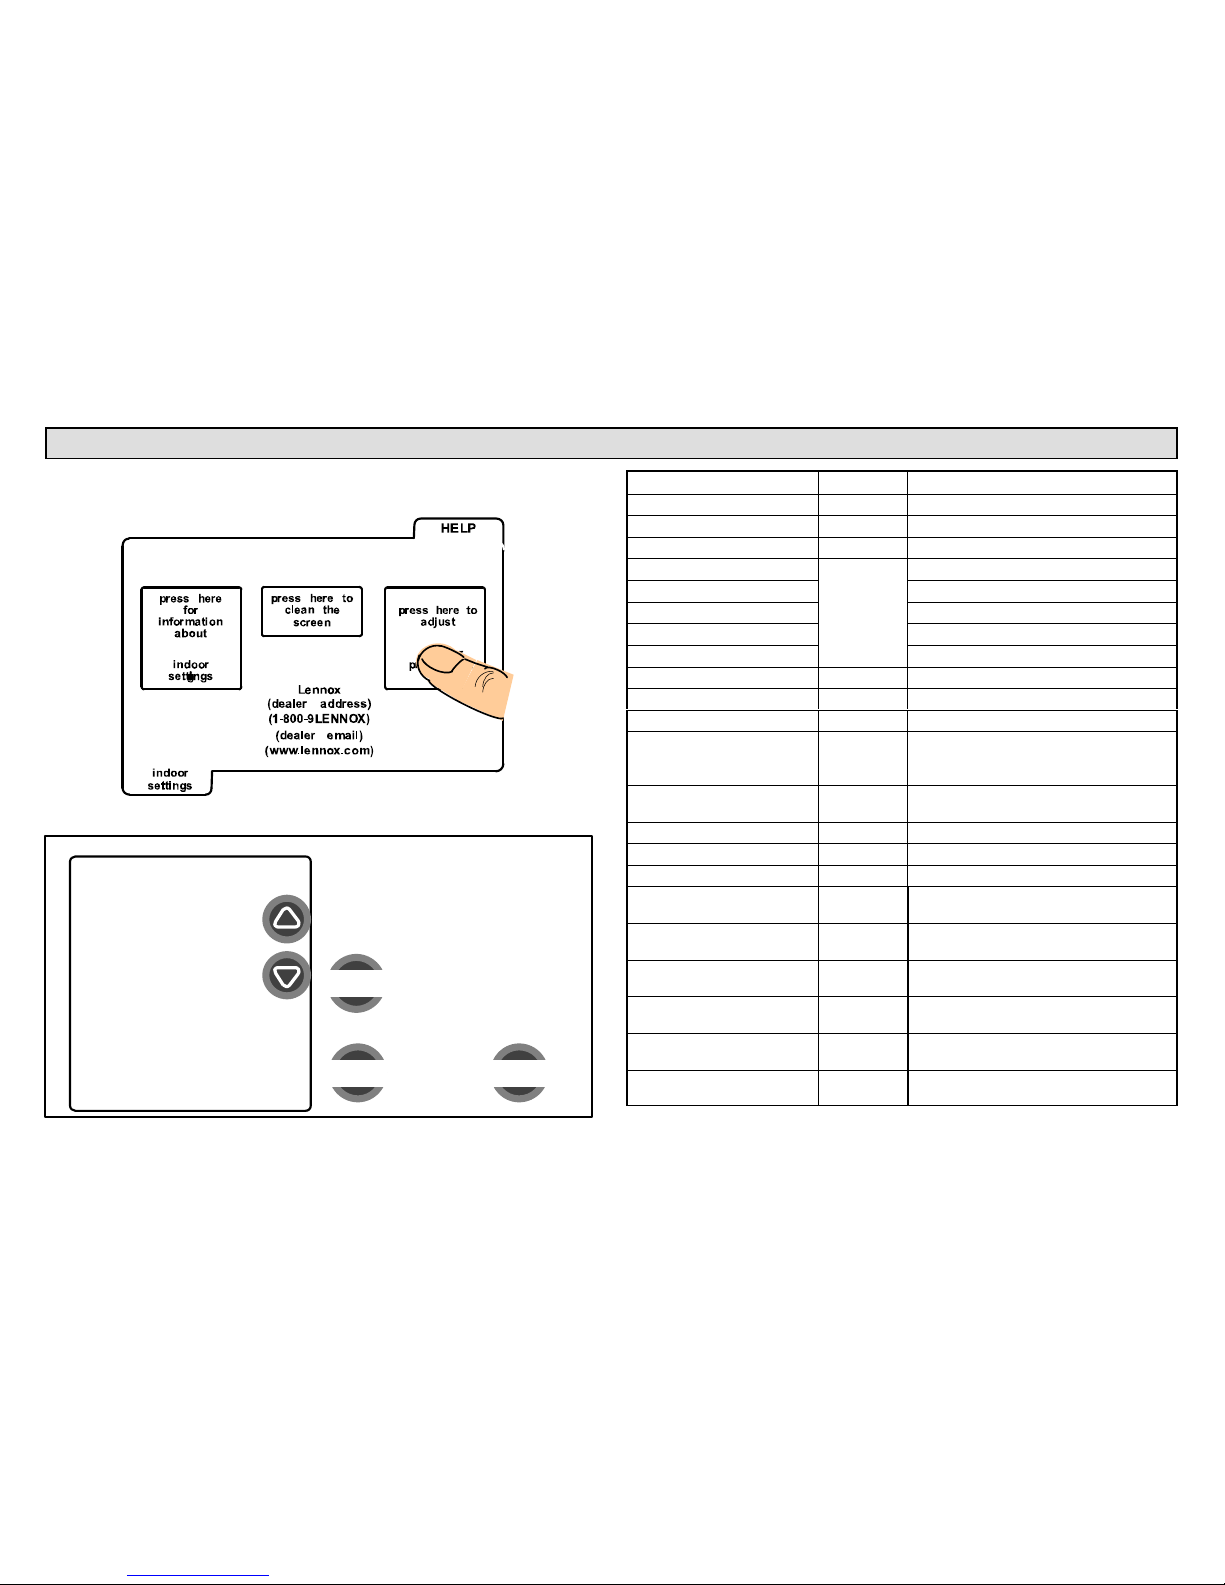
Press HELP tab in the top right corner; the User help access" screen
(figure 4) appears. From this screen, you can access help related to the
previously displayed screen, you can deactivate the pressscreen temporarily for cleaning the screen, and you can access the user settings
option to make adjustments such as Fahrenheit/Celsius, 12Hr/24Hr display, etc. (see Page 6).
press here for
information about
indoor settings
press here to
clean the screen
press here to
adjust
user preferences
Lennox
(dealer address)
(1−800−9 LENNOX)
(dealer email)
(www.lennox.com)
HELP
indoor
settings
Figure 4. User help access
icomfort Touch 7−Day Programmable Communicating Thermostat
Page 5
User Dashboard and HELP Screens (continued)
Clean screen
Press the ’press here to clean the screen’ box. A 30−second timer appears and the screen is not sensitive to touch during the countdown.
Clean the screen using a mild lens cleaning solution and soft cloth.
OK TO CLEAN SCREEN
30
Figure 5. Clean screen
HELP screens
For this example, the indoor settings page is open. Press the press
here for information about indoor settings" box (as shown in figure 4)
to access HELP.
If multiple pages" of help are available, the first page of help will appear
(as shown in figure 6). Multiple presses will scroll through the available
pages of help. (The example shows only two of the available pages.)
User preferences
The third box in the user help access screen (figure 4) is press here to
adjust user preferences". This allows the user to change many settings
in the thermostat. Details are provided in the follow pages (see Page 6).
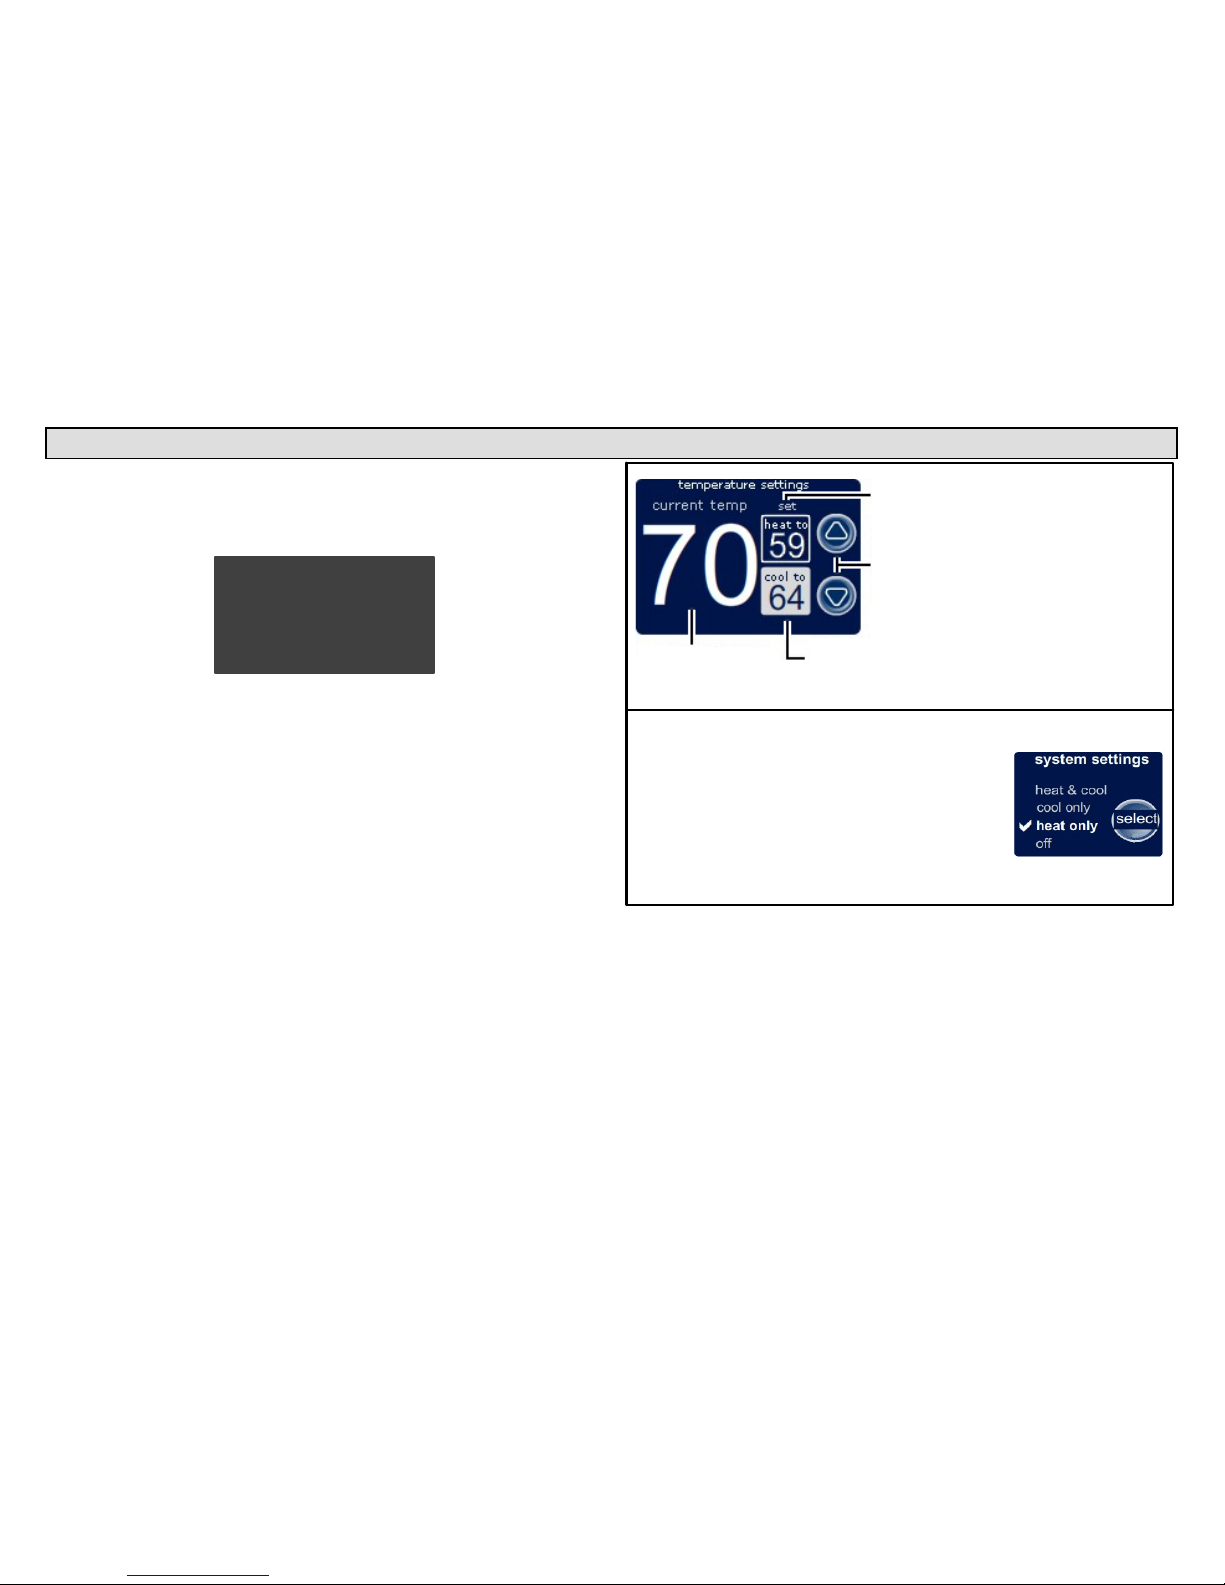
System settings indicate how the
temperature is controlled in your home
select" allows you to toggle between options
− heat & cool − system switches between
heating and cooling automatically based upon
indoor temperature
− heat only − system provides heating only
− cool only − system provides cooling only
− off − system is off
(HELP 1 of 7)
press anywhere
on the screen
for the next help
item; NOTE −
not all HELP
pages are
shown in this
example.
page 1
page 6
Shows the current
temperature in
the room
Prese inside the framed
area to select the heat or
cool settings
Desired heat
and cool settings
up/down"
arrows allow you
to change the
selected (heat or
cool) desired
setting
Figure 6. Typical HELP screens (indoor settings shown)
506053−01 12/10
Page 6
User Preferences
Press inside the press here to adjust user preferences" box to access the User Settings screen. A complete list is available on Page 6.
Figure 7. Setting user preferences
To change a user setting,
highlight a setting on the left
and then press ’modify’.
modify
back done
user settings
Time and Date
Daylight Saving
Time
Circulate Fan ON
time
Dealer Name
Dealer Address
Dealer Phone Number
Figure 8. User settings
setting default variables
Time and Date (Time/date elements screen)
Daylight Saving Time Enabled Enabled, Disabled
Circulate Fan ON Time 35% 15 to 45% (in 1% increments)
Dealer Name
(these may
show in-
staller input
data but
owner may
change)
(Typewriter input screen)
Dealer Address (Typewriter input screen)
Dealer Phone (Typewriter input screen)
Dealer Email (Typewriter input screen)
Dealer Website (Typewriter input screen)
Language Displayed English English
Temperature Display Scale (F) (F) Fahrenheit, (C) Celsius
Clock Format 12H 12 Hour, 24 Hour
Screen Lock−out Unlocked
Unlocked,
Partially Locked,
Fully Locked
Backlight Setting Always On
Power Save,
Always On
Backlight Intensity 100% 20 to 100% (in 20% increments)
Outdoor Temp Display Disabled Disabled, Enabled
Indoor Humidity Display Enabled Disabled, Enabled
Filter 1 Timer Disabled
Disabled, 3 Months, 6 Months, 12
Months, 24 Months, Custom Time
Filter 2 Timer Disabled
Disabled, 3 Months, 6 Months, 12
Months, 24 Months, Custom Time
Humidifier Pad Timer Disabled
Disabled, 3 Months, 6 Months, 12
Months, 24 Months, Custom Time
UV Bulb Timer Disabled
Disabled, 3 Months, 6 Months, 12
Months, 24 Months, Custom Time
Maintenance Timer Disabled
Disabled, 3 Months, 6 Months, 12
Months, 24 Months, Custom Time
PureAir Timer Disabled
Disabled, 3 Months, 6 Months, 12
Months, 24 Months, Custom Time
 Loading...