

Page 1
iComfort® E30
Smart Thermostat
User Guide
507687-03 4/2018
Supersedes 507687-02
2018© Lennox Industries Inc.
Dallas, Texas, USA
Page 2

2
Table of Contents
Features................................................................................................................ 3
Home Screen........................................................................................................ 3
Temperature Dial Feature ...............................................................................................3
Screen Elements .............................................................................................................4
Notications.....................................................................................................................4
Settings ................................................................................................................ 8
Wi-Fi ................................................................................................................................8
Access Point is Visible ..............................................................................................................................8
Access Point is Hidden ............................................................................................................................. 8
Troubleshooting Wi-Fi Connection ...........................................................................................................9
Received Signal Strength Indication (RSSI) ............................................................................................. 9
Name...............................................................................................................................9
Renaming System ................................................................................................................................... 9
Unregistering the System ......................................................................................................................... 9
Away .............................................................................................................................10
Manual Away ..........................................................................................................................................10
Smart Away ............................................................................................................................................10
Feels Like ......................................................................................................................11
Fan ................................................................................................................................11
Heat & Cool ...................................................................................................................11
Humidity ........................................................................................................................12
Humidity Control ..................................................................................................................................... 12
Humidication Control Center ................................................................................................................. 12
Dehumidication Control Center ............................................................................................................. 12
Humidify + Dehumidify............................................................................................................................12
Dehumidication Accessory Installed .....................................................................................................12
Notications...................................................................................................................12
Advanced Settings ........................................................................................................12
General .........................................................................................................................13
About ...................................................................................................................................................... 13
Dealer Info .............................................................................................................................................. 13
Dealer Access ......................................................................................................................................... 13
Screen Lock ............................................................................................................................................ 13
Date & Time ............................................................................................................................................13
Language ................................................................................................................................................ 13
Display ..........................................................................................................................13
Home Info......................................................................................................................14
Adding Home Information ....................................................................................................................... 14
Remove Home ........................................................................................................................................ 14
Account .........................................................................................................................14
Using Existing Account ........................................................................................................................... 14
Creating a New Account .........................................................................................................................14
Generate Pin .......................................................................................................................................... 14
Move Out ................................................................................................................................................ 14
HomeKit ........................................................................................................................14
Using the Secure Web Portal ........................................................................... 15
iComfort Support Center .................................................................................. 15
Installation Report ............................................................................................. 15
Performance Reports ........................................................................................ 15
Mobile Applications ........................................................................................... 15
Amazon Alexa .................................................................................................... 16
Setup .............................................................................................................................16
Alexa Voice Commands for Lennox Skill ......................................................................16
Changing to Celsius ......................................................................................................17
Heat and Cool Mode .....................................................................................................17
Apple® HomeKit™ ............................................................................................ 17
Overview .......................................................................................................................17
Remote Access .............................................................................................................17
Wi-Fi Conguration and Pairing Prerequisites ..............................................................18
Out of the Box Setup Procedure during Thermostat Commissioning ...........................18
Out of the Box Setup Procedure after Thermostat Commissioning ..............................18
HomeKit Manual Setup .................................................................................................19
Wi-Fi Accessory Conguration (WAC) ..........................................................................20
Apple HomeKit Pairing ..................................................................................................20
Additional Apple HomeKit Menu Options ......................................................................21
Enter WAC Mode ....................................................................................................................................21
Auto WAC Mode .....................................................................................................................................21
HomeKit User Reset ............................................................................................................................... 21
HomeKit Factory Reset ..........................................................................................................................21
Apply Firmware Update Now .................................................................................................................. 22
Thermostat - Factory Reset Smart Hub ........................................................................22
Thermostat - Notications or Actions Required .............................................................22
FCC Statements ................................................................................................. 23
FCC Compliance Statement — Part 15.19 ...................................................................23
FCC Interference Statement — Part 15.105 (B) ...........................................................23
RF Exposure Information ..............................................................................................23
Page 3

3
Features
This iComfort® E30 smart thermostat is an electronic, color display touchscreen
and 7-day programmable interface which communicates directly with a Smart
Hub Controller. After on-line registration is completed, the system may then be
accessed by the homeowner from anywhere via computer, tablet or mobile device
(Internet connection required).
Comfort Features include:
• Three languages supported (English, Français and Español)
• Wi-Fi Connected
• Smart Away® - Uses the thermostat to control the home temperature while
unoccupied (geo-fencing)
• FEELS LIKE® - Controls the system using outdoor / indoor temperatures and
indoor humidity to create the optimal comfortable conditions in the home
• Schedule IQ feature, you only need to program the thermostat once. Whenever
there’s a change in your routine, the thermostat adapts heating and cooling to
match
• Perfect Temperature (Single Set Point) - In non-zoning applications this allows
a single temperature setting to be used to cool or heat the home
• Air conditioning or heat pump units with up to four stages of heat / two stages of
compressor operation (two stages of heat pump heating, two stages of auxiliary
back-up heating, two stages of emergency heating)
• Humidication measurement and control
• Dew point adjustment control
• Equipment maintenance reminders
• Heat/Cool mode -- Permits control of heating, cooling, humidication, and
dehumidication without user involvement
• Performance reports are available through the homeowner web portal
This thermostat works with:
• Amazon® Alexa (For more details see “Amazon Alexa” on page 16.)
• Apple® HomeKit
TM
(For more details see “Apple® HomeKit™” on page 17.)
• PureAir™ Air Purication Systems - Indoor air quality with time or sensor based
notication of consumables including media lters, UVC bulbs, humidier pads,
and PureAir® system catalyst service / replacement
• Humiditrol® Enhanced Dehumidication Accessory (EDA)
WARNING
This product contains a chemical known to the State of California to cause cancer,
birth defects, or other reproductive harm.
IMPORTANT
Due to Lennox’ ongoing commitment to quality, features and options are subject
to change without notice and without incurring liability. Improper installation,
adjustment, alteration, service or maintenance can cause property damage or
personal injury. Installation and service must be performed by a qualied installer
or servicing agency.
Home Screen
Temperature Dial Feature
2:31 am
heat−to
cool−to
80
inside
57%
heat/cool
away
0
Ⓒ
Ⓑ
Ⓐ
Ⓔ
Ⓓ
Ⓕ
modes /schedules
78
75
tue | Mar 31, 2015
System
Figure 1. Temperature Dial Feature
A. This is the maximum heat position indicator on the dial. This object will be red/
white in color. Selecting this object will bring up the temperature adjustment dial
for the heat-to setting adjustment.
B. This is the maximum cool position indicator on the dial. This object will be blue/
white in color. Selecting this object will bring up the temperature adjustment dial
for the cool-to setting adjustment.
C. This is the location where no system demand will be active. For example, in
gure 1, the system would be off between A and B locations.
NOTE: By default, the system is congured not to allow the heating and cooling
settings to be any closer than three degrees when the system is running in
heat / cool mode (auto-changeover).
D. When there is an active call for heating, this area of the dial will have a red
background with yellow and dark red ames animation.
E. When there is an active call for cooling, this area of the dial will have a blue
background with snow akes animation.
F. The yellow line indicates the actual room temperature on the temperature dial
Page 4

4
indicator.
Screen Elements
2:31 am
heat−to
cool−to
80
inside
57%
heat/cool
away
0
Ⓒ
Ⓑ
Ⓐ
Ⓔ
Ⓓ
Ⓕ
modes /schedules
78
75
tue | Mar 31, 2015
living room
ⒼⒽ
Ⓘ
Ⓙ
outside
88
o
99
78
o
o
9
Ⓚ
Ⓛ
Ⓜ
Ⓝ
Figure 2. Screen Elements
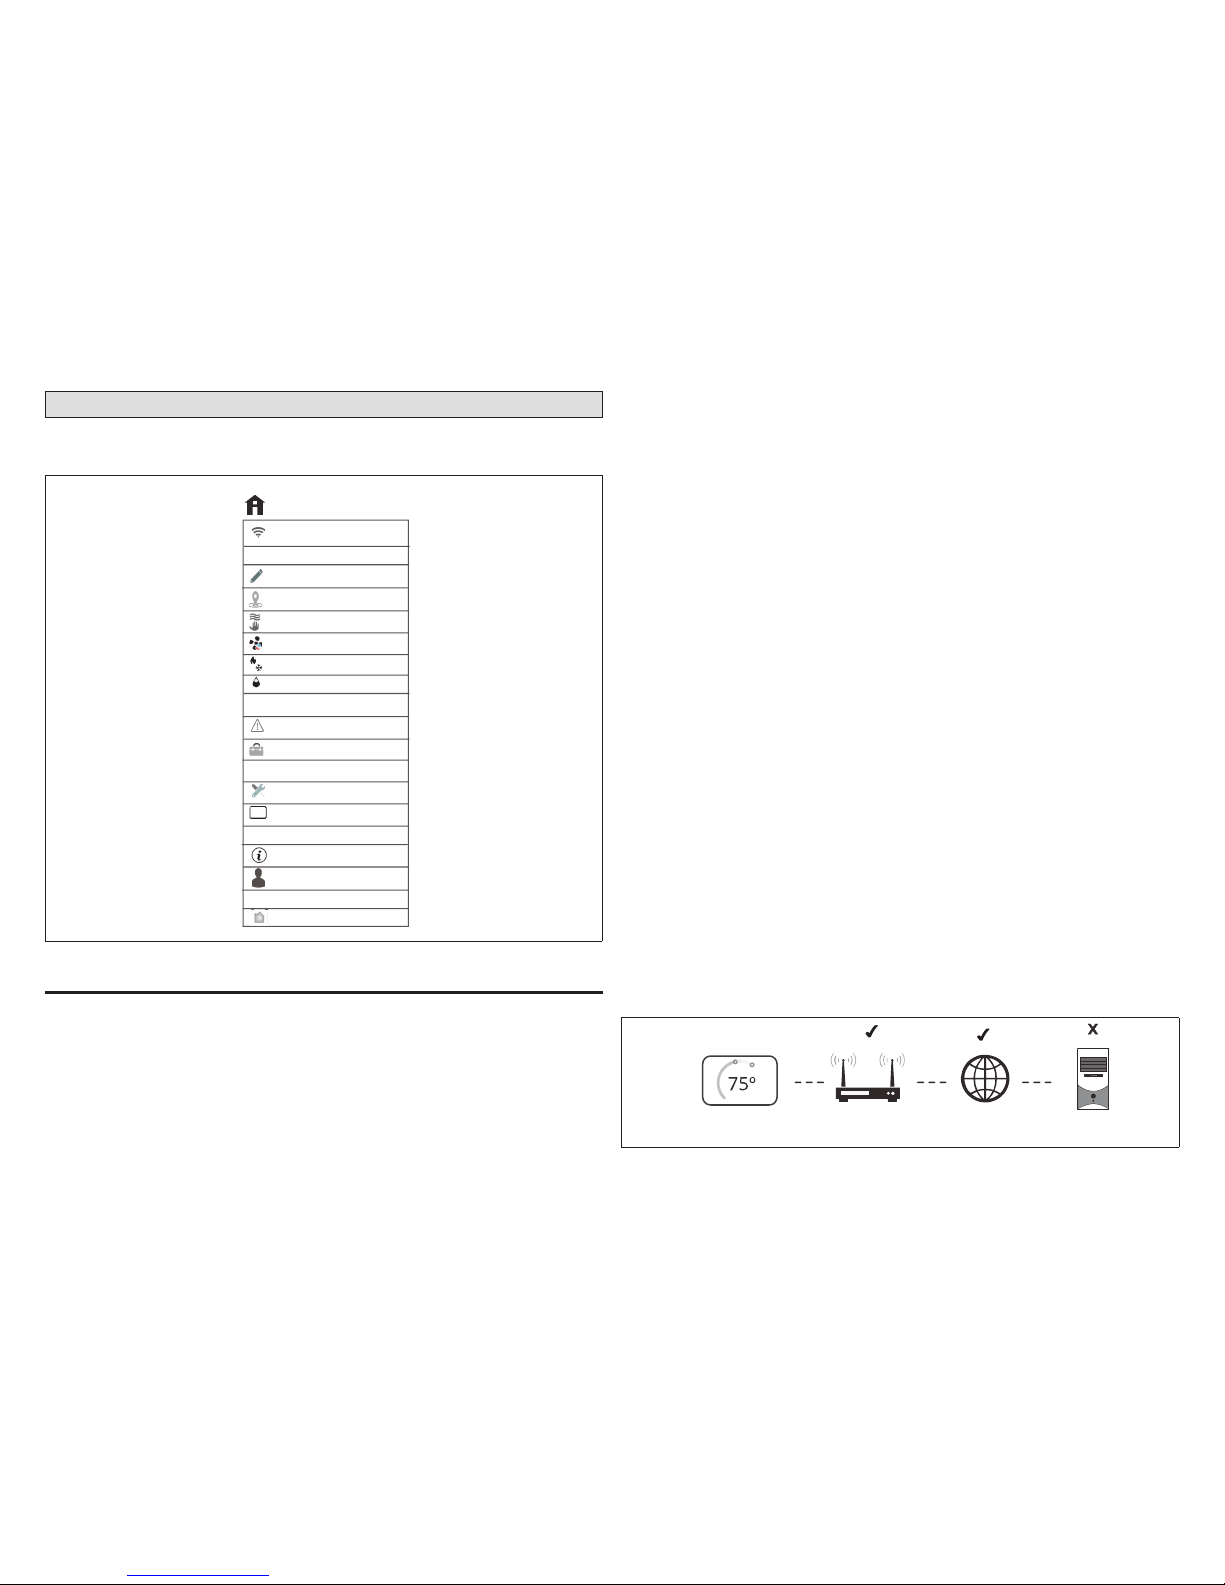
A. The MENU button is for accessing notications and settings.
B. A circle with a number indicates new notications. Touch menu > notications
to display active notications. Types of notications include: critical, warnings
reminders, and general information. This can also be sorted by last 24 hours,
last 30 days, last 12 months or all notications.
Notications
Table 1. Notication Types
Notication
Type
Color What it means
Critical Red
Indicates something has malfunctioned and needs immediate
attention. Contact your service technician.
Warnings Orange
Indicates an emerging or developing issues that will require
attention. One example is excessive run times. Contact your
service technician.
Reminders Yellow
Indicates lter, UVA light replacement or maintenance is
needed, based on run time or calendar schedule. See table 2
service reminders..
Info Blue Indicates various system modes, for example away mode.
NOTE: Selecting the ALL option displays all of the above.
Table 2. Reminders (Service Alerts)
Number Reminder
3000 Filter 1
3001 Filter 2
3002 Humidier Pad
3003 UV Light
3004 Maintenance
3005 PureAir Maintenance
4001 User Wi-Fi state change, disable
4002 Firmware download failed
4003 Image le download failed
C. This is the current time, day of the week and date (month/day/year). This
information can be adjusted from menu > settings > general > date & time
screen.
D. This will display the system name and if there is more than one iComfort E30
smart thermostat installed in the home. If there are dots underneath the name
that indicates there are other systems accessible from the home screen display.
The system name on display indicates which system is active on the HOME
screen. System names can be changed by going to menu > settings and on
the menu on the left side of the screen, select name.
80°
SYSTEM
SYSTEM 2
80°
Figure 3. Pop-Up Display (multi-system)
Page 5
5
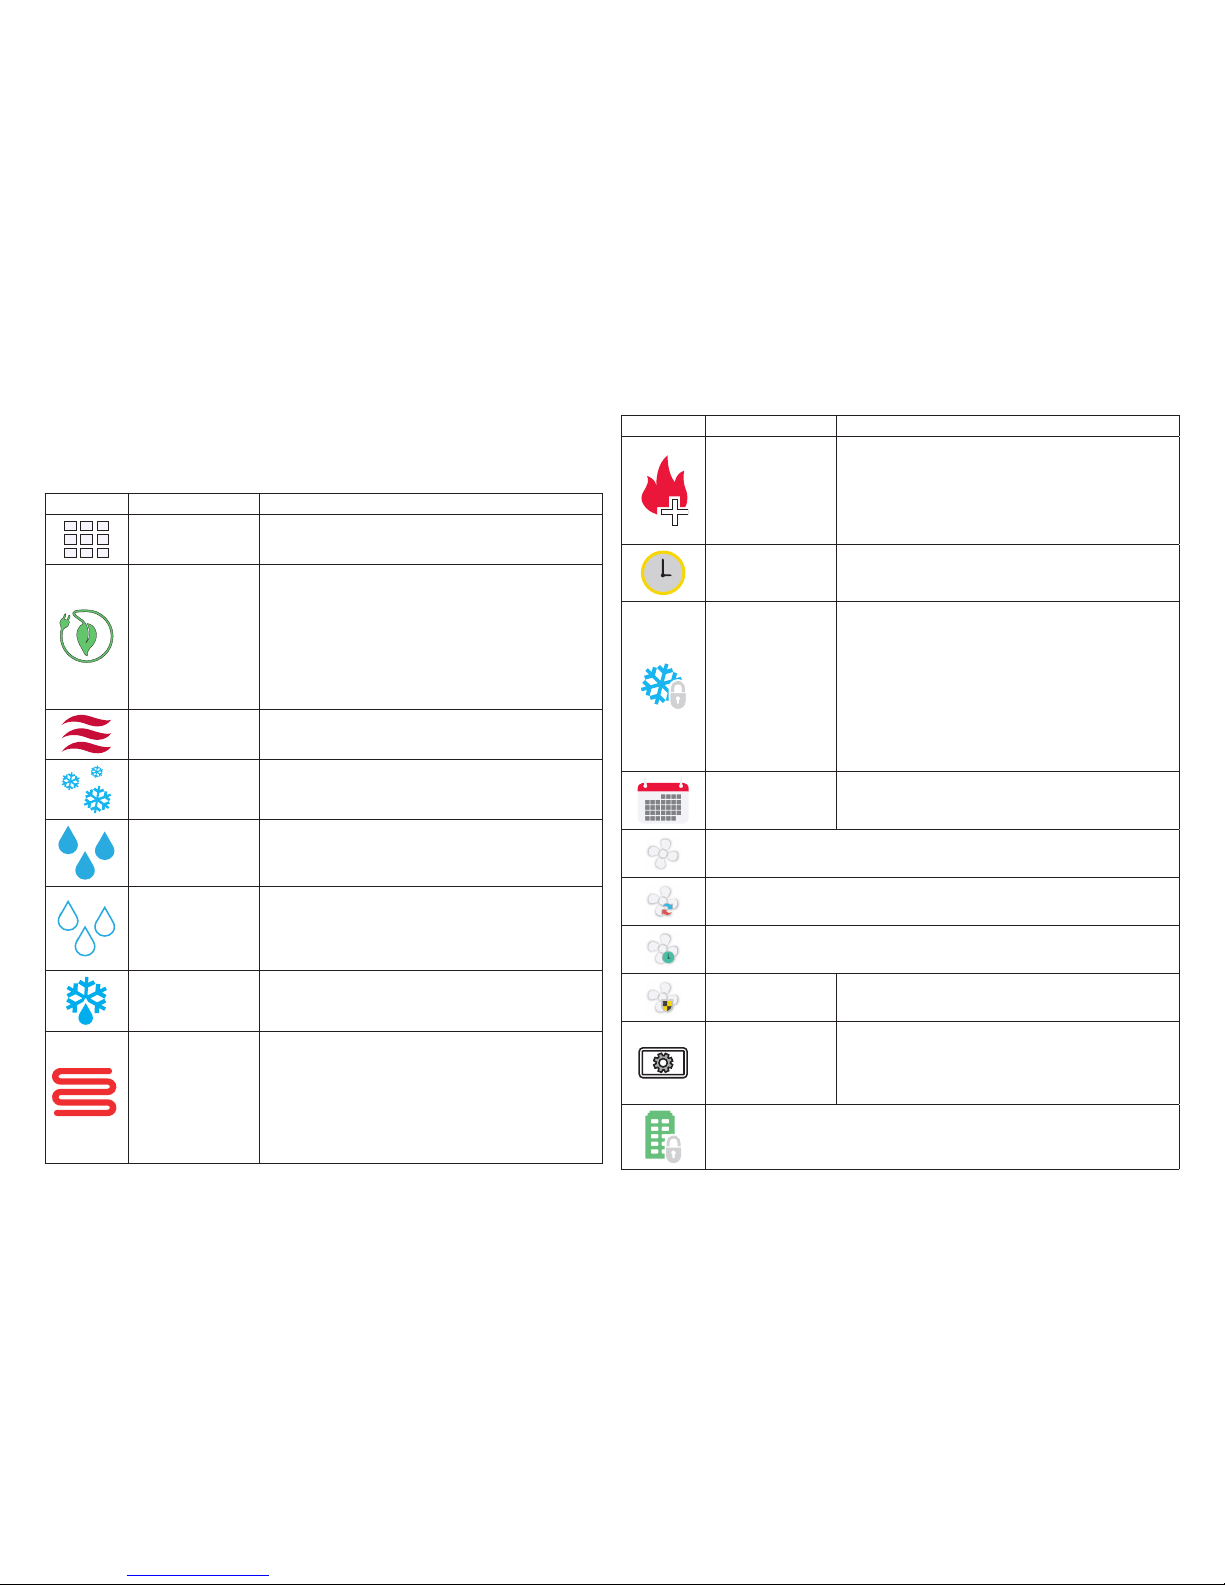
E. This area displays various functions that are either pending or currently active.
Indicators are humidifying, dehumidifying, cooling, heating, ambient lockout,
emergency heat, cleaning air, transitioning to next schedule, load shedding and
fan is running. Indicators are:
Table 3. Home Screen and System Status Icons
Icon Screen Text Purpose
Menu
Selecting this icon will bring up user and installer
menus.
Away
When the away icon is touched, the system will
automatically use energy saving settings - heat-to 62
(16.5) and cool-to 85 (29.5). Temperatures can be
adjusted by pressing on the available temperature setting
(i.e., heat-to or cool-to). To exit away, press the cancel
icon. In a zoning system, all zones are set to a single
heat-to and cool-too setting. Note that when manually
selecting Away from the home screen, the Smart Away
feature (if enabled under settings) will be temporally
disabled until Away is canceled. See page 10 for
additional information.
Heating System is heating the home
Cooling System is cooling the home.
Humidifying
If humidication equipment is installed and congured,
the system will display this message when adding
humidity to the air in the home.
Dehumidifying
The system can be used in cooling mode to help remove
excessive humidity as determined by the user setting. Go
to menu > settings > humidity > and turn on dehumidify.
Then adjust the acceptable low and high humidity levels
in the home with the dehumidication set-point slider.
Defrosting
The system is defrosting the outdoor unit coil (only when
required).
Emergency Heat
All heat pumps operating in northern climates below 35°F
(1.6°C) normally need a supplemental heating source.
Usually it is in the form of electric heating provided by the
indoor unit. Other sources could be gas, oil, or hot-water
back-up systems as well. The supplemental heat is also
referred to as “second-stage” or “back-up” heating, with
“rst-stage” being the heat pump only. Emergency heat
is when you use your supplemental heat (2nd stage) by
itself, without the use of your heat pump (1st stage heat).
Not available for non-heat pump systems.
Table 3. Home Screen and System Status Icons
Icon Screen Text Purpose
Auxiliary Heat
Is only available with heat pump system. If outdoor
temperature is above the high balance point, only the
heat pump will operate - default 50°F (10°C) high. If
outdoor temperature is below the low balance point, only
auxiliary heating will operate - default 25°F (-4.0°C) low.
If outdoor temperature is in-between the high and low
balance point, both the heat pump and auxiliary heat
sources can operate.
Will start soon
A ve minute safety delay prevents the compressor from
operating too soon after shut-down to allow internal
pressures to equalize.
Ambient lockout
This indicates that either the outdoor temperature is
above or below the balance point temperature settings.
The low balance point setting prevents heat pump heating
below the set point and back up heat will be used.
Typically the default is 25°F (-4.0°C), but that setting can
be adjusted by your dealer. At 25°F (-4.0°C) or below for
example, only auxiliary heating (electric or gas) is used. If
the high balance point is set to 50°F ( 10°C ) for example,
which is also adjustable by your dealer, then auxiliary
heat will not be allowed. Only heat pump heating will be
used. Anytime the outdoor temperature is below or above
the balance point temperature settings, the ambient
lockout notice will appear on the home screen.
Transitioning to
next schedule
The system is following an active schedule and is
transitioning to the next temperature setting based on a
time indicator.
Fan set to ON
Fan set to Auto
Fan set to circulate
Allergen Defender
is working
When Internet weather is enabled and pollen count is
high in the home’s location, the fan will run between
heating or cooling systems to help clean the air.
System Under
Test
Typically occurs when the system has had a power
interruption. The thermostat starts to look for the indoor
and outdoor controls. Sometimes the outdoor control
takes longer to boot up and therefore does not respond to
inquiry by the thermostat. Recycle power to system may
resolve issue.
Load shedding, wait time 45 min
Page 6

6
Table 3. Home Screen and System Status Icons
Icon Screen Text Purpose
Changing set
point range
Temperature is being adjusted.
Turning feels
like on
Indicating the system is transitioning to “feels like”
mode.
Schedule hold until next period
Coasting to
Perfect Temp
Coasting allows the current temperature to reach the
desired single set-point without the system doing any
work. The red arrow indicates the temperature is less
than the desired set point. The blue arrow indicates is
greater than the desired set point.
Coasting to
Perfect Temp
F. Away - When away icon is touched, the system will automatically use energy
saving settings which is heat-to 62 and cool-to 85 in Fahrenheit or heat-to 16.5
and cool-to 29.5 in Celsius). Temperatures can be adjusted by pressing on the
available temperature setting (i.e., heat-to or cool-to). To exit away, press the
cancel icon. Note that when manually selecting Away from the home screen,
the Smart Away feature (if enabled under settings) will be temporally disabled
until Away is canceled. See page 10 for additional information.
G. Pressing on the heat-to area will allow the temperature setting to be changed.
H. Pressing on the cool-to area will allow the temperature setting to be changed.
NOTE: If the system is running on a schedule, any adjustment will display schedule
will hold until next period or select duration of hold. Touch hold or duration
to select the desired time. The hold period can be canceled by pressing the
cancel icon on the right side of the Home Screen.
I. Select Mode: Touch modes/schedules to select the system mode of operation,
run a schedule, fan mode operation and turn the system off. To exit this screen,
press the home icon.
“Figure 4. Select Mode” shows the various modes of operation that may be
available. To select a mode for the system or a specic zone, press the desired
operation. The gray shaded area indicates the item has been selected.
select mode
cool only
heat only
heat / cool
emerg heat
schedules
auto
Figure 4. Select Mode
NOTE: Options are dependent on system conguration. For example, emerg heat
- emergency heat) will be auxiliary heat for heat pump systems only.
• Off: System is off. In addition, if system is off, Alexa will be unable to adjust the
temperature.
• Cool Only: System will run only in cool mode.
• Heat Only: System will run only in heat mode.
• Heat / Cool: This is the auto-changeover mode. System will heat or cool your
home at the temperature set point you desire.
• Emergency Heat: Selecting this setting will run the air handler’s electric heat or
furnace instead of the heat pump for heating. This selection is only available with
systems using a heat pump.
• Fan Operations: There are three fan modes of operation, which are auto, on and
circulate. Pressing on the fan icon will allow selection of the desired fan mode.
Table 4. Fan Operations
Fan Icon Fan Mode Description
ON
Fan is NOT following the schedule and runs continuously
until it is changed from the selected mode.
AUTO Fan will follow the fan setting in the selected schedule.
CIRC
Fan is following schedule and cycles during periods of
equipment inactivity. Circulate run time is dependent on
user settings.
Page 7

7
• Schedules: When selecting schedules, the available options are Schedule IQ,
summer, winter, spring/fall and save energy. Schedules are all predened and
can be changed or renamed by selecting edit schedules.
cancel
done
set time
559
006
7
01
PM
AM
Figure 5. Set Schedule Time Screen
Schedule IQ
This schedule operates in heat / cool mode and answering a few simple questions
will allow the system to know how to set the temperature for the home based on
time settings.
By default there are two time and temperature settings which can be adjusted
using the edit schedules option.
@ home day - default time is 7:00AM with a low temperature setting of 67°F
(19.5°C) and high temperature setting of 80°F (26.5°C).
@ home night - default time is 11:00PM with a low temperature setting of 66°F and
high temperature setting of 84°F (29°C).
away - Smart Away is used to set the temperature while the home is unoccupied.
Default low temperature setting of 62°F (16.5°C) and high temperature setting of
85°F (29.5°C) .
Temperatures for “home day”, “home night” and “away” can be adjusted by sliding
the low and high temperature circle left or right on the slider.
For each time setting, a specic fan operation can be set as well. Options are on,
auto and circulate. Other options are rename the schedule and restore defaults.
Press the home icon to exit the screen.
K. This is the “inside” room temperature.
NOTE: If the “feels like” option is enabled, feels like will appear above the
temperature. This feature can be enabled in the user settings.
L. This icon and number represents the humidity level inside the home at the
thermostat location only. This will only be displayed if enabled in the user
settings for display. The rain drop will be displayed as different levels based on
humidity percentage are detected in the home.
M. Items that may appear in this area of the screen are as follows:
Is displayed when a manual temperature override has been set. Press
cancel to return to the current schedule.
Indicates the system is set to “Perfect Temp”. Allows the current
temperature to reach desired set point without system operation by
“coasting” to the set cooling set point. Press cancel to return to the
current schedule.
Indicates the system is set to “Perfect Temp”. Allows the current
temperature to reach desired set point without system operation by
“coasting” to the set heating set point. Press cancel to return to the
current schedule
N. This area of the screen will display either the outdoor temperature or weather
forecast depending on system settings. The outdoor weather option under
menu > settings > display > outdoor weather has to be ON and outdoor
temperature is set to either Internet (AccuWeather) or sensor.
Press on the weather section of the Home screen to display detail information
concerning local weather. The weather displayed is also dependent on the user
correctly adding the home info. Go to menu > settings > home info and verify
or add the home information. If only the outdoor sensor is to be used, go to
outdoor temperature and set to sensor.
NOTE: If Internet and weather provider are selected, weather information will
only be displayed once the thermostat has been setup, connected to the
Internet and user login to their account.
NOTE: If a double lines appear in this area, either the thermostat is not setup
to use either an external temperature sensor or Accuweather, thermostat
has lost connection to the Internet or Lennox server. Another possibility is
you are not logged into your account. Also on rare occasion it could be a
temporary service outage by the weather service provider.
Page 8
8
Settings
The setting screen will allow the homeowner to connect to their home Wi-Fi router
and give their system a name. See list of settings for options.
wi−fi local
away
on
auto
Feels Like
fan
heat & cool
humidity
general
display
settings
notifications
home info
wi−fi local
name upstairs
account
System
advanced settings
HomeKit
on
Figure 6. User Setting Menu
Wi-Fi
This is for connecting the thermostat to a secure home wireless network.
NOTE: A router with Bonjour capabilities is required for this function. Check
the router functions if Smart Hubs do not connect. Apple Bonjour® is an
implementation of zero-conguration networking (Zeroconf), a group of
technologies that includes service discovery, address assignment, and
host name resolution.
NOTE: Never use a home guest account. Never use an open router connection
(non-secure). Always use a secure connection physically located in the
home where the thermostat is located.
Access Point is Visible
1. Slide the option to ON to enable Wi-Fi.
2. Wi-Fi network will show not connected. Press on not connected.
3. Select a network will be displayed listing all detected networks within range.
Select your home network by pressing on the network name.
NOTE: The thermostat can connect to a home wireless router that uses up to 32
characters in the access point name (visible or hidden).
4. When connecting to a secure home Wi-Fi network, a password will be requested.
Enter your home Wi-Fi network password and press join to continue.
NOTE: If you wish to see the characters you are typing, check show password.
The thermostat will support up to a 63 character password.
Access Point is Hidden
1. Slide the option to ON to enable Wi-Fi.
2. Wi-Fi network will show not connected. Press on not connected.
3. Select other.
4. The “enter new network information” screen will appear. Enter the name of the
hidden network.
NOTE: The thermostat can connect to a home wireless outer that uses up to 32
characters in the access point name (visible or hidden).
5. Select Security. Options are: none, WEP, WPA and WPA2. If your home Wi-Fi
connection is unsecured, then Wi-FI security must be enabled using WEP, WPA
or WPA2 via the router before proceeding. Consult your router documentation
on how to enable Wi-Fi security.
6. Once security type is selected, a password eld will appear. Enter the password
to access your home Wi-Fi network.
NOTE: If you wish to see the characters you are typing, check show password.
The thermostat will support up to a 63 character password.
7. Press join.
Whether connecting to a visible or hidden network, if successful, a check mark will
appear above both the router and Internet icons.
Figure 7. Connection Status
Page 9

9
Troubleshooting Wi-Fi Connection
The following terminology is used in this troubleshooting section:
• Received Signal Strength Indication (RSSI). This is an indication of the signal
strength of the Wi-Fi router being received by the scanning device (i.e., smart
phone). So the higher the RSSI number (or less negative in some devices), the
stronger the signal.
• Wireless Bands 802.11a, g and n. These are wireless networking standards that
extends bandwidth throughput up to 130 Mbps using the 2.4 GHz band.
• Internet Protocol Address (IP address). This is an address assigned by your
home router for each network device (e.g., computer, printer, thermostat).
Electromagnetic Interference Causing Poor Connectivity: Locate the
thermostat and router away from other devices that could possibility interfere with
wireless communications. Some examples of other devices that could interfere
are:
• Microwave ovens
• Wireless cameras
• Portable phones and bases
• Baby monitors
• Wireless speakers
• Bluetooth devices
• Garage door openers
• Neighbor’s wireless devices
To eliminate a possible source of interference, temporally disable any devices and
see if Wi-Fi performance has improved.
Received Signal Strength Indication (RSSI)
The ideal signal strength range for the thermostat is -1 to 69 RSSI. The signal
strength can be viewed from the thermostat interface.
1. Press NETWORK SETTINGS; this screen shows a graphical view of buttons
representing OPEN and SECURE wireless networks, along with button for
adding a network.
2. Select the access point that has already been established and connected.
When selecting the info icon, a screen will appear which will display an option
to forget the network and IP address assigned to the thermostat by your router,
sub-net mask, router, DNS and RSSI. If the RSSI signal strength is anywhere
between -9 to -69, then the signal strength is sufcient. If outside this range,
then either relocate the router closer to the thermostat, add a repeater, or move
the Smart Hub. Adjusting antennas on router and/or Smart Hub may resolve
the issue.
Home Network ........................
IP address 192.168.1.4...............
subnet mask 255.255.255.0............
router
DNS
04-ISSR............................
i
forget this network
Figure 8. Verifying Signal Strength
Name
Renaming System
Selecting this option to name your system. There is also an option to unregistered
the system.
Unregistering the System
Using this feature will unregister the system from your consumer portal account if it
has already been registered to your account. This will only remove the system that
is currently being accessed.
NOTE: If you have multiple systems assigned to your account, only the system
you are working from will be removed.
Page 10

10
Away
NOTE: Procedures listed in this section can be accomplished either at the
thermostat, Lennox iComfort Thermostat App on your mobile device or
consumer web portal.
Manual Away
The user can manually put the system into away mode by pressing the “away”
icon. When the system is in away mode, the horseshoe is grayed-out and shows
the “away” status text. In order to exit away mode, the user can press the “cancel”
icon. In away mode, the away set points are used to control the system. The user
can modify the away set points from the default values in menu > settings > away.
away
smart away
Use the iComfort app to control the temperatures in your home while you are away
reset smart away
Turn participate off in all mobile devices (there are currently 2 mobile devices participating)
on
min
away set−points
Please make sure to install the iComfort S30 mobile App to participate in Smart Away.
You can also configure the away fence in the mobile App.
There are currently 2 mobile devices participating.
55°
85°
55°
Figure 9. Away Screen and Smart Away Settings
Smart Away
Smart Away is a feature that can be enabled once you have created and registered
your account. Both Home Info and Account options must be completed before
this option can be enabled.
The Smart Away feature depends on the iComfort Thermostat App running on your
mobile device (smart phone or tablet) and being logged in to your account. It is
also required for Wi-Fi and location settings to be enabled on your mobile device.
Android devices must also have the location mode set to “high accuracy.” Consult
your mobile device user guide for instructions.
Smart Away can also be enabled from your mobile device once you have installed
the Lennox iComfort Thermostat App and logged in. Go to the menu > settings >
away and turn ON Smart Away. To allow the mobile device you are on to use this
feature, turn ON participate. The away fence option will appear and by default, the
setting is two miles (3 km). The range for this setting is 2 to 6 miles (3.00 to 9.50
km).
Inner and Outer Away Fences
The inner away fence is set by the user anywhere between 2 to 6 miles (3.00 to
9.50 km) on the mobile app. This setting can be different for each participating
mobile device. When any of the participating mobile devices are located inside of
its inner away fence, the system will not be in Smart Away; the system will use the
temperature set points dened by the schedule or what was manually set. Once
the inner away fence is set, the outer fence for each participating mobile device will
be automatically calculated by the Smart Away algorithm.
Transition Set Points
When the closest participating mobile device is between the inner and outer away
fences, the thermostat will show the Smart Away indicator. The system will use
transition set points to heat or cool the home. The transition temperature set points
are automatically calculated by the Smart Away algorithm using a combination of
the home and away set points.
Away Set Points
Once all participating mobile devices have moved outside the transition range, the
thermostat will continue to show the Smart Away indicator, and the user-set away
set points will be used to control the system.
Example: Away set points are 65ºF (18.5ºC) for heating and 85ºF (29.5ºC) for
cooling. When the away fence is set to two miles for all participating mobile
devices, and the closest participating mobile device is within the 0-2 mile (0 to 3.22
km) range of the home, the system is considered home; the system will use the
set points from the schedule or what was manually set. If the closest participating
mobile device moves into the 2.1 to 8 miles (3.40 to 13.04 km) range, the system
is considered in transition, and the system will start to either increase or reduce
the heating or cooling set point. Once all participating mobile devices have moved
beyond the 8.1 mile (9.50 km) range from the house, the system sets the set points
to the away set points (65ºF for heating and 85ºF for cooling).
Multiple Devices
It is possible to have more than one mobile device participating in Smart Away for
this system. The away fence can be set to the same value or different values for
each mobile device. The thermostat will not show the Smart Away indication until
all devices have moved past their inner away fence, and the system will not reach
the user-set away set points until all devices have moved past their outer fence.
Page 11

11
Feels Like
The feels like feature uses a combination of outdoor temperature and indoor
humidity to come up with the feels like comfort level in the home.
NOTE: Feels Like is not a temperature setting but the temperature that the space
feels like based on current outdoor temperature and indoor humidity.
NOTE: When Feels Like is set to on, the words Feels Like will appear above the
indoor temperature display on the home screen.
feels like
feels like
Display and control your system using feels like temperatures instead of actual temperatures
on
indoor
humidity
indoor
temperature
outdoor
temperature
feels like
++
Feels like temperatures factor in the outdoor temperature
and indoor humidity for more accurate control of the temperatures in your home
= 75°
Figure 10. Feels Like Screen
Fan
Go to menu > settings > fan to turn on or off Allergen Defender. Fan mode options
for circulate can be adjusted on this screen as well. Adjustments between 9 to 27
minutes on how long the air will circulated each hour. The circulate option runs
during any mode selected except when the system is turned off.
Allergen Defender: When Internet weather is enabled and pollen count is high in
the home’s zip code, the fan will run between heating or cooling systems to help
clean the air.
Heat & Cool
This screen allows changes to how the system operates. Options are single setpoint, heat pump mode (normal or comfort), auxiliary heat and safety protection.
1. Perfect Temp: Option will only be available in non-zoning systems. This option
allows the user to control both heating and cooling temperatures with one single
temperature setting. Factory default is off.
NOTE: When set to Perfect Temp, the heat / cool position indicator changes. The
blue color (cooling) indicator is on the left and heating (red) indicator is on
the right. This is just the opposite on how it is displayed in normal heat/cool
mode. Also the heat / cool mode indicator will display Auto instead.
2:31 am
set−to
76
inside
57%
auto
away
0
modes /schedules
80
tue | Mar 31, 2015
Home
Figure 11. Perfect Temp
2. Select Heat Pump Mode: (only available with system using a heat pump).
Options are normal and comfort. Default is normal. Descriptions for what each
setting does is displayed on the screen.
3. Wider Set-Point Range: Changes the default low and high maximum
temperature setting from 60-90°F to 40-99°F (15.5-32.0°C).
4. Auxiliary Heat*: (only on heat pump systems): An additional heat source will
be used automatically when the indoor temperature drops to a temperature that
can be adjusted using the slider temperature setting tool.
5. Safety Protection: Alerts you if the home gets too cold or hot. This is set
under this menu option on the setting for both low and high temperatures. The
system will automatically turn on either cooling or heating if the home’s interior
temperature reaches either the low or high setting. A notication is also sent to
the Home screen notication area and iComfort Thermostat App.
More on Auxiliary Heat
Auxiliary heat is the use of an additional heat source, when the heat pump BTU
capacity is not sufcient to keep up with the home’s heating demand; sometimes it
is also called supplemental heat.
When used in a dual-fuel mode, auxiliary heating is accomplished with a gas or oil
red unit. In this mode of operation, the heat pump must shut down and uses just
the auxiliary heating unit for heating.
If the system is an air handler with electric heat, the auxiliary heat will be in
conjunction with the heat pump when the home heating requires it.
Another use of auxiliary heat with heat pump systems includes a setting called
balance point. Balance point puts temperature limits on when the heat pump
and electric heat work together or independently. When the outdoor temperature
is above the default high balance point of 50°F (10°C) (default), only the heat
Page 12

12
pump will be allowed to run (no auxiliary heat). When the outdoor temperature is
below the default low balance point of 25°F (-4.0°C) (default), only the auxiliary
heat is allowed to run (no mechanical heat pump operation). When the outdoor
temperature is between the low and high balance point settings both heat sources
are allowed to satisfy the heating demand.
Humidity
Some options that are available under this section are dependent on type of
equipment (indoor and outdoor units) and humidication accessory is installed.
Adjustment Slider Tools
• Dehumidication Set Point Percentage — The slide bar adjustment tool allows
desired humidity level in the home. Selection between 40% to 60% are available.
Default is 55% when dehumidify is enabled.
• Humidication Set Point Percentage- This adjustment tool is only visible when
dew point is set to OFF. Range is 15% to 45% humidity. Default is 40%.
• Overcooling — This adjustment allows selection between 0°F to 4°F (0°C to
-2°C). This adjustment is only available when Max is selected. This selection will
limit how much overcooling is allowed when trying to achieve the dehumidication
set point. Default is 2°F (1.0°C).
• Dew Point — This adjustment twill help reduce the amount condensation that
may build up on windows and other glass surfaces. A dew point slider bar option
will appear under the humidity menu. By default the dew point slider is set to
OFF. When dew point is set to ON, the slide bar adjustment will appear with a
range of -15% to 15%. Default is 0%.
Humidity Control
The following options are available under humidity control:
• Off
• Humidify only option is available when a humidication accessory is installed.
• Dehumidify only option is available with or without a dehumidication accessory
installed.
• Humidify + dehumidify option is only available when a humidication accessory
is installed.
Humidication Control Center
When a humidication accessory is installed and humidify is enabled, the options
are as follows:
• Normal — Recommended for moderate climates. This runs the humidier when
there is a call for heat and humidication.
• Max — Recommended for drier climates. This runs the humidier when there is
a call for humidication only.
» Dew Point percentage slider adjustment tool is available for both Normal and
Max settings.
» Humidication set point percentage slider adjustment tool is only visible
when Dew point is set to OFF.
Dehumidication Control Center
When dehumidify is enabled and no dehumidier is installed, the options are as
follows:
• Normal — Recommended for moderate climates. No dehumidication is active.
» Dehumidication set point slider adjustment tool is available.
• Max — Recommended when outdoor air is excessively humid. May over cool
your home to achieve the desired dehumidication set point.
Humidify + Dehumidify
When this option is selection, a combination of both humidication and
dehumidication settings are available.
When dew point is set to NO. Then a dual purpose slider adjustment tool will appear.
This tool will allow you to adjust the set point percentage for both humidication
(left slider) and dehumidication (right slider). Range is 15% to 60 % humidity.
Dehumidication Accessory Installed
When either an auxiliary dehumidier or Humiditrol is installed the only setting
available is dehumidication set point slider adjustment tool is available.
NOTE: When Humiditrol accessory is used there is an additional setting that
your installer can adjust. This setting option is available under the Dealer
Control Center on the thermostat. The setting is called Humiditrol Comfort
Adjust, and the settings options are Maximum Overcooling, Midpoint
Overcooling and Minimum Overcooling. The factory default for this setting
is Maximum Overcooling. Please refer to the documentation included with
the Humiditrol accessory for further details.
Notications
This section allows the user to set up reminders for various accessories. By default
all listed items are disabled. The reminders can be set for 3, 6, 12 or 24 months and
a custom reminder by specic date can be set.
Advanced Settings
This section is for installers and technicians ONLY to customize system settings
and run various diagnostic tests.
• View dealer control center - allows installers and technicians to perform custom
congurations tailored for the homeowners unique requirements.
• Restart - Options are to restart Smart Hub or thermostat or both.
• Pair Smart Hub to iComfort Dealer Mobile Setup App - this allows an installer
to pair their mobile device to start the initial commissioning of the system,
Page 13

13
or a technician to use a mobile device to perform custom congurations or
troubleshooting.
General
This section provides information and setting changes for various displayed items.
About
This page will provide detailed information concerning the HD Display (thermostat
info) and Smart Hub. Provided are: model number, serial number, hardware,
software and Wi-Fi revisions.
In addition, for thermostat and Smart Hub, a software update option is listed. Select
software update and set Automatic Updates to YES or NO (default is NO). You can
also select check for updates now.
Dealer Info
This page will display or allow information to be changed concerning the dealer.
Items included on this page are name, address1, address2, city, state, zip code,
country/region, phone, email and website. There is a dealer access option at the
bottom of the page. Press the > button to access the dealer access page.
Dealer Access
1. Remote View: This option allows the dealer access to remotely view your
system. Options are ON and OFF. Default is OFF.
2. Remote Control: There are two options under this section, OFF and ON/
ALWAYS. Selecting the desired option will place a green check mark next to
the feature.
3. Alerts and Notications: Default is OFF. Turning on this feature will allow
automatic notications to be sent to your dealer concerning maintenance.
Screen Lock
There are three options for screen locking. Default is unlocked.
• Unlocked - Changes can be made to any settings.
• Partially Unlocked - Screen is locked but temperature settings can be changed.
• Locked - No changes can be made.
To unlock partially locked or locked, press anywhere on the screen and hold for
ve seconds.
Date & Time
The following items can be set on this screen:
1. The clock can be changed to 24 hour (military). Default is OFF.
2. The following settings are only available if the system is not connected to the
Internet.
• Daylight Savings - ON or OFF. Default is ON.
• Time Zone: Options are Pacic, Mountain, Central and Eastern. Default is
Central. Select time zone and press SET.
• Set Time - Local time can be adjusted. Press SET to nish.
• Set Date - Current date can be set. Press SET to nish.
NOTE: If the system is connected to the Internet, only changing to the 24 hour
clock can be selected.
Language
This allows the language used on the screen to be changed. Options are English,
Français and Español. Default is English.
Display
The following setting options available are:
1. Outdoor Weather - Turn ON to display weather on the HOME screen.
2. Outdoor Temperature Display - Options are:
• Internet (AccuWeather) - Will display weather provided by AccuWeather
for the local area based on the homeowner zip code.
NOTE: Thermostat has to be connected to the Internet, system is registered, and
you are logged into myicomfort.com for this feature to work. See menu >
system settings > account to verify.
• Sensor - Display outdoor temperature only from installed remote outdoor
sensor connected directly to the E30 Smart Hub.
3. Outdoor Air Quality - Turn ON to display outdoor air quality on the weather
screen.
4. Indoor Humidity - Turn ON to display indoor humidity above the indoor
temperature on the HOME screen.
5. Proximity Sensor - When turned ON, the display will wake up automatically
upon approach.
6. Screen Saver - Options for this feature are:
• Off
• Weather - If turned on, will allow up to 26 animated weather screen savers
based on the AccuWeather outdoor weather forecast for the local zip code.
NOTE: Thermostat has to be connected to the Internet, system is registered, and
you are logged into myicomfort.com for this feature to work. See menu >
system settings > account to verify.
• Power Save - Screen is blank until the screen is touched or activated by
proximity sensor if enabled.
• Logo - Displays the Lennox Logo.
Page 14

14
7. Screen Brightness - Options are ON or OFF.
• If set to ON, control of screen brightness is automatically controlled by the
system.
• If set to OFF, screen brightness can be adjusted using the sliding scale
adjustment tool.
8. Temp Scale - User can set to either Fahrenheit or Celsius temperature display.
9. Clean Screen - Locks the screen and allows user 30 seconds to clean the
screen. During this period, the screen will not respond to any input.
Home Info
Adding Home Information
This screen allows you to add your home information. Fields included are home
name, country/region, address, address2, city, state and zip/postal code.
Remove Home
Using “remove home” function will remove all addresses and thermostat systems
associated with your account.
To remove just one system, go to that system and navigate to menu > name and
select “unregistered system.”
NOTE: The remove home function does not delete your account but just removes
all systems and addresses.
Account
The account screen will allow the user to setup an account so they may access
their system remotely from the consumer portal. Reasons to create an account:
• To enable remote access to the system using a mobile device with the iComfort
Thermostat App installed. This will allow remote adjustment for temperature
settings and other features.
• To enable the Smart Away feature discussed later in this instruction.
• To directly communicate to the Dealer any issues the system may be incurring.
This menu allows four options:
Using Existing Account
If an iComfort S30 account has already been created, then use the sign in option
to access your account. Enter your email address and password to connect your
system to your on-line account.
Creating a New Account
1. Use this option to create an account. Enter your email address and desired
password. Select create new account.
2. The new account screen will appear. Enter your rst name, last name and
phone number (optional).
3. Enter an email address and repeat to verify.
4. Create a password under the set password location. Retype the password to
verify.
5. Check the box that will allow your dealer to receive service alerts and possibly
x your issue remotely (recommended).
6. Check that you agree to the Lennox EULA. Press on LENNOX EULA to read
the end-user license agreement.
If the setup and connection to the Lennox server is successful, a green check mark
will appear above the server icon under the Wi-Fi menu option.
Generate Pin
If you have already created a consumer account through the consumer web portal
(www.lennoxicomfort.com) then you can use the generate pin option to add your
system to your account.
NOTE: The generate pin option is not required if the account is setup from the
thermostat .
1. Create your account using either the iComfort Thermostat App or consumer
website (www.lennoxicomfort.com).
2. The rst time you login to your account the screen will indicate no iComfort
detected. Select the ▼ icon next to your email address in the upper right-hand
side of the screen. A drop down menu will appear and select add icomfort.
3. A add icomfort pop-up window will appear on the screen. Enter your pin number
which was generated by the thermostat and press add. When successful, the
setup will continue on to the next applicable screen.
4. If you have already associated an address to your account, you will have the
option to select that address or add a new address.
Move Out
Using “move out” function will remove all addresses and thermostat systems
associated with your account.
To remove just one system, go to that system and navigate to menu > name and
select “unregistered system.”
NOTE: The move out function does not delete your account but just removes all
systems and addresses.
HomeKit
See section “Apple® HomeKit™” on page 17 for information on how to add your
thermostat to Apple HomeKit.
Page 15

15
Using the Secure Web Portal
Access all the great Wi-Fi enabled features on your iComfort® thermostat from our
secure web portal.
www.lennoxicomfort.com
After signing in from your computer, tablet or smart phone, you will be able to view
your iComfort system settings, adjust the temperature and view reminders and
alerts – just as you would on your iComfort thermostat at home. With a familiar look
and settings this simple, you should feel right at home.
From the web portal welcome page, you may also click on links to launch an
interactive demo or learn more about iComfort.
iComfort Support Center
For the latest information on your E30 Smart Thermostat, go to your secure web
portal or mobile application for support. Additional information includes product
information, latest user guide, questions and answers, how-to videos, what’s new
and Lennox contact information. In addition, the latest information on Alexa and
Apple Homekit is also available.
Look for this icon on your Lennox
secure web portal.
support
click here for
Look for this icon on your Lennox
mobile application.
support
tap here for
Installation Report
Installation report is only available to the installer (dealer). Please contact your
dealer for a copy of your report.
Performance Reports
Performance reports are only available through the consumer portal at:
www.lennoxicomfort.com
Your dealer also has access through the dealer dashboard.
NOTE: Your dealer has the ability to view and generate reports (PDF) for up to 12
months to email to homeowner.
Mobile Applications
The iComfort® Thermostat App
(homeowner app) is available
for use on iPhone®, iPad®
and Android™ devices.
The Amazon Alexa mobile app
is available for use on iPhone®,
iPad® and Android™ devices.
Apple, the Apple logo, iPhone and iPad are trademarks of Apple Inc. registered in
the US and other countries.
Android is a trademark of Google Inc. Use of this trademark is subject to Google
permission.
Amazon, Echo, Alexa and all related logos are trademarks of Amazon.com, Inc. or
its afliates.
Page 16

16
Amazon Alexa
This section provides basic information on how to connect your Amazon device
utilizing Alexa speech-recognition technology for your thermostat. Also provided
are the voice commands that controls your thermostat.
The most current information provided by Lennox is available on the consumer
portal at:
www.lennoxicomfort.com
Go to the bottom right-side of the page and select the click here for support icon.
Setup
First you must have an Amazon Alexa enabled device installed and connected to
your home Wi-Fi network. Use the following procedure to enable the iComfort E30
Smart Thermostat Skill using the Amazon Alexa mobile app.
1. Download and install the Amazon Alexa app on your mobile device.
2. Start the Amazon Alexa app.
3. Search for “Lennox” in the Skills or Smart Home Skills section of the Amazon
Alexa app and ‘Enable Skill’ for the Lennox iComfort Skill.
4. Login with your Lennox iComfort user name and password
5. Your Lennox account should now be successfully linked with Amazon Alexa.
6. You can now add your iComfort thermostat to Alexa by either of the following
options:
• Clicking on “Discover Devices” in the Smart Home section in the Alexa
app OR
• Ask Alexa to discover your iComfort Thermostat by saying, “Alexa, discover
my devices”.
Under “Smart Home” in your Alexa app, you should see a list of discovered devices
with your thermostat name(s). You can see your system name on the E30 home
screen above the indoor temperature display.
IMPORTANT
If the system name displays the default “System” then it will be called “Thermostat”
in Alexa. If you changed the system name to a custom name other than “System”,
then that custom name will be used for Alexa.
So only use the exact name(s) you see on the E30 screen when speaking your
command. For example, “Alexa, change the “Hallway” to 68 degrees” will work, but
“Alexa, change the “Hallway thermostat” to 68 degrees” will not.
In a situation when you may have two or more thermostats in your home,
each thermostat must have a unique name.
If your thermostat is using the “Feels Like” feature, Alexa supports that mode of
operation as well.
NOTE: You can change your system name by going to the thermostat home
screen, select menu > settings > name.
Alexa Voice Commands for Lennox Skill
1. Set your device to a specic temperature:
“Alexa, set (thermostat name) to 75 degrees”
“Alexa, set (thermostat name) temperature to 75”
“Alexa, set (thermostat name) to 75”
“Alexa, change temperature to 75”. Alexa will ask you to conrm which device,
just say your thermostat’s name.
“Alexa, turn temperature to 75”. Alexa will ask you to conrm which device, just
say your thermostat’s name.
2. Turn UP the temperature a set amount:
“Alexa, increase (thermostat name) by 3 degrees”
“Alexa, increase (thermostat name) temperature by 3 degrees”
“Alexa, raise (thermostat name) by 3 degrees”
3. Turn UP the temperature by 2 degrees:
“Alexa, increase (thermostat name) temperature”
“Alexa, heat up (thermostat name)”
4. Turn DOWN the temperature a set amount:
“Alexa, decrease (thermostat name) by 3 degrees”
“Alexa, lower (thermostat name) temperature by 3 degrees”
“Alexa, decrease (thermostat name) temperature by 3 degrees”
5. Turn DOWN the temperature by 2 degrees:
“Alexa, lower (thermostat name) temperature”,
“Alexa, cool down (thermostat name)”
“Alexa, make (thermostat name) colder”
6. Ask for the current temperature:
“Alexa, what is the temperature of (thermostat name)” Alexa will reply with
current temperature.
7. Ask for thermostat set points:
“Alexa, what is the (thermostat name) set to?” Alexa will reply with the current
thermostat setpoints and the thermostat mode (heat, cool or auto).
If you ask Alexa to raise or lower the temperature without specifying by how much,
it will change the temperature by two degrees.
Page 17

17
Changing to Celsius
Using your Amazon Alexa mobile app, select the three bar icon in the upper lefthand of the screen.
1. Select Settings.
2. Choose your Amazon device
3. Select Measurement Units from the menu.
4. Toggle ON Temperature Units - Use metric measurements for temperature
units.
NOTE: Even though your Lennox thermostat supports half degree settings
in Celsius, Alexa only supports whole degrees. The rst temperature
adjustment that gets made will set the temperature to a whole degree, if it
was not already.
Heat and Cool Mode
Alexa will control your thermostat a bit differently when it’s in Heat • Cool mode.
In Heat and Cool mode the system can automatically switch between heating and
cooling as needed.
For instance, if you ask Alexa to set the hallway temperature to 70 degrees, your
thermostat will use this as a midpoint temperature, setting the Heat setpoint to 69
and Cool setpoint to 72. Alexa will conrm your request, saying “Hallway is in auto
mode, aiming for 70 degrees”.
NOTE:
1. You cannot change the mode (heat only, cool only, etc.) of your thermostat
using Alexa.
2. If your thermostat is in ‘away’ or ‘smart away’ mode, any Alexa commands to
change thermostat temperature will not work in this mode.
3. Currently, you can pair only one home that is listed in your Lennox iComfort
Account with Alexa. In the situation where you have multiple homes associated
with your iComfort account, you will not have a choice to choose the home for
Alexa. You can check the homes on your account by visiting:
www.lennoxicomfort.com
Apple® HomeKit™
Apple HomeKit technology provides an easy, secure way to control your home’s
lights, doors, thermostats, and more from your iPhone®, iPad®, iPod touch® or
Apple Watch®.
To control this HomeKit-enabled accessory, iOS 10.3.1 or later is recommended.
Controlling this HomeKit-enabled accessory automatically and away from home
requires an Apple TV® with tvOS 10.3 or later or an iPad with iOS 10.3 or later.
Apple, Apple Watch, iPad, iPad Air, iPhone and iPod touch are trademarks of
Apple Inc., registered in the U.S. and other countries. HomeKit and HomePod are
trademarks of Apple Inc.
Use of the Works with Apple HomeKit logo means that an electronic accessory has
been designed to connect specically to iPod touch, iPhone, or iPad, respectively,
and has been certied by the developer to meet Apple performance standards.
Apple is not responsible for the operation of this device or its compliance with
safety and regulatory standards.
Overview
There are three options available for Wi-Fi Accessory Conguration Setup and
HomeKit pairing which are:
• Out of the Box Setup Procedure during Thermostat Commissioning.
• Out of the Box Setup Procedure after Thermostat Commissioning.
• HomeKit Manual Setup
For more information about Apple Homekit, go to:
https://www.apple.com/ios/home
The most current information provided by Lennox is available on the consumer
portal at:
www.lennoxicomfort.com
Go to the bottom right-side of the page and select the click here for support icon.
Remote Access
With the Home app, on your iOS device, you can set up a home hub to control
your HomeKit accessories remotely, grant access to the people you trust, and
automate your accessories to do what you want, when you want. You can set up
your HomePod, Apple TV 4K, Apple TV (4th generation), or iPad as a home hub
to automate and remotely control your HomeKit accessories from your iOS device.
The device that you set up as a home hub must remain in your home, connected
to your home Wi-Fi network, and powered on.
Page 18

18
Wi-Fi Conguration and Pairing Prerequisites
The following is required in order to setup Wi-Fi and pairing your thermostat to
Apple Homekit:
• You are located in the home where the E30 system is located.
• The home’s wireless access point is up and running with Internet access.
• Your iOS mobile device’s Wi-Fi is enabled and already connected to your home
wireless network.
• Active iCloud account
Out of the Box Setup Procedure during Thermostat
Commissioning
1. When the thermostat is rst powered up, the Wi-Fi Accessory Conguration
(WAC) Active screen will appear on top of the dealer info setup screen.
Figure 12. Wi-Fi Conguration
NOTE: You have 15 minutes to complete the procedure or it will time out at the
thermostat and you will receive a WAC Failed message.
2. Proceed to “Wi-Fi Accessory Conguration (WAC)” on page 20 to continue
the procedure.
Out of the Box Setup Procedure after Thermostat
Commissioning
1. When the thermostat is powered is cycled, the Wi-Fi Accessory Conguration
(WAC) Active screen will appear on top of the thermostat’s home screen.
Figure 13. Wi-Fi Conguration
NOTE: You have 15 minutes to complete the procedure or it will time out at the
thermostat and you will receive a WAC Failed message.
2. Proceed to “Wi-Fi Accessory Conguration (WAC)” on page 20 to continue
the procedure.
Page 19

19
HomeKit Manual Setup
The following procedure is used when Apple Homekit was not congured during
the thermostat’s commissioning phase. This procedure could also be used if the
thermostat had been congured by a previous homeowner.
1. From the thermostat’s home screen, go to menu > settings > Home Kit.
Select HomeKit factory reset.
Figure 14. HomeKit Menu
2. A pop-up screen will appear asking you to conrm that you want to reset to
default. Select YES to continue.
Figure 15. HomeKit Reset Screen
3. The following screen indicates that the thermostat is ready to the begin the
Wi-Fi Accessory Conguration (WAC) procedure.
Figure 16. Wi-Fi Conguration
NOTE: You have 15 minutes to complete the procedure or it will time out at the
thermostat.
4. Proceed to “Wi-Fi Accessory Conguration (WAC)” on page 20 section to
continue the procedure.
Page 20

20
Wi-Fi Accessory Conguration (WAC)
1. The Wi-Fi Accessory Conguration (WAC) Active screen provides three setup
status indicators. Those are:
• Unit is ready for Conguring iOS device to begin WAC
• Destination Wi-Fi network has been received from Conguring iOS device
and is being applied
• Almost done, checking for Internet connection before exiting.
NOTE: You will receive an error message indicating “network not congured” if the
procedure failed.
NOTE: If there is no Internet connection available, your will get an error message
indicating “Internet connection not available”.
2. Go to your iOS device’s Wi-Fi utility and look for iComfort E30 e0fc37. Select
that SSID. Under Setup New Device, look for E30 and a unique ID (example:
E30 e0fc37).
NOTE: Please note that e0fe7 is an example and is a variable. Each E30 thermostat
will have its own unique alpha-numeric sequence.
Figure 17. Setup New Device
3. Select the iComfort device to continue.
4. Under Accessory Setup, you should see a message indicating the accessory
will be set up to join “your local network”.
5. Press Next to continue. If successful, you should see a accessory join message
pop-up screen.
Apple HomeKit Pairing
1. To add the thermostat to a specic home if you have more than one. Go to your
Apple Home application on your mobile device and FIRST select the home.
Figure 18. Typical Example of Home Selection.
2. Select Add Accessory.
3. Select a iComfort E30.
Figure 19. Typical Example of iComfort Accessory Selection
Page 21

21
4. The following screen will appear on your Thermostat. Use your iOS device’s
camera to read the pairing code that appears on the thermostat’s screen.
NOTE: If your camera is unable to read the code, you will be given the opportunity
to manually enter the code
Figure 20. Pairing Code
NOTE: You have 15 minutes to complete the procedure or it will time out at the
thermostat.
5. The following screens will indicated the pairing was successful.
Figure 21. Pairing Successful
6. Your E30 thermostat has been added to Apple Homekit. You can at this point
assigned a location for the thermostat and include in your favorites.
Additional Apple HomeKit Menu Options
There are several functions available from the HomeKit menu.
Figure 22. HomeKit Menu
Enter WAC Mode
This option is for changing to a new wireless access point or updating the existing
wireless access point password.
Auto WAC Mode
By default this option is set to ON. If the thermostat has never been connected to the
home’s wireless access point or a HomeKit Factory Reset was initiated. Anytime
the thermostat’s power is cycled or restarted, the Wi-Fi Accessory Conguration
(WAC) Active screen will always appear on thermostat boot-up. Selecting OFF, will
disable this function.
NOTE: The thermostat can be restarted by going to menu > settings > advanced
settings > restart and select restart smart hub or restart both
HomeKit User Reset
This option allows you to remove any existing Apple HomeKit user settings and
paired iOS devices. The thermostat however will retain its Wi-Fi connection
settings. This option will only appear if the thermostat has already been added to
a user’s iCloud account.
HomeKit Factory Reset
This option allows you to remove any existing thermostat Wi-Fi settings, Apple
HomeKit user settings and paired iOS devices. Use this option if you wish to
remove the thermostat’s Wi-Fi settings and set the Apple HomeKit function back
to factory default.
Proceed to “Wi-Fi Accessory Conguration (WAC)” on page 20 to continue the
procedure.
Page 22

22
Apply Firmware Update Now
If the button is visible, it indicates there is a rmware update available. Select the
button to update the Apple HomeKit rmware if you desire to do so. Once started a
pop-up will appear indicating that “Homekit rmware update is in progress. Please
wait...”.
Figure 23. Firmware Update Progress Indicator
Thermostat - Factory Reset Smart Hub
If your service technician needs to reset your E30 Thermostat, there is an option
not to erase the Apple HomeKit settings if already congured.
1. The rst screen to appear is the factory reset Smart Hub, the technician will
select conrm to continue.
2. A second screen will appear that provides the option to reset, or not reset the
Apple HomeKit settings to factory default. Select NO, to keep the settings.
Figure 24. Apple HomeKit Factory Reset
Thermostat - Notications or Actions Required
If there are notications or actions required for Apple Homekit, a notication icon
will appear on the home screen in the upper right-hand corner of the screen.
Currently there is only one purpose for this notication and that is to notify you that
a Apple HomeKit rmware update is available. See “Apply Firmware Update Now”
on page 22 for further details.
Once the updated rmware has been applied, the notication alert will disappear.
You can remove that it will disappear from the home screen.
NOTE: There could be other active notications not related to HomeKit.
Figure 25. Notications
The following example shows there is action required for the HomeKit option.
Figure 26. HomeKit Notication
Page 23

23
FCC Statements
FCC Compliance Statement — Part 15.19
This device complies with Part 15 of the FCC Rules. Operation is subject to the
following two conditions:
1. This device may not cause harmful interference, and
2. This device must accept any interference received, including interference that
may cause undesired operation.
FCC Interference Statement — Part 15.105 (B)
This equipment has been tested and found to comply with the limits for a Class
B digital device, pursuant to Part 15 of the FCC Rules. These limits are designed
to provide reasonable protection against harmful interference in a residential
installation. This equipment generates, uses and can radiate radio frequency
energy and, if not installed and used in accordance with the instructions, may cause
harmful interference to radio communications. However, there is no guarantee that
interference will not occur in a particular installation. If this equipment does cause
harmful interference to radio or television reception, which can be determined
by turning the equipment off and on, the user is encouraged to try to correct the
interference by one of the following measures:
• Reorient or relocate the receiving antenna.
• Increase the separation between the equipment and receiver.
• Connect the equipment into an outlet on a circuit different from that to which the
receiver is connected.
• Consult the dealer or an experienced radio/TV technician for help.
RF Exposure Information
This equipment complies with FCC radiation exposure limits set forth for an
uncontrolled environment. In order to avoid the possibility of exceeding the FCC
radio frequency exposure limits, human proximity to the antenna shall not be less
than 20cm during normal operation.
Page 24

24
Index
A
Account 14
Advanced Settings 12
Allergen Defender 11
Amazon Alexa Enabled Devices 16
Apple® HomeKit™ Setup 17
Away 6, 10
D
Dehumidication Control Center 12
Display 13
E
Emergency Heat 6
F
Fan 11
Fan Operation 6
Fan Operations 6
FCC Statements 23
Features 3
Feels Like 11
G
General 13
H
Heat & Cool 11
Home Info 14
HomeKit 14
Home Screen 3
Home Screen and System Status Icons 5
Humidication Control Center 12
Humidity 12
Humidity Control 12
I
Installation Report 15
M
Mobile Applications 15
modes/schedules 6
N
Name 9
Notications 4, 12
P
Performance Reports 15
R
Received Signal Strength Indication (RSSI) 9
Reminders 4
S
Schedule IQ 7
Screen Elements 4
Select Mode 6
Settings 8
Smart Away 10
T
Temperature Dial Feature 3
Troubleshooting Wi-Fi Connection 9
U
Using the Secure Web Portal 15
W
Weather 7
Wi-Fi 8
 Loading...