

Page 1
©2014 Lennox Industries Inc.
Dallas, Texas, USA
iComfort Wi-Fi
®
Web and Mobile
Apps
iComfort Wi-Fi
®
Thermostat
THIS MANUAL MUST BE LEFT WITH THE HOMEOWNER
FOR FUTURE REFERENCE
NOTICE
Use this thermostat only as described in this manual.
HOMEOWNER'S MANUAL
iComfort Wi-Fi®Thermostat
Touch-Screen Programmable Communicating Thermostat
CONTROLS
507342-01
2/2014
Supersedes 507200-01
General
Congratulations on choosing the iComfort Wi-Fi® touch-screen,
programmable thermostat! The state-of-the-art technology built into this
device makes it easy for you to adjust your home's comfort settings while at
home or from a remote location (via Internet access)!
Help screens are just a touch away. Use this manual as an introduction to a
whole new world of home comfort.
WARNING
Do not switch system to cool if the outdoor temperature is below 45°F
(7°C). This can damage the cooling system.
Page 2
507342-01
Page 2
Table of Contents
Precise Comfort® technology 2.............................
iComfort Wi-Fi
®
thermostat 2................................
Thermostat lock-out 2.....................................
Start-up 3...............................................
User preferences quick reference chart 4.....................
Tools used to change preferences 5.........................
User feature screen and HELP 6............................
Edit programs 6..........................................
System settings 7.........................................
Display settings 8.........................................
Zone settings 8...........................................
Alerts 9.................................................
Reminders 11.............................................
Service information and HELP (?) 13..........................
Adjusting room temperature, away mode, program change,
clock and weather 14.....................................
Setting zoning controls 17...................................
Setting humidity controls 19.................................
Connecting to a home Wi-Fi Router 20........................
Troubleshooting Wi-Fi Connections 23........................
Registering iComfort Wi-Fi® thermostat 25......................
PC welcome screen, interactive demo and Gelaskins 26.........
Precise Comfort™ Technology
When the iComfort Wi-Fi® thermostat is used with a Lennox indoor or
outdoor unit which includes a compatible communicating control, it
becomes part of a Precise Comfort™ system.
Precise Comfort™ Cooling (XC/XP25) — This feature keeps the room
temperature within 1/2 degree of the desired cooling setpoint. The airflow
is adjusted in increments as small as 1% to provide ultimate temperature
control.
Precise Comfort™ Heating (SLP98V) — This feature keeps the room
temperature within 1/2 degree of the desired heating setpoint. The airflow
is adjusted in increments as small as 1% to provide ultimate temperature
control.
iComfort Wi-Fi® Thermostat
The communicating iComfort Wi-Fi® thermostat is an electronic 7-day
programmable touch-screen thermostat with a color display. It also offers
enhanced capabilities which include: humidification measurement and control,
dew point adjustment control, dehumidification measurement and control,
Humiditrol® Enhanced Dehumidification Accessory (EDA) compatibility, and
equipment maintenance reminders. The thermostat's autochangeover mode
permits control of heating, cooling, humidification, and dehumidification without
user involvement.
The iComfort Wi-Fi® thermostat can connect to the internet using your home's
Wi-Fi access point. After online registration has been completed, weather
information is automatically sent to the thermostat. You also will have full access
to the thermostat from any remote location using an internet connection via
computer, smartphone, Android™ device, iPhone® or iPad®.
The thermostat stores system parameters in nonvolatile memory to retain data
and settings when electrical power fails or is turned off. The thermostat also
includes on‐board help screens.
Indoor Air Quality accessories are supported with time‐based maintenance
notifications which remind you when to check or replace media filters, UVC
bulbs, humidifier pads and PureAir™ catalytic inserts.
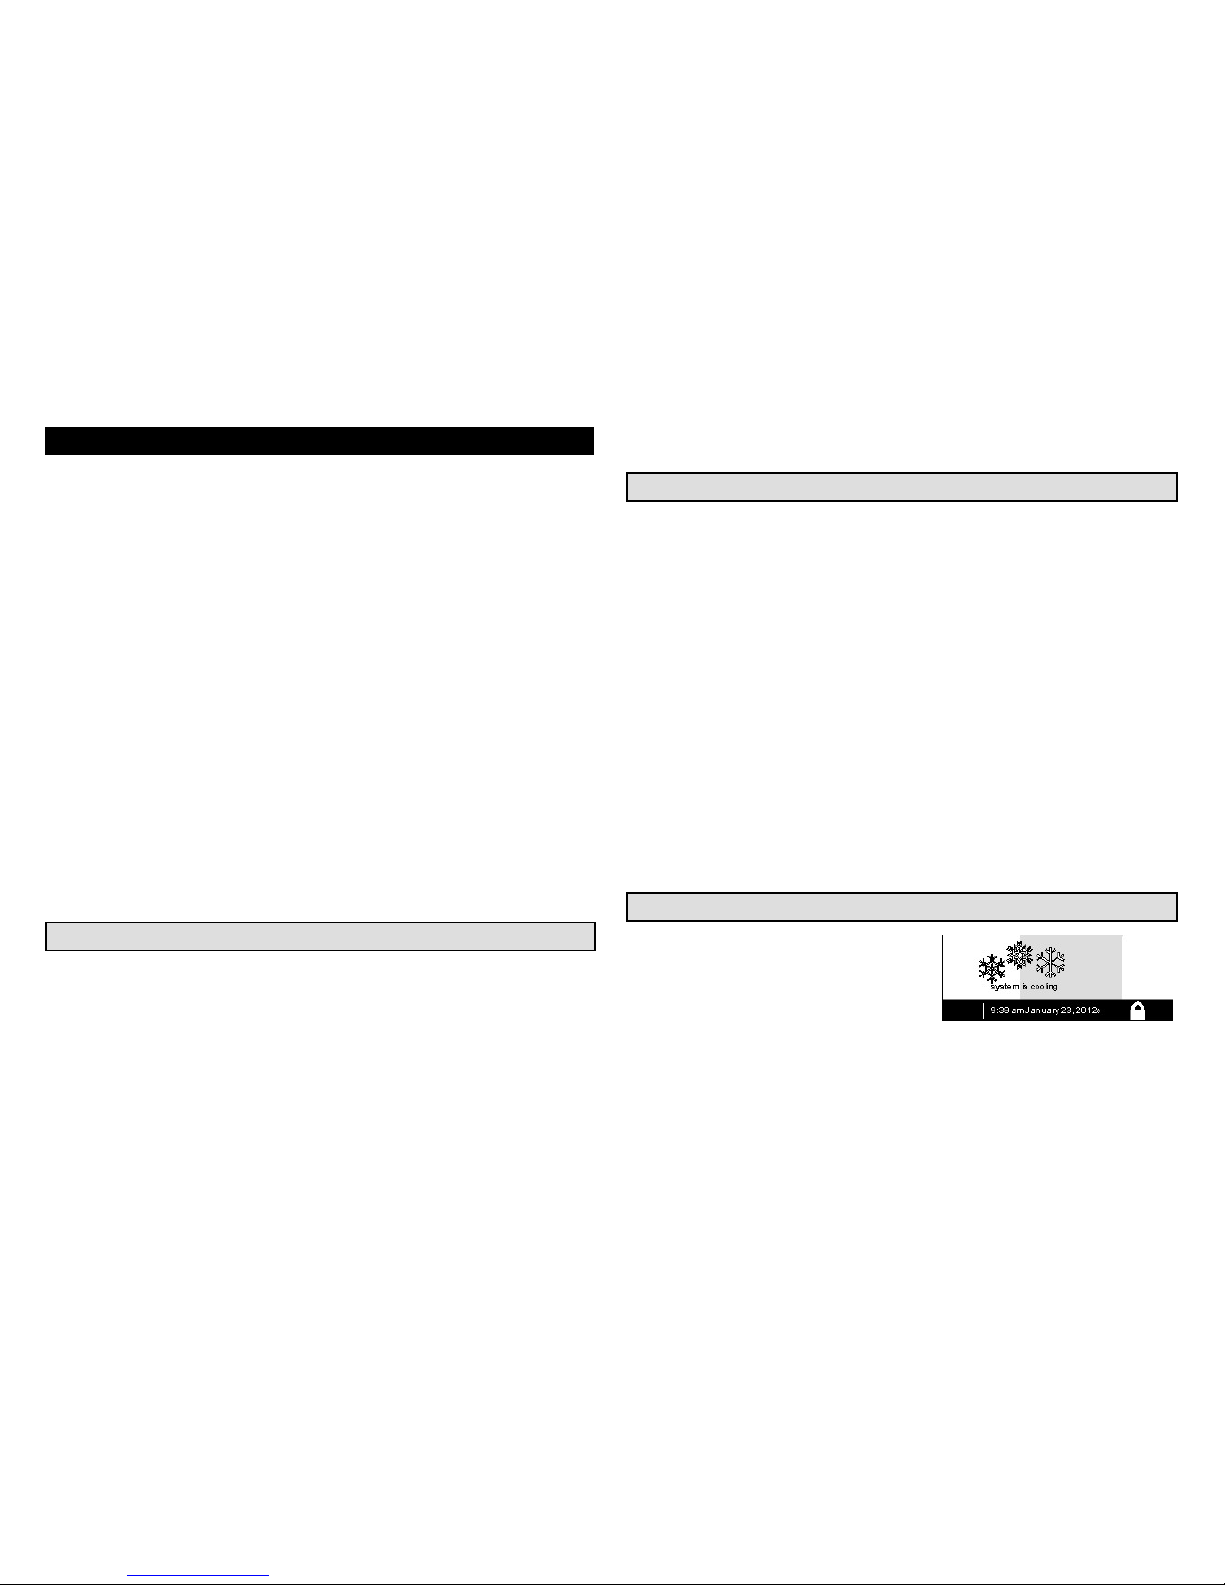
Thermostat Lock-Out
A lock icon at the bottom center of the
screen (shown in the picture),
indicates the thermostat is either
partially or fully locked.
When the thermostat is partially
locked, any user can adjust the temperature up or down to hold a setting for a
selectable time period. To lock the thermostat, access “Screen lockout”
through the FEATURES screen “display settings” described on Page 8.
When the thermostat is fully locked, no one can make any changes to the
thermostat's settings. To unlock the thermostat, touch and hold the lock icon
for 5 to 6 seconds.
Wi-Fi
Page 3

iComfort Wi-Fi® 7-Day Programmable Communicating Thermostat
Page 3
Start -Up
In event of power failure —The thermostat will reboot after power is
restored. When the reboot is complete, the HOME screen will return.
WHAT THE HOME SCREEN TELLS YOU...
After the thermostat and the
system have been fully connected
and powered on, the
thermostat's Home screen is
displayed. Figure 1 shows a
display and describes what the
thermostat is telling you.
When the system mode is set to
heat or cool, the system
is operating in manual
mode;
When a particular program
has
been selected, program name will
be displayed on the system mode
button (e.g., summer program is on).
OTHER INFORMATION...
The system will run until the indoor
temperature is within the range specified
by the selected cooling and heating
setpoints (70 to 75 degrees in this
example).
The “Wi-Fi” button in the bottom left corner provides access
to the Wi-Fi setting screen. Wi-Fi with a
beneath it indicates
a prior connection to the server has been lost. When the Wi-Fi
connection is re-established, the triangle goes away.
Away Mode sets the thermostat for energy-saving system operation
while you are gone for an extended period of time. In this mode, the
system will only come on if the indoor temperature falls below 62 degrees (for
heating), or if the indoor temperature rises above 85 degrees (for cooling).
WHAT YOU CAN DO FROM THE HOME SCREEN...
The Home Screen provides you with convenient
access to adjust heating and cooling setpoints,
as well as humidity levels in your home.
From this screen you may:
- adjust temperature
settings
- access menus to change the
program mode
- change how the
fan operates
- access the “Features screen”
(fig. 3) by touching
- access and view active
service alerts by touching the
icon
- access help screen by
touching the “?” icon
Temperature adjustment and system mode of
operation selection are described fully
beginning on Page 14.
If the installer has activated the indoor humidity feature,
you will be able to set the desired humidity level in your home
even if no physical humidifier or dehumidifier is present.
See Page 17 for details on humidity control.
Fan is set
to AUTO
Internet
weather
forecast
indoor temperature
indoor humidity is 41%
cool-to
set temp
75
heat to
70
heat
or
cool
outdoor
temperature
80
touch to go
to Features
use arrows
to change
temperature
Current indoor
temperature
Indoor
humidity
Outdoor
temperature
Cooling
setpoint
Heating
setpoint
System
mode
System
status
Service
alerts are
present
Time, month, day, year
(touch to change)
(if feature is
turned on)
Figure 1. Home Screen (Typical)
system is cooling
9:39 am May 23, 2012Wi-Fi
?
enter
away
Zone 1
Zoning
(if installed
and enabled)
Help screen
Away Mode
fan is
OFF
fan is
AUTO
forecast
Hi 85
Lo 60
Wi-Fi setup
button
Page 4
507342-01
Page 4
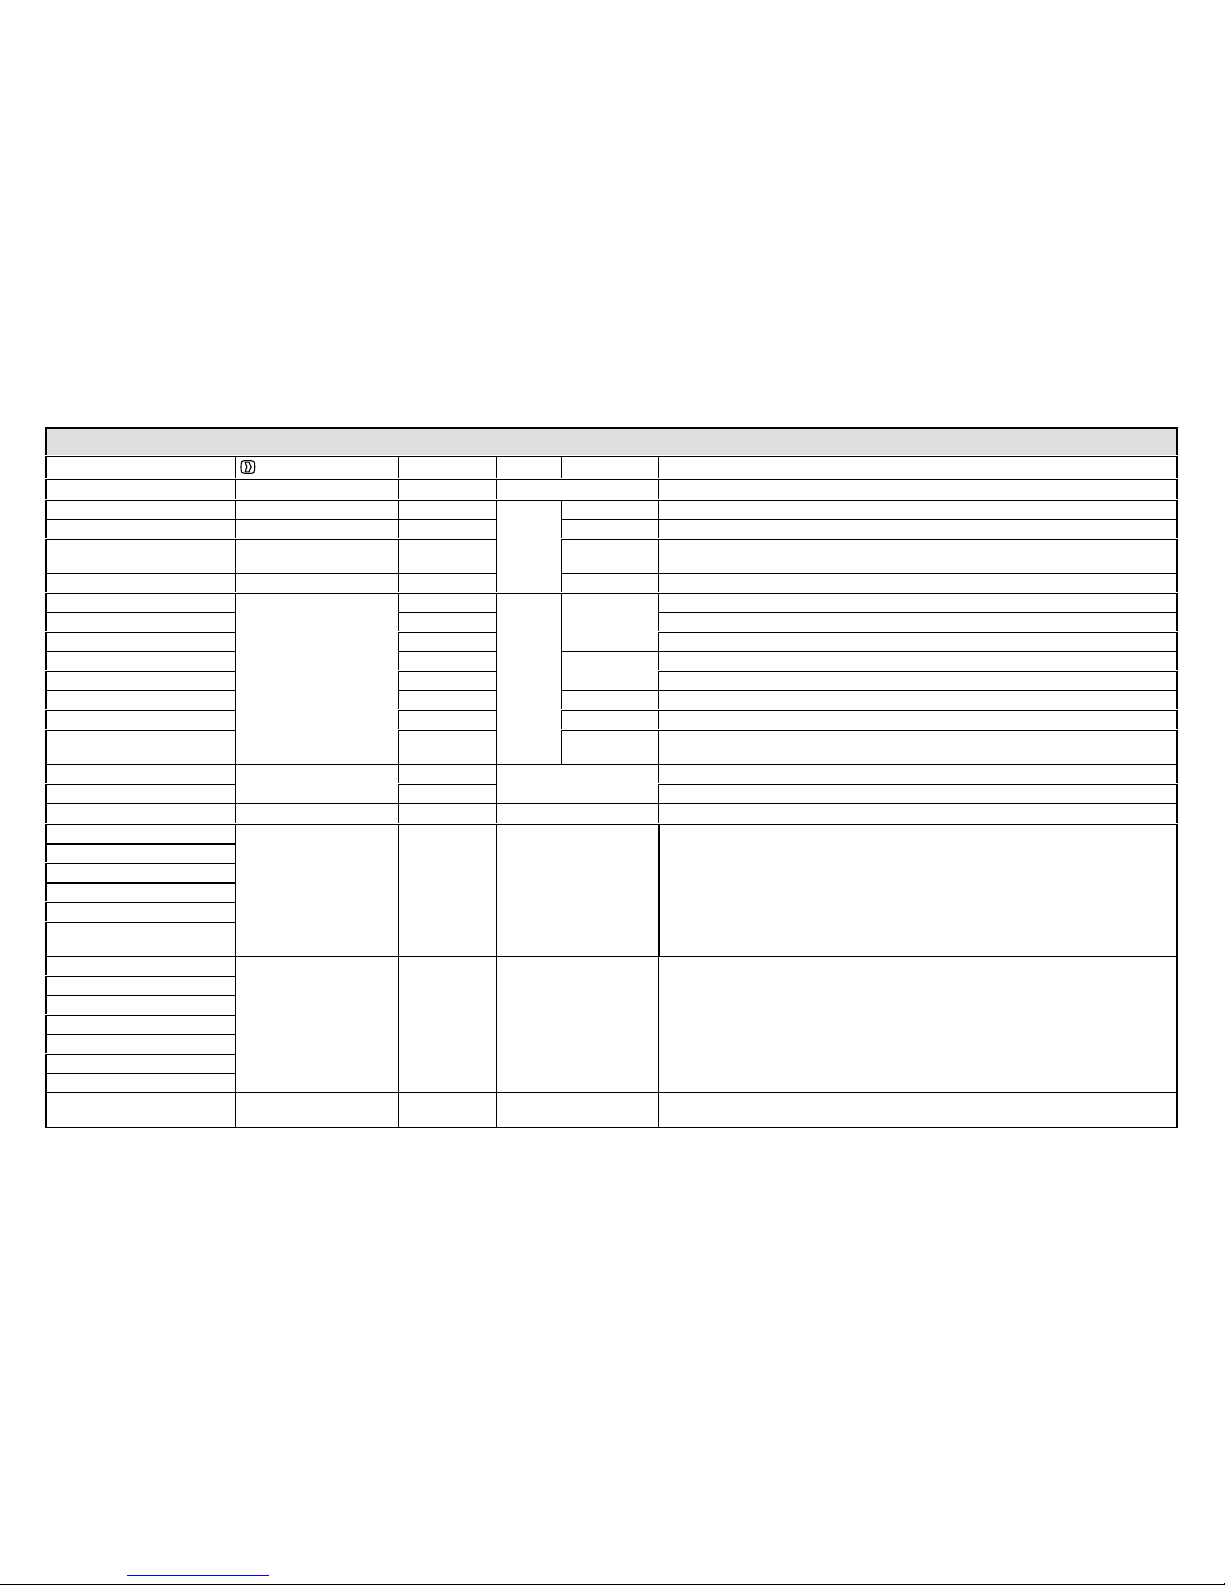
User Preference Quick Reference Chart (Use tools shown on page 5 to make changes)
User Setting Feature Button Default Page Tools Available Settings
Set up a program edit programs save energy See details Page 6 —
Heating mode system settings COMFORT
7
toggle Normal, Comfort (heat pump only)
Humidification settings system settings ON toggle OFF, ON (only visible if humidifier is installed)
Dehumidification settings system settings MODERATE toggle
ClimateIQ = Dry, Moderate, Humid (communicating outdoor unit only)
de-humidifier = Off, Medium, High (non-communicating outdoor unit only)
Humidity display system settings OFF toggle OFF, ON
Background theme
display settings
cobalt
16
toggle
cobalt, cotton, carbon
Temp scale is (F) (F) Fahrenheit, (C) Celsius
Screen saver ON ON, OFF
Screen lockout Unlocked
menu
Unlocked, partially (locked), (fully) locked
Language s English ENGLISH, FRANÇAIS, ESPAŇOL
Outdoor temp display OFF toggle Off, internet, sensor
Backlight Intensity 80% arrows 20 to 100% (in 20% increments)
Press to CLEAN SCREEN — (view only)
Deactivates touchscreen for 30 seconds to allow cleaning.
Use damp cloth to clean.
Zoning is ON
zoning settings
ON
Not applicable
ON, OFF (only visible if zoning installed)
Sensor screen ALWAYS ON ON ALWAYS ON, POWER SAVE
View alerts alerts — See details Page 9 —
Replace filter 1
reminders Disabled See details Page 11 Disabled, 3 Months, 6 Months, 12 Months, 24 Months, Custom Time
Replace filter 2
Replace humidifier pad
Replace UV bulb
Maintenance reminder
PureAirt maintenance
required
Dealer name
service
(These may
show install
er input data;
but owner
may change)
See details Page 13 (keyboard)
Dealer address
Dealer phone
Dealer email
Dealer website
Dealer number
System desc
Thermostat info service Display only
Model Number, Serial Number, Hardware Revision,
Software Revision and Wi-Fi Revision.
Page 5

iComfort Wi-Fi® 7-Day Programmable Communicating Thermostat
Page 5
keyboard tool
typical menu options
up/down arrows
network security key or passphrase
password displays here as keys touched
cool only
heat only
heat or cool
off
emerg. heat
programs
75
º
set to
on
auto
circulate
SMTWTFS
January 2012
1234567
8 9 10 11 12 13 14
15 16 17 18 19 20 21
22 23 24 25 26 27 28
29 30 31
save
09 : 39 am
time and date tool
time
format
12 HR
daylight
saving
enabled
toggle tool
Figure 2. User Preference Change Tools
Page 6
507342-01
Page 6
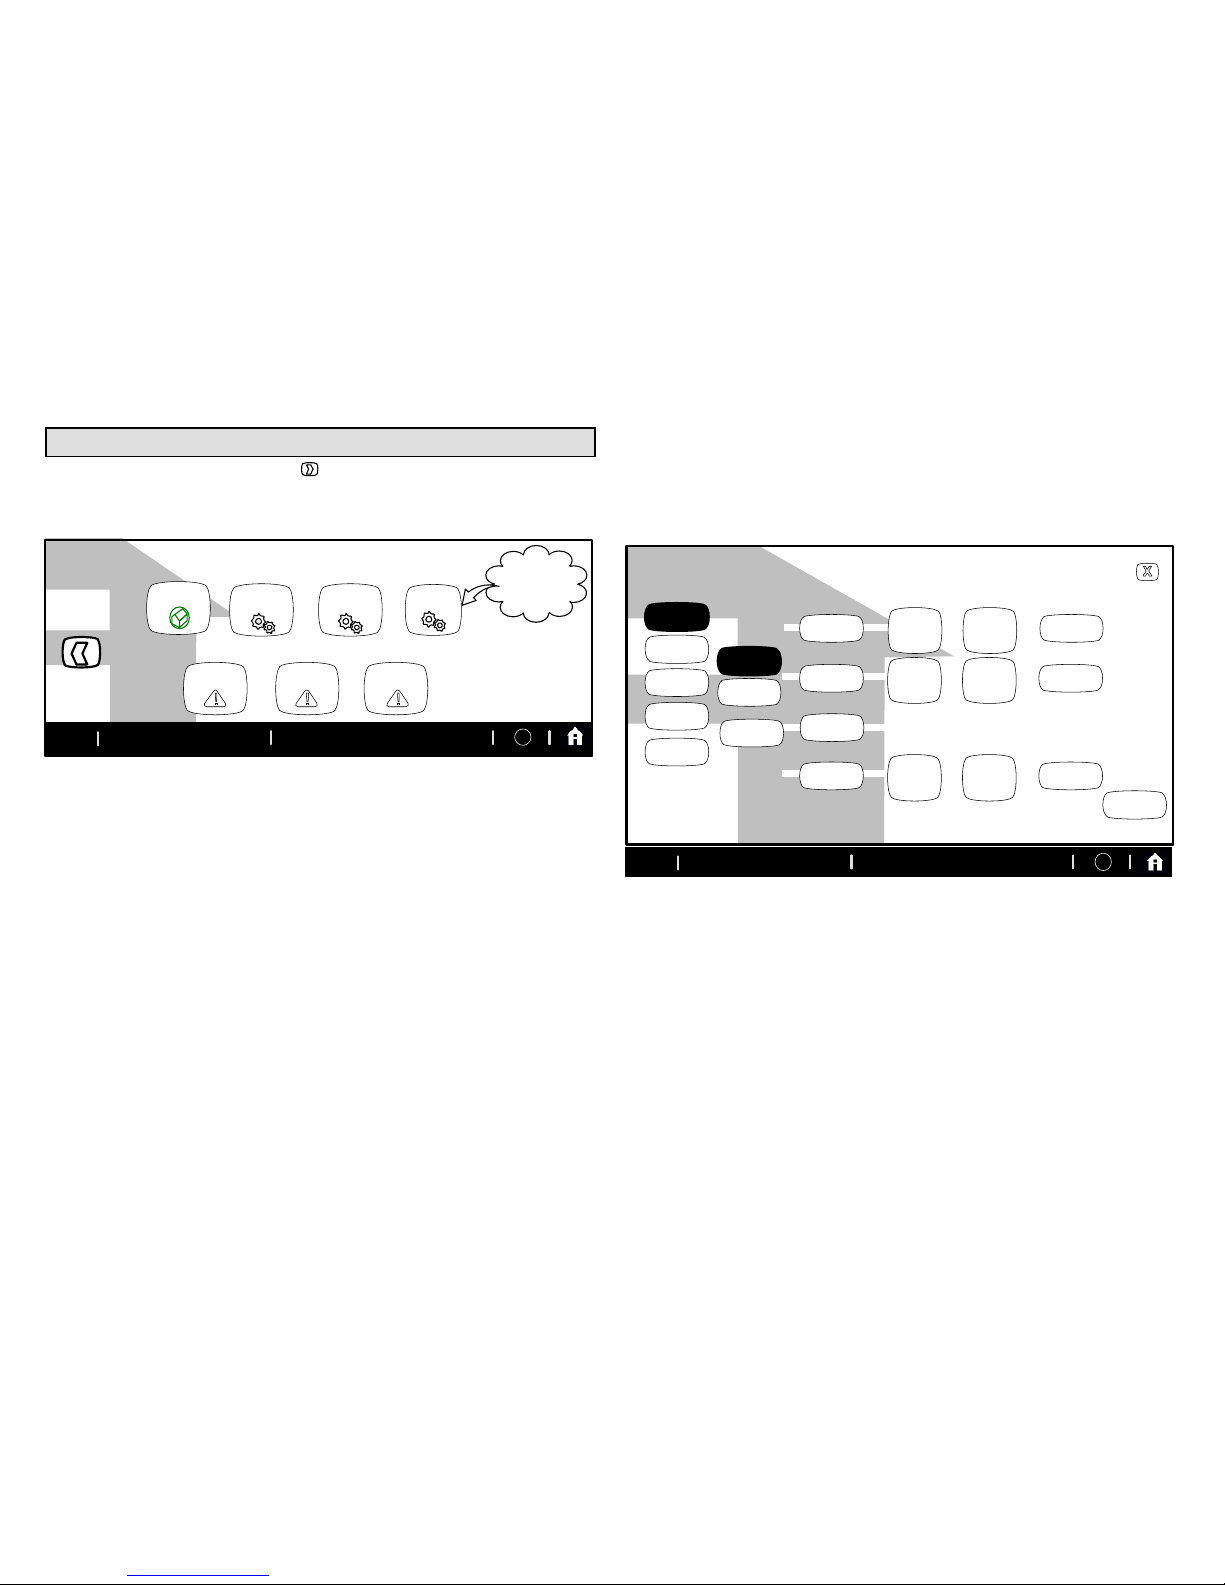
User Features and Help (?) Screens
From the Home screen, touch the button to go to the Features screen.
The Features screen (figure 3) allows you access to edit programs, system
settings, display settings, zoning settings, alerts, reminders, service and
help (?).
FEATURES
press any button for access to more features and controls
system
settings
zone
settings
display
settings
service
edit
programs
alerts reminders
9:39 am May 23, 2012 ?
Wi-Fi
Only
appears if
zoning is
installed.
Figure 3. User Features - Indoor Settings
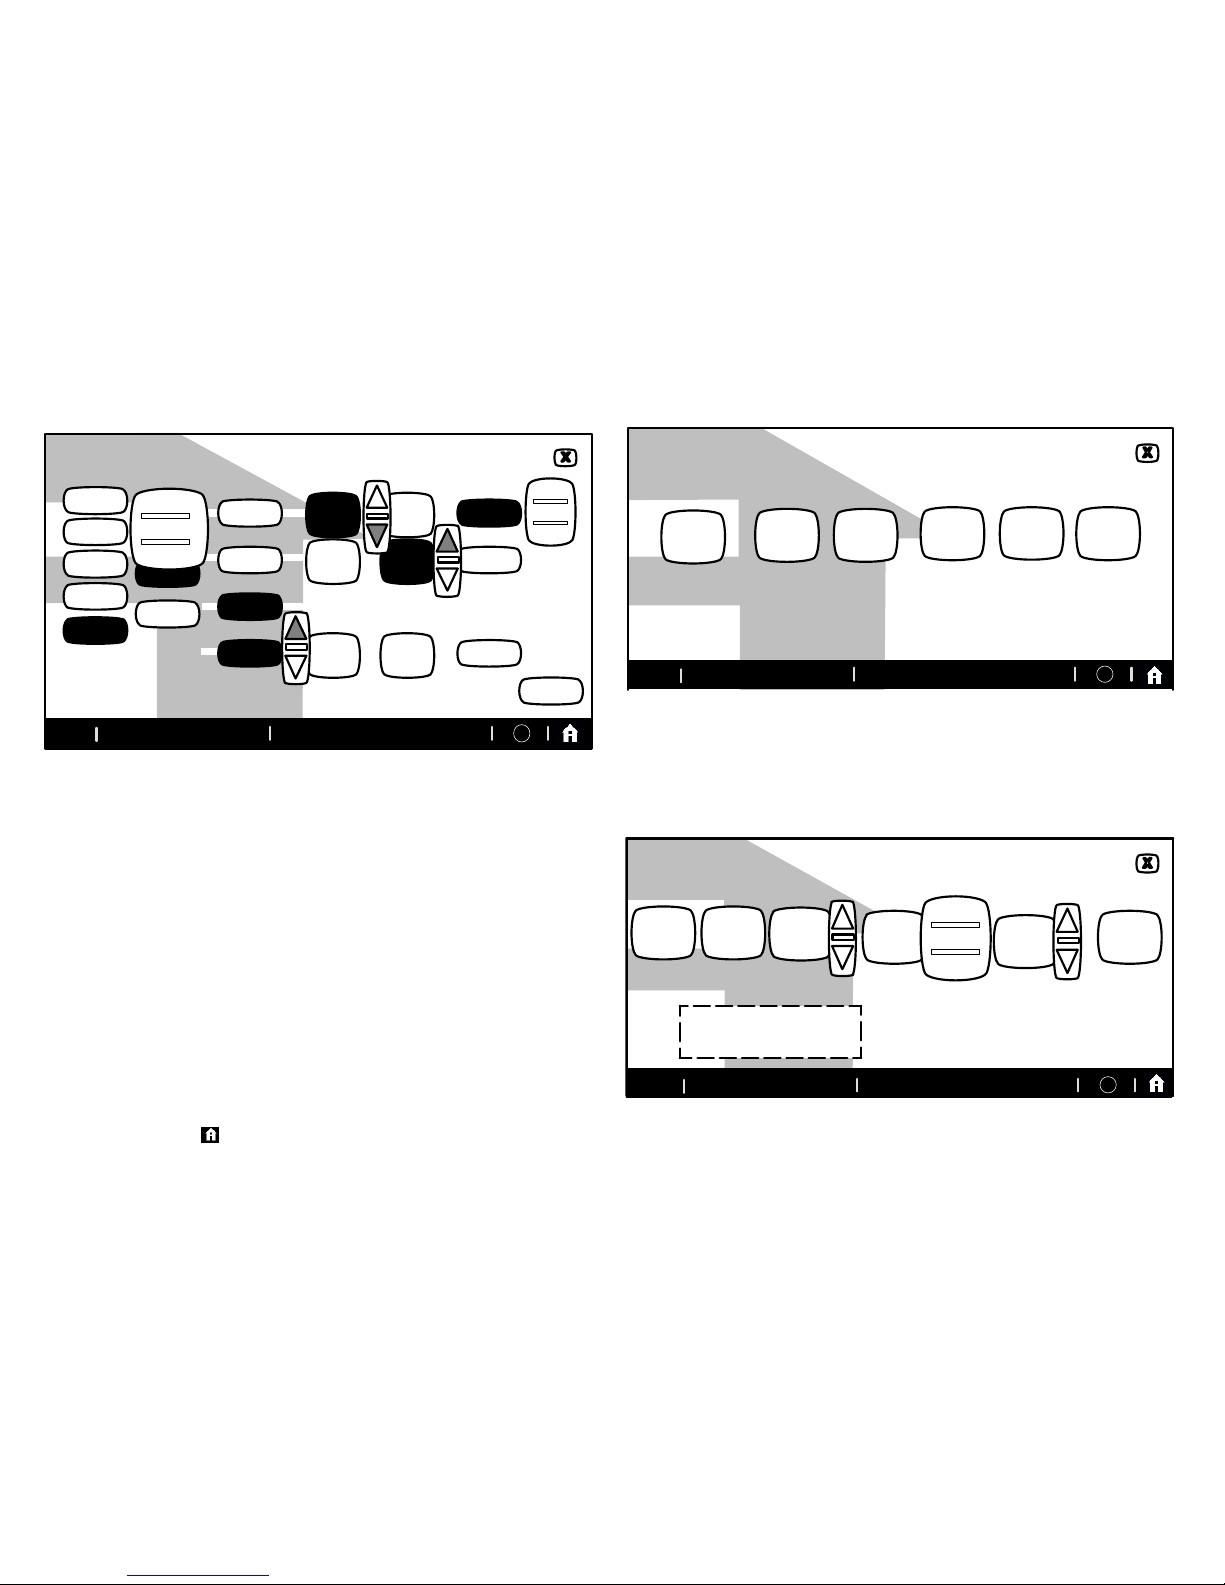
EDIT PROGRAMS
Touch edit programs button (see fig. 3). Figure 4 shows the EDIT
PROGRAMS screen. Figure 5 shows pop-up menus that appear when the
selections are touched and it illustrates changes made to the program.
Edit the “season programs” to reflect your preferences. (The Save energy
program uses high-efficiency Energy Star settings to promote energy
conservation.)
select programs - Select a preset program; or touch and hold any
button to enable the keyboard to change program names to suit your
preferences.
select days - Select week/weekend, individual days, all 7 days.
time - Use up/down arrows to change time in 15 minute increments.
cool- and heat-to - Use up/down arrows to change temperature in 1
degree increments.
fan mode - Select on, auto, or circulate.
In the example in Figure 4, the evening time has been disabled by touching
and holding the time button for that time period. (Touch add setting to
re-enable that time period.) Use the restore button to restore defaults for the
preset programs. Touch ”X“ button after changing; a pop-up prompts with
back, discard and save options. Select save to save and return to the
FEATURES screen.
EDIT PROGRAMS
summer
select
programs
summer
program will follow these settings on mon-fri
winter
spring fall
save energy
custom
06:00 am
78 70
AUTO
select
days
time cool-to heat-to fan mode
85 62
08:00 am AUTO
82 62
10:00 pm AUTO
sat-sun
mon-fri
add setting
change
days
press and hold any time to enable or disable for the time period
restore
touch/hold
program
button to
rename
9:39 am May 23, 2012
?
Wi-Fi
Figure 4. EDIT PROGRAMS Screen
Page 7
iComfort Wi-Fi® 7-Day Programmable Communicating Thermostat
Page 7
EDIT PROGRAMS
summer
select
programs
winter
spring fall
save energy
my program
06:00 am
76 70
ON
select
days
time cool-to heat-to fan mode
85 66
08:00 am AUTO
82 62
08:30 pm AUTO
all 7 days
mon-fri
add setting
change
days
press and hold any time to enable or disable for the time period
restore
on
auto
circulate
week/weekend
individual days
all 7 days
B
my program
program will follow these settings on all 7 days
press/hold
program
button to
rename
9:39 am May 23, 2012
?
Wi-Fi
Figure 5. EDIT PROGRAMS Screen
SYSTEM SETTINGS
For more information concerning humidification and dehumidification, go to
page 19.
Touch system settings button from the FEATURES screen. Figure 6
shows the SYSTEM SETTINGS screen with its defaults. Figure 7
shows how the devices can be configured.
Touch set to heating mode button (XP25 only). (button may read:
COMFORT or NORMAL). Select and change by touching heating
mode icon: COMFORT or NORMAL.
Touch buttons under appropriate humidification or dehumidification
setting titles to select preferences.
Humidifier display is visible on the SYSTEM SETTINGS screen and can be
changed to OFF from this screen. The resulting display shows the default
values for humidifier and ClimateIQ. Use the arrows to change either.
When humidity display is ON, text near the screen bottom shows the
current humidity. Touch the “X” button to return to FEATURES screen or
touch the Home icon to return to the Home screen.
SYSTEM SETTINGS
heating
mode
NORMAL
humidifier
is ON
ClimateIQ
setting
MOD
humidifier
display
is ON
Appears only
whenXP25 is
installed
humidification
settings
dehumidification
settings
(default is
moderate)
(default is ON)
(default is ON)
9:39 am May 23, 2012 ?
Wi-Fi
40
%
set to
50
%
set to
current indoor humidity is 50%
select the humidity
level that matches
your regional weather.
Figure 6. SYSTEM SETTINGS Screen (Example Only) -
Communicating Indoor Unit
SYSTEM SETTINGS
current indoor humidity is 50%
heating
mode
COMFORT
humidifier
is ON
ClimateIQ
setting
MOD
40
%
set to
50
%
set to
ALL CHANGES MADE
ON THIS SCREEN ARE
INSTANTLY SAVED.
9:39 am May 23, 2012
?Wi-Fi
DRY
MODERATE
HUMID
humidifier
display
is ON
(default is ON)
humidification
settings
dehumidification
settings
Figure 7. SYSTEM SETTINGS Screen - Making Adjustments
Page 8
507342-01
Page 8
DISPLAY SETTINGS
Touch display settings from the FEATURES screen (see figure 3). Figure 8
shows the DISPLAY SETTINGS screen and defaults.
Touch Temp scale button to toggle between ºF and ºC options.
Touch Background theme, screen saver, screen lockout,
language, outdoor temp display buttons to select options from
pop-up menus (figure 9).
Touch backlight intensity button and use up/down arrows to change
the intensity of backlighting in 20% increments.
Touch the press to CLEAN SCREEN button to enable a 30-second
touchscreen lock to allow screen cleaning. Use a damp cloth to clean the
screen.
DISPLAY SETTINGS
press any button for access to more features and controls
back-
ground
theme
COTTON
temp
scale
is ºF
screen
saver is
OFF
press
to
CLEAN
SCREEN
language
is
ENGLISH
screen
lockout
UN-
LOCKED
outdoor
temp
display
SENSOR
80
%
backlight
intensity
9:39 am May 23, 2012
?
Wi-Fi
Figure 8. Display Settings (defaults)
DISPLAY SETTINGS
back-
ground
theme
COTTON
temp
scale
is ºF
Screen
saver is
OFF
press to
CLEAN
SCREEN
language
is
ENGLISH
screen
lockout
UN-
LOCKED
outdoor
temp
display
is ON
20
%
backlight
intensity
cobalt
cotton
carbon
ENGLISH
FRANCAIS
ESPAÑOL
unlocked
partially
locked
9:39 am May 23, 2012 ?
Wi-Fi
off
on
skins
off
sensor
Internet
Figure 9. Display Settings (Adjusting)
ZONE SETTINGS
Touch display settings button (see figure 3). Figure 10 shows the zone
settings screen and defaults.
Touch the Zoning button to toggle this option ON or OFF.
Touch the Sensor Screen button to toggle this option ALWAYS ON or
POWER SAVE.
ZONE DISPLAY SETTINGS
zoning
is ON
sensor
display
ALWAYS
ON
9:39 am May 23, 2012
?
Wi-Fi
Figure 10. Zone Settings
Page 9

iComfort Wi-Fi® 7-Day Programmable Communicating Thermostat
Page 9
ALERTS
Figure 12 shows how an alert appears when it occurs after the system has
been put into operation. Use information on this screen to contact your
HVAC serviceman. Use the X to close the alert message and return to the
previous screen.
A red alert (red icon) identifies a problem that could prevent the system from
working properly or from working at all. If the system is allowed to run after a
red alert has been issued, damage to the system may be caused. A red alert
is your signal to call for service immediately.
alerts ( 1) of ( 1)
9:39 am May 23, 2012
Service Alert Code 290
indoor unit reports:
Heat Problem
service info:
Lennox
1-800-9-LENNOX
www.lennox.com
Figure 11. Typical Red Alert
A service alert (yellow icon) tells you to perform routine service, or to call the
dealer to service one or more of the following: Filters, Humidifier Pad, UV
Light, PureAirt Air Purification system and Maintenance. These alerts will
appear based on elapsed time set per the reminders. For information on
clearing a service alert or setting the alert to remind you later, see reminders
on page 11.
alerts ( 1) of ( 1)
9:39 am May 23, 2012
Service Alert Code 3000
system reports:
Replace Filter 1
service info:
Lennox
1-800-9-LENNOX
www.lennox.com
clear
remind
later
Figure 12. Typical Service Alert
ACCESS ALERTS THROUGH THE FEATURES SCREEN
Touch the Home screen alert icon ( ) or the alerts button on the
FEATURES screen (see figure 3). Any alerts will appear similar to those
shown in figure 13. Touch the select alert time period for viewing button to
view alerts that occurred in the last 24 hours, last 30 days, or last 12 months.
Contact your HVAC serviceman to report the alerts and related problems.
ALERT (1) of (1)
02/23/2012 9:39 am
Service Alert Code: 292
Indoor unit reports:
Problem
ALERT (1) of (1)
02/23/2012 9:39 am
Service Alert Code: 331
Indoor unit reports:
RSBCommunication Link Problem
ALERT (1) of (1)
02/23/2012 9:39 am
Service Alert Code: 252
Indoor unit reports:
Discharge Air Temperature High
service info:
LENNOX
1-800-9LENNOX
www.lennox.com
last 24
hours
select alert
time period for
viewing
last 24 hours
last 30 days
last 12 months
9:39 am May 23, 2012
?
Wi-Fi
Figure 13. Alerts Viewed from FEATURES Screen Option
Page 10

507342-01
Page 10
Navigate to different screens (see figure 14). You can clear alerts and set new reminders after routine service. You may also select remind later to be
reminded at a time that is more convenient for performing the service. If a red alert (red ) is present, contact the party identified under service info.
service info:
Lennox
1-800-9-LENNOX
www.lennox.com
reminder ( 1) of ( 4)
04/03/2012 02:39pm
Service Alert Code 3000
system reports:
replace filter 1
reminder ( 2) of ( 4)
04/03/2012 02:39pm
Service Alert Code 3001
system reports:
replace filter 2
reminder ( 3) of ( 4)
04/03/2012 02:39pm
Service Alert Code 3002
system reports:
replace humidifier pad
ALERT HISTORY
clear
last 24
hours
remind
later
select alert
time period
for viewing
MAIN ALERT SCREEN
noyes
was action taken?
(returns main
alert screen)
clear button SCREEN
cancelset
select one
disabled
3 months
6 months
12 months
24 months
custom time
yes button SCREEN
service info:
Lennox
1-800-9-LENNOX
www.lennox.com
reminder ( 1) of ( 4)
04/03/2012 02:39pm
Service Alert Code 3000
system reports:
replace filter 1
reminder ( 2) of ( 4)
04/03/2012 02:39pm
Service Alert Code 3001
system reports:
replace filter 2
reminder ( 3) of ( 4)
04/03/2012 02:39pm
Service Alert Code 3002
system reports:
replace humidifier pad
ALERT HISTORY
service info:
Lennox
1-800-9-LENNOX
www.lennox.com
select alert
time period
for viewing
reminder ( 1) of ( 4)
04/03/2012 02:39pm
Service Alert Code 3000
system reports:
replace filter 1
reminder ( 2) of ( 4)
04/03/2012 02:39pm
Service Alert Code 3001
system reports:
replace filter 2
reminder ( 3) of ( 4)
04/03/2012 02:39pm
Service Alert Code 3002
system reports:
replace humidifier pad
ALERT HISTORY
clear
last 24
hours
remind
later
last 24 hours
last 30 days
last 12 months
alert time period button SCREEN
9:39 am May 23, 2012
?
Wi-Fi
9:39 am May 23, 2012
?
Wi-Fi
Remind later
screen shown
in Figure 17.
Figure 14. Alerts
Page 11

iComfort Wi-Fi® 7-Day Programmable Communicating Thermostat
Page 11
SERVICE ALERT CODES
Number Value Number Value Number Value Number Value Number Value
3000 Filter 1 3002 Humidifier Pad 3004 Maintenance 4000 User Wi-Fi state change,
disable
4002 Image file download failed
3001 Filter 2 3003 UV Light 3005 PureAir Maintenance 4001 Firmware download failed
REMINDERS
Reminders alert you to perform routine maintenance, such as replacing filters. Access the reminders from the FEATURES screen reminders button.
SETTING REMINDERS
NOTE - A previously set service time can be changed using the “custom time” option.
Use one of the “month” reminders to be reminded when routine service is due.
Use custom to access the time/date screen (figure 16) to set an exact date and time for a reminder to appear. Use the arrows to select a month; then, select
the desired day of the month. Touch save when finished.
REMINDERS
select frequency for automatic reminders
back next
disabled 3 months 6 months 12 months 24 months custom
Replace Filter
1
Replace Filter
2
Replace Hu
midifier Pad
Replace UV
Bulb
Maintenance
Reminder
PureAir Mainte
nance Required
disabled 3 months 6 months 12 months 24 months custom
disabled 3 months 6 months 12 months 24 months custom
disabled 3 months 6 months 12 months 24 months custom
disabled 3 months 6 months 12 months 24 months custom
disabled 3 months 6 months 12 months 24 months
custom
Figure 15. Set New Alert Date
SMTWTFS
July 2012
REMINDERS
1234567
8 9 10 11 12 13 14
15 16 17 18 19 20 21
22 23 24 25 26 27 28
29 30 31
save
set custom date for
PureAir
Maintenance
Figure 16. Setting Custom Time
Page 12

507342-01
Page 12
alerts ( 1) of ( 1)
9:39 am May 23, 2012
Service Alert Code 3000
system reports:
Replace Filter 1
service info:
Lennox
1-800-9-LENNOX
www.lennox.com
remind
later
9:39 am May 23, 2012
?
alerts ( 1) of ( 1)
9:39 am May 23, 2012
Service Alert Code 3000
system reports:
Replace Filter 1
service info:
Lennox
1-800-9-LENNOX
www.lennox.com
noyes
was action taken?
If you have performed the required maintenance, choose clear to clear the
reminder. This will prompt the question, “was action taken?” If the answer is
yes, you will be asked to set the next reminder period for this service alert.
USING REMIND LATER
If you choose remind later, a new screen will appear. Select the desired re
minder period from the list provided. Touch the set button after you have
made your selection. This will trigger the ALERT HISTORY screen. Touch X
to return to the Home screen.
Choose custom to open the REMINDER screen, which includes a calendar
(figure 16). Select a date for the reminder to reappear. When desired remind
er time is displayed, touch set.
Service reminders can be cleared or the date can be revised by using the service alert's clear and remind later buttons on the right side of the screen.
(goes to
screen
below)
alerts ( 1) of ( 1)
9:39 am May 23, 2012
Service Alert Code 3000
system reports:
Replace Filter 1
service info:
Lennox
1-800-9-LENNOX
www.lennox.com
set
cancel
1 day
1 week
1 month
3 months
custom
(returns to
above
screen)
“X”
clears alert
temporarily;
alert will
repeat
Wi-Fi
9:39 am May 23, 2012
?
Wi-Fi
9:39 am May 23, 2012
?
Wi-Fi
clear
Figure 17. Viewing, Clearing and Changing Reminder Time
Page 13

iComfort Wi-Fi® 7-Day Programmable Communicating Thermostat
Page 13
SERVICE INFORMATION
Service information is normally completed by the installer at time of initial
installation.
Should you wish to change this information, proceed to the consumer portal.
Select My Account, then My Dealer tab and touch change dealer button.
SERVICE INFORMATION
Dealer Name Lennox
Dealer Address 1234 Fifth St
Dealer Phone 1-800-0-LENNOX
Dealer Email dealer@hvac.com
Dealer Website www.lennox.com
Dealer Number ******
System Desc myiComfort system
Touch any line to edit it
thermostat info
Touch any line.
Keyboard will
appear to permit
information input.
9:39 am May 23, 2012 ?
Wi-Fi
keyboard tool
System Desc
my iComfort system
Figure 18. Service Information
HELP (?)
When you touch the help icon (?) at the bottom, right-hand corner of the
screen, an array of (?) icons are displayed on the screen. When you touch
one of these help (?) icons, a pop-up describes the function of the nearest
active button(s). Figure 19 shows an example of the HELP screen and a
pop-up.
indoor temperature
indoor humidity is 41%
fan is
OFF
fan is
AUTO
cool-to
set temp
75
heat-to
70
heat
or
cool
fan is AUTO
outdoor
temperature
80
system is cooling
9:39 am May 23, 2012Wi-Fi
?
Change the system function to either heat
or cool (auto), heat only or cool only mode
or turn on one of the Programs. You can
also select 'edit' to enter the edit program
screen.
enter
away
Figure 19. Typical Help (?) Screen
Page 14

507342-01
Page 14
Adjusting Room Temperature, Away Mode, Program Change, Clock and Weather
Adjust temperature when programming is OFF — When the
programming is OFF, the system mode button (shown in figure 20, labeled
heat or cool) indicates a manual mode (no mention of “program”). In this
mode, touch one of the two set temp buttons to change the temperature
setting. The up/down arrows appear, allowing you to adjust the “cool to” (or
“heat to”) values to the desired temperature setting.
This setting will remain until you decide to change it again. (The inset shows
an alternate configuration of button layout in non-program mode.)
use arrows
to change
temperature
?
touch
cool-to
button
indoor temperature
indoor humidity is 41%
fan is
OFF
fan is
AUTO
cool-to
set temp
75
heat to
70
heat
or
cool
fan is
AUTO
system is cooling
alternate
cool-only button
layout
(system
mode button)
9:39 am May 23, 2012Wi-Fi
?
enter
away
cool-to
set temp
75
cool
only
fan is
AUTO
Figure 20. Adjusting Temperature with NO Program Running
Away Mode (Vacation) — The enter away mode button on the home
screen (upper right-hand corner) sets the system for manual operation and
allows you to set the thermostat for energy-saving operation while you are
gone for an extended period of time. In this mode, the system will only come
on if the indoor temperature falls below a set value in the heating mode (62º F
default), or if the indoor temperature rises above a set value in the cooling
mode (85º F default). You may adjust these settings as desired (see figure
21). To exit the away mode, touch cancel away mode.
indoor temperature
9:39 am May 23, 2012
cool-to
set temp
82
heat to
60
use arrows to
change
temperature
?
9:39 am May 23, 2012
Wi-Fi
?
cancel
away
system is currently using energy saving AWAY settings
Figure 21. Adjusting Temperature with Program Running
(Away Mode)
Turn Programming ON — If the programming is OFF, touch the
system mode button (shown in figure 22, labeled heat or cool) to open the
manual settings menu. Programs is the final selection in this menu. Select
programs to display the program settings menu. (The menu will disappear if
you don't make a selection within a few seconds). Select an option (e.g.
spring/fall). The system mode button will display the selected program (e.g.
spring...program is ON).
Turn Programming OFF — If the programming is ON, touch the
system mode button (e.g. spring...program is ON) to return to manual
mode. The program settings menu includes an option for manual. Select
manual to display the manual settings. Select one of the manual settings
(e.g. heat only). After the selection is made, the system mode button will
display the selected manual option (e.g. heat only).
Page 15

iComfort Wi-Fi® 7-Day Programmable Communicating Thermostat
Page 15
use arrows
to change
temperature
?
touch
cool-to
button
indoor temperature
indoor humidity is 41%
fan is
OFF
fan is
AUTO
cool-to
set temp
78
heat to
70
heat
or
cool
fan is
AUTO
system is waiting
cool only
heat only
heat or cool
off
emerg. heat
programs
summer
winter
spring/fall
save energy
custom
edit programs
manual
spring...
program
is ON
(mode
button)
(mode
button)
(manual
settings
menu)
(program
settings
menu)
9:39 am May 23, 2012Wi-Fi
?
Figure 22. Turning on the Program
Adjust temperature when program is ON — Program HOLD
When the program is ON, the system mode button (shown in figure 23,
labeled spring...program is ON) indicates which program is running. In this
mode, touch a set temp button to trigger the appearance of an up/down
arrow. Use the arrows to adjust the temperature setting for the “cool to” (or
“heat to”) value (see figure 23).
While changing the temperature setting, the other options menu appears
(see figure 24). This menu provides options for the length of time that you
may choose to hold a temperature setting.
indoor temperature
indoor humidity is 41%
fan is
OFF
fan is
AUTO
cool-to
set temp
78
heat to
75
spring...
program is
ON
fan is AUTO
outdoor
temperature
80
use arrows to
change
temperature
touch cool-to
button
9:39 am May 23, 2012
Wi-Fi
?
enter
away
Figure 23. Adjusting Temperature with Program Running
(cool-to and heat-to)
indoor temperature
indoor humidity is 41%
fan is
OFF
9:39 am May 23, 2012
fan is
AUTO
cool-to
set temp
75
heat to
72
program hold until next
program setting
other options include
system is cooling
use arrows to
change
temperature
?
1hr 2hr
8hr 24hr
custom
select an option or do nothing to
accept the default “Program
d”hold until next period”
Program hold until
next period
cancel
(other options menu)
9:39 am May 23, 2012
Wi-Fi
?
enter
away
Figure 24. Adjusting Temperature with Program Running
(other options)
Page 16

507342-01
Page 16
You may select one of the hour buttons (1, 2, 8, or 24) if desired. If you select
custom, a time/date screen appears and you have the option of setting the
hold for any length of time (see figure 25).
After a hold is set, the other options menu disappears and a message will
state when the hold expires, along with a cancel option should you choose to
revert to the original program.
If you do not choose one of the “other options” the setting will be held until the
next period (default).
S M T W T F S
January 2012
123 4 5 6 7
8 9 10 11 12 13 14
15 16 17 18 19 20 21
22 23 24 25 26 27 28
29 30 31
save
09 : 39 am
program hold
Figure 25. Adjusting Temperature with Program Running
(program hold)
CLOCK SETTINGS
1. Touch the clock display on the Home screen (see figure 1 on page
3). Figure 26 shows the CLOCK SETTINGS screen.
2. Use the horizontal arrows to scroll to the desired month and year.
Touch a day of the month to select it.
3. Touch time format and daylight saving to toggle these options (if
desired).
4. Use the up/down arrows to change time.
5. Touch am/pm to select morning or afternoon (am/pm does not appear
if 24HR format is selected).
CLOCK SETTINGS
SMTWTFS
January 2012
1234567
8 9 10 11 12 13 14
15 16 17 18 19 20 21
22 23 24 25 26 27 28
29 30 31
save
09 : 39 am
set current date and
time
time
format
12 HR
daylight
saving
enabled
Figure 26. Set Current Time and Date
WEATHER
1. Touch the weather icon on the Home screen (see figure 1 on page 3)
to view the WEATHER screen. Figure 27 shows a typical 5-day
forecast screen.
2. Use “X” button to return to the Home screen.
WEATHER
5 day forecast for Richardson, Texas
Thursday Friday Saturday Sunday Monday
85
60
Clouds
breaking for
some sun
88
61
Sunny,
pleasant and
warmer
85
62
Partly sunny
and Hot
88
61
86
60
9:39 am May 23, 2012
?
Wi-Fi
Provided by AccuWeather .com
Partly sunny
and Hot
Partly sunny
and Hot
Figure 27. Typical Weather Screen
Page 17

iComfort Wi-Fi® 7-Day Programmable Communicating Thermostat
Page 17
Setting Zoning Controls
When a zone control system has been installed and enabled by the installer,
the homeowner has the option to control temperature or set away mode for
each enabled zone. Touch the zone location button as shown below to
display the AVAILABLE ZONES screen.
indoor temperature
indoor humidity is 41%
fan is
OFF
fan is
AUTO
cool-to
set temp
75
heat to
72
heat
or
cool
fan is
AUTO
outdoor
temperature
80
system is cooling
forecast
Hi 85
Lo 60
20% chance of rain
9:39 am May 23, 2012
Wi-Fi
enter
away
Zone 1
?
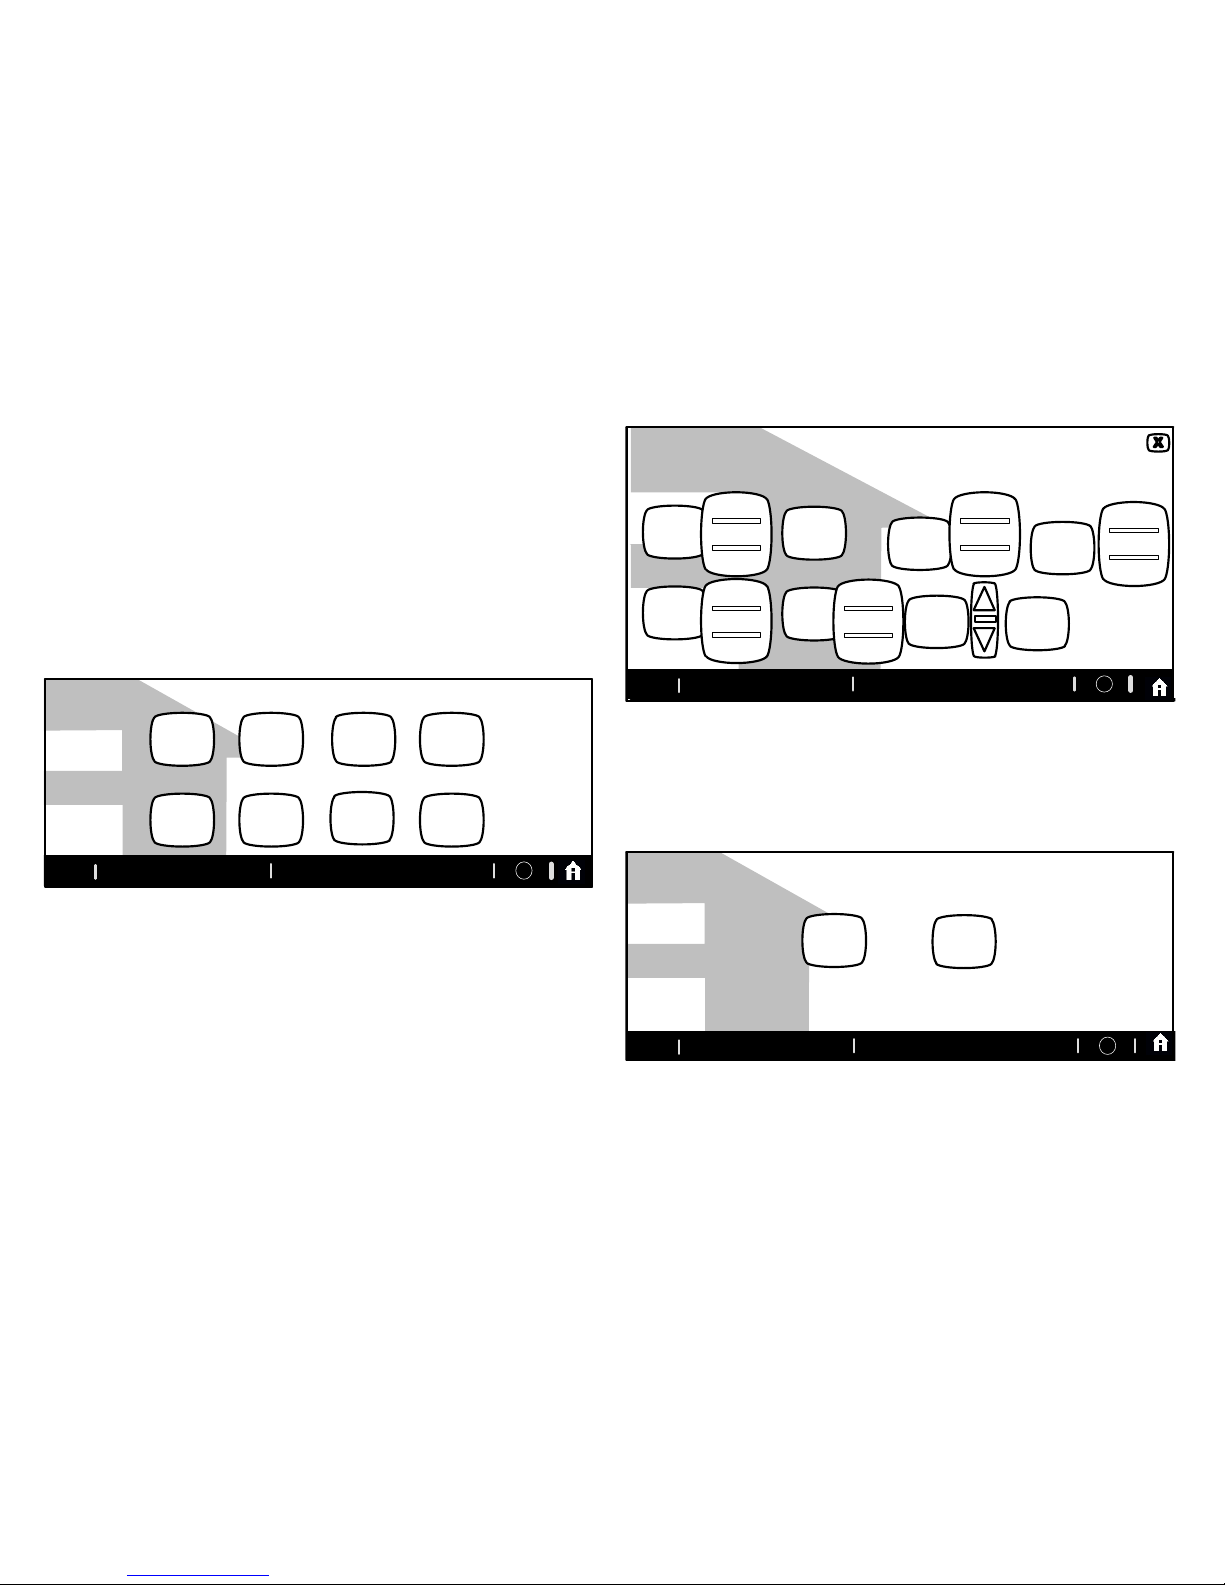
Figure 28 shows the AVAILABLE ZONES screen. This screen displays the
current temperature, as well as the heating / cooling settings for each zone.
RENAMING ZONES
Touch the zone number of the zone you wish to rename. An on-screen
keyboard will appear to allow you to rename a specific zone. Touch the save
button when you are through.
AVAILABLE ZONES
fan is
OFF
fan is
AUTO
Den
75
Press any zone button to make this thermostat contr0l that zone.
72
9:39 am May 23, 2012
70
Living Room
75
72
70
Zone 3
75
72
70
Zone 3
75
72
70
Wi-Fi
?
Figure 28. Home Screen - Selecting Available Zones Screen
ADJUSTING ZONE TEMPERATURES
Touch the current temperature reading of any zone that you wish to adjust.
This will trigger the appearance of the temperature adjustment screen. Make
desired adjustments for the particular zone as outlined beginning on page
14.
AVAILABLE ZONES
fan is
OFF
fan is
AUTO
Den
75
Press any zone button to make this thermostat contr0l that zone.
72
9:39 am May 23, 2012
Wi-Fi
?
70
Living Room
75
72
70
Master Bed
75
72
70
Zone 3
75
72
70
Figure 29. Selecting Available Zones
Page 18

507342-01
Page 18
use arrows
to change
temperature
?
touch
cool-to
button
indoor temperature
indoor humidity is 41%
fan is
OFF
fan is
AUTO
cool-to
set temp
75
heat to
70
heat
or
cool
fan is
AUTO
system is cooling
cool-to
set temp
75
cool
only
fan is
AUTO
alternate
cool-only button
layout
(mode
button)
9:39 am May 23, 2012Wi-Fi
?
Living Room
enter
Figure 30. Adjusting Temperature
SETTING AWAY MODE PER ZONE
AVAILABLE ZONES
fan is
OFF
fan is
AUTO
Den
75
Press any zone button to make this thermostat contr0l that zone.
72
9:39 am May 23, 2012
Wi-Fi
?
70
Living Room
75
85
62
Master Bed
75
85
62
Zone 3
75
72
70
Figure 31. Home Screen - Selecting Away Mode for Individual Zones
The Zone 1 thermostat becomes the system master thermostat. If the Zone
1 thermostat is set for Away Mode (on the Home Screen), the away mode is
enabled for the whole system (all zones) until canceled.
If zones 2, 3, or 4 are set for Away Mode on the Home Screen, the Away
Mode icon appears at the lower-right of each zone button on the AVAILABLE
ZONES screen.
ADJUSTING AWAY MODE TEMPERATURE OR CANCEL AWAY
MODE PER ZONE
To adjust the Away Mode zone temperature setting or to cancel Away Mode
for a specific zone, enter the Home Screen, select the desired zone and
touch the Cancel Away icon located in the upper right-hand corner of the
screen.
indoor temperature
cool-to
set temp
82
heat to
60
use arrows to change
temperature
9:39 am May 23, 2012
Wi-Fi
?
cancel
away
this zone in AWAY mode, use cancel to exit AWAY mode.
Figure 32. Adjusting Temperature or Canceling Away Mode with
Program Running (Away Mode)
HOW TO DISABLE ZONING
From the Home screen, select the right arrow to proceed to the FEATURES
screen. Select zone settings and then select zoning is ON. This will toggle
zoning to OFF. Once disabled, zoning information disappears from the
status bar along the bottom of the home screen. When zoning has been
disabled, the master thermostat controls the entire system in single comfort
mode.
NOTE - When Zoning is disabled, the in-zone thermostats are also disabled;
however, each of the zone thermostats continues to display the current
temperature for that zone. The iComfort® logo is also displayed to indicate
that zoning is off.
Page 19

iComfort Wi-Fi® 7-Day Programmable Communicating Thermostat
Page 19
Setting Humidity Controls
NOTICE
Humidifier and dehumidifier controls must be set up by the installer or
these controls will not be visible. If your system has one or both of
these features and the controls are not visible, contact your Lennox
dealer for proper setup.
If the controls have been set up, they will appear and will be ON.
Heating Mode: When an XP25 heat pump is installed, the heating mode
option is displayed. To adjust heating mode settings, touch the button to
go to the FEATURES screen; then touch the system settings button. Touch
the heating mode icon to toggle between NORMAL and COMFORT. Default
is NORMAL.
Normal — Standard system operation
Comfort — The system adjusts compressor operation to increase air
temperature.
Humidification and Dehumidification Settings: To adjust humidification
settings, touch the button to go to the FEATURES screen; then select the
system settings button. Some systems may have a humidifier and some
may have a dehumidifier. Some systems will have both (as shown in figure
33). You can control either or both from this screen.
Humidification Settings: Touch the humidifier setting button you want to
adjust. If it says humidifier is OFF, one touch will change it to ON and bring on
the set-to button. When you touch the set-to button, the arrows appear,
allowing you to change the humidity setting to the desired value.
Dehumidification Controls (iComfort® Outdoor Unit): Touch the
humidifier setting button you want to adjust. If it says ClimateIQ setting
DRY (off), one touch will display a selection for DRY, MODERATE and
HUMID. Select MODERATE or HUMID to trigger the set-to button.
Which one you chose depends on the region of the country you live in. For
example:
if you live in a humid location like Miami, FL select Humid
if you live in a moderate location like Denver, CO select Moderate
if you live in a dry location like Phoenix, AZ select Dry.
Touch the set-to button to bring up the up/down arrows. Use these arrows to
adjust the humidity level to the desired setting.
Three climate settings are available for iComfort® equipment: dry, moderate
and humid.
Dry The system supplies higher indoor airflow at all compressor
capacities. This will increase efficiency by operating at a higher
sensible-to-total ratio.
Moderate The system controls indoor airflow to ensure balanced
efficiency and comfort.
Humid The system lowers the indoor airflow at all compressor
capacities. This setting improves humidity removal by operating at a
lower sensible-to total-ratio.
Note: A cooling call has priority over a dehumidification call.
SYSTEM SETTINGS
current indoor humidity is 50%
heating
mode
COMFORT
humidifier
is ON
ClimateIQ
setting
MOD
40
%
set to
50
%
set to
ALL CHANGES MADE
ON THIS SCREEN ARE
INSTANTLY SAVED.
9:39 am May 23, 2012 ?
Wi-Fi
DRY
MODERATE
HUMID
humidifier
display
is ON
(default is ON)
humidification
settings
dehumidification
settings
Figure 33. Humidification Settings (iComfort® Outdoor Unit)
Page 20

507342-01
Page 20
Dehumidification Controls (Non-Communicating Outdoor Unit): Touch
the humidifier setting button you want to adjust. If it says de-humidifier OFF,
one touch will display a selection for OFF, MEDIUM and HIGH. Select
MEDIUM or HIGH to bring on the set-to button. When you touch the set-to
button, the arrows appear, allowing you to change to the desired humidity
setting.
Three climate settings are available for non-communicating equipment:
OFF The system supplies higher indoor airflow at all compressor
capacities. This will increase efficiency by operating at a higher
sensible-to-total ratio.
MEDIUM The system controls indoor airflow to ensure balanced
efficiency and comfort.
HIGH The system lowers the indoor airflow at all compressor
capacities. This setting improves humidity removal by operating at a
lower sensible-to total-ratio.
Remember that the humidification controls are only active while the system
is in the heating mode. The dehumidification controls are only active while in
the cooling mode.
SYSTEM SETTINGS
current indoor humidity is 50%
heating
mode
COMFORT
humidifier
is ON
de-
humidifier
MEDIUM
40
%
set to
50
%
set to
ALL CHANGES MADE ON
THIS SCREEN ARE IN
STANTLY SAVED.
9:39 am May 23, 2012 ?Wi-Fi
OFF
MEDIUM
HIGH
humidifier
display
is ON
(default is ON)
humidification
settings
dehumidification
settings
Figure 34. Humidifier Controls (Non-Communicating Outdoor Unit)
Connecting to a Home Wi-Fi Router
Check the router utility program or contact service provider for help.
The Wi-Fi thermostat must be close enough to the Wi-Fi router to ensure a
good communications signal between the thermostat and the router. (Hint:
use a smart phone with Wi-Fi and Wi-Fi finder application to locate and
determine signal strength.)
NOTE - The thermostat will not be able to reliably connect to the router
if the received signal strength indicator (RSSI) shows a larger negative
number than 70 i.e. 75, etc.
Secure Connection Recommended! Verify that the router is
compatible with and set to operate in either 802.11b, 802.11g or 802.11n
wireless network modes. Check router utility program or contact
service provider for assistance.
Below are some possible conditions that will cause wireless interference
with the thermostat resulting in poor signal reception.
Portable phones and bases
Baby monitors
Wireless speakers
Bluetooth devices
Garage door openers
Neighbors' wireless devices.
To eliminate a possible source of interference, temporarily disable any
devices and see if Wi-Fi performance has improved.
ENABLING WI-FI
To enable the Wi-Fi feature to communicate with a wireless router
Page 21

iComfort Wi-Fi® 7-Day Programmable Communicating Thermostat
Page 21
1. Press and release Wi-Fi in the lower left corner of the HOME screen
indoor temperature
indoor humidity is 41%
fan is
OFF
9:39 am May 23, 2012
fan is
AUTO
cool-to
set temp
75
Heat-to
72
heat
or
cool
fan is
AUTO
enter
away
outdoor
temperature
80
system is cooling
Wi-Fi
Zone 1
?
1
Wi-Fi
Figure 35. Press Wi-FI
2. Press the Wi-Fi disable button to enable Wi-Fi.
WI-FIL SETTINGS
Press to enable /
disable Wi-FI
disabled
Thermostat is not connected to the Wi-FI network
WI-FI
X
Figure 36. Enable Wi-FI
3. The User Agreement screens will appear next. Press next as many
times as necessary; then press accept after reading the User
Agreement.
ESTABLISHING A WI-FI CONNECTIONS
There are two methods to setup your Wi-Fi connection. Select either
NETWORK SETTINGS or connection status.
Method 1 — Network Settings Method
1. Press NETWORK SETTINGS; this screen shows a graphical view of
buttons representing OPEN and SECURE Wi-Fi networks and a button
for adding a network.
WI-FI SETTINGS
press to enable /
disable Wi-FI
enabled
Thermostat is not connected to the Wi-FI network
WI-FI
X
NETWORK
SETTINGS
press to change
network settings
Must setup a network connection before registering thermostat
connection
status
Press to see
connection status
Figure 37. Enable Wi-FI
Open connection which which requires no password.
Secure connection which requires Wi-Fi password (security
key).
Add a network is required when Wi-Fi identification (SSID) is
being hidden (not broadcasting). You will need to know the Wi-Fi
network name (SSID), security encryption type (if enabled), and
security password (if security encryption is enabled).
2. When selecting a:
unsecured connection a screen will appear with two options,
connect and router info. Press connect to continue.
secured connection a screen will appear requesting the Wi-Fi
network password (security key). There are two options to select
from which are connect and router info. Using the on-screen
keyboard, enter the password (security key) and then press
connect to continue.
Page 22

507342-01
Page 22
HOME
DS9
Open connection (no password required)
Secure connection (password required)
(lock icon is present)
BSG
Signal strength. For best results, the higher the
bar levels, the more reliable a connection.
Figure 38. Typical Connection Type and Signal Strength
NOTE - The router info button provides information concerning the home
Wi-fi connection (i.e, RSSI, IP address, MAC address and wait state) all of
which may be helpful in troubleshooting network connection issues).
3. If connection is successful the screen will return to the available
networks screens. Press X to return to the previous screen. If the
connection was successful it will be listed connected as exampled
below.
WI-FI SETTINGS
press to enable //
disable Wi-FI
9:39 am May 23, 2012
enabled
WI-FI
Zone 1
?
X
AP3
connected
press to change
wireless network
Must setup a network connection before registering thermostat
Wi-Fi
connection
status
Press to see
connection status
thermostat
not
registered
press to change
thermostat
registration
Figure 39. Network Connected
ESTABLISHING A WI-FI CONNECTIONS TO A HIDDEN
NETWORK
1. When connecting to a hidden network, press the add new network
icon to continue.
2. Enter the network name (SSID) using the onscreen keyboard and
press the save button.
3. By default security is set to none. To enable the security option, press
the security is none icon and select the security used for the Wi-Fi
network (WEP, WPA or WPA2).
4. Press the connect icon to continue.
5. Using the on-screen keyboard, enter the password (security key). If the
network name or security key combination is incorrect or incorrectly
type, and access to the specified network failed, a message will alert
you to retry.
press any line to edit it
network name (SSID)
security is
WPA
password
connect
Figure 40. Network Manual Setup (Hidden Network)
6. If connection is successful the screen will return to the available
networks screens. The network successfully connected will be listed
and shown as connected as exampled in figure 39.
Method 2 — Connection Status Method
1. Press connection status; this screen shows a graphical view of the
current connection status.
Page 23

iComfort Wi-Fi® 7-Day Programmable Communicating Thermostat
Page 23
2. Select the router icon to choose the desire W-Fi network. When
selecting a:
unsecured connection a screen will appear with two options,
connect and router info. Press connect to continue.
secured connection a screen will appear requesting the Wi-Fi
network password (security key). There are two options to select
from which are connect and router info. Using the on-screen
keyboard, enter the password (security key) and then press
connect to continue.
3. If connection is successful the screen will return to the available
networks screens. Press AP3 as exampled in figure 41 to return to the
previous screen. If the connection was successful it will be listed
connected as exampled below.
WI-FI SETTINGS
press to enable //
disable Wi-FI
9:39 am May 23, 2012
enabled
WI-FI
Zone 1
?
X
AP3
connected
press to change
wireless network
Must setup a network connection before registering thermostat
Wi-Fi
connection
status
Press to see
connection status
thermostat
not
registered
press to change
thermostat
registration
Figure 41. Network Connected
4. Select X to return to the WI-FI SETTINGS screen. Select connection
status again to verify that connection to the router and Internet is
active. Both the router and Internet icons will have green backgrounds
if connections are successful.
Troubleshooting Wi-Fi Connection
The following terminology is used in this troubleshooting section:
Router Signal Strength (RSSI). RSSI is an indication of the signal
strength of the Wi-Fi router being received by the scanning device (i.e.,
smart phone). Therefore, the higher the RSSI number (or less negative
in some devices), the stronger the signal..
802.11b, g and n are wireless networking specification that extends
throughput up to 130mbps using the 2.4 GHz band.
Internet Protocol Address (IP address). This is a numerical label
assigned to each device (e.g., computer, printer, thermostat)
participating in a computer network that uses the Internet Protocol for
communication. An IP address serves two principal functions: host or
network interface identification and location addressing.
Electromagnetic Interference Causing Poor Connectivity
Locate both the thermostat and router away from other devices that could
possibility interfere with wireless communications. Some examples of other
devices that could interfere are:
Microwave ovens
Wireless Cameras
Portable phones and bases
Baby monitors
Wireless speakers
Bluetooth devices
Garage door openers
Neighbor's wireless devices.
To eliminate a possible source of interference, temporally disable any
devices and see if Wi-FI performance has improved.
Router Signal Strength (RSSI)
The ideal signal strength range for the iComfort Wi-Fi® thermostat is -1 to -69
RSSI. The signal strength can be viewed from the thermostat interface. Use
steps 1
1. Press NETWORK SETTINGS; this screen shows a graphical view of
buttons representing Wi-Fi options OPEN and SECURE wireless
networks and a button for adding a network.
Page 24

507342-01
Page 24
2. Select the access point that has already been establish and connected
too. There are two options to select from which are connect and
Router info. Select Router Info and verify the RSSI strength. If the
signal is anywhere between -1 to -69, then the signal strength is
sufficient. If outside this range, the either locate the router closer to the
thermostat or add a signal repeater.
Remember that walls, appliances, equipment and other various barriers will
reduce signal strength.
Router Signal Strength (RSSI)
The signal strength can be viewed from the thermostat interface. Use the
following procedure to discover the Wi-FI router signal strength at the
installation location of the thermostat.
1. Touch NETWORK SETTINGS to display your Wi-Fi connection.
WI-FIL SETTINGS
press to enable /
disable Wi-FI
9:39 am May 23, 2012
enabled
Thermostat is not connected to the Wi-FI network
WI-FI
Zone 1
?
X
NETWORK
SETTINGS
press to change
network settings
Must set up a network connection before registering thermostat
Wi-Fi
Figure 42. Network Settings
2. Select an access point that has already been established and
connected. There are two options to select from: connect and Router
info. Select Router info and verify the RSSI strength. If the signal is
between -1 and -69, then the signal strength is sufficient. If the signal
strength is outside of this range, install the router closer to the
thermostat or add a repeater.
Rebooting the Thermostat to To Establish
Connection to the Server
If, after successfully connecting the thermostat to your wireless router, the
following message appears on the screen:
Connection to server has not been established or it has been
lost. Please wait until the connection is established,
wait five minutes. Perform the following procedure, if the server connection
is still not established.
1. From the home screen, touch the Lennox logo (bottom right-hand
corner of screen) and hold for 5 seconds.
2. A message screen stating qualified Lennox equipment installers only
warning screen appears (figure 43).
WARNING!
The following screens are intended for use by qualified Lennox
equipment installers only.
yes
no
reset
Do you want to proceed?
Figure 43. Qualified Lennox Equipment Installer Warning
3. Touch the reset button. The thermostat will reboot itself. The screen
will go blank for two or three seconds. Then, the home screen will
appear.
4. From the Home screen, touch and release Wi-Fi in the lower left corner
of the HOME screen.
5. If the message Connection to server has not been established or
it has been lost, it may take 10 to 15 more seconds to make
connection to server. If connection is established continue to the
next section. If connection fails, then contact Lennox Customer Care
Department at 1-800-9-LENNOX (1-800-953-6669) for further
assistance.
Page 25

iComfort Wi-Fi® 7-Day Programmable Communicating Thermostat
Page 25
Registering the Thermostat
REGISTRATION FOR ONLINE ACCESS
1. From the WI-FI SETTINGS screen, press either the thermostat not
registered icon or the connection status icon and select the server
icon.
WI-FI SETTINGS
connectio
n status
thermostat
not
registered
AP3
connected
press to change
network settings
press to enable /
disable Wi-Fi
press to change
thermostat
registration
press to toggle
off / auto
Wi-Fi
enabled
2. Enter homeowner email address and press the register button.
register
enter your email
Register with iComfort Wi-Fi thermostat to enable remote access
and online weather information
System Desc
3. A pop-up screen will appear asking if the email address below is
correct? Verify the email address is correct and press yes.
4. Another pop-up screen will appear notifying the user to check their
email.
An email has been sent to
xxxxxxxxxx@lennoxind.com
with instructions on how to register your thermostat. If you haven't
received the email, please check your spam folder and make sure
that your email address is correct.
NOTE - If the email address originally entered is incorrect, return to the
thermostat registered screen and reenter the correct information and
press register.
5. After the server sends the email with the network link, registration and
account creation must be completed from the homeowners personal
computer.
NOTE - Time from pushing the registration button on the thermostat and
receiving the consumer portal register link from your email on your computer
is normally from 5 to 15 minutes depending on Internet speed and traffic.
NOTE - Registration cannot be completed from any mobile device.
6. After registration has been completed, press the connection status
icon to verify the connection was successful. If the connection is
successful the server icon background will be green.
7. After successful connection to the server is completed, the firmware
update button will appear. The default setting is set to auto. If any
firmware updates are available they will immediately start downloading
and update the thermostat. The thermostat will reboot itself after the
update is completed. Updates are done in the background and will not
impair normal thermostat operations.
This auto update feature can be disabled by pressing the firmware
update button to toggle to OFF however this is not recommended.
Page 26

507342-01
Page 26
NOTE - Firmware updates will not affect installer or user thermostat settings.
Both will be retained after the update.
WI-FI SETTINGS
connected
Wi-Fi
enabled
thermostat
registered
Connection to server has not bee established or it has been lost.
Please wait until a connection is established.
firmware
update
auto
press to enable /
disable Wi-Fi
press to change
wireless network
press to change
thermostat
registration
press to search
for new update
NOTE If any downloads are available for the thermostat they will start down
loading right away. After the new firmware has been downloaded and
the thermostat is ready to update itself, the thermostat screen will tem
porarily go blank and running units may cease operation while the sys
tem is being reset to accommodate the new changes. This is normal
and can last a couple minutes.
AP3
connection
status
press to see
connection status
Figure 44. Registration for Online Access
Personal Computer Welcome Page; Interactive Demo;
Online iComfort® information; Using Gelaskins
Figure 45. PC Welcome Screen
Access all the great Wi-Fi enabled features on your icomfort® thermostat
from our secure web portal. After signing in, you’ll be able to view your
icomfort system settings, adjust the temperature and view reminders and
alerts – just as you would on your icomfort thermostat at home. With a
familiar look and settings this simple, you should feel right at home. Don’t
forget to check out the available Apps and customizable skins using the links
on the right side of the page. From the welcome page, you may also click on
links to launch an interactive demo or learn more about icomfort.
HOW DO I TURN ON SKINS ON THE ICOMFORT WI-FI
THERMOSTAT?
From the thermostat Home screen, press then display setting then
screen saver buttons. From the pop-up menu, select skins. The skin
picture will appear after 30 seconds of inactivity.
HOW DO I UPLOAD A SKIN?
Skins should be ordered from website listed below:
http:// www.gelaskins.com/lennoxicomfort
After ordering the skin, Gelaskins will email the image file (.jpg) to the
homeowner. This “jpg” has been altered to display correctly on the icomfort
Wi-Fi Thermostat. Images can be uploaded to the icomfort Wi-Fi thermostat
from the consumer portal site (www.myicomfort.com) under the tab ”skins”.
 Loading...