

Page 1
ENGLISH ITALIANO ESPAÑOL FRANÇAIS DEUTSCH GREEK
OWNER'S MANUAL
HI WALL
GCM/GHM
GHA
Page 2

ENGLISH
Room Air Conditioner
OWNER'S MANUAL
HI WALL TYPE ROOM AIR CONDITIONER
• Please read carefully and thoroughly this manual
before operating this unit.
• Contact the authorized SVC man for repair or
maintenance of this unit.
• Contact the installer for installation of this unit.
• The appliance is not intended for use by young children or
infirm persons without supervision.
• Young children should be supervised to ensure that they
do not play with the appliance.
Prior to installation, this air-conditioning
unit must be submitted for approval by the utility
service which provides electricity (EN 61000-3 Norm).
Page 3
2
Safety PrecautionsOperating InstructionsCare and MaintenanceTroubleshooting Tips
WARNING
WARNING
CAUTION
CAUTION
WARNING
WARNING
Safety precautions
Safety Precautions
Warning ................................2
Caution .................................3
Operating Instructions
Preparation before operation
..4
Remote Control Features .....5
Operation Mode Selection ......6
Additional features..............11
Care and Maintenance
Care and Maintenance .......14
Operation Tips....................16
Troubleshooting tips
Before You
Call For Service...............17
To prevent injury and property damage, follow these instructions.
Incorrect operation due to ignoring instructions will cause harm or
damage, the seriousness of which is indicated by the following
symbols.
This symbol shows the possibility of death or serious injury.
This symbol indicates the possibility of injury or damage to
property.
Plug in the power plug
properly.
Do not operate or stop the unit by
inserting or pulling out the power plug.
Do not damage or use an
unspecified power cord.
• Otherwise, it will cause electric shock
or fire due to heat generation or
electric shock.
• It will cause electric shock or fire due
to heat generation.
• It will cause electric shock or fire.
•
In the supply cord is damaged, it mut be
replaced by the manufacturer or its service
agent or a similarly quallfied person in order
to avoid a hazard. (Y Attachment)
Do not modify power cord length or
share the outlet with other appliances.
Do not operate with wet hands or in
damp environment.
Do not direct airflow at room occupants
only.
• It will cause electric shock or fire due
to heat generation.
• It may cause electric shock. • This could damage your health.
Always perform grounding work. Do not allow water to run into
electric parts.
Always install air leakage breaker
and a dedicated switching board.
• No grounding may cause electric
shock.
• It may cause failure of machine or
electric shock.
• No installation may cause fire and
electric shock accident.
Unplug the unit if strange
sounds, smell, or smoke
comes from it.
Do not use the socket if it is
loose or damaged.
Do not open the entrance
during operation.
• It may cause fire and electric
shock accident.
• It may cause fire and electric
shock.
• It may cause electric shock.
Keep firearms away.
Do not use the power cord close to the
heating tools.
Do not use the power cord near flammable
gas or combustibles, such as gasoline,
benzene, thinner, etc.
• It may cause fire. • It may cause fire and electric shock. • It may cause an explosion or fire.
■ The following items are classified by these symblos.
Never Do This
Always Do This
Page 4
ENGLISH
3
CAUTION
CAUTION
WARNING
WARNING
Never touch the metal parts
of the unit when removing
the filter.
Do not clean the air
conditioner with water.
Ventilate well when used
together with a stove, etc.
• They are sharp and may cause
injury.
• Water may enter the unit and
degrade the insulation. It may
cause an electric shock.
• An oxygen shortage may occur.
When cleaning the unit,
first make sure the power
and breaker are turned off.
Do not put a pet or house
plant where it will be
exposed to direct air flow.
Do not use appliance for special
purpose such as animals or
vegetables, precision machine,
or conservation of art articles.
• Since the fan rotates at high
speed during operation, it may
cause injury.
• This could injure the pet or
plant.
• It may cause damage of animals
or vegetables or loss of
property.
Stop operation and close
the window in storm or
hurricane.
Hold the plug by the head of
the power plug when taking
it out.
Turn off the main power
switch when not using it for
a long time.
• Operation with windows opened
may cause wetting of indoor and
soaking of household furniture.
• It may cause electric shock and
damage.
• It may cause failure of product
or fire.
Do not place obstacles
around the absorption inlet or
instead of blowing-out inlet.
Ensure that an installation console of
the outdoor appliance is not damaged
due to the use for a long time.
Always insert the filters
securely. Clean it once
every two weeks.
• It may cause failure of appliance
or accident.
• If leaving appliance damaged,
there is concern of damage due
to the falling of product.
• Operation without filters may
cause failure.
Do not use strong detergent
such as wax or thinner but
use a soft cloth.
Do not place heavy object on the
power cord and take care so that
the cord should not be pressed.
Do not drink water drained
from air conditioner.
• Appearance may be deteriorated
due to change of product color or
scratching of its surface.
• There is danger of fire or electric
shock.
• It contains contaminants and will
make you sick.
Ventilate before operating air conditioner
when gas goes out.
Do not disassemble or modify products
randomly.
• It may cause explosion, fire and, burn. • It may cause failure and electric shock.
Use caution when unpacking and installing.
Sharp edges could cause injury.
If water enters the product, turn the power
switch of the main body of appliance off. After
taking the power-plug out from the socket,
contact with the service center.
Page 5

4
Safety PrecautionsOperating InstructionsCare and MaintenanceTroubleshooting Tips
Preparation before operation
Storage and Tips For Using the Remote Control
• The remote control may be stored mounted on a
wall.
• To operate the room air conditioner, aim the
remote control at the signal receptor which is
located on the center or the right side of the indoor
unit.
How to Insert the Batteries
Remove the battery cover by pulling it according to the
arrow direction.
Insert new batteries making sure that the (+) and (-) of
battery are installed correctly.
Reattach the cover by sliding it back into position.
NOTES:
• Use 2 AAA(1.5volt) batteries. Do not use rechargeable
batteries.
Signal Receptor
Receives the signals from the remote control.(Signal receiving sound: two short beeps or one long beep.)
Operation Indication Lamps
On/Off : Lights up during the system operation.
Sleep Mode : Lights up during Sleep Mode Auto operation.
Timer : Lights up during Timer operation.
Defrost Mode : Lights up during Defrost Mode or Hot Start operation (Heat pump model only)
: Lights up during outdoor unit operation. (Cooling model only)
OUT
DOOR
OUTDOOR UNIT
OPERATION
Page 6
5
Cooling Operation
Auto Operation
Healthy Dehumidification Operation
Flip-up door
(opened)
Heating Operation
Signal transmitter
•
Cooling Model( ), Heat Pump Model( )
ON OFF
SET
CANCEL
10
11
12
13
7
8
9
2
6
1
5
4
3
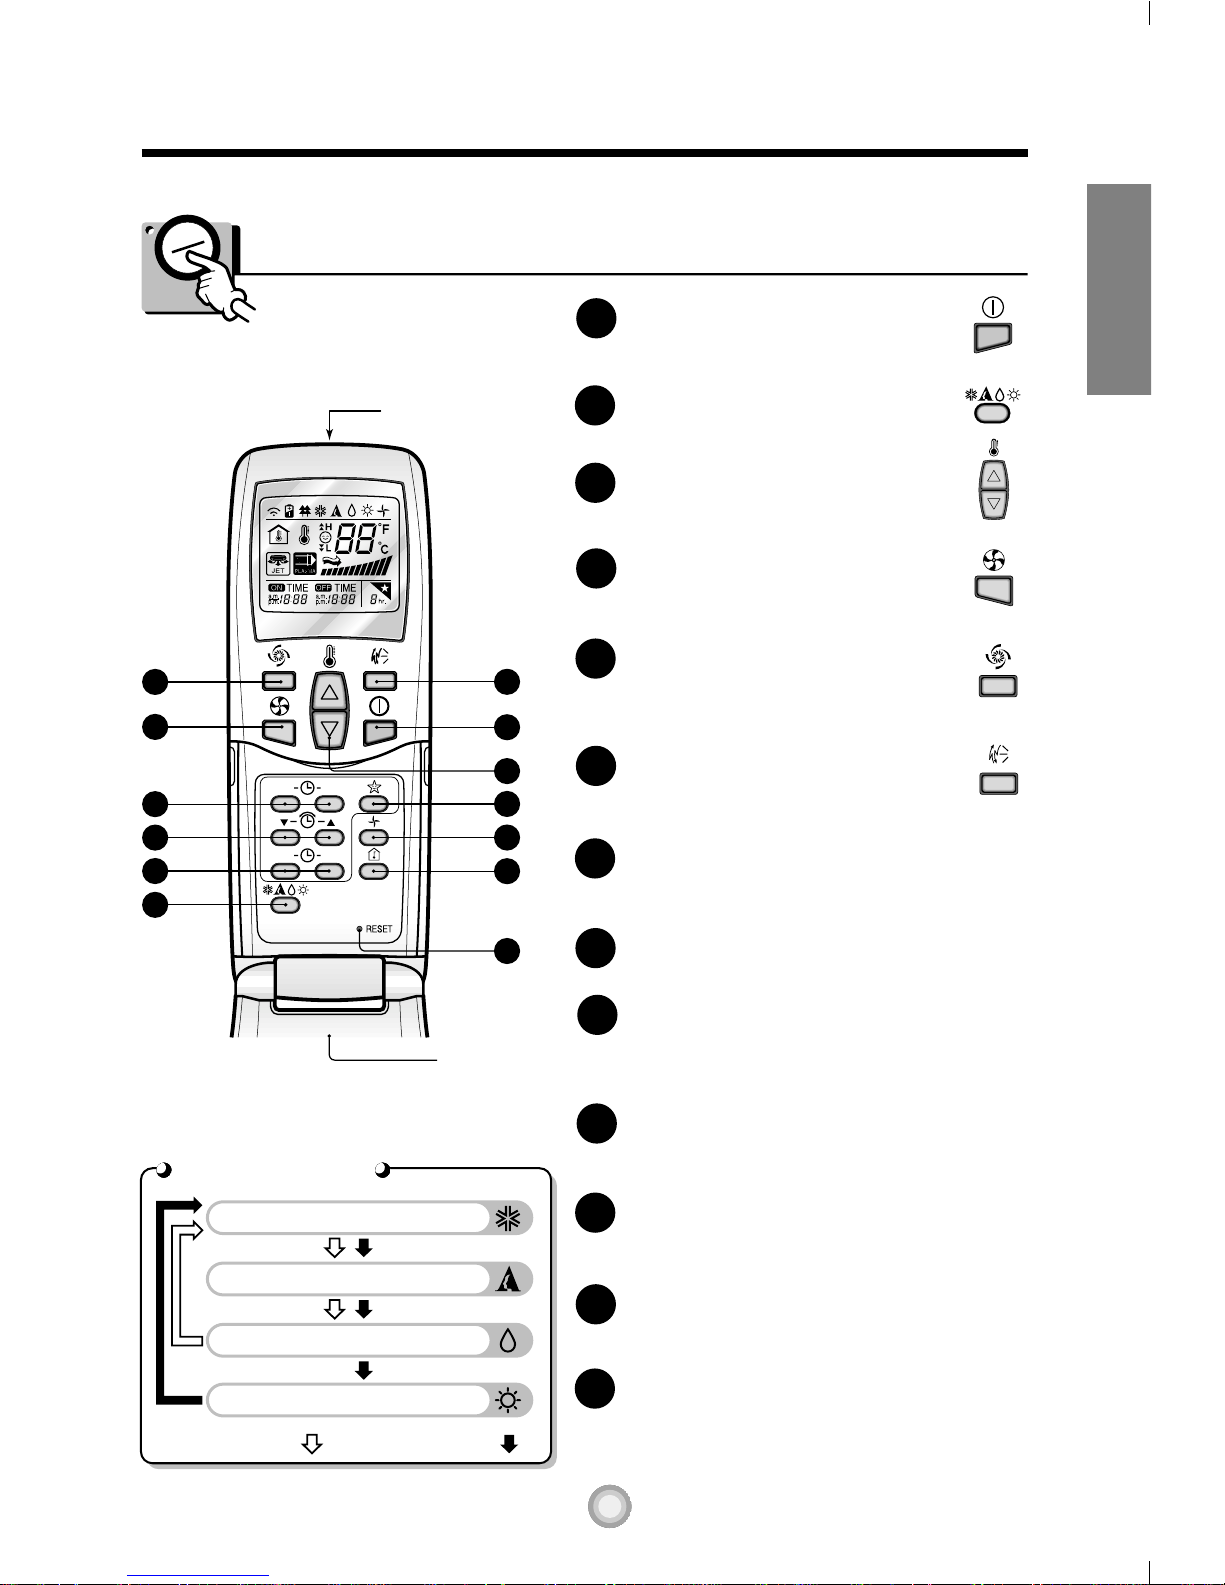
About the remote control on the system
ENGLISH
The remote control transmits the signals to the system.
Features of the Remote Control- Door Closed
Operation Mode
START/STOP BUTTON
Operation starts when this button is pressed
and stops when the button is pressed again.
OPERATION MODE SELECTION BUTTON
Used to select the operation mode.
ROOM TEMPERATURE SETTING
BUTTONS
Used to select the room temperature.
INDOOR FAN SPEED SELECTOR
Used to select fan speed in four steps
low, medium, high and CHAOS.
JET COOL
Used to start or stop the speed
cooling. (Speed cooling operates
super high fan speed in cooling mode.)
CHAOS SWING BUTTON
Used to stop or start louver movement and
set the desired up/down airflow direction.
ON/OFF TIMER BUTTONS
Used to set the time of starting and stopping
operation.
TIME SETTING BUTTONS
Used to adjust the time. (See page 11)
TIMER SET/CANCEL BUTTONS
Used to set the timer when the desired time
is obtained and to cancel the Timer
operation. (See page 11)
SLEEP MODE AUTO BUTTON
Used to set Sleep Mode Auto operation.
(See page 11)
AIR CIRCULATION BUTTON
Used to circulate the room air without cooling
or heating. (See page 12)
ROOM TEMPERATURE CHECKING
BUTTON
Used to check the room temperature.
RESET BUTTON
Used prior to resetting time or after replacing
batteries.
1
2
345
678
9
10
11
12
13
Page 7
6
Safety PrecautionsOperating InstructionsCare and MaintenanceTroubleshooting Tips
Cooling
Healthy
Dehumidification
Auto
Heating
(Heat pump model only)
To raise the temperature
To lower the temperature
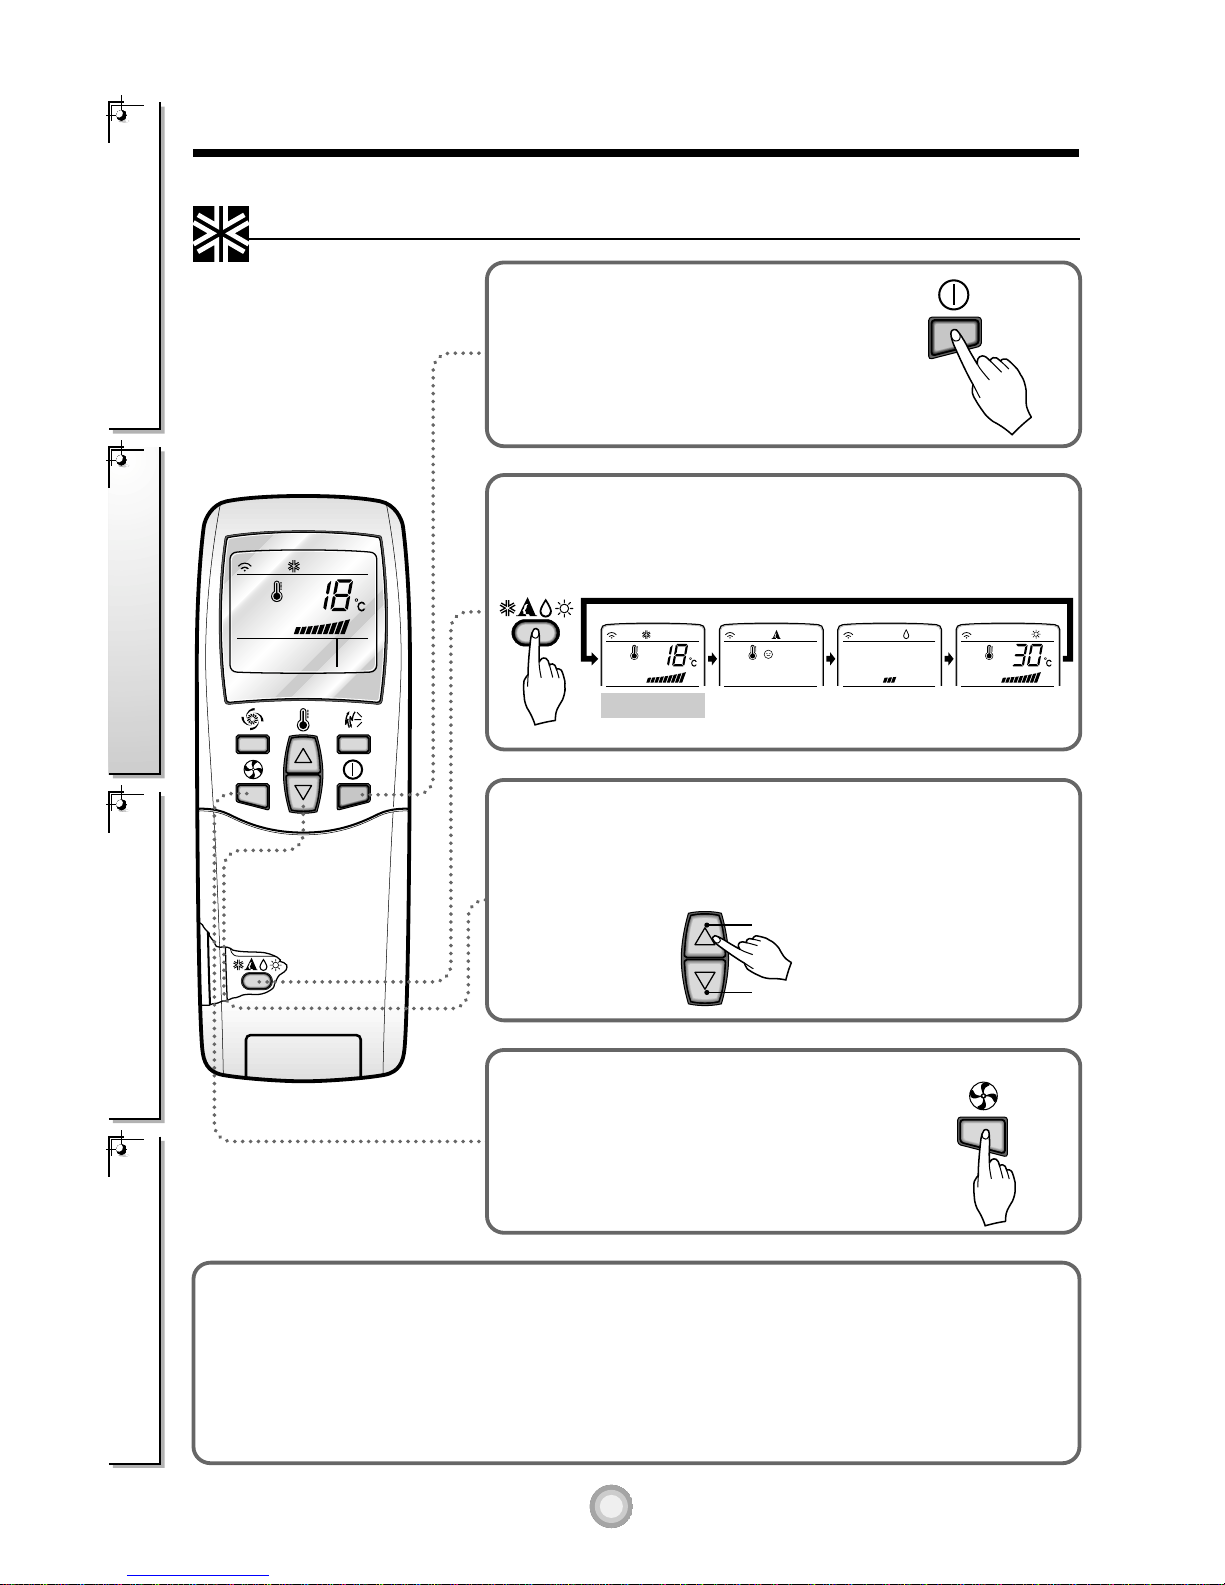
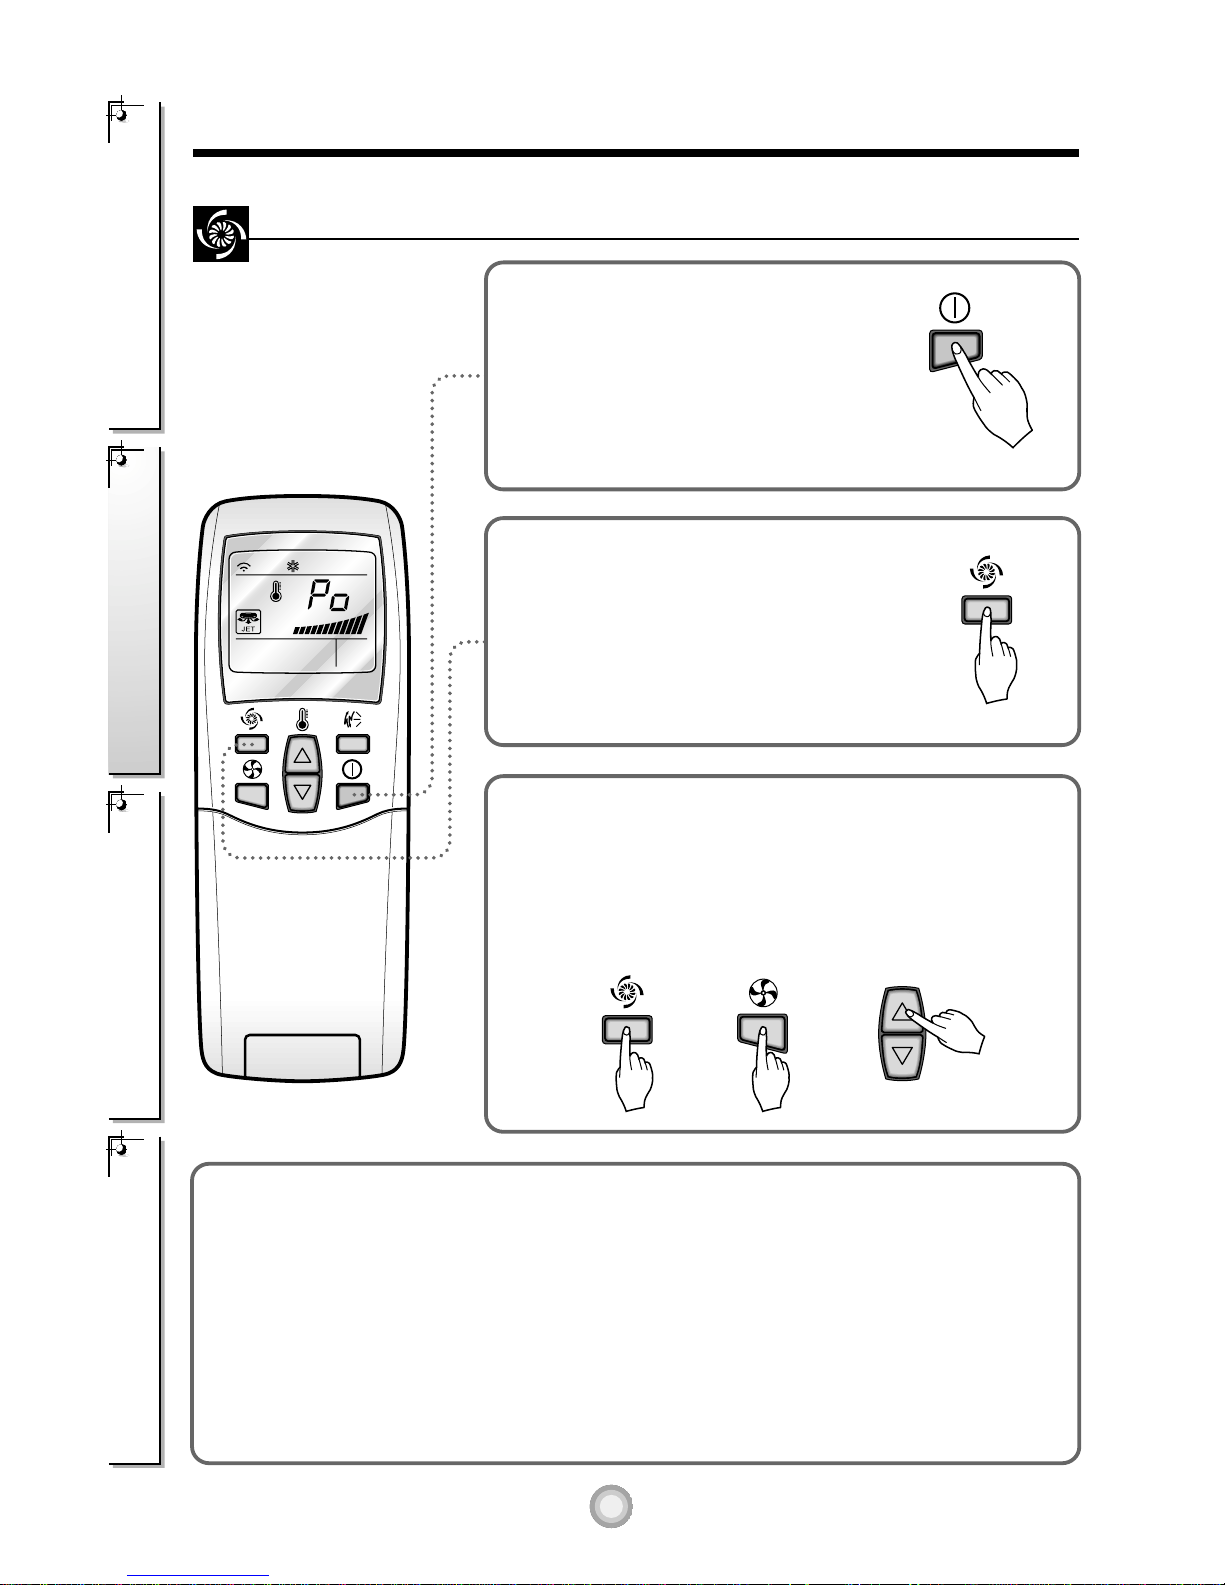
How to use the Operation Mode Selection button
Press the Start/Stop button.
The unit will respond with
a beep.
Open the door on the remote control. To select Cooling
Operation, press the Operation Mode Selection button.
Each time the button is pressed, the operation mode is
shifted in the direction of the arrow.
Close the door on the remote control. Set the temperature
lower than the room temperature. The temperature can be
set within a range of 18°C~30°C in 1°C increments.
Set the fan speed again with the door
of the remote control still closed. You
can select the fan speed in four stepslow, medium, high, or CHAOS. Each
time the button is pressed, the fan
speed mode is shifted.
Cooling Operation
1
2
3
4
Natural wind by the CHAOS logic
❏ For more fresh feeling than other fan speed, press the Indoor Fan Speed Selector and set to
CHAOS mode. In this mode, the wind blows like natural breeze by automatically changing fan
speed according to the CHAOS logic.
Page 8
ENGLISH
7
Cooling
Healthy
Dehumidification
Auto
Heating
(Heat pump model only)
Cooling
Healthy
Dehumidification
Auto
Heating
(Heat pump model only)
To raise the temperature
To lower the temperature
Press the Start/Stop button.
The unit will respond with
a beep.
Open the door on the remote control. To select Auto
Operation, press the Operation Mode Selection button.
Each time the button is pressed, the operation mode is
shifted in the direction of the arrow.
The temperature and fan speed are automatically set by the
electronic controls based on the actual room temperature. If
you want to change the set temperature, close the door on
the remote control and press the Room Temperature Setting
buttons. The cooler or warmer you feel, the more times (up to
two times) you should press the button. The set temperature
will then be changed automatically.
During Auto Operation:
❏ You cannot switch the indoor fan speed. It has already been set by the Fuzzy rule.
❏ If the system is not operating as desired, manually switch to another mode. The system will not
automatically switch from the cooling mode to the heating mode, or from heating to cooling, it must be
done by manually resetting.
❏ During Auto Operation, pressing the chaos swing button makes the horizontal louvers swing up and
down automatically. If you want to stop auto-swing, press the chaos swing button again.
Auto Operation
1
2
3
Page 9
8
Safety PrecautionsOperating InstructionsCare and MaintenanceTroubleshooting Tips
Cooling
Healthy
Dehumidification
Auto
Heating
(Heat pump model only)
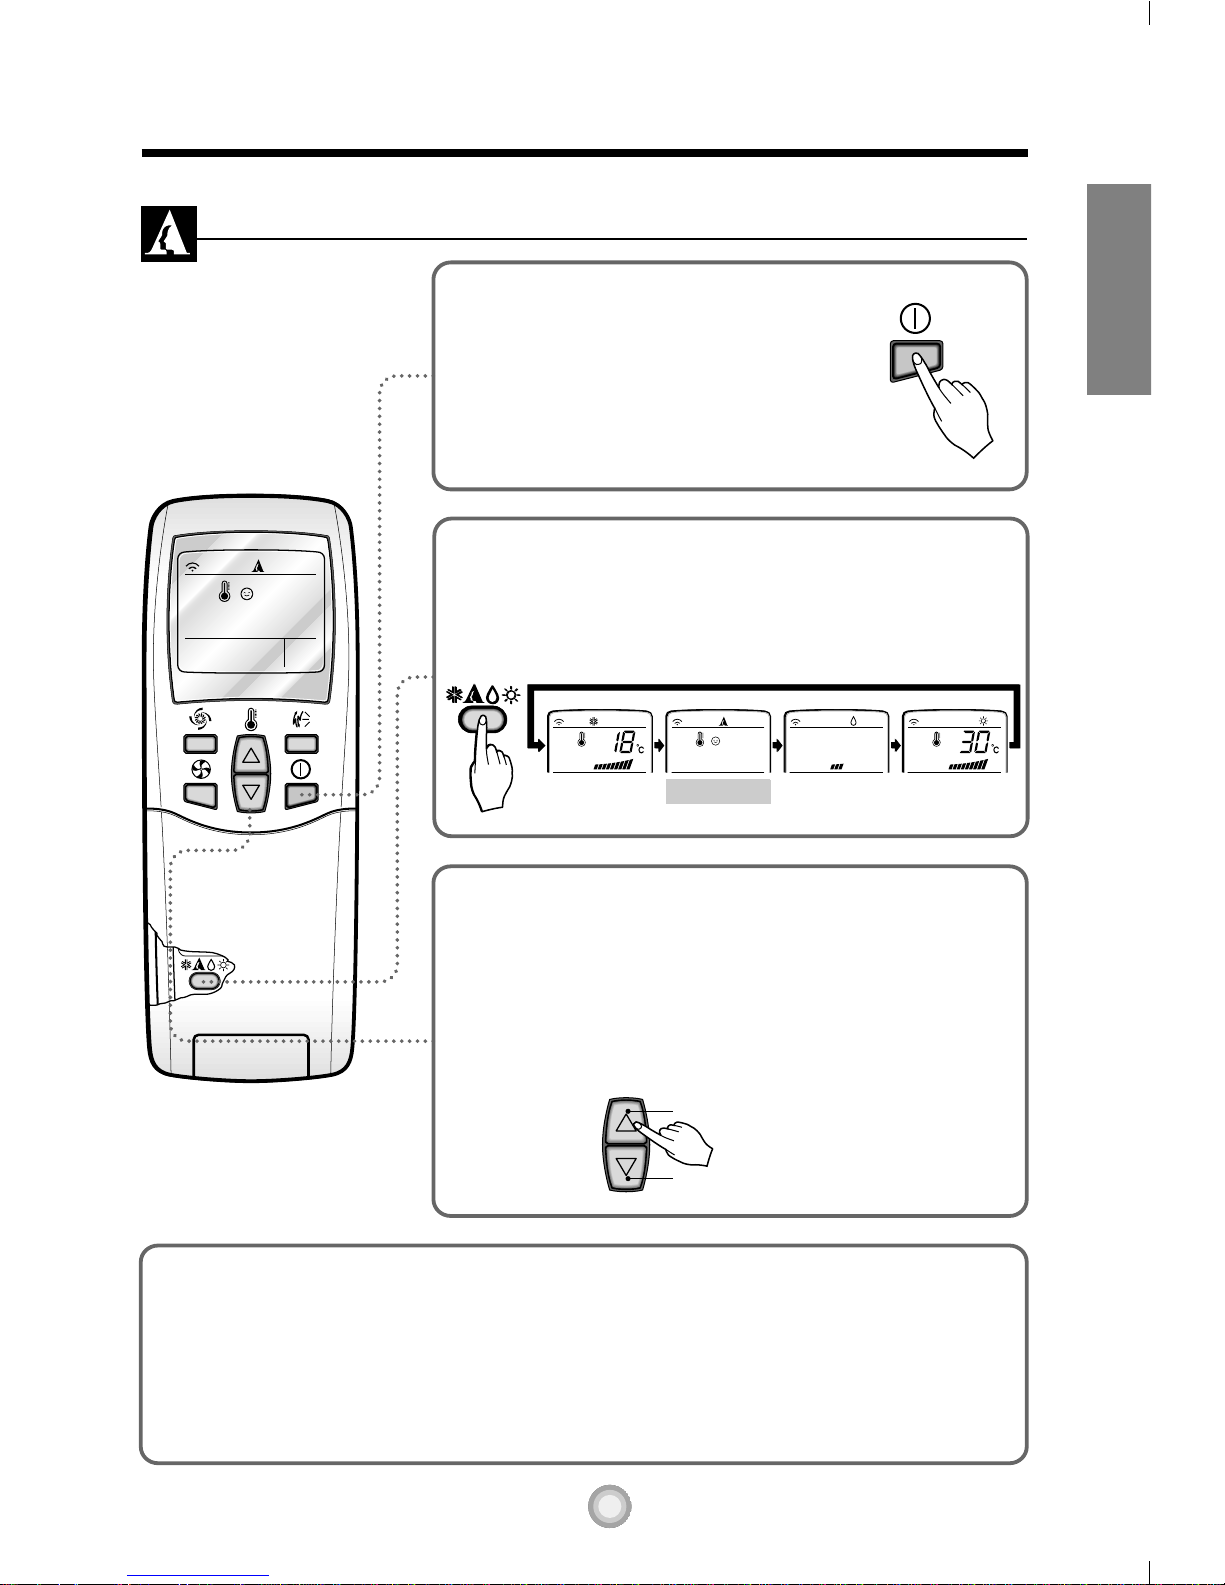
Press the Start/Stop button.
The unit will respond with
a beep.
Open the door on the remote control. To select Healthy
Dehumidification Operation, press the Operation Mode
Selection button.
Each time the button is pressed, the operation mode is
shifted in the direction of the arrow.
During Healthy Dehumidification Operation:
❏ If you select the dehumidification mode on the operation selection button, the A/C starts to run the
dehumidification function, automatically setting the room temp. and airflow volume to the best condition
for dehumidification based on the sensed current room temp.
In this case, however, the setting temp. is not displayed in the remote control and you are not able to
control the room temp. either.
❏ During the healthy dehumidification function, the airflow volume is automatically set according to the
optimization algorithm responding to the current room temp. status and makes the room condition
healthy and comfortable even in the high humidity season.
Healthy Dehumidification Operation
1
2
Set the fan speed again with the door
of the remote control still closed. You
can select the fan speed in four stepslow, medium, high, or CHAOS. Each
time the button is pressed, the fan
speed mode is shifted.
3
Natural wind by the CHAOS logic
❏ For more fresh feeling than other fan speed, press the Indoor Fan
Speed Selector and set to CHAOS mode. In this mode, the wind
blows like natural breeze by automatically changing fan speed
according to the CHAOS logic.
Page 10
ENGLISH
9
Cooling
Healthy
Dehumidification
Auto
To raise the temperature
To lower the temperature
Heating
(Heat pump model only)
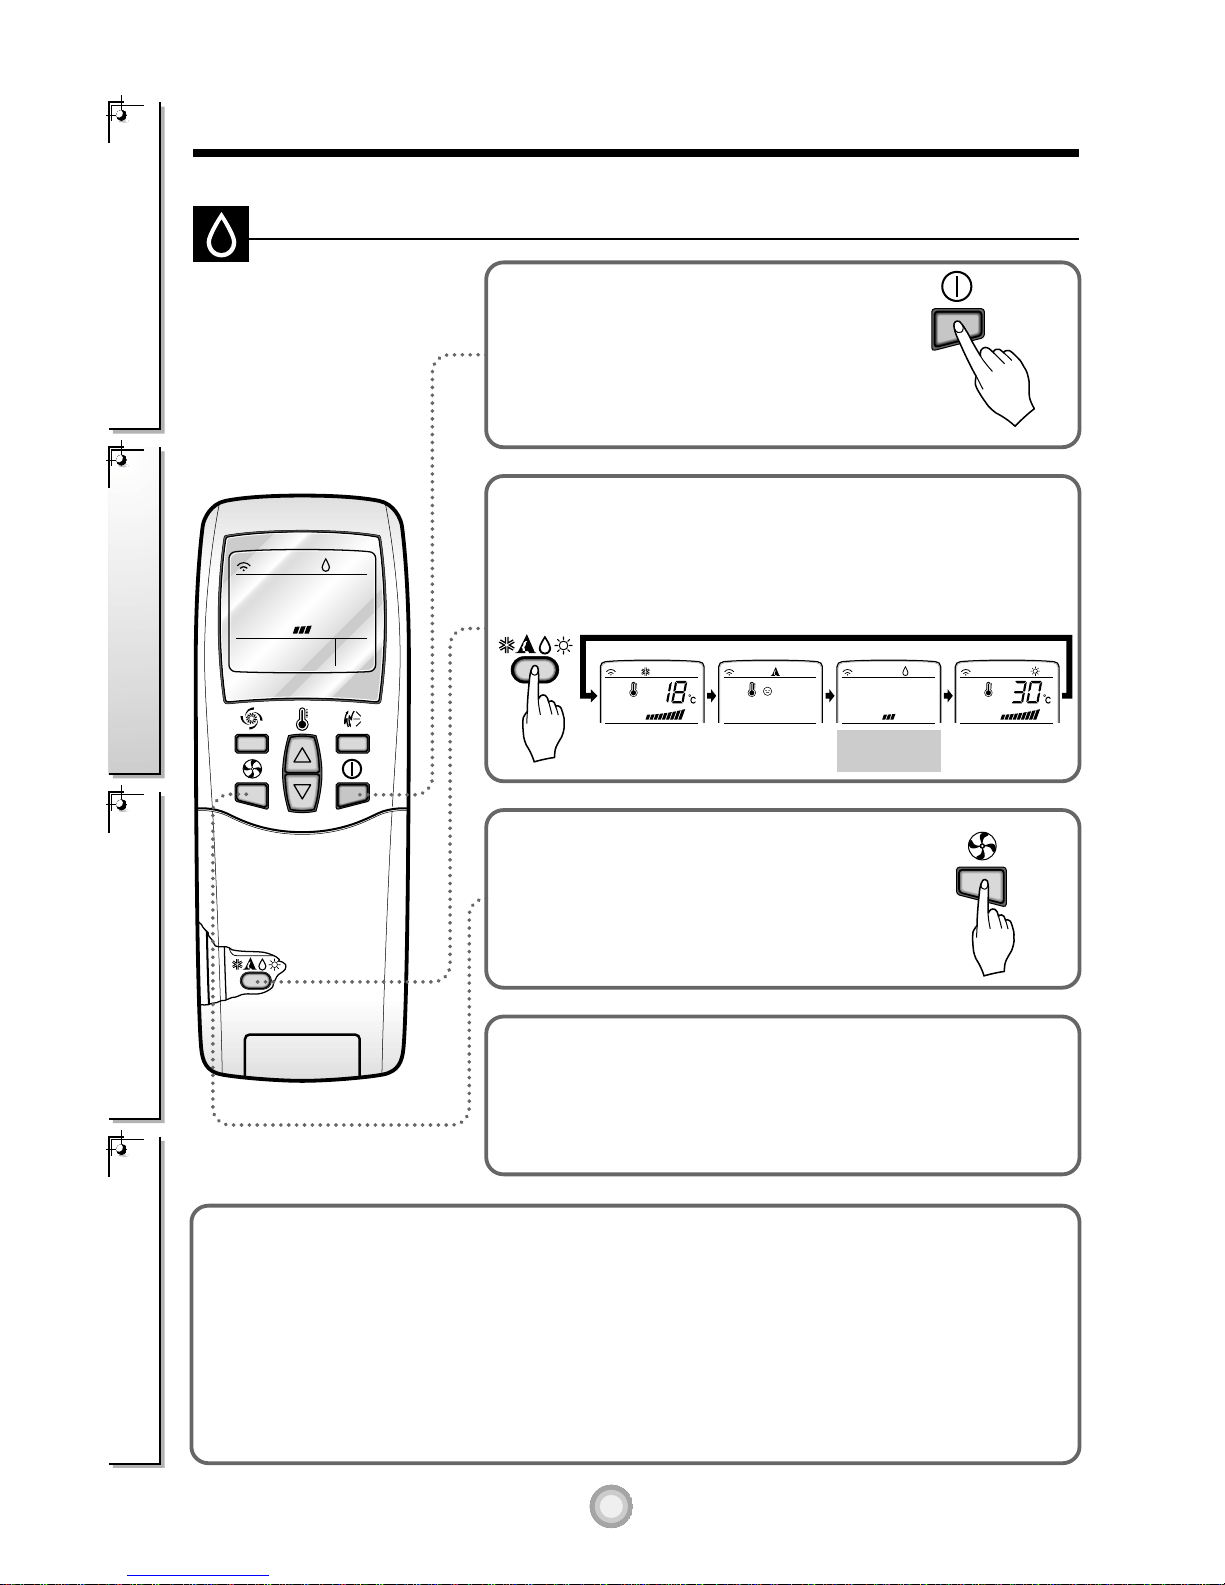
Press the Start/Stop button.
The unit will respond with
a beep.
Open the door on the remote control. To select Heating
Operation, press the Operation Mode Selection button.
Each time the button is pressed, the operation mode is
shifted in the direction of the arrow.
Close the door on the remote control.
Set the temperature higher than the room temperature.
The temperature can be set within a range of 16°C~30°C in
1°C increments.
Set the fan speed again with the door of the
remote control still closed. You can select
the fan speed in four steps–low, medium,
high, or CHAOS. Each time the button is
pressed, the fan speed mode is shifted.
Heating Operation(Heat pump model only)
1
2
3
4
Natural wind by the CHAOS logic
❏ For more fresh feeling than other fan speed, press the Indoor Fan Speed Selector and set to
CHAOS mode. In this mode, the wind blows like natural breeze by automatically changing fan
speed according to the CHAOS logic.
Page 11
10
Safety PrecautionsOperating InstructionsCare and MaintenanceTroubleshooting Tips
or or
NOTE:
❏ During the JET COOL function at any moment, the A/C starts to blow the cool air at
extremely high speed for 30 minutes setting the room temp. automatically to 18°C. It is
especially used to cool the room temp. in the shortest time in a hot summer.
In heat pump mode or neuro fuzzy mode however, the JET COOL function is not available.
❏ In order to return to the normal cooling mode from the JET COOL mode, you just press
either the operation mode selection button, airflow volume selection or temp. setting button
or the JET COOL button again.
Press the Start/Stop button.
The unit will respond with
a beep.
Press the Jet Cool button to operate
the speed cooling mode and the unit
will operate in super high fan speed
on cooling mode for 30 minutes.
To cancel the Jet Cool mode, press the Jet Cool button
again or the fan speed button or the room temperature
setting button and the unit will operate in high fan speed on
cooling mode.
Jet Cool Operation
1
2
3
Page 12
11
Delay OFF Timer Delay ON Timer Delay OFFand ON Timer Delay ONand OFF Timer
ENGLISH
Additional features
Sleep Mode
Press the Sleep Mode Auto button to set the
time you want the unit to turn off automatically.
The Timer is programmed in one-hour
increments by pressing the Sleep Mode Auto
button 1 to 7 times.
The sleep mode is available for 1 to 7 times. To
alter the time period in steps of 1 hour, press
the Sleep Mode Button while aiming at air
conditioner.
Make sure the Sleep Mode Auto LED lights up.
To cancel the Sleep Mode, press the sleep
Mode Auto button several times until the star
( ) disappears from the operation display.
Note: The Sleep Mode will be operated at
low fan speed (cooling) or medium fan
speed (heat pump only) for quiet sleeping.
IN COOLING MODE: The temperature will
automatically rise by 1°C over the next 30
minutes and by 2°C in 1 hour for comfortable
sleeping.
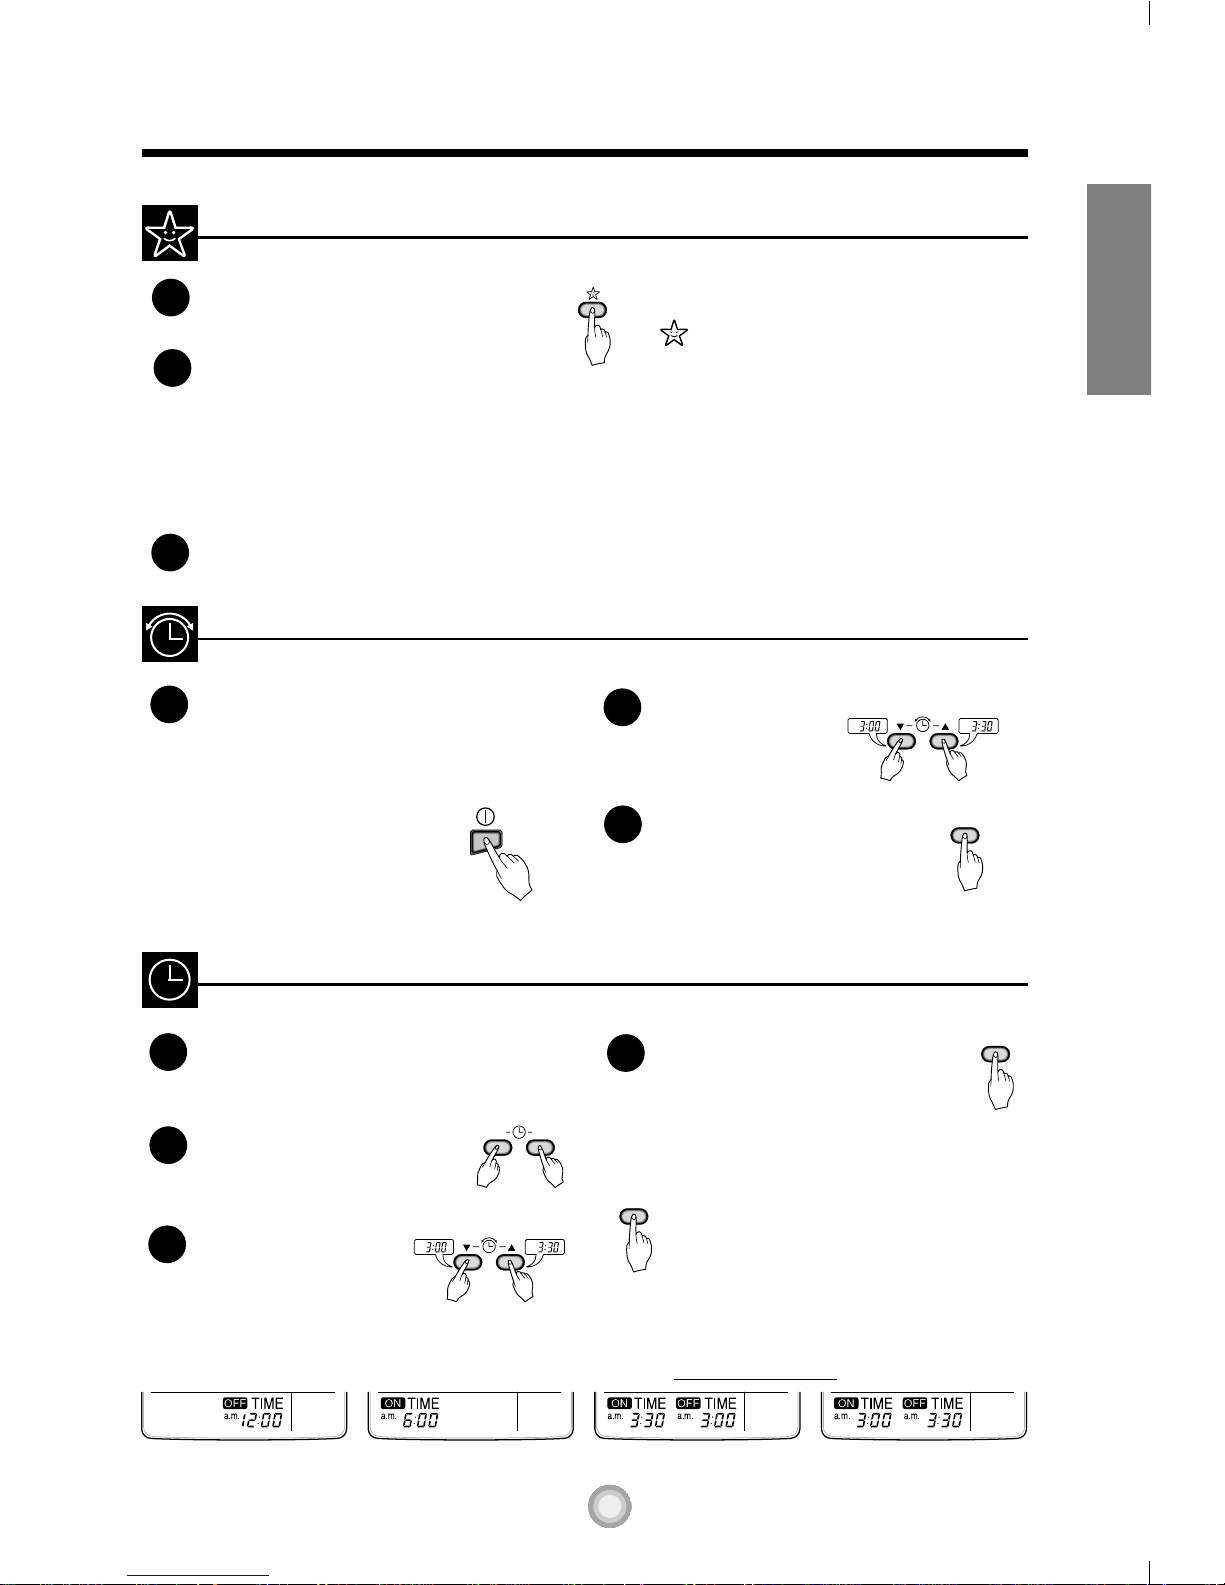
Setting the Time
Time can be set only when you have pressed
the Reset button. If you have just replaced the
batteries, the Reset button should be pressed
to reset the time.
Press the Start/Stop button.
Press the Time Setting buttons until the
desired time is set.
Press the Timer SET button.
Note: Check the indicator
for A.M. and P.M.
Make sure the time is set correctly on the
remote control display.
Press the ON/OFF Timer
buttons to turn Timer on or off.
Press the Time Setting
buttons until the desired
time is set.
Press the selected on/off setting by
pressing the Timer SET button while
aiming the remote control at the signal
receptor.
To cancel the setting the timer.
Press the Timer Cancel button while
aiming remote control at the signal
receptor.
(The timer lamp on the air conditioner and
the display will go out.)
Delay Start/Pre-Set Stop
NOTE: Select one of the following four types of operation.
1
1
2
3
2
3
with the unit running
1
2
3
4
ON OFF
SET
SET
CANCEL
Page 13
12
Safety PrecautionsOperating InstructionsCare and MaintenanceTroubleshooting Tips
CAUTION
CAUTION
Fan speed is on low. Fan speed is on medium. Fan speed is on high.CHAOS Air
Air Circulation Mode
Circulates the room air without cooling or heating.
Press the Start/Stop button. the unit will respond with a beep.
Open the door on the remote control. Press the Air Circulation button. Close the door on the
remote control. Now each time that you press the Indoor Fan Speed Selector, the fan speed is
shifted from low to CHAOS and back to low again.
Note:
❏ CHAOS Air economizes power consumption and prevents overcooling. The fan speed is
automatically changed from high to low or vice versa, depending on the ambient temperature.
1
2
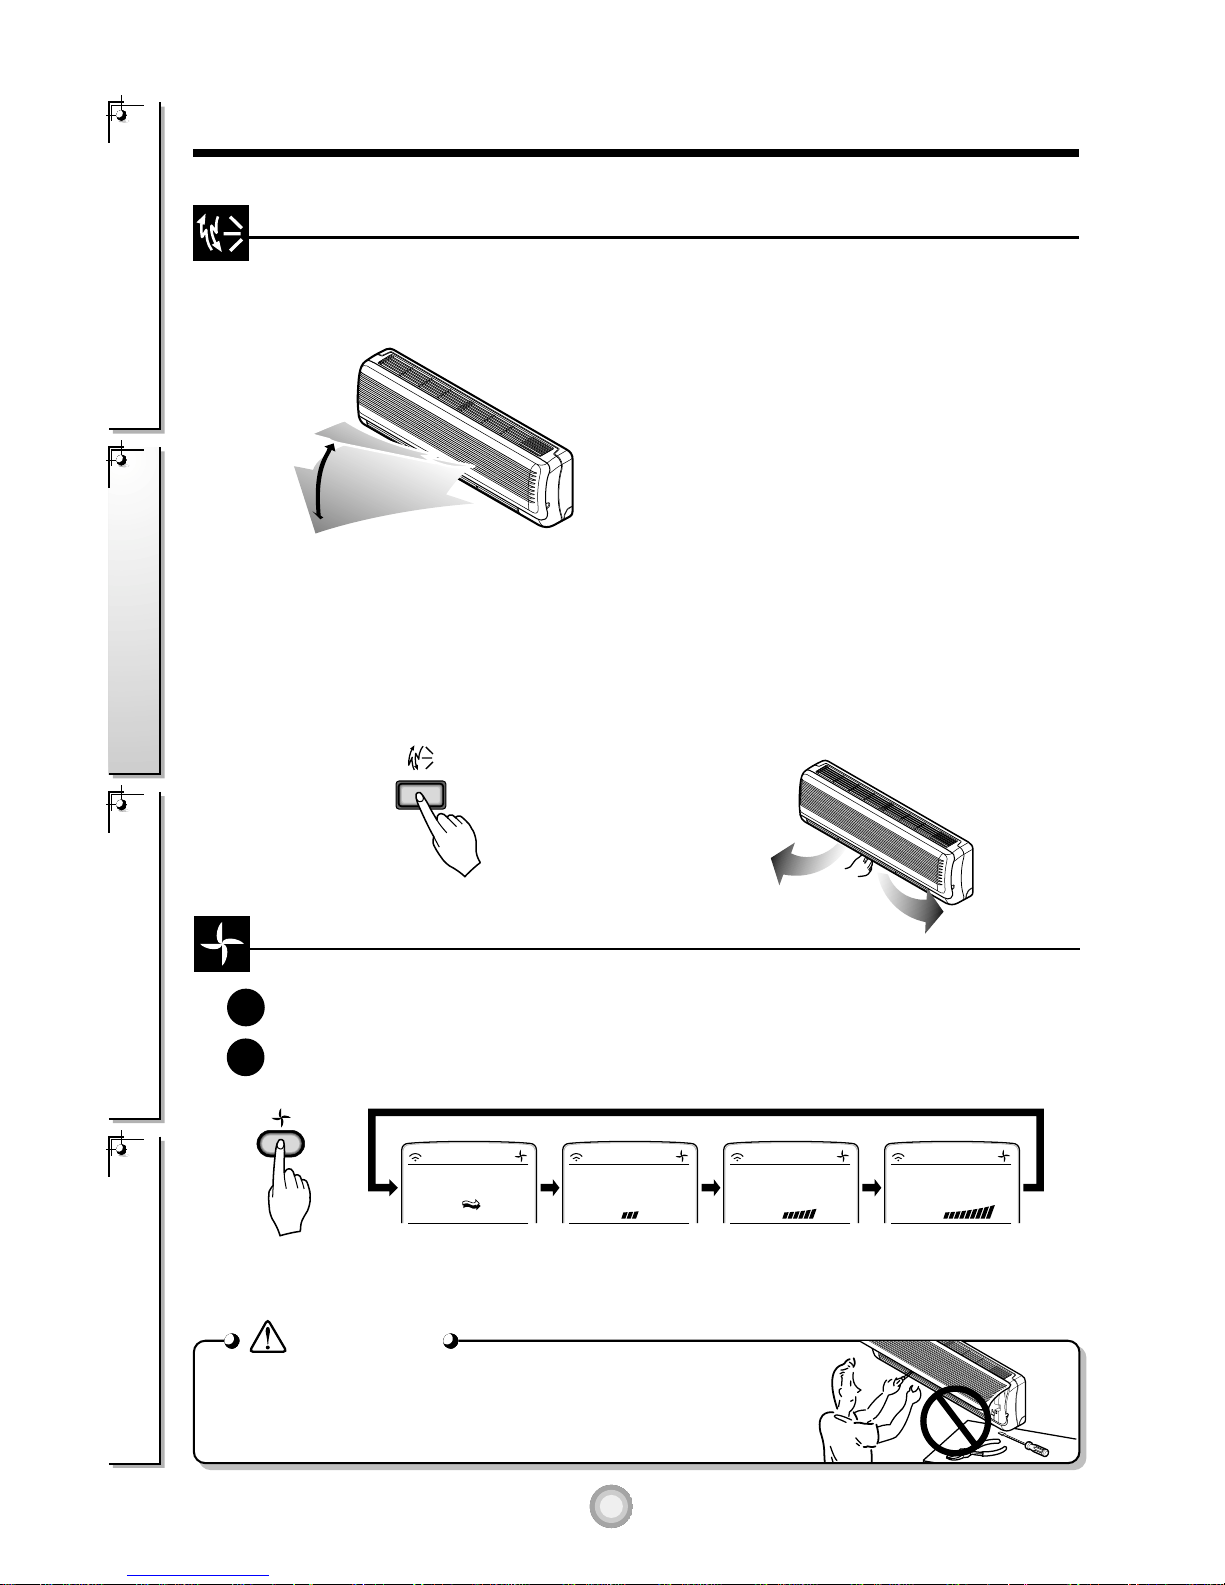
The up/down airflow (Vertical Airflow) can be
adjusted by using the remote control.
Press the Start/Stop button to start the unit.
Open the door on the remote control.
Press Chaos Swing button and the louvers will
swing up and down. Press the Chaos Swing
button again to set the vertical louver at the
desired airflow direction.
Note:
❏ If you press the CHAOS swing button, the
horizontal airflow direction is changed
automatically based on the CHAOS algorithm to
distribute the air in the room evenly and at the
same time to make the human body feel most
comfortable, as if enjoying a natural breeze.
❏ Always use the remote control to adjust the
up/down airflow direction. Manually moving the
vertical airflow direction louver by hand could
damage the air conditioner.
❏ When the unit is shut off, the up/down airflow
direction louver will close the air outlet vent of
the system.
To adjust left/right(Horizontal Airflow) direction
Caution :
Ensure unit is turned off before adjusting
the horizontal airflow direction control.
Carefully open vertical louver to allow
access to the horizontal airflow direction.
Adjust the left/right airflow direction by hand.
Vertical Airflow Direction Control
Do not disassemble or modify the air conditioner for special purpose.
Please contact the authorized service technician for repair or
maintenance.
Page 14
ENGLISH
13
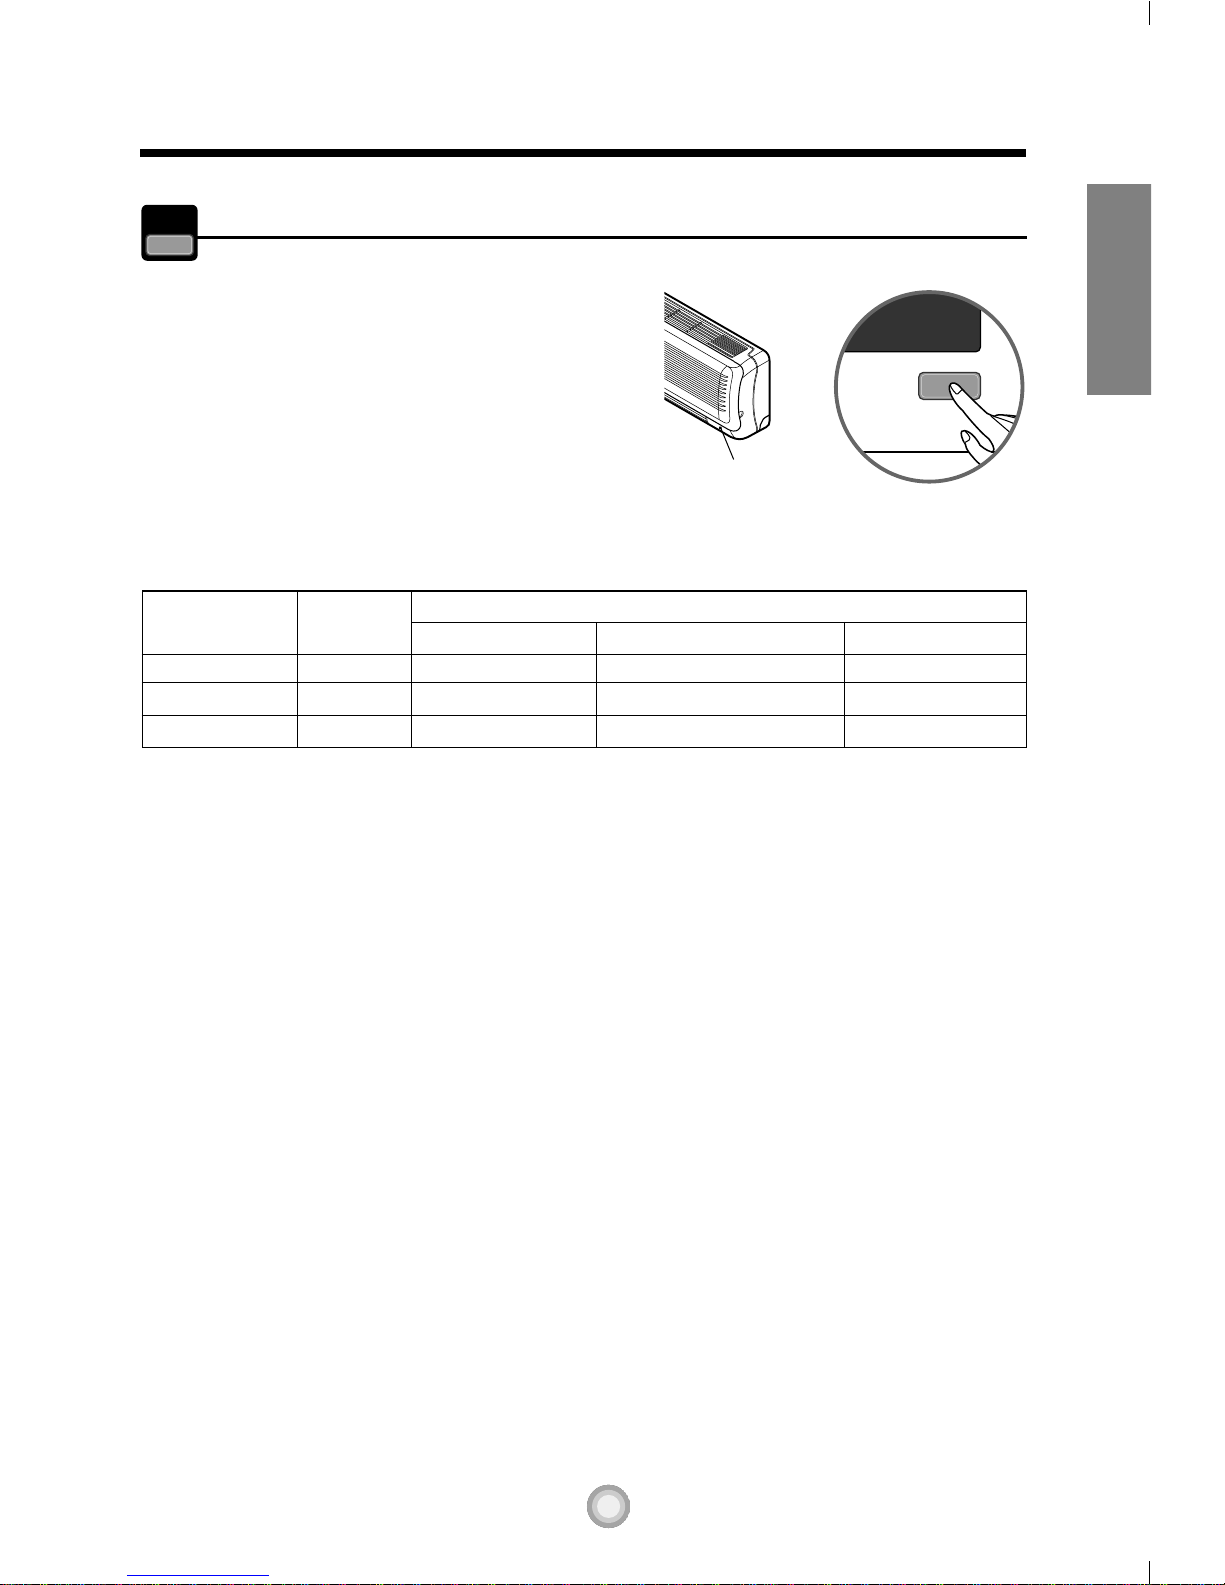
Tact Switch
(Some Models)
ON/OFF
ON/OFF
Heat pump Model
Cooling Model
Room Temp. ≥ 24°C21°C ≤ Room Temp. < 24°C Room Temp. < 21°C
Operating mode Cooling Cooling Healthy Dehumidification Heating
Indoor FAN Speed
High High High High
Setting Temperature
22°C22°C23°C24°C
ON/OFF OPERATION
Operation procedures when the remote control can't be used.
ON/OFF operation starts when this button is pressed, which is
located on the right side of the indoor unit and stops when you
press the button again.
Upon starting the ON/OFF operation, the operating conditions
are automatically set as Table 1, and the initial mode continues
during this operation.
Tact Switch Operation(Some Models)
Auto restart
In case the power comes on again after a power failure, Auto Restarting Operation is the function to
operate procedures automatically to the previous operating condition.
Page 15
14
Safety PrecautionsOperating InstructionsCare and MaintenanceTroubleshooting Tips
Helpful information
Fan speed and cooling capacity.
The cooling capacity indicated in the specification is the
value when the fan speed is set to high, and the capacity will
be lower at low or medium fan speed.
High fan speed is recommended when you wish to cool the
room quickly.
High
Speed
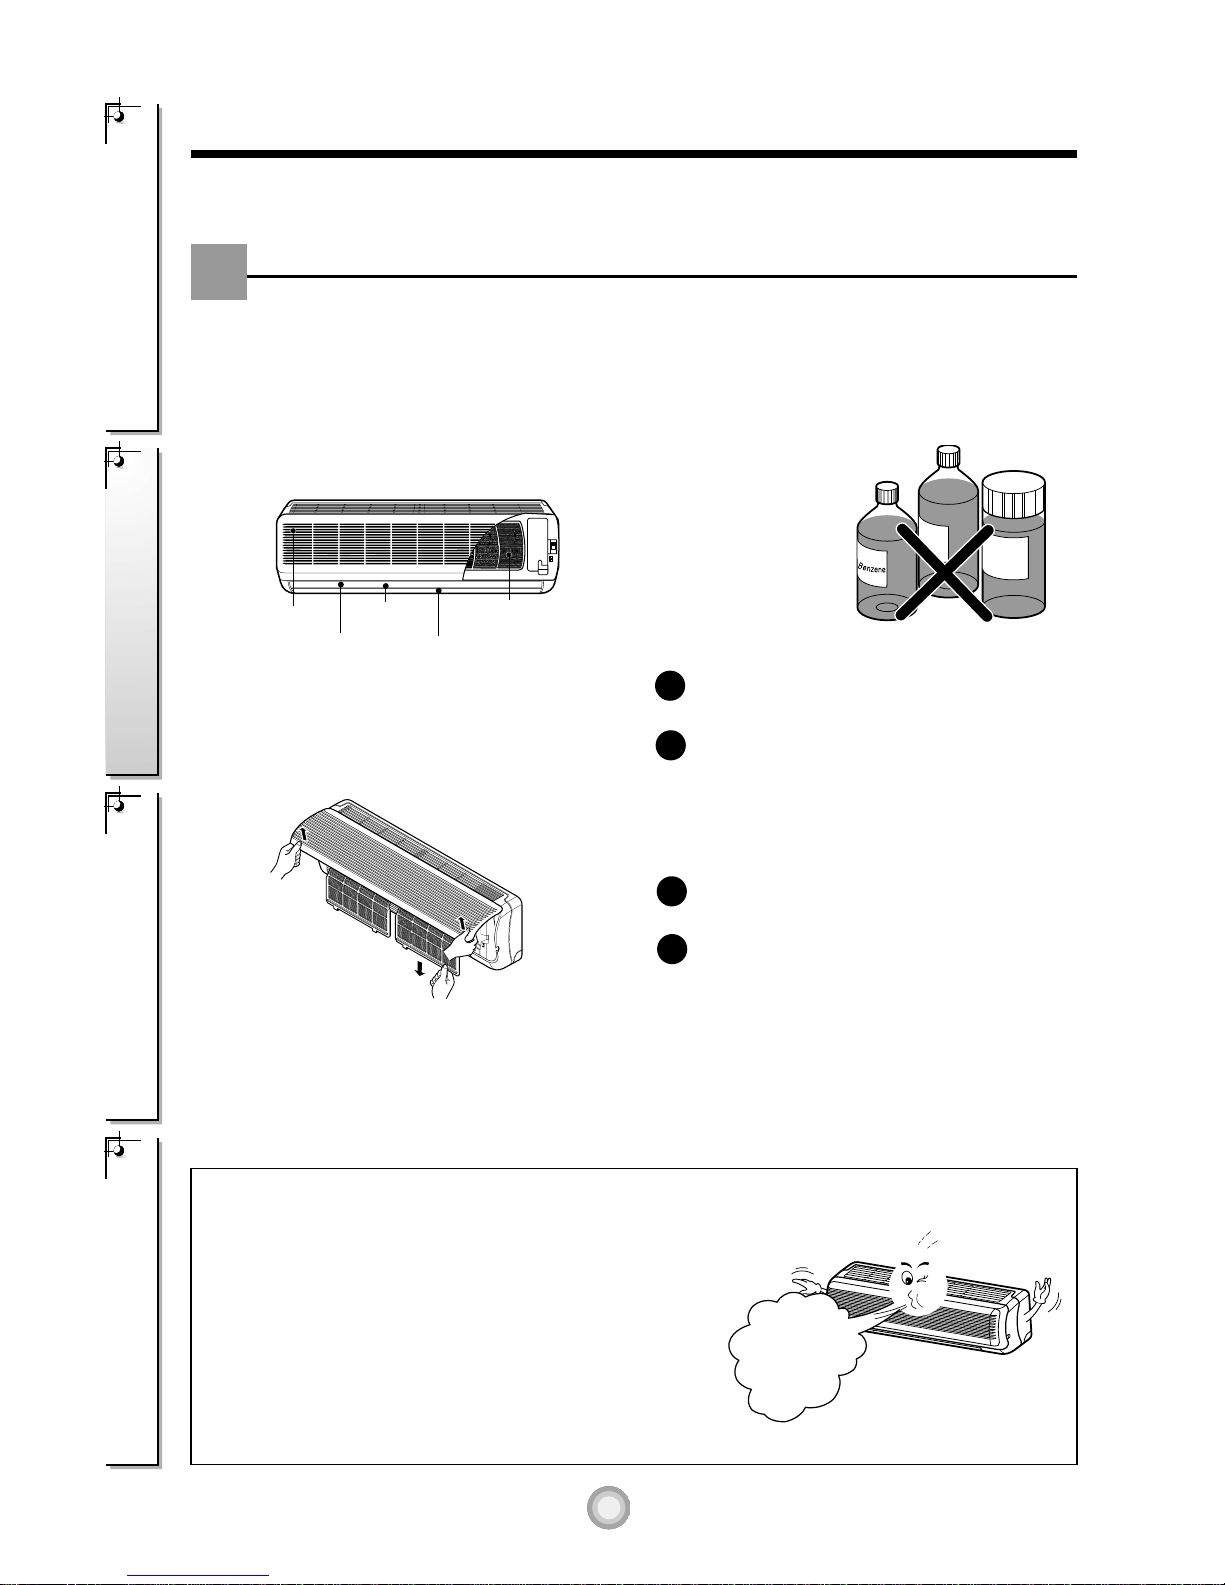
Care and maintenance of the air conditioner
CAUTION: Before performing any maintenance, turn off the main power to the system.
Indoor Unit
Grille, Case, and Remote Control
❏ Turn the system off before cleaning. To
clean, wipe with a soft, dry cloth. Do not
use bleach or abrasives.
NOTE:
Supply power must be disconnected before
cleaning the indoor unit.
AIR FILTERS
The air filters behind the front grille should be
checked and cleaned once every 2 weeks or more
often if neccessary.
❏
Never use any of the followings:
• Water hotter than 40°C
Could cause deformation and/or
discoloration.
• Volatile substances
Could damage the surfaces of the air
conditioner.
Lift the front access panel and pull the filter tab
slightly forward to remove the filter.
Clean the filter with a vacuum or warm, soapy
water.
• If dirt is conspicuous, wash with a
solution of detergent in lukewarm water.
• If hot water (40°C or more) is used, it
may be deformed.
After washing with water, dry well in the
shade.
Re-install the air filter.
Vertical louver
Horizontal louver
Air filters
(behind front panel)
Air outlet vent
Air inlet vent
G
a
s
o
l
i
n
e
P
o
w
d
e
r
1
2
3
4
Page 16
ENGLISH
15
(Side) (Rear)
Air intake
vents
Air outlet
vents
Piping
Drain Hose
Air purifying filter
Air filter
3
2
Outdoor Unit
The heat exchanger coils and panel vents of the outdoor unit should be checked regularly. If
clogged with dirt or soot, the heat exchanger and panel
vents may be professionally steam cleaned.
NOTE:
Dirty or clogged coils will reduce the
operating efficiency of the system and cause higher operating costs.
Replacement of Purifying Filter (Optional)
• Recomended use period : About 2 years
Open front panel and remove air
filters.
Reinsert air filters and close front
panel.
Remove air purifying filters.
Insert new air purifying filters.
1
2
3
4
Page 17

Safety PrecautionsOperating InstructionsCare and MaintenanceTroubleshooting Tips
16
CAUTION
Operate the air conditioner on Air circulation
mode (Refer to page 12) for 2 to 3 hours.
• This will dry out the internal mechanisms.
When air conditioner is not going to be
used for a long time.
When the air conditioner is to be used again.
Turn off the circuit breaker, and disconnect
the plug.
Remove the batteries from the remote
control.
When the air conditioner is not going to be used for a long time .
Turn off the circuit breaker when the air conditioner
is not going to be used for a long time.
Dirt may collect and may cause a fire.
Clean the air filter and install it in the indoor
unit.
(Refer to page 14 for cleaning filters.)
Check that the air inlet and outlet of the
indoor/outdoor unit are not blocked.
Do not overcool the room.
This is not good for the health
and wastes electricity.
Make sure that the doors
and windows are shut tight.
Avoid opening doors and
windows as much as possible
to keep the cool air in the room.
Keep blinds or curtains
closed.
Do not let direct sunshine enter
the room when the air
conditioner is in operation.
Clean the air filter regularly.
Blockages in the air filter
reduce the airflow and lower
cooling and dehumidifying
effects. Clean at least once
every two weeks.
Keep the room temperature
uniform.
Adjust the vertical and
horizontal airflow direction to
ensure a uniform temperature
in the room.
Ventilate the room
occasionally.
Since windows are kept closed,
it is a good idea to open them
and ventilate the room now and
then.
Operation Tips
Page 18

17
?
ENGLISH
Before you call for service...
Check the following points before requesting repairs or service.... If the fault persists, please
contact your dealer or service center.
Troubleshooting Tips! Save time and money!
Case Explanation See page
The air conditioner does not
operate.
The room has a peculiar
odor.
It seems that condensation
is leaking from the air
conditioner.
Air conditioner does not
operate for about 3 minutes
when restarted.
Does not cool or heat
effectively.
The air conditioner
operation is noisy.
Remote control display is
faint, or no display at all.
Crack sound is heard.
• Have you made a mistake in timer operation?
• Has the fuse blown or has the circuit breaker
been tripped?
• Check that this is not a damp smell exuded by
the walls, carpet, furniture, or cloth items in the
room.
• Condensation occurs when the airflow from
the air conditioner cools the warm room air.
• This is the protector of the mechanism.
• Wait about three minutes and operation will
begin.
• Is the air filter dirty? See air filter cleaning
instructions.
• Has the temperature been set incorrectly?
• Are the indoor unit's air inlet or outlet vents
obstructed?
• For a noise that sounds like water flowing.
-This is the sound of freon flowing inside the
air conditioner unit.
• For a noise that sounds like the compressed
air releasing into atmosphere.
-This is the sound of the dehumidifying water
being processed inside the air conditioning
unit.
• Are the batteries depleted?
• Are the batteries inserted in the opposite (+)
and (-) directions?
• This sound is generated by the
expansion/constriction of the front panel, etc.
due to changes of temperature.
11
-
-
-
-
14
6, 9
-
-
4
-
Page 19

18
MEMO
Page 20

ENGLISH
Room Air Conditioner
OWNER'S MANUAL
HI WALL TYPE ROOM AIR CONDITIONER
• Please read carefully and thoroughly this manual
before operating this unit.
• Contact the authorized SVC man for repair or
maintenance of this unit.
• Contact the installer for installation of this unit.
• The appliance is not intended for use by young children or
infirm persons without supervision.
• Young children should be supervised to ensure that they
do not play with the appliance.
Prior to installation, this air-conditioning
unit must be submitted for approval by the utility
service which provides electricity (EN 61000-3 Norm).
Page 21

2
Safety PrecautionsOperating InstructionsCare and MaintenanceTroubleshooting Tips
WARNING
WARNING
CAUTION
CAUTION
WARNING
WARNING
Safety precautions
Safety Precautions
Warning ................................2
Caution .................................3
Operating Instructions
Preparation before operation
..4
Remote Control Features .....5
Operation Mode Selection ......6
Additional features..............11
Care and Maintenance
Care and Maintenance .......14
Operation Tips....................16
Troubleshooting tips
Before You
Call For Service...............17
To prevent injury and property damage, follow these instructions.
Incorrect operation due to ignoring instructions will cause harm or
damage, the seriousness of which is indicated by the following
symbols.
This symbol shows the possibility of death or serious injury.
This symbol indicates the possibility of injury or damage to
property.
Plug in the power plug
properly.
Do not operate or stop the unit by
inserting or pulling out the power plug.
Do not damage or use an
unspecified power cord.
• Otherwise, it will cause electric shock
or fire due to heat generation or
electric shock.
• It will cause electric shock or fire due
to heat generation.
• It will cause electric shock or fire.
•
In the supply cord is damaged, it mut be
replaced by the manufacturer or its service
agent or a similarly quallfied person in order
to avoid a hazard. (Y Attachment)
Do not modify power cord length or
share the outlet with other appliances.
Do not operate with wet hands or in
damp environment.
Do not direct airflow at room occupants
only.
• It will cause electric shock or fire due
to heat generation.
• It may cause electric shock. • This could damage your health.
Always perform grounding work. Do not allow water to run into
electric parts.
Always install air leakage breaker
and a dedicated switching board.
• No grounding may cause electric
shock.
• It may cause failure of machine or
electric shock.
• No installation may cause fire and
electric shock accident.
Unplug the unit if strange
sounds, smell, or smoke
comes from it.
Do not use the socket if it is
loose or damaged.
Do not open the entrance
during operation.
• It may cause fire and electric
shock accident.
• It may cause fire and electric
shock.
• It may cause electric shock.
Keep firearms away.
Do not use the power cord close to the
heating tools.
Do not use the power cord near flammable
gas or combustibles, such as gasoline,
benzene, thinner, etc.
• It may cause fire. • It may cause fire and electric shock. • It may cause an explosion or fire.
■ The following items are classified by these symblos.
Never Do This
Always Do This
Page 22

ENGLISH
3
CAUTION
CAUTION
WARNING
WARNING
Never touch the metal parts
of the unit when removing
the filter.
Do not clean the air
conditioner with water.
Ventilate well when used
together with a stove, etc.
• They are sharp and may cause
injury.
• Water may enter the unit and
degrade the insulation. It may
cause an electric shock.
• An oxygen shortage may occur.
When cleaning the unit,
first make sure the power
and breaker are turned off.
Do not put a pet or house
plant where it will be
exposed to direct air flow.
Do not use appliance for special
purpose such as animals or
vegetables, precision machine,
or conservation of art articles.
• Since the fan rotates at high
speed during operation, it may
cause injury.
• This could injure the pet or
plant.
• It may cause damage of animals
or vegetables or loss of
property.
Stop operation and close
the window in storm or
hurricane.
Hold the plug by the head of
the power plug when taking
it out.
Turn off the main power
switch when not using it for
a long time.
• Operation with windows opened
may cause wetting of indoor and
soaking of household furniture.
• It may cause electric shock and
damage.
• It may cause failure of product
or fire.
Do not place obstacles
around the absorption inlet or
instead of blowing-out inlet.
Ensure that an installation console of
the outdoor appliance is not damaged
due to the use for a long time.
Always insert the filters
securely. Clean it once
every two weeks.
• It may cause failure of appliance
or accident.
• If leaving appliance damaged,
there is concern of damage due
to the falling of product.
• Operation without filters may
cause failure.
Do not use strong detergent
such as wax or thinner but
use a soft cloth.
Do not place heavy object on the
power cord and take care so that
the cord should not be pressed.
Do not drink water drained
from air conditioner.
• Appearance may be deteriorated
due to change of product color or
scratching of its surface.
• There is danger of fire or electric
shock.
• It contains contaminants and will
make you sick.
Ventilate before operating air conditioner
when gas goes out.
Do not disassemble or modify products
randomly.
• It may cause explosion, fire and, burn. • It may cause failure and electric shock.
Use caution when unpacking and installing.
Sharp edges could cause injury.
If water enters the product, turn the power
switch of the main body of appliance off. After
taking the power-plug out from the socket,
contact with the service center.
Page 23

4
Safety PrecautionsOperating InstructionsCare and MaintenanceTroubleshooting Tips
Preparation before operation
Storage and Tips For Using the Remote Control
• The remote control may be stored mounted on a
wall.
• To operate the room air conditioner, aim the
remote control at the signal receptor which is
located on the center or the right side of the indoor
unit.
How to Insert the Batteries
Remove the battery cover by pulling it according to the
arrow direction.
Insert new batteries making sure that the (+) and (-) of
battery are installed correctly.
Reattach the cover by sliding it back into position.
NOTES:
• Use 2 AAA(1.5volt) batteries. Do not use rechargeable
batteries.
Signal Receptor
Receives the signals from the remote control.(Signal receiving sound: two short beeps or one long beep.)
Operation Indication Lamps
On/Off : Lights up during the system operation.
Sleep Mode : Lights up during Sleep Mode Auto operation.
Timer : Lights up during Timer operation.
Defrost Mode : Lights up during Defrost Mode or Hot Start operation (Heat pump model only)
: Lights up during outdoor unit operation. (Cooling model only)
OUT
DOOR
OUTDOOR UNIT
OPERATION
Page 24

5
Cooling Operation
Auto Operation
Healthy Dehumidification Operation
Flip-up door
(opened)
Heating Operation
Signal transmitter
•
Cooling Model( ), Heat Pump Model( )
ON OFF
SET
CANCEL
10
11
12
13
7
8
9
2
6
1
5
4
3
About the remote control on the system
ENGLISH
The remote control transmits the signals to the system.
Features of the Remote Control- Door Closed
Operation Mode
START/STOP BUTTON
Operation starts when this button is pressed
and stops when the button is pressed again.
OPERATION MODE SELECTION BUTTON
Used to select the operation mode.
ROOM TEMPERATURE SETTING
BUTTONS
Used to select the room temperature.
INDOOR FAN SPEED SELECTOR
Used to select fan speed in four steps
low, medium, high and CHAOS.
JET COOL
Used to start or stop the speed
cooling. (Speed cooling operates
super high fan speed in cooling mode.)
CHAOS SWING BUTTON
Used to stop or start louver movement and
set the desired up/down airflow direction.
ON/OFF TIMER BUTTONS
Used to set the time of starting and stopping
operation.
TIME SETTING BUTTONS
Used to adjust the time. (See page 11)
TIMER SET/CANCEL BUTTONS
Used to set the timer when the desired time
is obtained and to cancel the Timer
operation. (See page 11)
SLEEP MODE AUTO BUTTON
Used to set Sleep Mode Auto operation.
(See page 11)
AIR CIRCULATION BUTTON
Used to circulate the room air without cooling
or heating. (See page 12)
ROOM TEMPERATURE CHECKING
BUTTON
Used to check the room temperature.
RESET BUTTON
Used prior to resetting time or after replacing
batteries.
1
2
345
678
9
10
11
12
13
Page 25

6
Safety PrecautionsOperating InstructionsCare and MaintenanceTroubleshooting Tips
Cooling
Healthy
Dehumidification
Auto
Heating
(Heat pump model only)
To raise the temperature
To lower the temperature
How to use the Operation Mode Selection button
Press the Start/Stop button.
The unit will respond with
a beep.
Open the door on the remote control. To select Cooling
Operation, press the Operation Mode Selection button.
Each time the button is pressed, the operation mode is
shifted in the direction of the arrow.
Close the door on the remote control. Set the temperature
lower than the room temperature. The temperature can be
set within a range of 18°C~30°C in 1°C increments.
Set the fan speed again with the door
of the remote control still closed. You
can select the fan speed in four stepslow, medium, high, or CHAOS. Each
time the button is pressed, the fan
speed mode is shifted.
Cooling Operation
1
2
3
4
Natural wind by the CHAOS logic
❏ For more fresh feeling than other fan speed, press the Indoor Fan Speed Selector and set to
CHAOS mode. In this mode, the wind blows like natural breeze by automatically changing fan
speed according to the CHAOS logic.
Page 26

ENGLISH
7
Cooling
Healthy
Dehumidification
Auto
Heating
(Heat pump model only)
Cooling
Healthy
Dehumidification
Auto
Heating
(Heat pump model only)
To raise the temperature
To lower the temperature
Press the Start/Stop button.
The unit will respond with
a beep.
Open the door on the remote control. To select Auto
Operation, press the Operation Mode Selection button.
Each time the button is pressed, the operation mode is
shifted in the direction of the arrow.
The temperature and fan speed are automatically set by the
electronic controls based on the actual room temperature. If
you want to change the set temperature, close the door on
the remote control and press the Room Temperature Setting
buttons. The cooler or warmer you feel, the more times (up to
two times) you should press the button. The set temperature
will then be changed automatically.
During Auto Operation:
❏ You cannot switch the indoor fan speed. It has already been set by the Fuzzy rule.
❏ If the system is not operating as desired, manually switch to another mode. The system will not
automatically switch from the cooling mode to the heating mode, or from heating to cooling, it must be
done by manually resetting.
❏ During Auto Operation, pressing the chaos swing button makes the horizontal louvers swing up and
down automatically. If you want to stop auto-swing, press the chaos swing button again.
Auto Operation
1
2
3
Page 27

8
Safety PrecautionsOperating InstructionsCare and MaintenanceTroubleshooting Tips
Cooling
Healthy
Dehumidification
Auto
Heating
(Heat pump model only)
Press the Start/Stop button.
The unit will respond with
a beep.
Open the door on the remote control. To select Healthy
Dehumidification Operation, press the Operation Mode
Selection button.
Each time the button is pressed, the operation mode is
shifted in the direction of the arrow.
During Healthy Dehumidification Operation:
❏ If you select the dehumidification mode on the operation selection button, the A/C starts to run the
dehumidification function, automatically setting the room temp. and airflow volume to the best condition
for dehumidification based on the sensed current room temp.
In this case, however, the setting temp. is not displayed in the remote control and you are not able to
control the room temp. either.
❏ During the healthy dehumidification function, the airflow volume is automatically set according to the
optimization algorithm responding to the current room temp. status and makes the room condition
healthy and comfortable even in the high humidity season.
Healthy Dehumidification Operation
1
2
Set the fan speed again with the door
of the remote control still closed. You
can select the fan speed in four stepslow, medium, high, or CHAOS. Each
time the button is pressed, the fan
speed mode is shifted.
3
Natural wind by the CHAOS logic
❏ For more fresh feeling than other fan speed, press the Indoor Fan
Speed Selector and set to CHAOS mode. In this mode, the wind
blows like natural breeze by automatically changing fan speed
according to the CHAOS logic.
Page 28

ENGLISH
9
Cooling
Healthy
Dehumidification
Auto
To raise the temperature
To lower the temperature
Heating
(Heat pump model only)
Press the Start/Stop button.
The unit will respond with
a beep.
Open the door on the remote control. To select Heating
Operation, press the Operation Mode Selection button.
Each time the button is pressed, the operation mode is
shifted in the direction of the arrow.
Close the door on the remote control.
Set the temperature higher than the room temperature.
The temperature can be set within a range of 16°C~30°C in
1°C increments.
Set the fan speed again with the door of the
remote control still closed. You can select
the fan speed in four steps–low, medium,
high, or CHAOS. Each time the button is
pressed, the fan speed mode is shifted.
Heating Operation(Heat pump model only)
1
2
3
4
Natural wind by the CHAOS logic
❏ For more fresh feeling than other fan speed, press the Indoor Fan Speed Selector and set to
CHAOS mode. In this mode, the wind blows like natural breeze by automatically changing fan
speed according to the CHAOS logic.
Page 29

10
Safety PrecautionsOperating InstructionsCare and MaintenanceTroubleshooting Tips
or or
NOTE:
❏ During the JET COOL function at any moment, the A/C starts to blow the cool air at
extremely high speed for 30 minutes setting the room temp. automatically to 18°C. It is
especially used to cool the room temp. in the shortest time in a hot summer.
In heat pump mode or neuro fuzzy mode however, the JET COOL function is not available.
❏ In order to return to the normal cooling mode from the JET COOL mode, you just press
either the operation mode selection button, airflow volume selection or temp. setting button
or the JET COOL button again.
Press the Start/Stop button.
The unit will respond with
a beep.
Press the Jet Cool button to operate
the speed cooling mode and the unit
will operate in super high fan speed
on cooling mode for 30 minutes.
To cancel the Jet Cool mode, press the Jet Cool button
again or the fan speed button or the room temperature
setting button and the unit will operate in high fan speed on
cooling mode.
Jet Cool Operation
1
2
3
Page 30

11
Delay OFF Timer Delay ON Timer Delay OFFand ON Timer Delay ONand OFF Timer
ENGLISH
Additional features
Sleep Mode
Press the Sleep Mode Auto button to set the
time you want the unit to turn off automatically.
The Timer is programmed in one-hour
increments by pressing the Sleep Mode Auto
button 1 to 7 times.
The sleep mode is available for 1 to 7 times. To
alter the time period in steps of 1 hour, press
the Sleep Mode Button while aiming at air
conditioner.
Make sure the Sleep Mode Auto LED lights up.
To cancel the Sleep Mode, press the sleep
Mode Auto button several times until the star
( ) disappears from the operation display.
Note: The Sleep Mode will be operated at
low fan speed (cooling) or medium fan
speed (heat pump only) for quiet sleeping.
IN COOLING MODE: The temperature will
automatically rise by 1°C over the next 30
minutes and by 2°C in 1 hour for comfortable
sleeping.
Setting the Time
Time can be set only when you have pressed
the Reset button. If you have just replaced the
batteries, the Reset button should be pressed
to reset the time.
Press the Start/Stop button.
Press the Time Setting buttons until the
desired time is set.
Press the Timer SET button.
Note: Check the indicator
for A.M. and P.M.
Make sure the time is set correctly on the
remote control display.
Press the ON/OFF Timer
buttons to turn Timer on or off.
Press the Time Setting
buttons until the desired
time is set.
Press the selected on/off setting by
pressing the Timer SET button while
aiming the remote control at the signal
receptor.
To cancel the setting the timer.
Press the Timer Cancel button while
aiming remote control at the signal
receptor.
(The timer lamp on the air conditioner and
the display will go out.)
Delay Start/Pre-Set Stop
NOTE: Select one of the following four types of operation.
1
1
2
3
2
3
with the unit running
1
2
3
4
ON OFF
SET
SET
CANCEL
Page 31

12
Safety PrecautionsOperating InstructionsCare and MaintenanceTroubleshooting Tips
CAUTION
CAUTION
Fan speed is on low. Fan speed is on medium. Fan speed is on high.CHAOS Air
Air Circulation Mode
Circulates the room air without cooling or heating.
Press the Start/Stop button. the unit will respond with a beep.
Open the door on the remote control. Press the Air Circulation button. Close the door on the
remote control. Now each time that you press the Indoor Fan Speed Selector, the fan speed is
shifted from low to CHAOS and back to low again.
Note:
❏ CHAOS Air economizes power consumption and prevents overcooling. The fan speed is
automatically changed from high to low or vice versa, depending on the ambient temperature.
1
2
The up/down airflow (Vertical Airflow) can be
adjusted by using the remote control.
Press the Start/Stop button to start the unit.
Open the door on the remote control.
Press Chaos Swing button and the louvers will
swing up and down. Press the Chaos Swing
button again to set the vertical louver at the
desired airflow direction.
Note:
❏ If you press the CHAOS swing button, the
horizontal airflow direction is changed
automatically based on the CHAOS algorithm to
distribute the air in the room evenly and at the
same time to make the human body feel most
comfortable, as if enjoying a natural breeze.
❏ Always use the remote control to adjust the
up/down airflow direction. Manually moving the
vertical airflow direction louver by hand could
damage the air conditioner.
❏ When the unit is shut off, the up/down airflow
direction louver will close the air outlet vent of
the system.
To adjust left/right(Horizontal Airflow) direction
Caution :
Ensure unit is turned off before adjusting
the horizontal airflow direction control.
Carefully open vertical louver to allow
access to the horizontal airflow direction.
Adjust the left/right airflow direction by hand.
Vertical Airflow Direction Control
Do not disassemble or modify the air conditioner for special purpose.
Please contact the authorized service technician for repair or
maintenance.
Page 32

ENGLISH
13
Tact Switch
(Some Models)
ON/OFF
ON/OFF
Heat pump Model
Cooling Model
Room Temp. ≥ 24°C21°C ≤ Room Temp. < 24°C Room Temp. < 21°C
Operating mode Cooling Cooling Healthy Dehumidification Heating
Indoor FAN Speed
High High High High
Setting Temperature
22°C22°C23°C24°C
ON/OFF OPERATION
Operation procedures when the remote control can't be used.
ON/OFF operation starts when this button is pressed, which is
located on the right side of the indoor unit and stops when you
press the button again.
Upon starting the ON/OFF operation, the operating conditions
are automatically set as Table 1, and the initial mode continues
during this operation.
Tact Switch Operation(Some Models)
Auto restart
In case the power comes on again after a power failure, Auto Restarting Operation is the function to
operate procedures automatically to the previous operating condition.
Page 33

14
Safety PrecautionsOperating InstructionsCare and MaintenanceTroubleshooting Tips
Helpful information
Fan speed and cooling capacity.
The cooling capacity indicated in the specification is the
value when the fan speed is set to high, and the capacity will
be lower at low or medium fan speed.
High fan speed is recommended when you wish to cool the
room quickly.
High
Speed
Care and maintenance of the air conditioner
CAUTION: Before performing any maintenance, turn off the main power to the system.
Indoor Unit
Grille, Case, and Remote Control
❏ Turn the system off before cleaning. To
clean, wipe with a soft, dry cloth. Do not
use bleach or abrasives.
NOTE:
Supply power must be disconnected before
cleaning the indoor unit.
AIR FILTERS
The air filters behind the front grille should be
checked and cleaned once every 2 weeks or more
often if neccessary.
❏
Never use any of the followings:
• Water hotter than 40°C
Could cause deformation and/or
discoloration.
• Volatile substances
Could damage the surfaces of the air
conditioner.
Lift the front access panel and pull the filter tab
slightly forward to remove the filter.
Clean the filter with a vacuum or warm, soapy
water.
• If dirt is conspicuous, wash with a
solution of detergent in lukewarm water.
• If hot water (40°C or more) is used, it
may be deformed.
After washing with water, dry well in the
shade.
Re-install the air filter.
Vertical louver
Horizontal louver
Air filters
(behind front panel)
Air outlet vent
Air inlet vent
G
a
s
o
l
i
n
e
P
o
w
d
e
r
1
2
3
4
Page 34

ENGLISH
15
(Side) (Rear)
Air intake
vents
Air outlet
vents
Piping
Drain Hose
Air purifying filter
Air filter
3
2
Outdoor Unit
The heat exchanger coils and panel vents of the outdoor unit should be checked regularly. If
clogged with dirt or soot, the heat exchanger and panel
vents may be professionally steam cleaned.
NOTE:
Dirty or clogged coils will reduce the
operating efficiency of the system and cause higher operating costs.
Replacement of Purifying Filter (Optional)
• Recomended use period : About 2 years
Open front panel and remove air
filters.
Reinsert air filters and close front
panel.
Remove air purifying filters.
Insert new air purifying filters.
1
2
3
4
Page 35

Safety PrecautionsOperating InstructionsCare and MaintenanceTroubleshooting Tips
16
CAUTION
Operate the air conditioner on Air circulation
mode (Refer to page 12) for 2 to 3 hours.
• This will dry out the internal mechanisms.
When air conditioner is not going to be
used for a long time.
When the air conditioner is to be used again.
Turn off the circuit breaker, and disconnect
the plug.
Remove the batteries from the remote
control.
When the air conditioner is not going to be used for a long time .
Turn off the circuit breaker when the air conditioner
is not going to be used for a long time.
Dirt may collect and may cause a fire.
Clean the air filter and install it in the indoor
unit.
(Refer to page 14 for cleaning filters.)
Check that the air inlet and outlet of the
indoor/outdoor unit are not blocked.
Do not overcool the room.
This is not good for the health
and wastes electricity.
Make sure that the doors
and windows are shut tight.
Avoid opening doors and
windows as much as possible
to keep the cool air in the room.
Keep blinds or curtains
closed.
Do not let direct sunshine enter
the room when the air
conditioner is in operation.
Clean the air filter regularly.
Blockages in the air filter
reduce the airflow and lower
cooling and dehumidifying
effects. Clean at least once
every two weeks.
Keep the room temperature
uniform.
Adjust the vertical and
horizontal airflow direction to
ensure a uniform temperature
in the room.
Ventilate the room
occasionally.
Since windows are kept closed,
it is a good idea to open them
and ventilate the room now and
then.
Operation Tips
Page 36

17
?
ENGLISH
Before you call for service...
Check the following points before requesting repairs or service.... If the fault persists, please
contact your dealer or service center.
Troubleshooting Tips! Save time and money!
Case Explanation See page
The air conditioner does not
operate.
The room has a peculiar
odor.
It seems that condensation
is leaking from the air
conditioner.
Air conditioner does not
operate for about 3 minutes
when restarted.
Does not cool or heat
effectively.
The air conditioner
operation is noisy.
Remote control display is
faint, or no display at all.
Crack sound is heard.
• Have you made a mistake in timer operation?
• Has the fuse blown or has the circuit breaker
been tripped?
• Check that this is not a damp smell exuded by
the walls, carpet, furniture, or cloth items in the
room.
• Condensation occurs when the airflow from
the air conditioner cools the warm room air.
• This is the protector of the mechanism.
• Wait about three minutes and operation will
begin.
• Is the air filter dirty? See air filter cleaning
instructions.
• Has the temperature been set incorrectly?
• Are the indoor unit's air inlet or outlet vents
obstructed?
• For a noise that sounds like water flowing.
-This is the sound of freon flowing inside the
air conditioner unit.
• For a noise that sounds like the compressed
air releasing into atmosphere.
-This is the sound of the dehumidifying water
being processed inside the air conditioning
unit.
• Are the batteries depleted?
• Are the batteries inserted in the opposite (+)
and (-) directions?
• This sound is generated by the
expansion/constriction of the front panel, etc.
due to changes of temperature.
11
-
-
-
-
14
6, 9
-
-
4
-
Page 37

18
MEMO
Page 38

ESPAÑOL
Aire Acondicionado
Manual del usuario
CLIMATIZADOR TIPO LA PARED ALTA
• Leer atentamente las instrucciónes de empleo antes de
instalar y poner en funcionamiento la unidad
• Ponerse en contacto con el hombre de servicio
autorizado para reparar o mantener este unidad.
• Ponerse en contacto con la especialista en instalación
para instalar este unidad.
• Este electrodoméstico no debe ser usado por niños o
personas incapacitadas sin super visión.
• No dejar a los niños que jueguen con este
electrodoméstico.
Antes de proceder a la instalación, esta unidad de
aire acondicionado debe ser aprobada por la
compañía suministradora de electricidad
(Norma EN-61000-3).
Page 39

2
Precauciones de Seguridad
Instrucciones de utilización
Cuidados y mantenimiento
Resolución de Problemas
ADVERTENCIA
ADVERTENCIA
ATENCIÓN
ATENCIÓN
ADVERTENCIA
ADVERTENCIA
Precauciones de Seguridad
Precauciones de
Seguridad
Advertencia...............................2
Atención....................................3
Instrucciones de
utilización
Sobre el control remoto del sistema
...4
Sobre el mando a distancia.......5
Cómo usar el botón de selección del
modo de funcionamiento
.............6
Funciones adicionales.............11
Cuidados y
mantenimiento
Cuidados y mantenimiento......14
Consejos para la utilización ....16
Resolución de
Problemas
Antes de llamar al servicio
técnico.....................................17
Para evitar lesiones al usuario o a otras personas y daños materiales, se
deben respetar las siguientes instrucciones.
Un uso incorrecto por ignorar las instrucciones provocará lesiones
o daños. La gravedad de los posibles daños se clasifica mediante
las siguientes indicaciones.
Este símbolo señala la posibilidad de provocar lesiones graves o muerte.
Este símbolo indica sólo la posibilidad de lesiones o daños materiales.
■ Los apartados que deben respetarse siempre se clasifican mediante
los siguientes símbolos.
No haga nunca esto
Haga esto siempre
Enchufe correctamente el cable
de la corriente.
No ponga en marcha o detenga la unidad
enchufando o desenchufando el cable
de la corriente.
No dañe el cable de la corriente
ni utilice un cable no
especificado.
• En caso contrario se provocarán
descargas eléctricas o incendios
debido a la generación de calor o de
descargas eléctricas.
• Provocará descargas eléctricas o
incendios debido a la generación de
calor.
•
Provocará descargas eléctricas o incendios.
•
Si el cable de suministro eléctrico está dañado
debe ser sustituido por un cable especial o por un
conjunto. Ambos están disponibles en el fabricante
o en su agente de servicio.
No modifique la longitud del cable de la
corriente ni utilice la misma toma de
corriente para otros aparatos.
No ponga en funcionamiento la
unidad con las manos mojadas ni
en un entorno empapado.
No dirija el flujo de aire sólo
para los ocupantes de la
habitación.
•
Provocará descargas eléctricas o incendios
debido a la generación de calor.
• Puede provocar descargas
eléctricas.
• Podría ser perjudicial para su salud.
Realice siempre una conexión a
tierra.
No debe entrar agua en los
componentes eléctricos.
Instale siempre un interruptor
automático de fugas de aire y un
tablero de conmutación específico.
•
Si no se realiza la conexión a tierra se pueden
provocar descargas eléctricas.
•
Puede provocar fallos de funcionamiento de la
máquina o descargas eléctricas.
•
Si no se instalan, pueden provocarse
incendios y descargas eléctricas.
Si el producto emitiera ruidos extraños
o generara humo, desenchufe el cable
de la corriente.
No utilice nunca una toma de
corriente que esté dañada o
floja.
No abra la entrada durante
el funcionamiento.
•
Se pueden provocar accidentes por
incendio o descarga eléctrica.
• Puede provocar incendios y
descargas eléctricas.
• Puede provocar descargas
eléctricas.
No acerque armas de fuego al
aparato.
No utilice herramientas que
despidan calor cerca del cable
de la corriente.
No utilice el cable de la corriente
cerca de gases inflamables o
sustancias que puedan
encenderse (benceno, gasolina, etc.)
• Puede provocar un incendio. • Puede provocar incendios y
descargas eléctricas.
• Puede provocar una explosión o un
incendio.
Page 40

ESPAÑOL
3
ATENCIÓN
ATENCIÓN
ADVERTENCIA
ADVERTENCIA
No toque nunca las partes
metálicas de la unidad
cuando desmonte el filtro.
No limpie el acondicionador
de aire con agua.
Disponga de una buena ventilación
cuando utilice el aparato al mismo
tiempo que estufas o similares.
• Puede provocar lesiones. •
El agua puede entrar en la unidad y
degradar el aislamiento. Puede
provocar una descarga eléctrica.
• Se puede provocar escasez de
oxígeno.
Cuando limpie la unidad, asegúrese
primero de que el suministro de
energía y el interruptor automático
están desconectados.
No coloque animales ni
plantas en un lugar expuesto
al flujo directo de aire.
No utilice el aparato para otros
fines como animales o plantas,
maquinaria de precisión o para la
conservación de obras de arte.
•
Como el ventilador gira a gran
velocidad durante el funcionamiento,
puede provocar lesiones.
• Puede ser perjudicial para
animales y plantas.
• Puede provocar daños en
animales o plantas y pérdidas
materiales.
Durante una tormenta,
detenga el aparato y cierre las
ventanas.
Cuando desenchufe el
aparato, estire de la cabeza
del enchufe.
Desconecte el interruptor
principal cuando no se vaya a
utilizar el aparato durante un
prolongado espacio de tiempo.
•
El funcionamiento con ventanas abiertas
puede provocar el humedecimiento de la
habitación y que se empape el mobiliario.
• Puede provocar descargas
eléctricas y daños.
• Puede provocar fallos del
producto o un incendio.
No coloque obstáculos
alrededor de las aberturas de
entrada y expulsión de aire.
Asegúrese de que la consola
exterior de instalación de la
unidad no esté dañada debido a
un prolongado uso del aparato.
Coloque correctamente los
filtros y límpielos una vez a la
semana.
• Puede provocar fallos del aparato
o un accidente.
• Se pueden provocar daños debido
a la caída del producto.
• El funcionamiento sin filtros puede
provocar fallos de funcionamiento.
No utilice detergentes fuertes
como cera o diluyentes. Utilice
un paño suave.
No coloque objetos pesados sobre
el cable de la corriente y tenga
cuidado de que éste no resulte
presionado por ningún objeto.
No ingiera el agua que
desagua el acondicionador de
aire.
•
El aspecto externo puede deteriorarse
debido a cambios en el color del
producto o al rayado de su superficie.
• Existe peligro de incendio o de
descargas eléctricas.
• Puede provocar desordenes
estomacales.
Si se produjera algún escape de gas, abra las
ventanas para que se ventile la habitación antes de
poner en marcha el acondicionador de aire o de
utilizar el mando a distancia.
No desmonte ni modifique ningún componente.
• Se puede provocar una explosión, un incendio y
quemaduras.
• Se pueden provocar fallos de funcionamiento y
descargas eléctricas.
Cuando se extraiga una pila utilizada en un
aparato, tenga cuidado de que los niños no la
ingieran por descuido. Colóquelas en un lugar
donde los niños no puedan tocarla.
Cuando en los productos entre agua u otros objetos,
desconecte el interruptor del cuerpo principal del
aparato. Después de desenchufar el cable de la corriente,
póngase en contacto con el servicio técnico.
• Si se descubriera que los niños lo han ingerido se
debe acudir inmediatamente a un médico.
Page 41

4
Precauciones de Seguridad
Instrucciones de utilización
Cuidados y mantenimiento
Resolución de Problemas
Sobre el control remoto del sistema
Almacenamiento y consejos para el uso del control remoto
• El mando a distancia puede colocarse en la pared. • Para que funcione el acondicionador de aire, dirija el
mando a distancia hacia el receptor de la señal que está
ubicado en el centro o en el lado derecho de la unidad
interior.
Cómo introducir las pilas
Retire la cubierta de las pilas tirando de esta según la dirección
de la flecha.
Introduzca las pilas nuevas asegurándose de que los polo (+) y
(-) de las mismas se colocan correctamente.
Vuelva a colocar la cubierta y deslícela a su posición inicial.
NOTAS:
• Utilice pilas 2AAA (1,5 voltios). No use pilas recargables.
• Retire las pilas del control remoto si el sistema no va ser
utilizado durante un largo período de tiempo.
REMOTE CONTROL(CONTROL REMOTO):
Si no desea utilizar el funcionamiento en reinicio automático.
Luces de indicación de funcionamiento
Encendido/Apagado
: Luces encendidas durante el funcionamiento del sistema.
Modo de dormir : Luces encendidas durante el funcionamiento del modo de dormir automático.
Temporizador : Luces encendidas durante el funcionamiento del temporizador.
Modo de descongelación
: Luces encendidas durante el modo de descongelación o en funcionamiento con inicio en calor
(sólo modelos de bomba de calor).
Exterior : FUNCIONAMIENTO DE LA UNIDAD EXTERIOR: Luces encendidas durante le funcio-namiento
de la unidad exterior (sólo modelos de enfriamiento)
OUT
DOOR
Page 42

5
ON OFF
SET
CANCEL
10
11
12
13
7
8
9
2
6
1
5
4
3
• Modo de enfriamiento
( ),
Modelo de bomba de calor
( )
Funcionamient para enfriamiento
Funcionamiento en deshumidificación saludable
Funcionamiento para calentamiento
Funcionamiento automático
Flip-up door
(opened)
Transmissione
du signal
Sobre el mando a distancia
ESPAÑOL
El mando a distancia transmite la señal al sistema.
Funciones del mando a distancia - Tapa abierta
BOTÓN DE ENCENDIDO/APAGADO
El aparato se pone en marcha cuando se presiona
este botón y se detiene cuando se vuelve a presionar
el mismo botón.
BOTÓN DE SELECCIÓN DEL MODO DE
FUNCIONAMIENTO
Utilícelo para seleccionar el modo de funcionamiento.
BOTONES DE SELECCIÓN DE LA TEMPERATURA
DE LA HABITACIÓN
Se utilizan para seleccionar la temperatura de la
habitación.
SELECTOR DE LA VELOCIDAD DE VENTILADOR
INTERIOR
Se utiliza para seleccionar la velocidad del ventilador
en cuatro fases - baja, media, alta o CAOS.
FRÍO EN CHORRO
Se utiliza para iniciar o detener el enfriamiento rápido.
(El enfriamiento rápido funciona con velocidad de
ventilador muy alta en el modo de enfriamiento.)
BOTÓN OSCILANTE DE CAOS
Se utiliza para iniciar y detener el movimiento de la
rejilla y para fijar la dirección del flujo de aire
arriba/abajo deseada.
BOTONES DE ENCENDIDO/APAGADO DEL
TEMPORIZADOR
Se utilizan para seleccionar el momento de inicio y
finalización del funcionamiento.
BOTONES DE PROGRAMACIÓN DE LAS HORAS
DE ARRANQUE/PARO
Se utiliza para ajustar la hora.(Ver página 11)
BOTONES DE SELECCIÓN/ANULACIÓN DE
TEMPORIZADOR
Se utilizan para seleccionar el temporizador cuando se
obtenga la hora deseada y para anular el
funcionamiento del temporizador.(Ver página 11)
BOTÓN DE FUNCIONAMIENTO AUTOMÁTICO DEL
MODO DE DORMIR
Se utiliza para seleccionar el funcionamiento en modo
de dormir automático.(Ver página 11)
BOTÓN DE VENTILACIÓN
Utilícelo para hacer circular el aire sin refrigeración ni
calentamiento.
(hace que el ventilador interior se encienda o apague.)
(Ver página 12)
BOTÓN DE COMPROBACIÓN DE LA
TEMPERATURA DE LA HABITACIÓN
Utilícelo para comprobar la temperatura de la
habitación.
BOTÓN DE REINICIO
Se utiliza antes de reajustar la hora o bien después de
reemplazar las baterías.
1
2
3
4
5
6
789
10
11
12
13
Modos de funcionamiento
Page 43

6
Resolución de Problemas
Precauciones de Seguridad
Instrucciones de utilización
Cuidados y mantenimiento
Enfriamiento
Calentamiento en
deshumidificación
saludable
Automático
Funcionamiento
para calentamiento
(sólo en el modelo de bomba de calor)
Para aumentar la temperatura
Para disminuir la temperatura
Cómo usar el botón de selección del modo de funcionamiento
Presione el botón de
encendido/apagado. La unidad
responderá emitiendo un sonido.
Abra la tapa del mando a distancia. Para seleccionar el
Funcionamiento para enfriamiento, accione el botón de selección
del modo de funcionamiento. Cada vez que accione el botón, el modo
de operación cambia siguiendo la dirección de la flecha.
Cierre la puerta en el control remoto. Elija una temperatura inferior a
la de la temperatura de la habitación. La temperatura puede
seleccionarse en la franja de 18°C-30°C en incrementos de un grado.
Vuelva a seleccionar la velocidad del ventilador
con la puerta del control remoto todavía cerrada.
Puede seleccionar la velocidad del ventilador en
cuatro fases - baja, media, alta o CHAOS. Cada
vez que se presiona el botón se conmuta la
velocidad del ventilador a la siguiente.
Funcionamiento para enfriamiento
1
2
3
4
Viento natural mediante la lógica de CHAOS
❏ Para tener una sensación más fresca que con otras velocidades de ventilador, presione el selector de velocidad
de ventilador interior y seleccione el modo de CAOS. De esta forma, el aire sopla como si fuera una brisa natural
y cambia de forma automática la velocidad del ventilador de acuerdo con la lógica de CAOS.
Page 44

ESPAÑOL
7
Cooling
Healthy
Dehumidification
Auto
Heating
(Heat pump model only)
Enfriamiento
Calentamiento en
deshumidificación
saludable
Automático
Funcionamiento
para calentamiento
(sólo en el modelo de bomba de calor
Para aumentar la temperatura
Para disminuir la temperatura
Presione el botón de
encendido/apagado. La unidad
responderá emitiendo un sonido.
Abra la tapa del mando a distancia. Para seleccionar
Funcionamiento automático, accione el botón de selección del
modo de funcionamiento. Cada vez que accione el botón, el modo de
operación cambia siguiendo la dirección de la flecha.
Tanto la temperatura como la velocidad del ventilador se fijan de
forma automática mediante controles electrónicos de acuerdo con la
temperatura real de la habitación. Si usted desea cambiar la
temperatura seleccionada, cierre la puerta en el control remoto y
presione los botones de selección de temperatura de la habitación.
Según usted sienta más frío o más calor, deberá ir presionando el
botón más o menos veces (hasta dos veces). En ese caso la
temperatura seleccionada se cambiará automáticamente.
Durante el funcionamiento automático:
❐ Usted no puede cambiar la velocidad del ventilador interior. Ya que esta ha quedado seleccionada en la función difusa
“Fuzzy".
❐ Si el sistema no funciona como se desea, cambie a otro modo de forma manual. El sistema no saltará automáticamente del
modo de enfriamiento al modo de calentamiento, ni del modo de calentamiento al de enfriamiento. Esto debe hacerse
mediante un reinicio manual.
❐ Durante le funcionamiento automático, presionar el botón de encendido/apagado de dirección de flujo de aire hace
que las rejillas horizontales se muevan hacia arriba y hacia abajo de forma automática. Si desea parar la autooscilacion, pulse de nuevo el botón CHAOS de oscilación.
Funcionamiento automático
1
2
3
Page 45

8
Precauciones de Seguridad
Instrucciones de utilización
Cuidados y mantenimiento
Resolución de Problemas
Enfriamiento
Calentamiento en
deshumidificación
saludable
Automático
Funcionamiento
para calentamiento
(sólo en el modelo de bomba de calor)
Presione el botón de
encendido/apagado. La unidad
responderá emitiendo un sonido.
Abra la tapa del mando a distancia. Para seleccionar el
Funcionamiento en deshumidificación saludable (modo de
enfriamiento), accione el botón de selección del modo de
funcionamiento. Cada vez que accione el botón, el modo de
operación cambia siguiendo la dirección de la flecha.
Durante el funcionamiento automático:
❐ Usted no puede cambiar la velocidad del ventilador interior. Ya que esta ha quedado seleccionada en la función difusa
“Fuzzy".
❐ Si el sistema no funciona como se desea, cambie a otro modo de forma manual. El sistema no saltará
automáticamente del modo de enfriamiento al modo de calentamiento, ni del modo de calentamiento al de
enfriamiento. Esto debe hacerse mediante un reinicio manual.
❐ Durante le funcionamiento automático, presionar el botón de encendido/apagado de dirección de flujo de aire hace
que las rejillas horizontales se muevan hacia arriba y hacia abajo de forma automática. Si desea detener el
movimiento automático, vuelva a presionar el botón de encendido/apagado de dirección de flujo de aire.
Funcionamiento en deshumidificación saludable (modo de enfriamiento)
1
2
Vuelva a seleccionar la velocidad del ventilador con
la puerta del control remoto todavía cerrada. Puede
seleccionar la velocidad del ventilador en cuatro
fases - baja, media, alta o CHAOS. Cada vez que
se presiona el botón se conmuta la velocidad del
ventilador a la siguiente.
3
Viento natural mediante la lógica de CHAOS
❏ Para tener una sensación más fresca que con otras velocidades de
ventilador, presione el selector de velocidad de ventilador interior y
seleccione el modo de CAOS. De esta forma, el aire sopla como si fuera una
brisa natural y cambia de forma automática la velocidad del ventilador de
acuerdo con la lógica de CAOS.
Page 46

ESPAÑOL
9
Enfriamiento
Calentamiento en
deshumidificación
saludable
Automático
Para aumentar la temperatura
Para disminuir la temperatura
Funcionamiento
para calentamiento
(sólo en el modelo de bomba de calor)
Presione el botón de
encendido/apagado. La unidad
responderá emitiendo un sonido.
Abra la tapa del mando a distancia. Para seleccionar el
Funcionamiento para calentamiento (modelo de bomba de calor),
accione el botón de selección del modo de funcionamiento. Cada vez
que accione el botón, el modo de operación cambia siguiendo la
dirección de la flecha.
Cierre la puerta en el control remoto. Elija una temperatura inferior a
la de la temperatura de la habitación. La temperatura puede
seleccionarse en la franja de 16°C-30°C en incrementos de un grado.
Vuelva a seleccionar la velocidad del ventilador con
la puerta del control remoto todavía cerrada. Puede
seleccionar la velocidad del ventilador en cuatro
fases - baja, media, alta o CHAOS. Cada vez que se
presiona el botón se conmuta la velocidad del
ventilador a la siguiente.
Funcionamiento para calentamiento (modelo de bomba de calor)
1
2
3
4
Viento natural mediante la lógica de CHAOS
❏ Para tener una sensación más fresca que con otras velocidades de ventilador, presione el selector de velocidad
de ventilador interior y seleccione el modo de CAOS. De esta forma, el aire sopla como si fuera una brisa natural
y cambia de forma automática la velocidad del ventilador de acuerdo con la lógica de CAOS.
Page 47

10
Precauciones de Seguridad
IInstrucciones de utilización
Cuidados y mantenimiento
Resolución de Problemas
oo
Nota:
❐ Durante la función de frío en chorro en cualquier momento, el A/C empieza a enfriar el aire frío a una velocidad
extremadamente elevada durante 30 minutos, fijando de este modo la temperatura de la habitación automáticamente
a 18°C. Esto se usa especialmente para enfriar la temperatura de la habitación en el espacio de tiempo más corto
posible en un verano caluroso.
No obstante, en el modo de bomba de calor o en el modo difuso “nero fuzzy", la función de enfriamiento más potente no
está disponible.
❐ Con el fin de regresar al modo de enfriamiento normal a partir del modo de FRÍO EN CHORRO, debe presionar o bien
el botón de selección del modo de funcionamiento, o bien el botón de selección de temperatura o de volumen de flujo
de aire, o bien el botón de enfriamiento potente de nuevo.
Presione el botón de
encendido/apagado. La unidad
responderá emitiendo un sonido.
Presione el botón de frío en chorro para poner
en marcha el modo de enfriamiento rápido y la
unidad funcionará en el modo de enfriamiento a
una velocidad de ventilador muy elevada
durante 30 minutos.
Para anular el modo de frío en chorro, presione el botón de frío en
chorro de nuevo o bien el botón de la velocidad del ventilador, o bien
el botón de selección de temperatura de la habitación, y la unidad
funcionará a alta velocidad del ventilador en el modo de enfriamiento.
Funcionamiento en frío en chorro
1
2
3
Page 48

11
Temporizador con retardo apagado Temporizador con retardo encendido
Temporizador con retardo
apagado y encendido
Temporizador con retardo
encendido y apagado
ESPAÑOL
Funciones adicionales
Modo de dormir
Presione el botón de modo de dormir automático para
seleccionar la hora en que desea que la unidad se
apague automáticamente
El temporizador se programa en incrementos de una
hora presionando el botón de modo de dormir
automático de 1 a 7 veces.
El modo de dormir está disponible de 1 a 7 veces.
Para modificar el período de tiempo en saltos de 1
hora, presione el botón de modo de dormir al tiempo
que apunta hacia el aire acondicionado.
Asegúrese de que se enciende el LED de modo de
dormir automático.
Para anular el modo de dormir, presione el botón de
modo de dormir automático varias veces hasta que
desaparezca la estrella ( ) de la pantalla de
funcionamiento.
NOTA: El modo de dormir funcionará a
velocidad de ventilador baja (enfriamiento) o
media (sólo en bomba de calor) para que
pueda dormir tranquilamente.
EN MODO DE ENFRIAMIENTO:
La temperatura subirá automáticamente 1°C
durante los siguientes 30 minutos, y 2°C en 1 hora
para que pueda dormir confortablemente.
Ajustar la hora
Sólo se puede ajustar la hora cuando se ha
presionado el botón de reinicio. Si sólo ha
reemplazado las pilas, debe presionarse el botón
de reinicio para volver a ajustar la hora.
Presione el botón de inicio/parada.
Presione los botones de ajuste de hora hasta que se
fije la hora deseada.
Presione el botón de temporizador.
NOTA: Verifique el indicador
de A.M. y P.M.
Asegúrese de que la hora en la pantalla del control
remoto es correcta.
Presione los botones de encendido/
apagado del temporizador para
encenderlo o pagarlo.
Presione los botones de ajuste
de hora hasta que se visualice
la hora correcta.
Presione el botón de encendido/apagado
sobre la hora escogida y el botón de
ajuste del temporizador mientras
apunta con el control remoto hacia el
receptor de señal.
Para cancelar la configuración del temporizador.
Presione el botón de cancelación de
temporizador mientras apunta con el control
remoto hacia el receptor de señal.
(Se apagarán las luces del temporizador en el
aire acondicionado y en la pantalla).
Inicio retardado / parada predeterminada
NOTA: Seleccione uno de los cuatro siguientes tipos de funcionamiento.
1
1
2
3
2
3
con la unidad funcionando
1
2
3
4
ON OFF
SET
SET
CANCEL
Page 49

12
Precauciones de Seguridad
Instrucciones de utilización
Cuidados y mantenimiento
Resolución de Problemas
La velocidad del
ventilador es baja
La velocidad del
ventilador es media
La velocidad del
ventilador es alta
Aire en CHAOS
ATENCIÓN
ATENCIÓN
Modo de circulación de aire
Hace que circule el aire de la habitación sin enfriar o calentar.
Presione el botón de encendido/apagado. La unidad responderá con un pitido.
Abra la puerta del control remoto. Presione al botón de circulación de aire. Cierre la puerta del control remoto.
Ahora cada vez que presione el selector e velocidad de ventilador interior, la velocidad del ventilador salta de
baja a CAOS y regresa a baja de nuevo.
NOTA:
El aire en CHAOS ahorra consumo de energía y evita el sobreenfriamiento. La velocidad del ventilador cambia
automáticamente de media a baja o viceversa, dependiendo de la temperatura ambiente.
1
2
Dirección del flujo de aire (unidad interior)
El flujo de aire hacia arriba o hacia abajo (flujo vertical)
puede ajustarse mediante el control remoto.
Presione el botón de encendido/apagado para poner
en marcha la unidad.
Abra la puerta del control remoto. Presione el botón de
oscilante de CAOS y las paletas se balancearán arriba
y abajo. Vuelva a presionar el botón oscilante de CAOS
para fijar la paleta vertical en la dirección de flujo de
aire deseada.
NOTA:
❐ Si presiona el botón oscilante de CAOS la dirección de
flujo de aire horizontal se cambia automáticamente, de
acuerdo con el algoritmo de CAOS, para distribuir el aire
en la habitación uniformemente y al mismo tiempo para
que el cuerpo humano se sienta más cómodo, como si
se tratara de una brisa natural.
❐ Use siempre el control remoto para ajustar la dirección
del flujo de aire. Mover manualmente la paleta de
dirección vertical del flujo de aire podría dañar el aire
acondicionado.
❐ Cuando la unidad está cerrada, la paleta de dirección de
flujo de aire cerrará la salida de aire del sistema.
Para ajustar la dirección izquierda/derecha
(flujo de aire horizontal)
Precaución: Asegúrese de que la unidad está
apagada antes de ajustar el control de
dirección de flujo de aire. Abra con
cuidado la paleta vertical para poder
acceder a la dirección de flujo de aire
horizontal.
Ajuste la dirección del flujo de aire izquierda/derecha
manualmente.
No desmonte o realice modificaciones en el acondicionador de aire
para fines especiales.
Póngase en contacto con el servicio técnico autorizado para trabajos de
reparación o mantenimiento.
Page 50

13
Interruptor de Tacto
(Algunos modelos)
ON/OFF
ON/OFF
ESPAÑOL
Modelo de bomba de calor
Temperatura de la habitación ≥ 24°C21°C ≤ temp. habit.< 24°C Temperatura de la habitación < 21°C
Modo de funcionamiento Enfriamiento Enfriamiento Deshumidificación saludable Calentamiento
Velocidad de VENTILADOR interior Alta Alta Alta Alta
Seleccionar la temperatura 22°C22°C23°C24°C
Modelo de
enfriamiento
FUNCIONAMIENTO ON/OFF
Procedimientos de funcionamiento cuando no se puede utilizar
el mando a distancia.
ON/OFF El funcionamiento comienza cuando se pulsa este
botón, el cual está situado a la derecha de la unidad interior, y
se detiene cuando se pulsa de nuevo.
Al inicio del funcionamiento ON/OFF, las condiciones de
funcionamiento se establecen automáticamente como se indica
en la Tabla 1 y el modo inicial continua durante este
funcionamiento.
REINICIO AUTOMÁTICO
Cuando se recupera la energÌa eléctrica tras un corte de suministro, el Funcionamiento en Reinicio
Automático hace que el equipo se ponga en marcha automáticamente en la condición de
funcionamiento previa.
Funcionamiento con el Interruptor de Tacto (Algunos modelos)
Page 51

14
Precauciones de Seguridad
Instrucciones de utilización
Cuidados y mantenimiento
Resolución de Problemas
Velocidad
Rápida
Información útil
Velocidad del ventilador y capacidad de refrigeración.
La capacidad de refrigeración indicada en las especificaciones es el
valor que se obtiene con la velocidad rápida del ventilador.
La capacidad disminuye si el ventilador funciona a velocidad lenta o
media.
La velocidad rápida del ventilador está recomendada para cuando
quiera refrigerar la habitación en poco tiempo.
Cuidados y mantenimiento
ATENCIÓN: antes de efectuar cualquier operación de mantenimiento, apague el interruptor principal del sistema.
Unidad interior
Rejilla, tapa y mando a distancia
❐ Apague el sistema antes de limpiarlo. Para
limpiarlo utilice un paño seco y suave. No utilice
lejía ni abrasivos.
NOTA:
La toma de energía debe estar
desconectada antes de limpiar la unidad
interior.
Filtros de aire
Los filtros de aire que se hallan detrás de la rejilla frontal
deben verificarse y limpiarse una vez cada 2 semanas o
más a menudo si fuera necesario.
❏ Nunca utilice lo siguiente:
• Agua a una temperatura superior a los 40°C
Podría provocar deformaciones y/o pérdida de color.
• Sustancias volátiles.
Podrían dañar las superficie del aire acondicionado.
Eleve el panel de acceso frontal y tire de la pestaña
del filtro ligeramente hacia delante para retirar el
filtro.
Limpie el filtro con agua y jabón tibia o con un
aspirador.
• Si la suciedad es persistente, lave con una solución
detergente en agua templada.
• Si se emplea agua caliente(40°C o más), puede
deformarse.
Después de lavar con agua, déjelo secar a la
sombra.
Vuelva a colocar el filtro de aire.
Paleta vertical
Paleta
horizontal
Filtros de aire
(detrás del panel frontal)
Orificio de
salida de aire
Orificio de
entrada de aire
G
a
s
o
l
i
n
e
P
o
w
d
e
r
1
2
3
4
Page 52

ESPAÑOL
15
(Lateral) (Posterior)
Toma
de aire
Salida
de aire
Conductos
Manguera de
drenaje
Filtro purificador de aire
Filtro de aire
3
2
Unidad exterior
El circuito de intercambio de calor y los paneles de ventilación de la unidad exterior deben examinarse con
regularidad. Si se obstruyen con polvo u hollín, el circuito de intercambio de calor y paneles de ventilación
pueden ser limpiados con vapor por un profesional.
NOTA:
Los circuitos de intercambio de calor sucios o obstruidos reducirán la eficiencia de funcionamiento y provocarán un
consumo superior.
Substitución del filtro purificador (Opcional)
• Período de uso recomendado: Aproximadamente por 2 años
Abrir el panel frontal y retirar los filtros de aire.
Introducir los nuevos filtros purificadores de aire..
Retirar los filtros purificadores de aire.
Volver a introducir los filtros de aire y cerrar el panel
frontal.
1
2
3
4
Page 53

16
Precauciones de Seguridad
Instrucciones de utilización
Cuidados y mantenimiento
Resolución de Problemas
ATENCIÓN
Haga funcionar el aparato en modo ventilación
(Véase la página 12) durante 2 o 3 horas.
• Esta secará por completo los mecanismos
internos.
Cuando acondicionador de aire no vaya a
ser utilizado durante un largo período.
Cuando vaya a utilizar el acondicionador
de aire de nuevo.
Apague le interruptor del circuito y desconecte el
enchufe.
Retire las baterías del control remoto.
Cuando el acondicionador de aire no vaya a ser utilizado durante un largo período.
Apague el interruptor de desconexión cuando el acondicionador de
aire no vaya a ser utilizado durante un largo período.
Puede acumularse el polvo y provocar un incendio.
Limpie el filtro de aire e instálelo en la unidad
interior. (Véase la página 14 para limpieza de
filtros).
Compruebe que la entrada de aire y la salida de
las unidades interiores y exteriores no están
obstruidas.
No refrigere exageradamente la
habitación.
No es bueno para su salud y
malgasta electricidad.
Mantenga corridas cortinas o
persianas.
No permita que el sol directo entre
en la habitación cuando el
acondicionador de aire esté en
funcionamiento.
Mantenga la uniformidad en la
temperatura de la habitación.
Ajuste la dirección del flujo de aire
horizontal y vertical para
asegurarse de que la temperatura
es uniforme en la habitación.
Asegúrese de que la puerta y las
ventanas están completamente
cerradas.
Evite al máximo abrir puertas y
ventanas para que el aire frío no
salga de la habitación.
Limpie el filtro de aire con
regularidad.
Las obstrucciones en el filtro de aire
reducen el flujo de aire y disminuye
el poder de refrigeración y
deshumidificación. Limpielos
quincenalmente o más a menudo.
Ventile la habitación de vez en
cuando.
Ya que las ventanas permanecen
cerradas, es una buena idea
abrirlas y ventilar la habitación de
vez en cuando.
Consejos para la utilización
Page 54

17
?
ESPAÑOL
Antes de llamar al servicio técnico...
Compruebo los siguientes puntos antes de solicitar una reparación o servicio técnico... Si los problemas
persisten, póngase en contacto con su distribuidor o servicio técnico.
NOTA:
RESISTENCIA AL AGUA. La parte exterior de este equipo es resistente al agua.
La parte interior no es resistente al agua y no debe ser expuesta al agua.
¡Resolución de Problemas! ¡Ahorre tiempo y dinero!
Caja Explicación Ver página
No funciona.
Se percibe un olor particular en
la habitación.
Parece que la condensación
está goteando del
acondicionador de aire.
El aire acondicionado no
funciona durante unos tres
minutos al activarlo.
No refrigera o calienta
eficazmente.
El equipo de aire acondicionado
parece ser ruidoso.
La pantalla del control remoto
está poco iluminada. O está
complrtamente apagada.
Se oye un crujido.
• Ha cometido un error en las funciones de
programación?
• Se ha fundido el fusible o ha saltado el automático?
• Compruebe que no sea olor a humedad que provenga
de las paredes, la moqueta, los muebles o los tejidos
que pueda haber en la habitación.
• La condensación tiene lugar cuando el flujo de aire del
acondicionador de aire enfría el aire caliente de la
habitación.
• Es una función de seguridad del acondicionador de
aire.
• Espere tres minutos y empezará a funcionar.
• Está sucio el filtro de aire? Consulte las instrucciones
para limpieza del filtro de aire. (Véase la página 19)
• Ha fijado una temperatura incorrecta?
• Están obstruidas las entradas o salidas de aire de la
unidad interior?
• Si es un ruido que se parece al fluir del agua.
-Es el sonido del freón que circula por el interior de la
unidad de aire acondicionado.
• Si es un ruido que se parece al de la liberación de aire
comprimido en la atmósfera.
• Están las baterías agotadas?
• Están las baterías colocadas en las direcciones
opuestas(+) y (-)?
• Este sonido se produce por la expansión/contracción
del panel frontal, etc. debido a los cambios de
temperatura.
11
-
-
-
-
14
6, 9
-
-
4
-
Page 55

18
NOTA
Page 56

GREAT BRITAIN,
IRELAND:
BELGIUM :
CZECH REPUBLIC :
FRANCE :
GERMANY:
NETHERLANDS :
POLAND :
PORTUGAL :
RUSSIA :
SLOVAKIA :
SPAIN:
UKRAINE :
OTHER EUROPEAN
COUNTRIES,
AFRICA,
P/No.:3828A20075V
LENNOX INDUSTRIES L TD
tél. : + 44 1604 59 9400
fax : + 44 1604 594200
e-mail : marketing lennoxind.com
LENNOX BENELUX N.V ./S.A.
tél. : + 32 3 633 30 45
fax : + 32 3 633 00 89
e-mail : inf.beo lennoxbenelux.com
JANKA RADOTIN AS
tél. : + 420 2 510 88 1 1 1
fax : + 420 2 579 10 393
e-mail : janka janka.cz
LENNOX FRANCE
tél. : + 33 1 60 17 88 88
fax : + 33 1 60 17 86 58
e-mail : accueil lennoxfrance.com
LENNOX DEUTSCHLAND Gmbh
tél. : + 49 69 42 0979 0
fax : + 49 69 42 0979 40
e-mail : info lennoxdeutschland.com
LENNOX BENELUX B.V .
tél. : + 31 33 2471 800
fax : + 31 33 2459 220
e-mail : info lennoxbenelux.com
LENNOX POLSKA SP z o.o.
tél. : + 48 22 832 26 61
fax : + 48 22 832 26 62
e-mail : lennoxpolska inetia.pl
LENNOX CLIMA TIZAÇAO LDA.
tél. : + 351 22 999 84 60
fax : + 351 22 999 84 68
e-mail : marketing lennoxportugal.com
LENNOX DISTRIBUTION MOSCOW
tél. : + 7 095 246 07 46
fax : + 7 502 933 29 55
e-mail : lennox.dist.moscow co.ru
LENNOX SLOV AKIA
tél. : + 421 7 44 88 92 16
fax : + 421 7 44 88 16 88
LENNOX REFAC S.A.
tél. : + 34 902 400 405
fax : + 34 91 542 84 04
e-mail : marketing lennox-refac.com
LENNOX DISTRIBUTION KIEV
tél. : + 380 44 213 14 21
fax : + 380 44 213 14 21
e-mail : jankauk uct..kiev .ua
LENNOX DISTRIBUTION
tél. : + 33 4 72 23 20 14
fax : + 33 4 72 23 20 28
e-mail :marketing lennoxdist..com
w w w . L e n n o x . c o m
 Loading...