

Page 1
User Guide
Color Touchscreen
Programmable Thermostat
ComfortSense® 5500 (13H13)
Page 2

2
TABLE OF CONTENTS
Features 2....................................
Temperature Dial Indicator 3....................
Home Screen 5................................
Selection Mode 9..............................
Menu Screen 11...............................
Features
The ComfortSense® 5500 Series thermostat is an
electronic 7-day, single-stage, programmable,
touchscreen thermostat. Features are:
S Large, clear color display that shows the cur
rent and set temperatures and time.
S Ergonomic design.
S Smooth Setback Recovery starts system
early to achieve setpoint at start of program
period.
S Compressor short-cycle protection (5 min
utes).
S Real-time clock keeps time during power fail
ures and automatically adjusts for daylight
savings time and leap year.
S Program Hold options allow user to override
the program schedule as desired by time and
date.
S Select individual days or groups of days to set
programming.
S Programmable fan offers increased perfor
mance when combined with whole home in
door air quality products.
Page 3
3
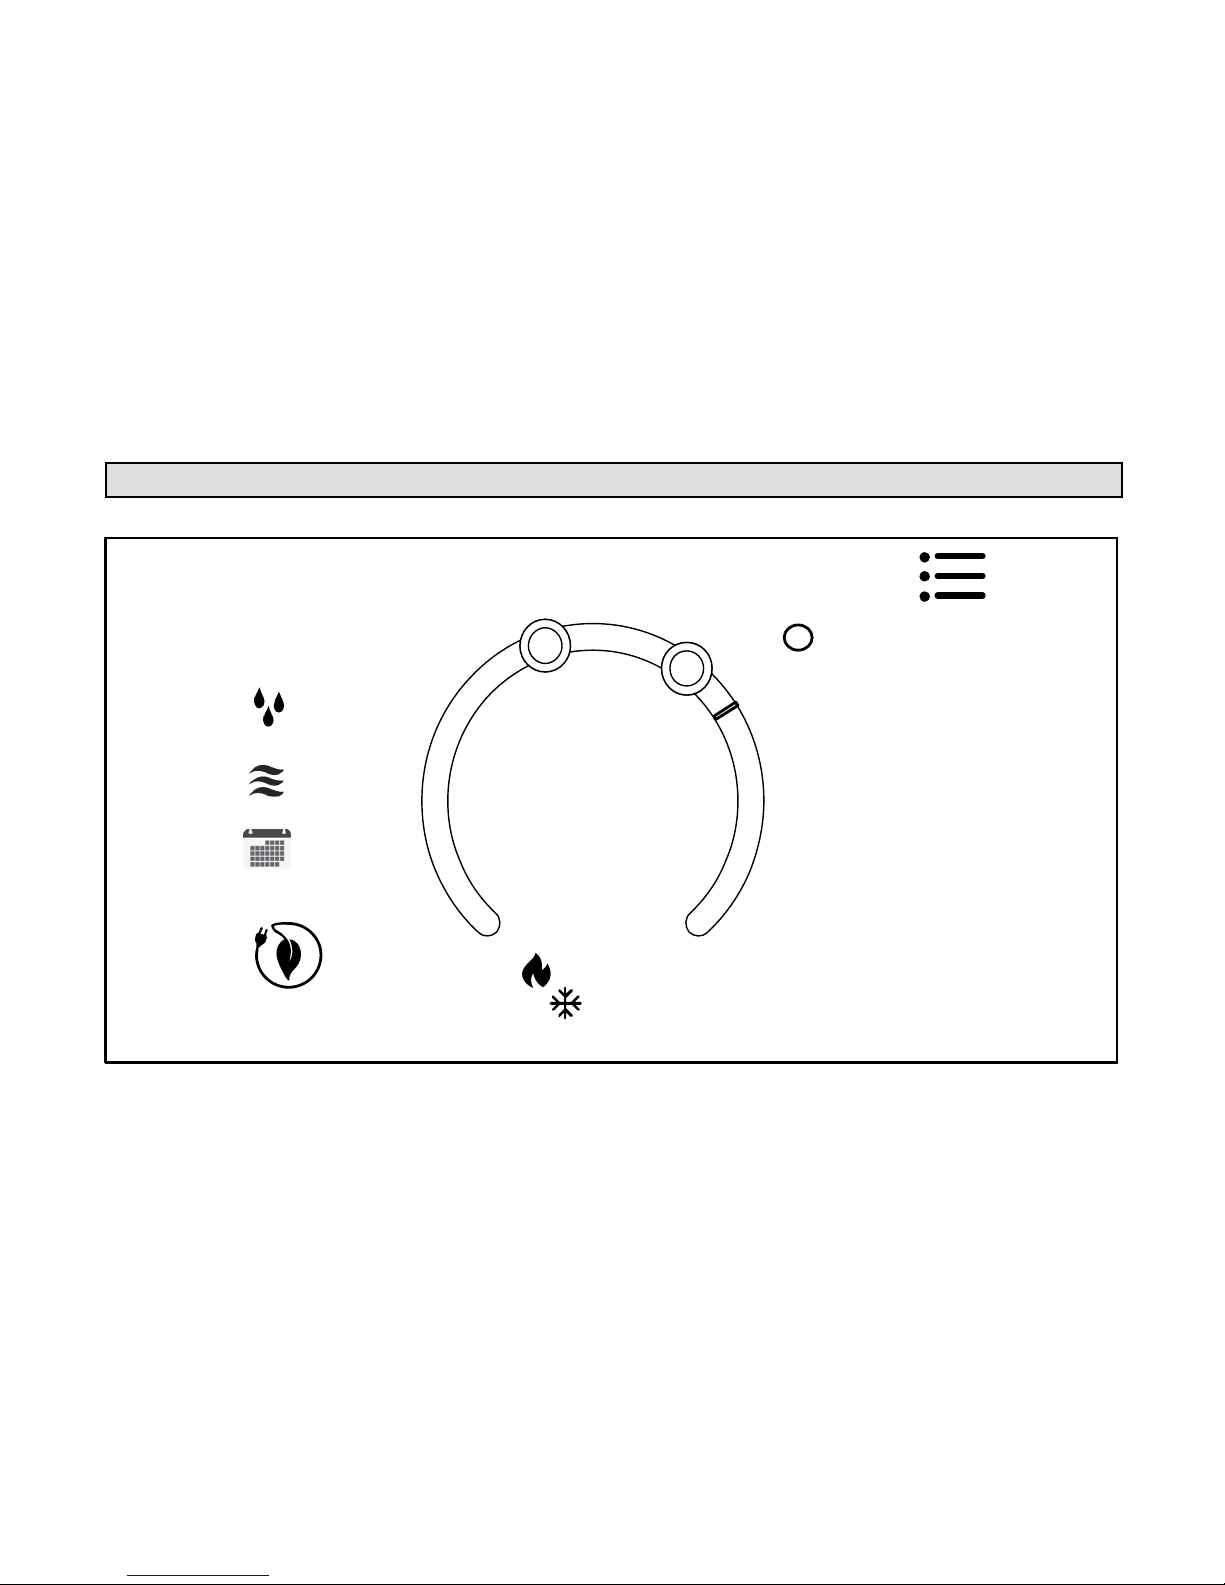
Temperature Dial Indicator
2:31 am
heat−to
cool−to
80
inside
heat/cool
away
72°
78°
Schedule hold
until next period
X
waiting
0
Ⓒ
Ⓑ
Ⓐ
Ⓔ
Ⓓ
Ⓕ
Figure 1. Temperature Dial Feature
Page 4

4
A. This is the maximum heat position indicator
on the dial. This object will be red in color.
B. This is the maximum cool position indicator
on the Dial. This object will be blue in color.
C. This is the location area where no system de
mand is active. In figure 1, the example would
be any temperature between 73°F and 77°F.
D. When there is an active call for heating, this
area of the dial will fade back and forth from
white to red.
E. When there is an active call for cooling, this
area of the dial will fade back and forth from
white to blue.
F. The yellow line indicates the actual room tem
perature on the temperature dial indicator.
Page 5
5
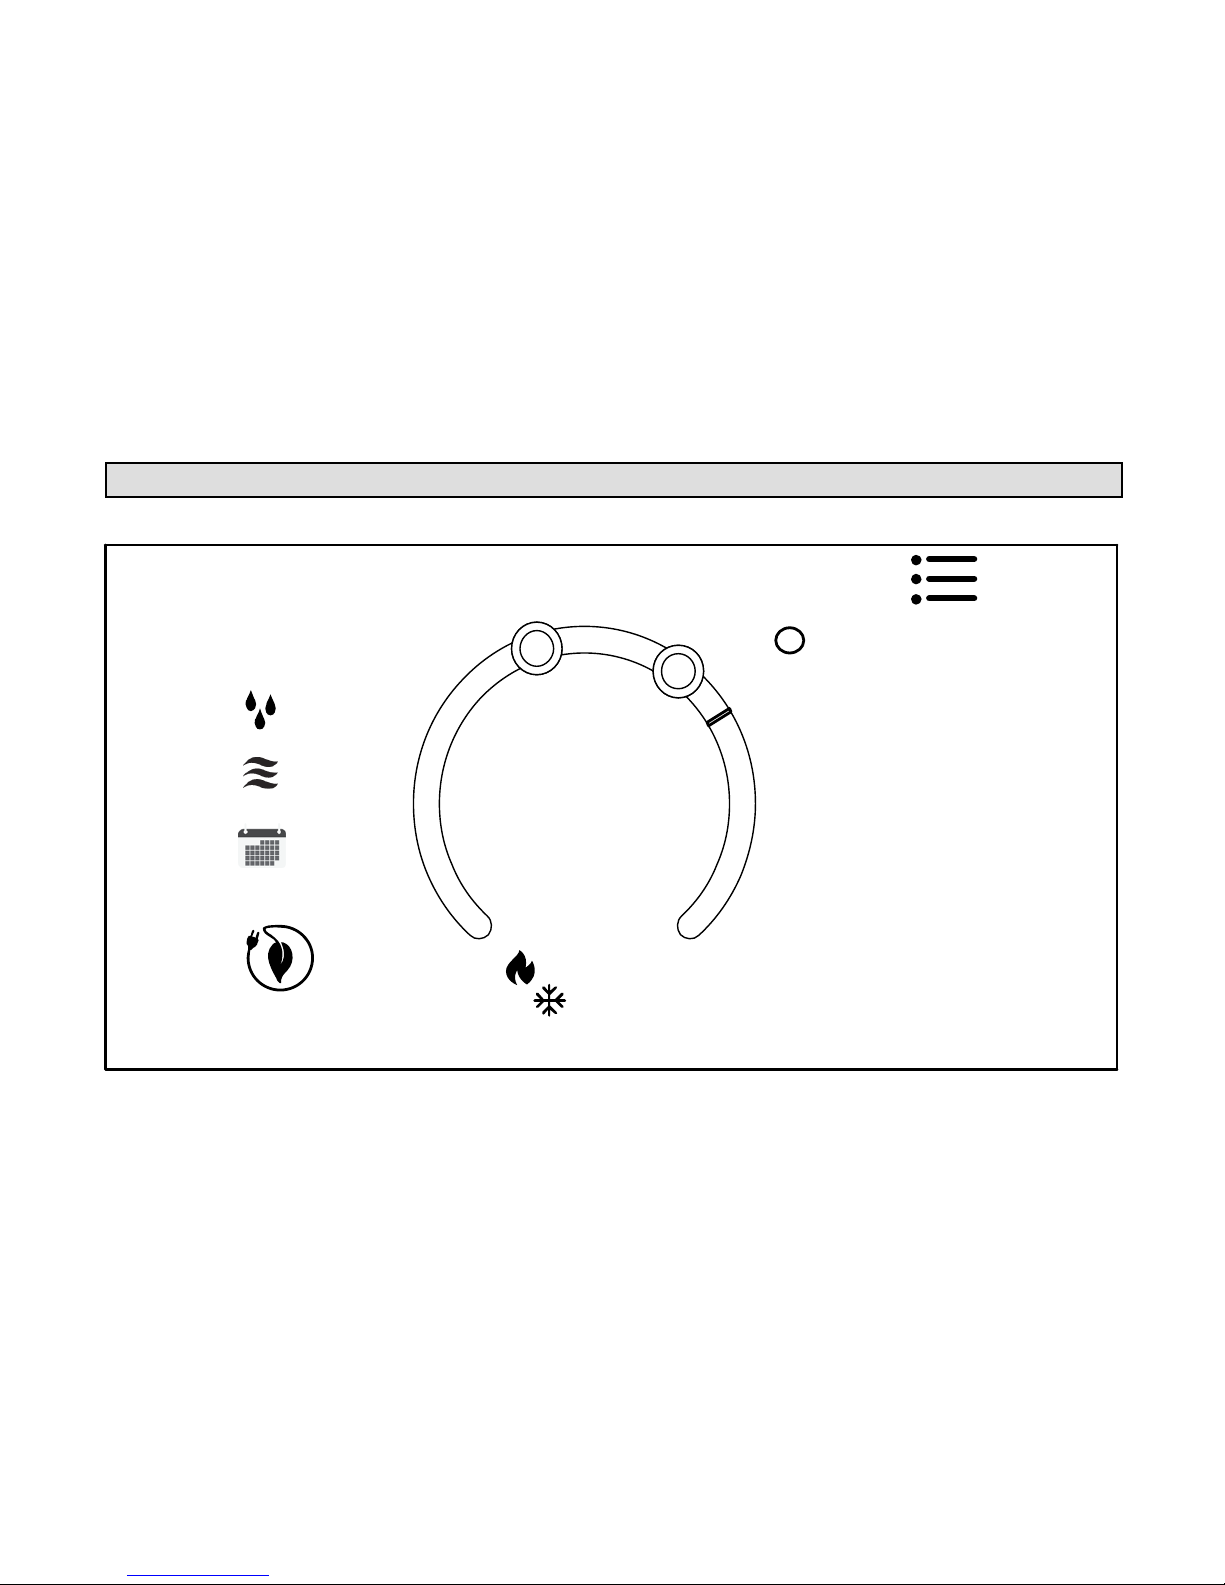
Home Screen
2:31 am
heat−to
cool−to
inside
heat/cool
away
72°
78°
Schedule hold
until next period
X
0
Ⓒ
Ⓑ
Ⓘ
Ⓐ
Ⓘ
Ⓔ
Ⓕ
Ⓖ
Ⓗ
Ⓓ
Ⓔ
Ⓕ
80
waiting
Figure 2. Home Screen
Page 6
6
Press the screen anywhere - the first press turns
on the backlight.
A. OPERATING MODE - press to access the
screen that will list available modes. Selectable
modes are heat/cool, heat only, cool only, off,
schedule 1, schedule 2, and schedule 3. In
addition fan operation can be set to on, auto or
circulate.
Heat and Cool (Auto-changeover)
Heat Only
Cool Only
Following a schedule
off
System if off
B. AWAY - Selecting AWAY will allow the user to
set the heating and/or cooling mode tempera
tures when away from home.
Press cancel to exit this screen and return
to the home screen and normal system op
erations.
cancel
C. Displays current time.
D. Menu - This will allow access to notifications,
performance report, schedules and set
tings.
Page 7

7
E. This allows you to set the heat-to (if enabled)
temperature. Selecting the heat-to or tempera
ture dial position indicator will take you to the
temperature setting detail screen. The temper
ature dial will change from white to red when
heating is active.
F. This allows you to set the cool-to (if enabled)
temperature. Selecting the cool-to or temper
ature dial position indicator will take you to
the temperature setting detail screen. The dial
will change from white to blue when cooling is
active.
G. Displays the current indoor temperature.
H. Indicates the schedule is on hold until the next
time period or permanent.
1. Place the schedule on hold by pressing on
either the heat-to or cool-to location on the
screen. If an adjustment is required for the
temperature setting, this can be done now.
2. After approximately three seconds the
screen will display the override setting op
tions.
3. From the override setting screen, the op
tions are 1 hour, 2 hour or Permanent.
Make selection and then press set.
4. For the 1 or 2 hour setting the home screen
will indicate schedule hold until time indi
cated (i.e., 11:57 pm). To exit schedule hold,
press Ⓧ.
5. For the permanent setting the screen will in
dicate schedule hold permanently. To exit
schedule hold, press Ⓧ.
I. System Status Icons - Equipment operation
information appears along the left side of the
home screen. The displayed icons will indicate
heating demand, cooling compressor delay,
cooling demand or transitioning to next sched
ule setting (see table 1).
Page 8

8
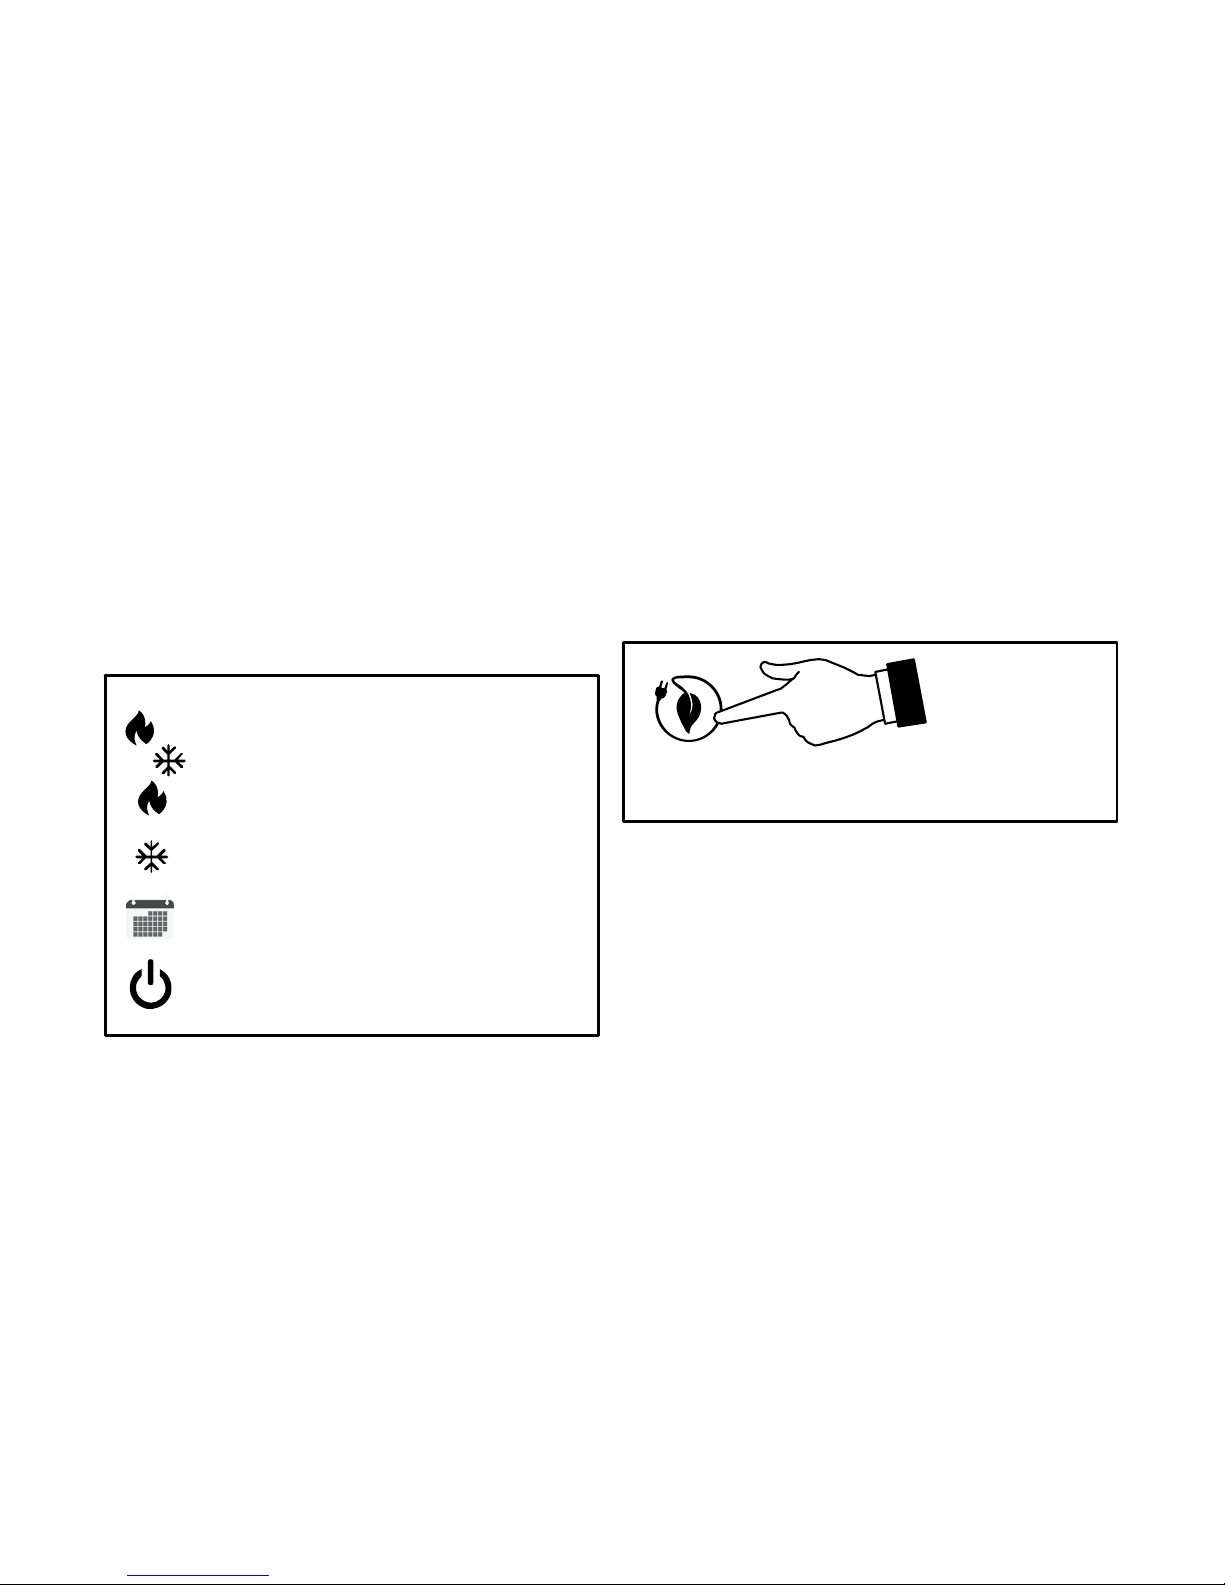
Table 1. System Status Icons
Red flames indicates the system is heating.
waiting
Snow flake indicates the next mode of operation will be cooling. Waiting indi
cates there is a compressor delay which is by default 5 minutes and not ad
justable.
Blue flames indicates the system is cooling.
Transitioning to next schedule setting.
Page 9

9
Selection Mode
Press anywhere in the area indicated below to select how the system will operate.
2:31 am
heat−to
cool−to
78
inside
schedule 1
away
72°
78°
0
Figure 3. Home Screen (Accessing Mode Screen)
Page 10

10
OPERATING MODES
1. HEAT/COOL allows the thermostat to switch
between heating and cooling automatically.
2. HEAT ONLY allows only heating demand.
3. COOL ONLY allows only cooling demand.
4. OFF indicates system has been turned off.
5. SCHEDULES (up to three can be set),
FAN-ON, AUTO and CIRCULATE (see Edit
Schedules on page 13 for customizing
schedules).
6. ON, AUTO and CIRCULATE - Select by
pressing the desired fan operation ON, AU
TO and CIRCULATE. When selected a green
check mark will be indicated.
If FAN mode AUTO, ON or CIRCULATE was se
lected during scheduling for the current period, the
thermostat will indicate the current fan mode in the
information display (FAN ON or FAN CIRC).
In the CIRCULATE mode, the user can cycle the
fan for a programmed period time of active time per
hour during periods of equipment inactivity (i.e.,
heating or cooling equipment not running).
Table 2. Fan Operation
on
Fan is NOT following the
schedule and runs contin
uously until it is changed
from the select mode.
auto
Fan will follow the fan set
ting in the selected sched
ule.
circu
late
Fan is following schedule
and cycles during periods
of equipment inactivity.
Circulate off time is
dependent on user
settings.
Page 11

11
Menu
menu
performance report
notifications
13
edit schedules
settings
heat−to
cool−to
72°
78°
0
o
ol
Figure 4. User Menu Screen
Page 12

12
NOTIFICATIONS
When a system error or reminder occurs, a pop-up
screen will appear indicating the condition.
S Error code notification pop-up can be dismiss
by pressing the back button. Contact the
dealer to resolve the issue.
S For notification, press either clear or set a fu
ture reminder.
Any active history for notifications (critical errors or
reminders will be listed under settings > notifica
tion.
If critical errors occur, they will also be displayed
under notifications as illustrated in figure 5. Press
the contractor info option for assistance.
notifications
critical
high temperature protection
error code: 0004
<
05/22 12:23pm
dealer info
Figure 5. Notifications - Critical
Page 13

13
PERFORMANCE REPORT
This will display the total number of hours each
month that the system has been running. Example
would be for mar (March) 23H or 23 hours. To re
turn to the menu screen, press the house icon in
the upper left-hand corner of the screen.
EDIT SCHEDULES
NOTE: See Selection Mode on page 9 to run a
specific schedule.
From the HOME screen press the MENU and
press edit schedules option.
The edit schedules screen will allow section of up
too three separate schedules. On the edit sched
ules screen, each schedule can be renamed and
edited. See Figure 7 for editing schedules.
NOTE: If a fan mode is selected under the select
mode screen, it will over-ride any fan setting in in
dividual schedules.
edit schedules
>
schedule 1
add schedule
schedule 2
schedule 3
>
>
<
Figure 6. Edit Schedules Screen
Page 14

14
edit schedules
schedule 1
schedule 2
schedule 3
schedule x
(rename)
select days
select mode
select days
individual days
week/weekend
al l 7 da y s
select mode
heat/cool
heat only
cool only
individual
days
monday
tuesday
wednesday
thursday
friday
saturday
sunday
wake
leave
home
night
week /
week
end
week
weekend
all 7 days
all days
wake
(rename)
time
cool-to
heat-to
fan
cool-to
and/or
heat-to
time
fan
select fan mode
select time or
delete period
If period
deleted
* A maximum of four time periods can be used. If
any time periods are deleted, an option to add a
time period back will appear on this screen.
*
Figure 7. Renaming and Editing Schedules
Page 15

15
SETTINGS (USER)
user settings
>
fan
heat/cool
>
>
<
general
display
>
>
reminders
Figure 8. User Settings Options
Table 3. User Settings (Fan)
Setting
Selection
Function Description
fan
on, auto and
circulate
See table 2 for
detail descrip
tion.
Page 16

16
Table 4. User Settings (Heat/Cool or Cool Only)
Setting Selection Function Description
heat / cool (gas or electric heat
ing is selected)
normal
Heats home to desired tempera
ture setting. Options are on or
off.
setpoint range
Heating limits with a default of
90°F. Range is 45°F to 90°F
Cooling limits with a default of
45°F. Range is 45°F to 99°F
cool only (option only appears
if no heating equipment is avail
able or configured)
setpoint range
Cooling limits with a default of
45°F. Range is 45°F to 99°F
reminders
Select reminders. The reminder setting screen will appear and a list
all of the predefined reminders plus the two custom reminders at the
end of the list.
NOTE: Your installer will need to change the name of the two available
custom reminders.
Select the desired reminder to set a date. By default all reminders are
set to disabled. Press disable for a specific reminder to choose from
3mon, 6mon, 12mon, 24mon or custom date.
When finished, press < to return to previous menu.
Page 17

17
Table 5. User Settings (General)
Setting Selection Function Description
general - provides
information about
the thermostat and
settings for screen
lock, date & time
and language.
about
Displays information concerning thermostat
model number, serial number, hardware and
software revisions.
screen lock
Setting options are unlocked, partially, and
locked.
To set partially lock, create a three digit code.
Partially lock restricts access to the menu.
To set locked, create a three digit code. Lock
restricts access to anything on the screen.
NOTE: Partially Lock and Locked is set for one
instance only. Either would need to be set each
time it is desired to partially locked or locked the
screen. Master code is 864 in case user forget
their custom code.
date & time
Settings for 24-hour clock (military), daylight
savings, set time and date.
language
Languages available are English, Spanish,
Portuguese and French.
Page 18

18
Table 6. User Settings (Display)
Setting Selection Function Description
display - Allows the user to
control some information that is
displayed on the home screen.
screen saver
Options are enable and disable.
Default is enabled. When
enabled only the time and inside
temperature is displayed on the
screen. Touching the screen will
restore all other details.
The backlight setting is also on
the same screen. Options are
continuous on or energy save.
Default is continuous on.
screen brightness
A horizontal adjustment bar is
provided to move from minimum
to maximum brightness.
temperature scale
°F for Fahrenheit or C° for
Celsius.
clean screen
This will disable the touchscreen
for 30 seconds.
Page 19

19
INDEX
A
About, 17
Away, 6
B
Backlight, 18
C
Clean Screen, 18
Cool-To, 7
Critical Notifications, 12
D
Date and Time, 17
Display Settings, 18
E
Edit Schedules, 13
F
Fan Operation, 10
Features, 2
G
General Settings, 17
H
Heat-To, 7
Home Screen, 5
L
Language Selection, 17
M
Master Unlock Code, 17
Menu, 6, 11
N
Normal Setting, 16
Notifications, 12
O
Operating Modes, 6, 10
Page 20

20
P
Performance Report, 13
S
Schedule Hold, 7
Schedules, 10
Screen Brightness, 18
Screen Lock, 17
Screen Saver, 18
Selection Mode, 9
setpoint range, 16
Settings, 15
Settings - User, display, 17
System Status Icons, 8
T
Temperature Dial Indicator, 3
Temperature Override Setting, 7
Temperature Scale, 18
U
Unlock Code (master), 17
® U.S. Registered Trademark
Model: 13H13
507500-01
4/2015
Supersedes 3/2015
©2015 Lennox Industries Inc.
Dallas, Texas, USA
 Loading...