

Page 1

®
magicolor 4650EN/4650DN
User’s Guide
A00F-9561-00A
1800853-001A
Page 2

Thank You
Thank you for purchasing a magicolor 4650EN/4650DN. You have made an excellent choice.
Your magicolor 4650EN/4650DN is specially designed for optimal performance in Windows,
Macintosh and Linux environments.
Trademarks
KONICA MINOLTA and the KONICA MINOLTA logo are trademarks or registered trademarks of
KONICA MINOLTA HOLDINGS, INC.
magicolor and PageScope are trademarks or registered trademarks of KONICA MINOLTA
BUSINESS TECHNOLOGIES, INC.
All other trademarks and registered trademarks are the property of their respective
owners.
Copyright Notice
Copyright © 2007 KONICA MINOLTA BUSINESS TECHNOLOGIES, INC., Marunouchi Center
Building, 1-6-1 Marunouchi, Chiyoda-ku, Tokyo, 100-0005, Japan. All Rights Reserved. This
document may not be copied, in whole or part, nor transferred to any other media or language,
without written permission of KONICA MINOLTA BUSINESS TECHNOLOGIES, INC.
Notice
KONICA MINOLTA BUSINESS TECHNOLOGIES, INC. reserves the right to make changes to
this guide and to the equipment described herein without notice. Considerable effort has been
made to ensure that this guide is free of inaccuracies and omissions. However, KONICA
MINOLTA BUSINESS TECHNOLOGIES, INC. makes no warranty of any kind including, but not
limited to, any implied warranties of merchantability and fitness for a particular purpose with
regard to this guide. KONICA MINOLTA BUSINESS TECHNOLOGIES, INC. assumes no
responsibility for, or liability for, errors contained in this guide or for incidental, special, or consequential damages arising out of the furnishing of this guide, or the use of this guide in operating
the equipment, or in connection with the performance of the equipment when so operated.
Page 3

SOFTWARE LICENSE AGREEMENT
This package contains the following materials provided by Konica Minolta Business Technologies, Inc. (KMBT): software included as part of the printing system, the digitally-encoded
machine-readable outline data encoded in the special format and in the encrypted form (“Font
Programs”), other software which runs on a computer system for use in conjunction with the
Printing Software (“Host Software”), and related explanatory written materials (“Documentation”). The term “Software” shall be used to describe Printing Software, Font Programs and/or
Host Software and also include any upgrades, modified versions, additions, and copies of the
Software.
The Software is being licensed to you under the terms of this Agreement.
KMBT grants to you a non-exclusive sublicense to use the Software and Documentation, provided that you agree to the following:
1. You may use the Printing Software and accompanying Font Programs for imaging to the
licensed output device(s), solely for your own internal business purposes.
2. In addition to the license for Font Programs set forth in Section 1 (“Printing Software”)
above, you may use Roman Font Programs to reproduce weights, styles, and versions of
letters, numerals, characters and symbols (“Typefaces”) on the display or monitor for your
own internal business purposes.
3. You may make one backup copy of the Host Software, provided your backup copy is not
installed or used on any computer. Notwithstanding the above restrictions, you may install
the Host Software on any number of computers solely for use with one or more printing
systems running the Printing Software.
4. You may assign its rights under this Agreement to an assignee of all of Licensee’s right and
interest to such Software and Documentation (“Assignee”) provided you transfer to
Assignee all copies of such Software and Documentation Assignee agrees to be bound by
all of the terms and conditions of this Agreement.
5. You agree not to modify, adapt or translate the Software and Documentation.
6. You agree that you will not attempt to alter, disassemble, decrypt, reverse engineer or
decompile the Software.
7. Title to and ownership of the Software and Documentation and any reproductions thereof
shall remain with KMBT and its Licensor.
8. Trademarks shall be used in accordance with accepted trademark practice, including identification of the trademark owner’s name. Trademarks can only be used to identify printed
output produced by the Software. Such use of any trademark does not give you any rights
of ownership in that trademark.
9. You may not rent, lease, sublicense, lend or transfer versions or copies of the Software that
the Licensee does not use, or Software contained on any unused media, except as part of
the permanent transfer of all Software and Documentation as described above.
10. In no event will KMBT or its licensor be liable to you for any consequential, incidental INDIRECT, PUNITIVE or special damages, including any lost profits or lost saving, even if
KMBT has been advised of the possibility of such damages, or for any claim by any third
party. KMBT or its licensor disclaims all warranties with regard to the software, express or
implied, including, without limitation implied warranties of merchantability, fitness for a particular purpose, title and non-infringement of third party rights. Some states or jurisdictions
do not allow the exclusion or limitation of incidental, consequential or special damages, so
the above limitations may not apply to you.
Page 4

11. Notice to Government End Users: The Software is a “commercial item,” as that term is
defined at 48 C.F.R.2.101, consisting of “commercial computer software” and “commercial
computer software documentation,” as such terms are used in 48 C.F.R. 12.212. Consistent with 48 C.F.R. 12.212 and 48 C.F.R. 227.7202-1 through 227.7202-4, all U.S. Government End Users acquire the Software with only those rights set forth herein.
12. You agree that you will not export the Software in any form in violation of any applicable
laws and regulations regarding export control of any countries.
About Adobe Color Profile
ADOBE SYSTEMS INCORPORATED
COLOR PROFILE LICENSE AGREEMENT
NOTICE TO USER: PLEASE READ THIS CONTRACT CAREFULLY. BY USING ALL OR ANY
PORTION OF THE SOFTWARE YOU ACCEPT ALL THE TERMS AND CONDITIONS OF
THIS SOFTWARE YOU ACCEPT ALL THE TERMS AND CONDITIONS OF THIS AGREEMENT. IF YOU DO NOT AGREE WITH THE TERMS OF THIS AGREEMENT, DO NOT USE
THE SOFTWARE.
1. DEFINITIONS In this Agreement, “Adobe” means Adobe Systems Incorporated, a Delaware corporation, located at 345 Park Avenue, San Jose, California 95110. “Software”
means the software and related items with which this Agreement is provided.
2. LICENSE Subject to the terms of this Agreement, Adobe hereby grants you the worldwide,
non-exclusive, nontransferable, royalty-free license to use, reproduce and publicly display
the Software. Adobe also grants you the rights to distribute the Software only (a) as embedded within digital image files and (b) on a standalone basis. No other distribution of the
Software is allowed; including, without limitation, distribution of the Software when incorporated into or bundled with any application software. All individual profiles must be referenced by their ICC Profile description string. You may not modify the Software. Adobe is
under no obligation to provide any support under this Agreement, including upgrades or
future versions of the Software or other items. No title to the intellectual property in the Software is transferred to you under the terms of this Agreement. You do not acquire any rights
to the Software except as expressly set forth in this Agreement.
3. DISTRIBUTION If you choose to distribute the Software, you do so with the understanding
that you agree to defend, indemnify and hold harmless Adobe against any losses, damages or costs arising from any claims, lawsuits or other legal actions arising out of such distribution, including without limitation, your failure to comply with this Section 3. If you
distribute the Software on a standalone basis, you will do so under the terms of this Agreement or your own license agreement which (a) complies with the terms and conditions of
this Agreement; (b) effectively disclaims all warranties and conditions, express or implied,
on behalf of Adobe; (c) effectively excludes all liability for damages on behalf of Adobe; (d)
states that any provisions that differ from this Agreement are offered by you alone and not
Adobe and (e) states that the Software is available from you or Adobe and informs licensees how to obtain it in a reasonable manner on or through a medium customarily used for
software exchange. Any distributed Software will include the Adobe copyright notices as
included in the Software provided to you by Adobe.
Page 5

4. DISCLAIMER OF WARRANTY Adobe licenses the Software to you on an “AS IS” basis.
Adobe makes no representation as to the adequacy of the Software for any particular purpose or to produce any particular result. Adobe shall not be liable for loss or damage arising out of this Agreement or from the distribution or use of the Software or any other
materials. ADOBE AND ITS SUPPLIERS DO NOT AND CANNOT WARRANT THE PERFORMANCE OR RESULTS YOU MAY OBTAIN BY USING THE SOFTWARE, EXCEPT
FOR ANY WARRANTY, CONDITION, REPRESENTATION OR TERM TO THE EXTENT
TO WHICH THE SAME CANNOT OR MAY NOT BE EXCLUDED OR LIMITED BY LAW
APPLICABLE TO YOU IN YOUR JURISDICTION, ADOBE AND ITS SUPPLIERS MAKE
NO WARRANTIES, CONDITIONS, REPRESENTATIONS OR TERMS, EXPRESS OR
IMPLIED, WHETHER BY STATUTE, COMMON LAW, CUSTOM, USAGE OR OTHERWISE AS TO ANY OTHER MATTERS, INCLUDING BUT NOT LIMITED TO NONINFRINGEMENT OF THIRD PARTY RIGHTS, INTEGRATION, SATISFACTORY QUALITY
OR FITNESS FOR ANY PARTICULAR PURPOSE. YOU MAY HAVE ADDITIONAL
RIGHTS WHICH VARY FROM JURISDICTION TO JURISDICTION. The provisions of Sections 4, 5 and 6 shall survive the termination of this Agreement, howsoever caused, but this
shall not imply or create any continued right to use the Software after termination of this
Agreement.
5. LIMITATION OF LIABILITY IN NO EVENT WILL ADOBE OR ITS SUPPLIERS BE LIABLE
TO YOU FOR ANY DAMAGES, CLAIMS OR COSTS WHATSOEVER OR ANY CONSEQUENTIAL, INDIRECT, INCIDENTAL DAMAGES, OR ANY LOST PROFITS OR LOST
SAVINGS, EVEN IF AN ADOBE REPRESENTATIVE HAS BEEN ADVISED OF THE POSSIBILITY OF SUCH LOSS, DAMAGES, CLAIMS OR COSTS OR FOR ANY CLAIM BY
ANY THIRD PARTY. THE FOREGOING LIMITATIONS AND EXCLUSIONS APPLY TO
THE EXTENT PERMITTED BY APPLICABLE LAW IN YOUR JURISDICTION. ADOBE’S
AGGREGATE LIABILITY AND THAT OF ITS SUPPLIERS UNDER OR IN CONNECTION
WITH THIS AGREEMENT SHALL BE LIMITED TO THE AMOUNT PAID FOR THE SOFTWARE. Nothing contained in this Agreement limits Adobe’s liability to you in the event of
death or personal injury resulting from Adobe’s negligence or for the tort of deceit (fraud).
Adobe is acting on behalf of its suppliers for the purpose of disclaiming, excluding and/or
limiting obligations, warranties and liability as provided in this Agreement, but in no other
respects and for no other purpose.
6. TRADEMARKS Adobe and the Adobe logo are the registered trademarks or trademarks of
Adobe in the United States and other countries. With the exception of referential use, you
will not use such trademarks or any other Adobe trademark or logo without separate prior
written permission granted by Adobe.
7. TERM This Agreement is effective until terminated. Adobe has the right to terminate this
Agreement immediately if you fail to comply with any term hereof. Upon any such termination, you must return to Adobe all full and partial copies of the Software in your possession
or control.
8. GOVERNMENT REGULATIONS If any part of the Software is identified as an export controlled item under the United States Export Administration Act or any other export law,
restriction or regulation (the “Export Laws”), you represent and warrant that you are not a
citizen, or otherwise located within, an embargoed nation (including without limitation Iran,
Iraq, Syria, Sudan, Libya, Cuba, North Korea, and Serbia) and that you are not otherwise
prohibited under the Export Laws from receiving the Software. All rights to use the Software
are granted on condition that such rights are forfeited if you fail to comply with the terms of
this Agreement.
Page 6

9. GOVERNING LAW This Agreement will be governed by and construed in accordance with
the substantive laws in force in the State of California as such laws are applied to agreements entered into and to be performed entirely within California between California residents. This Agreement will not be governed by the conflict of law rules of any jurisdiction or
the United Nations Convention on Contracts for the International Sale of Goods, the application of which is expressly excluded. All disputes arising out of, under or related to this
Agreement will be brought exclusively in the state Santa Clara County, California, USA.
10. GENERAL You may not assign your rights or obligations granted under this Agreement
without the prior written consent of Adobe. None of the provisions of this Agreement shall
be deemed to have been waived by any act or acquiescence on the part of Adobe, its
agents, or employees, but only by an instrument in writing signed by an authorized signatory of Adobe. When conflicting language exists between this Agreement and any other
agreement included in the Software, the terms of such included agreement shall apply. If
either you or Adobe employs attorneys to enforce any rights arising out of or relating to this
Agreement, the prevailing party shall be entitled to recover reasonable attorneys’ fees. You
acknowledge that you have read this Agreement, understand it, and that it is the complete
and exclusive statement of your agreement with Adobe which supersedes any prior agreement, oral or written, between Adobe and you with respect to the licensing to you of the
Software. No variation of the terms of this Agreement will be enforceable against Adobe
unless Adobe gives its express consent, in writing, signed by an authorized signatory of
Adobe.
ICC Profile for TOYO INK Standard Color on Coated paper
(TOYO Offset Coated 2.1)
This ICC Profile (TOYO Offset Coated 2.1) characterizes Japanese offset press on Coated
paper and is fully compatible with ICC profile format.
About “TOYO INK Standard Color on Coated paper”
This is the standard for color reproduction of sheet-fed offset press on Coated paper made by
TOYO INK MFG.CO., LTD. (“TOYO INK”).
This standard is made from printing test with using TOYO INK’s sheet-fed offset printing inks
and TOYO INK’s own printing conditions.
“TOYO INK Standard Color on Coated paper” is compatible with “JAPAN COLOR”.
Agreement
1. The reproduction of images on a printer or a monitor using this ICC Profile do not completely match the TOYO INK Standard Color on Coated paper.
2. Any and all copyrights of this ICC Profile shall remain in TOYO INK; therefore you shall not
transfer, provide, rent, distribute, disclose, or grant any rights in this ICC Profile to any third
party without the prior written consent of TOYO INK.
3. In no event will TOYO INK its directors, officers, employees or agents be liable to you for
any consequential or incidential, either direct or indirect, damages (including damages for
loss of business profits, business interruption, loss of business information, and the like)
arising out of the use or inability to use this ICC Profile.
4. TOYO INK shall not be responsible for answering any question related to this ICC Profile.
Page 7
5. All company names and product names used in this document is the trademarks or registered trademarks of their respective holder.
This ICC Profile made by GretagMacbeth ProfileMaker and granted TOYO INK certain license
to distribute by GretagMacbeth AG.
TOYO Offset Coated 2.1 © TOYO INK MFG. CO., LTD. 2004
For EU member states only
This symbol means: Do not dispose of this product
together with your household waste!
Please contact the Local Authority for appropriate disposal instructions. In the case of a new device being
purchased, the used one can also be given to our dealer
for appropriate disposal. Recycling of this product will
help to conserve natural resources and prevent potential
negative consequences for the environment and human
health caused by inappropriate waste handling.
This product complies with RoHS (2002/95/EC) directive.
Page 8

Page 9

Contents
1 Introduction ....................................................................................................... 1
Getting Acquainted with Your Printer 2
Space Requirements 2
Printer Parts 4
Front View 4
Rear View 5
Front View with Options 5
2 About the Software ...........................................................................................7
Printer Driver CD-ROM 8
PostScript Drivers 8
PCL Drivers 8
XPS Driver 8
PPD Files 9
Utilities and Documentation CD-ROM 9
Utilities 9
System Requirements 11
Selecting Driver Options/Defaults
(for Windows) 12
Contents
i
Page 10

Windows Vista/XP/Server 2003/2000 (KONICA MINOLTA mc4650 PCL6,
KONICA MINOLTA mc4650PS) 12
Uninstalling the Printer Driver
(for Windows) 14
Windows Vista/XP/Server 2003/2000(KONICA MINOLTA mc4650 PCL6,
KONICA MINOLTA mc4650PS) 14
Displaying Printer Driver Settings
(for Windows) 15
Windows Vista 15
Windows XP/Server 2003 15
Windows 2000 15
Using the Postscript and PCL Printer Driver 16
Common Buttons 16
OK 16
Cancel 16
Apply 16
Help 16
Favorite Setting 16
Paper View 16
Printer View 17
Quality View 17
Default 17
Advanced Tab (PostScript Printer Driver Only) 17
Basic Tab 17
Layout Tab 18
Cover Page Tab 18
Watermark/Overlay Tab 18
Quality Tab 19
Other Tab 20
Limitations on printer driver functions installed with Point and Print 20
3 Using the Status Monitor (Windows Only) ....................................................21
Working with the Status Monitor 22
Introduction 22
Operating Environment 22
Opening the Status Monitor 22
Using the Status Monitor 22
Recognizing Status Monitor Alerts 23
Recovering from a Status Monitor Alert 23
Closing the Status Monitor 23
4 Printer Control Panel and Configuration Menu ............................................25
About the Control Panel 26
Control Panel Indicators and Keys 27
Message Window 28
Help Screens 29
Contentsii
Page 11

Configuration Menu Overview 30
Main Menu 30
PROOF/PRINT MENU 32
Printing/Deleting a Stored Job 32
Entering the Password 34
PRINT MENU 35
PAPER MENU 37
QUALITY MENU 44
MEMORY DIRECT 62
CAMERA DIRECT 65
INTERFACE MENU 68
SYS DEFAULT MENU 76
MAINTENANCE MENU 87
SERVICE MENU 94
5 Camera Direct ..................................................................................................95
Camera Direct 96
Printing Directly from a Digital Camera 96
6 Memory Direct .................................................................................................97
Memory Direct 98
Printing From a Connected USB Memory Device 98
7 Using Media .....................................................................................................99
Media Specifications 100
Media Types 101
Plain Paper (Recycled Paper) 101
Thick Stock 103
Envelopes 103
Labels 104
Letterhead 105
Postcards 105
Transparencies 106
Glossy Media 107
What Is the Guaranteed Imageable (Printable) Area? 108
Imageable Area—Envelopes 108
Page Margins 108
Loading Media 109
Tray 1 (Manual Feed Tray) 109
Loading Plain Paper 109
Other Media 111
Loading Envelopes 112
Loading Label Sheets/Postcards/Thick Stock/Glossy Media and Transparencies 114
Tray 2 116
Loading Plain Paper 116
Contents
iii
Page 12

Tray 3 (Optional Lower Feeder Unit) 119
Loading Plain Paper 119
Duplexing 122
Output Tray 124
Media Storage 125
8 Replacing Consumables ...............................................................................127
Replacing Consumables 128
About Toner Cartridges 128
Replacing a Toner Cartridge 131
Replacing a Imaging Unit 135
Replacing the Waste Toner Bottle 141
Replacing the Transfer Roller 144
Replacing the Transfer Roller 144
Replacing the Ozone Filter 147
Replacing the Transfer Belt Unit 148
Replacing the Backup Battery 154
Replacing the Fuser Unit 157
9 Maintaining the Printer ..................................................................................161
Maintaining the Printer 162
Cleaning the Printer 164
Exterior 164
Media Rollers 165
Cleaning the Media Feed Rollers (Manual Feed Tray) 165
Cleaning the Media Feed Rollers (Tray 2/3) 167
Cleaning the Media Transfer Rollers for Tray 3 168
Cleaning the Laser Lens 169
10 Troubleshooting ............................................................................................171
Introduction 172
Printing a Configuration Page 172
Preventing Media Misfeeds 173
Understanding the Media Path 174
Clearing Media Misfeeds 175
Media Misfeed Messages and Clearing Procedures 176
Clearing a Media Misfeed in Tray 2 177
Clearing a Media Misfeed in Tray 3 181
Clearing a Media Misfeed from the Duplex (magicolor 4650DN only) 183
Clearing a Media Misfeed from the Fuser Unit 184
Clearing a Media Misfeed from Tray 1 (Manual Feed Tray) and Transfer
Roller 188
Solving Problems with Media Misfeeds 191
Solving Other Problems 194
Solving Problems with Printing Quality 200
Status, Error, and Service Messages 206
Contentsiv
Page 13

Standard Status Messages 206
Error Messages (Warning:) 207
Error Messages (Operator Call:) 211
Service Messages: 216
11 Installing Accessories .................................................................................. 217
Introduction 218
Antistatic Protection 219
Dual In-Line Memory Module (DIMM) 220
Installing a DIMM 220
Hard Disk Kit 223
Installing the Hard Disk kit 223
CompactFlash 227
Installing the CF adapter and CompactFlash card 227
Lower Feeder Unit 231
Kit Contents 231
Installing a Lower Feeder Unit 232
A Appendix ........................................................................................................235
Safety Specifications 236
Technical Specifications 236
Printer 236
Consumable Life Expectancy Chart 239
Our Concern for Environmental Protection 241
What is an ENERGY STAR product? 241
Contents
v
Page 14

Contentsvi
Page 15

Introduction
Page 16
Getting Acquainted with Your Printer
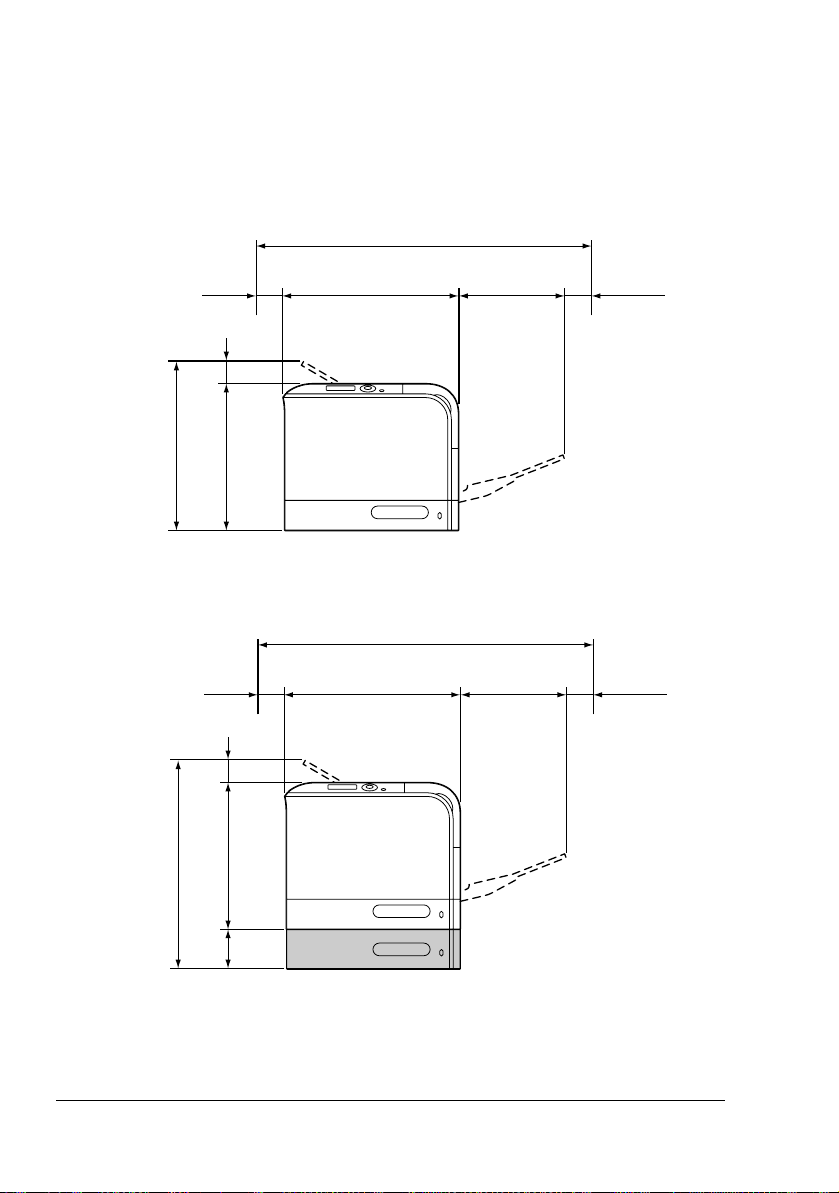
Space Requirements
To ensure easy operation, consumable replacement and maintenance,
adhere to the recommended space requirements detailed below.
913 mm (35.9")
436 mm (21.6")
100 mm
(3.9")
(2.0")
51 mm
100 mm
(3.9")
(2.0")
51 mm
244 mm
469 mm (18.5")
385 mm (15.2")
(9.6")
100 mm
(3.9")
Front View
913 mm (35.9")
469 mm (18.5")
244 mm
(9.6")
100 mm
(3.9")
548.5 mm (21.6")
mm
112 .5
385 mm (15.2")
(4.4")
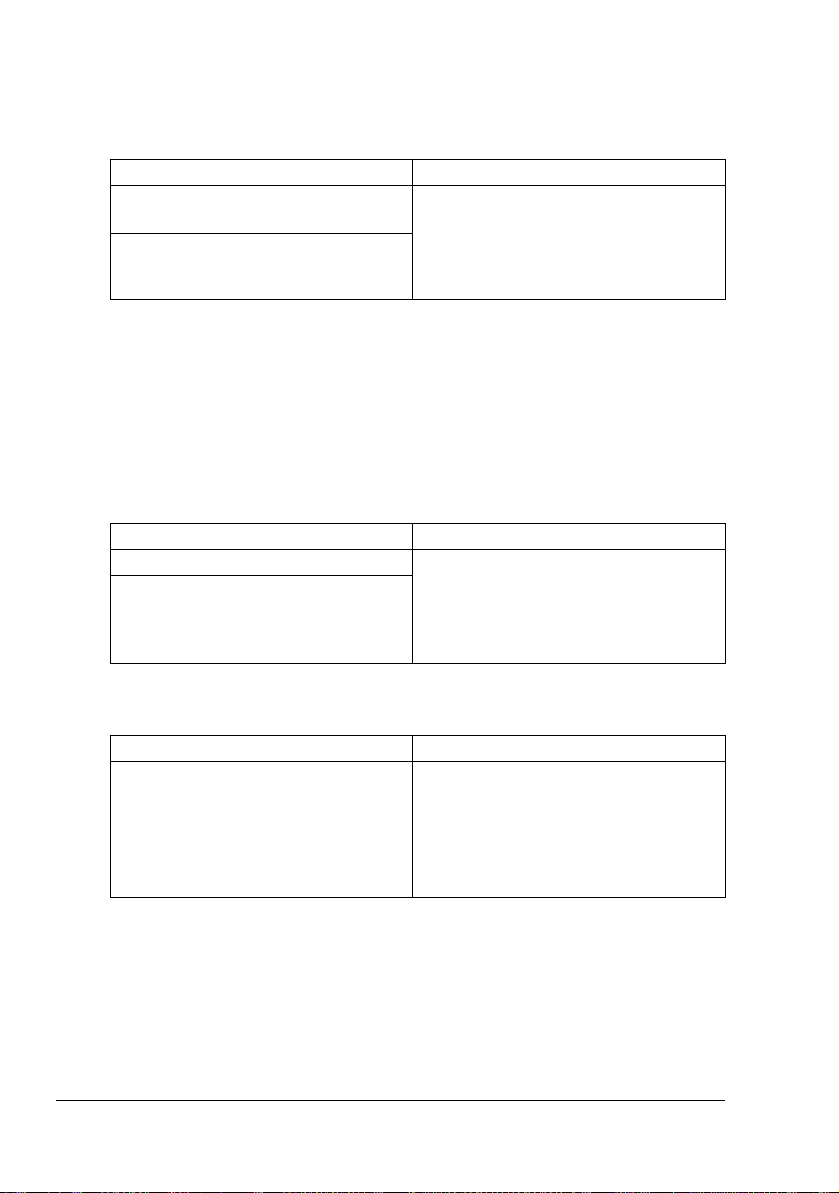
Front View with Options
Getting Acquainted with Your Printer2
Page 17
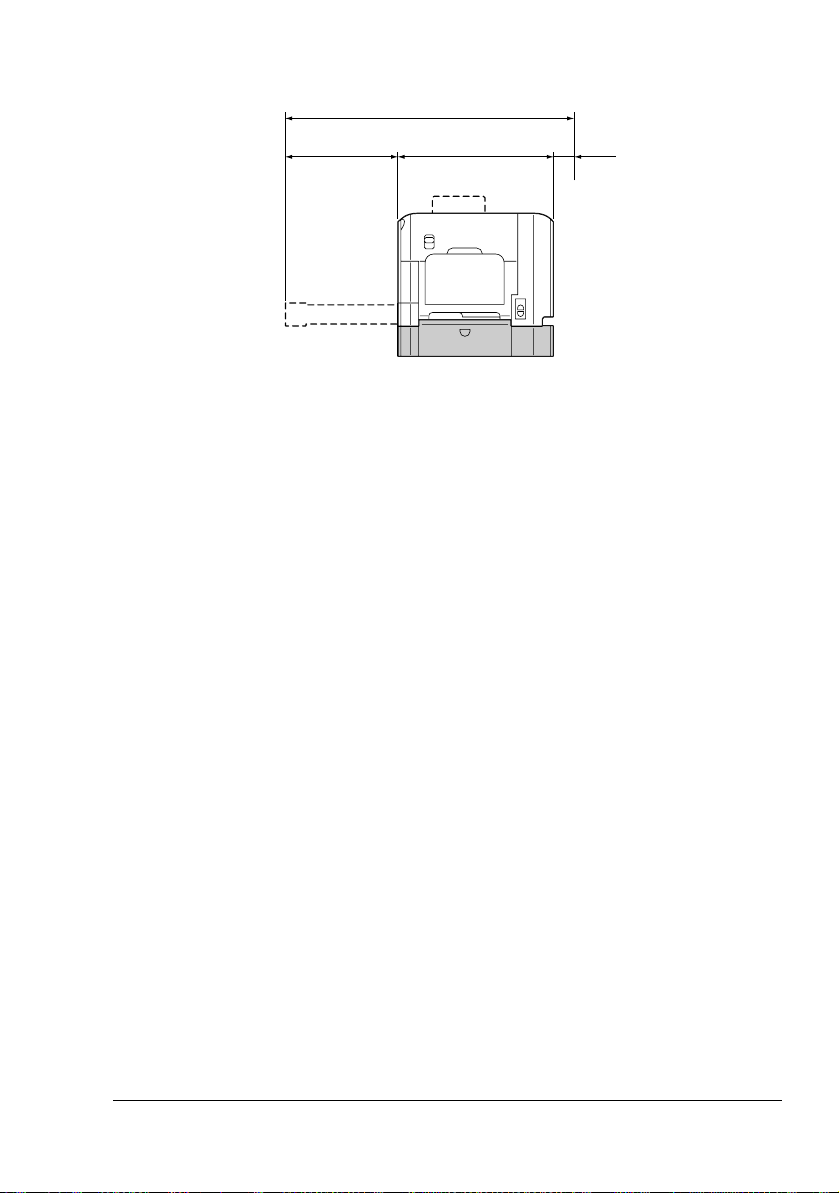
962 mm (37.9")
326 mm
(12.8")
536 mm (21.1")
Side View with Options
100 mm
(3.9")
" The option appears shaded in the above illustrations.
Getting Acquainted with Your Printer
3
Page 18
Printer Parts
The following drawings illustrate the parts of your printer referred to throughout this guide, so please take some time to become familiar with them.
Front View
1—Control panel
2—Output tray
3—Tray 1 (Manual feed tray)
4—Tray 2
5—Fuser unit
6—Right side cover
7—Transfer roller
8—Transfer belt unit
9—Imaging unit(s)
10—Laser lens cleaning tool
11—Front cover
12—Waste toner bottle
13—Toner cartridge(s)
14—Ozone filter
12
4
13
12
11
10
9
3
14
5
6
7
8
7
8
10
12
13
P
U
S
H
Y
Y
9
Getting Acquainted with Your Printer4
Page 19
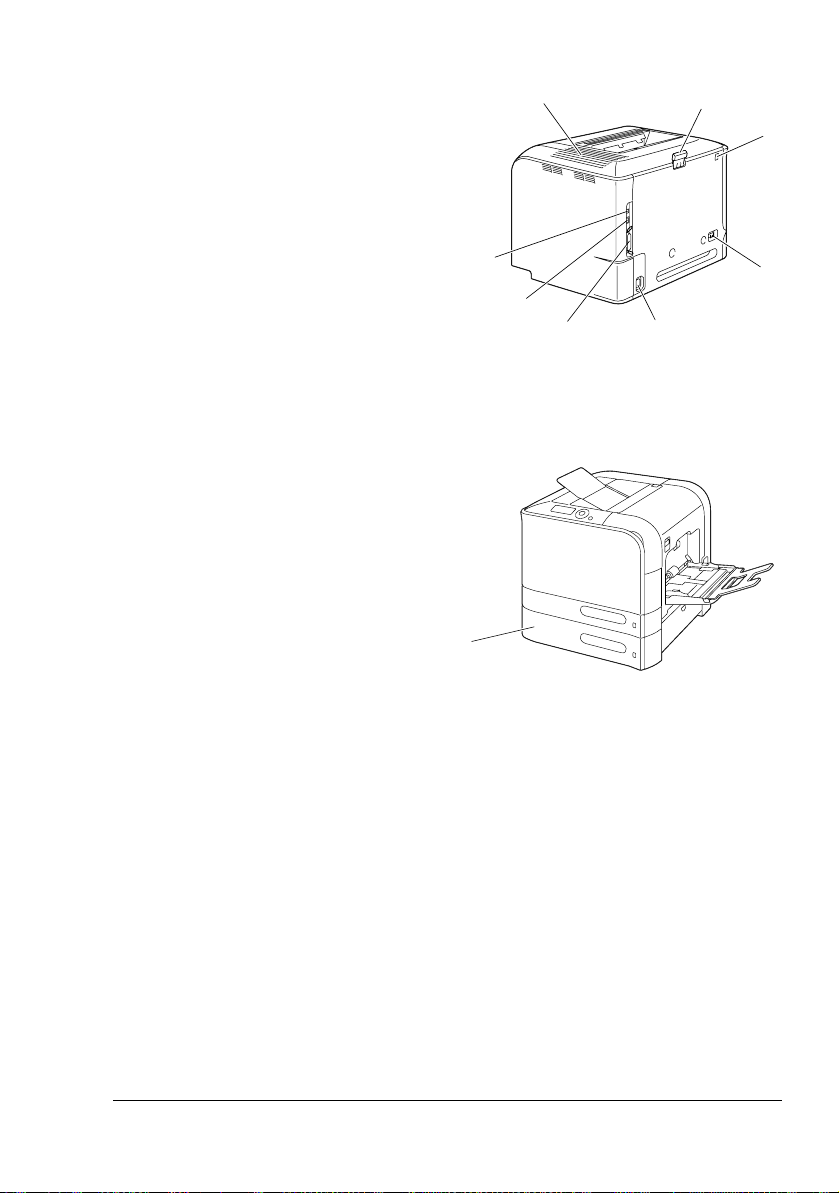
Rear View
1—KONICA MINOLTA Digital Cam-
era Direct Print Port
2—Power switch
3—Power connection
4—Parallel port
5—10Base-T/100Base-TX/
1000Base-T Ethernet Interface
port
6—USB port
7—Ventilation grilles
8—Paper stopper
Front View with Options
1—Lower feeder unit (Tray 3)
7
8
1
6
2
5
4
1
3
Getting Acquainted with Your Printer
5
Page 20

Getting Acquainted with Your Printer6
Page 21

About the
Software
Page 22
Printer Driver CD-ROM
PostScript Drivers
Operating System Use/Benefit
Windows Vista/XP/Server 2003/
2000
Windows Vista/XP/Server 2003 for
64bit
These drivers give you access to all of
the printer features, including finishing and advanced layout. See also
“Displaying Printer Driver Settings (for
Windows)” on page 15.
" A specific PPD file has been prepared for applications (such as Page-
Maker and Corel Draw) that require that a PPD file be specified when
printing.
When specifying a PPD file while printing on Windows Vista, XP,
Server 2003 and 2000, use the specific PPD file provided on the
Pinter Driver CD-ROM.
PCL Drivers
Operating System Use/Benefit
Windows Vista/XP/Server 2003/2000 These drivers give you access to all of
Windows Vista/XP/Server 2003 for
64bit
the printer features, including finishing and advanced layout. See also
“Displaying Printer Driver Settings (for
Windows)” on page 15.
XPS Driver
Operating System Use/Benefit
Windows Vista
Windows Vista for 64bit
These mini drivers for Windows Vista
are based on the Windows core. For
details on the installation method and
functions, refer to the Reference
Guide on the Utilities and Documentation CD-ROM.
" The XPS driver cannot be installed by using the auto-play installation
feature of the Printer Driver CD-ROM.
Printer Driver CD-ROM8
Page 23
PPD Files
Operating System Use/Benefit
Macintosh OS X These files are required in order to
Linux
use the printer driver for each operating system.
For details of the Macintosh and Linux
printer drivers, refer to the Reference
Guide on the Utilities and Documentation CD-ROM.
" For details on the installation of the Windows printer drivers, refer to
the Installation Guide on the Utilities and Documentation CD-ROM.
Utilities and Documentation CD-ROM
Utilities
Utility Use/Benefit
Download Manager
(Windows Vista/XP/Server 2003/
2000, Macintosh OS 10.2.x or later)
Status Monitor (Windows only) The current status of the printer in
PageScope Net Care Printer management functions such as
This utility, which can be used only if
the optional hard disk kit is installed,
enables fonts and overlay data to be
downloaded to the hard disk.
For details, refer to the Download
Manager online help for all of the functions.
addition to the status of consumables
and error information can be viewed.
For details, refer to See “Using the
Status Monitor (Windows Only)” on
page 21.
status monitoring and network settings
can be accessed.
For details, refer to the PageScope
Net Care Quick Guide on the Utilities
and Documentation CD-ROM.
Utilities and Documentation CD-ROM
9
Page 24
Utility Use/Benefit
PageScope Web Connection With a Web browser, the status of
printers can be checked, and the various settings can be changed.
For details, refer to the Reference
Guide on the Utilities and Documentation CD-ROM.
PageScope Network Setup Using the TCP/IP and IPX protocols,
basic network printer settings can be
specified.
For details, refer to the PageScope
Network Setup User Manual on the
Utilities and Documentation CD-ROM.
PageScope Plug and Print This utility automatically detects a new
printer connected to the network and
creates a print object on the Windows
print server.
For details, refer to the PageScope
Plug and Print Quick Guide on the
Utilities and Documentation CD-ROM.
PageScope NDPS Gateway This network utility enables printers
and KONICA MINOLTA multifunctional
products to be used in an NDPS environment.
For details, refer to the PageScope
NDPS Gateway User Manual on the
Utilities and Documentation CD-ROM.
PageScope Direct Print This application provides functions for
sending PDF and TIFF files directly to
a printer to be printed.
For details, refer to the PageScope
Direct Print User’s Guide on the Utilities and Documentation CD-ROM.
Utilities and Documentation CD-ROM10
Page 25

System Requirements
Personal computer
– Pentium 2: 400 MHz (Pentium 3: 500 MHz or higher is recommended)
– Power Mac G3 or later (G4 or later is recommended)
– Macintosh equipped with an Intel processor
Operating System
– Microsoft Windows Vista Home Basic/Home Premium/Ultimate/Busi-
ness/Enterprise, Windows Vista Home Basic /Home Premium /Ultimate/Business /Enterprise x64 Edition,
Windows XP Home Edition/Professional (Service Pack 1 or later; Service Pack 2 or later is recommended),
Windows XP Professional x64 Edition, Windows Server 2003,
Windows Server 2003 x64 Edition, Windows 2000 (Service Pack 4 or
later)
– Mac OS X (10.2 or later; We recommend installing the newest patch),
Mac OS X Server (10.2 or later)
– Red Hat Linux 9.0, SuSE Linux 8.2
Free hard disk space
– Approximately 20 MB of free hard disk space for printer driver and
Status Monitor
– Approximately 128 MB of free hard disk space for image processing
RAM
128 MB or more
CD/DVD-ROM drive
I/O interface
– 10Base-T/100Base-TX/1000Base-T Ethernet interface port
– USB Revision 2.0 compliant port
– Parallel (IEEE 1284) port
" For details of the Macintosh and Linux printer drivers, refer to the Ref-
erence Guide on the Utilities and Documentation CD-ROM.
System Requirements
11
Page 26

Selecting Driver Options/Defaults (for Windows)
Before you start working with your printer, you are advised to verify/change
the default driver settings. Also, in case you have options installed, you
should “declare” the options in the driver.
Windows Vista/XP/Server 2003/2000 (KONICA MINOLTA mc4650 PCL6, KONICA MINOLTA mc4650PS)
1 Choose the driver’s properties as follows:
– (Windows Vista)
From the Start menu, click Control Panel, then Hardware and
Sound, and then click Printers to open the Printers directory.
Right-click the KONICA MINOLTA mc4650 PCL6 or KONICA
MINOLTA mc4650 PS printer icon, and then click Properties.
– (Windows XP/Server 2003)
From the Start menu, choose Printers and Faxes to display the
Printers and Faxes directory. Right-click the KONICA MINOLTA
mc4650 PCL6 or KONICA MINOLTA mc4650 PS printer icon and
choose Properties.
– (Windows 2000)
From the Start menu, choose Settings and then Printers to display
the Printers directory. Right-click the KONICA MINOLTA mc4650
PCL6 or KONICA MINOLTA mc4650 PS printer icon and choose
Properties.
2 If you have installed options, proceed with the next step. Otherwise, skip
to step 9.
3 Select the Configure tab.
4 Check that the installed options are correctly listed. If not, proceed with
the next step. Otherwise, continue with step 8.
5 Click the Refresh to automatically configure installed options.
" The Refresh is available only if bi-directional communication is
available with the printer; otherwise it is grayed out.
6 From the Device Options list, select an option, one at a time, and then
select Enable or Disable from the Settings menu.
" For models with a embedded duplex unit (magicolor 4650DN),
select magicolor 4650DN for Printer Model in the Device
Options list.
Selecting Driver Options/Defaults (for Windows)12
Page 27

" If Printer Memory is selected, select 256 MB, 512 MB or 768 MB
according to the installed memory. The factory default setting is
256 MB.
" If Memory Card is selected, select Disable, Enable (1 GB
Under), or Enable (1 GB Over), according to the installed Com-
pactFlash card.
7 Click Apply.
" Depending on the version of the operating system, Apply may not
appear. If this is the case, continue with the next step.
8 Select the General tab.
9 Click Printing Preferences.
Printing Preference dialog box appears.
10 Select the default settings for your printer, such as the default media for-
mat you use, in the appropriate tabs.
11 Click Apply.
12 Click OK to exit from the Print preference dialog box.
13 Click OK to exit from the Properties dialog box.
Selecting Driver Options/Defaults (for Windows)
13
Page 28

Uninstalling the Printer Driver (for Windows)
This section describes how to uninstall the KONICA MINOLTA mc4650
printer driver if necessary.
Windows Vista/XP/Server 2003/2000(KONICA MINOLTA mc4650 PCL6, KONICA MINOLTA mc4650PS)
1 Close all applications.
2 Choose the Uninstall Program as follows:
– (Windows Vista/XP/Server 2003)
From the Start menu, choose All programs, KONICA MINOLTA,
magicolor 4650, and then Uninstall Printer Driver.
– (Windows 2000)
From the Start menu, choose Programs, KONICA MINOLTA, magicolor 4650, and then Uninstall Printer Driver.
3 When the Uninstall dialog box appears, select the name of the driver to be
deleted, and then click the Uninstall button.
4 Click Uninstall.
5 Click OK, and restart your computer.
6 The KONICA MINOLTA mc4650 printer driver will be uninstalled from your
computer.
Uninstalling the Printer Driver (for Windows)14
Page 29

Displaying Printer Driver Settings (for Windows)
Windows Vista
1 From the Start menu, click Control Panel, then Hardware and Sound,
and then click Printers to open the Printers directory.
2 Right-click the KONICA MINOLTA mc4650 PCL6, or KONICA MINOLTA
mc4650 PS printer icon, and then click Printing Preferences.
Windows XP/Server 2003
1 From the Start menu, choose Printers and Faxes to display the Printers
and Faxes directory.
2 Right-click the KONICA MINOLTA mc4650 PCL6 or KONICA MINOLTA
mc4650 PS printer icon and choose Printing Preferences.
Windows 2000
1 From the Start menu, point to Settings, and then click Printers to display
the Printers directory.
2 Right-click the KONICA MINOLTA mc4650 PCL6 or KONICA MINOLTA
mc4650 PS printer icon and choose Printer Properties.
Displaying Printer Driver Settings (for Windows)
15
Page 30

Using the Postscript and PCL Printer Driver
Common Buttons
The buttons described below appear on each tab.
OK
Click to exit the Properties dialog box, saving any changes made.
Cancel
Click to exit the Properties dialog box without saving any changes made.
Apply
Click to save all changes without exiting the Properties dialog box.
Help
Click to view the help.
Favorite Setting
This allows the current settings to be saved. To save the current settings,
specify the desired settings, and then click Add. Specify the settings
described below, and the click OK.
Name: Type in the name of the settings to be saved.
Comment: Add a simple comment to the settings to be saved.
Icon:Select an icon from the icon list to easily identify the settings.
The selected icon appears in the drop-down list.
Sharing: Specify whether or not the settings to be saved can be used by
other users logged onto the computer.
Afterward, the saved settings can be selected from the drop-down list. To
change the registered setting, click Edit.
Select Defaults from the drop-down list to reset the functions in all tabs to
their default values.
Paper View
Click the button to display a sample of the page layout in the figure area.
Using the Postscript and PCL Printer Driver16
Page 31

" This button does not appear on the Quality tab.
Printer View
Click the button to display an image of the printer (with all installed options) in
the figure area.
Quality View
Click this button to display a sample of the settings selected in the Quality
tab.
" This button appears only when the Quality tab is selected.
Default
Click this button to reset the settings to their defaults.
Advanced Tab (PostScript Printer Driver Only)
The Advanced Tab allows you to
Select whether to enable or disable the settings for advanced printing
functions (such as booklet printing)
Specify the PostScript output method
Specify whether or not the error messages of a print job are printed
Print a mirror image
Specify whether or not the application can directly output PostScript data
Basic Tab
The Basic Tab allows you to
Specify the orientation of the media
Specify the size of the original document
Select the output media size
Zoom (expand/reduce) documents
Specify the paper source
Specify the type of media
Specify the number of copies
Turn on/off job collation
Save a print job on the printer and print it later (Job Retention)
Using the Postscript and PCL Printer Driver
17
Page 32

Save a confidential job on the printer and protect it with a password
Print a single copy for proofing
Specify user authentication and account track settings
Print on the back side of paper that has already been printed on
" Use paper that has been printed on with this printer.
In addition, the page printed with this setting is not guaranteed.
" Do not use the following types of paper.
- Paper that has been printed on with an inkjet printer
- Paper that has been printed on with a monochrome/color laser
printer/copier
- Paper that has been printed on with any other printer or fax machine
Layout Tab
The Layout Tab allows you to
Print several pages of a document on the same page (N-up printing)
Specify booklet printing (magicolor 4650DN only)
Rotate the print image 180 degrees
Specify duplex (double-sided) printing (magicolor 4650DN only)
Specify whether or not blank pages are printed (PCL printer driver only)
Adjust the binding margin
Adjust the printing position (PCL printer driver only)
Specify the position on the paper where the document is to be printed
Cover Page Tab
The Cover Page Tab allows you to
Print front and back cover pages and separator pages
Specify the tray that contains the paper for the front and back cover pages
and separator pages
Watermark/Overlay Tab
" Be sure to use overlays with print jobs with a paper size and orienta-
tion that matches the overlay form.
In addition, if settings have been specified for “N-up” or “Booklet” in
the printer driver, the overlay form cannot be adjusted to match the
specified settings.
Using the Postscript and PCL Printer Driver18
Page 33

The settings in the “Overlay” function of the Watermark/Overlay tab allows
you to
Select the form to use
Add or delete overlay files
Launch Download Manager to download a form (PostScript printer driver
only)
" Download Manager Application should be installed earlier.
Create a form (PCL printer driver only)
Specify that the document and form are printed overlapping (PCL printer
driver only)
Display the form information (PCL printer driver only)
Print the form on All Pages, First Page, Even Pages and Odd Pages
Place the form in back of the document or in front on the printed docu-
ment (PCL printer driver only)
The settings in the “Watermark” function of the Watermark/Overlay tab allows
you to
Select the watermark to be used
Create, edit or delete watermarks
Lighten the density of the watermark
Print a frame around watermarks
Print transparent (shaded) watermarks
Print the watermark on only the first page
Print the watermark repeatedly throughout the all pages
Quality Tab
The Quality Tab allows you to
Switch between color and grayscale printing
Control the darkness of an image (Brightness)
Specify the printer color settings (Quick Color)
Specify the resolution for the printout
Perform color separation
Select whether or not economy printing is used
Set the edge strength to Low, Middle or High
Specify the amount of details in graphic patterns (PCL printer driver only)
Specify the format of fonts that are to be downloaded
Using the Postscript and PCL Printer Driver
19
Page 34

Print using the printer’s fonts
Control the tones of an image (Contrast) (PCL printer driver only)
Specify the image compression method (PCL printer driver only)
Other Tab
The Other Tab allows you to
Select that Microsoft Excel sheets are not to be divided when printing
Select that the white background of Microsoft PowerPoint data does not
hide overlay files (PCL printer driver only)
Send a notification by e-mail when printing is finished
Shows the version information for the printer driver
Prevent loss when printing fine lines
Limitations on printer driver functions installed with Point and Print
If Point and Print is performed with the following server and client combinations, there are limitations on some printer driver functions.
Server and client combinations
Server: Windows Server 2003/XP/2000/Vista
Client: Windows Server 2003/XP/2000/Vista
Functions with limitations applied
Booklet, Skip Blank Pages, Front Cover Page, Back Cover Page, Separator Page, Create Overlay, Print Overlay, Watermark
*JOBNAME, USERNAME, and HOSTNAME output of PJL
Using the Postscript and PCL Printer Driver20
Page 35

Using the Status
Monitor
(Windows Only)
Page 36

Working with the Status Monitor
Introduction
The Status Monitor shows information about the current status of the printer.
The Status Monitor can be installed from the Utilities and Documentation
CD-ROM.
For details on the installation, refer to the Reference Guide on the Utilities
and Documentation CD-ROM.
Operating Environment
The Status Monitor can be used on computers running Windows Vista/XP/
Server 2003/2000 connected to the printer using an Ethernet connection.
Opening the Status Monitor
Use one of the following steps to open the Status Monitor:
Windows Vista/XP/Server 2003—From the Start menu, choose All Pro-
grams, KONICA MINOLTA, and then Status Monitor. Double-click the
Status Monitor icon displayed in the taskbar.
Windows 2000—From the Start menu, choose Programs, KONICA
MINOLTA, and then Status Monitor. Double-click the Status Monitor icon
displayed in the task bar.
Using the Status Monitor
Status Tab
Select Printer—Selects the printer whose status is displayed. In addition,
the messages that appear in the message window of the selected printer
are displayed.
Graphic—Shows a graphic representation of the printer and indicates
where the problem is. When the background of the printer graphic is red
or yellow, there is an error and the job has been interrupted.
Advanced Options—Click Advanced Options to display the Advanced
Options dialog box. From the Advanced Options dialog box, select
whether the Status Monitor automatically starts when the operating system is started and whether error notifications are sent by e-mail.
Order Supplies—Click Order Supplies to automatically access the order
page for supplies. The address of the page that is accessed can be specified from the Advanced Options dialog box.
Working with the Status Monitor22
Page 37

Printer Alerts—Displays text messages that alert you of conditions such
as low toner.
Recovery Instructions—Provides you with explanations of what you
need to do in order to correct problems and recover from error conditions.
Consumables Tab
Displays the usage status (approximate percentage remaining) of each consumables.
Order Supplies—Click Order Supplies to automatically access the order
page for supplies. The address of the page that is accessed can be specified from the Advanced Options dialog box.
Refresh—Rechecks the supplies and displays their status.
" Click Help to display windows containing explanations of the Status
Monitor functions. Refer to this help for detailed information.
Recognizing Status Monitor Alerts
When the Status Monitor detects a printing problem, the icon on the Windows
task bar changes from green (normal) to yellow (warning), magenta or red
(error), depending on the severity of the printer problem.
Recovering from a Status Monitor Alert
When the Status Monitor notifies you of a printing problem, double-click its
icon on the Windows task bar to open the Status Monitor. The Status Monitor
identifies what type of error has occurred.
Closing the Status Monitor
Click Close to close the Status Monitor window. To exit Status Monitor,
right-click the Status Monitor icon in the taskbar, and then click Exit.
Recognizing Status Monitor Alerts
23
Page 38

Closing the Status Monitor24
Page 39

Printer Control
Panel and
Configuration
Menu
Page 40

About the Control Panel
The control panel, located on the top of the printer, allows you to direct the
printer’s operation. In addition, it displays the current status of the printer,
including any condition that needs your attention.
23 41
MESSAGE
WINDOW
65
About the Control Panel26
Page 41

Control Panel Indicators and Keys
No. Key Function
1 Cancels the currently displayed menu or menu
choice
Allows you to cancel one or all print jobs that
are currently being printed or processed:
1. Press the Cancel key.
2. Press the or keys to select either
RENT JOB
3. Press the Menu/Select key.
The print job(s) is (are) cancelled.
2 Enters the menu system
Moves down in the menu structure
Applies the selected setting
appears in the message window
3 Moves the cursor up
Returns to the status screen from the help
screen
Within a menu choice that is changeable char-
acter by character, scrolls upward through the
available characters
, appears in the message window
4 Moves the cursor to the right
Displays the next help screen
appears in the message window
5 Moves the cursor down
Displays the help screen when an error occurs
Within a menu choice that is changeable char-
acter by character, scrolls downward through
the available characters
or ALL JOBS.
CUR-
About the Control Panel
, appears in the message window
27
Page 42

No. Key Function
6 Moves the cursor to the left
Displays the previous help screen
appears in the message window
Message Window
The current status of the printer, the amount of toner remaining, and any error
messages can be viewed from the message window.
1
2
3
5
4
No. Details
1 The printer status is indicated by the color of the indicator and light-
ing/flashing of the message window.
READY: Indicator lit up in blue and window lit up
PROCESSING or PRINTING: Indicator flashing and window lit up
ENERGY SAVE: Indicator lit up in blue and window goes off
ERROR: Indicator lit up in red and window lit up
About the Control Panel28
Page 43

No. Details
2 The current status of the printer is displayed.
If the operator or service representative must be called, the sym-
bol and the error status are displayed.
If a warning occurs, the symbol appears.
When a digital camera is connected to the KONICA MINOLTA
Digital Camera Direct Print Port with a USB cable, the sym-
bol appears on the right side of the message window.
When a USB memory device is plugged into the KONICA
MINOLTA Digital Camera Direct Print Port, the symbol appears on the right side of the message window.
While a print job is being received, the symbol appears on the
right side of the message window. While a camera direct or mem-
ory direct print job is being received, the symbol appears.
3 Error messages are displayed.
While a print job is being received, the user name and the print
progress are displayed.
While updating the firmware, the type of firmware being updated
and the update progress are displayed.
4 Key information is displayed.
5 The approximate amount of toner remaining is displayed.
Help Screens
The help screens appear when the key is pressed after an error occurred,
such as a media misfeed, so that the error can be corrected.
About the Control Panel
29
Page 44

Configuration Menu Overview
The configuration menu accessible from the control panel is structured as
shown below.
Main Menu
READY
PROOF/
PRINT MENU
PRINT
MENU
PAPER
MENU
QUALITY
MENU
MEMORY DIRECT
CAMERA DIRECT
INTERFACE
MENU
SYS DEFAULT
MENU
MAINTENANCE
MENU
SERVICE
MENU
*
**
***
" * This menu item appears only if an optional hard disk kit is installed.
** This menu item appears when an optional hard disk kit or a CompactFlash card is installed, and
DIRECT
is set to ENABLE.
*** This menu item appears when INTERFACE MENU/CAMERA
DIRECT
is set to ENABLE.
INTERFACE MENU/MEMORY
Configuration Menu Overview30
Page 45

" MEMORY DIRECT and CAMERA DIRECT do not appear if public
user access has not been permitted through authentication settings.
For details on the authentication settings, refer to the Reference Guide
on the Utilities and Documentation CD-ROM.
Configuration Menu Overview
31
Page 46

PROOF/PRINT MENU
" This menu item appears only if an optional hard disk kit is installed.
With this menu item, print jobs that were set to be saved on the hard disk by
using Job Retention on the Basic tab of the printer driver can be printed or
deleted.
" All factory default values are shown in bold.
PROOF/
PRINT MENU
“User name”
“Job name”
DELETEPRINT
“Job name”
COPIES
1
“Job name”
YES
NO
Printing/Deleting a Stored Job
1 Follow the procedure described below to select a job.
Press Key Until Display Reads
PROOF/PRINT MENU
“User name”
If no print jobs have been stored on the hard disk,
NO STORED JOB appears.
Configuration Menu Overview32
Page 47

Press Key Until Display Reads
,
Press until the desired
user name appears.
Desired user name
Job name”
“
,
Press until the desired
job name appears.
Desired job name
PRINT
DELETE
If the selected print job was set as a secured job
from the printer driver, a screen for entering the
password appears. For details on typing the
password, refer to “Entering the Password” on page
34.
2 Select PRINT or DELETE, and then press the Menu/Select key.
" If PRINT was selected, continue with step 3.
DELETE was selected, continue with step 5.
If
3 Press the and keys to specify the number of copies to be printed.
(Settings:
4 Press the Menu/Select key.
Printing begins.
5 Select YES or NO.
6 Press the Menu/Select key.
YES was selected, the print job is deleted.
If
If NO was selected, the PRINT/DELETE selection screen appears
again.
1 to 999; Default: 1)
Configuration Menu Overview
33
Page 48

Entering the Password
If the print job selected in the PROOF/PRINT MENU is a secured job, a
screen for entering the password appears. Follow the procedure described
below to type in the four-digit password specified from the printer driver.
1 Press the to increase or the to decrease the first digit of the pass-
word.
2 Press the key to move the cursor to the next digit.
3 Press the to increase or the to decrease the second digit of the
password.
4 Continue these steps until all four digits of the password are specified.
5 Press the Menu/Select key.
PRINT/DELETE selection screen appears.
The
" If an incorrect password is entered, INVALID ENTRY appears and
the screen for entering the password appears again.
Configuration Menu Overview34
Page 49

PRINT MENU
With this menu, printer information, such as the configuration page and the
demo page, can be printed.
PRINT MENU
CONFIGURATION
PG
DEMO PAGE
STATISTICS PAGE
FONT LIST
MENU MAP
DIRECTORY LIST
*
POSTSCRIPT
PCL
" * This menu item appears only if an optional hard disk kit or a Com-
pactFlash card is installed.
" All factory default values are shown in bold.
CONFIGURATION PG
DEMO PAGE
STATISTICS
PAGE
Settings
Prints the configuration page.
Settings
Prints the demo page.
Settings
Prints the statistics page such as the number of pages
printed.
PRINT/CANCEL
PRINT/CANCEL
PRINT/CANCEL
Configuration Menu Overview
35
Page 50

FONT LIST POST
SCRIPT
PCL
MENU MAP
DIRECTORY
LIST
Settings
Prints the menu map.
Settings
Prints the directory list of the hard disk or a CompactFlash
card .
Settings
Prints the PostScript font list.
Settings
Prints the PCL font list.
PRINT/CANCEL
PRINT/CANCEL
PRINT/CANCEL
PRINT/CANCEL
Configuration Menu Overview36
Page 51

PAPER MENU
With this menu, the paper used for printing can be managed.
PAPER MENU
PAPER SOURCE
****
DUPLEX
COPIES
*****
COLLATE
DEFAULT TRAY
TRAY 1 PAPER SIZE
CUSTOM SIZE
PAPER TYPE
TRAY 2
***
TRAY 3
TRAY CHAINING
PAPER SIZE
CUSTOM SIZE
PAPER TYPE
PAPER SIZE
PAPER TYPE
*
**
Configuration Menu Overview
TRAY MAPPING
TRAY MAPPING
MODE
LOGICAL TRAY
0
LOGICAL TRAY
9
37
Page 52

" * This menu item appears only when you select CUSTOM from the
TRAY 1/PAPER SIZE menu.
**This menu item appears only when you select
TRAY 2/PAPER SIZE menu.
*** This menu item appear only if the optional lower feeder unit is
installed.
**** This menu item appears only magicolor 4650DN.
***** This menu item appears only if an optional hard disk kit or a
CompactFlash card of 1 GB or more is installed.
CUSTOM from the
" All factory default values are shown in bold.
PAPER
SOURCE
DEFAULT
TRAY
Settings
Select the setting for the default tray.
" TRAY 3 appears only if the optional lower
feeder unit is installed.
TRAY 1 PAPER
SIZE
TRAY1/TRAY2/TRAY3
Settings
Select the setting for the size of paper
loaded into Tray 1.
ANY/LETTER/LEGAL/
EXECUTIVE/A4/A5/A6/
B5(JIS)/B6(JIS)/GOVT
LETTER/STATEMENT/
FOLIO/SP FOLIO/UK
QUARTO/FOOLSCAP/GOVT
LEGAL/16K/PHOTO 4×6/
KAI 16/KAI 32/ENV C6/
ENV DL/ENV MONARCH/
ENV CHOU#3/ENV
CHOU#4/B5(ISO)/ENV
#10/JPOST/JPOST-D/
CUSTOM
" The default setting for North
America is
setting for all other regions is
LETTER. The default
A4.
" Depending on the setting selected
for SYS DEFAULT MENU/
PAPER/UNIT OF MEASURE
PHOTO 4×6 may change to
PHOTO 10×15.
Configuration Menu Overview38
,
Page 53

CUSTOM
SIZE
Specify the paper size when custom-sized
paper is loaded into Tray 1.
The setting units can be switched between
millimeters and inches with the
DEFAULT MENU/PAPER/UNIT OF
MEASURE
Setting range for WIDTH
For MILLIMETERS: 92 to 216 mm
(default)
setting.
SYS
– North America: 216 mm
– All other regions: 210 mm
For INCHES: 3.63 to 8.50 inches
(default)
– North America: 8.50 inches
– All other regions: 8.26 inches
Setting range for LENGTH
For MILLIMETERS: 148 to 356 mm
(default)
Configuration Menu Overview
– North America: 279 mm
– All other regions: 297 mm
For INCHES: 5.83 to
14.00 inches
(default)
– North America: 11.00 inches
– All other regions: 11.69 inches
" This menu item appears only if
PAPER SIZE is set to CUSTOM.
39
Page 54

PAPER
TYPE
TRAY 2 PAPER
SIZE
Settings
Select the setting for the type of paper
loaded into Tray 1.
Settings
Select the setting for the size of paper
loaded into Tray 2.
ANY/PLAIN PAPER/
RECYCLED/THICK 1/
THICK 2/LABEL/
TRANSPARENCY/
ENVELOPE/POSTCARD/
LETTERHEAD/GLOSSY 1/
GLOSSY 2
ANY/LETTER/EXECUTIVE/
A4/A5/A6/
B5(JIS)/B6(JIS)/GOVT
LETTER/STATEMENT/UK
QUARTO/16K/PHOTO 4×6/
KAI 16/KAI 32/CUSTOM
" The default setting for North
America is
setting for all other regions is A4.
LETTER. The default
" Depending on the setting selected
for SYS DEFAULT MENU/
PAPER/UNIT OF MEASURE,
PHOTO 4×6 may change to
PHOTO 10×15.
Configuration Menu Overview40
Page 55

CUSTOM
SIZE
Specify the paper size when custom-sized
paper is loaded into Tray 2.
The setting units can be switched between
millimeters and inches with the
DEFAULT MENU/PAPER/UNIT OF
MEASURE
Setting range for WIDTH
For MILLIMETERS: 92 to 216 mm
(default)
setting.
SYS
– North America: 216 mm
– All other regions: 210 mm
For INCHES: 3.63 to 8.50 inches
(default)
– North America: 8.50 inches
– All other regions: 8.26 inches
Setting range for LENGTH
For MILLIMETERS: 148 to 297 mm
(default)
PAPER
TYPE
Configuration Menu Overview
– North America: 279 mm
– All other regions: 297 mm
For INCHES: 5.83 to
11.69 inches
(default)
– North America: 11.00 inches
– All other regions: 11.69 inches
" This menu item appears only if
PAPER SIZE is set to CUSTOM.
Settings
Select the setting for the type of paper
loaded into Tray 2.
ANY/PLAIN PAPER/
RECYCLED
41
Page 56

TRAY 3 PAPER
SIZE
PAPER
TYPE
TRAY
CHAINING
TRAY
MAPPING
Settings
If ON is selected and the specified tray runs out of
paper during printing, a tray loaded with paper of the
same size is automatically selected so printing can
continue.
OFF is selected and the specified tray runs out of
If
paper, printing stops.
TRAY
MAPPING
MODE
LOGICAL
TRAY
0-9
The size of paper loaded in Tray 3 is
indicated.
This menu item only shows the current
setting. This setting cannot be changed.
Settings
ANY/PLAIN PAPER/
RECYCLED
Select the setting for the type of paper
loaded into Tray 3.
ON/OFF
Settings
Select whether or not the Tray Mapping
function is used.
Settings
ON/OFF
PHYSICAL TRAY1/
PHYSICAL TRAY2/
PHYSICAL TRAY3
Select the tray that is used for printing
when a print job is received from another
manufacturer’s printer driver.
The default setting for
TRAY 1
default setting for all other trays is
is PHYSICAL TRAY1. The
ICAL TRAY2
LOGICAL
PHYS-
.
" PHYSICAL TRAY3 appears only if
an optional lower feeder unit is
installed.
Configuration Menu Overview42
Page 57

DUPLEX
COPIES
COLLATE
Settings
If LONG EDGE is selected, the pages will be printed on both sides
of the paper for long-edge binding.
If SHORT EDGE is selected, the pages will be printed on both
sides of the paper for short-edge binding.
The setting specified in the printer driver will override this menu
setting.
OFF/LONG EDGE/SHORT EDGE
" For magicolor 4650DN only
Settings
Specify the number of copies to be printed.
The setting specified in the printer driver will override this menu
setting.
Settings
If ON is selected, all pages of the document are printed before the
next copy is printed.
If OFF is selected, all copies of the document are not printed
separately.
The setting specified in the printer driver will override this menu
setting.
1-9999
ON/OFF
" This menu item appears only if an optional hard disk kit or a
CompactFlash card of 1GB or more is installed.
Configuration Menu Overview
43
Page 58

QUALITY MENU
With this menu, settings for the print quality can be specified.
QUALITY MENU
COLOR MODE
BRIGHTNESS
HALFTONE
EDGE
ENHANCEMENT
EDGE STRENGTH
ECONOMY PRINT
PCL SETTING CONTRAST
IMAGE PRINTING
TEXT PRINTING
GRAPHICS
PRINTING
IMAGE PRINTING
TEXT PRINTING
GRAPHICS
PRINTING
IMAGE PRINTING
RGB SOURCE
RGB INTENT
RGB GRAY
Configuration Menu Overview44
Page 59

TEXT PRINTING RGB SOURCE
RGB INTENT
RGB GRAY
PS SETTING
GRAPHICS
PRINTING
IMAGE PRINTING RGB SOURCE
TEXT PRINTING RGB SOURCE
RGB SOURCE
RGB INTENT
RGB GRAY
RGB INTENT
RGB GRAY
DESTINATION
PROF
RGB INTENT
RGB GRAY
DESTINATION
PROF
Configuration Menu Overview
GRAPHICS
PRINTING
RGB SOURCE
RGB INTENT
RGB GRAY
DESTINATION
PROF
45
Page 60

SIMULATION
SIMULATION PROF
CALIBRATION
COLOR
SEPARATION
TONE CALIBRATION
AIDC PROCESS
CMYK DENSITY
" All factory default values are shown in bold.
COLOR
MODE
BRIGHTNESS
HALFTONE IMAGE
Settings
COLOR/GRAYSCALE
If COLOR is selected, the pages are printed in full color.
GRAYSCALE is selected, the pages are printed in black
If
and white.
Settings
-15%/-10%/-5%/0%/+5%/+10%/
+15%
The brightness of the printed image can be adjusted.
Settings
PRINTING
Select how halftones in images are
reproduced.
LINE ART/DETAIL/
SMOOTH
SIMULATION
INTENT
CMYK GRAY
CYAN
MAGENTA
YELLOW
BLACK
LINE ART is selected, halftones are
If
reproduced with high precision.
DETAIL is selected, halftones are
If
reproduced with detail.
SMOOTH is selected, halftones are
If
reproduced with smoothness.
Configuration Menu Overview46
Page 61

EDGE
ENHANCEMENT
TEXT
PRINTING
GRAPHICS
PRINTING
IMAGE
PRINTING
Settings
LINE ART/DETAIL/
SMOOTH
Select how halftones in text are
reproduced.
LINE ART is selected, halftones are
If
reproduced with high precision.
DETAIL is selected, halftones are
If
reproduced with detail.
If
SMOOTH is selected, halftones are
reproduced with smoothness.
Settings
LINE ART/DETAIL/
SMOOTH
Select how halftones in graphics are
reproduced.
If LINE ART is selected, halftones are
reproduced with high precision.
DETAIL is selected, halftones are
If
reproduced with detail.
If SMOOTH is selected, halftones are
reproduced with smoothness.
Settings
Select whether image edges are
emphasized.
ON/OFF
Configuration Menu Overview
If ON is selected, the edges are emphasized.
OFF is selected, the edges are not
If
emphasized.
" If ECONOMY PRINT is set to ON,
the edges cannot be emphasized.
47
Page 62

EDGE
STRENGTH
TEXT
PRINTING
GRAPHICS
PRINTING
Settings
Select whether text edges are
emphasized.
ON is selected, the edges are empha-
If
sized.
OFF is selected, the edges are not
If
emphasized.
Settings
Select whether graphic edges are
emphasized.
ON is selected, the edges are empha-
If
sized.
If OFF is selected, the edges are not
emphasized.
ON/OFF
ON/OFF
" If ECONOMY PRINT is set to ON,
the edges cannot be emphasized.
Settings
Select the desired amount that edges are emphasized.
If OFF is selected, the edges are not emphasized.
If LOW is selected, the edges are slightly emphasized.
OFF/LOW/MIDDLE/HIGH
If MIDDLE is selected, the edges are emphasized by an
average amount.
If HIGH is selected, the edges are highly emphasized.
" If OFF is selected, the edges are not emphasized,
even if an
ON.
to
EDGE ENHANCEMENT menu item is set
Configuration Menu Overview48
Page 63

ECONOMY
PRINT
PCL
SETTING
Settings
Select whether to print graphics with a reduced density by
reducing the amount of toner that is used.
ON is selected, the amount of toner used is reduced when
If
printing.
OFF is selected, the amount of toner used is not reduced
If
when printing.
ON/OFF
" If ON is selected, the edges are not emphasized, even
if IMAGE PRINTING and GRAPHICS PRINTING
EDGE ENHANCEMENT menu item are set to
of the
ON.
CONTRAST
IMAGE
PRINTING
Settings
-15%/-10%/-5%/0%/
+5%/+10%/+15%
The contrast of the image can be
adjusted.
RGB
SOURCE
RGB
INTENT
Settings
DEVICE COLOR/
sRGB
Specify the color space for
RGB image data.
If DEVICE COLOR is
selected, no color space is
specified.
If RGB source profiles are
downloaded with the Download
Manager, they are available
from the list of settings.
Settings
VIVID/
PHOTOGRAPHIC
Specify the characteristic
applied when converting RGB
image data to CMYK data.
Configuration Menu Overview
VIVID is selected, a vivid
If
output is produced.
If PHOTOGRAPHIC is
selected, a brighter output is
produced.
49
Page 64

TEXT
PRINTING
RGB
GRAY
RGB
SOURCE
Settings
COMPOSITE
BLACK/BLACK
AND GRAY/
BLACK ONLY
Specify how black and grays
are reproduced in RGB image
data.
COMPOSITE BLACK is
If
selected, black is reproduced
using the CMYK colors.
If
BLACK AND GRAY is
selected, black and gray are
reproduced using black only.
BLACK ONLY is selected,
If
black is reproduced using only
black.
Settings
DEVICE COLOR/
sRGB
Specify the color space for
RGB text data.
DEVICE COLOR is
If
selected, no color space is
specified.
If RGB source profiles are
downloaded with the Download
Manager, they are available
from the list of settings.
Configuration Menu Overview50
Page 65

RGB
INTENT
RGB
GRAY
Settings
VIVID/
PHOTOGRAPHIC
Specify the characteristic
applied when converting RGB
text data to CMYK data.
VIVID is selected, a vivid
If
output is produced.
If PHOTOGRAPHIC is
selected, a brighter output is
produced.
Settings
COMPOSITE
BLACK/BLACK
AND GRAY/
BLACK ONLY
Specify how black and grays
are reproduced in RGB text
data.
COMPOSITE BLACK is
If
selected, black is reproduced
using the CMYK colors.
BLACK AND GRAY is
If
selected, black and gray are
reproduced using black only.
GRAPHICS
PRINTING
Configuration Menu Overview
RGB
SOURCE
If BLACK ONLY is selected,
black is reproduced using only
black.
Settings
DEVICE COLOR/
sRGB
Specify the color space for
RGB GRAPHICS data.
DEVICE COLOR is
If
selected, no color space is
specified.
If RGB source profiles are
downloaded with the Download
Manager, they are available
from the list of settings.
51
Page 66

RGB
INTENT
RGB
GRAY
Settings
VIVID/
PHOTOGRAPHIC
Specify the characteristic
applied when converting RGB
GRAPHICS data to CMYK
data.
VIVID is selected, a vivid
If
output is produced.
If PHOTOGRAPHIC is
selected, a brighter output is
produced.
Settings
COMPOSITE
BLACK/BLACK
AND GRAY/
BLACK ONLY
Specify how black and grays
are reproduced in RGB
GRAPHICS data.
COMPOSITE BLACK is
If
selected, black is reproduced
using the CMYK colors.
BLACK AND GRAY is
If
selected, black and gray are
reproduced using black only.
BLACK ONLY is selected,
If
black is reproduced using only
black.
Configuration Menu Overview52
Page 67

PS
SETTINGS
IMAGE
PRINTING
RGB
SOURCE
RGB
INTENT
Settings
DEVICE COLOR/
sRGB/
AppleRGB/
AdobeRGB1998/
ColorMatchRGB/
BlueAdjustRGB
Specify the color space for
RGB image data.
If DEVICE COLOR is
selected, no color space is
specified.
If RGB source profiles are
downloaded with the Download
Manager, they are available
from the list of settings.
Settings
VIVID/
PHOTOGRAPHIC/
RELATIVE
COLOR/
ABSOLUTE
COLOR
Specify the characteristic
applied when converting RGB
image data to CMYK data.
Configuration Menu Overview
VIVID is selected, a vivid
If
output is produced.
PHOTOGRAPHIC is
If
selected, a brighter output is
produced.
RELATIVE COLOR is
If
selected, relative color is
applied to the RGB source
profile.
ABSOLUTE COLOR is
If
selected, absolute color is
applied to the RGB source
profile.
53
Page 68

RGB
GRAY
DESTINATION
PROF
Settings
COMPOSITE
BLACK/BLACK
AND GRAY/
BLACK ONLY
Specify how black and grays
are reproduced in RGB image
data.
COMPOSITE BLACK is
If
selected, black is reproduced
using the CMYK colors.
If
BLACK AND GRAY is
selected, black and gray are
reproduced using black only.
BLACK ONLY is selected,
If
black is reproduced using only
black.
Settings
Specify the destination profile.
If AUTO is selected, a
destination profile that the
printer automatically adapts is
selected based on a
combination of the specified
color matching, halftones and
other profiles.
If destination profiles are
downloaded with the Download
Manager, they are available
from the list of settings.
AUTO
Configuration Menu Overview54
Page 69

TEXT
PRINTING
RGB
SOURCE
RGB
INTENT
Settings
DEVICE COLOR/
sRGB/
AppleRGB/
AdobeRGB1998/
ColorMatchRGB/
BlueAdjustRGB
Specify the color space for
RGB text data.
If DEVICE COLOR is
selected, no color space is
specified.
If RGB source profiles are
downloaded with the Download
Manager, they are available
from the list of settings.
Settings
VIVID/
PHOTOGRAPHIC/
RELATIVE
COLOR/
ABSOLUTE
COLOR
Specify the characteristic
applied when converting RGB
text data to CMYK data.
Configuration Menu Overview
VIVID is selected, a vivid
If
output is produced.
PHOTOGRAPHIC is
If
selected, a brighter output is
produced.
RELATIVE COLOR is
If
selected, relative color is
applied to the RGB source
profile.
ABSOLUTE COLOR is
If
selected, absolute color is
applied to the RGB source
profile.
55
Page 70

RGB
GRAY
DESTINATION
PROF
Settings
COMPOSITE
BLACK/BLACK
AND GRAY/
BLACK ONLY
Specify how black and grays
are reproduced in RGB text
data.
COMPOSITE BLACK is
If
selected, black is reproduced
using the CMYK colors.
If
BLACK AND GRAY is
selected, black and gray are
reproduced using black only.
BLACK ONLY is selected,
If
black is reproduced using only
black.
Settings
Specify the destination profile.
If AUTO is selected, a
destination profile that the
printer automatically adapts is
selected based on a
combination of the specified
color matching, halftones and
other profiles.
If destination profiles are
downloaded with the Download
Manager, they are available
from the list of settings.
AUTO
Configuration Menu Overview56
Page 71

GRAPHICS
PRINTING
RGB
SOURCE
RGB
INTENT
Settings
DEVICE COLOR/
sRGB/
AppleRGB/
AdobeRGB1998/
ColorMatchRGB/
BlueAdjustRGB
Specify the color space for
RGB image data.
If DEVICE COLOR is
selected, no color space is
specified.
If RGB source profiles are
downloaded with the Download
Manager, they are available
from the list of settings.
Settings
VIVID/
PHOTOGRAPHIC/
RELATIVE
COLOR/
ABSOLUTE
COLOR
Specify the characteristic
applied when converting RGB
image data to CMYK data.
Configuration Menu Overview
VIVID is selected, a vivid
If
output is produced.
PHOTOGRAPHIC is
If
selected, a brighter output is
produced.
RELATIVE COLOR is
If
selected, relative color is
applied to the RGB source
profile.
ABSOLUTE COLOR is
If
selected, absolute color is
applied to the RGB source
profile.
57
Page 72

RGB
GRAY
DESTINATION
PROF
Settings
COMPOSITE
BLACK/BLACK
AND GRAY/
BLACK ONLY
Specify how black and grays
are reproduced in RGB image
data.
COMPOSITE BLACK is
If
selected, black is reproduced
using the CMYK colors.
If
BLACK AND GRAY is
selected, black and gray are
reproduced using black only.
BLACK ONLY is selected,
If
black is reproduced using only
black.
Settings
Specify the destination profile.
If AUTO is selected, a
destination profile that the
printer automatically adapts is
selected based on a
combination of the specified
color matching, halftones and
other profiles.
If destination profiles are
downloaded with the Download
Manager, they are available
from the list of settings.
AUTO
Configuration Menu Overview58
Page 73

SIMULATION SIMU-
LATION
PROF
SIMULATION
INTENT
Settings
NONE/SWOP/
Euroscale/
CommercialPre
ss/TOYO/DIC
Specify the simulation profile.
If NONE is selected, no
simulation profile is specified.
If simulation profiles are
downloaded with the Download
Manager, they are available
from the list of settings.
Settings
RELATIVE
COLOR/
ABSOLUTE
COLOR
Specify the characteristic of the
simulation profile.
RELATIVE COLOR is
If
selected, relative color is
applied to the simulation
profile.
ABSOLUTE COLOR is
If
selected, absolute color is
applied to the simulation
profile.
Configuration Menu Overview
59
Page 74

CALIBRATION
TONE
CALIBRATION
AIDC
PROCESS
CMYK
GRAY
Settings
COMPOSITE
BLACK/BLACK
AND GRAY/
BLACK ONLY
Specify how black and grays
are reproduced using the four
CMYK colors.
COMPOSITE BLACK is
If
selected, black is reproduced
using the CMYK colors.
If
BLACK AND GRAY is
selected, black and gray are
reproduced using black only.
BLACK ONLY is selected,
If
black is reproduced using only
black.
Settings
If ON is selected, image adjustments are
applied.
If OFF is selected, image adjustments are
not applied.
Settings
If EXECUTE is selected, image
adjustments are performed immediately.
ON/OFF
EXECUTE/CANCEL
If CANCEL is selected, image adjustments are not performed.
Configuration Menu Overview60
Page 75

COLOR
SEPARATION
CMYK
DENSITY
CYAN/
MAGENTA/
YELLOW/
BLACK
HIGHLIGHT
MIDDLE
Settings
-3/-2/
-1/0/
+1/+2/
+3
The density of the
highlight color in
images can be
adjusted.
Settings
-3/-2/
-1/0/
+1/+2/
+3
The density of the
middle color in
images can be
adjusted.
SHADOW
Settings
-3/-2/
-1/0/
+1/+2/
+3
The density of the
shadow color in
images can be
adjusted.
Settings
If ON is selected, color separation are performed. The
contents of a color page is separated into the color pages
for yellow, magenta, cyan and black, and each is printed
with black gradations as individual pages. The printing order
is yellow, magenta, cyan, then black.
ON/OFF
OFF is selected, color separation is not performed. A
If
normal color separation is performed.
Configuration Menu Overview
61
Page 76

MEMORY DIRECT
This menu item appears when an optional hard disk kit or a CompactFlash
card is installed, and
ENABLE
In addition, this menu item does not appear if public user access has not
been permitted through authentication settings. For details on the authentication settings, refer to the Reference Guide on the Utilities and Documentation
CD-ROM.
With this menu, settings for “memory direct” function can be specified.
.
INTERFACE MENU/MEMORY DIRECT is set to
" For details on memory direct, refer to “Memory Direct” on page 98.
MEMORY DIRECT
LIST OF FILES
TYPE OF FILES
*
" * This menu item appears when a USB memory device is plugged into
the KONICA MINOLTA Digital Camera Direct Print Port.
" All factory default values are shown in bold.
LIST
OF
FILES
Select the file that you wish to output, and then press the Menu/
Select key.
If the file to be printed is in a folder, select the folder, and then
press the Menu/Select key.
Settings
Select this setting to output a file.
Settings
Select this setting to stop outputting and to return to the file list.
PRINT
CANCEL
Configuration Menu Overview62
Page 77

Letter/
A4
DUPLEX:
OFF
Settings
Change the size of the paper.
LETTER/LEGAL/EXECUTIVE/A4/
A5/A6/B5(JIS)/B6(JIS)/GOVT
LETTER/STATEMENT/FOLIO/SP
FOLIO/UK QUARTO/FOOLSCAP/
GOVT LEGAL/16K/PHOTO 4×6/
KAI 16/KAI 32/ENV C6/ENV
DL/ENV MONARCH/ENV CHOU#3/
ENV CHOU#4/B5(ISO)/ENV #10/
JPOST/JPOST-D/CUSTOM
" The default setting for North America is
LETTER. The default setting for all other
regions is
A4.
" Depending on the setting selected for SYS
DEFAULT MENU/PAPER/UNIT OF
MEASURE
PHOTO 10×15.
, PHOTO 4×6 may change to
" This menu item does not appear if the
selected file is PDF and XPS file.
Settings
Select whether to perform duplex printing.
LONG EDGE/SHORT EDGE/OFF
LONG EDGE is selected, the page will be printed
If
on both sides of the paper for long edge binding.
If SHORT EDGE is selected, the page will be
printed on both sides of the paper for short edge
binding.
OFF is selected, duplex printing is not performed.
If
" For magicolor 4650DN only.
COPIES:1
Configuration Menu Overview
Settings
Specify the number of copies to be printed (between
1 and 9999).
1-9999
63
Page 78

TYPE
OF
FILES
COLLATE
Settings
Select whether to collate the copies.
ON is selected, collated printing is performed.
If
If OFF is selected, collated printing is not performed.
ON/OFF
" This menu item appears only if the optional
hard disk kit or a CompactFlash card of 1GB
or more is installed.
Settings PDF,XPS,JPEG,TIFF/PDF,XPS
Select the type of files to be displayed.
Configuration Menu Overview64
Page 79

CAMERA DIRECT
This menu item appears when INTERFACE MENU/CAMERA DIRECT is
ENABLE.
set to
In addition, this menu item does not appear if public user access has not
been permitted through authentication settings. For details on the authentication settings, refer to the Reference Guide on the Utilities and Documentation
CD-ROM.
With this menu, settings for “camera direct” function can be specified.
" These settings are overridden by any settings configured within the
digital camera.
For details on camera direct, refer to “Camera Direct” on page 96.
CAMERA DIRECT
PAPER SOURCE
LAYOUT
PAPER MARGIN
IMAGE QUALITY
Configuration Menu Overview
BRIGHTNESS
CONTRAST
ECONOMY PRINT
RGB SOURCE
RGB INTENT
RGB GRAY
HALFTONE
65
Page 80

" All factory default values are shown in bold.
PAPER
SOURCE
LAYOUT
PAPER
MARGIN
IMAGE
QUALITY
Settings
Select the tray that is used for camera direct printing.
TRAY1/TRAY2/TRAY3
" TRAY3 appears only if the optional lower feeder unit is
installed.
Settings
Specify the number of images printed on a single sheet of media.
When set to
sheet of media.
Settings
Select the size of the media margins (area that is not printed in).
If
STANDARD is selected, the standard media margin size is
specified.
If
MINIMUM is selected, the media margins are reduced.
BRIGHTNESS
CONTRAST
ECONOMY
PRINT
1-UP/2-UP/3-UP/4-UP/6-UP/8-UP
1-UP, only one image will be printed on a single
STANDARD/MINIMUM
Settings
-15%/-10%/-5%/0%/+5%/+10%/
+15%
The brightness of the printed image can be
adjusted.
Settings
-15%/-10%/-5%/0%/+5%/+10%/
+15%
The contrast of the image can be adjusted.
Settings
Select whether to print graphics with a reduced
density by reducing the amount of toner that is used.
If
ON is selected, the amount of toner used is
reduced when printing.
ON/OFF
If OFF is selected, the amount of toner used is not
reduced when printing.
Configuration Menu Overview66
Page 81

RGB
SOURCE
RGB
INTENT
RGB GRAY
HALFTONE
Settings
Specify the color space for RGB image data.
DEVICE COLOR is selected, no color space is
If
specified.
Settings
Specify the characteristic applied when converting
RGB image data to CMYK data.
If VIVID is selected, a vivid output is produced.
If PHOTOGRAPHIC is selected, a brighter output is
produced.
Settings
DEVICE COLOR/sRGB
VIVID/PHOTOGRAPHIC
COMPOSITE BLACK/BLACK AND
GRAY/BLACK ONLY
Specify how black and grays are reproduced in
RGB image data.
COMPOSITE BLACK is selected, black is
If
reproduced using the CMYK colors.
If BLACK AND GRAY is selected, black and gray
are reproduced using black only.
If BLACK ONLY is selected, black is reproduced
using only black.
Settings
Select how halftones are reproduced.
If
LINE ART is selected, halftones are reproduced
with high precision.
DETAIL is selected, halftones are reproduced
If
with detail.
If
SMOOTH is selected, halftones are reproduced
with smoothness.
LINE ART/DETAIL/SMOOTH
Configuration Menu Overview
67
Page 82

INTERFACE MENU
With this menu, interface settings can be specified.
" Restart the printer after changing settings in the ETHERNET menu.
INTERFACE MENU
JOB TIMEOUT
ETHERNET
MEMORY
**
DIRECT
CAMERA
DIRECT
TCP/IP ENABLE
IP ADDRESS
SUBNET MASK
DEFAULT
GATEWAY
DHCP
BOOTP
ARP/PING
HTTP
*
FTP
TELNET
BONJOUR
*
*
*
*
*
*
*
ENABLE
ENABLE
*
*
ENABLE
Configuration Menu Overview68
DYNAMIC DNS
*
IPP
*
ENABLE
ENABLE
Page 83

"
RAW PORT
*
SLP
*
SMTP
*
SNMP
*
ENABLE
BIDIRECTIONAL
ENABLE
ENABLE
ENABLE
WSD PRINT
IPSEC
IP ADDRESS
FILTER
IPv6
NETWARE
APPLETALK
SPEED/
DUPLEX
IEEE802.1X
*This menu item appears when INTERFACE MENU/ETHERNET/
"
TCP/IP/ENABLE
is set to YES.
ENABLE
ENABLE
ENABLE
*
*
*
*
** This menu item appears only if an optional hard disk kit or a CompactFlash card is installed.
ENABLE
ENABLE
ACCESS PERMISSION
ACCESS
REFUSE
ENABLE
AUTO
SETTING
LINK LOKAL
GLOBAL
ADDRESS
GATEWAY
ADDRESS
Configuration Menu Overview
69
Page 84

" All factory default values are shown in bold.
JOB
TIMEOUT
ETHERNET
Settings
Specify the timeout interval for a print job being received.
TCP/IP ENABLE
5 seconds-15 seconds-300 seconds
IP
ADDRESS
Settings
If YES is selected, TCP/IP is enabled.
If NO is selected, TCP/IP is disabled.
Setting
Set the IP address for this printer on the
network.
Use the , , , and keys to
specify the value.
If the IP address is manually specified,
YES/NO
000.000.000.000
DHCP/BOOTP is automatically set to
OFF.
SUBNET
MASK
DEFAULT
GATEWAY
DHCP
Setting
Specify the subnet mask for the network.
Use the , , , and keys to
specify the value.
Setting
Specify the IP address of the router if
one is on the network. Use the , ,
Settings
Select whether or not the IP address is
automatically acquired.
255.255.000.000
000.000.000.000
, and keys to specify the value.
ON/OFF
ON is selected, the IP address is auto-
If
matically acquired.
OFF is selected, the IP address is not
If
automatically acquired.
Configuration Menu Overview70
Page 85

BOOTP
ARP/
PING
Settings
Select whether or not the IP address is
automatically acquired.
ON is selected, the IP address is auto-
If
matically acquired.
OFF is selected, the IP address is not
If
automatically acquired.
Settings
Select whether or not the IP address is
automatically acquired.
ON is selected, the IP address is auto-
If
matically acquired.
If OFF is selected, the IP address is not
automatically acquired.
HTTP ENABLE
FTP ENABLE
TELNET
Settings
Select whether to enable or disable
Telnet transmissions.
ENABLE is selected, Telnet trans-
When
missions are enabled.
ON/OFF
ON/OFF
Settings
If YES is selected, HTTP is
enabled.
If NO is selected, HTTP is disabled.
Settings
If YES is selected, FTP is
enabled.
If NO is selected, FTP is disabled.
YES/NO
YES/NO
ENABLE/DISABLE
BONJOUR ENABLE
Configuration Menu Overview
When DISABLE is selected, Telnet
transmissions are disabled.
Settings
If YES is selected, Bonjour is
enabled.
If NO is selected, Bonjour is
disabled.
YES/NO
71
Page 86

DYNAMIC
ENABLE
DNS
IPP ENABLE
RAW
ENABLE
PORT
BIDIRECTIONAL
SLP ENABLE
SMTP ENABLE
SNMP ENABLE
Settings
If YES is selected, Dynamic
DNS is enabled.
If NO is selected, Dynamic
DNS is disabled.
Settings
If YES is selected, IPP is
enabled.
If NO is selected, IPP is disabled.
Settings
If YES is selected, Raw Port
is enabled.
If NO is selected, Raw Port is
disabled.
Settings
If ON is selected, Raw port
transmissions are enabled.
If OFF is selected, Raw port
transmissions are disabled.
Settings
If YES is selected, SLP is
enabled.
If NO is selected, SLP is disabled.
Settings
If YES is selected, SMTP is
enabled.
If NO is selected, SMTP is disabled.
Settings
If YES is selected, SNMP is
enabled.
If NO is selected, SNMP is
disabled.
YES/NO
YES/NO
YES/NO
ON/OFF
YES/NO
YES/NO
YES/NO
Configuration Menu Overview72
Page 87

WSD
ENABLE
PRINT
IPSEC ENABLE
IP
ADDRESS
FILTER
ACCESS
PERMISSION
ACCESS
REFUSE
Settings
If YES is selected, WSD print
is enabled.
If NO is selected, WSD print is
disabled.
Settings
If YES is selected, IPsec is
enabled.
If NO is selected, IPsec is disabled.
Settings
YES/NO
YES/NO
ENABLE/
DISABLED
Select whether to enable or
disable access granting.
If ENABLE is selected,
access granting is enabled.
DISABLE is selected,
If
access granting is disabled.
Settings
ENABLE/
DISABLED
Select whether to enable or
disable access blocking.
ENABLE is selected,
If
access blocking is enabled.
IPv6 ENABLE
Configuration Menu Overview
DISABLE is selected,
If
access blocking is disabled.
Settings
If YES is selected, IPv6 is
enabled.
If NO is selected, IPv6 is disabled.
YES/NO
73
Page 88

NETWARE ENABLE
APPLE
ENABLE
TALK
SPEED/
Settings
DUPLEX
Specify the transmission speed for the network and
the transmission method for bi-directional
transmission.
IEEE
ENABLE
802.1X
AUTO
SETTING
LINK
LOKAL
GLOBAL
Settings
If YES is selected, auto
configuration of IPv6 is
enabled.
If NO is selected, auto configuration of IPv6 is disabled.
Displays the Link-Local
address.
Displays the global address.
YES/NO
ADDRESS
GATEWAY
Displays the gateway
address.
ADDRESS
Settings
If YES is selected, NetWare is enabled.
If NO is selected, NetWare is disabled.
Settings
If YES is selected, AppleTalk is enabled.
If NO is selected, AppleTalk is disabled.
YES/NO
YES/NO
AUTO/10BASE FULL/10BASE
HALF/100BASE FULL/100BASE
HALF/1000BASE FULL
Settings
If YES is selected, IEEE 802.1X is
enabled.
YES/NO
MEMORY
DIRECT
If NO is selected, IEEE 802.1X is disabled.
Settings
Select whether to enable or disable memory direct printing.
ENABLE is selected, memory direct printing is enabled.
If
If DISABLE is selected, memory direct printing is disabled.
ENABLE/DISABLE
Configuration Menu Overview74
Page 89

CAMERA
DIRECT
Settings ENABLE/DISABLE
Select whether to enable or disable camera direct printing.
ENABLE is selected, camera direct printing is enabled.
If
If DISABLE is selected, camera direct printing is disabled.
Configuration Menu Overview
75
Page 90

SYS DEFAULT MENU
With this menu, settings can be specified to adjust the operation of the printer,
such as the display language of the message window and the time until the
machine enters Energy Saver mode.
SYS DEFAULT MENU
LANGUAGE
EMULATION DEF.
PAPER DEFAULT
EMULATION
POSTSCRIPT WAIT
PCL
*****
XPS
PAPER
UNIT OF
MEASURE
TIMEOUT
PS ERROR
PAGE
PS PROTOCOL
CR/LF
MAPPING
LINES PER
PAGE
FONT SOURCE FONT NUMBER
DIGITAL
SIGNATURE
XPS ERROR
PAGE
PAPER SIZE
CUSTOM SIZE
PITCH SIZE
(POINT SIZE)
SYMBOL SET
GRAYSCALE
PAGE
STARTUP
OPTIONS
AUTO
CONTINUE
DO STARTUP
PAGE
PAPER TYPE
Configuration Menu Overview76
Page 91

HOLD JOB
TIMEOUT
ENERGY
SAVER
*
ENERGY
SAVER TIME
**
MENU
TIMEOUT
LCD
CONTRAST
SECURITY CHANGE
PASSWORD
LOCK PANEL
CLOCK DATE
(xx.xx.xx)
TIME
TIME ZONE
HDD FORMAT
*
USER AREA
ONLY
ALL
CARD FOR-
***
MAT
USER AREA
ONLY
ALL
RESTORE
DEFAULTS
RESTORE
NETWORK
RESTORE
PRINTER
RESTORE ALL
Configuration Menu Overview
77
Page 92

ENABLE
WARNING
PAPER EMPTY
TRAY1
TONER LOW
I-UNIT LOW
TRAY2
TRAY3
****
" * These menu items appear only if an optional hard disk kit is installed.
** This menu item appears when you select
SAVER
menu.
*** This menu item appears only if an optional CompactFlash card is
installed.
**** This menu item appears only if the optional lower feeder unit is
installed.
***** This menu item appears only if an optional hard disk kit or a
CompactFlash card is installed.
ON from the ENERGY
Configuration Menu Overview78
Page 93

" All factory default values are shown in bold.
LANGUAGE
EMULATION
Settings
ENGLISH/FRENCH/GERMAN/SPANISH/
ITALIAN/PORTUGUESE/CZECH/JAPANESE/
KOREAN/SIMPLIFIED CHINESE/
TRADITIONAL CHINESE/DUTCH/RUSSIAN/
POLISH
The display language of the message window can be changed
to the selected language.
The language selections appear in the message window in the
corresponding language. For example,
GERMAN appears as
DEUTSCH.
DEF.
EMULA-
Settings
Specify the printer emulation language.
AUTO/POSTSCRIPT/PCL
TION
AUTO is selected, the printer automatically selects
If
the printer emulation language from the data stream.
POSTSCRIPT
WAIT
TIME
OUT
PS
ERROR
PAGE
PS
PROTOCOL
Settings
Specify the time until an error is
determined to be a PostScript error.
0 is selected, no timeout is performed.
If
Settings
Select whether or not an error page is
printed when a Postscript error occurs.
Settings
Specify the protocol for data transmissions
with a PostScript data stream.
0-300
ON/OFF
AUTO/NORMAL/BINARY
Configuration Menu Overview
AUTO is selected, the printer
If
automatically selects an applicable
protocol from the data stream.
79
Page 94

PCL CR/LF
MAPPING
LINES
PER
PAGE
FONT
SOURCE
Settings
CR=CR LF=LF/CR=CRLF
LF=LF/CR=CR
LF=LFCR/CR=CRLF
LF=LFCR
Select the definitions of the CR/LF codes
in the PCL language.
Settings
Specify the number of lines per page in the
PCL language.
FONT
NUMBER
PITCH
SIZE
(POINT
SIZE)
5-60-128
Settings
Specify the default font in the
PCL language.
The font numbers that appear
correspond to the PCL font list.
For details on printing the font
list, refer to “PRINT MENU” on
page 35.
Settings
0-102
0.44-10.00-
99.99
(4.00-12.00-
999.75)
Specify the font size in the PCL
language.
SYMBOL
SET
Configuration Menu Overview80
If the selected
is for a bitmap font,
SIZE
appears. If the selected
FONT NUMBER
PITCH
FONT NUMBER is for an
outline font,
appears.
Specify the symbol set used
with the PCL language.
The default setting is
POINT SIZE
PC8.
Page 95

XPS DIGTAL
PAPER DEFAULT
PAPER
SIGNATURE
XPS
ERROR
PAGE
PAPER
SIZE
Settings ENABLE/DISABLE
Select whether to enable or disable XPS
digital signatures.
ENABLE is selected, XPS digital
If
signatures are enabled.
DISABLE is selected, XPS digital
If
signatures are disabled.
Settings ON/OFF
Select whether or not an error report is
printed after an XPS error has occurred.
ON is selected, the error report is printed.
If
If OFF is selected, the error report is not
printed.
Settings
Select the size of media that is normally
used.
LETTER/LEGAL/EXECUTIVE/A4/A5/A6/
B5(JIS)/B6(JIS)/GOVT
LETTER/STATEMENT/
FOLIO/SP FOLIO/UK
QUARTO/FOOLSCAP/GOVT
LEGAL/16K/PHOTO 4x6/
KAI 16/KAI 32/ENV C6/
ENV DL/ENV MONARCH/
ENV CHOU#3/ENV
CHOU#4/B5(ISO)/ENV
#10/JPOST/JPOST-D/
CUSTOM
Configuration Menu Overview
" The default setting for North
America is
setting for all other regions is
LETTER. The default
A4.
" Depending on the setting selected
SYS DEFAULT MENU/
for
PAPER/UNIT OF MEASURE
PHOTO 4×6 may change to
PHOTO 10×15.
,
81
Page 96

CUSTOM
SIZE
Specify the media size when PAPER
SIZE
is set to CUSTOM.
The setting units can be switched between
millimeters and inches with the SYS
DEFAULT MENU/PAPER/UNIT OF
MEASURE
Setting range for WIDTH
For MILLIMETERS: 92 to 216 mm
(default)
setting.
– North America: 216 mm
– All other regions: 210 mm
For INCHES: 3.63 to 8.50 inches
(default)
– North America: 8.50 inches
– All other regions: 8.26 inches
Setting range for LENGTH
For MILLIMETERS: 148 to 356 mm
(default)
– North America: 279 mm
– All other regions: 297 mm
For INCHES: 5.83 to
14.00 inches
(default)
– North America: 11.00 inches
– All other regions: 11.69 inches
Configuration Menu Overview82
Page 97

GRAY
SCALE
PAGE
PAPER
TYPE
Settings
PLAIN PAPER/
RECYCLED/THICK 1/
THICK 2/LABEL/
TRANSPARENCY/
ENVELOPE/POSTCARD/
LETTERHEAD/GLOSSY 1/
GLOSSY 2
Select the type of media that is normally
used.
UNIT
OF
MEA-
Settings
The units for specifying the size of custom media can
be switched between inches and millimeters.
INCHES/MILLIMETERS
SURE
" The default setting for North America is
INCHES. The default setting for all other
regions is MILLIMETERS.
Settings AUTO/GRAYSCALE PRINT/COLOR PRINT
Specify the operation to be performed for black-and-white
pages in a job specified for color printing.
If AUTO is selected, printing is automatically performed according to the first page of the job.
GRAYSCALE PRINT is selected, black-and-white printing is
If
automatically performed depending on each page.
If COLOR PRINT is selected, color printing is performed, even
for a black-and-white page.
STARTUP
OPTIONS
DO
STARTUP
Settings
Select whether or not a startup page is printed when
the printer is turned on.
PAGE
Configuration Menu Overview
ON/OFF
83
Page 98

AUTO
CONTINUE
HOLD
JOB
TIME
OUT
ENERGY
SAVER
ENERGY
SAVER
TIME
Settings
Select whether or not printing continues if the size or type of
media in the selected tray is different from the size or type of
media for the print job.
AUTO CONTINUE is set to ON, printing automatically contin-
If
ues after about 10 seconds under the following conditions. At
this time, printing will be performed even if the media size is different.
No media: PAPER EMPTY (Page 212)/TRAY EMPTY (Page
214)
Different media size/type: PAPER ERROR (Page 212)/TRAY x
PAPER ERR (Page 214)
Settings
ON/OFF
DISABLE/1 hour/4 hours/1 day/
1 week
Specify the length of time until print jobs saved on the hard disk
are deleted. If DISABLE is selected, print jobs are not deleted
at a specific time.
Settings
If ON is selected, the machine enters Energy Saver mode
according to the length of time specified for
TIME
If OFF is selected, the machine will not enter Energy Saver
mode.
Settings
ON/OFF
ENERGY SAVER
.
5 minutes/6 minutes/7 minutes/8
minutes/9 minutes/10 minutes/11
minutes/12 minutes/13 minutes/14
minutes/15 minutes/30 minutes/
1 hour/3 hours
Specify the length of time until the machine enters Energy
Saver mode.
MENU
TIME
OUT
This menu item appears only when
ENERGY SAVER is set to
ON.
Settings
Specify the length of time until the status screen is displayed
when no operation is performed while a menu or help screen is
displayed in the message window. If OFF is selected, no
timeout occurs.
OFF/1 minute/2 minutes
Configuration Menu Overview84
Page 99

LCD
CON-
Settings
Adjust the contrast of the message window.
TRAST
The darkest level setting is
+3.
SECURITY
CHANGE
PASSWORD
LOCK
PANEL
CLOCK DATE
(xx.xx.
xx)
-3/-2/-1/0/+1/+2/+3
-3 and the brightest level setting is
Specify the password for locking the control panel.
If the password is set to 0000 (default), the control
panel is not locked. In order to lock the control panel,
be sure to specify a password other than
Settings
Specify how the control panel is locked.
If OFF is selected, the control panel is not locked.
If MINIMUM is selected, the INTERFACE MENU
and SYS DEFAULT MENU are protected with a
password.
If ON is selected, all menus are protected with a
password.
In order to lock the control panel, be sure to specify a
password other than
Specify the date for the printer’s internal clock.
The date for Asia and China is set in the order year,
month, then day (YY.MM.DD).
OFF/MINIMUM/ON
0000.
0000.
The date for the Americas is set in the order month,
day, then year (
The date for Europe is set in the order day, month,
then year (
Specify the time for the printer’s internal clock.
Settings
Specify the time zone.
Initialize the user area of the hard disk. When this
menu item is selected, the printer is automatically
restarted.
Initialize the hard disk. When this menu item is
selected, the printer is automatically restarted.
HDD
FORMAT
TIME
TIME
ZONE
USER
AREA
ONLY
ALL
Configuration Menu Overview
MM.DD.YY).
DD.MM.YY).
-12:00-00:00-+13:00
85
Page 100

CARD
FORMAT
RESTORE
DEFAULTS
ENABLE
WARNING
USER
AREA
ONLY
ALL
RESTORE
NETWORK
RESTORE
PRINTER
RESTORE
ALL
PAPER
EMPTY
TONER
LOW
I-UNIT
LOW
Initialize the user area of the compactflash card.
When this menu item is selected, the printer is
automatically restarted.
Initialize the compactflash card. When this menu item
is selected, the printer is automatically restarted.
Reset the network settings to their defaults. When
this menu item is selected, the printer is
automatically restarted.
Reset the printer settings to their defaults. When this
menu item is selected, the printer is automatically
restarted.
Reset all settings to their defaults. When this menu
item is selected, the printer is automatically restarted.
TRAY1
TRAY2
TRAY3
Settings ON/OFF
Select whether or not a warning appears when the
toner is about to run out.
Settings
Select whether or not a warning appears when the
imaging unit is about to reach the end of its life.
Settings
Select whether or not a warning appears
when Tray 1 runs out of media.
Settings
Select whether or not a warning appears
when Tray 2 runs out of media.
Settings
Select whether or not a warning appears
when Tray 3 runs out of media.
ON/OFF
ON/OFF
ON/OFF
ON/OFF
Configuration Menu Overview86
 Loading...