

Page 1

QUICK START GUIDE - MONTAGE™ PELLET STOVE 32FS
WARNING
Before you set up or operate your stove, review all safety, installation,
and operation instructions in your “Installation and Operation Manual.”
USING THIS GUIDE
This guide contains 5 easy steps to help you learn more about using
your new Montage pellet stove. Detailed operating and cleaning instructions are located in the “Installation and Operation Manual.”
PURCHASING THE CORRECT FUEL FOR THE STOVE
1
The Montage™ pellet stove has been designed to burn wood pellets only. We recommend
burning Premium Grade wood pellet fuel manufactured by companies who are members of
the Pellet Fuels Institute (PFI). Although similar in appearance to those made of wood, other
pelletized fuels such as wheat, barley, or corn will adversely affect the performance of the
stove and may compromise safety.
RECOMMENDED FUEL INCORRECT FUEL
PFI APPROVED
•
PREMIUM GRADE
•
LESS THAN 1% ASH CONTENT
•
LESS THAN 300 PPM CHLORIDES
•
MOISTURE DAMAGE
•
EXCESSIVE SAWDUST
•
HIGH CHLORIDE OR
•
ASH CONTENT
OVERSIZED PELLETS
•
(LONGER THAN 1-1/2”)
COMMERCIAL GRADE
•
ECONOMY GRADE
•
PFI LOGO
WHEAT PELLETS
•
BARLEY PELLETS
•
BARK PELLETS
•
CORN
•
Page 2
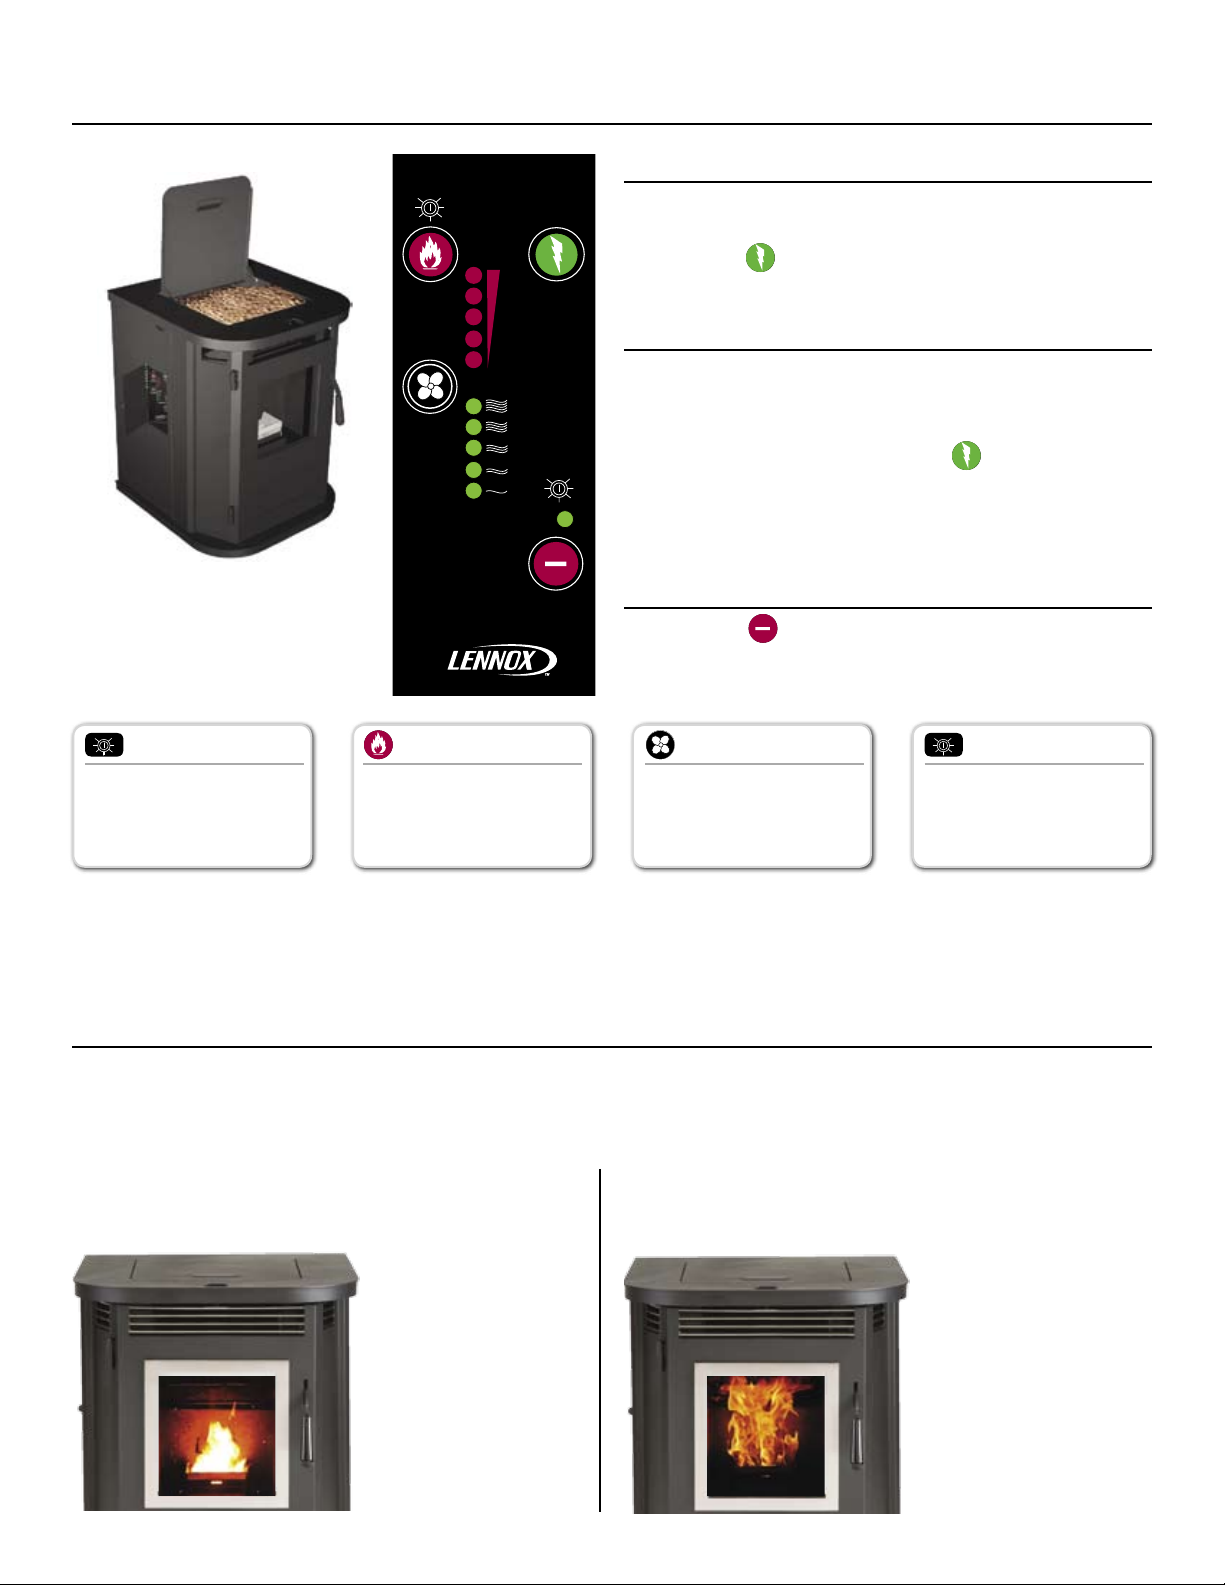
START
(-) (+)
O
PELLET
FEED
START
HEAT
OUTPUT
BLOWER
FEEDING
STOP
(-) (+)
O
(-) (+)
O
COMBUSTION
AIR
PELLET
FEED
HEA RTH P RODU CTS
MANUAL OPERATION*
O
AIR
START
HEAT
O
AIR
(-) (+)
O
AIR
(-) (+)
O
AIR
2
Hopper lid must
be closed during
operation.
STARTING THE MONTAGE™ PELLET STOVE
Fill the hopper with pellets
1.
Make sure the hopper lid is completely closed
2.
3.
Press the “START” button on the control panel to
begin the ignition cycle
RE-FUELING WHILE IN OPERATION
Open hopper lid and fill hopper with pellets
1.
Make sure the hopper lid is completely closed
2.
Check to make sure the stove remains lit
3.
If the flame goes out, press the “START” button
4.
on the control panel to re-ignite
Failure to ensure that pellets in the UltraGrate™ remain burning
after re-fueling may result in smoke escaping from the unit.
The control board is located on the left
side of the stove.
STOPPING THE MONTAGE PELLET STOVE
Press the
1.
“STOP” button
(The fans will automatically turn off once the stove
has cooled down)
Combustion Air Trim Heat Output Button Blower Button
Used to fine tune the amount of
combustion air to better accommodate variables such as venting
configuration, altitude and fuel.
Once the stove is running, you
can use the heat output button
to choose between five levels
ranging from low to high.
The blower button is used to
vary the output of the room fan.
Choose between five levels ranging from low to high.
Pellet Feed Trim
Used to fine tune the amount of
pellets fed into the UltraGrate™
and accommodate variations in
pellet size.
* Refer to the Manual if you are connecting your stove to a thermostat. Ignition and control board functions for
automatic (thermostat) operation are different from the explanations given above.
3
FLAME APPEARANCE
The appearance of the flame can be a good indicator of the overall performance of the stove. A bright clean flame
indicates proper balanced and efficient burning, while a dark slow-moving flame indicates incomplete combustion
and a stove that may be in need of service and/or adjustment.
PROPERLY ADJUSTED FLAME IMPROPERLY ADJUSTED FLAME
The stove burns clean and heats efficiently. Requires more frequent maintenance and can be unsafe
to operate.
SHARP ACTIVE
•
FLAME
BRIGHT YELLOW HUE
•
PELLET EMBERS
•
ACTIVELY MOVE IN
THE ULTRAGRATE
SLOW LAZY FLAME
•
DARK ORANGE HUE
•
LARGE FLAME WITH
•
BLACK SOOTY TIPS
PELLETS BUILD UP IN
•
THE ULTRAGRATE
Page 3

DAMPER ADJUSTMENT
4
The Montage™ pellet stove is equipped with a damper which is used to fine tune combustion. Although every
unit is test burned and calibrated at the factory, periodic adjustment may be necessary at times to compensate for
variables such as fuel, venting, altitude, and maintenance intervals.
OPENING THE DAMPER
Opening the damper increases the amount of
combustion air. This can help increase pellet activity
in the UltraGrate™ and correct a dark orange or sooty
flame.
CLOSING THE DAMPER
Closing the damper decreases the amount of
combustion air. This can be a useful adjustment if your
stove is burning out. If the damper is closed too much,
your stove will burn less efficiently and require more
maintenance.
REFER TO THE “INSTALLATION AND OPERATION
MANUAL” FOR DETAILED INSTRUCTIONS ON MAKING
ADJUSTMENTS TO THE DAMPER.
The damper is located behind the right
side door.
5
CLEANING AND MAINTENANCE SCHEDULE
Maintaining a clean UltraGrate™ is vital to the safe and efficient operation of the stove. It is a good idea to verify
your UltraGrate is clean prior to ignition each time you operate your stove.
Properly cleaned UltraGrate: The
bars running across the bottom are
clean and all the openings are clear.
Dirty UltraGrate: The bars running across the bottom are not
completely visible. The UltraGrate
should be cleaned.
Above is an example of a pellet
“clinker”. This mass of impurities
can reduce airflow through the
UltraGrate and create an unsafe
burning condition.
IMPORTANT NOTE:
UNPLUG POWER CORD AND ENSURE APPLIANCE IS COLD BEFORE PERFORMING ANY MAINTENANCE WORK.
Page 4

CLEANING AND MAINTENANCE SCHEDULE (CONTINUED)
In addition to the regular maintenance procedures described below, the “Installation and Operation Manual” outlines yearly service that should be performed by a qualified technician.
UltraGrate™
The UltraGrate should be checked
for clinkers prior to operating
the stove. Any non-combustible
material blocking the UltraGrate
should be emptied into the
firebox.
1 - 7 Days*
Ash Slide
The ash slide pulls out allowing
you to “drop” any accumulated
ash from the firebox to the ash
pan.
1 - 2 Weeks*
Ash Pan
The ash pan serves as a
receptacle to hold ash that has
accumulated in the firebox
and embers that drop from the
UltraGrate. Refer to the manual
for proper ash disposal.
2 Days - 2 Weeks*
Heat Exchanger
Keeping the heat exchanger
tubes clean will maximize the
heating efficiency of your stove.
Use the scraper tool to pull the
tube scraper rod back and forth
to release any ash build-up
inside the firebox.
2 Days - 2 Weeks*
Use the provided brush
to remove ash buildup
from the outside of the
heat exchanger tubes.
2 Weeks - 2 Months*
Additional Yearly
Maintenance*
Baffle Plates
•
Proof of Fire Switch
•
Ash Clean-Out Ports
•
Exhaust Passages/Vent Pipe
•
and Creosote Removal
Gaskets
•
Cleaning Rear Stove Compart-
•
ment
*Burning fuel with a high ash content or an improperly adjusted damper may require more frequent cleaning and stove maintenance.
IMPORTANT NOTE:
BURNING POOR QUALITY FUEL WILL SIGNIFICANTLY INCREASE THE FREQUENCY OF REQUIRED CLEANING.
FAILURE TO PROPERLY CLEAN AND MAINTAIN YOUR STOVE AS INDICATED IN THE MANUAL CAN RESULT IN A
STOVE THAT IS UNSAFE TO OPERATE.
WARNING
Hot! Do not touch! The glass and surface of this appliance will
•
be hot during operation and will retain heat for a while after
shutting off the appliance. Severe burns may result.
Carefully supervise children in the same room as appliance.
•
Lennox pellet-burning appliances are designed for use as
•
supplemental heater. They are not intended for continuous use
as a primary heat source.
©Lennox Industries Inc. 2009
Visit us at www.Lennox.com, or contact us at 1-800-9-LENNOX.
506033-28 05/09
 Loading...