

Lenmar Enterprises BCR336 User Manual
OPERATING INSTRUCTIONS
OmniSource® 336 / Model BCR336
For Li-Ion, NiMH, NiCd & Lead Acid Batteries
INTRODUCTION
Thank you for purchasing LENMAR’s OmniSource 336. The model BCR336, will charge virtually all 3.6, 4.8, 6, 7.2, 9.6 or 10 Volt Li-Ion, NiMH, NiCd and
Lead Acid type rechargeable batteries. When recharging NiCd type batteries, the model BCR336 will operate as an AC/DC Battery Charger and Reconditioner
to help avoid developing memory in your battery.
This charger will operate from a standard household AC outlet, or on the road from a 12 Volt cigarette lighter socket. It is a complete, convenient system to
charge and condition almost any of your rechargeable batteries.
Using the charger
Plug the unit into your selected power source
Choose the proper adapter for either 110V household current or 12VDC car cigarette lighter adapter. Plug the proper adapter into the power source and plug
the connector at the other end of the cord into the charger unit.
Adjust the contacts for your battery
The contacts on the charger must be properly adjusted to line up with the contacts on the battery before charging can take place. You must align the two
contacts on the charger to the two contacts on the battery marked “+” and “–“. There may be additional contacts on some batteries, which must not be
connected to. Only connect to the “+” and “-“ contacts on any battery. Connecting to the wrong contacts may damage the battery and/or the charger.
Reversed polarity
Once the battery is placed on the charger, the charger should emit a short beep and begin charging the battery. If the charger beeps continuously, the polarity to
the battery is reversed. To remedy this, slide the switch (labeled S) on the side of the charger to the opposite side. The beeping will stop and the charging will
begin.
The temperature sensor
The temperature sensor is important for the safe charging of your battery, so be sure it is attached to the battery whenever you are charging. Failure to do so
could result in overheating and permanent damage to the battery. The sensor is magnetized and will stick to all battery types except Lead Acid. The sensor may
be left off for this type of battery without harm.
If the battery has Bottom contacts
Open the hinged jaw on the charger to unlock the moveable contacts.
Hold the battery over the charger so you can see both the battery contacts
and the charger contacts at the same time. Move the charger contacts
sideways to set them at the proper distance from each other to match the
contacts on the battery. Set the battery down onto the contacts to test
they are in the correct position. The correct setup allows the battery to
rest against the long fence (marked “D”) and connect with the charger
contacts. This allows for easier alignment of the battery to the charger.
For large batteries or in some circumstances, the “D” fence may need to
be reversed or removed to make more room for the battery. The same is true for the smaller “C” fence. When you are satisfied with the contact locations, close
and latch the hinged jaw to lock the charger contacts into place. Set the battery down on top of the charger and make sure the charger contacts connect with the
battery. Place the magnetic temperature sensor on top of the battery being charged.
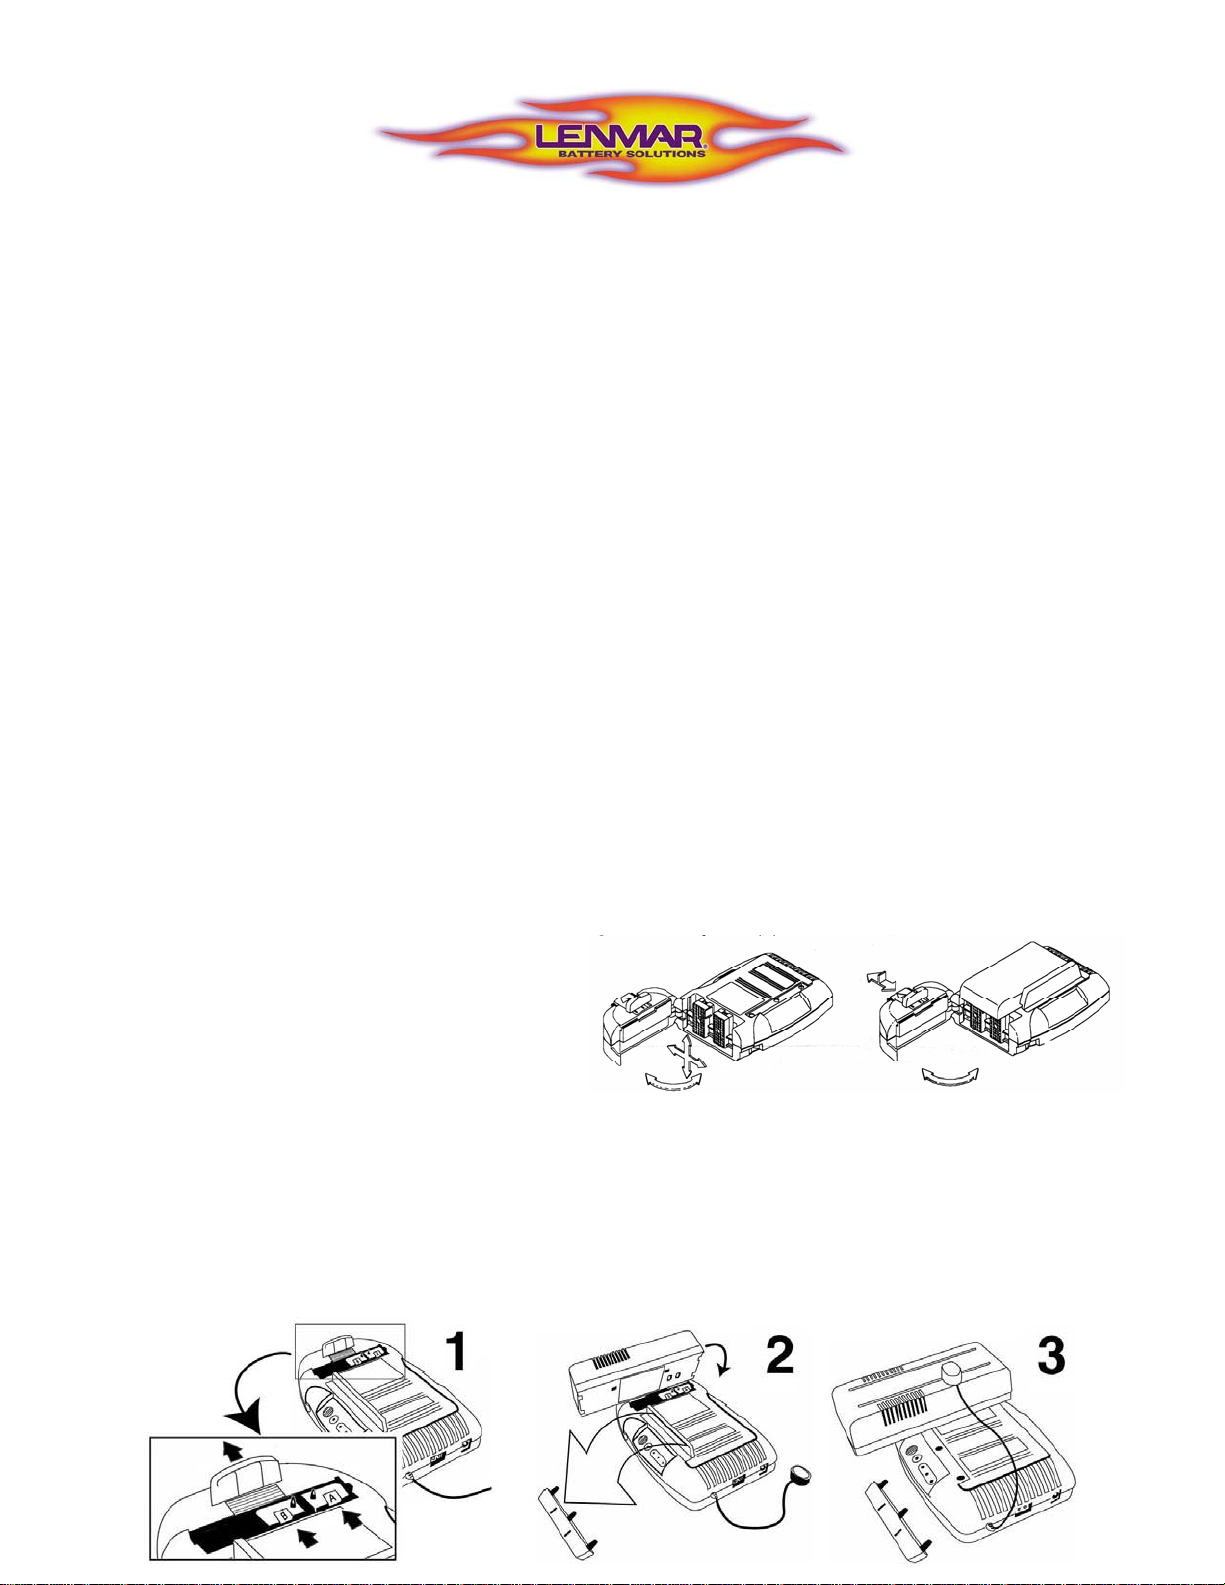
Special Instructions For Charging Sharp BT-30N Or Lenmar SBT30 Type Battery:
As shown in diagram 1, open the hinged jaw on the charger to unlock the moveable contacts and move contact “A” as far to the right as it will go. Position
contact “B” so that it is 3/8 inches left from the tip of “A”. Close and lock the hinged jaw. Slide Guide “C” out so that it hangs over the end of the charger by
½ inch. As shown in diagram 2, remove the guide fence “D”. To place the battery onto the charger, hold as shown and align the contacts on the battery to the
contacts on the charger, and lay the battery flat on top of the charger. The charger should emit a short beep and begin charging. If it ma kes a long continuous
beep, see section titled “Reversed Polarity” above. As shown in diagram 3, place the magnetic temperature sensor on top of the battery (optional).

If the battery has End or Side contacts
Open the hinged jaw on the charger to unlock the moveable contacts. Pull up on
the charger contacts to raise them above the top deck of the charger and expose
the side facing contacts. Set the battery to be charged on the deck of the charger
and against the fence (marked “D”) with its contacts facing the charger’s contacts.
For large batteries or in some circumstances, the “D” fence may need to be
reversed or removed to make more room for the battery. The same is true for the
smaller “C” fence. Adjust the charger contacts up, down, left or right to line up with the contacts on the battery properly. When you are satisfied with the
contact locations, close and latch the hinged jaw to lock the charger contacts into place. Set the battery down on top of the charger and slide the battery forward
against the charger contacts to make good connection with the battery. Place the magnetic temperature sensor on top of the battery being charged.
Connecting to other batteries
Many rechargeable hobby batteries used for R/C (remote control) toys
can plug directly into the charger on the end of the charger next to the
power input connector. This is a standard connector and will fit many
makes and types of hobby battery packs. For all other battery types, the
optional clip lead will be. Plug the connector end of the clip leads into
the charger base at the end next to the power input connector. Use the
alligator clips onto the exposed contacts on the battery to be charged. Be
careful not to crush or deform spring contacts made of bent sheet metal. Place the magnetic temperature sensor on top of the battery being charged.
The charge status display
Once the charger unit has beeped to verify the battery is making proper contact, the charge indicator on the side of the unit will show the progress of the
charge.
Charge Status Display
Yellow LED only (Flashing)
Yellow + 1 Red LED
Yellow + 2 Red LED’s
Red LED only
The charger will automatically stop the charge and beep when a full charge is detected on the battery. The charge indicator will show only 1 Red light to
indicate the battery has reached full charge. The time required to reach a full charge will vary depending on the capacity of the battery and how much charge is
already in it before you start.
Indicators
( = off, = on )
Charge Level
0-33%
33-66%
66-99%
Full / Complete
Reconditioning (for Ni-Cd type batteries only)
NiCd batteries are prone to developing a “memory” if not occasionally fully discharged before they are recharged. No other types of batteries are subject to
developing memory, so battery types other than NiCd should not be reconditioned. Make sure the unit is connected to power, and connect the NiCd battery to
be reconditioned/recharged. Once the charger beeps to indicate that the battery is properly connected, briefly press the Discharge button on the front of the
unit. The unit will beep 2 times and the green DISCHARGE light will go on. The DISCHARGE light will stay on until the battery is fully discharged, then the
charger will switch automatically into the charge mode and charge the battery fully. Depending on the capacity of the battery and the amount of charge present,
the discharge cycle could take many hours to complete.
NOTE:
You should only use the Discharge feature with a Ni-Cd type battery. Discharging other type batteries may cause damage to the battery’s ability to
accept a full charge in the future.
Battery Compatibility
This charger will charge virtually any NiMH, NiCd, or Lead Acid battery, but is ideally suited for use with the following Lenmar batteries:
CBE22, DLSP10, DMC50, OBC84S, SBT30
Limited 3 Year Warranty
This limited warranty starts from the date of original purchase and expires 3 years thereafter.
If any part, because of manufacturing defects or workmanship fails to function properly under normal use will be repaired at no charge for parts and labor or, at
our option, the product will be replaced. The following is excluded: damages from delay or loss of use of equipment, or damaged batteries, malfunctions
resulting from misuse, tampering, unauthorized repairs, modifications, or accident.
Package the unit and its accessories carefully using ample padding material to prevent damage in transit and ship it prepaid and insured to:
LENMAR ENTERPRISES INC. USA , 4035 VIA PESCADOR, CAMARILLO, CA. 93012.
When sending in product for service, your package should include evidence of date and place of purchase. Enclose $10.00 for shipping and handling for
addresses in the U.S. For outside the U.S. and Canada, freight will vary depending upon ship to address.
The following statement is required in the state of California pursuant to the settlement of an action brought by the Mateel Environmental Justice
Foundation against multiple electronics and appliance manufacturers.
WARNING: Handling the cord on this product will expose you to lead, a chemical known to the state of California to cause birth defects or other
reproductive harm. Wash hands after handling.
BCR336 202-169
 Loading...