

Lenmar Enterprises BC3GS User Manual
Model BC3GS
iBatteryCase - iPhone 3G & 3Gs Battery Case
PLEASE READ THIS INFORMATION THOROUGHLY BEFORE USING THIS PRODUCT. IT CONTAINS IMPORTANT
OPERATING INSTRUCTIONS FOR YOUR POWERPORT UNIT.
Owner’s Manual
Thank you for purchasing the iBatteryCase - iPhone 3G & 3Gs Battery Case. The iBatteryCase case oers the
convenience of an external battery built into the full protection of a hard case. You can use it as a case all
the time never having to remove it and enjoy the convenience of extra battery power when you need it.
Included in the package you have purchased:
iBatteryCase, USB charging / Sync cable and User Manual
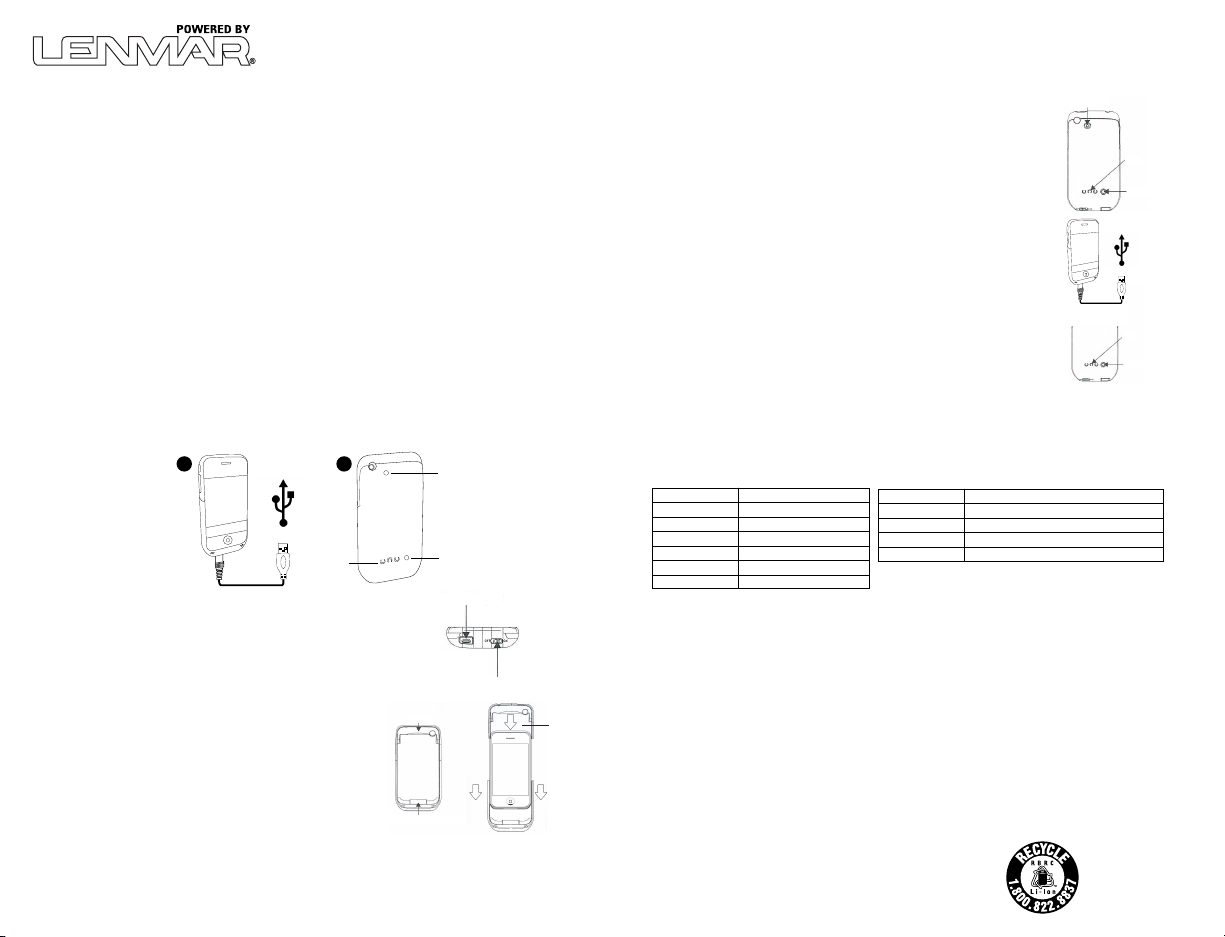
Charging Your iBatteryCase
Note: Prior to initial use fully charge your iBatteryCase before connecting to your iPhone.
You can charge the iBatteryCase case with the Micro USB to USB cable included with the case.
Just plug the Micro USB into the case, and the other ends USB into a computer USB port or into
a wall plug style adapter that has a USB out. Switch the iBatteryCase to “OFF” and the case will
begin to charge.
The LED status indicators show the charging status of the case. The rst LED will blink as it’s charging then
become steady, and then the second will blink and also become steady. Finally the third will blink and once the
case is fully charged it will also become steady. Then the charging progress is done.
Diagram:
1 2
LED Light
USB
Cover
Button
Micro USB port
On/Off Switch
Top Cover
LED
Status
On/Off Switch
With the built in ON / OFF switch you have the option of using the
iBatteryCase when you need it. When you need an extra charge in
your phone just switch it to the “ON” position and the iPhone case
will proceed to charge your main battery. If you are not quite ready
to charge you phone just leave the switch in the”OFF” position.
Indicator
Installing your iPhone into the iBatteryCase
Slide your iPhone facing you into the iBatteryCase from the top
making sure the 30 pin connector and the bottom of the iPhone
line up and connect correctly. Then take the top cover aligning it
into the channels of the lower case, slide down until it sets rmly
into the bottom half of the case. (Pay attention to the openings for
the headphone jack and the power jack, making sure they line up.)
Once connected you can turn the switch located on the bottom of
the case to the “ON” position. You should now see the charge
indicator icon appear on your iPhone.
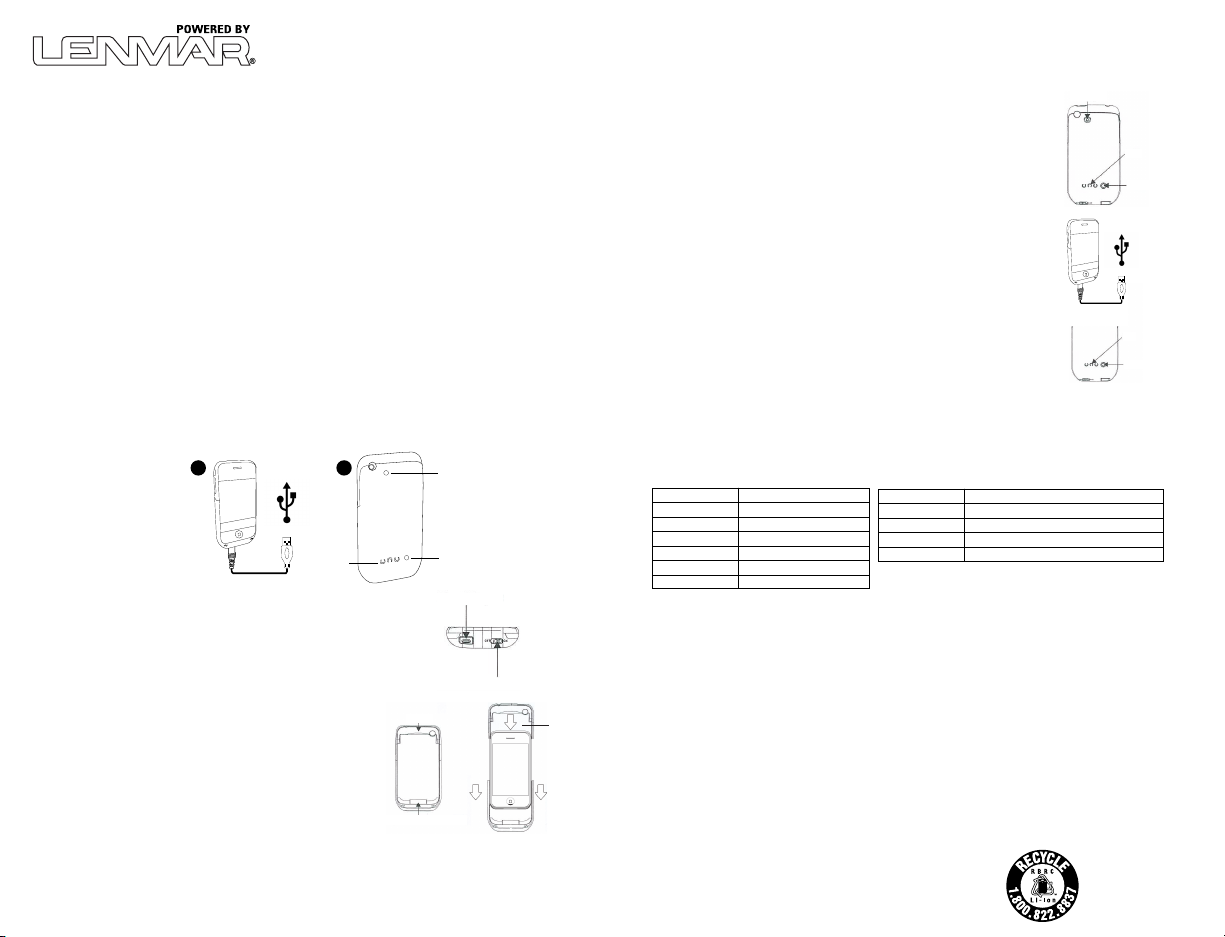
Charging your iPhone while installed in the iBatteryCase.
When charging an iPhone while installed in the iBatteryCase, switch the” ON / OFF” button located
on the bottom of the case to “ON” to allow the iPhone to charge. To charge just the iBatteryCase switch
to “OFF” and the case will charge.
Apple 30 Pin Connector
Battery Consumption
With the “ON / OFF” switch in the “ON” position your iPhone will always drain the case rst until its power is 5%,
then your iPhone switches to its main battery. With the “ON / OFF” switch in the “OFF” position your iBatteryCase
is in standby mode ready to charge your iPhone by switching it to the “ON” position.
Checking remaining capacity of the case
The integrated LED status indicator tells you exactly how much battery power is
left in your case. Simply press the test button The 1st LED will indicate 30% or
less charge remaining, the 2nd LED will indicate between 30 – 70% charge
remaining and the 3rd LED will indicate 70 -100% of charge remaining.
LED Light
LED Status
Indicator
Button
SYNC
Enjoy the convenience of syncing your iPhone without ever removing the case.
Using the supplied cable you can charge and sync your iPhone to iTunes without
ever removing it. Just plug the supplied Micro USB cable in to the case and the
other end into your computers USB slot.
USB
LED Light
The LED light is activated by pressing and holding down the button next to the
LED status indicators until it lights. To turn it o press and hold the button again
until it turns o.
LED Status
Indicator
Button
Operating the camera
The camera function on your iPhone works with no obstructions while the case is on, in fact the LED Light will add
to the light on your indoor pictures. Just hold the button next to your LED status indicators until it lights, when
your nished taking pictures just hold the button again until the LED Light shuts o.
Specifications
Cell type:
Lithium-Polymer Battery
Input:
DC 5V500mA
Output:
DC 5V500mA
Capacity:
Weight:
1300mAh
L126xW66xT20mm
55g
iPhone 3G/3Gs
other reproductive harm. Wash hands after handling.
Lithium-Polymer battery must be
recycled or dispose of properly.
Dimensions:
Compatibility:
Limited 1 Year Warranty
This limited warranty starts from the date of original purchase and expires one year thereafter. If, during this period, any part, because of manufacturing defects or
workmanship, fails to function properly under normal use it will be repaired at no charge for parts and labor or, at our option, the product will be replaced. The following
is excluded: damages from delay or loss of use of equipment or damaged batteries, malfunctions resulting from misuse, tampering, unauthorized repairs, modications
or accident.
Package the unit and its accessories carefully using ample padding material to prevent damage in transit and ship it prepaid and insured to:
When sending in product for service, your package should include evidence of date and place of purchase. Enclose $10.00 for shipping and handling for addresses in
the U.S. and $15.00 in Canada. For outside the U.S. and Canada, freight will vary depending upon ship-to address.
Proposition 65 Notice (California)
The following statement is required in the state of California pursuant to the settlement of an action brought by the Mateel Environmental Justice Foundation against
multiple electronics and appliance manufacturers
• WARNING: Handling the cord on this product will expose you to lead, a chemical known to the state of California to cause birth defects or
For additional questions, comments or to explore other Lenmar battery solutions, visit our web site at: www.poweredbylenmar.com or
call 800/424-2703 from 9AM – 5PM PST.
Standby:
Up to 240 hours*
Talk Time:
Internet Use:
Audio Play:
Video Play:
*All above times can vary due to device settings, location, and signal strength.
LENMAR ENTERPRISES, INC.
4035 Via Pescador
Camarillo, CA 93012 USA
Up to 4hours*
Up to 4.5 hours and on Wi-Fi up to 5 hours*
Up to 17 hours*
Up to 5 hours*
310-016-33-0218 r1
Modèle BC3GS
Bloc-pile intelligent - Bloc-pile pour iPhone® 3G et 3Gs
VEUILLEZ LIRE ATTENTIVEMENT CE DOCUMENT AVANT D'UTILISER LE PRODUIT. IL CONTIENT DES
RENSEIGNEMENTS IMPORTANTS POUR L'UTILISATION DU DISPOSITIF POWERPORT.
Mode d'emploi
Merci d'avoir acheté le bloc-pile intelligent - bloc-pile pour iPhone 3G et 3Gs. Le bloc-pile intelligent ore
la commodité d'une pile externe avec toute la protection d'un boîtier rigide. Vous pouvez l'utiliser comme
bloc-pile en tout temps sans jamais avoir à l'enlever et proter de la puissance d'une pile externe quand
vous en avez besoin.
L'emballage du produit que vous avez acheté contient : un bloc-pile intelligent, un câble USB de charge et
de synchronisation et un mode d'emploi.
Charge du bloc-pile intelligent
Remarque : chargez le bloc-pile intelligent complètement avant de l'utiliser pour la première fois et de le
brancher au iPhone.
Vous pouvez charger le bloc-pile intelligent à l'aide du câble micro USB - USB fourni. Il sut de brancher la che
micro USB dans le bloc-pile et l'autre extrémité dans le port USB d'un ordinateur ou dans la che USB d'un
adaptateur mural. Faites glisser l'interrupteur de marche/arrêt du bloc-pile intelligent à OFF (arrêt) et la charge du
bloc-pile commencera.
Les témoins DEL d'état indiquent le niveau de charge du bloc-pile. La première DEL clignotera pendant la charge
et ensuite, restera allumée; puis, la deuxième clignotera et restera allumée. Enn, la troisième clignotera et dès
que le bloc-pile sera complètement chargé, elle restera allumée. À ce moment, la charge est terminée.
Illustration :
1 2
Témoin DEL
USB
Témoins
Interrupteur marche/arrêt
L'interrupteur marche/arrêt vous permet d'utiliser le bloc-pile
intelligent lorsque vous en avez besoin. Lorsque le téléphone a
besoin d'une charge supplémentaire, placez l'interrupteur à ON
(marche) et le bloc-pile pour iPhone rechargera la pile principale.
Si vous n'êtes pas prêt à recharger le téléphone, laissez
l'interrupteur à OFF (arrêt).
DEL d'état
Installation du iPhone dans le bloc-pile intelligent
Tenez le iPhone face à vous et faites-le glisser dans le bloc-pile
intelligent depuis le haut en vous assurant que le connecteur à
30 broches et le bas du iPhone sont alignés et sont branchés
correctement. Ensuite, alignez le couvercle du dessus dans les
rainures du bloc-pile et faites-le glisser vers le bas jusqu'à ce qu'il
soit xé solidement à la moitié inférieure du bloc-pile. (Portez
attention aux ouvertures prévues pour la che d'écouteur et la
che d'alimentation et vériez l'alignement.) Une fois branché,
vous pouvez glisser l'interrupteur situé sous le bloc-pile ON
(marche). Vous devriez maintenant voir le symbole de charge sur
le iPhone.
Charge du iPhone lorsqu'il est installé dans le bloc-pile intelligent
Pour charger le iPhone installé dans le bloc-pile intelligent, faites glisser l'interrupteur marche/arrêt situé sous le
bloc-pile à ON (marche) an de charger le iPhone. Pour charger seulement le bloc-pile intelligent, faites glisser
l'interrupteur à OFF (arrêt) et la charge du bloc-pile commencera.
Connecteur Apple
à 30 broches
Bouton
Port micro USB
Couvercle
Interrupteur marche/arrêt
Couvercle
du dessus
Consommation énergétique
Lorsque l'interrupteur marche/arrêt est à ON (marche), le iPhone utilisera la puissance du bloc-pile en premier
jusqu'à ce que la charge de celui-ci diminue à 5 %; ensuite, le iPhone utilisera la pile principale. Lorsque
l'interrupteur marche/arrêt est à OFF (arrêt), le bloc-pile intelligent est en veille et il est prêt à charger le iPhone en
plaçant l'interrupteur marche/arrêt à ON (marche).
Témoin DEL
Vérification de la puissance restante du bloc-pile
Les témoins DEL d'état intégrés indiquent exactement la puissance restante
dans le bloc-pile. Il sut d'appuyer sur le bouton de vérication. La première
DEL indique une puissance restante de 30 % ou moins; la deuxième DEL
indique une puissance restante entre 30 et 70 % et la troisième DEL indique
une puissance restante entre 70 et 100 % de la capacité.
Témoins DEL d'état
Bouton
SYNCHRONISATION
Protez de la commodité de la synchronisation du iPhone sans jamais enlever le
bloc-pile. Vous pouvez utiliser le câble fourni pour charger et synchroniser le
iPhone à iTunes sans jamais l'enlever. Il sut de brancher le câble micro USB au
bloc-pile et l'autre extrémité à un port USB d'un ordinateur.
USB
Témoin DEL
Le témoin DEL est activé en gardant enfoncé le bouton adjacent aux témoins
DEL d'état jusqu'à ce que le témoin s'allume. Pour l'éteindre, gardez enfoncé le
bouton jusqu'à ce que le témoin s'éteigne.
Témoins DEL d'état
Bouton
Utilisation de l'appareil photo
L'appareil photo du iPhone fonctionne sans obstruction lorsque le bloc-pile est en marche; en réalité, l'éclairage
de la DEL ajoutera de la lumière aux photos que vous prenez à l'intérieur. Il sut d'appuyer sur le bouton adjacent
aux témoins DEL d'état jusqu'à ce qu'elle s'allume; lorsque vous avez terminé la prise de photos, appuyez sur le
bouton jusqu'à ce que le témoin DEL s'éteigne.
Spécifications
Type de pile :
Puissance :
Dimensions :
Compatibilité :
Garantie limitée d'une année
La présente garantie limitée commence à la date du premier achat et se termine une année plus tard. Si, durant cette période, une pièce ne fonctionne pas correctement
en usage normal en raison d'un défaut de fabrication ou de main- d'oeuvre, elle sera réparée sans frais pour la pièce ou la main-d'oeuvre ou le produit sera remplacé, à
notre discrétion. Sont exclus les dommages dus à un délai ou à la perte d'usage de l'appareil ou de piles endommagées, à un mauvais fonctionnement découlant d'une
utilisation incorrecte, d'altération, de réparation non autorisée, de modication ou d'accident.
Emballez soigneusement l'appareil et ses accessoires en utilisant susamment de matelassures pour éviter les dommages pendant le transport et faites-le parvenir, frais
de port et assurance payés, à :
Lorsque vous expédiez un appareil pour une réparation, le colis devrait inclure une preuve d'achat datée et indiquer l'endroit où il a été acheté. Joignez 10 $ pour les frais
de retour à une adresse située aux États-Unis et 15 $ pour une adresse située au Canada. Les frais de retour varieront pour les adresses hors des États-Unis et du Canada.
Avis relatif à la Proposition 65 (de la Californie)
La déclaration suivante est requise dans l'État de la Californie en vertu du règlement d'une poursuite intentée par la Mateel Environmental Justice Foundation contre
plusieurs fabricants d'appareils électroniques et d'appareils ménagers
• AVERTISSEMENT : tenir le cordon de ce produit vous expose à du plomb, un produit chimique que l'État de la Californie considère comme une cause d'anomalies
Si vous avez des questions ou des commentaires, ou si vous voulez en apprendre davantage sur les systèmes d'alimentation de Lenmar, visitez notre site Web à :
www.poweredbylenmar.com ou appelez au 800-424-2703 entre 9 h et 17 h HNP.
Entrée :
Sortie :
Poids :
pile au lithium-polymère
5 V CC, 500 mA
5 V CC, 500 mA
1 300 mAh
H 126 mm x L 66 mm x P 20 mm
55 g
iPhone 3G/3Gs
congénitales et d'autres problèmes de reproduction. Laver les mains à fond après manipulation.
La pile au polymère de lithium doit
être recyclée ou traitée de manière appropriée.
Autonomie en veille :
Autonomie en communication :
Utilisation d'Internet :
Lecture audio :
Lecture vidéo :
*Toutes les durées mentionnées peuvent varier en fonction de la conguration
des appareils, de l'emplacement et de la force des signaux.
LENMAR ENTERPRISES, INC.
4035 Via Pescador
Camarillo, CA 93012 USA
jusqu'à 240 heures*
jusqu'à 4 heures*
jusqu'à 4,5 heures et jusqu'à 5 heures avec Wi-Fi*
jusqu'à 17 heures*
jusqu'à 5 heures*
310-016-33-0326 r1
 Loading...