

Lenmar MSC1LX User Manual
Mach 1® SpeedCharger™
For 3.6 / 3.7 & 7.2 / 7.4 Volt
Li-Ion Batteries
Universal Charger for Li-Ion
Camcorder & Digital Camera Batteries
MSC1LX Series Chargers
PLEASE READ THE INFORMATION AND FOLLOW ALL INSTRUCTIONS THOROUGHLY
BEFORE USING THIS PRODUCT.
The Mach 1 SpeedCharger is a highly advanced and fully automatic battery charger which is
compatible with 3.6 / 3.7 & 7.2 / 7.4 Volt Lithium-Ion batteries for camcorders and digital
cameras from Sony, Canon, JVC, Panasonic, Hitachi, RCA, Nikon, Kodak, Fuji and other
manufacturers. In addition to the adapter plates included, you can also purchase additional
adapter plates for other Li-Ion battery models.
The Mach 1 SpeedCharger features microprocessor controlled Neotherm2® active pulse
speedcharging to charge your battery approximately three times faster than other chargers.
Not only will it charge the battery safely and reliably, it will prolongs battery life. Charging
progress, MAX charge and error conditions are all provided by the bi-color LED indicators.
Flexible power input allows you to use this Mach 1 SpeedCharger from home or overseas with
its 110V-240V AC Universal Power Supply, or on the road using the DC Cigarette Lighter
Adapter included.
Introduction
1.
Getting Ready
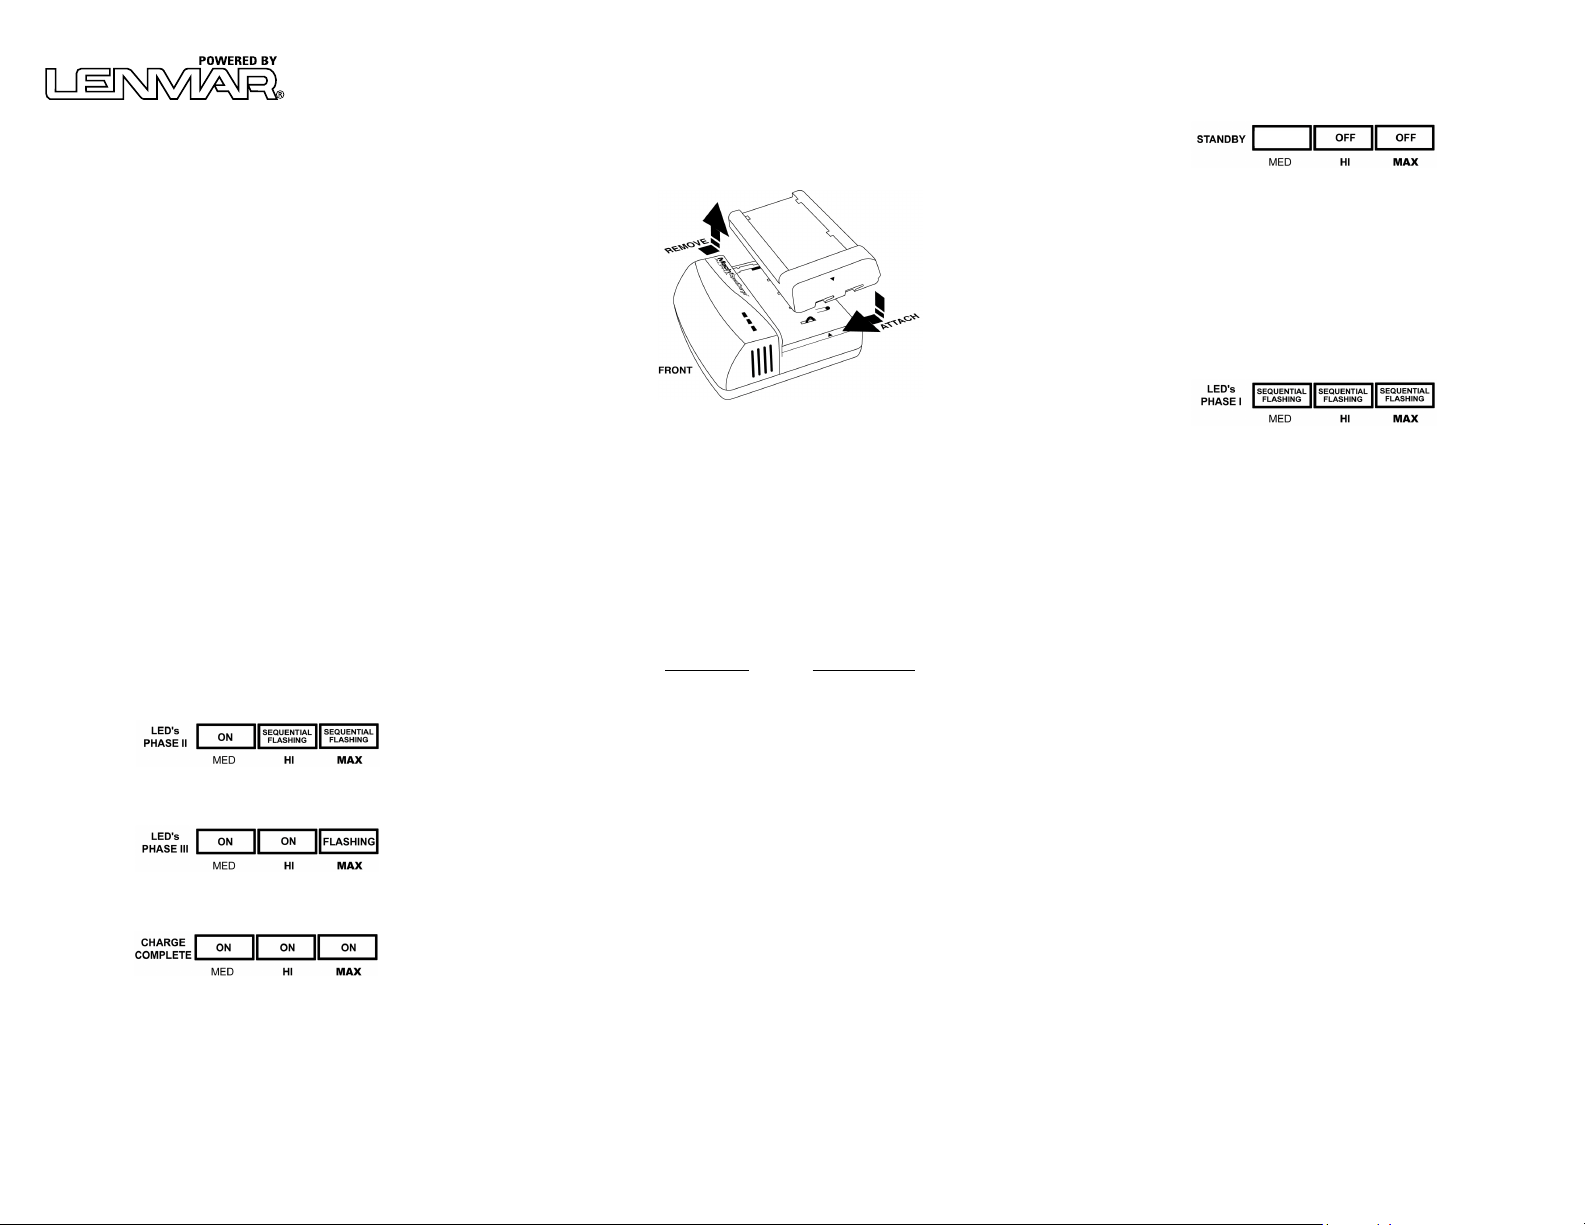
Choose the adapter plate for the type of Li-Ion (Lithium-Ion) battery you will be charging. Each
of the adapter plates is labeled as to the batteries it can work with. If the charger base does not
already have the adapter plate you want attached, you will need to remove the adapter plate
first by pushing down on the plate and sliding it to the rear of the charger base (away from the
LED indicators). Then, attach the selected adapter plate to the charger unit by aligning the
arrows on the sides of the adapter plates and the charger base as shown. While pressing down
lightly on the adapter plate, slide the plate toward the front of the charger base until it locks.
Plug-in, either the AC Adapter or the DC Cigarette Lighter power adapter, and connect the
other end of the power adapter cable to the power input jack on the rear of the charger unit.
Status LED’s
Together, the three LED’s on the front of the Mach 1 charger will indicate the status of the
battery and the charger. See the descriptions and diagrams included in the following sections
regarding the various indications and their meaning.
Operation:
2.
StandBy Mode: Without any battery installed, all of the LED’s will be off (see diag.-1).
Once a battery has been properly connected to the appropriate adapter plate, the charger will
determine the status of the battery and begin the proper phase of the charging cycle.
Note: If you are installing a battery that is already fully charged or has just finished charging,
no indicators will light and the charger will take no action. If this happens, test the battery on
your camera or camcorder to verify its condition.
There are 3 phases to the charge cycle. The battery may be removed during any of the
charging phases without harm to the battery or charger unit.
Phase I – Initial Charge: All 3 LED’s flashing in sequence from MED (left) to MAX (right) (see
diag.-2). If the battery is low, this will be the first charge phase. With high capacity batteries, this
phase can sometimes be the longest of the 3 phases. Similarly, with some low capacity
batteries and batteries reaching the end of their life, this phase can be very short.
Note: When the battery is first connected, the LED’s may instantly indicate MED, HI or MAX
charge depending on the charge status of the batter y. The process will continue normally
from that point forward.
Note: It is normal for the charger, AC adapter, or the battery to become warm during charging.
Charging Your Battery
OFF
Diag.-1
Diag.-2
3.
Phase II – MED Charge: The MED LED is on continuously and other LED’s are flashing in
sequence (see diag.-3). At this point the battery is typically about 50% charged. Some very
small capacity batteries (650mAh) and worn out batteries can be as low as 10% charged.
Diag.-3
Phase III – HI Charge: The MED and HI LED’s are on and the MAX LED is flashing
(see diag.-4). At this point the battery is typically, about 70% charged.
Diag.-4
Charge Complete – MAX Charge: All three LED’s are on at the same time (see diag.-5).
Charging has completed and the battery is fully charged. I t is recommended to remove the
battery at this time.
Diag.-5
Error Condition – Charge Terminated: If the M ach 1 detects a problem with the battery
being charged, an Error Condition will be shown with the indicators Flashing Red and the
charge is stopped. To reset the error condition, unplug the charger from the power adapter for
a few seconds, then reconnect it. If the error occurs again, there may be a defect in the battery
that will prevent safely speed-charging this battery.
4.
Estimated Battery Charge Times:
Battery Capacity Time to MAX Charge *
750 mAh
1200 mAh
1500 mAh
1850 mAh
2400 mAh
3700 mAh
* Actual charge times may vary depending on the battery, internal protection circuits, cell
capacity and condition.
Trouble Shooting Tips:
Batteries should be replaced when runtime becomes short.
•
If a battery is attached, and no indicators are lit, the battery may not be making proper contact to the
•
adapter plate. Unplug the unit and check that the battery is attached correctly. Also, make sure the
adapter plate is the proper one and that it is securely attached to the charger base. Also check for
proper connection to the power adapter being used, recheck the connections and make sure that
the AC socket or cigarette lighter has power.
Use a clean dry cloth when necessary to keep the metal contacts of both charger and battery clean.
•
Cautions:
For use with 3.6 - 3.7 & 7.2 – 7.4V Lithium-Ion (Li-Ion) batteries ONLY! Use with other type batteries
•
voids warranty, may cause damage to the charger / battery and possibly cause injury to the user.
•
For best battery life, we suggest recharging Li-Ion batteries after use and before storage.
Do not leave battery connected to camcorder or camera when not in use.
•
Do not leave the battery connected to the charger for prolonged periods. Remove the battery after
•
charge is complete.
Unplug the charger when not in use.
•
Do not use, place or store the charger where it may come into contact with water or moisture.
•
Always replace frayed or damaged wire and broken plugs immediately.
•
Use this charger with the power adapters included in the package only.
•
It is not necessary or recommended to discharge a Li-Ion prior to charge.
•
No user serviceable parts, opening chassis will void warranty.
•
Note: Batteries will self discharge when not in use whether they are installed in a camcorder,
digital camera or not. Batteries can be kept fresh if you recharge them every 2 - 3 months.
5550 mAh
5.
30 minutes
39 minutes
50 minutes
65 minutes
80 minutes
110 minutes
195 minutes
Specifications:
Power Input: 110 – 240VAC, 50 / 60Hz
Power Output: 12-18 VDC @ 1.7A
Charge Method: Patented Neotherm Charging Technology
Charge Rate: Variable, Continuously Adjusted via
Microprocessor
Limited 2 Year Warranty
Lenmar product is warranted to be free of defective parts and work manship for stated period from the
original date of purchase. Warranties are not transferable. The warranty excludes damage resulting from
accident, misuse, modification, delay or loss of use, damage to equipment or by normal wear and tear.
ALL WARRANTY REQUESTS MUST BE SUBMITTED AT: www.lenmar.com/warranty
INCLUDE A COPY OF ORIGINAL PROOF OF PURCHASE WITH RETURNED BATTERY OR THE CLAIM WILL BE
DENIED.
Copy of Proof of Purchase from an authorized Lenmar Dealer must include the following:
- The company where the product was purchased
- The date of purchase
- The model number of the product purchased
- Send back the product freight prepaid (we recommend insuring the pack age as Lenmar will not be
responsible for shipments lost or damaged in transit).
Include $10.00 payable to Lenmar Battery Solutions for processing fee for ship to address in the Continental
United States. Include $15.00 for ship to address in Hawaii, Alaska or Canada.
Use preprinted Lenmar shipping label or clearly print your RA Number on the outside of the shipping carton.
Proposition 65 Notice (California)
The following statement is required in the state of California pursuant to the settlement of an action brought
by the Mateel Environmental Justice Foundation against multiple electronics and appliance manufacturers
• WARNING: Handling the cord on this product will expose you to lead, a chemical known to the state
of California to cause birth defects or other reproductive harm. Wash hands after handling.
For additional questions, comments or to explore other Lenmar battery solutions, visit our web site at:
www.lenmar.com or call 800/424-2703 from 9AM – 5PM PST.
Send to:
Lenmar Battery Solutions
Attn: Return Department
4035 Via Pescador
Camarillo, CA 93012-5050
6.
309-064-CT0327 r1
 Loading...