

Page 1
Xemio-658 / Xemio-767BT / Xemio-777BT
Quick Guide
For information and support: www.lenco.com
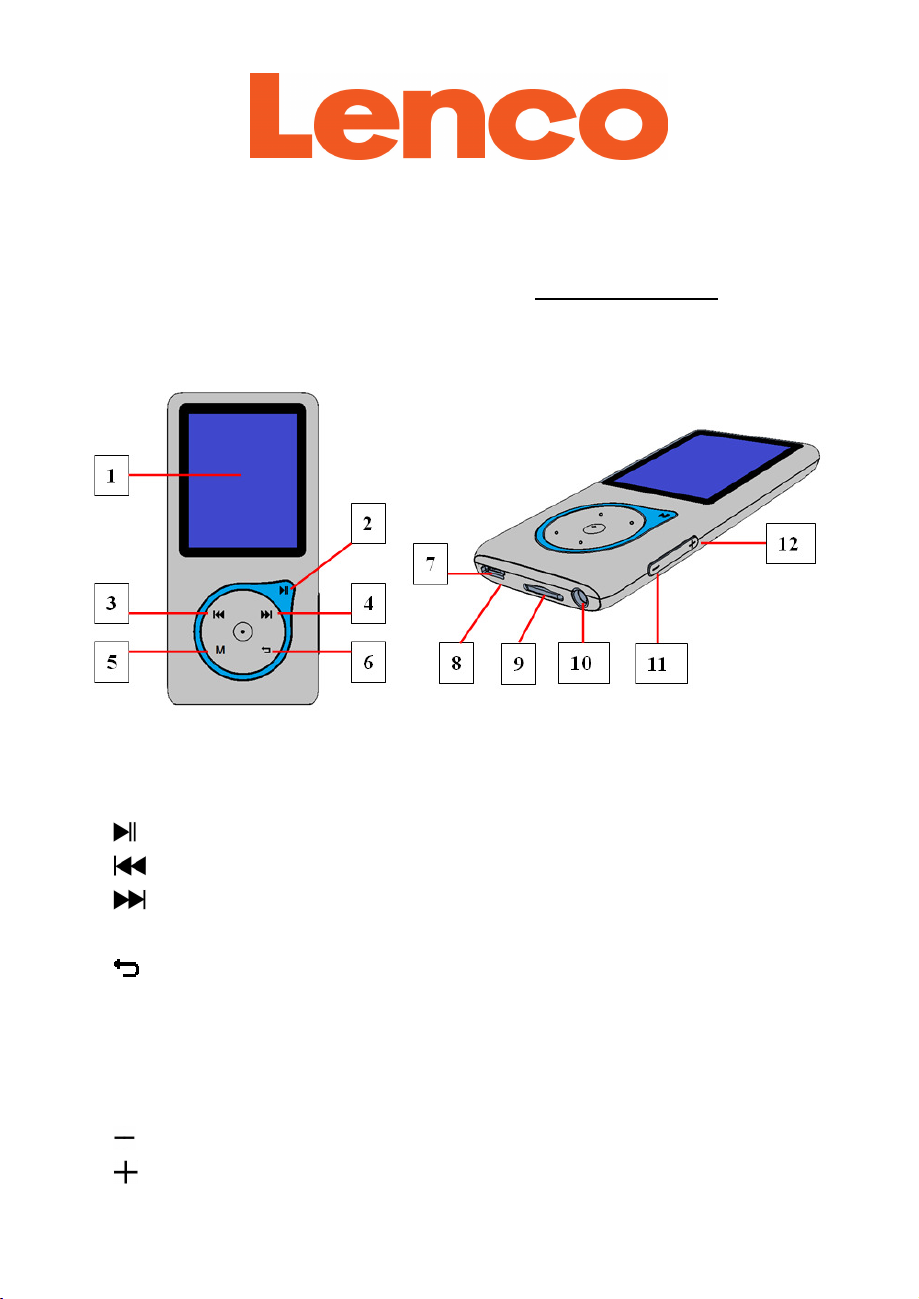
1. Controls and Connections
(1) TFT LCD Display (2 inches; R,G,B)
(2) Button (ON / OFF, Play / Pause, Select / Enter)
(3) Button (Previous / Fast-Rewind, Item up)
(4) Button (Next / Fast-Forward, item down)
(5) M Button (Call Menu / Submenu)
(6) Button (Exit; Back to Previous Menu / Main Menu)
(7) USB Micro Connector (PC Connection / Charge)
(8) Microphone Position (inside Micro USB port)
(9) Memory Card Slot (for Micro SD Card)
(10) Earphone Output Jack (3.5mm Stereo)
(11)
(12)
Button (Volume Down)
Button (Volume Up)
1
Page 2
2. Charging the battery
• Make sure that the computer is turned on. Connect the player to
the computer by using the USB cable. Now the computer will detect
and install the driver automatically. Once the installation is
complete, the player will be displayed in “My Computer” or for MAC
users on the desktop.
Note: For Windows 98/98SE the driver needs to be installed first.
• Once connected to a computer the player will charge automatically.
After 2 ~ 3 hours the battery is fully charged. At same time, the
player is ready for media files upload / download with your
computer.
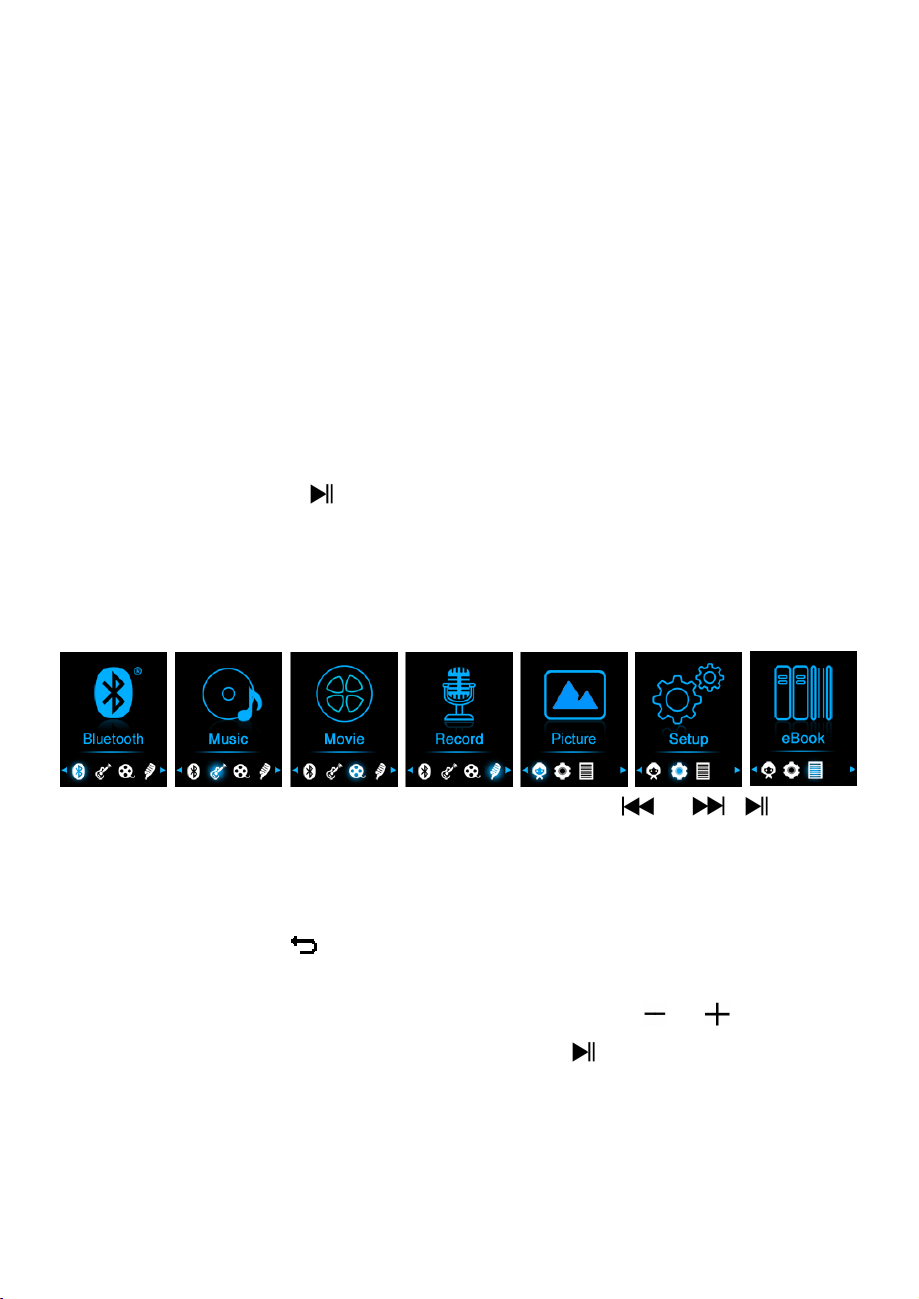
3. Turn ON/OFF player and use menu’s function
• Press and hold the button for 3 seconds to turn “ON” the player,
then you will see any one of the following shown Main Menu screen
“Bluetooth / Music / Movie / Record / Picture / Setup / eBook”
will appear on LCD after the Loading and Opening screen have
displayed.
• Select you desired menu function by using / , and M
button.
• Press M button to call up those submenus in different mode
functions.
• Press or pressing button for goes back to previous submenu and
main menu.
• Adjust the volume level by press or pressing the / button.
• To turn OFF the player, press and hold the button for 3 seconds.
For hearing protection; a display warning pop-up on TFT screen, or, a
beep warning will be heard from earphone when every time you
increase the volume level and reach to the default setting level which
may exceed 85dB. Press M button to accept the warning and
enter/continue into the volume control for increase the level and until
2
Page 3

to maximum level.
4. Bluetooth Audio Transmission
To Turn On the Bluetooth Function:
• From main menu, choose Bluetooth menu by using / and
buttons, a Bluetooth list menu appear to choose;
To Search and Pair Bluetooth receiver device:
• Before pairing, please make sure your Bluetooth Receiver Device
supports Bluetooth A2DP profile.
• Keep the device in 1 meter of your Bluetooth receiver device. Power
“On” your Bluetooth receiver device and enable it into searching /
pairing mode;
• Then, in the Bluetooth list menu choose “Search Device” by using
/ and buttons, the device searching mode is starting,
for approximately 10 ~ 20 seconds, a found device’s name list will
appear to choose for pairing.
• Choose your wanted “Device Name” in list > choose “Pair /
connect” by using / and button, wait for few seconds
both device should be paired and the first song in music list will play
automatically from your Bluetooth receiver device. The screen is
switch back to BT now playing screen and a Bluetooth icon “ “is
displaying at the information bar. The Bluetooth is in transmitting.
• Choose “All Music” in list to direct select the wanted music for play
and transmitting.
• Choose “BT Now Playing” to return now playing interface. And you
can selects Previous / Next, Play / Pause and adjust Volume
Up/Down function by using the
/ , and / buttons.
• To exit the Bluetooth Transmission function, pressing button
until a “Exit BT Transmission?” dialog appear for confirm;
3
Page 4

• Choose “Yes” to exit by using / and buttons, the
Bluetooth function will turn Off and return to main menu screen.
• Choose “No” to abort.
Bluetooth Function Limitation:
1. When you turn the player into Bluetooth audio transmitting mode,
the player earphone output sound will turned to Off automatically;
2. Only music format files with MP3, WMA and WAV can be
transmitting by the player’s Bluetooth function in music playing
interface mode.
3. Fast-forward and Fast backward is not allowed to use in Bluetooth
mode.
5. Downloading the User’s Manual
• For consider environment protection, the detailed User’s Manual is
stored on the Player’s memory, or on the CD if provided, in a folder
named “UTILITIES > User Manual”. To open it you need to
download it onto your computer, and then you can view it on
computer directly. Or, download the detail user manual via
www.lenco.eu/...downloads.
Note: To open the user manual the computer needs to have a .pdf
reader. You can download a .pdf reader for free via
http://get.adobe.com/reader/
6. Downloading the Video Convert Tool
• The AVI video convert tool is stored on the Player’s memory, or on
the CD if provided, in a folder named “UTILITIES > Video Conversion
Software”. Download it onto your computer for copy, and then you
can install this tool on computer directly.
4
Page 5

Guarantee
Lenco offers service and warranty in accordance with the European
law, which means that in case of repairs (both during and after the
warranty period) you should contact your local dealer.
Important note: It is not possible to send products that need repairs to
Lenco directly.
Important note: If this unit is opened or accessed by a non-official
service center in any way, the warranty expires.
This device is not suitable for professional use. In case of professional
use, all warranty obligations of the manufacturer will be voided.
Disclaimer
Updates to Firmware and/or hardware components are made regularly.
Therefore some of the instruction, specifications and pictures in this
documentation may differ slightly from your particular situation. All
items described in this guide for illustration purposes only and may
not apply to particular situation. No legal right or entitlements may be
obtained from the description made in this manual.
Disposal of the Old Device
This symbol indicates that the relevant electrical
product or battery should not be disposed of as general
household waste in Europe. To ensure the correct waste
treatment of the product and battery, please dispose
them in accordance to any applicable local laws of
requirement for disposal of electrical equipment or
batteries. In so doing, you will help to conserve natural
resources and improve standards of environmental protection in
treatment and disposal of electrical waste (Waste Electrical and
Electronic Equipment Directive).
5
Page 6

CE Marking
Products with the CE marking comply with the
EMC Directive (2014/30/EU) and the Low Voltage
Directive (2014/35/EU) issued by the Commission
of the European Community.
Hereby, Lenco Benelux BV, Thermiekstraat 1a, 6361 HB Nuth, The
Netherlands, declares that this product is in compliance with the
essential requirements and other relevant provisions of Directive
1999/5/EC.
The declaration of conformity may be consulted via
techdoc@lenco.com
Service
For more information and helpdesk support, please visit
www.lenco.com Lenco Benelux BV, Thermiekstraat 1a, 6361 HB, The
Netherlands.
6
 Loading...