

Page 1

STEREO FM CLOCK RADIO WITH BLUETOOTH®
M
E
M
O
RY
A
L
A
R
M
S
NO
O
Z
E
M
E
MO
RY
S
LEEP
BA
C L
K G
I
HT
CL KOC
MOD
E
SR-03 BTSR-03 BT
INSTRUCTION MANUAL
Page 2
SA FET Y PRE CAU TIO NS
- Read all t he instructions carefully befo re using the unit and keep th em for futu re reference.
- Check th at the voltage marked on the rating la bel matches your mains vo ltage.
Locati on of Unit
- The u nit must be placed on a flat st able surface and should not be subje cted to vibrations.
- Do not pla ce the unit on sloped or unstable surf aces as the unit may fall off or tip over.
- The m ains socket must be locat ed near the u nit and should be easily ac cessible.
- Avoi d extreme degrees of temp erature, either hot or cold. Place t he unit well away from heat s ources
such as ra diators or gas/electric fires. Avoid exposure to dire ct sunlight and other sou rces of hea t.
- Never pl ace any type of candle or naked flame on t he top of or near the unit.
- To redu ce the risk of fire, electr ic shock or p roduct damage, do not exp ose this unit to rain, mois ture,
drippi ng or splashing. No objec ts filled w ith liquids, such as vase s, should be placed on the unit.
- If you spi ll any liquid into the unit, it can caus e serious damage. Switc h it off at the mains imme diately.
Withdr aw the mains plug and consu lt your dea ler.
- To prev ent the risk of electric sh ock or fire h azard due to overheatin g, ensure that curtains a nd other
materi als do not obstruct the ventilatio n vents.
- Do not ins tall or place this unit in a bookcase, b uilt-in cabinet or in ano ther conf ined space, ensure that
a minimu m of 10cm should be kept around the appa ratus for ventilation .
Safety
- Always d isconnect the unit from the mains su pply before connectin g/disco nnecting other device s or
moving t he unit.
- Unplug t he unit from the mains socket during a l ightning storm.
- Thi s unit will become warm whe n used for a long period of time. This is normal and does not indi cate a
proble m with the unit.
DANGER OUS VOLTAGE
Conduc tor dangerous voltage , that may be o f sufficient magni tude to constitute a risk o f
electr ic shock to persons is present withi n this product's enclos ure.
ATTE NTION
The owne r's manual contains important op erating and maintenan ce instructions, for your
safety, it is necessary to refe r to the manu al.
Mains Ca ble
- Make sur e the unit is not resting on top of the main s cable, as the weight of the u nit may dam age the
mains ca ble and create a safety hazard.
- If the mai ns cable is damaged it must be replace d by the manufacturer, its s ervice ag ent, or similarly
qualif ied persons in order to avoid a hazard .
Interf erence
- The n ormal function of the pro duct may be disturbed by Strong Elec tro Magnetic Interfer ence. If so ,
simply r eset the product to resume normal op eration by following th e instruc tion manual. In case the
functi on could not resume, please use the pr oduct in other location .
- Thi s unit includes micro-p rocessors which may malfunctio n as a result of external ele ctrical
interf erence/noise or electrostati c discharge. If the unit is n ot workin g properly, disconn ect the power
source a nd then reconnect it.
Superv ision
- Childr en should be supervised to ensure th at they do not play with the un it.
- Never le t anyone especially children pus h anything into the holes , slots or an y other openings in the
case - thi s could result in a fatal electric sho ck.
Servic e/Maintenance
- To redu ce the risk of electric sho ck, do not re move screws. The uni t does not contain any user servic eable parts. Please leave all main tenance work to qualifi ed personnel.
- Do not ope n any fixed covers as this may expose da ngerous voltages.
- Ensure t o unplug the unit from the mains socke t before cleaning.
- Do not use a ny type of abrasive pad or abrasive cl eaning solutions as the se may dama ge the unit's
surfac e.
- Do not use l iquids to clean the unit.
CAUTI ON
RISK OF ELECTRIC SHOCK
DO NOT OPEN
UK-1
Page 3
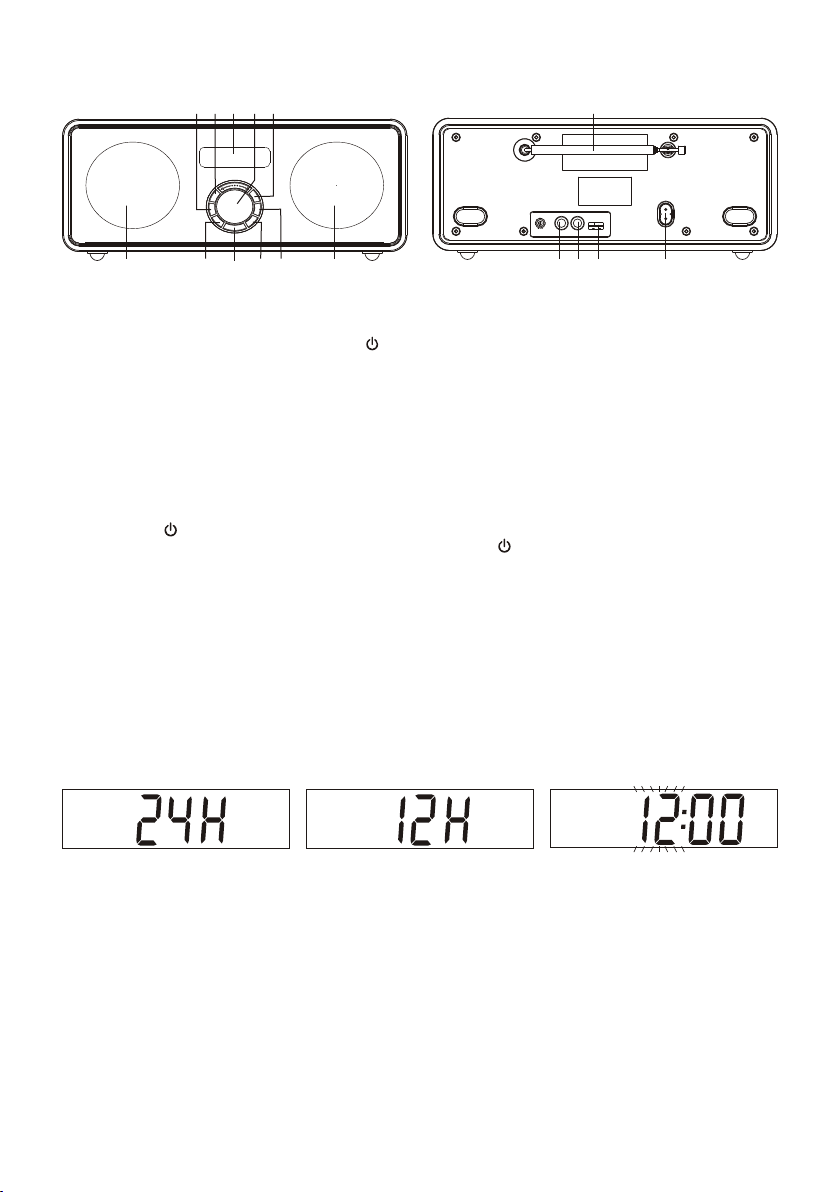
FE ATUR ES AN D CON TRO LS
1 2 3 4 5
11
6
►
1. MEMORY / BUTTON
2. MEMORY / BUTTON
3. LCD DIS PLAY
4. VOLUM E/SCROLL CONT ROL
5. MEMORY / BUTTON
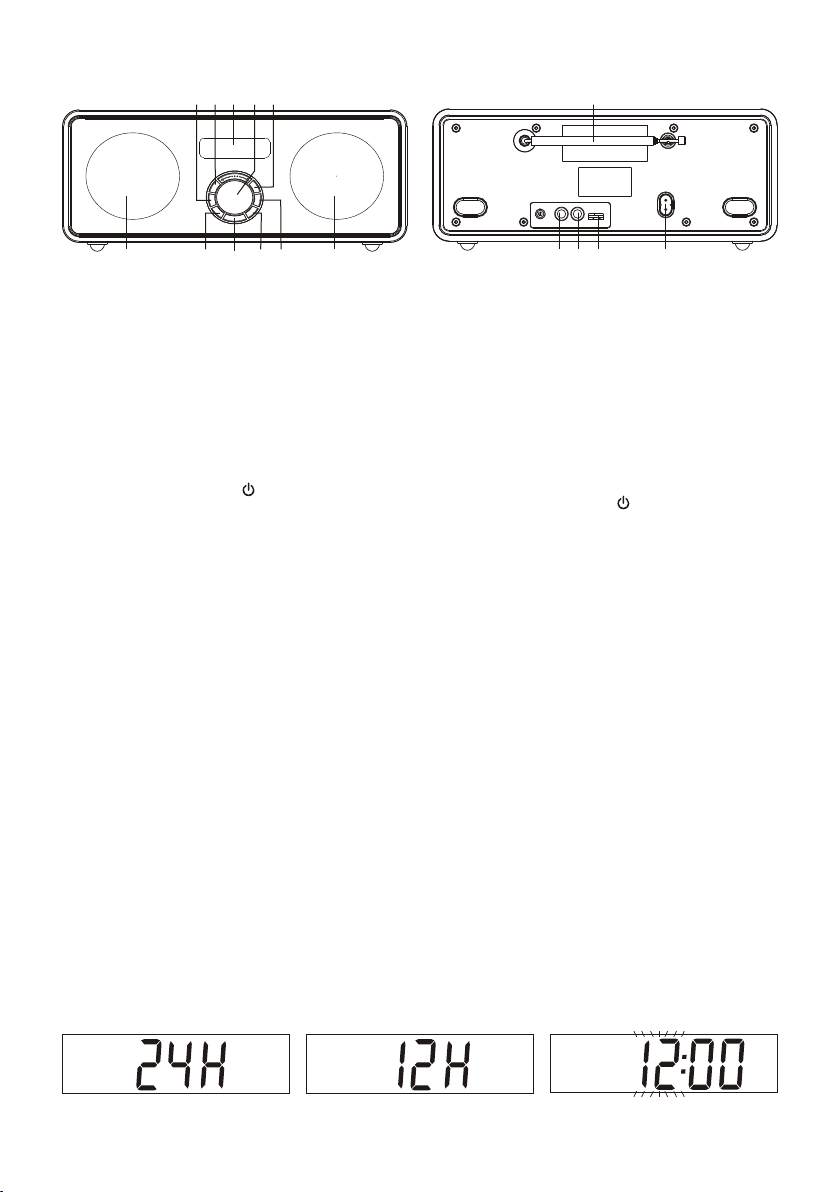
SW ITCHIN G YOUR R ADI O ON FO R THE FIRST TIME
When the r adio is connected to the AC power for the f irst time, it will be in stan dby mode, t he display will
show the c lock and flash.
1. Inser t one end of the AC power cord to the AC input socket locate d at the back of the unit.
2. Conne ct the AC power c ord to the AC mains outlet.
3. Press t he button o nce to turn the radio on.
4. To swi tch the radio to standby du ring on, press and hold the button for l onger than two seconds.
SE TTI NG TH E CLO CK
The clock can only be s et in sta ndby m ode. When the unit is powered up for the first time, it will be i n
standb y mode, the display will show “0:00” a nd flash, you can now proce ed for the cl ock setting
1. Press and hold the CLOCK butto n for longer than two seconds until the display shows “24 H”, then
press the or butto n to select the “ 12H” (12-Ho ur) or “24H” (24-Hour) clock displa y format,
when the d esired format appears in the displ ay, press the CLOCK but ton to confirm. (F. 1) (F. 2)
2. Th e displa y will show the clo ck with the hour digits fla sh, repeatedly press the or butto n to
set to the correc t hour followe d by pressing on t he CLOC K butto n to confirm, first set t he hour and
then the m inute. (F. 3)
3. Whe n the disp lay s hows the correct time, pres s the CLOC K but ton a gain to confirm, the clock setti ng
is now com pleted.
4. Th e clock is displayed duri ng unit standby or under AUX, USB and Blu etooth operation.
►
►/II
▶▶
I◀◀
▶▶I
II
9
8
7
II
◀◀
6
10
6. SPEAK ER
7. ALARM/ SNOOZE BUTTON
8. / MODE BU TTON
9. BACKL IGHT / CLOCK BUTTON
10. SLEE P BUTTON
F.2F.1 F.3
13
12
14
11. RO D AN TENNA
12. HEAD PHONE JACK
13. AUX IN SOCKET
14. USB PO RT
15. AC CORD SOCKET
▶▶
15
II
II
◀◀
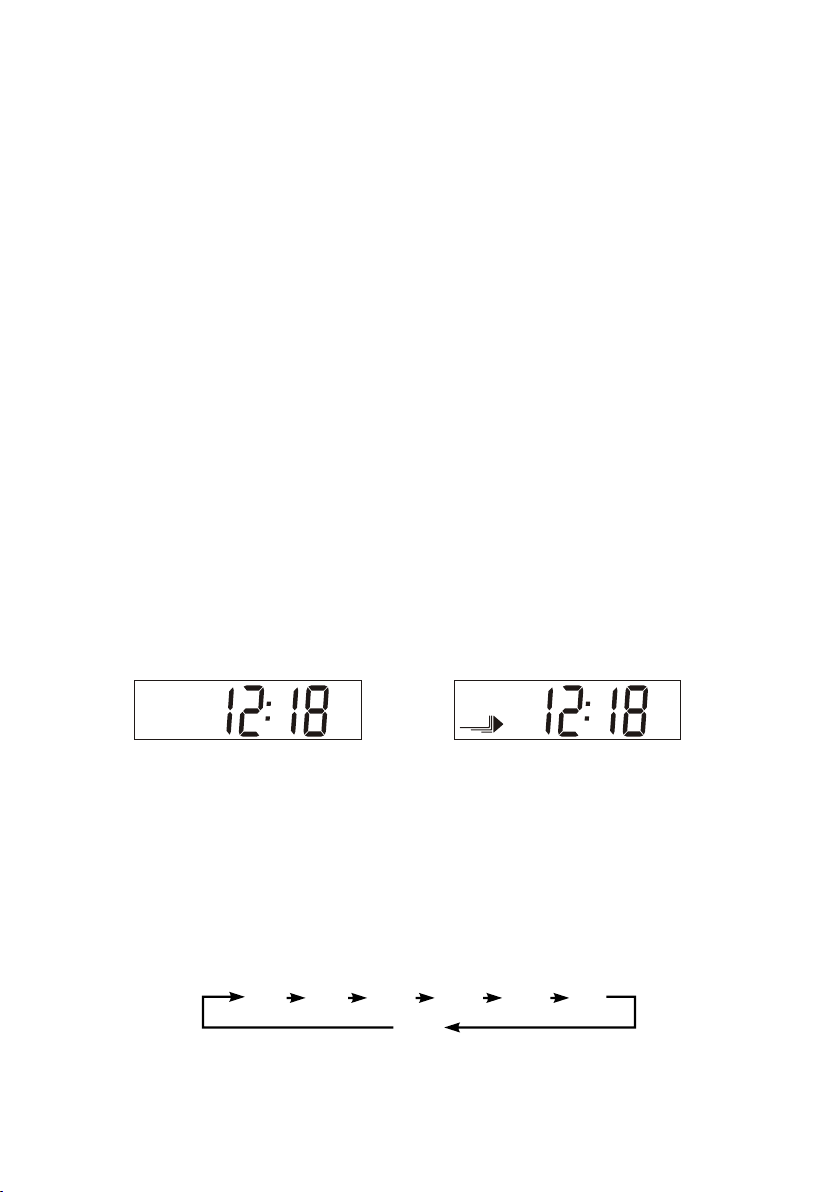
AL ARM F UNC TION
This unit incorporate s an alarm function. You can use thi s function to wake you to an elec tronic buz zer
tone, yo ur favourite FM radio station or the U SB MP3 songs.
The alarm function can be act ivated o nly when the unit is in standby. There is no alarm & snooze function
when the u nit is in operation.
Settin g up the alar m and the wake-up time
1. To set t he alarm, first switch th e unit to sta ndby, then p ress and ho ld the ALARM button for lon ger
than two s econds to enter into the alarm set up mo de - the alarm icon will be dis played an d the hour
digits o f the alarm wake-up time in the displa y will flash. (F. 4)
2. To set t he alarm wake-up time, re peatedly press the or button follo wed by pressing the
ALARM bu tton to confirm – first set the hour and t hen the minute. (F. 5)
▶▶
II
II
◀◀
UK-2
Page 4

3. After the alar m wake-up time is set, you will continue to go for t he alarm wake-up mode s ettings -
repeat edly press the or butto n for the select ions followed by pressing the ALARM button t o
confir m, first set the alarm wake -up volu me level (01-32), the n the wake-up radio station (P01-P10),
and fina lly the buzzer tone (HI/LO). (F. 6) (F. 7) (F. 8)
4. After th e confirmation of the buzzer tone se lection, the alarm set up i s complet ed.
5. To check t he alarm setti ngs, press the ALARM button once, t he alarm wake-up ti me and the wake-up
mode set tings will be displayed o ne by one in tw o seconds intervals.
F.4
▶▶
II
II
◀◀
F.5
F.6 F.7
Activa ting the alarm and the wake-up mode
1. Repeatedly press on the ALAR M button to activat e the a larm functio n and s elect the wake-up m ode,
the alarm icon an d the co rresponding wak e-up mode will appear in the display on every press:
“Tuner > USB > Buzzer > OFF > Tune r > USB > … …”.
2. Whe n your desir ed wake-up mode appe ars in the display, re lease the bu ttons, the alarm function is
now acti vated and the alarm icon will be displ ayed. (F. 9)
3. At the selected wake- up time, the selected wake-u p mode will be on and the alar m icon in the display
will f lash to indica te the alarm is triggered. It will continue f or one hour and then shut off
automa tically. To stop the al arm soone r, press the button once.
Note: If alar m wake- up to U SB is s elected and no USB is bein g inser ted or recognized, when the alarm
arrive s, the buzzer sound will be activate d in place automaticall y.
Automa tic alarm repeat
The alarm will au tomatically repeat each day at the sele cted wake- up time as long as the alar m icon is
displa yed (alarm functio n on ). To cancel t he a larm, repeatedly p ress the ALARM button unti l the display
shows “O FF”, and the alarm icon will be disapp eared.
Snooze f unction
During alarm, press the SNOO ZE button will tempor ary swit ch off the alarm fo r 5 minutes an d the snooze
icon wil l be displayed. This i s repeatable in the one hou r alarm dur ation. (F. 10)
F.9 F.10
LI STE NIN G TO TH E RAD IO
When the u nit is powered up and switched on for th e first time, it will autom aticall y enter into the FM radio
mode. To select radio mode durin g other operation modes , repeate dly press the MODE button o n the front
panel un til “TUNER” and the FM frequency are d isplayed. (F. 11)
Manual t uning
1. To select jog dial manu al t uning, first press on the VOLUME/SCRO LL c ontrol once, then rotate the
same con trol until you read the correct freq uency or the reception is a t its best.
2. The displ ay will show the stereo icon if a FM stereo s tation is receive d. To select FM mono reception,
press th e ►/II button, and the stereo icon wil l disappear in the displa y. (F.12)
Automa tic tuning
1. Press and hold the VOLUME/S CROLL control for long er than tw o seconds to scan up or down the
freque ncy band, it will automatically se arch for the first statio n of sufficient sign al streng th.
2. Repea t the above procedure if you wish to sea rch for another station .
F.8
UK-3
Page 5

Storin g and recalling preset stations
You can preset st ations of y our choice and store up to 10 F M station s into the memory.
1. To store a p reset, first tune to your desir ed station, then press and hold the MEMO RY button for
longer t han two seconds, the display will sh ow “P01” and flash. (F. 13)
2. Press the MEMORY or button to select your desired preset station num ber, then pre ss the
MEMORY button to conf irm you r selec tion. The display will show the stable preset station number
and then t he FM frequency.
3. To recall a pr eset st ation, press the MEMORY or butt on to s elect the stations that you hav e
stored . The display will sho w the recalled preset station numb er for two seconds.
F.11
TUNER
F M
BLUETO OTH M ODE
The Blue tooth capabilities of this unit en able it to receive audio fr om many Blu etooth capable device s
includ ing mobile phones, pers onal comp uters and PDAs. It suppor ts the foll owing Bluetooth profi les and
functi onality. Only one device per prof ile can be connected concurrentl y.
Advanc ed Aud io Distri but ion Profi le (A2DP)
- High-q uality stereo audio con nection
- Stream ing of stereo music from PC, mobile ph ones…etc
Audio Video Re mote Cont rol P rofile (AVRCP)
- Device r emote control
- Contro l connected device
Blueto oth performance consideratio ns
NOTE: Blue tooth connectivity perfor mance may vary with brand and mode l of the con nected device. For
best per formanc e, plea se conn ect newer Bluetooth dev ices inco rporating Blue tooth 2.1 and usin g the
latest firmware upd ate available from the dev ice vendor. Co mpatibility wit h all devices and media types is
not guar anteed.
Ensure all Bluetooth d evices with in 3 0 feet have Blue tooth trans mission dis abled. T he p resence of other
functi oning Bluetooth devices during c onnection may lead to ope rational difficu lties.
Blueto oth i s a short- range radio communic ation standard. The Bl uetooth transmitt er an d receiver
hardwa re in this unit has an approxim ate oper ational range of 30 feet in ope n space. General ly Bluet ooth
device s can c ommunicate w ith each other clearly w ithin a regular siz ed room or o ffice. Op eration betw een
different roo ms will depe nd on the construction of the room. It is important to recognize the fact that
Blueto oth communication r ange may be substant ially re duced if the signal p asses through a soli d object.
Human bodies, brick and conc rete w alls, and heavy furniture or bookcases will reduce the oper ational
range of your Bluetooth devices. Glass, dry-wa ll or wood paneled wal ls a nd office partitions m ay have a
less severe but noticeable e ffect. You should positio n your Bluetooth d evices closer to each other i f you
observ e communication difficulties.
Stereo m usic connection to your mobile pho nes
This connecti on requires a mobil e phone suppor ting the Bluetooth A2DP profi le for stereo music
connec tion. In order to create new Bl uetooth connect ion you w ill need some familiarity with the Blu etooth
functi ons of your mobile phon e. As each phone operates s lightly differently, please familiarize yourself
with the B luetooth capabilities of your de vice before connectin g.
1. Ensure that the Blue tooth on your m obile pho ne is powered on. You might nee d to refer to the
phone us er manual for details.
2. Place the r adio and the phone where th ey are no mor e than 3 feet apart.
3. Repeate dly press the MOD E b utton to select Bluetooth mode , t he display will show the fla shing
4. Set the A2D P-capable phone to search for Bluetooth devices and follow the instruc tions on the
5. Select and confirm the pairing on yo ur phon e, the conn ection will be completed in a few se conds
6. Press the ►/II button on the unit or select starting playback on you r pho ne to start the music
.
phone' s screen. You will recognize the radio by its Bluetooth name “BT spea kerN". In case that y ou
are prom pted for a passkey, ent er “0000”.
and the radio will produce a beep tone, t he on the dis play will become stabl e an d yo u ca n now
start yo ur Bluetooth music streaming ope ration.
playba ck.
▼
▲
▼
▲
F.12
TUNER
F M
F.13
UK-4
Page 6
7. To interru pt playback, press the ►/II button a gain or select “pause” on y our phone .
8. To skip forwa rd or back to other songs during pla yback, pres s the▶▶ I or I◀◀ butt on o n th e unit or
select t he “s kip contr ols” on you r mobile ph one .
Note: So me mobile phones may connect and dis connect as you make and end c alls. This is not an
Indica tion of a pro blem with your unit.
Stereo m usic connection to other Bluetoo th devices
This connection req uires a device supp orting the Bluetoo th A2DP profile for stereo music connect ion.
Please ensur e your devic e has the latest versions of softw are dr ivers and/o r firmware s upporti ng
Blueto oth functional ity. Compatibility with all devices is not gua ranteed. In addi tion to the procedures
descri bed above for mo bile phones, this radio c an receive stereo music f rom many other B luetooth source
device s includi ng personal c omputers, PDAs , Bluetoo th enabled music players. The exact con nection
proced ures ma y vary from de vice to device , pleas e refer to the d evice u ser manual for specific
operat ions.
Note : An in creasing number of computing dev ices include support fo r Bluetoo th, and many include
sup port for st ereo music over Bluetoo th (A2DP). For best performance fr om your particular devi ce,
ple ase ensure that you are using the late st update of software dri vers and/ or firmware available . In
cert ain circumstances, updating th e software drivers or fir mware of yo ur device to the latest rel ease
May ad d support for A2DP that w as not available in a previous relea se. Please contact the ve ndor of
your d evice for such updates and refer to th e device user manual for up date proc edures. Please
reme mber that system updates should on ly be performed by qualif ied indiv iduals after performi ng a
full s ystem backup.
LI STE NIN G TO TH E USB ( MP3 P lay back)
1. When th e radio is on, repeatedly press the MO DE button to select USB fun ction, th e display will show
“USB” an d “NO DATA”. (F. 14)
2. Conne ct your memory device loaded with yo ur favourite MP3 songs vi a the USB por t located on the
back pan el. The “NO DATA” will then go off.
3. It will b egin to playback automatically f rom the first MP3 track fou nd in the dev ice and the display
willsh ow the USB playback icon. (F. 15)
4. To int errupt playback, pres s the ►/II bu tton, the playback icon i n the display will flash.
5. To res ume playback, press the ► /II butto n again.
6. Durin g playback, press the ▶▶I or I◀ ◀ butt on to skip forward or back to other MP3 tr acks in the
memory d evice. Pl ayback will start at the be ginning of the selected t rack.
F.14 F.15
USB
NO DATA
Note 1: In c ase that your memory device is loade d with MP3 songs but the disp lay keeps o n showing 'NO
DATA”, the format of your USB d evice might not be compatible with t his radio. To listen to the
songs in t he device , please use the line-in ca ble (not supplied), ins ert one end t o the AUX IN
socket ( at the back o f the radio) and the other en d to the line out or the headphone jack of y our
USB devi ce, then re peatedly press the MODE b utton to select AUX mode.
Note 2: This product can suppo rt USB of memory size up to 16GB, only tha t the acknowledge time fo r
bigger m emory wil l be longer, and in some occas ions will cause system ti me out. So to b e
compat ible to all U SB device cannot be guara nteed, this is not an indic ation of a pr oblem with this
unit.
SL EEP F UNC TION
This fun ction allows you to program the radi o to switch off itself a fter a set period of time.
1. To act ivate the sleep functio n, repeatedly press the SLEEP butt on, the display will show “ SLEEP”,
and the sl eep time (flashes in minutes) will c hange in sequence on ever y press:
USB
90 8 0 7 0 60 30 1 0
OFF
2. When yo ur desired sleep time appears in the d isplay, release the b utton, the sleep functi on will be
activa ted in 5 seco nds. When the sleep time co unts to zero, the unit will g o off.
3. To put t he sleep function off sooner, repeatedly pre ss the SLEEP button until the displa y shows
“OFF”, a nd the “SLE EP” will then be disappea red. “OFF”, and the “SLEEP” will the n be disappeared.
UK-5
Page 7
DI SPL AY BACKLIGHT
The display backlight is defa ulted to dim in standby and wil l g o to on once the unit is swit ched to on. It
would be r eset back to the default every time th e unit is switched to stand by.
During u nit on, press the BACKLIGHT button w ill toggle the backligh t between o n and dim.
During s tandby, press on any of t he buttons will turn on the backligh t for 10 seconds.
AUX INPUT
There is a 3.5mm stereo aux input socket locat ed at the back of the unit; analogue audio sound signa ls
from oth er sources can be input to the radio thr ough this socket.
To sele ct AUX mo de, repea tedly press the MODE bu tton until “AUX” is dis played, the aud io will be
switch ed to the aux input signal and you can adj ust the volume control fo r your desired sound output level.
HE ADP HON E JAC K
The stereo headphone jack is located on the back panel . Connect a set of stereo headphones (not
includ ed) to this jack for pri vate listening. When headpho nes are in use, the spea ker will be automatically
cut off.
IMPORTANT: Whe n using headphone s always s et the volume control to a low level befor e you put the
headph ones on, then put the headphones on and graduall y increase the volu me to a comf ortable list ening
level.
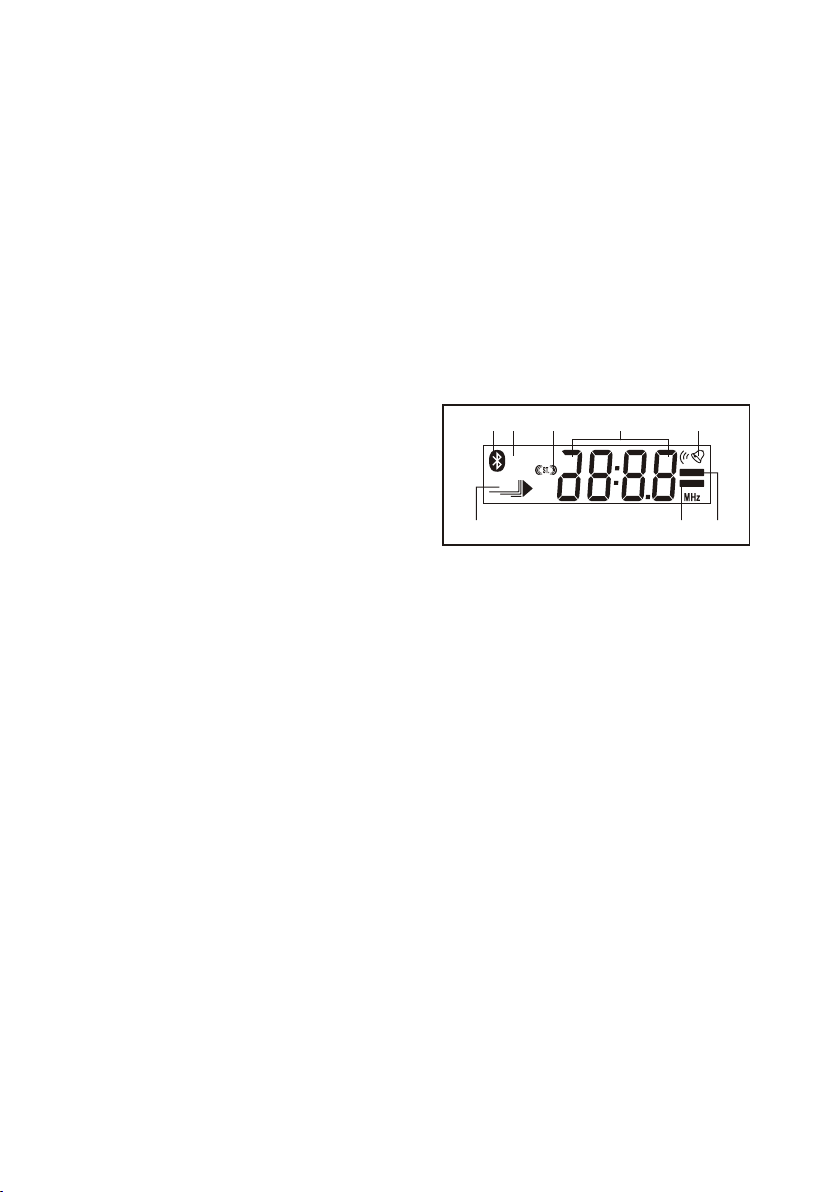
LCD DIS PLAY WIND OW
A. BLUETOOTH INDICATOR
B. TU NER INDICATOR
C. FM STER EO INDICATOR
D. TI ME/FREQUENCY RAN GE INDICATOR
E. ALARM IN DICATOR
F. USB INDIC ATOR
G. SLEEP INDICATOR
H. SNOOZ E INDICATOR
B C D E
A
TUNER
AUX
F M
USB
NO DATA
PM
F G H
SP ECI FIC ATIO N
POWER SU PPLY: AC 100-2 40V~ 50/60Hz
OUTPUT POWER: 2 x 5W
UNIT DIMENSION : 300 (L) x 145 (W) x 115 (H) mm
RADIO SE CTION
FREQUE NCY RANGE: FM 87.5 - 10 8 MHz
USB SECT ION
INTERFA CE USB 1.1 (U SB HUB not supported)
FLASH ME MORY U SB 1.1 Flash USB 2.0 High-Speed Flas h
FAT 16/32 32M 2 TByte
MP3 DECO DER MPEG Audi o 1, 2, 2.5 Layer 1, 2, 3
BLUETOOTH SECTION
BLUETOOTH SPECIFICATION V2.1+ ED R
OUTPUT POWER CLASS Class 2
SUPPORTING PROFILES A2DP, AVRCP
Bit Rate 8 - 3 20kbps & VBR except free format
SPECIF ICATION SUBJECT TO CHANGE WITHOUT FURTH ER NOTICE .
HI
SNOOZE
SLEEP
UK-6
Page 8
UKW STEREO-UHRENRADIO MIT BLUETOOTH®
M
E
M
O
RY
A
L
A
R
M
S
NO
O
Z
E
M
E
MO
RY
S
LEEP
BA
C L
K G
I
HT
CL KOC
MOD
E
SR-03 BTSR-03 BT
BEDIENUNGSANLEITUNG
Page 9
VORSICHTSMASSNAHMEN
- Lesen Sie sich diese Bedienungsanleitung vor der Benutzung des Geräts sorgfältig durch und bewahren Sie
sie für den späteren Gebrauch auf.
- Vergewissern Sie sich, dass die auf dem Typenschild gekennzeichnete Spannung mit Ihrer Netzspannung
übereinstimmt.
Aufstellen des Geräts
- Das Gerät muss auf einer ebenen und stabilen Unterlage aufgestellt werden und darf keinen Vibrationen
ausgesetzt werden.
- Stellen Sie das Gerät nicht auf geneigten oder instabilen Unterlagen auf, da das Gerät herunterfallen oder
umkippen kann.
- Die Steckdose muss sich in der Nähe des Geräts befinden und leicht zugänglich sein.
- Vermeiden Sie extreme Temperaturen, egal ob Hitze oder Kälte. Stellen Sie das Gerät in ausreichender
Entfernung von Wärmequellen wie Heizkörpern oder Gas- und Elektroherden auf. Vermeiden Sie direkte
Sonneneinstrahlung und andere Wärmequellen.
- Stellen Sie niemals Kerzen oder Gegenstände mit offenen Flammen auf oder in der Nähe des Geräts.
- Um das Risiko von Feuer, Stromschlag oder Schäden am Produkt zu verringern, darf dieses Gerät niemals
Regen, Feuchtigkeit, Tropf- oder Spritzwasser ausgesetzt werden. Gegenstände die mit Flüssigkeiten gefüllt
sind, wie z. B. Vasen, dürfen nicht auf das Gerät gestellt werden.
- Wenn Flüssigkeiten in das Gerät gelangen, kann dies zu schweren Schäden führen. Schalten Sie in diesem
Fall die Stromversorgung umgehend aus. Ziehen Sie den Stecker aus der Steckdose und wenden Sie sich an
Ihren Händler.
- Um die Gefahr von Stromschlägen oder Brandgefahr durch Überhitzung zu vermeiden, stellen Sie sicher, dass
Vorhänge und andere Materialien die Lüftungsöffnungen nicht behindern.
- Stellen Sie dieses Gerät nicht in einem Bücherregal, Einbauschrank oder anderen geschlossenen Räumen
auf. Stellen Sie sicher, dass ein Minimum von 10 cm um das Gerät herum für die Belüftung freigehalten wird.
Sicherheitshinweise
- Trennen Sie das Gerät vom Netz, bevor Sie andere Geräte daran anschließen bzw. abtrennen oder das Gerät
bewegen.
- Ziehen Sie während eines Gewitters den Netzstecker aus der Steckdose heraus.
- Dieses Gerät wird warm, wenn es über einen längeren Zeitraum nicht benutzt wird. Dies ist normal und kein
Anzeige einer Fehlfunktion des Geräts.
CAUTI ON
RISK OF ELECTRIC SHOCK
ACHTUNG
STROMSCHLAGGEFAHR
NICHT ÖFFNEN!
GEFÄHRLICHE STROMSPANNUNG
Gefährliche Spannung kann innerhalb des Geräts vorhanden sein, die stark genug ist, um für Personen eine
Stromschlaggefahr zu bilden.
ACHTUNG
Die Bedienungsanleitung enthält wichtige Bedienungs- und Wartungsanweisungen, die für Ihre Sicherheit gedacht
sind. Es ist deshalb wichtig die Anleitung vollständig durchzulesen.
Netzkabel
- Vergewissern Sie sich, dass das Gerät auf dem Netzkabel steht, da das Gewicht des Geräts das Netzkabel
beschädigen kann und ein Sicherheitsrisiko darstellt.
- Wenn das Netzkabel des Gerät beschädigt ist, lassen Sie es nur durch den Hersteller, dessen
Vertriebsagenten oder entsprechend ausgebildete Fachkräfte ersetzen, um eventuelle Gefahren zu vermeiden.
Interferenz
- Die normale Funktionsweise des Produkts kann durch starke elektromagnetische Interferenz gestört werden.
Sollte dies der Fall sein, führen Sie einfach einen Reset aus, um den normalen Betrieb wiederherzustellen.
Wenn es nicht möglich ist den Betrieb wiederherzustellen, stellen Sie das Gerät bitte an einem anderen Ort
auf. Dieses Gerät enthält Mikroprozessoren, bei denen es infolge äußerer elektrischer Störungen oder
elektrostatischer Entladung zu Fehlfunktionen kommen kann. Wenn das Gerät nicht wie gewohnt funktioniert,
trennen Sie es von der Stromversorgung ab und schließen Sie es wieder an.
Beaufsichtigung
Kinder müssen so beaufsichtigt werden, dass sichergestellt werden kann, dass sie nicht mit dem Gerät spielen.
Lassen Sie Niemanden, insbesondere keine Kinder, Gegenstände in das Innere des Geräts durch vorhandene
Öffnungen stecken -- dies kann zu tödlichen Stromschlägen führen.
Wartung
Zur Verringerung eventueller Stromschlaggefahr öffnen Sie niemals das Gehäuse. Das Gerät enthält keine Teile,
die vom Benutzer gewartet werden können. Bitte überlassen Sie alle Wartungsarbeiten entsprechend
ausgebildetem Fachpersonal.
- Öffnen Sie nicht das Gehäuse, da Sie dadurch gefährlichen Spannungen ausgesetzt werden.
- Achten Sie darauf, dass Sie den Netzstecker des Geräts vor der Reinigung aus der Steckdose ziehen.
- Verwenden Sie keine Scheuermittel oder andere scheuernde Reinigungsmittel, da diese die Oberfläche der
Geräts beschädigen können.
- Verwenden Sie keine Flüssigkeiten zum Reinigen des Geräts.
DO NOT OPEN
DE-1
Page 10
FUNKTIONEN UND BEDIENELEMENTE
1 2 3 4 5
11
6
1. SPEICHERTASTE
2. SPEICHERTASTE
3. LCD-ANZEIGE
4. LAUTSTÄRKE / AUSWAHL
5. SPEICHERTASTE
6. LAUTSPRECHER
7. ALARM / SCHLUMMER
8. MODUS
INBETRIEBNAHME IHRES RADIOS
Wenn das Radio zum ersten Mal an den Netzstrom angeschlossen wird, geht es in den Bereitschaftsbetrieb und
zeigt die Uhrzeit blinkend an.
1. Stecken Sie ein Ende des Netzkabels in den AC-Eingang an der Rückseite des Geräts.
2. Schließen Sie das Netzkabel an einer Steckdose an.
3. Betätigen Sie die Taste , um das Radio einzuschalten.
4. Um das Radio zurück in den Bereitschaftsmodus zu versetzen, halten Sie die Taste für mehr als zwei
Sekunden gedrückt.
EINSTELLEN DER UHRZEIT
Die Uhrzeit kann nur eingestellt werden, wenn das Radio sich im Bereitschaftsmodus befindet. Wenn das Gerät das
erste Mal eingeschaltet wird, geht es in den Bereitschaftsmodus und in der Anzeige erscheint blinkend "0:00". Sie
können dann mit der Einstellung der Uhrzeit fortfahren.
1. Halten Sie die CLOCK-Taste für mehr als zwei Sekunden gedrückt, bis in der Anzeige "24 H" erscheint.
Betätigen Sie dann die Taste oder , um Uhrzeitformat "12H" (12-Stunden) oder "24H" (24-Stunden)
auszuwählen. Sobald das gewünschte Format in der Anzeige erscheint, betätigen Sie die CLOCK-Taste zur
Bestätigung. (Abb. 1) (Abb. 2)
2. In der Anzeige fängt die Stundenanzeige an blinken. Betätigen Sie dann wiederholt die Taste oder , um die
gewünschten Stundeneinstellung zu erhalten. Betätige Sie die CLOCK-Taste zur Bestätigung. Daraufhin
können Sie die Minuten einstellen. (Abb. 3)
3. Wenn die korrekte Uhrzeit angezeigt wird, betätigen Sie die CLOCK-Taste erneut zur Bestätigung und die
Uhrzeit wird gespeichert.
4. Die Uhr wird in Bereitschaftsmodus und im AUX, USB und Bluetooth-Betrieb angezeigt.
WECKFUNKTION
Dieses Gerät verfügt über eine Weckfunktion. Sie können diese Funktion verwenden, um mit einem elektronischen
Summton, Ihrem Lieblings-UKW-Sender oder USB-MP3-Songs geweckt zu werden.
Die Weckalarmfunktion kann nur aktiviert werden, wenn sich das Gerät im Bereitschaftsmodus befindet. Während
des Betriebs kann die Weckalarm- & Schlummerfunktion nicht benutzt werden.
Einrichten des Weckalarms und der Weckzeit
1. Um die Weckzeit einzustellen, stellen Sie das Gerät in den Bereitschaftsmodus und halten Sie dann die
ALARM-Taste für mehr als zwei Sekunden gedrückt, um in den Alarmeinstellungsmodus zu gehen - das
Alarmsymbol wird angezeigt und die Stundenziffern der Weckzeit blinken in der Anzeige. (Abb. 4)
2. Um die Weckzeit einzustellen, betätigen Sie wiederholt die Taste oder gefolgt von der
ALARM-Taste zur Bestätigung - stellen Sie zunächst die Stunden und dann die Minuten ein. (Abb. 5)
3. Nachdem die Weckzeit eingestellt worden ist, stellen Sie den Weckmodus ein. Betätigen Sie mehrfach die
Taste oder z ur Auswahl und betätigen Sie die ALARM-Taste zur Bestätigung. Stellen Sie
zunächst den Wecklautstärke (01 - 32), dann den Radiosender (P01 - P10), und schließlich den Summton
(HI / LO ) ein. (Abb. 6) (Abb. 7) (Abb. 8)
4. Nach der Bestätigung der Summtonauswahl, ist die Einstellung des Weckalarms abgeschlossen.
▶▶
II
7
II
◀◀
9
8
6
10
9. HINTERBELEUCHTUNG / UHRZEIT
10. AUTOMATISCHE ABSCHALTUNG
11. STABANTENNE
12. KOPFHÖRERAUSGANG
13. AUX-EINGANG
14. USB-ANSCHLUSS
15. NETZKABELANSCHLUSS
F.2F.1 F.3
▶▶
13
12
14
II
II
◀◀
15
DE-2
Page 11
5. Um die Alarmeinstellungen zu überprüfen, betätigen Sie die ALARM-Taste und die Weckzeit und der
Weckmodus werden nacheinander in einem 2-Sekundenabstand angezeigt.
F.4
F.5
F.6 F.7
Aktivieren des Weckalarms und des Weckmodus
1. Betätigen Sie wiederholt die ALARM-Taste, um den Alarm zu aktivieren und den Weckmodus zu wählen. Das
Alarmsymbol und der entsprechende Weckmodus erscheinen in der Anzeige:
"Tuner > USB > Summer > AUS > Tuner > USB > ......".
2. Wenn der gewünschte Weckmodus in der Anzeige angezeigt wird, lassen Sie die Tasten los und die
Weckfunktion ist aktiviert. Das Alarmsymbol wird angezeigt. (Abb. 9)
3. Zur eingestellten Weckzeit wird der ausgewählte Weckmodus aktiviert und das Alarmsymbol blinkt in der
Anzeige, um anzuzeigen, das wird der Weckalarm ausgelöst wurde. Der Alarm hält für maximal eine Stunde an,
bevor er dann automatisch ausgeht. Um den Alarm früher zu beenden, betätigen Sie die Taste .
Hinweis: Wenn Sie den USB-Weckmodus gewählt haben und kein USB-Medium angeschlossen ist, wenn der
Alarm aktiviert wird, wird stattdessen der Summermodus aktiviert.
Automatische Weckalarmwiederholung
Der Alarm wird automatisch jeden Tag zur gewählten Weckzeit wiederholt, solange das Alarmsymbol angezeigt wird
(Weckalarmfunktion). Um den Weckalarm zu deaktivieren, betätigen Sie wiederholt die ALARM-Taste, bis "OFF"
angezeigt wird und das Alarmsymbol verschwindet.
Schlummerfunktion
Betätigen Sie während des Weckalarms die SNOOZE-Taste, um den Alarm vorübergehend für 5 Minuten
auszuschalten. Das Schlummersymbol wird zur gleichen Zeit angezeigt. Sie können dies während der einstündigen
Alarmdauer beliebig oft wiederholen. (Abb.10)
F.9 F.10
RADIOBETRIEB
Wenn das Gerät angeschlossen und zum ersten Mal eingeschaltet wird, geht es automatisch in den
UKW-Radiomodus. Um den Radiomodus in anderen Betriebsarten zu wählen, betätigen Sie wiederholt die
MODE-Taste auf der Gerätevorderseite, bis "TUNER" und die UKW-Frequenz angezeigt. (Abb. 11)
Manuelle Sendersuche
1. Betätigen Sie zur manuelle Sendersuche zunächst auf VOLUME / SCROLL, um dann daran zu drehen, bis die
gewünschte Frequenz angezeigt wird bzw. der Empfang am besten ist.
2. In der Anzeige erscheint das Stereo-Symbol , wenn ein UKW-Stereo-Sender empfangen wird. Um zum
UKW-Mono-Empfang zu wechseln, betätigen Sie die Taste und das Stereo-Symbol verschwindet von der
Anzeige. (Abb. 12)
Automatische Sendersuche
1. Halten Sie das VOLUME/SCROLL-Rad für mehr als zwei Sekunden gedrückt, um nach oben oder unten im
Frequenzband zu suchen. Das Gerät sucht automatisch nach dem ersten Sender mit ausreichender
Signalstärke.
2. Wiederholen Sie diesen Vorgang zur Suche weiterer Sender.
Speichern und Abrufen von Sendern
Sie können im Speicher des Gerät bis zu 10 UKW-Sender ablegen.
1. Um einen Sender zu speichern, stellen Sie zuerst den gewünschten Sender ein und halten Sie dann die
MEMORY-Taste für mehr als zwei Sekunden gedrückt. In der Anzeige erscheint "P01" blinkend. (Abb. 13)
F.11
TUNER
F M
F.12
TUNER
F M
►/II
F.8
F.13
DE-3
Page 12

2. Betätigen Sie die Taste MEMORY oder , um den gewünschten Senderspeicher zu wählen. Betätigen Sie
dann die MEMORY-Taste, um die Auswahl zu bestätigen. In der Anzeige wird die Senderspeichernummer und
dann die UKW-Frequenz angezeigt.
3. Um einen gespeicherten Sender aufzurufen, betätigen Sie die Taste MEMORY oder MEMORY . In der
Anzeige wird die Senderspeichernummer für zwei Sekunden angezeigt.
BLUETOOTH-MODUS
Die Bluetooth-Funktion des Geräts ermöglicht es ihnen Audiosignale von vielen Bluetooth-fähigen Geräten wie
Mobiltelefonen, PCs und PDAs zu empfangen. Es unterstützt die folgenden Bluetooth-Profile und -Funktionalität.
Nur ein Gerät pro Profil kann gleichzeitig verbunden werden.
Advanced Audio Distribution Profile (A2DP)
- Hochwertige Stereo-Audio-Verbindung
- Streaming von Stereo-Musik vom PC, Mobiltelefonen etc.
Audio Video Remote Control Profile (AVRCP)
- Fernbedienung
- Steuerung des angeschlossenen Geräts
Bluetooth-Performance
HINWEIS: Die Performance einer Bluetooth-Verbindung kann vom Hersteller und dem Modell des verbundenen
Geräts variieren. Für eine optimale Leistung verwenden Sie bitte neuere Bluetooth-Geräte, die Bluetooth 2.1
unterstützen und benutzen Sie das neueste Firmware-Update des entsprechenden Geräteherstellers. Eine
Kompatibilität mit allen Geräten und Medien-Typen wird nicht garantiert.
Vergewissern Sie sich, dass alle Bluetooth-Geräte innerhalb von 10 Metern ihre Bluetooth-Funktion deaktiviert
haben. Die Anwesenheit von anderen Bluetooth-Geräten kann zur Interferenzen führen.
Bluetooth ist ein Kurzstrecken-Funkstandard. Der Bluetooth-Sender und die Empfänger-Hardware in diesem Gerät
haben eine ungefähre Reichweite von 10 Metern ohne Hindernisse. Bluetooth-Geräte können ohne weiteres
innerhalb eines normalgroßen Zimmers oder im Büro miteinander kommunizieren. Die Verbindung zwischen
verschiedenen Räumen hängt von der Konstruktion der Wände ab. Es ist wichtig wisse, dass die BluetoothReichweite wesentlich reduziert wird, wenn das Signal durch feste Gegenstände gehen muss.
Menschliche Körper, Ziegel- und Betonwände, aber auch schwere Möbel oder Bücherregale reduzieren die
Reichweite von Bluetooth-Geräten. Glas-, Gips- oder Holzwände und Bürotrennwände haben einen weniger
schweren, aber bemerkbaren Effekt. Sie müssen Ihre Bluetooth-Geräte näher zueinander positionieren, wenn Sie
Verbindungsprobleme beobachten.
Stereo-Musik-Verbindung zu Ihrem Mobiltelefon
Diese Verbindung erfordert ein Mobiltelefon, das das Bluetooth-Profil A2DP für Stereo-Musik unterstützt. Um eine
neue Bluetooth-Verbindung aufzubauen, müssen Sie mit den Bluetooth-Funktionen Ihres Mobiltelefons vertraut
sein. Da jedes Telefon Unterschiede aufweist, machen Sie sich bitte mit den Bluetooth-Funktionen des Geräts vor
dem Verbindungsaufbau vertraut.
1. Vergewissern Sie sich, dass die Bluetooth-Funktion auf Ihrem Mobiltelefon eingeschaltet ist. Für detaillierte
Informationen müssen Sie unter Umständen dazu die Bedienungsanleitung Ihres Mobiltelefons lesen.
2. Stellen Sie das Radio und das Telefon nicht mehr als 1 Meter auseinander auf.
3. Betätigen Sie die MODE-Taste, um den Bluetooth-Modus zu wählen und in der Anzeige erscheint ein
blinkendes .
4. Stellen Sie das A2DP-fähige Mobiltelefon so ein, dass es nach Bluetooth-Geräten sucht und befolgen Sie die
Anweisungen auf dem Bildschirm des Telefons. Sie werden das Radio durch seinen Bluetooth-Namen "BT
speakerN" erkennen. Für den Fall, dass Sie nach einem Kennwort gefragt werden, geben Sie "0000" ein.
5. Wählen und bestätigen Sie den Verbindungsaufbau auf dem Telefon. Der Verbindungsaufbau ist nach wenigen
Sekunden abgeschlossen und Sie hören einen Signalton auf dem Radio. Die Anzeige hört auf zu blinken
und das Bluetooth-Musik-Streaming ist aktiviert.
6. Betätigen Sie die Taste auf dem Gerät, um die Musikwiedergabe zu starten oder starten Sie die
Wiedergabe auf Ihrem Telefon.
7. Um die Wiedergabe zu unterbrechen, betätigen Sie die Taste erneut oder wählen Sie "Pause" auf Ihrem
Mobiltelefon.
8. Um während der Wiedergabe vorwärts oder rückwärts zu anderen Musiktiteln zu springen, betätigen Sie die
▶▶I I◀◀
Taste oder auf dem Gerät bzw. wählen Sie die entsprechenden Bedienelemente auf Ihrem
Mobiltelefon.
Hinweis: Einige Mobiltelefone starten und trennen die Verbindung, wenn Sie Anrufe tätigen bzw. beenden.
Dies ist keine Fehlfunktion ihres Geräts.
Stereo-Musik-Verbindung zu anderen Bluetooth-Geräten
Diese Verbindung erfordert ein Gerät, das das Bluetooth-Profil A2DP für Stereo-Musik unterstützt.
Bitte stellen Sie sicher, dass Ihr Gerät über die neueste Version der Software-Treiber und / oder Firmware mit
Unterstützung der Bluetooth-Funktionalität verfügt. Eine Kompatibilität mit allen Geräten wird nicht garantiert.
Zusätzlich zu dem oben beschriebenen Verfahren für Mobiltelefone, kann dieses Radio Stereo-Musik von vielen
anderen Bluetooth-Geräten, einschließlich PCs, PDAs, Bluetooth-fähigen Musik-Playern etc. empfangen. Der
genaue Verbindungsaufbau
kann von Gerät zu Gerät variieren. Lesen Sie bitte die Bedienungsanleitung des Geräts für detaillierte Anweisungen.
Hinweis: Eine wachsende Anzahl Geräten besitzen Bluetooth-Unterstützung und viele bieten Unterstützung für
Stereo-Musik über Bluetooth (A2DP). Für eine optimale Leistung Ihres Geräts, stellen Sie bitte sicher, dass Sie die
neuesten Software-Treiber und / oder Firmware zur Verfügung stehen. Unter bestimmten Umständen kann die
►/II
▼
▲
▲
DE-4
▼
Page 13

Aktualisierung der Software-Treiber oder Firmware des Geräts auf die neueste Version
Unterstützung für A2DP hinzufügen. Bitte wenden Sie sich für solche Updates an den Hersteller Ihres Geräts und
lesen Sie die Bedienungsanleitung für den genauen Vorgang der Aktualisierung. Bitte beachten Sie, dass SystemUpdates nur von qualifizierten Personen nach der Durchführung einer vollständige Datensicherung ausgeführt
werden sollten.
USB-WIEDERGABE (MP3-Wiedergabe)
1. Wenn das Radio eingeschaltet ist, betätigen Sie die MODE-Taste, um die USB-Funktion auszuwählen und in
der Anzeige erscheint "USB" und "NO DATA". (Abb. 14)
2. Schließen Sie Ihr Speichermedium mit Ihren Lieblings-MP3-Titeln an den USB-Anschluss auf der Rückseite
des Radios. Die Anzeige "NO DATA" verschwindet dann.
3. Die Wiedergabe beginnt automatisch mit dem ersten MP3-Titel, der gefunden wird und in der Anzeige erscheint
das USB-Wiedergabesymbol. (Abb. 15)
4. Um die Wiedergabe zu unterbrechen, betätigen Sie die Taste und das Wiedergabesymbol fängt in der Anzeige
an zu blinken.
5. Zum Fortfahren der Wiedergabe betätigen Sie die Taste einfach erneut.
6. Betätigen Sie während der Wiedergabe die Taste oder , um zum nächsten bzw. vorigen MP3-Titel auf dem
Speichermedium zu springen. Die Wiedergabe wird vom Anfang des gewählten Titels gestartet.
F.14 F.15
USB
NO DATA
Anmerkung 1: In dem Fall, dass Ihr Speichergerät mit MP3-Titel enthält, aber in der Anzeige weiterhin "NOT DATA"
angezeigt wird, ist das Format des USB-Geräts möglicherweise nicht kompatibel mit diesem Radio.
Um die Musiktitel auf dem Gerät hören zu können, verwenden Sie bitte ein Line-In-Kabel (nicht im
Lieferumfang enthalten) und schließen Sie das eine Ende am AUX-Eingang (an der Rückseite des
Radios) an und das andere Ende an den Line-Ausgang oder Kopfhörerausgang des USB-Geräts.
Betätigen Sie dann wiederholt die MODE-Taste, um den AUX-Modus auszuwählen.
Hinweis 2: Dieses Produkt unterstützt USB-Medien mit einer Speichergröße von bis zu 16 GB. Bei größeren
Speichermedien dauert da Einlesen länger und kann in einigen Fällen fehlschlagen. Die
Kompatibilität zu allen USB-Geräten kann nicht garantiert werden. Dies stellt kein Problem dieses
Geräts dar.
AUTOMATISCHE ABSCHALTUNG
Diese Funktion ermöglicht es Ihnen, das Radio nach einer voreingestellten Zeitdauer automatisch auszuschalten.
1. Um die Einschlaf-Funktion zu aktivieren, betätigen Sie mehrmals die SLEEP-Taste und in der Anzeige
erscheint "SLEEP" und die Abschaltzeit (blinkend in Minuten) kann in folgender Reihenfolge verändert werden:
90 8 0 7 0 60 3 0 1 0
USB
OFF
2. Sobald der gewünschte Abschaltzeit in der Anzeige erscheint, lassen Sie die Taste los und die Einschlaf-
Funktion wird 5 Sekunden danach aktiviert. Wenn die eingestellte Abschaltzeit erreicht wird, schaltet sich das
Gerät automatisch aus.
3. Um die Einschlaf-Funktion vorzeitig auszuschalten, betätigen Sie wiederholt die SLEEP-Taste, bis in der
Anzeige "OFF" erscheint und "SLEEP" verschwindet. Die Anzeigen "OFF" und "SLEEP" verschwinden dann.
HINTERGRUNDBELEUCHTUNG
Die Hintergrundbeleuchtung der Anzeige wird im Bereitschaftsmodus gedimmt und geht an, wenn das Gerät
eingeschaltet wird. Die Beleuchtung wird jedesmal gedimmt, wenn das Gerät in den Bereitschaftsmodus versetzt
wird.
Betätigen Sie im eingeschalteten Zustand die BACKLIGHT-Taste auf der Fernbedienung, um die
Hintergrundbeleuchtung der Anzeige ein- bzw. auszuschalten.
Im Bereitschaftsmodus können Sie eine beliebige Taste betätigen, um die Hintergrundbeleuchtung für 10
Sekunden einzuschalten.
AUX-EINGANG Auf der Rückseite des Geräts befindet sich ein 3,5-mm-Stereo-Aux-Eingang, mit dem Sie analoge
Audiosignale von anderen Gerät über das Radio wiedergeben können.
Um den AUX-Modus auszuwählen, betätigen Sie wiederholt die MODE-Taste, bis "AUX" angezeigt wird. Die
Audioausgabe wird dann auf den Aux-Eingang umgeschaltet und Sie können die Lautstärke auf das gewünschte
Niveau einstellen.
KOPFHÖRERAUSGANG
Der Stereo-Kopfhörerausgang befindet sich auf der Rückseite. Schließen Sie Ihre Stereo-Kopfhörer (nicht im
Lieferumfang) an diesem Anschluss für nicht-störenden Musikgenuss an. Wenn die Kopfhörer angeschlossen sind,
wird die Tonausgabe über die Lautsprecher automatisch unterbunden.
WICHTIG: Wenn Sie Kopfhörer benutzen, stellen Sie die Lautstärke immer zunächst auf ein niedriges Niveau.
Setzen Sie dann die Kopfhörer auf und erhöhen Sie die Lautstärke auf ein angenehmes Maß.
DE-5
Page 14

LCD-ANZEIGE
A. BLUETOOTH
B. TUNER
C. UKW-STEREO
D. UHRZEIT / FREQUENZBEREICH
E. WECKALARM
F. USB
G. EINSCHLAF-TIMER
H. SCHLUMMERMODUS
TECHNISCHE DATEN
STROMVERSORGUNG: AC 100 - 240 V ~ 50/60 Hz
AUSGANGSLEISTUNG: 2 x 5 W
ABMESSUNGEN: 300 (L) x 145 (B) x 115 (H) mm
RADIO
FREQUENZBEREICH: UKW 87,5 - 108 MHz
USB
USB-1.1-SCHNITTSTELLE (USB HUBs nicht unterstützt)
FLASH-SPEICHER: USB 1.1 Flash, USB 2.0 High-Speed F lash
FAT 16/32, 32 MB - 2 TB
MP3-DEKODER: MPEG Audio 1, 2, 2.5, Layer 1, 2, 3
Bitrate 8 - 320 kbps & VBR, außer bei freien Formaten
BLUETOOTH
BLUETOOTH-SPEZIFIKATIONEN: V2.1 + EDR
LEISTUNGSKLASSE: Klasse 2
UNTERSTÜTZTE PROFILE: A2DP, AVRCP
ÄNDERUNG DER TECHNISCHEN DATEN VORBEHALTEN.
B C D E
A
TUNER
AUX
F M
USB
NO DATA
PM
F G H
SNOOZE
SLEEP
HI
DE-6
Page 15

STEREO FM KLOK RADIO MET BLUETOOTH®
M
E
M
O
RY
A
L
A
R
M
S
NO
O
Z
E
M
E
MO
RY
S
LEEP
BA
C L
K G
I
HT
CL KOC
MOD
E
SR-03 BTSR-03 BT
HANDLEIDING
Page 16

VEILIGHEIDSMAATREGELEN
- Lees alle instructies zorgvuldig door en bewaar ze voor toekomstige referentie.
- Controleer of de spanning die op het apparaat staat overeenkomt met de spanning van het lichtnet in uw
woning.
Plaatsing van het apparaat
- Het apparaat moet op een vlakke stabiele ondergrond worden geplaatst en mag niet worden blootgesteld aan
trillingen.
- Plaats het apparaat niet op een schuine of instabiele ondergrond, omdat het apparaat dan kan vallen of kantelen.
- Het stopcontact moet zich in de buurt van het apparaat bevinden en eenvoudig bereikbaar zijn.
- Voorkom extreme temperaturen, warm of koud. Plaats het apparaat uit de buurt van warmtebronnen, zoals
radiatoren of gas/elektrische kachels. Voorkom blootstelling aan direct zonlicht en andere warmtebronnen.
- Plaats nooit kaarsen of andere voorwerpen met open vlam op of in de buurt van het apparaat.
- Stel het apparaat niet bloot aan regen, vocht, druppend of spattend water om het risico van brand, elektrische
schokken of schade aan het product te verminderen. Plaats geen voorwerpen gevuld met vloeistof, zoals
vazen, op het apparaat.
- Als u vloeistof op het product morst, dan kan dit leiden tot ernstige schade. Schakel het apparaat direct uit.
Haal de stekker uit het stopcontact en neem contact op met uw dealer.
- Zorg ervoor dat gordijnen en andere materialen niet over de ventilatieopeningen hangen om het risico op
elektrische schokken en brandgevaar door oververhitting te voorkomen.
- Installeer of plaats het apparaat niet in een boekenkast, ingebouwde kast of andere afgesloten ruimte, zorg
voor een minimum van 10cm vrije ruimte rond het apparaat voor ventilatie.
Veiligheid
- Haal de stekker altijd uit het stopcontact voordat u andere apparaten aansluit/loskoppelt of het apparaat
verplaatst.
- Haal de stekker uit het stopcontact tijdens onweer.
- Dit apparaat wordt warm wanneer het voor lange tijd wordt gebruikt. Dit is normaal en duidt niet op een
probleem met het apparaat.
CAUTI ON
RISK OF ELECTRIC SHOCK
DO NOT OPEN
GEVAARLIJKE SPANNING
Er is gevaarlijke spanning aanwezig in de behuizing van dit product, die van voldoende kracht is om een risico op
elektrische schokken voor personen te vormen.
LET OP
De handleiding bevat belangrijke bedienings- en onderhoudsinstructies, het is voor uw veiligheid nodig om de
handleiding te lezen.
Netsnoer
- Zorg ervoor dat het apparaat niet op het netsnoer wordt geplaatst, omdat het gewicht van het apparaat het
netsnoer kan beschadigen en dit kan gevaar veroorzaken.
- Als het netsnoer is beschadigd, dan moet het worden vervangen door de fabrikant, een service agent van de
fabrikant of een soortgelijk gekwalificeerd persoon om gevaar te voorkomen.
Storing
- De normale werking van dit product kan worden verstoord door sterke elektromagnetische interferentie. Als dit
het geval is, reset het product dan volgens de handleiding om normaal gebruik te hervatten. Als het apparaat
niet normaal werkt, probeer het dan op een andere locatie te gebruiken.
- Dit apparaat bevat microprocessoren die onjuist kunnen werken als gevolg van elektrische storing/ruis of
elektrostatische ontlading. Als het apparaat niet naar behoren werkt, haal de stekker uit het stopcontact en
steek de stekker opnieuw in het stopcontact.
Toezicht
- Houd toezicht op kinderen en zorg ervoor dat ze niet met het apparaat spelen.
- Laat nooit iemand, in het bijzonder kinderen, voorwerpen door de gaten, sleuven of andere openingen in de
behuizing steken dit kan leiden tot fatale elektrische schokken.
Onderhoud
- Om het risico van elektrische schokken te verminderen, verwijder de schroeven niet. Het apparaat bevat geen
door de gebruiker te onderhouden onderdelen. Laat alle onderhoud over aan gekwalificeerd personeel.
- Open geen onderdelen van de behuizing die zijn vastgezet, aangezien dit u kan blootstellen aan gevaarlijke
spanningen.
- Zorg ervoor dat u de stekker uit het stopcontact haalt voor het schoonmaken.
- Gebruik geen schurende pads of schuurmiddelen om het apparaat schoon te maken omdat deze het
oppervlak van het apparaat kunnen beschadigen.
- Gebruik geen vloeistoffen om het apparaat schoon te maken.
NL-1
Page 17

FUNCTIES EN BEDIENINGSELEMENTEN
1 2 3 4 5
6
►
1. MEMORY / BUTTON
2. MEMORY / BUTTON
3. LCD DIS PLAY
4. VOLUM E/SCROLL CONT ROL
5. MEMORY / BUTTON
UW RADIO VOOR HET EERST INSCHAKELEN
Als de radio voor het eerst is aangesloten op netstroom, dan zal de radio in standbymodus gaan. Het display toont
een knipperende klokweergave.
1. Steek een van de uiteinden van het netsnoer in de netaansluiting op de achterkant van het apparaat.
2. Steek het andere uiteinde van het netsnoer in het stopcontact.
3. Druk één keer op om de radio in te schakelen.
4. Houd voor langer dan twee seconden ingedrukt om de ingeschakelde radio in standbymodus te zetten.
DE KLOK INSTELLEN
De klok kan alleen worden ingesteld in standbymodus. Als het apparaat voor het eerst wordt ingeschakeld, dan zal
het de standbymodus betreden. Het display knippert en toont “0:00”, u kunt nu de klok instellen.
1. Houd CLOCK voor langer dan twee seconden ingedrukt tot het display “24 H” toont, druk daarna op ▶▶I of
I◀◀om het weergaveformaat “12H” (12-uur) of “24H” (24-uur) te selecteren. Druk als het gewenste formaat
verschijnt op CLOCK om de instelling te bevestigen. (F. 1) (F. 2)
2. Het display toont de klok en de cijfers van de klok knipperen, druk herhaaldelijk op ▶▶I of I◀◀ om het juiste
aantal uren in te stellen en druk daarna ter bevestiging op CLOCK. Stel eerst de uren in en daarna de minuten.
(F. 3)
3. Als het display de juiste tijd toont, druk dan nogmaals ter bevestiging op CLOCK, het instellen van de klok is nu
voltooid.
4. De klok wordt getoond als het apparaat standby staat of in de AUX-, USB- en Bluetooth-modus.
I◀◀
▶▶I
►
►/II
Remove button
Remove button
LCD-DISPLAY
VOLUME/SCROLL-KNOP
Remove button
9
8
7
6
10
6. SPEAK ER
7. ALARM/ SNOOZE BUTTON
8. / MODE BU TTON
9. BACKL IGHT / CLOCK BUTTON
10. SLEE P BUTTON
LUIDSPREKER
Remove button
Remove button
Remove button
Remove button
F.2F.1 F.3
11
13
12
14
11. RO D AN TENNA
12. HEAD PHONE JACK
13. AUX IN SOCKET
14. USB PO RT
15. AC CORD SOCKET
Staafantenne
Hoofdtelefoonuitgang
Aux ingang
USB-poort
Netaansluiting
15
ALARMFUNCTIE
Dit apparaat beschikt ook over een alarmfunctie. U kunt de alarmfunctie gebruiken om u te wekken met een
elektronische zoemer, uw favoriete FM-zender of MP3-nummers op een USB-apparaat.
De alarmfunctie kan alleen worden geactiveerd als het apparaat standby staat. Er is geen alarm- & snooze-functie
als het apparaat wordt gebruikt.
NL-2
Page 18

Het alarm en de wektijd instellen
1. Zet het apparaat eerst in de standbymodus om het alarm in te stellen. Houd daarna ALARM voor langer dan 2
seconden ingedrukt om de instelmodus van het alarm te openen het alarmicoontje zal worden getoond en de
uren van het alarm knipperen op het display. (F. 4)
2. Druk om de wektijd in te stellen herhaaldelijk op of en druk daarna ter bevestiging op ALARM eerst voor de
uren en daarna voor de minuten. (F. 5)
3. Nadat de wektijd is ingesteld, kunt u de verdere instellingen voor de wekmodus instellen druk herhaaldelijk op
of en daarna ter bevestiging op ALARM. Stel eerst het wekvolume in (01-32), daarna de wekzender (P01-P10)
en tot slot de zoemertoon (HI/LO). (F. 6) (F. 7) (F. 8)
4. Na het bevestigen van de instelling van de zoemertoon is het instellen van het alarm voltooid.
5. Druk om de alarminstellingen te controleren één keer op ALARM, de wektijd en de wekmodus van het alarm
worden één voor één voor 2 seconden getoond.
F.4
F.5
F.6 F.7
Het alarm activeren en de wekmodus selecteren
1. Druk herhaaldelijk op ALARM om de alarmfunctie te activeren en de wekmodus te selecteren, het
alarmicoontje en de corresponderende wekmodus zullen bij elke druk op de knop op het display verschijnen:
“Tuner > USB > Zoemer > UIT > Tuner > USB > … …”.
2. Laat de knop los als de gewenste wekmodus wordt getoond. De alarmfunctie is nu geactiveerd en het
alarmicoontje wordt getoond. (F. 9)
3. Als de geselecteerde wektijd is bereikt, dan zal de geselecteerde wekmodus geactiveerd worden en het
alarmicoontje knippert op het display om aan te geven dat het alarm geactiveerd is. Het alarm zal een uur
geactiveerd worden en daarna automatisch uitschakelen. U kunt het alarm eerder stoppen door één keer op
te drukken.
Opmerking: Als de wekmodus is ingesteld op USB, maar er geen USB-apparaat is geplaatst of als het USB-
apparaat niet wordt herkend, dan zal automatisch het zoemeralarm, in plaats van het USB-alarm,
worden geactiveerd wanneer de alarmtijd wordt bereikt.
Het alarm automatisch herhalen
Het alarm zal elke dag automatisch op de geselecteerde wektijd worden geactiveerd als het alarmicoontje wordt
getoond (de alarmfunctie is ingeschakeld). Druk om het alarm te annuleren herhaaldelijk op ALARM tot het display
de melding “OFF” toont en het alarmicoontje verdwijnt van het display.
Snooze-functie
Druk als het alarm is geactiveerd op SNOOZE om het alarm tijdelijk voor 5 minuten uit te schakelen, het snoozeicoontje wordt getoond op het display. Dit kan worden herhaald tijdens de alarmduur van een uur. (F.10)
F.9 F.10
NAAR DE RADIO LUISTEREN
Als het apparaat is aangesloten op het lichtnet en voor het eerst wordt ingeschakeld, dan zal het apparaat
automatisch naar de FM-radiomodus schakelen. Om de radiomodus vanuit andere modi te selecteren, drukt u
herhaaldelijk op MODE op het voorpaneel tot “TUNER” en de FM-frequentie worden getoond. (F. 11)
Handmatig afstemmen
1. Druk, om handmatig afstemmen te selecteren, eerst één keer op de VOLUME-/SCROLL-knop, draai daarna
aan dezelfde knop tot u de juiste frequentie ziet of de ontvangst het best is.
2. Het display toont het stereo-icoontje als er een FM-stereozender wordt ontvangen. Druk op om mono FM-
ontvangst te selecteren. Het stereo-icoontje verdwijnt van het display. (F.12)
F.8
Automatisch afstemmen
1. Houd de VOLUME/SCROLL-knop langer dan twee seconden ingedrukt om naar zenders met een hogere of
lagere frequentie te zoeken op de band, het apparaat zoekt automatisch naar de eerste zender met voldoende
signaalsterkte.
2. Herhaal de bovenstaande procedure als u naar een andere zender wilt zoeken.
NL-3
Page 19

Het opslaan en oproepen van voorkeurszenders
U kunt zelf tot 10 voorkeurszenders opslaan in het geheugen van de radio.
1. Om een voorkeurszender op te slaan, moet u eerst afstemmen op de gewenste zender, houd daarna
MEMORY voor langer dan twee seconden ingedrukt, het display toont “P01” en knippert. (F. 13)
2. Druk op MEMORY of om het nummer van de gewenste voorkeurszender te selecteren en druk daarna op
MEMORY om uw keuze te bevestigen. Het display toont de voorkeurszender en daarna de FM-frequentie.
3. Om een voorkeurszender op te roepen, drukt u op MEMORY MEMORY of om een zender die u heeft
opgeslagen te selecteren. Het display toont het nummer van de voorkeurszender voor twee seconden.
F.11
TUNER
F M
BLUETOOTH-MODUS
De Bluetooth-mogelijkheden van deze radio maken het mogelijk om audio te ontvangen van vele apparaten die
over Bluetooth beschikken, waaronder mobiele telefoons, PC's en PDA's. De radio ondersteunt de volgende
Bluetooth-profielen en functionaliteit. Er kan per profiel gelijktijdig verbinding worden gemaakt met één apparaat.
Advanced Audio Distribution Profile (A2DP)
- Hoge kwaliteit, stereo-audioverbinding
- Steamen van stereomuziek van PC's, mobiele telefoons, etc.
Audio Video Remote Control Profile (AVRCP)
- Afstandsbediening
- Besturen verbonden apparaat
Overwegingen Bluetooth-prestaties
OPMERKING: Bluetooth-connectiviteit prestaties kunnen variëren, afhankelijk van het merk en model van het
verbonden apparaat. Voor de beste prestaties wordt aangeraden om verbinding te maken met nieuwere Bluetoothapparaten met Bluetooth 2.1 en de laatste firmware-update te gebruiken die beschikbaar is gesteld door de
fabrikant van het apparaat. Compatibiliteit met alle apparaten en mediatypen is niet gegarandeerd.
Zorg ervoor dat de Bluetooth-transmissie van alle Bluetooth-apparaten die zich binnen 10 meter bevinden is
uitgeschakeld. De aanwezigheid van andere, functionerende Bluetooth-apparaten tijdens het maken en in stand
houden van een verbinding kan tot operationele problemen leiden.
Bluetooth is een radiocommunicatie-standaard met een kort bereik. De hardware van de Bluetooth-zender en
ontvanger in deze radio hebben een operationeel bereik van ongeveer 9 meter in een open ruimte. Over het
algemeen kunnen Bluetooth-apparaten duidelijk met elkaar communiceren binnen een kamer of kantoor van
normaal formaat. Gebruik in verschillende ruimten hangt af van de constructie van de ruimten. Het is belangrijk om
te realiseren dat het Bluetooth-communicatiebereik aanzienlijk kan worden verminderd als het signaal door vaste
objecten heen moet.
Menselijke lichamen, bakstenen, betonnen muren en zwaar meubilair of boekenkasten zullen het operationele
bereik van uw Bluetooth-apparaten verminderen. Glas, muren die bestaan uit gipsplaten of houten panelen en
kantoor partities hebben een minder ernstig, maar merkbaar effect. U moet uw Bluetooth-apparaten dicht bij elkaar
plaatsen als u communicatieproblemen opmerkt.
Verbinding voor stereomuziek met uw mobiele telefoon
Een verbinding voor stereomuziek vereist een mobiele telefoon die het Bluetooth A2DP-profiel ondersteunt. Om een
nieuwe Bluetooth-verbinding te maken, moet u enige vertrouwdheid hebben met de Bluetooth-functies van uw
mobiele telefoon. Aangezien elke telefoon iets anders werkt, dient u zich, voor het maken van een verbinding,
vertrouwd te maken met de Bluetooth-mogelijkheden van uw apparaat.
1. Zorg ervoor dat Bluetooth is ingeschakeld op uw mobiele telefoon. Het is mogelijk dat u voor details de
handleiding van uw telefoon moet raadplegen.
2. Plaats de radio en de telefoon niet meer dan 1 meter uit elkaar.
3. Druk herhaaldelijk op MODE om de Bluetooth-modus te selecteren, het display toont de knipperende .
4. Gebruik de A2DP-capabele telefoon om te zoeken naar Bluetooth-apparaten en volg de instructies op het
scherm van de telefoon. U herkent de radio aan zijn Bluetooth-naam “BT speakerN". In het geval u wordt
gevraagd om een wachtwoord in te voeren, voer “0000” in.
5. Selecteer en bevestig het pairen op uw telefoon, de verbinding wordt binnen een paar seconden gemaakt en
de radio produceert een pieptoon, de op het display zal blijvend oplichten en u kunt nu starten met het
streamen van Bluetooth-muziek.
6. Druk op op de radio of selecteer de optie voor het afspelen van muziek op de telefoon om het afspelen van
muziek te starten.
7. Druk om het afspelen te onderbreken nogmaals o of selecteer “pause” op uw telefoon.
8. Druk om naar het volgende of vorige nummer te gaan tijdens het afspelen op of op de radio of
selecteer de
Opmerking: Sommige mobiele telefoons kunnen de Bluetooth-verbinding maken of verbreken als u een oproep
maakt of beëindigd. Dit is geen indicatie van een probleem met uw radio.
►/II
▼
▲
F.12
TUNER
F M
►/II
desbetreffende opties op uw mobiele telefoon.
▼
▲
F.13
▶▶I I◀◀
NL-4
Page 20

Verbinding voor stereomuziek met andere Bluetooth-apparaten
Een verbinding voor stereomuziek vereist een apparaat die het Bluetooth A2DP-profiel ondersteunt.
Zorg ervoor dat uw apparaat de laatste versies van de stuurprogramma's en/of firmware heeft die Bluetoothfunctionaliteit ondersteunt. Compatibiliteit met alle apparaten is niet gegarandeerd. In aanvulling op de procedures
die hierboven zijn beschreven voor mobiele telefoons, kan deze radio ook stereomuziek ontvangen van vele andere
Bluetooth-bronapparaten, waaronder PC's, PDA's en muziekspelers met Bluetooth. De exacte procedures om een
verbinding op te zetten kunnen variëren van apparaat tot apparaat, raadpleeg de handleiding van het apparaat voor
specifieke instructies.
Opmerking: Een toenemend aantal computers biedt ondersteuning aan Bluetooth en vele bieden ook
ondersteuning aan stereomuziek over Bluetooth (A2DP). Zorg er voor de beste prestaties met uw specifieke
apparaat voor dat u gebruik maakt van de laatste updates of stuurprogramma's en/of firmware die beschikbaar zijn.
In bepaalde gevallen kan een update naar de meeste recente release van de stuurprogramma's of firmware van uw
apparaat ondersteuning toevoegen aan A2DP, zelfs als dit in een eerdere release niet beschikbaar was. Neem
contact op met de verkoper van uw apparaat voor zulke updates en raadpleeg de handleiding voor
updateprocedures. Onthoud dat systeemupdates alleen moeten worden uitgevoerd door gekwalificeerde individuen
en na het uitvoeren van een volledige backup van het systeem.
LUISTEREN NAAR MUZIEK VAN USB (Afspelen MP3)
1. Als de radio is ingeschakeld, druk herhaaldelijk op MODE om de USB-modus te selecteren. Het display toont
“USB” en “NO DATA”. (F. 14)
2. Sluit uw geheugenapparaat met daarop uw favoriete MP3-nummers aan op de USB-poort op het achterpaneel.
De tekst “NO DATA” zal verdwijnen.
3. De radio begint automatisch met afspelen vanaf de eerste MP3-track die wordt gevonden op het
geheugenapparaat en het display toont het USB-afspeelicoontje. (F. 15)
4. Druk om het afspelen te onderbreken op , het afspeelicoontje knippert op het display.
5. Druk om het afspelen te hervatten nogmaals op .
6. Druk tijdens het afspelen op of om naar de volgende of vorige MP3-track op het geheugenapparaat te gaan.
Het afspelen start op het begin van de geselecteerde track.
F.14 F.15
USB
NO DATA
Opmerking 1: Als uw geheugenapparaat wordt ingeladen met MP3-nummers, maar het display blijft 'NO DATA”
tonen, dan is het mogelijk dat het formaat van uw USB-apparaat niet compatibel is met deze radio.
Gebruik een line-in-kabel (niet meegeleverd) om naar nummers op het apparaat te luisteren. Steek
een uiteinde van de kabel in de AUX INGANG (op de achterkant van de radio) en het andere
uiteinde in de line-out of hoofdtelefoonuitgang van uw USB-apparaat. Druk daarna herhaaldelijk op
MODE om de AUX-modus te selecteren.
Opmerking 2: Dit product biedt ondersteuning aan USB-apparaten met een geheugencapaciteit tot 16GB, maar u
moet er rekening mee houden dat het inladen van geheugenapparaten met veel capaciteit langer
duurt en het kan in enkele gevallen leiden tot een time out. Er kan dus niet worden gegarandeerd
dat de radio compatibel is met alle USB-apparaten, dit is geen indicatie van een probleem met de
radio.
SLAAPFUNCTIE
Deze functie kan worden gebruikt om de radio zichzelf automatisch uit te laten schakelen nadat een vooraf
ingestelde tijd is verstreken.
1. Druk om de slaapfunctie te activeren herhaaldelijk op SLEEP, het display toont “SLEEP”, en de slaaptijd
(knippert in minuten) veranderd bij elke druk op de knop:
USB
90 8 0 7 0 60 3 0 1 0
OFF
2. Stop met drukken als de gewenste slaaptijd op het display verschijnt, de slaapfunctie wordt na 5 seconden
geactiveerd. Als de slaaptijd is afgeteld tot nul, dan zal het apparaat worden uitgeschakeld.
3. Als u de slaapfunctie eerder wilt uitschakelen, druk dan herhaaldelijk op SLEEP tot het display “OFF” toont,
daarna zal “SLEEP” van het display verdwijnen.
ACHTERGRONDVERLICHTING DISPLAY
De achtergrondverlichting van het display zal standaard worden gedimd in standbymodus en zal inschakelen als
het apparaat wordt ingeschakeld. De achtergrondverlichting zal weer worden gedimd als het apparaat in de
standbymodus wordt gezet.
Druk als het apparaat is ingeschakeld op BACKLIGHT om de achtergrondverlichting in te schakelen of te dimmen.
Druk in de standbymodus op een willekeurige knop om de achtergrondverlichting voor 10 seconden in te schakelen.
AUX INGANG Er zit een 3,5mm stereo aux-ingang op de achterkant van de radio; analoge audiosignalen van
andere apparaten kunnen met behulp van deze ingang worden verstuurd naar de radio.
Druk, om de AUX-modus te selecteren, herhaaldelijk op MODE tot “AUX” wordt getoond op het display. De radio zal
het geluid dat via de aux-ingang wordt ontvangen laten horen en u kunt de volumeregeling gebruiken om het
volume in te stellen.
NL-5
Page 21

HOOFDTELEFOONUITGANG
De stereo-hoofdtelefoonuitgang zit op het achterpaneel. Sluit een stereo-hoofdtelefoon (niet meegeleverd) aan op
deze uitgang om privé van uw muziek te genieten. Als de hoofdtelefoon wordt gebruikt, dan zullen de luidsprekers
automatisch worden uitgeschakeld.
BELANGRIJK: Stel het volume bij gebruik van een hoofdtelefoon altijd laag in voordat u de hoofdtelefoon op zet,
zet daarna de hoofdtelefoon op en verhoog het volume geleidelijk tot een comfortabel luistervolume is bereikt.
B C D E
LCD-DISPLAY
A. BLUETOOTH-INDICATOR
B. TUNER-INDICATOR
C. FM-STEREO-INDICATOR
D. TIJD/FREQUENTIEBEREIK-INDICATOR
E. ALARM-INDICATOR
F. USB-INDICATOR
G. SLAAP-INDICATOR
H. SNOOZE-INDICATOR
SPECIFICATIES
VOEDING: AC 100-240V~ 50/60Hz
VERMOGEN: 2 x 5W
AFMETINGEN : 300 (L) x 145 (B) x 115 (H) mm
RADIO GEDEELTE
FREQUENTIEBEREIK: F M 87.5 - 108 MHz
USB GEDEELTE
INTERFACE USB 1.1 (USB HUB niet ondersteund)
FLASH-GEHEUGEN: USB 1.1 Flash USB 2.0 High-Speed Flash
FAT 16/32 32M 2TByte
MP3 DECODER: MPEG Audio 1, 2, 2.5 Layer 1, 2, 3
Bit Rate 8 - 320kbps & VBR behalve free-formaat
BLUETOOTH GEDEELTE
BLUETOOTH-SPECIFICATIES: V2.1+ EDR
VERMOGENSKLASSE: Klasse 2
ONDERSTEUNDE PROFIELEN: A2DP, AVRCP
SPECIFICATIES ONDERHEVIG AAN VERANDERING ZONDER VERDERE BERICHTGEVING.
A
TUNER
AUX
F M
USB
NO DATA
PM
F G H
HI
SNOOZE
SLEEP
NL-6
Page 22

RADIO REVEIL FM STEREO AVEC BLUETOOTH®
M
EMOR
Y
A
LARM
SN
OO
ZE
ME
MOR
Y
S PL
E
E
B
AC
L
I
G
HTK
C
L K
OC
M
O
DE
SR-03 BTSR-03 BT
MANUEL D'INSTRUCTION
Page 23

PRÉCAUTIONS DE SÉCURITÉ
- lisez toutes les instructions soigneusement avant d'utiliser l'unité et gardez-les pour référence ultérieure.
- Vérifiez que la tension indiquée sur l'étiquette correspond avec celle de votre secteur.
Emplacement de l'unité
- L'unité doit être placée sur une surface stable et ne doit pas être sujettes à vibrations.
- Ne placez pas l'unité sur des surfaces pentues ou instables car l'unité risque de tomber ou de se renverser.
- La prise secteur doit être située près de l'unité et doit être facilement accessible.
- Evitez les températures trop extrêmes, chaudes ou froides. Placez l'unité suffisamment éloignée des sources
de chaleur, comme les radiateurs ou les feux électriques. Evitez l'exposition à la lumière directe du soleil et
d'autres sources de chaleur.
- Ne placez jamais aucun type de bougie ou de flamme au dessus ou à l'arrière de l'unité.
- Pour réduire le risque d'incendie ou de choc électrique, n'exposez pas cet appareil à la pluie ou l'humidité.
Aucun objet rempli de liquide, comme des vases, ne doit être placé sur l'unité.
- Si vous renversez du liquide dans l'unité, cela peut causer des dégâts graves. Coupez-le au niveau du secteur
immédiatement. Retirez la prise du secteur et consultez votre vendeur.
- Pour éviter le risque d'électrochoc ou d'incendie du a la surchauffe, assurez-vous que les rideaux et autres
matériaux n'obstruent pas les ouvertures de ventilation.
- N'installez pas ou ne placez pas cette unité dans une bibliothèque ou dans un autre espace confiné, assurez vous qu'un minimum de 10 cm est préservé autour de l'appareil pour la ventilation.
Sécurité
- Déconnectez toujours l'unité du secteur avant de connecter/déconnecter d'autres appareil ou déplacer l'unité.
- Débranchez l'unité de l'alimentation secteur lors des orages.
- Cette unité deviendra chaude lorsqu'utilisée pendant une longue période. Cela est normal et ne signifie pas un
problème concernant l'unité.
CAUTI ON
RISK OF ELECTRIC SHOCK
DO NOT OPEN
TENSION DANGEREUSE
Une tension dangereuse des conducteurs, d'ampleur suffisante pour constituer un risque de choc électrique aux
personnes, est présente dans le boitier de ce produit.
ATTENTION
Le manuel de l'utilisateur contient des instructions importantes d'utilisation et d'entretien, pour votre sécurité il est
nécessaire de vous référer à ce manuel.
Câble secteur
- Assurez-vous que l'unité ne repose pas sur le câble secteur, car le poids de l'unité risque d'endommager le
câble secteur et créer des risques de sécurité.
- Si le câble d'alimentation est endommagé, il doit être remplacé par le fabricant ou son prestataire de service,
ou un technicien qualifié, afin d'éviter tout risque inutile.
Interférence
- Le fonctionnement normal du produit peut être perturbé par des interférences électromagnétiques fortes. Si
cela venait à se produire, réinitialisez simplement le produit pour reprendre le fonctionnement normal. Au cas
où le fonctionnement ne reprenait pas, veuillez utiliser le produit dans un autre endroit.
- Cette unité comporte des microprocesseurs qui peuvent mal fonctionner du fait d'interférences ou de bruits
extérieurs ou des décharges électrostatique. Si l'unité ne fonctionne pas correctement, déconnectez
l'alimentation puis reconnectez-la.
Supervision
- Les enfants doivent rester sous surveillance afin d'éviter qu'ils ne jouent avec l'appareil.
- Ne laissez jamais personne, particulièrement les enfants, pousser quoi que ce soit dans les trous, fentes ou
autres
Réparation/maintenance
- Pour réduire le risque d'électrochoc, n'enlevez pas les vis. L'unité ne contient pas de parties réparables par
l'utilisateur. Veuillez confier tout le travail de maintenance à du personnel qualifié.
- N'ouvrez pas les couvertures fixées car cela peut exposer à des tensions dangereuses.
- Assurez-vous de débrancher l'unité du secteur avant de nettoyer.
- N'utilisez pas de tampon type abrasif ou de solutions nettoyantes car ils pourraient endommager la surface de
l'unité.
- N'utilisez pas de liquide pour nettoyer l'unité.
FR-1
Page 24

CARACTÉRISTIQUES ET COMMANDES
1 2 3 4 5
11
6
►
1. MEMORY / BUTTON
2. MEMORY / BUTTON
3. LCD DIS PLAY
4. VOLUM E/SCROLL CONT ROL
5. MEMORY / BUTTON
ALLUMER VOTRE RADIO POUR LA PREMIERE FOIS.
Lorsque l'unité est connectée au secteur pour la première fois, elle sera en mode veille, et l'écran affichera l'horloge
en clignotant.
1. Insérez une extrémité du cordon d'alimentation CA sur la prise CA située à l'arrière de l'unité.
2. Connectez le cordon d'alimentation CA sur l'alimentation secteur.
3. Appuyez sur la touche pour allumer la radio.
4. Pour faire passer la radio sur veille pendant le fonctionnement, maintenez appuyée la touche pendant
plus de deux secondes.
REGLER L'HORLOGE
L'horloge ne peut être réglée qu'en mode veille. Lorsque l'unité est allumée pour la première fois, elle sera en mode
veille, l'écran affichera « 0 :00 » en clignotant, vous pouvez alors commencer à régler l'heure.
1. Tenez la touche HORLOGE (CLOCK) appuyée pendant plus de deux secondes jusqu'à ce que l'écran affiche
« 24H », puis appuyez sur la touche ou pour sélectionner le format d'affichage de l'horloge « 12H »
(12 heures) ou 24H (24 heures), lorsque le format de votre choix apparait sur l'écran, appuyez sur la touche
CLOCK pour confirmer. (F. 1) (F. 2)
2. L'écran affichera l'horloge avec les chiffres des heures en clignotant, appuyez de manière répétée sur la touche
▶▶I I◀◀
ou pour régler l'heure correcte suivi d'une pression sur la touche CLOCK pour confirmer, réglez
d'abord les heures, puis les minutes. (F. 3)
3. Lorsque l'écran affiche l'heure correcte, appuyez sur la touche CLOCK de nouveau pour confirmer, le réglage
de l'horloge est désormais terminé.
4. L'horloge s'affiche pendant que l'unite est en veille ou pendant le fonctionnement AUX, MP3 ou Bluetooth
I◀◀
▶▶I
►
►/II
9
8
7
6
10
6. SPEAK ER
7. ALARM/ SNOOZE BUTTON
8. / MODE BU TTON
9. BACKL IGHT / CLOCK BUTTON
10. SLEE P BUTTON
▶▶I I◀◀
F.2F.1 F.3
13
12
14
15
11. RO D AN TENNA
12. HEAD PHONE JACK
13. AUX IN SOCKET
14. USB PO RT
15. AC CORD SOCKET
FONCTION ALARME
Cette unité comporte une fonction alarme. Vous pouvez utiliser cette fonction pour vous réveiller avec une tonalité
d'alarme électronique, votre station de radio FM favorite, ou des chansons MP3 USB.
La fonction alarme ne peut être activée que lorsque l'unité est en veille. Il n'y a pas d'alarme et de fonction report
d'alarme lorsque l'unité est en fonctionnement.
Régler l'heure de l'alarme et du réveil.
1. Pour régler l'alarme, commencez par faire passer l'unité en mode veille, puis tenez la touche ALARM pendant
plus de deux secondes pour entrer en mode de réglage d'alarme- l'icône d'alarme s'affichera et les chiffres de
l'heure de l'alarme clignoteront sur l'écran. (F. 4)
2. Pour régler l'heure de sonnerie de l'alarme, appuyez plusieurs fois sur la touche ou suivie d'une
pression sur la touche ALARME pour confirmer commencez par régler les heures, puis les minutes. (F. 5)
FR-2
▶▶I I◀◀
Page 25

3. Une fois que l'heure de sonnerie de l'alarme est réglée, vous continuerez avec le réglage du mode de sonnerie
de l'alarme appuyez plusieurs fois sur les touches ou pour les sélections, suivie de la touche ALARME pour
confirmer, commencez par régler le niveau de volume de l'alarme (01-32), puis la station de radio de réveil
(P01-P10), et finalement la sonnerie d'alarme(HI/LO). (F. 6) (F. 7) (F. 8)
4. Une fois confirmée la sélection de la tonalite de l'alarme, le réglage de l'alarme est terminé.
5. Pour vérifier les paramètres de l'alarme, appuyez une fois sur la touche ALARME, l'heure de sonnerie de
l'alarme et les paramètres de mode de sonnerie s'afficheront un par un par intervalles de deux secondes.
Activer l'alarme et le mode de sonnerie.
1. Appuyez plusieurs fois sur la touche ALARME pour activer la fonction alarme et sélectionner le mode de
sonnerie, l'icône d'alarme et le mode de sonnerie correspondant apparaitront sur l'écran à chaque pression :
“Radio > USB > Buzzer > OFF > Radio > USB > … …”.
2. Lorsque le mode de sonnerie de votre choix apparait à l'écran relâchez les touches, la fonction d'alarme est à
présent activée et l'icône de l'alarme s'affichera. (F. 9)
3. A l'heure de l'alarme sélectionnée, le mode de sonnerie sélectionnée se déclenchera et l'icône d'alarme
apparaitra en clignotant sur l'écran pour indiquer que l'alarme est déclenchée. Elle continuera pendant une
heure et s'éteindra automatiquement. Pour arrêter l'alarme plus tôt, appuyez une fois sur la touche .
Remarque: Si la sonnerie de l'alarme est réglée sur USB, et qu'aucune clé USB n'est insérée ou reconnue, lorsque
l'heure de l'alarme arrive, la sonnerie d'alarme sera activée à la place automatiquement.
Répétition automatique de l'alarme
L'alarme se répétera automatiquement chaque jour à l'heure de l'alarme sélectionnée aussi longtemps que l'icône
de l'alarme sera affichée (fonction alarme allumée) Pour annuler l'alarme, appuyez plusieurs fois sur la touche
ALARME jusqu'à ce que l'écran affiche « OFF » et que l'icône d'alarme disparaisse.
Fonction report d'alarme
Pendant l'alarme, appuyez sur la touche SNOOZE, pour éteindre l'alarme temporairement pendant 5 minutes,
l'icône de report d'alarme s'affichera. Vous pouvez répéter cela pendant toute la durée de l'alarme. (F.10)
F.9 F.10
ÉCOUTER LA RADIO
Lorsque l'unité est allumée et alimentée pour la première fois, elle passera automatiquement en mode radio FM.
Pour sélectionner le mode radio pendant d'autres modes de fonctionnement, appuyez plusieurs fois sur la touche
MODE sur la façade jusqu'à ce que « TUNER » s'affiche ainsi que la fréquence FM. (F. 11)
Réglage manuel
1. Pour sélectionner le réglage manuel avec la molette, commencez par appuyer sur la commande
VOLUME/SCROLL une fois, puis tournez la même commande jusqu'à ce que la réception de fréquence
optimale soit atteinte.
2. L'écran affichera l'icône de stéréo si une station FM stéréo est reçue. Pour sélectionner la réception FM mono,
appuyez sur la touche et l'icone (F.12)
Réglage automatique
1. Maintenez et appuyez sur la commande VOLUME/SCROLL pendant plus de deux seconde pour faire une
recherche avant ou arrière sur la bande de fréquence, la recherche s'effectuera automatiquement pour la
première station de force de signal suffisante.
2. Répétez la procédure ci-dessus si vous souhaitez chercher une autre station.
Enregistrer et rappeler une station présélectionnée
Vous pouvez présélectionner les stations de votre choix et enregistrer jusqu'à 10 stations FM dans la mémoire.
1. Pour enregistrer une présélection, commencez par régler la station de votre choix, puis maintenez appuyée la
touche MEMOIRE pendant plus de deux seconde, l'écran affichera « P01 » en clignotant. (F. 13)
2. Appuyez sur la touche MEMOIRE ou pour sélectionner le numéro de station présélectionnée de votre
choix, puis appuyez sur la touche MEMOIRE pour confirmer votre sélection. L'écran affichera le nombre stable
de station présélectionnées et alors la fréquence FM.
3. Pour rappeler une station présélectionnée, appuyez sur la touche MEMOIRE ou pour sélectionner les
stations que vous avez enregistrées. L'écran affichera le numéro de station présélectionné rappelé pendant
deux secondes.
F.11
TUNER
F M
►/II
▲
F.12
▼
TUNER
F M
F.13
▼
▲
FR-3
Page 26

MODE BLUETOOTH
La fonction Bluetooth de cette unité lui permet de recevoir du son depuis de nombreux appareils disposant
également de la fonction Bluetooth, y compris des téléphones portables, des PC et des PDA. Elle prend en charge
les profils et fonctionnalités Bluetooth suivants. Seul un appareil par profil peut être connecté en même temps.
Advanced Audio Distribution Profile (A2DP)
- Connexion audio stéréo de haute qualité
- Streaming de musique stéréo depuis des PC, téléphones mobiles, etc.
Audio Video Remote Control Profile (AVRCP)
- Commande distante des appareils
- Commande des appareils connectés.
Considération concernant le fonctionnement Bluetooth
REMARQUE : La performance de connectivité Bluetooth peut varier en fonction de la marque et du modèle de
l'appareil connecté. Pour une meilleure performance, veuillez connectez des appareils Bluetooth dotés du Bluetooth
2.1 et en utilisant la dernière mise à jour disponible du vendeur de l'appareil. La compatibilité avec tous les
appareils et types de media n'est pas garantie.
Assurez-vous que tous les appareils Bluetooth soient désactivés dans un cercle de 30 pieds. La présence d'autres
appareils Bluetooth en fonctionnement pendant la connexion peut provoquer des difficultés opérationnelles.
Le Bluetooth est un standard de communication de faible portée. Le matériel de transmission et d'émission
Bluetooth dans cette unité dispose d'une portée opérationnelle d'environ 30 pieds en terrain dégagé. En général,
les appareils Bluetooth peuvent communiquer entre eux clairement dans une pièce ou un bureau de taille normale.
Le fonctionnement entre différentes pièces dépendra de la construction de la pièce. Il est important de reconnaitre
le fait que la portée de communication Bluetooth peut être considérablement réduite si le signal passe au travers
d'un objet solide.
Les corps humains, les murs de briques et de béton, et les meubles ou étagères lourdes réduiront la portée
opérationnelle de vos appareils Bluetooth. Le verre, les murs secs ou en panneau de bois et les partitions de
bureau peuvent avoir un effet notable mais moins sévère. Nous conseillons de positionner vos appareils Bluetooth
plus proches l'un de l'autre si vous constatez des difficultés de communication.
Connexion de musique stéréo sur votre téléphone portable
Cette connexion nécessite un téléphone portable compatible avec le profil Bluetooth A2DP pour la connexion de
musique stéréo. Afin de créer une nouvelle connexion Bluetooth, vous devrez être familiarisé avec les fonctions
Bluetooth de votre téléphone portable. Vu que chaque téléphone fonctionne légèrement différemment, commencez
par vous familiariser avec les fonctions Bluetooth de votre appareil avant la connexion.
1. Assurez-vous que le Bluetooth est activé sur votre téléphone portable. Vous aurez peut-être besoin de vous
référer au manuel de l'utilisateur du téléphone pour plus de détails.
2. Placez la radio et le téléphone à moins de 3 pieds l'un de l'autre.
3. Appuyez plusieurs fois sur la touche MODE pour sélectionner le mode Bluetooth, l'écran affichera en
clignotant.
4. Réglez le téléphone avec la fonction A2DP pour chercher les appareils Bluetooth et suivez les instructions sur
l'écran du téléphone. Vous reconnaitrez la radio par son nom Bluetooth « BT speakerN ». Si l'on vous demande
un mot de passe, saisissez « 0000 ».
5. Sélectionnez et confirmez le couplage sur votre téléphone, la connexion sera complétée en quelques secondes
et la radio produira un Bip, l'icône sur l'écran deviendra stable et vous pourrez commencer votre opération
de streaming Bluetooth.
6. Appuyez sur la touche sur l'unité ou sélectionnez le début de lecture sur votre téléphone pour démarrer la
lecture de musique.
7. Pour interrompre la lecture, appuyez sur la touche de nouveau ou sélectionnez « pause » sur votre
téléphone.
8. Pour passer à la piste suivante ou précédente pendant la lecture, appuyez sur la touche ou sur
l'unité ou sélectionnez les commandes « saut » sur votre téléphone portable.
Remarque: Certains téléphones portables peuvent se connecter et déconnecter lorsque vous passez et terminez
des appels. Cela n'indique pas un problème de votre unité.
Connexion de musique stéréo depuis d'autres appareils Bluetooth
Cette connexion nécessite un appareil compatible avec le profil Bluetooth A2DP pour la connexion de musique
stéréo.
Veuillez vous assurer que votre appareil dispose de la dernière version de logiciels pilot et/ou de micro logiciels
compatibles avec la fonctionnalité Bluetooth. La compatibilité avec tous les appareils n'est pas garantie. En plus
des procédures décrites ci-dessus pour les téléphones portables, cette radio peut recevoir de la musique stéréo de
la part d'autres sources Bluetooth y compris les PC, les PDA et les lecteurs de musique avec la fonction Bluetooth.
La procédure de connexion exacte peut varier d'un appareil a l'autre, veuillez commencer par consulter le manuel
de l'utilisateur pour le fonctionnement spécifique.
Remarque: Un nombre de plus en plus important d'appareils informatiques sont dotés de la compatibilité Bluetooth,
et de nombreux incluent une compatibilité pour la musique stéréo par Bluetooth (A2DP). Pour une meilleure
performance de votre appareil particulier, veuillez vous assurer que vous utilisez la dernière mise à jour des pilotes
et/ou des micro-logiciels disponibles. Dans certaines circonstances, la mise à jour des pilotes ou micro-logiciel de
►/II
►/II
▶▶I I◀◀
FR-4
Page 27

votre appareil sur la dernière version peut ajouter la compatibilité pour A2DP qui n'était pas disponible dans une
version précédente.
Veuillez contacter le vendeur de votre appareil pour obtenir ces mises a jour ou consultez le manuel de l'utilisateur
de votre appareil pour la procédure de mise à jour. Veuillez vous souvenir que les mises à jour du système ne
peuvent être exécutées que par des individus qualifiées après avoir effectué une sauvegarde intégrale du système.
ECOUTER DU SON DEPUIS USB (lecture MP3)
1. Lorsque la radio est allumée, appuyez plusieurs fois sur MODE pour sélectionner la fonction USB, l'écran
affichera « USB » et « NO DATA ». (F. 14)
2. Connectez votre dispositif de mémoire avec vos chansons MP3 préférées chargées dessus sur le port USB
située sur le panneau arrière. Le « NO DATA » disparaitra alors.
3. Il commencera la lecture automatiquement à partir de la première piste MP3 détectée sur le dispositif et l'écran
affichera l'icône de lecture USB. (F. 15)
4. Pour interrompre la lecture, appuyez sur la touche , l'icône de lecture sur l'écran clignotera.
5. Pour reprendre la lecture de musique, appuyez de nouveau sur le bouton.
6. Pendant la lecture, appuyez sur les touches ou pour passer a la piste MP3 suivante ou précédente dans le
dispositif de mémoire. La lecture commencera au début de la piste sélectionnée.
F.14 F.15
USB
NO DATA
Remarque 1 : Au cas où votre dispositif de mémoire est chargé avec des chansons MP3 mais que l'écran continue
d'afficher « NO DATA », le format de votre dispositif USB n'est peut-être pas compatible avec cette
radio. Pour écouter les chansons dans l'appareil, veuillez utiliser le câble d'entrée de ligne
(non fourni), insérez une extrémité dans la fente AUX IN (à l'arrière de la radio) et l'autre extrémité
dans la sortie de ligne ou la sortie casque de votre appareil USB, puis appuyez plusieurs fois que la
touche MODE pour sélectionner le mode AUX.
Remarque 2 : Ce produit est compatible avec des dispositifs USB d'une taille maximum de 16GB, le temps de
reconnaissance pour des mémoires plus volumineuses sera plus long, et pourra causer une
inactivité du système. Donc, la compatibilité avec tous les appareils USB ne peut être garantie, cela
n'indique pas un problème de cette unité.
FONCTION SOMMEIL
Cette fonction vous permet de programmer le système à s'éteindre automatiquement après un certain temps.
1. Pour activer la fonction sommeil, appuyez plusieurs fois sur la touche SLEEP, l'écran affichera « SLEEP »,
et le temps avant mise en veille (clignotant en minutes) changera selon la séquence suivante sur chaque
pression :
USB
90 8 0 7 0 60 3 0 1 0
OFF
2. Lorsque la durée avant mise en veille de votre choix apparait sur l'écran, relâchez la touche, la fonction mise
en veille programmée se déclenchera après 5 secondes. Lorsque le compte à rebours de mise en veille arrive
à zéro, l'unité s'éteindra.
3. Pour annuler l'alarme, appuyez plusieurs fois sur la touche SLEEP jusqu'à ce que l'écran affiche « OFF » et
que l'icône « SLEEP » disparaisse. « OFF » et « SLEEP » disparaitront alors.
ECLAIRAGE DE L'ECRAN
L'éclairage de l'écran s'attenue par défaut en mode veille et s'allume à chaque fois que l'unité est allumée. Elle
reviendra au mode par défaut à chaque fois que l'unité sera mise en veille.
Lorsque l'unité est allumé, appuyez sur la touche BACKLIGHT fera passer l'écran en mode allumé ou éteint.
En mode veille, appuyer sur n'importe quelle touche allumera l'écran pendant 10 secondes.
ENTREE AUX, il y'a une fente d'entrée stéréo 3,5 mm située à l'arrière de l'unité ; des signaux sonores analogiques
provenant d'autres sources peuvent être diffusées sur la radio grâce à cette fente.
Pour sélectionner le mode AUX, appuyez plusieurs fois sur la touche MODE jusqu'à ce que AUX s'affiche, le son
passera sur le signal d'entrée auxiliaire, et vous pouvez régler le volume sur le niveau de votre choix.
FENETRE D'ECRAN LCD
A. INDICATEUR BLUETOOTH
B. INDICATEUR DE RADIO
C. INDICATEUR STEREO FM
D. INDICATEUR DE PORTEE DE FREQUENCE/HEURE
E. INDICATEUR D'ALARME
F. INDICATEUR USB
G. INDICATEUR DE MISE EN VEILLE PROGRAMMEE
H. INDICATEUR DE REPORT D'ALARME
FR-5
B C D E
A
TUNER
AUX
F M
USB
NO DATA
PM
F G H
HI
SNOOZE
SLEEP
Page 28

CARACTÉRISTIQUES
ALIMENTATION AC 100-240V~ 50/60Hz
PUISSANCE DE SORTIE : 2 x 5W
DIMENSIONS DE L'UNITÉ : 300(L) x 145(L) x 115(H) mm
SECTION RADIO
BANDE DE FRÉQUENCE : FM 87,5 - 108 MHz
SECTION USB
INTERFACE USB 1.1 (USB HUB non compatible)
MEMOIRE FLASH : USB 1.1 Flash USB 2.0 High-Speed Flash
FAT 16/32 32M 2Toctets
DECODEUR MP3 : MPEG Audio 1, 2, 2.5 Layer 1, 2, 3
Débit binaire 8 - 320kbps & VBR sauf format libre
SECTION BLUETOOTH
SPECIFICATION BLUETOOTH : V2.1+ EDR
PUISSANCE DE SORTIE : Classe 2
PROFILS COMPATIBLES : A2DP, AVRCP
CARACTÉRISTIQUE SUJETTES A CHANGEMENTS SANS NOTIFICATION PRÉALABLE.
FR-6
Page 29

RADIO RELOJ ESTÉREO CON BLUETOOTH®
M
EMOR
Y
A
LARM
SN
OO
ZE
ME
MOR
Y
S PL
E
E
B
AC
L
I
G
HTK
C
L K
OC
M
O
DE
SR-03 BTSR-03 BT
MANUAL DE INSTRUCCIONES
Page 30

PRECAUCIONES DE SEGURIDAD
- Le a todas las instrucciones detenidamente antes de usar la unidad y manténgala para futura referencia.
- Compruebe que el voltaje marcado en la etiqueta de clasificación coincida con el voltaje de la red eléctrica.
Ubicación de la unidad
- La unidad se debe poner en una superficie estable plana y no debe tener vibraciones.
- No ponga la unidad en superficies inclinadas o inestables porque se puede voltear o caer.
- La toma de la red eléctrica debe estar ubicada cerca de la unidad y fácilmente accesible.
- Evite temperaturas extremas ya sea de calor o frío. Ponga la unidad lejos de la fuente de calor, tales como
radiadores o juegos de gas o eléctricos. Evite la exposición directa a los rayos del sol u otra fuente de calor.
- Nunca ponga ningún tipo de velas hubo llamas vivas en la parte superior ni cerca de la unidad.
- Para reducir el riesgo de incendios, descargas eléctricas o daños del producto, no exponga esta unidad a la
lluvia, humedad, empapado o salpicaduras. No ponga objetos llenos de líquidos, tales como floreros.
- Si derrama algún líquido la unidad, esto puede dañarla. Desconéctela inmediatamente de la red eléctrica.
Desenchufe de la red eléctrica y consulte a su distribuidor.
- Para evitar riesgos descargas eléctricas o incendios debido a sobrecalentamiento, asegúrese de que las
cortinas y otros materiales no obstruyan los conductos de ventilación.
- No instalen y ponga esta unidad en una librería, gabinete integrado bien un espacio cerrado. Deje al menos
10 cm alrededor del aparato para ventilación.
Seguridad.
- Siempre desconecte la unidad de la red eléctrica antes de que conectar/desconectar otros dispositivos o
mover la unidad.
- Desconecte la unidad de la red eléctrica durante tormentas eléctricas.
- Esta medida se gastará cuando se usa por mucho tiempo. Esto es normal y no significa que la unidad tenga
algún problema.
CAUTI ON
RISK OF ELECTRIC SHOCK
DO NOT OPEN
Voltaje peligroso
Dentro de la carcasa del producto existe voltaje peligroso conductor que puede tener suficiente magnitud para
generar riesgos de descargas eléctricas en las personas.
¡ATENCIÓN!
El manual del propietario contiene instrucciones de mantenimiento y operativas importantes para su seguridad. Es
necesario que consulte el manual.
Cable de alimentación eléctrica
- Asegúrese de que la unidad no reposen la parte superior de los cables de alimentación eléctrica, porque el
pece la unidad puede dañar el cable y crear peligro de seguridad.
- Si el cable está dañado, debe reemplazarlo el fabricante, su agente de servicio o una persona calificada para
evitar accidentes.
Interferencia
- El funcionamiento normal del producto lo puede afectar la interferencia electromagnética fuerte. Si es así,
simplemente reinicie el producto para reasumir la operación normal siguiente manual de instrucciones. En
caso de que el funcionamiento no se reanude, use el producto en otro lugar.
- Esta unidad incluyen microprocesadores los cuales pueden funcionar mal como resultado de la interferencia
/ruido eléctricos externos o descargas electrostáticas. Si la unidad no funciona apropiadamente, desconecte
la de la alimentación eléctrica y vuélvala a conectar.
SUPERVISIÓN
- Los niños deben vigilarse para garantizar que no jueguen con la unidad.
- Nunca dejen los niños que introduzcan nada en los orificios, ranuras o en cualquier horca abertura de la
carcasa. Esto puede causar descargas eléctricas fatales.
Servicio/Mantenimiento
- Para prevenir el riesgo de cortos circuitos, no retire los tornillos. La unidad no contiene ninguna parte que el
usuario pueda hacerle mantenimiento. Se recomienda que el trabajo de mantenimiento lo haga personal
calificado.
- No habrá ninguna de las coberturas fijas por que esto puede tener voltajes peligrosos.
- Asegúrese de desconectar la unidad de la fuente de alimentación eléctrica antes de limpiarla.
- No use ningún tipo de almohadillas agresivas o soluciones de limpieza agresivas puesto que esto puede
dañar la superficie de la unidad.
- No use líquidos para limpiar la unidad.
ES-1
Page 31

FUNCIONES Y CONTROLES
1 2 3 4 5
11
6
►
1. MEMORY / BUTTON
2. MEMORY / BUTTON
3. LCD DIS PLAY
4. VOLUM E/SCROLL CONT ROL
5. MEMORY / BUTTON
ENCENDIDO DE SU RADIO POR PRIMERA VEZ
Cuando el radio se conecte a una fuente de CA primera vez, entrará al modo standby (reposo). La pantalla
mostrará el reloj y destellará.
1. Inserte un extremo del cable de alimentación eléctrica CA en la toma de entrada CA ubicada en la parte
posterior de la unidad.
2. Conecte el cable eléctrico CA a la toma de alimentación eléctrica CA.
3. Presione el botón una vez para encender el radio.
4. Para cambiar el radio a standby mientras esté encendido, presión y sostenga el botón por más de dos
segundos.
Configuración del reloj
El reloj solamente se puede configurar en el modo standby. Cuando la unidad se enciende por primera vez, entrará
al modo standby. La pantalla mostrará “0:00” y destellará. Usted ahora podrá configurar el reloj.
1. Presiones sostenga el botón CLOCK por más de dos segundos hasta que aparece en la pantalla “24 H”, luego
presione los botones o para seleccionar el formato de visualización del reloj “12H” (12-horas) o
“24H” (24-horas). Cuando el formato deseado aparece la pantalla, presión el botón CLOCK para confirmar.
(F. 1) (F. 2)
2. La pantalla mostrará el reloj con los dígitos de la hora destellando. Presione repetidamente los botones
▶▶I I◀◀
o para establecer la hora correcta y luego presione botón CLOCK para confirmar. Primero fin la
hora y luego los minutos. (F. 3)
3. Cuando la pantalla muestre la hora correcta, Presione el botón CLOCK nuevamente para confirmar. La
configuración del reloj ahora se ha completado.
4. El reloj se muestra cuando la unidad esté en standby o funcionando en AUX, USB y Bluetooth
Función de alarma
Esa unidad trae la función de alarmas. Usted puede usar esta función con un tono de timbre electrónico, su emisora
de radio FM favorita o canciones USB MP3.
La función de alarma se puede activar solamente cuando la unidad esté en el modo standby. Cuando la unidades
en operación, la función de alarma o silenciar no están activas.
Configuración de la alarma y la hora del despertador
1. Para configurar la alarma, primero cambie la unidad al modo standby y luego presione sostenga el botón
ALARM por más de dos segundos para entrar en el modo de configuración de la alarma. El icono de alarma
se mostrará y los dígitos de la hora del despertador empezarán a destellar en la pantalla. (F. 4)
2. Para fijar la hora del despertador de la alarma, presione repetidamente el botón o y luego presione el botón
ALARM para confirmar. Primero establezca la hora y luego los minutos. (F. 5)
3. Después de haber establecido la hora del despertador de la alarma, continuará con la configuración del modo
del despertador de la alarma. Presione repetidamente los botones o para hacer las elecciones y luego
presione el botón ALARM para confirmar. Primero establezca el nivel del volumen del despertador de la alarma
(01-32), luego la emisora de radio del despertador (P01-P10) y finalmente el tono de timbre (HI/LO). (F. 6)
(F. 7) (F. 8)
4. Después de confirmar la selección del tono de timbre, la configuración de la alarma se habrá completado.
5. Hará comprobar la configuración de la alarma, presión el botón ALARM una vez. La configuración del modo
del despertador y el tiempo de la alarma se mostrarán uno a uno con intervalos de dos segundos.
I◀◀
▶▶I
►
►/II
8
7
▶▶I I◀◀
9
6
10
6. SPEAK ER
7. ALARM/ SNOOZE BUTTON
8. / MODE BU TTON
9. BACKL IGHT / CLOCK BUTTON
10. SLEE P BUTTON
F.2F.1 F.3
ES-2
13
12
14
11. RO D AN TENNA
12. HEAD PHONE JACK
13. AUX IN SOCKET
14. USB PO RT
15. AC CORD SOCKET
15
Page 32

F.4
F.5
F.6 F.7
Activación del modo de la alarma y del despertador
1. Lesiona repetidamente el botón ALARM para activar la función de alarma y selecciona el modo del
despertador. El icono de la alarma y el modo del despertador correspondiente aparecerán en la pantalla cada
vez que presione:
“Sintonizador> USB > Timbre> OFF > Sintonizador> USB > … …”.
2. Cuando su modo del despertador deseado aparezca la pantalla, suelte los botones. La función de alarma ya
estará activada y el icono se mostrará. (F. 9)
3. En el tiempo del despertador seleccionado, el modo del despertador seleccionado estará activado y el icono
de alarma en la pantalla destellará para indicar que la alarma se ha activado. Continuará por una hora y luego
se pagará automáticamente. Para detener la alarma antes, presione el botón una vez.
Nota: Si se ha seleccionado USB para activar la alarma y no se ha insertado una USB o no se reconoce, se
activará el timbre automáticamente.
Repetir la alarma automáticamente
Alarma se repetirá automáticamente todos los días a la hora seleccionada sólo si el icono de la alarma se muestra
(la función de alarma esta activa). Para cancelar la alarma, presione repetidamente el botón ALARM hasta que
aparezca “OFF” y luego desaparecerá el icono de alarma.
La función Snooze (Silenciar):
Durante la alarma, presione botón SNOOZE para desactivar temporalmente la alarma durante cinco minutos y el
icono de silenciar se mostrará. Esto se repetirá en la siguiente hora. (F.10)
ESCUCHAR LA RADIO
Cuando la unidad es encendida por primera vez, entrará automáticamente al modo de radio FM. Para seleccionar
el modo de radio durante otros modos de operación, presione repetidamente el botón MODE ubicado en el panel
frontal hasta que se muestre “TUNER” y la frecuencia FM. (F. 11)
Sintonización manual
1. Para seleccionar la sincronización manual, primero presione una vez el control VOLUME/SCROLL, luego gire
el mismo control hasta que lea la frecuencia correcta u obtenga la mejor recepción.
2. Aparecerá la pantalla el icono exterior si se recibe una emisora estéreo FM. Para seleccionar la recepción
mono FM, presione el botón y el icono de desaparecerá de la pantalla. (F.12)
Sintonización automática
1. Presiones sostenga el control VOLUME/SCROLL por más de dos segundos control para buscar arriba y abajo
la frecuencia y se buscará la primera emisora con fuerza del señor suficiente.
2. Repite el procedimiento anterior si desea buscar otra emisora.
Almacenar y recuperar emisoras preseleccionadas
Usted puede preseleccionar emisoras que dice que almacenar hasta máximo 10 emisoras FM en la memoria.
1. Para preseleccionar una emisora, primero sintonice su emisora deseada y luego presione sostenga el botón
MEMORY por más de dos segundos. Se mostrará en la pantalla “P01” destellando. (F. 13)
2. Presione los botones MEMORY o para seleccionar el número de emisoras pared seleccionada deseada
yluego presione botón MEMORY para confirmar su selección. Aparecerá en la pantalla el número de la
emisora preseleccionada estable y luego la frecuencia FM.
3. Para recuperar una emisora preseleccionada, presione los botones MEMORY MEMORY o para
seleccionar las emisoras que desea almacenar. Aparecerá en la pantalla el número de la emisora
preseleccionada llamado durante dos segundos.
F.11
TUNER
F M
►/II
▼
▲
F.12
TUNER
F M
F.8
F.13
▼
▲
Modo de Bluetooth
Las capacidades de Bluetooth de esa unidad permiten recibir a audio de muchos dispositivos compatibles con
Bluetooth, como teléfonos celulares, computadoras portátiles y dispositivos PDA. Admite los siguientes perfiles
y funcionalidad Bluetooth. Solamente se puede conectar simultáneamente un dispositivo por perfil.
ES-3
Page 33

Bluetooth Es un estándar de comunicación de radios de corto alcance. El hardware del receptor y transmisor
Bluetooth de esta unidad tiene un rango operativo aproximado de 30 pies en espacio abierto. Generalmente los
dispositivos Bluetooth se pueden comunicar entre sí claramente dentro de un salón hubo oficina de tamaño regular.
. La operación entre diferentes salones dependerá de la construcción de los salones. Es importante reconocer el
hecho que el rango de comunicación Bluetooth se puede reducir sustancialmente si la señal pasa a través de un
objeto sólido.
Los cuerpos humanos, las paredes de concreto o ladrillo, así como muebles o librerías pesadas reducirán el rango
operativo de sus dispositivos Bluetooth. Las paredes de madera, vidrio o paredes secas y las divisiones de oficinas
pueden tener un efecto menos severo pero notorio. Usted debe poner sus dispositivos Bluetooth cercanos entre sí
si tiene problemas de comunicación.
Conexión de música estéreo a sus teléfonos celulares
Esta conexión necesita que los celulares admitan el perfil Bluetooth A2DP para la conexión de música estéreo.
Para crear una conexión Bluetooth, necesita familiarizarse con algunas de las funciones Bluetooth de su teléfono
celular. Debido que cada teléfono funciona un poco diferente, debe familiarizarse con las capacidades Bluetooth de
su dispositivo antes de conectarse.
1. Asegúrese de que la función Bluetooth de su teléfono celular esté activa. Puede necesitar consultar el manual
del usuario del teléfono para detalles.
2. Ponga el radio y el teléfono a una distancia no superior a tres pies.
3. Presione repetidamente el botón MODE para seleccionar o Bluetooth. Aparecerá destellando en la pantalla .
4. Configure el teléfono compatible con A2DP para que busque los dispositivos Bluetooth y siga las instrucciones
de la pantalla del teléfono. Usted reconocerá el radio por su nombre Bluetooth “BT speakerN". En caso de que
se le pida una contraseña puede escribir “0000”.
5. Seleccione confirme el pareado de su teléfono, y la conexión se completará en algunos segundos y luego
radio producirá un sonido bip se volverá estable en la pantalla y usted podrá ahora empezar la operación
de transmisión de música Bluetooth.
6. Presione botón de la unidad o seleccione iniciar reproducción en su teléfono para empezar la reproducción
de música.
7. Para interrumpir la reproducción, presión el botón otra vez o seleccione “pausar” en su teléfono.
8. Para avanzar o retroceder rápidamente a otras canciones durante la reproducción, presione el botón o
I◀◀
de la unidad o seleccione “omitir controles” en su teléfono celular.
Nota: Algunos celulares se pueden conectar y desconectar cuando haga o termine llamadas. Este no es una
indicación de algún problema de su unidad.
Conexión de música estéreo a otros dispositivos Bluetooth
Esta conexión necesita un dispositivo que admita el perfil Bluetooth A2DP para la conexión de música estéreo.
Asegúrese de que su dispositivo tenga las versiones y controladores de software más recientes y que el firmware
admita la funcionalidad Bluetooth. No se garantiza la compatibilidad con todos los dispositivos. Además de los
procedimientos descritos anteriormente para celulares, esta radio puede recibir música exterior de otros
dispositivos Bluetooth incluyendo computadoras, PDA, reproductores de música habilitados con Bluetooth. Los
procedimientos de conexión exactos pueden variar entre cada dispositivo. Consulte el manual del usuario del
dispositivo para operaciones específicas.
Nota: Una gran cantidad de dispositivos de computación incluyen compatibilidad para Bluetooth y muchos incluyen
soporte para música estéreo a través de Bluetooth (A2DP). Para obtener un mejor rendimiento de su
dispositivo particular, asegúrese de usar la actualización más reciente de los controladores de software y o
firmware disponibles. En ciertas circunstancias, actualiza los controladores de software o firmware de su
dispositivo con la última versión, puede añadir soporte para A2DP quien no estaba disponible las versiones
anteriores. Póngase en contacto con el distribuidor de su dispositivo para obtener dichas actualizaciones y
consulte el manual del usuariodel dispositivo para los procedimientos de actualización. Recuerde que las
actualizaciones del sistema solamente la de realizar una persona calificada después de hacer copia de
seguridad del sistema completa.
Escuchar en USB (reproducción de MP3)
1. Cuando el radio esté encendido, presione repetidamente para el botón MODE para seleccionar la función
USB. Aparecerá en la pantalla “USB” y “NO HAY DATOS”. (F. 14)
2. Conecte su dispositivo de memoria cargado con sus canciones MP3 favoritas en el puerto USB ubicado en
le panel posterior. Ya no se mostrará el mensaje “NO HAY DATOS”.
3. Empezará a reproducir automáticamente desde la primera pista MP3 encontrada en el dispositivo
y aparecerá en la pantalla el icono de reproducción USB. (F. 15)
4. Para interrumpir la reproducción, presione el botón , el icono de reproducción empezará a destellar en la
pantalla.
5. Para reanudar la reproducción presione de nuevo el botón .
6. Durante la reproducción, presione el botón o para saltar hacia adelante o hacia atrás a otras
pistas MP3 del dispositivo de memoria. La reproducción empezará a al principio de la pista seleccionada.
►/II
►/II
►/II
▶▶I I◀◀
F.14 F.15
►/II
▶▶I
USB
NO DATA
USB
ES-4
Page 34

Perfil de distribución de audio avanzado (A2DP)
- Conexión de audio estéreo de alta calidad
- Transmisión de música exterior desde PC, celulares,…etc
Perfil de control remoto de vídeo y audio (AVRCP)
- Control remoto de dispositivos
- Dispositivos conectados de control
Consideraciones de rendimiento de Bluetooth
NOTA: El rendimiento de conectividad Bluetooth puede variar con la marca y modelo del dispositivo conectado.
Para obtener un mejor rendimiento, conecte los dispositivos Bluetooth más recientes que incorporan Bluetooth 2.1
y usando la actualización de firmware más reciente disponible para el dispositivo. No se garantiza la compatibilidad
con todos los dispositivos y tipo de medios.
Garantice que todos los dispositivos Bluetooth dentro de 30 pies tengan deshabilitada la transmisión Bluetooth. La
presencia de otros dispositivos que funcionan con Bluetooth durante la conexión puede representar dificultades
operativas.
Nota 1: En caso de que su dispositivo de memoria se cargue con canciones mp3 pero en la pantalla aparezca el
mensaje 'NO DATA”, el formato y su dispositivos USB podría no ser compatible con esta radio. Para
escuchar las canciones de este dispositivo uso del cable de conexión (no suministrado), inserte un extremo
en la entrada AUX IN (de la parte posterior delradio) y el otro extremo en la entrada para audífonos de su
dispositivo USB, y luego presione repetidamente el botón MODE para seleccionar el modo AUX.
Nota 2: Este producto puede admitir memoria USB de máximo 16GB, solamente que el tiempo de aceptación para
más memoria será mayor y en algunas ocasiones, para que el sistema se demore. No se puede garantizar
que sea compatible con todos los dispositivos USB. Esta no es la de indicación de un problema con esta
unidad.
Función Sleep (dormir)
Esa función permite programar el radio para que se apague automáticamente después de un periodo de tiempo
establecido.
1. Para activar la función sleep, presione varias veces el botón SLEEP y aparecerá en la pantalla “SLEEP”, y el
tiempo de reposo (destellar en minutos) cambiará en frecuencia cada vez que lo presione:
90 8 0 7 0 60 3 0 1 0
OFF
2. Cuando dice que el tiempo lo de reposo aparece la pantalla, suelte botón y la función sleep se activará en
cinco segundos. Cuando el tiempo de reposo llegue a cero, la unidad se apagará.
3. Para desactivar la función sleep antes, presione varias veces el botón SLEEP hasta que aparece en la
pantalla “OFF” y luego desaparecerá “SLEEP”. “OFF” y “SLEEP” desaparecerán.
Luz de fondo de la pantalla
La luz del fondo de la pantalla es tenue de forma predeterminada y en el modo de reposo se activará cuando se
encienda la unidad. Regresará a asustado predeterminado cada vez que la unidad cambie al modo de reposo.
Cuando la unidad esté encendida, presione el botón BACKLIGHT para cambiar la luz del fondo entre activa y tenue.
Durante el modo de reposo, al presionar cualquiera de los botones, la luz del fondo se encenderá durante 10
segundos.
AUX INPUT Hay una toma de entrada auxiliar estéreo de 3,5mm ubicada en la parte posterior de la unidad; las
señales análogas de audio de otras fuentes se pueden introducir en el radio a través de esta toma.
Para seleccionar el modo AUX, presione repetidamente el botón MODE hasta que aparezca “AUX”. El audio
cambiará la señal de entrada aux y usted podrá ajustar el volumen al nivel deseado.
JACK PARA AUDÍFONOS
El jack para audífonos se encuentra ubicado en el panel posterior. Conecte audífonos estéreos (no incluidos) en
este jack para poder escuchar de forma privada. Cuando los audífonos estén en uso, el autobús se desactivará
automáticamente.
IMPORTANTE: Cuando use audífonos, siempre establezca control de volumen a un nivel bajo antes de activar los
audífonos. Luego active los audífonos y aumente gradualmente el volumen hasta un nivel adecuado.
Ventana de la pantalla LCD
A. Indicador Bluetooth
B. INDICATOR SINTONIZADOR
C. INDICADOR DE FM ESTÉREO
D. INDICADOR DEL RANGO DE FRECUENCIA/HORA
E. INDICADOR DE ALARMA
F. INDICADOR USB
G. INDICADOR DE REPOSO
H. INDICADOR DE SILENCIO
ES-5
B C D E
A
TUNER
AUX
F M
USB
NO DATA
PM
F G H
HI
SNOOZE
SLEEP
Page 35

ESPECIFICACIONES
ALIMENTACIÓN ELÉCTRICA: 100-240V CA~ 50/60Hz
Potencia de salida: 2 x 5W
Dimensiones de la unidad: 300 (L) x 145 (A) x 115 (H) mm
Sección de radio
Rango de frecuencia: FM 87.5 - 108 MHz
Sección USB
INTERFAZ USB 1.1 (No se admite concentrador USB)
Memoria Flash: USB 1.1 Flash USB 2.0 Flash de alta velocidad
FAT 16/32 32M 2TByte
Decodificador de Mp3: MPEG Audio 1, 2, 2.5 Capa 1, 2, 3
Tasa de Bits 8 - 320kbps & VBR excepto formato libre
SECCIÓN DE BLUETOOTH
Especificaciones de Bluetooth: V2.1+ EDR
Clase de potencia de salida: Clase 2
Perfiles compatibles: A2DP, AVRCP
Especificaciones sujetas a cambios sin previo aviso.
ES-6
Page 36

Tips voordat u met de helpdesk belt of het apparaat retourneert:
1) Raadpleeg de handleiding of indien aanwezig de ‘quick guide’.
2) Haal de stekker uit het stopcontact voor zo’n 10 sec.om te resetten, steek de stekker opnieuw in
het stopcontact en kijk of het apparaat nu werkt.
3) Let op of de kabels goed zijn aangesloten, en dat eventuele batterijen nog voldoende opgeladen
zijn.
4) Controleer nogmaals de desbetreffende functie.
5) Noteer eventuele foutmeldingen en systeemboodschappen en wanneer deze optreden.
5) Probeer, indien er geen probleem of foutmelding verschijnt, een korte omschrijving van het
probleem te formuleren.
7) Indien het product moet worden aangesloten op een apparaat (tv, computer enz.) probeer als u
de mogelijkheid heeft het product op een ander apparaat aan te sluiten.
8) Raadpleeg eventueel de FAQ (veelgestelde vragen)
U kunt ook mailen naar onze helpdesk.
9) Zorg dat u uw aankoopbon bij de hand heeft, of neem deze mee indien u het apparaat
retourneert.
10) Zorg ervoor dat het model nummer/naam van uw Lenco-apparaat bekend is.
Deze staat vermeld op het apparaat en op de verpakking.
11) Indien u de helpdesk belt, zorg er dan voor dat het apparaat bedrijfsklaar is zodat het advies van
onze helpdesk meteen kan worden toegepast.
TELEFONISCHE HELPDESK : 0900 – BELLENCO
0900-(23553626)
De helpdesk is bereikbaar van Maandag t/m Vrijdag van 09:00 tot 18:00 uur.
Let op:
Na het verstrijken van uw garantieperiode (zie garantievoorwaarden) dient u contact op te nemen met uw
winkelier, deze kan u verder adviseren.
De telefonische helpdesk zal u in geval van een noodzakelijke reparatie doorverwijzen naar uw aankoop
adres.
Deze service geldt voor aankopen gedaan in Nederland
Voor informatie en ondersteuning, www.lenco.eu
.
€45ct/pm
Page 37

Tipps bevor Sie den Helpdesk anrufen, oder wenn Sie das Gerät zurück
bringen wollen:
1) Lesen Sie die Anleitung genau durch.
2) Nehmen Sie den Stecker fuer ca. 10 Sekunden aus der Steckdose um das Geraet zu resetten.
Stecken Sie dann den Stecker erneut in die Steckdose und ueberpruefen Sie, ob das Geraet
nun funktioniert.
3) Achten Sie darauf, dass das Gerät korrekt angeschlossen ist und eventuell die Batterien
aufgeladen sind.
4) Kontrollieren Sie nogmals die Funktion.
5) Notieren Sie mögliche Fehlermeldungen und Systemberichte und in welchen Situationen diese
auftreten.
6) Versuchen Sie – falls keine Problem- oder Fehlermeldung erscheint – eine kurze Beschreibung
des Problems zu formulieren.
7) Sollte sich ein Problem durch den Anschluss an ein anderes Gerät ergeben, testen Sie, ob sich
das Problem auch ergibt beim Anschluss an andere Produkte.
8) Lesen Sie bei Bedarf die FAQ (Liste mit häufig gestellten Fragen) durch. Sie können auch den
Helpdesk anmailen.
9) Achten Sie darauf, dass Sie den Kaufbeleg bereit liegen haben, oder dass Sie den Kaufbeleg
mitnemen wenn Sie das Gerät zurück bringen wollen.
10) Achten Sie darauf, dass die Modellnummer Ihres Lenco Gerätes bereit liegt. Diese steht auf
dem Gerät und auf der Verpackung.
11) Indem Sie den Helpdesk anrufen wollen, achten Sie dann darauf, dass der Apparat
betriebsbereit vor Ihnen steht, damit Sie die Ratschläge des Helpdesks unmittelbar in die Praxis
umsetzen können.
TELEFONISCHER HELPDESK: 0900-(1520530)
€45 Ct/p.m.
Der Helpdesk steht Ihnen von Montag bis einschließlich Freitag von 09.00 bis 18.00 Uhr zur
Verfügung.
Achtung:
Nach Ablauf des Garantiezeitraums müssen Sie Kontakt mit Ihrem Vertragshändler aufnehmen, der Sie
beraten wird.
Der telefonische Helpdesk wird Sie, falls eine Reparatur unumgänglich ist, an Ihren Vertragshändler weiter
verweisen.
DIESER SERVICE BEZIEHT SICH AUSSCHLIESSLICH AUF IN DEUTSCHLAND BEZOGENE GERÄTE.
Zur Information und Unterstützung, www.lenco.eu
 Loading...