


Sportcam-500 Wifi Camera User Manual
www.lenco.com
Thank you for purchasing our Wi-Fi Camera. Please read this User’s
Manual carefully in order to obtain the best performance of the product
and extend its service life.
Key Features
WIFI, Photos, Video Recording,1080P HD Videos ( 30fps )
1000mah External Power Supply
Micro USB port + Micro SD card slot +HDMI Port
PC Camera
888 Digital Screen /1.8inch Removable Screen
4X Digital Zoom
Infrared Remote Control
120º Wide-angle lens
Appearance&&
Appearance
Buttons
Buttons
1

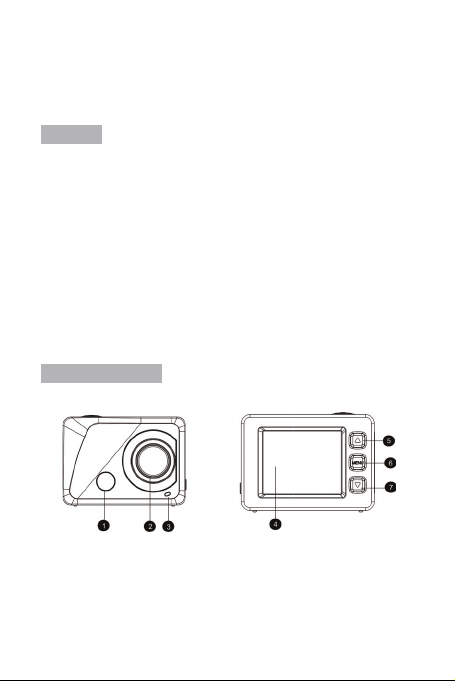
1. Infrared remote control lamp 10. Power / Mode button
2. Lens 11. Speaker
3. Indicator light 12. WIFI key
4. 1.8’’ LCD display 13.
5. Up key 14. Double Push key
6. Menu key 15. Microphone
7. Down key 16. Shutter/OK button
8. Micro USB port 17. HDMI port
9. Micro SD card slot
888 Digital Screen
2
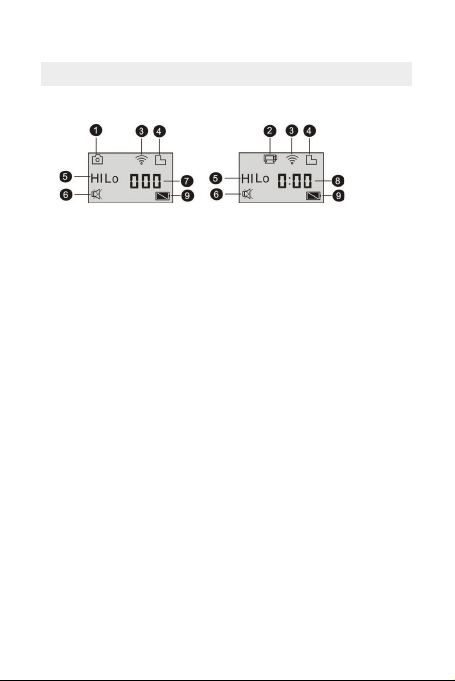
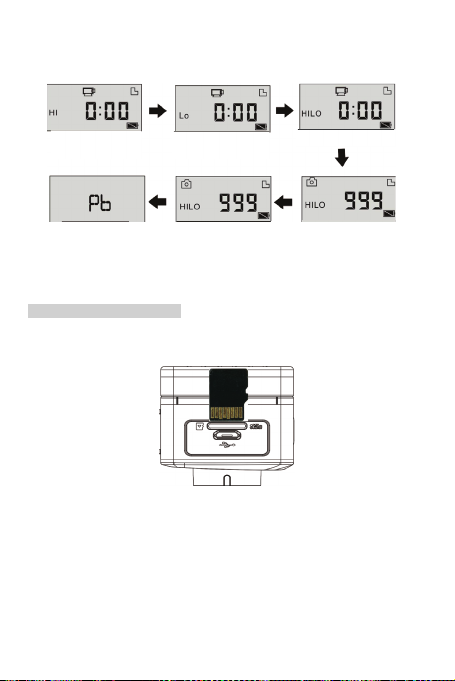
Introduction of Local LCD Status
When the Camera starts up, LCD will show the following information:
1. Photo Mode
2. Video Mode (by default)
3. Wi-Fi Icon (it appears upon the start-up)
4. TF Card Icon (it appears upon loading)
5. Resolution Icon:
Under the photo mode, HI means 10 Million Pixels (3648x2736); under the video mode, it means
Full HD videos (1920x1080,30fps);
Under the photo mode, LO means 0.3 Million Pixels (640x480); under the video m ode, it means
720P videos (1280x720, 30fps);
Under the photo mode, HILO means 3 Million Pixels (2048x1536)/ 5 Million Pixels (2592x1944)
/ 8 Million Pixels (3264x2448);under the video mode can HILO appear, indicating 720P videos
(1280x720, 60fps).
6. Silent Mode: When the Camera is under the Silent Mode, it will appear; the Silent Mode is not
enabled by d efault;
7. Photo Counter: When the number of photos exceeds 999, it will only reveal 999;
8. Video Timer: It will merely show hours and minutes;
9. Power Icon: It will indicate the current power status.
Note:
1. Above icons will change according to your Camera’s status. Operating Mode Diagram
2. Photo mode, the default 5 M and 8 M. If need to change pixel, please enter the menu
Settings to select it. When the mode scroll one cycle, the set of pixels will be restored to default
pixels.
3

When the C amera starts up, press the Power/Mode Key to enter the following modes in turn:
Preview
Mode
by
d
)
Video
Mode
V
0fps)
ideoMode (720P,6
VideoPrev iew Mode(108 0Pby default)
(1080P
VideoM ode(720 P,30fps)
efault
(720P,30fps)
VideoMode (720P,60fps)
Playback Mode
Under the Video Mode, press the Shutter Button to start recording, and the Indicator Light will turn
green and flicker; press the Shutter Button again to stop recording; (under the Video Mode, press the
Shutter Button for a while to Turn On/Off the Silent Mode);
Under the Photo Mode, press the Shutter Button to start taking photos. press the Shutter Button for a
while to Turn On/Off the Silent Mode);
Photo Mode (8 Million Pixels)
Photo Mode (5 Million Pixels)
Usage of the Wi-Fi Camera
I. Before you start to use the Camera for the first time, please:
1. Firstly insert one micro SD card or micro SDHC card as follow;
Class 4 or above SDHC card is recommended; under the professional video recording mode, Class
10 Card is recommended. Please shut down the Camera before your insert or pull out any card.
Note: The first if camera can’t power on,please reinstalling battery, Check whether the battery
is well con nected or if the wrong battery.
4

2. Assemble the Battery
Please firstly press the “PUSH Key” of the external screen on the two sides at the same time, and
then take down the external screen.
Step 1: Remove the battery cover t o the unlocking position, and then take down it;
Step 2: Please insert the battery into the case towards the indicated direction;
Step 3: Assemble the battery cover in its original position to fasten the battery.
3. Charge the Battery
The rechargeable lithium battery is removable. When the Camera is powered off, it can be charged
through connecting it with the computer via the USB cable; during the charging process, the
Indicator Light will turn red, and it will be off when the Camera is fully charged. The charging
process may last for 2 to 4 hours.
II. Video Mode:
1. Start-up: press the Power key for 3s and then release it; LCD (Black & White Screen)will
show “ON”. The Buzzer will sound for once.
2. Video Recording
Before you conduct v ideo recording, please verify whether the Camera i s under the Video Mode; if
the icon does not show itself on the screen, please keep pressing the icon till it appears on
the screen.
Start: Press and release the Shutter Button, and the icon
REC and the green indicator light will flicker,meaning that video recording begins;
Stop: Press and release the Shutter Button, and the icon will appear on the screen; the indicator
light will be off, and video recording stops.
Note: Above icons will change according to your Camera’s status.
The maximum size for a video is about 4GB.
will appear on the screen; the Icon
III. Video Mode and Photo Mode of the External Screen
1. Under the Video Mode, press the Shutter Button to start recording, and the LED Light will turn
green and flicker; press the Shutter Button again to stop recording;
Under the Photo Mode, press the S hutter Button to start taking photos.
2. Advanced Operation
Video Mode and Photo Mode
Press the Shutter Button to start recording, and press it again to stop;
Press the Shutter Button to take a photo;
When an external screen has been connected, press the Up Key and Down Key to conduct digital
zoom under the VideoMode and the Photo Mode.
5

3. Video Recording Displ ay Screen
No. Name of the Icon Remark
1 Video Mode The Camera is under the Video Mode.
2 White Balance The Camera is currently under the Auto W h ite Balance Mode.
3 Quality The current video is of the best quality.
4 1080P It means the current Resolution.
5 Time for Recording It means the time left for video recording.
6 Power Status It shows the current power status.
7 Face detection According to t he current open face detection
4. Photo Display Screen
6
No. Name of the Icon Remark
pp
g
(
1 Photo Mode The Camera is under the Photo Mode.
2 White Balance The Camera is currently under the Auto White Balance
3 Picture Size It means the current Resolution.
4 Quality The current video is of the best quality.
5 Limit of Photos It means the limit of photos which can be successfully taken.
6 Power Status It shows the current power status.
7 Smile Detect According to the current open smile detection
Mode.
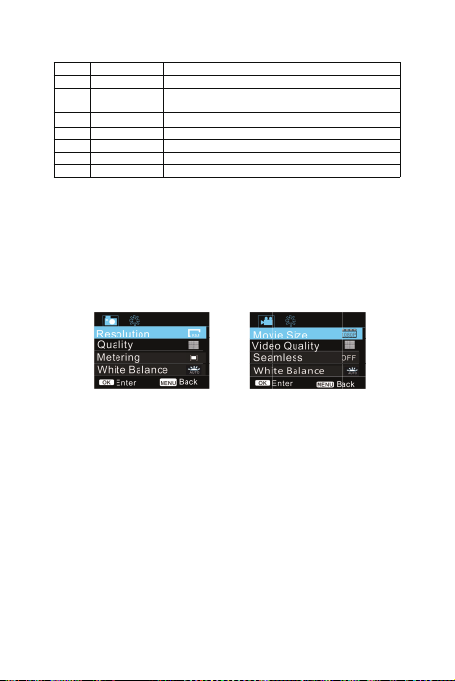
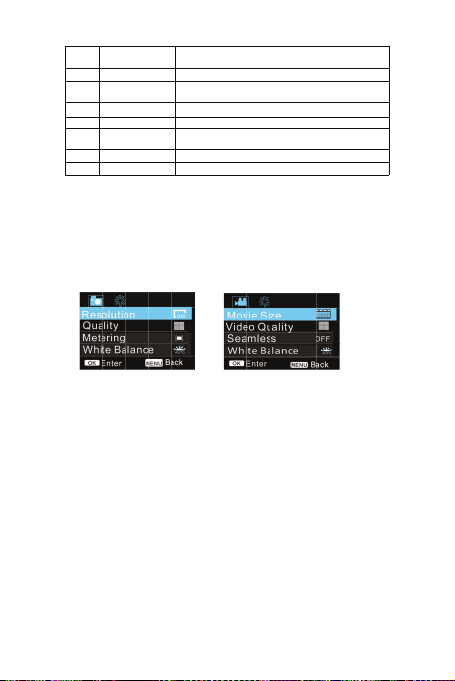
IV.Menu Mode Settings when An External Screen is Connected
1. Menu S ettings
Under the Photo Mode, Video Mode or Playback Mode, press the Menu Key to open the Menu; then
press the Up Key or the Down Key to select the Menu; press the Shutter Button to enter the
Submenu; the chosen option will be highlighted with the backgr ound color; press the Up Key or the
Down Key again to select the secondary Submenu, and press the Shutter Button for Confirmation;
press the Menu Key to quit.
Video Mode Photo Mode
1.1 In video mode menu, setting S eamless menu can be used for driving record function
This seamless function can be started and sto
select the desired file length andpush record button.
When connect camera with charger the camera willpower on automaticallyand start recordin
Please make sure Micro S D card is inserted), accordingto settingtime it will save a video segment,
then start to record the next video segment.
When the storage card is full, the earliest segment of video will be deleted to release the
correspondingspace for continuous/looprecording.
Note: Seamless time can choose 1 minute, 3 minutes, 5 minutes.
ed manuallybyselectingSeamless in camera mode,
7
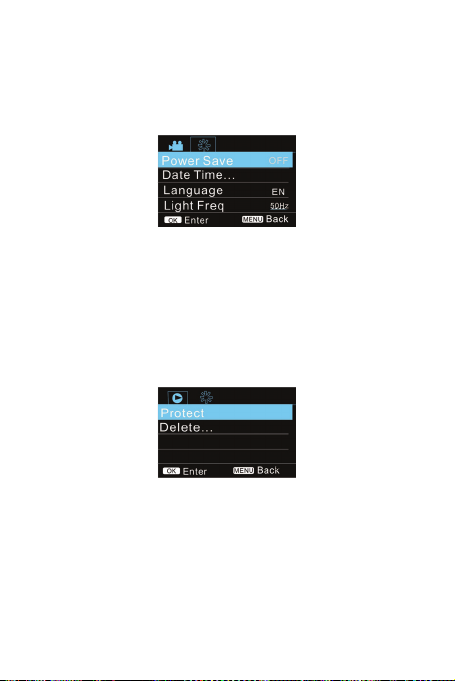
2. System Menu Settings
Press the Menu Key to open the Menu; press the Power Key to enter Main Menu Settings. Then,
please press the Up Key or the Down Key to select the Menu, and press the Shutter Button to enter
the Submenu; press the Up Key or the Down Key again to select the secondary Submenu, and press
the Shutter Button for Confirmation; to leave the system menu, press the Menu Key.
3. Playback Mode Settings
Press the Power Key to switch to the Playback Mode; you can view Photos/video, and play the
recorded videos.
View Photos: Press the Up Key or the Down Key to select a photo/video;
View Videos: Press the Up Key or the Down Key to select a photo/video; press the Shutter Button to
play the recorded file, and press it again to stop playing.
4. Menus Settings under the Playback Mode
Press the Menu Key to open the Playback Main Menu; press the Up Key or the Down Key to select
the Menu; press the Shutter Button to enter the Submenu, and then press the Up Key or the Down
Key again to select the secondary Sub-menu; finally, press the Shutter Button for Confirmation;
Playback Mode
8
System Mode

V.Connection with the HDTV
1. Connect the Camera with the HDTV through a HDMI cable (optional)
If you need transfer photos and voices from the Camera to the HDTV, please insert the universal
terminal of the HDMI cable into the HDMI port of the Camera, and the other terminal (output
terminal) into the HD input port of the HDTV as follow:
Note: Please firstly stop recording videos before you insert/pull out the HDMI cable.
2. When the Camera is connected with the HDTV, it will enter the Playback Mode, and the Display
Screen will play videos as follow:
1
3
Name of the
No.
Icon
1Playback Mode The Camera is under the Playback Mode.
2 Number of Files You are watchingthe 19thvideo file out of the total 31 files.
3 Video Icon It means that the current file is a recorded video file.
3. Under the Playback Mode, please press the Up Key and the Down Ket to select a photo or video;
then press the Shutter Button to play the photo or video; press it again to stop.
4. Under the Playback Mode, press the Menu Key to lock a picture and delete the picture. Press the
Up Key and the Down Key to choose between Delete and Format; press the Shutter Button for
confirmation, and then enter the Submenu; press the Up Key and the Down Key to choose YES or
NO; press the Shutter Button for confirmation to quit.
2
Remark
9
VI. Connect to PC
N
I. Please firstly power on your Camera, and then connect it to PC through inserting the USB cable
into the USB port on your PC. After that, the Camera will automatically enter the MSDC Mode, and
you can view photos or videos/sound recording files on your PC screen.
ote: During the downloading process, please do not disconnect the USB cable or insert/pull
out the storage card in case of data loss.
Under the MSDC Mode (
Mode( Mode). Upon the successful connection, the LCD of the Camera will show
“PCCAM”:
At the moment, you can enable the preview picture of the Camera by means of related application
programs; press the Shutter Button again to go back to the MSDC Mode.
Tips: The PCCAM Mode can be enabled by the windows XP (SP3) system without any Device
Driver.
Tips: When the Camera has been connected to PC, it will enter the MSDC Mode. In the
windows operating system, My Computer will show two Removable Disks. One is the TFCard
which has contained all photos and videos recorded by the Camera; another one is to load the
system file information, and one file named SSID_PW.CFG has been saved within it to record
the Camera’s APID number and its password. The User can only view the said information
and cannot al ter,delete or format any of them.
II.Web camera functions
When the camer a power on, press power key to enter after connecting the computer camera model;
Or in the Settings menu USB option in selected UVCH264 format into the camera。
Note: In case of PCCAM, version 1 is XP sp3 or the above.
Mode), press the Shutter Button to switch to the PC Camera
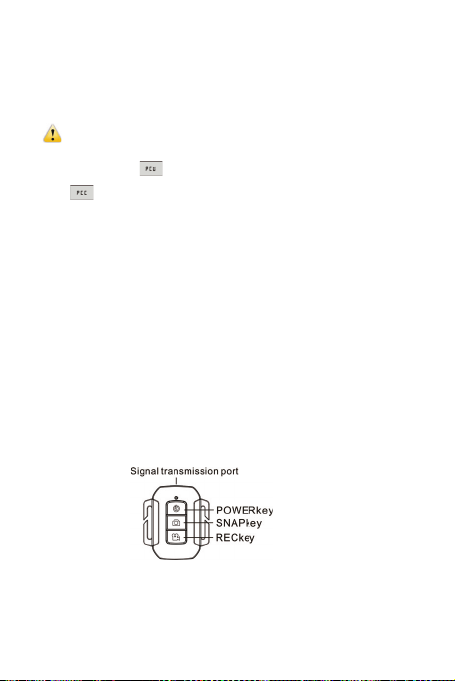
VII. Remote Control Application
I. Introduction of Keys
Keys on the Remote Controller are as follow:
10

II. Instructions
It is possible for the User to conduct video recording, take a photo and to shut the Camera down
without touching it. Please point the signal transmitting port of the Remote Controller at the Infrared
Ray Lamp of the Camera, and press different keys for different functions.
Note: Wifi allows data transfer over short distances within 20 meters. Any walls or ceiling may
reduce the strength of the Wifi connectivi ty. Therefore, try to locate the unit an d/or access
point within this distance and avoid any obstacles.
Ⅲ.Remote controller battery replacement
Ⅲ
When the remote control battery is low, need to replace the battery, please be careful to open the
battery door with a coin, avoid scratc hing the battery door.
When replacing the battery, put a coin inside the groove in the middle of the battery cover, to
unscrew battery cover according to direction and replace old battery (when put the new battery,
please note the positive and negative pole), then put the battery cover and screw till tighten.
(Picture 1,open the battery cover)(Picture 2,take out the battery)
(Picture 3,in the battery)(picture 4, close the battery cover)
11
VIII. APP (for Android and iOS System)
I. How to Obtain the APP Installation Program
1. For the Android System, you can search “SYMAGIX” in the Play Store to obtain corresponding
installation programs, and then you can install them according to the indicated steps or through
scanning the two-dimensional code
2. For the IOS System, you can search “SYMAGIX” in the APP Store to obtain corresponding
installation programs, and then you can install them according to the indicated steps or through
scanning the two-dimensional code
II. Camera WIFI and System Applications
Android Applications
1. Please install the SYMAGIX application program (provided by the Supplier or the Internet) for
the Android mobile phone or tablet PC, and then the Display Screen will show the Icon ;
2. Insert a Storage Card into the Camera and then power it on. Press the WIFI key to conduct WIFI
connection, and the Screen of the Camera will show the WIFI signal Icon with the external screen
revealing WIFI Connecting.
3. Enable the WIFI function of the Android mobile phone or tablet PC, and try to find the AP Name
“Lenco Sportcam-500_WIFI”; please conduct connection between them till the system reveals a
successful connection;
if you are conducting WIFI connection for the first time, please input the password: 1234567890.
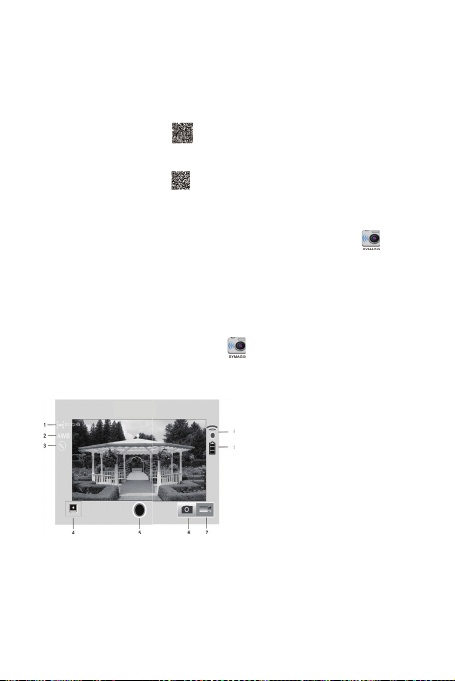
4. Tap and enable the Application Program Icon
you can directly view the preview picture transmitted by the Camera (see the following picture), and
then conduct relevant operations.
.
.
12
on the Android mobile phone or tablet PC;
1. Resolution
2. White Balance
3. Settings (Enter Settings Menu)
4. Enter the Playback Mode
5. Shutter Button
6. Photo Mode
7. Video Mode
8. Wi-Fi Signal Icon
9. Camera’s Battery Status Icon
IOS Applications
1. Please install the SYMAGIX application program (provided by the Supplier or the Internet) for
the IOS mobile phone or tablet PC, and then the Display Screen will show the Icon
2. Insert a Storage Card into the Camera and then power it on. Press the WIFI key to conduct WIFI
connection, and the Screen of the Camera will show the WIFI signal Icon with the external screen
revealing WIFI Connecting.
3. Enable the WIFI function of the IOS mobile phone or tablet PC, and try to find the AP Name
WDV8277SA_WIFI; please conduct connection between them till the system reveals a successful
connection;
if you are conducting WIFI connection for the first time, please input the password: 1234567890.
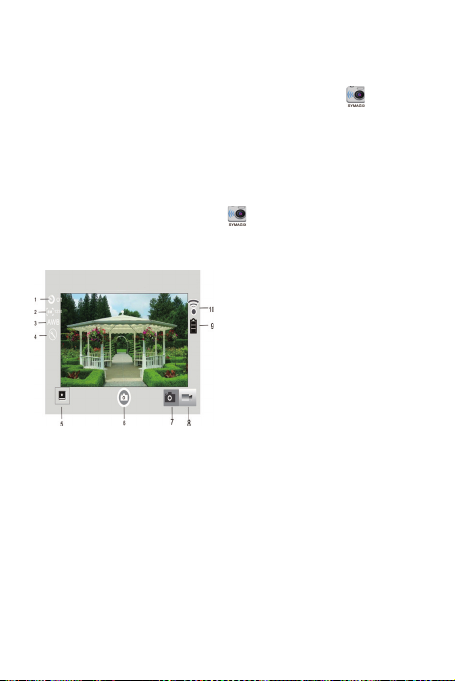
4. Tap and enable the Application Program Icon
can directly view the preview picture transmitted by the Camera (see
the following picture), and then conduct relevant operations.
Notes:
1. If you need to record videos or download pictures using your mobile phone or tablet PC,
please insert one TFcard for your camera;
2. When the Camera has been successfully connected with your mobile phone or tablet PC,
the WIFI Indicator Light will be on.
on the IOS mobile phone or tablet PC; you
1. Set the Self -Timer
2. Picture Pixel
3. White Balance
4. Settings (Enter Settings Menu)
5. Enter the Playback Mode
6. Shutter Button
7. Photo Mode
8. Video Mode
9. Camera’s Battery Status Icon
10. Wi-Fi Signal Icon
;
13

ⅨⅨ
. How to use the Bike mount/waterproof shell accessories.
Notes:Waterproof case is IPX8
Technical
Parameters
Technical
Parameters
Image Sensor 5 Million Image Sensor
Function Modes Video Mode, Photo Mode and Playback Mode
Lens F2.1, f=3.68mm
Digital Zoom 4X
LCD Display S creen 1.8inch LCD Screen
Photo Definition
Ratio
Video Definition
Ratio
Storage Media TF Card (32GB at most)
File Formats
USB Port USB 2.0 Port
Power Supply External 3.7V rechargeable lithium battery 1000mAh.
Language English/ German/ Spanish/ Dutch/French/ Czech/ Hungarian
Auto Shut-down 1minute/3minutes/5minutes/OFF
Dimension
Note:
The product design specification is made based on updated information when
compiling this product manual. The specification is subject to change without
further notice. The product is subject to the actual camera.
10 M (3648x2736) , 8M (3264x2448), 5 M(2592x1944),3 M (2048x1536)
VGA(640x480)
FHD (1920x1080 30fps), HD (1280X720 30fps), HD (1280X720 60fps)
Videos(MOV); H.264 Compressed Format;
Photos(JPG)
60x43x36mm(not including the external Screen);
60x43x48mm(including the external screen);
14

y
)
g
)
)
g
_________________________________
p
y p
) y
p
Thisproduct operates at 2400 - 2483.5 MHz and is designated onlyto be used inside a normal household
p
y
q
p
environment. This
Hereb
with the essential re
The declaration of conformity may be consulted at
htt
roduct is suited for thispurpose within all EU counties.
, STL GroupBV, Ankerkade 20 NL 5928 PL Venlo, declares that thisproduct is in compliance
s://lencosupport.zendesk.com/forums/22413161-CE-Documents
uirements and other relevantprovisions of Directive 1999/5/EC.
Service and support
For information: www.lenco.com
For support: http://lencosupport.zendesk.com
Lenco helpdesk:
German
The Netherlands 0900-23553626 (Local charges + 1ct p/min)
Bel
France 03-81484280(Local charges
The helpdesk is accessible from Mondaytill Fridayfrom 9 AM till 6 PM.
When contactin
The serial number can be found on the back of th e device. Please write down the serial number
below:
Model:Sportcam-500
Serial number:
Lenco offers service and warranty in accordance to European law, which means that in case of
re
Im
Important note: If this unit is opened or accessed by a non-official service center in any way, the
warranty expires.
This device is not suitable for professional use. In case of professional use, all warranty obligations
of the manufacturer will be voided.
CAUTION:
RISK OF EXPLOSION IF BATTERYIS REPLACED BY AN INCORRECT TYPE.
DISPOSE OF USED BATTERIES ACCORDING TO THE INSTRUCTIONS
conserve natural resources and improve standards of environmental protection in treatment and
disposal of electrical waste (Waste Electrical and Electronic E quipment Directive).
®All rights reserved
0900-1520530(Local charges
ium 02-6200115(Local charges
Lenco,you will always be asked for the model and serial number ofyourproduct.
airs(both duringand after the warrant
ortant note: It is notpossible to sendproducts that need repairs to Lenco directly.
Products with the CE marking comply with the EMC Directive (2004/108/EC) and the
Low Voltage Directive (2006/95/EC) issued by the Commission of the European
Community.
This symbol indicates that the relevant electrical product or battery should not be disposed
of as general household waste in Europe. To ensure the correct waste treatment of the
product and battery, please dispose them in accordance to any applicable local laws of
requirement for disposal of electrical equipment or batteries. In so doing, you will help to
eriod
ou should contactyour local dealer.
15

Sportcam-500 Wifi-Kamera Benutzerhandbuch
www.lenco.com

Vielen Dank für den Kauf dieser WiFi-Kamera. Lesen Sie sich dieses
gung
g
g
g
j
Benutzerhandbuch bitte sorgfältig durch, um zu gewährleisten, dass Sie eine
optimale Produktleistung erhalten und eine längere Lebensdauer des Produkt
gewährleistet werden kann.
Haupteigenschaften
WIFI, Fotos, Videoaufnahme, 1080P-HD-Videos <(30 BpS)
1000 mAh externe Stromversor
Micro-USB-Anschluss + Micro-SD-Kartensteck
PC-Kamera
888 Di
italbildschirm / 1,8" abnehmbarer Bildschirm
italzoom
4X Di
IR-Fernbedienun
120°-Weitwinkelob
Erscheinungsbild
Erscheinungsbild
und
und
ektiv
Tasten
Tasten
platz + HDMI-Anschluss
1

1. Infrarot-Steuerlampe
2. Objektiv
3. Kontrolllampe
4. 1,8" LCD-Anzeige
5. Navigation Oben
6. Menü
7. Navigation Unten
8. Micro-USB-Anschluss
9. Micro-SD-Kartensteckplatz
10. Ein/Aus/ Modus
11. Lautsprecher
12. WIFI
13. 888 Digitalbildschirm
14. Doppeldrucktaste
15. Mikrofon
16. Auslöser/OK
17. HDMI-Ausgang
2

3
Lokaler LCD-Status
Wenn die Kamera eingeschaltet wird, zeigt der LCD-Bildschirm die folgenden Informationen an:
1. Fotomodus
2. Videomodus (Standardmodus)
3. WiFi-Symbol (erscheint beim Einschalten)
4. TF-Kartensymbol (erscheint nach dem Einlesen)
5. Aufllösungssymbol:
Im Fotomodus bedeuet HI 10 Megapixel (3648 x 2736). Im Videomodus bedeutet es Full-HD-Video (1920
x 1080, 30 BpS).
Im Fotomodus bedeutet LO 0,3 Megapixel (640 x 480). Im Videomodus bedeutet es 720P-Videos (1280 x
720, 30 BpS).
Im Fotomodus bedeutet HILO 3 Megapixel (2048 x 1536)/ 5 Megapixel (2592 x 1944) / 8 Megapixel (3264
x 2448). Im Videomodus bedeutet HILO 720P-Videos (1280 x 720, 60 BpS).
6. Stillmodus: Wenn die Kamera sich im Stillmodus befindet, erscheint dieses S
standardmäßig nicht aktiviert.
7. Fotozähler: Wenn die Anzahl der Fotos 999 übersteigt, wird lediglich 999 angezeigt.
8. Video-Timer: Zeigt lediglich Stunden und Minuten an.
9. Stromversorgungssymbol: Zeigt den momentanen Zustand der Stromversorgung an.
Hinweis:
1. Die oben beschriebenen Symbole verändert sich entsprechend dem Betriebszustand der Kamera.
Betriebsmodusdiagramm
2. Im Fotomodusist die Standardauflösung 5 M und 8 M. Wenn Sie die Auflösung ändern wollen, tun
Sie dies bitte über das Einstellungsmenü. Wenn der Modus einen Zyklus durchgeht, wird die
Auflösung wieder auf die Standardauflösung gestellt.
ymbol. Der Stillmodus ist
Wenn die Kamera eingeschaltet ist, betätigen Sie die POWER/MODE-Taste zur Auswahl einer der
folgenden Betriebsarten:
Video-Vorschaumodus
(1080P standardmäßig)
Wiedergabemodu
Betätigen Sie den Auslöser im Videomodus, um die Aufnahme zu starten. Die Kontrolllampe geht zur
Farbe grün über und blinkt. Betätigen Sie den Auslöser erneut, um die Aufnahme zu stoppen (halten Sie den
Auslöser im Videomodus gedrückt, um den Stillmodus zu aktivieren bzw. deaktivieren).
Betätigen Sie den Auslöser im Fotomodus, um Fotos aufnehmen zu können. Halten Sie den Auslöser
gedrückt, um dem Stillmodus ein- bzw. ausz uschalten).
Bedienung der WiFi-Kamera
I. Bevor Sie die Kamera das erste Mal benutzen, gehen Sie bitte wie folgt
vor:
1. Legen Sie zunächst eine Micro-SD-Karte oder Micro-SDHC-Karte wie folgt ein:
SDHC-Karten der Klasse 4 oder höherwerden empfohlen. In professionellen Videoaufnahmemodi, werden
Karten der Klasse 10 empfohlen. Schalten Sie die Kamera bitte aus, bevor Sie eine Karten einlegen bzw.
entfernen.
Hinweis: Wenn die Kamera nicht eingeschaltet werden kann, versuchen Sie die Batterien erneut
einzulegen. Überprüfen Sie, ob die Batterien richtig eingelegt wurden oder ob es sich um den falschen
Batterietyp handelt.
Videomodus (720P, 30 BpS)
Fotomodus (8 Megapixel)
4
Videomodus (720P, 60 BpS)
Fotomodus (5 Megapixel)

5
Einlegen des Akkus
2.
Betätigen Sie bitte zunächst die "Druckknöpfe" auf beiden Seiten des externen Bildschirms zur gleichen
Zeit und nehmen Sie den externen Bildschirm dann herunter.
Schritt 1: Stellen Sie die Batteriefachabdeckung in die entriegelte Position und entfernen Sie sie.
Schritt 2: Legen Sie den Akku entsprec hend der Angaben in das Batteriefach.
Schritt 3: Setzen Sie die Batteriefachabdeckung z urück, um den Akku zu fixieren.
3.
Aufladen des Akkus
Der Akku kann aus dem Gerät herausgenommen werden. Wenn die Kamera ausgeschaltet ist, kann
aufgeladen werden, indem sie über ein USB-Kabel an einen Computer angeschlossen wird. Während des
Ladevorgangs leuchtet die Kontrolllampe rot auf und geht aus, wenn die Kamera vollständig aufgeladen ist.
Der Ladevorgang kann 2 bis 4 Stunden dauern.
II. Videomodus:
1. Einschalten: Halten Sie die POWER-Taste für 3 Sekunden gedrückt. Auf dem LCD-Bildschirm
(Schwarz/Weiß) erscheint die Meldung "ON". Ein Signalton ist zu hören.
2. Videoaufnahme
Bevor Sie eine Videoaufnahme machen, überprüfen Sie bitte, ob die Kamera sich im Videomodus befindet.
Wenn das Symbol nicht auf dem Bildschirm vorhanden ist, betä tige n Sie das Symbol bitte solange,
bis es auf dem Bildschirm erscheint.
Start: Betätigen Sie den Auslöser und das Symbol erscheint auf dem Bildschirm. Das REC-Symbol
und die grüne Kontrolllampe fangen an zu blinken, um anzuzeigen, dass die Videoaufnahme gestartet
wurde.
Stopp: Betätigen Sie den Auslöser und das Symbol
geht aus und die Videoaufnahme wird gestoppt.
Hinweis: Die obigen Symbole verändern sich entsprechend des Betriebszustands der Kamera. Die
maximale Größe für Videoaufnahmen ist ca. 4 GB.
III. Videomodus und Fotomodus des externen Bildschirms
1. Betätigen Sie den Auslöser im Videomodus zum Starten der Aufnahme und die LED-Lampe blinkt grün
auf. Betätigen Sie dann den Auslöser erneut, um die Aufnahme zu stoppen.
Betätigen Sie den Auslöser im Fotomodus, um Fotos aufnehmen zu können.
2. Weiterführende Bedienung
Videomodus und Fotomodus
Betätigen Sie den Auslöser zum Starten der Aufnahme und betätigen Sie ihn erneut, um die Aufnahme zu
stoppen.
Betätigen Sie den Auslöser, um ein Foto zu machen.
Wenn ein externer Bildschirm angeschlossen ist, betätigen Sie die Navigationstaste Oben und die
Navigationstaste Unten für den Digitalzoom im Videomodus bzw. Fotomodus.
erscheint auf dem Bildschirm. Die Kontrolllampe

6
3. Videoaufnahmebildschirm
Nr. Name des Symbols Anmerkung
1 Videomodus Die Kamer a befindet sich im Videomodus.
2 Weißabgleich Die Kamera befindet sich momentan im
3 Qualität Das momentane Video ist in der besten Qualität.
4 1080P Dies steht für die momentane Bildauflösung.
5 Aufnahmezeit Dies zeigt die verbleibende Zeit für die
6 Batteriestand Dieszeigt den aktuellen Batteriestand an.
7 Gesichtserkennung Einstellung der Gesichtserkennung.
automatischen Weißabgleichmodus.
Videoaufnahme an.
4. Fotoanzeigebildschirm
7
Nr. Name des
g
Symbols
1 Fotomodus Die Kamera befindet sich im Fotomodus.
2 Weißabgleich Die Kamera befindet sich momentan im automatischen
3 Bildgröße Dies steht für die momentane Bildauflösung.
4 Qualität Das momentane Video ist in der besten Qualität.
5 Maximale Anzahl
von Fotos
6 Batteriestand Dies zeigt den aktuellen Batteriestand an.
7 Lächelnerkennung Einstellung der Lächelnerkennung.
IV. Menümoduseinstellungen bei Anschluss eines externen Bildschirms
1. Menüeinstellungen
Betätigen Sie die MENU-Taste im Fotomodus, Videomodus oder Wiedergabemodus, um das Menü zu
öffnen. Benutzen Sie dann die Navigationstaste Oben oder Navigationstaste Unten zur Menüauswahl.
Betätigen Sie den Auslöser, um in das Untermenü zu gelangen. Die gewünschte Option wird mit der
Hintergrundfarbe markiert. Benutzen Sie erneut die Navigationstaste Oben oder Navigationstaste Unten zur
Auswahl eines zweiten Untermenüs und betätigen Sie den Auslöser zur Bestätigung. Betätigen Sie die
MENU-Taste zum Verlassen des Menüs.
Videomodus Fotomodus
1.1 Das Einstellungsmenü für die lückenloses Aufnahme im Videomodus kann zur Aufnahme
während der Fahr verwendet werden.
Diese lückenlose Aufnahmefunktion kann durch die Auswahl von Lückenlos im Kameramodus
bzw.gestoppt werden. Wählen Sie diegewünschte Dateilänge und betätigen Sie die Aufnahmetaste.
Wenn Sie die Kamera mit dem Aufnahmegerät verbinden, wird sie automati sch eingeschaltet und startet die
Aufnahme(vergewissern Sie sich bitte, dass eine Micro-SD-Karte eingelegt wurde). Das Video wird
entsprechend der Einstellungen in Abschnittengespeichert.
Wenn die Speicherkarte voll ist, wird derjeweils älteste Abschnittgelöscht, um Platz für einen neuen
Abschnitt zu schaffen und eine fortlaufende Aufnahme zu ermöglichen.
Hinweis: Sie können für die lückenlose Aufnahme 1 Minute, 3 Minuten oder 5 Minuten wählen.
Anmerkung
Weißabgleichmodus.
Zeigt die maximale Anzahl von Fotos, die
aufgenommen werden können, an.
estartet

8
2. Systemmenüeinstellungen
Betätigen S ie die MENU-Taste, um das Menü zu öffnen. Betätigen Sie die POWER-Tast e, um das
Haupteinstellungsmenü zu öffnen. Betätigen Sie dann die Navigationstaste Oben oder Navigationstaste
Unten zur Menüauswahl und betätigen Sie den Auslöser, um in das Untermenü zu gelangen. Betätigen Sie
die Navigationstaste Oben oder Navigationstaste Unten erneut zur Auswahl des zweiten Untermenüs und
betätigen Sie den Auslöser zur Bestätigung. Um das S ystemmenü zu verlassen, betätigen Sie die MENUTaste.
Systemmodus
3. Wiedergabemodus-Einstellungen
Betätigen Sie die POWER-Taste, um in den Wiedergabemodus zu wechseln. Sie können sich dann Ihre
Fotos/Videos ansehen und aufgenommene Videos wiedergeben.
Fotos ansehen: Betätigen Sie die Navigationstaste Oben oder Navigationstaste Unten zur Auswahl eines
Fotos / Videos.
Videos ansehen: Betätigen Sie die Navigationstaste Oben oder Navigationstaste Unten zur Auswahl eines
Fotos / Videos. Betätigen Sie den Auslöser zur Wiedergabe der Aufnahmeda tei und betätigen Sie Sie den
Auslöser erneut, um die Wiedergabe zu stoppen.
4. Menüeinstellungen im Wiedergabemodus
Betätigen Sie die MENU-Taste, um das Wiedergabemenü zu öffnen. Betätigen Sie die Navigationstaste
Oben oder Navigationstaste Unten zur Auswahl des Menüs. Betätigen Sie den Ausl öser, um in das
Untermenü zu gelangen. Betätigen Sie dann die Navigationstaste Oben oder Navigationstaste Unten erneut
zur Auswahl des zweiten Untermenüs. Betätigen Sie den Auslöser zur Bestätigung.
Wiedergabemodus
 Loading...