

Page 1
2.1 Aluminum Soundbar System with Bluetooth
and Wireless Subwoofer
SB-0160
®
USER’S MANUAL
www.lenco.com
Please read this manual carefully before connecting or operating
the appliance. Save it for future reference.
Page 2

1
CONTENTS
A. War nings……………………………… …….………………… ............. 2
B. Parts……… ……… ………………....... ………………….……............ 4
C. Outlook and Controls…… …………………………………… ............. 5
D. As sem bly……… …...... .………………………… ……… .……............ 7
E. Placing methods…………....... ………………………….……. ... ....... 8
F. System co nnections…………... ... .……………………. ……............ 9
G. Basic operation… ………... ... .……………… ….……………...........1 0
H. Functions operat ion………….......………………….… ………........ 11
I. Trou bleshooting…….…………… ………………… …………... ... ....1 3
J. Specif ica tion…… ……. …….…….…….…….…….…… .…….........1 4
K. Disclaimer.…….… ….…….…….… ….…….…..….……. ……........1 4
L. Service and Su pport.…….… ….…….…… ……………… ……........1 5
M. R ecycling.…….… …………….…….… .…….…….… .………........16
N. CE Mark ing.…….…….……… ………………… ……… …….…...... ..1 6
Page 3

2
A. Warnings
IMPORTANT SAFETY INSTRUCTION
• When using electrical equipments basic safety precautions should
always be followed.
• This equipment is not intended for use by persons(including
children)with reduced physical, sensory or mental capabilities or
lack of experience or knowledge. They should be given appropriate
supervision and instructions to use the equipment by a person
responsible for their safety.
• Ensure the equipment is not too close to heat emitting appliances
or placed in direct sunlight.
• Check that the voltage indicated on the data plate corresponds with
that of the local network before connecting the equipment to the
mains power supply.
• Do not leave the equipment unattended while connected to the
power supply.
• Do not immerse the equipment in water or any other liquids. It is
imperative to unplug the power cord after the equipment has been
used, before it is cleaned and while being repaired.
• Close supervision is required when using this equipment near
children.
• Never leave the equipment within reach of children.
• Repairs to electrical appliances should only be performed by
qualified personnel. Improper repairs may place the user and/or
equipment at serious risk.
• This equipments intended for household use only and should not
be used for industrial or commercial purposes.
• Do not operate this appliance with a damaged plug or cord, after a
malfunction or after being dropped or damaged in any wa y.
• Do not use this equipment for anything other than its intended use.
This equipment must be placed on a stable, heat resistant surface.
• Do not push objects into any openings as damage to the
equipment and/or electric shock may occur.
• Do not use this product in wet or bad weather conditions. This
product is not a toy.
• Do not play music at excessive levels especially near children.
• The normal function of the product may be disturbed by Strong
Electro Magnetic Interference. If so, simply reset the product to
resume normal operation by following the instruction manual.
• Refer all serving to qualified service personnel. Servicing is
required when the apparatus has been damaged in an y wa y, such
as power-supply cord or plug is damaged, liquid has been spilled or
objects have fallen into the apparatus, the apparatus has been
Page 4
3
exposed to rain or moisture.
• Please keep the unit in a good ventilation environment.
• These servicing instructions ar e for use by qualified service
personnel onl y. To reduce the risk of electric shock, do not perform
any servicing other than that contained in the operating instructions
unless yo u are qualified to do so.
• The main plug is used as disconnect device, the disconnect device
shall remain readily operable.
• This equipment is a class II or double insulated electrical appliance.
It has been designed in such a wa y that it does not require a safety
connection to electrical earth.
• The lighting with the triangle symbols shows that the unit contains
non-insulated dangerous voltage.
• The batteries in remote shall not be exposed or excessive heat
such as sunshine and fire.
• The apparatus shall not be exposed to liquid or objects filled with
liquids, such as vases, shall not be placed on the apparatus.
We, suggest retaining the packaging in case for future transport of the
product.
WARNING:
Never remove the casing of this apparatus.
•
•
Never place this apparatus on the other
electrical equipment.
Page 5
4
Subwoofer
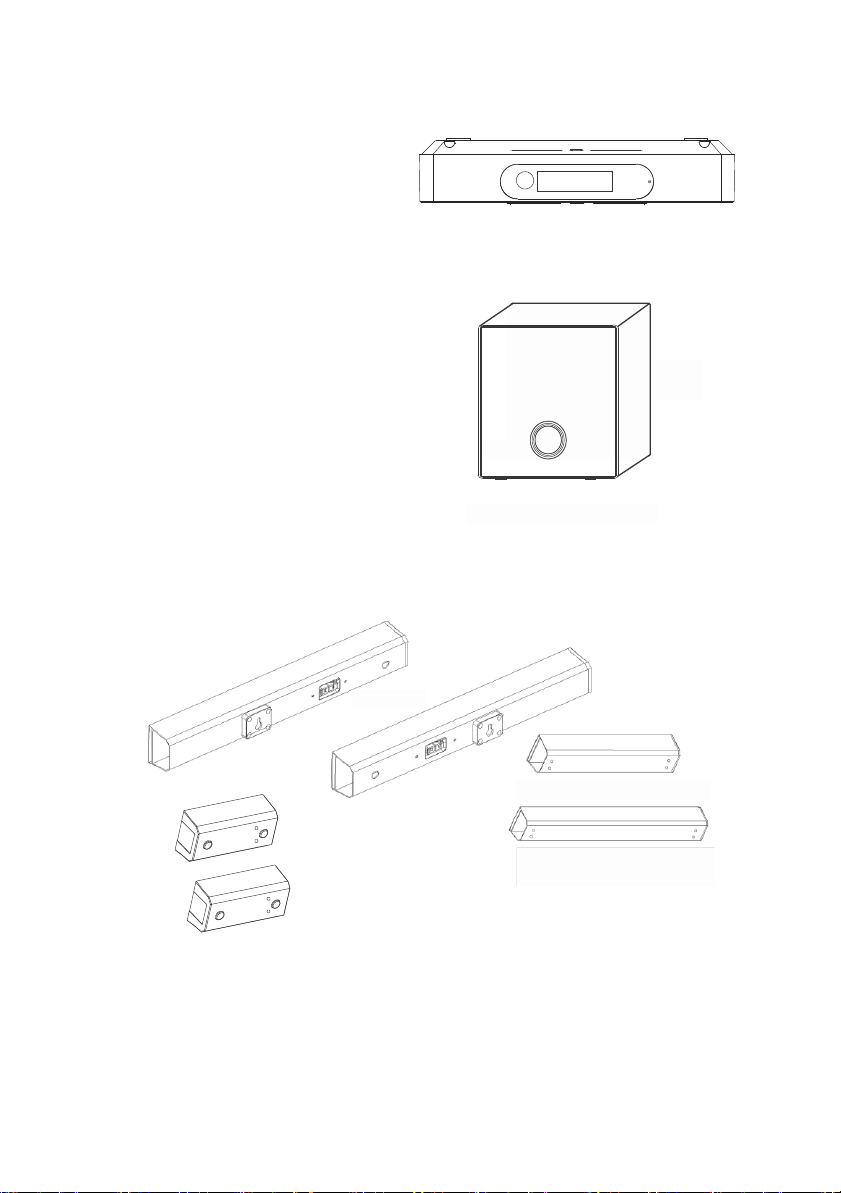
B. Parts
1. Main player
2. Subwoofer
3. Speakers
4. Extension tube (200mm)
5. Extension tube (250mm)
6. Connectors
Included:
• Power cable x 1
• Power adaptor x 1
• Speaker cable x 2
• Audio cable x 1
• User Manual
• Remote control x 1
• Screws x 4
6
1
2
3
4
5
Page 6

5
C. Outlook and Controls
Panels
1. Power Supply Input
2. L/R Speakers Output
3. L/R Audio Input
4. Coaxial 1 and 2 Inputs
5. HDMI-Out ARC
6. Optical Input
7. HDMI 1 and 2 Inputs
8. USB Port
9. Remote Control Sensor
10. Display
11. Play/Pause
12. Previous/Next
13. Standby
14. Volume +/-
15. Mode
16. Indicator Light
17. Subwoofer Pairing Button
18. Power On/Off
19. Power Supply Input
13 15
11
12
14
2 3 4 5 6 7
1
8
9
10
18
16
19
17
Page 7

6
Remote
1. Mute
2. HDMI 1
3. Previous
4. USB
5. Tone -
6. Tone
7. Optical
8. Coaxial 1
9. Standby
10. Bluetooth
11. HDMI 2
1
12. Volume +
13. Play/Pause
14. Next
15. Volume -
16. DPS
17. Tune +
18. AUX
19. Coaxial 2
10
9
2
3
11
13
12
14
4
5
6
7 18
8
15
17
16
19
Page 8

7
V鋘sterh鰃talare
D. Assembly
Follow the below pictures to assemble the Soundbar system.
Be sure all the connections are firmly joint.
Picture 1, simple connection
Left speaker
1. Follow Picture 1 to assemble the left and right Speakers with 1
Connector.
A basic connection:
Use one connector to connect with speakers. Press the buttons
when insert or pull open the L/R Speakers from connector.
Picture 2, full connection
Left speaker
Connector
2. Follow Picture 2 to assemble the Speakers with 2 Connectors and
Extension tube.
A full connection:
Use the 200mm Extension tube or 250mm Extension tube to connect
with the speakers and connectors.
Press the buttons when insert or pull open the L/R Speakers and
connectors. Press the buttons when insert or pull open the L/R
Speakers from the connectors and fix the nails into the holes to firmly
connect the parts. (You can only use one Extension tube at a time)
Connector
Extension tube
Screws
Screws
Right speaker
Right speaker
Connector
Page 9

8
E. Placing methods
Method 1:
Place the Soundbar on a table. Please try to adjust the height with
television.
Method 2:
Place the Soundbar on the wall. Please try to adjust the height with
television. Choose one of the connections from Picture 1 and Picture 2
and then hit the nails on wall and hold the Soundbar on the nails as
Picture 3.
Caution:
· Ensure the installation location is strong enough to support the
Soundbar.
· Check the wall if it is available to hit the nails and firm enough to
hold the Soundbar.
· Keep the machine away from wet, dust, smoke, stream, heat, or air
-conditioner to avoid fire, electric shock or etc danger happen.
· Make sure the screws not touch with metal objects or wires that
lead electric shocks.
· Remember to remove th e wall screws when yo u remove the
Soundbar from wall.
· Do not connect the AC Power until you have finished all the
connection rightly.
Picture 3
Page 10

→
F. System connections
Connect the unit with the audio device to enjoy a more vivid
entertainment.
Before connecting equipment, pay attention to the below Picture 4.
Each connection must be safe an d firm. Disconnect power cables until
finish all the connections.
Important notice of Subwoofer:
• The Subwoofer launch the wireless signals to connect with the
Main player in the range of 10M without obstructions and the best
performance should be in the range of 1.5M by considering the
obstacles in home.
• The Subwoofer searches the Main player connects with it
automatically.
• If there is another machine of stronger signals in the search range,
press the PAIR button on the rear panel of Subwoofer, and connect
the Main player.
Picture 4
9
Page 11

G. Basic operation
Standby
Press the STANDBY button on the remote control or on front panel of
Main player to switch on the unit, or switch to the standby mode.
Mode Selection
Press the Bluetooth, HDMI1, HDMI2, USB, OPT, COAX1, COAX2,
or AUX button on the remote control or press the SOURCE button on
the top panel to ente r the desired mode.
Volume
Press the VOLUME+/- buttons to adjust the volume level.
DSP
Press the DSP button on the remote control to select the different
music categories: Jazz, Rock, Classic, Pop, Vocal, Dance, Party
and off.
Tone
Press the TONE to select treble or Subwoofer bass sound effect level,
then press -/+ button to adjust.
Play/pause(For USB/Bluetooth music playing only)
Press the PLAY/PAUSE button to pause the playback, press again to
resume.
Previous/Next(For USB/Bluetooth music playing only)
Press the PREVIOUS or NEXT button to skip to the previous or
next track.
Mute
Press the MUTE button to mute the sound, press again to resume.
10
Page 12

H. Functions operation
HDMI Function:
1. To use HDMI music with Soundbar system, please select the
corresponding cables to connect the unit to TV, DVD or other
devices.
2. Connect the HDMI cable to the HDMI 1 or HDMI 2 jack to the HDMI
OUT jack on the other device.
HDMI Audio Return Channel (ARC):
Check if your TV supports the HDMI 1.4 ARC function and make sure
it is enabled.
1. Use an HDMI 1.4 cable to connect the HDMI OUT jack to the HDMI
IN jack on your TV.
2. Press the HDMI 1 or HDM I 2 button on the remote control to enter
the HDMI mode. Or press the Mode button on the front panel to
switch to HDMI 1 or HDMI 2 mode.
3. The Soundbar will detect the ARC signal and starts playing
automatically.
Bluetooth Function:
a. Pairing:
1. Press the BLUETOOTH button on the remote control to enter the
Bluetooth mode. Or press the Mode button on the front panel to
switch to Bluetooth mode.
2. The indicator light flashes in blue.
3. Turn on the Bluetooth function on your device (e.g. mobile phone).
4. Place your device in Bluetooth search mode and it will search for
this unit.
5. Select SB-0160 from the list of found devices on the device.
6. Select OK or YES to pair the unit with your phone or music device.
7. (For some devices) If prompted, enter the password 0000.
8. When successfully paired with your device, the indicator light will
be lit steadily.
b. Playback operation:
1. The Bluetooth playback is controlled by your device and buttons on
the remote control.
2. Please refer to Basic operation for more detailed operations.
c.To disconnect and pair with another device:
1. Turn off the Bluetooth function on your device to disconnect the
device. The unit will enter the Bluetooth pairing status automatically.
11
Page 13

2. In the paired status, follow the steps 2-5 of Pairing section to
connect with another device automatically.
USB Playback:
1. Insert the USB device to the USB port on the rear panel of the unit.
2. Press the USB button on the remote control to enter the USB mode.
Or press the Mode button on the front panel to switch to USB mode.
3. The unit will automatically detect the USB drive and start playing
the files when it finds the USB drive.
4. Please refer to Basic operation for more detailed operations.
Note:
• USB-extension cable should have a maximum length of 0.5m.
• Depending on the amount of data and media speed, it may take
longer for the system to read the contents of the media device. In
some cases, reading time may be as long as 60 seconds. This is
not a malfunction.
• The supported format for USB play is MP3.
• Eve n when the files are in a supported format, some may not play
or display depending on the contents.
• The unit supports the USB device of capacity on or below 32GB.
• The unit supports maximum 128 folders in the USB device.
• This device has been developed in line with the latest technical
advances in the USB field. The wide range of different USB storage
devices of all types which are currently on the market, unfortunately
do not allow us to guarantee full compatibility with all USB storage
devices. For this reason, in rare cases there may be problems in
playing back files from USB storage devices. This is not a
malfunction of the device.
12
Page 14

I. Troubleshooting
Problem
Possible cause
Solution
Power supply
does not work.
Power plug is not fully
connected in the power
socket.
Fully insert the power plug
into the power socket.
Remote control
does not work.
The batteries are empty.
The remote is not aimed
at the sensor.
Replace the batteries with
new ones.
Aim the control to the
sensor.
Play is
unavailable.
No disc inserted.
Disc incorrectly inserted.
The disc does not fit this
device.
Insert the disc again.
Re-insert the disc.
Only use discs that work.
No sound from
speakers.
Audio cable is not
connected to PC.
Connect all the cables
correctly.
Discontinuous
The disc is not clean.
Disc is scratched.
Clean disc.
Change disc.
The Subwoofer
does not work.
The Subwoofer has lost
connection with the main
unit.
Press the Subwoofer
Pairing button on the back
panel of the Subwoofer.
13
Page 15

J. Specification
Power Supply
Subwoofer: AC220-240V ~ 50Hz
Main player: DC 16V, 2.3A (Included)
Output Power
20W x2 + 60W (Subwoofer)
Inputs
USB, RCA (Left, Right) Audio,
COAXIAL x2, Optical, HDMI x2
Output
HDMI (ARC)
Remote Control Batteries
2 x UM4/AAA/LR03 size 1.5V
Bluetooth Specification
Version: V2.1+EDR
Profile: A2DP, AVRCP
Operating Conditions
Temperature: 5°C – 35°C
Installation: On a flat horizontal surface
Dimension
Soundbar:950mm (L) x 54mm (D) x 42mm (H)
Box:230mm(L) x170mm (D) x40mm (H)
Subwoofer:180mm (L) x 350mm (D) x352mm (H)
Weight
8.6kg (Approximate)
Power supply adaptor (For EU only)
Manufacturer: Shenzhen Qi Xin Electronics Co., Ltd.
Model Number: QX30WH160230FG
Use only power supplies listed in the user instructions.
K. Disclaimer
Updates to Firmware and/or hardware components are made regularly.
Therefore some of the instruction, specifications and pictures in this
documentation may differ slightly from your particular situation. All
items described in this guide for illustration purposes only and may
not apply to particular situation. No legal right or entitlements may be
obtained from the description made in this manual.
14
Page 16

L. Service and Support
For information: www.lenco.com
Lenco offers service and warranty in accordance to European law,
which means that in case of repairs (both during and after the warranty
period) you should contact your local dealer.
Important note: It is not possible to send products that need repairs
to Lenc o directly.
Important note: If this unit is opened or accessed by a non-official
service center in any way, the warranty expires.
This device is not suitable for professional use. In case of professional
use, all warranty obligations of the manufacturer will be voided.
15
Page 17

M. Recycling
N. CE Marking
This symbol indicates that the relevant electrical
product or battery should not be disposed of as
general household waste in Europe. To ensure the
correct waste treatment of the product and battery,
please dispose them in accordance to any applicable
local laws of requirement for disposal of electrical
equipment or batteries. In so doing, you will help to
conserve natural resources and improve standards
of environmental protection in treatment and disposal
of electrical waste (Waste Electrical and Electronic
Equipment Directive).
Products with the CE marking comply with the EMC
Directive (2004/108/EC) and the Low Voltage
Directive (2006/95/EC) issued by the Commission
of the European Community.
Hereby, ST L Group BV, Ankerkade 20 NL 5928 PL Venlo, declares that
this product is in compliance with the essential requirements and other
relevant provisions of Directive 1999/5/EC.
The declaration of conformity may be consulted at
https://lencosupport.zendesk.com/forums/22413161-CE-Documents.
This product operates at 2400 - 2483.5 MHz and is designated only to
be used inside a normal household environment. This product is
suited for this purpose within all EU counties.
® All rights reserved.
16
 Loading...