

Page 1

DELUXE ALARM CLOCK
STEREO RADIO
COMPACT DISC PLAYER
INSTRUCTION MANUAL
Before operating, please read all these instructions thoroughly
Page 2

1
INTRODUCTION
Thank you for purchasing our product. You now possess a stylishly designed quality deluxe stereo
Compact Disc Player/Alarm Clock Radio.
Used carefully and in accordance with the instructions set out below your stereo Compact Disc
Player/Alarm Clock Radio should give you many years of trouble free service.
Please read
the instructions carefully to obtain the best results from your purchase.
THE PROPER USE OF THIS UNIT
To ensure proper and safe use of this unit, please pay your special attention to these DOs &
DON'Ts.
This unit has been designed and manufactured to meet the highest International standards, but,
like any electrical apparatus, care must be taken if best results and safety are to be assured.
D
O read the operating instructions carefully before you attempt to use this unit.
D
O Ensure that all electrical conne
ctions, including the mains plug and extension leads
used, are properly made and in accordance with the manufacturers instructions.
DON'T operate this unit if you have any doubt about it working normally, or if it is damaged in any
way; disconnect from
the AC Mains and consult a qualified engineer.
DO always ask the advice of a qualified engineer if you are ever in doubt about the operation or
safety of this unit. He/She is the best person to advise you.
D
ON'T expose this unit to rain or moisture to pre
vent fire or electric shock hazards.
DON'T continue to operate this unit if you have any doubt about it working normally, or it is
damaged in any way, withdraw the mains plug and consult a qualified engineer.
DON'T remove any fixed cover unless you are qualified to do so, and even then, disconnect from
AC mains before you start.
DON'T obstruct any of the ventilation slots in this equipment, or stand it close to curtains or on soft
furnishings such as carpets. Obstructing these ventilation slots may cause overheating and
shorten the life of the unit.
ABOVE ALL
Never let children push anything into holes or slots in the cabinet or casing this could result in an
electric shock! Never guess or take a chance with this unit it is better to be safe than sorry!
CAUTION:
THIS APPARATUS SHOULD NOT BE EXPOSED TO DRIPPING OR
SPLASHING!!!
Page 3
2
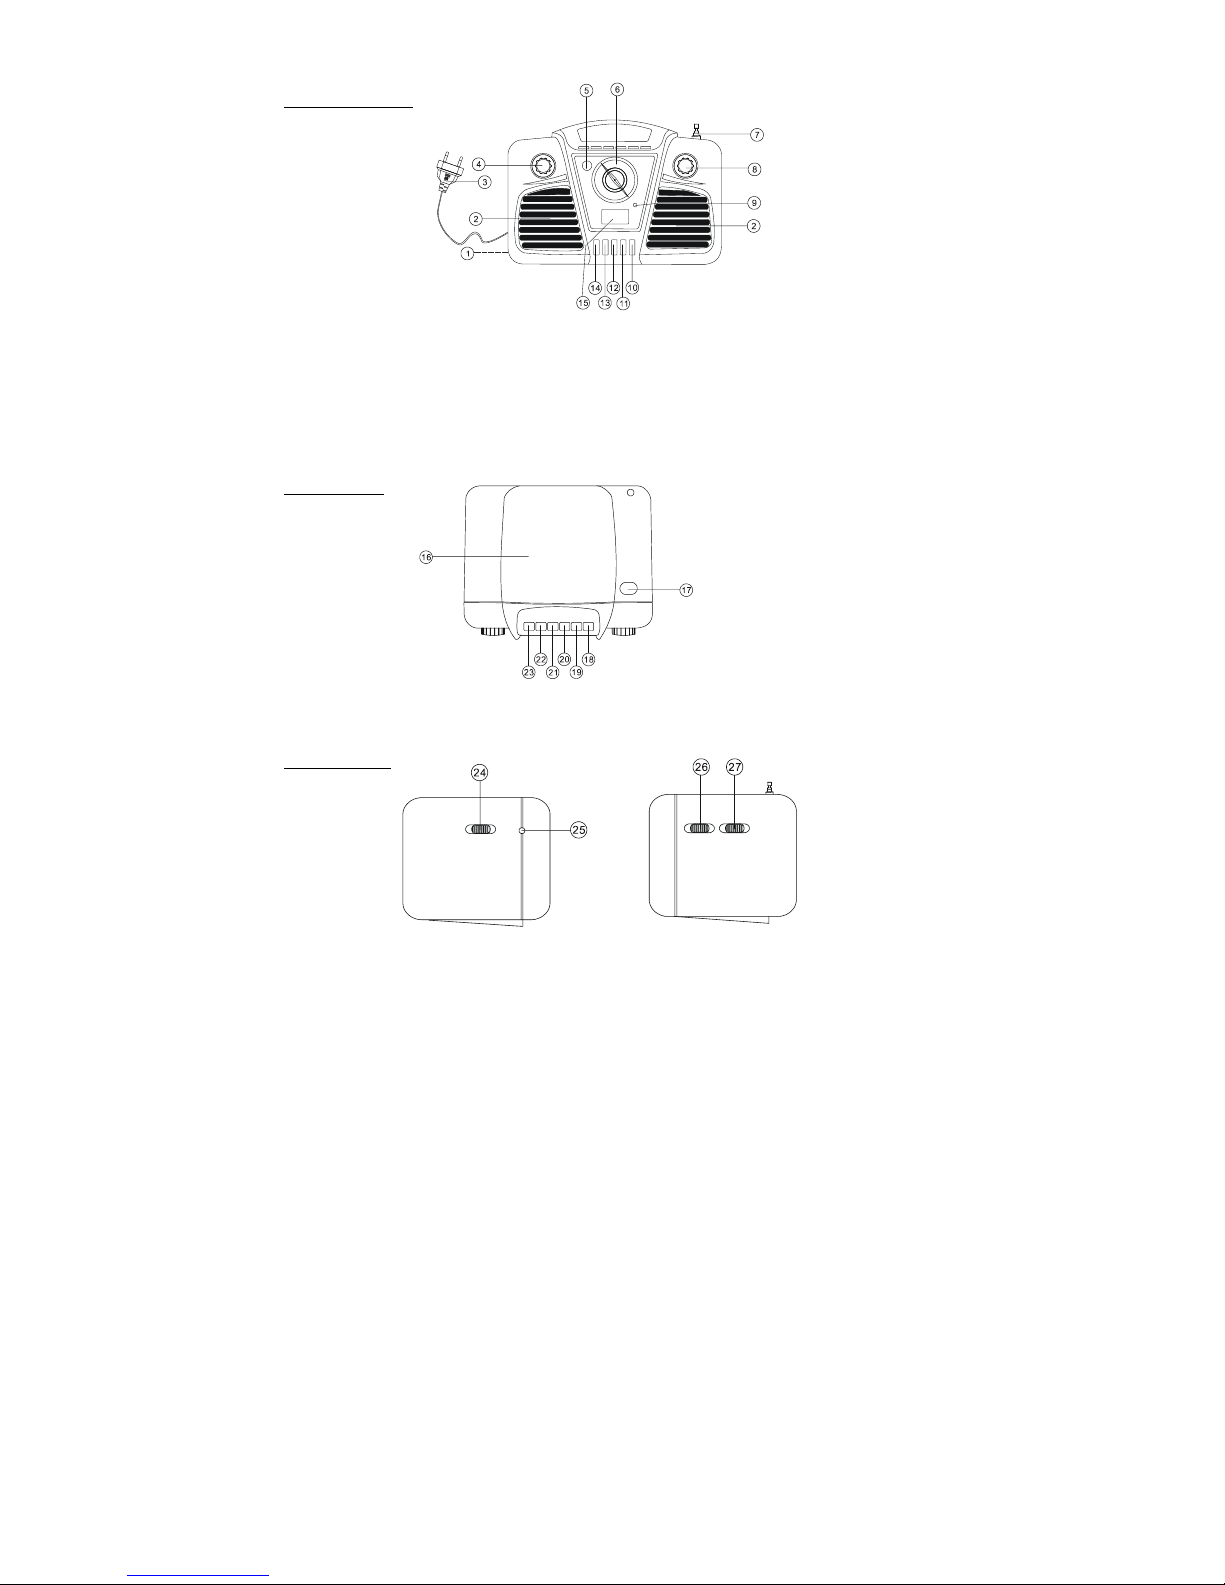
IDENTIFICATION OF CONTROLS
FRONT VIEW
1.
AC VOLTAGE SELECTOR(optional)
8.
TUNING CONTROL
2.
SPEAKER
9 FM STEREO INDICATOR
3.
AC P
OWER CORD
10.
MINUTE SET BUTTON
4.
VOLUME CONTROL
11.
HOUR SET BUTTON
5.
SNOOZE BUTTON
12.
TIME SET BUTTON
6. FREQUENCY DISPLAY 13.
ALARM SET/OFF BUTTON
7. FM TELESCOPIC ANTENNA 14.
SLEEP BUTTON
15. LCD DISPLAY
TOP
VIEW
16. DISC
COMPARTMENT
20. CD SKIP FORWARD BUTTON
17. DISC DOOR OPEN BUTTON
21. CD SKIP BACKWARD BUTTON
18. CD REPEAT BUTTON
22. CD PLAY/PAUSE BUTTON
19. CD PROGRAM BUTTON
23. CD STOP BUTTON
SIDE VIEW
24. CD/RADIO/BUZZER FUNCTION SWITCH
26.
BAND SELECTOR
25. HEADPHONE SOCKET
27. AUTO/ON/OFF SWITCH
Page 4

3
POWER SOURCES
MAINS POWER
Plug the AC MAINS POWER PLUG into the standard household AC receptacle. The Clock LCD
display will show 12:00.
Warning:
Before insert the MAINS POWER PLUG into the household receptacle, please make
sure the AC VOLTAGE SELECTOR
MUST
be set to your local voltage. (optional)
TIME SETTING
After the unit is connected to power source, depress the TIME SET BUTTON with one hand, and
press the HOUR SET BUTTON and the MINUTE SET BUTTON to correct hour and minute with
another hand. Release the buttons when time setting finished.
You may also press and hold the HOUR SET BUTTON and the MINUTE SET BUTTON to skip to
correct time continuously.
ALARM TIME SETTING
Depress the ALARM SET BUTTON with one hand, appears on the LCD display, then press
the HOUR SET BUTTON to desired hour; Press the MINUTE SET BUTTON to desired minutes
with another hand. Release the buttons when alarm time setting finished.
To check your alarm time, pre
ss and hold the ALARM SET BUTTON.
ALARM SETTING
Set the desired alarm time as ALARM TIME SETTING described, slide the ON/OFF/AUTO switch
to On or AUTO, set the CD/RADIO/BUZZER function switch to BUZZER.
To the preset alarm time, alarm(buzz) will sound aut
omatically. To pause the alarm temporarily and
sleep another 9 minutes, press the SNOOZE BUTTON, the buzz stops and resume in 9 minutes.
To stop the alarm, slide the ON/OFF/AUTO to OFF.
WAKE UP TO MUSIC (CD or radio)
1. Set the alarm time as ALARM TIME SE
TTING described.
2. Slide the CD/RADIO/BUZZER function switch to CD or RADIO.
3. Tune to desired broadcasting programme follow steps of RADIO OPERATION. Or start CD
playing follow steps in CD OPERATION.
4. Set the ON/OFF/AUTO switch to AUTO position.
To
the pre-set alarm time, RADIO or CD turns on automatically. To pause the music temporarily and
sleep another 9 minutes, press the SNOOZE BUTTON.
5. Set the ON/OFF/AUTO to OFF to terminate playing.
SLEEP (AUTO-STOP) FUNCTION
To switch off the CD or RADIO p
laying automatically in 59 minutes or 1 hour and 59 minutes before
you fall asleep, start RADIO or CD playback, depress the SLEEP and TIME SET BUTTONS
simultaneously, press the HOUR SET BUTTON to set sleep time to 59 minutes or 1 hour and 59
minutes, then
slide the POWER ON/OFF-AUTO selector to AUTO.
After 59 minutes or 1 hour and 59 minutes, the playback will stop automatically.
To resume playing, press SLEEP BUTTON once again.
Page 5

4
RADIO OPERATION
1. Slide the ON/OFF/AUTO to ON.
2. Rotate the FUNCTION switch to the
RADIO position.
3. Set the BAND SELECTOR to the desired band.
4. Tune in to the desired station by rotating the TUNING CONTROL.
5. Adjust the volume level via the VOLUME CONTROL.
6.
Extend the FM TELESCOPIC ANTENNA to its full length or adjust the direction and position of
the whole unit to obtain the best possible radio reception.
HEADPHONE SOCKET
This is a facility specially provided for private listening. Connect a 3.5mm Headphone Plug of your
Headphones/Earphones (note: not supplied) into the HEADPHONE SOCKET, and adjust the
VOLUME CONTROL to a desired level. During the use of headphones/earphones, the built-
in
speakers are automatically disconnected.
CD OPERATION
HANDLING A DISC
Although built to withstand a certain amount of the effects from dust, soil and scratches, discs
should be treated with the care normally accorded to conventional analog discs (records). Always
protect a disc against scratches, soil and dust etc. We recommend that during non-use periods the
discs should be stored in the original case.
Bear in mind the following points, since any dirt, scratches or
warping of the disc can cause broken or intermittent sound and
also noise. When holding the discs, take care not to touch the
playing surface.
Store the discs in their cases. Return them to their cases with the
label surface facing up and push down lightly on the label surface.
Do not place discs in the following locations:
Near a heating device or a place where the temperature is high or
in dusty areas.
Do not write on the label surface using
a ballpoint pen and do not
stick labels on the CD.
Wipe away any fingerprints or dust on the playing surface of a
disc using a soft cloth.
Bear in mind the following points:
-
Always wipe from the inside toward the outside of the disc.
-
Never in a circular mo
tion.
- Do not use conventional record cleaners, anti-static agents,
benzene, thinner or other solvents.
Note:
CDs which can be played on this unit must have the following mark on them:
This unit is compatible with CD-Rs/CD-RWs based on audio data.
Page 6

5
USING
THE CD
LOADING A DISC
1. Set the FUNCTION switch to CD position.
2. Open the CD door by pressing CD DOOR OPEN button.
3. Place an audio CD into the tray with the label side facing up.
4. Close the CD door.
The total number of tracks will appear in the display after 5
seconds.
5.
To remove the CD, press OPEN to open CD compartment lid, grasp the CD by its edges, and
carefully take it out.
Note:
To ensure good system performance; wait until the disc tray completely reads the disc before
proceeding.
If no disc loaded into
the compartment, or the disc is unreadable, the display will show 00.
PLAYING A DISC
1. Press PLAY/PAUSE button to start playback.
The playback starts from track 1,
appears in the display.
To interrupt playback, press PLAY/PAUSE button.
flashes on and off in the display.
To resume playback, press PLAY/PAUSE button again, PLAY become steady on the display.
2. To stop playback, press STOP button, The total number of tracks appears in the display.
SELECTING A DESIRED TRACK/PASSAGE
To
select a desired track
Press SKIP FORWARD(NEXT)/BACKWARD button repeatedly in stop mode or during playing until
the desired track appears on the display.
Press PLAY/PAUSE button to start play.
To search for a particular passage during playback( track sc
anning at high speed)
Press and hold SKIP BACKWARD/FORWARD button to scan the current playing track at high
speed until desired point(passage), then release the button.
Playback will start again from this point.
PROGRAM TRACKS
Program tracks of disc are
possible when playback is stopped. Up to 20 tracks can be stored in the
memory in any order.
1.
In stop mode, press PROG button to enter program setting, the flashes on and off in
the display.
2. Press FORWARD SKIP button to select the first d
esired track to be programmed.
3. Press PROG button to enter. The display shows
02
flashing.
4. Repeat steps 2 & 3 to store other desired tracks until all tracks programmed.
5.
Press PLAY/PAUSE button to start playback from the first programmed track. The display will
show
6. Press STOP button to stop program playback.
Page 7

6
To Erase the Memory(Program)
To clear the program, you may have two ways:
1. Press STOP button when the disc stopped, or
2. Open the CD compartment lid, program will be erased.
REPEAT
You can pla
y one track or all tracks on the disc repeatedly.
To Repeat a Single Track
1. Press REPEAT button once in play,
"REPEAT"
shows flashing in the display. The current track
will be played over and over again till you press STOP button.
2. To cancel repeat
play, press REPEAT button twice.
"REPEAT"
goes off from display.
To repeat all the Tracks
1. Press REPEAT button twice in play,
"REPEAT"
shows steady in the display, all tracks on the
disc will be played over and over again till you press STOP button.
2. To cancel repeat play, press REPEAT button once.
"REPEAT"
goes off from display.
Note: Repeat function also can be done in stop mode.
SPECIFICATIONS
Power Requirement ................................................. AC230V
Power consumption ........
....................................... AC 27 Watts
Operation temperature.......................................... .
+5 o C - +35 o C
RECEIVER SECTION
Receiving Bands................................................... .
AM/FM
Tuning Range ...........
............................................. AM 530 - 1600 KHz
FM 88 - 108 MHz
COMPACT DISC SECTION
Optical Pickup....................................................... .3-
Beam Laser
Frequency Response.....................................
........ 100Hz - 16KH z
AUDIO SECTION
Power output ........................................................ Maximum 4 Wattsx2
Speaker Impedance.............................................. .
4 Ohm x 2
Headphone Impedance ..........................
............... 4 ~ 32 Ohms
ACCESSORIES
Instruction Booklet.....................................................1
Specifications are subject to change for performance improvement without notice.
 Loading...