

Page 1
Model PMX-350
User manual-High power DJ mixer system with Bluetooth, USB, FM and party lights
Gebruikershandleiding-Krachtig DJ-mixersysteem met Bluetooth USB FM en discolichten
Bedienungsanleitung Hochleistungs-DJ-Mixersystem mit Bluetooth, USB, UKW und Partylicht
Mode d’emploi - Système de mixage DJ puissant avec Bluetooth, USB, FM et éclairages de fête
Manual de usuario –Sistema de mezclador DJ de alta potencia con Bluetooth, USB, FM y luces
festivas
Page 2

2
Index
English.........................................................................................................................................................3
Nederlands..........................................................................................................................................................14
Deutsch................................................................................................................................................................25
Français...............................................................................................................................................................36
Español................................................................................................................................................................47
Page 3

3
English
PMX-350
CAUTION:
Usage of controls or adjustments or performance of procedures other than those specified herein may
resulte in hazardous radiation exposure.
This unit should not be adjusted or repaired by anyone except qualified service personnel.
PRECAUTIONS BEFORE USE
KEEP THESE INSTRUCTIONS IN MIND:
1. Do not use this device near water.
2. Clean only with a slightly damp cloth.
3. Do not cover or block any ventilation openings. When placing the device on a shelf, leave 5 cm (2”) free
space around the whole device.
4. Install in accordance with the supplied user manual.
5. Don’t step on or pinch the power adaptor. Be very careful, particularly near the plugs and the cable’s
exit point. Do not place heavy items on the power adaptor, which may damage it. Keep the entire
device out of children’s reach! When playing with the power cable, they can seriously injure
themselves.
6. Unplug this device during lightning storms or when unused for a long period.
7. Keep the device away from heat sources such as radiators, heaters, stoves, candles and other heatgenerating products.
8. Avoid using the device near strong magnetic fields.
9. Electrostatic discharge can disturb normal usage of this device. If so, simply reset and restart the device
following the instruction manual. During file transmission, please handle with care and operate in a
static-free environment.
10. Warning! Never insert an object into the product through the vents or openings. High voltage flows
through the product and inserting an object can cause electric shock and/or short circuit internal parts.
For the same reason, do not spill water or liquid on the product.
11. Do not use in wet or moist areas such as bathrooms, steamy kitchens or near swimming pools.
12. Do not use this device when condensation may occur.
13. Although this device is manufactured with the utmost care and checked several times before leaving
the factory, it is still possible that problems may occur, as with all electrical appliances. If you notice
smoke, an excessive build-up of heat or any other unexpected phenomena, you should disconnect the
plug from the main power socket immediately.
14. This device must be well ventilated at all time!
15. This device must operate on a power source as specified on the specification label. If you are not sure
of the type of power supply used in your home, consult your dealer or local power company.
16. The socket outlet must be installed near the equipment and must be easily accessible.
17. Do not overload ac outlets or extension cords. Overloading can cause fire or electric shock.
18. Devices with class 1 construction should be connected to a main socket outlet with a protective
earthed connection.
19. Devices with class 2 construction do not require a earthed connection.
20. Keep away from rodents. Rodents enjoy biting on power cords.
21. Always hold the plug when pulling it out of the main supply socket. Do not pull the power cord. This
can cause a short circuit.
22. Avoid placing the device on any surfaces that may be subject to vibrations or shocks.
23. To protect the device during a thunderstorm, unplug the ac power adaptor.
24. When the device is not in use for long periods, unplug the ac power adaptor for safety reasons.
25. To clean the device, use a soft dry cloth. Do not use solvents or petrol based fluids. To remove severe
stains, you may use a damp cloth with dilute detergent.
26. The supplier is not responsible for damage or lost data caused by malfunction, misuse, modification of
the device or battery replacement.
Page 4

4
27. Do not interrupt the connection when the device is formatting or transferring files. Otherwise, data
may be corrupted or lost.
28. The usb memory stick should be plugged into the unit directly. Don’t use an usb extension cable
because it can cause interference resulting in failing of data.
29. The apparatus shall not be exposed to dripping or splashing and make sure that no objects filled with
liquids, such as vases, are placed on or near the apparatus.
30. To completely disconnect the power input, the mains plug of the apparatus shall be disconnected from
the mains, as the disconnect device is the mains plug of apparatus.
31. The mains plug of the apparatus should not be obstructed or should be easily accessed during intended
use.
32. Battery shall not be exposed to excessive heat such as sunshine, fire or the like.
33. Minimum distance of 10cm around the apparatus is needed for sufficient ventilations.
34. The ventilation should not be impeded by covering the ventilation openings with items such as
newspapers, table-cloths, curtains etc.
35. No naked flame sources such as lighted candles should be placed on the apparatus.
36. Attention should be drawn to the environmental aspects of battery disposal.
37. The apparatus can only be used in moderate extremely cold or climates warm environments should be
avoided.
38. The rating label has been marked on the bottom panel of the apparatus.
39. This device is not intended for use by people (including children) with physical, sensory or mental
disabilities, or a lack of experience and knowledge, unless they’re under supervision or have received
instructions about the correct use of the device by the person who is responsible for their safety.
40. This product is intended for household use only and not for commercial or industrial use.
41. Make sure the unit is adjusted to a stable position. Damage caused by using this product in an unstable
position or by failure to follow any other warning or precaution contained within this user manual will
not be covered by warranty.
42. Never remove the casing of this apparatus.
43. Never place this apparatus on other electrical equipment.
44. Do not use or store this product in a place where it is subject to direct sunlight, heat, excessive dust or
vibration.
45. Do not clean this product with water or other liquids.
46. Do not block or cover the slots and holes in the product.
47. Do not push foreign objects into the slots or holes in the product.
48. Do not allow children access to plastic bags.
49. Please check that the voltage on the type plate of your appliance corresponds with your house
electricity supply (type plate is located on the back of the unit).
50. Protect the power cord from being walked on or pinched, particularly at plugs, convenience
receptacles, and the point where they exit from the apparatus.
51. Only use attachments/accessories specified by the manufacturer.
52. Refer all servicing to qualified service personnel. Servicing is required when the apparatus has been
damaged in any way, such as the power supply cord or the plug, when liquid has been spilled or objects
have fallen into the apparatus, when the apparatus has been exposed to rain or moisture, does not
operate normally, or has been dropped.
53. Do not use a damaged power cord or plug or a loose outlet. Doing so may result in fire or electric shock.
Warning: prolonged exposure to loud sounds from personal music players may lead to temporary or
permanent hearing loss.
INSTALLATION
• Unpack all parts and remove protective material.
• Do not connect the unit to the mains before checking the mains voltage and before all other
connections have been made.
• Do not cover any vents and make sure that there is a space of several centimeters around the unit
for ventilation.
Page 5

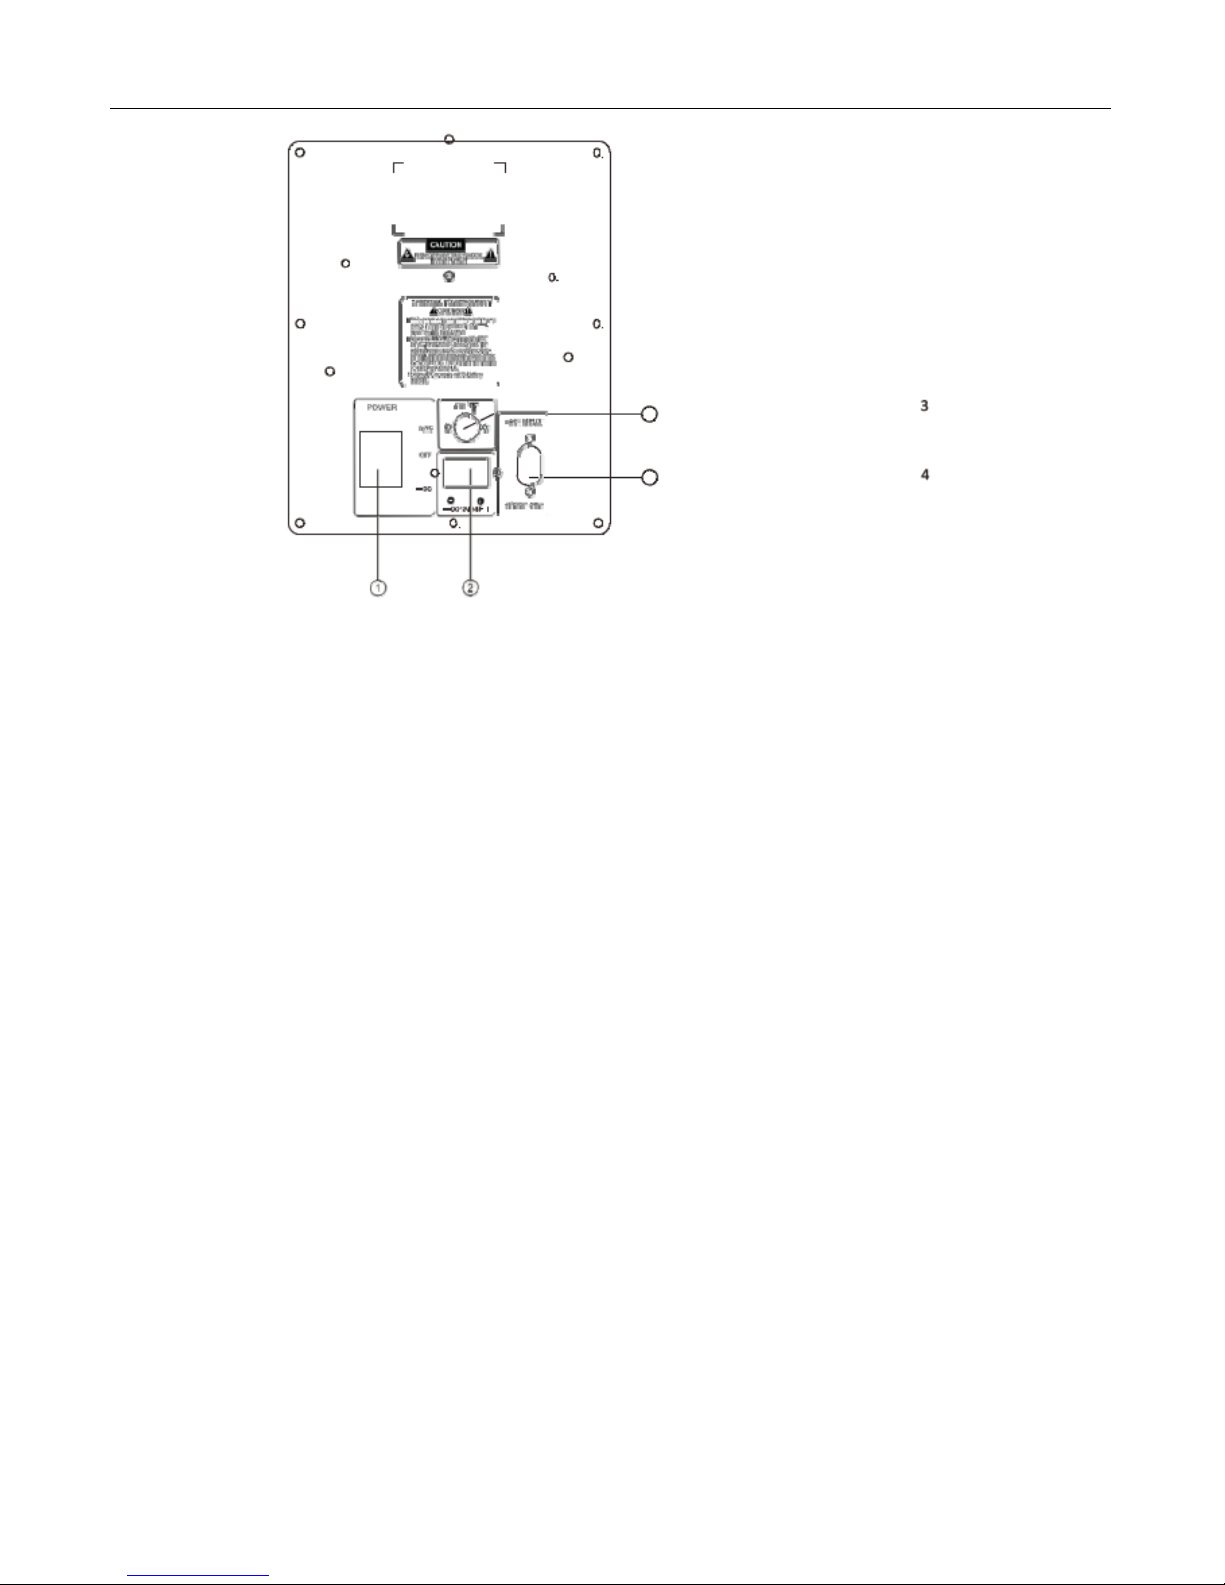
REAR PANEL
5
1. Power Switch
Switch modes DC INPUT, AC INPUT or off.
When switched to AC status, the speaker is working on 230V and Battery will be charged.
When switched to OFF, power is off with no battery charging.
When switched to DC, speaker is battery powered.
2. DC 12V INPUT
The speaker can be connected to the 12V DC battery of a car.
3. FM ANTENNA
4. AC INPUT AC 230V~, 50Hz
Page 6

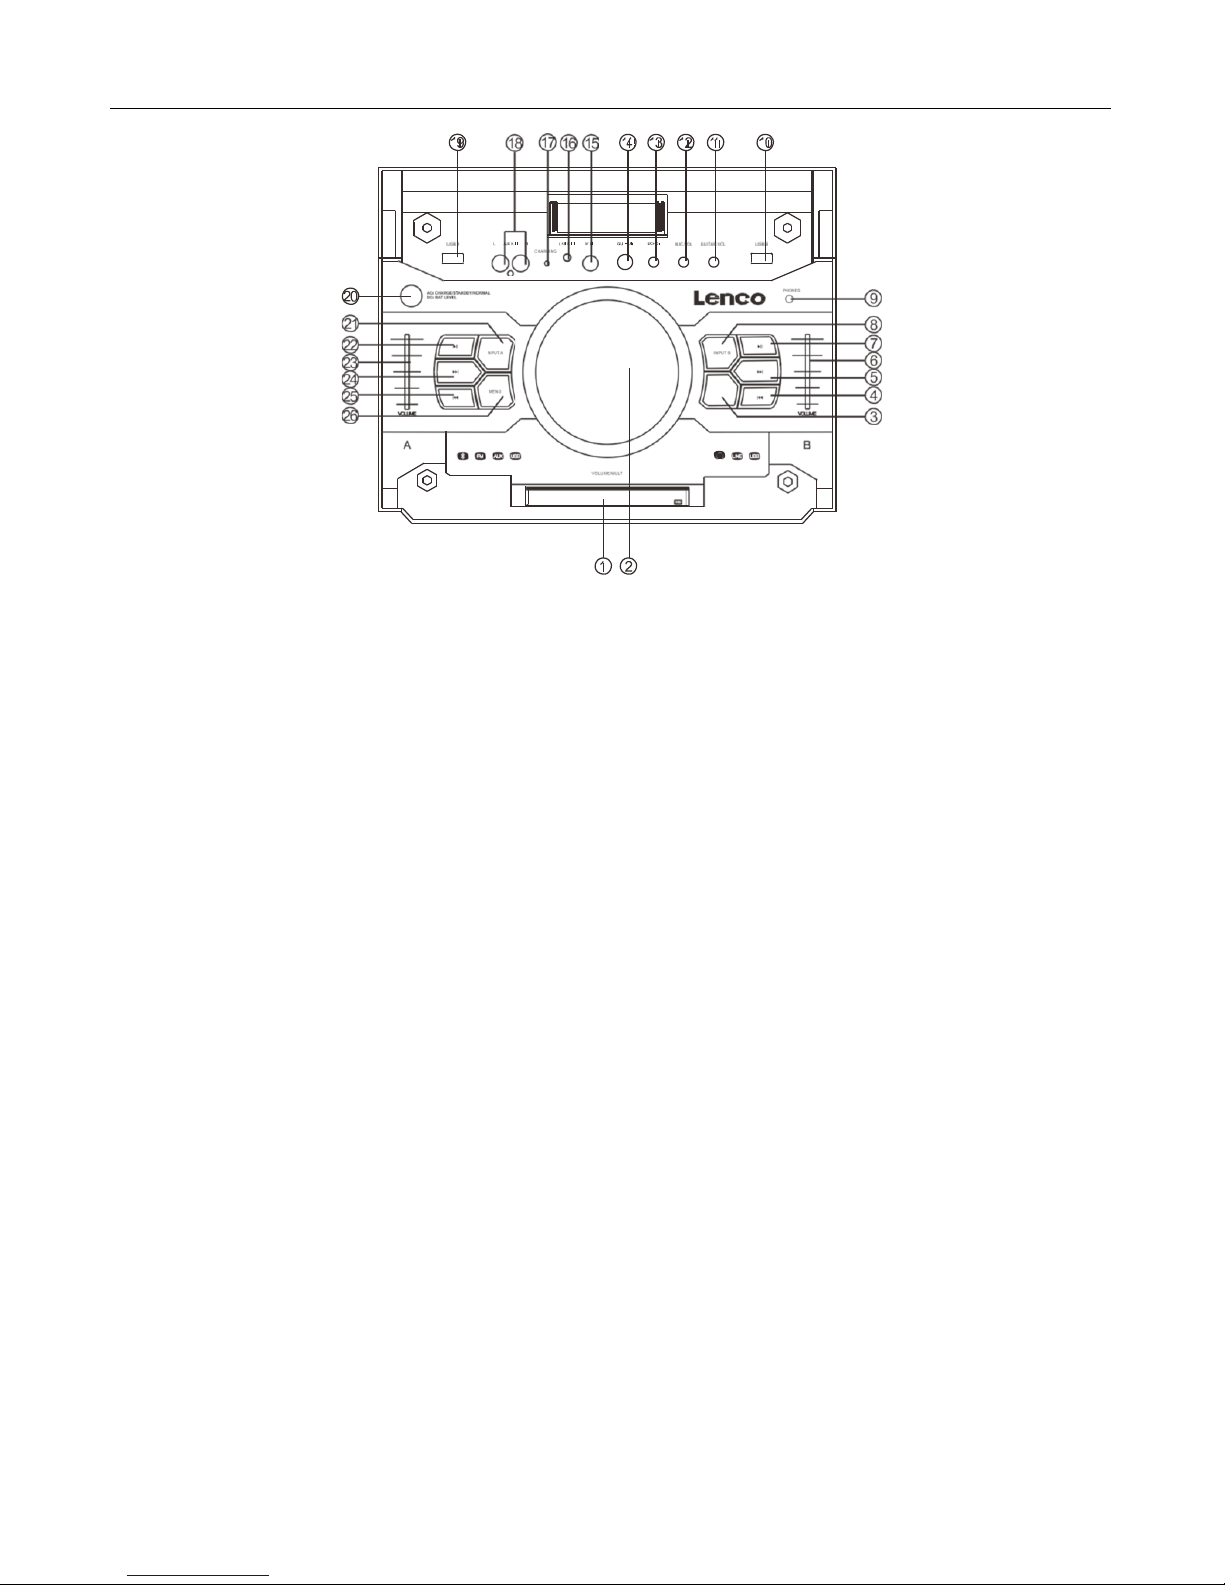
FRONT PANEL
6
1. LED DISPLAY
Display System parameter information, the left side of the display shows the INPUT A status, the
right side of the display shows the INPUT B status
2. VOLUME/MULTI/DJ EFFECT
Rotate the wheel to adjust the main volume, phones volume, treble, bass. Short press this key to
choose different music effect SCRATCH, REVERB, BEAT BOX, YEAH, BRING IT, GEYA, COME ON Long
press plays DRUMS effect.
3. PHONES MODE
Press this key to choose different EARPHONES mode, INPUT A, INPUT B, INPUT AB
4. INPUT B PREV
Press this key to choose previous music with USB B
5. INPUT B NEXT
Press this key to choose next music with USB B
6. INPUT B VOLUME
This is used to adjust the volume with INPUT B
7. INPUT B PLAY/PAUSE
Press this key to choose play/pause music with INPUT B
When playing usb, long press this key to change playtime count down or count up.
8. INPUT B MODE
Press this key to choose different INPUT B mode, LINE, USB B
9. EARPHONES INPUT JACK
10. USB B input jack
11. GUITAR VOLUME
Adjust the volume of the GUITAR
12. MIC VOLUME
Adjust the volume of the MICROPHONE
13. ECHO
Adjust the ECHO of the MIC input
14. GUITAR jack
15. MIC jack
16. LINE IN AUDIO INPUT JACK
Connect to LINE IN signal input jack.
Page 7

FRONT PANEL
7
17. CHARGING INDICATOR
When the battery is low, the charging light is red. When charging, the light is green
18. AUX AUDIO INPUT JACK
Connect to AUX signal input jack.
19. USB A input jack
20. On AC: CHARGE/STANDBY/NORMAL
A long Press on this key turns on or standby the unit. A short Press on this key turns on the unit to
CHARGE, STANDBY or NORMAL mode
On DC: BAT LEVEL
A Press on this key shows the current battery level.
21. INPUT A MODE
Press this key to choose different INPUT A mode, AUX A, BT A, FM, USB A
22. INPUT A PLAY/PAUSE
Press this key to choose play/pause music with INPUT A
When playing usb, long press this key change play time count down or count up.
23. INPUT A VOLUME
This is used to adjust the volume of INPUT A
24. INPUT A NEXT
Press this key to choose next music with USB A
25. INPUT A PREV
Press this key to choose previous music with INPUT USB A
26. MENU
This switch selects the main volume, bass, treble, x driver, light mode
Page 8

REMOTE CONTROL
8
1. LIGHT
2. STANDBY
3. NUMBER BUTTON
4. TUNING-
5. CHANNEL-
6. VOLUME+
7. X DRIVE
8. TREBLE+
9. VOLUME-
10. TREBLE-
11. AUX-A
12. USB-A
13. USB-A F.WARD
14. USB-A B.WARD
15. LINE
16. USB-B
17. USB-B F.WARD
18. USB-B B.WARD
19. MUTE
20. FM
21. AUTO
22. TUNING+
23. CHANNEL+
24. BT
25. DISCONNECT
26. BASS+
27. BASS-
28. INPUT-A REPEAT
29. INPUT-A PAUSE
30. INPUT-A PREVIOUS
31. INPUT-A NEXT
32. INPUT-B REPEAT
33. INPUT-B PAUSE
34. INPUT-B PREVIOUS
35. INPUT-B NEXT
REMOTE CONTROL OPERATION:
□ If the remote control conflicts with other devices, the operation will be affected.
□ Do not simultaneously press buttons on the unit and the remote control.
□ Avoid using two remote controls at the same me as this wiII cause a malfunction.
□ Use only UM-4 ‘AAA’ size batteries. Do not mix old batteries with new ones.
□ If the batteries Ieak, clean the remote control thoroughly before replacing batteries
□ Do not short two terminals of the batteries. Dispose old batteries in a suitable place.
EN
INFRARED REMOTE CONTROL RECEIVER
5m
INFRARED REMOTE CONTROL UNIT
EN
INFRARED REMOTE CONTROL RECEIVER
5m
INFRARED REMOTE CONTROL UNIT
Page 9

OPERATING
9
NORMAL FUNCTION
1. Select power switch on the backside of the speaker to AC or DC mode.
2. Select an audio source by pressing the INPUT A key on the front panel to display AUX A, BT A, FM,
USB A. Press the INPUT B key on the front panel to display LINE, USB B.
When unit is AC mode:
- Pressing standby button once, will activate charging mode, showing the battery charging status
on the blue led-display.
- Pressing standby button second time will activate the speaker and showing green charging
light.
- You can also select the standby mode, without charging the battery
When unit is DC mode:
- Pressing standby button shows the battery level on the blue led display
3. Rotate the VOLUME/MULTI/DJ EFFECT wheel on the control panel or the VOL+/- key on the remote
control to adjust the main volume. Then adjust the volume slider of INPUT A and use the right
volume slider to change the volume of INPUT B.
4. To adjust the bass, treble, X-drive, speaker lights and main volume, press the menu key to select
bass, treble, X-drive, speaker lights, then rotate the big VOLUME/MULTI/DJ EFFECT wheel.
5. PHONES OUTPUT selection. Press the PHONES MODE button on the control panel to display INPUT
A, INPUT B, or INPUT AB and adjust the volume of A,B or AB by rotating the multi DJ effect wheel.
6. Press the LIGHT button on the remote control or press the MENU button on the front panel until
speaker light mode is displayed, then rotate the VOLUME/MULTI/DJ EFFECT wheel to select to OFF,
R, G, B, RG, RB, GB, RGB, AUTO, DEMO light mode.
7. Press the MUTE key on the remote to mute, press it again to reset.
8. Press X DRIVE on the remote to turn on/off X-Bass effect.
SPEAKER LIGHT COLOR CONTROL OPTIONS
• R = red lights flash
• G = green lights flash
• B = blue lights flash
• RG = red and green lights flash
• RB = red and blue lights flash
• GB = green and blue lights flash
• RGB = red, green, and blue lights flash
• Auto = the various color combinations cycle through and flash.
• Demo = lights flash and change color as if they were responding to the beat of the music.
Page 10

OPERATING
10
TUNER APPLICATIONS
1. Before using the radio functions, you must adjust the antenna to obtain optimum reception.
Press the INPUT A key on the front panel or the FM key on the remote control, to select “FM”
function.
2. Press the AUTO key on the remote control or the play button of the INPUT A control panel.
The machine will scan radio channels from low- frequency to high-frequency by itself and stores the
channels found one by one.
3. Press the CH+/CH- key on the remote control to change radio presets that have been stored
previously.
4. Press or hold the TU+/TU- key on the remote control to adjust the radio frequency manually.
5. To select radio stations from the control panel, press and hold the next/prev buttons.
KARAOKE & GUITAR FUNCTION
1. The machine can auto detect whether a MICROPHONE or GUITAR is connected.
Please turn off the microphone volume with the MIC.VOL knob on the front panel and adjust the
volume gradually after inserting the microphone.
2. Adjust the ECHO knob on the front panel to change the microphone ECHO.
3. Adjust the GUITAR VOL knob on the front panel to change the guitar VOLUME.
Note: Do not touch the top of the microphone when singing in order to avoid howling effect.
Adjust the microphone volume gradually to avoid howling effect.
BLUETOOTH PAIRING AND CONNECT
• Turn off any Bluetooth devices previously paired (linked) with this unit.
• Turn on the Bluetooth feature on your phone or music player.
• Turn on and set this unit to Bluetooth mode. The flashing blue light “BT” on LED display indicates it is
in pairing mode.
• Set your phone or music player to search for Bluetooth devices.
• Select ‘PMX-350’ from search results on your phone or music player.
• Select OK or YES to pair this unit with your phone or music player.
• If protected, enter 0000 for passkey steady blue light indicates successful connection.
• Press the DISCONNECT key on the remote control to disconnect the Bluetooth.
Page 11
OPERATING
11
FUNCTION OF USB READER
USB interface
This unit has two USB jacks. Press the INPUT A key to select USB A, then you can insert a USB stick to
play music. Press the INPUT B key to select USB B, then you can insert another USB stick to play music.
Important: The USB port is intended for data transfer only, other devices cannot be used with this USB
connection. The use of USB extension cords is not recommended.
TIME DISPLAY
In USB mode, the display can show either the elapsed or the remaining time.
With long press of the play/pause key, you can select negative or positive display of the time.
CHARGING THE BATTERY
1. When in battery powered mode, the standby operation cannot be used.
2. The control panel has a charging light. When the battery is charged enough, the light is green.
When the battery is low, the system display prompts ‘LOW POWER’ and the light turns red.
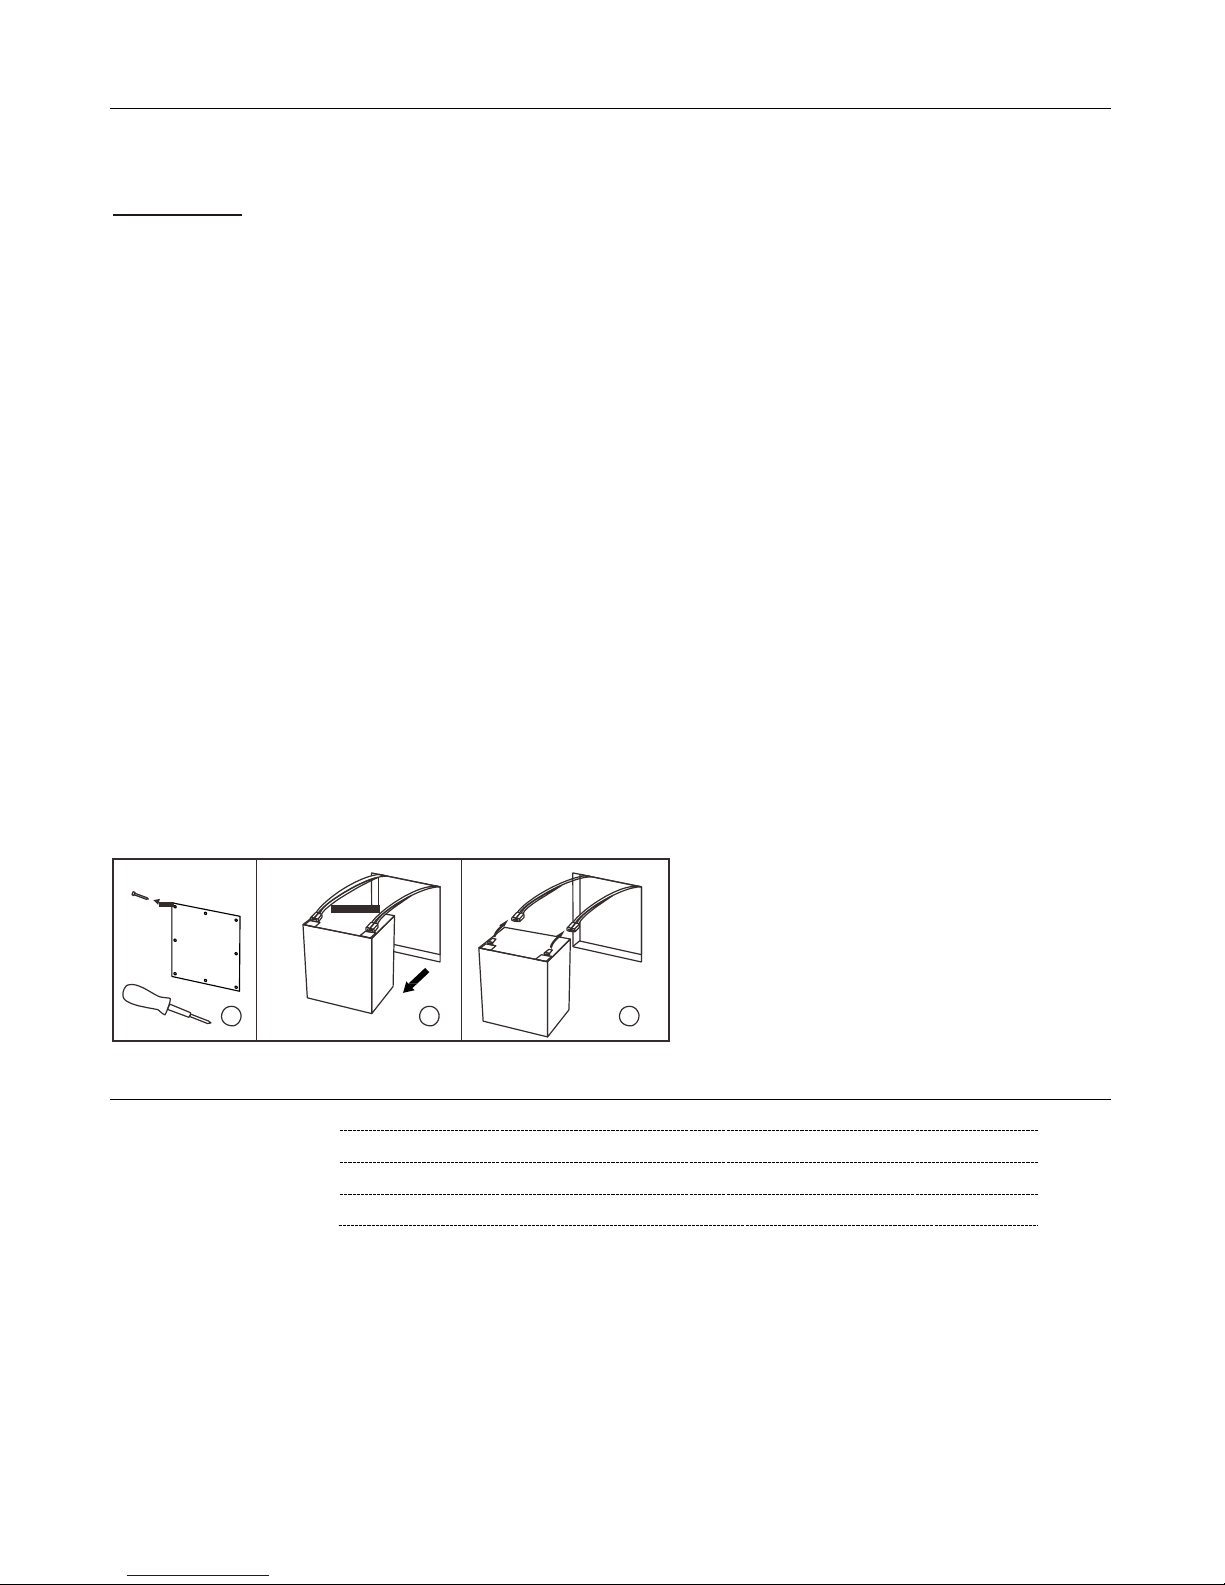
BATTERY DISASSEMBLY
1. Remove the screws on the rear panel.
2. Take out the battery.
3. Disconnect the battery
ACCESSORIES
Remote control
1 pc
Instruction Manual
1 pc
Wireless Microphone
1 pc
AC power cable
1 pc
Page 12

OPERATING
12
SPECIFICATION
Frequency Response
20Hz-20KHz
Power Source
230V~, 50Hz/12VDC
Power Consumption 120W
Battery
Lead/Acid 12VDC, 7 Ah
DC Playback time
~12hrs on 50% volume
Output power 320W (RMS)
Microphone
Wireless 863-865 MHz
Bluetooth
V4.2
FM radio 87.5-108 MHz
Unit Size (W x D x H)
43 x 28 x 115 cm
Tweeter size 1 x 1 inch
Woofer size 1 x 3 inch
Subwoofer size 2 x 12 inch
Unit weight
29.2 kg
Working Temperature
10-40 °C
■ The specification presents only as a reference. The value of weight and size are approximation.
■ Our product is improved ceaselessly and the specification and function may be changed without
prior notice.
Please note
This product operates at a frequency of 863-865 MHz and is designated only to be used inside a
normal household environment. This product is suited for this purpose within most EU countries.
The user should check the allowed frequencies of the country where the unit will be used in.
(More information can be found at: https://www.apwpt.org)
The user is responsible for the use of this unit. Lenco cannot be held responsible if this unit is used
for other purposes than which are described in this manual.
Guarantee
Lenco offers service and warranty in accordance to European law, which means that in case of repairs
(both during and after the warranty period) you should contact your local dealer.
Important note: It is not possible to send products that need repairs to Lenco directly.
Important note: If this unit is opened or accessed by a none official service center in any way, the
warranty expires.
This device is not suitable for professional use. In case of professional use, all
warranty obligations of the manufacturer will be void.
Page 13
OPERATING
13
Disclaimer
Updates to Firmware and/or hardware components are made regularly. Therefore some of the
instruction, specifications and pictures in this documentation may differ slightly from your particular
situation. All items described in this guide for illustration purposes only and may not apply to a
particular situation. No legal right or entitlements may be obtained from the description made in this
manual.
Disposal of the Old Device
This symbol indicates that the relevant electrical product or battery should not
be disposed of as general household waste in Europe. To ensure the correct
waste treatment of the product and battery, please dispose them in accordance
to any applicable local laws of requirement for disposal of electrical equipment
or batteries. In so doing, you will help to conserve natural resources and
improve standards of environmental protection in treatment and disposal of
electrical waste (Waste Electrical and Electronic Equipment Directive).
Service
For more information and helpdesk support, please visit www.lenco.com
Lenco Benelux BV, Thermiekstraat 1a, 6361 HB Nuth, The Netherlands.
Page 14

14
Nederlands
PMX-350
CAUTION:
Usage of controls or adjustments or performance of procedures other than those specified herein may
resulte in hazardous radiation exposure.
This unit should not be adjusted or repaired by anyone except qualified service personnel.
PRECAUTIONS BEFORE USE
KEEP THESE INSTRUCTIONS IN MIND:
1. Do not use this device near water.
2. Clean only with a slightly damp cloth.
3. Do not cover or block any ventilation openings. When placing the device on a shelf, leave 5 cm (2”) free
space around the whole device.
4. Install in accordance with the supplied user manual.
5. Don’t step on or pinch the power adaptor. Be very careful, particularly near the plugs and the cable’s
exit point. Do not place heavy items on the power adaptor, which may damage it. Keep the entire
device out of children’s reach! When playing with the power cable, they can seriously injure
themselves.
6. Unplug this device during lightning storms or when unused for a long period.
7. Keep the device away from heat sources such as radiators, heaters, stoves, candles and other heat-
generating products.
8. Avoid using the device near strong magnetic fields.
9. Electrostatic discharge can disturb normal usage of this device. If so, simply reset and restart the device
following the instruction manual. During file transmission, please handle with care and operate in a
static-free environment.
10. Warning! Never insert an object into the product through the vents or openings. High voltage flows
through the product and inserting an object can cause electric shock and/or short circuit internal parts.
For the same reason, do not spill water or liquid on the product.
11. Do not use in wet or moist areas such as bathrooms, steamy kitchens or near swimming pools.
12. Do not use this device when condensation may occur.
13. Although this device is manufactured with the utmost care and checked several times before leaving
the factory, it is still possible that problems may occur, as with all electrical appliances. If you notice
smoke, an excessive build-up of heat or any other unexpected phenomena, you should disconnect the
plug from the main power socket immediately.
14. This device must be well ventilated at all time!
15. This device must operate on a power source as specified on the specification label. If you are not sure
of the type of power supply used in your home, consult your dealer or local power company.
16. The socket outlet must be installed near the equipment and must be easily accessible.
17. Do not overload ac outlets or extension cords. Overloading can cause fire or electric shock.
18. Devices with class 1 construction should be connected to a main socket outlet with a protective
earthed connection.
19. Devices with class 2 construction do not require a earthed connection.
20. Keep away from rodents. Rodents enjoy biting on power cords.
21. Always hold the plug when pulling it out of the main supply socket. Do not pull the power cord. This
can cause a short circuit.
22. Avoid placing the device on any surfaces that may be subject to vibrations or shocks.
23. To protect the device during a thunderstorm, unplug the ac power adaptor.
24. When the device is not in use for long periods, unplug the ac power adaptor for safety reasons.
25. To clean the device, use a soft dry cloth. Do not use solvents or petrol based fluids. To remove severe
stains, you may use a damp cloth with dilute detergent.
26. The supplier is not responsible for damage or lost data caused by malfunction, misuse, modification of
the device or battery replacement.
Page 15

15
27. Do not interrupt the connection when the device is formatting or transferring files. Otherwise, data
may be corrupted or lost.
28. The usb memory stick should be plugged into the unit directly. Don’t use an usb extension cable
because it can cause interference resulting in failing of data.
29. The apparatus shall not be exposed to dripping or splashing and make sure that no objects filled with
liquids, such as vases, are placed on or near the apparatus.
30. To completely disconnect the power input, the mains plug of the apparatus shall be disconnected from
the mains, as the disconnect device is the mains plug of apparatus.
31. The mains plug of the apparatus should not be obstructed or should be easily accessed during intended
use.
32. Battery shall not be exposed to excessive heat such as sunshine, fire or the like.
33. Minimum distance of 10cm around the apparatus is needed for sufficient ventilations.
34. The ventilation should not be impeded by covering the ventilation openings with items such as
newspapers, table-cloths, curtains etc.
35. No naked flame sources such as lighted candles should be placed on the apparatus.
36. Attention should be drawn to the environmental aspects of battery disposal.
37. The apparatus can only be used in moderate extremely cold or climates warm environments should be
avoided.
38. The rating label has been marked on the bottom panel of the apparatus.
39. This device is not intended for use by people (including children) with physical, sensory or mental
disabilities, or a lack of experience and knowledge, unless they’re under supervision or have received
instructions about the correct use of the device by the person who is responsible for their safety.
40. This product is intended for household use only and not for commercial or industrial use.
41. Make sure the unit is adjusted to a stable position. Damage caused by using this product in an unstable
position or by failure to follow any other warning or precaution contained within this user manual will
not be covered by warranty.
42. Never remove the casing of this apparatus.
43. Never place this apparatus on other electrical equipment.
44. Do not use or store this product in a place where it is subject to direct sunlight, heat, excessive dust or
vibration.
45. Do not clean this product with water or other liquids.
46. Do not block or cover the slots and holes in the product.
47. Do not push foreign objects into the slots or holes in the product.
48. Do not allow children access to plastic bags.
49. Please check that the voltage on the type plate of your appliance corresponds with your house
electricity supply (type plate is located on the back of the unit).
50. Protect the power cord from being walked on or pinched, particularly at plugs, convenience
receptacles, and the point where they exit from the apparatus.
51. Only use attachments/accessories specified by the manufacturer.
52. Refer all servicing to qualified service personnel. Servicing is required when the apparatus has been
damaged in any way, such as the power supply cord or the plug, when liquid has been spilled or objects
have fallen into the apparatus, when the apparatus has been exposed to rain or moisture, does not
operate normally, or has been dropped.
53. Do not use a damaged power cord or plug or a loose outlet. Doing so may result in fire or electric shock.
Warning: prolonged exposure to loud sounds from personal music players may lead to temporary or
permanent hearing loss.
INSTALLATION
• Unpack all parts and remove protective material.
• Do not connect the unit to the mains before checking the mains voltage and before all other
connections have been made.
• Do not cover any vents and make sure that there is a space of several centimeters around the unit
for ventilation.
Page 16
ACHTERPANEEL
16
1. Aan/uit-schakelaar
Schakelmodi DC INGANG, AC INGANG of uit.
Wanneer u de schakelaar op AC zet, werkt de speaker op 230V en zal de accu opgeladen worden.
Wanneer u de schakelaar op OFF zet, is er geen stroom en zal de accu niet opgeladen worden.
Wanneer u de schakelaar op DC zet, wordt de speaker aangedreven door de accu.
2. DC 12V INGANG
De speaker kan verbonden worden met de 12V DC accu van een auto.
3. FM-ANTENNE
4. AC INGANG AC 230V~, 50Hz
Page 17
VOORPANEEL
17
1. LED-SCHERM
Geeft systeem parameterinformatie weer, de linkerkant laat de INVOER A status zien en de
rechterkant van het scherm laat de INVOER B status zien
2. VOLUME/MULTI/DJ EFFECT
Draai aan de knop om het primaire volume, hoofdtelefoon volume, de treble en bas aan te passen.
Druk deze knop kort in om een ander muziek effect uit te kiezen, zoals SCRATCH, REVERB, BEAT
BOX, YEAH, BRING IT, GEYA of COME ON. Lang indrukken speelt een DRUMS effect af.
3. HOOFDTELEFOON MODUS
Druk op deze knop om verschillende HOOFDTELEFOON modi uit te kiezen, zoals INVOER A, INVOER
B, INVOER AB
4. INVOER B VORIGE
Druk op deze knop om het vorige nummer met USB B te kiezen
5. INVOER B VOLGENDE
Druk op deze knop om het volgende nummer met USB B te kiezen
6. INVOER B VOLUME
Dit wordt gebruikt om het volume van INVOER B aan te passen
7. INVOER B AFSPELEN/PAUZEREN
Druk op deze knop om muziek met INVOER B af te spelen/pauzeren
Wanneer een USB afspeelt, kunt u door deze knop lang ingedrukt te houden de speeltijd af of op
laten tellen.
8. INVOER B MODUS
Druk op deze knop om een andere INVOER B modus te selecteren, zoals LINE of USB B
9. HOOFDTELEFOON AANSLUITING
10. USB B invoer aansluiting
11. VOLUME GITAAR
Pas het volume van de GITAAR aan
12. VOLUME MICROFOON
Pas het volume van de MICROFOON aan
13. ECHO
Pas de ECHO van de MIC invoer aan
14. GITAAR aansluiting
15. MICROFOON aansluiting
16. LlNE IN AUDIO INVOER AANSLUITING
Page 18

VOORPANEEL
18
Verbind met de LINE IN-signaal invoer aansluiting.
17. OPLAADINDICATOR
Wanneer de accu bijna leeg is, zal het oplaadlichtje rood zijn. Wanneer de accu opgeladen wordt, is
het lichtje groen
18. AUX AUDIO INVOER AANSLUITING
Verbind met de AUX-signaal invoer aansluiting.
19. USB A invoer aansluiting
20. Op AC: OPLADEN/STAND-BY/NORMAAL
Door deze knop lang in te drukken zet u het apparaat aan of in stand-by. Door deze knop kort in te
drukken zet u het apparaat in de OPLAAD, STAND-BY of NORMAAL modus
Op DC: ACCUNIVEAU
Als u deze knop indrukt wordt het huidige accuniveau weergegeven.
21. INVOER A MODUS
Druk deze knop in om een andere INVOER A modus te kiezen, zoals AUX A, BT A, FM, USB A
22. INVOER A AFSPELEN/PAUZEREN
Druk op deze knop om muziek met INVOER A af te spelen/pauzeren
Wanneer een USB afspeelt, kunt u door deze knop lang ingedrukt te houden de speeltijd af of op
laten tellen.
23. INVOER A VOLUME
Dit wordt gebruikt om het volume van INVOER A aan te passen
24. INVOER A VOLGENDE
Druk op deze knop om het volgende nummer met USB A te kiezen
25. INVOER A VORIGE
Druk op deze knop om het vorige nummer met USB A te kiezen
26. MENU
Deze schakelaar selecteert het primaire volume, de bas, treble, x driver en licht modus
Page 19

AFSTANDSBEDIENING
19
1. LICHT
2. STAND-BY
3. NUMERIEKE TOETSEN
4. AFSTEMMEN-
5. KANAAL-
6. VOLUME+
7. X DRIVE
8. TREBLE+
9. VOLUME-
10. TREBLE-
11. AUX-A
12. USB-A
13. USB-A DOORSPOELEN
14. USB-A TERUGSPOELEN
15. LINE
16. USB-B
17. USB-B DOORSPOELEN
18. USB-B TERUGSPOELEN
19. DEMP
20. FM
21. AUTO
22. AFSTEMMEN+
23. KANAAL+
24. BT
25. VERBINDING VERBREKEN
26. BAS+
27. BAS-
28. INVOER-A HERHALEN
29. INVOER-A PAUZEREN
30. INVOER-A VORIGE
31. INVOER-A VOLGENDE
32. INVOER-B HERHALEN
33. INVOER-B PAUZEREN
34. INVOER-B VORIGE
35. INVOER-B VOLGENDE
AFSTANDSBEDIENING:
□ Als de afstandsbediening verstoord wordt door andere apparaten, zal het gebruik hierdoor beïnvloedt worden.
□ Druk niet gelijktijdig knoppen op het apparaat en de afstandsbediening in.
□ Vermijd het gelijktijdig gebruiken van twee afstandsbedieningen, aangezien dit een storing zal veroorzaken.
□ Gebruik alleen UM-4 ‘AAA’ batterijen. Gebruik geen oude en nieuwe batterijen naast elkaar.
□ Als de batterijen lekken, maak de afstandsbediening dan grondig schoon voordat u de batterijen vervangt
□ Verbind twee kanten van de batterijen niet met elkaar. Gooi oude batterijen weg op de daarvoor bestemde plek.
EN
INFRARED REMOTE CONTROL RECEIVER
5m
INFRARED REMOTE CONTROL UNIT
NL
INFRARODE AFSTANDSBEDIENING ONTVANGER
5m
INFRARODE AFSTANDSBEDIENING
Page 20

GEBRUIK
20
NORMALE FUNCTIE
1. Zet de aan/uit-schakelaar op de achterkant van de speaker op de AC of DC modus.
2. Selecteer een geluidsbron door op de INVOER A knop te drukken op het voorpaneel om AUX A, BT A,
FM en USB A weer te geven. Druk op de INVOER B knop op het voorpaneel om LINE en USB B weer
te geven.
Wanneer het apparaat in de AC modus staat:
- Wanneer u een keer op de stand-by knop drukt, zal u de oplaadmodus activeren en de
oplaadstatus van de accu wordt weergegeven op het blauwe led-scherm.
- Een tweede keer op de stand-by knop drukken zal de speaker activeren en een groen
oplaadlichtje laten zien.
- U kunt ook de stand-by modus selecteren zonder de accu op de laden
Wanneer het apparaat in de DC modus staat:
- Als u op de stand-by knop drukt, ziet u het accuniveau op het blauwe led-scherm
3. Draai aan de VOLUME/MULTI/DJ EFFECT knop op het besturingspaneel of druk op de VOL+/-
knoppen op de afstandsbediening om het primaire volume aan te passen. Pas vervolgens de
volumeschuifregelaar van INVOER A aan en gebruik de rechter volumeschuifregelaar om het
volume van INVOER B aan te passen.
4. Om de bas, treble, X-drive, speakerlichten en het primaire volume aan te passen, drukt u op de
menu-knop om bas, treble, X-drive of speakerlichten te selecteren en vervolgens draait u aan de
grote VOLUME/MULTI/DJ EFFECT knop.
5. HOOFDTELEFOON UITVOER selectie. Druk op de PHONES MODE knop op het besturingspaneel om
INPUT A (INVOER A), INPUT B (INVOER B) of INPUT AB (INVOER AB) weer te geven en pas het
volume van A, B of AB aan door aan de multi DJ effect knop te draaien.
6. Druk op de LIGHT knop op de afstandsbediening of druk op de MENU knop op het voorpaneel
totdat de speaker licht modus weergegeven is. Draai vervolgens aan de VOLUME/MULTI/DJ EFFECT
knop om de OFF (UIT), R,G,B, RG, RB, GB, RGB, AUTO, DEMO licht modus te selecteren.
7. Druk op de MUTE knop op de afstandsbediening om het geluid te dempen en nog een keer om dit
ongedaan te maken.
8. Druk op de X DRIVE knop op de afstandsbediening om het X-Bas effect in/uit te schakelen.
SPEAKER LICHTKLEUR BESTURINGSOPTIES
• R = rode lichten knipperen
• G = groene lichten knipperen
• B = blauwe lichten knipperen
• RG = rode en groene lichten knipperen RB = rode en blauwe lichten knipperen GB = groene en
blauwe lichten knipperen
• RGB = rode, groene en blauwe lichten knipperen
• Auto = de verschillende kleurcombinaties worden willekeurig geselecteerd en knipperen.
• Demo = lichten knipperen en veranderen van kleur, net alsof ze reageren op de beat van de muziek.
Page 21

GEBRUIK
21
AFSTEM APPLICATIES
1. Voordat u de radiofuncties gebruikt, moet u eerst de antenne aanpassen om een optimaal
ontvangst te krijgen.
Druk op de INVOER A knop op het voorpaneel of de FM knop op de afstandsbediening om de “FM”
functie te selecteren.
2. Druk op de AUTO knop op de afstandsbediening of de afspeelknop van het INVOER A
besturingspaneel.
Het apparaat zal automatisch lage tot hoge radiofrequenties scannen en de gevonden kanalen een
voor een opslaan.
3. Druk op de CH+/CH- knop op de afstandsbediening om te schakelen tussen de radiokanalen die
opgeslagen zijn.
4. Druk op of houdt de TU+/TU- knop op de afstandsbediening ingedrukt om de radiofrequentie
handmatig aan te passen.
5. Om radiostations vanaf het besturingspaneel te selecteren, houdt u de volgende/vorige knoppen
ingedrukt.
KARAOKE EN GITAAR FUNCTIE
1. Het apparaat kan automatisch detecteren of een MICROFOON of GITAAR verbonden is.
Zet het geluid van het microfoon volume uit met de MIC.VOL knop op het voorpaneel en pas het
volume geleidelijk aan nadat u de microfoon verbonden heeft.
2. Draai aan de ECHO knop op het voorpaneel om de ECHO van de microfoon aan te passen.
3. Draai aan de GUITAR VOL knop op het voorpaneel om het VOLUME van de gitaar aan te passen.
Opmerking: Raak de bovenkant van de microfoon niet aan tijdens het zingen om het jankende effect te
voorkomen.
Pas het volume van de microfoon geleidelijk aan om het jankende effect te voorkomen.
BLUETOOTH KOPPELEN EN VERBINDEN
• Schakel alle Bluetooth apparaten uit die u voorheen gekoppeld (verbonden) heeft met dit apparaat.
• Activeer de Bluetooth functie op uw telefoon of muziekspeler.
• Zet dit apparaat aan en stel deze in op de Bluetooth modus. Het knipperende blauwe “BT” licht op
het LED-scherm geeft aan dat de koppelmodus geactiveerd is.
• Zoek met uw telefoon of muziekspeler naar Bluetooth apparaten.
• Selecteer ‘PMX-350’ in de zoekresultaten van uw telefoon of muziekspeler.
• Selecteer OK (OKÉ) of YES (JA) om dit apparaat met uw telefoon of muziekspeler te verbinden.
• Voer 0000 in als er om een wachtwoord gevraagd wordt en een vast blauw licht geeft aan dat de
verbinding gelukt is.
• Druk op de DISCONNECT knop op de afstandsbediening om de Bluetooth verbinding te verbreken.
Page 22

GEBRUIK
22
FUNCTIE VAN DE USB-LEZER
USB-interface
Dit apparaat heeft twee USB aansluitingen. Druk op de INVOER A knop om USB A te selecteren en
vervolgens kunt u een USB-stick verbinden om muziek af te spelen. Druk op de INVOER B knop om USB
B te selecteren en vervolgens kunt u nog een USB-stick verbinden om muziek af te spelen.
Belangrijk: De USB-poort is alleen bedoeld voor het versturen van data, andere apparaten kunnen niet
gebruikt worden met de USB-verbinding. Het gebruik van USB-verlengkabels raden we af.
TIJDWEERGAVE
In de USB modus kan het scherm zowel de verstreken als resterende tijd weergeven.
Door de afspelen/pauzeren knop lang ingedrukt te houden, kunt u schakelen tussen een negatieve of
positieve tijdweergave.
DE ACCU OPLADEN
1. De stand-by kan niet gebruikt worden wanneer het apparaat aangedreven wordt door de accu.
2. Het besturingspaneel heeft een oplaadlichtje. Wanneer de accu voldoende opgeladen is, is het
lichtje groen.
Wanneer de accu bijna leeg is, zal er ‘LOW POWER’ (ACCU BIJNA LEEG) op het scherm verschijnen
en het lichtje wordt rood.
ACCU VERWIJDEREN
1. Verwijder de schroeven op het achterpaneel.
2. Haal de accu eruit.
3. Ontkoppel de accu
ACCESSOIRES
Afstandsbediening
1 st
Handleiding
1 st
Draadloze microfoon
1 st
AC stroomkabel
1 st
Page 23

GEBRUIK
23
SPECIFICATIE
Frequentiebereik
20Hz-20KHz
Voedingsbron
230V~, 50Hz/12VDC
Stroomverbruik 120W
Accu Lood/zuur 12VDC, 7 Ah
DC Gebruikstijd
~12u bij 50% volume
Totaal vermogen
320W (RMS)
Microfoon
Draadloos 863-865 MHz
Bluetooth
V4.2
FM-radio 87,5-108 MHz
Afmetingen (B x D x H)
43 x 28 x 115 cm
Tweeter afmeting
2,54 x 2,54 cm
Woofer afmeting
2,54 x 7,62 cm
Subwoofer afmeting
5,08 x 30,48 cm
Gewicht van het apparaat
29,2 kg
Gebruikstemperatuur
10-40 °C
■ De specificatie fungeert alleen als een referentie. Het gewicht en de afmetingen zijn gemiddelden.
■ Ons product wordt continu verbeterd en de specificaties en functies kunnen zonder voorafgaande
kennisgeving aangepast worden.
Opmerking
Dit product werkt met een frequentie van 863-865 MHz en is alleen bedoeld voor gebruik binnen een
normale huishoudelijke omgeving. Dit product is geschikt voor dit doel in de meeste EU-landen.
De gebruiker zou de toegestane frequenties van het land waar het apparaat gebruikt zal worden
moeten controleren.
(Meer informatie kan gevonden worden op: https://www.apwpt.org)
De gebruiker is verantwoordelijk voor het gebruik van dit apparaat. Lenco kan niet aansprakelijk gesteld
worden als dit apparaat gebruikt wordt voor andere doeleinden dan degene die in deze handleiding zijn
beschreven.
Garantie
Lenco biedt service en garantie aan overeenkomstig met de Europese wetgeving. Dit houdt in dat u, in
het geval van reparaties (zowel tijdens als na de garantieperiode), uw lokale handelaar moet
contacteren.
Belangrijke opmerking: Het is niet mogelijk om producten die moeten worden gerepareerd rechtstreeks
naar Lenco te sturen.
Belangrijke opmerking: De garantie verloopt als een onofficieel servicecenter het apparaat op wat voor
manier dan ook heeft geopend, of er toegang toe heeft gekregen.
Het apparaat is niet geschikt voor professioneel gebruik. In het geval van professioneel gebruik worden
alle garantieverplichtingen van de fabrikant nietig verklaard.
Page 24

GEBRUIK
24
Disclaimer
Er worden regelmatig updates in de firmware en/of hardwarecomponenten gemaakt. Daardoor kunnen
gedeelten van de instructie, de specificaties en afbeeldingen in deze documentatie enigszins verschillen
van uw eigen situatie. Alle onderwerpen die staan beschreven in deze handleiding zijn bedoeld als
illustratie en zijn niet van toepassing op specifieke situaties. Aan de beschrijving in dit document
kunnen geen rechten worden ontleend.
Afvoer van het oude apparaat
Dit symbool geeft aan dat het betreffende elektrische product of de
accu/batterij niet mag worden verwijderd als algemeen huishoudelijk afval in
Europa. Zorg voor een juiste afvalverwerking door het product en de
accu/batterij in overeenstemming met alle van toepassing zijnde lokale wetten
voor het verwijderen van elektrische apparatuur of accu's/batterijen te
verwijderen. Als u dit doet, helpt u de natuurlijke hulpbronnen te behouden en
de standaard van milieubescherming te verbeteren bij de behandeling en
verwijdering van elektrisch afval (Afgedankte Elektrische en Elektronische
Apparatuur).
Service
Bezoek voor meer informatie en helpdeskondersteuning www.lenco.com
Lenco Benelux BV, Thermiekstraat 1a, 6361 HB, Nuth, Nederland.
Page 25

25
Deutsch
PMX-350
CAUTION:
Usage of controls or adjustments or performance of procedures other than those specified herein may
resulte in hazardous radiation exposure.
This unit should not be adjusted or repaired by anyone except qualified service personnel.
PRECAUTIONS BEFORE USE
KEEP THESE INSTRUCTIONS IN MIND:
1. Do not use this device near water.
2. Clean only with a slightly damp cloth.
3. Do not cover or block any ventilation openings. When placing the device on a shelf, leave 5 cm (2”) free
space around the whole device.
4. Install in accordance with the supplied user manual.
5. Don’t step on or pinch the power adaptor. Be very careful, particularly near the plugs and the cable’s
exit point. Do not place heavy items on the power adaptor, which may damage it. Keep the entire
device out of children’s reach! When playing with the power cable, they can seriously injure
themselves.
6. Unplug this device during lightning storms or when unused for a long period.
7. Keep the device away from heat sources such as radiators, heaters, stoves, candles and other heat-
generating products.
8. Avoid using the device near strong magnetic fields.
9. Electrostatic discharge can disturb normal usage of this device. If so, simply reset and restart the device
following the instruction manual. During file transmission, please handle with care and operate in a
static-free environment.
10. Warning! Never insert an object into the product through the vents or openings. High voltage flows
through the product and inserting an object can cause electric shock and/or short circuit internal parts.
For the same reason, do not spill water or liquid on the product.
11. Do not use in wet or moist areas such as bathrooms, steamy kitchens or near swimming pools.
12. Do not use this device when condensation may occur.
13. Although this device is manufactured with the utmost care and checked several times before leaving
the factory, it is still possible that problems may occur, as with all electrical appliances. If you notice
smoke, an excessive build-up of heat or any other unexpected phenomena, you should disconnect the
plug from the main power socket immediately.
14. This device must be well ventilated at all time!
15. This device must operate on a power source as specified on the specification label. If you are not sure
of the type of power supply used in your home, consult your dealer or local power company.
16. The socket outlet must be installed near the equipment and must be easily accessible.
17. Do not overload ac outlets or extension cords. Overloading can cause fire or electric shock.
18. Devices with class 1 construction should be connected to a main socket outlet with a protective
earthed connection.
19. Devices with class 2 construction do not require a earthed connection.
20. Keep away from rodents. Rodents enjoy biting on power cords.
21. Always hold the plug when pulling it out of the main supply socket. Do not pull the power cord. This
can cause a short circuit.
22. Avoid placing the device on any surfaces that may be subject to vibrations or shocks.
23. To protect the device during a thunderstorm, unplug the ac power adaptor.
24. When the device is not in use for long periods, unplug the ac power adaptor for safety reasons.
25. To clean the device, use a soft dry cloth. Do not use solvents or petrol based fluids. To remove severe
stains, you may use a damp cloth with dilute detergent.
26. The supplier is not responsible for damage or lost data caused by malfunction, misuse, modification of
the device or battery replacement.
Page 26

26
27. Do not interrupt the connection when the device is formatting or transferring files. Otherwise, data
may be corrupted or lost.
28. The usb memory stick should be plugged into the unit directly. Don’t use an usb extension cable
because it can cause interference resulting in failing of data.
29. The apparatus shall not be exposed to dripping or splashing and make sure that no objects filled with
liquids, such as vases, are placed on or near the apparatus.
30. To completely disconnect the power input, the mains plug of the apparatus shall be disconnected from
the mains, as the disconnect device is the mains plug of apparatus.
31. The mains plug of the apparatus should not be obstructed or should be easily accessed during intended
use.
32. Battery shall not be exposed to excessive heat such as sunshine, fire or the like.
33. Minimum distance of 10cm around the apparatus is needed for sufficient ventilations.
34. The ventilation should not be impeded by covering the ventilation openings with items such as
newspapers, table-cloths, curtains etc.
35. No naked flame sources such as lighted candles should be placed on the apparatus.
36. Attention should be drawn to the environmental aspects of battery disposal.
37. The apparatus can only be used in moderate extremely cold or climates warm environments should be
avoided.
38. The rating label has been marked on the bottom panel of the apparatus.
39. This device is not intended for use by people (including children) with physical, sensory or mental
disabilities, or a lack of experience and knowledge, unless they’re under supervision or have received
instructions about the correct use of the device by the person who is responsible for their safety.
40. This product is intended for household use only and not for commercial or industrial use.
41. Make sure the unit is adjusted to a stable position. Damage caused by using this product in an unstable
position or by failure to follow any other warning or precaution contained within this user manual will
not be covered by warranty.
42. Never remove the casing of this apparatus.
43. Never place this apparatus on other electrical equipment.
44. Do not use or store this product in a place where it is subject to direct sunlight, heat, excessive dust or
vibration.
45. Do not clean this product with water or other liquids.
46. Do not block or cover the slots and holes in the product.
47. Do not push foreign objects into the slots or holes in the product.
48. Do not allow children access to plastic bags.
49. Please check that the voltage on the type plate of your appliance corresponds with your house
electricity supply (type plate is located on the back of the unit).
50. Protect the power cord from being walked on or pinched, particularly at plugs, convenience
receptacles, and the point where they exit from the apparatus.
51. Only use attachments/accessories specified by the manufacturer.
52. Refer all servicing to qualified service personnel. Servicing is required when the apparatus has been
damaged in any way, such as the power supply cord or the plug, when liquid has been spilled or objects
have fallen into the apparatus, when the apparatus has been exposed to rain or moisture, does not
operate normally, or has been dropped.
53. Do not use a damaged power cord or plug or a loose outlet. Doing so may result in fire or electric shock.
Warning: prolonged exposure to loud sounds from personal music players may lead to temporary or
permanent hearing loss.
INSTALLATION
• Unpack all parts and remove protective material.
• Do not connect the unit to the mains before checking the mains voltage and before all other
connections have been made.
• Do not cover any vents and make sure that there is a space of several centimeters around the unit
for ventilation.
Page 27

RÜCKANSICHT
27
1. Ein/Aus-Schalter
Schaltermodi: BATTERIEBETRIEB, NETZBETRIEB oder aus.
Wenn Sie den Schalter auf AC stellen, dann wird der Lautsprecher mit 230 V Netzspannung betrieben
und die Batterie aufgeladen.
Wenn Sie den Schalter auf OFF stellen, denn ist der Lautsprecher ausgeschaltet und die Batterie wird
nicht aufgeladen.
Wenn Sie den Schalter auf DC stellen, dann wird der Lautsprecher über Batterie betrieben.
2. GLEICHSPANNUNGSEINGANG 12 V
Der Lautsprecher kann an das 12-V-Bordnetz von Autos angeschlossen werden.
3. UKW-ANTENNE
4. WECHSELSPANNUNGSEINGANG 230 V/50 Hz
Page 28

VORDERANSICHT
28
1. LED-Display
Das Display zeigt Ihnen Informationen über Systemparameter an – auf der linken Seite des Displays
wird der Status von EINGANG A, auf der rechten der von EINGANG B angezeigt.
2. LAUTSTÄRKE/MULTI/DJ-EFFEKT
Drehen Sie den Drehregler, um Gesamtlautstärke, Kopfhörerlautstärke, Höhen und Bässe
einzustellen. Drücken Sie diese Taste kurz, um die verschiedenen Musikeffekte SCRATCH, REVERB,
BEAT BOX, YEAH, BRING IT, GEYA, COME ON auszuwählen. Drücken Sie diese zur Auswahl der
SCHLAGZEUGEFFEKTE lang.
3. KOPFHÖ RERMODUS
Drücken Sie diese Taste, um zwischen den Kopfhörermodi EINGANG A, EINGANG B und EINGANG
AB auszuwählen.
4. EINGANG B VORHERIGER
Drücken Sie diese Taste, um den vorherigen Titel für USB B zu wählen.
5. EINGANG B NÄCHTER
Drücken Sie diese Taste, um den nächsten Titel für USB B zu wählen.
6. LAUTSTÄRKE EINGANG B
Stellen Sie hiermit die Lautstärke für EINGANG B ein.
7. WIEDERGABE/PAUSE EINGANG B
Drücken Sie diese Taste, um die Musikwiedergabe von EINGANG B zu starten oder zu pausieren.
Drücken Sie während der USB-Wiedergabe diese Taste lang, um die Anzeige der Wiedergabezeit
aufwärts oder abwärts zählend einzustellen.
8. MODUS EINGANG B
Drücken Sie diese Taste, um entweder LINE oder USB B als Eingangsmodi für EINGANG B
auszuwählen.
9. BUCHSE KOPFHÖ REREINGANG
10. USB-PORT für EINGANG USB B
11. GITARRENLAUTSTÄRKE
Stellen Sie hier die Lautstärke Ihrer GITARRE ein.
12. MIKROFONLAUTSTÄRKE
Stellen Sie hier die Lautstärke des MIKROFONS ein.
13. ECHO
Stellen Sie hier das ECHO für den MIKROFONEINGANG ein.
14. GITARRENBUCHSE
Page 29

VORDERANSICHT
29
15. MIKROFONBUCHSE
Page 30

VORDERANSICHT
30
16. AUDIOEINGANGSBUCHSE LINE-IN
Schließen Sie hier das LINE-IN-Signal einer Audioquelle an.
17. LADEANZEIGE
Bei geringer Batterieladung leuchtet die LED rot. Während des Aufladens leuchtet die LED grün.
18. AUDIOEINGANGSBUCHSE AUX
Schließen Sie hier das AUX-OUT-Signal einer Audioquelle an.
19. USB-PORT für EINGANG USB A
20. Bei Wechselspannung: AUFLADEN/STANDBY/NORMAL
Drücken Sie diese Taste lang, um in den Standby-Modus zu wechseln oder das Gerät einzuschalten.
Durch kurzes Drücken der Taste können Sie in den AUFLADE-, STANDBY- oder NORMALBETRIEB
wechseln.
Bei BATTERIEBETRIEB: BATTERIELADUNG
Wenn Sie diese Taste kurz drücken, wird die aktuelle Batterieladung angezeigt.
21. MODUS EINGANG A
Drücken Sie diese Taste, um zwischen den Modi für EINGANG A auszuwählen – AUX A, BLUETOOTH
A, UKW, USB A.
22. WIEDERGABE/PAUSE EINGANG A
Drücken Sie diese Taste, um die Musikwiedergabe von EINGANG A zu starten oder zu pausieren.
Drücken Sie während der USB-Wiedergabe diese Taste lang, um die Anzeige der Wiedergabezeit
aufwärts oder abwärts zählend einzustellen.
23. LAUTSTÄRKE EINGANG A
Stellen Sie hiermit die Lautstärke für EINGANG A ein.
24. EINGANG A NÄCHTER
Drücken Sie diese Taste, um den nächsten Titel für USB A zu wählen.
25. EINGANG A VORHERIGER
Drücken Sie diese Taste, um den vorherigen Titel für EINGANG USB A zu wählen.
26. MENÜ
Mit dieser Taste wählen Sie die Gesamtlautstärke, Bässe, Höhen, X-Drive und Lichtmodus aus.
Page 31

FERNBEDIENUNG
31
1. LICHT
2. STANDBY
3. ZIFFERNTASTEN
4. ABSTIMMEN –
5. KANAL –
6. LAUTSTÄRKE +
7. X-DRIVE
8. HÖ HEN +
9. LAUTSTÄRKE –
10. HÖ HEN –
11. AUX-A
12. USB-A
13. USB-A VORSPULEN
14. USB-A ZURÜ CKSPULEN
15. LINE
16. USB-B
17. USB-B VORSPULEN
18. USB-B ZURÜ CKSPULEN
19. STUMM
20. UKW
21. AUTOMATISCH
22. ABSTIMMEN +
23. KANAL +
24. BLUETOOTH
25. TRENNEN
26. BASS +
27. BASS –
28. INPUT-A WIEDERHOLUNG
29. INPUT-A PAUSE
30. INPUT-A VORHERIGER
31. INPUT-A NÄCHSTER
32. INPUT-B WIEDERHOLUNG
33. INPUT-B PAUSE
34. INPUT-B VORHERIGER
35. INPUT-B NÄCHSTER
BEDIENUNG FERNBEDIENUNG:
□ Wenn die Fernbedienung in Konflikt mit anderen Geräten steht, wirkt sich dies negativ auf die Bedienung auf.
□ Drücken Sie nicht gleichzeitig Tasten am Gerät und auf der Fernbedienung.
□ Benutzen Sie 2 Fernbedienungen nicht zur selben Zeit, weil dies zu Fehlfunktionen führt.
□ Verwenden Sie nur UM-4 Batterien (Typ AAA). Verwenden Sie gebrauchte und neue Batterien nicht zusammen.
□ Wenn eine Batterie ausgelaufen ist, dann reinigen Sie die Fernbedienung gründlich, bevor Sie neue Batterien
einsetzen.
□ Schalten Sie die beiden Batteriepole nicht kurz. Entsorgen Sie verbrauchte Batterien vorschriftsmäßig.
EN
INFRARED REMOTE CONTROL RECEIVER
5m
INFRARED REMOTE CONTROL UNIT
DE
EMPFÄNGER IR-FERNBEDIENUNG
5 m
IR-FERNBEDIENUNG
Page 32

BEDIENUNG
32
NORMALBETRIEB
1. Wählen Sie über den Ein/Aus-Schalter auf der Rückseite des Lautsprechers entweder den AC-
(Netzbetrieb) oder den DC-Modus (Batteriebetrieb) aus.
2. Wählen Sie durch Drücken der Taste EINGANG A auf der Vorderseite des Lautsprechers eine Audioquelle
aus. Auf der Anzeige erscheint AUX A, BT A (Bluetooth A), FM (UKW) oder USB A. Drücken Sie für die
Auswahl und Anzeige von LINE oder USB B die Taste EINGANG B auf der Vorderseite des Lautsprechers.
Lautsprecher im Netzbetrieb:
- Drücken Sie die Taste Standby einmal, um den Lademodus zu aktivieren. Auf dem blauen LEDDisplay wird das Statussymbol für das Batterieladen angezeigt.
- Wenn Sie die Taste ein zweites Mal drücken, dann schaltet sich der Lautsprecher ein und die
grüne Lade-LED leuchtet auf.
- Sie können ebenfalls den Standby-Modus auswählen, ohne die Batterie aufladen zu lassen.
Lautsprecher im Batteriebetrieb:
- Wenn Sie die Taste Standby drücken, dann wird auf dem blauen LED-Display der Zustand der
Batterieladung angezeigt.
3. Drehen Sie den Drehregler VOLUME/MULTI/DJ EFFECT der Bedieneinheit oder drücken Sie die Taste
VOL+/– auf der Fernbedienung, um die Gesamtlautstärke einzustellen. Stellen Sie dann mit dem
Lautstärke-Schieberegler die Laustärke für EINGANG A ein und verwenden Sie den rechten
Lautstärke-Schieberegler, um die Lautstärke von EINGANG B zu ändern.
4. Drücken Sie die Taste MENU, um Bass, Höhen, X-Drive, Lautsprecherlicht und Gesamtlautstärke
auszuwählen und mit dem Drehregler VOLUME/MULTI/DJ EFFECT einzustellen.
5. Auswahl KOPFHÖ RERAUSGANG. Drücken Sie die Taste PHONES MODE der Bedieneinheit, bis INPUT
A, INPUT B oder INPUT AB angezeigt wird und stellen Sie anschließend mit dem Drehregler
VOLUME/MULTI/DJ EFFECT die Lautstärke ein.
6. Drücken Sie die Taste LIGHT auf der Fernbedienung oder die Taste MENU der Bedieneinheit, bis der
Modus speaker light (Lautsprecherlicht) angezeigt wird und wählen Sie anschließend mit dem
Drehregler VOLUME/MULTI/DJ EFFECT einen der Lichtmodi OFF (aus), R, G, B, RG, RB, GB, RGB,
AUTO oder DEMO aus.
7. Drücken Sie für eine Stummschaltung die Taste MUTE auf der Fernbedienung. Drücken Sie diese
Taste noch einmal, um die Stummschaltung wieder aufzuheben.
8. Drücken Sie X DRIVE auf der Fernbedienung, um den X-Bass ein- oder auszuschalten.
OPTIONEN FÜ R DIE LAUTSPRECHER-LICHTFARBENSTEUERUNG
• R = rot blinkendes licht
• G = grün blinkendes Licht
• B = blau blinkendes Licht
• RG = rot und grün blinkendes Licht RB = rot und blau blinkendes Licht GB = grün und blau blinkendes
Licht
• RGB = rot, grün und blau blinkendes Licht
• Auto = zyklisches Durchlaufen verschiedener blinkender Farbkombinationen
Page 33

BEDIENUNG
33
• Demo = das Licht blinkt und ändert die Farbe, als ob es auf den Rhythmus der Musik reagieren würde.
Page 34

BEDIENUNG
34
TUNERBEDIENUNG
1. Bevor Sie die Radiofunktionen benutzen können, müssen Sie für einen optimalen Empfang die
Antenne einstellen.
Drücken Sie die Taste EINGANG A der Bedieneinheit oder die Taste FM auf der Fernbedienung, um
die Funktion „FM“ (UKW) auszuwählen.
2. Drücken Sie die Taste AUTO auf der Fernbedienung oder die Wiedergabetaste für EINGANG A der
Bedieneinheit.
Der Lautsprecher scannt nun automatisch aufwärts nach Radiosendern und speichert nacheinander
alle gefundenen Radiosender ab.
3. Drücken Sie die Taste CH+/CH– auf der Fernbedienung, um zwischen den eben abgespeicherten
Radiosender zu wechseln.
4. Halten Sie die Taste TU+/TU– auf der Fernbedienung gedrückt, um die Radiofrequenz manuell
einzustellen.
5. Halten Sie die Taste NEXT/PREV gedrückt, um Radiosender über die Bedieneinheit auszuwählen.
KARAOKE- UND GITARRENFUNKTION
1. Der Lautsprecher erkennt automatisch, ob eine GITARRE oder ein MIKROFON angeschlossen wurde.
Drehen Sie bitte die Mikrofonlautstärke mit dem Drehregler MIC.VOL der Bedieneinheit herunter
und stellen Sie diese nach Anstecken des Mikrofons schrittweise wieder lauter.
2. Stellen Sie das Mikrofonecho mit dem Drehregler ECHO der Bedieneinheit ein.
3. Stellen Sie die Gitarrenlautstärke mit dem Drehregler GUITAR.VOL der Bedieneinheit ein.
Hinweis: Berühren Sie beim Singen nicht die Mikrofonkapsel, um Rückkopplungen vorzubeugen.
Erhöhen Sie die Mikrofonlautstärke schrittweise, um Rückkopplungseffekte zu vermeiden.
BLUETOOTH KOPPELN UND VERBINDEN
• Schalten Sie alle bereits vorher mit dem Lautsprecher gekoppelten (verbundenen) Bluetooth-Geräte
aus.
• Aktivieren Sie das Bluetooth Ihres Mobilgeräts oder ihres Musikplayers.
• Schalten Sie den Lautsprecher ein und wechseln Sie dann in den Bluetooth-Modus. Die blau
blinkende „BT“-LED zeigt an, dass sich der Lautsprecher im Kopplungsmodus befindet.
• Suchen Sie mit Ihrem Mobilgerät oder Musikplayer nach Bluetooth-Geräten.
• Wählen Sie aus den Suchergebnissen Ihres Mobilgeräts oder Musikplayers „PMX-350“ aus.
• Wählen Sie OK oder YES (Ja) aus, um den Lautsprecher mit Ihrem Mobilgerät oder Musikplayer zu
koppeln.
• Geben Sie wenn nötig als Passwort „0000“ ein. Die permanent blau leuchtende LED zeigt das
erfolgreiche Verbinden an.
• Drücken Sie die Taste DISCONNECT auf der Fernbedienung, um die Bluetooth-Verbindung wieder zu
trennen.
Page 35

BEDIENUNG
35
FUNKTION DER USB-SCHNITTSTELLE
USB-Schnittstelle
Der Lautsprecher besitzt 2 USB-Ports. Drücken Sie die Taste EINGANG A, um USB A auszuwählen.
Danach können Sie für das Wiedergeben von Musik einen USB-Stick einstecken. Drücken Sie die Taste
EINGANG B, um USB B auszuwählen. Danach können Sie für das Wiedergeben von Musik einen USBStick einstecken.
Wichtig: Die USB-Ports sind nur für eine Datenübertragung ausgelegt. Andere Geräte können mit
diesen USB-Ports nicht verwendet werden. Die Verwendung von USB-Verlängerungskabeln ist nicht
empfehlenswert.
ZEITANZEIGE
Im USB-Modus kann entweder die bereits verstrichene oder die noch übrige Zeit angezeigt werden.
Durch langes Drücken der Wiedergabe-/Pausetaste können Sie das Aufwärts- bzw. Abwärtszählen der
Zeit auswählen.
AUFLADEN DER BATTERIE
1. Im Batteriemodus steht die Funktion Standby nicht zur Verfügung.
2. Auf der Bedieneinheit leuchtet die Lade-LED. Bei genügend hoher Batterieladung leuchtet diese LED
grün.
Bei geringer Batterieladung wird auf der Anzeige „LOW POWER“ (Batterie schwach) angezeigt und
die Lade-LED leuchtet rot.
HERAUSNAHME DER BATTERIE
1. Drehen Sie die Schrauben in der Rückenabdeckung heraus.
2. Nehmen Sie die Batterie heraus.
3. Klemmen Sie die Batterie ab.
ZUBEHÖ R
Fernbedienung
1 x
Bedienungsanleitung
1 x
Funkmikrofon
1 x
Netzkabel
1 x
Page 36

BEDIENUNG
36
TECHNISCHE DATEN
Frequenzbereich
20 Hz – 20 kHz
Stromquelle 230 V~/50 Hz/12 V DC
Leistungsaufnahme
120 W
Batterie
Bleiakku 12 V DC/7 Ah
Wiedergabezeit im Batteriebetrieb
Bis zu 12 Stunden bei 50 % Lautstärke
Ausgangsleistung
320 W (RMS)
Mikrofon
Funk 863 – 865 MHz
Bluetooth
V4.2
UKW-Radio
87,5 – 108 MHz
Geräteabmessung (B x T x H)
43 x 28 x 115 mm
Abmessung Hochtonlautsprecher 1 x 1"
Abmessung Tieftonlautsprecher 1 x 3"
Abmessung Tiefbasslautsprecher 2 x 12"
Gerätegewicht
29,2 kg
Betriebstemperatur
10 – 40 °C
■ Diese Angaben dienen lediglich als Richtwerte. Die Gewichts- und Größenangaben sind
Näherungswerte.
■ Unser Produkt wird permanent weiterentwickelt und unterliegt bezüglich Spezifikationen und
Funktionen stillschweigenden Änderungen.
Bitte beachten Sie
Dieses Produkt arbeitet im Frequenzbereich von 863 bis 865 MHz und darf nur in einer normalen
häuslichen Umgebung verwendet werden. Dieses Produkt ist mit seinem Verwendungszweck für
eine Verwendung innerhalb der meisten EU-Länder geeignet.
Der Benutzer hat die Frequenzen für den Ort auf Zulässigkeit zu überprüfen, in dem er das Gerät
verwenden möchte.
(Weiter Informationen finden Sie auf: https://www.apwpt.org)
Der Benutzer ist für die Verwendung des Produkts eigenverantwortlich. Lenco kann im Falle einer
anderen als die in dieser Bedienungsanleitung beschriebene Nutzung des Geräts nicht haftbar
gemacht werden.
Garantie
Lenco bietet Leistungen und Garantien im Einklang mit Europäischem Recht. Im Falle von Reparaturen
(sowohl während als auch nach Ablauf der Garantiezeit) sollten Sie deshalb Ihren Einzelhändler
kontaktieren.
Wichtiger Hinweis: Es ist nicht möglich, Geräte für Reparaturen direkt an Lenco zu schicken.
Wichtiger Hinweis: Falls dieses Gerät von einem nicht autorisierten Kundendienst geöffnet oder
darauf zugegriffen wird, erlischt die Garantie.
Page 37

BEDIENUNG
37
Dieses Gerät ist nicht für professionelle Zwecke geeignet. Falls das Gerät für
professionelle Zwecke eingesetzt wird, erlöschen alle Garantieverpflichtungen seitens
des Herstellers.
Haftungsausschluss
Aktualisierungen der Firmware und/oder Hardware-Komponenten werden regelmäßig durchgeführt.
Daher können einige der Anweisungen, Spezifikationen und Abbildungen in dieser Dokumentation
von Ihrer individuellen Situation abweichen. Alle in diesem Handbuch beschriebenen Elemente
dienen nur zur Illustration und treffen auf Ihre individuelle Situation möglicherweise nicht zu. Aus der
in diesem Handbuch getätigten Beschreibung können keine Rechtsansprüche oder
Leistungsanforderungen geltend gemacht werden.
Entsorgung des Altgeräts
Dieses Symbol zeigt an, dass das entsprechende Produkt oder dessen Batterie in
Europa nicht mit dem normalen Hausmüll entsorgt werden darf. Um die
ordnungsgemäße Abfallbehandlung des Produkts und dessen Batterie zu
gewährleisten, müssen diese im Einklang mit allen anwendbaren örtlichen
Vorschriften zur Entsorgung von Elektrogeräten und Batterien entsorgt werden.
Dabei helfen Sie, natürliche Ressourcen zu schonen und Umweltschutzstandards
zur Verwertung und Entsorgung von Altgeräten aufrecht zu halten (Waste
Electrical and Electronic Equipment Directive).
Service
Besuchen Sie bitte für weitere Informationen und unseren Kundendienst unsere Homepage
www.lenco.com
Lenco Benelux BV, Thermiekstraat 1a, 6361 HB Nuth, The Netherlands.
Page 38

38
Français
PMX-350
CAUTION:
Usage of controls or adjustments or performance of procedures other than those specified herein may
resulte in hazardous radiation exposure.
This unit should not be adjusted or repaired by anyone except qualified service personnel.
PRECAUTIONS BEFORE USE
KEEP THESE INSTRUCTIONS IN MIND:
1. Do not use this device near water.
2. Clean only with a slightly damp cloth.
3. Do not cover or block any ventilation openings. When placing the device on a shelf, leave 5 cm (2”) free
space around the whole device.
4. Install in accordance with the supplied user manual.
5. Don’t step on or pinch the power adaptor. Be very careful, particularly near the plugs and the cable’s
exit point. Do not place heavy items on the power adaptor, which may damage it. Keep the entire
device out of children’s reach! When playing with the power cable, they can seriously injure
themselves.
6. Unplug this device during lightning storms or when unused for a long period.
7. Keep the device away from heat sources such as radiators, heaters, stoves, candles and other heat-
generating products.
8. Avoid using the device near strong magnetic fields.
9. Electrostatic discharge can disturb normal usage of this device. If so, simply reset and restart the device
following the instruction manual. During file transmission, please handle with care and operate in a
static-free environment.
10. Warning! Never insert an object into the product through the vents or openings. High voltage flows
through the product and inserting an object can cause electric shock and/or short circuit internal parts.
For the same reason, do not spill water or liquid on the product.
11. Do not use in wet or moist areas such as bathrooms, steamy kitchens or near swimming pools.
12. Do not use this device when condensation may occur.
13. Although this device is manufactured with the utmost care and checked several times before leaving
the factory, it is still possible that problems may occur, as with all electrical appliances. If you notice
smoke, an excessive build-up of heat or any other unexpected phenomena, you should disconnect the
plug from the main power socket immediately.
14. This device must be well ventilated at all time!
15. This device must operate on a power source as specified on the specification label. If you are not sure
of the type of power supply used in your home, consult your dealer or local power company.
16. The socket outlet must be installed near the equipment and must be easily accessible.
17. Do not overload ac outlets or extension cords. Overloading can cause fire or electric shock.
18. Devices with class 1 construction should be connected to a main socket outlet with a protective
earthed connection.
19. Devices with class 2 construction do not require a earthed connection.
20. Keep away from rodents. Rodents enjoy biting on power cords.
21. Always hold the plug when pulling it out of the main supply socket. Do not pull the power cord. This
can cause a short circuit.
22. Avoid placing the device on any surfaces that may be subject to vibrations or shocks.
23. To protect the device during a thunderstorm, unplug the ac power adaptor.
24. When the device is not in use for long periods, unplug the ac power adaptor for safety reasons.
25. To clean the device, use a soft dry cloth. Do not use solvents or petrol based fluids. To remove severe
stains, you may use a damp cloth with dilute detergent.
26. The supplier is not responsible for damage or lost data caused by malfunction, misuse, modification of
the device or battery replacement.
Page 39

39
27. Do not interrupt the connection when the device is formatting or transferring files. Otherwise, data
may be corrupted or lost.
28. The usb memory stick should be plugged into the unit directly. Don’t use an usb extension cable
because it can cause interference resulting in failing of data.
29. The apparatus shall not be exposed to dripping or splashing and make sure that no objects filled with
liquids, such as vases, are placed on or near the apparatus.
30. To completely disconnect the power input, the mains plug of the apparatus shall be disconnected from
the mains, as the disconnect device is the mains plug of apparatus.
31. The mains plug of the apparatus should not be obstructed or should be easily accessed during intended
use.
32. Battery shall not be exposed to excessive heat such as sunshine, fire or the like.
33. Minimum distance of 10cm around the apparatus is needed for sufficient ventilations.
34. The ventilation should not be impeded by covering the ventilation openings with items such as
newspapers, table-cloths, curtains etc.
35. No naked flame sources such as lighted candles should be placed on the apparatus.
36. Attention should be drawn to the environmental aspects of battery disposal.
37. The apparatus can only be used in moderate extremely cold or climates warm environments should be
avoided.
38. The rating label has been marked on the bottom panel of the apparatus.
39. This device is not intended for use by people (including children) with physical, sensory or mental
disabilities, or a lack of experience and knowledge, unless they’re under supervision or have received
instructions about the correct use of the device by the person who is responsible for their safety.
40. This product is intended for household use only and not for commercial or industrial use.
41. Make sure the unit is adjusted to a stable position. Damage caused by using this product in an unstable
position or by failure to follow any other warning or precaution contained within this user manual will
not be covered by warranty.
42. Never remove the casing of this apparatus.
43. Never place this apparatus on other electrical equipment.
44. Do not use or store this product in a place where it is subject to direct sunlight, heat, excessive dust or
vibration.
45. Do not clean this product with water or other liquids.
46. Do not block or cover the slots and holes in the product.
47. Do not push foreign objects into the slots or holes in the product.
48. Do not allow children access to plastic bags.
49. Please check that the voltage on the type plate of your appliance corresponds with your house
electricity supply (type plate is located on the back of the unit).
50. Protect the power cord from being walked on or pinched, particularly at plugs, convenience
receptacles, and the point where they exit from the apparatus.
51. Only use attachments/accessories specified by the manufacturer.
52. Refer all servicing to qualified service personnel. Servicing is required when the apparatus has been
damaged in any way, such as the power supply cord or the plug, when liquid has been spilled or objects
have fallen into the apparatus, when the apparatus has been exposed to rain or moisture, does not
operate normally, or has been dropped.
53. Do not use a damaged power cord or plug or a loose outlet. Doing so may result in fire or electric shock.
Warning: prolonged exposure to loud sounds from personal music players may lead to temporary or
permanent hearing loss.
INSTALLATION
• Unpack all parts and remove protective material.
• Do not connect the unit to the mains before checking the mains voltage and before all other
connections have been made.
• Do not cover any vents and make sure that there is a space of several centimeters around the unit
for ventilation.
Page 40

PANNEAU ARRIÈRE
40
1. Interrupteur marche/arrêt
Pour basculer entre les modes ENTRÉE CC, ENTRÉE CA ou DÉSACTIVÉ.
Quand l’enceinte est réglée sur CA, elle fonctionne sur 230 V et la batterie se chargera.
Quand l'appareil est réglé sur OFF, il est hors tension et la batterie ne se charge pas.
Quand il est réglé sur CC, l’enceinte est alimentée par batterie.
2. ENTRÉE CC 12 V
L’enceinte peut être raccordée à la batterie de 12 V CC d’une voiture.
3. ANTENNE FM
4. ENTRÉE CA : CA 230 V~, 50 Hz
Page 41

FAÇADE
41
1. ÉCRAN LED
Pour afficher les informations de paramètres du système, le côté gauche de l’écran indique l'état
de ENTRÉE A, tandis que le côté droit de l’écran indique l'état de ENTRÉE B.
2. VOLUME/MULTI/EFFET DJ
Pivotez la molette pour régler le volume principal, le volume des écouteurs, les aiguës et les basses.
Appuyez brièvement sur cette touche pour choisir différents effets de musique : SCRATCH, REVERB,
BEAT BOX, YEAH, BRING IT, GEYA, COME ON. Appuyez longuement pour lire l’effet DRUMS
(batterie).
3. MODE ÉCOUTEURS
Appuyez sur cette touche pour choisir parmi les différents modes ÉCOUTEURS, ENTRÉE A, ENTRÉE
B et ENTRÉE AB.
4. PRÉC ENTRÉE B
Appuyez sur cette touche pour choisir la piste musicale précédente avec USB B.
5. SUIV ENTRÉE B
Appuyez sur cette touche pour choisir la piste musicale suivante avec USB B.
6. ENTRÉE B
Cela sert à régler le volume avec ENTRÉE B.
7. LECTURE/PAUSE ENTRÉE B
Appuyez sur cette touche pour choisir la lecture/mise en pause de la piste musicale suivante avec
ENTRÉE B.
En lisant une clé USB, appuyez longuement sur cette touche pour basculer entre compte à rebours
et compte positif et de durée de lecture.
8. MODE ENTRÉE B
Appuyez sur cette touche pour choisir un autre mode ENTRÉE B, LINE et USB B.
9. PRISE D'ENTRÉE D’ÉCOUTEURS
10. Prise d’entrée USB B
11. VOLUME DE LA GUITARE
Pour régler le volume de la GUITARE.
12. VOLUME DU MICROPHONE
Pour régler le volume du MICROPHONE.
13. ÉCHO
Pour régler l’ÉCHO de l’entrée MIC (micro).
14. Prise GUITARE
Page 42

FAÇADE
42
15. Prise MICRO
Page 43

FAÇADE
43
16. PRISE D’ENTRÉE AUDIO D’ENTRÉE DE LIGNE
Pour connecter une prise d’entrée de signal LINE IN (entrée de ligne).
17. INDICATEUR DE CHARGE
Quand la batterie est faible, le voyant de charge rouge est allumé. Lors de la charge, le voyant vert
est allumé.
18. PRISE D'ENTRÉE AUDIO AUX
Pour connecter une prise d'entrée de signal AUX.
19. Prise d’entrée USB A
20. Sur CA : CHARGE/VEILLE/NORMAL
Appuyez longuement sur cette touche pour mettre l'appareil en marche ou en veille. Appuyez
brièvement sur cette touche pour mettre l'appareil en mode CHARGE, VEILLE ou NORMAL.
Sur CC : NIVEAU DE BATTERIE
Appuyez sur cette touche pour afficher le niveau de batterie actuel.
21. MODE D’ENTRÉE A
Appuyez sur cette touche pour choisir parmi les différents modes ENTRÉE A : AUX A, BT A, FM et
USB A.
22. LECTURE/PAUSE ENTRÉE A
Appuyez sur cette touche pour choisir la lecture/mise en pause avec ENTRÉE A.
En lisant une clé USB, appuyez longuement sur cette touche pour basculer entre compte à rebours
et compte positif et de durée de lecture.
23. VOLUME D’ENTRÉE A
Cela sert à régler le volume de ENTRÉE A.
24. SUIV ENTRÉE A
Appuyez sur cette touche pour choisir la piste musicale suivante avec USB A.
25. PRÉC ENTRÉE A
Appuyez sur cette touche pour choisir la piste musicale précédente avec ENTRÉE USB A.
26. MENU
Cet interrupteur permet de sélectionner les modes volume principal, basses, aiguës, X Drive et
lumière.
Page 44

TÉLÉCOMMANDE
44
1. LUMIÈRE
2. MISE EN VEILLE
3. PAVÉ NUMÉRIQUE
4. RÉGLAGE-
5. CHAÎNE-
6. VOLUME+
7. X DRIVE
8. AIGUËS+
9. VOLUME-
10. AIGUËS-
11. AUX-A
12. USB-A
13. USB-A AVANCER
14. USB-A RECULER
15. LIGNE
16. USB-B
17. USB-B AVANCER
18. USB-B RECULER
19. MUET
20. FM
21. AUTO
22. RÉGLAGE+
23. CHAÎNE+
24. BT
25. DÉCONNECTER
26. BASSES+
27. BASSES-
28. ENTRÉE-A RÉPÉTER
29. ENTRÉE-A PAUSE
30. ENTRÉE-A PRÉCÉDENT
31. ENTRÉE-A SUIVANT
32. ENTRÉE-B RÉPÉTER
33. ENTRÉE-B PAUSE
34. ENTRÉE-B PRÉCÉDENT
35. ENTRÉE-B SUIVANT
FONCTIONNEMENT DE LA TÉLÉCOMMANDE :
□ Si la télécommande entre en conflit avec d’autres appareils, cela altèrera son fonctionnement.
□ N'appuyez pas simultanément sur des boutons sur l’appareil et la télécommande.
□ Évitez d’utiliser deux télécommandes en même temps, car cela causerait un dysfonctionnement.
□ Utilisez uniquement des piles UM-4 de taille « AAA ». Ne mélangez pas les batteries anciennes et neuves.
□ Si les batteries fuient, nettoyez soigneusement la télécommande avant de changer les piles.
□ Ne court-circuitez pas deux bornes des piles. Mettez au rebut les piles usagées dans un endroit approprié.
EN
INFRARED REMOTE CONTROL RECEIVER
5m
INFRARED REMOTE CONTROL UNIT
FR
RÉCEPTEUR DE LA TÉLÉCOMMANDE INFRAROUGE
5m
TÉLÉCOMMANDE INFRAROUGE
Page 45

MARCHE (EN...)
45
FONCTIONNEMENT NORMAL
1. Avec l’interrupteur marche/arrêt à l’arrière de l’enceinte, sélectionnez le mode CA ou DC CC.
2. Sélectionnez une source audio en appuyant sur la touche ENTRÉE A en façade pour afficher AUX A,
BT A, FM, USB A. Appuyez sur la touche INPUT B en façade pour afficher LINE (ligne), USB B.
Quand l'appareil est en mode CA :
- Un premier appui sur le bouton veille active le mode de charge, en affichant l'état de charge de
la batterie sur l'écran LED bleu.
- Une deuxième appui sur le bouton veille active l’enceinte et allume le voyant de charge vert.
- Vous pouvez également sélectionner le mode veille sans charger la batterie.
Quand l'appareil est en mode CC :
- un appui sur le bouton veille affiche le niveau de la batterie sur l'écran LED bleu.
3. Tournez la molette VOLUME/MULTI/DJ EFFECT en façade ou appuyez sur la touche VOL+/- de la
télécommande pour régler le volume principal. Ensuite, réglez le curseur du volume de ENTRÉE A et
utilisez le curseur du volume droit pour changer le volume de ENTRÉE B.
4. Pour régler les basses, les aiguës, X-Drive, les lumières de l’enceinte et le volume principal, appuyez
sur la touche menu pour sélectionner basses, aiguës, X-Drive et lumières de l’enceinte, puis pivotez
la grande molette VOLUME/MULTI/DJ EFFECT.
5. Sélection de la SORTIE ÉCOUTEURS. Appuyez sur le bouton PHONES MODE en façade pour afficher
ENTRÉE A, ENTRÉE B ou ENTRÉE AB et réglez le volume de A, B ou AB en pivotant la molette MULTI
DJ EFFECT.
6. Appuyez sur la touche LIGHT de la télécommande ou appuyez sur le bouton MENU en façade
jusqu’à ce que Speaker Light Mode (mode lumière de l’enceinte) s'affiche, puis pivotez la molette
VOLUME/MULTI/DJ EFFECT pour sélectionner les modes de lumière OFF (désactivé), R, G, B, RG, RB,
GB, RGB, AUTO ou DEMO.
7. Appuyez sur la touche MUTE de la télécommande pour mettre le son en sourdine, rappuyez dessus
pour réinitialiser.
8. Appuyez sur la touche X DRIVE de la télécommande pour activer/désactiver l’effet X-Bass.
OPTIONS DE COMMANDE DE COULEUR DE LUMIÈRE DE L’ENCEINTE
• R = lumières rouges clignotantes
• G = lumières vertes clignotantes
• B = lumières bleues clignotantes
• RG = lumières rouges et vertes clignotantes
RB = lumières rouges et bleues clignotantes
GB = lumières vertes et bleues clignotantes
• RGB = lumières rouges, vertes et bleues clignotantes
• Auto = les diverses combinaisons lumineuses alternent et clignotent.
• Demo = les lumières clignotent et changent de couleur comme si elles répondaient au rythme de la
musique.
Page 46

MARCHE (EN...)
46
APPLICATIONS DU SYTONISEUR
1. Avant d’utiliser les fonctions de la radio, vous devez régler l’antenne pour optimiser la réception.
Appuyez sur la touche ENTRÉE A en façade ou sur la touche FM de la télécommande pour
sélectionner la fonction « FM ».
2. Appuyez sur la touche AUTO de la télécommande ou le bouton Lecture du panneau de commande
de ENTRÉE A.
La machine recherchera les stations de radio par fréquence croissante automatiquement et
mémorisera les stations trouvées une par une.
3. Appuyez sur la touche CH+/CH- de la télécommande pour modifier les présélections de radio
mémorisées au préalable.
4. Maintenez enfoncée la touche TU+/TU- de la télécommande pour régler manuellement la
fréquence radio.
5. Pour sélectionner les stations de radio à partir du panneau de commande, maintenez enfoncés les
boutons suiv/préc.
FONCTIONS KARAOKÉ ET GUITARE
1. L'appareil peut détecter automatiquement si un MICROPHONE ou une GUITARE sont raccordés.
Désactivez le volume du microphone avec la molette MIC.VOL en façade et réglez le volume
progressivement après avoir branché le microphone.
2. Réglez la molette ECHO en façade pour modifier l’ÉCHO du microphone.
3. Réglez la molette GUITAR VOL en façade pour modifier le VOLUME de la guitare.
Remarque : Ne touchez pas le dessus du microphone en chantant afin d’éviter un effet d’hurlement.
Réglez progressivement le volume du microphone afin d'éviter un effet d’hurlement.
APPARIEMENT ET CONNEXION PAR BLUETOOTH
• Éteignez tous les appareils Bluetooth précédemment appariés (associés) à cet appareil.
• Activez la fonction Bluetooth sur votre téléphone ou votre lecteur audio.
• Mettez en marche cet appareil et réglez-le en mode Bluetooth. Le voyant bleu clignotant « BT » sur
l'écran LED indique que l'appareil est en mode d'appariement.
• Recherchez les appareils Bluetooth avec votre téléphone ou lecteur audio.
• Sélectionnez «PMX-350 » dans les résultats de recherche sur votre téléphone ou lecteur audio.
• Sélectionnez OK ou YES (oui) pour apparier cet appareil avec votre téléphone ou lecteur audio.
• Si un mot de passe est demandé, saisissez 0000, puis la connexion sera établie si le voyant bleu reste
allumé.
• Appuyez sur la touche « DISCONNECT » sur la télécommande pour désactiver la fonction Bluetooth.
Page 47

MARCHE (EN...)
47
UTILISATION D’UNE CLÉ USB
Interface USB
Cet appareil a deux prises USB. Appuyez sur la touche ENTRÉE A pour sélectionner USB A, puis vous
pouvez insérer une clé USB pour lire de la musique. Appuyez sur la touche ENTRÉE B pour
sélectionner USB B, puis vous pouvez insérer une autre clé USB pour lire de la musique.
Important : Le port USB est conçu uniquement pour transférer des données, d’autres appareils
ne peuvent pas être utilisés avec cette connexion USB. Il est déconseillé d’utiliser des rallonges
USB.
AFFICHAGE DE L'HEURE
En mode USB, l'écran peut afficher la durée écoulée ou restante.
En appuyant longuement sur la touche lecture/pause, vous pouvez sélectionner l'affichage
négatif ou positif de la durée.
CHARGE DE LA BATTERIE
1. Quand l'appareil est en alimenté par batterie, la commande de veille est indisponible.
2. Le panneau de commande a un voyant de charge. Quand la batterie est suffisamment chargée, le
voyant vert est allumé.
Quand la batterie est faible, le système affiche le message « LOW POWER » (batterie faible) et le
voyant rouge est allumé.
DÉMONTAGE DE LA BATTERIE
1. Enlevez les vis sur le panneau arrière.
2. Sortez la batterie.
3. Déconnectez la batterie.
ACCESSOIRES
Télécommande
1 pc
Mode d’emploi
1 pc
Microphone sans fil
1 pc
Câbles d'alimentation CA
1 pc
Page 48

MARCHE (EN...)
48
CARACTÉRISTIQUES
Réponse en fréquence
20 Hz à 20 kHz
Source d’alimentation
230V~, 50Hz/12VCC
Puissance consommée 120 W
Batterie
Plomb/acide 12 VCC, 7 Ah
Autonomie en lecture CC
~12 h à 50 % du volume
Sortie d’alimentation
320W (RMS)
Microphone
Sans fil 863 à 865 MHz
Bluetooth
V4.2
Radio FM 87,5 à 108 MHz
Dimensions de l’appareil (L X P X H)
43 x 28 x 115 mm
Taille du haut-parleur d'aiguës
1 x 1 pouces
Taille du haut-parleur
1 x 3 pouces
Taille du caisson de basses
2 x 12 pouces
Poids de l’appareil 29,2 kg
Température de fonctionnement
10 à 40 °C
■ Les caractéristiques sont indiquées uniquement à titre indicatif. Les valeurs de poids et de taille
sont des approximations.
■ Étant donné que nous améliorons constamment nos produits, leurs caractéristiques et fonctions
peuvent changer sans préavis.
Remarque
Ce produit fonctionne à une fréquence de 863 à 865 MHz et il est conçu pour être utilisé uniquement
au sein d’un environnement privé normal. Ce produit convient à cette fin dans la plupart des pays de
l’UE.
L’utilisateur doit vérifier les fréquences permises du pays où l'appareil sera utilisé.
(Pour en savoir plus, visitez : https://www.apwpt.org)
L'utilisateur est responsable de l’utilisation de cet appareil. La société Lenco ne peut être pas tenue
pour responsable si cet appareil est utilisé à d’autres fins que celles décrites dans ce mode d’emploi.
Garantie
Lenco propose un service et une garantie conformément à la législation européenne, ce qui signifie
qu’en cas de besoin de réparation (aussi bien pendant et après la période de garantie), vous pouvez
contacter votre revendeur le plus proche.
Remarque importante : Il n’est pas possible de renvoyer l’appareil pour réparation directement à Lenco.
Remarque importante : Si l’unité est ouverte ou modifiée de quelque manière que ce soit par un
réparateur non agréé, la garantie serait caduque.
Cet appareil ne convient pas à une utilisation professionnelle. En cas d’utilisation professionnelle, les
obligations de garantie du fabricant seront annulées.
Page 49

MARCHE (EN...)
49
Clause de non-responsabilité
Des mises à jour du logiciel et/ou des composants informatiques sont régulièrement effectuées. Il se
peut donc que certaines instructions, caractéristiques et images présentes dans ce document diffèrent
légèrement de votre configuration spécifique. Tous les articles décrits dans ce guide sont fournis
uniquement à des fins d’illustration et peuvent ne pas s’appliquer à une configuration spécifique. Aucun
droit légal ne peut être obtenu depuis les informations contenues dans ce manuel.
Mise au rebut de l’appareil usagé
Ce symbole indique que le produit électrique concerné ou la batterie ne doivent
pas être jetés parmi les autres déchets ménagers en Europe. Pour garantir un
traitement correct du déchet de la batterie ou de l’appareil, veuillez les mettre
au rebut conformément aux règlements locaux en vigueur relatifs aux appareils
électriques et autres batteries. En agissant de la sorte, vous contribuerez à la
préservation des ressources naturelles et à l’amélioration des niveaux de
protection environnementale concernant le traitement et la destruction des
déchets électriques (directive sur les déchets des équipements électriques et
électroniques).
Service après-vente
Pour en savoir plus et obtenir de l’assistance, visitez www.lenco.com
Lenco Benelux BV, Thermiekstraat 1a, 6361 HB, Nuth, Pays-Bas
Page 50

50
Español
PMX-350
CAUTION:
Usage of controls or adjustments or performance of procedures other than those specified herein may
resulte in hazardous radiation exposure.
This unit should not be adjusted or repaired by anyone except qualified service personnel.
PRECAUTIONS BEFORE USE
KEEP THESE INSTRUCTIONS IN MIND:
1. Do not use this device near water.
2. Clean only with a slightly damp cloth.
3. Do not cover or block any ventilation openings. When placing the device on a shelf, leave 5 cm (2”) free
space around the whole device.
4. Install in accordance with the supplied user manual.
5. Don’t step on or pinch the power adaptor. Be very careful, particularly near the plugs and the cable’s
exit point. Do not place heavy items on the power adaptor, which may damage it. Keep the entire
device out of children’s reach! When playing with the power cable, they can seriously injure
themselves.
6. Unplug this device during lightning storms or when unused for a long period.
7. Keep the device away from heat sources such as radiators, heaters, stoves, candles and other heat-
generating products.
8. Avoid using the device near strong magnetic fields.
9. Electrostatic discharge can disturb normal usage of this device. If so, simply reset and restart the device
following the instruction manual. During file transmission, please handle with care and operate in a
static-free environment.
10. Warning! Never insert an object into the product through the vents or openings. High voltage flows
through the product and inserting an object can cause electric shock and/or short circuit internal parts.
For the same reason, do not spill water or liquid on the product.
11. Do not use in wet or moist areas such as bathrooms, steamy kitchens or near swimming pools.
12. Do not use this device when condensation may occur.
13. Although this device is manufactured with the utmost care and checked several times before leaving
the factory, it is still possible that problems may occur, as with all electrical appliances. If you notice
smoke, an excessive build-up of heat or any other unexpected phenomena, you should disconnect the
plug from the main power socket immediately.
14. This device must be well ventilated at all time!
15. This device must operate on a power source as specified on the specification label. If you are not sure
of the type of power supply used in your home, consult your dealer or local power company.
16. The socket outlet must be installed near the equipment and must be easily accessible.
17. Do not overload ac outlets or extension cords. Overloading can cause fire or electric shock.
18. Devices with class 1 construction should be connected to a main socket outlet with a protective
earthed connection.
19. Devices with class 2 construction do not require a earthed connection.
20. Keep away from rodents. Rodents enjoy biting on power cords.
21. Always hold the plug when pulling it out of the main supply socket. Do not pull the power cord. This
can cause a short circuit.
22. Avoid placing the device on any surfaces that may be subject to vibrations or shocks.
23. To protect the device during a thunderstorm, unplug the ac power adaptor.
24. When the device is not in use for long periods, unplug the ac power adaptor for safety reasons.
25. To clean the device, use a soft dry cloth. Do not use solvents or petrol based fluids. To remove severe
stains, you may use a damp cloth with dilute detergent.
26. The supplier is not responsible for damage or lost data caused by malfunction, misuse, modification of
the device or battery replacement.
Page 51

51
27. Do not interrupt the connection when the device is formatting or transferring files. Otherwise, data
may be corrupted or lost.
28. The usb memory stick should be plugged into the unit directly. Don’t use an usb extension cable
because it can cause interference resulting in failing of data.
29. The apparatus shall not be exposed to dripping or splashing and make sure that no objects filled with
liquids, such as vases, are placed on or near the apparatus.
30. To completely disconnect the power input, the mains plug of the apparatus shall be disconnected from
the mains, as the disconnect device is the mains plug of apparatus.
31. The mains plug of the apparatus should not be obstructed or should be easily accessed during intended
use.
32. Battery shall not be exposed to excessive heat such as sunshine, fire or the like.
33. Minimum distance of 10cm around the apparatus is needed for sufficient ventilations.
34. The ventilation should not be impeded by covering the ventilation openings with items such as
newspapers, table-cloths, curtains etc.
35. No naked flame sources such as lighted candles should be placed on the apparatus.
36. Attention should be drawn to the environmental aspects of battery disposal.
37. The apparatus can only be used in moderate extremely cold or climates warm environments should be
avoided.
38. The rating label has been marked on the bottom panel of the apparatus.
39. This device is not intended for use by people (including children) with physical, sensory or mental
disabilities, or a lack of experience and knowledge, unless they’re under supervision or have received
instructions about the correct use of the device by the person who is responsible for their safety.
40. This product is intended for household use only and not for commercial or industrial use.
41. Make sure the unit is adjusted to a stable position. Damage caused by using this product in an unstable
position or by failure to follow any other warning or precaution contained within this user manual will
not be covered by warranty.
42. Never remove the casing of this apparatus.
43. Never place this apparatus on other electrical equipment.
44. Do not use or store this product in a place where it is subject to direct sunlight, heat, excessive dust or
vibration.
45. Do not clean this product with water or other liquids.
46. Do not block or cover the slots and holes in the product.
47. Do not push foreign objects into the slots or holes in the product.
48. Do not allow children access to plastic bags.
49. Please check that the voltage on the type plate of your appliance corresponds with your house
electricity supply (type plate is located on the back of the unit).
50. Protect the power cord from being walked on or pinched, particularly at plugs, convenience
receptacles, and the point where they exit from the apparatus.
51. Only use attachments/accessories specified by the manufacturer.
52. Refer all servicing to qualified service personnel. Servicing is required when the apparatus has been
damaged in any way, such as the power supply cord or the plug, when liquid has been spilled or objects
have fallen into the apparatus, when the apparatus has been exposed to rain or moisture, does not
operate normally, or has been dropped.
53. Do not use a damaged power cord or plug or a loose outlet. Doing so may result in fire or electric shock.
Warning: prolonged exposure to loud sounds from personal music players may lead to temporary or
permanent hearing loss.
INSTALLATION
• Unpack all parts and remove protective material.
• Do not connect the unit to the mains before checking the mains voltage and before all other
connections have been made.
• Do not cover any vents and make sure that there is a space of several centimeters around the unit
for ventilation.
Page 52

PANEL FRONTAL
52
1. Interruptor de encendido
Modos de cambio ENTRADA CC, ENTRADA CA u off.
Cuando se cambia al estado CA, el altavoz funciona a 230V y se cargará la batería.
Cuando se cambia a apagado, la alimentación está apagada y no hay carga de la batería.
Cuando se cambia a CC, el altavoz está alimentado por la batería.
2. ENTRADA CC DE 12V
El altavoz puede conectarse a la batería CC de 12V de un vehículo.
3. ANTENA FM
4. ENTRADA CA CA 230V~, 50Hz
Page 53

PANEL FRONTAL
53
1. PANTALLA LED
Información de parámetros del sistema de pantalla: la parte izquierda de la pantalla muestra el
estados de la ENTRADA A; la parte derecha de la pantalla muestra el estado de ENTRADA B
2. VOLUMEN/MULTI/EFECTO DJ
Gire el dial para ajustar el volumen principal, el volumen del teléfono, los bajos y agudos. Pulse
brevemente esta tecla para elegir los diferentes efectos musicales, SCRATCH, REVERB, BEAT BOX,
YEAH, BRING IT, GEYA, COME ON. Púlsela durante un periodo prolongado de tiempo para
reproducir el efecto de PERCUSIÓN.
3. MODO TELÉFONO
Pulse esta tecla para elegir los diferentes modos AURICULARES, ENTRADA A, ENTRADA B, ENTRADA
AB
4. ENTRADA B ANTERIOR
Pulse esta tecla para elegir la música anterior con USB B
5. ENTRADA B SIGUIENTE
Pulse esta tecla para elegir la siguiente música con USB B
6. ENTRADA B VOLUMEN
Esto se usa para ajustar el volumen con ENTRADA B
7. ENTRADA B REPRODUCIR/HACER UNA PAUSA
Pulse esta tecla para elegir reproducir/hacer una pausa en la música con ENTRADA B
Cuando reproduzca un USB, pulse esta tecla durante un periodo prolongado de tiempo para
cambiar la cuenta atrás o cuenta hacia delante de la reproducción.
8. MODO ENTRADA B
Pulse esta tecla para elegir entre los diferentes modos ENTRADA B, LÍNEA, USB B
9. TOMA DE ENTRADA DE AURICULARES
10. Toma de entrada USB B
11. VOLUMEN DE LA GUITARRA
Ajusta el volumen de la GUITARRA
12. VOLUMEN DEL MICRÓ FONO
Ajusta el volumen del MICRÓFONO
13. ECO
Ajusta el ECO de la entrada del MICRÓFONO
14. Toma de GUITARRA
15. Toma de MICRÓ FONO
16. TOMA DE ENTRADA DE AUDIO DE TOMA DE LÍNEA
Conéctela a la soma de entrada de señal LINE IN (ENTRADA DE LÍNEA).
17. INDICADOR DE CARGA
Cuando la batería está baja, la luz de carga está de color rojo. Cuando está cargando la luz es de
color verde.
Page 54

PANEL FRONTAL
54
18. TOMA DE ENTRADA DE AUDIO AUXILIAR
Conéctelo a la toma de entrada de señal AUXILIAR.
19. Toma de entrada USB A
20. en CA: CARGA/EN ESPERA/NORMAL
Pulsar durante un periodo prolongado esta tecla enciende o pone la unidad en espera. Pulsar
brevemente esta tecla enciende la unidad en modo CARGA, EN ESPERA o NORMAL
En CC: NIVEL DE BATERÍA
Al pulsar esta tecla se muestra el nivel de batería actual.
21. MODO DE ENTRADA A
Pulse esta tecla para elegir los diferentes modos de ENTRADA A, AUX A, BT A, FM, USB A
22. ENTRADA A REPRODUCCIÓ N/PAUSA
Pulse esta tecla para elegir reproducción/pausa de la música con ENTRADA A
Mientras reproduce un USB, pulsar durante un periodo prolongado de tiempo esta tecla cambia la
cuenta atrás o cuenta hacia delante del tiempo de reproducción.
23. ENTRADA A VOLUMEN
Esto se usa para ajustar el volumen de ENTRADA A
24. ENTRADA A SIGUIENTE
Pulse esta tecla para elegir la siguiente música con USB A
25. ENTRADA A ANTERIOR
Pulse esta tecla para elegir la música anterior con ENTRADA USB A
26. MENU
Este interruptor selecciona el modo de volumen principal, bajos, agudos, x-drive y luz.
Page 55

MANDO A DISTANCIA
55
1. LUZ
2. ESPERA
3. BOTONES NUMÉRICOS
4. SINTONIZANDO-
5. CANAL-
6. VOLUMEN+
7. DRIVE X
8. AGUDOS+
9. VOLUMEN-
10. AGUDOS-
11. AUXILIAR-A
12. USB-A
13. USB-A HACIA DELANTE
14. USB-A HACIA ATRÁS
15. LÍNEA
16. USB-B
17. USB-B HACIA DELANTE
18. USB-B HACIA ATRÁS
19. SILENCIO
20. FM
21. AUTOMÁTICO
22. SINTONIZAR+
23. CANAL+
24. BT
25. DESCONECTAR
26. BASE+
27. BASE-
28. ENTRADA-A REPETIR
29. ENTRADA-A PAUSA
30. ENTRADA-A ANTERIOR
31. ENTRADA-A SIGUIENTE
32. ENTRADA-B REPETIR
33. ENTRADA-B PAUSA
34. ENTRADA-B ANTERIOR
35. ENTRADA-B SIGUIENTE
FUNCIONAMIENTO DEL MANDO A DISTANCIA:
□ Si el mando a distancia entra en conflicto con otros dispositivos, se verá afectado su funcionamiento.
□ No pulse simultáneamente botones en la unidad y en el mando a distancia.
□ Evite usar dos mandos a distancia a la vez ya que esto provocará un funcionamiento incorrecto.
□ Use únicamente pilas UM-4 tamaño ‘AAA’. No mezcle pilas antiguas con nuevas.
□ Si las pilas presentan fugas, limpie bien el mando a distancia antes de sustituir las pilas.
□ No cortocircuite dos terminales de las pilas. Deshágase de las pilas antiguas en un lugar adecuado.
EN
INFRARED REMOTE CONTROL RECEIVER
5m
INFRARED REMOTE CONTROL UNIT
ES
RECEPTOR DEL MANDO A DISTANCIA POR
INFRARROJOS
5m
UNIDAD DEL MANDO A DISTANCIA POR INFRARROJOS
Page 56

FUNCIONAMIENTO
56
FUNCIONAMIENTO NORMAL
1. Seleccione el interruptor de alimentación situado en la parte posterior de la unidad del altavoz bien
en modo CA o CC.
2. Seleccione una fuente de audio pulsando la tecla ENTRADA A situada en el panel frontal para
mostrar AUX A, BT A, FM, USB A. Pulse la tecla ENTRADA B situada en el panel frontal para mostrar
LINE, USB B.
Cuando la unidad está en modo CA:
- Pulsar una vez el botón en espera active el modo de carga, mostrando el estado de carga de la
batería en la pantalla LED de color azul.
- Pulsar el botón en espera una segunda vez activará el altavoz y mostrará la luz de carga de
color verde.
- Asimismo puede seleccionar el modo en espera sin cargar la batería.
Cuando la unidad está en modo CC:
- Pulsar el botón en espera muestra el nivel de batería en la pantalla LED de color azul
3. Gire el dial VOLUME/MULTI/DJ EFFECT en el panel de control o la tecla VOL+/- en el mando a
distancia para ajustar el volumen principal. Posteriormente ajuste el deslizador de volumen de
ENTRADA A y use el deslizador de volumen derecho para cambiar el volumen de ENTRADA B.
4. Para ajustar los bajos, agudos, X-drive, luces del altavoz y volumen principal pulse la tecla del menú
para seleccionar los bajos, agudos, X-drive, luces del altavoz, y después gire el dial grande
VOLUME/MULTI/DJ EFFECT.
5. Selección de SALIDA DE TELÉFONO. Pulse el botón PHONES MODE en el panel de control para
mostrar ENTRADA A, ENTRADA B, o ENTRADA AB y ajuste el volumen de A, B o AB girando el dial de
multi efectos DJ.
6. Pulse el botón LIGHT en el mando a distancia o pulse el botón MENU situado en el panel frontal
hasta que se muestre el modo luz del altavoz; posteriormente, gire el dial de VOLUME/MULTI/DJ
EFFECT para seleccionar OFF, R, G, B, RG, RB, GB, RGB, AUTO, modo de luz DEMO.
7. Pulse la tecla MUTE en el mando a distancia para silenciarlo; vuélvalo a pulsar para reanudarlo.
8. Pulse X DRIVE en el mando a distancia para conectar/desconectar el efecto X-Bass.
OPCIONES DE CONTROL DE COLOR DE LAS LUCES DEL ALTAVOZ
• R = parpadean las luces rojas
• G = parpadean las luces verdes
• B = parpadean las luces azules
• RG = parpadean las luces rojas y verdes RB = parpadean las luces rojas y azules GB = parpadean las
luces verdes y azules
• RGB = parpadean las luces rojas, verdes y azules
• Auto = las diversas combinaciones de colores cambian y parpadean.
• Demo = las luces parpadean y cambian de color como si respondieran al ritmo de la música.
Page 57

FUNCIONAMIENTO
57
APLICACIONES DE LA RADIO
1. Antes de usar las funciones de la radio, debe ajustar la antena para obtener la recepción óptima.
Pulse la tecla ENTRADA A en el panel frontal o la tecla FM en el mando a distancia para seleccionar
la función “FM”.
2. Pulse la tecla AUTO en el mando a distancia o el botón reproducir en el panel de control de
ENTRADA A.
El aparato buscará canales de radio desde la frecuencia baja a la frecuencia alta y guarda los canales
encontrados uno a uno.
3. Pulse la tecla CH+/CH- en el mando a distancia para cambiar las presintonías de radio que se hayan
guardado previamente.
4. Mantenga pulsada la tecla TU+/TU- en el mando a distancia para ajustar manualmente la frecuencia
de radio.
5. Para seleccionar emisoras de radio del panel de control, mantenga pulsados los botones
siguiente/anterior.
FUNCIÓ N KARAOKE Y GUITARRA
1. El aparato puede conectar automáticamente si se ha conectado un MICRÓ FONO o una GUITARRA.
Por favor, apague del micrófono con el dial MIC.VOL situado en el panel frontal y ajuste el volumen
gradualmente tras insertar el micrófono.
2. Ajuste el dial ECO situado en el panel frontal para cambiar el micrófono a ECO.
3. Ajuste el dial GUITAR VOL en el panel frontal para cambiar el VOLUMEN de la guitarra.
Nota: No toque la parte superior del micrófono cuando cante para evitar el efecto aullido.
Ajuste gradualmente el volumen del micrófono para evitar el efecto aullido.
EMPAREJAMIENTO Y CONEXIÓN BLUETOOTH
• Desconecte cualquier dispositivo Bluetooth previamente emparejados (vinculados) con esta unidad.
• Conecte la propiedad Bluetooth de su teléfono o reproductor de música.
• Conecte y fije esta unidad en modo Bluetooth. La luz azul que parpadea “BT” en la pantalla LED indica
que se encuentra en modo emparejamiento.
• Fije su teléfono o reproductor de música para que busque los dispositivos Bluetooth.
• Seleccione ‘PMX-350’ de los resultados de la búsqueda en su teléfono o reproductor de música.
• Seleccione OK o YES (SÍ) para emparejar esta unidad con su teléfono o reproductor de música.
• Si está protegido, introduzca 0000 como contraseña; la luz azul constante indica una conexión con
éxito.
• Pulse la tecla DISCONNECT en el mando a distancia para desconectar el Bluetooth.
Page 58

FUNCIONAMIENTO
58
FUNCIÓ N DEL LECTOR USB
Interfaz USB
Esta unidad dispone de dos tomas USB. Pulse la tecla ENTRADA A para seleccionar USB A;
posteriormente, puede insertar una memoria USB para reproducir música. Pulse la tecla ENTRADA B
para seleccionar USB A; posteriormente, puede insertar otra memoria USB para reproducir música.
Importante: El puerto USB tiene como finalidad únicamente la transferencia de datos; no se pueden
usar otros dispositivos con esta conexión USB. No se recomienda el uso de cables de extensión USB.
MOSTRAR HORA
En modo USB, la pantalla puede mostrar bien el tiempo transcurrido o el tiempo restante.
Pulsando durante un periodo prolongado de tiempo la tecla reproducción/pausa, puede seleccionar la
pantalla positiva o negativa del tiempo.
CARGAR LA BATERÍA
1. Cuando la batería está en modo alimentada, no se puede usar el funcionamiento en espera.
2. El panel de control dispone de una luz de carga. Cuando la batería está lo suficientemente cargada,
la luz es de color verde.
Cuando la batería está baja, la pantalla del sistema avisa de ‘LOW POWER’ (BATERÍA BAJA) y la luz
de vuelve de color rojo.
DESMONTAJE DE LA BATERÍA
1. Retire los tornillos del panel posterior.
2. Extraiga la batería.
3. Desconecte la batería
ACCESORIOS
Mando a distancia
1 unidad
Manual de instrucciones
1 unidad
Micrófono inalámbrico
1 unidad
Cable de alimentación CA
1 unidad
Page 59

FUNCIONAMIENTO
59
ESPECIFICACIONES
Respuesta de frecuencia
20Hz-20KHz
Fuente de alimentación
230V~, 50Hz/12VCC
Consumo de energía 120W
Batería Plomo/Ácido 12VCC, 7 Ah
Tiempo de reproducción CC
~12 horas al 50% de volumen
Potencia de salida 320W (RMS)
Micrófono
Inalámbrico 863-865 MHz
Bluetooth
V4.2
Radio FM
87,5-108 MHz
Tamaño de la unidad (A x D x A)
43 x 28 x 115 mm
Tamaño del altavoz de agudos
2,54 x 2,54 cm
Tamaño del woofer 2,54 x 7,62 cm
Tamaño del subwoofer
5,08 x 30,48 cm
Peso de la unidad
29,2 kg
Temperatura de funcionamiento
10-40 °C
■ La especificación se presenta solo como referencia. Los valores del peso y del tamaño son
aproximados.
■ Nuestro producto se mejora constantemente y las especificaciones y funciones pueden cambiarse
sin previo aviso.
Tenga en cuenta
Este producto opera a una frecuencia de 863-865 MHz y está diseñado sólo para usarse en un entorno
doméstico normal. Este producto es adecuado para su uso con esta finalidad en la mayoría de los países
de la UE.
El usuario debe comprobar las frecuencias permitidas del país donde se usará la unidad.
(Se puede obtener más información en : https://www.apwpt.org)
El usuario es responsable del uso de esta unidad. Lenco no asume ninguna responsabilidad si se usa
esta unidad para una finalidad diferente a aquella descrita en este manual.
Garantía
Lenco ofrece servicio y garantía en cumplimiento con las leyes de la Unión Europea, lo cual implica que,
en caso de que su producto precise ser reparado (tanto durante como después del periodo de garantía),
deberá contactar directamente con su distribuidor.
Nota importante: No es posible enviar sus reparaciones directamente a Lenco.
Nota importante: Si la unidad es abierta por un centro de servicio no oficial, la garantía quedará
anulada.
Este aparato no es adecuado para el uso profesional. En caso de darle un uso profesional, todas las
obligaciones de garantía del fabricante quedarán anuladas.
Page 60

FUNCIONAMIENTO
60
Exención de responsabilidad
Regularmente se llevan a cabo actualizaciones en el Firmware y en los componentes del hardware. Por
esta razón, algunas de las instrucciones, especificaciones e imágenes incluidas en este documento
pueden diferir ligeramente respecto a su situación particular. Todos los elementos descritos en esta
guía tienen un objetivo de mera ilustración, y pueden no ser de aplicación en su situación particular. No
se puede obtener ningún derecho ni derecho legal a partir de la descripción hecha en este manual.
Eliminación del antiguo dispositivo
Este símbolo indica que no deberá deshacerse del producto eléctrico o batería
en cuestión junto con los residuos domésticos, en el ámbito de la UE. Para
garantizar un tratamiento residual correcto del producto y su batería, por favor,
elimínelos cumpliendo con las leyes locales aplicables sobre requisitos para el
desechado de equipos eléctricos y baterías. De hacerlo, ayudará a conservar
recursos naturales y mejorar los estándares de protección medioambiental en el
tratamiento y eliminación de residuos eléctricos (Directiva sobre la Eliminación
de Equipos Eléctricos y Electrónicos).
Servicio
Para obtener más información y soporte del departamento técnico, por favor, visite la página web
www.lenco.com
Lenco Benelux BV, Thermiekstraat 1a, 6361 HB, Nuth, Países Bajos.
 Loading...