

Page 1
Version: 1.0
Model : PDR-020
USER MANUAL
DAB+/FM Radio
HANDLEIDING
DAB+/FM-radio
BENUTZERHANDBUCH
DAB+/UKW-Radio
MODE D'EMPLOI
Radio DAB+/FM
MANUAL DEL USUARIO
Radio DAB+/FM
Page 2

Version: 1.0
Index:
English ..................................................................................................................................................... 3
Nederlands ............................................................................................................................................ 11
Deutsch ................................................................................................................................................. 19
Français ................................................................................................................................................. 28
Español .................................................................................................................................................. 37
Page 3

3
English
DAB+/FM Radio
General Safety
General precautions
Install the unit in accordance with the manufacturer’s instructions. Do not install it near any heat
sources such as radiators, heart registers, stoves or other objects (including amplifiers) that produce
heat.
Only use the unit with the accessories that are sold with the unit.
To ensure proper ventilation and operation, do not block any ventilation openings.
Unplug the unit from the charging power source during lightning storms.
Excessive sound pressure from earphones and headphones can cause hearing loss.For the sake of
your health, always keep the volume at a low to moderate level when using eraphones/headphones.
Keep candles or other open flams away from this product at all times.
Placing this radio near a TV, refrigerator, microwave oven, amplifier or DVD player and may
adversely affect the sound quality.In such a case, move the radio away from the device that causes
the interference.
Do not install or place this radio in a bookcase, built-in cabinet or in another confined space.Insure
the unit is well ventilated.
This product is not intended for the use by persons (including children) with reduced physical,
sensory or mental capabilities, or lack of experience and know ledge, unless they have been given
supervision or instruction concering the use of the appliance by a person responsible or their safety.
Supervise children to ensure they do not play with the appliance.
Keep the original packaging for future transport of the radio.For maximum protection, repack the
unit as it was originally packaged.
Ensure to unplug adaptor form the unit before cleaning.
Only use a soft, dry cloth for cleaning the unit and the display screen.
Do not use any type of solvent, such as thinner and benzene, as they may cause damage to the
surface of the radio.
Before first use
Unpack the appliance but keep all packaging meaterials until you have made sure your new DAB
Radio is undamaged and in good working order, Plastic wrapping can be suffocation hazard for
babies and young children, so ensure all packaging materials are out of their reach.
Page 4

4
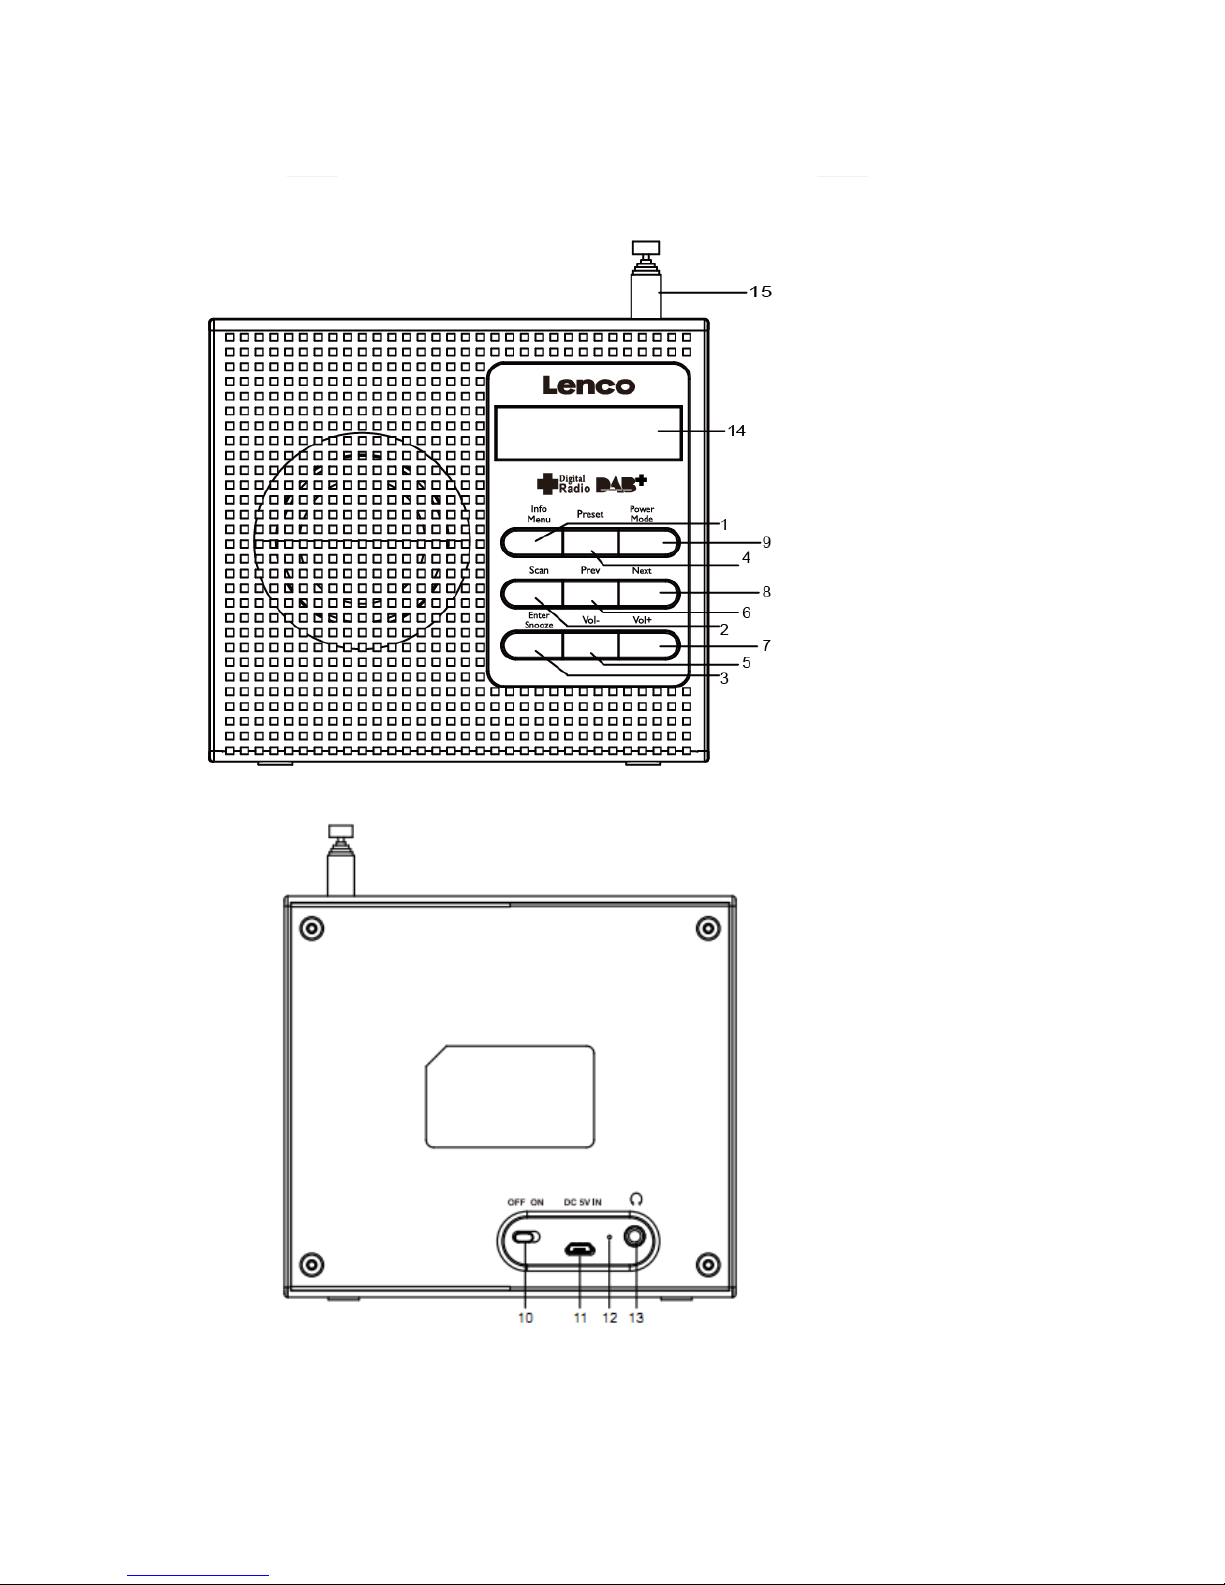
Product Overview
1. Info/Menu
Press and hold to access menu settings.
2. Scan
Auto-scan all DAB and FM stations.
3. Enter/Snooze
Press to activate 9 minutes mode when the alarm is sounding.
Page 5

5
4. Preset
Store and access up to 10 DAB and 10 FM Station Presets.
5. Vol-
Decrease the volume.
6. Prev
Select previous frequency, station, preset station or menu option.
7. Vol+
Increase the volume.
8. Next
Select next frequency, station, preset station or menu option.
9. Power/Mode
While the radio is on, press to switch between DAB and FM modes.
10. Power on/off switch
While the radio is on, slide to switch it off. While the radio is off, slide to
switch it on.
11. DC 5V,1A Power connector
12. Charging Light Indicator
13. 3.5mm Headphone Socket
14. LCD display
15. Telescopic Antenna
Instructions
Basic operations
Switch on your DAB Radio for the first time
Slide the OFF/ON switch to the ON position on the back of your DAB radio to power up the DAB
radio.
Extend the telescopic antenna for the best reception possible.
Then press the Power/Mode button to turn the radio on.
When DAB mode is activated for the first time, a full scan will automatically commence, or will play
the last station before the unit was turned off.
Once the radio has been switched ON, press the Power/Mode button to switch between DAB and
FM modes.
During scanning the screen will display a slide bar that indicates the progress of the scan, and the
amount of radio stations that have been found so far. Once the scan has finished, the radio will
select the first alphanumeric station.
Slide the ON/OFF switch to the OFF positin to turn the DAB radio off.
Note: Long press power button and unit will go to standby mode.
Selecting the modes
When the DAB radio is turned on, press the power/Mode button repeatedly to switch between DAB
and FM modes.
Adjusting volume
Press the VOL+ or VOL- button to increase/decrease the volume.
DAB operation
To listen to the tuned stations press either the PREV or NEXT buttons. Each time you press the
PREV/NEXT burrons, you wll skip to the previous or next stored station.
The radio will display the station name.
Page 6

6
Memory
When you power up the radio again after a switch off.it will automatically tune into the same station
(DAB of FM) that was last selected.
Storing stations
You can store up to 10DAB stations to the memory presets for quick and easy recall of your favourite
stations.
To store a preset, you must first be listening to the station that you would like to save. Press and
hold the PRESET button. The display will show “Preset Store<#: (Empty)>”. If a station is already
stored. The display will show “<#: Station name>”.
Press the PREV/NEXT buttons to select the preset station number 1-10.
To save to the selected preset station number, press the ENTER button. The display will then show
“Preset# stored”.
Recalling a stored station
Once you have saved a station to one of rthe preset buttons, you can:
Press the PRESET button and press the PREV/NEXT button to select your desired preset station’s
number.
Press the ENTER button to recall a preset station number.
Station information on DAB mode
Press the INFO/MENU button repeatedly to show the different program information.
Signal Strength: Displays a signal bar with the strength of the current station.
Bit Error Rate (BER): Provides daails of the signal error rate.
Channel and Frequency: Displays the station’s transmission channel number and frequency.
PTY (Program Type): Shows the type and description of the program provided by the DAB station.
Time and Date: Displays the time and date information provided by the broadcaster.
DAB indicatiom: Indicates DAB mode.
Dynamic Label Segment (DLS): Displays scrolling text information supplied by the broadcaster.
FM opearation
In order to switch the radio from DAB to FM mode, press the Power/Mode button once.
Auto scan
To search for an FM station, press the SCAN button. This will start scanning up the frequency band.
To scan down the frequency band. Press and hold the SCAN button.
Once a station has been found.the scanning will stop automatically. If no station is found, then the
tuning will stop one it has cycled through the entire FM band (87.5-108 MHz).
Page 7

7
Manual Scan
To search FM stations manually, simply press the PRES/NEXT buttons repeatedly until your desired
frequency is reached.
Storing stations
You can store up to 10 FM stations to the memory presets for quick and easy recall of your favourite
stations.
To store a preset, you must first be listening to the station that you would like to save. Press and hold
the PRESET button. The display will show “Preset store <#: (Empty)>”. If a station is already stored, the
display will show “<#: Station frequency>”.
Press the PREV/NEXT button to select the preset station number 1-10.
To save to the selected preset station number, press the ENTER button. The display will then show
“Preset # stored”.
Recalling a stored station
Once you saved a station to one of the preset buttons, you can:
Press the PRESET button and press the PREV/NEXT buttons to select your desired preset station’s
number.
Press the ENTER button to recall a preset station number.
Station information on FM mode
Press the INFO button repeatedly to show the different program information.
Program Type: Displays a description of the type of program provided by the broadcaster.
Signal Strength: Displays a signal bar with the strength of the current station.
Time and Date: Displays the time and the date.
Frequency: Displays the station’s transmission frequency.
Audio Type: Displays the audio type of the station you are listening to. It will either be Stereo or Mono.
Radio Text: Displays scrolling test information supplied by the broadcaster.
System Settings
With the unit turned on press and hold the INFO/MENU button. This will open the “System Menu
Settings”.
Press the PREV/NEXT buttons to select your desired Sub-option between:
Setting the Time/Date
Press the ENTER button, the hour digitals will flash.
Press the PREV/NEXT buttons to set the hour correctly.
Press the ENTER button to confirm.
Repeat the last two steps to set the minutes, the Year, Month, Date.
Page 8

8
Alarm Setting
Press the Enter/Snooze to use Alarn 1 or press NEXT to access Alarm2.
Press the Next button so the word “ON” is flashing and press Enter to confirm.
The hour digits for the alarm will flash, press the Prev or Next to change the hour and press the Enter
button to confirm.
Press the Prev or Next button to change the minute and press the Enter button to confirm.
Press the Prev or Next button to change the volume and press the Enter button to confirm.
Press the Prev or Next button to change between Alarm-DAB-FM and press the Enter to confirm.
To set the Alarm 2, follow the Alarm 1 instructions.
Note: You can press the Info/Menu button to get back last one step when in the process of setting the
alarm.
Turn off the alarm
To turn off the alarm, press the Next button so the word “OFF” is flashing and press Enter button. The
alarm is now OFF.
Turn off the alarm when sounding
Press the Power/Mode button to turn off the alarm when sounding.
Note: The alarm will keep ringing for one hour if you do not turn it off when it is sounding.
Sleep Setting
Press the Prev or Next button to select either OFF-120-90-60-45-30-15-5 minutes.
Press the Enter button to confirm your selection.
Factory Reset
Press the Enter button and the display will show “Factory Reset?”. Press the Next or Prev to select
“Yes”.
Press the Enter button again and will reset the radio.
FM Scan Set
Press the Enter button to select Only or All. If select Only, the radio only scan the strong signal station
and play. If select All, the radio will also scan the weak signal station and play.
System Version
You can check the software version number.
Resetting the radio
Resetting the radio will delete all the tuned DAB stations and all the preset memory stations in FM and
DAB modes.To reset the radio:
Press and hold the INFO/MENU button.
Press the Next button repeatedly until “Factory Reset” is displayed on the screen.
Page 9
9
Press the Enter button and the display will show “Factory Reset?”. Press the Next button until the word
“YES” is flashing.
Press the Enter button again, this will reset the radio.
Snooze Function
When the alarm sounds, press the Enter/Snooze button to delay the alarm for another 9 mins. The
radio will go to Standby mode.
You can press Power/Mode button to stop the Snooze function and go to the operation mode before
the alarms rings.
FAQs
Problem
Solution
No sound
The station is not tuned in. Fine tune the station.
The volume is set to a low position. Increase the volume.
Headphones may be connected. Disconnect the headphones.
Buttons are not working
Turn off the unit and turn on after a few seconds.
FM: Static sound
DAB: Burbling/intermittent
cut - out
Signal reception is too low. Adjust the aerial or move the unit to a
stronger signal location.
Rescan stations.
Sound is destorted
The volume is too high. Adjust the volume control.
Desired station not found
Weak signal. Use the manual tune function.
Display shows “No Service”
There is no DAB coverage in your area, or poor receiption. Adjust the
position of the aerial, or move the unit to a stronger signal location.
Display is blank
This may occur if the broadcaster changes the label of a service or
removes a label while tuned. The radio will try to retune or perform a
scan.
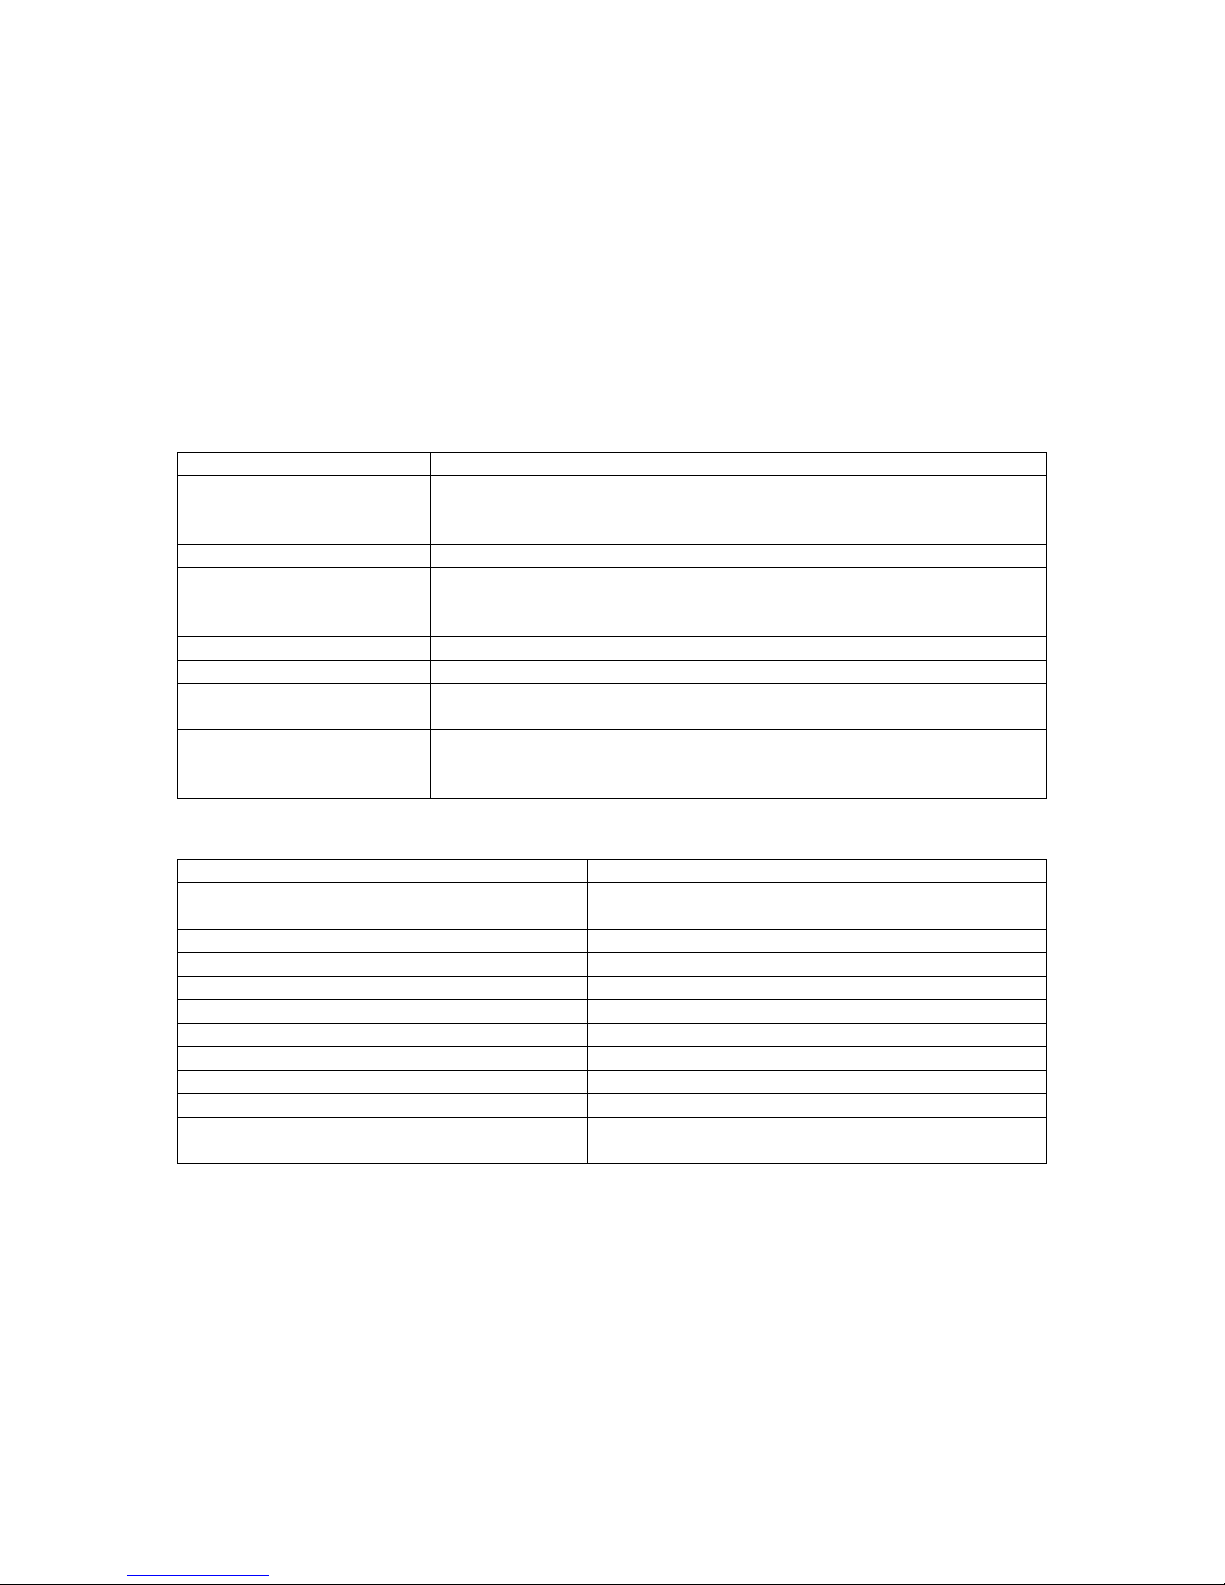
Specifications
Power supply
Built-in battery
Frequency rangs
FM 87.5-108MHz
DAB 174-240 MHz
Output connector
3.5mm earphone socket
Aerial
Telescopic antenna
Power supply adaptor (For EU only)
Manufacture
Shenzhen Adition Audio Science &Technology Co.Ltd
Input
AC 100-240V~50/60Hz,0.15A Max
Output
DC 5V/1A
Mode Number
AD050501000EUU
Use only original AC adaptor
Use only the power supply listed on the user
instructions
Play Time
Your radio has a play time of around 3-5 hours. This is dependant on signal strength and volume
selection of the radio
Page 10
10
5. Guarantee
Lenco offers service and warranty in accordance with the European law, which means that in case of
repairs (both during and after the warranty period) you should contact your local dealer.
Important note: It is not possible to send products that need repairs to Lenco directly.
Important note: If this unit is opened or accessed by a non-official service center in any way, the
warranty expires.
This device is not suitable for professional use. In case of professional use, all warranty obligations of
the manufacturer will be voided.
6. Disclaimer
Updates to Firmware and/or hardware components are made regularly. Therefore some of the
instruction, specifications and pictures in this documentation may differ slightly from your particular
situation. All items described in this guide for illustration purposes only and may not apply to
particular situation. No legal right or entitlements may be obtained from the description made in
this manual.
7. Disposal of the Old Device
This symbol indicates that the relevant electrical product or battery should not be
disposed of as general household waste in Europe. To ensure the correct waste
treatment of the product and battery, please dispose them in accordance to any
applicable local laws of requirement for disposal of electrical equipment or
batteries. In so doing, you will help to conserve natural resources and improve
standards of environmental protection in treatment and disposal of electrical
waste (Waste Electrical and Electronic Equipment Directive).
8. CE Marking
Products with the CE marking comply with the EMC Directive (2014/30/EU) and
the Low Voltage Directive (2014/35/EU) issued by the Commission of the European
Community.
Hereby, Lenco Benelux BV, Thermiekstraat 1a, 6361 HB Nuth, The Netherlands, declares that this
product is in compliance with the essential requirements and other relevant provisions of Directive
1999/5/EC.
The declaration of conformity may be consulted via techdoc@lenco.com
9. Service
For more information and helpdesk support, please visit www.lenco.com
Lenco Benelux BV, Thermiekstraat 1a, 6361 HB, The Netherlands.
Page 11

11
Nederlands
DAB+/FM-radio
Algemene veiligheid
Algemene voorzorgsmaatregelen
Installeer het apparaat volgens de instructies van de fabrikant. Installeer het niet in de buurt van
warmtebronnen zoals radiatoren, verwarmingen, kachels of andere voorwerpen (inclusief versterkers)
die warmte produceren.
Gebruik het apparaat alleen met de accessoires die worden verkocht samen met het apparaat.
Blokkeer of bedek geen van de ventilatieopeningen, om een goede ventilatie en werking te garanderen.
Haal de stekker uit het stopcontact tijdens onweer.
Overmatige blootstelling aan luid geluid van oortelefoons en hoofdtelefoons kan leiden tot
gehoorverlies. Houd uit gezondheidsoverwegingen het volume altijd op een laag tot matig niveau
wanneer u gebruik maakt van oortelefoons/hoofdtelefoons.
Houd kaarsen of andere bronnen met een open vlam te allen tijde uit de buurt van dit product.
Gebruik van deze radio in de buurt van een televisie, koelkast, magnetron, versterker of DVD-speler
kan een negatieve invloed hebben op de geluidskwaliteit. Plaats in een dergelijk geval de radio uit de
buurt van het apparaat dat de storing veroorzaakt.
Installeer of plaats deze radio niet in een boekenkast, ingebouwde kast of in een andere afgesloten
ruimte. Zorg ervoor dat het apparaat goed geventileerd blijft.
Dit apparaat is niet bedoeld voor gebruik door personen (inclusief kinderen) met een lichamelijke,
zintuiglijke of verstandelijke beperking of met een gebrek aan kennis en ervaring, tenzij zij onder
toezicht staan of instructies over het juiste gebruik van het apparaat hebben gekregen van de
persoon die verantwoordelijk is voor hun veiligheid.
Kinderen moeten onder toezicht staan om ervoor te zorgen dat zij niet met het apparaat spelen.
Bewaar de originele verpakking voor toekomstig transport. Verpak de radio zoals hij oorspronkelijk
werd verpakt voor maximale bescherming.
Zorg ervoor dat u de adapter uit het apparaat verwijdert vooraleer het te reinigen.
Gebruik alleen een zachte, droge doek om het apparaat en het beeldscherm te reinigen.
Gebruik geen oplosmiddelen, zoals verfverdunner en benzeen, omdat deze het oppervlak van de
radio kunnen beschadigen.
Vóór het eerste gebruik
Pak het apparaat uit, maar bewaar alle verpakkingen totdat u er zeker van bent dat uw nieuwe DABradio niet beschadigd en in goede staat is. Plastic verpakkingsmateriaal levert verstikkingsgevaar op
voor baby's en jonge kinderen, zorg er daarom voor dat alle verpakkingsmaterialen buiten hun
bereik blijven.
Page 12
12
Productoverzicht
1. Info/Menu
Ingedrukt houden om toegang te krijgen tot de menu-instellingen.
2. Scan
Automatische scan van alle DAB en FM-zenders.
3. Enter/Snooze
Druk om 9 minuten te sluimeren wanneer het alarm afgaat.
Page 13

13
4. Preset
Opslag en toegang tot 10 DAB en 10 FM-voorkeuzezenders.
5. Vol-
Verlaag het volume.
6. Prev
Selecteer vorige frequentie, zender, voorkeuzezender of menuoptie.
7. Vol+
Verhoog het volume.
8. Next
Selecteer volgende frequentie, zender, voorkeuzezender of menuoptie.
9. Power/Mode
Druk, terwijl de radio is ingeschakeld, om te schakelen tussen DAB en
FM-modi.
10. Aan/uit-schakelaar
Verschuif, terwijl de radio is ingeschakeld, om deze uit te schakelen.
Verschuif, wanneer de radio is uitgeschakeld, om deze in te schakelen.
11. DC 5 V, 1 A voedingsaansluiting
12. Laadindicator
13. 3,5 mm hoofdtelefoonaansluiting
14. LCD-scherm
15. Uitschuifbare antenne
Instructies
Basishandelingen
Wanneer u uw DAB-radio voor de eerste keer inschakelt
Schuif de schakelaar OFF/ON op de achterkant van uw DAB-radio naar de positie ON om de DABradio in te schakelen.
Verleng de uitschuifbare antenne voor de best mogelijke ontvangst.
Druk vervolgens op de knop Power/Mode om de radio aan te zetten.
Wanneer de DAB-modus voor de eerste keer wordt ingeschakeld, zal automatisch een volledige scan
worden uitgevoerd, of zal de laatste zender beginnen te spelen die opstond voordat het apparaat
werd uitgeschakeld.
Druk wanneer de radio is ingeschakeld op de knop Power/Mode om te schakelen tussen DAB en
FM-modi.
Tijdens het scannen zal een schuifbalk op het scherm verschijnen die de voortgang van het scannen
aangeeft, en het aantal radiozenders dat tot dan toe werd gevonden. Zodra de scan is voltooid,
selecteert de radio het eerste alfanumerieke station.
Schuif de schakelaar ON/OFF naar de positie OFF om de DAB-radio uit te schakelen.
Opmerking: Wanneer u de powerknop ingedrukt houdt, zal het apparaat in stand-bymodus gaan.
Modus selecteren
Druk wanneer de DAB-radio is ingeschakeld herhaaldelijk op de knop power/Mode om te schakelen
tussen DAB en FM-modi.
Volume aanpassen
Druk op de knoppen VOL+ of VOL- om het volume te verhogen/verlagen.
DAB-bediening
Druk om te luisteren naar de zenders op de knoppen PREV of NEXT. Elke keer dat u op de knoppen
PREV/NEXT drukt, gaat u naar de vorige of volgende opgeslagen zender.
De radio zal de naam van de zender weergeven.
Page 14

14
Geheugen
Wanneer u de radio opnieuw inschakelt nadat hij was uitgeschakeld, zal hij automatisch afstemmen
op dezelfde zender (DAB of FM) die het laatst was geselecteerd.
Zenders opslaan
U kunt maximaal 10 DAB-zenders opslaan in het geheugen voor voorkeuzezenders voor snelle en
eenvoudige toegang tot uw favoriete zenders.
Om een voorkeuzezender op te slaan, moet u eerst luisteren naar de zender die u wilt opslaan. Houd
de knop PRESET ingedrukt. Op het scherm verschijnt “Preset Store<#: (Empty)>” (Voorkeuzezenders<#:
(leeg)>). Als een zender reeds is opgeslagen. Op het scherm verschijnt “<#: Station name>” (<#: Naam
zender>).
Druk op de knop PREV/NEXT om de voorkeuzezendernummers 1-10 te selecteren.
Druk op de knop ENTER om de geselecteerde voorkeuzezender op te slaan. Op het scherm verschijnt
dan “Preset# stored” (Voorkeuzezender# opgeslagen).
Een opgeslagen zender oproepen
Zodra u een zender hebt opgeslagen op een van de voorkeuzetoetsen, kunt u:
op de knop PRESET drukken en met de knoppen PREV/NEXT uw gewenste voorkeuzezender selecteren;
op de knop ENTER drukken om een voorkeuzezender op te roepen.
Zenderinformatie in de DAB-modus
Druk herhaaldelijk op de knop INFO/MENU om de verschillende programma-informaties te tonen.
Signal Strength (Signaalsterkte): Geeft een signaalbalk weer met de sterkte van de huidige zender.
Bit Error Rate (BER) (Bitfoutenkans): Geeft gegevens weer over de signaalfoutenkans.
Channel and frequency (Kanaal en frequentie): Geeft het nummer en de frequentie van het
transmissiekanaal weer.
PTY (Program Type) (Soort programma (PTY)): Geeft het type en de beschrijving weer van het
programma op de DAB-zender.
Time and Date (Tijd en datum): Geeft de tijd en datum weer die door de zender wordt gegeven.
DAB indication (DAB-indicatie): Geeft de DAB-modus weer.
Dynamic label segment (DLS) (Dynamische berichtenindeling): Toont schuivende tekstinformatie die
door de zender wordt verstrekt.
Bediening FM
Druk eenmaal op de knop Power/Mode om van DAB-modus naar FM-modus over te schakelen.
Automatische scan
Druk op de knop SCAN om een FM-zender te zoeken. Dit zal de frequentieband naar boven beginnen
te scannen.
Om de frequentieband naar beneden af te scannen: houd de knop SCAN ingedrukt.
Zodra een zender wordt gevonden, zal het scannen automatisch stoppen. Als er geen zender wordt
gevonden, stopt de afstemming zodra de hele FM-band (87,5-108 MHz) werd afgelopen.
Page 15

15
Handmatige scan
Druk herhaaldelijk op de knop PRES/NEXT totdat de gewenste frequentie is bereikt.
Zenders opslaan
U kunt maximaal 10 FM-zenders opslaan in het geheugen voor voorkeuzezenders voor snelle en
eenvoudige toegang tot uw favoriete zenders.
Om een voorkeuzezender op te slaan, moet u eerst luisteren naar de zender die u wilt opslaan. Houd de
knop PRESET ingedrukt. Op het scherm verschijnt “Preset store <#: (Empty)>” (Voorkeuzezenders<#:
(leeg)>). Als een zender reeds is opgeslagen, verschijnt er op het scherm “<#: Station frequency>”
(<#: Zenderfrequentie>).
Druk op de knop PREV/NEXT om de voorkeuzezendernummers 1-10 te selecteren.
Druk op de knop ENTER om de geselecteerde voorkeuzezender op te slaan. Op het scherm verschijnt
dan “Preset # stored” (Voorkeuzezender # opgeslagen).
Een opgeslagen zender oproepen
Zodra u een zender hebt opgeslagen op een van de voorkeuzetoetsen, kunt u:
op de knop PRESET drukken en met de knoppen PREV/NEXT uw gewenste voorkeuzezender selecteren.
op de knop ENTER drukken om een voorkeuzezender op te roepen.
Zenderinformatie in de FM-modus
Druk herhaaldelijk op de knop INFO om de verschillende programma-informaties te tonen.
Soort programma: Geeft een beschrijving weer van het type programma geleverd door de zender.
Signal Strength (Signaalsterkte): Geeft een signaalbalk weer met de sterkte van de huidige zender.
Time and Date (Tijd en datum): Geeft de tijd en de datum weer.
Frequentie: Geeft de zendfrequentie van de zender weer.
Soort audio: Geeft het type audio weer van het station waar u naar luistert. Dat zal ofwel Stereo of
Mono zijn.
Radiotekst: Toont schuivende tekstinformatie die door de zender wordt verstrekt.
Systeeminstellingen
Houd, wanneer het apparaat is ingeschakeld, de knop INFO/MENU ingedrukt. Dit opent de “System
Menu Settings” (Systeeminstellingen).
Druk op de knop PREV/NEXT om uw gewenste suboptie te selecteren:
Instellen van tijd/datum
Druk op de knop ENTER, dan begint het uur te knipperen.
Druk op de knop PREV/NEXT om het uur aan te passen.
Druk op de knop ENTER om te bevestigen.
Herhaal de laatste twee stappen om de minuten, het jaar, de maand, en de datum in te stellen.
Page 16

16
Alarminstelling
Druk op de knop Enter/Snooze om Alarm 1 te gebruiken of druk op de knop NEXT om naar Alarm 2 te
gaan.
Druk op de knop Next en het woord “ON” (AAN) begint te knipperen, druk dan op Enter om te
bevestigen.
De uurcijfers voor het alarm beginnen te knipperen, druk op de knoppen Prev of Next om het uur te
wijzigen en druk dan op de knop Enter om te bevestigen.
Druk op de knoppen Prev of Next om de minuten te wijzigen en druk dan op de knop Enter om te
bevestigen.
Druk op de knoppen Prev of Next om het volume te wijzigen en druk dan op de knop Enter om te
bevestigen.
Druk op de knoppen Prev of Next om te schakelen tussen Alarm-DAB-FM en druk dan op de knop
Enter om te bevestigen.
Volg om Alarm 2 in te stellen de instructies voor Alarm 1.
Opmerking: U kunt op de knop Info/Menu drukken om terug te keren naar de laatste stap tijdens
het instellen van het alarm.
Het alarm uitschakelen
Druk om het alarm uit te schakelen op de knop Next, zodat het woord “OFF” (UIT) begint te
knipperen en druk op de knop Enter om te bevestigen. Het alarm is nu UIT.
Het alarm uitschakelen wanneer het afgaat
Druk op de knop Power/Mode om het alarm uit te schakelen wanneer het afgaat.
Opmerking: Het alarm zal gedurende een uur blijven klinken als u het niet uitschakelt wanneer het
afgaat.
Slaapstandinstelling
Druk op de knoppen Prev of Next om te kiezen uit OFF-120-90-60-45-30-15-5 minuten.
Druk op de knop Enter om uw selectie te bevestigen.
Fabrieksinstellingen terugstellen
Druk op de knop Enter en op het scherm verschijnt “Factory Reset?” (Fabrieksinstellingen terugstellen?).
Druk op de knoppen Next of Prev om “Yes” (Ja) te selecteren.
Druk nogmaals op de knop Enter en de radio wordt teruggesteld op de fabrieksinstellingen.
FM-scaninstelling
Druk op de knop Enter om Only (Uitsluitend) of All (Alle) te selecteren. Als u Only (Uitsluitend)
selecteert, zal de radio alleen de sterke signaalzenders scannen en afspelen. Als u All (Alle) selecteert,
zal de radio ook de zwakkere signaalzenders scannen en afspelen.
Systeemversie
U kunt het nummer van de softwareversie bekijken.
De radio opnieuw instellen
Als u de radio opnieuw instelt, worden alle afgestemde DAB-zenders en alle voorkeuzezenders in FM
en DAB-modes verwijderd. Om de radio opnieuw in te stellen:
Page 17

17
Houd de knop INFO/MENU ingedrukt.
Druk herhaaldelijk op de knop Next totdat “Factory Reset” (Fabrieksinstellingen terugstellen) op het
scherm verschijnt.
Druk op de knop Enter en op het scherm verschijnt “Factory Reset?” (Fabrieksinstellingen terugstellen?).
Druk op de knop Next totdat het woord “YES” (Ja) knippert.
Druk nogmaals op de knop Enter en de radio wordt teruggesteld op de fabrieksinstellingen.
Sluimerfunctie
Druk op de knop Enter/Snooze wanneer het alarm afgaat om het alarm voor 9 minuten uit te stellen.
De radio gaat naar de stand-bymodus.
U kunt op de knop Power/Mode drukken om de sluimerfunctie te stoppen en naar de bewerkingsmodus
te gaan voordat het alarm afgaat.
Veelgestelde vragen
Probleem
Oplossing
Geen geluid
Zender is niet afgestemd. Stem de zender beter af.
Het volume is ingesteld op een lage stand. Verhoog het volume.
Er is een hoofdtelefoon aangesloten. Verwijder de hoofdtelefoon.
Knoppen werken niet
Schakel het apparaat uit en zet het na een paar seconden opnieuw aan.
FM: Geluid met ruis
DAB: Geluid kraakt/
komt met tussenpozen
De signaalontvangst is te laag. Pas de positie van de antenne aan of
verplaats het apparaat naar een locatie met een sterker signaal.
Scan de zenders opnieuw.
Geluid klinkt vervormd.
Het volume is te hoog. Pas het volume aan.
Gewenste zender niet
gevonden
Zwak signaal. Gebruik de functie handmatig afstemmen.
Het scherm toont “No
Service” (Geen service)
Er is geen DAB-dekking in uw omgeving, of slechte ontvangst. Pas de
positie van de antenne aan of verplaats het apparaat naar een locatie
met een sterker signaal.
Beeldscherm is leeg
Dit kan zich voordoen als de zender de benaming van een dienst wijzigt
of verwijdert terwijl u erop afgestemd bent. De radio zal proberen om
opnieuw in te stellen of een scan uit te voeren.
Specificaties
Stroomvoorziening
Ingebouwde batterij
Frequentiebereik
FM 87.5-108 MHz
DAB 174-240 MHz
Uitvoerconnector
3,5 mm oortelefoonaansluiting
Antenne
Uitschuifbare antenne
Voedingsadapter (alleen voor EU)
Fabrikant
Shenzhen Adition Audio Science &Technology Co.Ltd
Ingang
AC 100-240 V~50/60 Hz, 0,15 A Max
Uitgang
DC 5 V/1 A
Modelnummer
AD050501000EUU
Gebruik alleen de originele
wisselstroomadapter
Gebruik uitsluitend de voeding die op de
gebruiksaanwijzing is aangegeven
Speelduur
Uw radio heeft een speelduur van ongeveer 3-5 uur. Dit is afhankelijk van de signaalsterkte en de
volumeselectie van de radio
Page 18

18
5. Garantie
Lenco biedt service en garantie aan overeenkomstig met de Europese wetgeving. Dit houdt in dat u, in
het geval van reparaties (zowel tijdens als na de garantieperiode), uw lokale handelaar moet contacteren.
Belangrijke opmerking: Het is niet mogelijk om producten die gerepareerd moeten worden direct
naar Lenco te sturen.
Belangrijke opmerking: De garantie verloopt als een onofficieel servicecenter het apparaat op wat
voor manier dan ook heeft geopend, of er toegang toe heeft gekregen.
Het apparaat is niet geschikt voor professioneel gebruik. In het geval van professioneel gebruik
worden alle garantieverplichtingen van de fabrikant nietig verklaard.
6. Disclaimer
Er worden regelmatig updates in de firmware en/of hardwarecomponenten gemaakt. Daardoor
kunnen gedeelten van de instructie, de specificaties en afbeeldingen in deze documentatie enigszins
verschillen van uw eigen situatie. Alle onderwerpen die staan beschreven in deze handleiding zijn
bedoeld als illustratie en zijn niet van toepassing op specifieke situaties. Aan de beschrijving in dit
document kunnen geen rechten worden ontleend.
7. Afvoer van het oude apparaat
Dit symbool geeft aan dat het betreffende elektrische product of de batterij niet
moet worden verwijderd als algemeen huishoudelijk afval in Europa. Zorg voor een
juiste afvalverwerking door het product en de batterij in overeenstemming met
alle van toepassing zijnde lokale wetten voor het verwijderen van elektrische
apparatuur of batterijen te verwijderen. Als u dit doet, helpt u de natuurlijke
hulpbronnen te behouden en de standaard van milieubescherming te verbeteren
bij de behandeling en verwijdering van elektrisch afval (Afgedankte Elektrische en
Elektronische Apparatuur).
8. CE-markering
Producten met een CE-keurmerk houden zich aan de EMC-richtlijn (2014/30/EU)
en de Richtlijn voor Lage Voltage (2014/35/EU) uitgegeven door de Europese
Commissie.
Hierbij verklaart Lenco Benelux BV, Thermiekstraat 1a, 6361 HB Nuth, Nederland, dat dit product
voldoet aan de essentiële eisen en andere relevante bepalingen van Richtlijn 1999/5/EU.
De conformiteitsverklaring kan worden geraadpleegd op techdoc@lenco.com
9. Service
Bezoek voor meer informatie en helpdeskondersteuning www.lenco.com
Lenco Benelux BV, Thermiekstraat 1a, 6361 HB, Nederland.
Page 19

19
Deutsch
DAB+/UKW-Radio
Allgemeine Sicherheitshinweise
Allgemeine Vorsichtsmaßnahmen
Bei der Aufstellung des Gerätes sind die Anweisungen des Herstellers zu befolgen. Das Gerät nicht in der
Nähe von Wärmequellen, wie Heizkörpern, Heizregistern, Ö fen und anderen Objekten (einschließlich
Verstärkern), die Wärme abgeben, aufstellen.
Das Gerät nur mit dem Zubehör verwenden, das mit dem Gerät verkauft wird.
Die Lüftungsschlitze nicht blockieren, um eine ausreichende Belüftung und einen ordnungsgemäßen
Betrieb zu gewährleisten.
Während Gewittern das Gerät von der Stromversorgung trennen.
Ü bermäßiger Schalldruck von Kopfhörern kann zu Gehörschäden führen. Halten Sie Ihrer Gesundheit
zuliebe die Lautstärke bei Verwendung von Kopfhörern niedrig bis mäßig.
Kerzen oder andere offene Flammen immer vom Gerät fernhalten.
Das Aufstellen dieses Radios in der Nähe eines Fernsehers, einer Mikrowelle, eines Verstärkers order
eines DVD-Spielers kann die Klangqualität beeinträchtigen. Stellen Sie das Radio in solchen Fällen
entfernt von Geräten auf, die diese Störungen verursachen.
Dieses Radio sollte nicht in Bücherregalen, Einbauschränken oder anderen geschlossenen Bereichen
aufgestellt werden. Eine ausreichende Belüftung des Gerätes muss sichergestellt werden.
Das Gerät ist nicht für die Verwendung durch Personen (einschließlich Kinder) mit eingeschränkten
physischen, sensorischen oder psychischen Fähigkeiten bzw. ohne jegliche Erfahrung oder Wissen
vorgesehen, es sie denn sie sind unter Aufsicht oder wurden in die Verwendung des Gerätes durch
eine Person, die für ihre Sicherheit verantwortlich ist, eingewiesen.
Kinder sollten beaufsichtigt werden und nicht mit dem Gerät spielen.
Bewahren Sie die Originalverpackung für den zukünftigen Transport des Radios auf. Um einen
maximalen Schutz zu erzielen, das Gerät wieder so einpacken, wie es ursprünglich verpackt wurde.
Sicherstellen, dass der Adapter vor der Reinigung des Gerätes entfernt wurde.
Zur Reinigung des Gerätes und des Display nur ein weiches, trockenes Tuch verwenden.
Keine Lösungsmittel wie Verdünner oder Benzol verwenden, da diese die Oberfläche des Radios
beschädigen können.
Vor der Erstinbetriebnahme
Das Gerät auspacken und sämtliches Verpackungsmaterial aufbewahren, bis sichergestellt ist, dass das
DAB Radio unbeschädigt ist und einwandfrei funktioniert. Kunststoffverpackung kann eine
Erstickungsgefahr für Babys und Kleinkinder darstellen, dasher sollte sämtliches Verpackungsmaterials
außerhalb ihrer Reichweite aufbewahrt werden.
Page 20

20
Produktübersicht
1. Info/Menu
Gedrückt halten, um auf die Menüeinstellungen zuzugreifen.
2. Scan
Automatischer Suchlauf aller DAB- und FM-Sender.
3. Enter/Snooze
Drücken, um den 9-Minuten-Modus zu aktivieren, wenn der Alarm ertönt.
Page 21

21
4. Preset
Speicherung von und Zugriff auf bis zu jweils 10 DAB- und FMSenderspeicher.
5. Vol-
Reduzierung der Lautstärke.
6. Prev
Auwahl der vorherigen Frequenz, des vorherigen Senders, des vorherigen
Senderspeichers oder der vorherigen Menüoption.
7. Vol+
Erhöhen Sie die Lautstärke.
8. Next
Auwahl der nächsten Frequenz, des nächsten Senders, des nächsten
Senderspeichers oder der nächsten Menüoption.
9. Power/Mode
Bei eingeschaltetem Radio diesen Schalter drücken,, um zwischen DAB- und
FM-Modus zu wechseln.
10. Schalter zum
Ein-/Ausschalten
Bei eingeschaltetem Radio diesen Schalter zum Ausschalten verschieben.
Bei ausgeschaltetem Radio diesen Schalter zum Einschalten schieben.
11. DC 5 V,1 A Netzstecker
12. LED Ladestandanzeige
13. 3,5 mm Kopfhörerbuchse
14. LCD-Anzeige
15. Teleskop-Antenne
Anleitungen
Grundbedienung
Erstes Einschalten des DAB-Radios
Schieben Sie den Schalter OFF/ON auf der Rückseite des DAB-Radios in die Stellung ON, um das DABRadio einzuschalten.
Für den bestmöglichen Empfand die Teleskopantenne vollständig ausziehen.
Danach die Taste Power/Mode drücken, um das Radio einzuschalten.
Wenn der DAB-Modus zum ersten Mal aktiviert wird, wird automatisch ein vollständiger Suchlauf
ausgeführt, oder es wird der Sender wiedergegeben, der vor dem Ausschalten des Gerätes zuletzt
wiedergegeben wurde.
Sobald das Radio eingeschaltet wurde, kann der Schalter Power/Mode gedrückt werden, um
zwischen dem DAB- und FM-Modus zu wechseln.
Während des Suchlaufs wird auf dem Display ein Schieberegler dargestellt, der den Fortschritt des
Suchlaufs als auch die bisher gefundene Anzahl an Radiosendern anzeigt. Sobald der Suchlauf
beendet ist, wählt das Radio die erste alphanumerische Station aus.
Zum Ausschalten des DAB-Radios den Schalter ON/OFF in die Stellung OFF schieben.
Hinweis: Wenn der Schalter zum Ein-/Ausschalten des Gerätes gedrückt gehalten wird, geht das
Gerät in den Standby-Modus.
Auswahl der Modi
Um zwischen dem DAB- und FM-Modus zu wechseln, bei eingeschaltetem DAB-Radio den Schalter
Power/Mode wiederholt drücken.
Anpassen der Lautstärke
Um die Lautstärke zu erhöhen oder zu reduzieren, die Taste VOL+ oder VOL- drücken.
Page 22

22
DAB-Bedienung
Zur Wiedergabe der eingestellten Sender entweder die Taste PREV oder NEXT drücken. Mit jedem
Betätigen der Tasten PREV/NEXT, wird zum nächsten oder vorherigen gespeicherten Sender gesprungen.
Das Radio zeigt den Sendernamen an.
Speicher
Wenn das Radio nach dem Ausschalten wieder eingeschaltet wird, kehrt es automatisch zu dem
Sender (DAB oder FM) zurück, der vor dem Ausschalten ausgewählt war.
Sender speichern
Im Senderspeicher können für schnellen und einfachen Zugriff auf die bevorzugten Sender bis zu
10 DAB-Sender gespeichert werden.
Um eine Schnellwahl zu speichern, müssen Sie zuerst den Sender hören, den Sie abspeichern
möchten. Die Tastet PRESET gedrückt halten. Auf dem Display wird „Preset Store<#:
(Empty)>“ (Senderspeicher Speicher<Nr.: (Leer)>) angezeigt. Wenn bereits ein Sender gespeichert ist,
wird auf dem Display „<#: Station name>“ (<Nr.: Sendername>) angezeigt.
Zur Auswahl der Nummer 1- 10 der Senderspeicher, die Tasten PREV/NEXT drücken.
Um die ausgewählte Senderspeichernummer zu speichern, die Taste ENTER drücken. Auf dem
Display wird dann „Preset# stored“ (Senderspeicher Nr. gespeichert) angezeigt.
Aufrufen eines gespeicherten Senders
Sobald ein Sender auf einer der Senderspeichertasten gespeichert wurde, können Sie:
Die Taste PRESET und die Taste PREV/NEXT drücken, um die gewünschte Nummer des Senderspeichers
auszuwählen.
Die Taste ENTER drücken, um eine Senderspeichernummer aufzurufen.
Senderinformationen im DAB-Modus
Wiederholtes Drücken der Taste INFO/MENU zeigt die unterschiedlichen Programminformationen
an.
Signalstärke: Zeigt einen Signalbalken mit der Signalstärke des aktuellen Senders an.
Bit Error Rate (BER) (Bitfehlerrate ): Zeigt Details über die Fehlerrate des Signals an.
Kanal und Frequenz: Zeigt die Kanalnummer der Übertragung und die Frequenz des Senders an.
Program type (PTY) (Programmtyp): Zeigt die Art und eine Beschreibung des von dem DAB-Senders
bereitgestellten Programms an.
Zeit und Datum: Zeigt die von dem Sender zur Verfügung gestellten Zeit- und Datumsinformationen
an.
DAB-Anzeige: Zeigt den DAB-Modus an.
Dynamic label segment (DLS) (Dynamisches Etikettensegment): Zeigt die von dem Sender
bereitgestellten Lauftextinformationen an.
FM-Bedienung
Um von dem DAB-Modus in den FM-Modus zu wechseln, den Schalter Power/Mode einmal drücken.
Page 23

23
Automatischer Suchlauf
Um nach FM-Sendern zu suchen, die Taste SCAN drücken. Das Frequenzband wird aufsteigende
durchsucht.
Um das Frezquenzband absteigend zu durchsuchen, die Taste SCAN gedrückt halten.
Sobald ein Sender gefunden wurde, wird der Suchlauf automatisch angehalten. Wenn kein Sender
gefunden wird hält der Suchlauf an. sobald das gesamte FM-Band (87,5-108 MHz) durchsucht wurde.
Manueller Suchlauf
Für die manuelle Suche nach FM-Sendern die Taste PRES/NEXT wiederholt drücken, bis die gewünschte
Frequenz erreicht ist.
Sender speichern
Im Senderspeicher können für schnellen und einfachen Zugriff auf die bevorzugten Sender bis zu
10 FM-Sender gespeichert werden.
Um eine Schnellwahl zu speichern, müssen Sie zuerst den Sender hören, den Sie abspeichern
möchten. Die Tastet PRESET gedrückt halten. Auf dem Display wird „Preset Store<#:
(Empty)>“ (Senderspeicher Speicher<Nr.: (Leer)>) angezeigt. Wenn ein Sender bereits gespeichert ist,
wird auf dem Display „<#: Station frequency>“ (<Nr.: Stationsfrequenz>) angezeigt.
Zur Auswahl der Nummer 1- 10 der Senderspeicher, die Taste PREV/NEXT drücken.
Um die ausgewählte Senderspeichernummer zu speichern, die Taste ENTER drücken. Auf dem
Display wird dann „Preset # stored“ (Senderspeicher # gespeichert) angezeigt.
Aufrufen eines gespeicherten Senders
Sobald ein Sender auf einer der Senderspeichertasten gespeichert wurde, können Sie:
Die Taste PRESET und die Tasten PREV/NEXT drücken, um die gewünschte Nummer des Senderspeichers
auszuwählen.
Die Taste ENTER drücken, um eine Senderspeichernummer aufzurufen.
Senderinformationen im FM-Modus
Wiederholtes Drücken der Taste INFO zeigt die unterschiedlichen Programminformationen an.
Programmart: Zeigt eine Beschreibung der von dem Sender bereitgestellten Programmart an.
Signalstärke: Zeigt einen Signalbalken mit der Signalstärke des aktuellen Senders an.
Zeit und Datum: Zeigt die Uhrzeit und das Datum an.
Frequenz: Zeigt die Übertragungsfreuqenz des Senders an.
Audiotyp: Zeigt den Audiotyp des wiedergegebenen Senders an. Dies ist entweder Stereo oder Mono.
Radiotext: Zeigt die von dem Sender bereitgestellten Lauftextinformationen an.
Systemeinstellungen
Die Taste INFO/MENU bei eingeschaltetem Gerät gedrückt halten. Dies öffnet die „System Menu
Settings“ (Systemmenüeinstellungen).
Zur Auswahl aus den gewünschten Unteroptionen die Tasten PREV/NEXT drücken:
Page 24

24
Einstellen von Uhrzeit/Dtum
Die Taste ENTER drücken und die Studenziffern beginnen zu blinken.
Die Tasten PREV/NEXT zum Einstellen der korrekten Studen drücken.
Drücken Sie zur Bestätigung die Taste ENTER.
Die letzten beiden Schritte für die Einstellung der Minuten und des Datums (Jahr, Monat, Tag)
wiederholen.
Alarmeinstellung
Die Taste Enter/Snooze für Alarm 1 drücken oder die Taste NEXT für Alarm 2.
Die Taste Next drücken, sodass das Wort „ON“ (An) blinkt und zur Bestätigung Enter (Eingabe)
drücken.
Die Stundenziffern für den Alarm beginnen zu blinken. Die Taste Prev oder Next zum Ändern der
Stunden drücken und zur Bestätigung die Taste Enter betätigen.
Die Taste Prev oder Next zum Ändern der Minuten drücken und zur Bestätigung die Taste Enter
betätigen.
Die Taste Prev oder Next zum Ändern der Lautstärke drücken und zur Bestätigun die Taste Enter
betätigen.
Zum Wechsel wischen DAB- und FM-Alarm die Taste Prev oder Next drücken und zur Bestätigung die
Taste Enter betätigen.
Die Anleitung für das Einstellen von Alarm 1 gelten auch für das Einstellen von Alarm 2.
Hinweis: Um beim Einstellen des Alarms den letzten Schritt rückgängig zu machen, kann die Taste
Info/Menu gedrückt werden.
Ausschalten des Alarms
Um den Alarm auszuschalten die Taste Next drücken, sodass das Wort „OFF“ (Aus) blinkt und die
Taste Enter drücken. Der Alarm ist nun AUS.
Ausschalten eines ertönenden Alarms
Die Taste Power/Mode drücken, um den Alarm auszuschalten.
Hinweis: Wenn der Alarm nicht ausgeschaltet wird, erklnigt er für eine Stunde.
Automatische Abschaltung
Die Taste Prev oder Next drücken, um eine Auswahl zwischen AUS-120-90-60-45-30-15-5 Minuten z
zu treffen.
Zur Bestätigung der Auswahl die Taste Enter drücken.
Zurücksetzen auf Werkseinstellungen
Drücken Sie die Taste Enter und auf dem Display wird „Factory Reset?“ (Zurücksetzen auf
Werkseinstellungen?) angezeigt. Drücken Sie Next oder Prev, um „Yes“ (Ja) auszuwählen.
Ein erneutes Drücken der Taste Enter setzt das Radio zurück.
Page 25

25
FM-Suchlaufeinstellung
Die Taste Enter zur Auswahl von „Only“ (nur) oder „All“ (Alle) drücken. Wenn „Only“ (nur)
ausgewählt wird, sucht das Radio nur nach Sendern mit starken Signalen und gibt nur diese wieder.
Wenn „All“ (Alle) ausgewählt wird, sucht das Radio auch nach Sendern mit schwachen Signalen und
gibt diese wieder.
Systemversion
Sie können die Software-Versionsnummer überprüfen.
Zurücksetzen des Radios
Ein Zurücksetzen des Radios löscht alle eingestellten DAB-Sender und alle im FM- und DAB-Modus
gespeicherten Senderstationen. Zum Zurücksetzen des Radios:
Die Taste INFO/MENU gedrückt halten.
Wiederholt die Taste Next drücken, bis auf dem Display „Factory Reset“ (Auf Werkseinstellungen
zurücksetzen) angezeigt wird.
Drücken Sie die Taste Enter und auf dem Display wird „Factory Reset?“ (Zurücksetzen auf
Werkseinstellungen?) angezeigt. Die Taste Next drücken, bis das Wort „YES“ (Ja) blinkt.
Erneut die Taste Enter drücken und das Radio wird zurückgesetzt.
Schlummerfunktion
Wenn der Alarm ertönt kann der Alarm durch Drücken der Taste Enter/Snooze für weitere 9 Minuten
verzögert werden. Das Radio schaltet in den Standby-Modus.
Zum Ausschalten der Schlummerfunktion die Taste Power/Mode drücken und in das Radio in den
Betriebsmouds schalten, bevor der Alarm ertönt.
Häufig gestellte Fragen:
Problem
Lösung
Kein Ton
Der Sender ist nicht eingestellt. Nehmen Sie eine Feineinstellung
des Senders vor.
Die Lautstärke ist sehr leise eingestellt. Erhöhen Sie die Lautstärke.
Eventuell ist ein Kopfhörer angeschlossen. Trennen Sie die
Kopfhörerverbindung.
Tasten funktionieren nicht
Das Gerät ausschalten und nach einigen Sekunden wieder
einschalten.
FM: Rauschen
DAB: Plätschern/Abbrechender
Ton/Ausfälle
Signalempfang ist zu schwach. Die Antennenausrichtung anpassen
oder das Gerät an einem Ort mit stärkerem Signalempfang
aufstellen.
Sender neu suchen.
Ton ist verzerrt
Die Lautstärke ist zu hoch. Den Lautstärkepegel anpassen.
Gewünschter Sender wird nicht
gefunden
Schwaches Signal. Verwenden Sie die „Manual Tune (Manuelle
Abstimmung)“ Funktion.
Display zeigt „No Service“ (Kein
Dienst)
Keine DAB-Abdeckung oder schlechter Empfang in Ihrem Bereich.
Die Antennenausrichtung anpassen oder das Gerät an einem Ort
mit stärkerem Signalempfang aufstellen.
Display ist leer
Dies kann auftreten, wenn der Sender während der Abstimmung
die Bezeichnung für einen Service ändert oder die Bezeichnung
entfernt. Das Radio wird versuchen sich neu abzustimmen oder
einen neuen Suchlauf durchführen.
Page 26

26
Technische Daten
Stromversorgung
Eingebaute Batterie
Frequenzbereich
UKW 87.5 – 108 MHz
DAB 174-240 MHz
Ausgangsanschluss
3,5 mm Kopfhörerbuchse
Antenne
Teleskop-Antenne
Netzteil (nur für EU)
Hersteller
Shenzhen Adition Audio Science &Technology Co.Ltd
Primär
AC 100-240 V~50/60 Hz, 0,15 A max.
Sekundär
DC 5 V/1 A
Modellnummer
AD050501000EUU
Verwenden Sie nur den originalen
AC-Adapter
Verwenden Sie nur die im Handbuch
angegebene Stromversorgung
Wiedergabedauer
Das Radio verfügt über eine Wiedergabedauer von ca. 3-5 Stunden. Dies ist abhängig von der Singalstärke
und der eingestellten Lautstärke.
Page 27

27
5. Garantie
Lenco bietet Leistungen und Garantien im Einklang mit Europäischem Recht. Im Falle von Reparaturen
(sowohl während als auch nach Ablauf der Garantiezeit) sollten Sie deshalb Ihren Einzelhändler
kontaktieren.
Wichtiger Hinweis: Es ist nicht möglich, Geräte für Reparaturen direkt an Lenco zu schicken.
Wichtiger Hinweis: Falls dieses Gerät von einem nicht autorisierten Kundendienst geöffnet oder
darauf zugegriffen wird, erlischt die Garantie.
Dieses Gerät ist nicht für professionelle Zwecke geeignet. Falls das Gerät für professionelle Zwecke
eingesetzt wird, erlöschen alle Garantieverpflichtungen seitens des Herstellers.
6. Haftungsausschluss
Aktualisierungen der Firmware und/oder Hardware-Komponenten werden regelmäßig durchgeführt.
Daher können einige der Anweisungen, Spezifikationen und Abbildungen in dieser Dokumentation von
Ihrer individuellen Situation abweichen. Alle in diesem Handbuch beschriebenen Elemente dienen nur
zur Illustration und treffen auf Ihre individuelle Situation möglicherweise nicht zu. Aus der in diesem
Handbuch getätigten Beschreibung können keine Rechtsansprüche oder Leistungsanforderungen
geltend gemacht werden.
7. Entsorgung des Altgeräts
Dieses Symbol zeigt an, dass das entsprechende Produkt oder dessen Batterie in
Europa nicht mit dem normalen Hausmüll entsorgt werden darf. Um die
ordnungsgemäße Abfallbehandlung des Produkts und dessen Batterie zu
gewährleisten, müssen diese im Einklang mit allen anwendbaren örtlichen
Vorschriften zur Entsorgung von Elektrogeräten und Batterien entsorgt werden.
Dabei helfen Sie, natürliche Ressourcen zu schonen und Umweltschutzstandards
zur Verwertung und Entsorgung von Altgeräten aufrecht zu halten (Waste
Electrical and Electronic Equipment Directive).
8. CE-Kennzeichen
Produkte mit der CE Kennzeichnung entsprechen der EMV-Richtlinie (2014/30/EU) und
der Niederspannungsrichtlinie (2014/35/EU), herausgegeben von der Kommission der
Europäischen Gemeinschaft.
Lenco Benelux BV, Thermiekstraat 1a, 6361 HB Nuth, Die Niederlande, erklärt hiermit, dass dieses
Produkt den grundlegenden Anforderungen und anderen Vorschriften der Richtlinie 1999/5/EC
entspricht.
Die Konformitätserklärung ist erhältlich unter techdoc@lenco.com
9. Service
Weitere Informationen und Unterstützung erhalten Sie unter www.lenco.com
Lenco Benelux BV, Thermiekstraat 1a, 6361 HB, Die Niederlande.
Page 28

28
Français
Radio DAB+/FM
Sécurité générale
Précautions générales
Installez l'appareil selon les instructions du fabriquant. Ne l’installez pas près d’une source de
chaleur telle qu’un radiateur, une bouche de chaleur, une cuisinière ou autre appareil (tel qu'un
amplificateur) qui émet de la chaleur.
Utilisez l'appareil uniquement avec les accessoires qui sont vendus avec.
Afin d'assurer une ventilation et un fonctionnement appropriés, ne bloquez pas les ouvertures de
ventilation.
Débranchez l'appareil de la prise secteur pendant les orages.
Une pression acoustique excessive des écouteurs peut endommager votre audition.Pour votre santé,
gardez toujours le volume à un niveau bas à modéré en utilisant des écouteurs.
Les bougies ou les autres flammes nues doivent rester toujours éloignées de l'appareil.
N'approchez pas cette radio d’une TV, d’un réfrigérateur, d’un four à micro-ondes, d’un amplificateur
ou d’un lecteur de DVD, car cela pourrait nuire à la qualité audio.Si cela arrive, éloignez la radio de
l’appareil causant les interférences.
N’installez ou ne placez pas cette radio dans une étagère, une armoire intégrée ou dans un autre
espace confiné.Assurez-vous que l'appareil est bien ventilé.
Cet appareil n'est pas destiné à être utilisé par des personnes (y compris les enfants) ayant des capacités
physiques, sensorielles ou mentales réduites, ou manquant d'expérience et de connaissances, sauf si
elles sont sous surveillance ou instruites concernant l'utilisation de l'appareil par une personne
responsable de leur sécurité.
Surveillez les enfants et assurez-vous qu'ils ne jouent pas avec l'appareil.
Conservez les emballages d’origine pour un futur transport de la radio.Pour une protection maximale,
remballez l'appareil comme il l'était initialement.
Veillez à débrancher l'adaptateur de l’appareil avant nettoyage.
Utilisez un chiffon doux et sec pour nettoyer l’appareil et l'écran d'affichage.
N’utilisez aucun type de solvant, tel qu'un diluant et du benzène, car ils peuvent endommager la
surface de la radio.
Avant la première utilisation
Déballez l'appareil, mais conservez tous les emballages tant que vous n’êtes pas sûr que votre
nouvelle radio DAB n’est pas endommagée et en bon état de marche. Les emballages en plastique
présentent un risque d'asphyxie pour les bébés et les jeunes enfants, assurez-vous donc que les
emballages sont hors de leur portée.
Page 29

29
Présentation du produit
1. Info/Menu
Maintenez enfoncé pour accéder aux paramètres du menu.
2. Scan
Rechercher automatiquement toutes les stations DAB et FM.
3. Enter/Snooze
Appuyez dessus pour activer la fonction de rappel d'alarme quand l'alarme sonne.
Page 30

30
4. Preset
Mémoriser et charger jusqu’à 10 préréglages de stations DAB et
10 préréglages de stations FM.
5. Vol-
Baisser le volume.
6. Prev
Sélectionner la fréquence, station, station préréglée ou option du menu
précédente.
7. Vol+
Monter le volume.
8. Next
Sélectionner la fréquence, station, station préréglée ou option du menu
suivante.
9. Power/Mode
Quand la radio est en marche, appuyez dessus pour basculer entre les modes
DAB et FM.
10. Interrupteur
marche/arrêt
Quand la radio est en marche, glissez l’interrupteur pour l'éteindre. Quand la
radio est arrêtée, glissez l’interrupteur pour l'allumer.
11. Connecteur d'alimentation de 5 Vcc/1 A
12. Témoin lumineux de charge
13. Prise pour écouteurs de 3,5 mm
14. Écran LCD
15. Antenne télescopique
Instructions
Fonctionnement de base
Premier démarrage de votre radio DAB
Mettez l’interrupteur OFF/ON (marche/arrêt) à l’arrière de votre radio DAB en position ON (marche)
pour mettre en marche la radio DAB.
Déployez l'antenne télescopique pour améliorer la réception.
Ensuite, appuyez sur le bouton Power/Mode (Alim/mode) pour allumer la radio.
Quand le DAB est activé pour la première fois, une recherche complète commencera
automatiquement, ou la station lue avant l'arrêt de l'appareil sera lue.
Une fois que la radio a démarré, appuyez sur le bouton Power/Mode (Alim/mode) pour basculer
entre les modes DAB et FM.
Pendant la recherche, une barre coulissante s’affichera pour indiquer la progression de la recherche
et le nombre de stations de radio trouvées jusqu’à présent. Une fois que la recherche est terminée,
la radio sélectionnera la première station trouvée dans l'ordre alphanumérique.
Mettez l'interrupteur ON/OFF (marche/arrêt) en position OFF (arrêt) pour éteindre la radio DAB.
Remarque : Faites un appui long sur le bouton et l'appareil passera en mode veille.
Sélection des modes
Quand la radio est en marche, appuyez plusieurs fois sur le bouton Power/Mode (Alim/mode) pour
basculer entre les modes DAB et FM.
Réglage du volume
Appuyez sur le bouton VOL+ ou VOL- pour monter ou baisser le volume.
Fonctionnement DAB
Pour écourter les stations syntonisées, appuyez sur le bouton PREV (précédent) ou NEXT (suivant).
Chaque fois que vous appuyez sur les boutons PREV/NEXT (préc./suiv.), vous passerez à la station
mémorisée précédente ou suivante.
Page 31

31
La radio affichera le nom de la station.
Mémoire
Quand vous redémarrez la radio après l'avoir éteinte, elle se syntonisera automatiquement sur la
même station (DAB ou FM) que la dernière qui était sélectionnée.
Mémorisation de stations
Vous pouvez mémoriser au max. 10 stations DAB dans les préréglages pour charger rapidement et
facilement vos stations préférées.
Pour mémoriser une station, vous devez d'abord écouter la station à enregistrer. Maintenez enfoncé
le bouton PRESET (préréglage). L'écran affichera « Preset Store<#: (Empty)> » (Mémoriser<#:
(Vide)>). Si une station est déjà mémorisée. L'écran affichera « <#: Station name> » (#: Nom de
station>).
Appuyez sur les boutons PREV/NEXT (précédent/suivant) pour sélectionner le numéro d’emplacement
de 1 à 10.
Pour sauvegarder à l’emplacement sélectionné, appuyez sur le bouton ENTER (entrée). L'écran
affichera ensuite « Preset# stored » (Préréglage# mémorisé).
Charger une station mémorisée
Une fois que vous avez sauvegardé une station sur l’un des boutons de préréglage, vous pouvez :
Appuyer sur le bouton PRESET (préréglage) et sur le bouton PREV/NEXT (précédent/suivant) pour
sélectionner le numéro de station préréglée voulu.
Appuyez sur le bouton ENTER (entrée) pour charger un numéro de station préréglée.
Informations sur la station en mode DAB
Appuyez plusieurs fois sur le bouton INFO/MENU (info/menu) pour afficher les informations des
différentes émissions.
Puissance du signal : Affiche une barre de signal avec la puissance du signal de la station actuelle.
Bit Error Rate (BER) (Taux d’erreurs sur les bits) : Fournit des détails du taux d’erreurs du signal.
Station et fréquence : Affiche le numéro et la fréquence du canal de transmission de la station.
PTY (Program Type) (type de programme) : Affiche le type et la description du programme fourni par
la station DAB.
Heure et date : Affiche les informations sur l’heure et la date fournies par le diffuseur.
Indications DAB : Indique le mode DAB.
Dynamic Label Segment (DLS) (Segment d'étiquette dynamique) : Affiche les informations du texte
défilant fournies par le diffuseur.
Fonctionnement FM
Pour faire basculer la radio entre les modes DAB et FM, appuyez une fois sur le bouton Power/Mode
(Alim/mode).
Recherche automatique
Pour rechercher une station FM, appuyez sur le bouton SCAN (recherche). Cela lancera la recherche
croissante sur la bande de fréquence.
Page 32

32
Pour effectuer une recherche décroissante sur la bande de fréquence. Maintenez enfoncé le bouton
SCAN (recherche).
Une fois qu’une station a été trouvée, la recherche s'arrête automatiquement. Si aucune station
n’est trouvée, alors la recherche s'arrêtera après avoir balayé toute la bande FM (87,5 à 108 MHz).
Recherche manuelle
Pour rechercher manuellement des stations FM, appuyez simplement plusieurs fois sur les boutons
PREC/NEXT (préc./suiv.) jusqu’à avoir atteint la fréquence voulue.
Mémorisation de stations
Vous pouvez mémoriser au max. 10 stations FM dans les préréglages pour charger rapidement et
facilement vos stations préférées.
Pour mémoriser une station, vous devez d'abord écouter la station à enregistrer. Maintenez enfoncé
le bouton PRESET (préréglage). L'écran affichera « Preset store <#: (Empty)> » (Mémoriser<#:
(Vide)>). Si une station est déjà stockée, l'écran affiche « <#: Station frequency> » (<#: Fréquence de
station>).
Appuyez sur le bouton PREV/NEXT (précédent/suivant) pour sélectionner le numéro d’emplacement
de 1 à 10.
Pour sauvegarder à l’emplacement sélectionné, appuyez sur le bouton ENTER (entrée). L'écran
affichera ensuite « Preset # stored » (Préréglage # mémorisé).
Charger une station mémorisée
Une fois que vous avez sauvegardé une station sur l’un des boutons de préréglage, vous pouvez :
Appuyer sur le bouton PRESET (préréglage) et sur les boutons PREV/NEXT (précédent/suivant) pour
sélectionner le numéro de station préréglée voulu.
Appuyez sur le bouton ENTER (entrée) pour charger un numéro de station préréglée.
Informations sur la station en mode FM
Appuyez plusieurs fois sur le bouton INFO (info) pour afficher les informations des différentes
émissions.
Type de programme : Affiche une description du type d'émission fourni par le diffuseur.
Puissance du signal : Affiche une barre de signal avec la puissance du signal de la station actuelle.
Heure et date : Affiche l’heure et la date.
Fréquence : Affiche la fréquence de transmission de la station.
Type audio : Affiche le type audio de la station que vous écoutez. Cela sera Stéréo ou Mono.
Texte radio : Affiche les informations du texte défilant fournies par le diffuseur.
Réglages système
Quand l'appareil est en marche, maintenez enfoncé le bouton INFO/MENU (info/menu). Cela ouvrira
les « System Menu Settings » (Réglages du menu du système).
Appuyez sur les boutons PREV/NEXT (préc./suiv.) pour sélectionner votre sous-option voulue entre :
Page 33

33
Réglage de l’heure/de la date
Appuyez sur le bouton ENTER (entrée) et les chiffres des heures clignoteront.
Appuyez sur le bouton PREV/NEXT (préc./suiv.) pour régler correctement les heures.
Appuyez sur le bouton ENTER pour confirmer.
Répétez les deux dernières étapes pour régler les minutes, l'année, le mois et le jour.
Réglage d'alarme
Appuyez sur le bouton Enter/Snooze (entrée/rappel d’alarme) pour utiliser Alarme1 ou appuyez sur
le bouton NEXT (suivant) pour accéder à Alarme2.
Appuyez sur le bouton Next (suivant) pour que le mot « ON » (activé) clignote et appuyez sur Enter
(entrée) pour confirme.
Les chiffres des heures pour l’alarme clignoteront, appuyez sur Prev (préc.) ou Next (suiv.) pour
modifier les heures et appuyez sur le bouton Enter (entrée) pour confirmer.
Appuyez sur le bouton Prev (préc.) ou Next (suiv.) pour modifier les minutes et appuyez sur le
bouton Enter (entrée) pour confirmer.
Appuyez sur le bouton Prev (préc.) ou Next (suiv.) pour changer le volume et appuyez sur le bouton
Enter (entrée) pour confirmer.
Appuyez sur le bouton Prev (préc.) ou Next (suiv.) pour basculer entre Alarme-DAB-FM et appuyez
sur Enter (entrée) pour confirmer.
Pour régler Alarme2, suivez les instructions pour Alarme1.
Remarque : Vous pouvez appuyer sur le bouton Info/Menu (info/menu) pour revenir à la dernière
étape lors du procédé de réglage de l’alarme.
Arrêter l'alarme
Pour arrêter l'alarme, appuyez sur le bouton Next (suivant) pour que le mot « OFF » (activé) clignote
et appuyez sur le bouton Enter (entrée). L'alarme est désormais désactivée.
Désactiver le son de l’alarme
Appuyez sur le bouton Power/Mode (Alim/mode) pour désactiver l’alarme quand elle sonne.
Remarque : L’alarme continuera de sonner pendant une heure si vous ne la dédsactivez pas quand
elle sonne.
Réglage de la mise en veille
Appuyez sur le bouton Prev (préc.) ou Next (suiv.) pour sélectionner l’une des options suivantes :
Désactivé-120-90-60-45-30-15-5 minutes.
Appuyez sur le bouton Enter (entrée) pour confirmer votre sélection.
Réinitialisation des réglages d'usine
Appuyez sur le bouton Enter (entrée) et l'écran affichera « Factory Reset? » (Rétablir les paramètres
d’usine ?). Appuyez sur le bouton Next (suiv.) ou Prev (préc) pour sélectionner « Yes » (oui).
Rappuyez sur le bouton Enter (entrée) pour réinitialiser la radio.
Page 34

34
Réglage de la recherche FM
Appuyez sur le bouton Enter (entrée) pour sélectionner Only (uniquement) ou All (tout). Si vous
sélectionnez Only (uniquement), la radio recherchera et lira uniquement les stations à signal
puissant. Si vous sélectionnez All (tout), la radio recherchera et lira également les stations à signal
faible.
Version du système
Vous pouvez consulter le numéro de version du logiciel.
Réinitialisation de la radio
La réinitialisation de la radio supprimera toutes les stations DAB syntonisées et toutes les stations
mémorisées en modes FM et DAB.Pour réinitialiser la radio :
Maintenez enfoncé le bouton INFO/MENU (info/menu).
Appuyez plusieurs fois sur le bouton Next (Suivant) jusqu’à ce que « Factory Reset » (Rétablir les
réglages d’usine ?) s'affiche sur l’écran.
Appuyez sur le bouton Enter (entrée) et l'écran affichera « Factory Reset? » (Rétablir les paramètres
d’usine ?). Appuyez sur le bouton Next (suivant) jusqu'à ce que le mot « YES » (oui) s'affiche.
Rappuyez sur le bouton Enter (entrée) pour effectuer la réinitialisation de la radio.
Fonction de rappel d’alarme
Lorsque l'alarme sonne, appuyez sur le boutonEnter/Snooze (entrée/rappel d'alarme) pour retarder
l'alarme pendant 9 minutes de plus. La radio passera en mode veille.
Vous pouvez appuyer sur le bouton Power/Mode (Alim/mode) pour arrêter la fonction de rappel
d'alarme et passer en mode de fonctionnement avant que l'alarme ne sonne.
FAQ
Problème
Solution
Aucun son
La station n’est pas syntonisée. Réglez la station.
Le volume est réglé au minimum. Monter le volume.
Les écouteurs sont peut-être branchés. Déconnectez les
écouteurs.
Les boutons ne fonctionnent pas.
Éteignez l’appareil, puis rallumez-le au bout de quelques
secondes.
FM : Bruits parasites
DAB : Bruit sourd/intermittent
La réception du signal est trop faible. Réglez l’antenne ou
déplacez l'appareil pour améliorer la réception.
Relancez une recherche des stations.
Le son est déformé.
Le volume est réglé trop fort. Réglez le volume.
Impossible de trouver la station
voulue
Signal faible. Utilisez la fonction de syntonisation manuelle.
L'écran affiche « No Service »
(pas de service).
Il n’y a pas de couverture DAB dans votre zone ou la réception
est mauvaise. Réglez la position de l’antenne ou déplacez
l'appareil pour améliorer la réception.
L’écran est vide.
Cela peut se produire si le diffuseur change l'étiquette d’un
service ou enlève une étiquette pendant qu'il est syntonisé. La
radio essayera de resyntoniser ou d’effectuer une recherche.
Page 35

35
Caractéristiques
Alimentation électrique
Batterie intégrée
Plage de fréquence
FM 87.5 à 108 MHz
DAB 174 à 240 MHz
Connecteur de sortie
Prise d'écouteurs de 3,5 mm
Antenne
Antenne télescopique
Adaptateur d’alimentation (uniquement
pour l’Europe)
Fabricant
Shenzhen Adition Audio Science &Technology Co.Ltd
Entrée
CA 100-240V~50/60Hz ; 0,15A Max
Sortie
CC 5V/1A
Numéro du modèle
AD050501000EUU
Utilisez uniquement l’adaptateur CA
d’origine
Utilisez uniquement l'alimentation
électrique indiquée dans le mode d'emploi.
Autonomie de lecture
Votre radio a une autonomie en lecture d’environ 3 à 5 heures. Cela dépend de la puissance du
signal et du volume sélectionné sur la radio
Page 36

36
5. Garantie
Lenco propose un service et une garantie conformément à la législation européenne, ce qui signifie
qu’en cas de besoin de réparation (aussi bien pendant et après la période de garantie), vous pouvez
contacter votre revendeur le plus proche.
Remarque importante : Il n’est pas possible de renvoyer l’appareil pour réparation directement à Lenco.
Remarque importante : Si l’unité est ouverte ou modifiée de quelque manière que ce soit par un
réparateur non agréé, la garantie serait caduque.
Cet appareil ne convient pas à une utilisation professionnelle. En cas d’utilisation professionnelle, les
obligations de garantie du fabricant seront annulées.
6. Clause de non-responsabilité
Des mises à jour du logiciel et/ou des composants informatiques sont régulièrement effectuées. Il se
peut donc que certaines instructions, caractéristiques et images présentes dans ce document
diffèrent légèrement de votre configuration spécifique. Tous les articles décrits dans ce guide ne sont
fournis uniquement qu’à des fins d’illustration et peuvent ne pas s’appliquer à une configuration
spécifique. Aucun droit légal ne peut être obtenu depuis les informations contenues dans ce manuel.
7. Mise au rebut de l’appareil usagé
Ce symbole indique que le produit électrique concerné ou la batterie ne doivent pas
être jetés parmi les autres déchets ménagers en Europe. Pour garantir un
traitement correct du déchet de la batterie ou de l’appareil, veuillez les mettre au
rebut conformément aux règlements locaux en vigueur relatifs aux appareils
électriques et autres batteries. En agissant de la sorte, vous contribuerez à la
préservation des ressources naturelles et à l’amélioration des niveaux de protection
environnementale concernant le traitement et la destruction des déchets
électriques (directive sur les déchets des équipements électriques et électroniques).
8. Marquage CE
Les produits avec la marque CE sont conformes à la directive CEM (2014/30/EU) et à
la directive basse tension (2014/35/EU) émises par la commission de la communauté
européenne.
Par la présente, Lenco Benelux BV, Thermiekstraat 1a, 6361 HB Nuth, Pays-Bas, déclare que ce produit
est conforme aux exigences principales et autres clauses applicables de la Directive 1999/5/CE.
La déclaration de conformité peut être consultée au lien : techdoc@lenco.com
9. Service après-vente
Pour en savoir plus et obtenir de l’assistance, visitez www.lenco.com
Lenco Benelux BV, Thermiekstraat 1a, 6361 HB, Pays-Bas.
Page 37

37
Español
Radio DAB+/FM
Seguridad general
Precauciones generales
Instale la unidad siguiendo las instrucciones del fabricante. No la instale cerca de fuentes de calor
como radiadores, marcapasos, estufas u otros objetos (incluyendo amplificadores) que produzcan
calor.
Use solo la unidad con los accesorios incluidos.
No bloquee las aperturas de ventilación para garantizar la ventilación y funcionamiento adecuados.
Desenchufe la unidad de la fuente de alimentación durante las tormentas eléctricas.
La presión acústica excesiva de auriculares y audífonos puede provocar pérdida de audición. Por el
bien de su salud, mantenga siempre el volumen en un nivel de bajo a moderado cuando utilice
auriculares o audífonos.
Mantenga las velas u otras llamas abiertas alejadas de este producto en todo momento.
Colocar esta radio cerca de un TV, nevera, horno microondas, amplificador o reproductor de DVD
podría afectar negativamente a la calidad del sonido. En tal caso, aparte la radio del dispositivo que
provoque las interferencias.
No instale ni coloque esta radio sobre una estantería, armario empotrado u otros espacios
confinados. Asegúrese de que la unidad esté bien ventilada.
Este producto no está diseñado para ser utilizado por personas (incluidos niños) con capacidades
físicas, sensoriales o mentales reducidas, o con falta de experiencia y conocimiento, a menos que
estén bajo supervisión o reciban instrucciones acerca del uso del aparato por parte de una persona
responsable de su seguridad.
Supervise a los niños para asegurarse de que no jueguen con el aparato.
Conserve el embalaje original para transportar la radio en el futuro. Vuelva a empaquetar la unidad
como estaba empaquetada originalmente para su máxima protección.
Asegúrese de desenchufar el adaptador de la unidad antes de limpiarla.
Utilice solo trapos suaves y secos para limpiar la unidad y la pantalla.
No utilice ningún tipo de disolvente, como diluyentes o benceno, ya que podrían provocar daños en
la superficie de la radio.
Antes del primer uso
Desembale el aparato pero conserve todo el material de embalaje hasta que esté seguro de que la
radio DAB no tiene daños y funciona correctamente. El embalaje de plástico puede suponer un
riesgo de asfixia para bebés y niños, así que asegúrese de que el material de embalaje esté fuera de
su alcance.
Page 38

38
Descripción general del producto
1. Info/Menu
Mantener pulsado para acceder al menú de ajustes.
2. Scan
Buscar automáticamente todas las emisoras DAB y FM.
3. Enter/Snooze
Pulsar para activar el modo 9 minutos mientras suena la alarma.
Page 39

39
4. Preset
Almacenar y acceder a un máximo de 10 emisoras DAB y 10 emisoras
FM prestablecidas.
5. Vol-
Bajar el volumen.
6. Prev
Seleccionar anterior frecuencia, emisora, emisora prestablecida o menú
de opciones.
7. Vol+
Subir el volumen.
8. Next
Seleccionar siguiente frecuencia, emisora, emisora prestablecida o menú
de opciones.
9. Power/Mode
Con la radio encendida, pulsar para alternar entre los modos DAB y FM.
10. Interruptor de
encendido/apagado
Con la radio encendida, deslizar para apagarla. Con la radio apagada,
deslizar para encenderla.
11. Conector eléctrico 5 V CC, 1 A
12. Indicador luminoso de carga
13. Toma de auriculares de 3,5 mm
14. Pantalla LCD
15. Antena Telescópica
Instrucciones
Funcionamiento básico
Encender la radio DAB por primera vez
Deslice el interruptor OFF/ON de la parte trasera de la radio DAB a la posición ON para encender la
radio DAB.
Extienda la antena telescópica para conseguir la mejor recepción posible.
A continuación, pulse el botón Power/Mode para encender la radio.
Cuando se active el modo DAB por primera vez, se iniciará automáticamente una búsqueda
completa o se reproducirá la última emisora escuchada antes de apagar la unidad.
Cuando la radio esté encendida, pulse el botón Power/Mode para alternar entre los modos DAB y
FM.
Durante la búsqueda, la pantalla mostrará una barra indicando el progreso de la búsqueda y el
número de emisoras de radio que se han encontrado. Una vez haya terminado la búsqueda, la radio
seleccionará la primera emisora en orden alfanumérico.
Deslice el interruptor ON/OFF a la posición OFF para apagar la radio DAB.
Nota: Mantenga pulsado el botón de encendido y la unidad pasará a modo de espera.
Seleccionar los modos
Cuando la radio esté encendida, pulse repetidamente el botón Power/Mode para alternar entre los
modos DAB y FM.
Ajustar el volumen
Pulse los botones VOL+ o VOL- para subir/bajar el volumen.
Funcionamiento de DAB
Pulse los botones PREV o NEXT para escuchar las radios sintonizadas. Cada vez que pulse los botones
PREV/NEXT para omitir la emisora almacenada anterior o siguiente.
La radio mostrará el nombre de la emisora.
Page 40

40
Memoria
Cuando vuelva a encender la radio después de apagarla, sintonizará automáticamente la misma
emisora (DAB o FM) que seleccionó la última vez.
Almacenar emisoras
Puede almacenar hasta 10 emisoras DAB en la memoria prestablecida para recuperar de forma
rápida y sencilla sus emisoras favoritas.
Para almacenar una emisora, primero debe escuchar la emisora que desee guardar. Mantenga
pulsado el botón PRESET. La pantalla mostrará “Preset Store<#: (Empty)>” (Almacenar
prestablecido<#: (Vacío)>). Si ya hay alguna emisora almacenada, la pantalla mostrará “<#: Station
name>” (<#: nombre de emisora).
Pulse los botones PREV/NEXT para seleccionar la emisora prestablecida 1-10.
Para guardar el número de emisora prestablecida seleccionada, pulse el botón ENTER. La pantalla
mostrará entonces “Preset# stored” (Prestablecida# almacenada).
Recuperar una emisora almacenada
Una vez haya almacenado una emisora en uno de los botones prestablecidos, podrá:
Pulse el botón PRESET y los botones PREV/NEXT para seleccionar el número de emisora prestablecida
que desee.
Pulse el botón ENTER para recuperar un número de emisora prestablecida.
Información de emisora en modo DAB
Pulse repetidamente el botón INFO/MENU para mostrar las diferentes informaciones de programa.
Intensidad de señal: Muestra una barra de señal con la intensidad de la emisora actual.
Bit Error Rate (BER, siglas en inglés de tasa de error binario): Proporciona información sobre la tasa
de error de la señal.
Canal y frecuencia: Muestra el número de canal y la frecuencia de transmisión de la emisora.
PTY (Program Type) (Tipo de programa): Muestra el tipo y la descripción del programa proporcionado
por la emisora DAB.
Hora y fecha: Muestra la información de hora y fecha proporcionada por la emisora.
DAB Indication (Indicación de DAB): Indica el modo DAB.
Dynamic label segment (Segmento de etiqueta dinámica) (DLS): Muestra la información en texto con
desplazamiento proporcionada por la emisora.
Funcionamiento de FM
Para alternar entre el modo de radio DAB y FM, pulse una vez el botón Power/Mode.
Búsqueda automática
Para buscar una emisora FM, pulse el botón SCAN. Esto iniciará la búsqueda en la banda de frecuencia.
Para buscar en la banda de frecuencia, mantenga pulsado el botón SCAN.
Una vez haya encontrado una emisora, la búsqueda se detendrá automáticamente. Si no se encuentra
ninguna emisora, la sintonización se detendrá una vez haya buscado toda la banda FM (87.5-108 MHz).
Page 41

41
Búsqueda manual
Para buscar manualmente emisoras FM, solo debe pulsar repetidamente los botones PRES/NEXT
hasta llegar a la frecuencia deseada.
Almacenar emisoras
Puede almacenar hasta 10 emisoras FM en la memoria prestablecida para recuperar de forma rápida
y sencilla sus emisoras favoritas.
Para almacenar una emisora, primero debe escuchar la emisora que desee guardar. Mantenga
pulsado el botón PRESET. La pantalla mostrará “Preset store <#: (Empty)>” (Almacenar
prestablecido<#: (Vacío)>). Si ya hay alguna emisora almacenada, la pantalla mostrará “<#: Station
frequency>” (<#: Emisora>).
Pulse los botones PREV/NEXT para seleccionar el número de emisora prestablecida 1-10.
Para guardar el número de emisora prestablecida seleccionada, pulse el botón ENTER. La pantalla
mostrará entonces “Preset# stored” (Prestablecida# almacenada).
Recuperar una emisora almacenada
Una vez haya almacenado una emisora en uno de los botones prestablecidos, podrá:
Pulse el botón PRESET y los botones PREV/NEXT para seleccionar el número de emisora prestablecida
que desee.
Pulse el botón ENTER para recuperar un número de emisora prestablecida.
Información de emisora en modo FM
Pulse repetidamente el botón INFO para mostrar las diferentes informaciones de programa.
Tipo de programa: Muestra una descripción del tipo de programa proporcionada por la emisora.
Intensidad de señal: Muestra una barra de señal con la intensidad de la emisora actual.
Hora y fecha: Muestra la hora y la fecha.
Frecuencia: Muestra la frecuencia de transmisión de la emisora.
Tipo de audio: Muestra el tipo de audio de la emisora que está escuchando. Será estéreo o mono.
Radio texto: Muestra la información en texto con desplazamiento proporcionada por la emisora.
Configuración del sistema
Con la unidad encendida, mantenga pulsado el botón INFO/MENU. Se abrirá “System Menu Settings”
(Menú de ajustes del sistema).
Pulse los botones PREV/NEXT para seleccionar la subopción que desee entre:
Ajustar la hora/fecha
Pulse el botón ENTER y los dígitos de hora parpadearán.
Pulse los botones PREV/NEXT para ajustar correctamente la hora.
Pulse el botón ENTER para confirmar.
Repita los últimos dos pasos para ajustar los minutos, el año, el mes y la fecha.
Page 42

42
Ajustar la alarma
Pulse Enter/Snooze para usar la Alarma 1 o pulse NEXT para acceder a la Alarma 2.
Pulse el botón Next hasta que parpadee “ON” (Encendido) y pulse Enter para confirmar.
Los dígitos de hora de la alarma parpadearán. Pulse Prev o Next para cambiar la hora y pulse el
botón Enter para confirmar.
Pulse los botones Prev o Next para cambiar el minuto y pulse el botón Enter para confirmar.
Pulse los botones Prev o Next para cambiar el volumen y pulse el botón Enter para confirmar.
Pulse los botones Prev o Next para alternar entre alarma-DAB-FM y pulse el botón Enter para confirmar.
Para ajustar la Alarma 2, siga las instrucciones de la Alarma 1.
Nota: Puede pulsar el botón Info/Menu para retroceder un paso en el proceso de ajuste de la alarma.
Apagar la alarma
Para apagar la alarma, pulse el botón Next hasta que parpadee “OFF” (Apagado) y pulse el botón
Enter. La alarma estará ahora apagada.
Apagar la alarma cuando suene
Pulse el botón Power/Mode para apagar la alarma cuando suene.
Nota: La alarma seguirá sonando durante una hora si no la apaga cuando suene.
Ajuste de espera
Pulse los botones Prev o Next para seleccionar Apagado-120-90-60-45-30-15-5 minutos.
Pulse el botón Enter para confirmar la selección.
Reinicio Fabrica
Pulse el botón Enter y a pantalla mostrará “Factory Reset?” (¿Restaurar ajustes de fábrica?). Pulse
Next o Prev para seleccionar “Yes” (Sí).
Pulse otra vez el botón Enter y se restablecerá la radio.
Ajuste de búsqueda FM
Pulse el botón Enter para seleccionar Only (Solo) o All (Todo). Si selecciona Only (Solo), la radio solo
buscará y reproducirá las emisoras con señal fuerte. Si selecciona All (Todo), la radio también
buscará y reproducirá las emisoras con señal débil.
Versión del sistema
Puede comprobar el número de versión del software.
Restablecer la radio
Al restablecer la radio se eliminarán todas las emisoras DAB sintonizadas y todas las emisoras de la
memoria prestablecida en los modos FM y DAB. Para restablecer la radio:
Mantenga pulsado el botón INFO/MENU.
Pulse repetidamente el botón Next hasta que aparezca “Factory Reset” (Restablecimiento de fábrica)
en la pantalla.
Page 43

43
Pulse el botón Enter y a pantalla mostrará “Factory Reset?” (¿Restaurar ajustes de fábrica?). Pulse el
botón Next hasta que la palabra “YES” (SÍ) parpadee.
Pulse otra vez el botón Enter y se restablecerá la radio.
Función de repetición
Cuando suene la alarma, pulse el botón Enter/Snooze para retardar la alarma otros 9 minutos. La
radio pasará a modo en espera.
Puede pulsar el botón Power/Mode para detener la función de repetición e ir al modo de
funcionamiento antes de que suene la alarma.
Preguntas frecuentes
Problema
Solución
No hay sonido
La emisora no está sintonizada. Sintonícela.
El volumen está ajustado en un nivel bajo. Subir el volumen.
Es posible que haya auriculares conectados. Desconecte los
auriculares.
Los botones no funcionan
Apague la unidad y vuelva a encenderla pasados unos
segundos.
FM: Suena ruido estático
DAB: Sonido
intermitente/entrecortado
La recepción de señal es demasiado baja. Ajuste la antena
aérea o mueva la unidad a una ubicación con una señal más
fuerte.
Vuelva a buscar las emisoras.
El sonido está distorsionado
El volumen está demasiado alto. Ajuste el control de
volumen.
No se encuentra la emisora deseada
Señal débil. Utilice la función de sintonización manual.
La pantalla muestra “No Service”
(Sin servicio)
No hay cobertura DAB en su zona o hay mala recepción.
Ajuste la posición de la antena aérea o mueva la unidad a una
ubicación con una señal más fuerte.
La pantalla está en blanco
Es posible que suceda si la emisora cambia la etiqueta de un
servicio o si elimina la etiqueta mientras se sintoniza. La radio
intentará volver a sintonizar o hará una búsqueda.
Especificaciones
Alimentación CC
Batería integrada
Rangos de frecuencia
FM 87.5-108 MHz
DAB 174-240 MHz
Conector de salida
Toma de auriculares de 3,5 mm
Antena aérea
Antena telescópica
Adaptador de corriente (Sólo para la UE)
Fabricante
Shenzhen Adition Audio Science &Technology Co. Ltd
Entrada
100-240 V CA, 50/60 HZ, 0,15 A máx
Salida
5 VCC/1 A
Número de modelo
AD050501000EUU
Utilice únicamente el adaptador de CA
original
Utilice solo la alimentación eléctrica
indicada en las instrucciones del usuario
Tiempo de uso
La radio tiene un tiempo de uso de aproximadamente 3-5 horas. Este dependerá de la intensidad de
la señal y del volumen ajustado de la radio.
Page 44

44
5. Garantía
Lenco ofrece servicio y garantía en cumplimiento con las leyes de la Unión Europea, lo cual implica
que, en caso de que su producto precise ser reparado (tanto durante como después del periodo de
garantía), deberá contactar directamente con su distribuidor.
Nota importante: No es posible enviar sus reparaciones directamente a Lenco.
Nota importante: Si la unidad es abierta por un centro de servicio no oficial, la garantía quedará anulada.
Este aparato no es adecuado para el uso profesional. En caso de darle un uso profesional, todas las
obligaciones de garantía del fabricante quedarán anuladas.
6. Exención de responsabilidad
Regularmente se llevan a cabo actualizaciones en el Firmware y en los componentes del hardware. Por
esta razón, algunas de las instrucciones, especificaciones e imágenes incluidas en este documento
pueden diferir ligeramente respecto a su situación particular. Todos los elementos descritos en esta
guía tienen un objetivo de mera ilustración, y pueden no ser de aplicación en su situación particular.
No se puede obtener ningún derecho ni derecho legal a partir de la descripción hecha en este manual.
7. Eliminación del antiguo dispositivo
Este símbolo indica que no deberá deshacerse del producto eléctrico o batería en
cuestión junto con los residuos domésticos, en el ámbito de la UE. Para garantizar
un tratamiento residual correcto del producto y su batería, por favor, elimínelos
cumpliendo con las leyes locales aplicables sobre requisitos para el desechado de
equipos eléctricos y baterías. De hacerlo, ayudará a conservar recursos naturales y
mejorar los estándares de protección medioambiental en el tratamiento y
eliminación de residuos eléctricos (Directiva sobre la Eliminación de Equipos
Eléctricos y Electrónicos).
8. Marca CE
Los productos con la marca CE cumplen con la Directiva EMC (2014/30/EU) y con la
Directiva de Bajas Tensiones (2014/35/EU) emitida por la Comisión de la Unión
Europea.
Por la presente, Lenco Benelux BV, Thermiekstraat 1a, 6361 HB Nuth, Países Bajos, declara que este
producto cumple con las exigencias esenciales y otras provisiones relevantes de la Directiva 1999/5/EC.
La declaración de conformidad puede consultarse en techdoc@lenco.com
9. Servicio
Para obtener más información y soporte del departamento técnico, por favor, visite la página web
www.lenco.com
Lenco Benelux BV, Thermiekstraat 1a, 6361 HB, Países Bajos.
 Loading...