

NAV-400
OWNER’S MANUAL
Global Positioning System

CONTENTS
SAFETY INFORMATION .............................................................................................3
INSTALLATION............................................................................................................6
VIEWS ........................................................................................................................11
Front View.............................................................................................................11
Back View .............................................................................................................12
Bottom View .........................................................................................................13
Left View ...............................................................................................................13
Right View.............................................................................................................13
GPS (GLOBAL POSITIONING SYSTEM)..................................................................14
Memory Card Quick Installation ...........................................................................14
Starting Navigation ...............................................................................................14
Software Installation On Your PC .........................................................................15
Installing Microsoft ActiveSync.............................................................................15
Welcome to Destinator OP ......................................................................................16
Navigating a route ....................................................................................................17
Options ......................................................................................................................29
Setting .......................................................................................................................32
Changing map views................................................................................................37
Auto & favorites Alerts .............................................................................................39
Favorites importing ..................................................................................................40
GLOSSARY................................................................................................................41
Appendix A - Favorites Importing file Structure ...................................................42
Appendix B - Destinator OP Console...................................................................43
Appendix C - Installing and activating Additional maps.......................................51
Appendix D - MO Setting .....................................................................................55
2

SAFETY INFORMATION
Safety Instructions
Please read this section carefully and follow all the instructions given. This will help
ensure reliable operation and extend the service life for your appliance.
Keep the packaging and the user instructions for future reference or inquiries at a later
date. If you pass the article on to another person, you must pass on these instructions.
• Never open up the housing of the appliance or the power adapter. These contain no
user-serviceable parts. If the housing is opened there is a danger to life from electric
shock.
• Do not place any objects on the appliance and do not exert any pressure on the
display. Otherwise there is a danger that the screen will break.
• To avoid damage, do not touch the screen with sharp objects. Use only the stylus
provided.
• There is a risk of injury if the display breaks. If this should occur, use protective gloves
to pack the broken parts and contact customer support to arrange for disposal. Then
wash your hands with soap, since there is a possibility that chemicals may have
escaped.
• Never allow children to play with electrical equipment unsupervised. Children not
always correctly recognize possible danger.
• Remove the power adapter from the outlet, switch the appliance off immediately, or
don not actually switch it on, and contact Customer Service …
…if the power adapter or the attached plug become scorched or damaged.
…if the housing of the appliance or the power pack becomes damaged or fluids leak
into it. Components must be checked by Customer Service in order to avoid damage!
Data Security
• Every time you update your data make backup copies on an external storage
mediums. The supplier does not assume liability for data loss or damage to data
storage units, and no claims can be accepted for damages resulting from the loss
of data or for consequential damages.
Operating Environment
• Keep your navigation system and all connected devices away from moisture and
avoid dust, heat and direct sunlight, especially in the car.
• Make sure you protect your appliance from getting wet. (e.g. from rain and hail, at
all times.) Please pay attention that moisture can even build up in a protective pouch
because of condensation.
• Avoid heavy vibrations and shaking.
• Avoid the device from releasing itself from its holder, for example when braking. In
stall the device as vertically as possible.
Failure to follow these instructions may lead to damage to your appliance.
Ambient Temperature
• The appliance if most reliably operated at an ambient temperature of between 41˚F
to 104˚F (5˚C to 40˚C) and at a relative humidity of between 10% to 90%.
• In the powered down state the appliance can be stored at between 32˚F to 140˚F
(0˚C to 60˚C).
• Store the appliance in a safe location to avoid high temperatures (e.g. when parking
or from direct sunlight).
Electromagnetic Compatibility
• When connecting additional or other components the “Electromagnetic Compatibility
Directive”(EMC) must be adhered to. Please also note that only screened cable
(maximum 10ft) should be used with this appliance.
For optimal performance, maintain a distance of at least 10ft. from sources of highfrequency and magnetic interference (televisions, loudspeaker systems, mobile
telephones and so on.) This will help avoid malfunctions and loss of data.
3

SAFETY INFORMATION
Battery Operation
Your appliance is operated with a removable battery. In order to prolong the life and
efficiency of your battery and to ensure safe operation, follow the instructions below:
• Warning: Danger of explosion if rechargeable batteries are not charged properly.
Only replace with the same type of battery or a similar type recommended by the
manufacturer. Never open the rechargeable battery. Do not throw the rechargeable
battery into fire. Dispose of the used batteries following the manufacturer’s instructions.
• Batteries cannot withstand heat. Avoid the appliance and the integrated battery
becoming overheated. Failure to comply with this instruction may lead to damage
to and even explosion of the battery.
• Use only the original power pack to charge the battery or the car adapter from the
optional navigation kit.
• The batteries are special category waste. When disposing of the appliance ensure
that this is done correctly. Contact Customer Service for more details.
Care of the Display
• Avoid scratching the display surface as this is easily damaged. It is strongly
recommended to use a display protection mylar to avoid scratches. Please ask your
nearest dealer for this accessories. The foil on the display at delivery is purely for
protection during transportation!
• Ensure that no traces of water remain on the screen. Water can cause irreversible
discoloration.
• Use only a soft , lint-free cloth to clean the screen.
• Do not expose the screen to either strong sunlight or ultraviolet radiation.
Transport
If you wish to transport the appliance follow the instructions below:
• Following transport of the appliance wait until the unit has acclimatized before using
it.
• In the case of wide fluctuations in temperature or humidity condensation or moisture
may form inside the appliance and this can cause and electrical short-circuit.
• In order to protect the appliance from dirt, knocks and scratching, use either the
protective case.
• Before traveling insure that you are aware of the power and communications provision
at your destination. Before traveling obtain any power or communications
adapters(modem, LAN, etc.) That may be needed.
• When shipping your appliance use only the original packaging and advise the carrier
accordingly.
• When passing through the hand luggage control at airports, it is recommended that
you pass the appliance and all magnetic storage media (external hard drives) through
the X-ray system (the machine on which you place your bags). Avoid the magnetic
detector (the structure through which you pass) or the magnetic wand (the hand
device that the security staff use), since this may corrupt your data.
Connection
When connection your appliance be sure to correctly observe the following instructions:
• The outlet must be in the vicinity of the appliance and must be easily accessible.
• Only use the mains adapter on grounded sockets at 100-240V~AC, 50/60Hz. If you
are unsure about the power supply to the place of use, ask the relevant energy
supplier.
• Use only the power adapter provided with your appliance.
• For additional safety, we recommend the use of a surge protector in order to protect
your appliance from damage of spikes or lighting strikes on the power network.
4

SAFETY INFORMATION
Power Through Car Adapter
• The car adapter should only be connected to the lighter socket of a car (car battery
=DV12V ,no trucks!). If you are in any doubt about the power source in your car,
contact your car manufacturer.
Cabling
• Arrange cables so that no-one can tread on them or trip over them.
• Do not place any items on the cable.
WARNING
When the unit is not in use for a long time, please recharge the battery every
other time, otherwise the battery’s lifetime would be shortened.
5
INSTALLATION
The following guides you step by step through the initial set up of the navigation
system.
Firstly, remove the foil for protecting the device during transportation from the display.
Switching on the navigation system
Switch the main switch (9) on the bottom of the device to ON.
Attention: Always leave the main switch on the ON position, unless you want to carry
out a new reinstallation. if the switch is set to OFF , All data will be lost and the initial
installation will have to be carried out again.
The Navigation System will start the initial installation automatically. The brand logo
will appear and your device will display the application screen after a few seconds.
You set the date and the time by means of the Setting Button on the touch screen
and the date/time control button. Set the applicable time zone, if available.
Attention: According to the charging status of the accumulator installed. It is necessary
for the device to be charged before the initial setting up can run through.
Charging Battery of the Navigation system
Note: When charging the battery, please be sure switch the Battery Switch to ON
position. In causing of charging, the Battery Charge Indicator is red.
You have different possibilities to charge the battery of your navigation system:
• With the help of the network adapter.
• By means of the car adapter.
• The battery charge indicator lights red until the navigation system is charged. Don
not interrupt the charging before the battery is fully charged. It will take a few hours
for the navigation system to be fully charged. When the battery is fully charged the
battery indicator will turn to green.
• Note: You can use the navigation system during the charging process, but the power
supply must not be interrupted during initial set-up.
• Leave the mains adapter connected to the navigation system for around 24 hours,
so that the backup battery can be fully charged.
• You can leave the main adapter connected, and this is very handy for continuous
operation. However, the mains adapter also requires power even when it is not
charging up the battery of the navigation system.
2
1
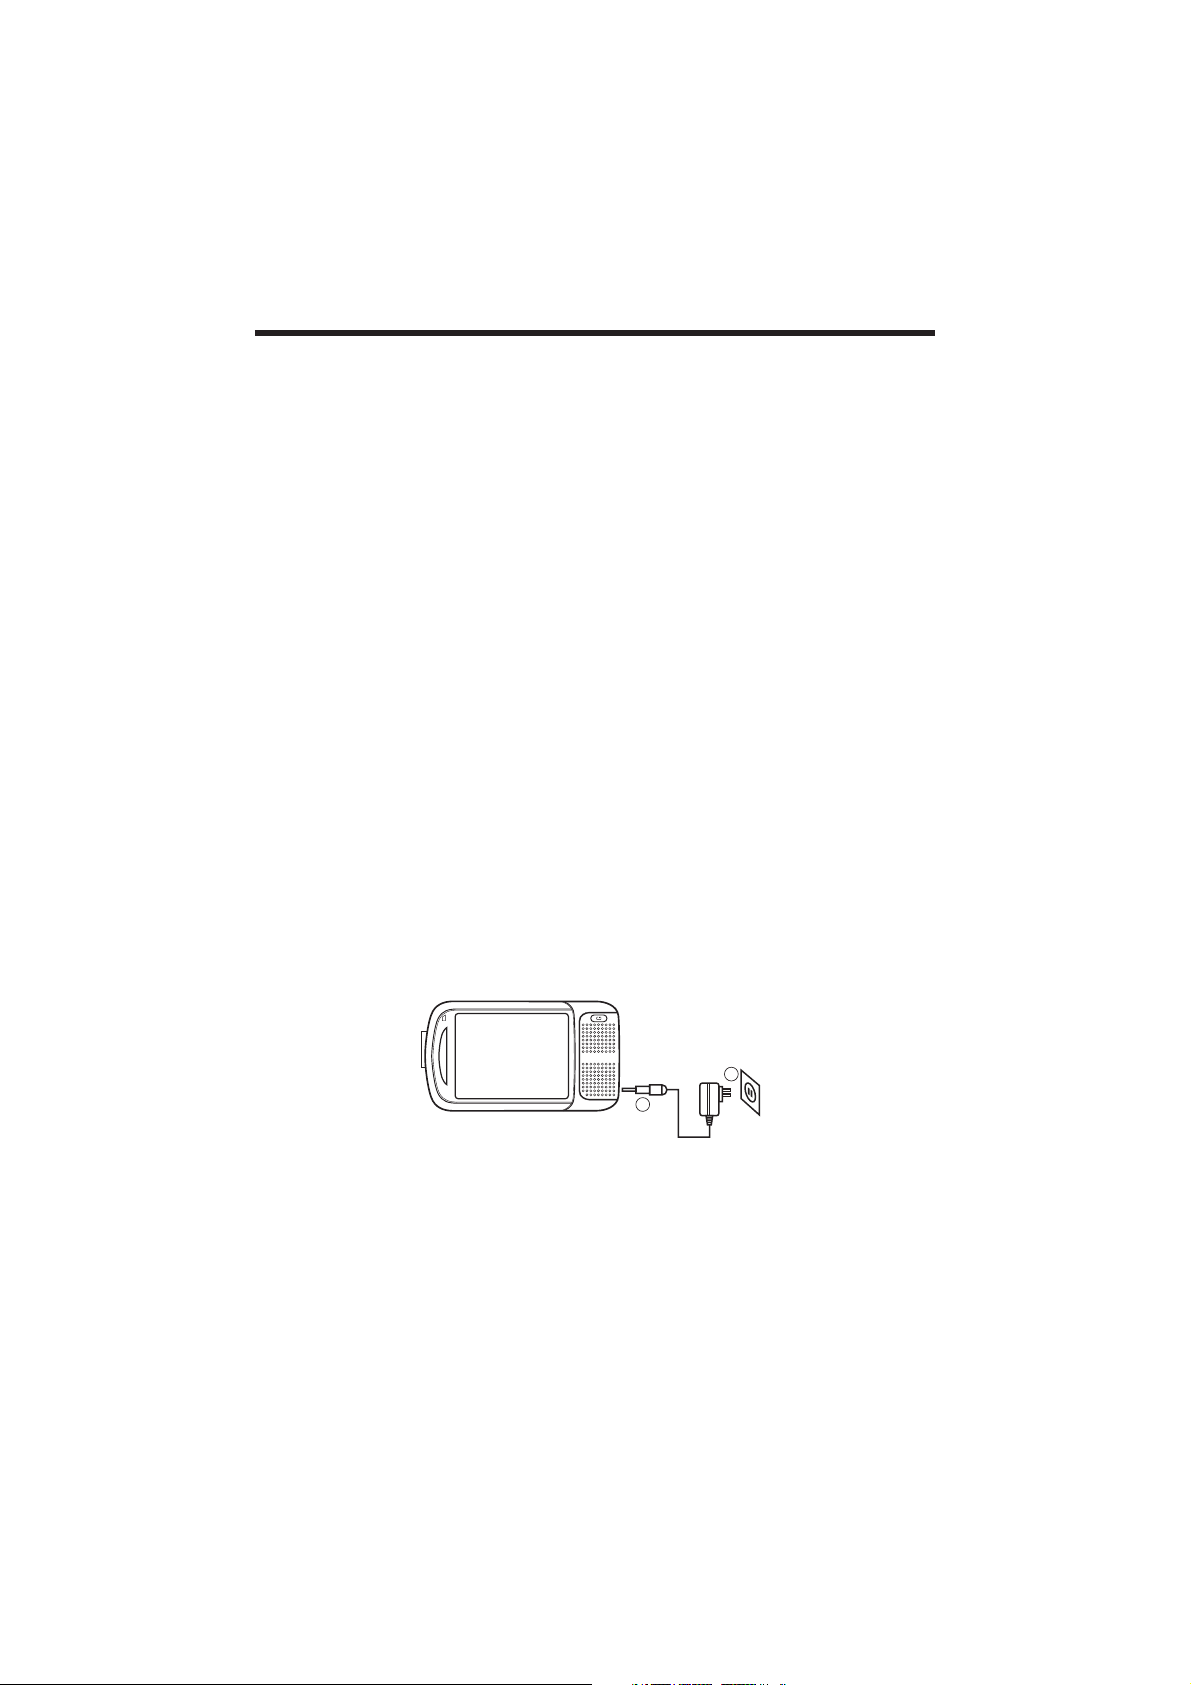
Push the adapter connector into the guide on the right of the network adapter. Push
the Network Adapter (2) into a power point that is easily accessible.
Push the cable of the Network Adapter (1) into the network adapter connection of the
navigation system.
Working with memory cards
Your navigation system supports SD memory cards.
Inserting memory cards
1.Carefully take the memory card out of its packing (if included). Take care not to touch
or dirty the contacts.
2.Push the memory card carefully into the card bay. The side of the memory card
wearing the label must point upwards. The memory card should slightly lock in place.
6

INSTALLATION
Removing memory cards
• Do not remove the memory card while it is accessed. This could result in loss of
data.
1.To remove the card press lightly onto the upper edge until it ejects.
2.Pull the card out without touching the contacts.
3.Store the memory card in the packing or in another safe location.
• Memory cards are very fragile. Take care not to dirty the contacts and not to force
the card.
Accessing Memory Cards
• The appliance only supports memory cards in the FAT16/32 file format. If you insert
a card prepared with a different format (e.g. in cameras, MP3 players), your navigation
system may not recognize it and will ask you to format it again.
Warning: Formatting the memory card irretrievably wipes out all data.
• Likewise you cannot just copy files onto the memory card. In some cases they must
be converted by the Microsoft ActiveSync program.
Data Exchange VIA Card Reader
You can transfer or synchronise data via ActiveSync. This is also the correct method,
in particular, if files are to be transferred that must be converted into a navigation
system-readable format.
However, if you wish to copy large quantities of data (navigation maps) to the memory
card, these can also be stored directly to the memory card.
Many computers already have memory card devices. Insert the card in this and copy
the data directly to the card.
Because of the direct access significantly faster transfer will be achieved.
Resetting The Navigation System
There are two options for resetting the navigation system.
Soft Reset
This option restarts the navigation system, without reinstallation being necessary. A
soft-reset is often used in order to reorganize the memory. In doing so all programs
that are running are interrupted and the working memory is reinitialized.
Choose this option if your navigation system is not responding or working properly.
Perform the soft-reset as follows: Screw off the end cap of the pointer and carefully
press the point of the end cap into the reset opening on the left side of your device.
Hard Reset
Warning: A hard-reset deletes all data on your appliance and causes a new initial
installation. It is not necessary to install the software on your synchronization computer
again, however.
Perform the hard-reset as follows: Push the BATTERY ON/OFF switch on the bottom
of the device to the OFF position initially and back to ON after two seconds.
Safety Instructions for Navigation
The bundled product CD contains a comprehensive instruction manual.
Tips for Navigation
• Do not manipulate the navigation system while driving to protect yourself and others
from accidents!
• In the event that you do not understand the voice instruction or if you are in any
doubt about what to do at the next intersection, then the map or arrow display will
provide you with a quick orientation. Only look at the display when you are in a safe
driving situation!
• Attention: The road layout and driving rules take precedence over the instructions
7

INSTALLATION
of the navigation system. Only follow the instructions when circumstances and driving
rules permit it! The navigation system will guide you to your destination even when
you have to deviate from your planned route.
• The direction statements of the navigation system given do not release the driver
of the vehicle from his or her duty of care or personal responsibility.
• Plan routes before you leave. If you want to play a new route whilst on the road stop
driving.
• In order to receive the GPS signal correctly, metal objects may not hinder reception.
Attach the navigation system onto the inside of the windscreen or near the windscreen
with the sucker. Try out different positions in your vehicle in order to find the best
reception.
Notes for Use In A Vehicle
• Take care that the holder does not present any risk to safety, even in the case of an
accident, when installing it.
• Take care that the cable does not impede any safety components.
• The display of your navigation system may show “light re-flexions”. Please take care
of not being “blinded” during operation.
• Take care that the cable does not impede any safety components.
• Do not mount the components within the operating range of any airbags.
• Check the secure adherence of the suction cup at regular intervals.
• The power plug will consume power, even if no device is connected. Remove it when
not in use to avoid draining the battery.
• Check all safety equipment in your car after installation.
Additional Notes for Use on A Bicycle Or A Motorcycle
• Pay attention during installation that the ability to steer is not impaired.
• Do not cover any instruments during installation.
Mounting The Navigation Set In A Car
Attention! Only fix the holder for the navigation system to the windscreen, if it does
not impede the view. Should this not be possible, Then mount the holder with the
enclosed suction plate in any way that will allow peril-free and safe operation. Installation
Of The Holder Of The Navigation System
• Hint: If you want to fix the holder to the wind screen, then you can skip steps 1 and
2.
1.Remove the protective foil from the sticky side of the suction plate.
2.Fix the suction plate to a suitable location on the dashboard. Take care, that the
surface of the dashboard is clean and press the suction plate strongly onto the
surface.
• To obtain a strong and secure hold the suction plate should not be used for 24 hours.
Suction
Car holder
Suction
Flexible neck
3. Mount the car holder to the flexible neck. Note the labels on the flexible neck. The
arrow labelled CLOSE must point in the direction of the fixture. The connection
closes with a noticeable clicking sound.
4. Place the holder with the suction head onto the suction plate (or directly onto the
8
INSTALLATION
wind screen) and press the lever on the suction head downwards. The suction head
will stick itself firmly to the suction plate.
5. Place the navigation system into the car holder by placing it initially in the lower
noses and then pressing it down gently until the holder clicks in.
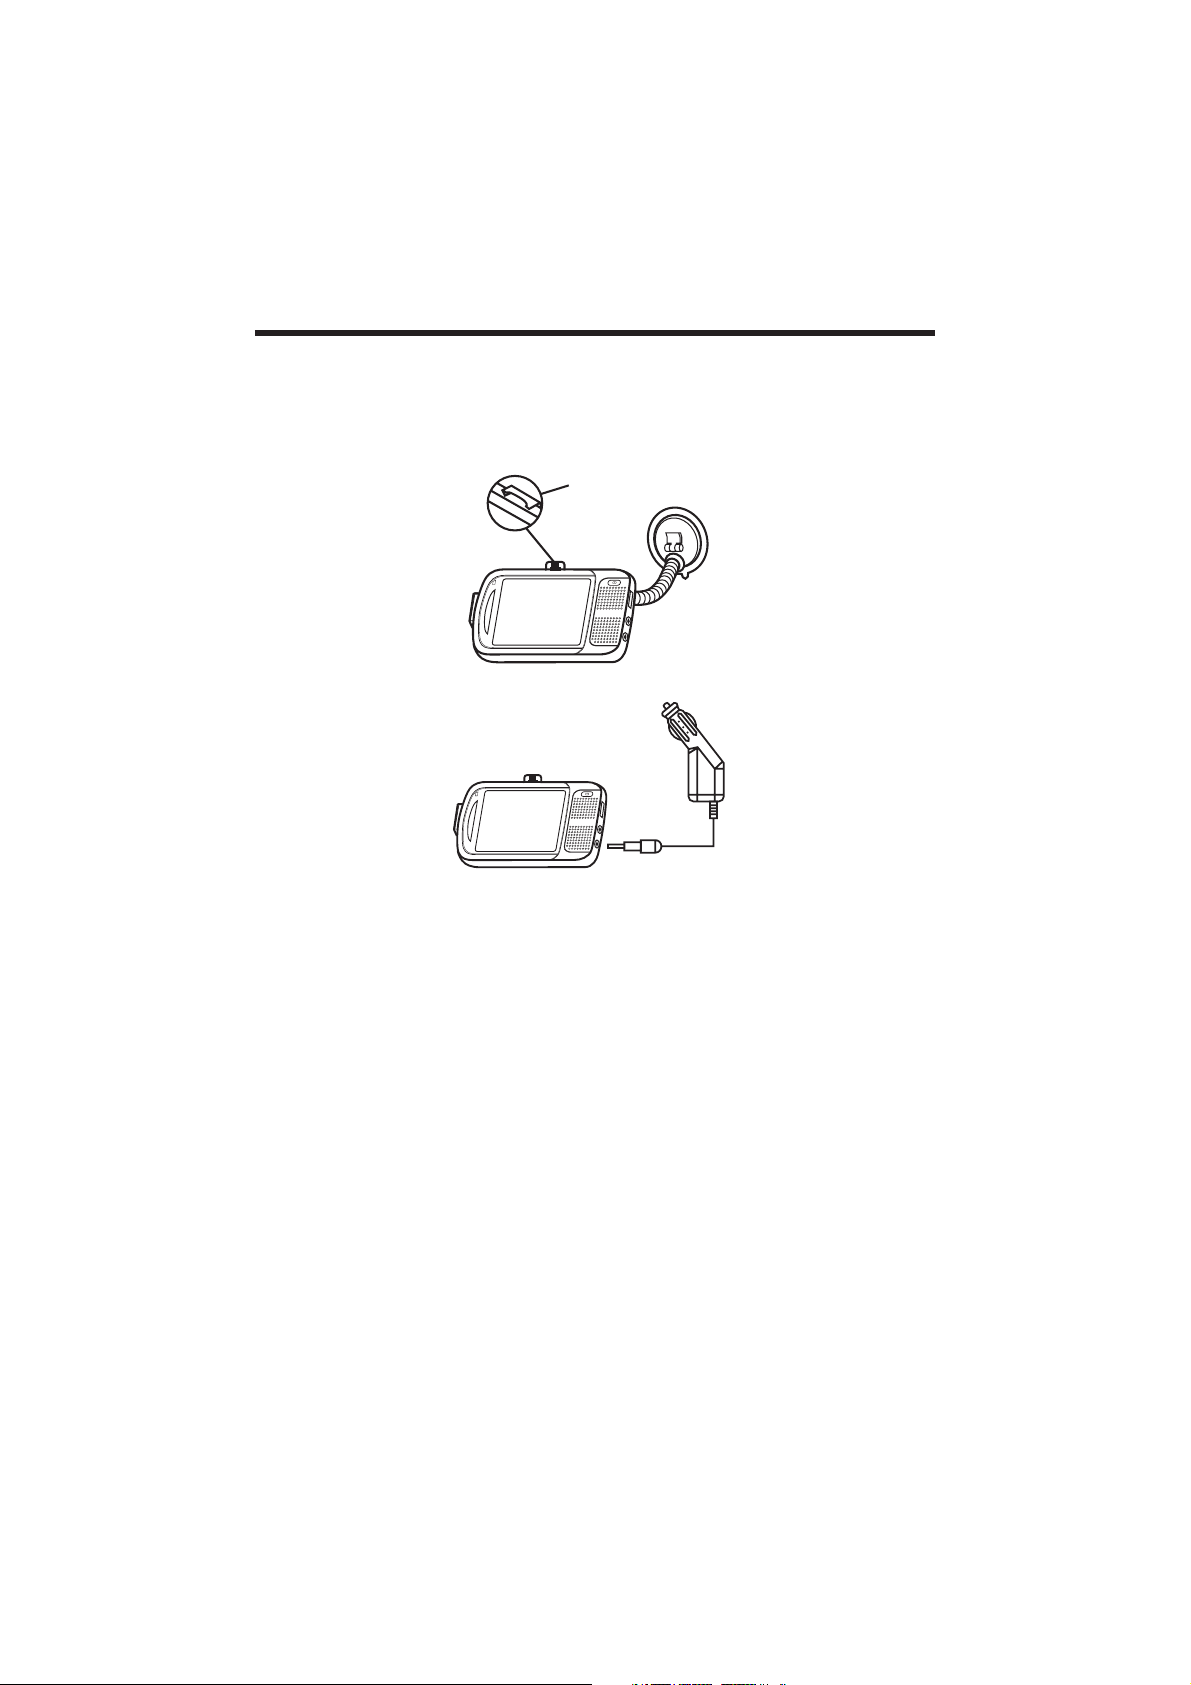
When the battery is in a low voltage, you can recharge it in the car:
1. Plug the jack (1) of the connection cable into the corresponding receptor at the
bottom of your navigation system .
2. Insert the power adapter (2) now into the cigarette lighter socket and ensure, that
it will not lose contact while driving. This could cause a malfunction.
3. Hint: Remove the power adapter from the cigarette lighter socket when ending a
trip or when parking the car for a extended period of time. Otherwise the car
3. Fix the complete holding device with the supplied screw (5) and tighten it slightly
by hand.
4. Now insert the navigation system into the holder. You must pay attention to a firm
seating of the clip holder.
5. Set the inclination angle by screwing the bicycle holder in according to your
requirements. Now turn the screws finger-tight.
Connecting The Navigation System In The Car
Holder
2
1
9

INSTALLATION
Note: After assembly, protect your navigation system from dust and dirt using the
storage pocket. The storage pocket does not protect against rain or moisture. Take
care that the navigation system does not exposed to moisture. This may damage the
electronic parts.
When you use the navigation system, make the navigation system upright with the
GPS antenna (13) will get a strong signal. If the signal is not good, please adjust the
direction of the GPS antenna to receive the signal.
10
VIEWS
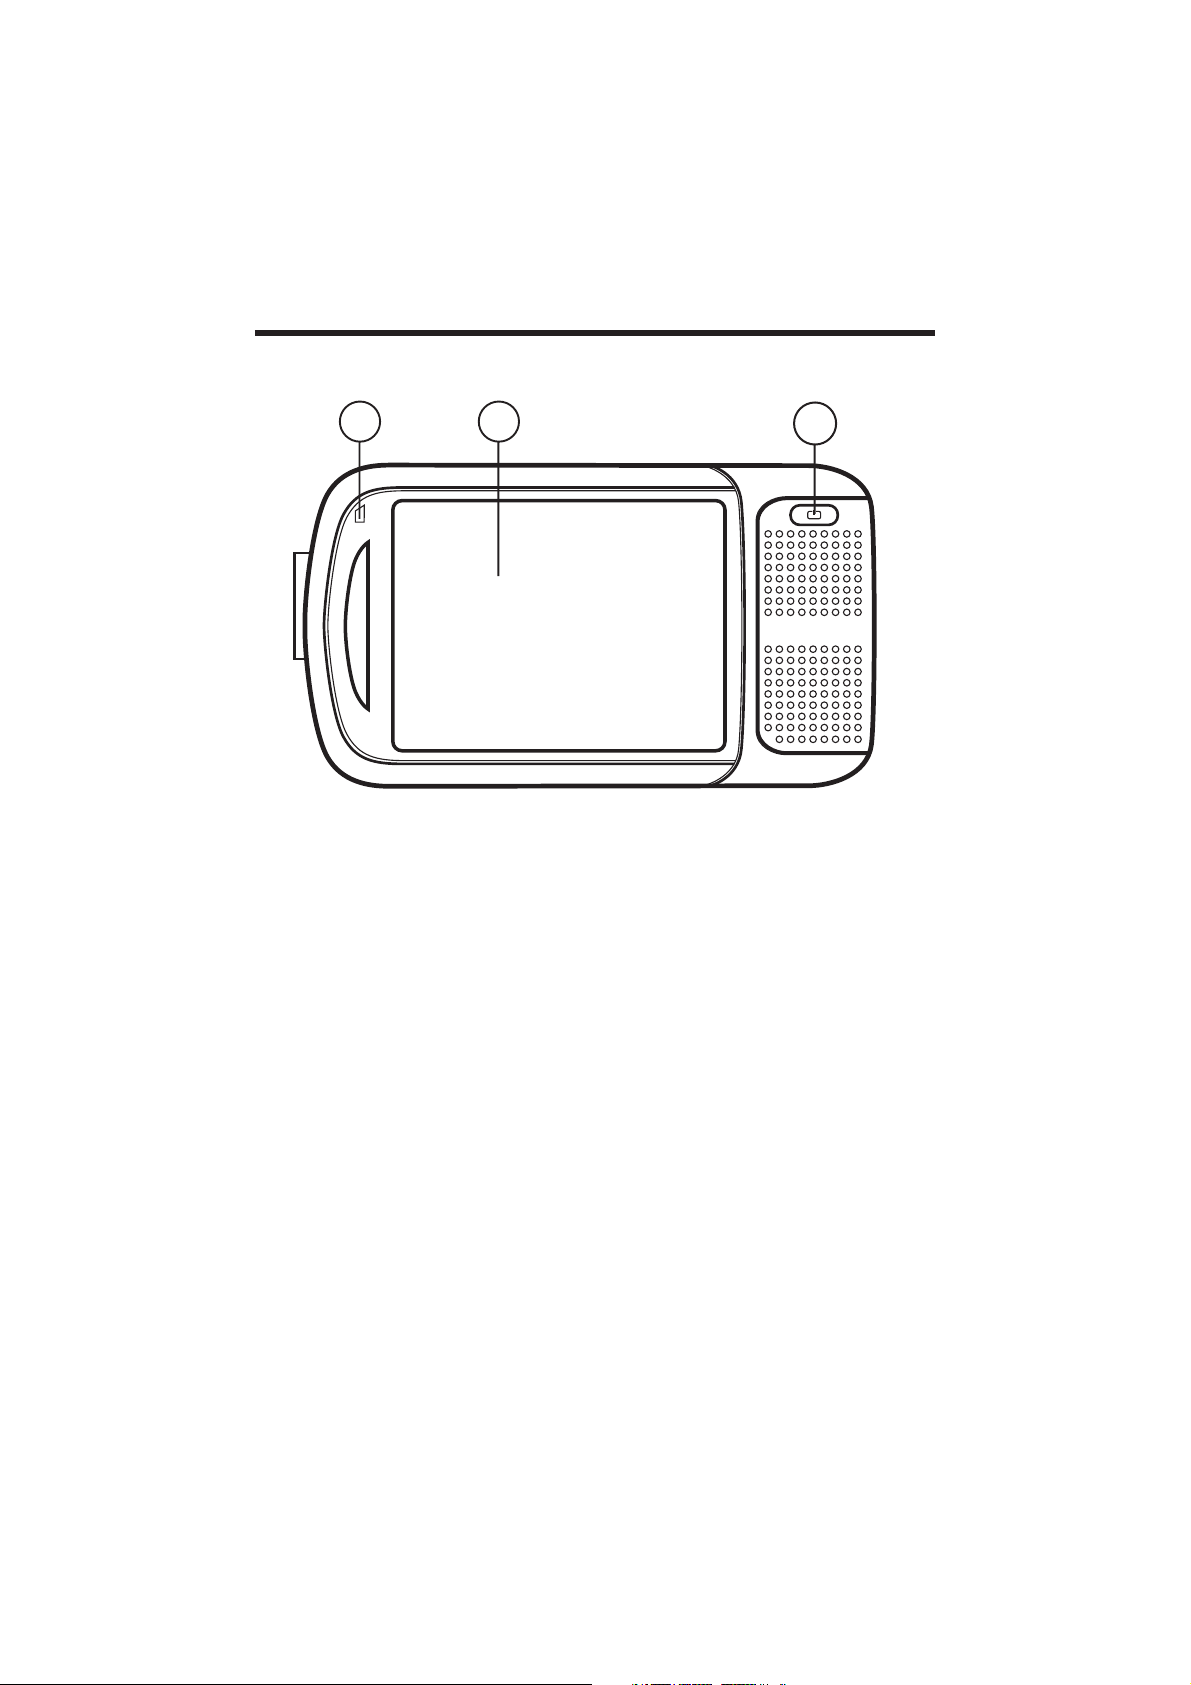
Front View
2 3
1. Sleep/Wake up Button Press it to open/close the unit.
2. Battery Charge Indicator When the battery is charging the Indicator is red, When
the battery is fully charged, the Indicator will turn to
green.
3. Touch Screen Display the output of your appliance. Tap the screen
with the stylus to select menu commands or enter
information.
1
11
VIEWS
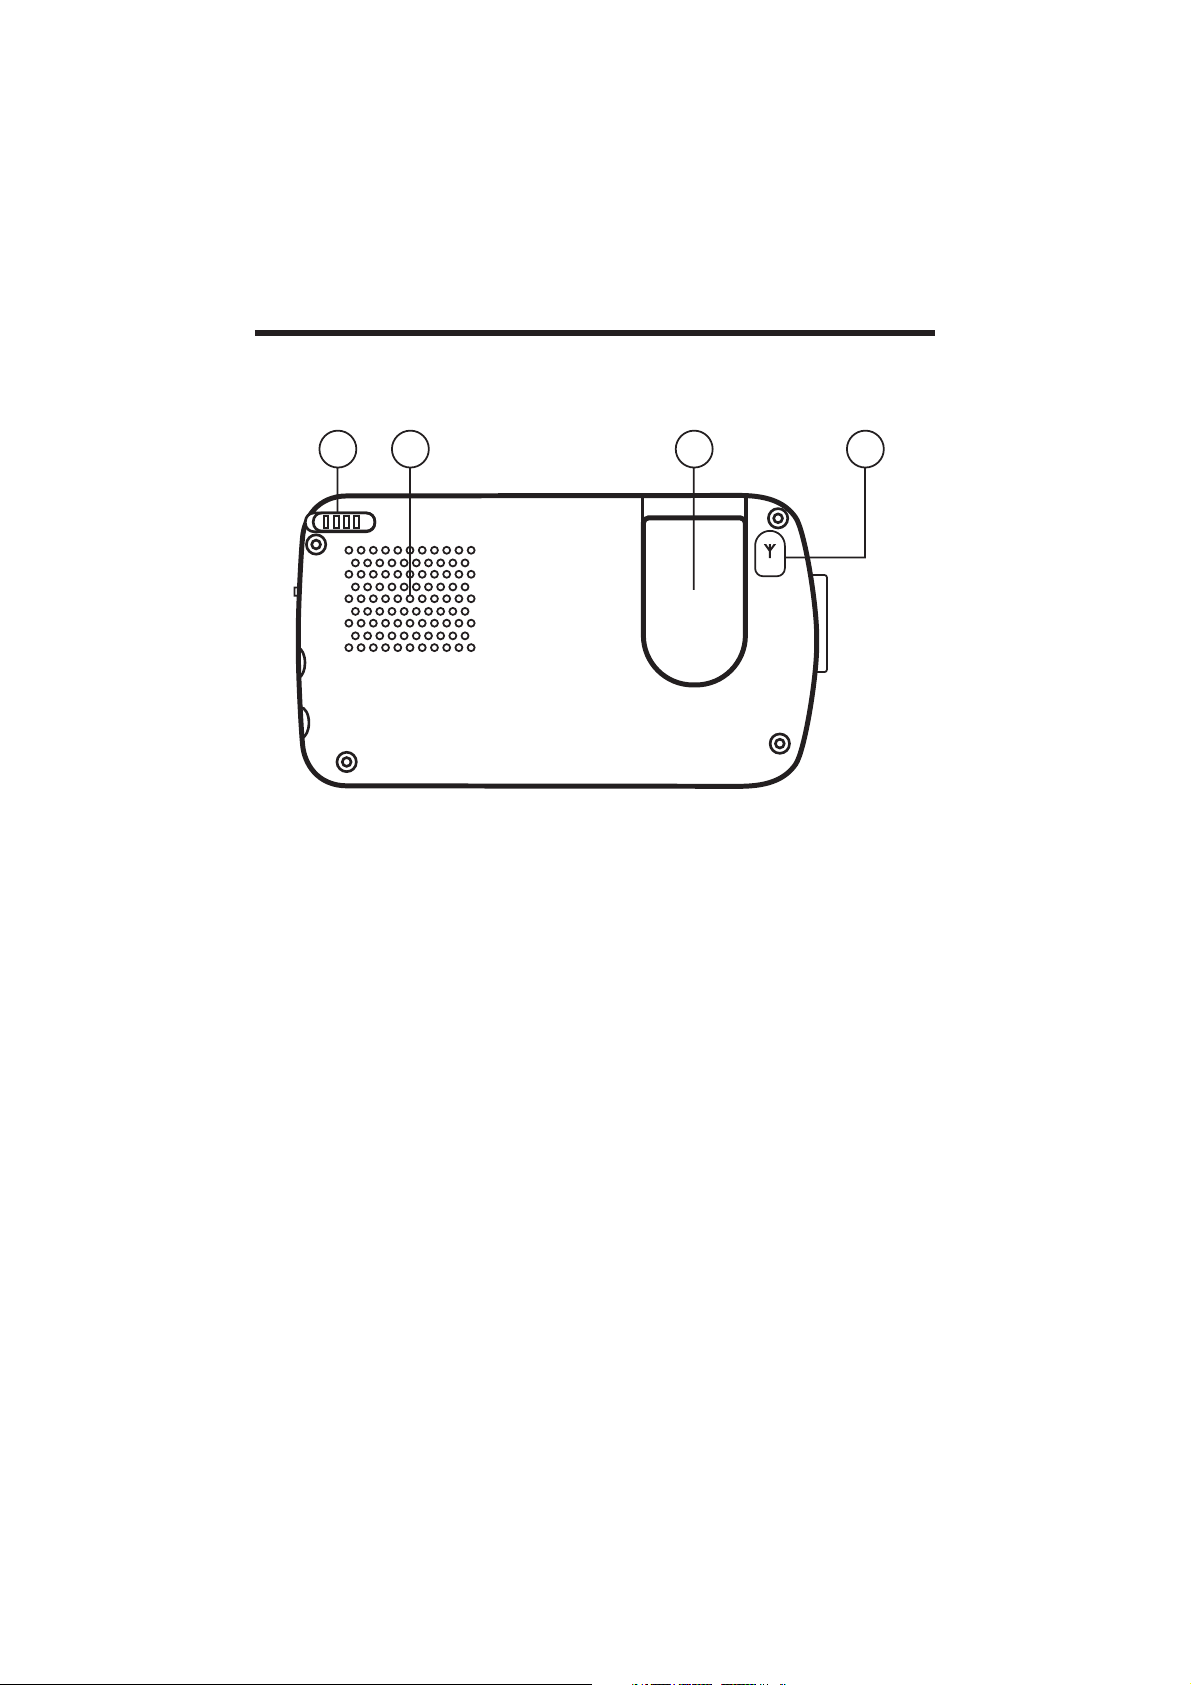
Back View
4 5 6 7
4. Stylus Take the pen out of its compartment in order to use it,
5. Loudspeaker Plays back language statements and warnings.
6. GPS antenna Receives the signals of the GPS satellite.
7. External aerial interface Interface for an optional second aerial.
and replace it after use. The pointer pen is required for
operating the touch screen.
12
VIEWS
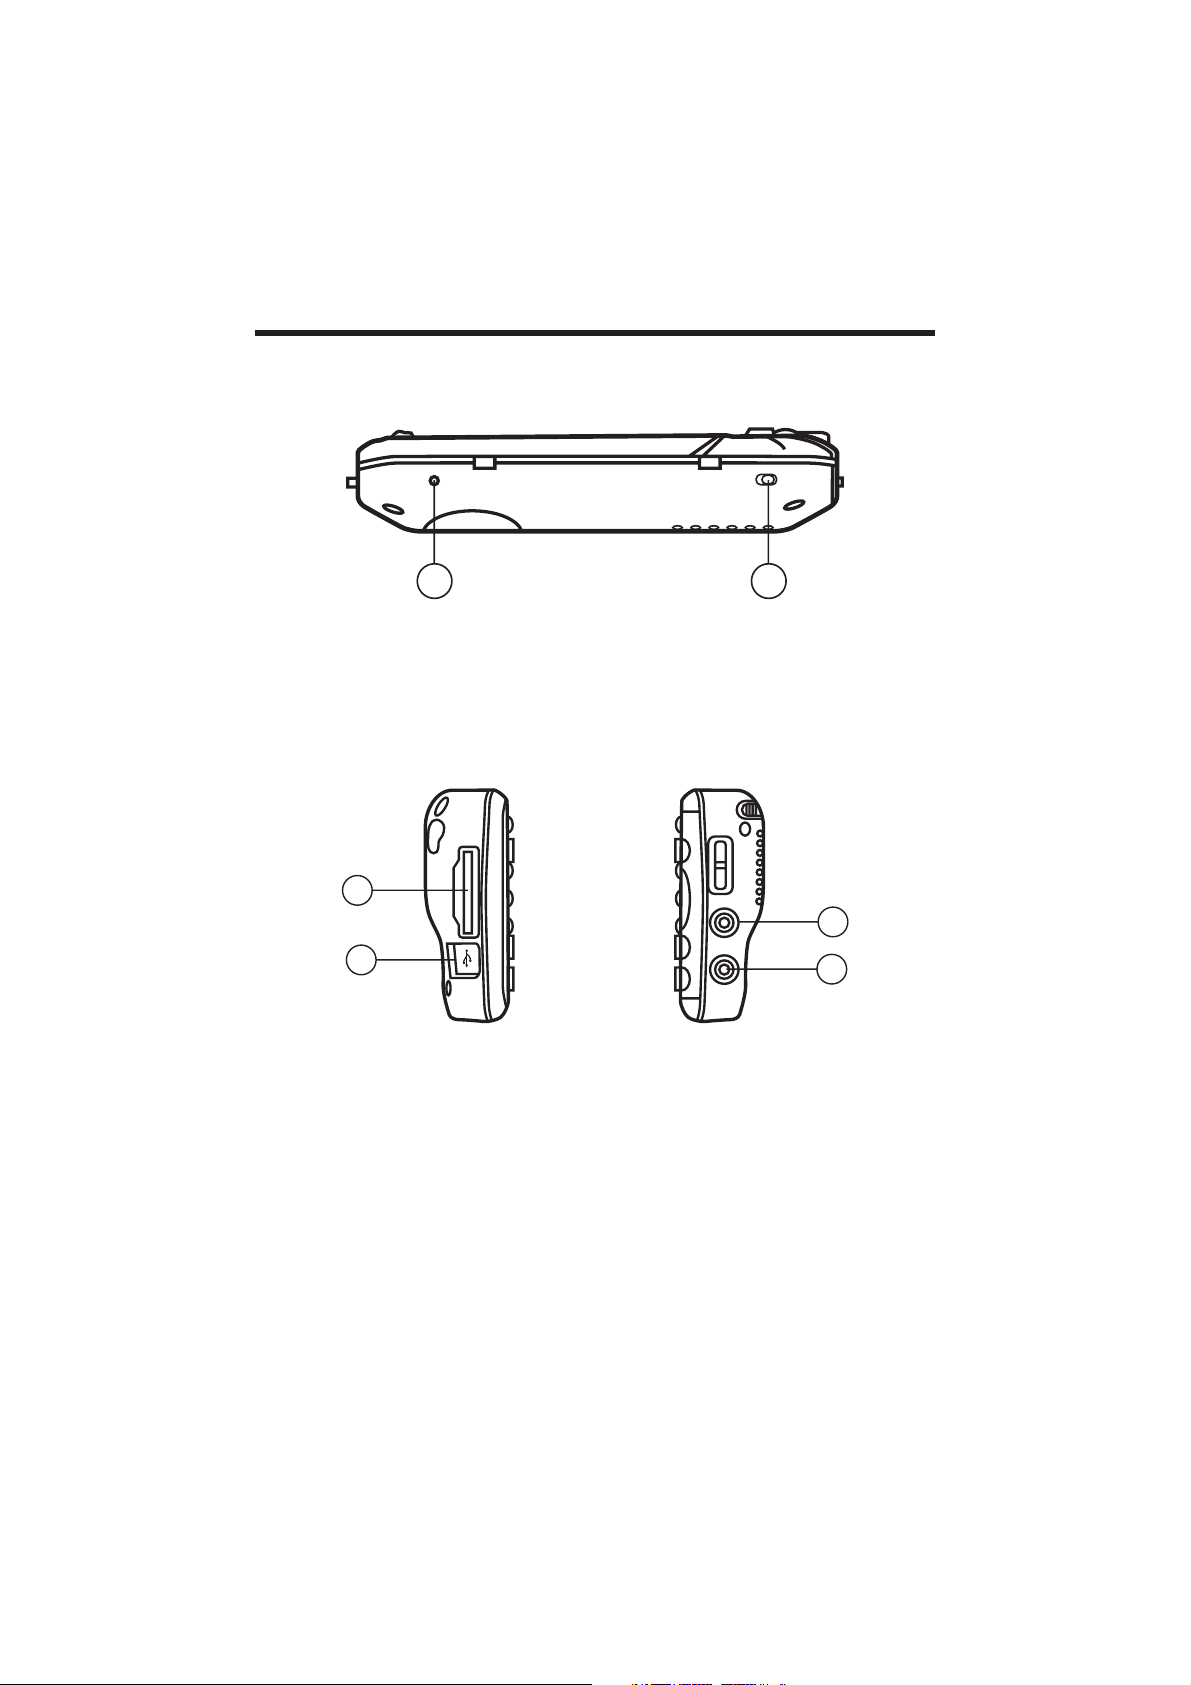
Bottom View
RESET
ON
BATTERY
OFF
98
8. Reset button Press it to reset the unit.
9. Battery Switch Separates the device from the battery completely (also
Left View Right View
10
11
Hard Reset).
12
13
10. SD Accepts an optional SD (Secure Digital) Card for
removable storage.
11. USB Interface Interface for connecting to a PC by means of the
ActiveSync Cable (for data matching)
12. Headphone Connects to a pair of stereo headphones.
13. AC Adaptor Port Connection to external power supply.
13

GPS (Global Positioning System)
GPS is a satellite-backed system for determining your position. With the help of 24
satellites revolving around the earth, it is possible to determine your position on earth
with the accuracy of a few meters. The satellite signals are received by the antenna
of the built-in GPS receiver, which must have a “line of sight” to at least 4 of these.
• Note: By limited line of sight (e.g. in tunnels, between houses, in woods or also in
vehicles with metal-coated windows) it is not possible to determine the position. The
satellite reception however automatically picks up again as soon as the obstacle
has been passed and there line of sight is reestablished again.
The GPS receiver consumes additional power. This is especially of concern, when
running on batteries. To conserve power do not turn on the GPS receiver unnecessarily.
However, you can also switch the device off by means of the ON/OFF switch in the
case of a shorter interruption to your journey. Pressing the same switch again will
activate a restart. The GPS receiver will also be reactivated at the same time, if
navigation software is still active. Here, it can take a short time for the position to
be updated again, according to the reception situation.
• Note: Please note that your appliance is preset to not shut down automatically after
a few minutes without activity. You can Change this preset in the Settings mode.
• If the GPS receiver has not been active for some hours, it must orientate itself again.
This process may take a while.
Memory Card Quick Installation
This option is only available to you if your navigation system is equipped with a prepared
memory card. In this case, you will ready be able to use the Navigation function of
your device after a short time, without carrying out the pre-installation on a PC.
• The initial setting up must be carried out as described on page 16 in any case.
• The following installation limits the Navigation to the area which is pre-installed on
your memory card.
You must carry out these steps to put the navigation into operation in your car:
1.Read and adhere to the safety instructions on p.2 and following and p.23 and
following.
2.Install the remaining components of the navigation system.
3.Press the BATTERY ON/OFF button to start your navigation system. If the instructions
of Step1 have not yet been executed, then do it now. The battery should be charged.
The accumulator will be charged by means of the car power supply if necessary.
• Insert the pre-installed memory card in the navigation system software will start
automatically. Follow the instructions on the screen.
NOTES:
• The memory card must always be inserted into the device during the use of the
navigation system. A Soft Reset will have to be carried out to restart the navigation
system, if the memory card is removed during its use, even for a short time.
• The software installation will have to be carried out again following a Hard Reset.
• Carry out a Hard Reset initially, if you want to reinstall the navigation software.
Set the date and time by means of the Settings button and the date/time control button,
if this has not yet taken place. St the applicable time zone, if available.
Starting Navigation
1.Switch on your navigation system.
2.The navigation software will start automatically or after clicking on the navigation
control button, according to the version.
3.Press on the button for entering the destination. Then start the navigation by clicking
on Navigate. YOU will receive the rout information on the screen, augmented by
language statements, after a short time, if the satellite reception is adequate. Please
14

GPS (Global Positioning System)
take information about the further operation of the Navigation software from the
comprehensive User Handbook on the Navigation CD.
In addition, brief help is available to you on your navigation system. You will reach
it by means of the Options/Destination Entry button and by selecting the help function.
Note: The GPS-receiver will require some minutes for initialization when deployed
for the first time. Even when GPs signal reception is indicated the navigation could
be imprecise. In all future instances it will take about 30-60 seconds until a correct
GPS-signal is available, sufficient “sight” of the satellite is a prerequisite.
Software Installation On Your PC
In order to be able to deploy self-defined cards on your navigation system you must
install the corresponding navigation software on your PC.
1. Before installing the navigation software ensure that ActiveSync is installed and
your navigation system is connected with your PC via the ActiveSync-cable.
2.Place the CD 1 with the navigation software in your CD drive . The installation will
start automatically.
3. Follow the program instructions. Contents of The Navigation CDs It is possible for
several CDs to be contained in the scope of the delivery according to the version.
Content of the CDs:
CD 1 contains the PC application, digitalized card material and the data material for
restoring the content of the memory card fast. Additional material on the card will
be located on the optional CD2. The PC application will be installed on the computer
and used to set up your own card details. Apart from this, it will support the recreation
of data on the memory card.
Installing Microsoft ActiveSync
In order to transfer your data between your PC and your navigation system you need
the Microsoft ActiveSync program.
15

WELCOME TO DESTINATOR OP
1. Introduction
Destinator OP is a full-featured
mobile satellite navigation system.
It utilizes GPS (Global Positioning
System) satellites to pinpoint your
location utilizing the latest mapping
data technology to get you to your
destination in the most ecient and
timely manner.
Destinator OP assists you in
planning your route and it provides
Turn by Turn, Voice and Visual
instructions for getting to your
destination.
2. Getting Help
An abbreviated Help
le with basic
Destinator OP
navigational
denitions and
instructions is
available.
At the map screen,
press the
button, cycle to the
Options Menu by
pressing the
button,
Destinator FAQ for Registered Users
online at:
http://www.destinatoreurope.com ,
click Community, login and choose
FAQ.
If you have other questions about
Destinator OP, please contact your
supplier or Destinator Technical
Support via email at
support@destinatoreurope.com or
telephone
+49 (0) 1805 12 30 12 *.
* for fees in your country please ask your
telephone service provider
In North America
For answers to common questions
and quick assistance see the
Destinator FAQ for Registered Users
online at: http://www.destinator1.com/,
click Community, login and choose
FAQ.
If you have other questions about
Destinator OP, please contact your
supplier or Destinator Technical
Support via email at
support@destinator1.com or
telephone 1-866-798-0905 **.
** toll free
4. Getting Started
Your MO device comes with the
Destinator OP application already
installed. Turn on the MO device,
and from the main MO screen, press
and select
3. Technical Support
In Europe
For answers to common questions
and quick assistance see the
.
Destinator OP.
For information about changing the
MO device settings, see Appendix D
– MO Settings.
16
to launch
NAVIGATING A ROUTE
1. Introduction
This chapter will help you to dene and plan a route. You will be able to
select a destination, set your origin, or plan a journey. The route calculated
in real time is from your current GPS position.
There are several ways to determine your destination using the Menu button
(
). You can navigate to:
An Address
An Intersection
A AIP/Postal Code
A POL(Point Of Interest)
An Address in Favorites
An Address in Favorites
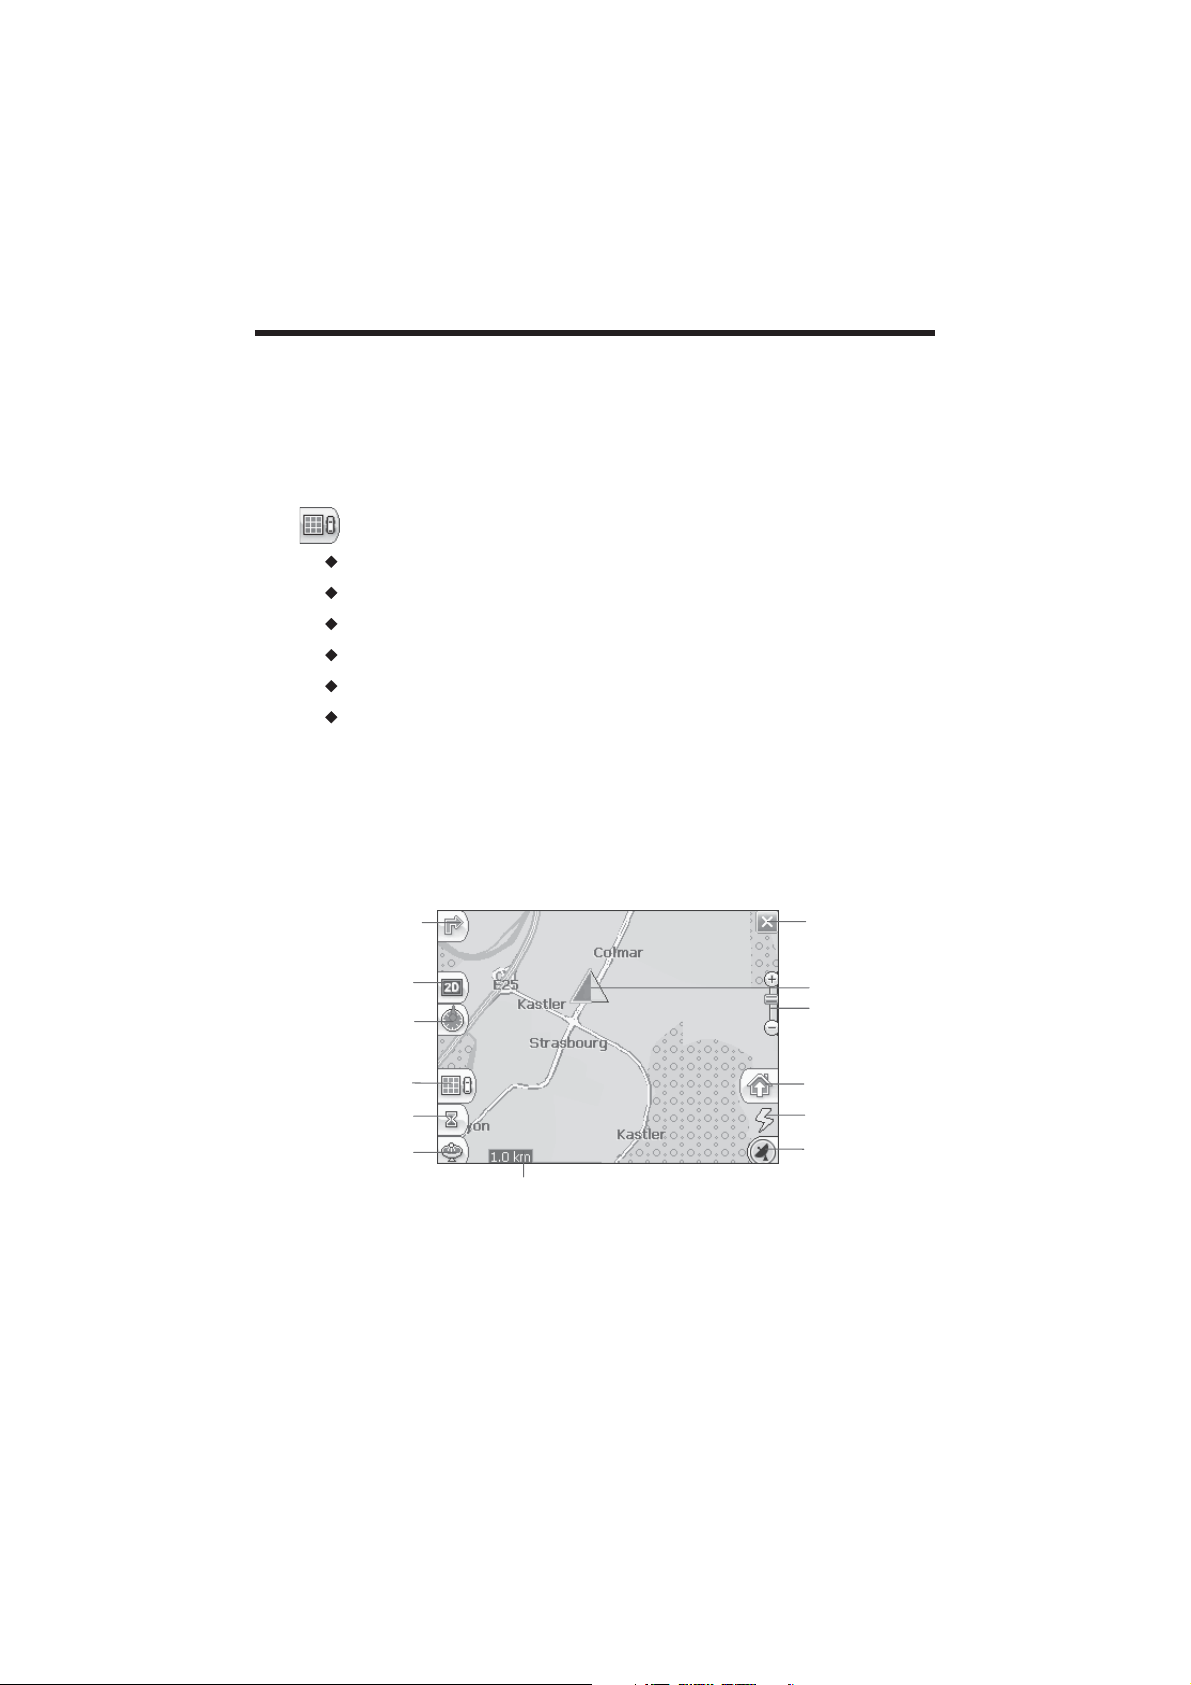
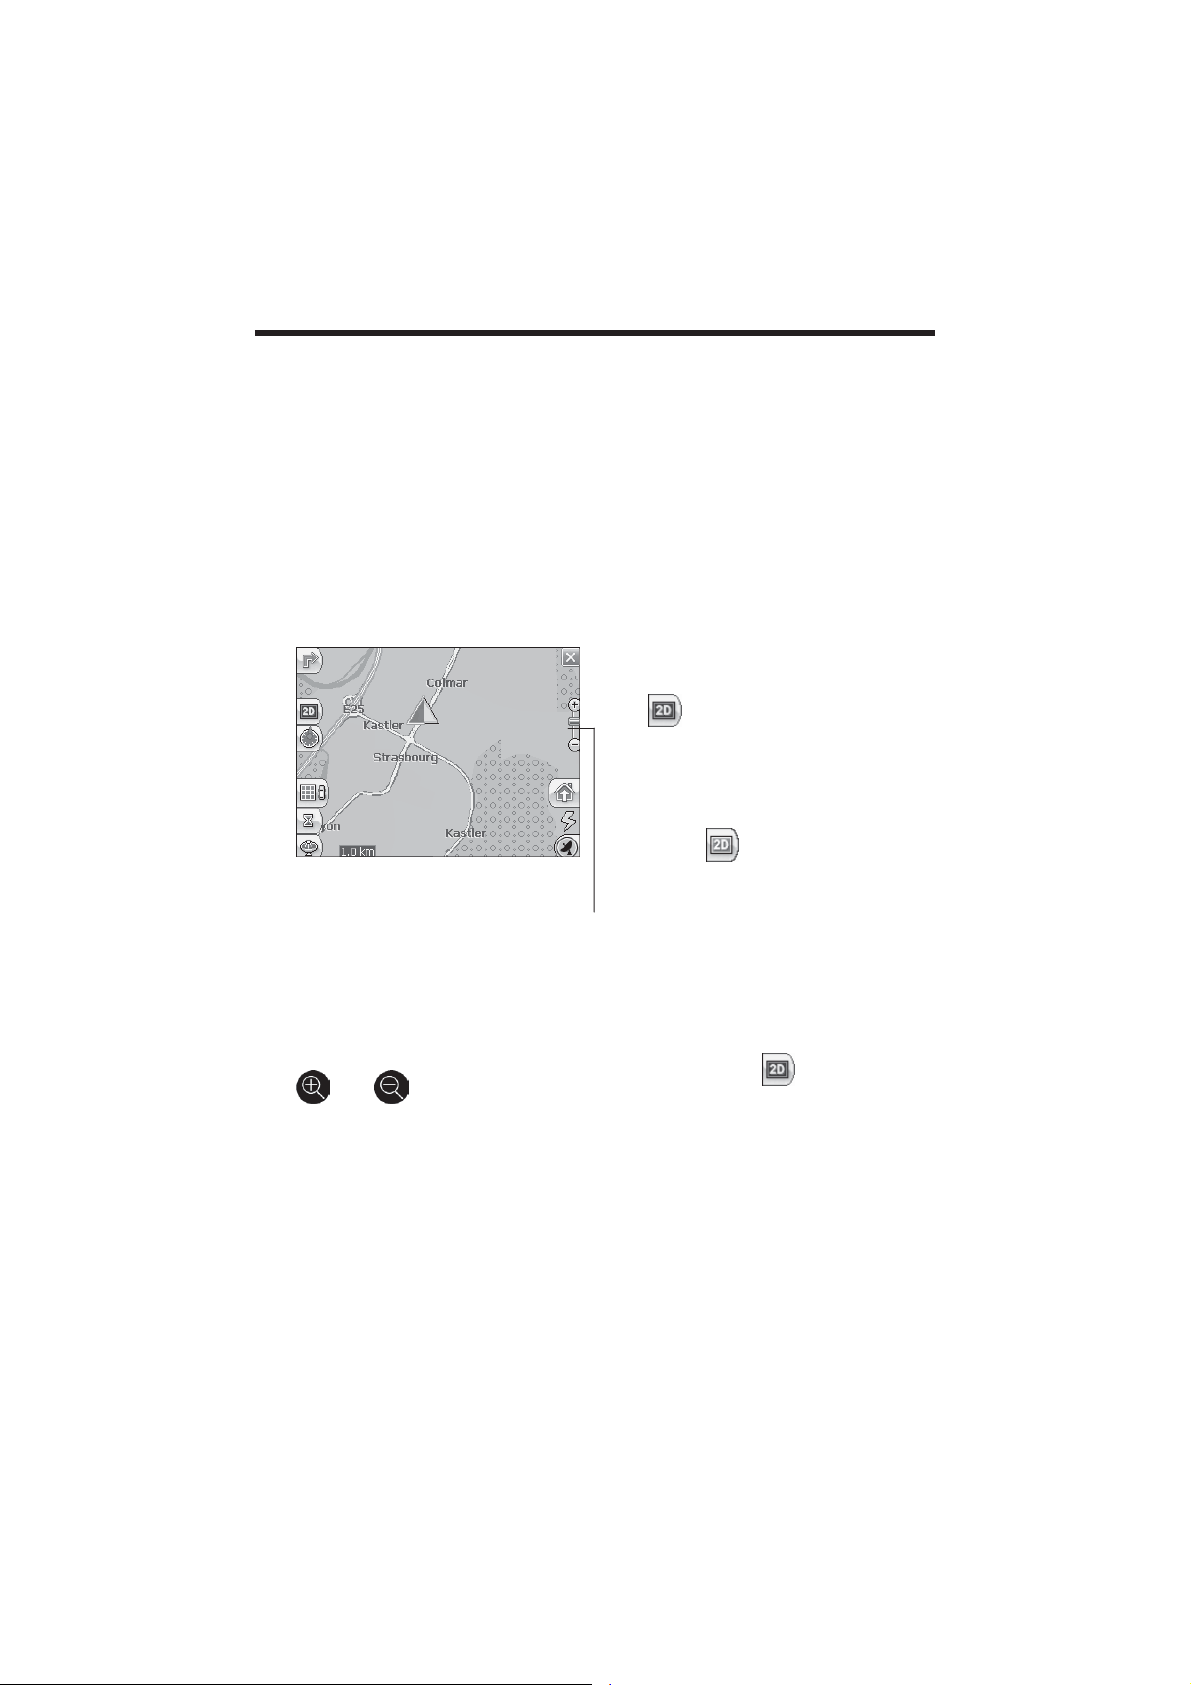
2. Map Description
There are various buttons and icons on the map screen that are used to plan and view a
route.
Driving Directions
Button
View Selector
Button
Compass Button
Menu Button
Route Details
Button
GPS-Generated
Statistics Button
Length Scale Indicator
17
Exit Button
Current Location
Zoom Scroll Bar
Home Button
Battery Status
Indicator
GPS Status
Button

NAVIGATING A ROUTE
Location Icons
(or in Pedestrian Mode)
shows your current location while in
Navigation Mode .
(or in Pedestrian Mode)
shows your last known GPS location
while in Navigation Mode . This is
not your current location, because
there is no valid GPS information at
this time.
(or in Pedestrian Mode)
shows the Origin in Planner Mode .
See Section 0 7. Route Settings for
descriptions of Navigation Mode and
Planner Mode.
Dynamic cursor
Destinator OP's screen cursor has
the capability to automatically
change its appearance so that you
will be informed of several important
navigation conditions:
The cursor indicates if you are in
Car or Pedestrian mode
The cursor indicates if you are
driving at high or low speeds. The
cursor becomes elongated at higher
speeds and wider at lower speeds.
The cursor displays a shadow that
shows the position of the Sun. This is
especially important if you are using
Destinator OP in Pedestrian mode.
By positioning yourself so that the
shadow that you cast is in the same
position as the shadow on the screen,
you can be assured that you are
walking in the right direction.
The cursor shadow disappears
during night driving.
Map Screen Buttons
Toggles between Turn by Turn
details and a complete list of Driving
Directions.
Toggles between 2D, 2D Night,
3D and 3D Night views. The icon
indicates the next view to be
displayed.
Shows magnetic direction as you
move.
Lets you dene and plan your
route via the Destination Menu.
Also allows you to access the
Options Menu and Settings Menu.
Indicates whether you are in Vehicle
Mode (
(
holding down the button for several
seconds, or by opening the Options
Menu and pressing either
or . In Pedestrian Mode,
the navigation radius is restricted to
10 kilometres (6 miles).
such as ETA, ETR and the distance
to your destination.
information, such as UTM (Universal
Transverse Mercator), geographic
position, current location, altitude,
) or Pedestrian Mode
). You can change modes by
Displays details about your route,
Displays GPS–generated
18

NAVIGATING A ROUTE
and speed. The icon indicates the
next item to be displayed.
Displays GPS status, such as
information about your satellite x,
and the latitude, longitude and
altitude of your position. The icon
appears green when there is a GPS
x, and red when there is no GPS x.
Also provides a link to the GPS
Settings screen.
Displays battery status. When
the battery power is low, a message
box will appear.
Calculates a route to a pre-set
POI or address.
Lets you exit from the
Destinator OP application.
Menu Button
This button is shared by two
functions: Vehicle Mode (
Pedestrian Mode ( ). You can
toggle between these two modes by
holding down this button for several
seconds. In Pedestrian Mode, the
navigation radius is restricted to 10
kilometres (6 miles).
Press the Menu Button to open
theDestination Menu. Pressing the
and buttons
at the bottom of the screen allows
you to cycle between the Destination
Menu, the Options Menu and the
Settings Menu as seen in Figure
1-Menu structure
) and
3. The Destination Menu
At the map screen, press the
button to open the Destination menu.
19
NAVIGATING A ROUTE
You can choose yourdestination
from the following options:
Address list
Point of Interest (POI) list
Favorites list
History list
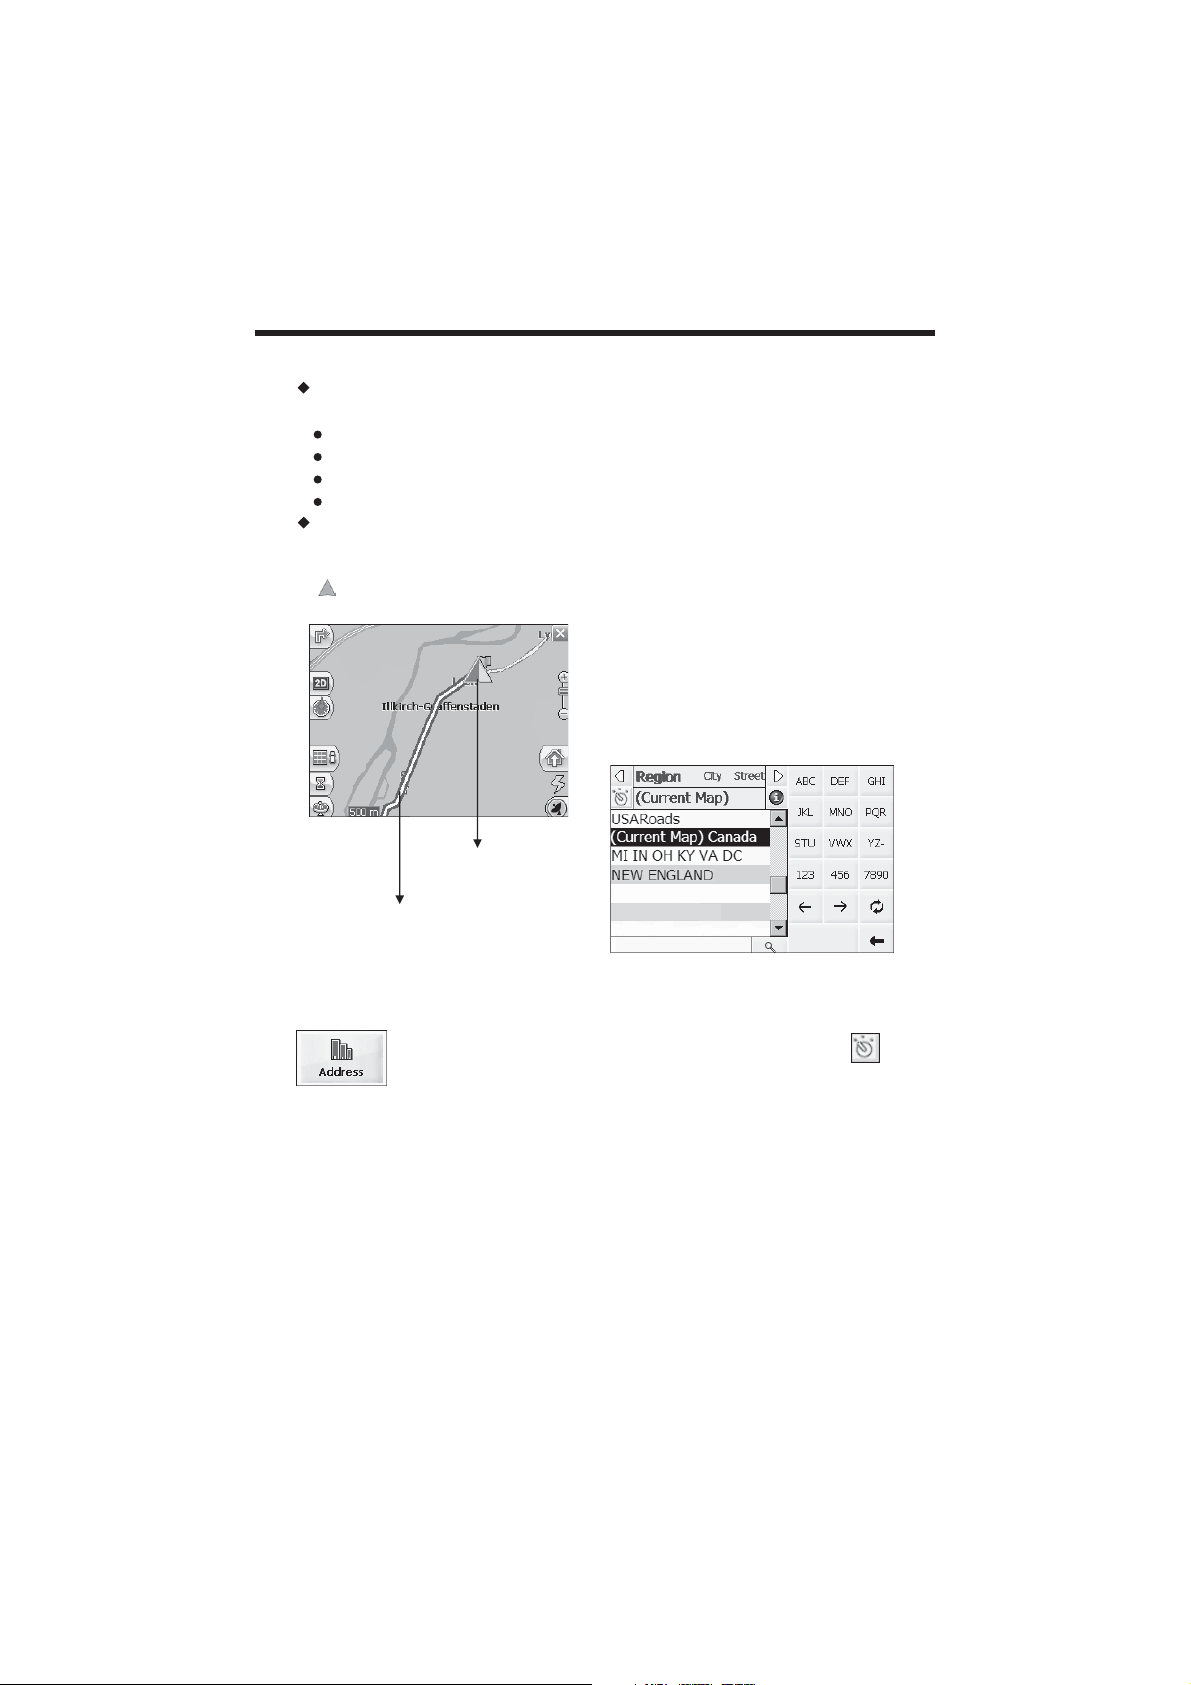
From your current position, the
route is calculated and displayed
as a blue line. The green triangle
represents your Origin (or
departure point).
Origion
Route
switch maps. This feature
becomes available only when you
have the following maps installed:
the map of your origin, the map of
your destination, and a map of the
major roads for that continent (e.g.
major roads of
Cross Region feature is enabled,
you can press Region to display a
list of installed maps, and select the
map pertaining to your destination.
Destinator OP will automatically
change maps as you travel across
regions, displaying your route at the
same level of detail as you drive.
You will not need to switch maps
during your route.
Europe). When the
4. Navigate To An Address
(or Intersection)
When you navigate to an address,
there are several ways of dening
your destination. You can navigate
to a destination by selecting an
address, a ZIP/Postal Code, or an
intersection.
The Cross Region Navigation feature lets
you navigate a route that extends
across more than one region on the
same continent, without having to
The default order for entering your
destination is City -> Street ->
Number, but by clicking on the
button, you can cycle through the
dierent ways of specifying your
address.
20

NAVIGATING A ROUTE
Click on this
button to change
your s ear ch t ype.
Lets you search for an address
by rst entering the City , then the
Street , then the Number .
Lets you search for an address
by rst entering the Street , then the
City , then the Number .
Lets you search for an address
by rst entering the ZIP/Postal code ,
then the Street , then the Number .
Lets you search for an address
by rst entering the Street , then the
ZIP/Postal code , then the Number .
Lets you search for an
intersection by entering the City , the
rst Street , then the intersecting
Street .
For example, to navigate to an
address using the City -> Street ->
Number search order:
(1)Press Region if you are
navigating a route across several
maps. Highlight your selection from
the list of installed maps. (If only
one map is installed, you will not see
the Region option.)
(2)Press City and use the keyboard
to enter the rst few characters of the
city name. The scroll list will update
accordingly. You can also change
your keyboard from uppercase to
lowercase by pressing the
button.
(3)Press Street to display a list of
street names for the selected city.
Select the street name by entering
the rst few characters or by scrolling
down the list (eg: Birch, Ave).
(4)Not all cities/towns are mapped to
the street level. In such cases, the
software will display Street data not
found . You can still navigate to the
city as selected.
(5)Press Number and enter the
number using the keyboard.
(6)Once you have entered your
destination, there are several options
available on the toolbar found at the
bottom of the screen.
Calculates and displays
your route, which is shown as a blue
line on the map.
Shows the destination on
the map and displays its details.
Allows you to add the
destination to your Favorites Folder,
or to set it as your Origin.
As you drive, Destinator OP
provides you with turn-by-turn voice
and visual directions, letting you
know when your next turn is coming
up until you arrive at your
destination.
NAVIGATING A ROUTE
21

NAVIGATING A ROUTE
Note:
Some smaller (sub-) municipalities may not contain street data. In such
cases, please choose the larger (super-) municipality displayed in
parentheses to search for these streets. Alternatively, you can change
the search order to Street>City or ZIP/Postal Code>Street to nd street
data for the smaller municipality.
If you don’t know the entire name of a city or street, type in part of
the name and press the
names containing your typed sequence.
For more information on a City, Street or Number click
display details about the location, such as its city, street name,
and latitude and longitude coordinates.
5. Navigate To A Point of
Interest (POI)
The Points of Interest (POI) list is a
collection of potential destinations of
interest in predened categories.
POIs are identied on the map by
various icons (eg:
POI navigation is especially handy
when you need to nd a facility,
attraction or amenity by category or
type. For example, you can ask
Destinator OP to guide you to the
closest bank, mall, hotel, restaurant,
gas station, etc.
Restaurants ).
button. This will display a list of all
The Cross Region Navigation
feature lets you navigate a route that
extends across more than one region
on the same continent, without
having to switch maps. This feature
becomes available only when you
have the following maps installed:
the map of your origin, the map of
your destination, and a map of the
major roads for that continent (e.g.
major roads of Europe). When the
Cross Region feature is enabled,
you can press Region to display a
list of installed maps, and select the
map pertaining to your destination.
Destinator OP will automatically
change maps as you travel across
to
22

NAVIGATING A ROUTE
regions, displaying your route at the
same level of detail as you drive.
You will not need to switch maps
during your route.
(1)From the Destination Menu, press
the POI button.
(2)Press Region if you are
navigating a route across several
maps. Highlight your selection from
the list of installed maps. (If only
one map is installed, you will not see
the Region option.)
(3)Press Category and highlight
your selection from the list of POI
categories. For example, we
can search for the nearest
restaurant.
At this point, you can
display all the items
within a category on
the map screen by
tapping the button
beside any of the
categories. When
selected, the button
will appear as .
Press
the map screen.
(4)With Restaurants highlighted, tap
Items to display a list of
Restaurants in your area. The
POIs are listed in order of
distance. To sort them
alphabetically, press the
button.
(5)Highlight your choice and click
to calculate your route.
The route is shown on the map as
a blue line from your current GPS
position.
(6)You can select to
preview your destination on the
to return to
map, or press to add
the destination to your Favorites
or to set it as your Origin. Select
Settings to dene your Search
Radius and Search Center.
23

NAVIGATING A ROUTE
As you drive, Destinator OP
provides you with turn-by-turn
voice and visual directions, letting
you know when your next turn is
due.
6. Navigate To A Favorite
You can select a destination from
your list of stored Favorites . (The
next section describes how to save
an item to your Favorites list.)
A Favorite is an address or
destination previously stored by you
for quick and easy retrieval. You
can also save, edit or delete
destinations from this folder.
(1)From the Destination menu, press
the Favorites button. Your list of
Favorites categories is displayed.
(2)Highlight My Favorites and tap
Items . A list of stored items is
displayed.
(3)Highlight your selection and click
7. Save To Favorites
When selecting a Destination which
you may use regularly, you can save
it to your personalized Favorites list.
(1)At the map screen, press the
button to open the
Destination menu.
(2)Select and specify your desired
destination as described
previously, be it from Address, POI,
History or Contacts.
(3)To save the location in your
Favorites folder, click the
button and select
Favorites. The Edit Item
Properties screen is displayed.
to calculate your route.
The route is shown on the map as a
blue line from your current GPS
position.
You can also select to
preview your destination on the
map, or press to edit
or delete your choice, or to set it
as your Origin.
(4)Enter a name and comment that
will help you recognize the item in
future.
(5)Enter a new category name (eg:
Must see) or select an existing
one and press Save.
Your favorite destination has now
been stored for future use.
24

NAVIGATING A ROUTE
8. Navigate To A History Item
History allows you to select an
existing destination from a list of
previously traveled routes. The
software automatically stores the last
few destinations in memory. As
each new route is added to the top of
the list, the older destinations at the
bottom are erased.
(1)From the Destination Menu,
press the History button to
display your list of previously
traveled routes.
(2)Highlight your selected History
item and click
calculate your route. The route
is shown on the map as a blue
line from your current GPS
position.
(3)You can also select
preview your destination on the map,
or press to add the
destination to your Favorites or to
set it as your Origin.
9. Navigate To A Point on the
Map
You can navigate to any point on the
map by tapping its location directly
on the map screen. This feature is
especially handy when you want to
navigate to a specic point you see
on the map, but you don’t have its
street address.
Dialog Box on the Map
Screen
(1)Use the stylus to scroll or drag the
map to a specic point, and then
tap the desired location.
(2)A dialog box displays the address
to
to
of that point, and lets you select
whether you want to navigate to it,
recalculate your route, add the
point to your Favorites, or set it as
your Origin (if you are in Planner
Mode).
(3)To clear the cursor dialog, just tap
the screen again.
25

NAVIGATING A ROUTE
If you need to
reset the point
of Origin, tap
the map screen
to open the
Cursor Dialog ,
and select Set
As Origin . All
new route
calculations will
use this as the
starting point,
but only if you
are in Planner
Mode. In
Navigation
Mode, your
current GPS
location is
always your
Origin.
10. Trip Planning
and then recalculated to the third
waypoint, and so on.
How to Use Trip Planning
Use the following method to plan a
trip:
(1)Ensure you are in Planner Mode .
To do this, press the
and cycle to the Settings Menu.
(2)Press Route Settings
and for Routing mode,
select Planner mode.
(3)Press the button to save
and return to the map screen.
(4)At the map screen, press the
button
Trip planning is useful when you
have more than one destination
along your route. This process is
similar to the procedures used to
enter or select a destination and
initiate navigation, except that you
must be in Planner Mode.
When you press ,
the Route is calculated in stages,
from the departure point to the rst
waypoint. Once you’ve reached the
rst waypoint, the route is
recalculated to the second waypoint,
button and select Trip
Planner
Destination menu.
Note: If this is the rst time
you are using Trip Planner you will
need to create a Trip Folder in which
to store your trip details. You can
use any name. For this example we
will be using My trip .
(5)From the tool bar at the top of the
screen, click Tools and select Add
to create a trip folder.
26
from the

NAVIGATING A ROUTE
(6)Enter the name of your trip folder
(e.g. My trip) and press Save . You
can now enter the waypoints of your
trip.
What is a waypoint? A waypoint is
a stop or break in your journey, along
a predened route.
(7)Highlight your trip folder, and
press Waypoints above to dene
your waypoints.
(8)From the tool bar at the bottom,
click Tools and select Add to dene
your waypoints.
(11)Select the Show
button to view the complete route.
The rst part of the route is shown as
double blue lines. The remaining
parts of the route are shown in a
series of single line vectors.
(12)Using
, you can change
the order of your waypoints to suit
your purposes.
(13)You can also click on Tools >
Optimize, which will automatically
sort the waypoints for the most
eective and quickest route.
or
(9)Select the address of your rst
waypoint – be it an Address , POI ,
Favorites or History – and press
.
(10)In the Edit WayPoint Properties
screen, you can change the name or
details of the waypoint. Press Save
to add to your trip.
Repeat steps 6 to 9 to enter all the
waypoints.
(14)To calculate the route, press
Navigate
shown as a blue line from your
current GPS position.
* Remember to change back to
Navigational Mode. * See Section 0
7. Route Settings for a description of
Navigation Mode and Planner Mode.
27
. The route is

NAVIGATING A ROUTE
11. Avoid Roads
You can specify that certain roads be
excluded from your route
calculations. For example, you may
prefer to not travel on any toll roads.
(1)From the Destination Menu, press
the Avoid Roads button to display
a list of road categories.
(2)To place restrictions on a desired
road category, highlight
button and select Show .
(4)Once you have specied your
road restrictions, press
MO device to return to the map
screen.
on the
Restrictions and press
to suit your preference.
Press
category.
(3)Tap on Items to list all the roads in
a highlighted category. To
specify restrictions for a particular
road, highlight it and press
or . To preview
a highlighted road on the map
screen, press the
to add a new
or
28

OPTIONS
1. Introduction
There are various route and map
options available from the Options
Menu.
This chapter contains the following
topics:
(1)Showing your Route
(2)Displaying Directions
(3)Canceling your Route
(4)Recording and Playing Back a
Route
(5)Switching Maps
(6)Selecting Travel Mode
(7)Getting Help
2. The Options Menu
The Options Menu provides choices
for displaying your route, displaying
your driving directions, canceling a
route, playing and recording a route,
switching maps, selecting your mode
of travel, and getting help with basic
navigation.
details such as the address of and
distance to your destination, the ETA
(Estimated Time of Arrival), and the
ETR (Estimated Time Remaining).
4. Driving Directions
This function displays a visual list of
your route, distances to each
maneuver, and street names. By
using the scroll bar on the right hand
side, you can scroll through the
entire route. Tapping on the
maneuver twice displays that part of
the route.
Voice and visual prompts (displayed
at the top of the screen) are provided
at varying intervals to indicate your
next turn or change of direction.
3. Show Route
This option displays your route on
the map screen in its entirety, plus
The Driving Directions screen also
gives you several route options:
29

OPTIONS
Show Route
Displays your route on the
map screen in its entirety, plus
details such as the address of your
destination, the ETA, and the ETR.
Cancel Route
Cancels and clears the
route from the map screen.
Show Turn
Displays the highlighted
portion of the list on the map screen,
including the street name, distance
to it, and an arrow diagram to
indicate the turn. You can also use
the Prev and Next arrows to scroll to
the previous or next turn.
This view indicates the distance to
your next turn, and the name of the
next street immediately after
completing the previous turn.
Voice and visual prompts are
displayed at varying intervals to
indicate your next turn or change of
direction.
6. Cancel Route
Avoi d Tu rn
Will recalculate your
route to exclude this particular turn or
maneuver.
5. Turn By Turn
Cancels and clears the route from
the map screen.
7. Play
This feature allows you to record
your route as you’re traveling, and
then to play it back on the map
screen at a later time. From the
Play/Record screen, you can record
a route, play back a route, change
the speed of the playback, and
delete recordings.
30

OPTIONS
8. Switch Maps
This feature lets you switch between
your maps. The Switch Maps
screen also displays details and
version numbers of your maps, and
allows you to delete maps.
9. Travel Mode
You can further dene your route
according to whether you are
traveling by car or on foot. This
button lets you switch to Pedestrian
Mode or Vehicle Mode. In
Pedestrian Mode, the navigation
radius is restricted to 10 kilometres
(6 miles).
10. Help
Displays software version and details
about your Destinator OP
application.
This button launches an abbreviated
help le with basic navigational
denitions and instructions.
11. About
31

SETTING
1. Introduction
You can easily change the default
settings of maps, views and route
parameters to suit your personal
preferences.
This chapter contains the following
topics:
(1)GPS Status
(2)Home Button Settings
(3)General Settings
(4)Map Settings
(5)Route Settings
(6)Alert Settings
(7)Visual Notications
(8)Look & Feel
2. The Settings Menu
updates your vehicle's location and
position. The GPS may take a few
minutes to nd its current location
initially. For best results, ensure
that the GPS has a clear view of the
sky.
To view your GPS conguration,
click on the
You can access this button via the
Settings Menu > GPS Status , or by
clicking on the
map screen.
button.
button on the
The Settings Menu allows you to
change the settings which determine
how your route is calculated or
displayed.
3. GPS Status And Settings
Destinator OP uses GPS signals to
pinpoint your location. In Navigation
mode , the software automatically
acquires GPS signals and constantly
GPS Settings Conguration menu:
(1) COM Port - Denes the
Communications Port.
(2) Baud Rate - Transmission rate of
data.
(3) Protocol - Default is NMEA.
32

SETTING
Automatic reconnect – Select this
option to ensure automatic
reconnection whenever the GPS
signal is lost.
Set GPS - Sets the GPS
Conguration.
Now, when you press the
button, Destinator OP will
automatically calculate a route to this
destination.
5. General Settings
Press the
your selections and return to the
GPS Satellite graphic screen.
button to save
4. Home Button Settings
The Home Button Settings button
lets you dene an address or POI as
your home destination. Whenever
you want to navigate to your home
destination (for example, the nearest
gas station), press the
In the Home Button Settings
screen, select either POI Mode or
Address Mode to set your desired
destination.
button.
The General Settings screen allows
you to choose the unit of
measurement for your route.
All distances are displayed in
imperial or metric units.
(1) Imperial (Miles and yards)
(2) Metric (Kilometers and meters)
Press the
selection and return to the map
screen.
button to save your
6. Map Settings
Press the button to save and
return to the map screen.
The Map Settings screen lets you
customize your map display.
33

SETTING
Map Orientation
Forward is up – orients the map so
that your forward direction is always
at the top.
North is up – orients the map so that
north is always at the top.
Zoom Mechanism
Automatic Zoom – ensures that the
zoom will return to its previous level
after several seconds of inactivity.
Map Font
Use large labels – increases the
size of street names to make the
map easier to read.
Press the
selections and return to the map
screen.
7. Route Settings
The Route Settings screen lets you
choose the parameters for route
calculation.
button to save your
Routing Mode
Navigation Mode – Provides voice
instructions as you drive.
This mode is the one you will use
most frequently. Destinator OP
uses the satellite-based global
positioning system (GPS) to
constantly detect your current
position. As you drive, your location
is compared to the destination you
have chosen and you will be
constantly provided with accurate
driving directions. Even if you
accidentally drive
Destinator OP will direct you back on
track.
Planner Mode – Displays a route on
the map.
You set an origin and a destination,
and Destinator OP displays a map
that shows you the route. In this
mode of operation, the
satellite-based global positioning
system (GPS) is not used. Your
current position is not detected and
Destinator OP does not keep track of
your driving progress. Use Planner
Mode for trip planning.
course,
34

SETTING
Route generation
Quickest route – Destinator OP
calculates the route by picking the
shortest distance and highest speed
limits.
Shortest route – Destinator OP
calculates the route by picking the
shortest distance.
Note : Route generation
excludes any detours, stops or
delays along the route.
U Turn Usage
U Turn enabled - If you select this
option, the route will be calculated by
including any U Turns that are
needed. If you clear this option, the
route will be calculated without any U
Turns. (This feature is included
because some drivers prefer not to
make U Turns.)
Press the
selections and return to the map
screen.
8. Alert Settings
This screen displays warnings and
alerts which, when selected, will
provide voice prompts.
button to save your
Voice Prompts
(1)Speed Limit - Gives you a voice
prompt when your car exceeds the
speed limit on this section of the
road.
(2) Route Recalculation - If you
deviate from the original route,
Destinator OP automatically
recalculates a new route and
updates ETA and distances.
(3) Low Signal - Warns that you are
in an area of low GPS signal.
(4) GPS Not Found - Alerts you if the
GPS signal is lost, or if power is
removed from the GPS receiver.
(5) Drive Carefully - Friendly
reminder at the start of each journey.
Press the
selections and return to the map
screen.
button to save your
9. Visual Notications
The Visual Notications screen lets
you choose how Destinator OP
noties you of your upcoming turns.
35

SETTING
(1) Text – Visual notication is
displayed in written form.
(2) Symbols – Visual notication is
displayed in pictorial form (as an
arrow diagram).
(3) None - No visual prompts are
displayed.
Press the
selections and return to the map
screen.
button to save your
36
CHANGING MAP VIEWS
1. Introduction
You can change your view of the
map, and the way in which the map
is displayed on the screen.
This chapter contains a description
of the following topics:
(1)How to Zoom and Scroll
(2)Types of Views
(3)Day or Night Mode
2. How to Zoom and Scroll
Zoom Scroll Bar
The Zoom scroll bar can be used to
Zoom In (+ Magnify )orto Zoom
Out (- Expand ) on the displayed
map. Alternatively, you can use the
and buttons on the MO to
zoom in and out.
With Automatic Zoom selected
(Settings Menu > Map Settings
button) you can use the zoom
buttons to override the auto zoom,
but the zoom will return to its
previous level after several seconds
of inactivity.
When Automatic Zoom is not
selected, you can zoom in or zoom
out manually and it will remain at that
level.
You can scroll the map by holding
your stylus on the screen, and
dragging the image in any direction.
3. Types of View
The button on the map screen
toggles between 4 types of views: 2D,
2D Night, 3D and 3D Night. The
icon indicates the next view to be
displayed.
2D View
The 2D view is the straight-forward
two-dimensional view. This is the
default map view. In this view, the
map is dynamically updated, and
allows for manual panning and
zooming.
2D Night View
This is a high contrast,
two-dimensional view, optimized for
night driving or adverse weather
conditions. The map is dynamically
updated, and allows for manual
panning and zooming.
37

CHANGING MAP VIEWS
The route, start point and destination
(outlined in blue) are clearly seen
and visible under a variety of weather
and driving conditions.
3D View
The 3D view is a simplied
three-dimensional view showing the
map in a basic 3D relief. It shows
the basic relief (outline) and details of
the surrounding roads and general
area.
Figure 1 - 3D View
3D Night View
The 3D night view is a simplied
three-dimensional view with
high-contrast colorization optimized
for night driving or adverse weather
conditions.
38

AUTO & FAVORITES ALERTS
1. Introduction
An Automatic Alert refers to an item
that you so that Destinator
will alert you when you are within a
certain distance of the item’s location.
You can
each Automatic Alert. Destinator will
alert you when you are within the
distance and then alert you when
you are within the second. Automatic
Alerts must be stored in either one of
three categories - Auto
Alerts 1, Auto Alerts 2, and Favorites
Alerts.
2. Auto Alerts
Note that this ration is applied
to all items in the category.
(1)From the Destination dialog,
select Favorites.
(2)Highlight the Auto Alerts folder
you want to and select
Edit… from the Tools menu in the
lower-right corner.
(3)To enable both alerts, check both
boxes. Or, you can disable one of the
alerts by clearing the box next to it. If
you two alerts, the
must have a greater distance than
the second.
(4)From the pull-down menus, select
a distance for each enabled alert.
Destinator will alert you when the
distance between your current
traveling position and the location of
the alert equals the distance you
enter here.
(5)Close the Edit menu.
(6)To display the map position of
items in the Auto Alerts category,
check the box to the left of the
category name, just as you would to
display map positions of items in any
other category.
two distances for
Category
(7)Select Save to complete the
3. Auto Alerts
You can change the name, comment,
and category of any item in Auto
Alerts 1 or Auto Alerts 2. Note that if
you change the category of an item
to something other than Auto Alerts 1
or Auto Alerts 2, it will no longer
function as an auto alert. Only those
items in categories Auto Alert 1 and
Auto Alert 2 will function as
automatic alerts.
(1) From the Destination dialog, select
Favorites to display all the categories.
(2) Highlight a category and then select
Items from the upper menu bar. All items
in the category are displayed.
(3) Highlight the alert you want to edit and
select Edit from the tools menu in the
lower right corner.
(4) You can change the name, comment,
and category of an item. You cannot
change any other information. Note that
if you change the category, the item will
be moved
either Auto Alerts 1 or Auto Alerts 2 will
function as auto alerts.
(5) Close the edit window.
Items
4. Favorites Alerts
From the Favorites folder, you can add a new
Category called Favorites Alerts. These alerts
function the same way as Auto Alerts, but
can be used speci
list of Favorites, such as your favorite
restaurants and places of interest.
cally for items from your
39

FAVORITES IMPORTING
1. Introduction
Destinator OP also lets you
download a list of locations from your
PC to any category within Favorites
on your MO. Creating information
about locations in this way is much
faster than entering the information
via the MO keyboard. A practical
application of this time-saving feature
could include a commercial vendor
who would create a list of all retail
outlet locations in a specic area.
Destinator users could then
download the list quickly to their
MOs.
You can download a list of locations
from your PC to your MO to any
category within Favorites, including
Auto Alerts. The list must be
contained in *.csv les. As part of
the download procedure, you convert
the *.csv les to *.dat format for
storage on your MO by using a
Destinator conversion utility.
2. Downloading Favorites
(1)Be sure your MO is connected to
your PC.
(2)Launch the Destinator Console
from the start menu of your PC.
Start > Programs >
DestinatorApps > Destinator
Console
This will enable the Installing Map
and Favorites Importer features.
(4)Click the Favorites Importer button.
The converter dialog is displayed.
(5)Select the le (*.csv format)
containing the automatic alert.
(6)About the *.csv le: Appendix A
describes csv format. Basically, the
*csv le contains addresses and
longitude and latitude values for
locations. The le must contain exact
street address, ZIP/Postal Code, and
city data. However, the longitude and
latitude values can be omitted
because the Destinator software will
query the map you selected in Step 3
above for any missing longitude and
latitude. If the *.csv le does not
contain longitudes and latitudes, the
separating commas must still be
included, as Appendix A shows.
(7)Convert the .csv le to .dat format
by highlighting the le, entering a
Category Name, and selecting the
Convert button. The Report area of
the screen will display a message
stating that the content of the le has
been converted and that the le is
ready for download.
(8)Download the le to your MO by
selecting the Download button.
(3)On the Destinator Console, click
on a Standard Map.
40

FAVORITES IMPORTING
`
This glossary describes terms and abbreviations used with Destinator OP.
Abbreviation Name Description
COM PORT
EULA
ETA
ETR
FAQ
GPS
Lat
Long
Orbit
POI
Sat
SD
TTD
Communications
Port
End-User License
Agreement
Estimated Time of
Arrival
Estimated Time
Remaining
Frequently Asked
Questions
Global Positioning
System
Latitude
Longitude
Orbital path of a
Satellite
Point Of Interest
Satellite
See also GPS
Secure Digital
memory card
Total Time Duration The projected total time the trip is
In Computer systems, the name of a
serial communications port - Eg: COM1,
COM2, COM3, and COM4.
Is a legal contract between a software
application author or publisher and the
user of that application. The EULA, often
referred to as the "software license," is
similar to a rental agreement; the user
agrees to pay for the privilege of using
the software, and promises the software
author or publisher to comply with all
restrictions stated in the EULA.
The estimate time to complete the
journey, if we where to leave now.
Excluding any detours, stops or delays
along the route.
Estimated Time remaining to complete
route. Does not allow for any delays.
List of Frequently Asked Questions with
Answers.
The GPS (Global Positioning System) is
a "constellation" of 24 well-spaced
satellites that orbit the Earth and make it
possible for Vehicles/ people/ assets
enabled with GPS receivers to pinpoint
their location.
An imaginary parallel circular line ( East /
Wes t ) around the earth, the same distance,
north or south from the equator – expressed
in degrees.
An imaginary circular line on the surface of
the earth passing through theNorth and
South poles at right angles to the equator expressed in degrees.
Path or trajectory of a body through
space. A GPS satellite traces out an
orbit about the earth.
A place or item of interest along the selected
route.
A man-made object, or device that orbits
the earth. Eg: a GPS Satellite which
orbits the earth in a x pattern, height and
speed
A Secure Digital (SD) card is a tiny ash
memory card used to make data storage
portable among various devices.
calculated to take - does not allow for any
detours or other delays.
41

FAVORITES IMPORTING
Appendix A - Favorites Importing File Structure
The Favorites Importing structure must be in CSV (Comma-Separated Values) * Format
contains the following
The
1. Name of the point.
2. Comment.
3. Longitude.
4. Latitude.
5. ZIP/Postal Code.
6. City.
7. Street.
8. House number.
The Longitude and Latitude are numerical values; all the others are strings.
If a string value contains a comma, the
Examples:
Text
Favorite place 1,Destinator Favorites Convertor Comment 1,39.21 370,38.78903,8033,Munich, Ariboweg ,1
Favorite place 2,Destinator Favorites Convertor,comment 2,24.85091,34.3301 2,1070,Brussels, Moutstraat
“Weg”,183
TABLE
1 Name 2 Comment 3 Long 4 Lat 5 ZIP/
Favorite
place 1
Favorite
place 2
Favorite
place 3
Favorite
place 4
Favorite
place 5
Destinator
Favorites
Convertor
Comment 1
Destinator
Favorites
Convertor
Comment 2
Destinator
Favorites
Convertor
Comment 3
Destinator
Favorites
Convertor
Comment 4
Destinator
Favorites
Convertor
Comment 5
39.21370 38.78903 8033 Munich Ariboweg 173
24.85091 34.33012 1070 Brussels Moutstraat
44.80999 38.16141 1096 Amsterdam Joop
24.79360 37.08604 75010 Paris Rue Danton 3013
44.978
89
must have quotation marks.
6 City 7 Street 8 Number
Postal
Code
23.82
718
80
44
Zurich Frits
“Weg”
Geesinkweg
Weg
183
9003
123
* CSV (comm tains the values in a table as a series of ASCII text lines,
organized so that each column value is separated by a comma from the next column's value and
each row starts a new line.
42

FAVORITES IMPORTING
Appendix B - Destinator OP
Console
Installing the Destinator OP
Console
You will need to install the Destinator
OP Console in order to install
additional maps, or to create your
own maps by cutting out sections of
existing maps.
Insert the Destinator OP Disk 1 into
the PC’s CD-ROM drive, and the
Destinator OP installer screen
appears automatically.
(1)From the Select language
pop-up– highlight your language
preference and click OK.
(2)After reading the Welcome
message click Next.
(3)We recommend that you use the
default directory on your PC and click
Next.
Or, if you wish to install to a
installation directory click Browse
and follow the onscreen instructions.
(4)Select the default Destinator
language for your MO. Click Next.
(5)An installation
rmation
window is displayed. Click Next.
(6)A status window indicates the
progress of the installation. Click
Finish to exit installer program.
Toolbar
Figure 2 - Destinator Console Toolbar
(1) Install / Remove Map – Dual
function of installing new or
self created maps or removing
old unused maps to save
memory
(2) Cut Map – Allows you to
create and cut own selection of
map(s)
(3) Favorites Importer –Youcan
download a list of locations
from your PC to your MO to
any category within Favorites
(See Chapter 7 Favorites
Importing)
(4) Quick Activation – This
activation featureis reserved for
additional maps.
File Menu
43

FAVORITES IMPORTING
(1) Install and Remove Maps – Install new
or remove old maps.
(2) Cut Map – Cut your selection from a
large map.
(3) Exit – Close down Destinator Console.
Tool Menu
(1) Select Target Device – Select where to
load map
(2) Remove Maps – Remove old or unused
maps to save on memory
(3) Refresh map data – Load new map(s)
and refresh installedmap window
(4) Favorites Importer – You can download
a list of locations from your PC to your
MO to any category within Favorites (See
Chapter 7 Favorites Importing)
(5) Language – Select your Language to
install Destinator in (default English)
Help Menu
Destinator Console
Creating Your Own Maps
You can create your own maps by
cutting out sections of existing maps.
This lets you work with maps that are
smaller and take up less memory.
(1) From Standard Maps window
select the map(s) you wish to
load by clicking on the map image
or selecting them from the list.
(
) represents a selected map to
install.
(2) Press the Cut Map
button. A Conrmation Dialog is
displayed, press the OK button to
install the map(s), or the Cancel
button to exit map installation and
return to select map(s). The
selected map is temporally
loaded to hard disk.
(3) The map is displayed on screen -
(1) User Manual – Provides a detailed
description on using Destinator
(2) Destinator Customer Support – Contact
Destinator information
(3) Quick Activation – This activation
feature is reserved foradditional maps
(4) About Destinator Console – Version of
Then Zoom In
a section, zone, selected area or
city of interest.
(4) Use the toolbar for Address or
POI selection, to Zoom , to select
a sub-region ,or Crop (to select
a rectangular area to be cut).
(5) Click Crop
Rectangle around area to cut.)
44
on
(Draws a
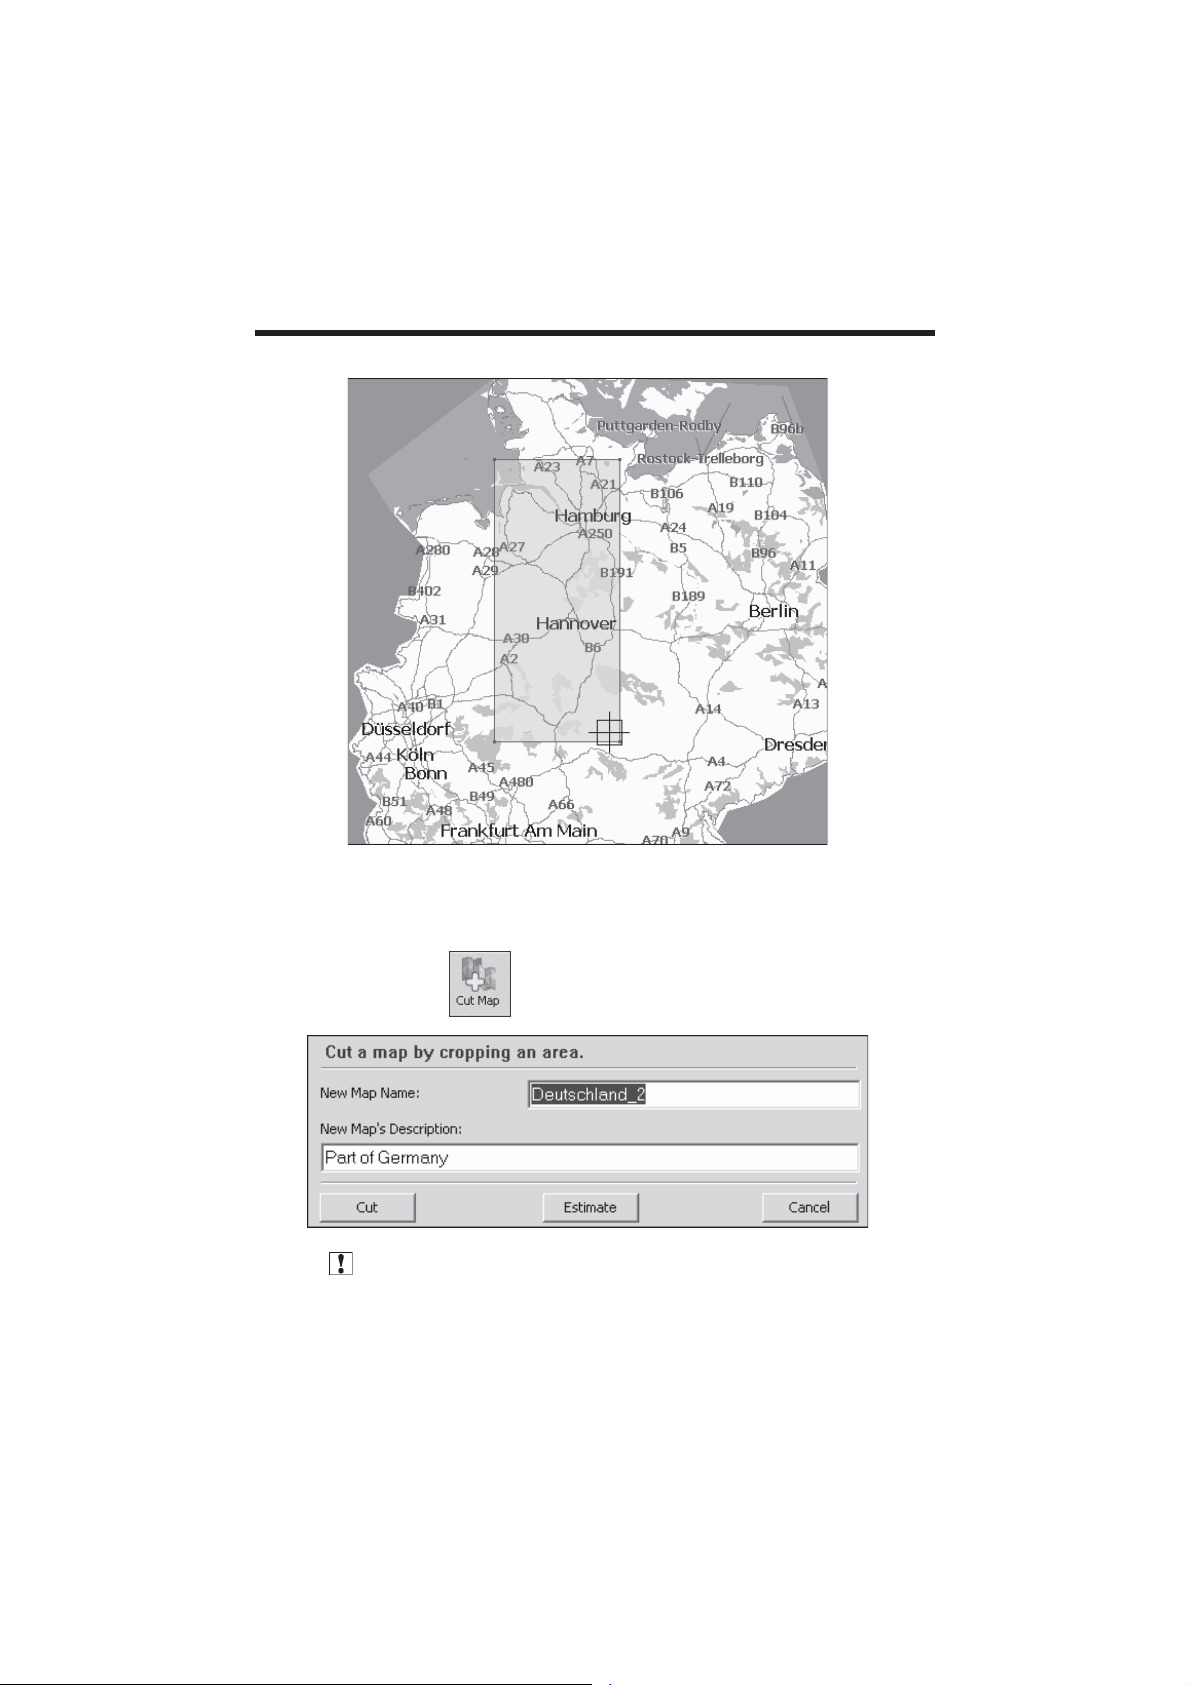
p
FAVORITES IMPORTING
Cutting Maps
(1).Click Cut Ma
(2).Enter a unique name as the new map name.
Note : No spaces between words are allowed, but you can use
underscores to separate the words (16 character maximum).
to create that selected zone (map).
45

FAVORITES IMPORTING
(3)Pressing Estimate gives the
size of the selected map. Do
you have enough memory
available? Click OK.
(4)Click Cut – To automatically
store the newly cut map on your
computer.
Destinator creates a default
directory on your computer,
C:\DestinatorApps\New Maps,
where all cut maps are stored.
(5)Click OK. From Destinator
Maps Cutter, click File > Return
to Console. (You are returned
to the Destinator Console).
Route Cutting
Destinator supports route cutting,
which allows you to create a map
composed of a travel route. To
create the route, you specify two or
more points. After the route has been
created you can create a map from it
and download the map to your MO.
(1) From the console, select one of
the standard maps. The route you
create will be restricted to the
area of the predened map.
(2) Click on Cut Map
enlarged image of the map is
displayed in the left-hand pane.
(3) Click on Route
Notice the additional window that
is displayed in the right-hand
pane.
.An
.
(4) To establish a point on your route,
click on the desired position on
the map. A description of the
point is displayed in the
right-hand pane. To more
precisely select a point, you can
click on Address or POI as the
next section describes. The rst
point you dene is considered the
starting point of the route. A route
must include at least two points.
(5) Some tools you can use when
creating a route:
Corridor - You can select how
much surrounding area will be
included along the route’s path.
You can also choose either
kilometers or miles.
Route - You can select either the
quickest or the shortest route to
connect the points.
Centers a point on the map. First,
highlight the point in the
right-hand pane, and then click
the icon. - Deletes a single
point from the route. First,
highlight the point in the
right-hand pane, and then click
the icon.
icon to delete all points from the
route.
Changes the numerical order of
- Click on this
and -
-
46

FAVORITES IMPORTING
the points on the map and in the
right-hand pane. First, highlight a
point in the right-hand pane, and
then click one of these icons.
(6)
When you have established all
the points on the route, click the
Create Route
icon. Notice
that all the points become
connected by a blue line that is
bordered by a corridor. You can
use any of the tools described in
step 5 to modify the route shown.
If you modify the route, you will
have to recreate the route by
simply clicking on the Create
Route icon again.
(7)To create a map of the route,
click on Cut Map
. You
will be prompted to give the map
a name. The map will be
displayed in the “My Maps”
section on the Destinator Console.
Then, you can download the map
to your MO just as you would
download any other map.
hard disk and displayed in the Map
Cutter window.
Selecting Pre-Cut Maps
Selecting by Address
(1)Select map to load from Standard
Maps .
(2)Click Cut Map
selected map is automatically loaded to
.The
47

FAVORITES IMPORTING
Do you have a specific Address, POI or Region that you need to map? On the In
Destinator Cutter, on the Toolbar select Address POI, zoom or sub-region to Cut.
(3)If you have an address choose the Address
Street and Home or City > Intersection.
(4)Click Show Address.
48
button, select by: City >

FAVORITES IMPORTING
(5)In the Destinator Map Cutter main view the
map is updated and selected area to be cut is
centered and marked.
(6) From Toolbar, click Crop
select on the map where to draw
rectangular zone tobe cut. (Move your
curser to the area marked and draw a box
around the previously marked area).
(7) Click Cut Map
selected zone.
Selecting Map by Intersection
If you need to select a map by
Intersection:
(1)From Toolbar click Address, then
click City > Intersection.
(2)First, click City then the 1stStreet
and then Intersection.
(3)From the list, click 2ndStreet.
(4)The map view is updated and area
to be cut is centered.
to cut the
(4) From Toolbar > Crop
On the map select, with the mouse,
where to draw Rectangular zone to
,
be cut.
(5) Click Cut Map
selected zone.
Selecting by Sub Region
If you are ready using the Destinator Map
cutter see step 3)
(1) On the Destinator Consoleselect the main
maptoloadfrom.
(2) Click Cut Map
Destinator Map Cutter is displayed.
(3) A list of sub-regions is, displayed on the
right hand of the selected map. Click on
the sub-region to download.
.
to cut
. The
(5)From Toolbar > Crop ,
then on the map select where
to draw rectangular zone to be
cut.
(6)Click Cut Map
to cut the
selected zone.
Selecting Map by Points of
Interest (POI)
(1) From the Toolbar click
(2) Select the POI eg: Golf Courses.
(3) Select your Golf Course.
(Ensure that it is highlighted).
(4) Click Cut Map to cut
selected zone.
.
49

FAVORITES IMPORTING
Loading Newly Created Maps to
the MO Device
(1) On the Destinator Console, to
refresh Standard Map dialog, Click
Tools > Refresh New Map Data.
(2) Select the map(s) you wish to
load by clicking on the map image or
selecting them from the list. (
represents a selected map to install.
(3) In Target device, click Change to
select where to install the map(s).
(4) Choose Storage Card, click OK.
Conrm that there is enough
memory to install map.
(5) Click
. A pop-up
message requiring conrmation
appears.
(6)Press OK to load map. Destinator
Console will display a progress
window to let you monitor the
installation’s progress.
(7)When the map installation has
completed, a Successfully loaded
message appears. Press OK.
Removing Map(s) from Memory
If you do not have Destinator
Console launched:
(1)Insert the Destinator Disk 1, into
the CD-ROM in your desktop
computer, this automatically
launches the Destinator Console .
)
(2)In Target device click Change ,
select from where (which memory)
to remove map(s). This will
update the Installed Map Window.
(3)The Installed Map Window
displays a list of all the loaded
maps available. Click in the
check box (
) beside the map(s)
you wish to remove.
(4)
Press the button
to remove the selected map.
(5) Destinator requires that you
conrm that you wish to remove
the selected map(s).
(6) Press Yes. The selected map(s) are
removed from memory.
Exit From Destinator Console
(1) If you need to exit the Destinator
Console, choose File > Exit .
You will need to conrm that you
want to Exit the Destinator
Console .
(2) Press Ye s and you will exit.
50

FAVORITES IMPORTING
Appendix C – Installing and
Activating Additional Maps
Where to Load map(s)
(1) From Target Device press
Change to choose where to install
maps.
(2) In the Select Target Device dialog,
highlight Storage Card and click
OK.
The Target Device window
displays the size of the map(s),
and the available room on the
storage card.
Select Maps to Load
(1) Select the map(s) you wish to
load by clicking on the map image
or selecting them from the list. ( )
represents a selected map to
install.
Activating Additional Maps
After you have installed the
additional maps, they must be
activated before you can use them.
(1) Be sure your PC is connected to
the Internet.
(2) Be sure your MO is
communicating with your PC via
Microsoft Active Sync.
(3) Start the Destinator program on
your PC.
(4) From the toolbar at the top of the
screen, select the
button.
(5) The Quick Activation screen
appears. Click Next to
continue.
(2) Press the
button.
A Conrmation Dialog is
displayed. Press the OK button
to install the map(s), or the
Cancel button to exit map
installation and return to select
map(s). A status window will
indicate the progress of the map
installation.
(3)
When the map installation has completed,
a Successfully loaded message appears.
Press OK .
51

FAVORITES IMPORTING
(6) The User Information screen is displayed. Fill in the required information
to create your account on Destinator Community, and click on Next.
52
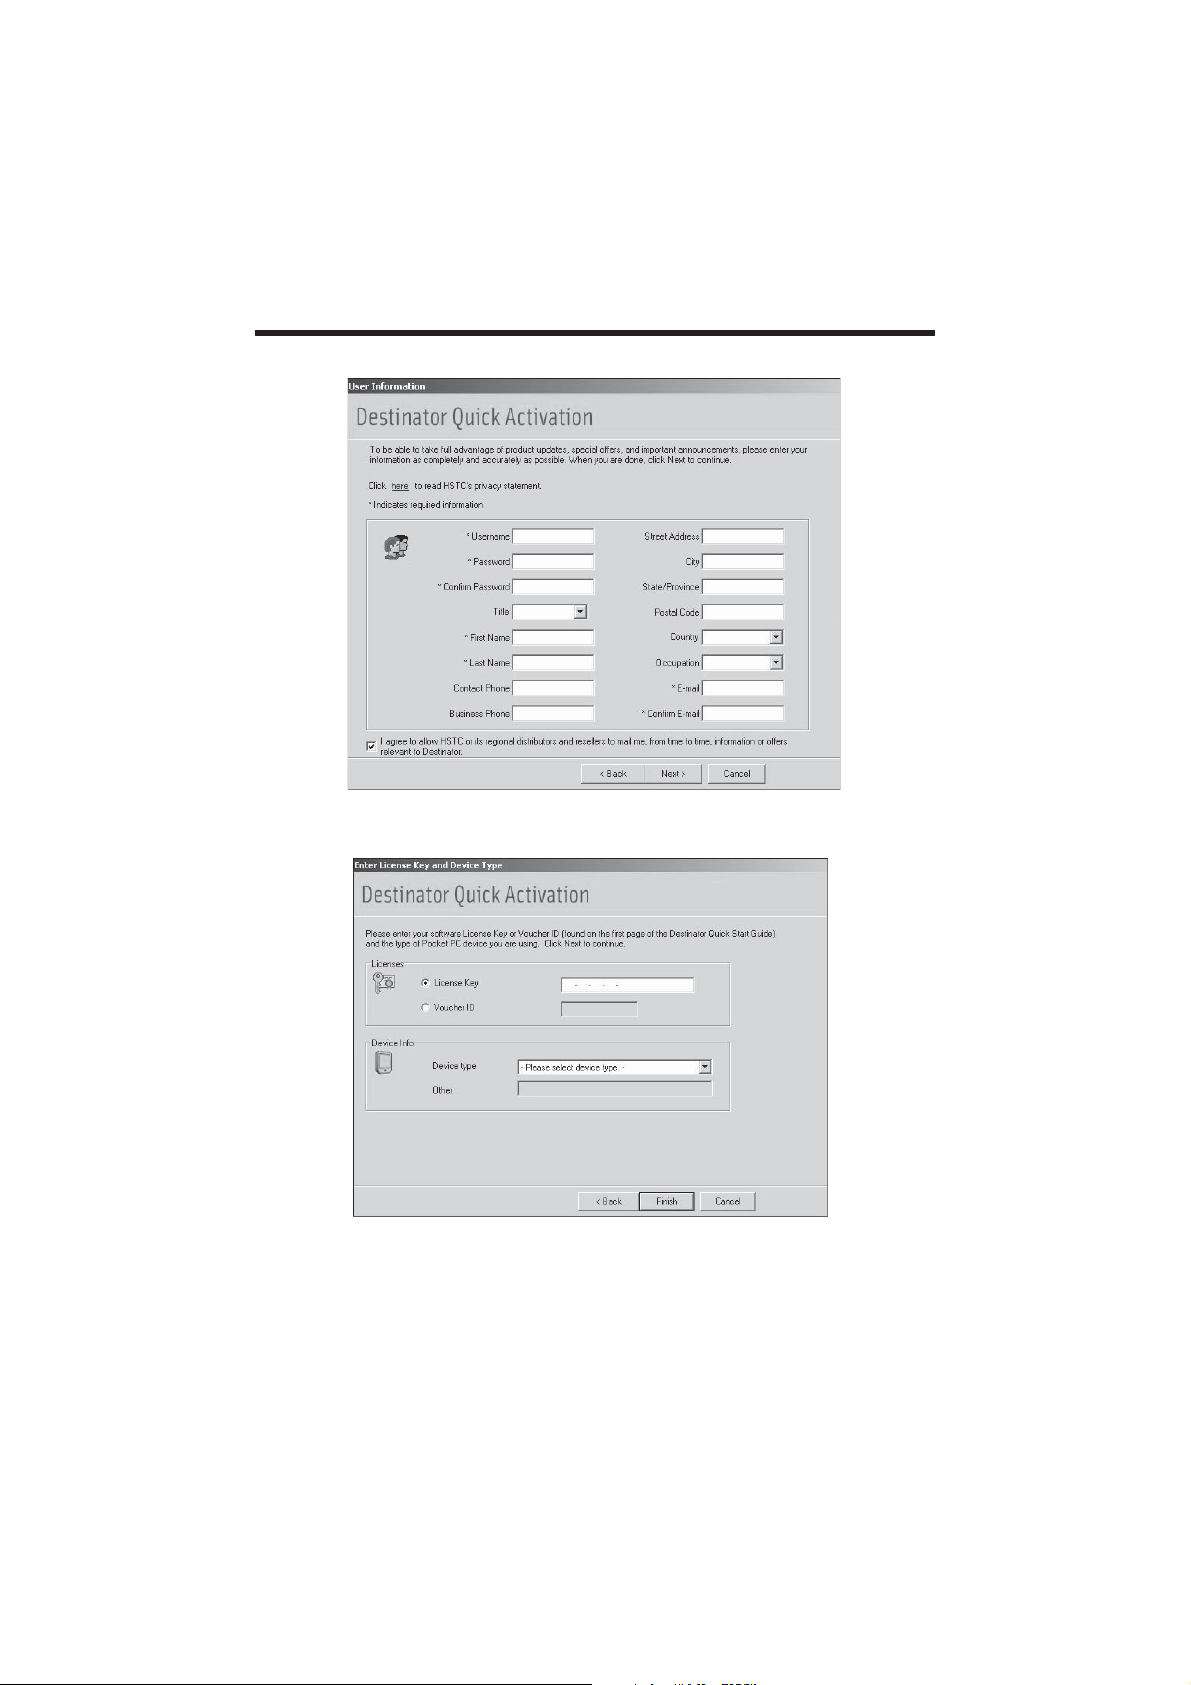
FAVORITES IMPORTING
(7)Enter the license key and select your device type. Click on Finish.
(8)The message “Congratulations, your Destinator license key has been
successfully activated” is displayed. Click on Done to close the screen.
53

FAVORITES IMPORTING
54

FAVORITES IMPORTING
Appendix D – MO Settings
You can change the default user settings for the MO device by pressing
on the main screen.
Launches the Destinator OP
application
Opens the Settings Menu for
your MO device
Backlight Settings
Power Settings
Language Settings
Power Settings
The Power Settings screen indicates
Press
to return to the Settings
Returns you to the
Time Settings
System Information
the battery status of the MO device.
menu.
55

FAVORITES IMPORTING
Backlight Settings
The Backlight Settings screen lets
you select how bright the screen will
be. You can save power by
selecting how long the backlight will
stay on before it dims.
Press
menu.
Time Settings
The Time Settings screen allows you
to select your time zone, and lets you
set the date and time.
to return to the Settings
Press
menu.
Language Settings
The Language Settings screen lets
you select the language that will be
used for screen displays and voice
prompts.
Press
menu.
System Information
The System Information screen
displays the software version of your
Destinator OP application and
information about your MO device.
You can also calibrate the position of
the display.
to return to the Settings
to return to the Settings
Press
menu.
to return to the Settings
If at any time in the future you should need to dispose of this product
please note that: Waste electrical products should not be disposed of
with household waste. Please recycle where facilities exist. Check with
your Local Authority or retailer for recycling advice. (Waste Electrical
and Electronic Equipment Directive)
56
88-G3741-07
 Loading...