

Page 1

300Mbps Ceiling
Wireless Access Point
Quick Installation Guide
300Mbps Ceiling
Wireless Access Point
Quick Installation Guide
Page 2
1
Hardware and Operation Mode
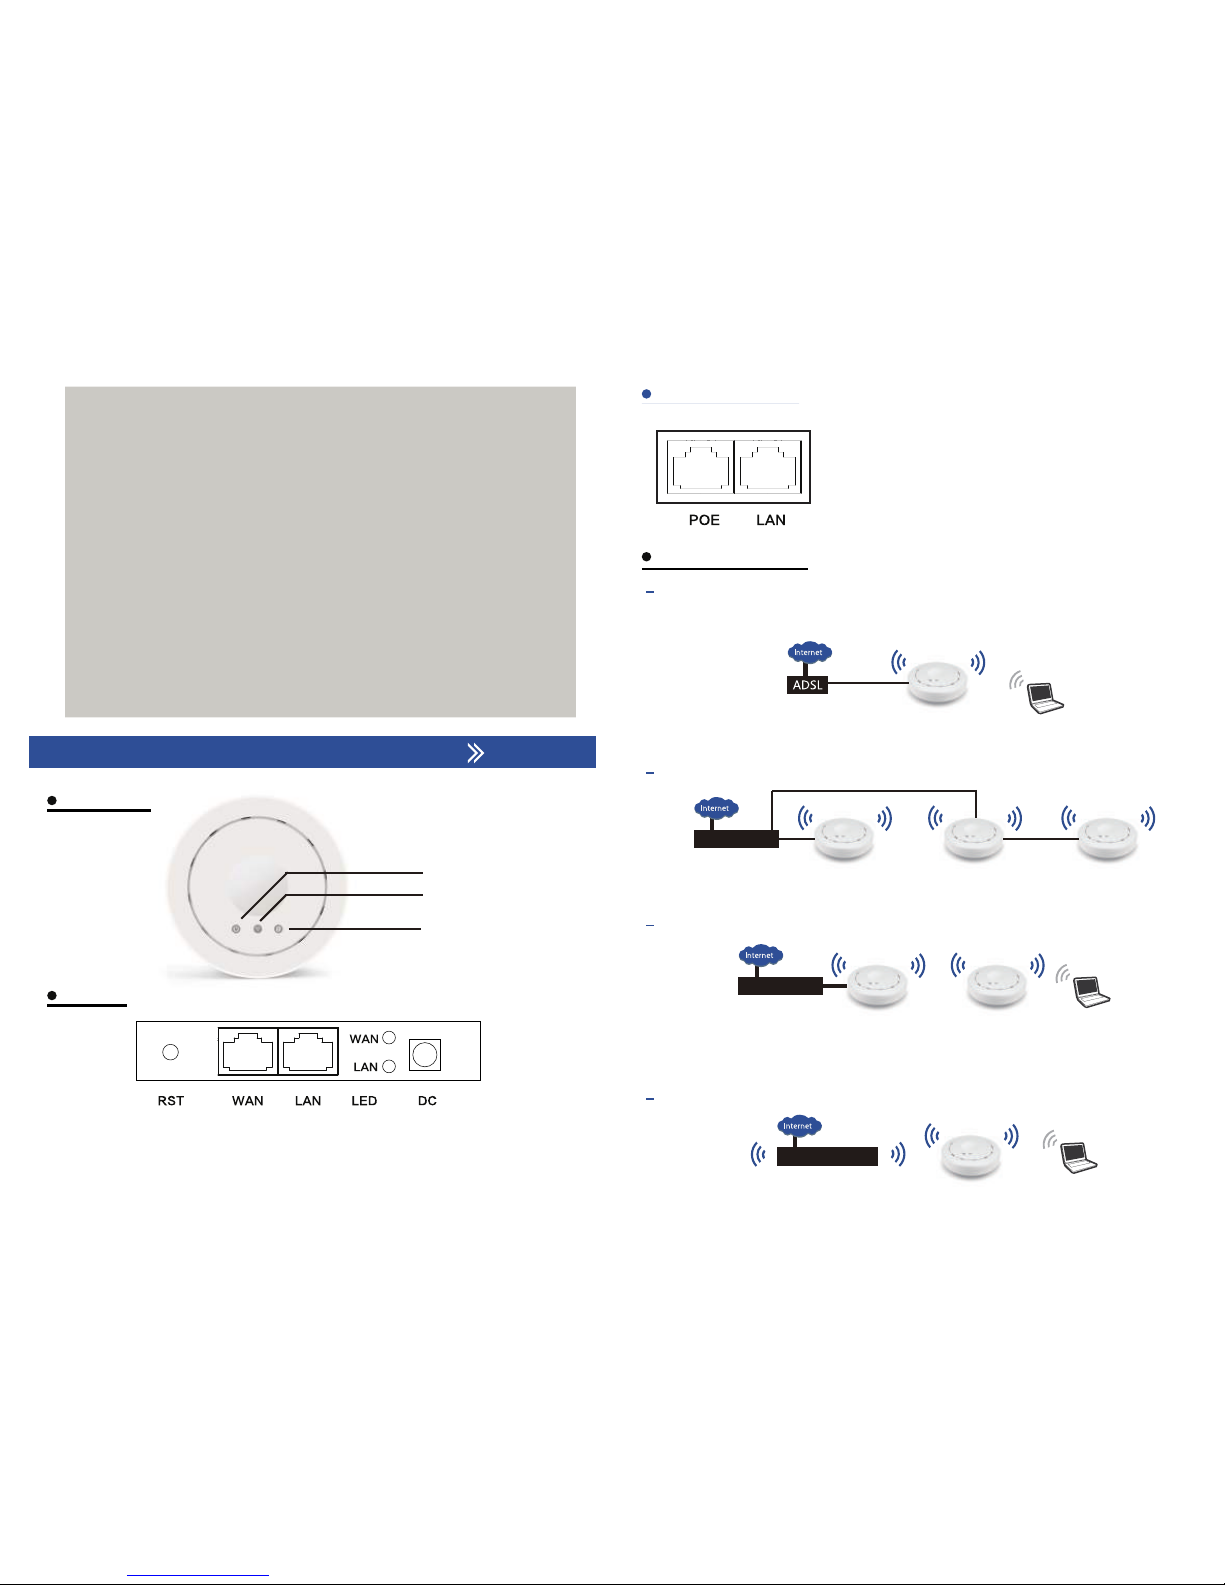
Interface
PoE Power Supply
PoE Port: Transfer the power and data at same time
LAN Port: Transfer data only through Ethernet cable
Gateway Mode
WISP Client Router
WISP
Access Point Mode
Repeater Mode
WISP Router Mode
AP Mode AP Mode AP Mode
AP MODE
Repeater MODE
Router/Switch
Operation Mode
Thank you for purchasing the Ceiling AP.
This manual suit for quick installation of indoor
300Mbps 11N wireless AP & High Power Router.
This manual will instruct you how to configure
and manage indoor 300m 11N wireless AP &
High Power Router in right ways.
Introduction
Power LED
Wi-fi LED
Data LED
LED
RST: Reset Button,and hold the RESET button for at least 18 seconds when the
wifi led is off, and then the AP reboots to its factory default settings.
WAN/LAN: The Ethernet port is used to connect the power and should be
connected to the LAN and DHCP server.
LED: When the Ethernet Port is connect with cable to other device, is Flashing
Gateway
Router/Switch
Page 3
2
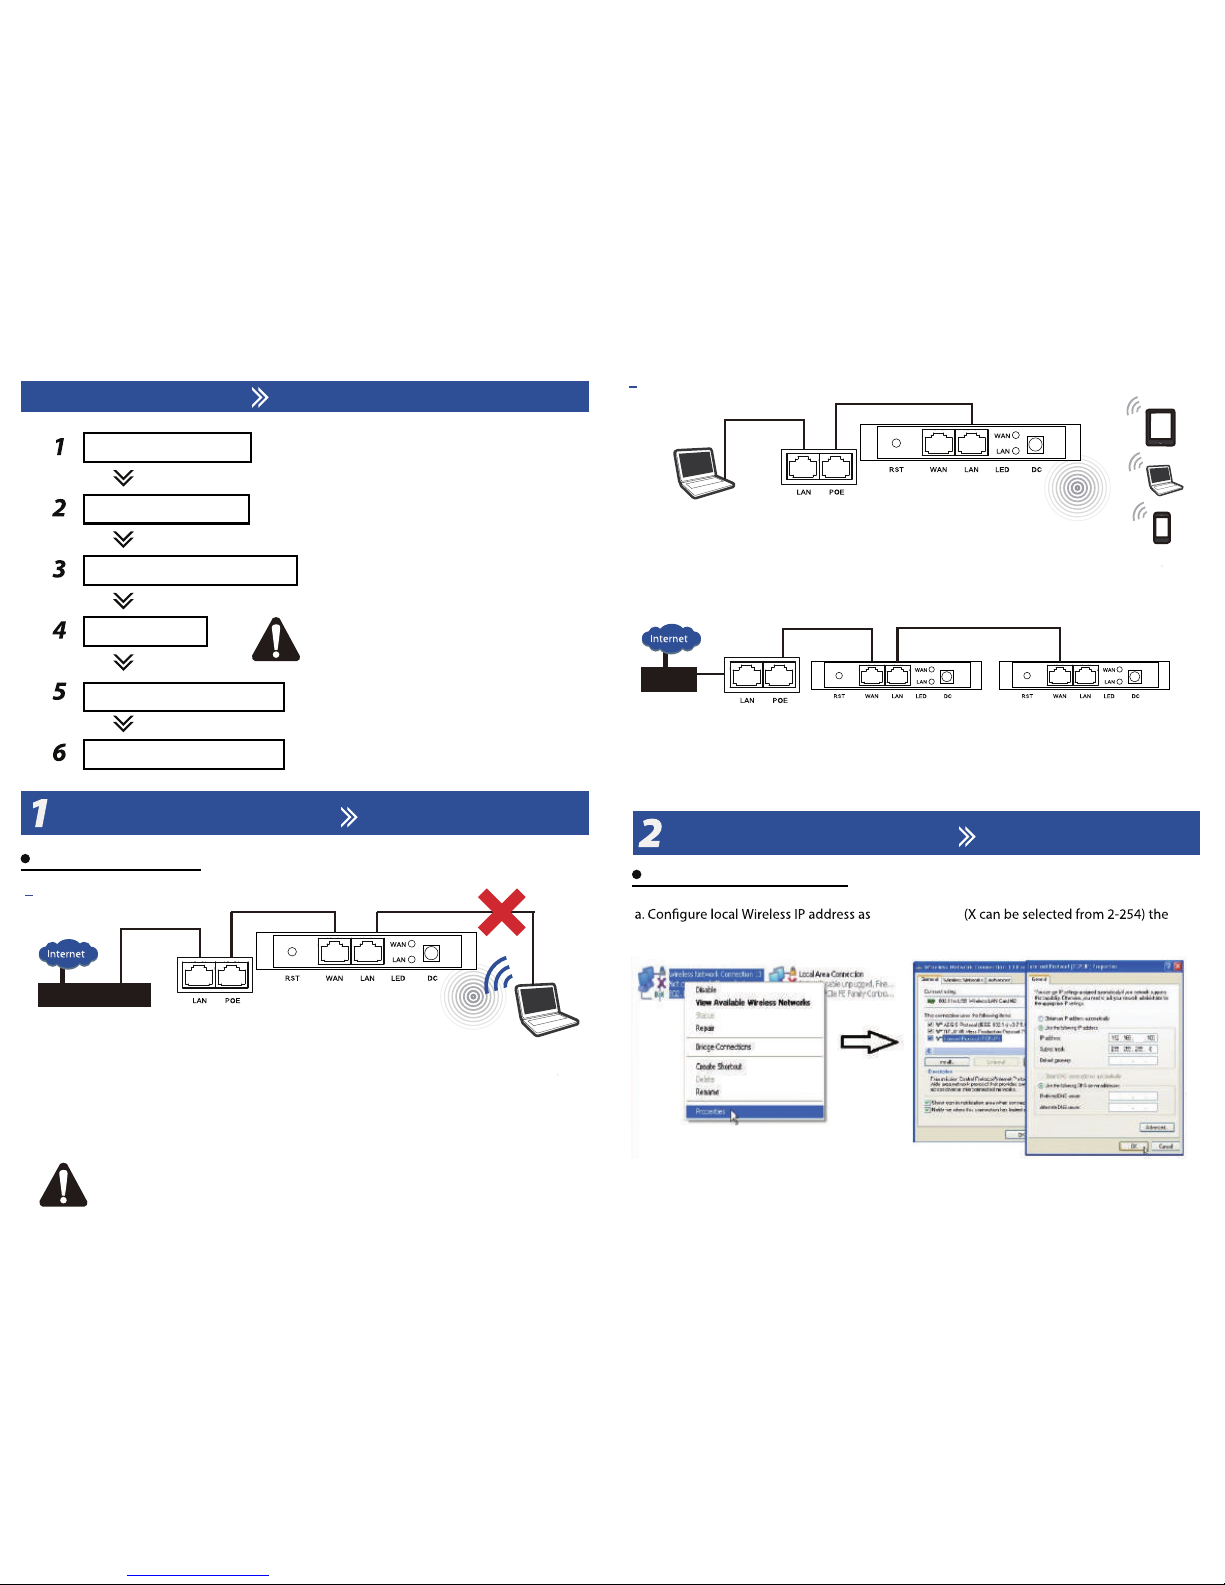
As belows shows.
Installation Steps
Ceiling AP
Hareware Conection
Setting the AP through Wireless
Router/Switch
PoE Power Supply
Setting the AP using Wireless
Connect the Switch or Router’s Ethernet Port to PoE Power Supply’s LAN Port, and connect
the PoE Power Supply’s PoE Port to AP’s WAN port. The computer using wireless to connect
the Ceiling AP (SSID:9508S,Key:66666666), and then log the 192.168.188.253 to setting the
AP using the IE Browser.
Note: when AP is power on, the LAN/WAN port can supply the power and data
at same time, so you can not connect the Ethernet cable with computer and AP,
otherwise, the network adapter of computer may be damage.
Switch
Hardware Connection
Setting the Computer
Log in the Web Management
Setting the AP
Test the Wireless Network
Install the AP to the Ceiling
Note:
1. Before Install the AP on the Ceiling, you would
better complete the software setting.
2. Before the setting of the AP, you would better
complete the design of Topology of network
and IP address the devices.
Hardware Connection
Setting the Computer
Setting the AP through Wires with RJ45 Cable
Ceiling AP
POE Power Supply
Setting the AP using Wires
Connect the PoE Power Supply’s PoE Port to AP’s LAN port. The computer using wires to
connect the PoE’s LAN Port, and then log the 192.168.188.253 to setting the AP using the
IE Browser.
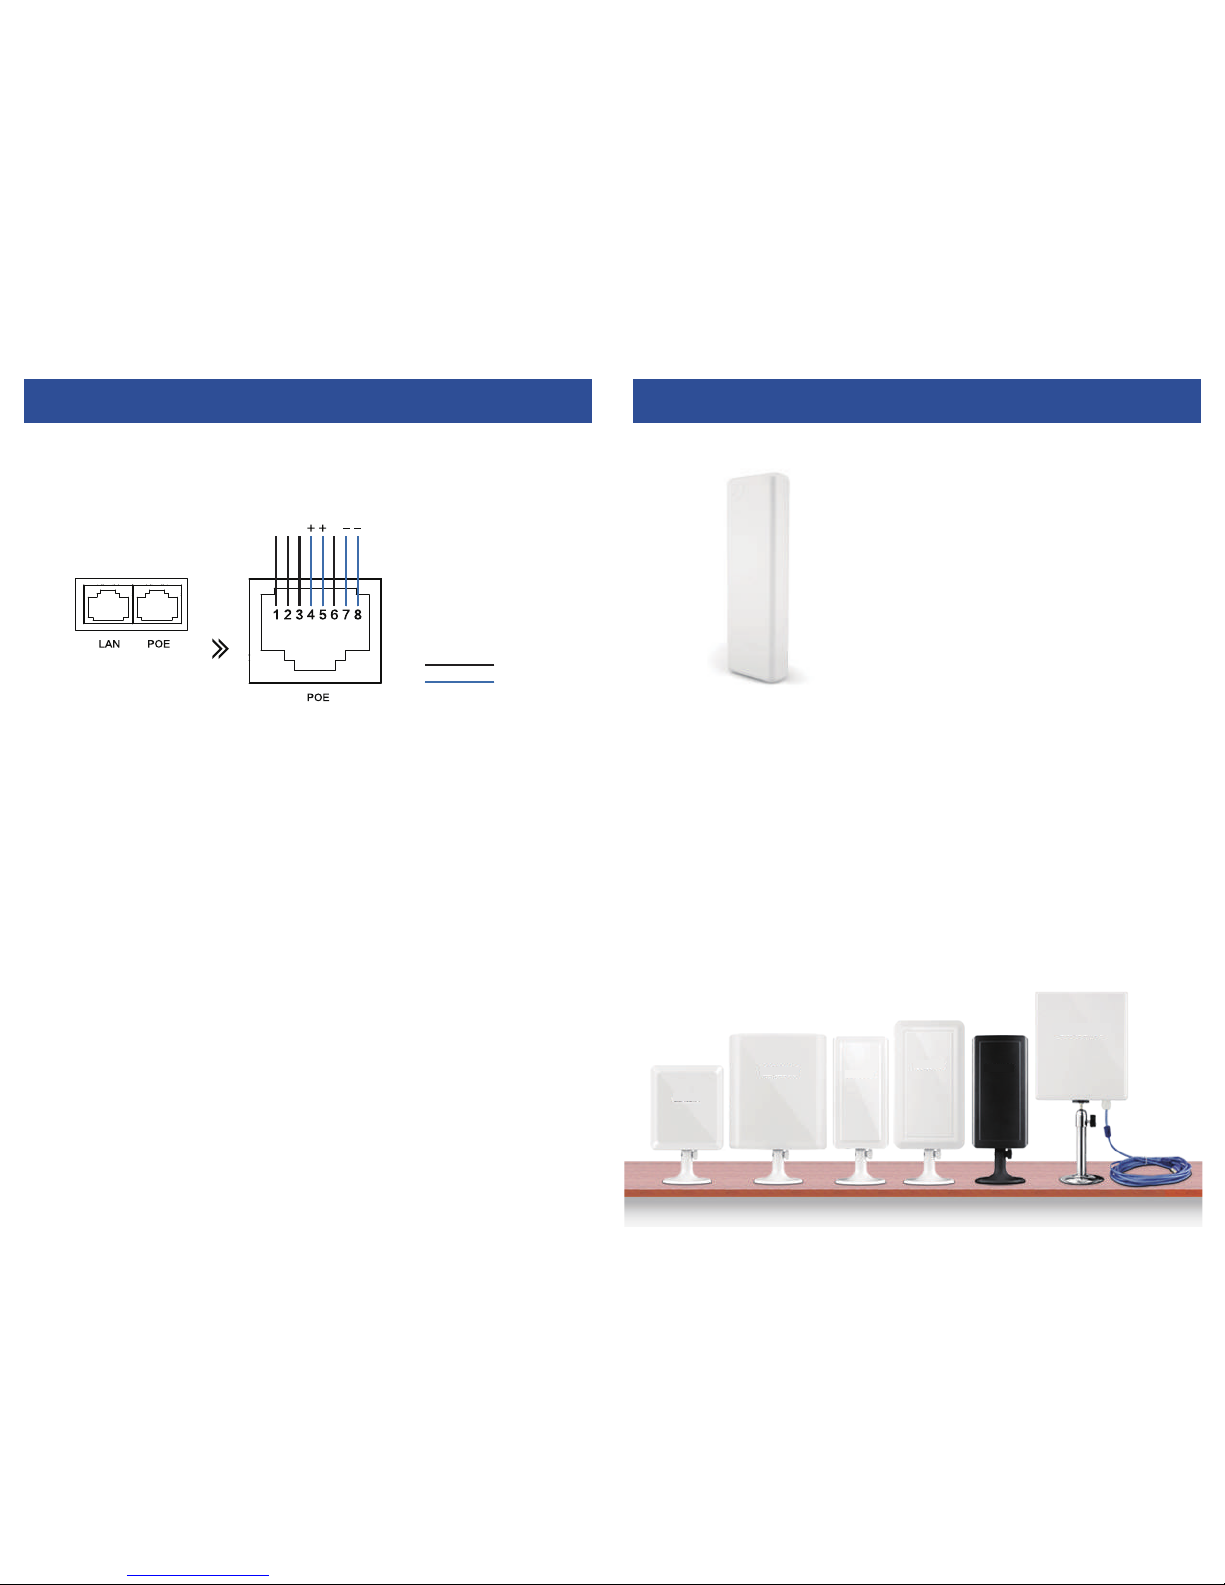
When powered by 24V/1A PoE, XD9500 can be PSE power supply for another XD9500 from
Wan port or Lan port Attention: line 4,5 must be positive electrode, Line 7,8 must be negative
electrode in RJ45 Port.Just as the picture shows below, Device A’s WAN port connect with
24V/1A PoE Power Adapter, then A’s LAN port supply 12V/1A power for B
Setting the AP through Wireless
same network segment as AP, subnet mask 255.255.255.0
192.168.188.X
188
Page 4
3
(To be continued...)
,the default Passwords is"666666"
segment as the AP subnet mask 255.255.255.0 As belows shows.
Log in the Web Management
Setting the AP
Setting the AP through Wires with RJ45 Cable
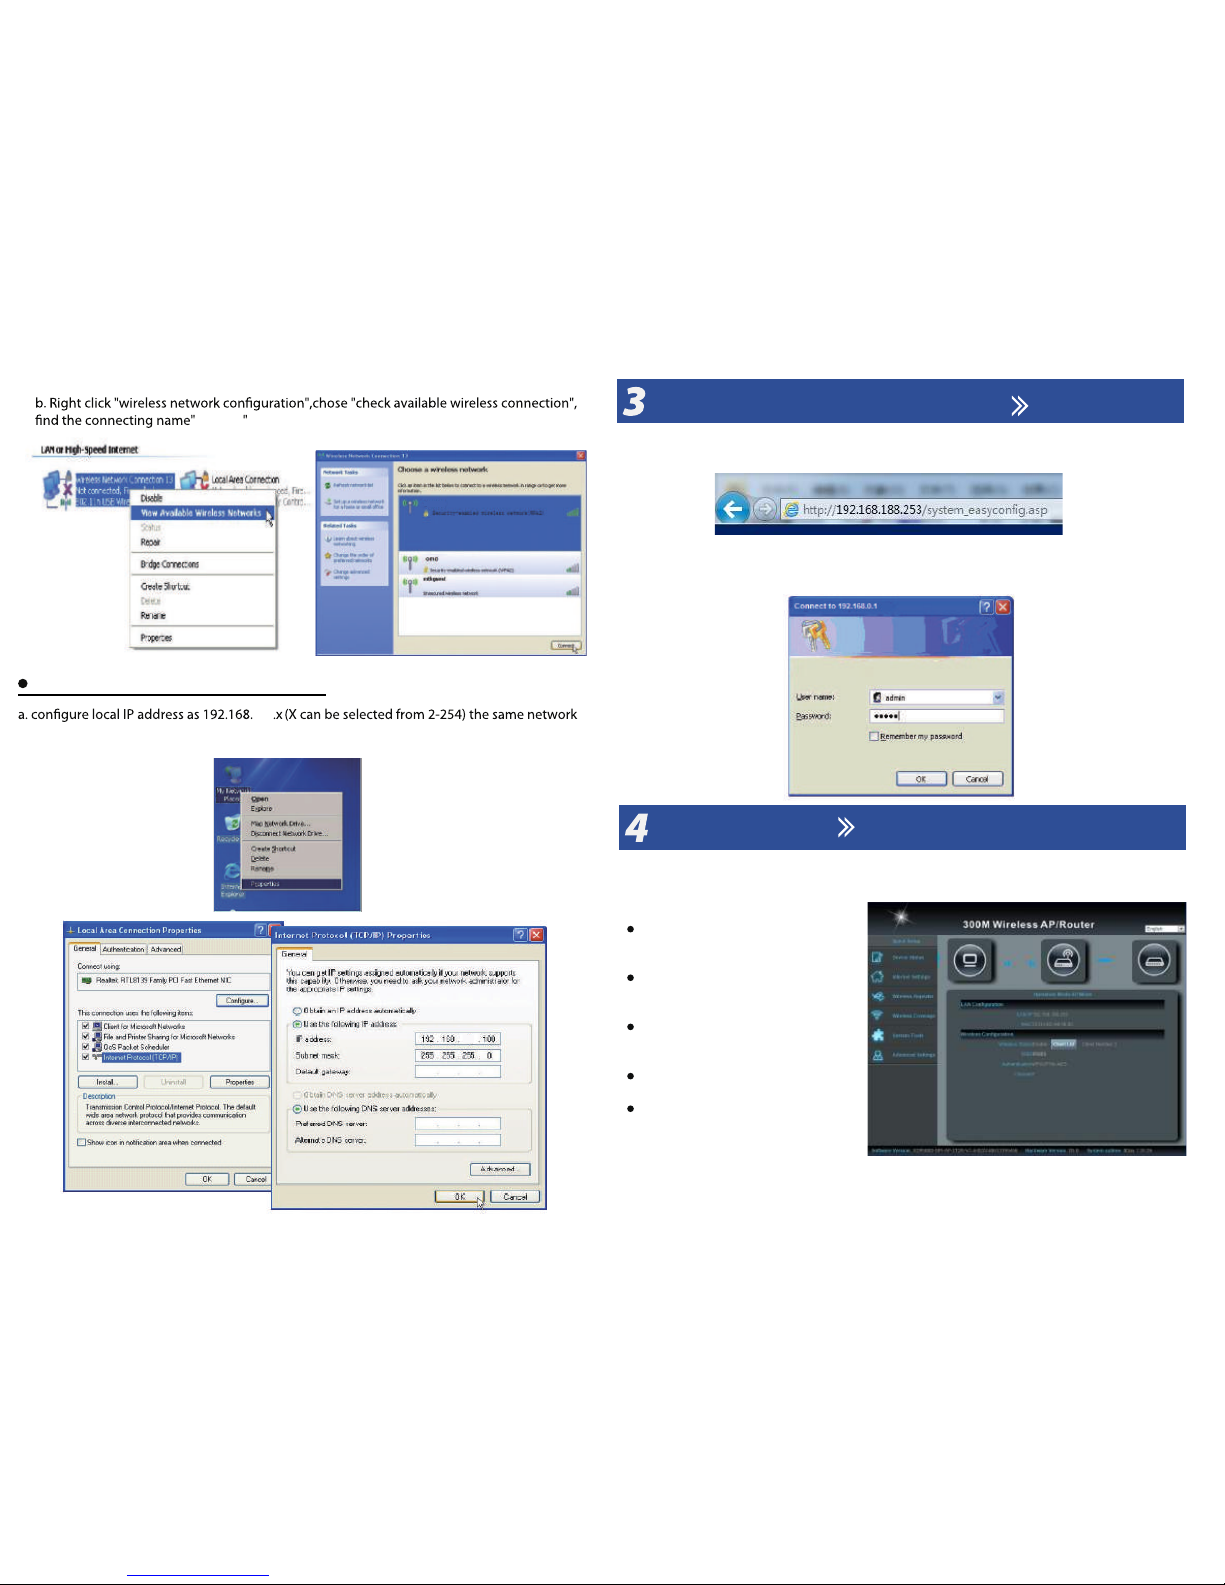
a.Open your web browser, type 192.168.188.253 in the address bar
b.enter the User name/Passwords: preset as admin/admin, then you can found on
the label attached to the router, click OK
Enter into the page of WEB software management page, then set ceiling AP as
requirement. The default working mode is AP.
9508S
ZHH
188
9508S
188
Wireless Repeater:The AP will setting
to Repeater Mode;
Internet Setting: The AP will setting
to Gateway Mode;
Wireless Repeater:The AP will setting
to Repeater Mode;
Wireless Coverage:The AP will setting
to APMode;
System Tools: PING Tools
Advanced Settings
Page 5
4
Setting the AP
Gateway Mode
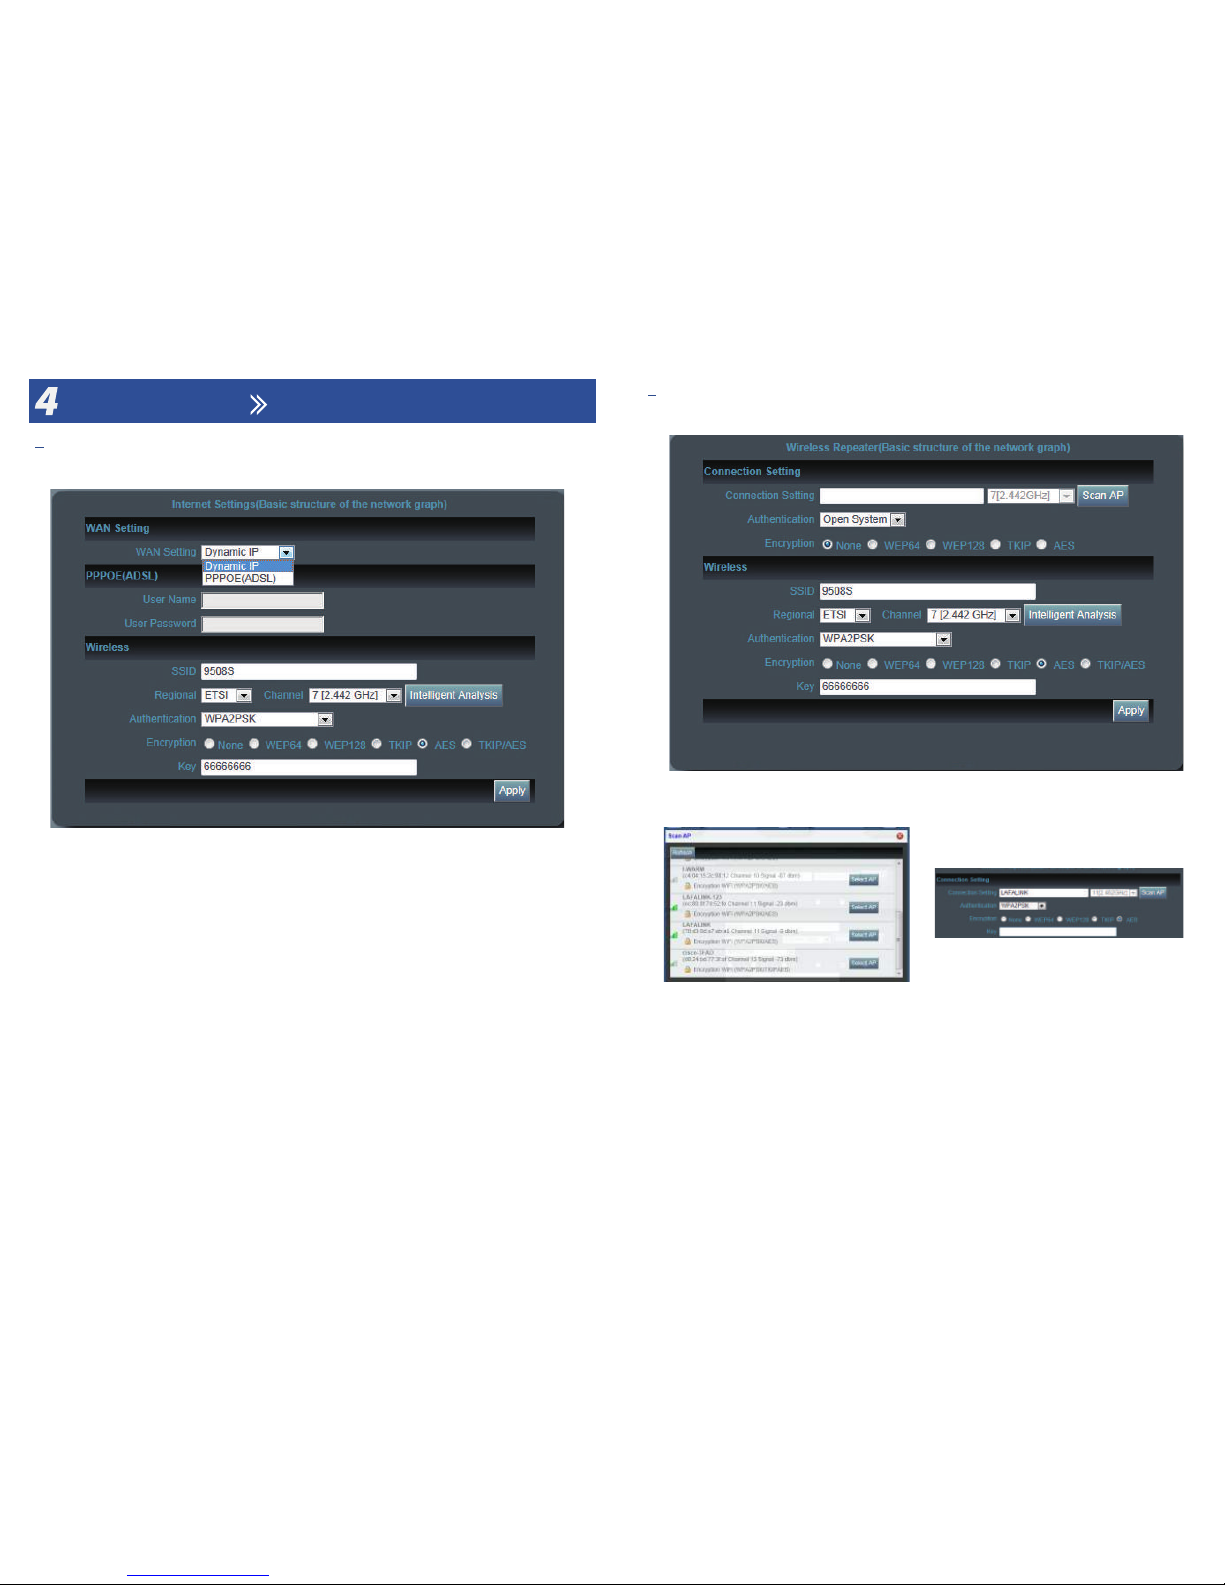
1. Choose the “Internet Setting”, that means AP will change to Gateway Mode:
Repeater Mode
1. Choose the “Wireless Repeater”, that means AP will change to Repeater Mode:
2. In this mode, the AP’s two Ethernet Port change into WAN & LAN Port:
2. In this mode, the AP can connect to other wireless networks, click the “Scan AP”, the AP will
search the wireless network, see the picture as below, choose the wi- you want to connect:
3. Fill the key of wireless network,and then seeting the wireless of AP
3. WAN Setting: Choose Dail Way, PPPoE/Dynamic IP Support. PPPoE need User Name and
User Password ll in, which is provided by ISP
NOTE: In the mode, the DHCP Server is enable by default, the computer can get the IP
address from AP.
5. Click the Apply the System will reboot.
5. Click the Apply the System will reboot.
4. Wireless: setting the Wireless Network, such as SSID and Key of the netowrk.
- SSID : the name of wireless network
- Channel: Setting wi- signal channel, you can click the intelligent analysis,
here will show details of wireless networks nearby
- Authentication and Encryption: WPA2-PSK, AES is default
- Key: the password of wi- network
4. Wireless: setting the Wireless Network, such as SSID and Key of the netowrk.
- SSID : the name of wireless network
- Channel: Setting wi- signal channel, you can click the intelligent analysis,
here will show details of wireless networks nearby
- Authentication and Encryption: WPA2-PSK, AES is default
- Key: the password of wi- network
Page 6
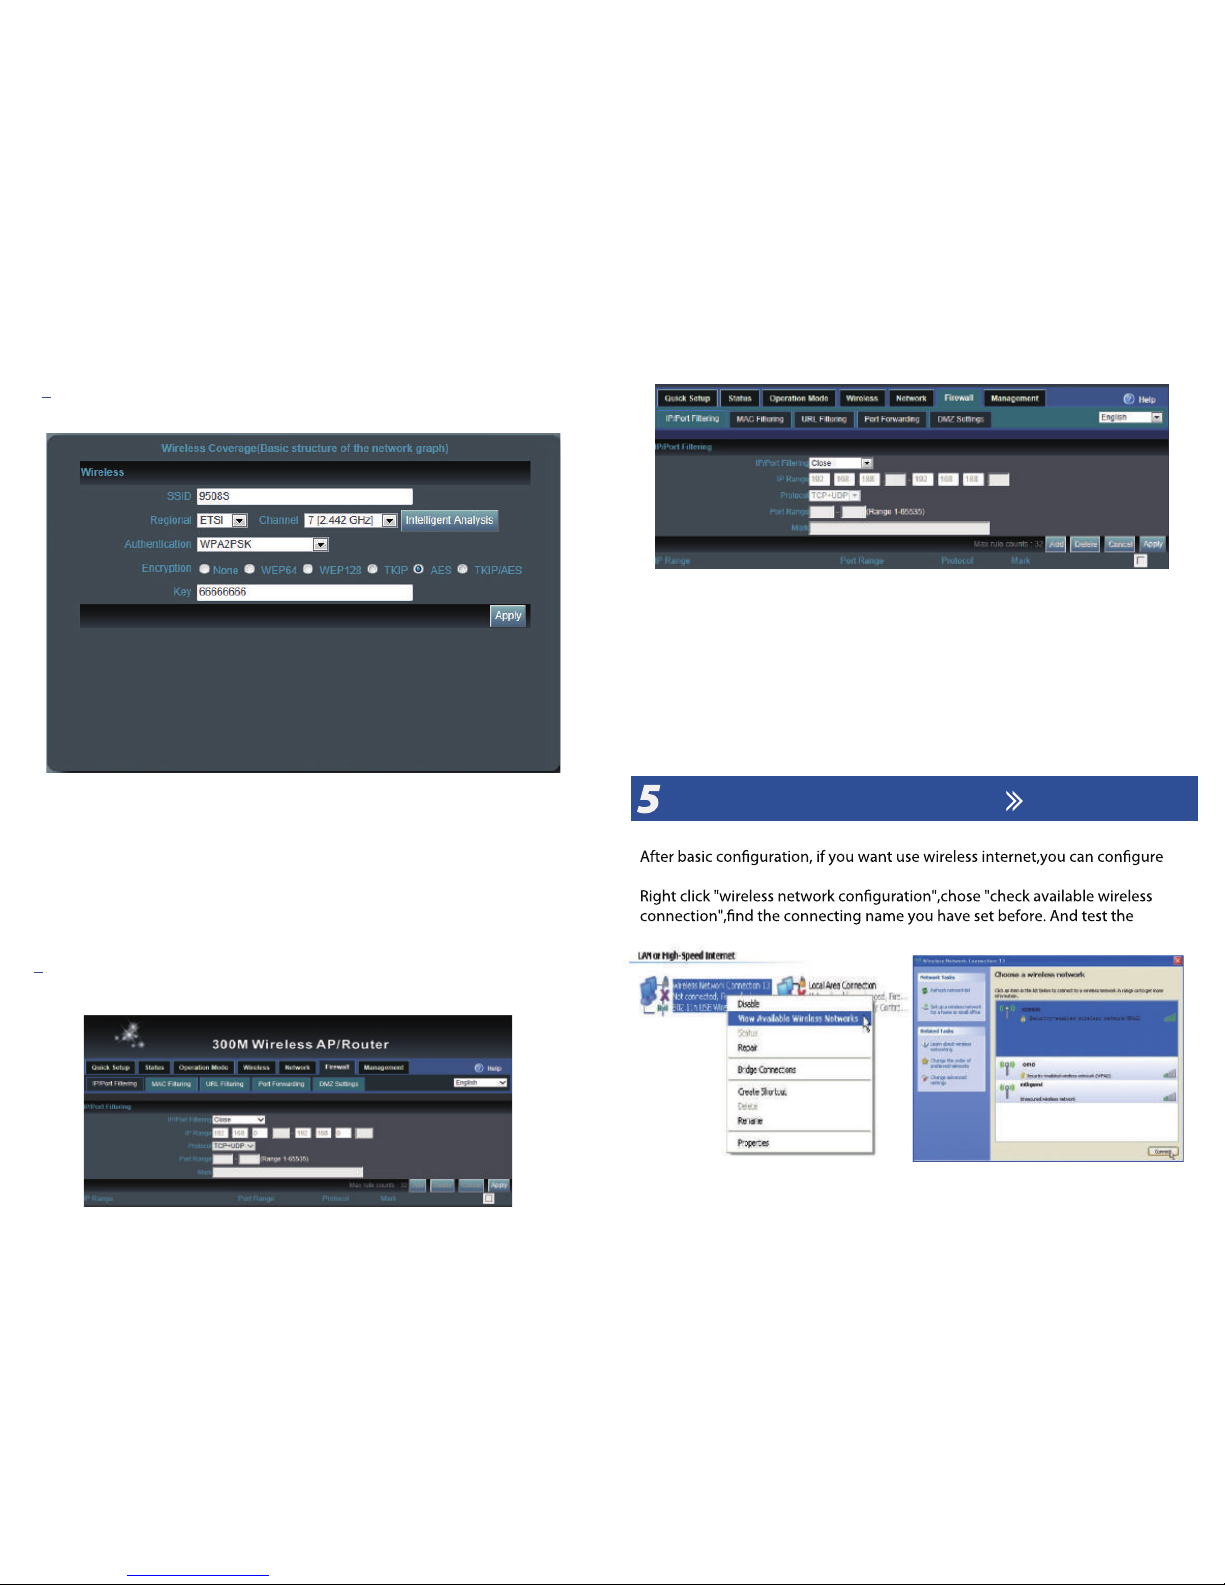
Test the Wireless Network
computer wireless connection as local connection settings mentioned above.
wireless network’s performance.
5
NOTE: In the mode, the DHCP Server is disable by default, the computer can get the IP
address from core router.
3. Click the Apply the System will reboot.
2. Wireless: setting the Wireless Network, such as SSID and Key of the netowrk.
- SSID : the name of wireless network
- Channel: Setting wi- signal channel, you can click the intelligent analysis,
here will show details of wireless networks nearby
- Authentication and Encryption: WPA2-PSK, AES is default
- Key: the password of wi- network
AP Mode
1. Choose the “Wireless Coverage”, that means AP will change to
AP
Mode:
Advances Setting
Choose the “Advances Setting”, you can set Firewall and Management function of AP:
IP/Port/MAC/URL Filtering: This feature is turned on, the router will be in accordance
with the ltering rules are selected for forwarding of data limitations. When the ltering
rules for [refuse], the router will refuse to forward data in accordance with the
conditions; when the ltering rules to [allow], the router will only transmit data i
n accordance with the conditions
Backup: Save the conguration le to your computer
Restore: Using the saved conguration le recovery conguration
Reset Default: Restore the factory default settings, please press this button
Reboot: Device will restart
Router, DDNS, QoS, User Logs, Upgrade Firmaware are also supports
Page 7
6
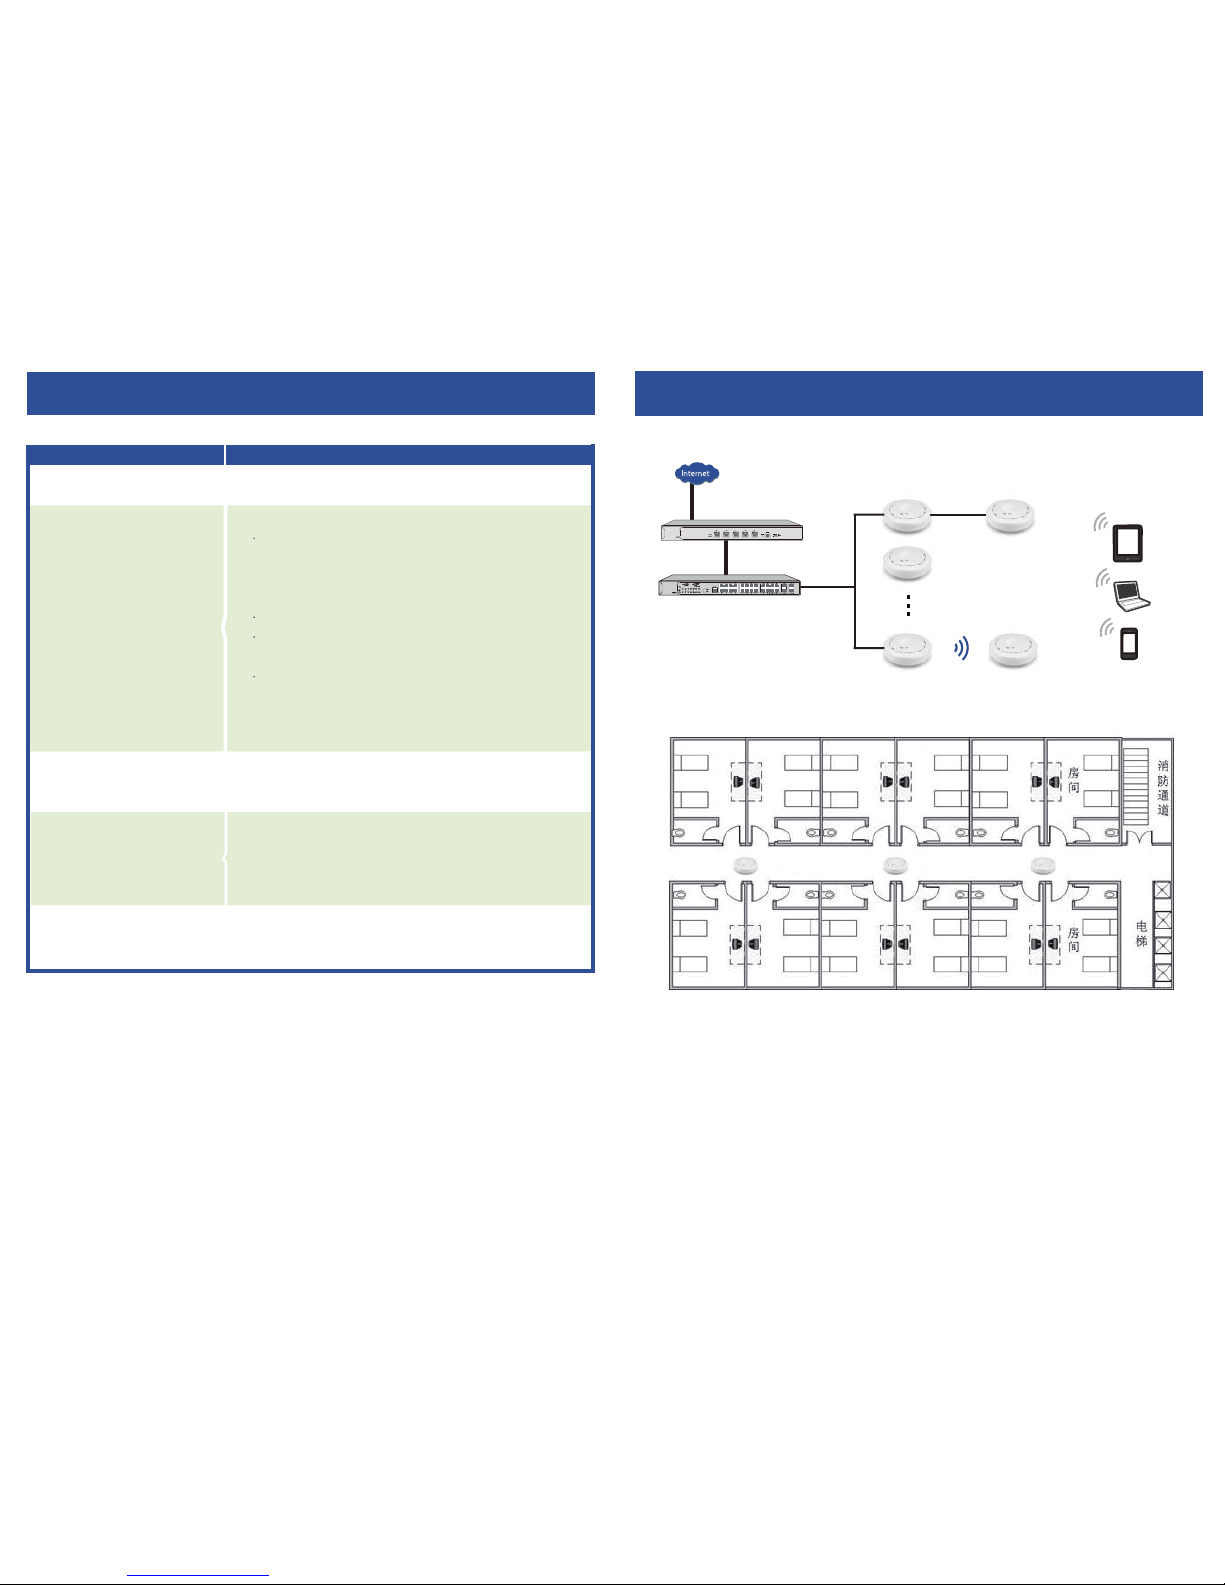
AP Deployment
Symptoms Treatment
Forget the login user
name and passwords
Can’t login AP
through WEB
management
Forget the AP’s SSID
and passwords
Forget the AP’s SSID
and passwords
No Power indicator
1. Check the AP’s DHCP and make it enable in
Gateway mode and WISP mode
2. Check the connection between AP and
the top networking in AP and Repeater mode
1. If DC Power, check the local power supplier
2. If PoE Power, check the PoE adapter and Internet
cable
Restore to factory default
Restore to factory default
Trouble Shooting Appendix I
Hotel Wireless Solution Appendix 2
1 Pls make sure the PC and AP’s IP Address
are in same network segment, can be checked
through Ping: PC start--input CMD in Run, then
ping 192.168.188.253
2 Login after Restore AP to factory default
3 Make sure there isn’t any equipment take IP
address of 192.168.188.253 in AP networking
4 Check your computer and network cable to
avoid any problem, recommend to use unshielded
twisted pair 10/100M Ethernet cable.
Topology
Router
AP Mode
AP Mode
AP Mode
Switch
Page 8
7
PoE Power Supply
Data
Power
PoE Power Supply Appendix 3
150Mbps Outdoor High Power Wireless Bridge/CPE
WISP mode and AP function can be using at same time
Wireless speed up to 150Mbps
Outdoor weatherproof protection design
12dBi Antenna to build long distance Wi-Fi connection
High Power to boost your signal coverage and link
Up to 60 meters (200 feet) Power over Ethernet Injector
The PoE power supply of Access Point, line 1.2.3.6 is using transfer the data,
and 4.5.7.8 is using transfer the power, 4.5 is “+”, 7.8 is “-”.
 Loading...