

Page 1
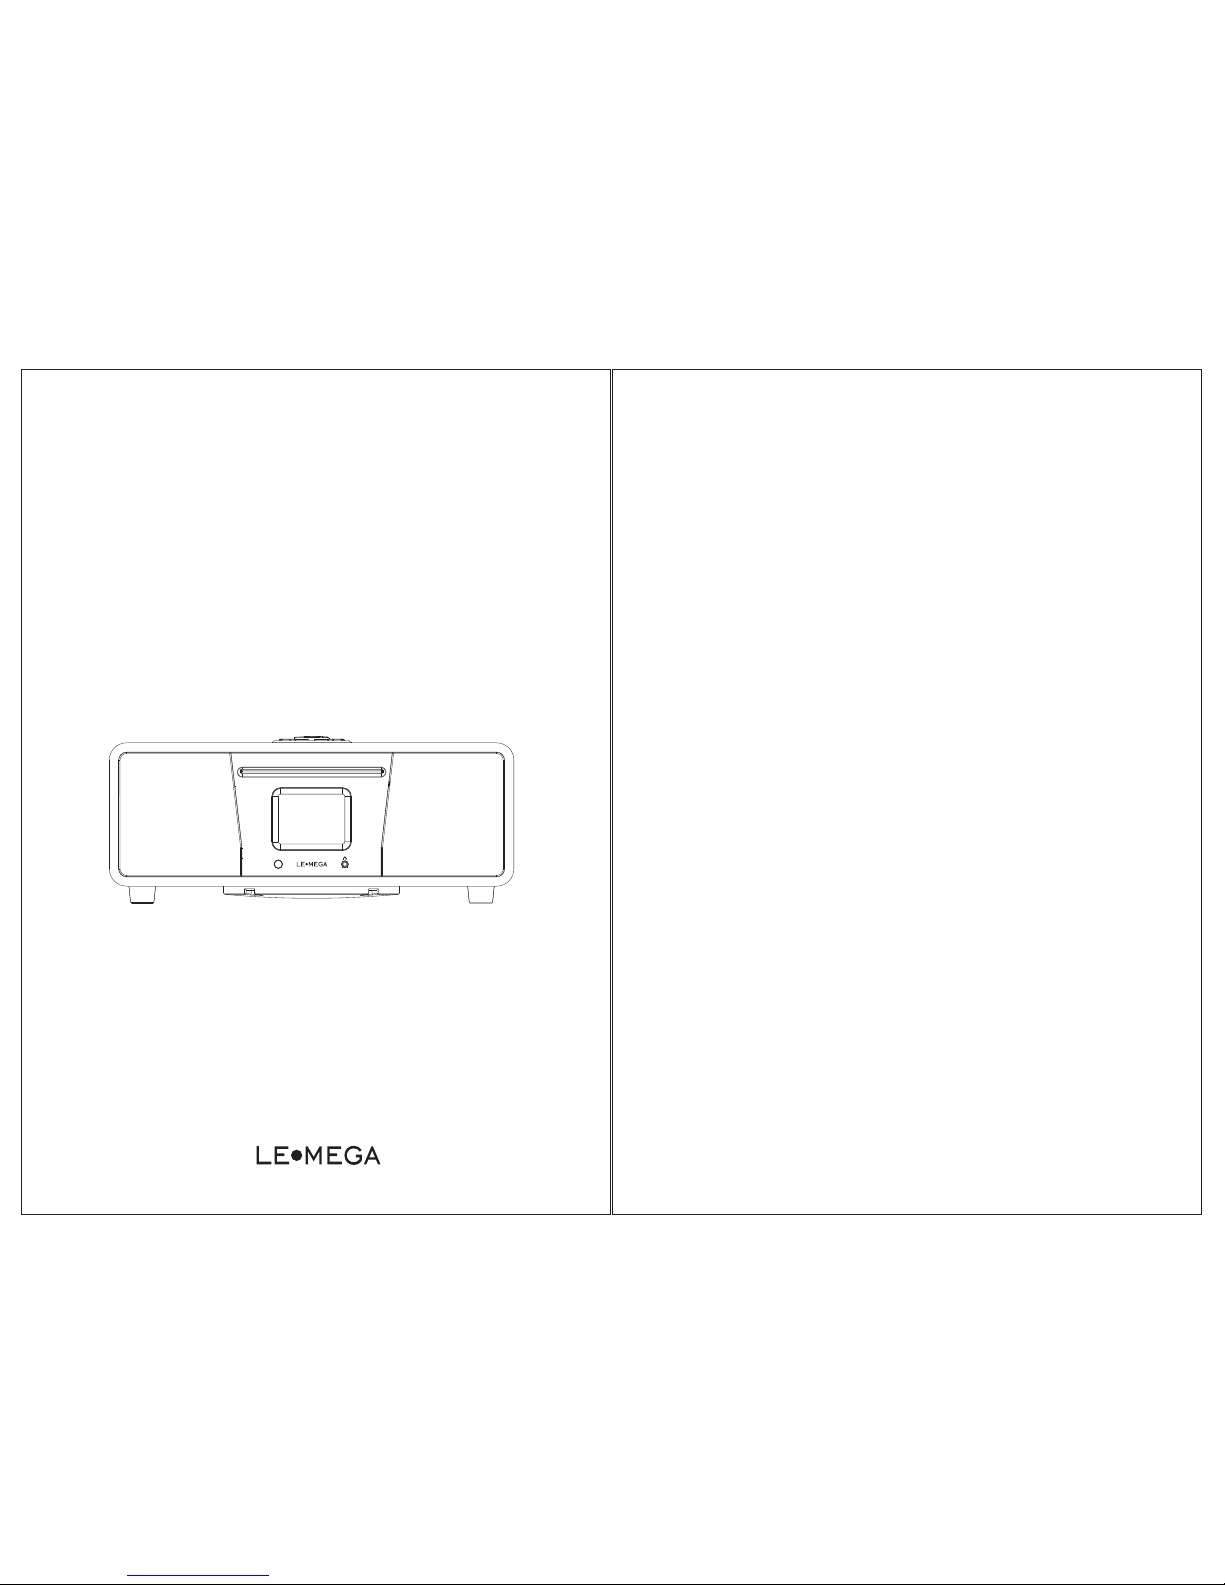
Owner’s Manual
Wireless Streaming Music System
CD/WiFi/DL NA/Spotif y/Interne t Radio/
DAB/DA B+/FM/AUX/Bluetooth
M4+
Table of cont en t
1 Introduction
1.1 Safety
1.2 Features
1.3 Carton contents
1.4 External resources
1.5 Conventions used in this manual
2 Controls, connectors and display
2.1 Main controls
2.2 Connectors
2.3 Remote control
2.4 Screens
2.5 Operation
2.6 Menu navigation
3 Started and setup
3.1 Setup wizard
3.2 Other settings
3.3 Internet radio portal registration
3.4 Setting up a music server
3.5 Sharing media with Windows Media Pla ye r
3.6 Setting up M4+ for “Play To” Wind ow s 7 st re am in g me di a fe at ur e.
4. Internet radio mode
4.1 Last listened
4.2 Presets
4.3 Favorites
4.4 Browse
4.5 Search
4.6 My added stations
4.7 Now playing information
5. Spotify Connect
6. Music player mode (network)
6.1Shared media (from UPnP me di a se rv er )
…… ……… …………… ……………01……… ………
…… ……… …………… ……………03……… ………
…… ……… …………… ……………04……… …
…… ……… …………… ……………04……
…… ……… ……………04……
…… ……… ……………04……
…… … ……… …………… …………04…… …
…… … ……… …………… …………06…… …
…… … ……… …………… …………07…… …
…… ……… …………… ……………08………
…… ……… …………… ……………10………
…… ……… …………… ……………10………
…… ……… …………… ……………11………
…… … ……… …………… …………11…… …
…… ……… …………14…………………… …
…… ……… …………15……… …
… … ……… ……17……… ……
… 17……… ……………
…18
…… …… ……… …………… …20…… ………
…… …… ……… …………… …19…… ………
…… …… ……… …………… ………20…… ………
…… …… ……… …………… ………20…… ………
…… … …………… …………20…… …………… …
…… …… ……… …………… ………21…… ………
…… … ………… ………21…… ………………
…… … ………… ………22…… …… …
…… … ……………22……… ……………
…… ……… …………… ……23……
……… …………… ……24
Page 2
6.2 USB playback
6.3 Playlists
6.4 Repeat/shuffl e
6.5 Now playing information
7 Using the “Play To” fe at ur e in W in do ws 7 t o st re am m ed ia
7.1 Use “Play To” in Wi nd ow s Me di a Pl ay er
7.2 Use “Play To” els ew he re i n Wi nd ow s 7
7.3 Now playing information
8 DAB radio mode
8.1 Scanning for stations
8.2 Selecting stations
8.3 Now playing information
8.4 Settings
9 FM radio mode
9.1 Selecting stations
9.2 Now playing information
9.3 Settings
10 Au x mo de
11 Bluetooth mode
12 CD playback
13 Alarms and sleep
13.1 Alarms
13. 2 Sleep
14 Software upgrade and factory reset
14.1 Software upgrade
14.2 Factory reset
15 Troubleshooting and error messages
15.1 Error messages
15.2 Troubleshooting
16 Tec hn ic al S pe ci fi ca ti on
…… ……… …………… …………25………… …
…… ……… …………… …………25………… …
…… ……… …………… …………26………… …
…… …… …………… ……………26…
………26
……… …………… ……26
……… …………… ………27
…… ……… …………… …………27……
…… ……… …………… …………27………… …
…… ……… …………… ……28……………
…… ……… …………… ………28………… …
…… ……… …………… …………29……
…… ……… …………… …………29………… …
…… ……… …………… …………29………… …
…… ……… …………… …………30………
……… …………… …………………30
…… ……… …………… …………30………… …
…… ……… …………… …………30………… …
…… ……… …………… ………31………… …
…… ……… …………… …………32……… …
…… ……… …………… …………33………
…… ……… …………… …………33………… …
…… ………33………………………………… …
…… ……… …34……… ……
…… ……… …………… …………34………
…… ………34……………
…… ………34……………
…… ……… …………… ………34………… …
…… ……… …………… …36…… ………
…… ……… …………… …38…… ………
1. Safety
1.1 Safety Instructions
Please store this instruction manual for future re fe re nc e.
Ÿ WARNING: To red uc e th e ri sk o f fi re o r el ec tr ic s ho ck , do n ot e xp os e th is
apparatus to rain or moisture. The apparatus sha ll n ot b e ex po se d to d ri pp in g
or splashing and that objects filled with li qu id s, s uc h as v as es , sh al l no t be
placed on apparatus.
Ÿ WARNING: Th e di re ct p lu g- in a da pt er i s us ed a s di sc on ne ct d ev ice, the
disconnect device shall remain readi ly o pe ra bl e.
Ÿ This lightning flash with arrowhead symb ol w it hi n an e qu il at er al t ri an gl e is
intended to alert the user to the presence of non-in su la te d “d an ge ro us
voltage” within the product's enclosur e th at m ay b e of s uff ic ie nt magnitude to
constitute a risk of electric shock.
Ÿ War ni ng : To red uc e th e ri sk o f el ec tr ic s ho ck , do n ot r em ov e co ve r( or
back) as there are no user-serviceable par ts i ns id e. R ef er s er vi ci ng t o
qualified personnel.
Ÿ The exclamation point within an equila te ra l tr ia ng le i s in te nd ed t o al er t
the user to the presence of important operating an d ma in te na nc e
instructions in the literature accompany in g th e ap pl ia nc e.
Ÿ Correct Disposal of this product. Thi s ma rk in g in di ca te s th at t hi s
product should not be disposed with other ho us eh ol d wa st es t hr ou gh ou t th e
EU. To prev en t po ss ib le h ar m to t he e nv ir on me nt o r hu ma n he al th f ro m
uncontrolled waste disposal, recycle i t re sp on si bl y to p ro mo te t he
sustainable reuse of material resource s. To ret ur n yo ur u se d device, please
use the return and collection systems or contact the r et ai le r wh er e th e
product was purchased. Th ey c an t ak e th is p ro du ct f or e nv ir on me ntal safe
recycling.
Ÿ No naked flame sources, such as lighted cand le s, s ho ul d no t be p la ce d
on the apparatus.
Ÿ Do not use this product near water or moisture.
Ÿ Cl ea n on ly w it h a dr y cl ot h.
Ÿ Un pl ug t hi s pr od uc t fr om t he w al l ou tl et b ef or e cl ea ni ng .
Ÿ Place th unit on a solid surface.
1 of 38
Page 3

3 of 38
Ÿ Do not put it in a closed bookcase or a cabinet that may kee p ai r fr om
flowing through its ventilation open in gs .
Ÿ Do not install near any heat sources, such as radi at or s, h ea t re gi st er s,
stoves or other appliances that produce he at .
Ÿ Protect the power cord from being walked on or pin ch ed , pa rt ic ul ar ly a t
plugs and the point where they exit from the produ ct .
Ÿ Servicing is required when the produ ct h as b ee n da ma ge d. D o no t at te mp t
to service this product yourself. Opening or remov in g co ve rs m ay e xp os e yo u
to dangerous voltages or other hazards. Plea se c on ta ct t he m an uf ac tu re r to
be referred to an authorized service center ne ar y ou .
Ÿ To prevent risk of fire or electric shock, avoid over load in g wa ll o ut le ts ,
extension cords, or integral convenien ce r ec ep ta cl es .
Ÿ Do not let objects or liquids enter the product.
Ÿ
Ÿ Use proper power sources. Plug the product i nt o a pr op er p ow er s ou rc e,
As described in the operating instructio ns o r as m ar ke d on t he p ro du ct
Ÿ .
Ÿ Changing sources while a CD is playing c au se s th e CD t o st op p la yb ac k.
Playback will resume when the source is set to CD ag ai n.
Ÿ
Ÿ The so un d qu al it y of MP 3, C D- R/ CD -R W, a nd e ve n commercially re co rd ed
discs c an var y g re at ly . Th e s am e ho ld s true fo r the s ou nd q ua li ty of port ab le
MP3 players.
Ÿ
Ÿ Do NO T us e an y C D le ns clea ni ng discs si nc e th es e ar e n ot d es ig ne d fo r
slot-load machines.
Ÿ Avo id b en di ng t he d is c wh en l oa di ng o r ej ec ti ng .
Ÿ
Ÿ Do not m ov e t he un it wh il e a di sc is pl ay in g a nd do not ship the unit w it h a
CD inside.
Ÿ
Ÿ Do not try to insert a disc in the slot if one is already inside the u ni t.
Ÿ
Ÿ Do not insert specially shaped discs or 3" CD “si ng le” d is cs .
You ma y expe ri en ce a d el ay in pl ay ba ck when ins er ti ng MP3 or W MA dis cs
while the player reads the directory.
Ÿ
Paper la be ls s tu ck t o CD -R /C D- RW s ma y be co me l oo se and poss ib ly d am ag e
the player.
Ÿ
Ÿ CDs with severe scratches may not play properly.
Ÿ Do not insert anything except a CD inside the load in g sl ot .
Ÿ In the rare event you exp er ie nc e a n erro r, unp lu g the powe r cord for 60
seconds and then plug it back in firmly.
1.2 Features
This manual describes how to use the M4+, an advan ce d bu t ea sy -t o- us e
Wi-Fi connected audio system with the followin g mo de s:
Ÿ
Ÿ Internet Radio with access to over 20,000 stations by wifi s tr ea mi ng o r
Wired Ethernet connected, 'Listen again' b ro ad ca st s an d po dc as ts .
Ÿ Spotify acting as wireless speakers controll ed b y th e Sp ot if y App
available for iOS/Android smart devices an d a de sk to p cl ie nt f or P cs .
Ÿ Music player allowing easy navigation an d pl ay ba ck t hr ou gh a U SB o r
network-stored library of music files incl ud in g AAC +, M P3 , WM A, WAV, an d
FLAC. Play To fea tu re a ll ow in g me di a to b e pu sh ed f ro m a PC r un ni ng
Windows 7 to M4+.
Ÿ DAB/DAB+digital radio with a wide choice of channe ls a nd d ig it al q ua li ty
sound broadcast free-to-air.
Ÿ FM with RDS (Radio Data System).
Ÿ Bluetooth: streaming music and control from smart devi ce .
• USB port: to play the MP3 music from USB stick storage device.
• Aux in or external MP3 music sources from iPod/iPad or other Mp3
players.
• CD playback: playback formats: audio CD, MP3 CD, WMA CD, CD-R a nd
CD-RW )
M4+ also provides the following features
Ÿ Large TFT c ol or d is pl ay f or e as y co nt ro l an d cl ea r in fo rm at io n di sp la y.
Ÿ Infrared remote control
Ÿ Remote control from an Android or iOS Smart Devic e, u si ng S po ti fy A pp o r
UNDOK the Frontier Silicon Remote Control App t o co nt ro l th e pl ay ba ck .
Ÿ Clock with auto-update capability and du al i nd ep en de nt a la rm s
Sleep/snooze.
2 of 38
Page 4

1
2
5
6
4
7
8
9
10
11
3
Ÿ UPnP Mu si c pl ay er m od es
Ÿ Multiple network profiles for easy setup and p or ta bi li ty.
Ÿ Multiple languages.
1.3 Carton contents
After you unpack the box, you will find the follow in g it em s:
Ÿ 1 M4+ unit
Ÿ 1 power cord
Ÿ 1 owner's manual
Ÿ 1 Remote Control
Ÿ 1 gloves
1.4 External resources
To operate M4+, the following external resou rc es a re n ee de d:
Ÿ A power source (100-240 V mains supply)
Ÿ A wireless (Wi-Fi) network (provided thro ug h a ro ut er ) wi th Ap pr op ri at e
permissions and password if necessary (f or I nt er ne t ra di o an d Ne tw or k Mu si c
player modes)
Ÿ Broadband Internet access (for Internet radi o mo de a nd S po ti fy m od e an d
Internet Software Update)
Ÿ A music library stored on the network or on a USB mass storage d ev ic e (f or
Music player modes),
Ÿ An iOS or Android device (for using control app s) .
Ÿ An external audio source (for Aux in mode)
1.5 Conventions used in this manual
Button (press) Physical button on the keypad
Option (select) Menu option shown on the display
Name Menu, screen or other name
2. Controls, connectors and display
2.1 Main controls
1. SELECT/ VOLUME/MUTE/SNOOZE:
POWER ON | OFF the unit: Long press this button to power on/off t he u ni t
2. SLEEP: When playing, press Sleep, M4+ will back to set slee p ti me . Wh en
playing, opens the sleep menu to set the time inte rv al b ef or e th e un it i s se t to
Standby mode. When alarm is sounding, allo ws y ou t o se t th e sn oo ze i nt er va l.
3. SOURCE: Press to Source to select diff er en t mo de s in te rn et r ad io , Sp ot if y,
My music, DAB, FM, Bluetooth, CD and Aux.
4. AL AR M: P re ss t o Ala rm , th e sc re en w il l di sp la y Ala rm 1 a nd Al ar m 2; t he n
Rotate and press the SELECT button to select alarm 1 or alar m 2 to s et u p.
5. INFO: Vi ew m or e in fo rm at io n ab ou t th e st at io n or t ra ck p la yi ng . Pr es s
again to cycle through further information scr ee ns t he n re tu rn t o th e no rm al
Now playing screen.
6. BACK/MENU:
a. BACK: press the BACK to return to the previous screen.
a. S EL EC T: Tur n to sc ro ll through a m en u or st at io n list. T he chosen o pt io n i s
highlighted in yellow text), Press to the button to se le ct .
b. VOLUME:Tur n to t he b ut to n to a dj us t th e vo lu me u p or d ow n wh en
playback.
c. MUTE: Press to the button to mute the music when playing.
d. SNOOZE: Press the button to snooze a set time when alarm soun di ng .
e. .
4 of 38
5 of 38
1
2
3
4
5
+
I
N
F
O
O
O
Z
N
E
S
Page 5
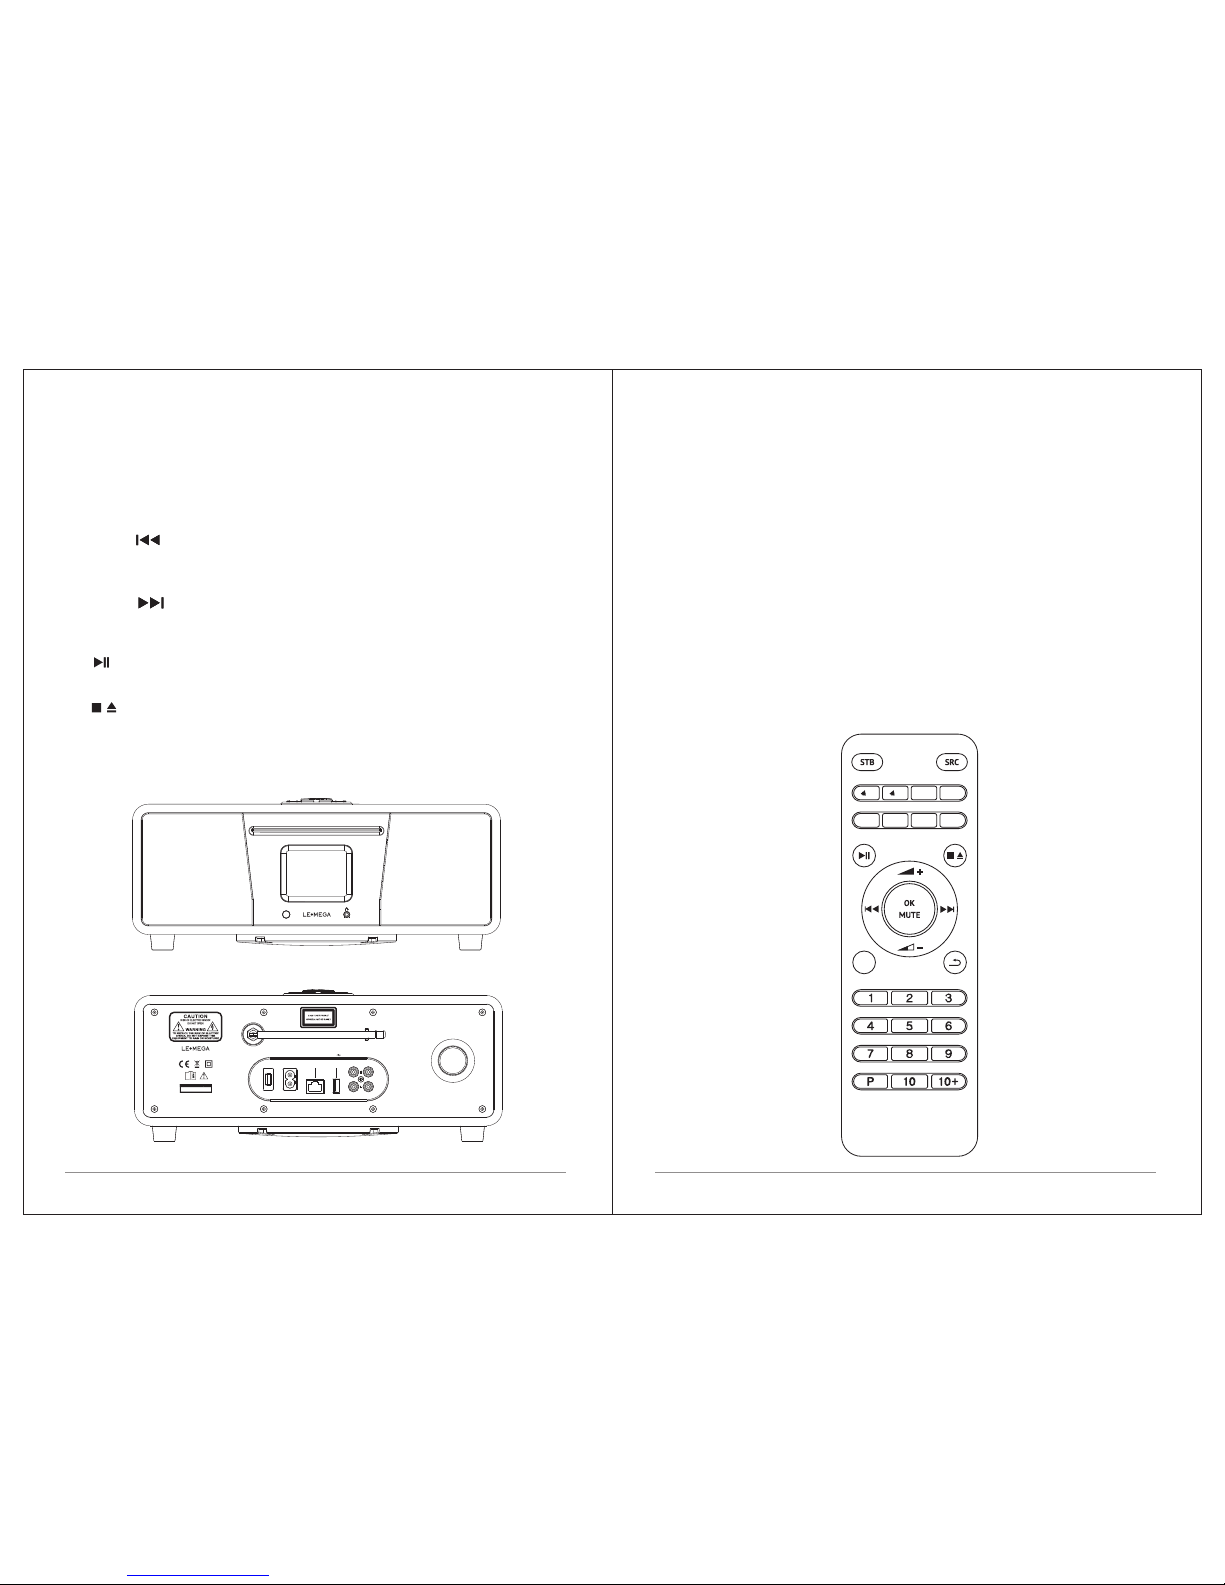
b. MENU: press the MENU to show the MENU for the current mode. Press
again to show now playing screen.
7. PRESET: Long press 1,2,3,4,5+ to preset and save the favo ri te s ta ti on s
(save 20 favorite stations); Short Press to 1,2,3,4,5+ to se le ct t he f av or it e
station or Preset recall. You ca n pr es et 2 0 st at io ns b y pr es s 5+ a nd b y sc ro ll
the preset list to achieve.
8. TUNE-/ : Previous: Press to select the previous track under FM/DAB /
Bluetooth/CD mode; Press and hold the Tun e- b ut to n 2 se co nd s to a ut o- sc an
the stations under the FM/DAB mode.
9. TUNE+/ : Next: Press to select the next track under FM/DAB/ Bluetooth
/ CD mode; Press and hold the Tune+ button 2 seconds to aut o- sc an t he
stations under the FM /DAB mode.
10. : Press to select Play/Pause under internet radio, Spo ti fy, My m us ic ,
Bluetooth and CD mode. In DAB and FM, press to do auto scan the statio ns .
11. In CD mode, Press to stop CD track. Press again for CD ejection.
2.2 Connectors
As shown below has connectors (from left to right) fo r th e fo ll ow in gs :
Ÿ Power switch
Ÿ Power input (100-240V)
Ÿ LAN for Wired Ethernet connect
Ÿ USB socket for USB stick with MP3 music playback (not for chargi ng ).
Ÿ Line out (to connect to an external amplifier or act iv e sp ea ke r)
Ÿ Aux in (to connect external MP3 music source from the iPod , or P ad o th er
device)
Ÿ Headphones out on front panel for the headph on e pl ay ba ck .
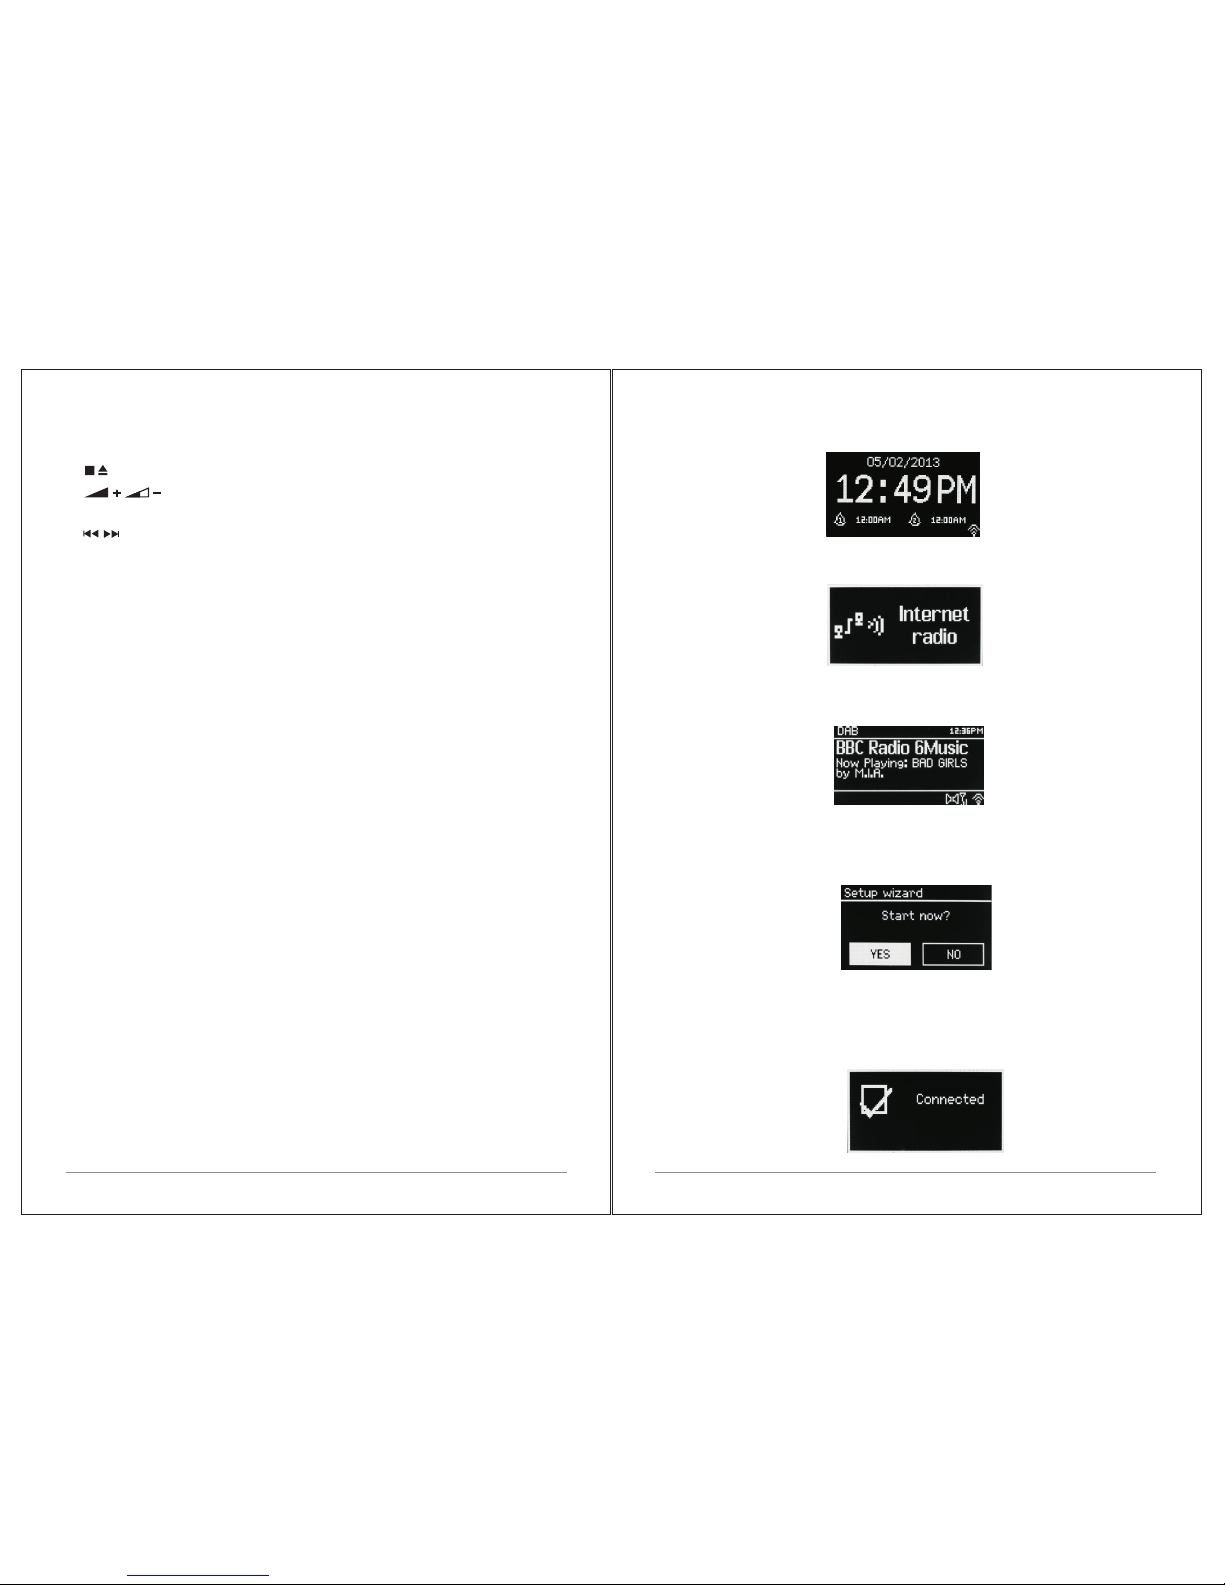
2.3 Remote control
In additional to duplicating most of buttons o n to p of t he u ni t, t he r em ot e
control adds the following functions:
1. 1, 2, 3, 4, 5, 6, 7, 8, 9, 10, 10+: Press to preset the favorite stations.The
presets recalled using the 1 through 10+ but to ns o n th e re mo te c on tr ol .
1
2
SLEEP
Z
Z
Z
PRG
MENU
SHUF
REP
INFO
6 of 38
7 of 38
M4+ HiFi MUSIC SYSTEM
100-240V~AC 50/60Hz 60W
POWER
LINE OUT
AUX IN
LAN
Engineered in UK and assembled in China
Manufacturer: LEMEGA Technology Co., Ltd
ADD: Shenzhen City, GD Province, China
USB
Page 6
9 of 38
The Standby screen shows the time, date and any active ala rm t im es .
A splash screen is displayed for each mode. Press sou rc e to c yc le t hr ou gh
the listening modes.
Now playing screens show information about the aud io s ou rc e an d tr ac k
now playing, where available.
Dialogue screens are shown to allow the user to chan ge s et ti ng s. T he y va ry
in complexity from simple Yes/ No o pt io ns u p to t he s cr ol la bl e ne tw or k
passphrase input screen.
The selected option is highlighted wit h a ye ll ow b ac kg ro un d. D ia lo gu e
screens mark the currently saved setting with an ast er is k (* ).
Error/Information screens give specific messag es f or a f ew s ec on ds , th en
change automatically to the next screen.
2. :Press to play / pause the playing under internet radio , Sp ot if y, My
music, BT mod e an d CD m od e. A ut o Sc an s ta ti on s un de r DA B an d FM m od e.
3. Press to stop CD playback, press again for CD ejection.
4. Press to volume up or volume down in playing screen. Press up
or down to select menu for settings.
5. / Press right or left to select mode. In pl ay in g sc re en , pr es s ri gh t or
left to select FM, DAB, internet radio or CD tracks.
6. P: Preset: To store an FM/DAB preset, press and hold Preset u nt il t he
display shows the Save preset screen. Select one o f th e 20 p re se ts t o sa ve
the currently playing station.
To select a preset, press Preset briefly, then select one of the l is te d Pr es et
stations. When a preset station is playing, it shows (*1 , *2 e tc ) in t he b ot to m
middle of the screen.
7. OK/MUTE: Long press the button to switch normal playi ng s cr ee n im ag e to
full screen slide show image.
8. PRG: for CD programme, adjust the diff er en t pl ay ba ck s eq ue nc es t o pl ay
tracks.
9. SHUF(Shuffle): with a CD playing, briefly press to play the t ra ck s in
random order. Press the Shuffl e bu tt on a s ec on d ti me t o ca nc el s hu ff le p la y.
10. REP(Repeat):With a CD playing, press once to rep ea t th e tr ac k be in g
played; Press twice to repeat the entire disc; Press aga in t o ca nc el t he
Repeat mode or press stop. Repeat 1 can not be used in c on ju nc ti on w it h
Shuff le .
2.4 Screens
The screen shows various menus, dialog ue s an d di sp la ys a s de sc ri be d
below. There are basically six types of screen :
Ÿ Standby (clock)
Ÿ Splash (mode)
Ÿ Now playing
Ÿ Dialogue
Ÿ Error/Information
Ÿ Menu
Where there is more text than can be fitted onto a screen, the text
automatically scrolls right to left after a brief pa us e.
8 of 38
u;
Page 7
11 of 38
Menu Screens – for details of menu screens see under S ec ti on 2 .7 M en u.
2.5 Operation
After the initial setup, M4+ is ready for operating in m os t Mo de s.
To select a Mode, press source until the required Mo de s pl as h sc re en i s
displayed. Press select button to that mode. Th e la st s ta ti on o r tr ac k
previously used in that mode is selected.
If this is not possible, M4+ scans for relevant stations , ne tw or ks , or p ro mp ts
the user for appropriate input. See the releva nt M od e se ct io n fo r de ta il s of
how to use each listening mode.
The Common local controls for sound volume , Mu te a nd P la y/ Pa us e ar e
available in all listening modes.
2.6 Menu navigation
The primary control for moving through menus a nd o pt io ns i s th e Se le ct
Control. Rotate the control to move up or down a menu. Onc e th e re qu ir ed
option or value is highlighted press the S el ec t Co nt ro l. Al l me nu s an d li st s ac t
as loops such that turning the control to go beyon d th e fi rs t or l as t en tr y in a
menu or list takes you to the opposite end of the menu or li st . So g oi ng u p fr om
the first entry in a menu will take you to the last option in the me nu , et c.
A “>” appears on the right of the screen if there a re m or e op ti on s ab ov e
or below those visible.
To enter the menu tree in a particular mode press Menu . To move b ac k a me nu
level press Back . To exi t th e me nu s ys te m, p re ss M en u ag ai n. E ac h mo de h as
a Mode menu, with options specific to that mode.
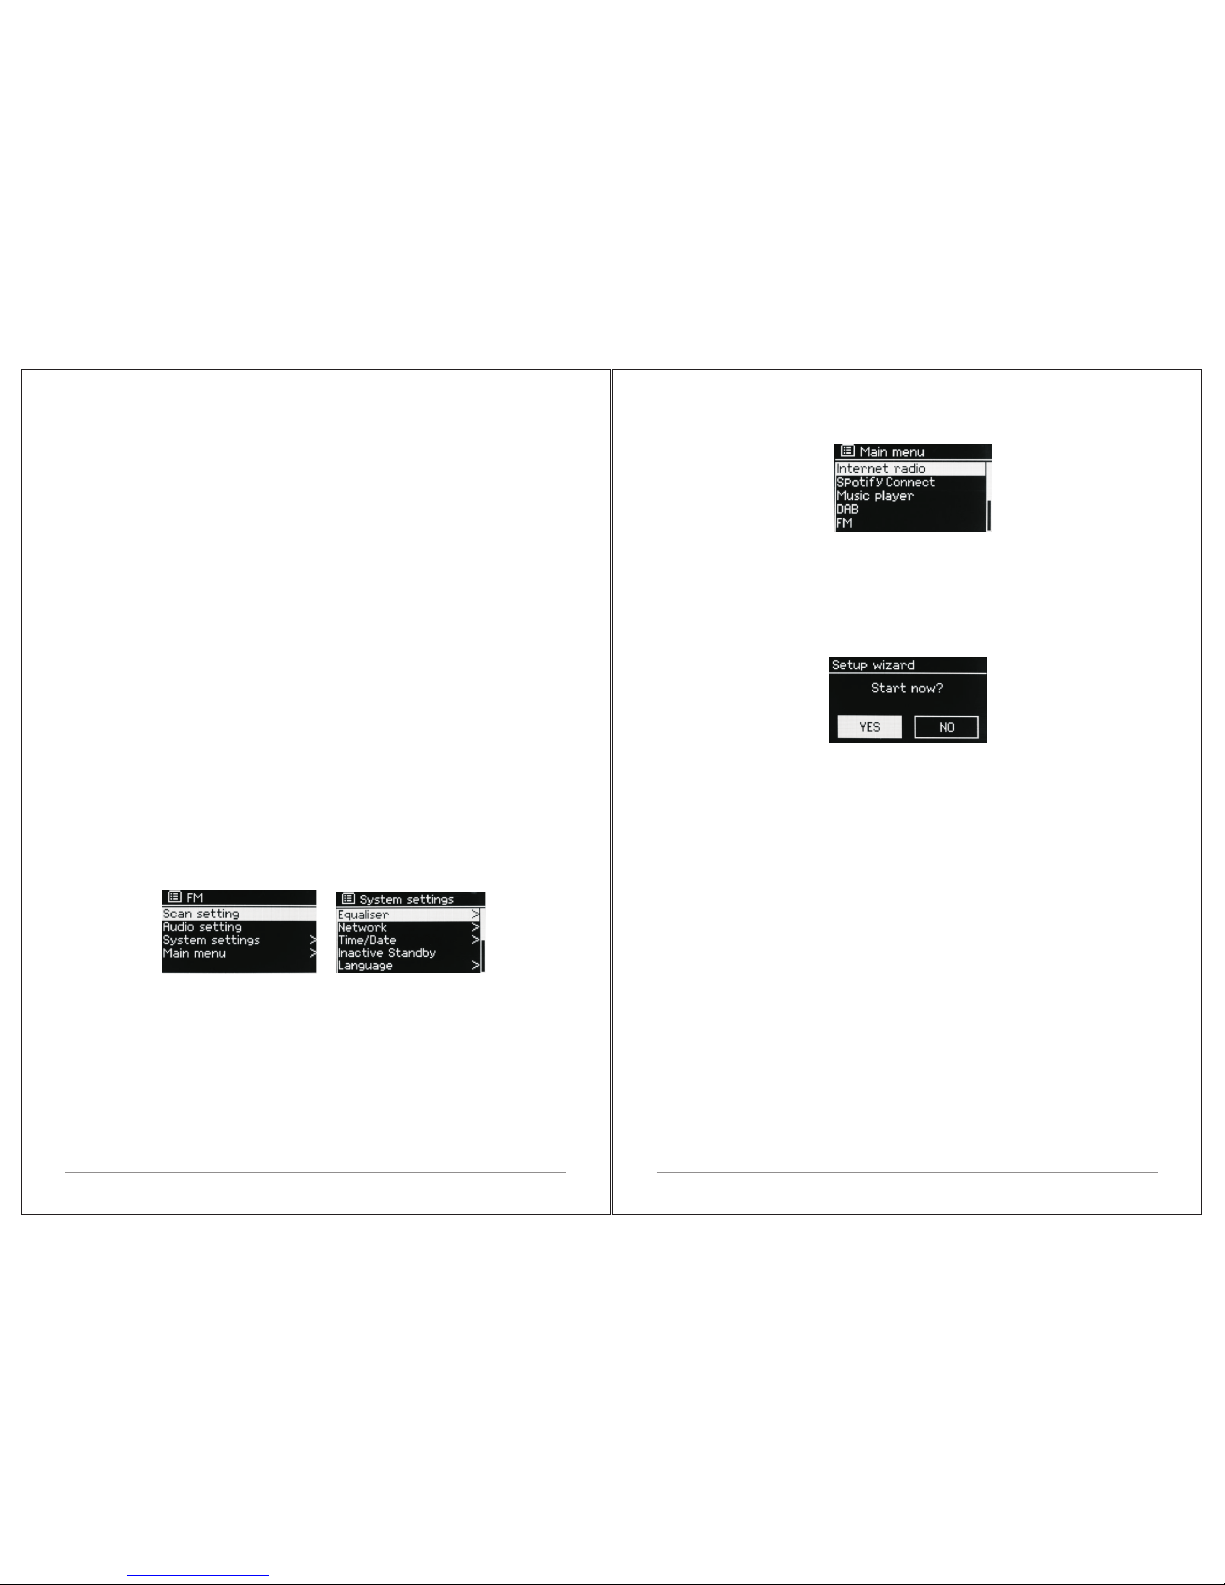
For example, the FM mode menu has two mode specific op ti on s: S ca n se tt in g
and Audio setting.
In addition, each mode menu has two final opti on s: S ys te m se tt in gs > a nd
Main menu >. The " >" indicates options leading to further menus.
The System settings menu presents system setting funct io ns t o al lo w th e us er
to setup how the unit behaves. Th is i nc lu de s Eq ua li ze r, ne twork time/ da te ,
language, factory reset and software update…….
The Main menu presents an alternative method for selecti ng l is te ni ng m od es
plus sleep and alarm functions.
3. Started and setup
M4+ is easy to use. To play DAB or FM radio, all you need is a power s ou rc e (a
100-240 V mains supply); For Music Player mode , yo u ne ed a w ir ed /w ir el es s
Ethernet network and a UPnP mus ic s er ve r (e .g . a PC ). F or I nt er ne tconnected modes such as Internet radio, you al so n ee d a br oa db an d In te rn et
connection.
3.1 Setup wizard
When M4+ is started for the first time, it runs through a setup wiza rd t o
configure settings for date/time and network . On ce t hi s ha s fi ni sh ed , th e
system is ready to use in most modes.
Note: To change these settings later, select Menu > Syst em s et ti ng s >.
To run the setup wizard again, select Menu > System settin gs > S et up w iz ar d.
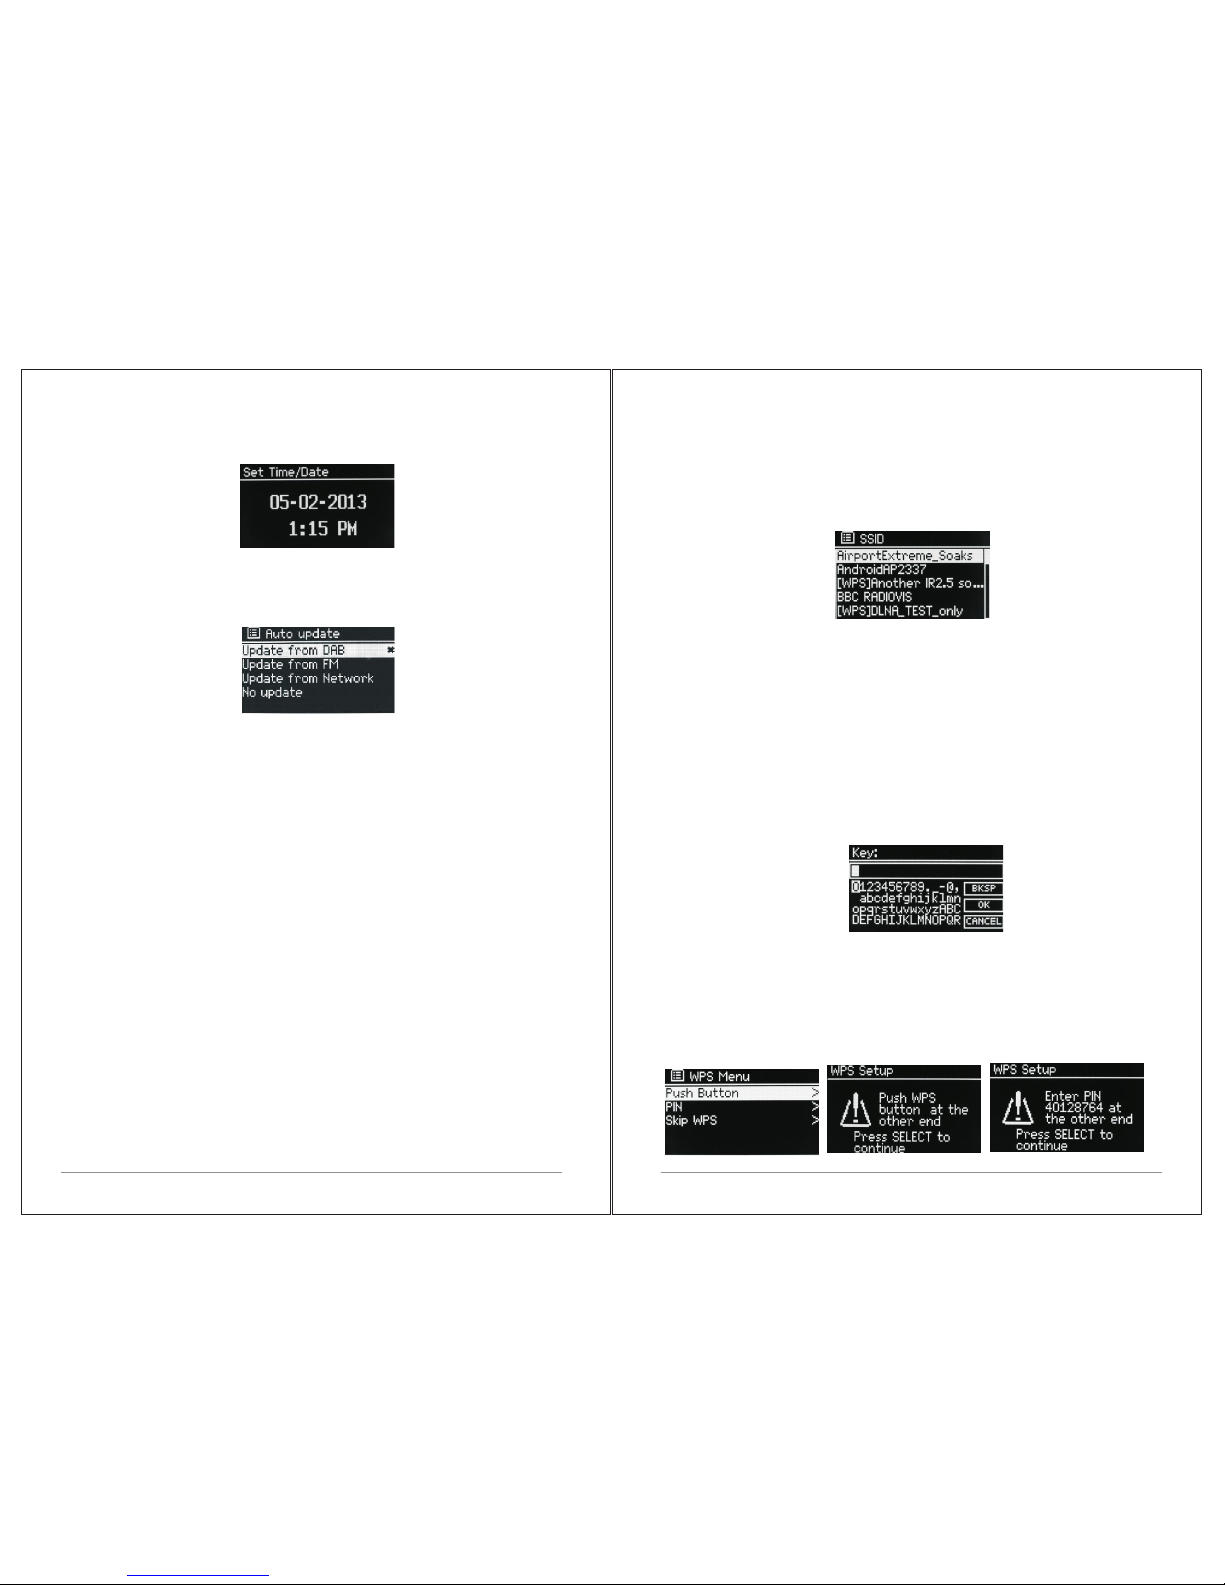
Select Yes to start the setup wizard.
If you choose No, the next screen asks if you would like to ru n th e wi za rd n ex t
time M4+ is started. The system then starts without configur in g ti me /d at e an d
network settings and enters the Main Menu.
Note: If power is removed while the wizard is in pro gr es s, t he w iz ar d wi ll r un
again next time M4+ is started.
3.1.1 12/24 hour display
To change between 12 and 24 hour display , se le ct S et 1 2/ 24 h ou r an d th en
select your preference.
3.1.2 Set Tim e/ Da te ( wi za rd )
The date and time are displayed as dd-mm-yyyy and hh :m m AM/ PM w it h th e
first value, dd, active (flashing).
10 of 3 8
Page 8
13 of 3 8
12 of 38
Adjust each value with the Select control. As eac h va lu e is s et b y pr es si ng t he
Select control, the next value becomes active re ad y fo r ad ju st me nt .
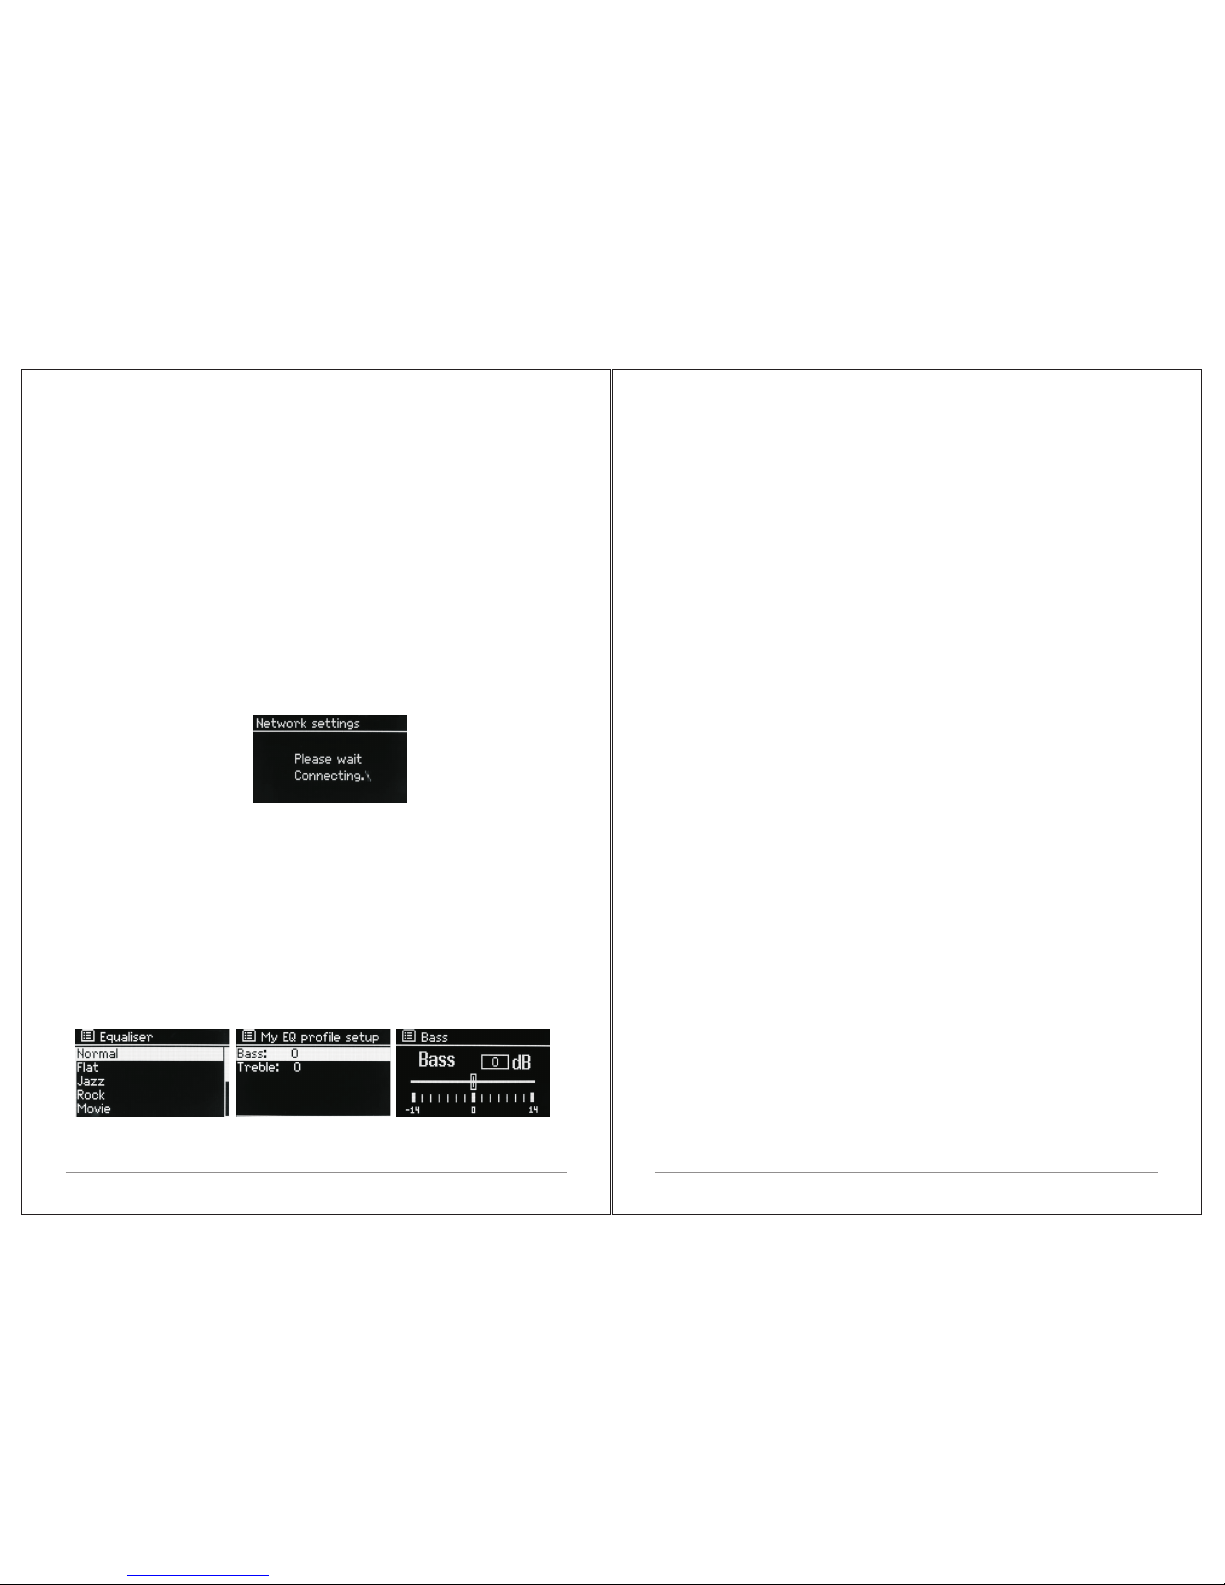
Auto-update
Auto-update w or ks with data s en t ov er DA B, FM or t he Inte rn et . T he clock is
only u pd at ed w he n in a co rr es po nd in g mo de , so it i s be st t o select a mo de y ou
use regularly.
DAB and FM use time signals broadcast with radio t ra ns mi ss io ns .
Network uses a time signal sent from the Internet radio po rt al w he n in a ny
network-connected mode.
1.Select Update from DAB, Update from FM, Update from Netw or k or N o
update.
2. If you are updating from the network, set your time zone.
3. If your country uses daylight saving, the automat ic al ly u pd at ed t im e fr om
the network may be wrong by one hour. When daylig ht s av in gs a re i n effect
(during the winter), turn on the Daylight savi ng s op ti on t o re ct if y th is .
Note that if you are updating the time from DAB or FM, the Dayli gh t sa vi ng s
option has no eff ec t on t he c lo ck 's t im e.
M4+ will auto-update from the selected sourc e wh en t im e in fo rm at io n is
available.
Manual set
If you set No update, the wizard now prompts you to set the time and d at e
manually.
The date and time are displayed as dd-mm-yyyy an d hh :m m AM/ PM w it h th e
first value, dd, active (flashing).
Adjust each value with the Select control.
As each value is set, the next value becomes active an d fl as he s.
3.1.3 Network
M4+ is compatible with all common network prot oc ol s an d en cr yp ti on
methods, including Wi-Fi Protected Setup (WPS) .
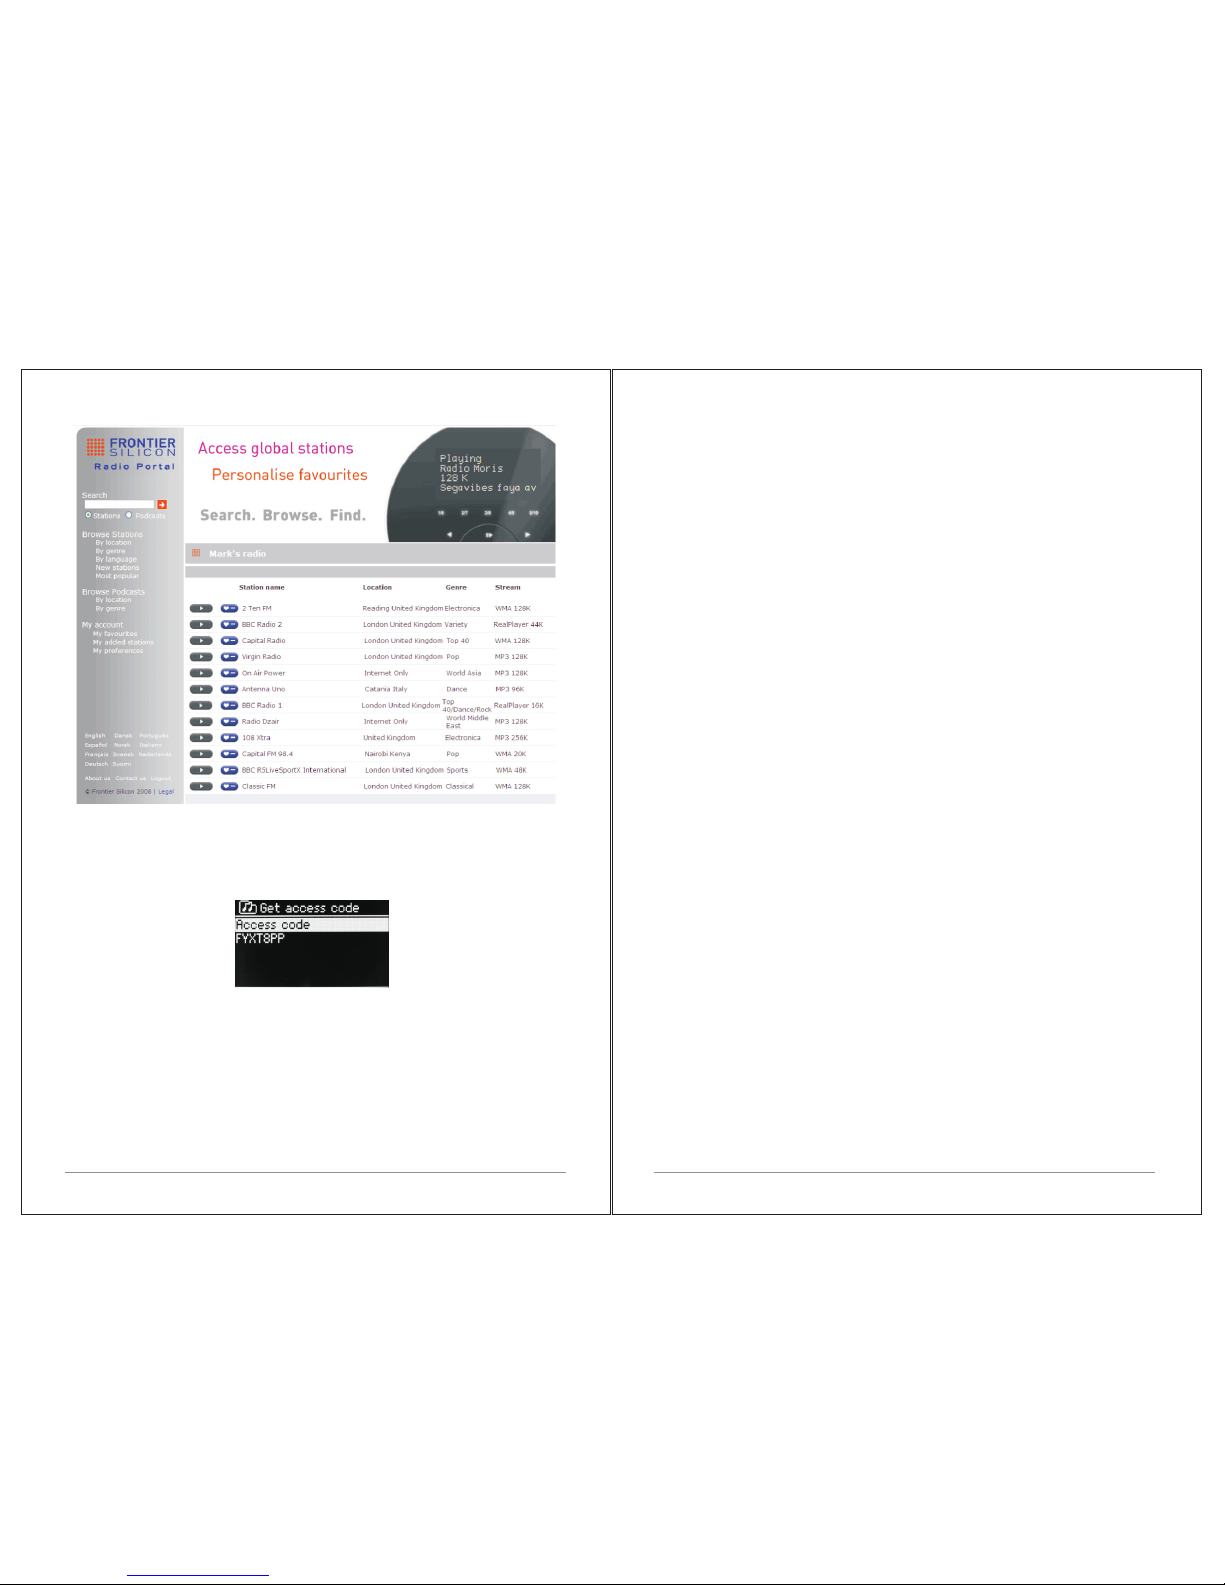
To c on ne ct M4+ to your ne tw or k, you ne ed a W i- Fi wire le ss rout er, together
with pass wo rd ke y i f s et Se le ct WL AN re gi on /c ou nt ry >Wi-Fi network (S SI D) ,
and then select a network from the list.
If the n et wo rk is o pe n (n on -e nc ry pt ed ), M4+ co nn ec ts and no further details
are required; see Completion below.
Standard encrypted network
To en te r t he ne tw or k’ s k ey (p as sw or d) , u se th e Select control t o h ig hl ig ht th e
next rele va nt cha ra ct er and pres s to se le ct each ch ar ac te r in turn. A s each
character is selected, the key is built up near the top of the d is pl ay.
The t hr ee options – B ac ks pa ce, OK an d Ca nc el ar e includ ed in the se le ct io n
loop.
These can be accessed just using the Select contro l, o r, a sh or t cu t Is
available, pressing the Info key, wh ic h mo ve s th e se le ct io n hi ghlight to the
Back Space option.
WPS setup
WPS e nc ry pt ed networks a re identifie d b y ‘[ WP S] ’ at t he start of the ne tw or k
name, a nd ha ve tw o met ho ds of connection. Select one a nd fo ll ow th e
prompts. Wh en us in g the n et wo rk wi za rd an additional o pt io n t o Skip WP S i s
available.
Select one and follow the prompts:
Page 9
14 of 3 8 15 of 3 8
Ÿ Push Button
M4+ prompts you to press the connect button on the route r. It the n pr es s th e
select control.
Ÿ Pin > (code number)
M4+ generates an 8-digit code number whi ch y ou e nt er i nt o th e wi re le ss
router, access point.
Ÿ Skip WPS >
Enter key as for a standard encrypted network, abo ve . Fo r mo re i nf or ma ti on
on setting up a WPS encrypted network, see your WPS router ’s i ns tr uc ti on s.
On completion
M4+ connects to the selected network.
If connecting fails, M4+ returns to a previous scree n to t ry a ga in . To e xi t th e
process use the Back/Menu button.
3.2 Other settings
Sections for those modes. Common settings are cove re d be lo w.
3.2.1 Equalizer
Several preset EQ modes are available; als o a us er -d ef in ed s et ti ng ( My E Q) .
To choose an EQ setting, select Menu >System settings > Equa li ze r. Y ou c an
then choose from a variety of preset modes and My EQ
The last option ‘My EQ profile setup’ allows you t o de fi ne y ou r ow n se tt in gs
for the ‘My EQ’ option, with custom bass, and treble setti ng s.
3.2.2 Network
M4+ remembers the last four wireless networks it h as c on ne ct ed t o, a nd
automatically tries to connect to whicheve r on e of t he m it c an f in d. Y ou c an
3.2.3 Language
The default language is English. To cha ng e, s el ec t Me nu > S ys te m settings
> Language >then select your language.
3.2.4 Connection your smartphone with the radio via UNDOK APP
To connect your Smartphone with M4+ you need to down lo ad t he f re e ap p
“UNDOK“ from Apple Store or Google Play Store. IMPORTA NT : Th e ph on e
must be in the same wireless network as the music system .
Ÿ Download the app and open it.
Ÿ The app automatically searches for avail ab le d ev ic es . Se le ct “L EM EG A
M4+” from the list.
Ÿ Open SOURCE to choose between diffe re nt i np ut s ig na ls .
Ÿ Open BROWSE to get a list of available stations. Select the desired station.
Ÿ Open NOW PLAYI NG t o ge t mo re i nf or ma ti on a bo ut t he c ha nn el .
Ÿ Open the settings to adjust the equalizer, set slee p ti me r an d ot he r
functions easily.
3.3 Internet radio portal registration
M4+ uses the Frontier Silicon Internet radio por ta l we bs it e th at a ll ow s yo u to
organize your favorite's lists and also list en t o In te rn et r ad io o n a co mp ut er.
see the list of registered networks through Menu > S ys te m se tt in gs > Ne tw or k
> Network profile >From here you can delete unwa nt ed n et wo rk s by t ur ni ng
and pressing Select then confirming dele te Yes .
There are also other options for viewing and m an ua ll y al te ri ng n et wo rk
settings from Menu > System settings > Network > (for exampl e se tt in g up a
wired network).
Users experienced with networking ma y fi nd t he se o pt io ns u se fu l fo r
diagnosing and fixing network prob le ms .
Page 10
16 of 3 8 17 of 3 8
Ÿ access code,
Ÿ
Ÿ your e-mail address,
Ÿ
Ÿ passphrase,
Ÿ
Ÿ radio model (M4+).
If yo u al re ad y ha ve an a cc ou nt and wish t o ad d an addi ti on al r ad io , log in to
your account and select My preferences > Add another Wi-Fi radio.
Once your radio is registered with the portal, you c an i mm ed ia te ly u se t he
Internet radio favorites and added station s fe at ur es .
3.4 Setting up a music server
In order for M4+ to play music files from a computer, the computer m us t be s et
up to share files or media.
UPnP me di a sh ar in g al lo ws d ev ic es l ik e M4 + to p la y mu si c fr om a shared
media library navigating through tag men us s uc h as Ar ti st , Alb um o r Ge nr e. I f
you are running a suitable server system such as a PC wi th W in do ws M ed ia
Player 10 or later (WMP), and your music library is we ll -t ag ge d, t he n it i s
recommended to use media sharing. Only the U Pn P ser ve r ne ed s to b e set
up.
Notice: iTu ne s do es n ot c ur re nt ly w or k as a U Pn P me di a se rv er, b ut t he re a re
add-ons available to work with an iTu ne s li br ar y.
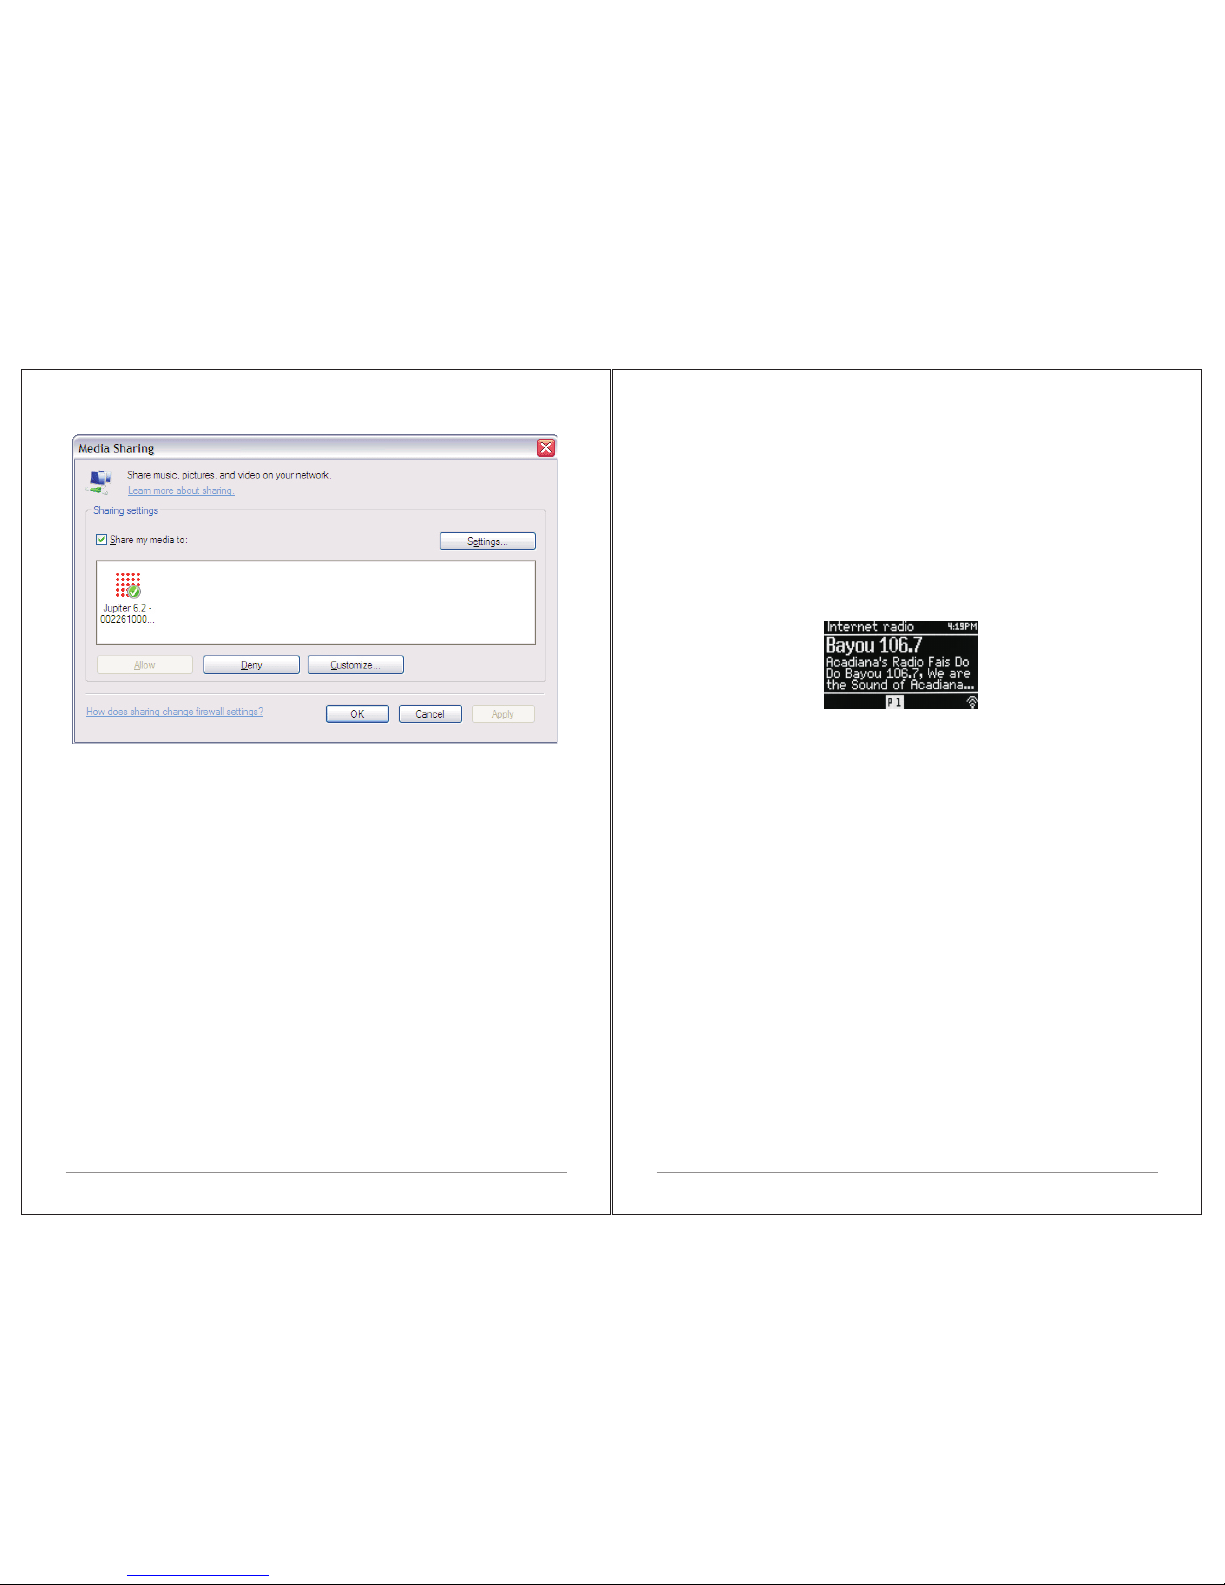
3.5 Sharing media with Windows Media Player
The most common UPnP se rv er i s Wi nd ow s Me di a Pl ay er ( 10 o r la te r) .
Alternatively, oth er U Pn P pl at fo rm s an d se rv er s ma y be u se d. To se t up W MP
for media sharing, perform the following ste ps :
1.Ensure that the PC is connected to the network.
2.Ensure that the radio is powered on and conn ec te d to t he s am e ne tw or k.
3.In WMP, add t o th e me di a li br ar y th e au di o fi le s an d fo ld er s yo u wa nt t o
share with M4+ (Library > Add to Library…).
4.In WMP, ena bl e me di a sh ar in g (L ib ra ry > M ed ia s ha ri ng…) .
Notice: setup can diffe r de pe nd in g on w hi ch v er si on o f WM P yo u ha ve .
Notice: it may show; M4+, “Unknown device”, “Frontier Sili co n” or t he J up it er
logo as shown below.
To register your M4+ with the portal, switch to Internet rad io m od e an d th en
obtain your radio's unique portal acce ss c od e by s el ec ti ng M en u >S ta ti on l is t
> Help > Get access code >Wri te d ow n th e ac ce ss c od e.
Note: The d is pl ay ed a cc es s co de i s on ly v al id f or a f ew m in ut es . If y ou f ai l to
register your radio within the time window y ou w il l ne ed t o re pe at t he a bo ve
step to get a new access code and try again. Do not confuse th e po rt al a cc es s
code with the Radio ID (from Menu > System settings > Info.)
Vis it t he p or ta l we bs it e at w ww. wi fi ra di o- fr on ti er. co m.
If this is your first visit to the portal, register for a new account, ent er in g th e
following information:
Page 11
18 of 3 8 19 of 3 8
Make sure that the radio has access to the shared medi a by s el ec ti ng i t an d
clicking Allow.
You ca n al so s et a n am e fo r th e sh ar ed m ed ia i n Se tt in gs… C li ck O K to c lo se
the dialogue boxes.
The PC is now ready to stream the music to the radio. The WMP UPnP servi ce
runs in the background; there is no need to start WMP expl ic it ly .
3.6 Setting up M4+ for “Play To” Win do ws 7 s tr ea mi ng m ed ia f ea tu re .
To set-up M4+ to be controlled and to stream music via Windo ws M ed ia P la ye r
12 (Windows 7 only), perform the following steps :
1. Ensure that the PC is connected to the network.
2. Ensure that M4+ is powered on and connected to the sa me n et wo rk .
Note: M4+ must be in an Internet radio mode to be detected
3. From the Windows 7 main screen, select Start > Devices an d Pr in te rs .
4. Select the Add a device tab in the top left of the Devices and P ri nt er s
window and follow the instruction prom pt s gi ve n by t he w iz ar d.
In the Devices and Printers window a icon *) wil l ap pe ar a nd y ou a re n ow
ready to stream your Windows media music files to M4 +.
*) To change the name of your device, right click on ico n an d ch oo se
properties. Then choose UPnP an d cl ic k on “d ev ic e we bp ag e”.
4. Internet radio mode
M4+ can play thousands of radio stations and pod ca st s fr om a ro un d th e wo rl d
though a broadband Internet connection .
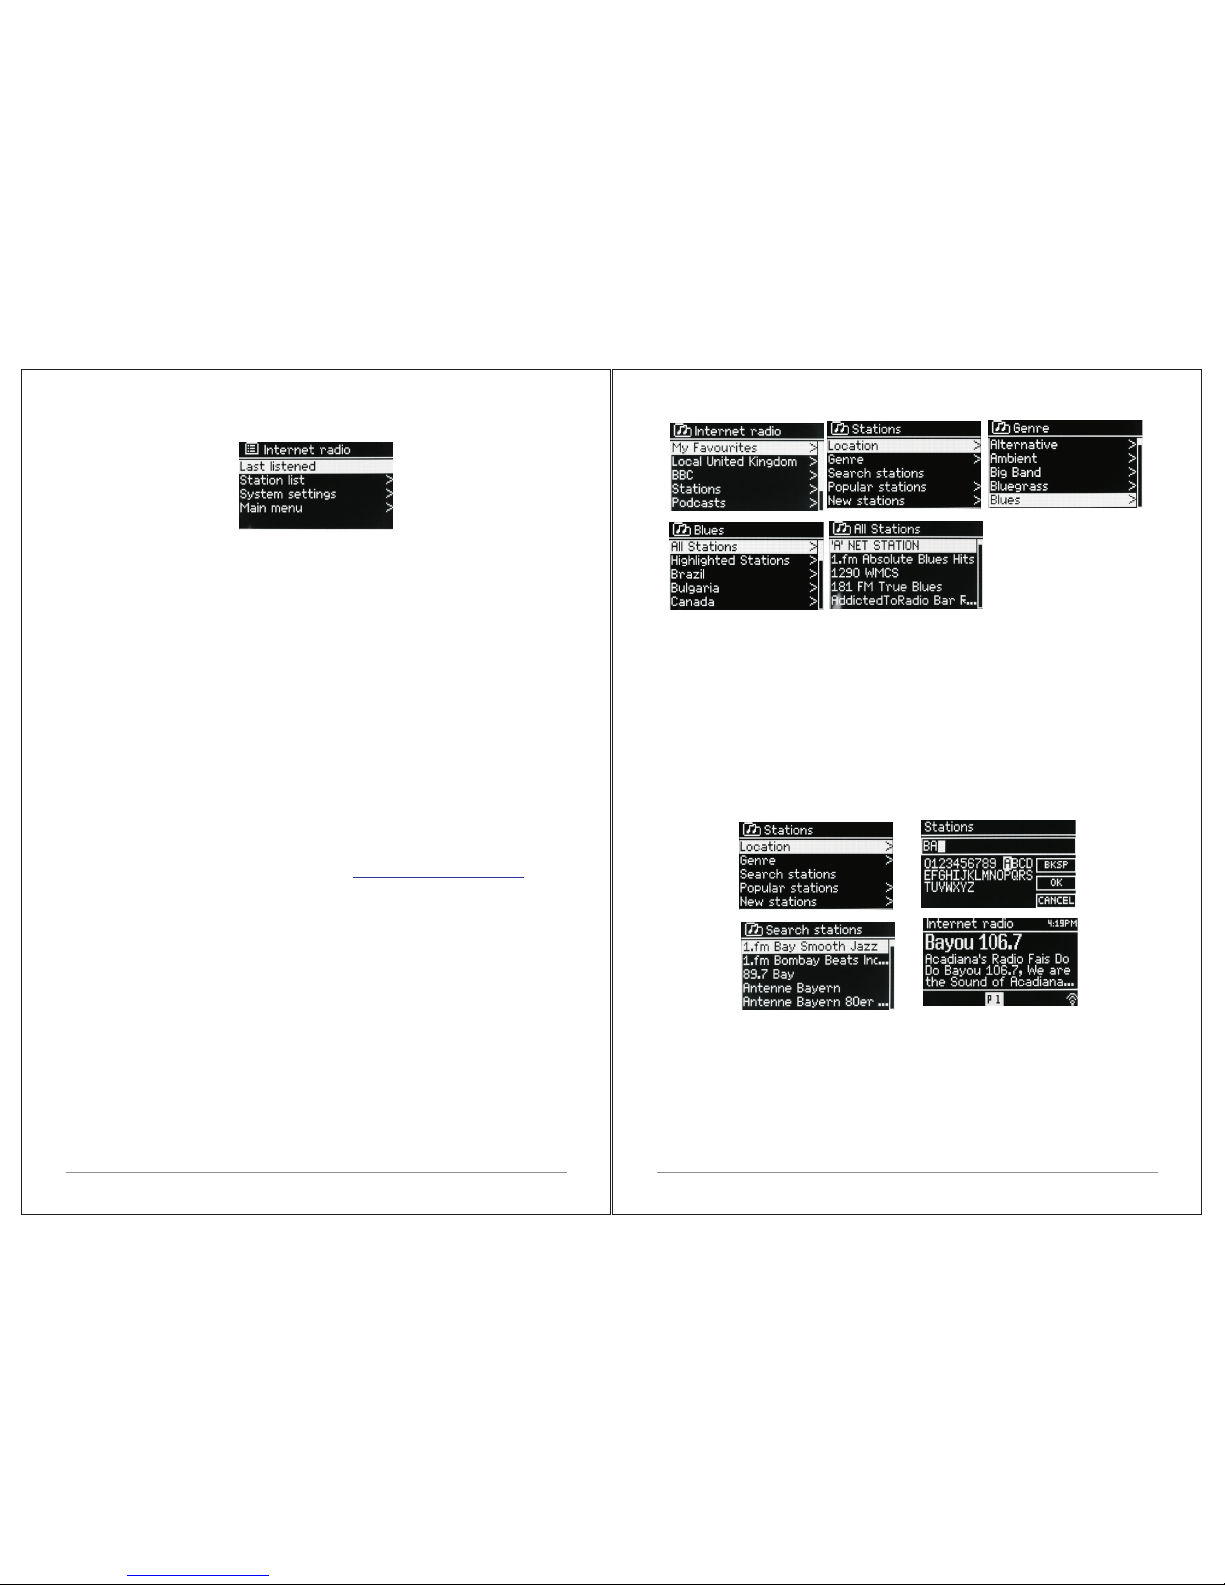
When you select Internet radio mode, M4+ contacts the Fr on ti er S il ic on
Internet radio portal to get a list of stations, organiz ed i nt o di ffe re nt
categories like Country, Most popular and Ge nr e.
Once you select a station, M4+ connects directly to that stati on .
The portal also enables multiple lists of favo ur it e st at io ns t ha t yo u ca n
personalise, for example Andy's station s, J o' s fa vo ur it es , Talkshows. To use
the favourites feature, register your radio wi th t he p or ta l we bs it e. I f yo u ha ve
several Frontier Silicon radios, you can reg is te r th em a ll o n th e sa me a cc ou nt
so that each radio has access to your favourite's li st s. I t is p os si bl e to a dd
favourites either directly through M4+ or thro ug h an y co mp ut er w it h a we b
browser.
To enter Internet Radio mode, either press Mode un ti l th e di sp la y sh ow s
Internet Radio or select Menu >Main menu > Interne t Ra di o.
Note: The s ta ti on l is t me nu i s pr ov id ed f ro m th e In te rn et r ad io p or ta l, so it is
only accessible when M4+ is connected to the Inter ne t. S ta ti on l is ts a nd
submenus may change from time to time.
There are several ways of selecting stations .
Directly from the radio:
Ÿ Last listened
Ÿ Presets
From the portal through the Menu > Station list> menu:
Ÿ Favourites lists
Ÿ Browse by Country, Gen re , Mo st p op ul ar, N ew es t
Ÿ Search by keyword
Ÿ My added stations
Page 12
20 of 3 8 21 of 3 8
4.1 Last listened
When Int er ne t radi o mod e rest ar ts , the las t- li st en ed sta ti on is sel ec te d. To
select a no th er r ec en tl y used st at io n, s el ec t M en u > La st li st en ed t he n one o f
the stations listed. Most recent stations appear a t th e to p of t he l is t.
4.2 Presets
Presets are stored in the radio and cannot be acce ss ed f ro m ot he r ra di os .
To store an Internet radio preset, press and hold Pr es et u nt il t he d is pl ay
shows the Save preset screen. Select one of the preset s to s av e th e cu rr en tl y
playing station.
To select a preset, press Preset briefly, then selec t on e of t he l is te d pr es et
stations.
When a preset station is playing, it shows ☆1,2,3 etc in th e bo tt om m id dl e of
the screen. Note: Operation of presets is identica l fo r In te rn et r ad io , DA B an d
FM.
4.3 Favourites
Favourites are stored on the Internet radio port al . Be fo re y ou s et u p an
account on the portal from its We b in te rf ac e ( ), the
favourites are associated solely with the ra di o on w hi ch y ou s et t he m. Af te r
you set up a portal account, all the favourites from you r di ffe re nt r ad ios are
merged into a combined favourites list. Thi s co mb in ed l is t is a vailable to all
the radios on your account.
To store a playing station as a favourite, press and h ol d Se le ct u nt il t he
display shows 'Favourite added'. The stati on a pp ea rs i n th e de fa ul t fa vo ur it es
list Stations.
To select a favourite, select Menu > Station list > My favourites > [Favou ri te s
list] > [Station].
4.4 Browse
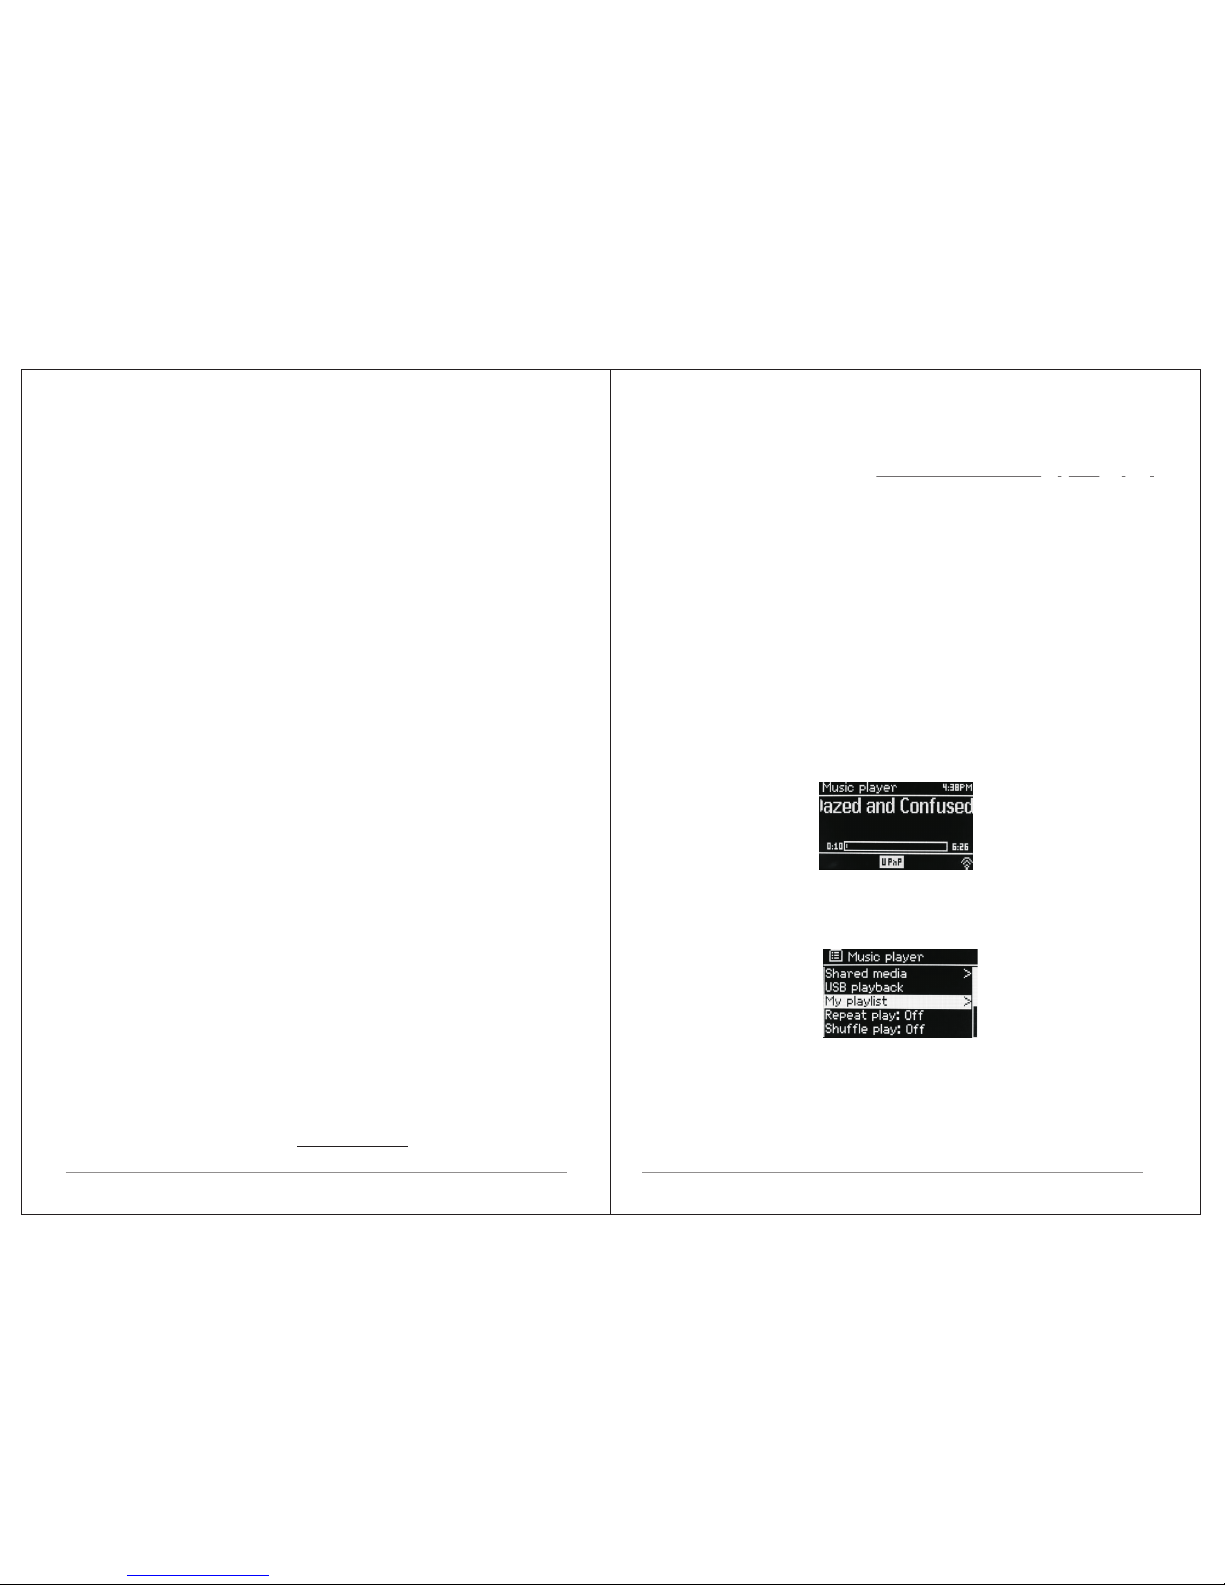
To browse Internet broadcasts, select Menu> Station li st > th en e it he r
Stations > or Podcasts >Browse through the menus to find b ro ad ca st s.
www.wifiradio-frontier.com
4. 5 Search
You ca n al so s ea rc h th ro ug h In te rn et b ro ad ca st s fo r st at io ns o r po dc as ts
with particular keywords in their title.
To search, select Menu > Station list > then either Stations > or Podc as ts >
Enter a keyword by selecting characters then OK. Th e se ar ch e nt ry s cr ee ns
are similar in operation to the Wi-Fi password e nt ry s cr ee n.
Select a broadcast from the list.
For podcasts, you may be able to select a particular e pi so de .
4.6 My added stations
Even t ho ug h th e Internet ra di o po rt al contains t ho us an ds o f stations, y ou m ay
want to li st en to stat io ns not listed. You can add your own s tations vi a the
portal. Th es e adde d stat io ns are acc es si bl e f ro m M4+ by selecting Menu >
Station list > My added stations > [Station].
Page 13
22 of 3 8
23 of 3 8
4.7 Now playing information
While the stream is playing, the screen shows its na me a nd d es cr ip ti on . If
artist and track information is available, thi s is a ls o sh ow n. To view further
information, press Info .
Each time you press Info, another set of information is disp la ye d, c yc li ng
through the following details:
Ÿ Artist and track name (default; where availabl e)
Ÿ Description
Ÿ Genre and show country
Ÿ Reliability
Ÿ Bit rate and Codec and Sampling
Ÿ Playback buff er
Ÿ Today's Date
5.
Connect your M4+ and Spotify control device to your home Wi-Fi
All devices need to be on the same Wi-Fi.
Get the Spotify app/Premium free trial
Download the Spotify app for your mobile or tabl et f ro m yo ur a pp s to re , an d
take the Premium free trial. Log in to Spotify and start pla yi ng a t ra ck .
Play millions of songs on your M4+.
To start with, your mobile/tablet and M4+ need to be on the sa me W i- Fi . Tap
on the Now Playing bar to reveal extra controls, a nd s el ec t th e Sp ea ke r ic on .
On the Connect screen, Just choose your M4+ and it'll star t pl ay in g. Ad ju st t he
volume at the volume bar below on the Connec t sc re en .
Spotify Connect
With Spotify you get millions of songs easily acce ss ib le . The a rtists you like,
the latest hit songs and new discoveries, just for you .
With Spotify Connect feature lets you play and con tr ol a ll y ou r mu si c
wirelessly. Se le ct m us ic o n yo ur s ma rt ph on e or t ab le t an d he ar o n th e ra dio.
Your r ad io h as S po ti fy C on ne ct b ui lt . Th is a ll ow s yo u to c on tr ol t he m us ic
playing on the radio using the Spotify app on yo ur s ma rt ph on e or t ab le t.
Listen Nobody is seamless - you can call, play g am es , wa tc h mo vi es , an d
even turn off t he p ho ne w it ho ut i nt er fe ri ng m us ic . Th er e is a b et te r wa y to h ear
music at home.
* For availability in your region, see www. sp ot if y.co m.
Spotify Connect
You mu st h av e a Sp ot if y Pr em iu m ac co un t to g et f ul l ac ce ss t o mi ll io ns o f
songs from Spotify archive, all with adequate so un d qu al it y.
If you do not have it, you can go to www.spotify.co m/ fr ee tr ia l fo r a 30 - d ay t ri al .
To use S po ti fy C on ne ct
1. Download Spotify app for your Smartphone or t ab le t ( iO S or A nd ro id ) .
2. Connect the radio to the same wireless networ k as y ou r Sm ar tp ho ne o r
tablet, and then press the MODE button repeatedly to sel ec t Sp ot if y Co nn ec t
mode.
3. Open Spotify app on your Smartphone or tablet and p la y a so ng .
4. Touc h th e pi ct ur e of t he a lb um a t th e bo tt om l ef t of t he s cr ee n. T he n pr es s
Connect icon
5. Press M4+ to select your radio and it will start playin g fr om y ou M 4+ .
Note that radio is that " LEMEGAxxxxxxxxxxxx " ( 12-digit nu mb er i s th e MA C
address of the radio ) in Spotify app.
6. Music player mode (network)
Music player mode plays audio files such a s MP 3s , AAC s, W MA s or F LA Cs
from a computer on the local network.
To enter Music player mode, either press Mode un ti l th e di sp la y sh ow s Mu si c
player, or select Menu > Main menu > Music player Once in mu si c pl ay er
mode, press Menu , then select Shared media.
If you are already playing a music file, you can pre ss B ac k to q ui ck ly r et ur n to
the last visited branch of the menu tree. For example, sup po se y ou w er e
listening to the track Heat by the artist 50 Cent through br ow si ng s ha re d
media as described in section 0 below. Pr es si ng B ac k wo ul d re tu rn y ou t o th e
track listing for the album Get Rich or Die Tryin'. Press in g Ba ck a ga in w ou ld
list all 50 Cent albums. Pressing Back again w ou ld l is t al l al bu m ar ti st s, a nd
so on.
Page 14
24 of 3 8 25 of 3 8
You ca n us e << and >> to m ov e th ro ug h tr ac ks . Pr es s an d ho ld to r ew in d or
fast forward and press quickly to select previou s or n ex t tr ac k.
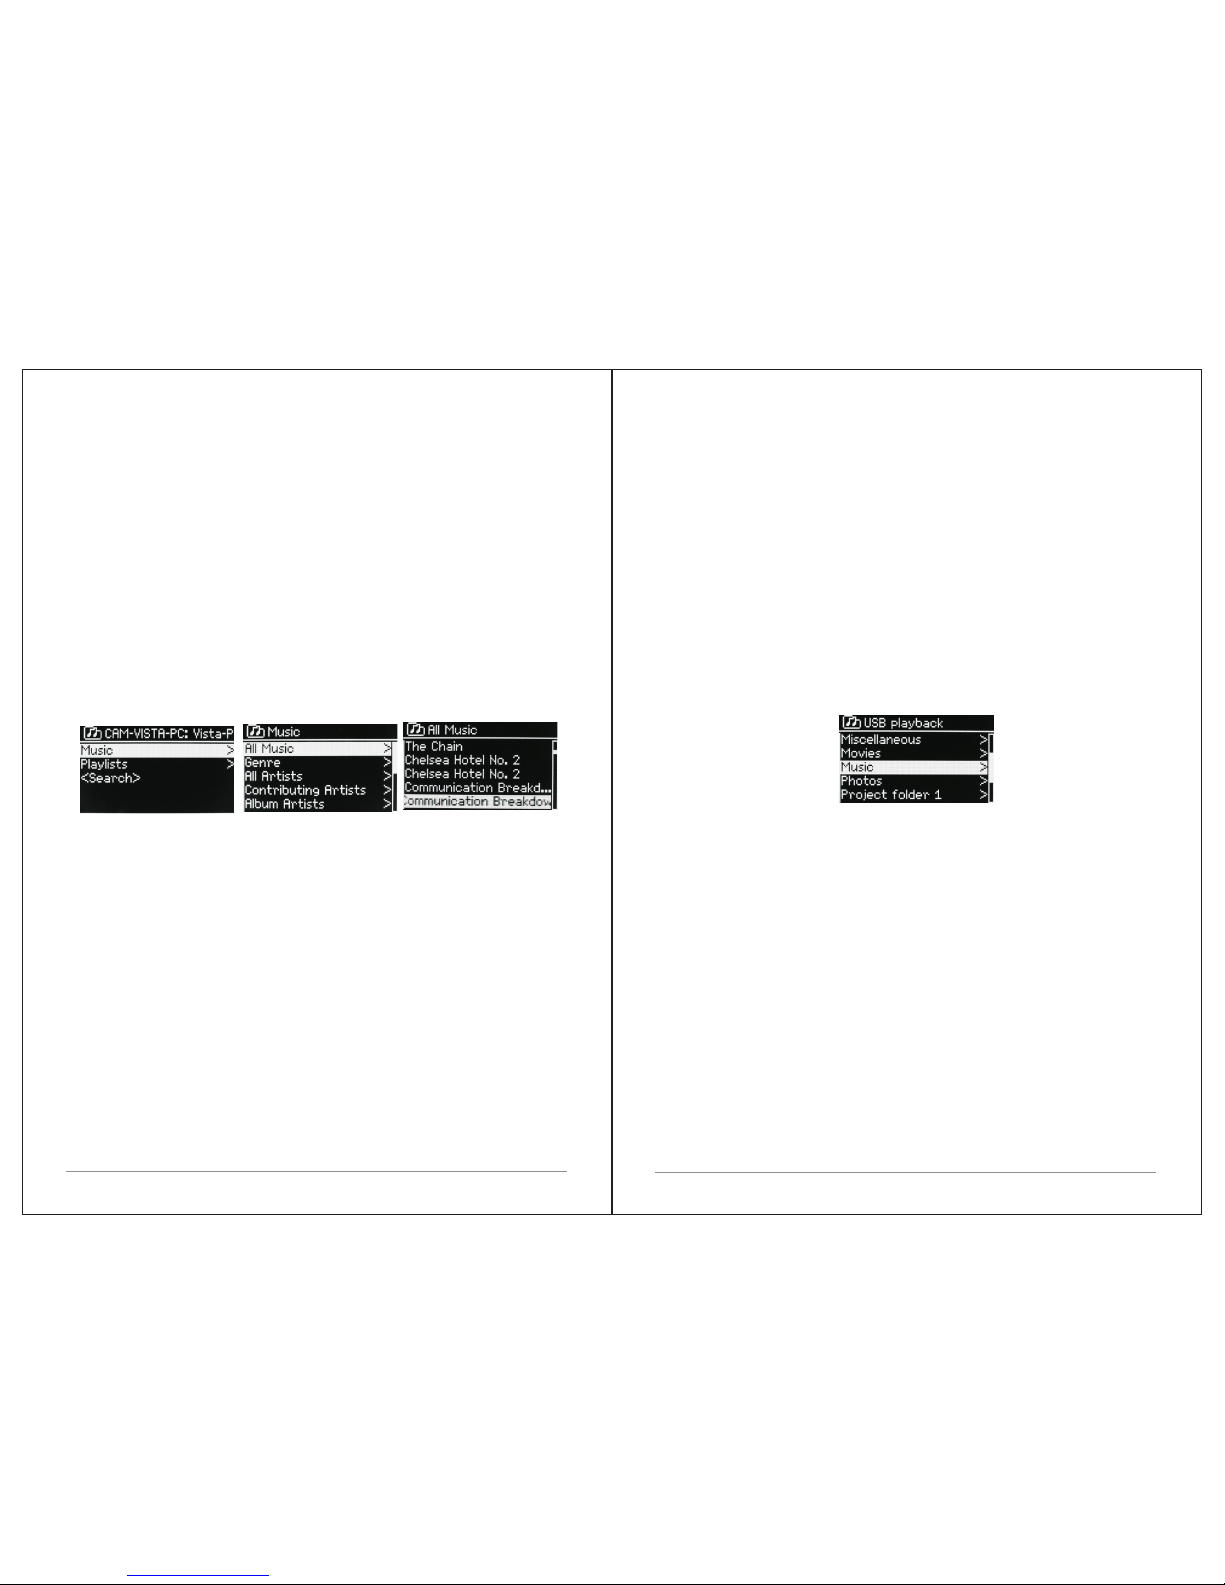
6.1 Shared media (from UPnP med ia s er ve r)
Select Menu > Shared media >
If you have set up shared media, you should see an ent ry c on si st in g of
<computer name>: <Shared media name>, for exam pl e JB -L ap to p: Au di o. I f
you have more than one computer sharing medi a, t he a lt er na ti ve s ar e li st ed .
Select the shared media you want to play.
From this point on, the menus are generated from the sha re d me di a se rv er
(typically Windows Media Player).
The first menu shows a list of media types, for example Musi c, Vi de o, P ic tu res
and Playlists. M4+ can only play music and playl is ts .
There is also a search function, which finds track s in a s im il ar w ay t o In te rn et
radio search
From Music, there are numerous ways of selecting tra ck s, i nc lu di ng :
Ÿ Genre
Ÿ Artist
Ÿ Album
Ÿ Composer
Ÿ Rating
Once you have found a track you want to play, pr es s Se le ct . A sh or t pr es s
plays the track immediately and a long press add s th e tr ac k to t he p la yl is t. You
can also add entire albums to the playlist.
M4+ plays either the selected track or the playlis t.
6.1.1 Wak e- on -L AN
If shared media is selected a list of available mu si c se rv er s wi ll b e di sp la ye d.
If a question mark appears before the server name, thi s in di ca te s th at t he
server has been seen before and supports Wa ke -o n- LA N fu nc ti on al it y, bu t
cannot currently be found on the network.
If a server with a question mark is selected by the user, the devi ce w il l tr y to
.
wake the server up and connect to it. In some instances this m ay n ot b e
possible as the server may not be connected to the net wo rk a ny m or e or m ay
be switched off .
6.1.2 Prune servers
From time to time it may be necessary to remove servers displa yi ng q ue st io n
marks in front of the server name from the server list. For exampl e,
if the device is moved to a new network or if a Wak e- on -L AN s er ve r is
removed from your current network.
To perform this function go to Menu > Prune servers > Yes
6.2 USB PLAYBA CK
To play audio from a USB mass-storage device such as a U SB F la sh s ti ck o r
USB hard drive, Select Menu > USB playback.
Browsing folders From this point on, menus are generated f ro m th e fo ld er s
on the USB device. Browse folders with the S el ec t co nt ro l an d Ba ck
button. The display shows folder and fil e na me s (not necessarily track
names) .
Once you have found a track that you want to play, pre ss S el ec t . A shor t pr es s
plays the track immediately.
A long press (at any time while the track is displaye d or p la yi ng ) ad ds t he t ra ck
to My playlist. You can also add entire fold er s to M y pl ay li st .
6.3 Playlists
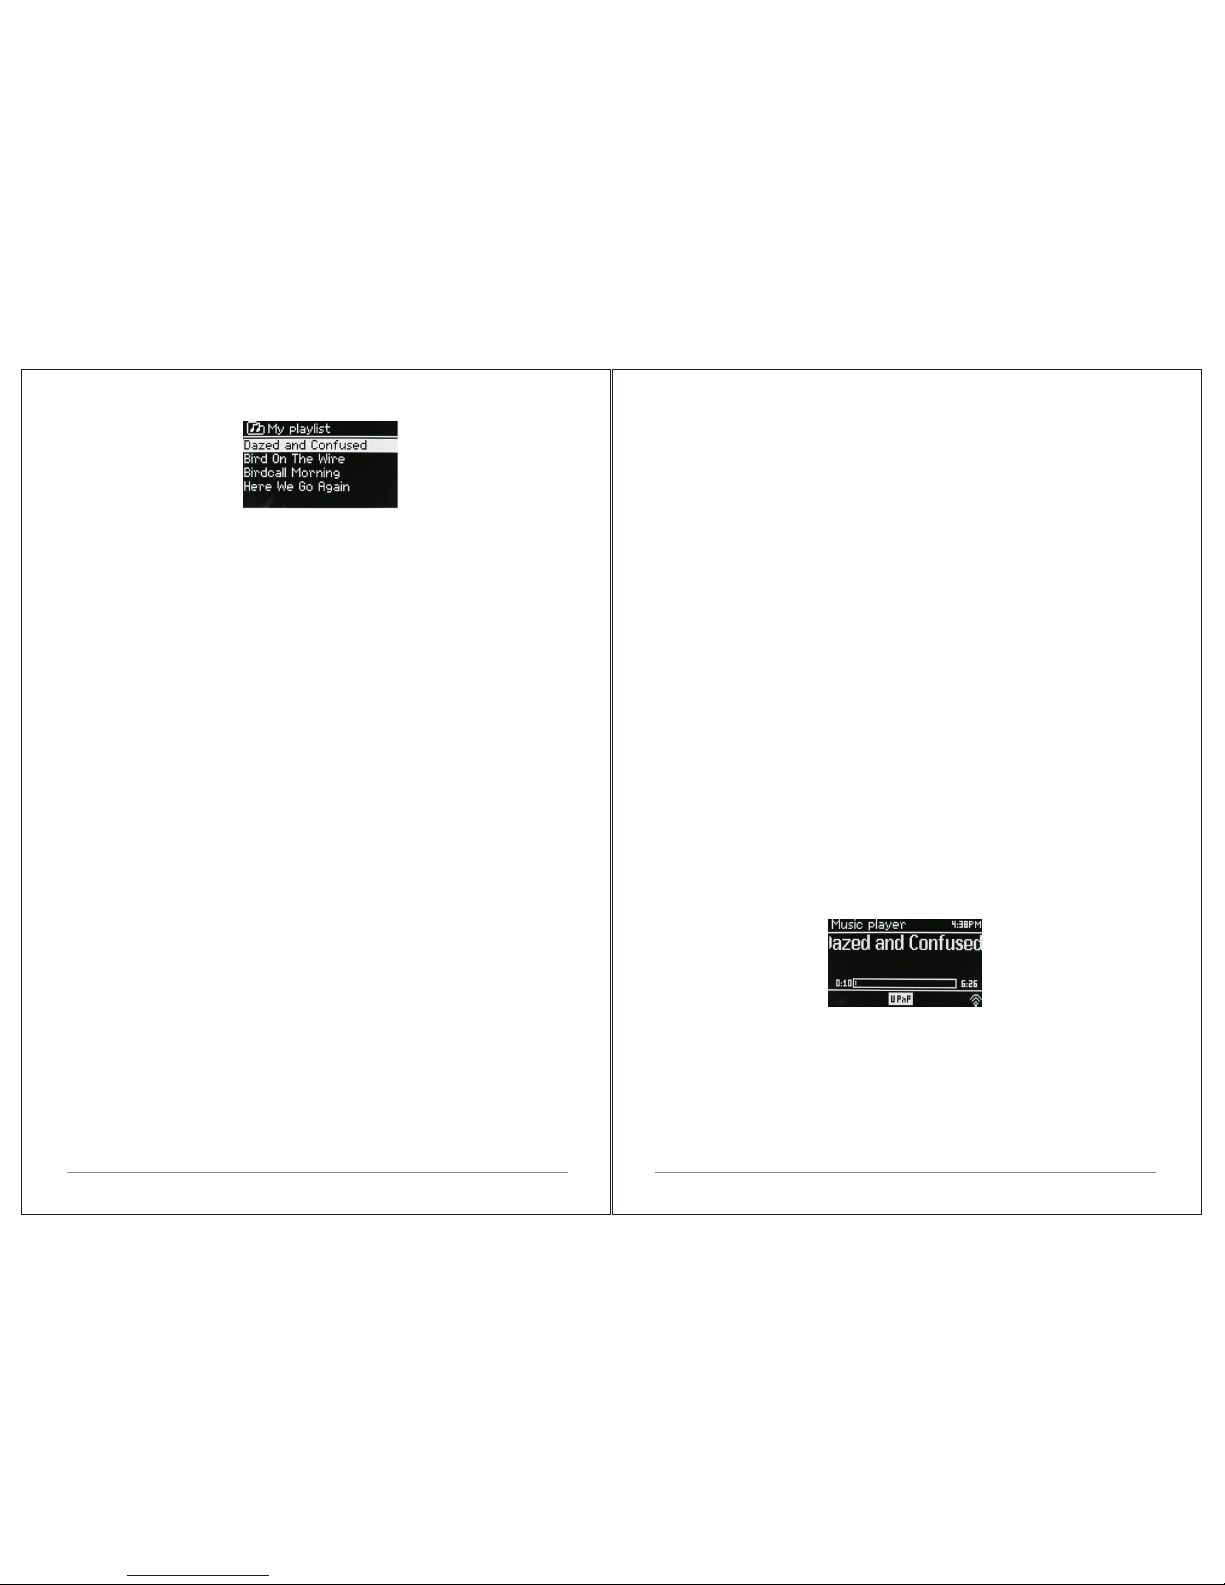
M4+ holds a queue of up to 200 tracks in the playlist.
Playlist tracks can be mixed from multiple UPn P ser ve rs .
To manage the playlist, select Menu > My playlist.
To view the playlist, scroll though it by turning Se le ct . U Pn P tr ac ks s ho w th ei r
track name.
To play the playlist from a certain track, quick Selec t .
To erase a track from the playlist, long Select .then confir m YE S.
If you select a track/album/folder for instant playb ac k (w it ho ut u si ng t he
playlist), the playlist is preserved. The p la yl is t is a ls o pr eserved during
standby.
Page 15
26 of 3 8
6.4 Repeat/shuffle
You ca n re pe at t ra ck s or p la y th em i n ra nd om o rd er b y se le ct in g Me nu >
Repeat play or Menu > Shuff le p la y.
6.5 Now playing information
While a track is playing, the screen shows its track and a rt is t (U Pn P) . The re is
also a progress bar with figures for elapsed a nd t ot al t ra ck t im e. A t th e bo tt om
of the screen, an icon indicates UPnP. To view further inf or ma ti on , pr es s In fo .
Each time you press Info, another set of information is disp la ye d, c yc li ng
through:
UPnP p layback p ro gr es s b ar (d ef au lt ), al bu m, codec/sampling rate, pl ay ba ck
Buffer bar, today's date.
7. Using the “Play To” fea tu re i n Wi nd ow s 7 to s tr ea m me di a
One of the new Windows 7 features includes a feature c al le d “Pl ay To” and
this lets your PC running Windows 7 control M4+ to pus h me di a an d us e as a
universal remote control for your media coll ec ti on .
M4+ supports the industry standard DLNA (Di gi ta l Li vi ng N et wo rk Al li an ce )
1.5 digital media renderer. Th is a ll ow s yo u to " Pl ay To" o th er d ev ic es a ro un d
your home and combine media streaming wi th c on tr ol li ng a c on ne ct ed m ed ia
receiver while streaming content to it from anot he r Wi nd ow s 7 PC o n a ho me
network.
Before you can use the “Play To” feat ur e yo u ne ed t he s et -u p M4 + fo r
Windows 7 streaming media.
7.1 Use “Play To” in W in do ws M ed ia P la ye r
Windows Media Player makes it easy to manage y ou r me di a, f in d it em s th at
you want to play, and open Play To. To select items that you wan t to p la y,
follow these steps:
1.Click the Start button, click All Programs, and then c li ck W in do ws M ed ia
Player.
If the Player is currently open and you’re in No w Pl ay in g mo de , cl ic k th e
Switch to Library button in the upper-righ t co rn er o f th e Pl ay er .
2. If the list pane is closed or if the Burn or Sync tabs are expose d, c li ck t he
Play tab.
3. Find the items that you want to play in the Player Librar y, and t he n dr ag
those items From the details pane into the list pane .
4. Click the Play to button at the top of the list pane, click the dev ic e on y ou r
network that Will receive the media.
5. In the Play To dia lo g bo x, u se t he p la yb ac k co nt ro ls t o pl ay, p au se , or s to p
the media stream, and to change to the next or previou s it em i n th e li st .
7.2 Use “Play To” el se wh er e in W in do ws 7
Outside of Windows Media Player, you can stream m ed ia t o M4 + wi th “P la y
To” by right-clicking music files. To select music file s an d st re am t he m to M 4+ ,
follow these steps:
1).Click the files you want to stream to M4+.
2).Right-click the selected files, point to “Play t o”, an d th en c li ck t he d ev ic e on
the network that will receive the media.
3). In the Play to dialog box, use the playback controls t o pl ay, pa us e, o r st op
the media stream, and to change to the next or previou s it em i n th e li st .
7.3 Now playing information
While a track is playing, the screen shows its track nam e (U Pn P) . The re i s
also a progress bar with figures for elapsed a nd t ot al t ra ck t im e. At t he b ot to m
of the screen, an icon indicates UPnP. To vie w fu rt he r in fo rm at io n, p re ss I nf o.
Each time you press Info, another set of information is di sp la ye d, c yc li ng
through the following:
Artist, album, codec/sampling rate, playback b uff er
8. DAB radio mode
DAB radio mode receives DAB/DAB+ digital rad io a nd d is pl ay s in fo rm at io n
about the station, stream and track playing.
To enter DAB mode, either press Mode until the displ ay s ho ws D AB R ad io o r
select;
Menu > Main menu > DAB.
27 of 3 8
Page 16
28 of 3 8
8.1 Scanning for stations
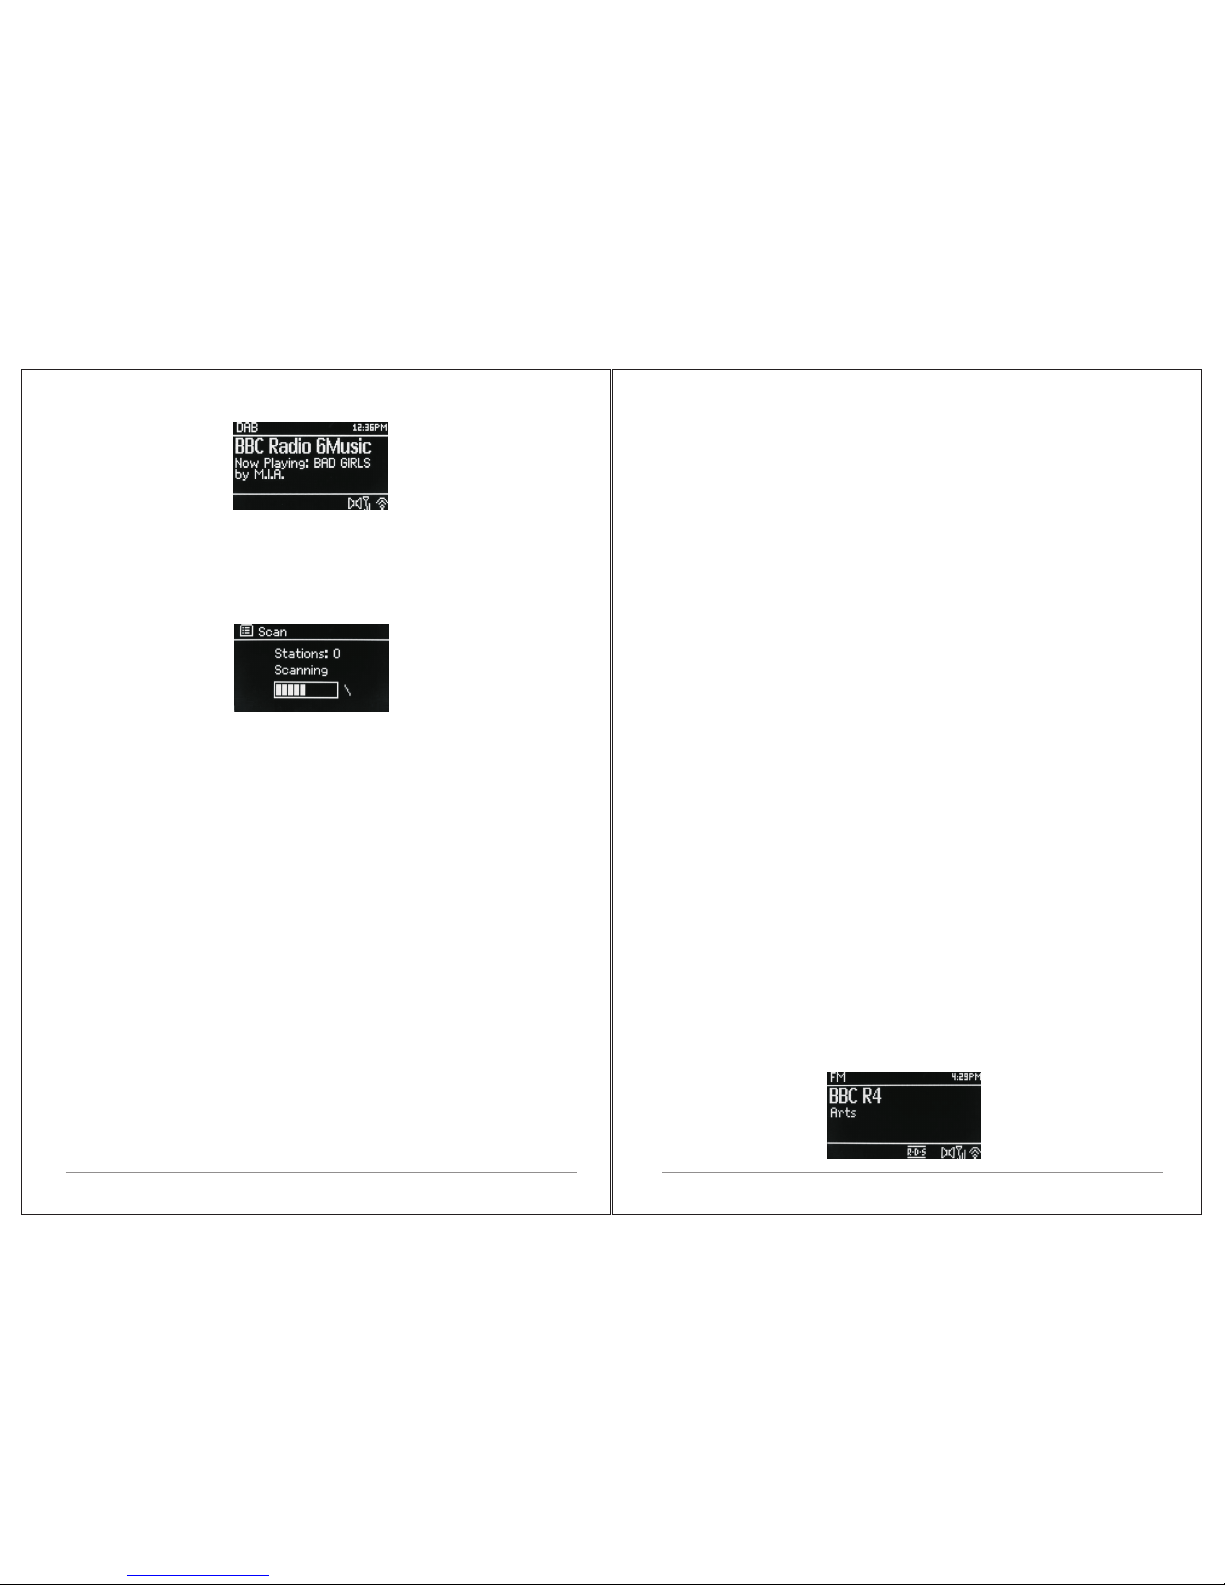
The first time you select DAB radio mode, Or if the station list is em pt y, M4+
STEREO automatically performs a full scan to see wha t stat io ns a re a va il ab le .
You ma y al so n ee d to s ta rt a s ca n ma nu al ly t o up da te t he l is t of s ta ti on s fo r
one of the following reasons:
Ava il ab le s ta ti on s ch an ge f ro m ti me t o ti me .
If reception was not good for the original scan (for e xa mp le t he a nt en na w as
not up), this may result in an empty or incomplete lis t of a va il ab le s ta ti on s.
If you have poor reception of some stations (burbl in g) , yo u ma y wi sh t o li st
only stations with good signal strength.
To start a scan manually, se le ct M en u > Sc an .
Once the scan is complete, the radio shows a list of avail ab le s ta ti on s.
To remove stations that are listed but unavailab le , se le ct M en u > Pr un e
invalid.
8.2 Selecting stations
To listen to or change a station, turn the Select control to vie w a li st o f st at io ns
and press to select. Once selected, the station plays an d th e sc re en s ho ws
information about the station, track or show as broa dc as t.
Presets
To store a DAB preset, press and hold Preset until the dis pl ay s ho ws t he S av e
preset screen.
Select one of the 20 presets (on the remote) to save the current ly p la yi ng
station.
To select a preset, press Preset briefly, th en s el ec t on e of t he l is te d pr es et
stations.
When a preset station is playing, it shows☆ 1,2,3 etc in th e bo tt om m id dl e of
29 of 3 8
the sc reen.
8.3 Now playing information
While the stream is playing, the screen shows its na me a nd D LS ( Dy na mi c
Label Segment) information broadca st b y th e st at io n gi vi ng r ea l- ti me
information such as programme name, track titl e an d co nt ac t de ta il s. S te re o
broadcasts are indicated with an icon at the top o f th e sc re en . To view f urther
information, press Info .
Each time you press Info , another set of information is dis pl ay ed , cy cl in g
through DLS text, programme type, ensemble nam e/ fr eq ue nc y, sig nal
strength/error rate, bit rate/codec/channe ls a nd t od ay 's d at e.
8.4 Settings
Dynamic range compression
Some DAB broadcasts off er d yn am ic r an ge c om pr es si on ( DR C). Th is f ea tu re
allows radios to compress the dynamic rang e of t he o ut pu t au di o st re am , so
that the volume of quiet sounds is increased, an d th e vo lu me o f lo ud s ou nd s is
reduced. Th is c an b e us ef ul i f yo u ar e li st en in g to m us ic w it h a hi gh d ynamic
range in a noisy environment (for example, c la ss ic al m us ic w hi le c oo ki ng ).
To change the DRC of the M4+, select Menu > DRC, and then DRC hi gh , DR C
low or DRC off.
Note: The M 4+ 's D RC s et ti ng d oe s ha ve a ny e ff ec t if D RC d at a is n ot i nc lu de d
in the broadcast.
Station order
You ca n ch oo se t he o rd er o f th e DA B st at io n li st t o be e it he r Alp ha nu me ri c,
Ensemble or Vali d. E ns em bl e li st s gr ou ps o f st at io ns t ha t ar e br oa dcast
together on the same ensemble, for example BBC o r So ut h Wal es l oc al . Val id
lists valid stations first, alphanumeric al ly, th en o ff -a ir s ta ti on s.
To change station order, select Menu > Station order > then Al ph an um er ic ,
Ensemble or Vali d.
9. FM radio mode
FM radio mode receives analogue radi o fr om t he F M ba nd a nd d is pl ay s RD S
(Radio Data System) information about the statio n an d sh ow ( wh er e
broadcast).
To enter FM mode, either press mode to choose FM Radio or sele ct M en u
>Main menu >FM.
Page 17
30 of 3 8
9.1 Selecting stations
To find a station, press Select. The frequency display s ta rt s to r un u p as M 4+
scans the FM band. Alternatively, you c an s ca n up o r do wn b y pr es si ng a nd
holding the TUN E+ o r TU NE - bu tt on s or t un e ma nu al ly w it h qu ic k pr es se s, o r
by turning the Select control.
Presets to store an FM preset, press and hold button 1-5+ Pr es et u nt il t he
display shows the Save preset screen. Select one o f th e 20 p re se ts t o sa ve
the currently playing station.
To select a preset, press Preset briefly, th en s el ec t on e of t he l is te d Pr es et
stations. When a preset station is playing, it shows ☆1 ,2 ,3 e tc i n th e bo tt om
middle of the screen.
9.2 Now playing information
While an FM station is playing, the screen shows one o f th e tw o fo ll ow in g se ts
data:
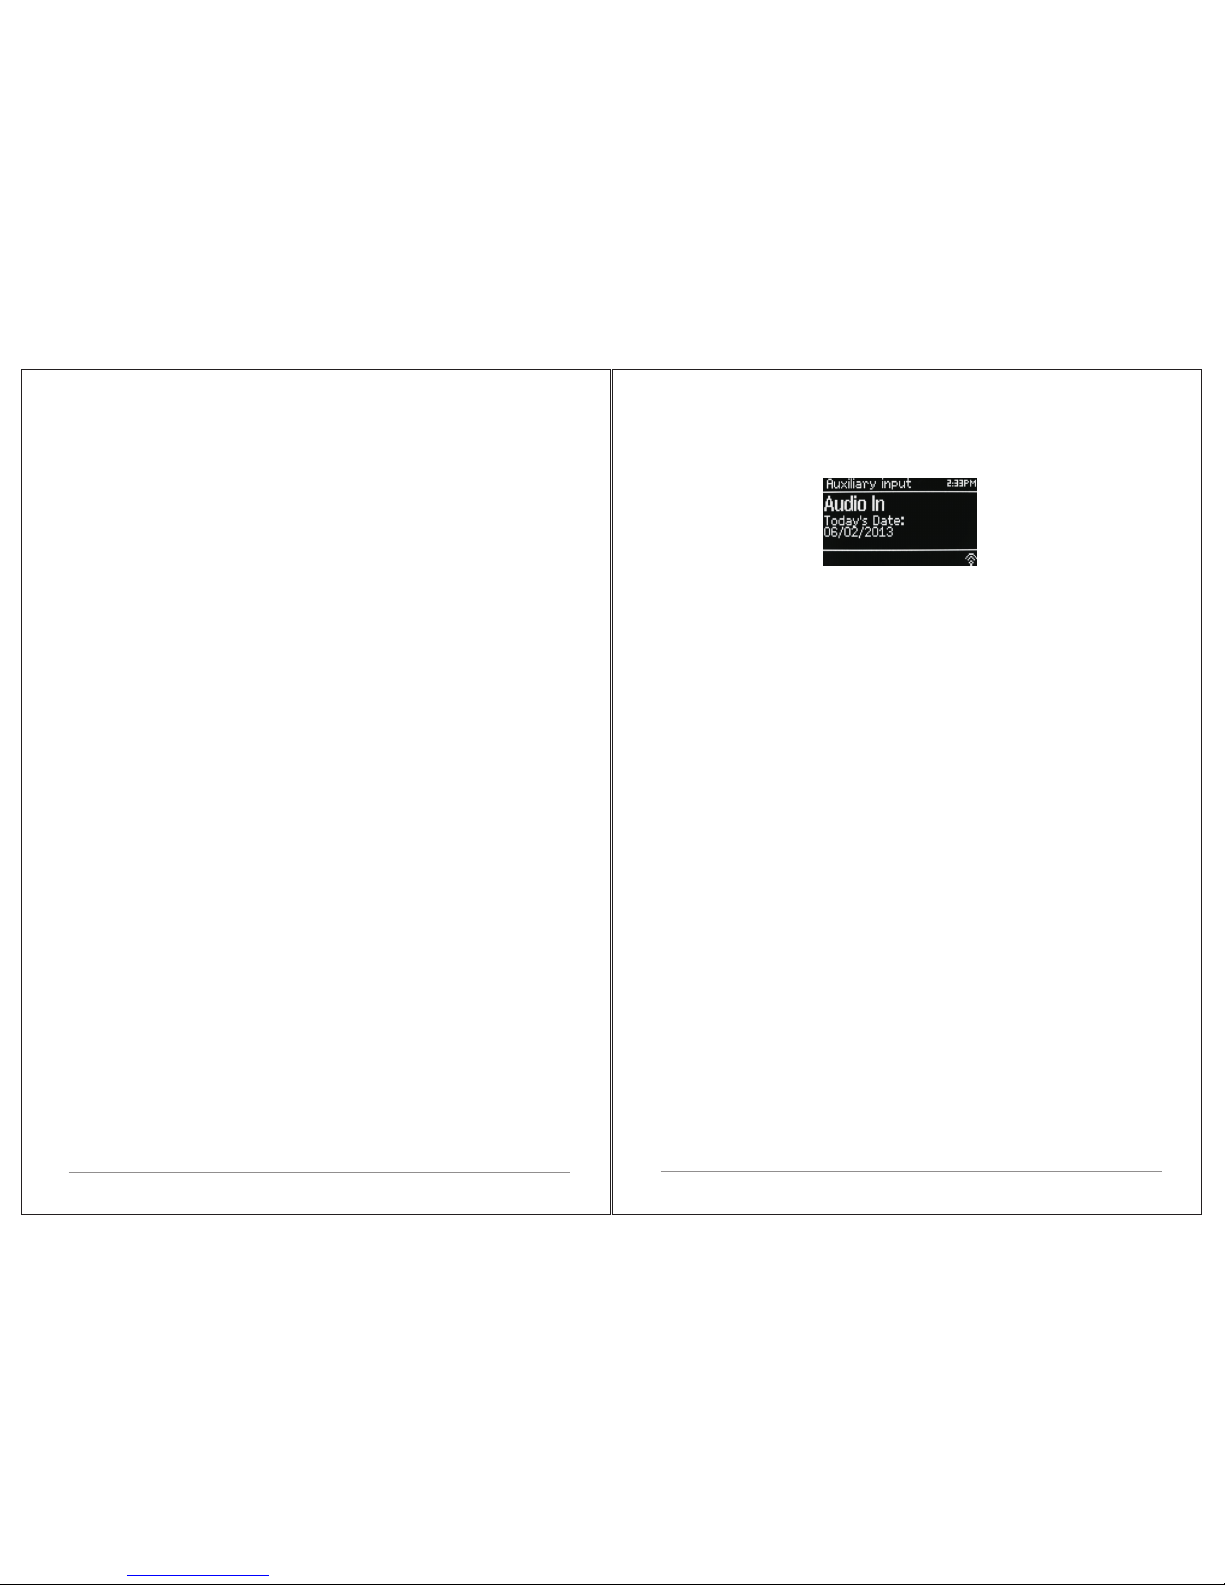
If RDS information is available, by default the se rv ic e na me ( i. e. s ta ti on
name) is displayed.
You ca n cy cl e th ro ug h fu rt he r RD S in fo rm at io n by p re ss in g In fo . Ea ch t im e
you press Info, another set of information is displaye d, c yc li ng t hr ou gh R DS
radio text, RDS programme type, frequency and toda y' s da te .
If no RDS information is available, the curren tl y tu ne d fr eq ue nc y is s ho wn .
9.3 Settings
Scan settings
By default, FM scans stop at any available station. Thi s ma y re su lt i n a po or
signal-to-noise ratio (hiss) from weak sta ti on s. To cha ng e th e scan settings to
stop only at stations with good signal strengt h, s el ec t Me nu > S ca n se tt in g >
Strong stations only? > Yes.
Audio settings
By default, all stereo stations are reproduced i n st er eo . Fo r we ak s ta ti on s,
this may result in a poor signal-to-noise ra ti o (h is s) . To play w eak stations in
mono, select Menu >Audio setting > FM weak reception: Li st en i n mo no o nl y
> Yes.
10. AUX mode
Aux in mode plays audio from an external sourc e su ch a s an M P3 p la ye r.
To play audio with Aux in mode,
1).Connect the external audio source to the Aux In 3. 5 mm s te re o so ck et .
2). Either press Mode until the display shows AUX in or se le ct M en u>
Main menu > AUX in.
3). Adjust the volume of M4+ (and, if necessary, the audio s ou rc e de vi ce ) as
required.
11. Bluetooth mode
Prior to pairing, verify your device support s Bl ue to ot h 4. 0+ ED R A2D P and
your device is not connected to any other Blueto ot h pr od uc t. D ev ic es m ay p ai r
diffe re nt ly. B el ow i s a ge ne ra l gu id e.
1. Press to source to Bluetooth mode. Thi s wi ll p ow er o n th e Bl ue to ot h. Turn
the volume up about ¼ to start. Also turn up the volume on the so ur ce d ev ic e
(the device you are streaming from).
2. Tu rn o n th e Bl ue to ot h on y ou r en ab le d de vi ce .
3. Select Bluetooth device name “LEMEGA M4+” when i t ap pe ar s on y ou r
device's screen to initiate searching.
4. You c an s ta rt t o pl ay y ou r mu si c fi le s wi re le ss ly. Ad ju st t he v ol um e le ve l on
your device.
You sh ou ld n ot h av e to p ai r yo ur d ev ic e ag ai n.
Depending on your device, you may need to ma ke m ul ti pl e at te mp ts a t Pa ir in g
and/or Connecting to the “LEMEGA M4+”, but please gi ve y ou r de vi ce
adequate time to Pair or Connect before repe at in g th e pr oc es s.
Pairing a Bluetooth Wireless Technolog y En ab le d iP ho ne / iP od t ou ch /i Pa d
1. Press source to select Bluetooth mode. Thi s wi ll p ow er o n th e Bl ue tooth.
Tur n th e vo lu me u p ab ou t ¼ to s ta rt . Al so t ur n up t he v ol um e on t he s ou rc e
device (the device you are streaming from).
2. Select “Settings”. (Depending on software vers io n)
3. Select “General”.
4. Select “Bluetooth”.
5. Switch Bluetooth “On” to initiate searching.
6. Select “LEMEGA M4+” when it appears on the display .
7. You c an b eg in p la yi ng y ou r mu si c fi le s wi re le ss ly o nc e th e BT l og o is s to p
flashing at the bottom right of the display.(means con ne ct ed s uc ce ss fu ll y)
31 of 3 8
Page 18
Adjust the volume level on your device. You sh ou ld n ot h av e to p ai r yo ur
iPhone/iPod/iPad again. The v ol um e ou tp ut l ev el o f mu si c files varies.
If you prefer an even higher output level, check the s et ti ng s in y ou r
iPhone/iPod touch/iPad:
Set the EQ Off, t he S ou nd C he ck O ff , an d th e Vol um e li mi t Off. If you
encounter a problem Pairing, press the sma ll a rr ow t o th e ri gh t of “L EM EG A
M4+” on your iPhone/iPod touch/iPad displ ay a nd s el ec t “Fo rg et t hi s De vi ce”,
then repeat the Pairing process. Dependi ng o n yo ur d ev ic e.
You ma y ne ed t o ma ke m ul ti pl e at te mp ts a t Pa ir in g an d/ or C on ne ct in g to t he
M4+, but please give your device adequate time t o Pa ir o r Co nn ec t be fo re
repeating the process.
12. CD Playback
Notice! Improper operation can result in mat er ia l da ma ge s!
Do not insert any recording media that devia te f ro m th e st an da rd C D fo rm at
(eg: mini-discs) into the CD player. The se m ay n ot b e pl ay ed a nd e jected
correctly. Ins er t on ly o ne d is c at a t im e in to t he C D pl ay er.
Insert a disc (with printing side facing up) unt il i t is d ra wn i ns id e. T he C D
player will automatically load the CD an d st ar t pl ay ba ck .
The display will say “Loading”. Disc function s wi ll n ot w or k wh il e th e di sc i s
loading. Playback will begin autom at ic al ly o nc e th e ta bl e of c on te nt s is r ea d.
The display will show “No Disc” when the uni t is set to CD m od e an d th er e is
no CD inside.
Insert the CD into the CD slot with the label side up, Th e di sp la y sh ow s th e
following information in CD mode:
Ÿ CD mode
Ÿ Tim e
Ÿ Elapsed playback time in minutes
Ÿ Tra ck n um be r
Ÿ Payback status(playing/pause)
To pause/resume playback of the CD, press the button .
To switch to the next track, press the button once.
To fast forward through a track, press and hold
To switch to the previous track, press and hold
To fast backward through a track, press and hold
To stop CD playback, press
Adjusting CD playback,You ca n ch oo se d if fe re nt p la yb ac k se qu en ce s to p la y
tracks by press PRG on remote control. Press the menu button to op en t he C D
32 of 3 8
menu for system settings.
13. Ala rm s an d sl ee p
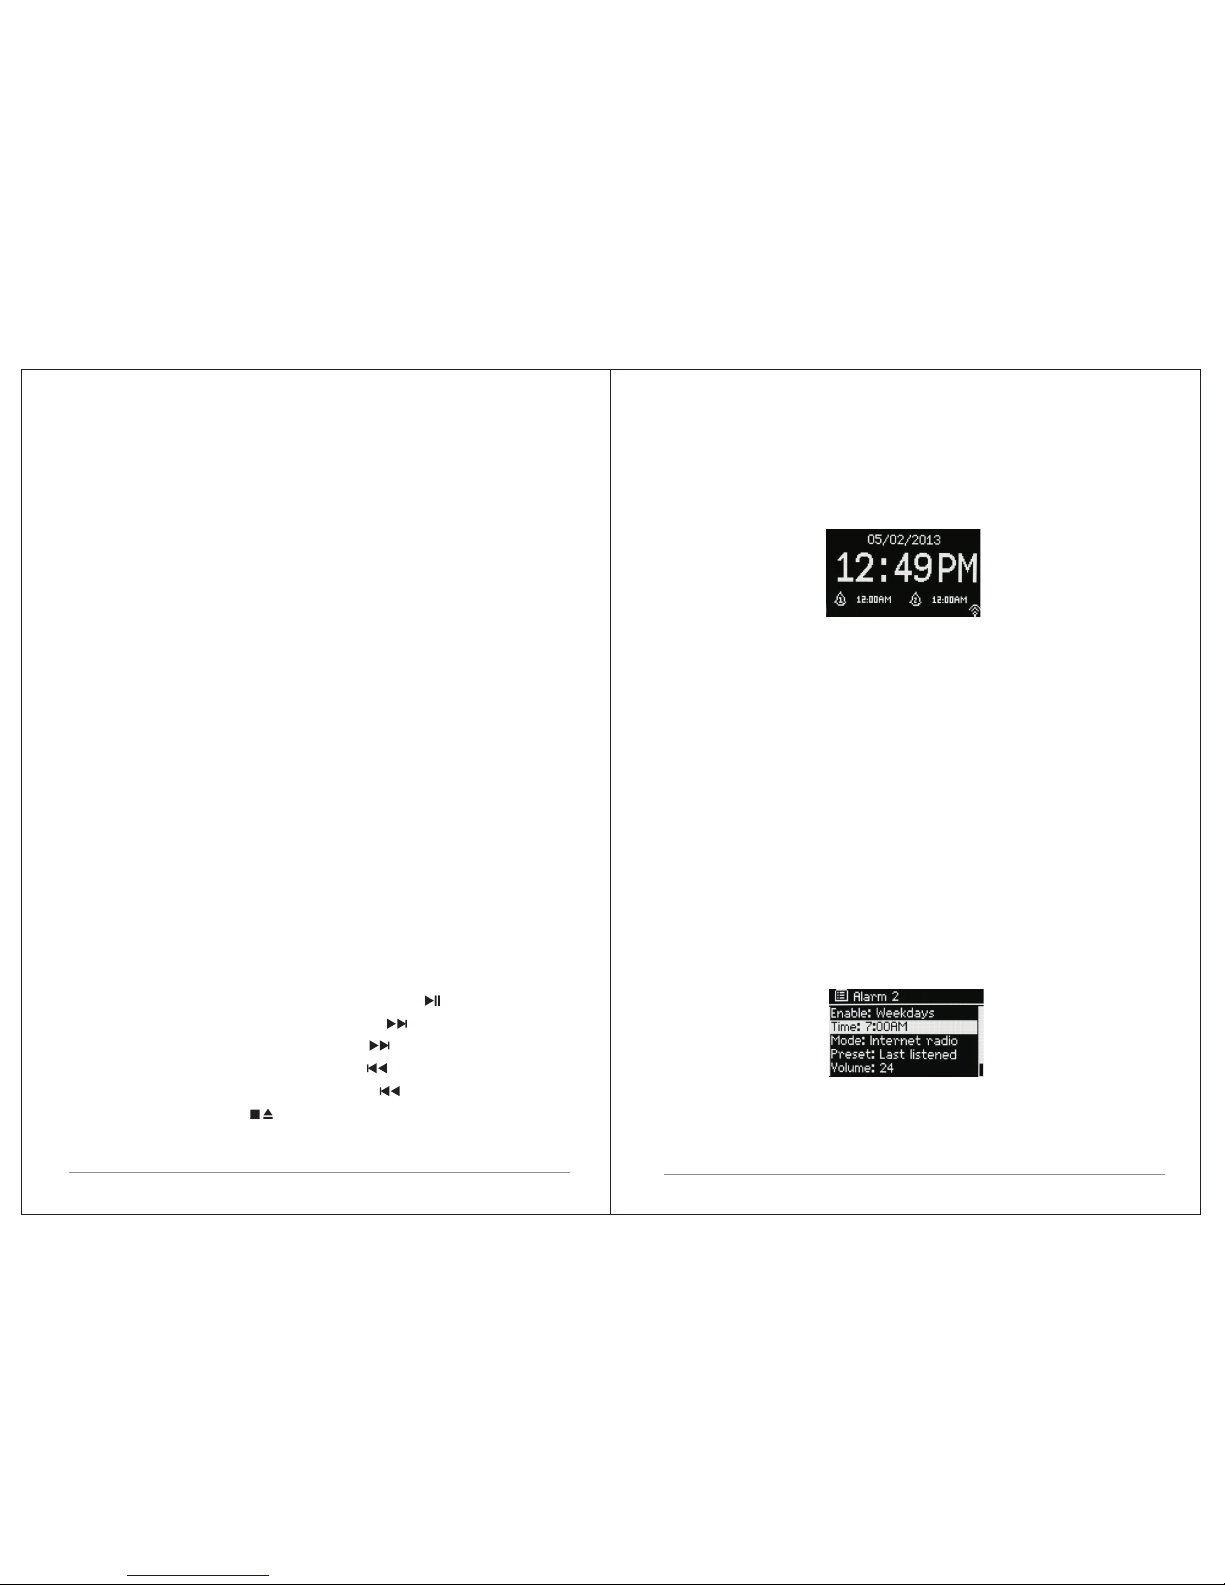
As well as a clock/calendar, there are two versat il e wa ke -u p al ar ms w it h
snooze facility, and a s le ep f un ct io n to t ur n th e sy st em o ff a ft er a s et p er io d.
Each alarm can be set to start in a particular mode.
13.1 Al ar ms
To set or change an alarm, either press Alarm or selec t Me nu > M ai n Me nu
>Alarms.
Select the alarm number (1 or 2) then configure the fo ll ow in g pa ra me te rs :
Ÿ Enable: on/off,
Ÿ Frequency: Daily, On ce , We ek en ds o r Weekda ys ,
Ÿ Tim e,
Ÿ Mode: Buzzer, Internet radio, DAB, FM, CD
Ÿ Preset: Last listened or 1-20,
Ÿ Volume: 0 - max.
To activate the new settings, scroll down and sele ct S av e.
The screen shows active alarms with an icon at the bot to m le ft .
At the set time, the alarm will sound. To tem po ra ri ly s il en ce i t, p re ss S no oz e .
You ca n ch an ge t he s no oz e pe ri od w it h th e Se le ct c on tr ol i f yo u li ke . Th e
radio returns to standby for the set period, with the si le nc ed a la rm i co n
flashing.
13.2 Sleep
To set the sleep timer, select Menu > Main menu > Sleep then choo se f ro m
Sleep OFF, 15 MINS,30 MINS, 45 MINS or 60 MINS.
33 of 3 8
Page 19
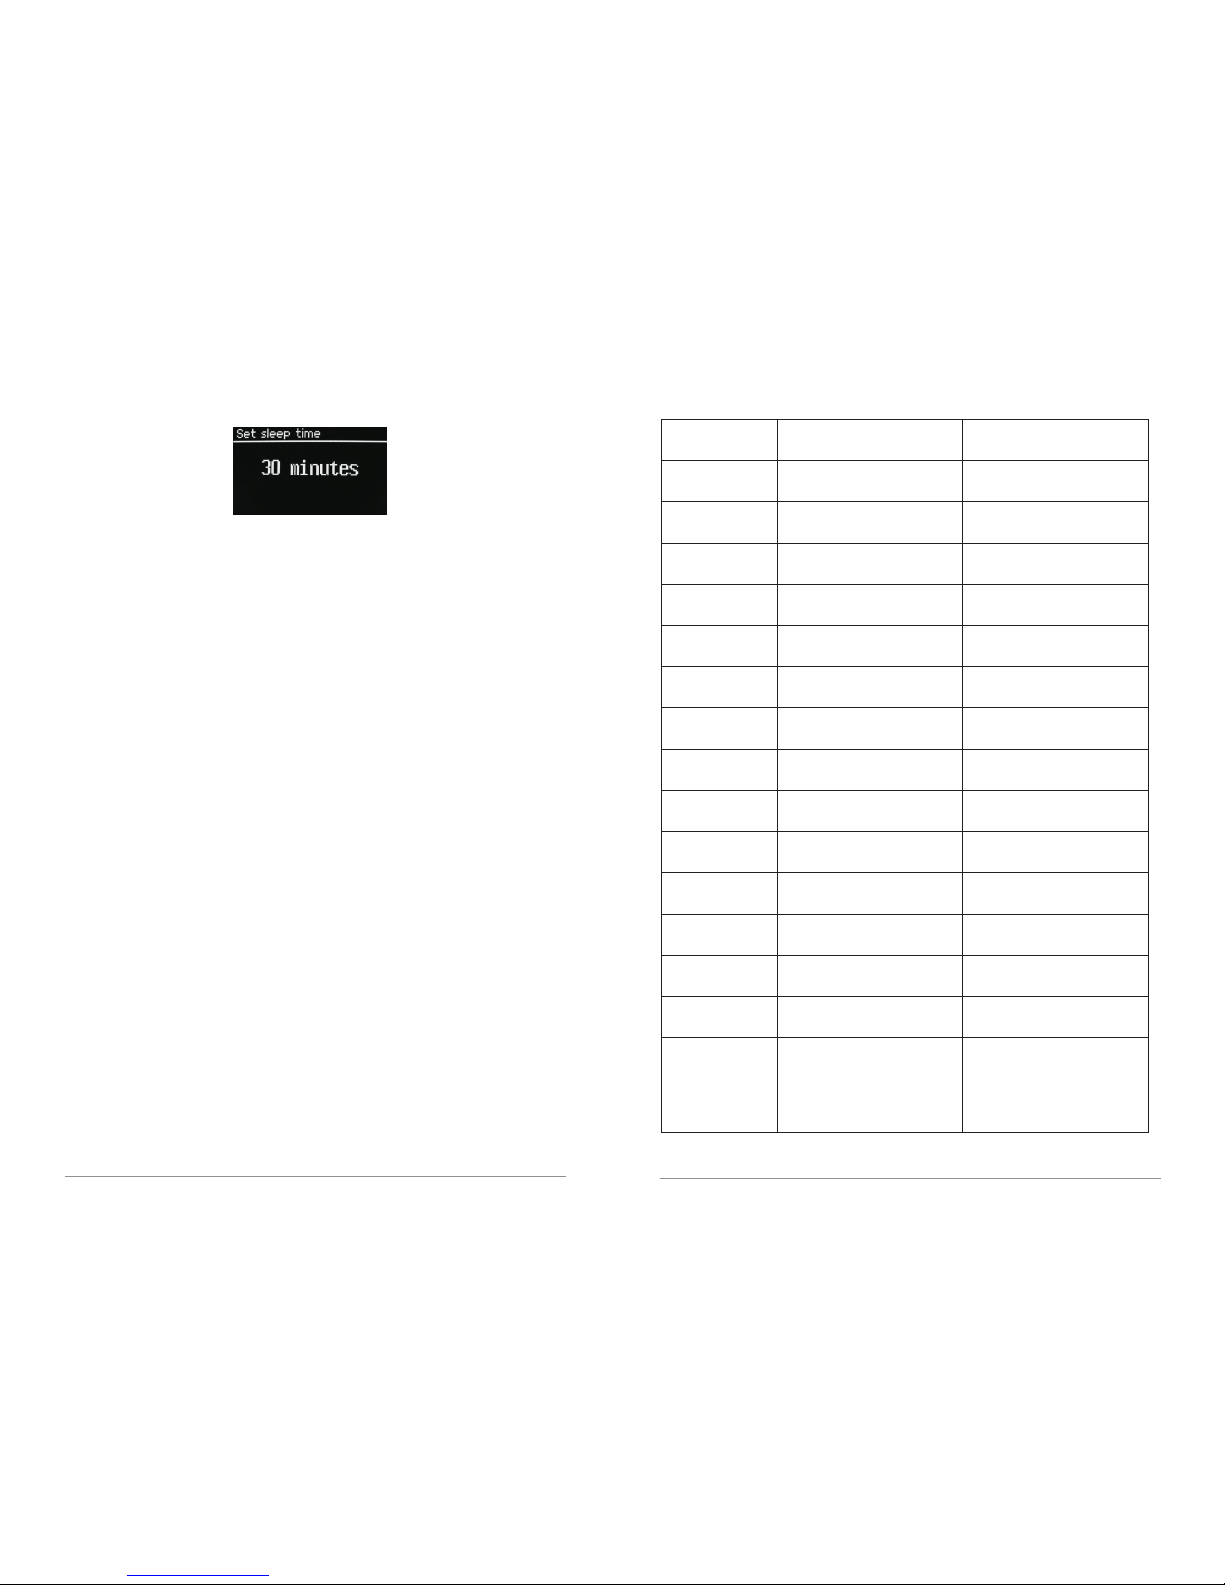
Once you select a sleep period, the system returns to the ma in m en u.
Press Menu to return to the Now playing screen.
14. Software upgrades and factory reset
14.1 Software upgrade
From time to time, M4+ may make software upgrades availa bl e wi th b ug
Fixes and/or additional features. You ca n ei th er c he ck m an ua ll y, or set M4+ to
check periodically automatically (th is i s th e de fa ul t) . If M 4+ d et ec ts t ha t
newer software is available, it asks if you want to go a he ad w it h an u pd at e.
If you agree, the new software is then downloade d an d in st al le d. Af te r a
software upgrade, all user settings are main ta in ed .
CAUTION: Before starting a software upgrade, ensure that M4+ is
plugged into a stable mains power connection. Disconnecting power
during a software update may permanently damage the unit.
To tur n au to ma ti c ch ec ki ng o n or o ff , se le ct M en u > Sy st em
settings>Software update >Auto-check setting.
14.2 Factory reset
A factory reset resets all user settings to default value s, s o ti me /d at e, n et wo rk
configuration and presets are lost. Howeve r, th e ra di o' s cu rr en t so ft wa re
version is maintained, as is registration wi th t he I nt er ne t ra di o po rt al . In te rn et
radio favorites therefore remain unless yo u re -r eg is te r yo ur r ad io w it h an ot he r
account on the portal website.
To perform a factory reset, select Menu > System settings > Factory re se t
proceed >Yes .
15. Troubleshooting and error messages
15.1 Error messages
Example
MAC filtering enabled on
Received.wma ,b ut f ou nd
Data obtained from server
Router switched off
Streaming IR station and
suddenly station becomes
unavailable
that the stream wasn't WMA
is unreadable.
when trying to decode
when trying to decode
Description
Correct key entered,
But router rejects request
Cannot recognise file format
Problem past router -
Problem with connection to
Problem past router – no
No UPnP ser ve rs f ou nd
No DAB reception
Tryi ng to acces s US B me nu,
UPnP server settings
Allow access for M4+ in
UPnP se rv er
but n o USB plu gged in
Access not granted by
Software upgrade failed
plugged in.
Unsupported USB device
General USB problems
USB
USB device
device
Bad memory sector found on
-independent of network
incorrect data being
router
response being received
received from network
from network
from network
Messege
Failed to connect
Format error
Network error
Network not ready
Network timeout
No UPnP med ia
Service not
No US B devic e
Unauthorised
Upda te f ai le d
unsupported
USB device
data from memory
user have to remove the
Unable to read particular
Power failure to USB device-
USB read error
u nd er po we re d
US B er ror
available (DAB)
fou nd
found
router
35 of 3 8
34 of 3 8
Wai ti ng f or U se rs
Spotify mode - No Spotify
account credentials
available on the M4+
audio system. Connect to
the audio system using a
Spotify Connect account.
Page 20
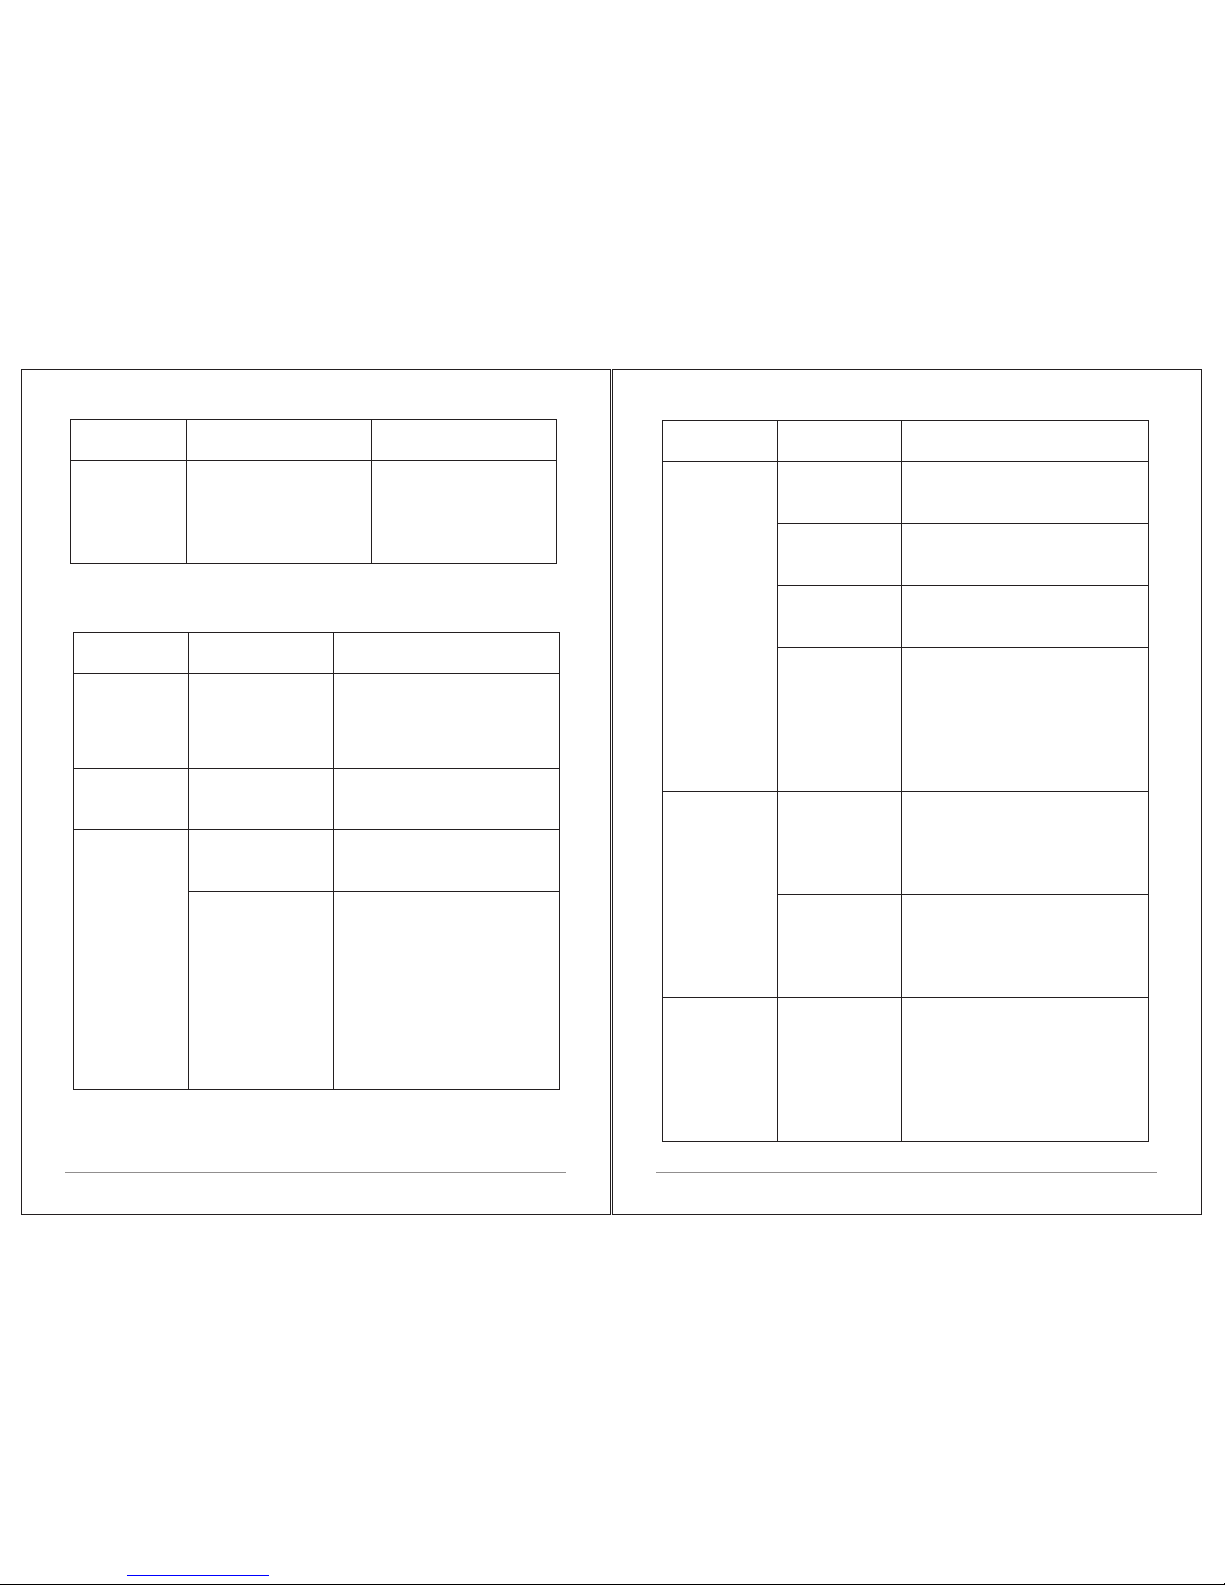
15.2 Troubleshooting
'Press Play…'
Spotify mode – Wai ti ng fo r
playback information;
for example, when the
audio playback is moved by
the Spotify app to a
diffe re nt au di o s pe ak er
or the smart device itself.
Example
Description
Messege
'DAB:' No stations
available'
message'
'Cannot connect
to network
Low signal strength
Low signal strength
N et wo rk d ow n
Solutions
Cause
Problem
FM: Hiss
DAB: burbling/
intermittent
cut-out
Check/move antenna
Move radio
Rescan local (high-strength)
stations only
For DAB, check local coverage at
www.ukdigitalradio.com/covera ge
As above then rescan
stations.
Check that network is working
between a computer and
the router
Obtain the M4+ MAC address
from Menu < System settings >
Network > Vie w s et ti ng s a nd
add to router list.
Router restricts
access to listed
MAC addresses
Note: M4+ has separateMAC
addresses for wired and wireless
networks only the current network
adaptor method address is
displayed, but the other address
can be obtained by changing the
first pair of digits between '00' (
wireless) and '02' (wired)
Insuffi ci en t Wi -F i
signal strength
Unusual network
configuration
Unknown
encryption method
Firewall
preventing
access
Check distance to router; see if a
computer can connect to the
network in this location
Setup network manually through
Menu> System settings > Network
>Manual settings
Change encryption method on router.
M4+ supports WEP, WPA a nd WPA2
Check the following ports are open on
the router: UDP an d T CP ports 80 and
123; DNS port 53.
Windows shares:ports 135–1 39 an d
445.
Windows Media Player: varies– nonMicrosoft firewalls may require
configuration for UPnP.
'Cannot connect
to network
Solutions
Cause
Problem
Internet connection
down
Firewall preventing
access
Sta tion no t
bro adcas ting,
ove rload ed or
ins uffic ie nt
ban dwidt h.
Sta tion br oadca sting
usi ng unkn own
cod ec.
Lin k out of da te.
Check that Internet is working for
a computer connected to the
same network
Check the following ports are open:
UDP an d T CP ports 80 and 123;
DNS port 53.
Some Internet radio stations may
require additional ports to be open ed .
Try ot he r s ta ti on s; tr y l is te ni ng on
computer via Internet radio portal
website; try later.
'
Cannot connect
to Internet
' Cannot play
particular
Internet radio
station
37 of 3 8
36 of 3 8
Page 21
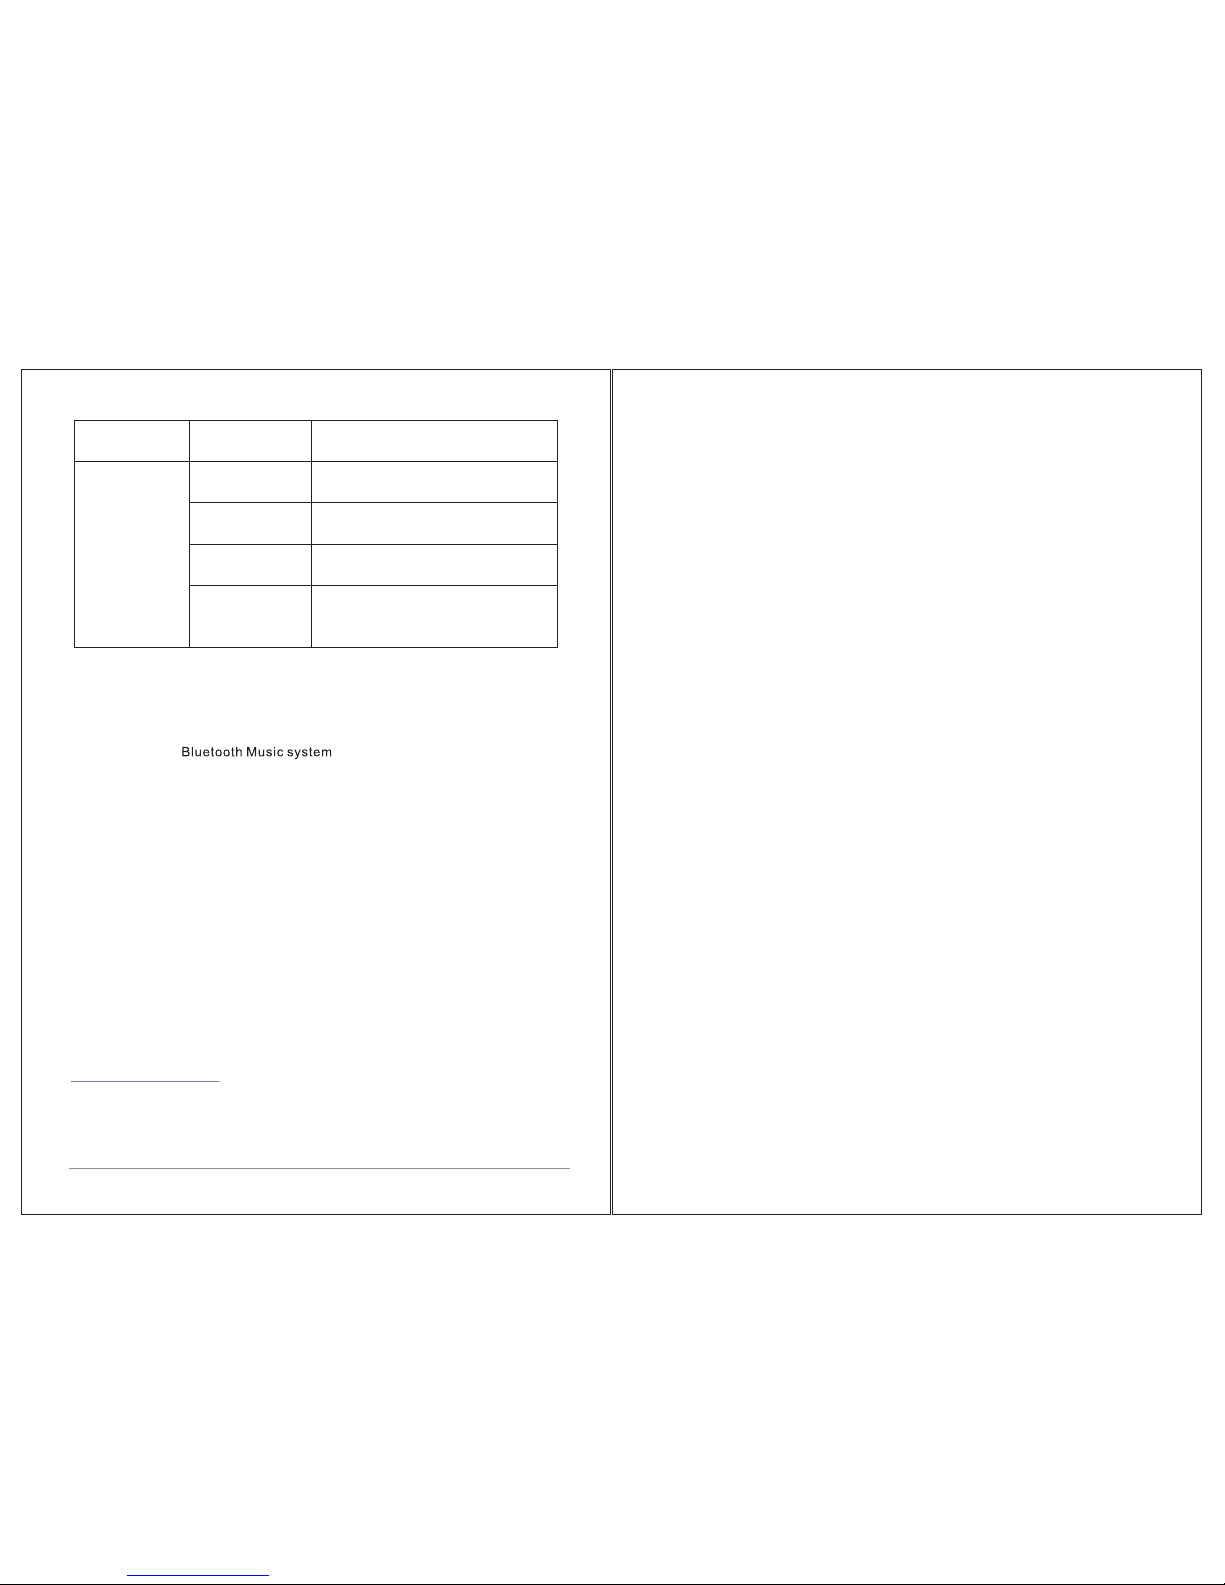
38 of 38
CD format is not
compatible
CD is dirty
CD is damaged
CD is upside down
in the CD slot
Insert a diff er en t CD i nt o th e CD s lo t
Clean the CD
Insert a diff er en t CD i nt o th e CD s lo t
Eject the CD and insert it in the CD
slot the right way up
'
CD playback
does
not start
Solutions
Cause
Pr ob le m
16 Tec hn ic al S pe ci fi ca ti on:
Model: M4+ Wireless Streaming Music System
Type: CD/ WiFi/DLNA/Spotify/Internet radio/DAB/DAB+/FM/AUX/
Speaker: 2 x 2 .5“ (full range), 1 x 5 .2 5“ woofer
Power: RMS 30W
Power Supply: 100-240V mains supply
Dimension (mm): 350W x 124H x 215D
Wei gh t: 4 .8 K G
Specifications are subject to change witho ut n ot ic e.
If you have any questions, problems or suggestio ns f or
improvement, don’t hesitate to write us an email or gi ve u s a ca ll .
LEMEGA Technology Co., Ltd
Shenzhen City, GD Province, China
info@lemegaaudio.com
For more information about other exciting prod uc ts f ro m LE ME GA , pl ea se
visit our website or contact us directly.
www.lemegaaudio.com
 Loading...