

Page 1
Owner’s Manual
-
WiFi/DLNA/ Spotify/I nternet Radio/
DAB/DA B+/FM/AUX/Bluetooth
M3+ Hi Fi Music System
Table of cont en t
1 Introduction
1.1 Safety
1.2 Features
1.3 Carton contents
1.4 External resources
1.5 Conventions used in this manual
2 Controls, connectors and display
2.1 Main controls
2.2 Connectors
2.3 Remote control
2.4 Screens
2.5 Operation
2.6 Menu navigation
3 Started and setup
3.1 Setup wizard
3.2 Other settings
3.3 Internet radio portal registration
3.4 Setting up a music server
3.5 Sharing media with Windows Media Pla ye r
3.6 Setting up M3+ for “Play To” Wind ow s 7 st re am in g me di a fe at ur e.
4. Internet radio mode
4.1 Last listened
4.2 Presets
4.3 Favorites
4.4 Browse
4.5 Search
4.6 My added stations
4.7 Now playing information
5. Spotify Connect
6. Music player mode (network)
6.1Shared media (from UPnP me di a se rv er )
…… ……… …………… ……………01……… ………
…… ……… …………… ……………02……… ………
…… ……… …………… ……………03……… …
…… ……… …………… ……………03……
…… ……… …………… …03……
…… ……… …………… …03……
…… … ……… …………… …………03…… …
…… … ……… …………… …………05…… …
…… … ……… …………… …………06…… …
…… ……… …………… ……………06………
…… ……… …………… ……………08………
…… ……… …………… ……………08………
…… ……… …………… ……………09………
…… … ……… …………… …………09…… …
…… ……… …………12…………………… …
…… ……… …………13…………
… … ……………15……… ……
… 15……… ……………
…16
…… …… ……… …………… …18…… ………
…… …… ……… …………… …17…… ………
…… …… ……… …………… ………18…… ………
…… …… ……… …………… ………18…… ………
…… … …………… …………18…… …………… …
…… …… ……… …………… ………19…… ………
…… … ………… ………19…… ………………
…… … ………… ………20…… …… …
…… … ……………20……… ……………
…… ……… …………… ……21……
……… …………… ……21
Page 2
6.2 USB playback
6.3 Playlists
6.4 Repeat/shuffl e
6.5 Now playing information
7 Using the “Play To” fe at ur e in W in do ws 7 t o st re am m ed ia
7.1 Use “Play To” in Wi nd ow s Me di a Pl ay er
7.2 Use “Play To” els ew he re i n Wi nd ow s 7
7.3 Now playing information
8 DAB radio mode
8.1 Scanning for stations
8.2 Selecting stations
8.3 Now playing information
8.4 Settings
9 FM radio mode
9.1 Selecting stations
9.2 Now playing information
9.3 Settings
10 Au x mo de
11 Bluetooth mode
12 Alarms and sleep
12.1 Alarms
12.2 Sleep
13 Software upgrade and factory reset
13.1 Software upgrade
13.2 Factory reset
14 Troubleshooting and error messages
14.1 Error messages
14.2 Troubleshooting
15 Tec hn ic al S pe ci fi ca ti on
…… ……… …………… …………23………… …
…… ……… …………… …………23………… …
…… ……… …………… …………24………… …
…… …… …………… ……………24…
………24
……… …………… ……24
……… …………… ………25
…… ……… …………… …………25……
…… ……… …………… …………25………… …
…… ……… …………… ……26……………
…… ……… …………… ………26………… …
…… ……… …………… …………27……
…… ……… …………… …………27………… …
…… ……… …………… …………27………… …
…… ……… …………… …………28………
……… …………… …………………28
…… ……… …………… …………28………… …
…… ……… …………… …………28………… …
…… ……… …………… …………29………… …
…… ……… …………… …………30……… …
…… ……… …………… …………30………… …
…… ……… …………… …………31………… …
…… ………31……………
…… ……… …………… ……31……………
…… ……… …………… …………31………… …
…… ………32……………
…… ……… …………… ………32………… …
…… ……… …………… ………33………… …
…… ……… …………… …35…… ………
1. Safety
1.1 Safety Instructions
Please store this instruction manual for futur e re fe re nc e.
Ÿ WARNING: To red uc e th e ri sk o f fi re o r el ec tr ic s ho ck , do n ot e xp os e th is
apparatus to rain or moisture. The apparatus sha ll n ot b e ex po se d to d ri pp in g
or splashing and that objects filled with li qu id s, s uc h as v as es , sh al l no t be
placed on apparatus.
Ÿ WARNING: Th e di re ct p lu g- in a da pt er i s us ed a s di sc on ne ct d evice, the
disconnect device shall remain rea di ly o pe ra bl e.
Ÿ This lightning flash with arrowhead sy mb ol w it hi n an e qu il at er al t ri an gl e is
intended to alert the user to the presence of non- in su la te d “d an ge ro us
voltage” within the product's enclosur e th at m ay b e of s uff ic ient magnitude to
constitute a risk of electric shock.
Ÿ War ni ng : To red uc e th e ri sk o f el ec tr ic s ho ck , do n ot r em ov e co ve r( or
back) as there are no user-serviceable p ar ts i ns id e. R ef er s er vi ci ng t o
qualified personnel.
Ÿ The exclamation point within an equila te ra l tr ia ng le i s in te nd ed t o al er t
the user to the presence of important operating an d ma in te na nc e
instructions in the literature accompany in g th e ap pl ia nc e.
Ÿ Correct Disposal of this product. Thi s ma rk in g in di ca te s th at this
product should not be disposed with othe r ho us eh ol d wa st es t hr ou gh ou t th e
EU. To prev en t po ss ib le h ar m to t he e nv ir on me nt o r hu ma n he al th from
uncontrolled waste disposal, recycle i t re sp on si bl y to p ro mo te t he
sustainable reuse of material resour ce s. To ret ur n yo ur u sed device, please
use the return and collection systems or conta ct the r et ai le r wh er e th e
product was purchased. Th ey c an t ak e th is p ro du ct f or e nv ir on mental safe
recycling.
Ÿ No naked flame sources, such as lighted cand le s, s ho ul d no t be p la ce d
on the apparatus.
Ÿ Do not use this product near water or moisture.
Ÿ Cl ea n on ly w it h a dr y cl ot h.
Ÿ Un pl ug t hi s pr od uc t fr om t he w al l ou tl et b ef or e cl ea ni ng .
Ÿ Place th unit on a solid surface.
1 of 35
Page 3

3 of 35
Ÿ Do not put it in a closed bookcase or a cabinet that may kee p ai r fr om
flowing through its ventilation open in gs .
Ÿ Do not install near any heat sources, such as radi at or s, h ea t re gi st er s,
stoves or other appliances that produce he at .
Ÿ Protect the power cord from being walked on or p in ch ed , pa rt ic ul ar ly a t
plugs and the point where they exit from the produ ct .
Ÿ Servicing is required when the produ ct h as b ee n da ma ge d. D o no t at te mp t
to service this product yourself. Opening or rem ov in g co ve rs m ay e xp os e yo u
to dangerous voltages or other hazards . Pl ea se c on ta ct t he m an uf ac tu re r to
be referred to an authorized service cente r ne ar y ou .
Ÿ To prevent risk of fire or electric shock, avoid over lo ad in g wa ll o ut le ts ,
extension cords, or integral conveni en ce r ec ep ta cl es .
Ÿ Do not let objects or liquids enter the produc t.
Ÿ Use proper power sources. Plug the produ ct i nt o a pr op er p ow er s ou rc e,
As described in the operating instructio ns o r as m ar ke d on t he p ro du ct .
1.2 Features
This manual describes how to use the M3+, an adv an ce d bu t ea sy -t o- us e Wi Fi connected audio system with the followi ng m od es :
Ÿ Internet Radio with access to over 20,000 stations by wi fi s tr ea mi ng o r
Wired Ethernet connected, 'Listen again' b ro ad ca st s an d po dc as ts .
Ÿ Spotify acting as wireless speakers controll ed b y th e Sp ot if y App
available for iOS/Android smart device s an d a de sk to p cl ie nt f or P Cs .
Ÿ Music player allowing easy navigatio n an d pl ay ba ck t hr ou gh a U SB o r
network-stored library of music files incl ud in g AAC +, M P3 , WM A, WAV, an d
FLAC. Play To fea tu re a ll ow in g me di a to b e pu sh ed f ro m a PC r un ni ng
Windows 7 to M3+.
Ÿ DAB/DAB+digital radio with a wide choice of chan ne ls a nd d ig it al q ua li ty
sound broadcast free-to-air.
Ÿ FM with RDS (Radio Data System).
Ÿ Bluetooth: streaming music and control from smart de vi ce .
• USB port: to play the MP3 music from USB stick storage device.
• Aux i n or e xt er na l MP 3 mu si c so ur ce s fr om i Po d/ iP ad o r ot he r Mp 3 pl ay er s
M3+ also provides the following features:
Ÿ Large TFT c ol or d is pl ay f or e as y co nt ro l an d cl ea r in fo rm at io n di sp la y.
Ÿ
Ÿ Remote control from an Android or iOS Smart Devic e, u si ng S po ti fy A pp o r
UNDOK the Frontier Silicon Remote Contro l App t o co nt ro l th e pl ay ba ck .
Ÿ Clock with auto-update capability an d du al i nd ep en de nt a la rm s
Sleep/snooze.
Ÿ Multiple network profiles for easy setup and p or ta bi li ty.
Ÿ Multiple languages.
1.3 Carton contents
After you unpack the box, you will find the follow in g it em s
Ÿ 1 M3+ unit
Ÿ 1 DC12V 2.5A power adapter
Ÿ 1 owner's manual
Ÿ 1 Remote Control
Ÿ 1 gloves
1.4 External resources
To operate M3+, the following external resou rc es a re n ee de d:
Ÿ A power source (100-240 V mains supply)
Ÿ A wireless (Wi-Fi) network (provided thro ug h a ro ut er ) wi th Ap pr op ri at e
permissions and password if necessar y (f or I nt er ne t ra di o an d Ne tw or k Mu si c
player modes)
Ÿ Broadband Internet access (for Internet radi o mo de a nd S po ti fy m od e an d
Internet Software Update)
Ÿ A music library stored on the network or on a USB mass stora ge d ev ic e (f or
Music player modes),
Ÿ An iOS or Android device (for using control a pp s) .
Ÿ An external audio source (for Aux in mode)
1.5 Conventions used in this manual
Button (press) Physical button on the keypad
Option (select) Menu option shown on the display
Name Menu, screen or other name
2. Controls, connectors and display
2.1 Main controls
Infrared remote control
2 of 35
Page 4
5 of 35
4 of 35
1
2
5
6
4
7
8
9
10
11
3
1
2
3
4
5
+
I
N
F
O
O
O
Z
N
E
S
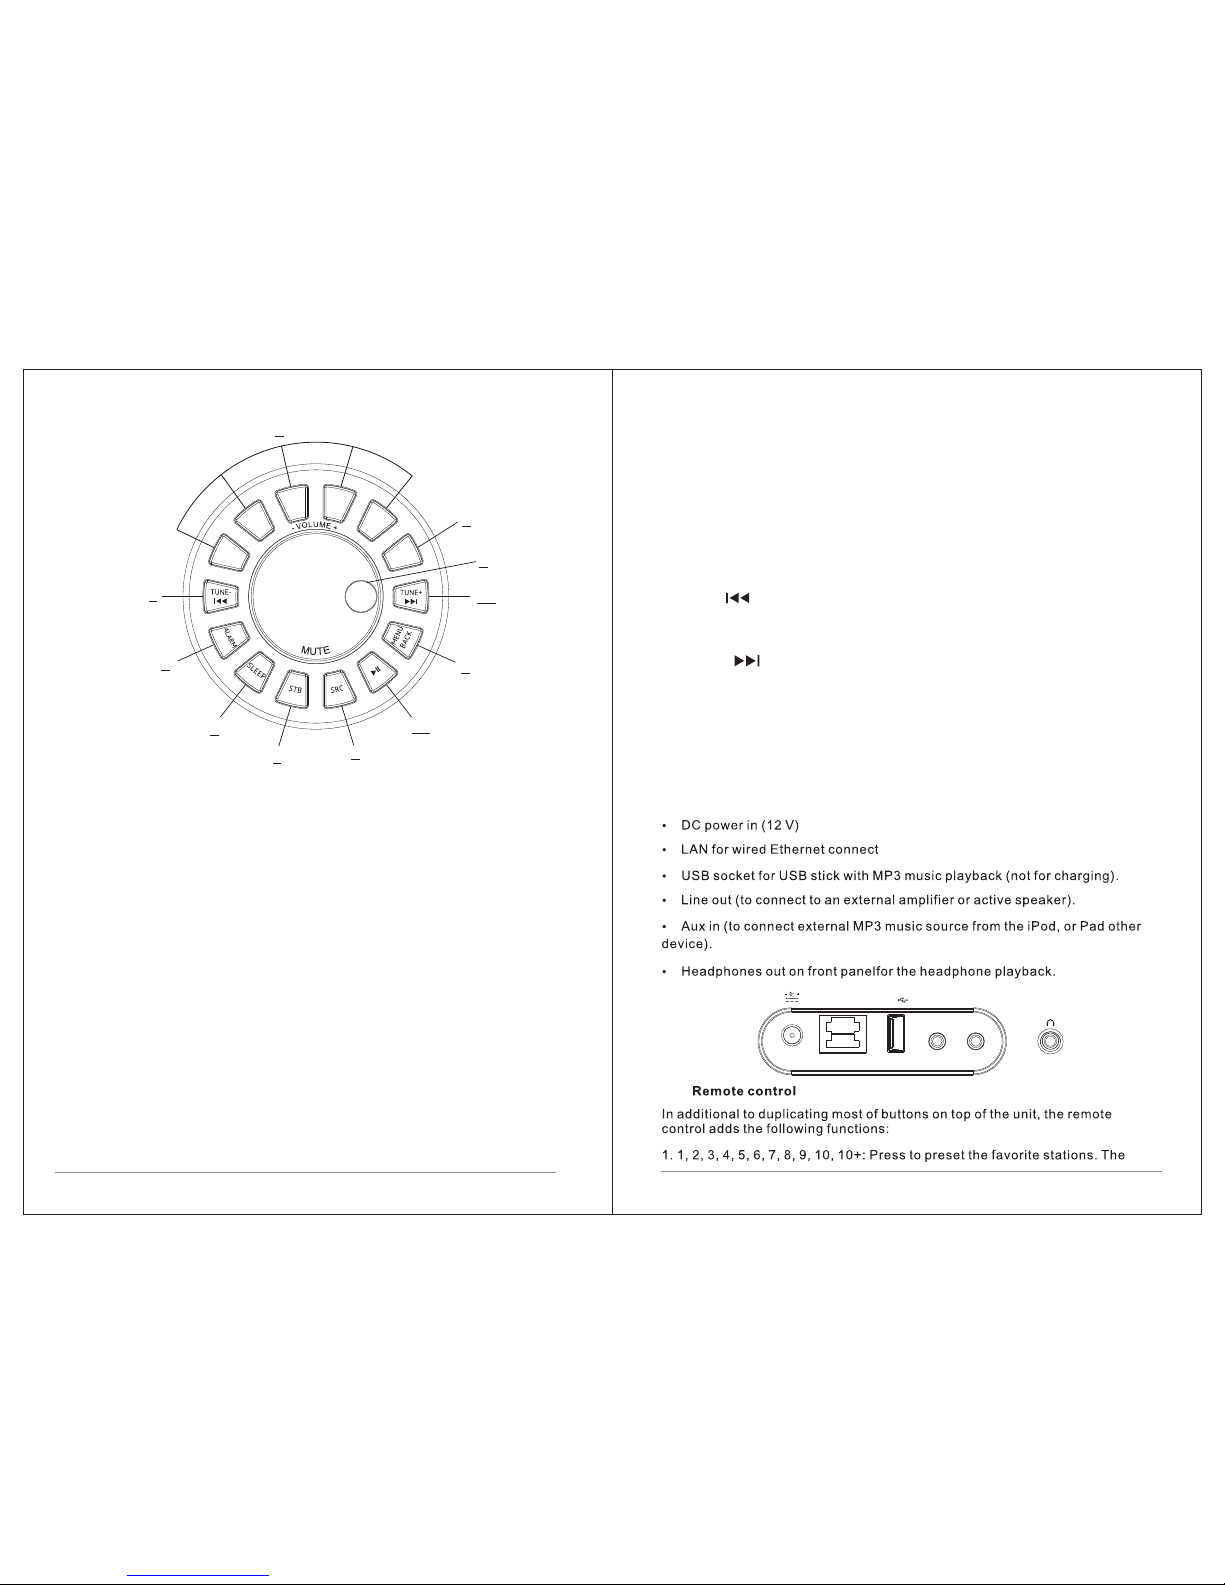
1. SELECT/ VOLUME/MUTE/SNOOZE:
2. STAND BY : Turn on or back to standby mode (showing clock a nd d at e) o r
cancel sleep or cancel alarm function.
3. SLEEP: When playing, press Sleep, M3+ will back to se t sl ee p ti me .W he n
playing, opens the sleep menu to set the time inte rv al b ef or e th e un it i s se t to
Standby mode. When alarm is sounding, allo ws y ou t o se t th e sn oo ze i nt er va l.
4. SOURCE: Press to Source to select diff er en t mo de s in te rn et r ad io , Sp otify,
My music, DAB, FM, Bluetooth and Aux.
5. AL AR M: P re ss t o Ala rm , th e sc re en w il l di sp la y Ala rm 1 a nd Al ar m 2; t he n
Rotate and press the SELECT button to select alarm 1 or al ar m 2 to s et u p.
6. INFO: Vi ew m or e in fo rm at io n ab ou t th e st at io n or t ra ck p la yi ng . Pr ess
again to cycle through further information s cr ee ns t he n re tu rn t o th e no rm al
a. S EL EC T: Tur n to sc ro ll through a m en u or st at io n list. T he chosen o pt io n i s
highlighted in yellow text), Press to the button t o se le ct .
b. VOLUME:Tur n to t he b ut to n to a dj us t th e vo lu me u p or d ow n wh en
playback.
c. MUTE: Press to the button to mute the music when playing.
d. SNOOZE: Press the button to snooze a set time when alarm soun di ng .
e. FU LL SIDESHOW: Lo ng pres s th e button to s wi tc h no rm al play in g sc re en
image to full screen slide show image.
Now playing screen.
8. PRESET: Long press 1,2,3,4,5+ to preset and save the fa vo ri te s ta ti on s
(save 20 favorite stations); Short Press to 1,2,3,4,5+ to se le ct t he f av or it e
station or Preset recall. You ca n pr es et 2 0 st at io ns b y pr es s 5+ a nd b y sc ro ll
the preset list to achieve.
9. TUNE-/ : Previous: Press to select the previous track under FM/DAB /
Bluetooth mode; Press and hold the Tu ne - bu tt on 2 s ec on ds t o au to -s ca n th e
stations under the FM/DAB mode.
10. TUNE+/ : Next: Press to select the next track under FM/DAB/
Bluetooth mode; Press and hold the Tune+ bu tt on 2 s ec on ds t o au to -s ca n th e
stations under the FM /DAB mode.
11. : Press to select Play/Pause under intern et r ad io , Sp ot if y, My mu si c
and BT mo de . In D AB a nd F M, p re ss t o do a ut o sc an t he s ta ti on s.
2.2 Connectors
As shown below has connectors (from left to righ t) fo r th e fo ll ow in gs :
7. BACK/MENU:
a. BACK: press the BACK to return to the previous screen.
b. MENU: press the MENU to show the MENU for the current mode. Pre ss
again to show now playing screen.
u;
AUX INLINE OUT
LAN
12V 2.5A
USB
2.3
Page 5
6 of 35
7 of 35
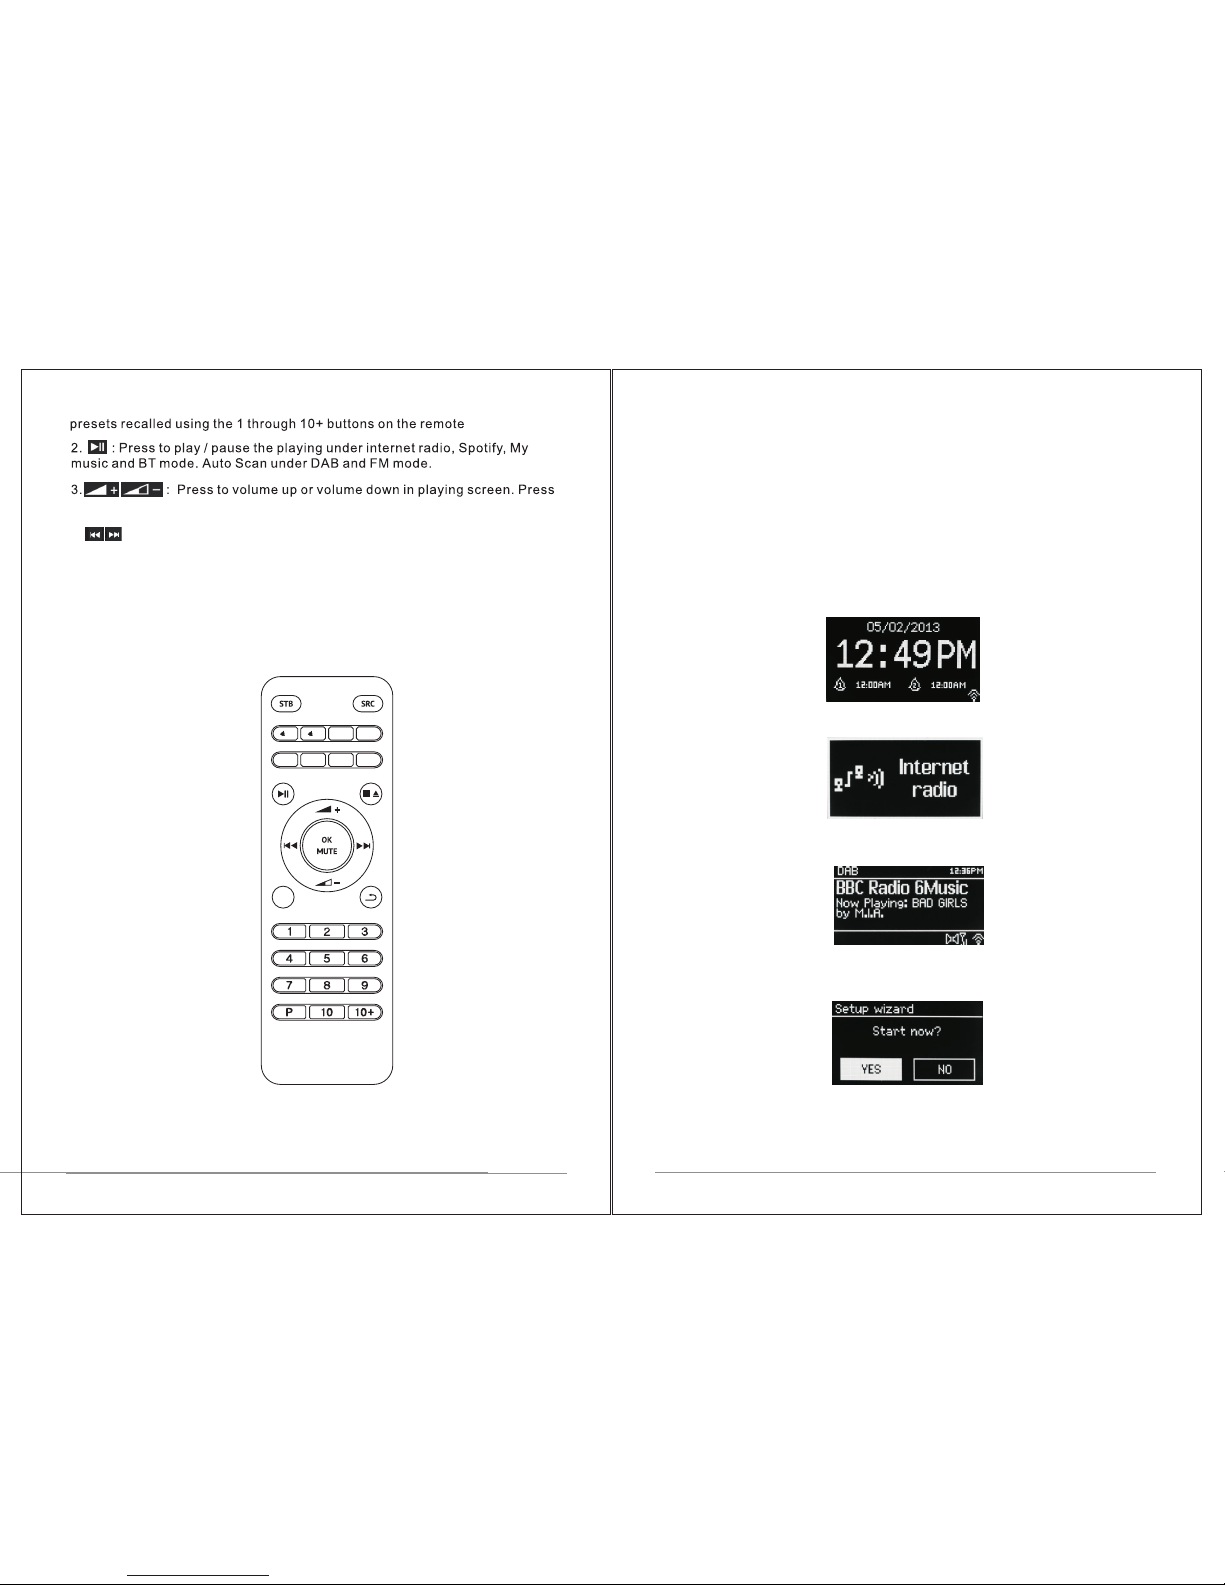
up or down to select menu for settings.
4. : Press right or left to select mode. In playing screen, press right or
left to select spotify, my m us ic , FM a nd D AB s ta ti on .
5. P: Preset: Press for the Preset recall; press up or down to sel ec t th e pr es et
number then press 'OK' to confirm. There are 20 preset s ea ch f or i nt er ne t
radio, DAB and FM modes.
6. OK/MUTE: Long press the button to switch normal pla yi ng s cr ee n im ag e to
full screen slide show image.
2.4 Screens
The screen shows various menus, dialog ue s an d di sp la ys a s de sc ri be d
below. There are basically six types of scre en :
1
2
SLEEP
Z
Z
Z
PRG
MENU
SHUF
REP
INFO
Ÿ Standby (clock)
Ÿ Splash (mode)
Ÿ Now playing
Ÿ Dialogue
Ÿ Error/Information
Ÿ Menu
Where there is more text than can be fitted onto a screen, the tex t
automatically scrolls right to left after a brie f pa us e.
The Standby screen shows the time, date and any active a la rm t im es .
A splash screen is displayed for each mode. Pre ss s ou rc e to c yc le t hr ou gh
the listening modes.
Now playing screens show information about the aud io s ou rc e an d tr ac k
now playing, where available.
Dialogue screens are shown to allow the user to chan ge s et ti ng s. T he y va ry
in complexity from simple Yes/ No o pt io ns u p to t he s cr ol la bl e ne tw or k
passphrase input screen.
The selected option is highlighted wit h a ye ll ow b ac kg ro un d. D ia lo gu e
screens mark the currently saved setting with an a st er is k (* ).
Error/Information screens give specific mess ag es f or a f ew s ec on ds , th en
change automatically to the next screen.
control
Page 6
8 of 35 9 of 35
Menu Screens – for details of menu screens see und er S ec ti on 2 .7 M en u.
2.5 Operation
After the initial setup, M3+ is ready for operatin g in m os t Mo de s.
To select a Mode, press source until the require d Mo de s pl as h sc re en i s
displayed. After a brief moment M3+ switches to tha t mo de . The l as t st at io n or
track previously used in that mode is selected . If thi s is n ot p os si bl e, M 3+
scans for relevant stations, networks, or prompt s th e us er f or a pp ro pr ia te
input. See the relevant Mode section for detai ls o f ho w to u se e ac h li st en in g
mode.
The Common local controls for sound volu me , Mu te a nd P la y/ Pa us e ar e
available in all listening modes .
2.6 Menu navigation
The primary control for moving through menus a nd o pt io ns i s th e Se le ct
Control. Rotate the control to move up or down a men u. O nc e th e re qu ir ed
option or value is highlighted press the S el ec t Co nt ro l. Al l me nu s an d li st s ac t
as loops such that turning the control to go beyon d th e fi rs t or l as t en tr y in a
menu or list takes you to the opposite end of the menu or li st . So g oi ng u p fr om
the first entry in a menu will take you to the last option in the me nu , et c.
A “>” appears on the right of the screen if there a re m or e op ti on s ab ov e
or below those visible.
To enter the menu tree in a particular mode press Me nu . To move b ac k a me nu
level press Back . To exi t th e me nu s ys te m, p re ss M en u ag ai n. E ac h mo de h as
a Mode menu, with options specific to that mode.
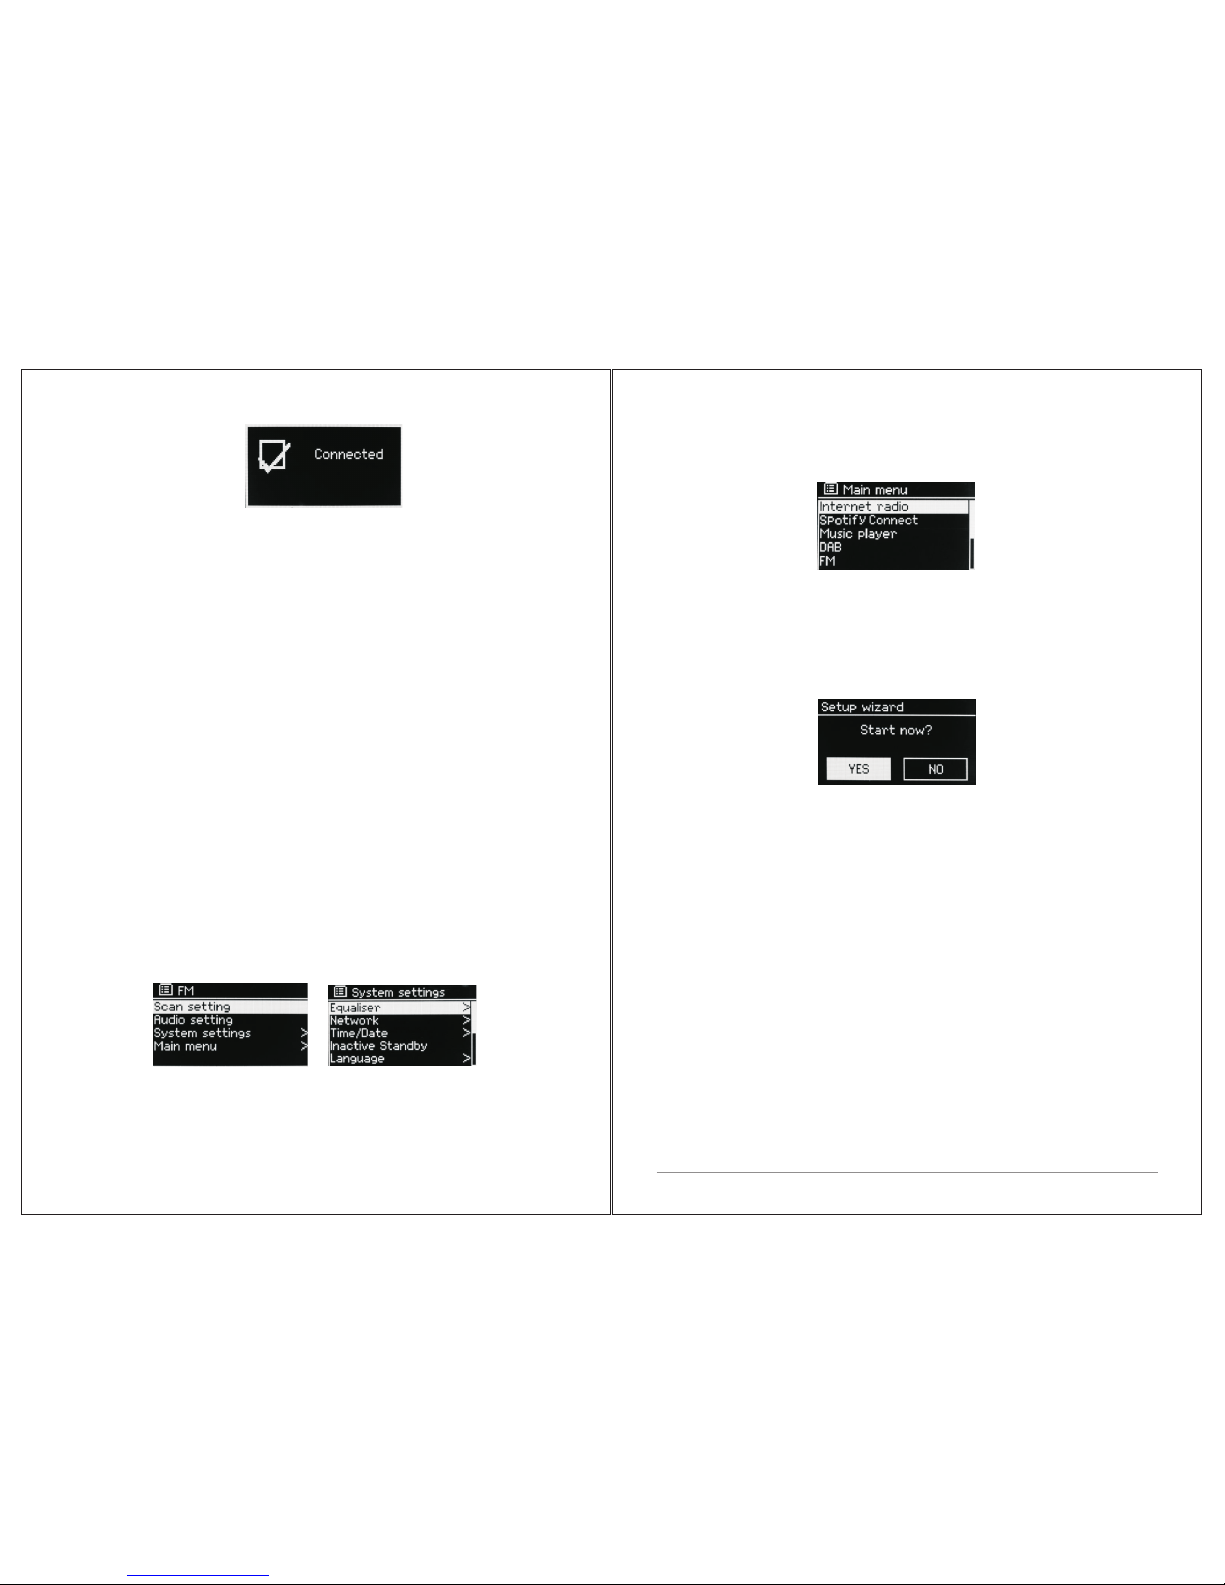
For example, the FM mode menu has two mode specifi c op ti on s: S ca n se tt in g
and Audio setting.
In addition, each mode menu has two final op ti on s: S ys te m se tt in gs > a nd
Main menu >. The " >" indicates options leading to further menus.
The System settings menu presents system setting fun ct io ns t o al lo w th e us er
to setup how the unit behaves. Th is i nc lu de s Eq ua li ze r, network,time/ da te ,
language, factory reset and software updat e…….
The Main menu presents an alternative method for sel ec ti ng l is te ni ng m od es
plus sleep and alarm functions.
3. Started and setup
M3+ is easy to use. To play DAB or FM radio, all you need is a pow er s ou rc e (a
100-240 V mains supply); For Music Player mo de , yo u ne ed a w ir ed /w ir el es s
Ethernet network and a UPnP mus ic s er ve r (e .g . a PC ). F or I nt er ne tconnected modes such as Internet radio, you al so n ee d a br oa db an d In te rn et
connection.
3.1 Setup wizard
When M3+ is started for the first time, it runs through a setup wi za rd t o
configure settings for date/time and netwo rk . On ce t hi s ha s fi ni sh ed , th e
system is ready to use in most modes.
Note: To change these settings later, select Men u > Sy st em s et ti ng s >.
To run the setup wizard again, select Menu > Syste m se tt in gs > S et up w iz ar d.
Select Yes to start the setup wizard.
If you choose No, the next screen asks if you would li ke t o ru n th e wi za rd n ex t
time M3+ is started. The system then starts without config ur in g ti me /d at e an d
network settings and enters the Main Menu.
Note: If power is removed while the wizard is in p ro gr es s, t he w iz ar d wi ll r un
again next time M3+ is started.
3.1.1 12/24 hour display
To change between 12 and 24 hour displ ay , se le ct S et 1 2/ 24 h ou r an d th en
select your preference.
3.1.2 Set Tim e/ Da te ( wi za rd )
Page 7
11 of 35
10 of 35
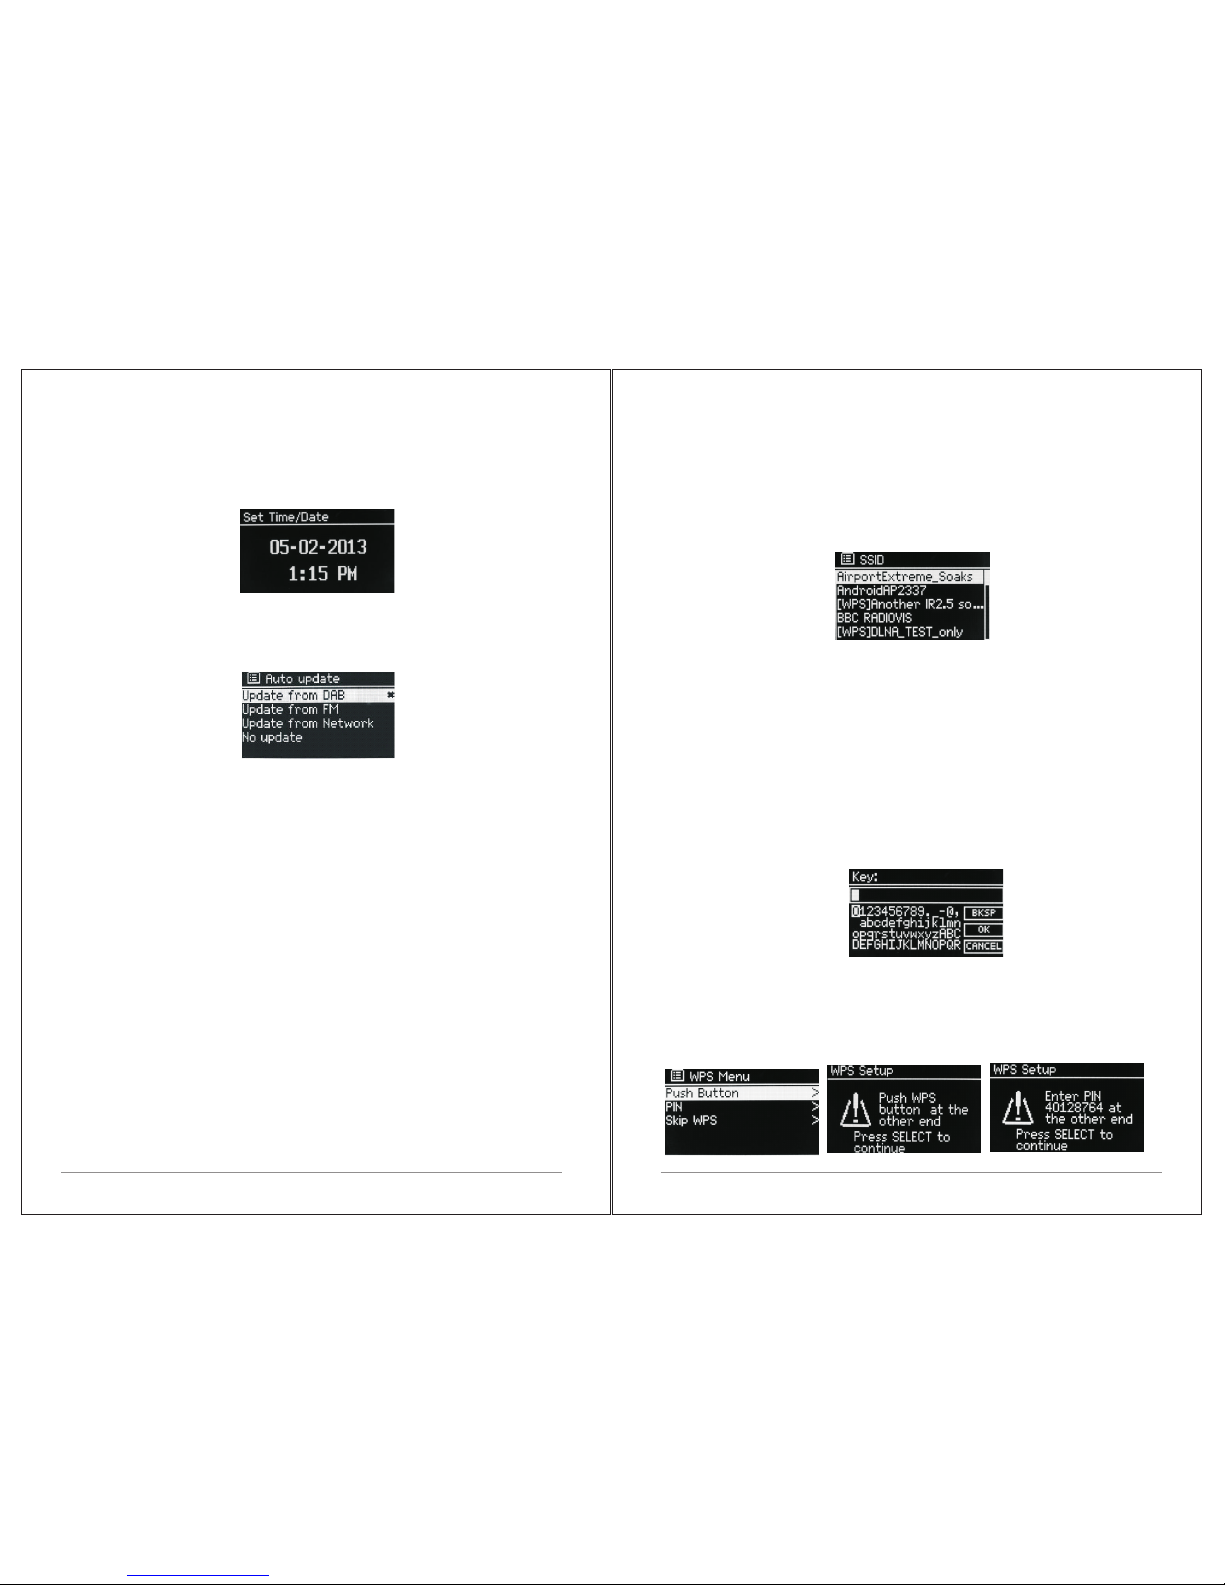
The date and time are displayed as dd-mm-yyyy an d hh :m m AM/ PM w it h th e
first value, dd, active (flashing).
Adjust e ac h va lu e w it h th e Select co nt ro l. As ea ch v al ue is s et by p re ss in g th e
Select control, the next value becomes activ e re ad y fo r ad ju st me nt .
Auto-update
Auto-update w or ks with data s en t ov er DA B, FM or t he Inte rn et . T he clo ck is
only u pd at ed w he n in a co rr es po nd in g mo de , so it i s be st t o select a mo de y ou
use regularly.
DAB and FM use time signals broadcast with rad io t ra ns mi ss io ns .
Network uses a time signal sent from the Internet radi o po rt al w he n in a ny
network-connected mode.
1.Select Update from DAB, Update from FM, Update from Ne tw or k or N o
update.
2. If you are updating from the network, set your time zone.
3. If your country uses daylight saving, the autom at ic al ly u pd at ed t im e fr om
the network may be wrong by one hour. When dayl ig ht s av in gs a re i n effect
(during the winter), turn on the Daylight savi ng s op ti on t o re ct if y th is .
Note that if you are updating the time from DAB or FM, the Dayli gh t sa vi ng s
option has no eff ec t on t he c lo ck 's t im e.
M3+ will auto-update from the selected sou rc e wh en t im e in fo rm at io n is
available.
Manual set
If you set No update, the wizard now prompts you to set the time a nd d at e
manually.
The date and time are displayed as dd-mm-yyy y an d hh :m m AM/ PM w it h th e
first value, dd, active (flashing).
Adjust each value with the Select control.
As each value is set, the next value becomes activ e an d fl as he s.
3.1.3 Network
M3+ is compatible with all common network pr ot oc ol s an d en cr yp ti on
methods, including Wi-Fi Protected Setup ( WP S) .
To c on ne ct M3+ to your ne tw or k, you ne ed a W i- Fi wire le ss rout er, together
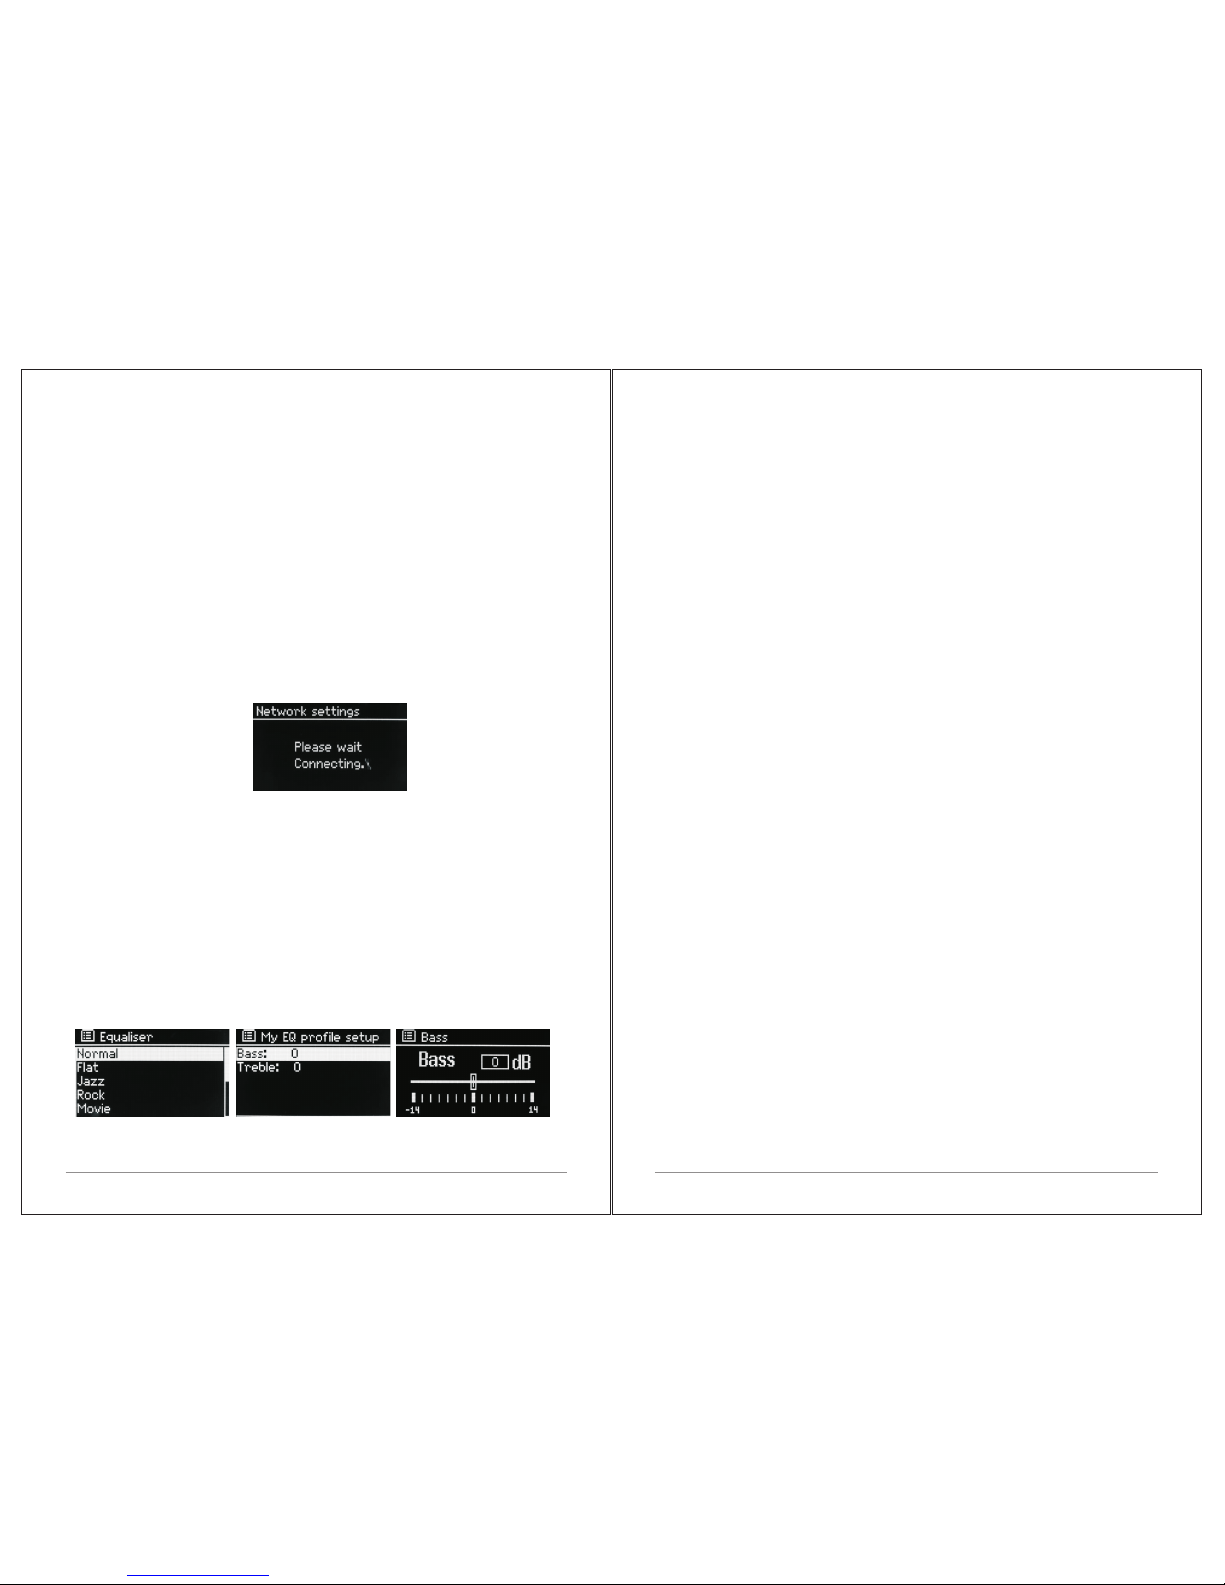
with pass wo rd ke y i f s et Se le ct WL AN re gi on /c ou nt ry >Wi-Fi network (S SI D) ,
and then select a network from the list.
If the n et wo rk is o pe n (n on -e nc ry pt ed ), M3+ co nn ec ts and no further details
are required; see Completion below.
Standard encrypted network
To en te r t he ne tw or k’ s k ey (p as sw or d) , u se th e Select control t o h ig hl ig ht th e
next rele va nt cha ra ct er and pres s to se le ct each ch ar ac te r in turn. A s each
character is selected, the key is built up near the to p of t he d is pl ay.
The t hr ee options – B ac ks pace, OK an d Ca nc el ar e incl ud ed in the se le ct io n
loop.
These can be accessed just using the Select cont ro l, o r, a sh or t cu t Is
available, pressing the Info key, wh ic h mo ve s th e se le ct io n hi ghlight to the
Back Space option.
WPS setup
WPS e nc ry pt ed networks a re identif ie d b y ‘[ WP S] ’ at t he start of the ne tw or k
name, a nd hav e two meth od s of c on ne ct io n. Sel ec t one and follow t he
prompts. Wh en us in g the n et wo rk wi za rd an additiona l o pt io n t o Skip WP S i s
available.
Select one and follow the prompts:
Page 8
12 of 35 13 of 35
Ÿ Push Button
M3+ prompts you to press the connect button on the rou te r. It t he n pr es s th e
select control.
Ÿ Pin > (code number)
M3+ generates an 8-digit code number whi ch y ou e nt er i nt o th e wi re le ss
router, access point.
Ÿ Skip WPS >
Enter key as for a standard encrypted network, abo ve . Fo r mo re i nf or ma ti on
on setting up a WPS encrypted network, see your WPS rout er ’s i ns tr uc ti on s.
On completion
M3+ connects to the selected network.
If connecting fails, M3+ returns to a previous scree n to t ry a ga in . To e xi t th e
process use the Back/Menu button.
3.2 Other settings
Sections for those modes. Common settings are co ve re d be lo w.
3.2.1 Equalizer
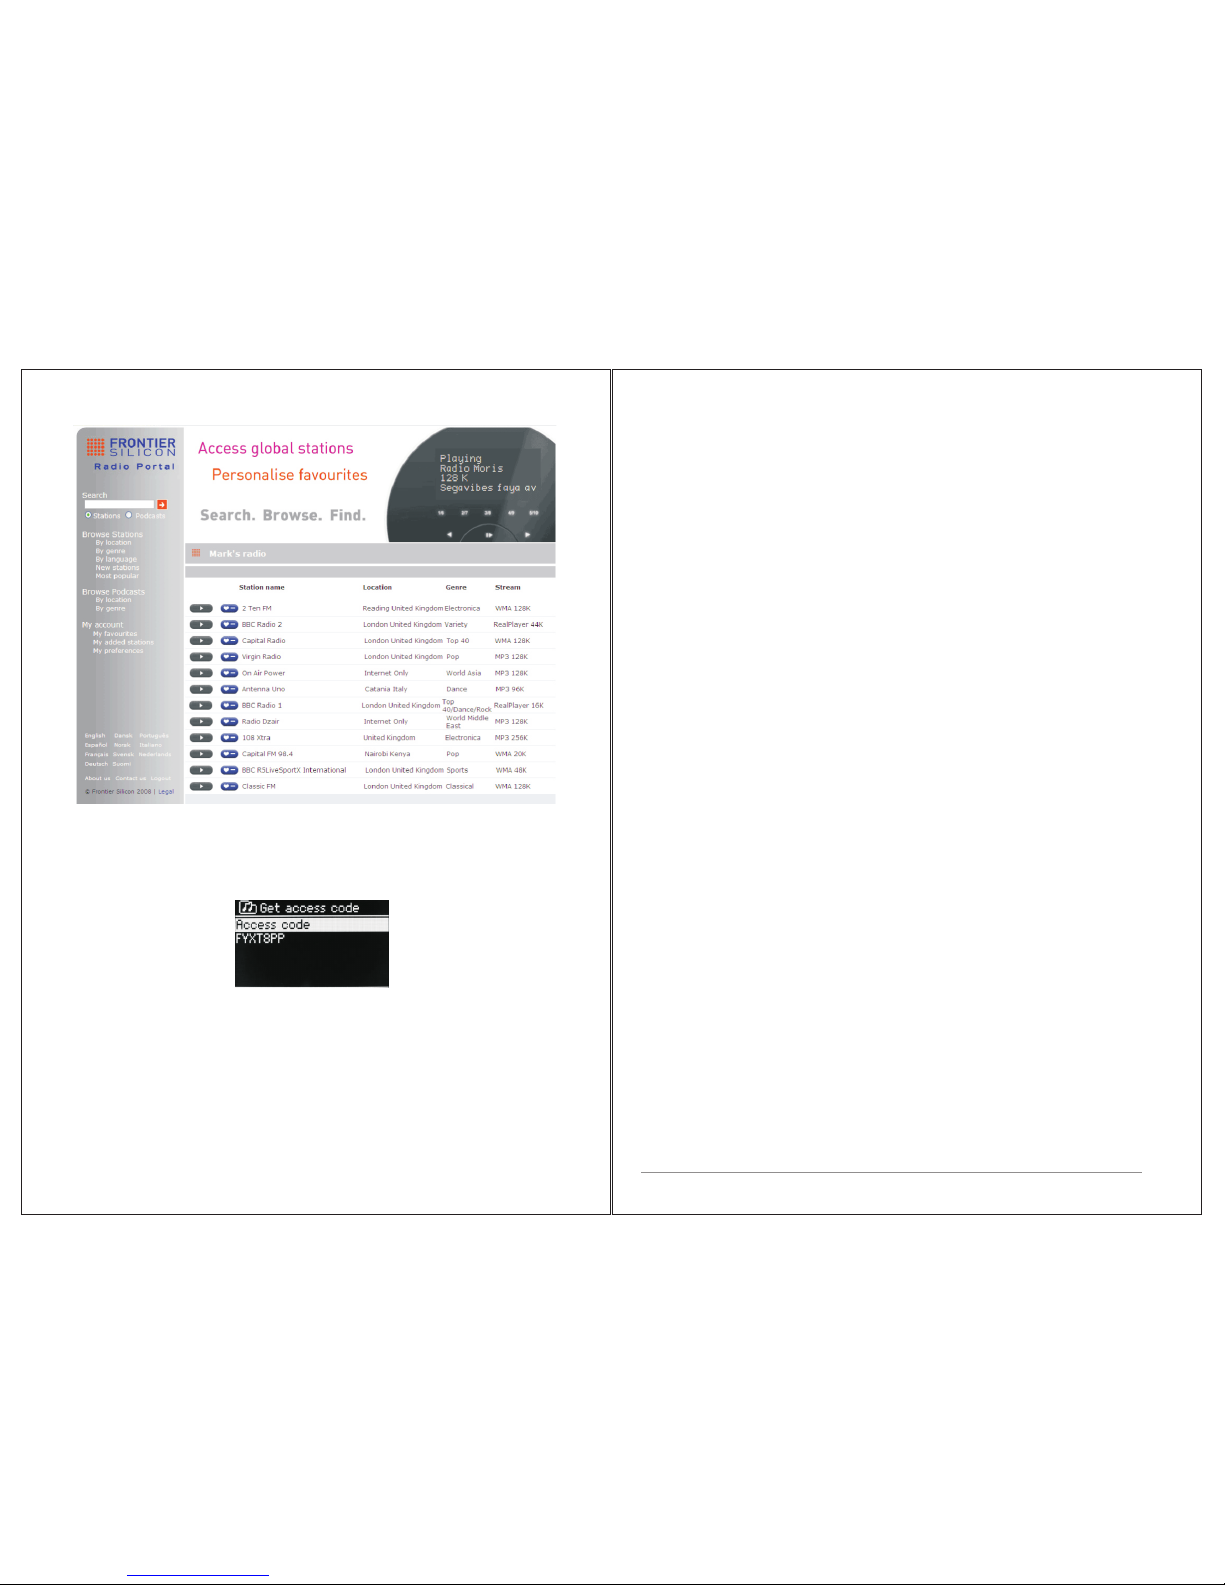
Several preset EQ modes are available; a ls o a us er -d ef in ed s et ti ng ( My E Q) .
To choose an EQ setting, select Menu >System setting s > Eq ua li ze r. Y ou c an
then choose from a variety of preset modes and My EQ
The last option ‘My EQ profile setup’ allows y ou t o de fi ne y ou r ow n se tt in gs
for the ‘My EQ’ option, with custom bass, and treble set ti ng s.
3.2.2 Network
M3+ remembers the last four wireless network s it h as c on ne ct ed t o, a nd
automatically tries to connect to whiche ve r on e of t he m it c an f in d. Y ou c an
3.2.3 Language
The default language is English. To cha ng e, s el ec t Me nu > S ys te m settings
> Language >then select your language.
3.2.4 Connection your smartphone with the radio via UNDOK APP
To connect your Smartphone with M3+ you need to do wn lo ad t he f re e ap p
“UNDOK“ from Apple Store or Google Play Store. IMPORTA NT : Th e ph on e
must be in the same wireless network as the music syst em .
Ÿ Download the app and open it.
Ÿ The app automatically searches for avail ab le d ev ic es . Se le ct “L EM EG A
M3+” from the list.
Ÿ Open SOURCE to choose between diffe re nt i np ut s ig na ls .
Ÿ Open BROWSE to get a list of available stations. Select the desired station.
Ÿ Open NOW PLAYI NG t o ge t mo re i nf or ma ti on a bo ut t he c ha nn el .
Ÿ Open the settings to adjust the equalizer, se t sl ee p ti me r an d ot he r
functions easily.
3.3 Internet radio portal registration
M3+ uses the Frontier Silicon Internet radio p or ta l we bs it e th at a ll ow s yo u to
organize your favorite's lists and also li st en t o In te rn et r ad io o n a co mp ut er.
see the list of registered networks through Me nu > S ys te m se tt in gs > Ne tw or k
> Network profile >From here you can delete un wa nt ed n et wo rk s by t ur ni ng
and pressing Select then confirming de le te Yes .
There are also other options for viewing and m an ua ll y al te ri ng n et wo rk
settings from Menu > System settings > Network > (for exampl e se tt in g up a
wired network).
Users experienced with networkin g ma y fi nd t he se o pt io ns u se fu l fo r
diagnosing and fixing network prob le ms .
Page 9
14 of 35 15 of 35
Ÿ access code,
Ÿ
Ÿ your e-mail address,
Ÿ
Ÿ passphrase,
Ÿ
Ÿ radio model (M3+).
If yo u al re ad y ha ve an a cc ou nt and wish t o ad d an addi ti on al r ad io , log in to
your account and select My preferences > Add another Wi-Fi radio.
Once your radio is registered with the porta l, y ou c an i mm ed ia te ly u se t he
Internet radio favorites and added station s fe at ur es .
3.4 Setting up a music server
In order for M3+ to play music files from a computer, the comp ut er m us t be s et
up to share files or media.
UPnP me di a sh ar in g al lo ws d ev ic es l ik e M3 + to p la y mu si c from a shared
media library navigating through tag m en us s uc h as Ar ti st , Alb um o r Ge nr e. I f
you are running a suitable server system such as a P C wi th W in do ws M ed ia
Player 10 or later (WMP), and your music library i s we ll -t ag ge d, t he n it i s
recommended to use media sharing. Only the U Pn P ser ve r ne eds to be set
up.
Notice: iTu ne s do es n ot c ur re nt ly w or k as a U Pn P me di a se rv er, b ut t he re a re
add-ons available to work with an iTu ne s li br ar y.
3.5 Sharing media with Windows Media Player
The most common UPnP se rv er i s Wi nd ow s Me di a Pl ay er ( 10 o r la te r) .
Alternatively, oth er U Pn P pl at fo rm s an d se rv er s ma y be u se d. To se t up W MP
for media sharing, perform the following s te ps :
1.Ensure that the PC is connected to the network.
2.Ensure that the radio is powered on and conn ec te d to t he s am e ne tw or k.
3.In WMP, add t o th e me di a li br ar y th e au di o fi le s an d fo ld er s yo u wa nt to
share with M3+ (Library > Add to Library…).
4.In WMP, ena bl e me di a sh ar in g (L ib ra ry > M ed ia s ha ri ng…).
Notice: setup can diffe r de pe nd in g on w hi ch v er si on o f WM P yo u ha ve .
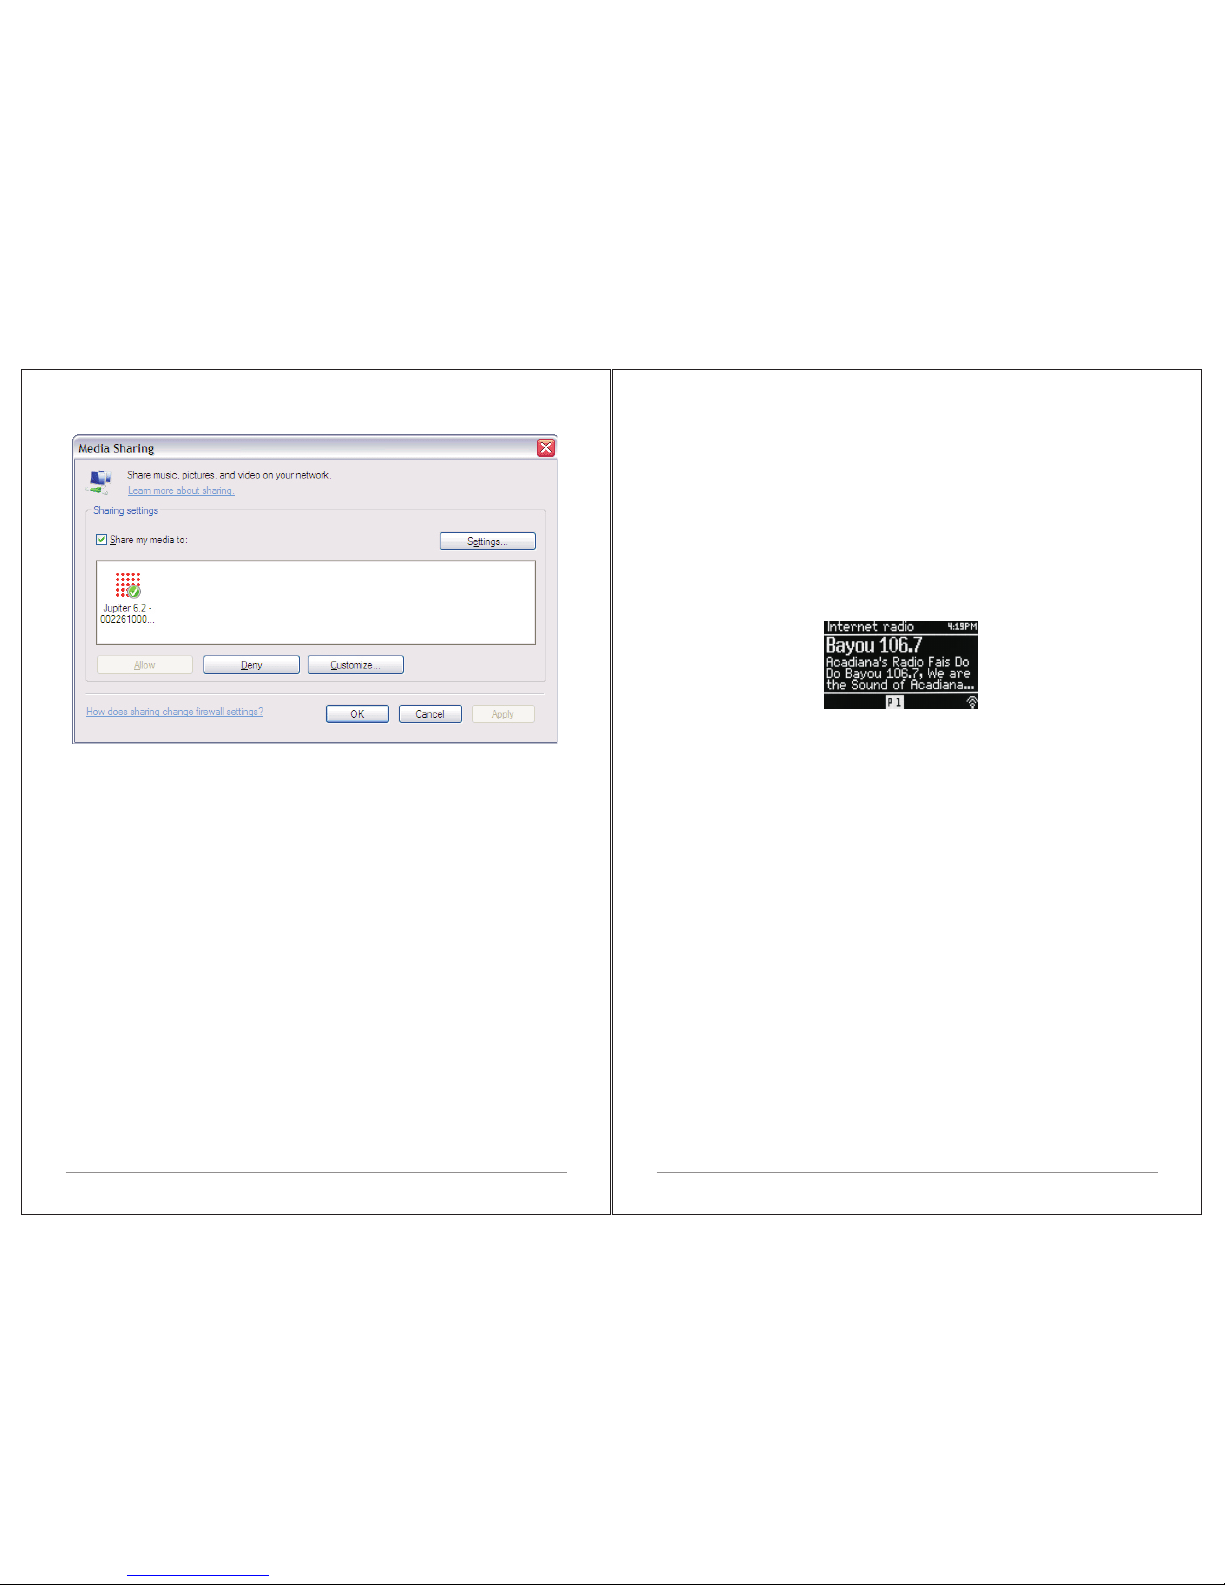
Notice: it may show; M3+, “Unknown device”, “Frontier Si li co n” or t he J up it er
logo as shown below.
To register your M3+ with the portal, switch to Internet rad io m od e an d th en
obtain your radio's unique portal ac ce ss c od e by s el ec ti ng M en u >S ta ti on l is t
> Help > Get access code >Wri te d ow n th e ac ce ss c od e.
Note: The d is pl ay ed a cc es s co de i s on ly v al id f or a f ew m in ut es. If y ou fail to
register your radio within the time window y ou w il l ne ed t o re pe at t he a bo ve
step to get a new access code and try again. Do not confus e th e po rt al a cc es s
code with the Radio ID (from Menu > System settings > Info.)
Vis it t he p or ta l we bs it e at w ww. wi fi ra di o- fr on ti er. com.
If this is y ou r first v is it to t he portal, reg is te r fo r a new accou nt , en te ri ng the
following information:
Page 10
16 of 35 17 of 34
Make sure that the radio has access to the shared medi a by s el ec ti ng i t an d
clicking Allow.
You ca n al so s et a n am e fo r th e sh ar ed m ed ia i n Se tt in gs… C li ck O K to c lo se
the dialogue boxes.
The PC is now ready to stream the music to the radio. The WMP UPnP ser vi ce
runs in the background; there is no need to start WMP expl ic it ly .
3.6 Setting up M3+ for “Play To” Win do ws 7 s tr ea mi ng m ed ia f ea tu re .
To set-up M3+ to be controlled and to stream music via Win do ws M ed ia P la ye r
12 (Windows 7 only), perform the following ste ps :
1. Ensure that the PC is connected to the network.
2. Ensure that M3+ is powered on and connected to th e sa me n et wo rk .
Note: M3+ must be in an Internet radio mode to be detected
3. From the Windows 7 main screen, select Start > Device s an d Pr in te rs .
4. Select the Add a device tab in the top left of the Devices a nd P ri nt er s
window and follow the instruction prom pt s gi ve n by t he w iz ar d.
In the Devices and Printers window a icon *) wil l ap pe ar a nd y ou a re n ow
ready to stream your Windows media music files t o M3 +.
*) To change the name of your device, right click on ico n an d ch oo se
properties. Then choose UPnP an d cl ic k on “d ev ic e we bp age”.
4. Internet radio mode
M3+ can play thousands of radio stations and p od ca st s fr om a ro un d th e wo rl d
though a broadband Internet connecti on .
When you select Internet radio mode, M3+ contact s th e Fr on ti er S il ic on
Internet radio portal to get a list of stations, organ iz ed i nt o di ffe rent
categories like Country, Most popular an d Ge nr e.
Once you select a station, M3+ connects directly to that s ta ti on .
The portal also enables multiple lis ts o f fa vo ur it e st at io ns t ha t yo u ca n
personalise, for example Andy's station s, J o' s fa vo ur it es , Talkshows. To use
the favourites feature, register your radio wi th t he p or ta l we bs it e. I f yo u ha ve
several Frontier Silicon radios, you can r eg is te r th em a ll o n th e sa me a cc ou nt
so that each radio has access to your favourite's li st s. I t is p os si bl e to a dd
favourites either directly through M3+ or thro ug h an y co mp ut er w it h a we b
browser.
To enter Internet Radio mode, either press Mod e un ti l th e di sp la y sh ow s
Internet Radio or select Menu >Main menu > Inter ne t Ra di o.
Note: The s ta ti on l is t me nu i s pr ov id ed f ro m th e In te rn et r ad io p or tal, so it is
only accessible when M3+ is connected to the I nt er ne t. S ta ti on l is ts a nd
submenus may change from time to time.
There are several ways of selecting stations .
Directly from the radio:
Ÿ Last listened
Ÿ Presets
From the portal through the Menu > Station list> menu:
Ÿ Favourites lists
Ÿ Browse by Country, Gen re , Mo st p op ul ar, N ew es t
Ÿ Search by keyword
Ÿ My added stations
 Loading...