

Page 1

Banana Pro&Pi RD - 1 -
Copyright © 2014 LeMaker. All Rights Reserved.
Banana Pro
V1.1
2014-11-15
Page 2
Banana Pro&Pi RD - 2 -
Copyright © 2014 LeMaker. All Rights Reserved.
Revision History
Revision Data Author Description
1.0 2014-11-06 Peter Initial version
1.1 2014-11-15 Tony Format and fix error
Page 3
Banana Pro&Pi RD - 3 -
Copyright © 2014 LeMaker. All Rights Reserved.
1 Introduction
Page 4

Banana Pro&Pi RD - 4 -
Copyright © 2014 LeMaker. All Rights Reserved.
Page 5

Banana Pro&Pi RD - 5 -
Copyright © 2014 LeMaker. All Rights Reserved.
2 Setting up the bootable SD card
This chapter describes how to create a bootable SD card. Depending on how the SD
card is set up, the locations in which data is written can be different. Throughout this
chapter ${card} refers to the SD card and ${p} to the partition, if there are any.
If the SD card is connected via a USB adapter, Linux will know it for example as
/dev/sdX (X represents the letters b or c or d, etc.). Please note that this device might
be different depending on various factors, so when you are not sure, use the fdisk
command to check it.
If connected via an SD slot on a device, Linux will know it as /dev/mmcblk0 (or
mmcblk1, mmcblk2, depending on which mmc slot is being used). (mmc stands for
MultiMediaCard by the way!)
Data is either stored raw on the SD card or in a partition. If ${p} is used, then the
appropriate partition should be written to. Also, this differs for USB adapters and
mmc controllers. When using an USB adapter, ${p} will be 1, 2, 3 etc so the resulting
device is /dev/sdX1. Using an mmc controller, this would be p1, p2, p3 etc so the
resulting device is /dev/mmcblk0p1.
To summarize, ${card} and ${card}${p}1 mean /dev/sdX and /dev/sdX1 on a USB
connected SD card, and /dev/mmcblk0, /dev/mmcblk0p1 on an mmc controller
connected device.
If the SD card is physically removed but then inserted into/connected to another slot
or port of the PC, the device nodes can change again and be different, so be aware of
this and take it into account.
It is assumed that you have already got files such as u-boot-sunxi-with-spl.bin,
uImage and script.bin.
Page 6
Banana Pro&Pi RD - 6 -
Copyright © 2014 LeMaker. All Rights Reserved.
2.1 SD card layout
start size usage
0 8KB Unused, available for partition table etc.
8 24KB Initial SPL loader
32 512KB u-boot
544 128KB environment
672 352KB reserved
1024 - Free for partitions
Page 7

Banana Pro&Pi RD - 7 -
Copyright © 2014 LeMaker. All Rights Reserved.
3 Setting up the Linux distribution root file
system on SD card
From “Building u-boot, script.bin and linux kernel” and “Setting up the bootblesd
card” chapter, you already have a bootable SD card, but with no root file system. So
this chapter describes how to set up a root file system. Here this depends on what
distribution you want to install.
It is assumed that you have a bootable SD card with 2 partitions. Throughout this
document, ${card} and ${card}${p}1 mean /dev/sdX and /dev/sdX1 on a USB
connected SD card, and /dev/mmcblk0, /dev/mmcblk0p1 on an mmc controller
connected device, as described previously in the aforementioned Section 2.
Page 8
Banana Pro&Pi RD - 8 -
Copyright © 2014 LeMaker. All Rights Reserved.
4 Wifi module
Page 9
Banana Pro&Pi RD - 9 -
Copyright © 2014 LeMaker. All Rights Reserved.
Operation
Frequency:
802.11b/g/n(20):2412~2462 MHz
802.11n(40):2422~2452MHz
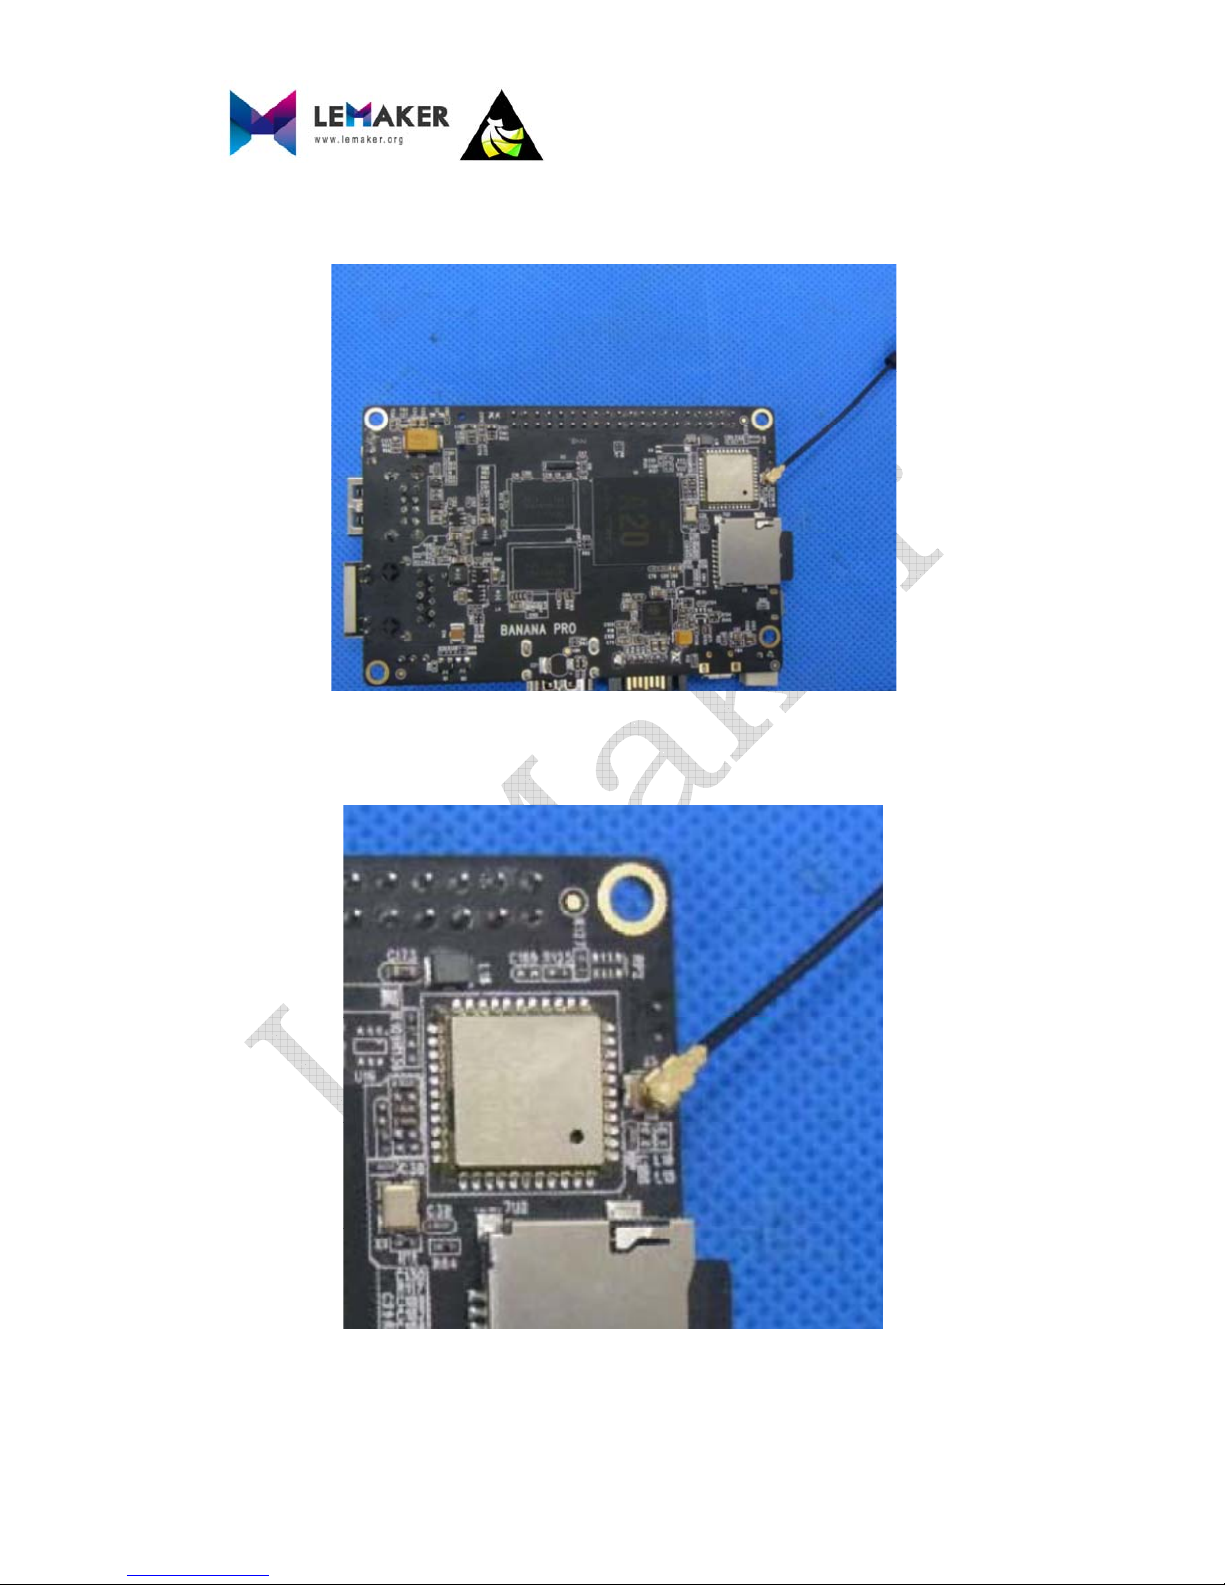
WIFI module: AP6210
WIFI Crystal 26MHz
Integrated antenna UFL antenna, Gain(1dBi),Model: BPRO-A20
Manufacture:
Shenzhen LeMaker Science&Technology Co.,Limited.
Modulation Type: CCK/OFDM/DBPSK/DAPSK
Bit Rate of
Transmitter
802.11b:11/5.5/2/1 Mbps
802.11g:54/48/36/24/18/12/9/6Mbps
802.11n(20MHz/40MHz):150/144.44/130/117/115.56/104/
86.67/78/52/6.5 Mbps
Number Of Channel 802.11b/g/n(20):11CH
802.11n(40):9CH
Output
Power(Conducted,
PK):
802.11b: 17+/-1dBm
802.11g: 15+/-1dBm
802.11n(20): 14+/-1dBm
802.11n(40): 12+/-1dBm
Page 10

Banana Pro&Pi RD - 10 -
Copyright © 2014 LeMaker. All Rights Reserved.
FCC Caution: Any changes or modifications not expressly approved by the party responsible for
compliance could void the user's authority to operate this equipment. This device complies with Part 15
of the FCC Rules. Operation is subject to the following two conditions: (1) This device may not cause
harmful interference, and (2) this device must accept any interference received, including interferenc e
that may cause undesired operation. This device and its antenna(s) must not be co-located or operatin g
in conjunction with any other antenna or transmitter.
This equipment should be installed and operated with minimum distance 20cm between the radiator and
your body.
Radiation Exposure Statement:
This equipment complies with FCC radiation exposure limits set forth for anuncontrolled environment.
This transmitter must not be co-located or operating in conjunction with any other antenna or transmitter.
The availability of some specific channels and/or operational frequency bands are country dependent
and are firmware programmed at the factory to match the intended destination.
The firmware setting is not accessible by the end user.
The final end product must be labelled in a visible area with the following:“Contains Transmitter Module
FCC ID: 2ADVNBPRO-A20”
IMPORTANT NOTE:
This module is intended for OEM integrator. The OEM integrator is still responsible for the FCC
compliance requirement of the end product, which OEM integrates this module.
Any changes or modifications not expressly approved by the manufacturer could void the user's authority
to operate this equipment.
USERS MANUAL OF THE END PRODUCT:
In the users manual of the end product, The end user has to be informed that the FCC radio frequency
exposure guidelines for an uncontrolled environment can be satisfied.
The end user has to also be informed that any changes or modifications not expressly approved by the
manufacturer could void the user's authority to operate this equipment.
If the size of the end product is smaller than 8x10cm, then additional FCC part 15.19
statement is required to be available in the users manual:
This device complies with Part 15 of FCC rules. Operation is subject to the following two conditions:(1)
this device may not cause harmful interference and (2) this device must accept any interference received,
including interference that may cause undesired operation.
UFL antenna, Gain(1dBi),Model: BPRO-A20
Manufacture: Shenzhen LeMaker Science &Technology Co., Limited.
This allows comparison to other antennas that may be also used provided antenna gain is less or
equal and same in-band/out-band characteristics.
This module will be integrated by the Grantee himself, or the OEM integrator which is under the control of
Grantee.
Page 11

Banana Pro&Pi RD - 11 -
Copyright © 2014 LeMaker. All Rights Reserved.
LABEL OF THE END PRODUCT:
The final end product must be labeled in a visible area with the following " Contains
TX FCC ID: 2ADVNBPRO-A20”.If the size of the end product is larger than 8x10cm,
then the following FCC part 15.19 statement has to also be available on the label:
This device complies with Part 15 of FCC rules. Operation is subject to the following
two conditions: (1) this device may not cause harmful interference and (2) this device
must accept any interference received, including interference that may cause
undesired operation.
 Loading...