

Page 1

Before using your washing machine, please read this
manual carefully and keep it for future reference.
Twin Tub Washing Machine
OWNER’S MANUAL
MODEL:LTT8
Read This Manual
Inside you will find many helpful hints on how to
use and maintain your washing machine properly.
Just a little preventative care on your part can
save you a great deal of time and money over the
life of your washing machine. You'll find many
answers to common problems in the chart of
troubleshooting tips. If you review the chart of
troubleshooting tips first, you may not need to call
for service.
Page 2
Safe ty Precau tion
Atte ntion To Installa tion
Lay up per drain h ose
Chan ge the posi tion of the dra in hose
Inst allation si te
Prep aration I nstructio ns
Refe rence of laun dry quant ity
corr espondi ng to different c apacities
Laun dry volum e and deterge nt
dosa ge refere nce
Name O f Parts
Acce ssories
Intr oductio n Of Control Pa nel
Quic k Start
Was hing Meth od
Rins ing Metho d
Spin ning Meth od
Effici ency Progra m
Spec ial Featu res
Soak f unction
Buzz er function
The dual v oltage
Atte ntion To Maintena nce
Cabi net maintenance
Clea ning the li nt filter
Anti- freezin g protectio n
Oper ation whe n objects are
drop ped into ou tside of the sp in tub
Note s
Main Techn ical Parame ters
SAFETY PRECAUTIONTABLE OF CONTENTS
Safety Precaution
1
2
2
2
2
3
3
3
4
4
4
5
5
5
6
7
7
7
7
7
8
8
8
8
8
8
9
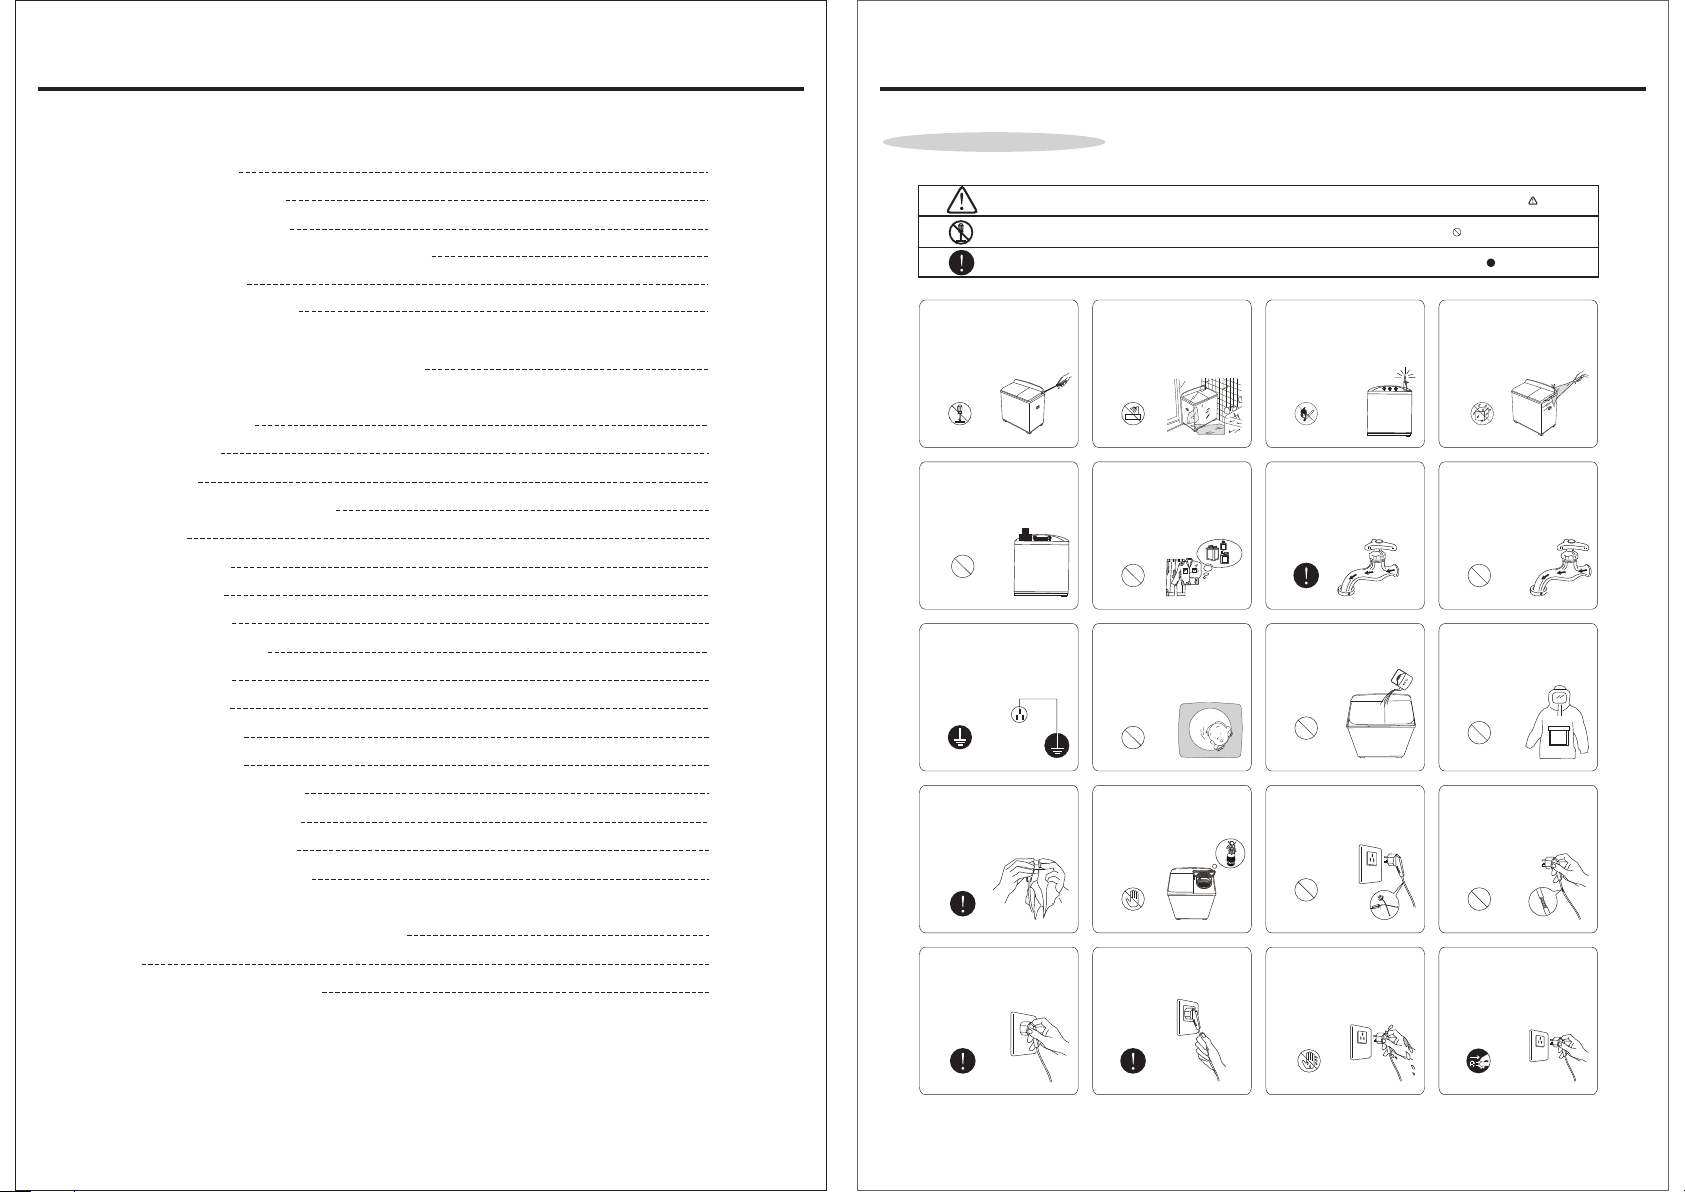
Be sure to comply with the following to prevent damage to body and property of you and others:
The s ig n sta nds for “ pay a ttent ion ” , and the p ict ure of sp eci fic ite ms ne eds att ent ion sho ws in .
The s ig n sta nds for “ for bid”, a nd th e pictu re of s pecif ic it ems for bid den sho ws in .
The s ig n sta nds for “ mus t do”, an d the p ictur e of sp ecifi c ite ms must b e don e shows i n .
Do no t disma ntle th e machi ne
by yo ursel f.
Forb id dism antli ng
Do no t let bab y sit on it o r place
hea vy thin gs on it.
Forb id
To avoi d elect ric sho ck
res ultin g from el ectri c leaka ge,
ple ase con nect gr oundi ng wire
of th e plug pr operl y.
Grou ndin g
W
ip
e o
ff di rt
y a
n
d d
u
s
t o
n t
plu
g o
f
t
en t
o p
c
o
n
t
ac
t w
i
t
h p
owe r supp
Ins ert the p lug tig htly wh en
use .
he
re
v
en
t poo r
l
y.
Do no t insta ll the ma chine i n
dam p or rain y envir onmen t to
avo id elec tric sh ock, fi re,
mac hine fa ilure ,or def ormat ion.
Avoi d dampn ess
D
o n
ot w
as
h c
l
ot
h
e
s th
h ke
r p
d a
at ar e
ro
s
e
n
e
, p
l
t
y c
a
cci d
h
er fl
li
y nea
m
e
a
mm
b to th
r ru
nt
.
etr
a
b
e
n
ni
ng
d o
s
tai n
e
d w
it
alc
o
h
o
l, a
n
s
ub
sta
nc
e.
Forb id
D
o n
ot le t bab
mac hin
e o
t
ub t
o a
v
oi
Forb id
Do no t put han ds into t he tub
bef ore it st oppin g runni ng.
Forb id putt ing int o
Do no t pull th e cord wh en
unp lug the p lug.
Do no t place i nflam mable
mat erial s like bu rning c andle ,
mos quito i ncens e, ciga ret etc .
or he ating s ource l ike ele ctric
sto ve, cal orifi er etc. o n the
mac hine.
Forb id
Mak e sure th at the wa ter inl et
hos e is conn ected a nd the ta p
o
l
,
is op ened be fore wa shing .
l
e
If us e warm wa ter, the w ater
tem perat ure sho uld not
exc eed 50℃.
Forb id
Do no t repla ce powe r cord by
you rself .
Forb id
Do no t inser t or unpl ug the pl ug
wit h wet han ds to avo id elec tric
sho ck.
+
Do no t spray w ater di rectl y to
the m achin e.
Avoi d spray ing wat er
Do no t excee d the max . water
lev el to avo id wate r overf lowin g
and m achin e failu re.
Forb id
Do no t wash do wn-fi lled co at,
rai ncoat o r simil ar clot hes.
Forb id
D
o n
ot da
mag e the p
and p lu
g t
o a
s
hoc k , sh
ort c
Forb id
Unp lug the p lug fro m socke t
aft er use.
+
waterp roof
o
we
r cor d
v
o
i
d ele
c
t
ri
c
ir
cui t o
r fi
re.
Forb id wet ha nds
-1-
Unp lug the p lug
Page 3

Usage methodInstallation
Attention To Installation
Lay upper drain hose
●●Needs a dra in h ose wit h mi nimum dia me ter 3 cm, and m in im um carr y aw ay capaci ty o f
40 liters p er m inute .
For upper d ra in syst em , the drain h os e must be p la ced at leas t 86 c m(30 in ch es) from th e
botto m of w as her , but n ot h igher tha n 10 0 cm.
86cm<H<100cm
Change the position of the drain hose
The ex-fa ct ory ins ta llation p os ition o f th e drain
hose is loc at ed t he spin s id e . Acc ordin g to t he
install at ion sit e, t he drain ho se c an also b e in stalled
at the wa sh s id e of the ma ch ine . The m ethod is
as follow s:
①
Unplug th e po wer cor d an d empty wat er i n the dra in
hose co mp le tely.
②
Spread a pi ec e of soft c lo th on the flo or ( e.g. a bl an ket)
and pla ce t he w ashin g ma chine on it g en tly.
③
Take the drai n ho se out fr om t he buckle a t th e
spin si de , an d put it in to t he buckle a t th e wash si de .
④
Hang up the d ra in hose k it .
at
of
FOR UPPER DRA IN S YS TEM ONLY
Front
Drain hose
Buckle
FOR LOW ER D RA IN SYST EM O NLY
Blanket
Preparation Instr uctions
Plug in pow er a nd conn ec t the water i nl et hose .
●
● Lay down th e lo wer dra in h ose and con ne ct it to th e se wer , or lay th e up per dra in h ose to plac es a s
indic at ed i n page 2.
● Check tha t th ere are n o ob jects suc h as c oins, h ai rpins, mu d or s and in th e po cket.
● Strin gs s ho uld be kn ot ted in adva nc e to prev en t entangl em ent.
● Clothes c an b e class if ied for was hi ng acco rd ing to the te xt ure, di rt y
● For sma ll p ie ces (e. g. ,stocki ng s) or flu ffy clo th es, put the m in to a nylo n ne t
Attachment: Reference of laundry quantity corresponding to different capacities
Laundry
Capacit y
2.0kg Cap ac ity abo ut 4 p cs. abo ut 3 p cs. about 2 p cs . about 1 p cs .
3.0kg Cap ac ity abo ut 6 p cs. abo ut 4 p cs. about 3 p cs . about 1 p cs .
3.6kg Cap ac ity abo ut 7 p cs. abo ut 5 p cs. about 4 p cs . about 2 p cs .
4.6kg Cap ac ity abo ut 9 p cs. abo ut 6 p cs. about 5 p cs . about 2 p cs .
5.0kg Cap ac ity abo ut 1 0 pcs. ab ou t 7 pcs. abou t 5 pc s. abou t 3 pc s.
5.5kg Cap ac ity abo ut 11 pcs. a bo ut 8 pcs. abo ut 6 p cs. abo ut 3 p cs.
6.0kg Cap ac ity abo ut 1 2 pcs. ab ou t 9 pcs. abou t 6 pc s. abou t 3 pc s.
7.0kg Cap ac ity abo ut 1 4 pcs. ab ou t 10 pcs. abo ut 7 p cs. abo ut 4 p cs.
7.5kg Cap ac ity abo ut 1 5 pcs. ab ou t 11 pcs. ab ou t 8 pcs. ab ou t 4 pcs.
8.0kg Cap ac ity abo ut 1 6 pcs. ab ou t 11 pcs. ab ou t 8 pcs. ab ou t 4 pcs.
●The figure above is for reference only, specific weights are subject to actual clothes.
Shirt
about 500 g
Uniform
about 650 g
Attachment : Laundry volume and detergent dosage reference
degree an d co lor.
Jeans
about 900 g
for was hi ng .
Jacket
about 1600 g
Installation site
In order to a vo id elec tr ical fail ur e, disc ol oration a nd d eform at ion, do not i ns tall th e ma chine
in the fo ll ow ing pla ce s:
● Locatio ns e xpose d
to dire ct s un light
●
Locations exposed to rain
or snow
Locations with uneven
●
or unstable ground
Fabric type
Synth et ic s, si lk,
Delicat e fa brics
Cotto n or l in en
Heavy soi ls
●The dosage of washing detergent varies according to dirty degree and texture of laundries.
Laundry
capacity(kg)
0-5.0
5.0-6.5
0-6.5
6.5-8.0
0-6. 5
6.6-8.0
Wat er
level
Low
Mid
Mid
High
Mid
High
Wat er f lo w
Gentl e
Gentl e
Normal
Was h ti me
(minutes)
3
3-5
7
7-10
10
10-35(s oa k 20)
Detergent
amount(g)
50
About
61
About
61
About
77
About
61
About
77
About
-3--2-
Page 4

Usage methodStructure Instruction
Name Of Parts
Wash cover
Lint filter
Was h tub
Pulsator
Base
Control panel
(For up pe r dra in o nly )
Safet y co ver
Cabin et
Drain h os e
Spin cover
Frame
Power p lu g
Drain h os e
(For lo we r dra in o nly )
Accessories
Inner spi n co ver
Wat er inlet ho se
Introduction Of Control Panel
Water inlet
Water inlet
Wash timer
Wash timer
Wash timer
Wash timer
35
Soak
Normal
5
10
Normal
15
Wash selector -Drain
Gentle
Drain
Wash-Drain Selector
Wash selector -Drain
Gentle
Drain
Wash-Drain Selector
※ h e dr aw in g ab ov e is f or r ef er en ce o nl y, specific drawing is subject to actual models.T
Wat er inlet: b e us ed to inj ec t water.
●
Was h timer: be u se d to sele ct r equired w as hing ti me .
●
Spin time r: b e used to s el ect requi re d spinn in g time.
●
● Was h-Drain s el ector : Fo r washing o r ri nsing , se lect “ Gent le ”or“ No rm al”. For Dr ai ning ,s el ect “Drai n” .
Spin timer
Spin timer
Spin timer
Spin timer
Quick Start
Take out th e lau ndry fr om
1. In st all t he wa sh ing m achin e
2. Lo ad t he la undry
3. Add det erg ent and w ate r
int o th e was h tub
4.
Tur n the w ash tim er kn ob
to se t wa sh ti me
5.
Set the w ash d rain se lec tor to
“Dr ai n” po sitio n aft er wash ing
9.
the s pi n tub
8.
Tur n the s pin tim er kn ob
to se t sp in ti me
7. Move the laundry into the spin
tub and close the spin cover
6. Repeat the steps 3-5 for rinsing
Washing Method
1. Inse rt t he inlet hos e in to the , and c ho ose inj ec tingwater water inl et m outh
water to th e wa sh tub
Put the l au nd ry into t he w ash tub, an d ad d deter ge nt into it.
2.
.
Wash timer
When fi ll w at er to hal f of t he desi re d wa ter lev el , turn off the
water t ap a nd l et laun dr ies soak in t he s oluti on f or minute s,
then fi ll w at er to des ir ed water le ve l.
3. Set wa sh p ro gram “G en tle” or “No rm al” as pe r am ount and te xt ure of la un dries.
4. Turn th e wa sh t imer kn ob t o set wash ti me .
5. After was hi ng, set t he w ash drain s el ector t o “D rain” pos it ion for d ra ining.
HI
Wat er le vel i nd ica tor
Rinsing Method
A. Spraying rinse (rinse in the spin tub)
Put the l au nd ry into t he s pin tub aft er w ashin g.
①
Tur n on the wate r ta p, choo se t o fill wate r in to the sp in t ub for 3-4 mi nu tes, an d th en turn off t he wate r ta p.
②
Set the s pi n ti mer for 2 -5 m inutes fo r ri nsing .
③
The above s te ps can be r ep eated.
④
Note: If ther e is r ed r ust in wa te r, do not ch oo se s prayi ng r inse, f or t he rust is ea sy t o adher e to
①
laund ri es.
Ensur e th at d o not fil l wa ter int o sp in tub when s pi nning .
②
-5--4-
Page 5

Usage methodUsage method
B. Common rinse (rinse in the wash tub)
①To save time, w at er and en er gy, ca n do p re -spin ni ng befo re r in sing.
②Put laund ri es whic h ha ve alread y be en dehy dr ated into t he w ash tub .
③After f il li ng wate r to t he desire d le vel, tu rn o ff th e wa te r tap to sa ve w ater.
④Tur n the “Wash sele ct or” kno b to t he "Gentl e” o r “Norm al ”.
⑤Set the “ wa sh t imer” to t he desire d ti me (abo ut 3 -5 minute s) for rin si ng.
⑥After r in si ng, put t he w ashing ma te rials i nt o the spin tu b to s pin for 1 t o 5 mi nutes.
⑦Drain out t he r insin g wa ter in the wa sh t ub.
⑧The above s te ps can be r ep eated.
Spin timer
Spinning Method
1.Shake out the laundry and put
them into the spin tub.
2.Put the inner spin cover on .
Confirm the inner spin cover is placed
horizontally.
Inner
spin cover
Spin tub
Correct
3.Close the safety cover and the
spin cover.
cover
Spin
Safety
cover
The appli an ce can no t be u sed by chil dr en or per so ns with red uc ed phys ic al, senso ry o r menta l
capab il it ies, or l ac k of experi en ce and kn ow ledge, un le ss they h av e been give n su pervi si on or instr uc tion.
The new hos e su pplie d wi th the appl ia nce are t o be u sed and tha t ol d hose sh ou ld not be use d.
When choo si ng the wa te r inflowi ng t o wash tu b or s pin tub , ple as e do not mo ve t he water in le t valve
durin g th e pr ocess o f wa ter inflo wi ng.
If stro ng v ib ratio n oc curs in tim e of s pinni ng , open the sp in c over im me diately. M ake sur e th at the wa sh in g
machi ne i s pl aced on a f la t and stabl e fl oor ,an d th en adjust w as hing ma te rials, di st ribut e th em evenly.
To do spinnin g an d drain in g togethe r, pl ease sp in f or 1 minute b ef ore dra in ing.
Do not wash o r sp in wate rp roof clot he s or clot he s that floa t ea sily to a vo id abnorm al v ibrat io n or damage
to the cl ot he s.
4.Refer to the following table to select
spinning time.
Washing materials
Silk
Light clothes
(fiber/blended)
Knitwear (fiber)
Underwear
(cotton)
Slipover
(cotton/linen)
Toweling coverlet
(cotton)
Spin time
About 50
seconds
About 1
minute
About 1~2
minutes
About 2~3
minutes
About 3~4
minutes
About 5
minutes
the laundry
Incorrect
Spin timer
Efficiency Program
The tes ts w er e carri d ou t under pro gr am Norm al . Below is th e de tail fo r te st seting a nd s teps;
1. Main was h: 3 0 min., H w at er level, w as h tempe ra ture 40 ℃;
2. Sp in : 3 min., 2 t im es; 4 kg test l oa d for one t ur n;
3. Rinse: 3 m in ., L wa ter lev el , water tem pe ratur e 20 ℃;
4. Spin: 3 mi n. , 2 times ; 4 kg t est loa d fo r on e turn.
(For ef ficienc y pr ogram o nl y )
Special Features
A.Soak function (For ma ch in es havi ng s oak fun ct io n only )
For ser io us ly stai ne d clothes , So ak wash i s us eful to ach ie ve bett er w ash resul t.
15-35 min ut es of the w as h timer is fo r so ak wash :( illustr at e as foll ow s)
Total: 35 ( min s)
This machine can wash blended blanket (less than 3 kg) marked with the "hand washing"
35
about 2
Work time
Sta ti c tim e
about 5 about 5 about 5
about 1 .5
about 1 .5
15
(un it: )mins
label.Was hi ng m et ho d is a s fo ll ow s:
Dilute de te rgent w it h water (be lo w 50℃), the n po ur the solu ti on into
① adequat e the wash tu b.
Fold th e bl an ket as sh ow n in the figu re , and into th e wa sh t ub.
② put it
● Fold in half along
the long edge
● 1/3 fold in the
same direction
Roll up the blanket●
B.Buzzer function (For ma ch in es havi ng b uzzer fun ct ion onl y)
Functio n of t he buzz er i s to alarm fi ni sh of was hi ng,and it i s he lpful t o co ntrol was h pr ocess .
● Buzzer wi ll a larm th e co mpletio n of w ashin g.
C.The dual voltage ( For mac hi nes hav in g th e dual vo lt age funct io n only)
The dual vo lt age was hi ng machin e ca n work at t he v oltage of 2 20 V or 127V t o me et needs of d iffer en t
countri es a nd area s.
● convert t he v oltag e fr om 220V60 Hz t o 127V6 0H z :
①
Unplug th e wa shing m ac hine plug t o cu t off t he p ower su pp ly.
②
Remove th e ba ck cove r.
③
Take down the n yl on clip , an d remove th e pl astic b ag .
④ “ ”
Connect t he Was h127V o f th e termi na l connect or w ith “Wash” , “S pin127V ” wi th “Spi n” , t he n the vol ta ge
can be co nv er ted to “1 27 V60Hz”.
⑤
Put the w ir es i n order, w ra p them in the p la stic ba g, a nd refix th e ba ck cove r. Then th e wa sh ing mac hi ne
can be po we re d for ope ra tion.
●
If conv er t th e volta ge f rom 127 V6 0H z to 220V 60 Hz:
①②③ ① ③
Steps - are t he s ame as ab ov e
④
Connect t he “ Was h 220V” o f th e termina l co nnect or w ith “Wa sh”, “S pi n 220V” w it h “S pin” to c on vert th e
voltage t o .
⑤ ⑤
In the st ep a bo ve, sho ul d connect t he t ermin al c onnecto rs o f both wa sh a nd spin, an d ma ke sure t o
connect c or rectl y.
*The fact or y-set v ol tage is 2 20 V60Hz . U se rs can ch os e the volta ge a ccord in g to the regi on al volt ag e range.
220V60H z
The ste p is t he s ame as ab ov e
④
“ ”
Wash timer
Soak
●
Put into th e tu b with
blank et e dg e facin g do wn
5
35
10
15
-7--6-
Page 6

MaintenanceMaintenance
Attention To Maintenance
Cabinet maintenance
After u si ng t he wash in g machine ,w ipe
the moist ur e and sta in o n it with a pie ce
of soft c lo th .To avoid d am age to the
surfa ce ,d o not use c or rosive or v ol atile
chemica ls .
◆
pull th e li nt f ilter o ut .
◆
in wate r.
◆
to inse rt i t in to plac e.
◆
Anti-freezing protection
▲ To prevent from freezing:
Tur n off the w at er tap, r em ove the wat er i nlet ho se a nd empty wa te r in the
① water inl et
hose co mp le tely.
②
Lay the dra in h ose and t ur n the drain s el ector k no b to the "Dra in ”posi ti on to
empty t he w at er in the t ub .
▲ If the water is frozen, please take the following steps:
Put the w at er i nlet ho se i nto warm wa te r of abou t 50℃.
①
②
Keep abou t 2 li ters of w ar m water bel ow 5 0℃ in the wa sh t ub for
about 10 mi nu tes. an d th en lay the dr ai n hose an d tu rn the
wash dr ai n se lecto r kn ob to the "Dr ai n”pos it ion to empt y th e water .
③
Fit the w at er i nlet ho se a nd turn on th e wa ter tap t o
confi rm w at er fill in g and drain in g work pr op erly.
Operation when objects are
dropped into the outside of the spin tub
①Remove all screws on the frame with a screw driver and
loosen the connector of the brake belt .
②Pull up the frame with both hands and turn it backwards.
③Take out the clothes dropped into the outside of the spin tub.
④Fasten the connector of the brake belt ,Press the frame to
reset and tighten screws.
Aft er you use th e wa shing m ac hine, nev er f orget t o do t he foll ow in g two thi ng s:
1. Discon ne ct the po we r plug.
2. Remove t he w ater in le t hose.
-8-
Cleaning the lint filter
Press the b ut ton hea d, a nd
Tur n the filte r ne t insid e ou t, and rins e it
After i ns er ting th e cl aw, press th e bu tton
A sound of “ba ” me ans pro pe r install at ion.
Butto n he ad
Claw
Frame
Cabinet
Notes
The washi ng m achin e em ploys alt er nativ e cu rrent wit h ra ted vol ta ge and freq ue ncy . Whe n vo ltage flu ct uates
between - 10 % and 10% o f th e rated vol ta ge, the m ac hine can wo rk n ormal ly.
Connect io n mode of t he p ower cord o f th is mach in e is Y-shaped c on necti on .Users
reconne ct t he wire b y th emselve s. please co nt act the d es ignated s er vice ce nt er.
If this p ar t ne eds to be r ep aired,
should no t de tach or
●Do not conn ec t to the ho t wa ter suppl y.
After u si ng , be sure t o un plug the po we r plug.
●
●
Be sure to us e pl ug that i s pr operly gr ou nded.
●
The maxim um g radie nt o f the suppo rt ing sur fa ce for the wa sh ing mac hi ne should n ot e xceed 2º.
●
Do not te ar d ow n elect ri cal wires a nd c ompon en ts in the mac hi ne by you rs elf.
●
There are h ol es on the b as e for venti la tion. T hese ho le s sh ould no t be b locked by f or eign ob je cts
(carp et s, e tc.).
●
Never con ne ct the gr ou nding wir e wi th the li ve w ire, or it ma y le ad to an el ec tric shoc k.
●
If the po we r co rd is dam ag ed, it must b e re place d by a q ualifie d pe rson to a vo id a hazard .
If the following symptoms occur, please disconnect the power plug and perform the
following checks:
Symptom
The washing
machine does
not work.
The drain hose
does not work.
There is abnormal
noise during washing.
There is abnormal
noise and violent
vibration during
spinning.
Check tha t th e power s up ply is in goo d co nditi on .
●
Check tha t th e power p lu g is insert ed p roper ly.
●
● Check tha t th e wash ti me r knob or the s pi n timer k no b is not
in the "0 " po si tion.
●
Check tha t th e drain h os e is not laid t oo h igh.
●
Check tha t th e drain h os e is not froz en .
●
Check tha t th e drain h os e is not bloc ke d by fore ig n matter.
Check tha t th ere are n o co ins or any ot he r forei gn o bjects
●
dropp ed i nt o the was h tu b.
●
Check tha t th e washi ng m achine is p la ced on fl at , stable fl oo r.
●
Check tha t cl othes a re e venly dis tr ibute d in t he spin tub .
●
Check tha t th ere are n o wa shing mat er ials or f oa ming debr is
dropp ed i nt o the out si de of the spi n tu b.
Reason
Main Technical Parameters
Capacity (dry Clothes)
Power Supply
Input Power (lower drain)
Input Power (upper drain)
Maximum Time
Wat er v ol um e
Maximum water pressure
Overall dimension
Net weight
Pump Input Power
Was h
8.0 kg
240V/50Hz
400W
400W
15 min. 35 min.(soak wash)
HI:77L H: 7 2L M: 61L L: 50L
0.6Mpa
870x512x957(mm)
Lower Drain System
23kg
Upper Drain System
23.5kg
30W
Spin
4.6kg
135W
135W
5 min.
/
-8-
-9-
Page 7

Main Technical Parameters
Capacity (dry Clothes)
Power Supply
Input Power (lower drain)
Input Power (upper drain)
Maximum Time
Wat er v ol um e
Maximum water pressure
Overall dimension
Net weight
Pump Input Power
Was h
8.0 kg
240V/50Hz
420W
420W
15 min. 35 min.(soak wash)
HI:77L H: 7 2L M: 61L L: 50L
0.6Mpa
870x512x957(mm)
Lower Drain System
Upper Drain System
30W
Spin
4.6kg
160W
160W
5 min.
/
23kg
23.5kg
此参数 表 功率只 适 用于C B认证,非C B认 证机型 用
第9页参数 表
-10-
 Loading...