

Page 1

MANUAL
LEKKER
BIKES
L E K K E R X
Page 2

CONTACT
WARNING: In the interests of safety it is
recommended that you have this bicycle
assembled by a skilled bicycle mechanic.
AUSTRALIA - NZ - SINGAPORE
phone: 1300 053 525
email: [email protected]
EUROPE & USA
phone: 0031 8187 8491
email: [email protected]
MANUAL LEKKER BIKES 1
MANUAL LEKKER BIKES
2
The Class Of
TABLE OF
CONTENTS
WELCOME TO LEKKER
CHAPTER 1 | Getting started
CHAPTER 2 | Handlebar fitment and adjustment
CHAPTER 3 | Assembly of the pedals
CHAPTER 4 | Adjusting gears and final checks
CHAPTER 5 | Turning on your Lekker X and charging
CHAPTER 6 | Battery care and general tips for use
3
5
6
IMAGES | Chapter 1 & 2
IMAGES | Chapter 4
7
10
11
13
15
17
IMAGES | Chapter 6
20
Page 3

MANUAL LEKKER BIKES / Lekker x 3 MANUAL LEKKER BIKES / Lekker X 4
WELCOME TO
LEKKER
Dear Lekker Customer, first of all
we would like to congratulate
you with your brand new bicycle!
It’s already a great day. But
before you ride out we want to
make sure your bike is in tip-top
condition, and you are aware how
to keep it like that. Very
important, to ensure endless
smiles each single ride.
In this manual we have compiled
for you lots of tips on how to use
your Lekker Bicycle, instructions
for maintenance and care, plus
obviously a walk through how to
execute the final assembly of
your ride. We advise to read this
manual thoroughly. You will find
it worth your while; even if you
have cycled all your life and feel
like a veteran with your new ride.
WELCOME TO
LEKKER
For your enjoyment and safety please complete the first part of this manual,
to ensure all is clear about general bicycle safety.
Chapter 2 shows you the correct thightening force in anticipation of the final
assembly of your bicycle. Chapter 3 takes you on a journey how proceed
with the final assembly of your bicycle. At last, Chapter 4 gives you a better
idea how to service and maintain your bicycle.
Your Lekker Team
Note: We have to stress that this manual
won’t teach you the skills of a bicycle
mechanic. Even a manual as big as all
Harry Potters books together could not
describe every possible combination,
tricks and available components. For this
reason this manual only focuses on your
newly Lekker Bicycle, standard assembly
and drawing your attention to important
notes, warnings and maintenance.
Page 4

The Class Of
MANUAL LEKKER BIKES / Lekker X 5 MANUAL LEKKER BIKES / Lekker X 6
CHAPTER 1
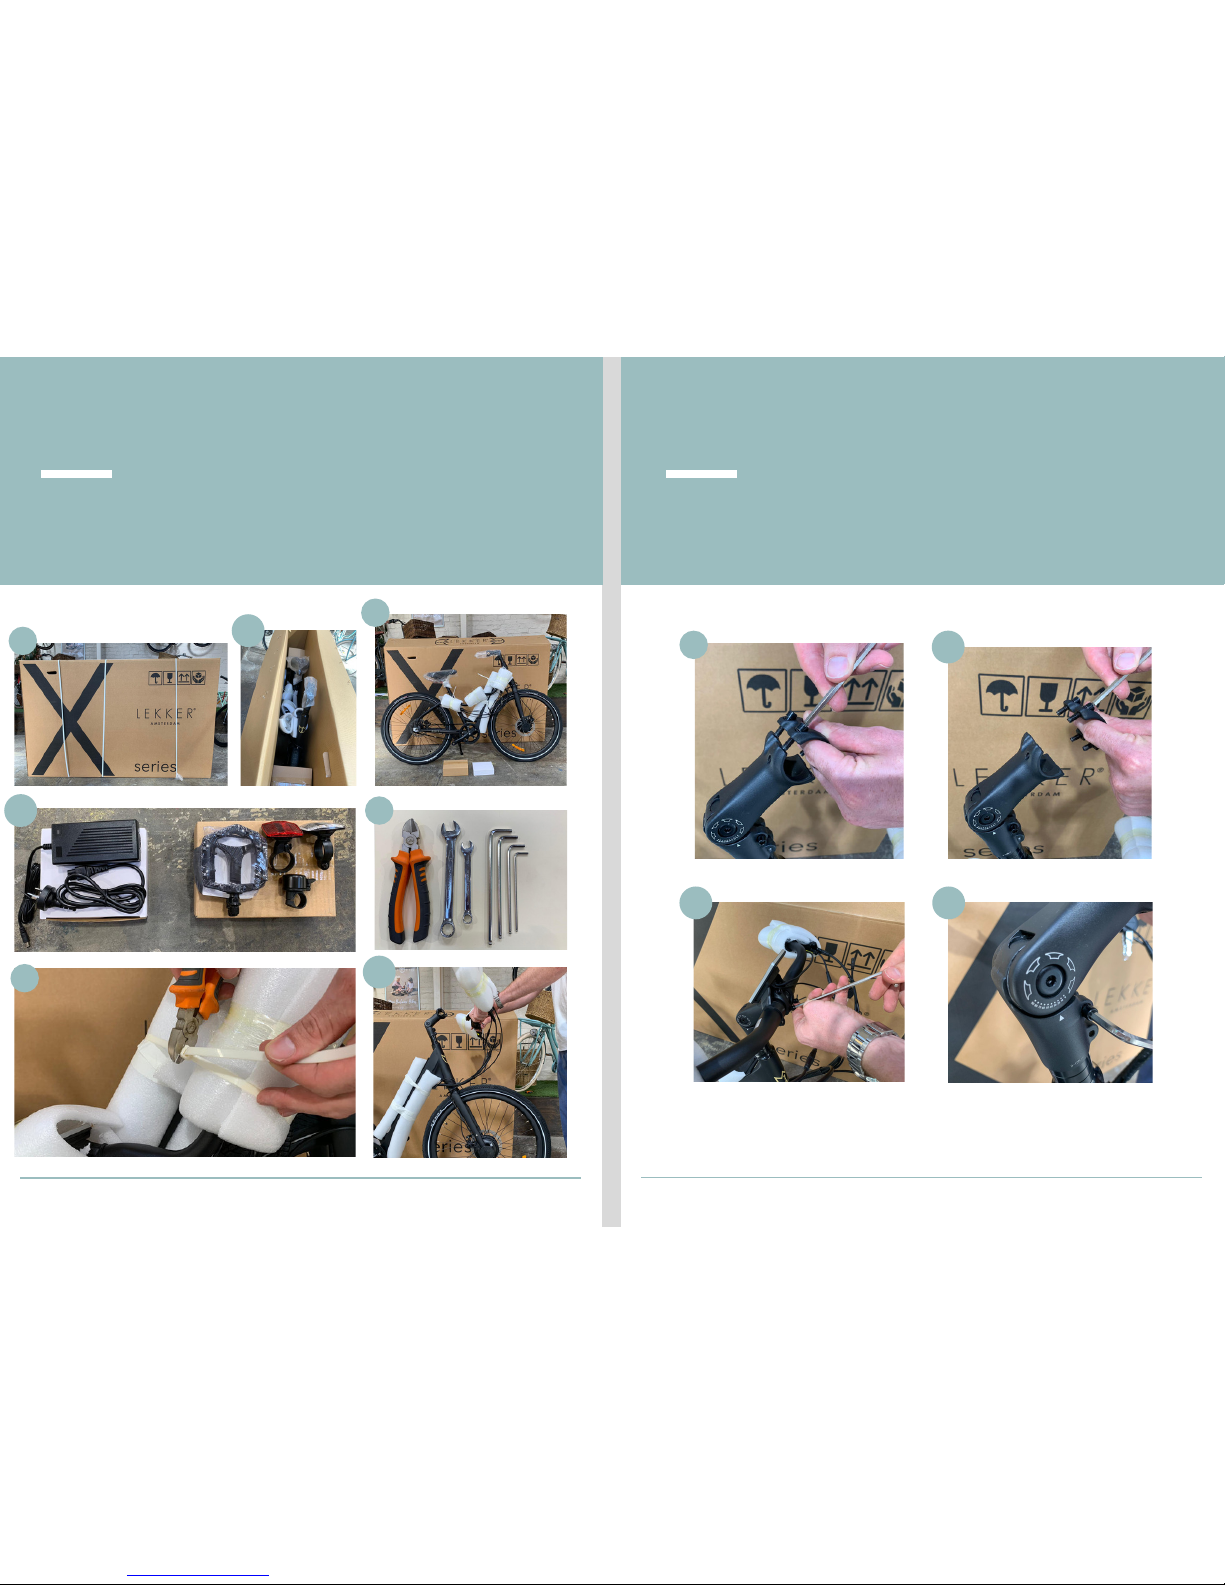
1. Congratulations! You are the proud owner of a brand new
Lekker X! When you receive your bike, the first thing to do is
check that it has arrived in perfect condition, Open the top
of the box, and visually inspect the bike.
2. Remove the bike from the box, be careful, as E-bikes are
generally much heavier than standard bikes, so some help
maybe needed for this step. Once removed, you will find a
small accessory box, the charger box and of course your
bike!
3. For the correct assembly of your bike you will need the
following tools; 15mm spanner, 3/4/5/6mm Allen keys, a
small amount of lithium grease and a pump.
4. Remove all the packaging and turn the front fork 90º so
the brake is facing the rear of the bike, and the stem is
facing forward, You may also need to spin the stem round
due to different packing styles.
Getting started
CHAPTER 2
Handlebar fitment and
adjustment
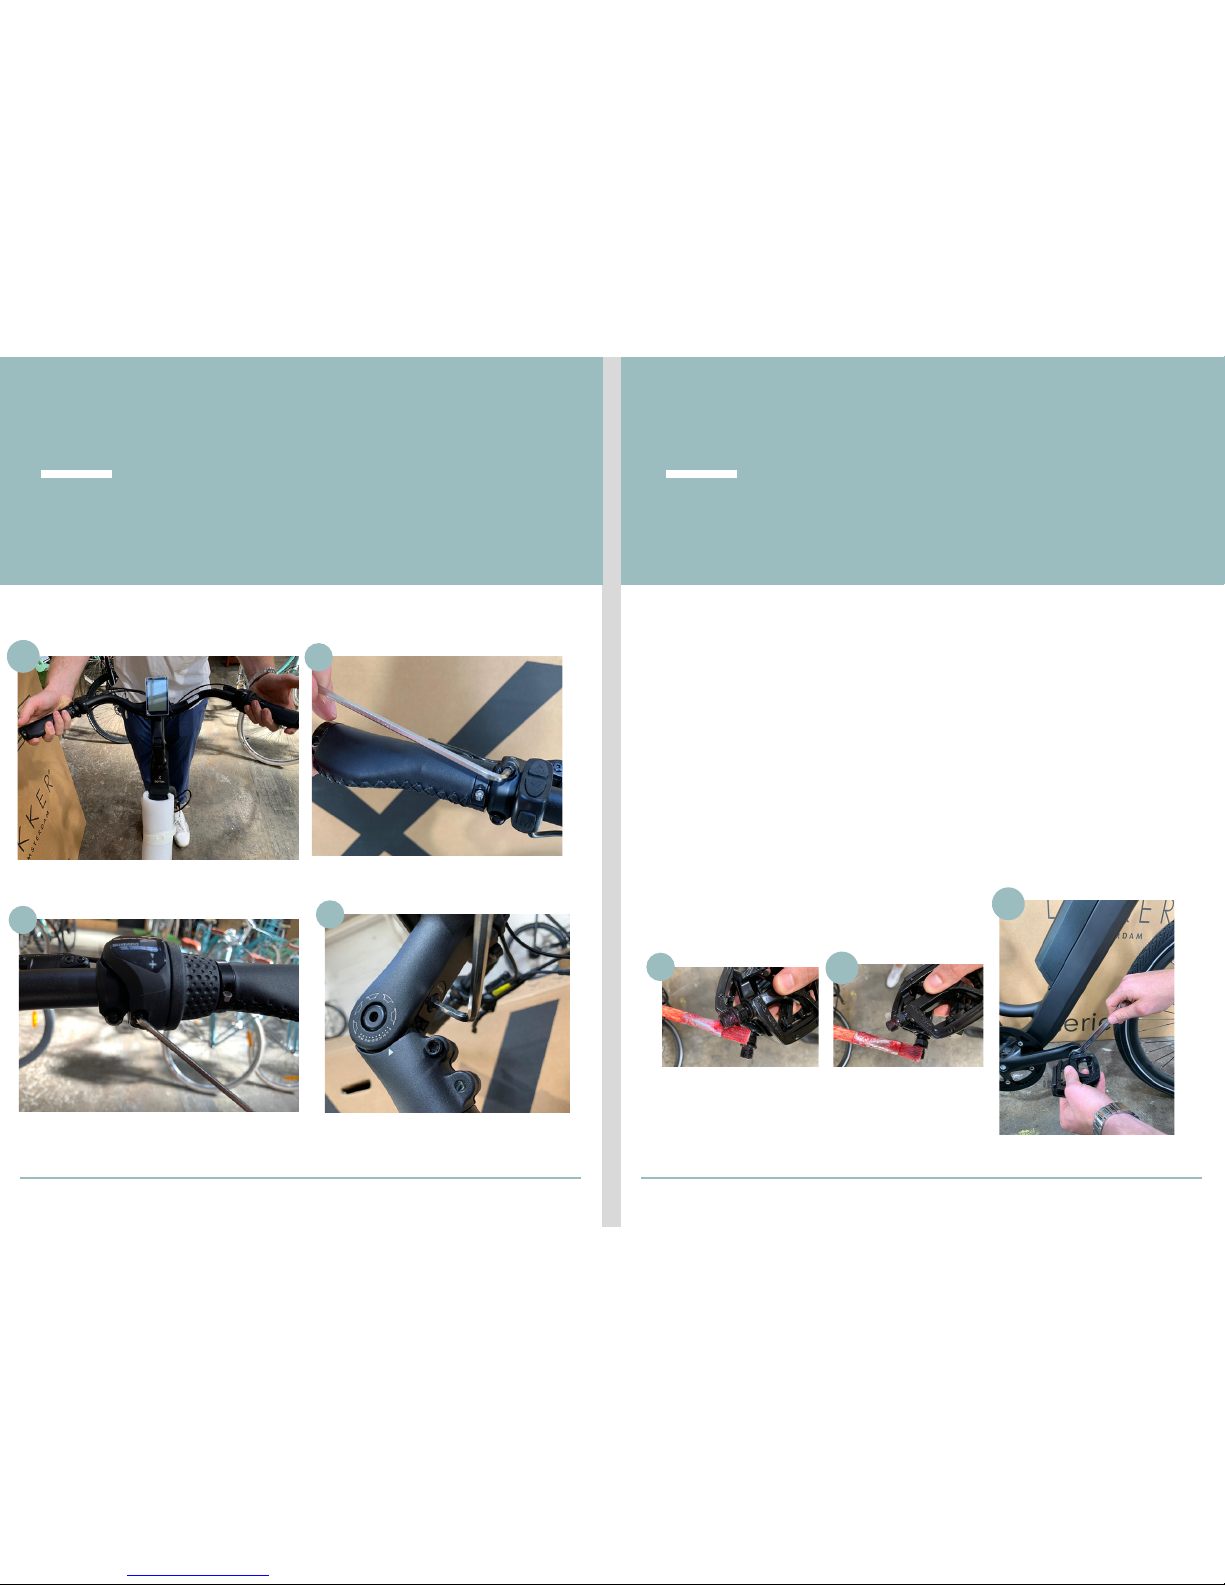
5. Using a 5mm allen key, remove the front plate of the stem, place the
handlebar in the centre and re-fit the front plate with the four allen key
bolts and loosely tighten, before securing the handlebar, make sure you
have adjusted it to the desired angle, then tighten the four front bolts
in a cross pattern and gradually build up to the correct torque (5Nm),
you can then centre the handlebar/stem by loosening the two 5mm
allen key bolts on the neck of the stem, moving the bar to the correct
position and tightening the two bolts to 5Nm.
6. Now it’s time to adjust the angle of the brake levers and gear shifter to
your desired position. Using a 4mm Allen key, loosen the two bolts on
each of the brake levers to allow you to move them, once in the correct
position tighten the bolts to the manufacturer’s torque recommendation,
PLEASE NOTE: you may have have to adjust the gear shifter position to
allow you to move the right hand lever, to do this, loosen the bolt with a
3mm allen key, then perform the same steps as above,just remember to
tighten the shifter back up!
7. The Lekker X comes equipped with an adjustable stem. This allows
you to adjust the angle of the handlebar, to do this, simply loosen the
5mm bolt found on the underside of the stem, adjust to the desired
angle, and retighten to 17Nm, PLEASE NOTE: you will have to re-adjust
the bar agle when this stem is completed.
- for more support please see images for chapter 1 in page 7 -
- for more support please see images for chapter 2 in page 8 & 9 -
Page 5
MANUAL LEKKER BIKES / Lekker X 7
MANUAL LEKKER BIKES / Lekker X
8
IMAGES IMAGES
Chapter 2Chapter 1
(From LEFT to RIGHT, images follow the order of instructions.)
1
2
3
4
5
5.1
5.2 5.3
1.1
2.1
4.1
Page 6
The Class Of
MANUAL LEKKER BIKES / Lekker X 9 MANUAL LEKKER BIKES / Lekker X 10
IMAGES CHAPTER 3
Assembly of the pedals
8. For the assembly of the pedals you will need a 15mm open
ended spanner, ATTENTION: Please make sure to check the
thread direction before inserting the pedals, as fitting the
pedal to the wrong side can damage the crank arm which is
not covered under warranty!. Apply some grease or anti seize
to the pedal threads and tighten to 40-42Nm torque, PLEASE
NOTE; It is very important to tighten the pedals to the correct
torque, as by not doing so will lead to the pedals loosening
and damaging the crank arm thread, which is not covered
under warranty!
Chapter 2
8
7
6
6.1
5.4
8.1
8.2
Page 7

The Class Of
MANUAL LEKKER BIKES / Lekker X 11 MANUAL LEKKER BIKES / Lekker X 12
CHAPTER 4 CHAPTER 4
Adjusting gears and final
checks
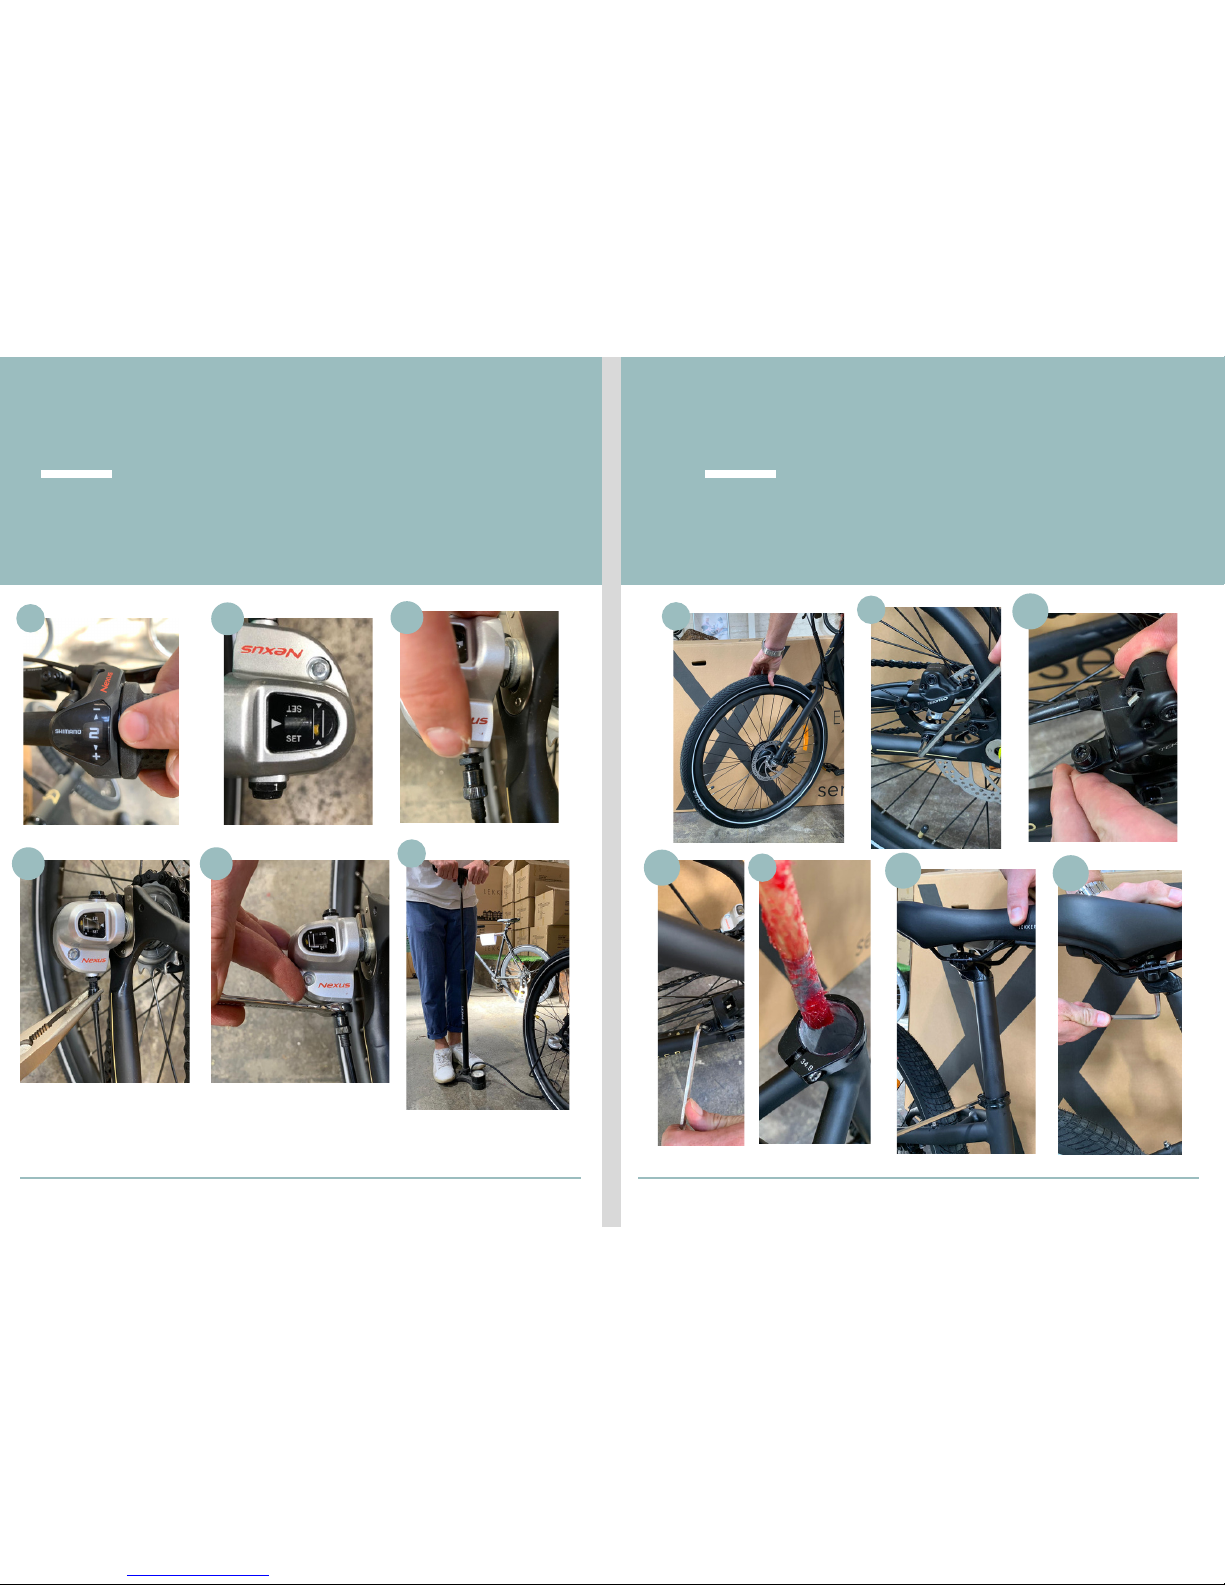
11. Check the brakes are working by pressing the lever rapidly a few time to
allow pressure to build up in the system, lift the wheel off the ground and
spin it, It should spin freely without noise, if you hear a metallic rubbing
sound then the brakes will need adjusting, PLEASE NOTE: the brakes will
need checking before every ride, any anomalies should be addressed
before using the bike further.
12. To adjust the the brakes, you will need a 5 mm allen key, Firstly check
the the side mounted bolts to make sure they are secured tightly, once this
is done you can then proceed to adjust the caliper, you will need to loosen
the two 5mm allen key bolts found on the top of the caliper, once done, you
will then be able to adjust the caliper horizontally so the disc rotor moves
freely between the brake pads.
PLEASE NOTE; Disc brakes are subjected to high temperatures and stresses,
which can cause the disc rotor to warp slightly, this is normal and can be
adjusted by bending the disc rotor back to its original position. ATTENTION:
If you do not feel comfortable adjusting the brakes, we recommend to
always take your bicycle to a trained mechanic for building/adjustment.
13. To adjust the saddle, loosen the bolt on the seat post collar using a 5mm
allen key and remove the seat post completely, apply a small amount of
grease to the inside of the frame, insert the seat post to the desired height
and tighten the collar to 5Nm. Check the saddle is correctly positioned and
retighten the 6mm bolt at the top of the seat post (located under the saddle)
to 17Nm.
Adjusting gears and final
checks
The Lekker X comes fitted with the excellent Shimano Nexus 3
speed hub, this allow gear changing without the need to pedal
for engagement, whilst we check all gear systems, some cable
stretch can occur before, during and after the first few rides. To
check that your gears are correctly aligned, just follow these
simple steps.
9. Place the gear shifter in gear number 2, now go to the rear of
the bike and check the gear selector housing, the yellow dot
should be between the two white lines on the housing for
correct gear shifting. If the yellow dot is outside of these two
lines, the cable tension needs to be adjusted, to do this loosen
the 10mm lock nut at the front of the housing, and with a pair of
grips, tighten or loosen the adjuster barrel to move the yellow
dot to the correct position, re-tighten the lock nut and cycle
through the gears to check correct working, repeat the steps if
necessary until correct adjustment is achieved.
10. Using either a hand pump or track pump, remove the valve
covers on both wheels, attach the pump head and inflate the
tyres to the recommended pressure (usually printed on the
sidewall of the tyre) remove pump and fit the valve caps.
- for more support please see images for chapter 4 in page 13 & 14 -
Page 8
MANUAL LEKKER BIKES / Lekker X 13
IMAGES
Chapter 4
IMAGES
Chapter 4
MANUAL LEKKER BIKES / Lekker X 14
9
10
11
12
13
9.1
9.2
9.3 9.4
12.1
12.2
13.1
13.2
Page 9
MANUAL LEKKER BIKES / Lekker X 15
CHAPTER 5
Turning on your Lekker X
and charging
16. You are now ready to ride your Lekker X!!! Please
remember to regularly check your pedals and all bolts
are correctly tightened, and to service your bike regularly
so you can enjoy it for many years to come!
The Class Of
MANUAL LEKKER BIKES / Lekker X
CHAPTER 5
Turning on your Lekker X
and charging
We know you are excited to try your Lekker X for the first time! You‘re
nearly there, just a few more steps before it’s ready to go!
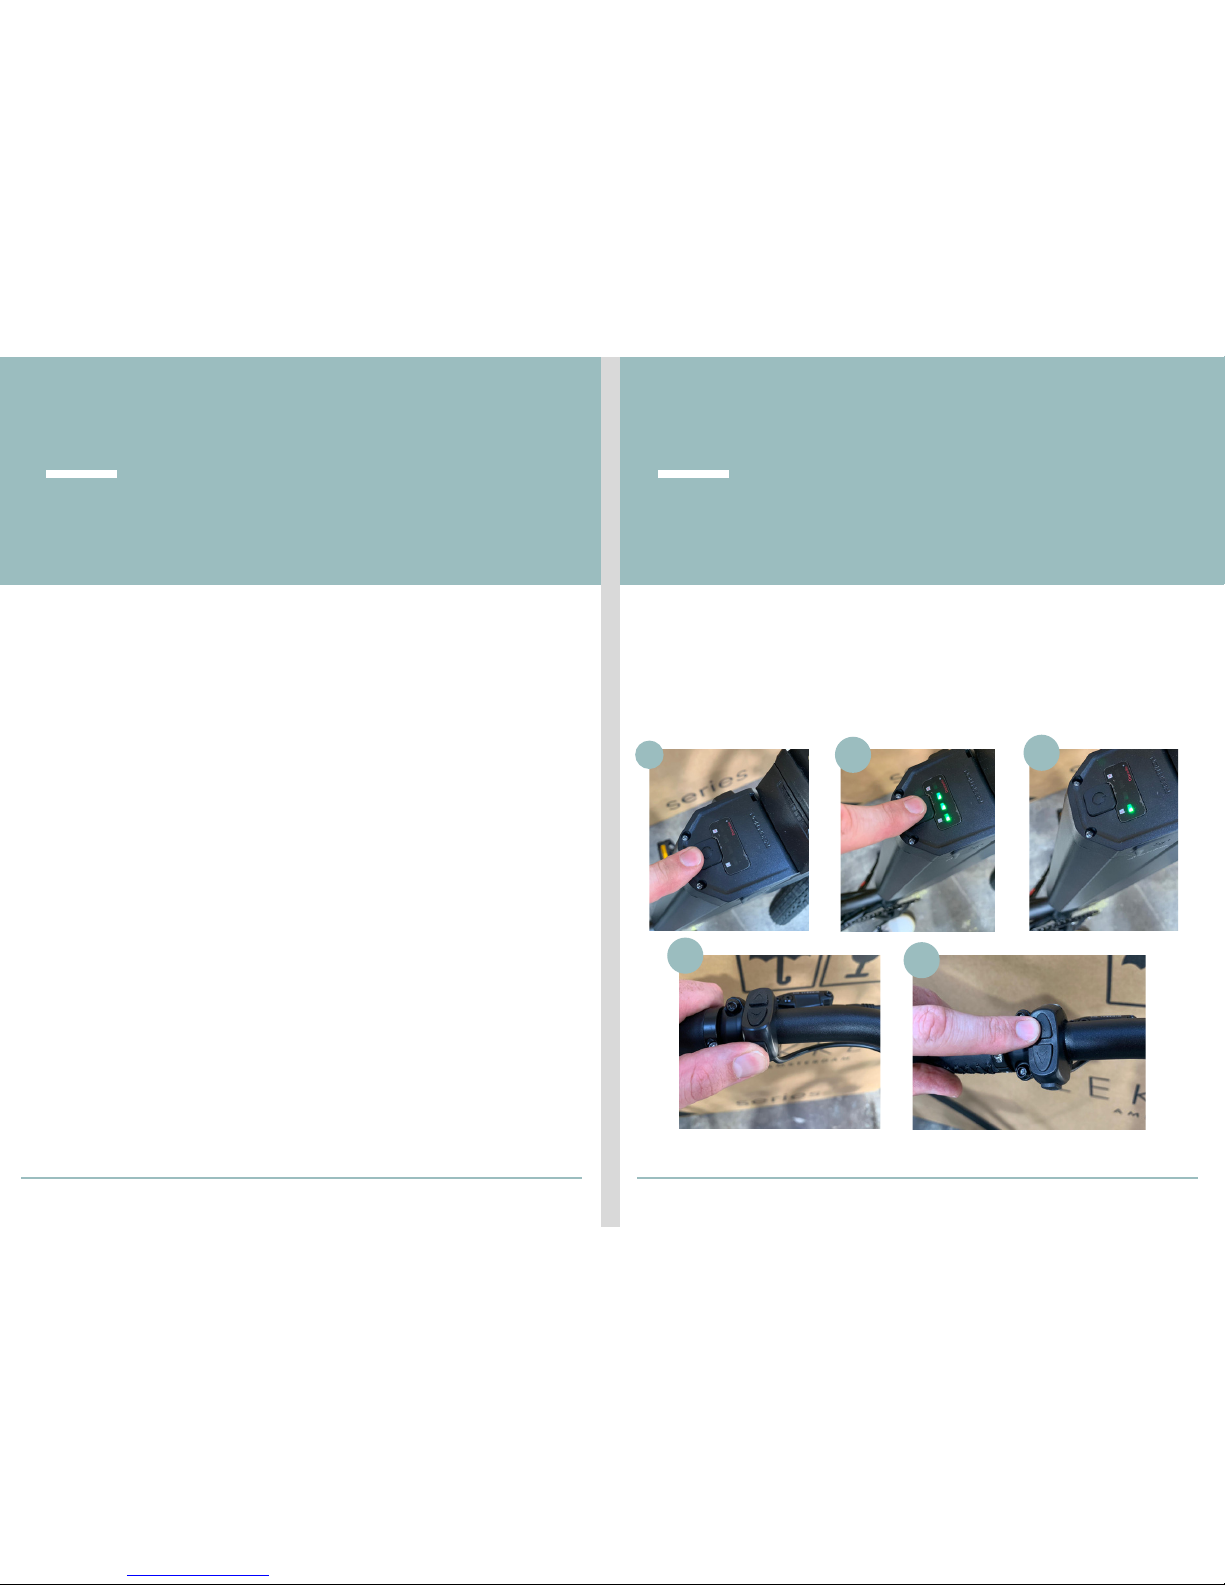
14. Before turning on your Lekker X, we recommend doing this whilst
sitting on the bike, this allows full control over the bike and can avoid
accidents. To turn your Lekker X on, firstly press the “power” button
located at the top of your battery, the 4 LED lights should switch on to
show the current charge, and will revert back to only one LED light for
the remainder of the ride. Using the control module found on the left
hand side of your bar, press the “menu” button for a few seconds to
turn on your screen, once turned on, you can then cycle through the
assist modes using the arrow buttons on the control module. For more
in-depth instructions for your screen, please refer to the
manufacturer's manual, found in PDF format online. PLEASE NOTE:
when turning on your screen, please ensure the brake levers are free
and not engaged, as this will show an error code on the screen. We
also recommend always using assist level 1 for starting, as this will
allow better control of the bike.
15. All batteries will come with some charge, to get the most out of
your battery, you may need to charge it before your first ride. We
recommend that for the first three charges, to charge it for 12hr cycles,
PLEASE NOTE: this will allow the battery to have full charge capacity.
16
14
14.1
14.2
14.3
14.4
Page 10

17 18
The Class Of
MANUAL LEKKER BIKES / Lekker X
CHAPTER 6
To ensure your battery lasts it’s full life cycle, there are a few things you
will need to do to ensure the correct working of the battery.
1. First charge, when you receive your bike, you will need to cycle charge
the battery for 12hr for the first 3 charges, this will ensure the battery can
hold the correct amount of charge.
2. Your bike will come with two keys for the battery lock, it is very
important to keep these safe, as Lekker Bikes do not carry replacements.
3. If you place the bike in storage, remove the battery from the bike,
charge to around 60% charge capacity and store in a cool dry place,
covered. This will ensure no damage or moisture build up will occur, check
the battery every 3 months, and charge to 60% if needed,
ATTENTION: If the battery is stored fully discharged for a long time, it may
result in damage despite the low self-discharge rate and charge capacity
may be substantially reduced.
4. All batteries and frames are water resistant, not waterproof, if you are
storing the bike outside overnight, or for long periods of time, please
ensure the battery is removed and kept inside, and the bike is correctly
covered and stored.
5. Never charge batteries in high humidity areas or outdoors, doing so
may result in electric shock.
Battery care & general tips
for use
CHAPTER 6
Battery care & general tips
for use
6. Do not remove or insert the plug if it’s wet, as this may cause electric
shocks. If the plug is wet, completely dry before using.
7. Ensure the battery or charging cables are removed before maintenance or
repairs are carried out.
8. All out batteries are supplied with a 2 year warranty, should a fault occur in
this period, Lekker with replace the battery. Normal ageing as well as wear
and tear do not constitute as material deficiency.
9. Do not place the battery into fresh water or sea water, and do not allow
the battery terminals to get wet. Doing so may cause overheating, bursting, or
ignition of the battery
10. Take care to ensure that the battery does not get too hot. Battery ageing
increases sharply with temperatures above 40 °C. Placing the battery in direct
sunlight can cause a battery to heat up considerably. Take care to ensure you
do not leave the battery in a hot car and park your bike in the shade during
bike rides. If you cannot avoid the heat, make sure you do not charge the
battery at the same time.
11. If you ride constantly using maximum motor assist, your motor will always
need a higher current. Higher currents cause the battery to age faster. Use
the assist modes judiciously, cycle through them as you would a normal gear
system, Starting off in a high assist level is not recommended and can
cause you to lose control of the bike.
MANUAL LEKKER BIKES / Lekker X
Page 11
The Class Of
MANUAL LEKKER BIKES / Lekker X 19
CHAPTER 6
12. Please take care when using E-Bikes on loose terrain, the added power
from the motor can cause the bike to lose control in these situations, Please
remember to be aware of your surroundings when using an E-bike, do not
give too much attention to the screen when riding.
13. It is law in Australia to always use a helmet when riding, it is also required
in many states to use lights when riding in low visibility conditions. We also
highly recommend wearing a helmet in countries where this is not compulsory.
14. All pedelec E-bikes must be limited to 250w power output and motor
assist cannot exceed 25km/h, Lekker Bikes will not be held liable for any
aftermarket modifications to the motor or system that may have an effect on
it’s performance.
15. Lekker Bikes recommends servicing your E-bike every 4-6 months to
ensure correct working of the bicycle, by a trained mechanic, and will not be
held responsible for any misuse, incorrect fitting or assembly of the bike.
16. Do not make any changes to your electric system or fit any other products
to it aimed at increasing the power output from your e-bike. As a rule you will
shorten the service life of the system and risk damaging the Drive Unit (motor)
and the e-bike. In addition there is also the danger that you will void the
warranty of your e-bike. Furthermore, as a result of inexpert work on the
system you will jeopardise your safety and that of other road users which risks
accidents caused by manipulations, high personal liability costs and potentially
even the danger of criminal prosecution.
Battery care & general tips
for use
The Class Of
IMAGES
Battery care & general tips
for use
MANUAL LEKKER BIKES / Lekker X 20
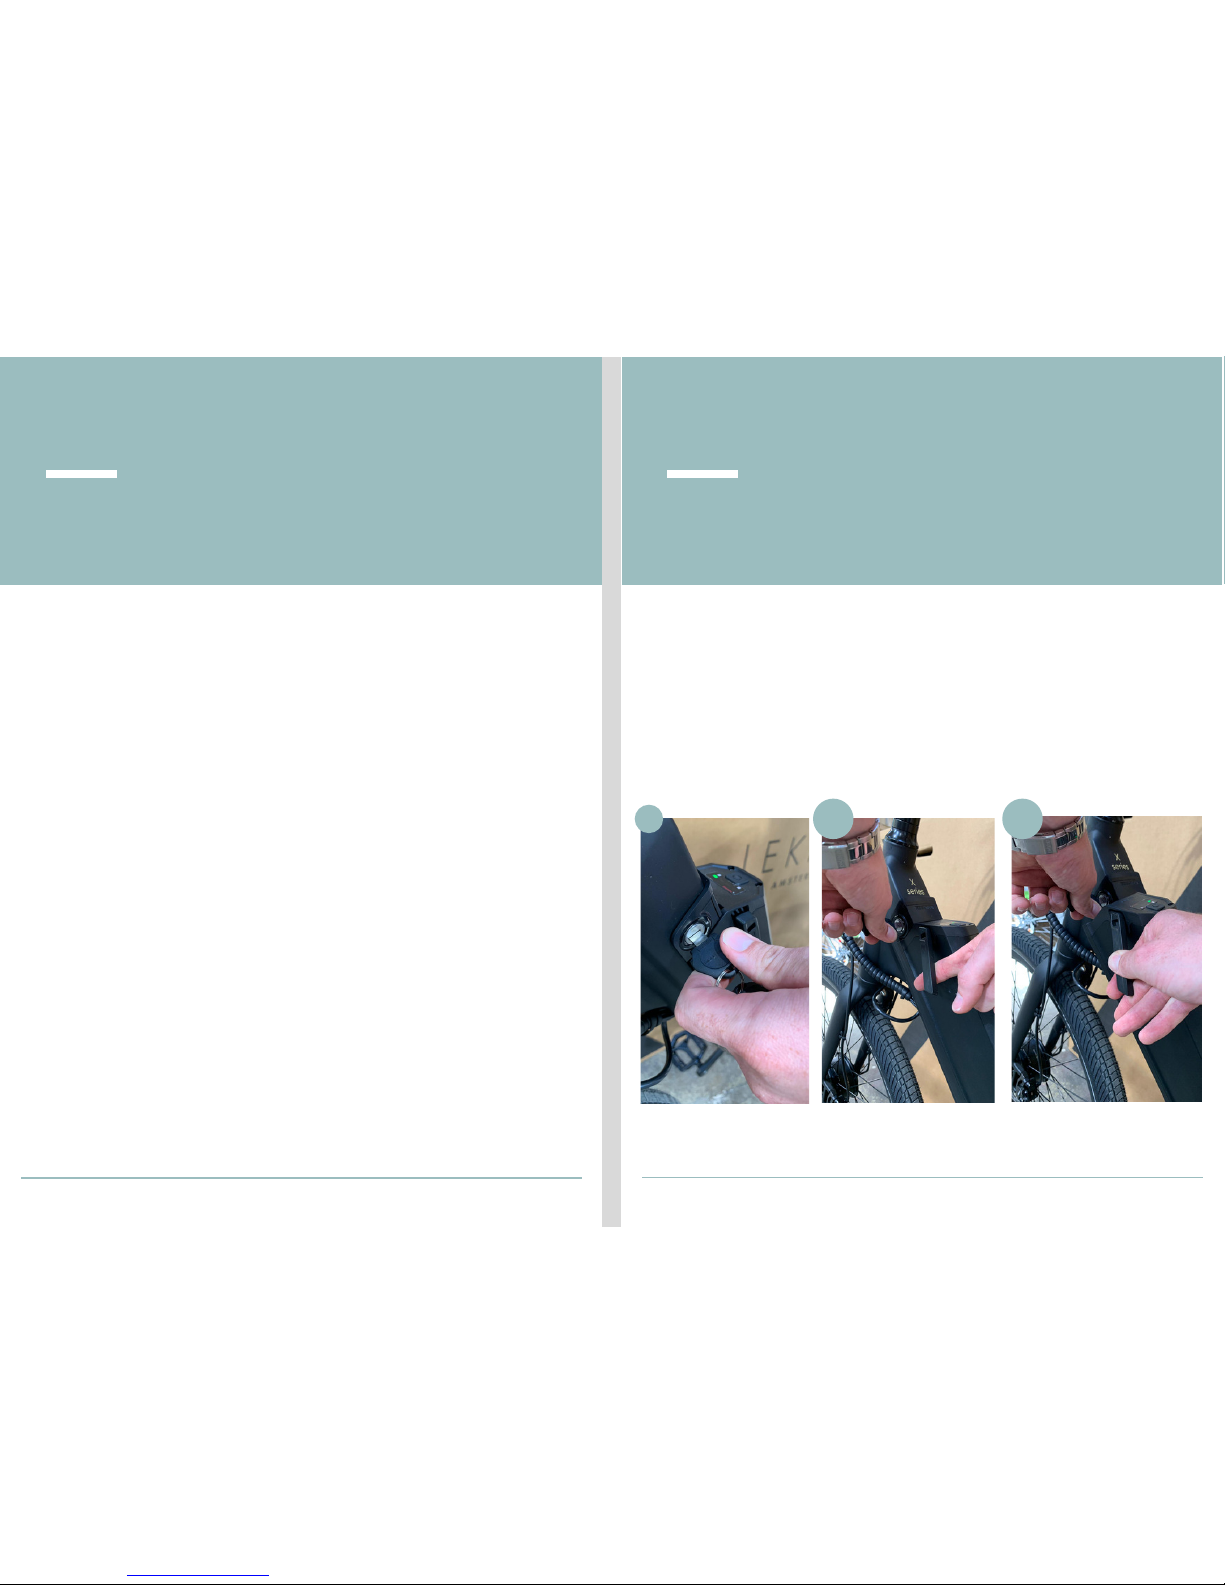
17. To remove the battery simply turn and hold the key in the unlock
position, pull the lever on the battery and pull sideways to release.
18. To fit the battery, place the bottom of the battery in the frame and slide
the top of the battery sideways until you hear a click. To ensure it is
correctly fitted try and move it slightly from side to side. I shouldn't move if
it's correctly inserted.
17
17.1 17.2
Page 12
MANUAL
LEKKER
BIKES
L E K K E R X
@LEKKERbikes
@lekkerbikes
www.lekkerbikes.com
 Loading...