

Leisure H 92 K, H 92 PK, H 92 X, H 102 K, H 92 PX Installation Manual
...
H 92 K
H 92 X
H 92 PK
H 92 PX
H 102 K
H 102 X
H 102 PK
H 102 PX
H 112 K
H 112 X
EN FR NL
Complies with the WEEE Directive.
This product was manufactured using the latest technology in environmentally friendly conditions.
Please read this user manual first!
Dear Customer,
Thank you for purchasing this Leisure product. We hope that you get the best results
from your product which has been manufactured with high quality and state-of-the-art
technology. Therefore, please read this entire user manual and all other accompanying
documents carefully before using the product and keep it as a reference for future use.
If you handover the product to someone else, give the user manual as well. Follow all
warnings and information in the user manual.
Remember that this user manual is also applicable for several other models. Differences
between models will be identified in the manual.
Explanation of symbols
Throughout this user manual the following symbols are used:
C
Important information and useful hints about
usage.
A
CAUTION: Warning for hazardous situations with
regard to life and property.
A
DANGER: Warning for hazardous situations with
regard to life and property.
Does not contain PCB

Hood / User Manual
3 / EN
CONTENTS
ENGLISH 4-21
FRANÇAIS 22-41
NEDERLANDS 42-62

4 / EN
Hood / User Manual
1
Important instructions for safety and
environment
This appliance can only be used
by children over the age of 8
and individuals with no physical,
sensory or mental insufficiencies
or no experience and knowledge
insufficiencies when supervision
or instruction on safe use is given
to them and they understand the
dangers.
•
This product is intended for
domestic use. Usage voltage
of your appliance is 220-240
Volt~50 Hz. Mains cable of your
appliance is equipped with an
earth plug. This cable must be
plugged into an earth plug.
•
All electricity connections
must be made by a qualified
technician.
•
Unauthorized installation can
cause low performance, damage
to the appliance and accidents.
•
Appliance cable must not be
jammed or crushed during
installation. Power cable must
not be fed near cookers. This
can cause melting and fire.
•
Do not plug the appliance before
the installation is over.
•
Make sure that the plug is
easily accessible in order to
disconnect the appliance in
case of an emergency.
•
Do not touch the appliance
lamps when they are operated
for a long time. Lamps may
cause burns in your hands as
they will be hot.
•
Kitchen hoods are designed for
domestic use for conventional
cooking. It might fail and the
warranty will be void if it is used
for other purposes.
•
Follow regulations and rules of
authorities about the exhaust air
discharge. (This is not valid for
use without stacks).
•
Food that catch fire while
cooking must not be cooked
under this appliance.
•
Start your appliance after
placing pans, pots, etc. on the
cooker. Otherwise, high heat
may cause deformation in some
parts of your appliance.
•
Turn off your appliance before
removing pans, pots, etc. on the
cooker.

Hood / User Manual
5 / EN
1
Important instructions for safety and
environment
•
Do not leave hot oil on the
cooker. Pans with hot oil may
cause self-ignition and fire.
•
Oil may catch fire while frying,
etc. Be careful with curtains and
quilts.
•
Ensure that filters are replaced
in time. Filters that are not
replaced in time pose fire risk
due to accumulated oil in them.
•
Do not use non-fire-resistant
filtering material instead of
filters.
•
Do not operate your product
without a filter.
•
Do not remove filters while the
product is being used.
•
In case of a fire, disconnect the
hood and cooker. (Unplug the
appliance or switch off the main
circuit breaker).
•
Your appliance may pose fire
risk if notcleaned regularly.
•
Disconnect your device before
maintenance works. (Unplug the
appliance or switch off the main
circuit breaker).
•
Negative pressure in the room
while hoods and devices
operating on other sources than
electricity are used at the same
time must not exceed 4 Pa ( 4
X 10 bar ).
•
If there are devices that are
used with fuel or gas such as
room heaters in the area where
your appliance is used, the
exhaust of these devices must
be completely isolated or the
device must be air tight.
•
Use pipes with 150 or 120
mm diameter when connecting
your appliance’s stacks. The
connection must be as short
as possible with the fewest
possible elbows.
•
Children must not play with the
appliance.
•
Use ”MAX 6 A” fuse in your
appliance for your safety.
•
Keep packaging material away
from children as they may be
dangerous.

6 / EN
Hood / User Manual
•
If the supply cable is damaged,
it must be replaced by the
manufacturer or its service
agency or any personnel of
equivalent qualifications to avoid
any dangerous situation.
•
In case of a fire, disconnect
the hood and cooker and cover
the flames. Never use water to
extinguish.
•
Accessible parts can be hot
when cookers are operated.
•
This appliance is not intended
to be used by individuals with
limited physical, sensory and
mental abilities (including
children) or individuals with
limited knowledge or experience
unless supervision and
administration are provided by a
person responsible for appliance
safety.
•
When hood is installed,
there must be at least 65 cm
clearance with the product and
electricity cookers and with
cookers operating on gas or
other fuels.
•
Hood outlet must not be
connected to air channels that
include other smoke.
•
Care must be taken when
appliance is used with devices
that use air and fuel (e.g.
heaters, water heaters that
operate on gas, diesel fuel,
coal or wood). This is because
it may decrease combustion as
hood discharges air in the room
atmosphere.
•
This is not valid for use without
stacks.
•
The room must have sufficient
ventilation when cooker, hood
and devices that operate on
gas and other fuels are used at
the same time (this may not be
applied to devices that circulates
air in the room).
1
Important instructions for safety and
environment
Hood / User Manual
7 / EN
1
Important instructions for safety and
environment
1.1 Compliance with the WEEE
Directive and Disposing of the Waste
Product:
This product complies with EU WEEE Directive
(2012/19/EU). This product bears a classification
symbol for waste electrical and electronic
equipment (WEEE).
This product has been manufactured
with high quality parts and materials
which can be reused and are suitable
for recycling. Do not dispose of the
waste product with normal domestic
and other wastes at the end of its service life. Take
it to the collection center for the recycling of
electrical and electronic equipment. Please consult
your local authorities to learn about these collection
centers.
Compliance with RoHS Directive
The product you have purchased complies with EU
RoHS Directive (2011/65/EU). It does not contain
harmful and prohibited materials specified in the
Directive.
1.2 Package information
Packaging materials of the product are
manufactured from recyclable materials
in accordance with our National
Environment Regulations. Do not
dispose of the packaging materials together with
the domestic or other wastes. Take them to the
packaging material collection points designated by
the local authorities.

8 / EN
Hood / User Manual
2
Risk of death - risk of poisoning
2.1 Risk of Death - Risk of Poisoning
A
DANGER: Risk of poisoning due to
the reabsorbed combustion gasses.
Unless adequate air entrance is
provided during air egression use,
do not use the device concurrently
with items which exhaust poisonous
gasses through stack such as
stoves, burners, water heaters, etc.
operating on circulating air gas, oil,
wood or coal.
Figure 2: Risk poisoning
A
DANGER: Air circulation items
(e.g. stoves, burners, water heaters
operating on gas, oil, wood or coal)
take the combustion air from the
installation place and expel the
exhaust gasses through an exhaust
gas system (e.g. stack). Air is
absorbed from the kitchen and
adjacent rooms with the running
hood. Vacuum occurs if adequate
air entrance is not provided. In
such a case, poisonous gasses
are reabsorbed from the stack and
exhaust gas channel and re-enter in
the house. Figure 2. For this reason,
adequate fresh air intake should
always be ensured. Figure 3
Figure 3
A
DANGER: Risk of fire! Due to floating
sparks. Installation of device on
heating equipment which is heated
by using solid fuels (e.g. wood or
coal) may only be allowed if there
is a non-detachable cover. Updated
current building regulations and
regulations for local electricity and
water supply companies should
be paid attention for installation. If the
device is not cleaned in accordance
with the cleaning instructions, it may
cause fire.
A
DANGER: Risk of electrocution! Due
to damaged connection cable. Do
not fold or squeeze the connection
cable during installation process.
A
DANGER: Risk of injury!
– There is risk of injury during
installation due to sharp edges.
Always use safety gloves throughout
installation works of device.
– All safety bolts and safety covers
should be mounted as described
in the operation manual due to
device›s risk of falling down.
Hood / User Manual
9 / EN
A
DANGER: Risk of burning, risk of
electrocution!
– Wait until the device cools down
prior to cleaning or maintenance
work. Disconnect the fuse or unplug
from the mains.
– There is risk of damage due to
humidity seepage to electronic parts.
Never clean the control elements
with a damp cloth.
– Surface can be damaged as a
result of incorrect cleaning. Clean
stainless steel surfaces only in
brushing direction. Do not use
stainless steel cleaners for control
elements.
– Surface can be damaged due to
sharp or scrubbing cleaning agents.
Never use sharp or scrubbing
cleaning agents.
A
DANGER: Risk of fire, risk of injury!
Disconnect the fuse or unplug
your device from the mains due
to exceptional or amiss repairs.
Repairs should always be carried out
by authorized service or authorized
specialist staff only.
C
In case of failure or damage on
the device, disconnect the fuse or
unplug your device from the mains
and call the authorized service.
C
If the supply cable is damaged, it must
be replaced by the manufacturer or
its service agency or any personnel
of equivalent qualifications to avoid
any dangerous situation.
2
Risk of death - risk of poisoning
C
When the bulbs of the device is
damaged, disconnect the fuse or
unplug your device from the mains.
To avoid overloading the other bulbs,
immediately replace the failed bulbs
(wait until the bulb cools down).
A
CAUTION: When used together with
cookers, accessible parts may heat
up.
A
DANGER: Air outlet pipe of this
device should never be connected
inside the stack which is used to
expel fumes emitting from devices
using gas or other fuels.

10 / EN
Hood / User Manual
3
Technical specifications of your appliance
Markings on the product or the values stated in other documents supplied with the product are values obtained
under laboratory conditions as per relevant standards. These values may vary depending on operational and
environmental conditions of the product.
998
500
Min.600 Max.930
250
20
350
80
221
164
1098
500
Min.600 Max.930
250
20
350
80
221
164
898
500
Min.600 Max.930
250
20
350
80
221
164
Hood / User Manual
11 / EN
4
Usage with or without carbon filter
4.1 Carbon Filter Replacement
Under circumstances without a stack, active carbon
filter should be used to resend the inside air by
re-filtering. Active carbon filter should be procured
from the service or your dealer. Disconnect the
device prior to replacing the carbon filter. Since
the carbon filter is used in kitchens without a stack
outlet, it should be replaced by a new one every 3
to 5 months subject to usage. Carbon filter should
never be washed. In any case the oil filters should
be attached to the product regardless of using a
carbon filter or not. Do not use the product without
oil filter.
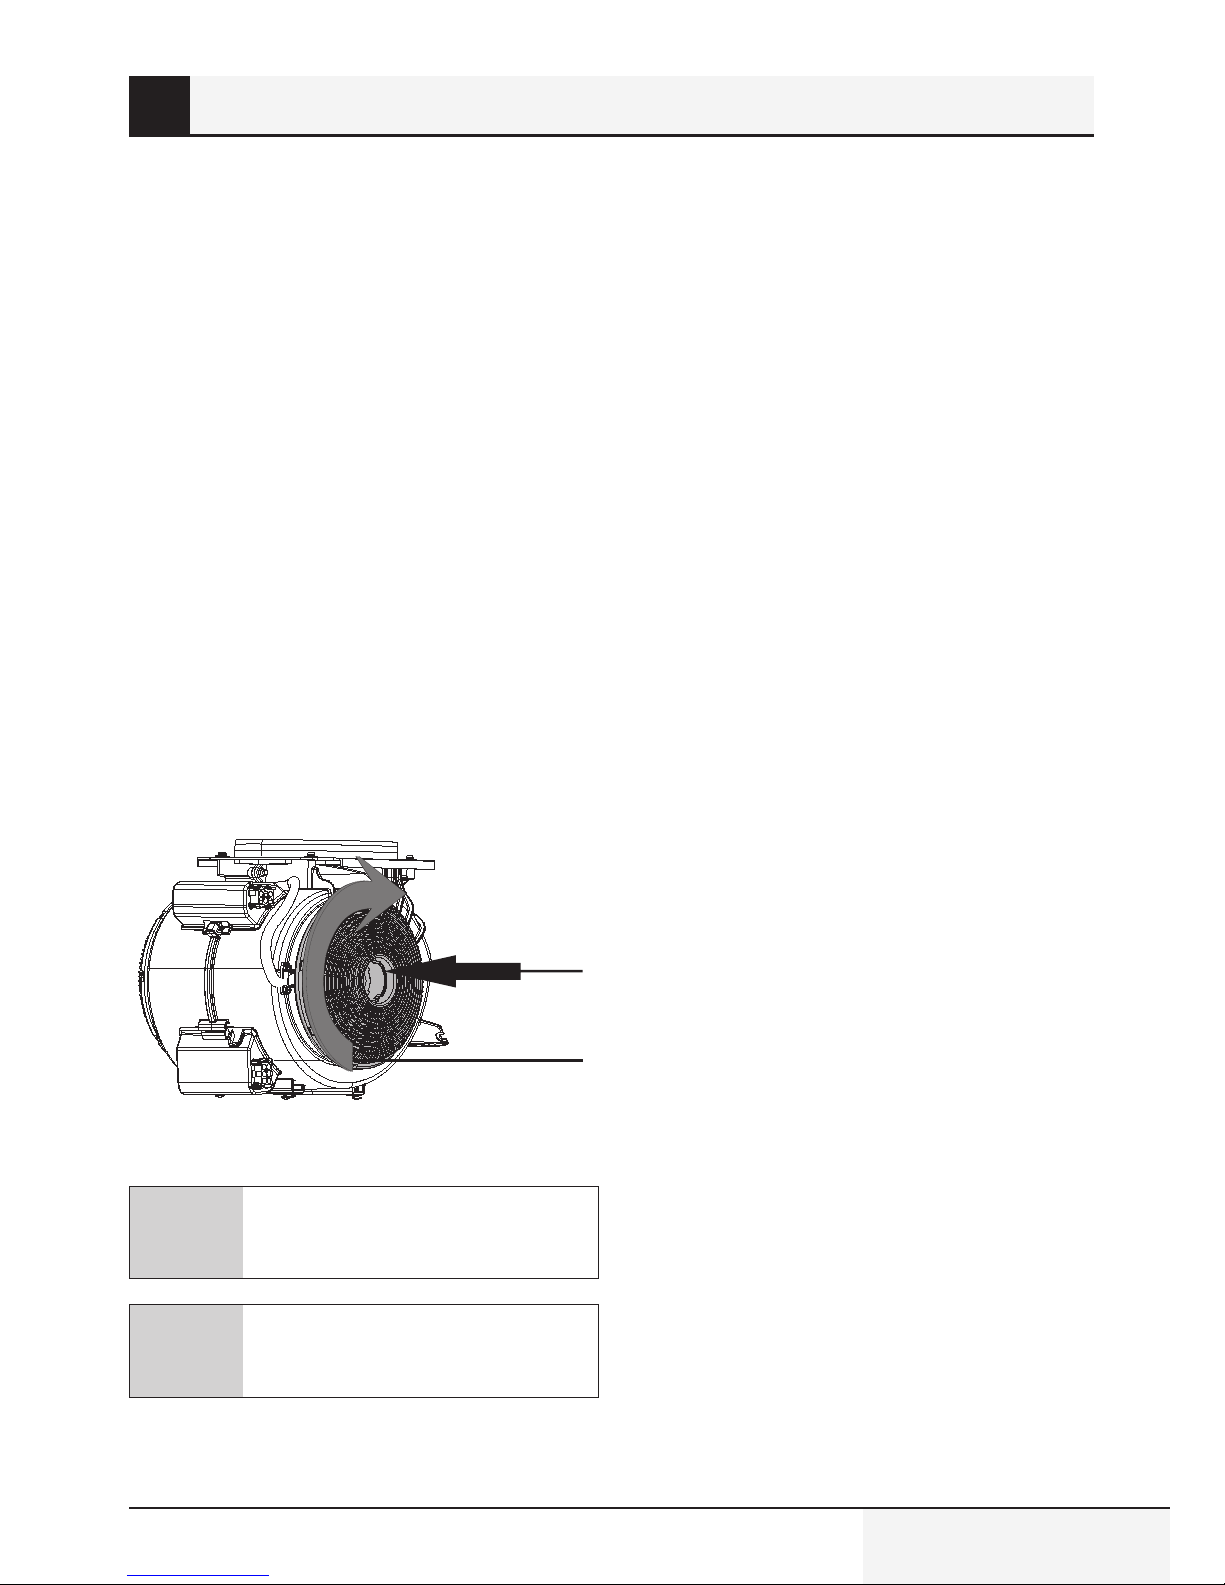
4.2 Carbon Filter Replacement
The device you have bought is suitable for AF 90
carbon-filter use.
1. Place the carbon filter in its housing. Figure 4
2. Rotate the carbon filter clockwise and make
sure that it is seated completely. Figure 4
Figure 4: Carbon Filter
C
If not seated completely, carbon filter
can fall and damage your product.
A
DANGER: Never wash the carbon
filters. Keep carbon filters away from
children.
1
2
12 / EN
Hood / User Manual
5
Cleaning and preventive maintenance
A
CAUTION:Cleaning and user service
should not be made by children who
are not under supervision.
- Surface can be damaged due to
sharp or scrubbing cleaning agents.
Never use sharp or scrubbing
cleaning agents. Procure cleaning
and protection agents proper for
your device from the authorized
service. Surface of the device and
control units are sensitive against
scratching.
Clean the surfaces with a soft, damp
cloth, dishwashing detergent or a
mild glass cleaning agent. Soften
dried and stuck soil with a damp
cloth. Do not scrape!
- Using dry clothes, sponges that
may scratch, agents that necessitate
rubbing, cleaning agents containing
sand, soda, acid or chlorine or other
strong materials is not appropriate.
- Clean stainless steel surfaces only
in the direction of grinding.
- Do not use stainless steel cleansers
and wet clothes for control units.
Cleaning metallic oil filters Used
metallic oil filters trap oily particles
contained in the humidity and steam
in the kitchen. Under normal usage
(1-2 hours daily), clean metallic oil
filters approximately every three
months.
- Do not use excessively strong,
acidic or chlorine- solution
cleansers.
- While cleaning the metallic oil filter,
clean the trapping arrangements of
metallic oil filters in the device with a
damp cloth also.
- You can clean metallic oil filters in
the dishwasher or by hand wash.
5.1 Washing in the Dishwasher
In case of dishwashing, slight discoloration may
be in question. This has no impact in terms of the
function of the metallic oil filter.
- Do not wash heavily soiled metallic oil filters
together with the dishes.
- Place the metallic oil filters in the dishwasher
loosely or freely standing. Metallic oil filters
should be placed in the dishwasher without any
compression on them.
5.2 Hand Washing
Soften the stains of the metallic oil filters in hot
dishwashing detergent water.
– Use a brush for cleaning and let the liquids on
the metal oil filters to drain completely.
– Rinse the filters well after cleaning.
You may use a special oil solvent to remove
persistent soils. You can get this product via
authorized sales center.
Hood / User Manual
13 / EN
6
Installation of the device
Figure 5: Installation of the device
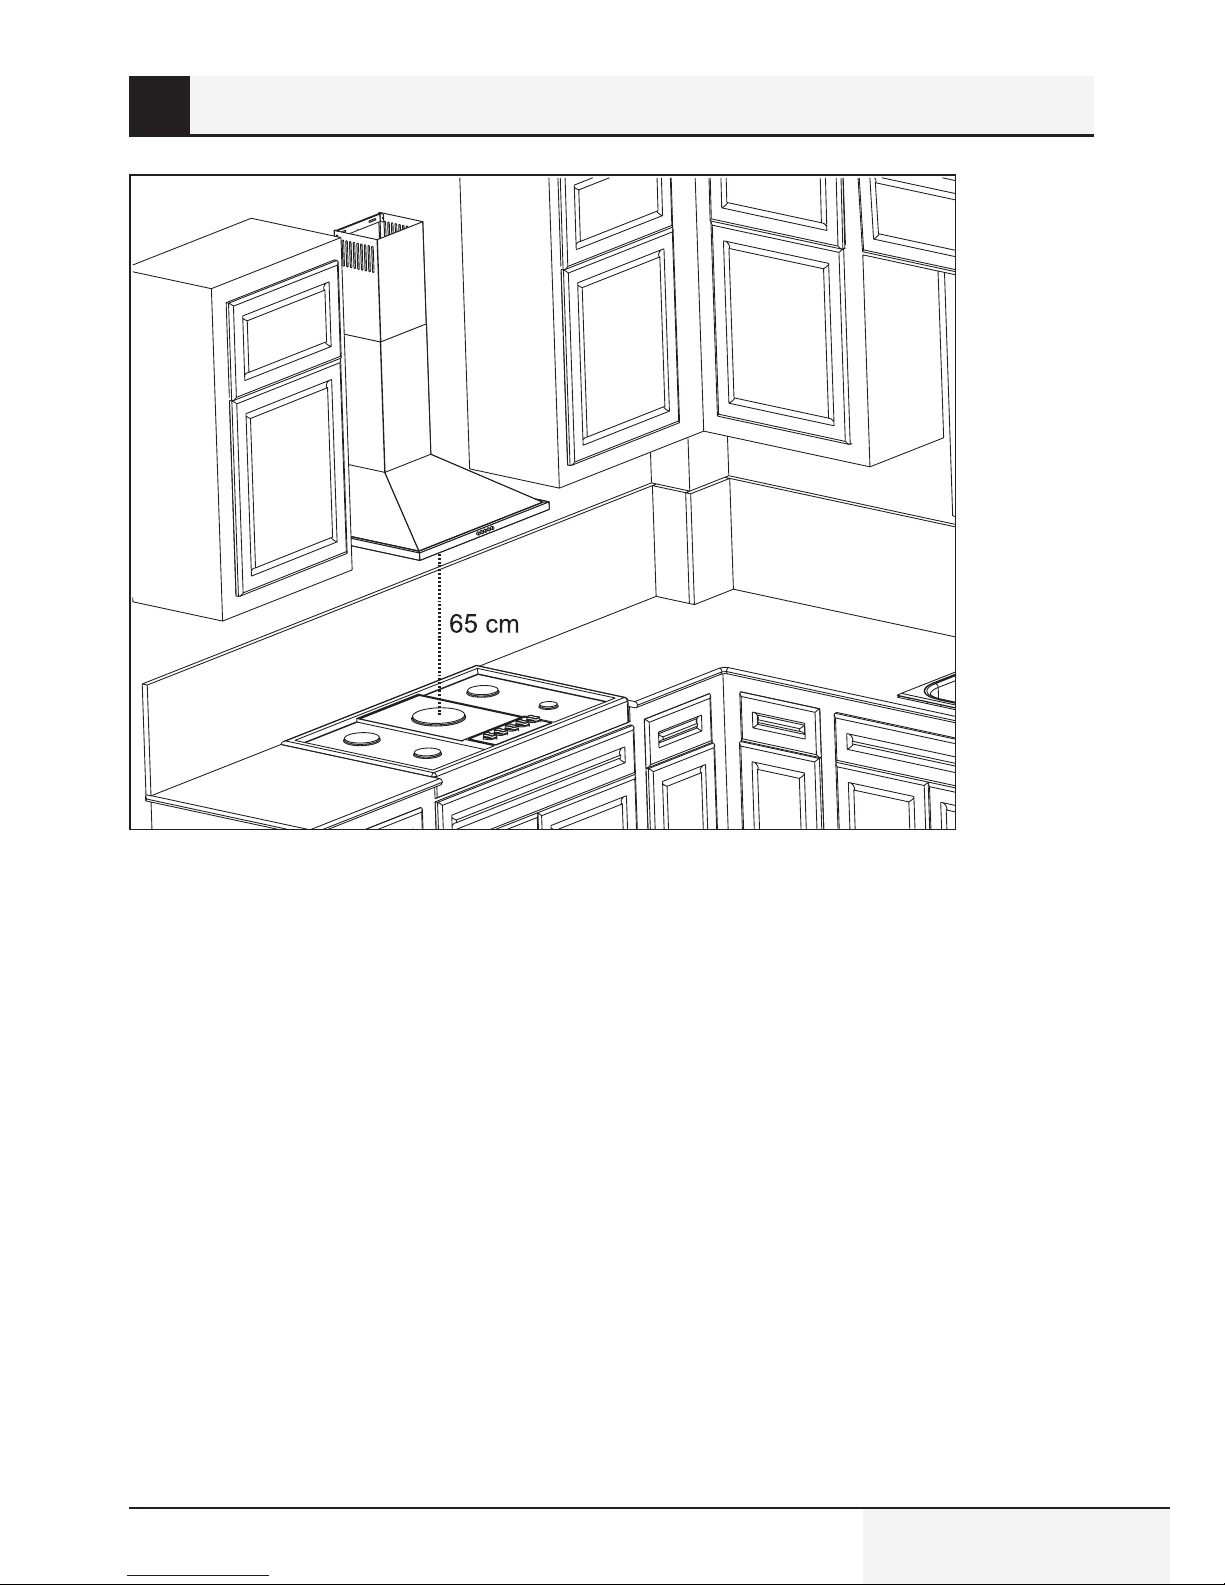
When hood is installed, the product must have at
least 65 cm clearance with the electricity cookers
and with cookers operating on gas or other fuels.
Figure 5
14 / EN
Hood / User Manual
6
Installation of the device
6.1 Installation Scheme
10
Figure 6: Installation scheme
6.2 Installation and Unpacking
Check if there are any damages on your appliance.
– Shipment damages must be reported to the
shipment responsible immediately.
– Visible defects must also be communicated
to the seller.
– Do not let children play with packaging
material.
Regularly change carbon filters.
– Clean aluminum filters regularly. You might
need to operate your appliance in high levels
as dirty filter will block air intake.
– Use your appliance levels appropriately.
– Using in high levels will increase your energy
consumption.

Hood / User Manual
15 / EN
7
Package content
2
3
1
7 8 9 10 11
5 6
4
Figure 7: Package content
1. Product
2. Internal Stack
3. External Stack
4. 150/120 mm Plastic Flue Adapter
5. Stack Connection Metallic Sheet
6. Operation Manual
7. Ø6mm Plastic Pin
8. Ø10mm Plastic Pin
9. 5.5x60 Wall Mount Screw
10. 3.9 x 22 Stack Connection Sheet Screw
11. 3.5 x 9.5 Stack Connection Screw
16 / EN
Hood / User Manual
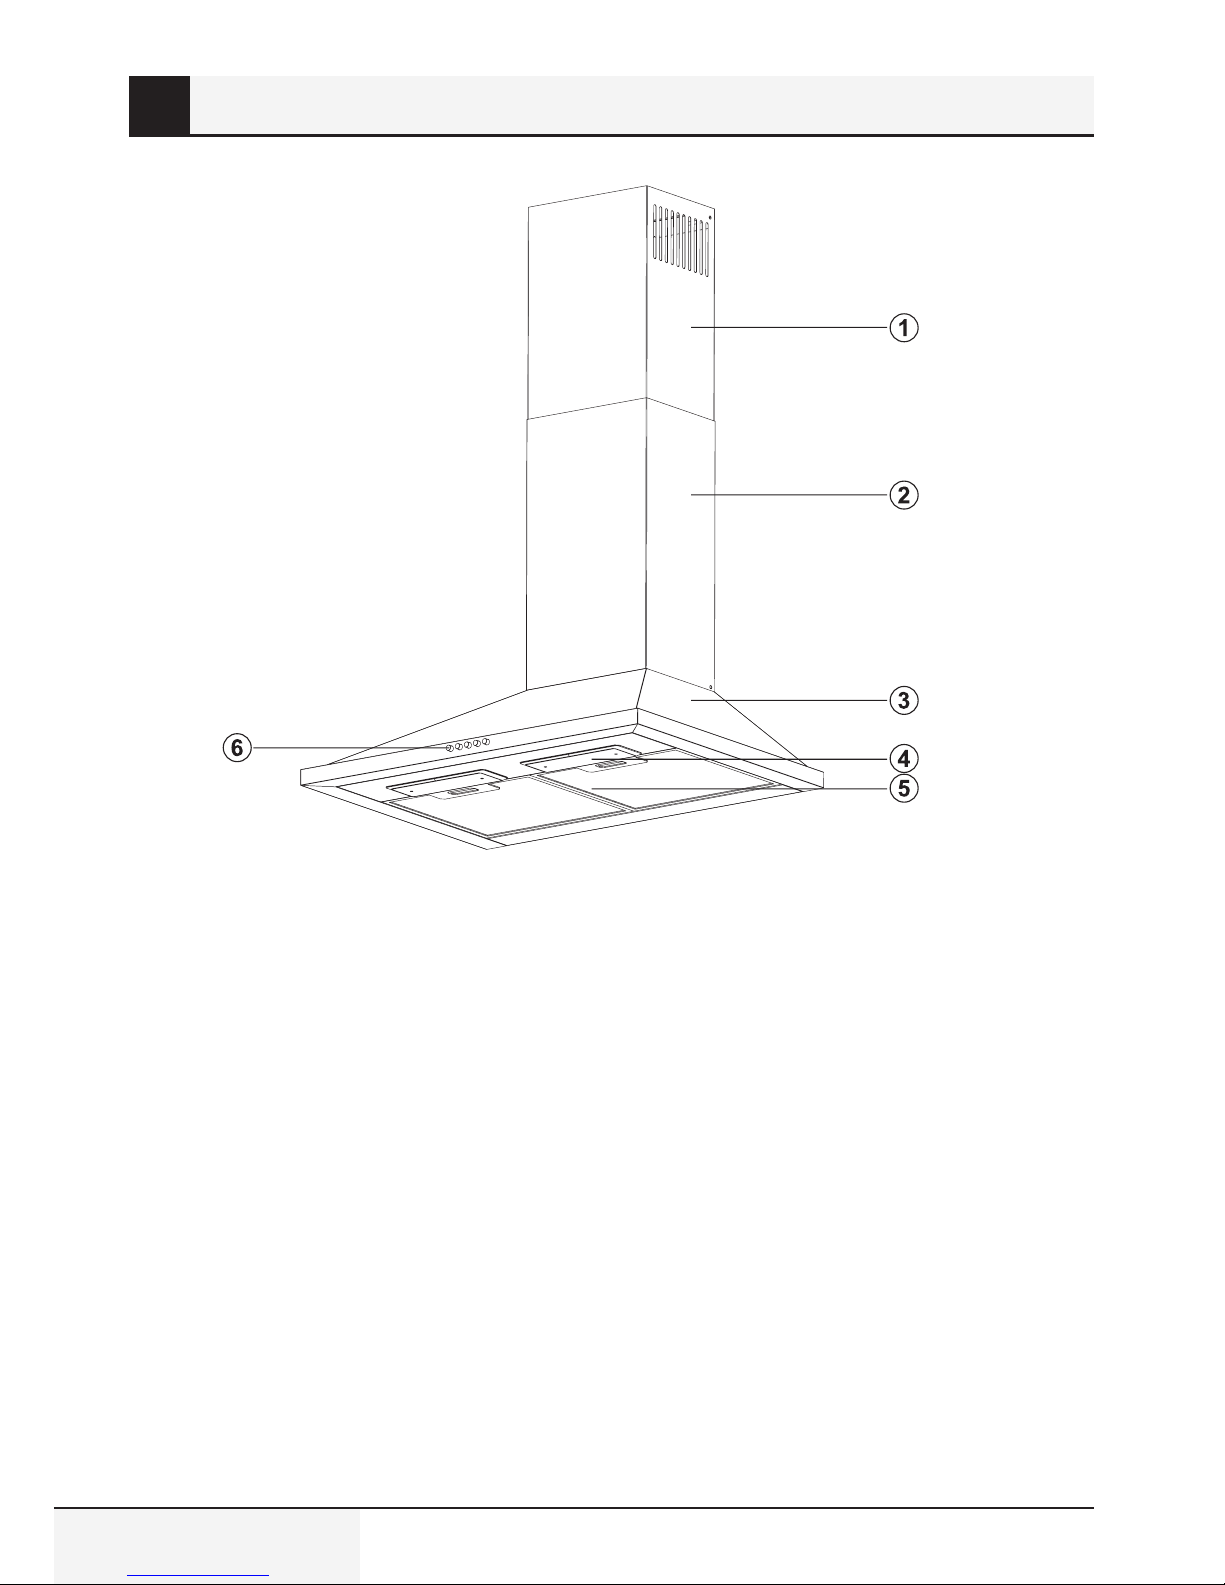
8
Overview of the hood
Figure 8: Overview of the hood
1. Internal Stack
2. External Stack
3. Body
4. Cooker Lighting
5. Aluminium Filter
6. Control Panel
Hood / User Manual
17 / EN
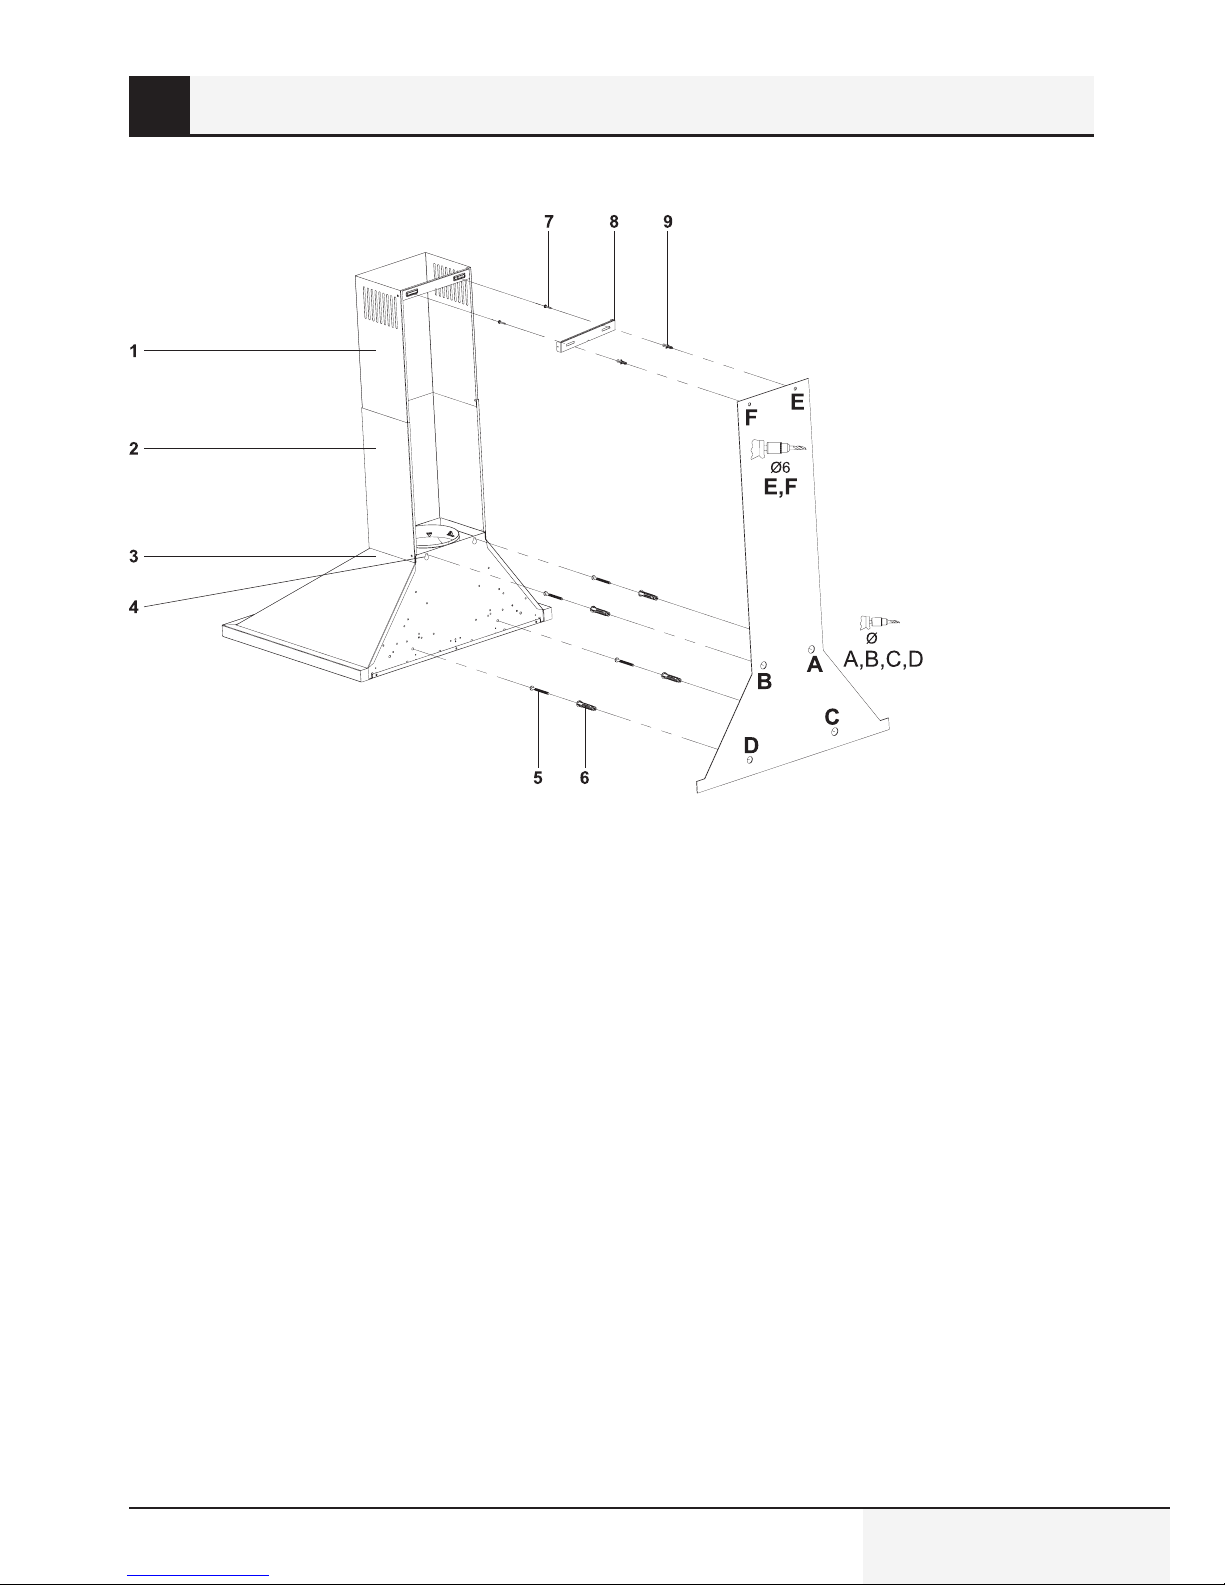
9
Installation of the product
9.1 Installation scheme and parts
10
Figure 9: Installation and parts
1. Internal Stack
2. External Stack
3. Body
4. Product Rack Sheet
5. 2x 5.5x60 Wall Rack Screw
6. 2x Ø10mm Plastic Pin
7. 2x 3.9x22 Screw
8. Stack Connection Metallic Sheet
9. 2x Ø6mm Plastic Pin
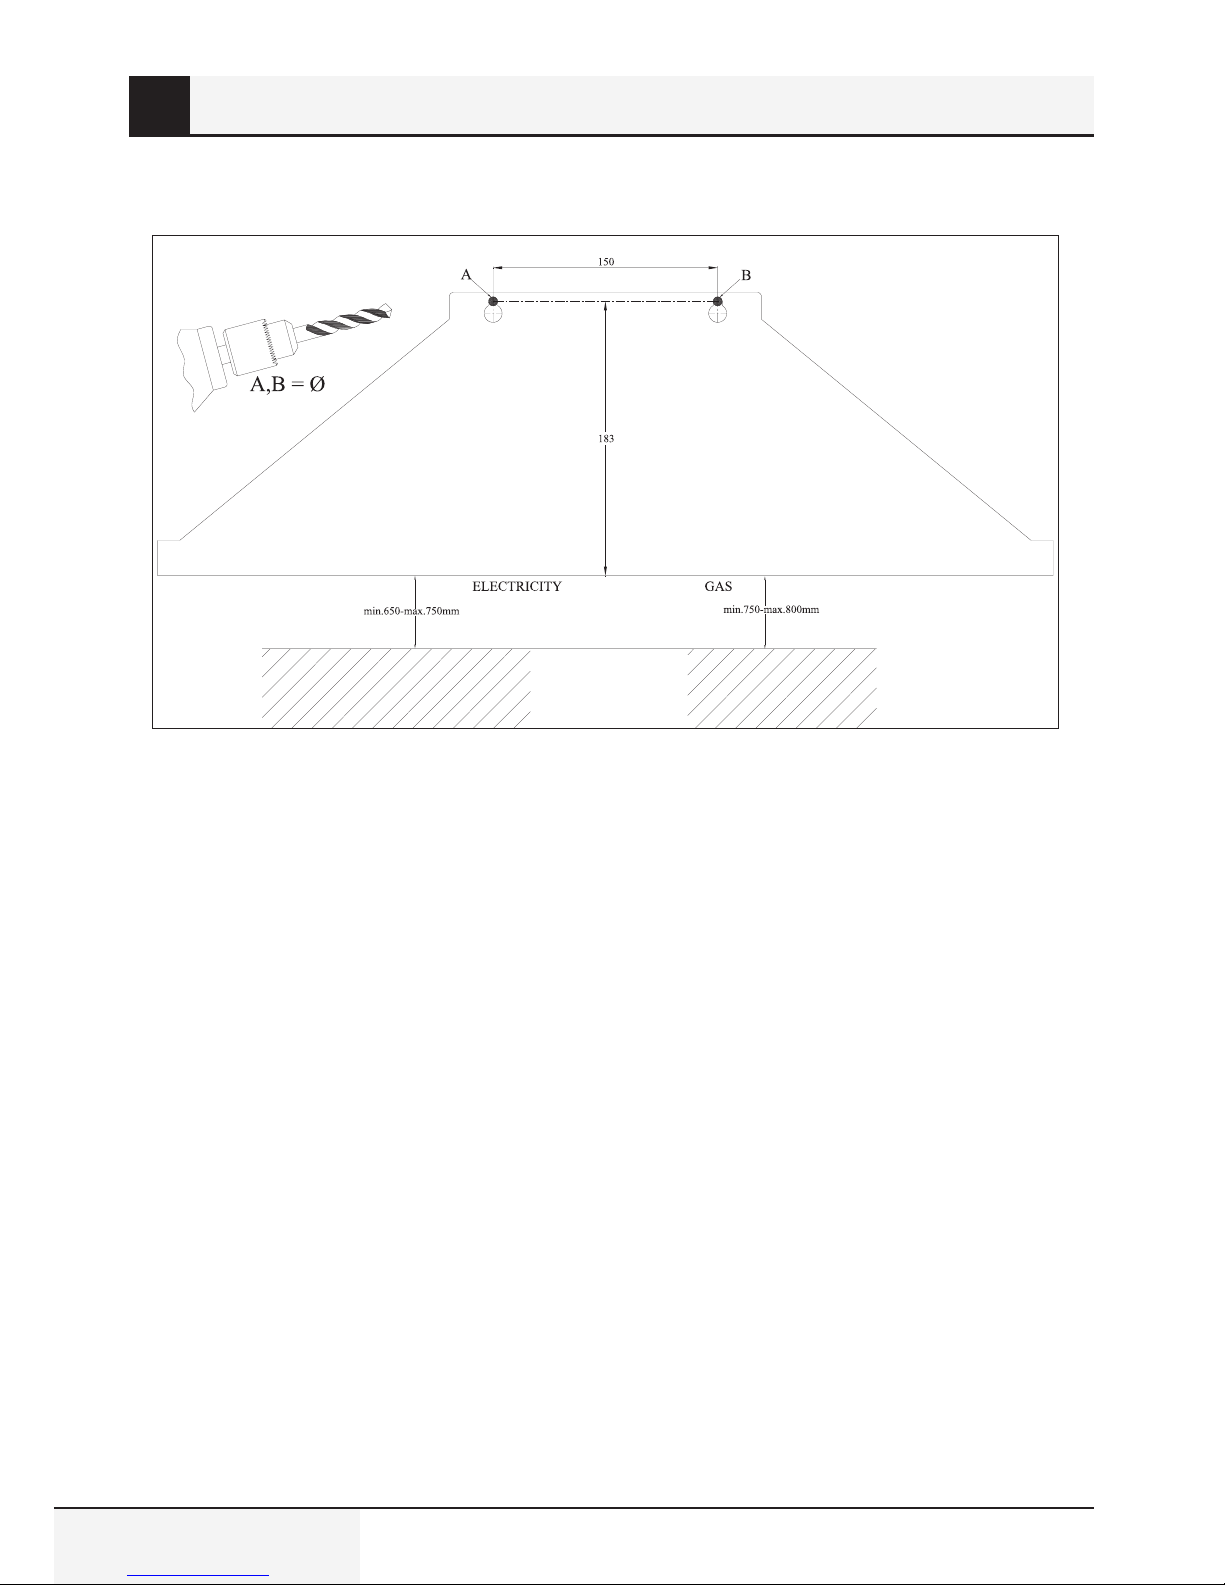
Install the hood using the installation scheme.
– Check the minimum and maximum distance
according to workbench and drill points A, B.
(Figure 9)
– Place Ø10mm pins in drilled A, B points and
screw the screws to A+B points leaving 5
mm gap between screw head and the wall.
(Figure 9)
– Hang the hood on the wall using A, B points.

18 / EN
Hood / User Manual
10 Mounting sheet stacks
Figure 10: Mounting sheet stacks
1. Internal Stack
2. Internal Stack Connection Sheet Fixing Screws
3. Stack Connection Metallic Sheet
4. External Stack
5. External Stack Fitting Screw
Install air exhaust connection of the appliance.
Internal and external sheet stacks are inserted
to each other. “Installation Scheme and Parts”.
Center stack connection sheet (3) on the hood,
hold it under the cover or measure and mark C,
D points. (Figure 10)
– Drill C, D points with Ø6mm drill and place
Ø6mm plastic pins. Place stack connection
sheet on the surface where 3.9x22 screws
will be installed. (Figure 10)
– Pull out the internal stack (1) using screws (2)
and screw it on stack connection sheet on the
right and left (3). (Figure 10)
– Mount the external stack (4) on hood body
using 2 screws (5). (Figure 10)
Hood / User Manual
19 / EN
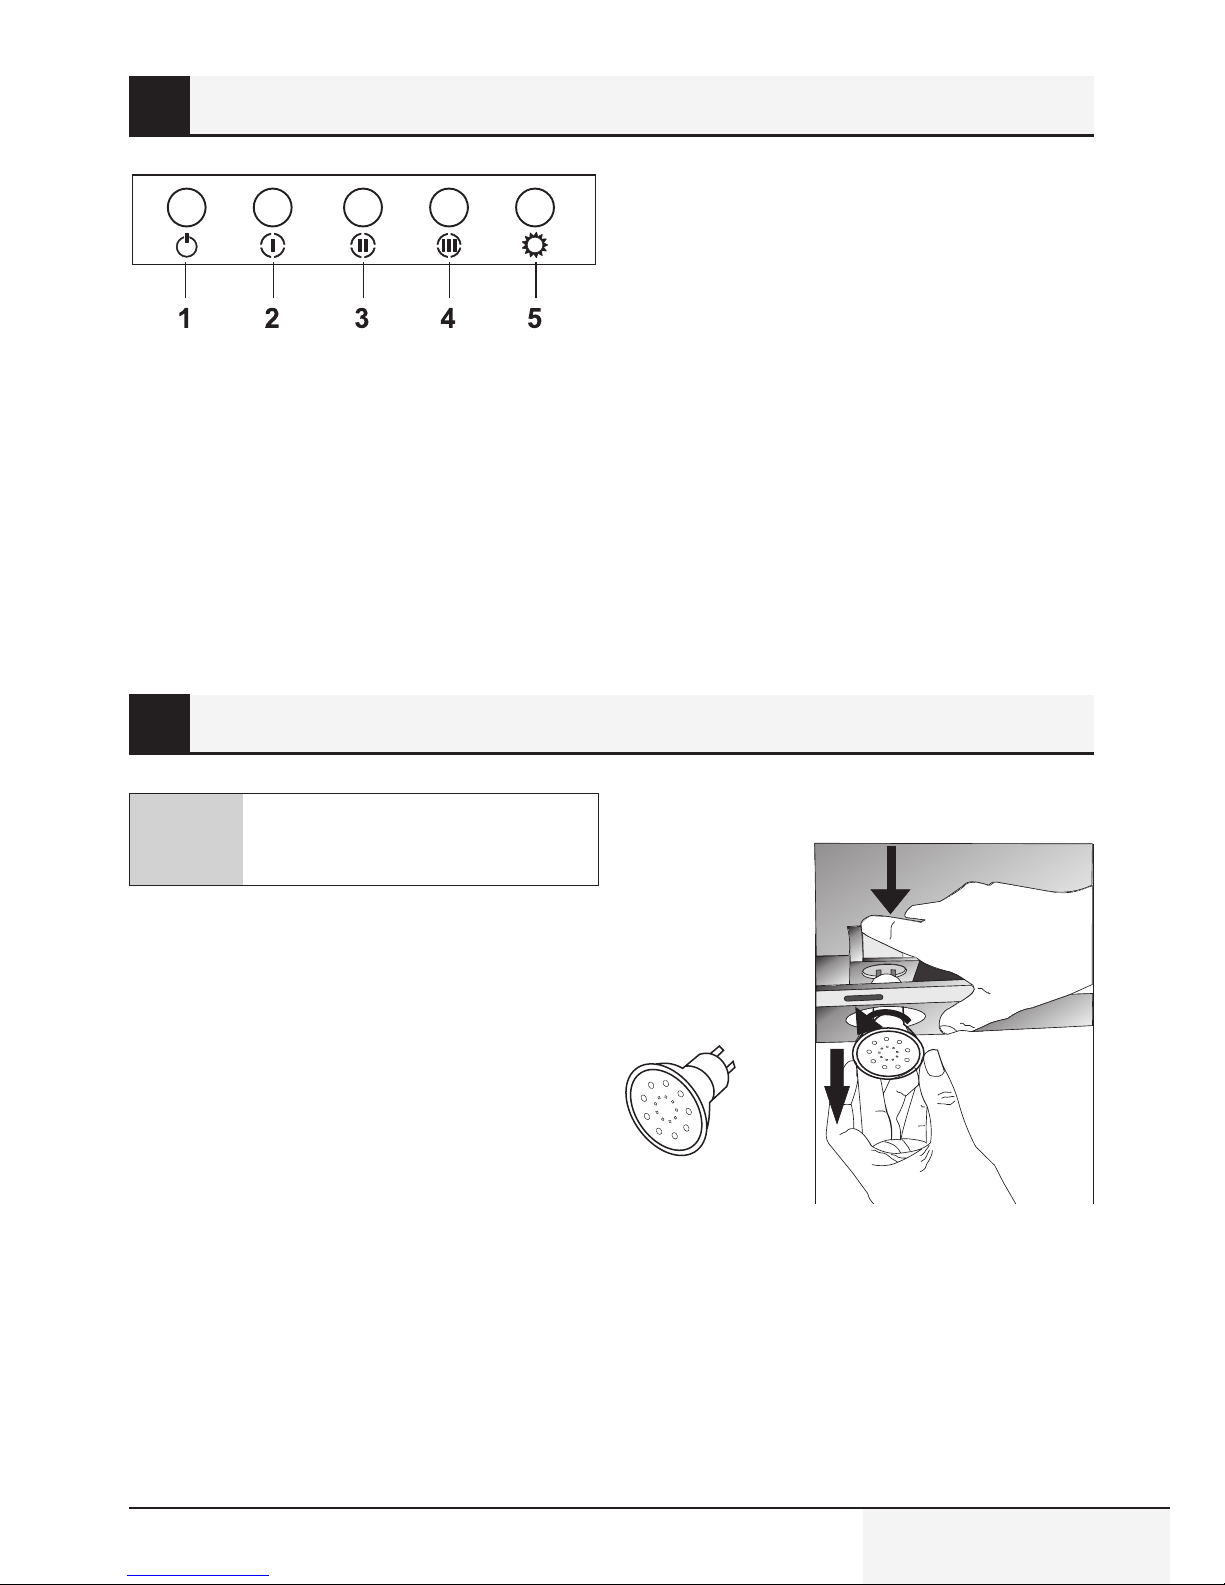
11 How to use the product
Figure 11: Push button
1. Press this button to reset your product.
2. Product will run on 1st speed level when this
button is pressed.
3. Product will run on 2nd speed level when this
button is pressed.
4. Product will run on 3rd speed level when this
button is pressed.
5. Press this button to turn on and off the lamp.
A
DANGER: Disconnect the hood from
mains. Wait for the lamps to cool as
you might burn your hands.
12 Lamp replacement
12.1 Replacement of LED Lamp
Figure 13: Replacement of LED lamp
Remove the aluminium cartridge filter. Remove the
faulty bulb and replace with a new one with the
same rating.Fig. 13

20 / EN
Hood / User Manual
13 Authorized service
If Lighting is not working:
– Make sure the appliance is plugged and fuses
are not faulty.
– Check bulbs. Make sure to unplug the
appliance while making this check. Tighten
the lamps if they are loose. Replace them if
they still do not work.
Possible Failures and Actions You Can Do Without
Calling the Service:
• Appliance does not work at all:
– Check if the appliance is plugged or the plug
is secured in the socket.
– Check the breaker of the appliance and main
breaker of your house.
If the device shows low performance or makes
loud noises while working:
– Does the appliance have a sufficient stack
diameter? (min.120 mm).
– Are the metallic filters clean? Check.
– If your are using the hood without stack,
make sure carbon filters are not older than
6 months.
– Make sure your kitchen is ventilated enough
to ensure air flow. If you are still dissatisfied
with your appliance’s performance, contact
the authorized service.
 Loading...