

Page 1
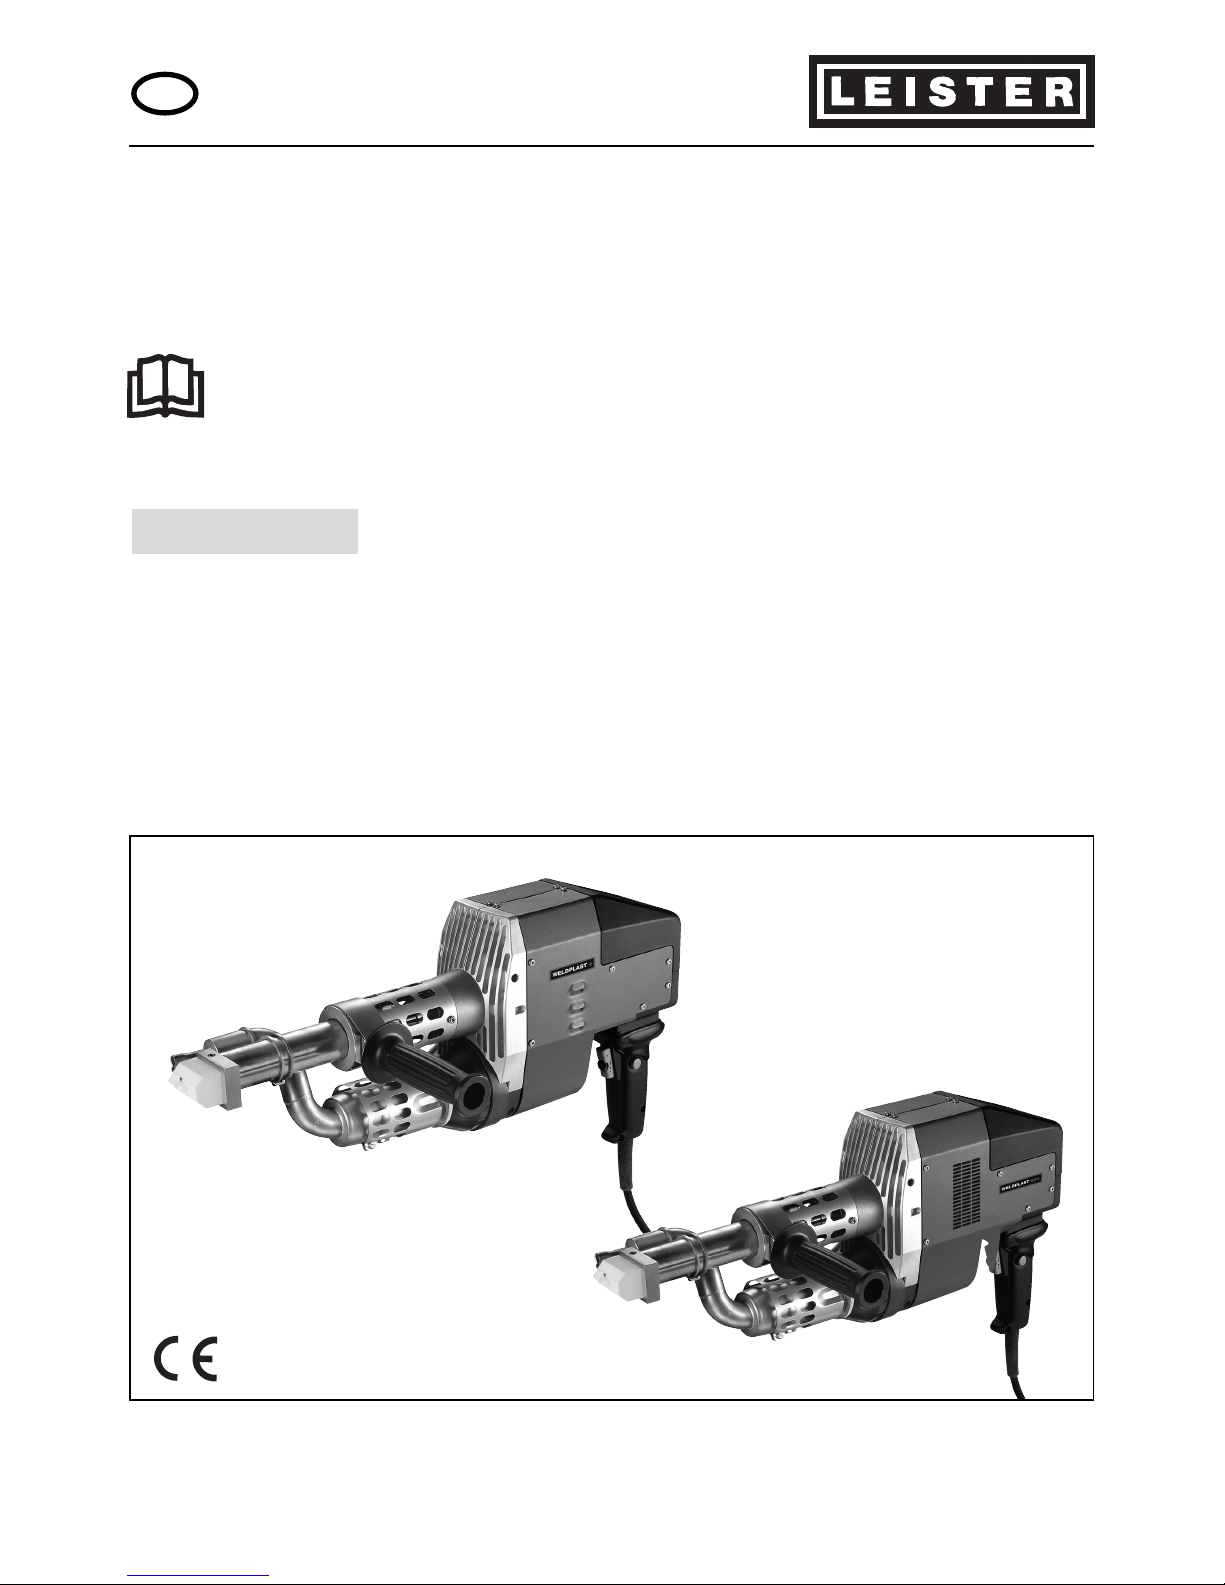
Leister WELDPLAST S4 / WELDPLAST EC4
Hand extruder
Please read operating instructions carefully before
use and keep for further reference.
GB
OPERATING INSTRUCTIONS
Leister Process Technologies, Riedstrasse, CH-6060 Sarnen/Switzerland
Tel. +41 41 662 74 74 Fax +41 41 662 74 16
www.leister.com [email protected]
®
Welding PE and PP thermoplastics for applications in
• container engineering
• plastic fabrication
• pipeline construction
• landfill sites
APPLICATION
WELDPLAST S4
WELDPLAST EC4
Page 2
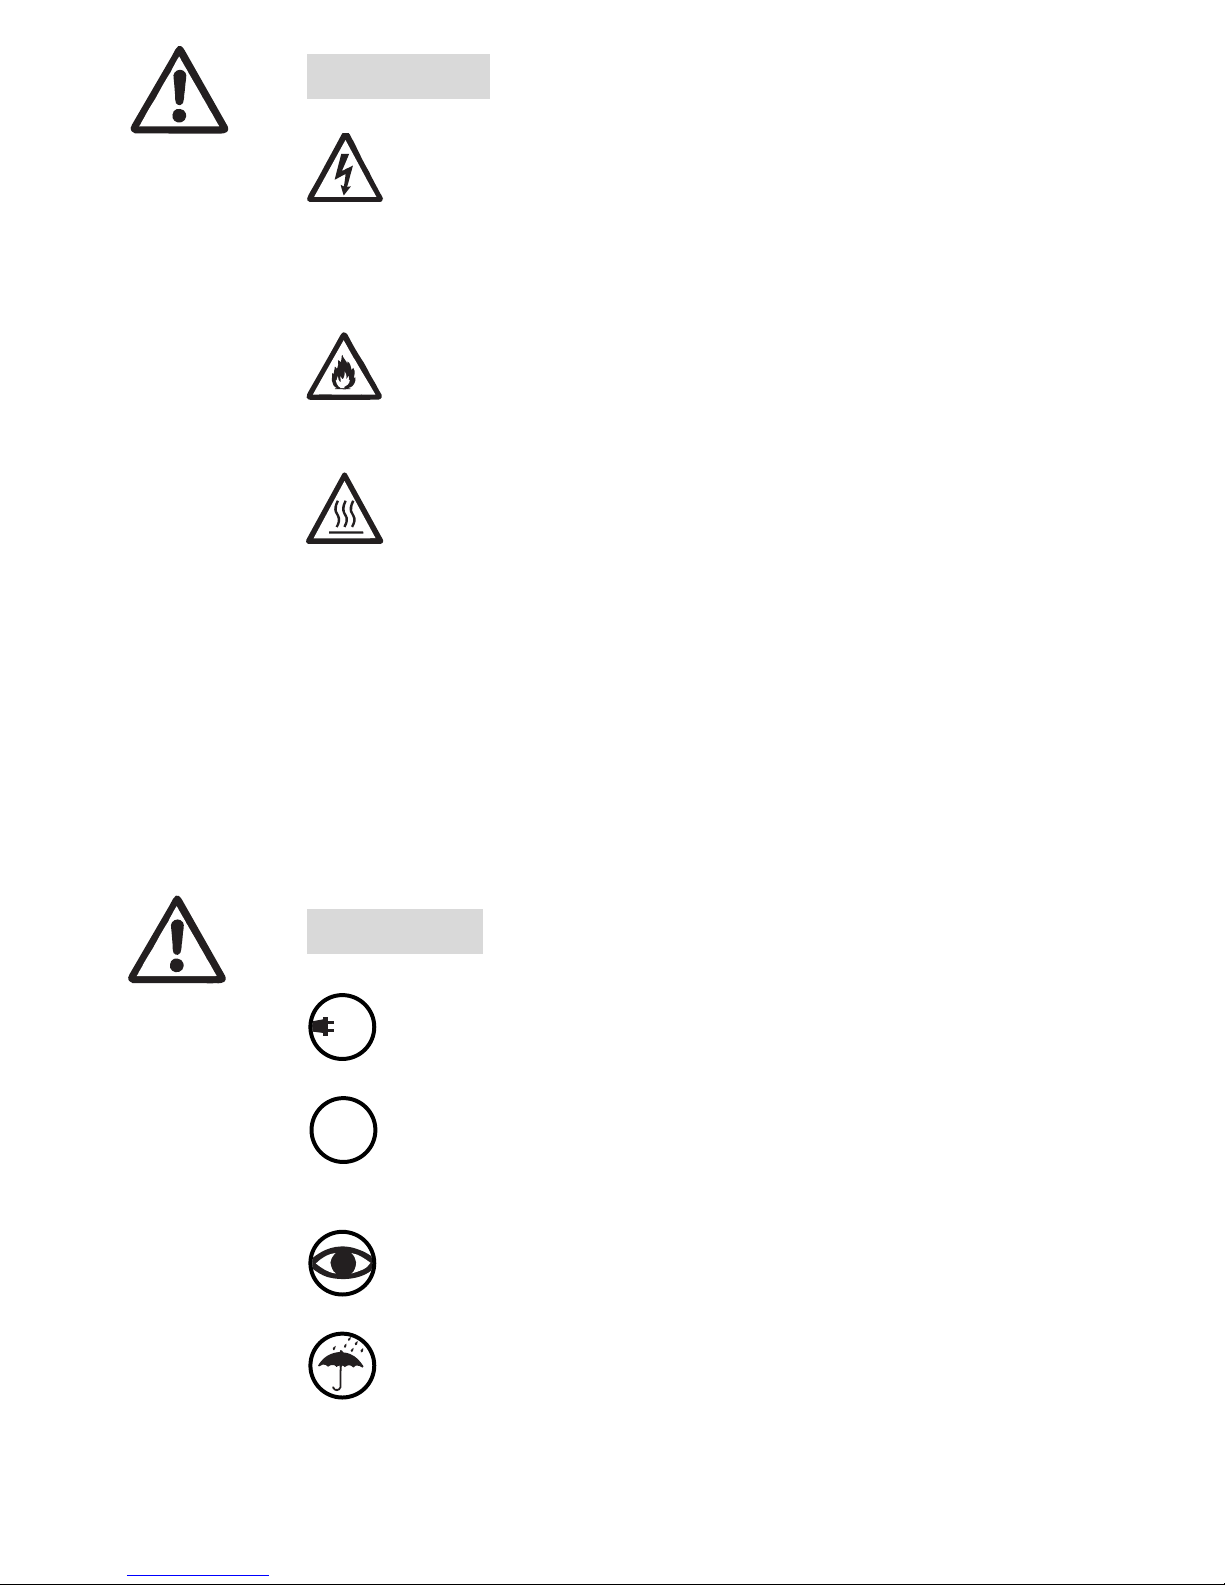
Danger to life!
Danger to life when opening up the tool, as live components and connections are exposed. Before opening the
tool, unplug from the mains supply. Electrically conducting
material (e.g. PE-EL) must not be welded.
Fire and explosion hazard with incorrect use of the hand
extruder (e.g. overheating of the material), especially near
combustible materials and explosive gases.
The tool must be operated under supervision. Heat can
reach combustible materials, which are out of sight.
For personal protection on building sites we strongly
recommend the tool to be connected to a RCCB (Residual Current Circuit Breaker).
The voltage rating stated on the name plate of the tool
must correspond to the mains voltage.
Danger of getting burned! Do not touch exposed metal
parts and escaping plastizised material. Do not point the
hot air flow and escaping plastizised material in the
direction of people or animals.
Protect tool from dampness and wet.
FI
120
230
WARNING
CAUTION
Connect the tool to a mains socket with protective earth.
Every interruption of the protective earth inside or outside
of the tool is dangerous!
Only use extension cables with protective earth!
‡
2
Page 3

3
TECHNICAL DATA WELDPLAST S4 WELDPLAST EC4
Voltage V~ 230 230
Power consumption W 3680 3680
Frequency Hz 50/60 50/60
Air flow (20°C) l/min approx. 400 with no. 2 nozzle approx. 400 with no. 2 nozzle
Air temperature °C max. 350 max. 350
Plasticizer temperature °C max. 260 max. 260
Welding output * Ø 3 kg/h PE 1.5– 2.2 PP 1.4– 1.9 PE 0.7– 2.3 PP 0.5– 2.0
Welding output * Ø 4 kg/h PE 2.2– 3.8 PP 2.2– 3.4 PE 1.1– 3.7 PP 1.1– 3.7
(*average values at 50 Hz)
Welding rod mm Ø 3 / Ø 4 ±0.2 (in accordance with DVS 2211) Ø 3 / Ø 4 ±0.2 (in accordance with DVS 2211)
Size L × B × Hmm560 × 110 × 300 (without welding shoe) 560 × 110 × 300 (without welding shoe)
Weight kg 8.7 (without cable to mains) 10.5 (without cable to mains)
Marking of conformity ¬¬
Approval mark ††
Certification scheme CCA CCA
Protection class I
‡‡
Page 4
1
15
11
9
5
2
10
7
6
16
8
14
13
4
3
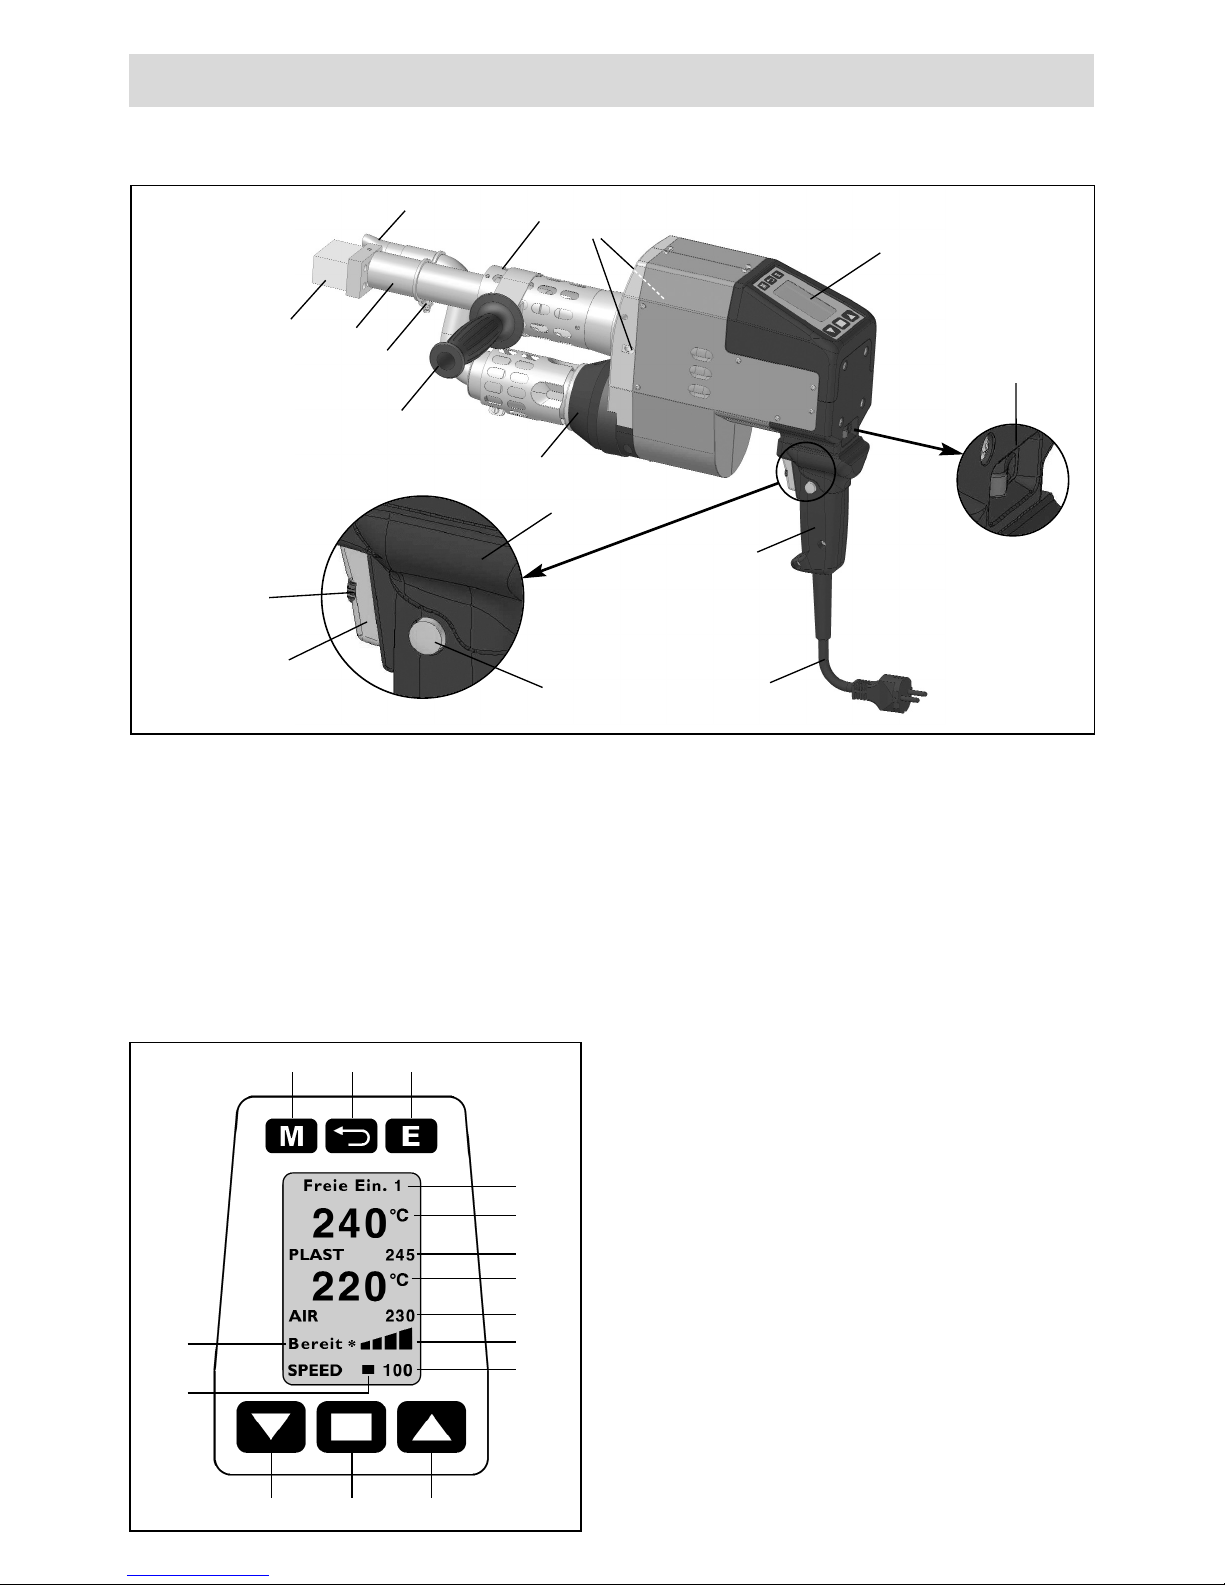
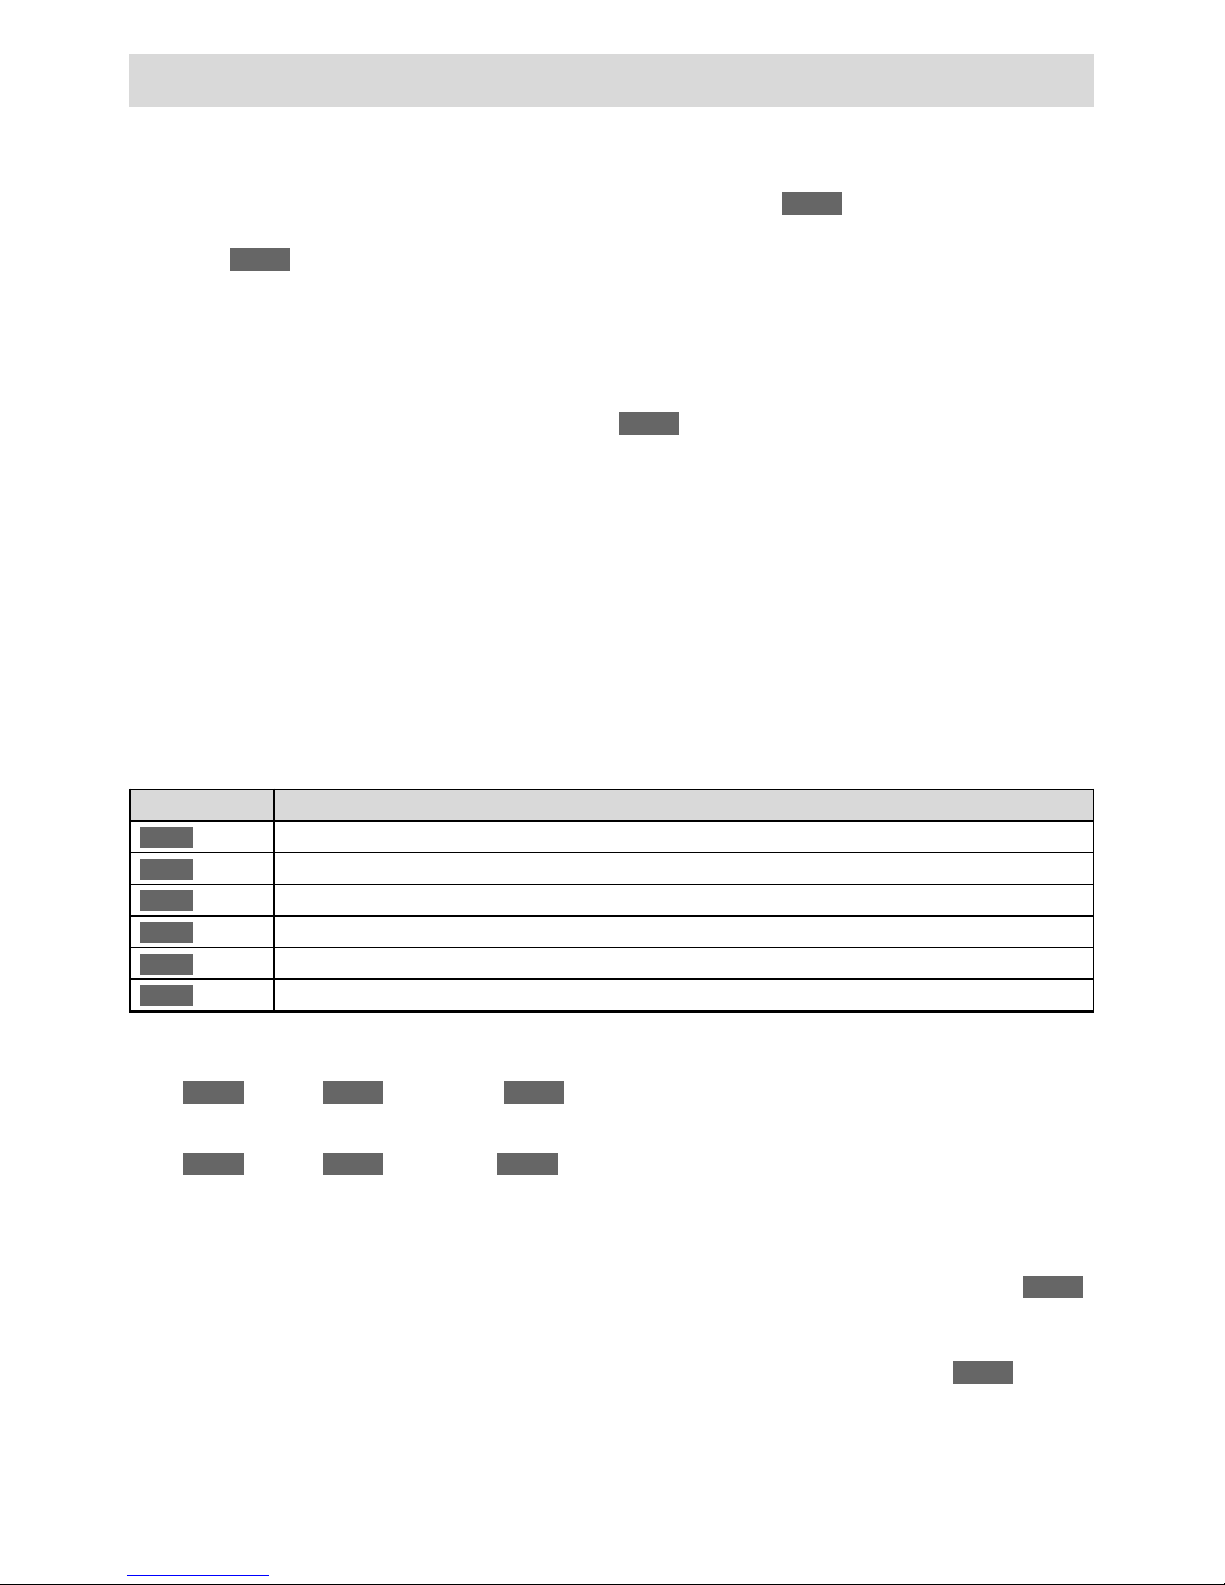
OPERATING Leister WELDPLAST S4 / EC4 hand extruder
1 Main switch
2 Motor on/off switch
3 Potentiometer
4 Locking device
5 Display
6 Handle
7 Jacket heating
8 Welding shoe
17 Welding program
18 Actual value plast
19 Set value plast
20 Actual value air
21 Set value air
22 Bar display
23 Welding output display
24 Menu key
25 Back key
26 Enter key
27 Down key
28 Select key
29 Up key
30 Status display
31 Cursor
9 Pre-heating nozzle
10 Tube clamp
11 Protective tube
12 Welding rod opening
13 Tool handle
14 Mains cable
15 Hand protection
16 Hot-air blower
Description of tool
4
24
27 28 29
30
31
17
18
19
20
21
22
23
25 26
Operating unit
12
Page 5
OPERATING Leister WELDPLAST S4 / EC4 hand extruder
5
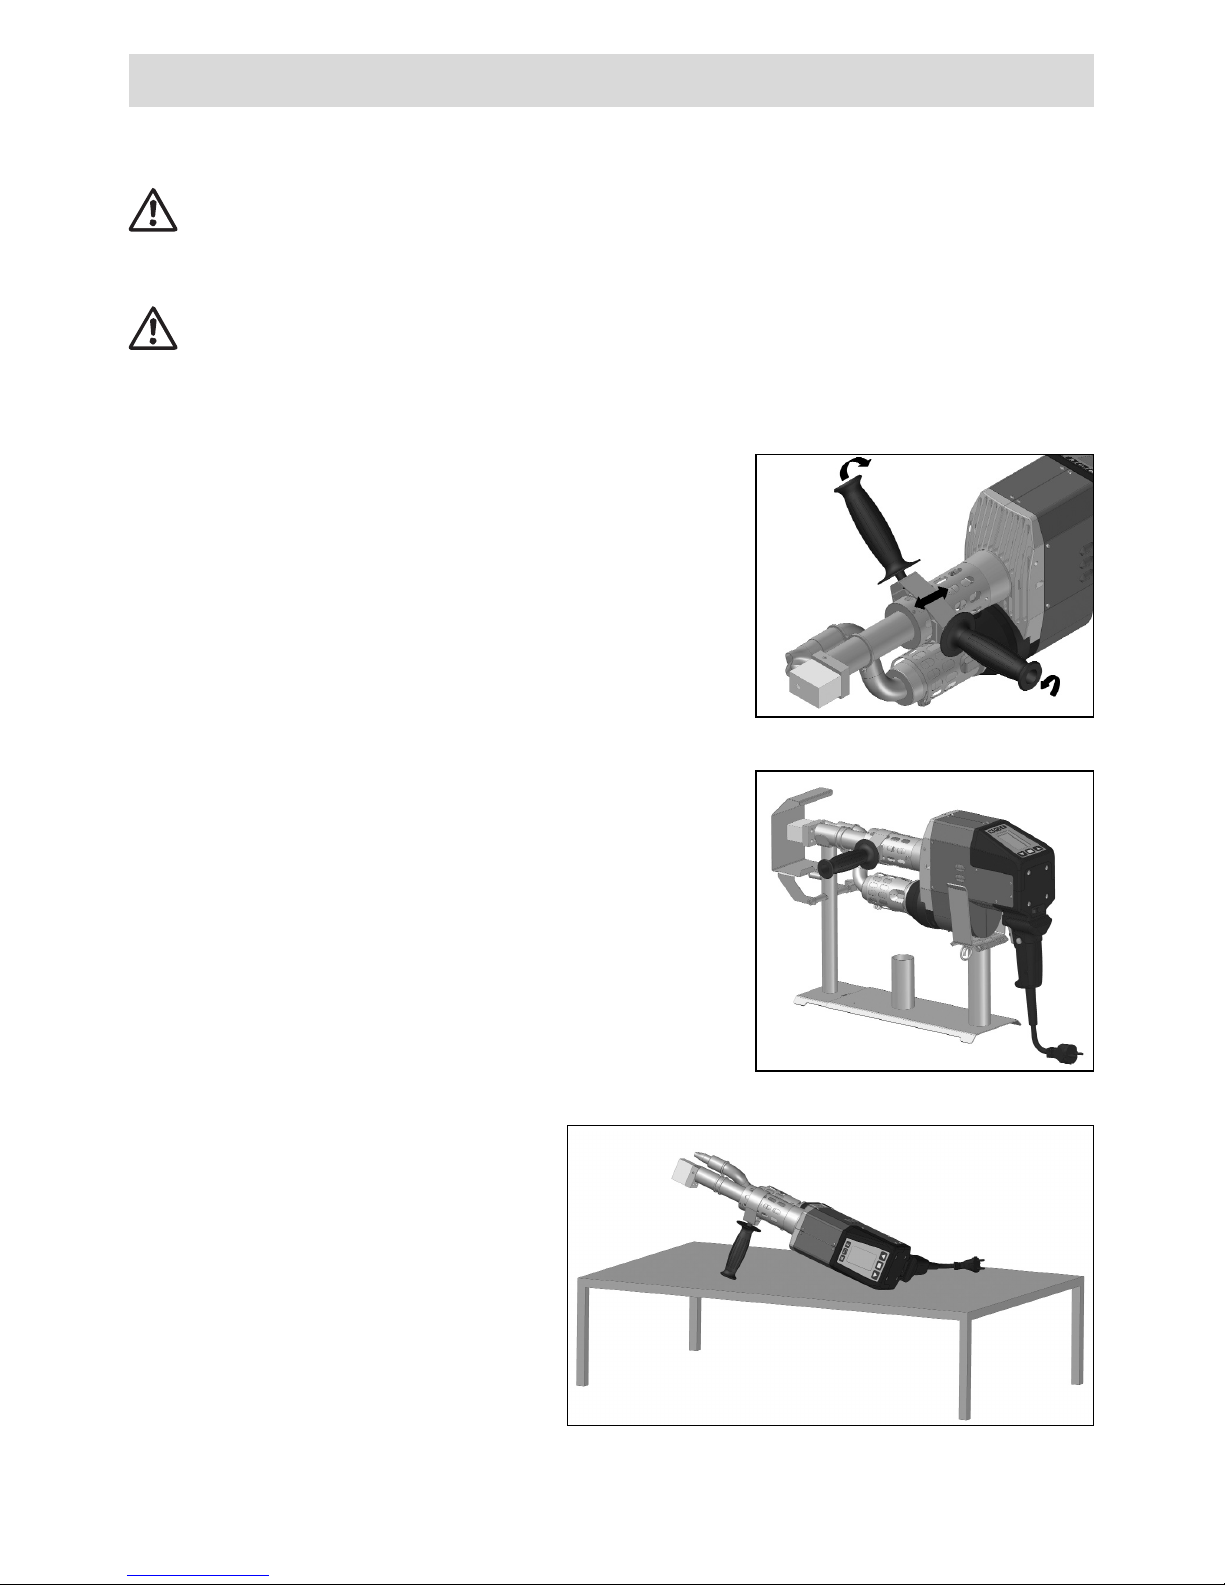
Working environment / safety
In the case of interruptions to welding
work, the drive motor can be switched off with the motor on/off switch
(2). Place the hand extruder with the
handle appropriately positioned and
tightened on a stable fireproof surface as illustrated.
The hand extruder must not be used in inflammable environments or where
explosion hazards exist. Ensure stable positioning during operation. The
connection cable and the welding rod must remain unimpeded and must
not hinder the user or others during operation.
Rest the hand extruder on a fireproof surface! Hot metal parts and the hot-air
jet must have sufficient clearance from the surface and walls.
Adjusting the handle
The clamp is loosened by turning the plastic handle
counter-clockwise and the handle can be positioned in the ideal working position by sliding back or
forwards. The handle can also be rotated for
left/right handed users (see also Welding direction
left/right)
Workstation
For starting operation of the hand extruder and setting
it down, Leister offers a comfortable universal tool
stand with integrated hot-air hood and welding rod
dereeler holder (see Accessories).
Page 6
OPERATING Leister WELDPLAST S4 / EC4 hand extruder
6
Power supply
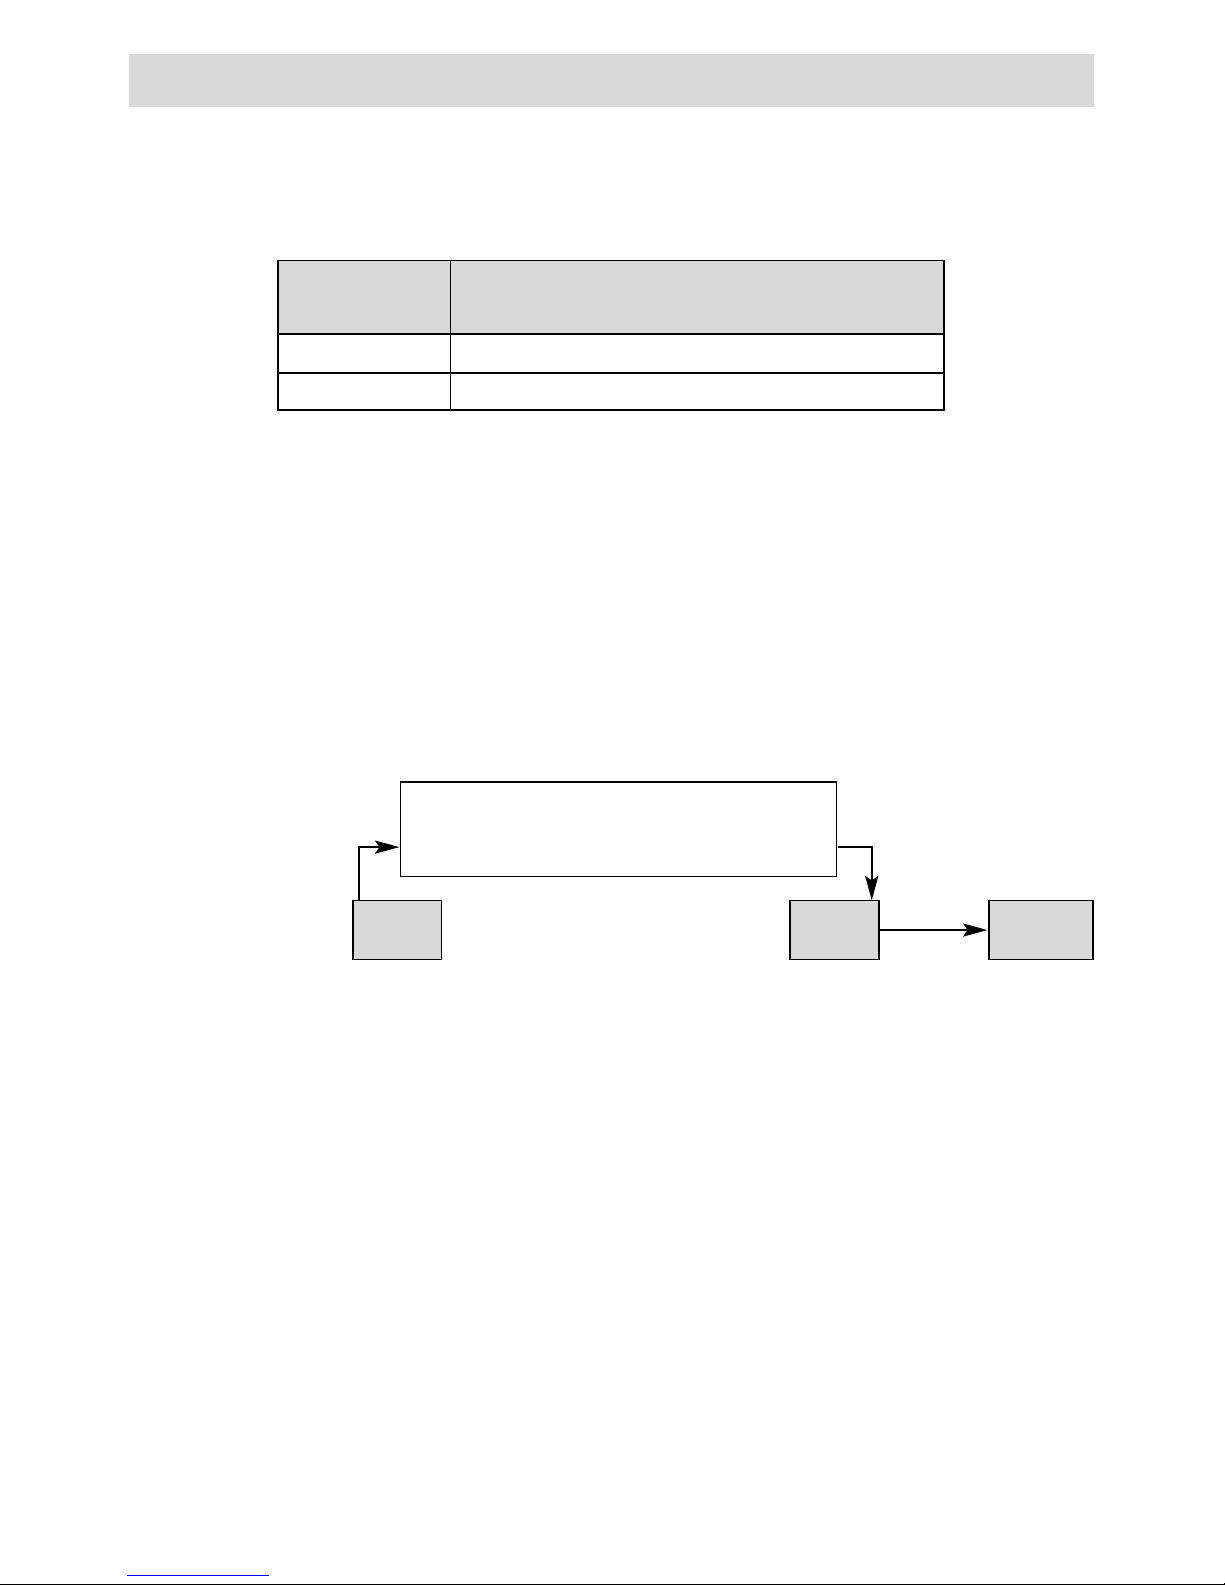
When using an extension cable, take care to ensure the minimal cable crosssection:
Extension cables must be approved for the working environment (e.g. outdoors) and labelled accordingly.
If a generator is used to supply electricity, the rated power of the generator
must be 2x the rated power of the hand extruder.
Length
[m]
Minimum cross-section (at ~230V) [mm2]
Up to 19
2.5
20-50 4.0
The tool starts immediately by heating up to the target temperatures last set. A
counter in the status display then counts down the warm-up lock time of 220 sec. The
hand extruder reaches its operating temperature (READY* status) after approx. 8
minutes. On completion of the starting procedure the tool is ready to weld.
motor disabled
WARM-UP LOCK TIME:WELDPLAST S4 220 SEC.
WELDPLAST EC4 270 SEC.
HEAT FREE M READY *
Display
Status display (29)
Heating until target
value is reached
motor release ready to weld
Starting procedure
Temperature monitoring prevents the hand extruder starting up in a cold state.
Page 7
OPERATING Leister WELDPLAST S4 / EC4 hand extruder
7
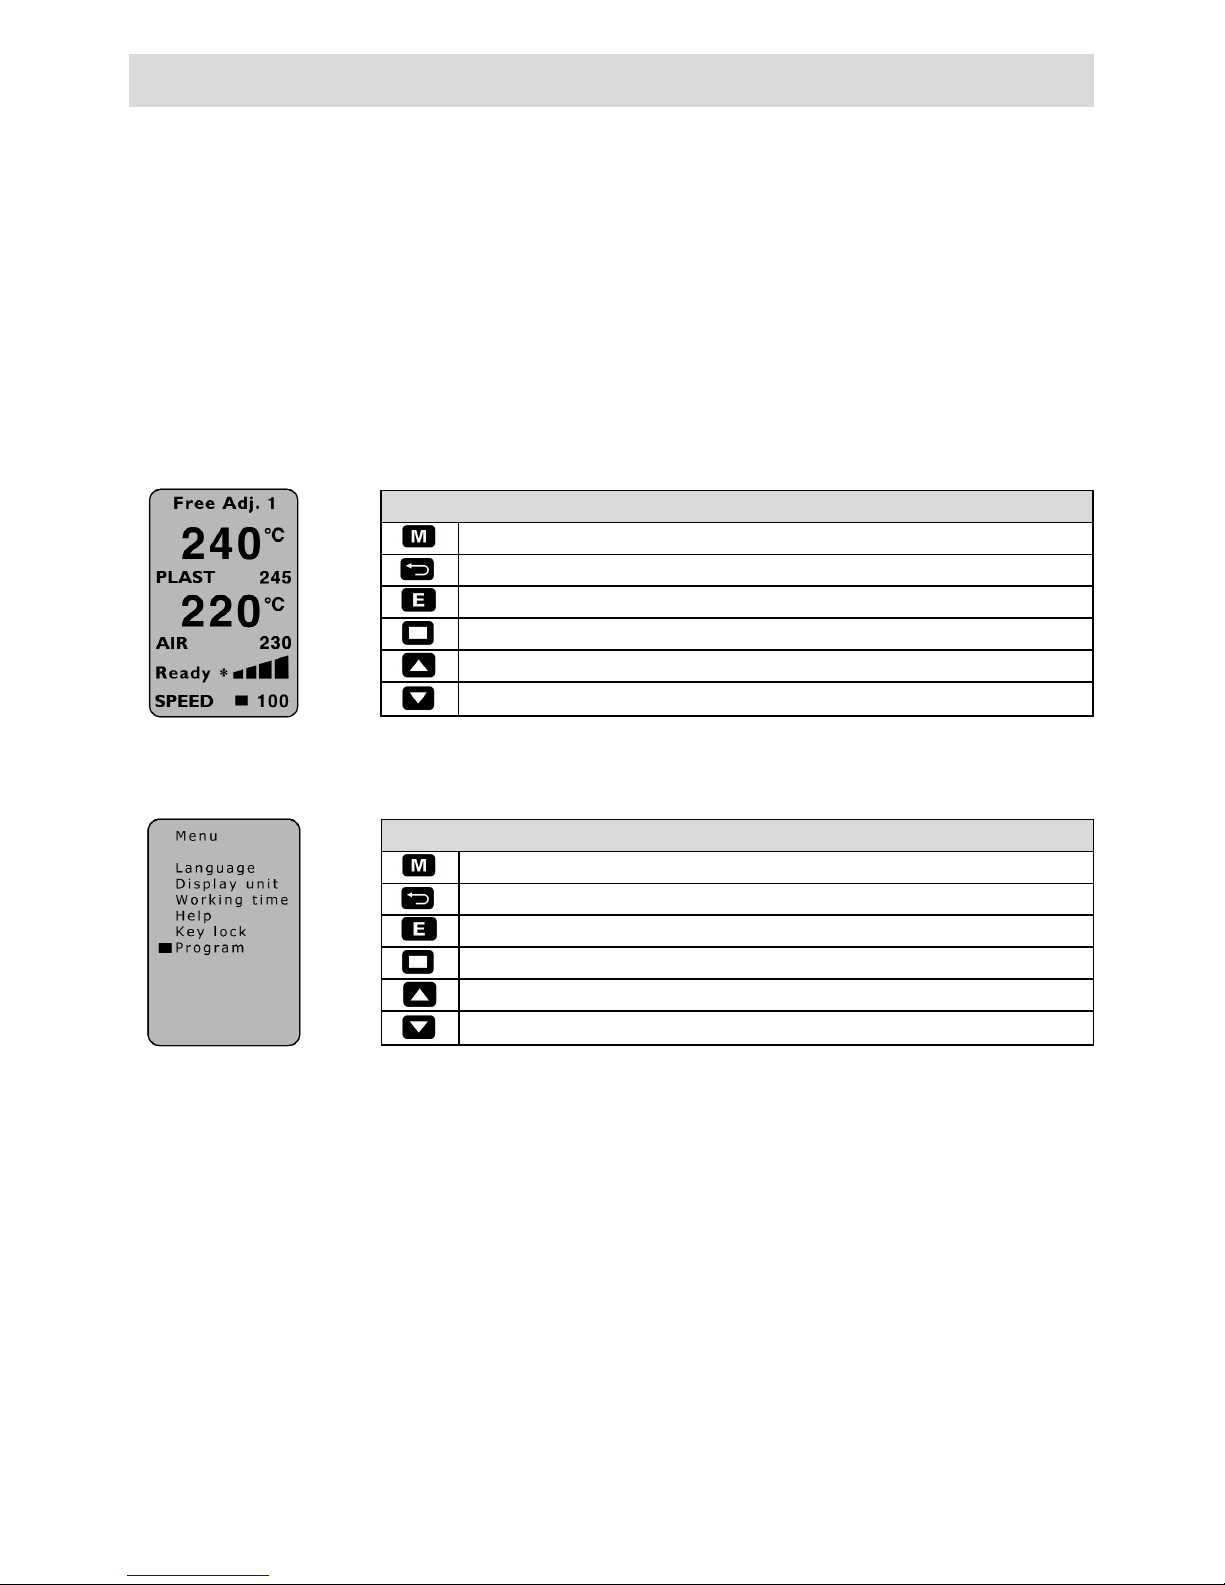
Operating window functions
Menu selection
Set contrast
Heating on/off
Change cursor position
Selected parameter [+]
Selected parameter [–]
Key functions
• Operating window
• Menu selection
Menu selection functions
Menu selection / return to operating window
Return as ESC (changes are not saved!)
Select and return to operating window
Select
Cursor up / selected parameter +
Cursor down / selected parameter –
The keys respond with gentle keystrokes.
Software and menu navigation
The Weldplast hand extruder comes equipped with comfortable operating software, which simplifies operation for the user and makes it easier to handle the
extruder.
Page 8
8
OPERATING Leister WELDPLAST S4 / EC4 hand extruder
Preparation for welding
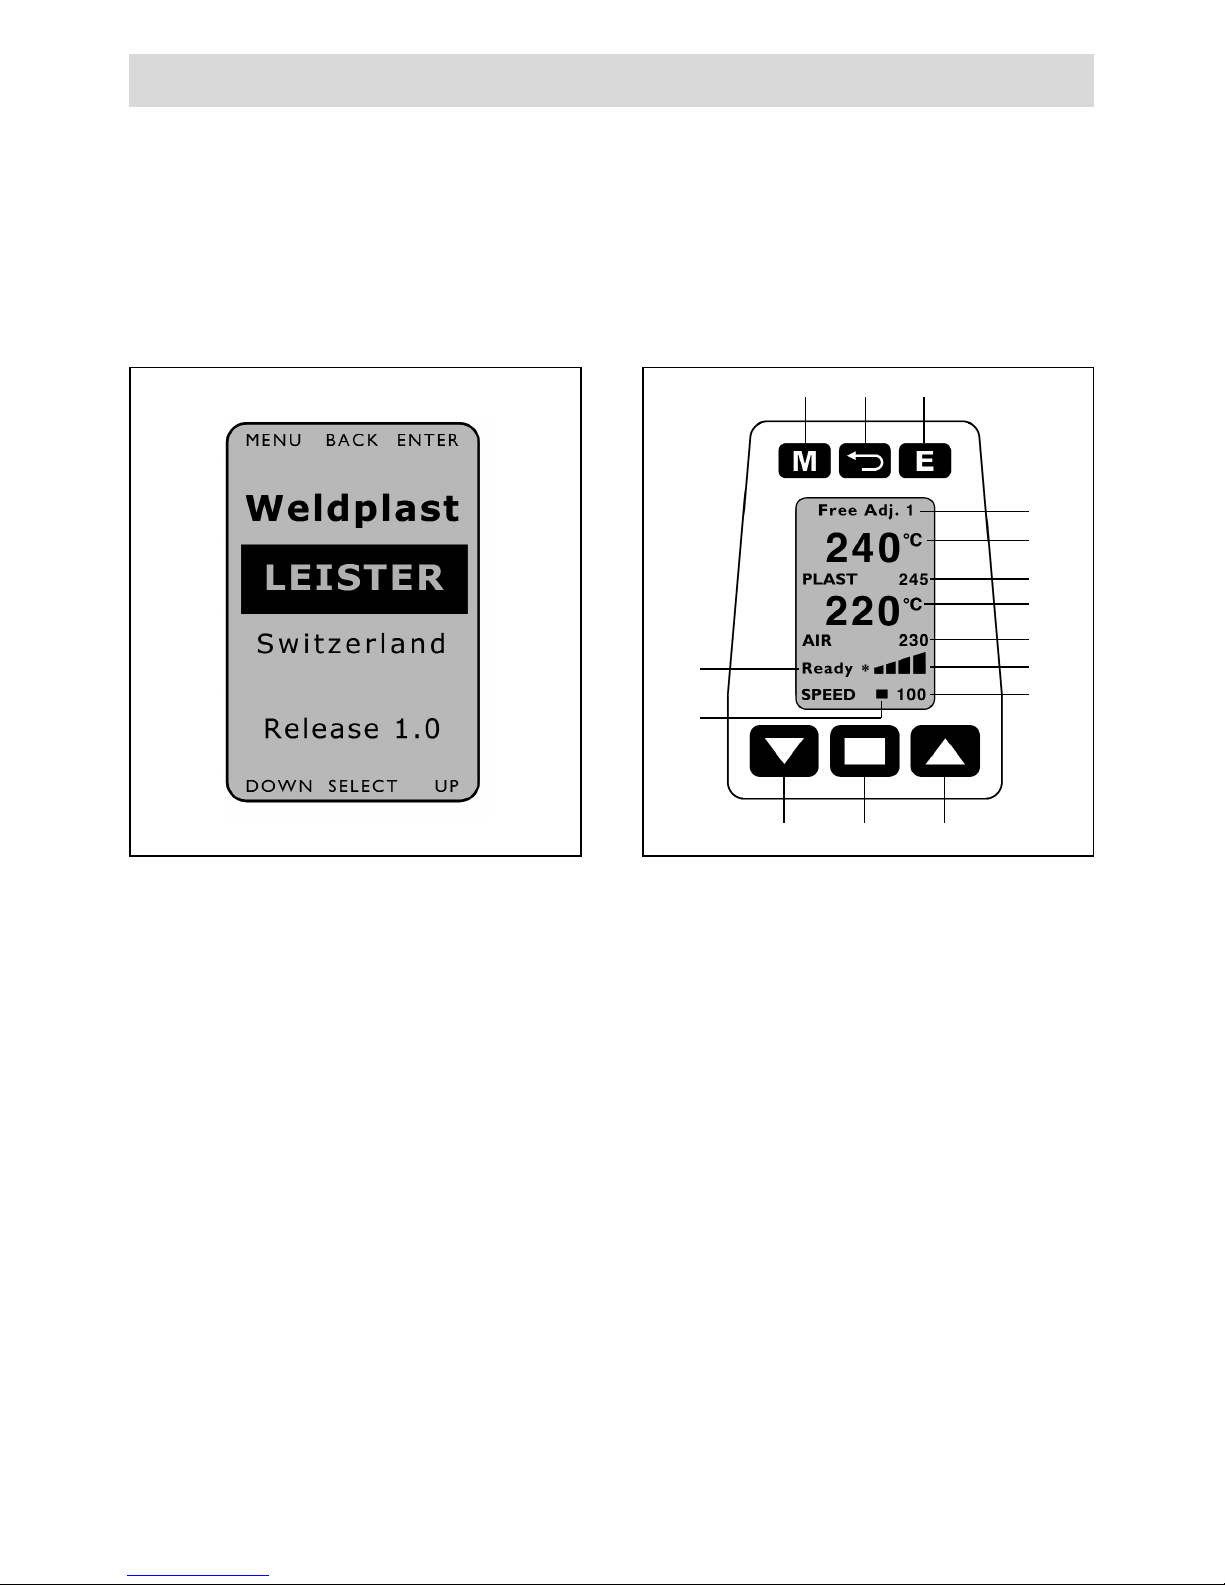
Start window
After switching on the extruder, the
name of the tool and the current software version are displayed for 3 sec.
Operating window
The operating window shows the parameters currently set.
24
27 28 29
30
31
17
18
19
20
21
22
23
25 26
Page 9
9
OPERATING Leister WELDPLAST S4 / EC4 hand extruder
Setting the welding output
A variable welding output allows seam thickness and pre-heating times to be coordinated.
Presetting on the display
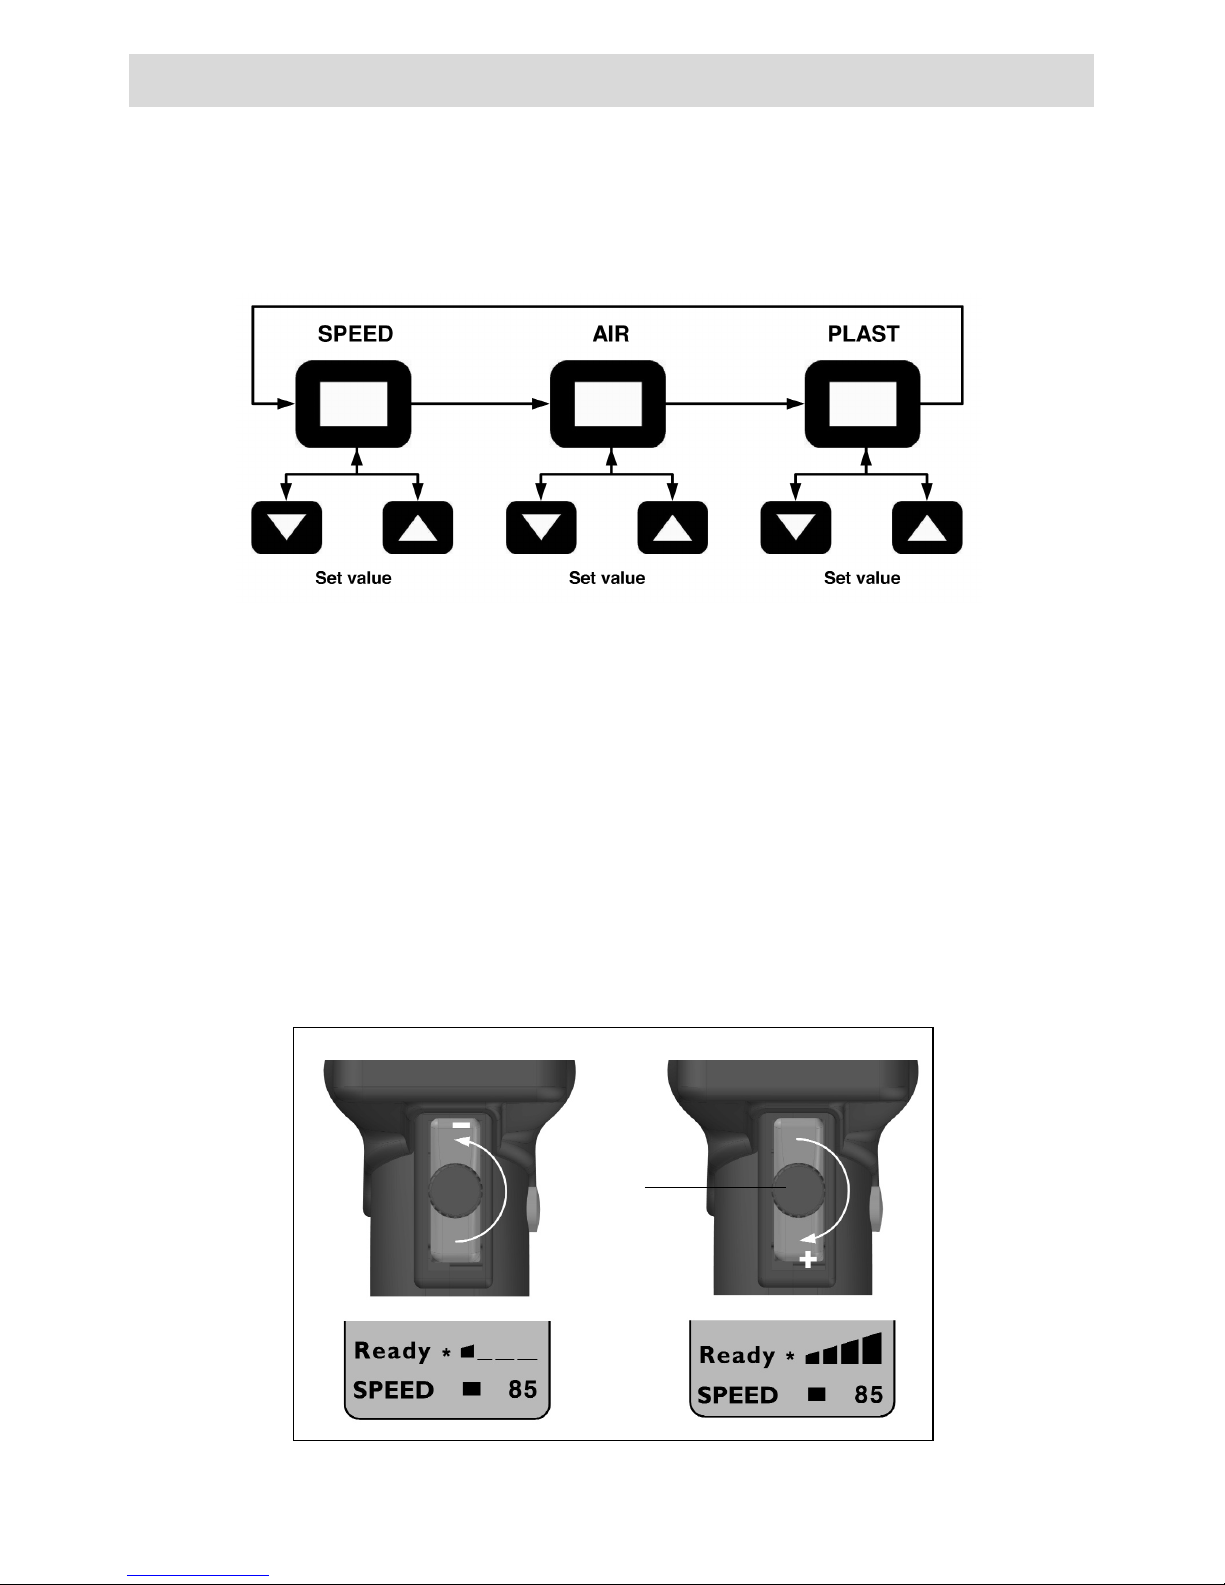
• Set the cursor to the «SPEED» position by pressing the Select key (28).
• Define the maximum welding output value (30 to 100) with the Up (29) or Down
(27) keys
Fine tuning during the welding process
By turning the potentiometer (3), the welding output set can be reduced from the
maximum value (e.g. 85) to the minimum (displayed on the display bars (22).
The plastizised material throughput is also dependent on the welding rod thickness
used. If the welding output is too high with the output display “30” and the potentiometer is set to “minimum”, the next smallest welding rod thickness must be selected.
Setting parameters in the operating window
The cursor (31) shows which parameters can be set. After switching on, the cursor
is on the «SPEED» position.
In the operating window, the following parameters can be selected with the Select
key (28) and changed in their values with the Up (29) and Down keys (27).
3
Page 10
OPERATING Leister WELDPLAST S4 / EC4 hand extruder
10
Setting the PLAST and AIR temperatures
• Set the cursor to the «PLAST» or «AIR» position by pressing the Select key (28).
• Set the temperature value with the Up (29) or Down (27) keys.
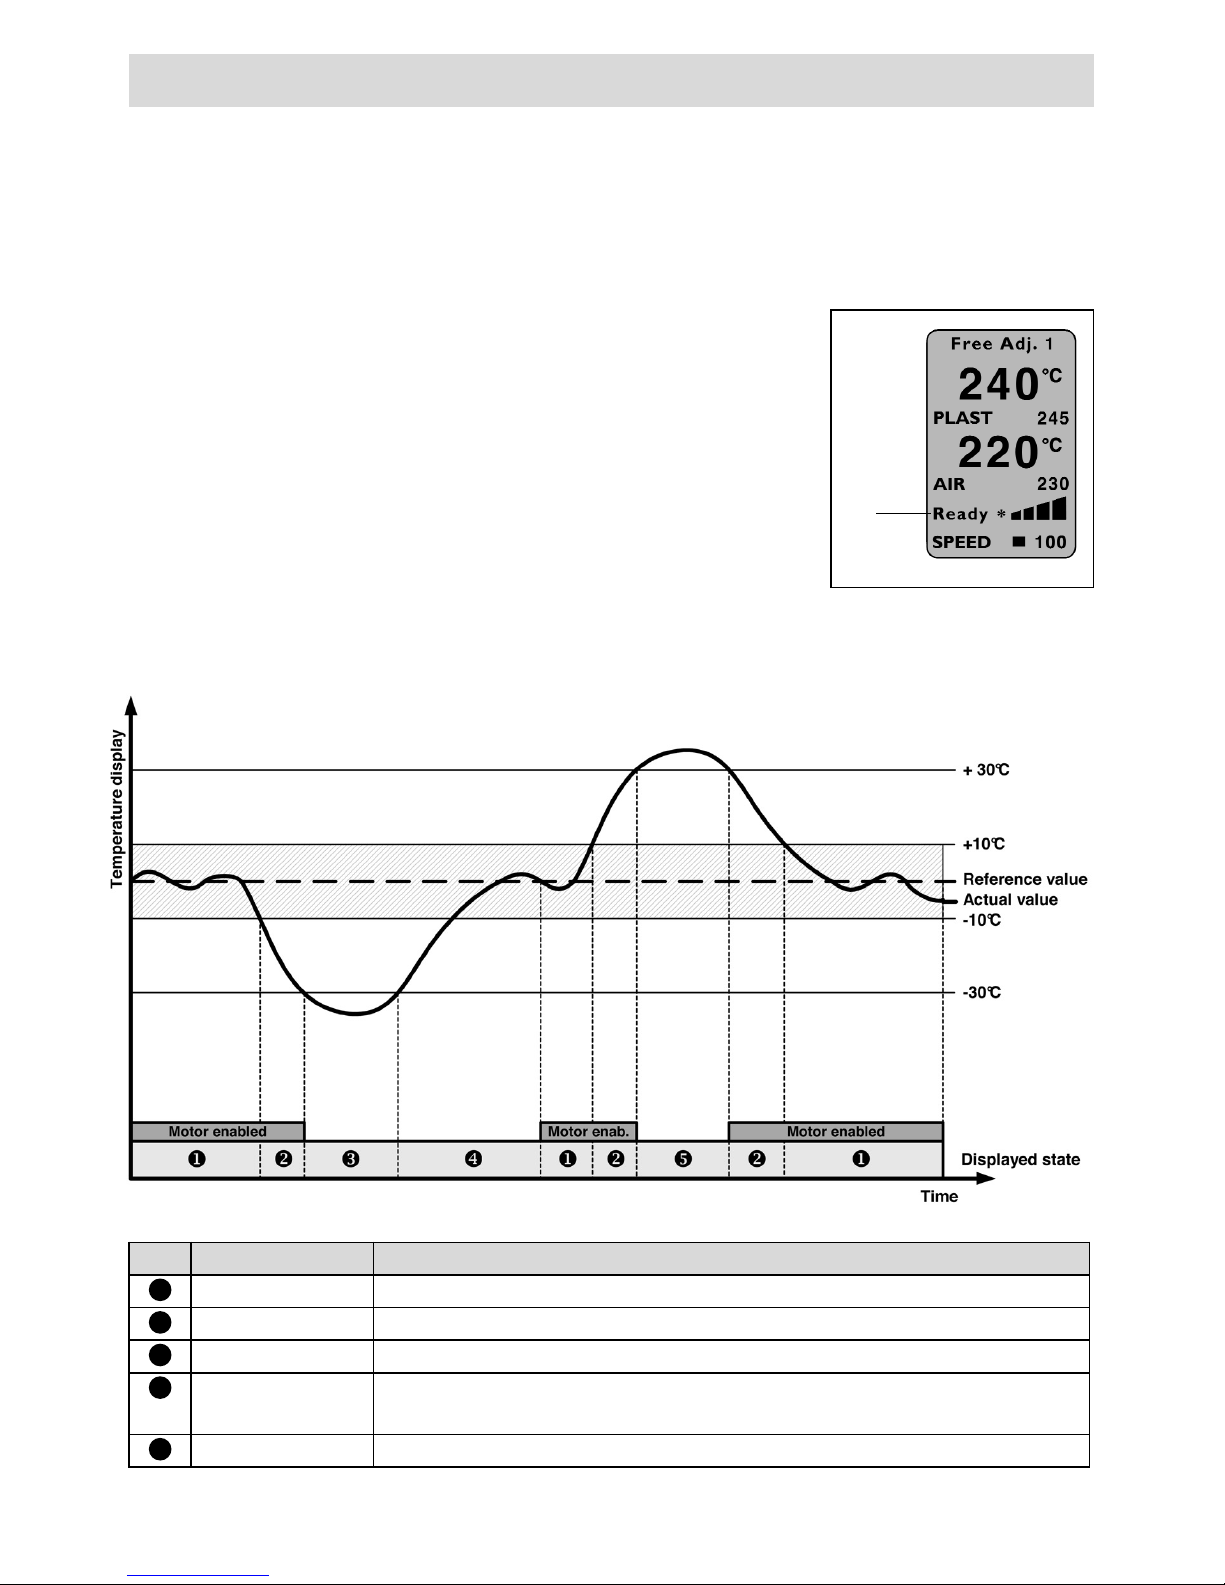
Monitoring the welding parameters
The set and actual values of the AIR and PLAST
temperatures are continuously monitored. If the
actual value deviates from the respective set value
(value outside the tolerance band), this is indicated
on the status display (30) with a status change. If
necessary, the drive motor is temporarily disabled
until the welding parameters are once again within
the prescribed tolerance band. The possible status
displays and the tolerance bands may be seen in
the following graph and table.
30
No.
Status display
Status properties
1
Ready * Ready to weld
2
M enabled Deviation of the welding parameters > -10°C
3
Heat
Deviation of the welding parameters > -30°C, drive motor disabled
4
S4: 220s
EC4: 270s
Warm-up lock time of 220 sec., drive motor disabled
Warm-up lock time of 270 sec., drive motor disabled
5
Too hot
Deviation of the welding parameters > +30°C, drive motor disabled
Page 11

OPERATING Leister WELDPLAST S4 / EC4 hand extruder
11
Starting the welding process
Welding work should comply with German Welding Association (DVS) guidelines.
• Fit the appropriate welding shoe (8) as required.
• Set the potentiometer (3) to max.
• Once the operating temperature is reached («READY*» status), welding can
begin.
• Activate the motor on/off switch (2).
• Insert welding rod with a diameter of 3 or 4 mm into the welding rod opening (12).
• The welding rod is automatically drawn in through the welding rod opening (12).
The rod should feed in without resistance.
• Interrupt the passage of plastizised material with the motor on/off switch (2).
• Direct the pre-heating nozzle (9) towards the welding zone.
• Preheat the welding zone with a fanning motion.
• Place the tool over the prepared welding zone and reactivate the motor on/off
switch (2).
• Produce a test weld and analyse it.
• Adjust the temperature setting and welding output as required.
• For a prolonged welding process, the motor on/off switch (2) can be kept in con-
tinuous operation by means of the locking device (4).
• Release the locking device (4) of the motor on/off switch (2) as applicable,
and then let go of the motor on/off switch (2). Remove welding material in the
welding shoe in order that the welding shoe is not damaged with the next start
• Switch off the heating with the button (26) ”Enter”.
• Let the tool to cool down for approx. 5 min.
• Switch off at the main switch (1).
CAUTION!
Never insert into both welding rod openings simultaneously. Never operate
the tool without welding rod.
Switching off the tool
Page 12
12
OPERATING Leister WELDPLAST S4 / EC4 hand extruder
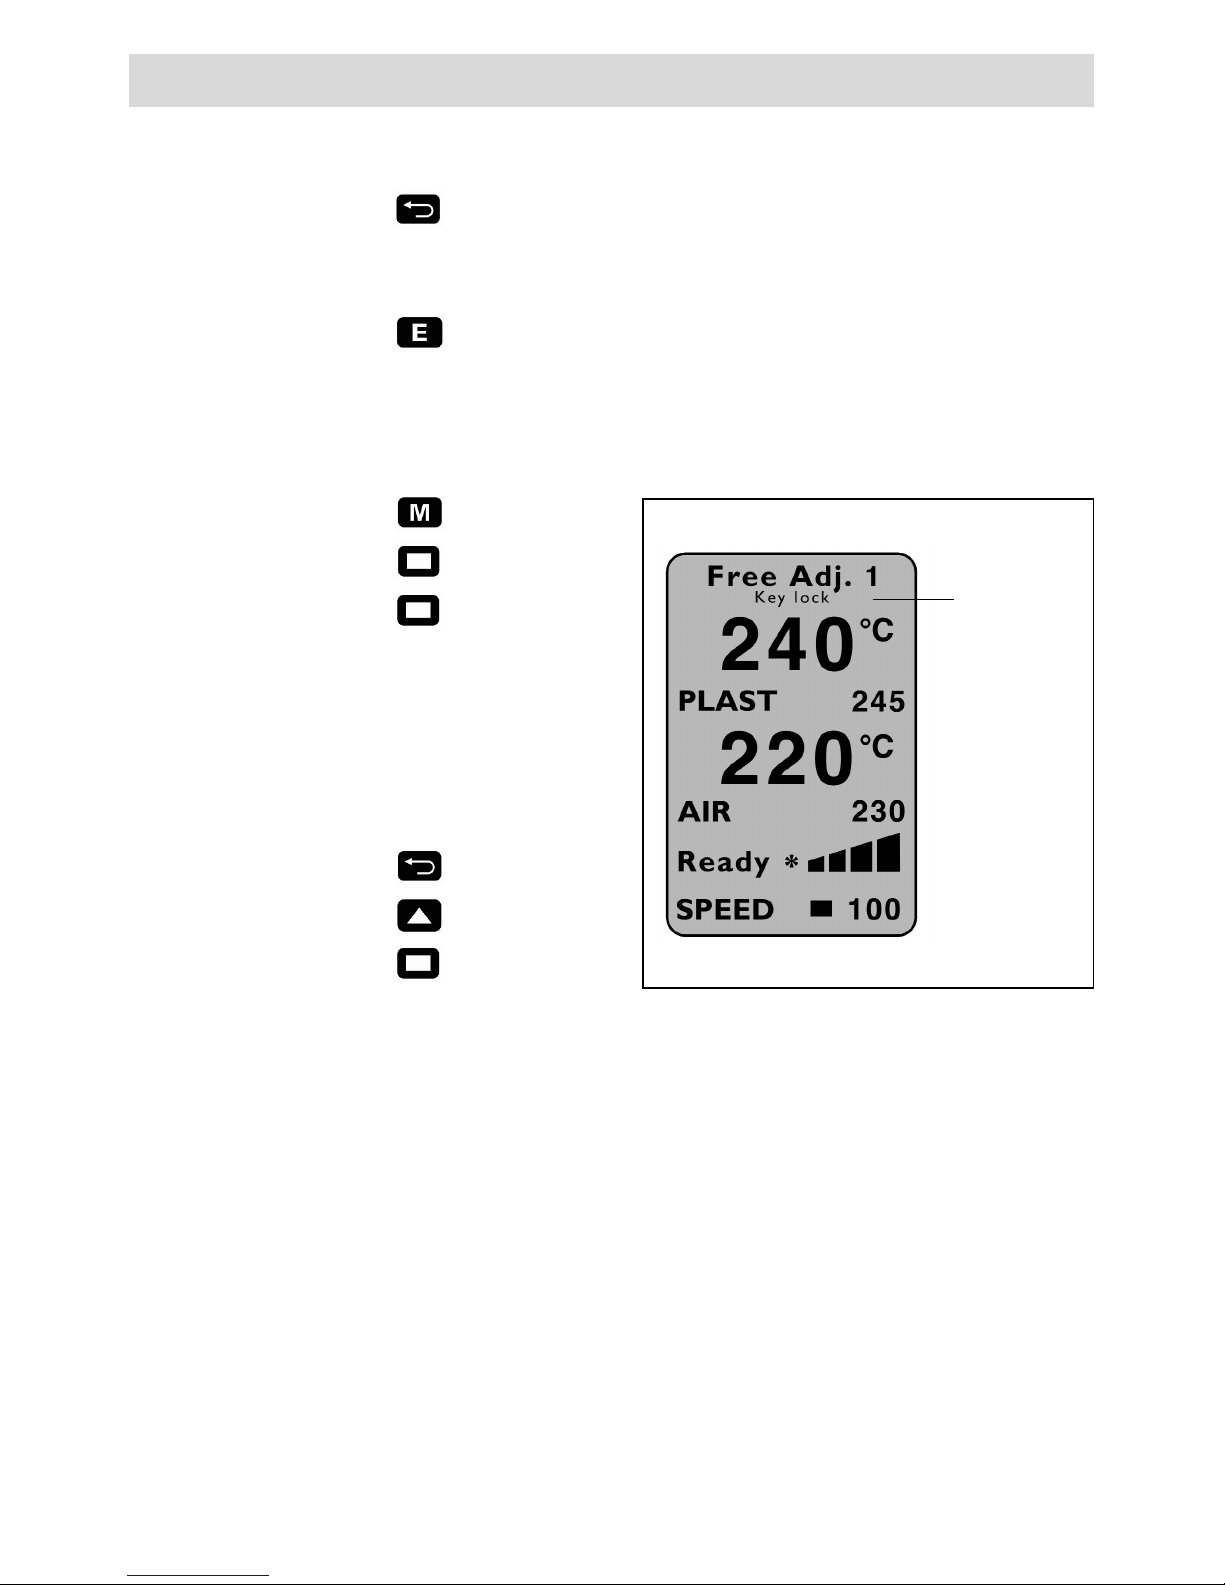
Activate key lock
1. Menu
2. Key lock
3. Activate
If the key lock has been activated,
key lock appears in the display.
The lock can be reset as follows:
Deactivate key lock
1. Back
2. Reset
3. Select
Confirmation with the Select key must
immediately follow the reset!
Further settings
Contrast setting
Given unfavourable lighting conditions and fluctuations in the ambient temperature, the contrast on the display can be set in the operating window with the
back key (25).
Heating on/off
In the case of long interruptions (standby), the heating for PLAST and AIR can be
deactivated with the enter key (26) in the operating window.
Page 13
OPERATING Leister WELDPLAST S4 / EC4 hand extruder
13
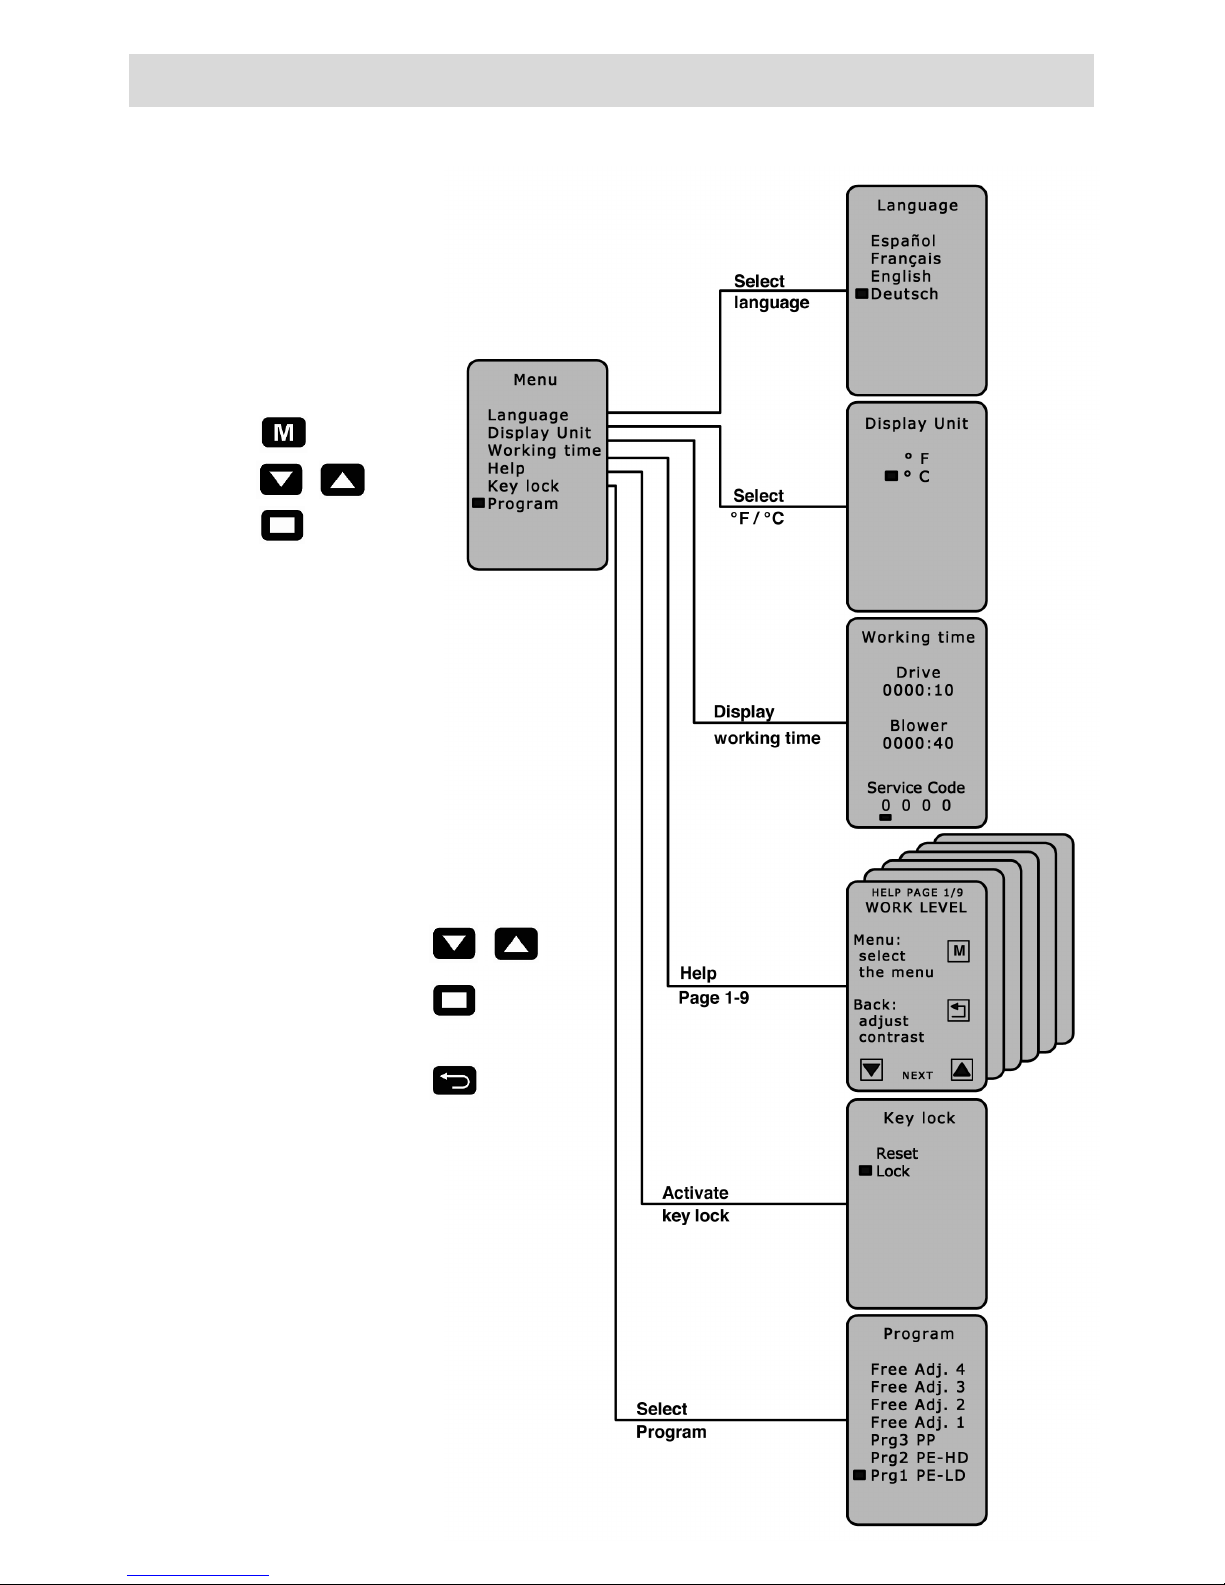
Menu
Menu
Scroll
Select
Functions
Scroll
Select and
return
Return to
operating
window
Scroll
Menu navigation
Page 14

14
OPERATING Leister WELDPLAST S4 / EC4 hand extruder
Menu
Select program
Scroll
Enter
Welding parameters – Programming
The hand extruder is suitable for the following
types of thermoplastic: • PP /PE-HD/ PE-LD
Programs 1 – 3 include the relevant preset values, which can be adjusted during the
course of the welding process.
The adjustments are not saved!
The free settings 1 - 4 are factory set and can be freely programmed. The parameters remain saved after the tool is switched off.
Setting the welding output
• Place the cursor on the «SPEED» position by pressing the Select key (28).
• Set the welding output value (30 to 100) with the Up (29) or Down keys (27).
Setting the PLAST and AIR temperature
• Place the cursor on the «PLAST» or «AIR» position by pressing the Select key (28).
• Set temperature value with the Up (29) or Down keys (27).
The welding program (17) currently set is shown in the operating display.
Welding program Target PLAST (°C) Target AIR [°C]
Free settings 1 – 4 230 260
Prg1 PE-LD 220 260
Prg2 PE-HD 230 260
Prg3 PP 230 260
Free
setting
1-4
Page 15
15
OPERATING Leister WELDPLAST S4 / EC4 hand extruder
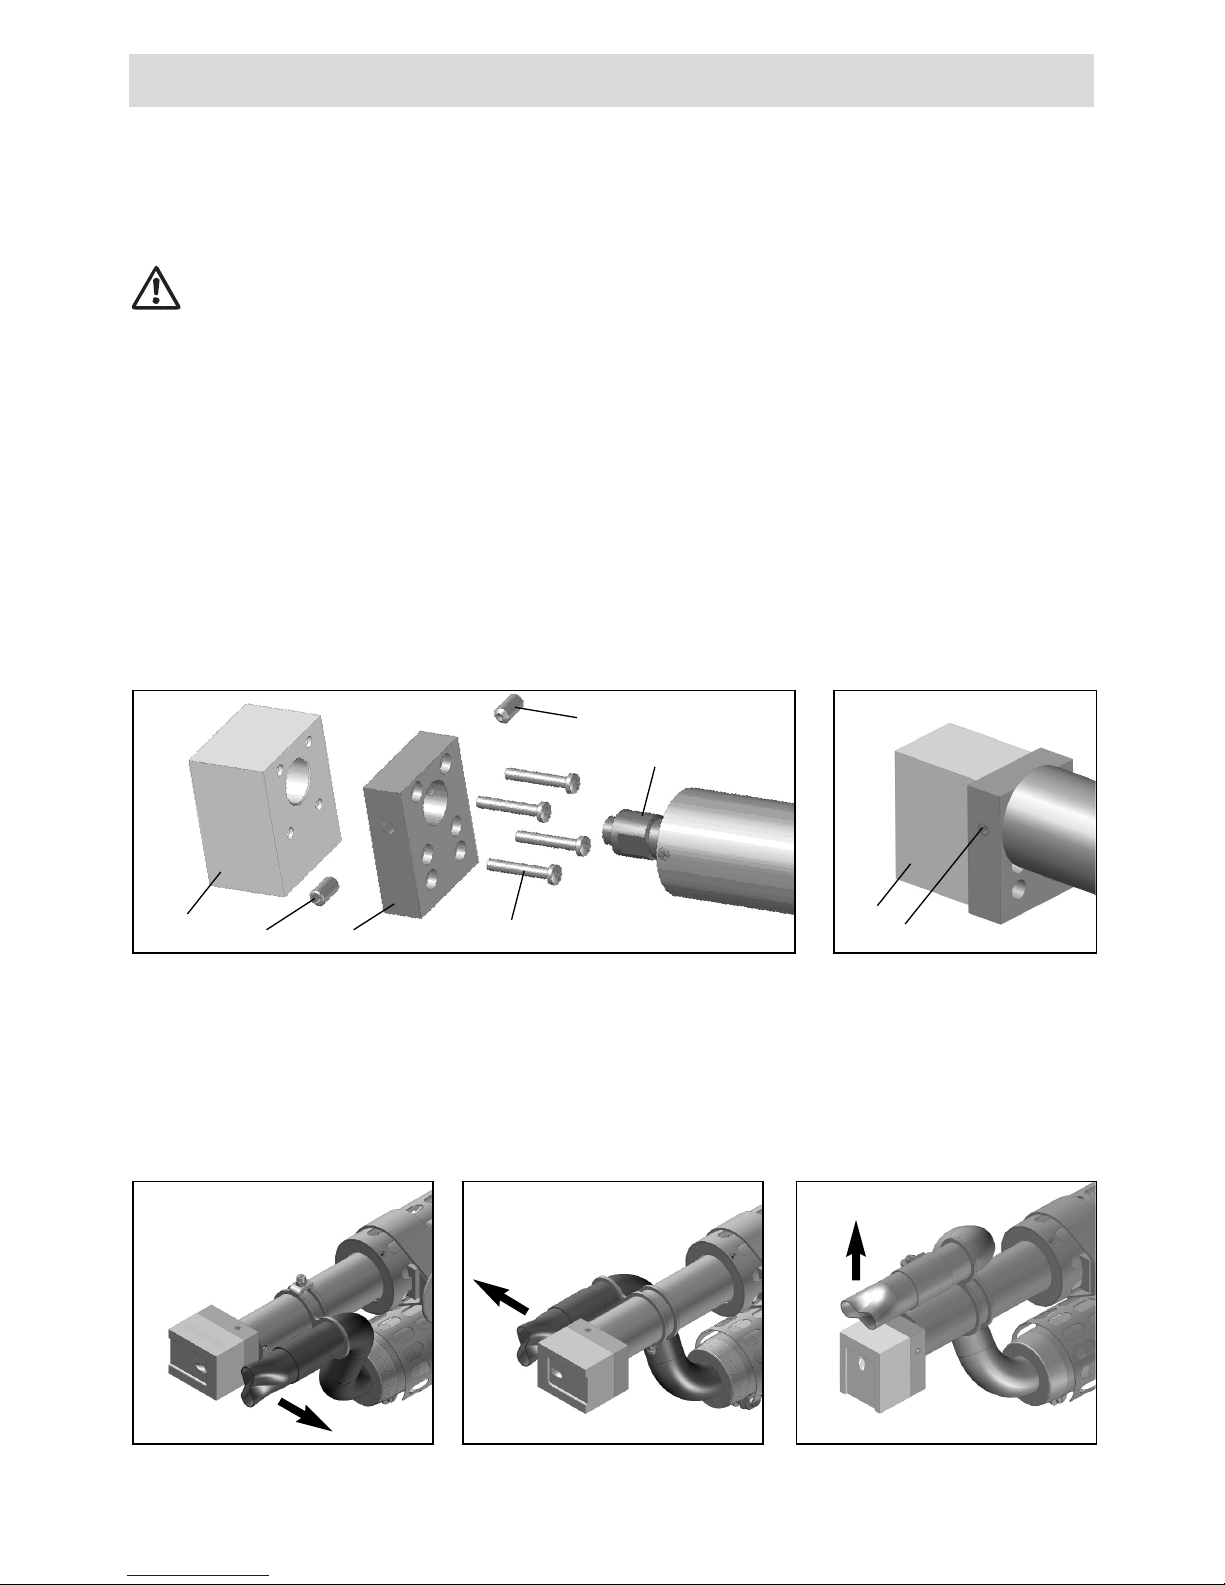
Replacing the welding shoe
• Switch off the tool at its operating temperature and disconnect it from the
mains supply.
• Remove the complete welding shoe (8) by loosening the screws (35) from the
extruder nozzle (32).
• Clean the extruder nozzle (32) each time the welding shoe is replaced and
remove any welding deposits.
•
Attach an appropriate welding shoe.
Work with temperature resistant gloves only.
Danger of getting burned!
•
The welding shoe must only be replaced when the tool has attained its operating
temperature.
Disassembling the welding shoe
• The welding shoe (36) can be removed by unscrewing the clamping bolts (33)
from the welding shoe holder (34). (e.g. for reworking)
8 Welding shoe
32 Extruder nozzle
33 Welding shoe clamping bolts
34 Welding shoe holder
35 Welding shoe holder set screw
35
8
Welding direction
Orientation of the pre-heating nozzle (9) for different welding directions
With the standard hot-air tube the nozzle
can be mounted either left or right.
With the optional hot-air
tube the nozzle is mounted on top.
8
33
32
35 34
35
Page 16
16
OPERATING Leister WELDPLAST S4 / EC4 hand extruder
To disassemble the hot-air tube (44), firstly remove the welding shoe (8). After loosening the countersunk locating screw (45) on the tube clamp (10) and the clamping
screw (47) on the hot-air tube connector, the complete unit can be removed.
Assembly in the reverse
sequence.
To ensure no pre-heated air is lost
when reassembling, the unit must
be pushed on the hot-air blower
(16) as far as possible.
Work with temperature resistant gloves only.
Danger of getting burned!
Replacing the pre-heating nozzles
To disassemble the pre-heating nozzle, loosen the clamping screw (43) on the
side and pull the pre-heating nozzle (9) off the hot-air tube (44). To ensure no
pre-heated air is lost, the nozzle is pushed on the hot-air tube (44) as far as it
goes. Take care that the nozzle is parallel to the nozzle shoe.
Replacing the hot-air tube
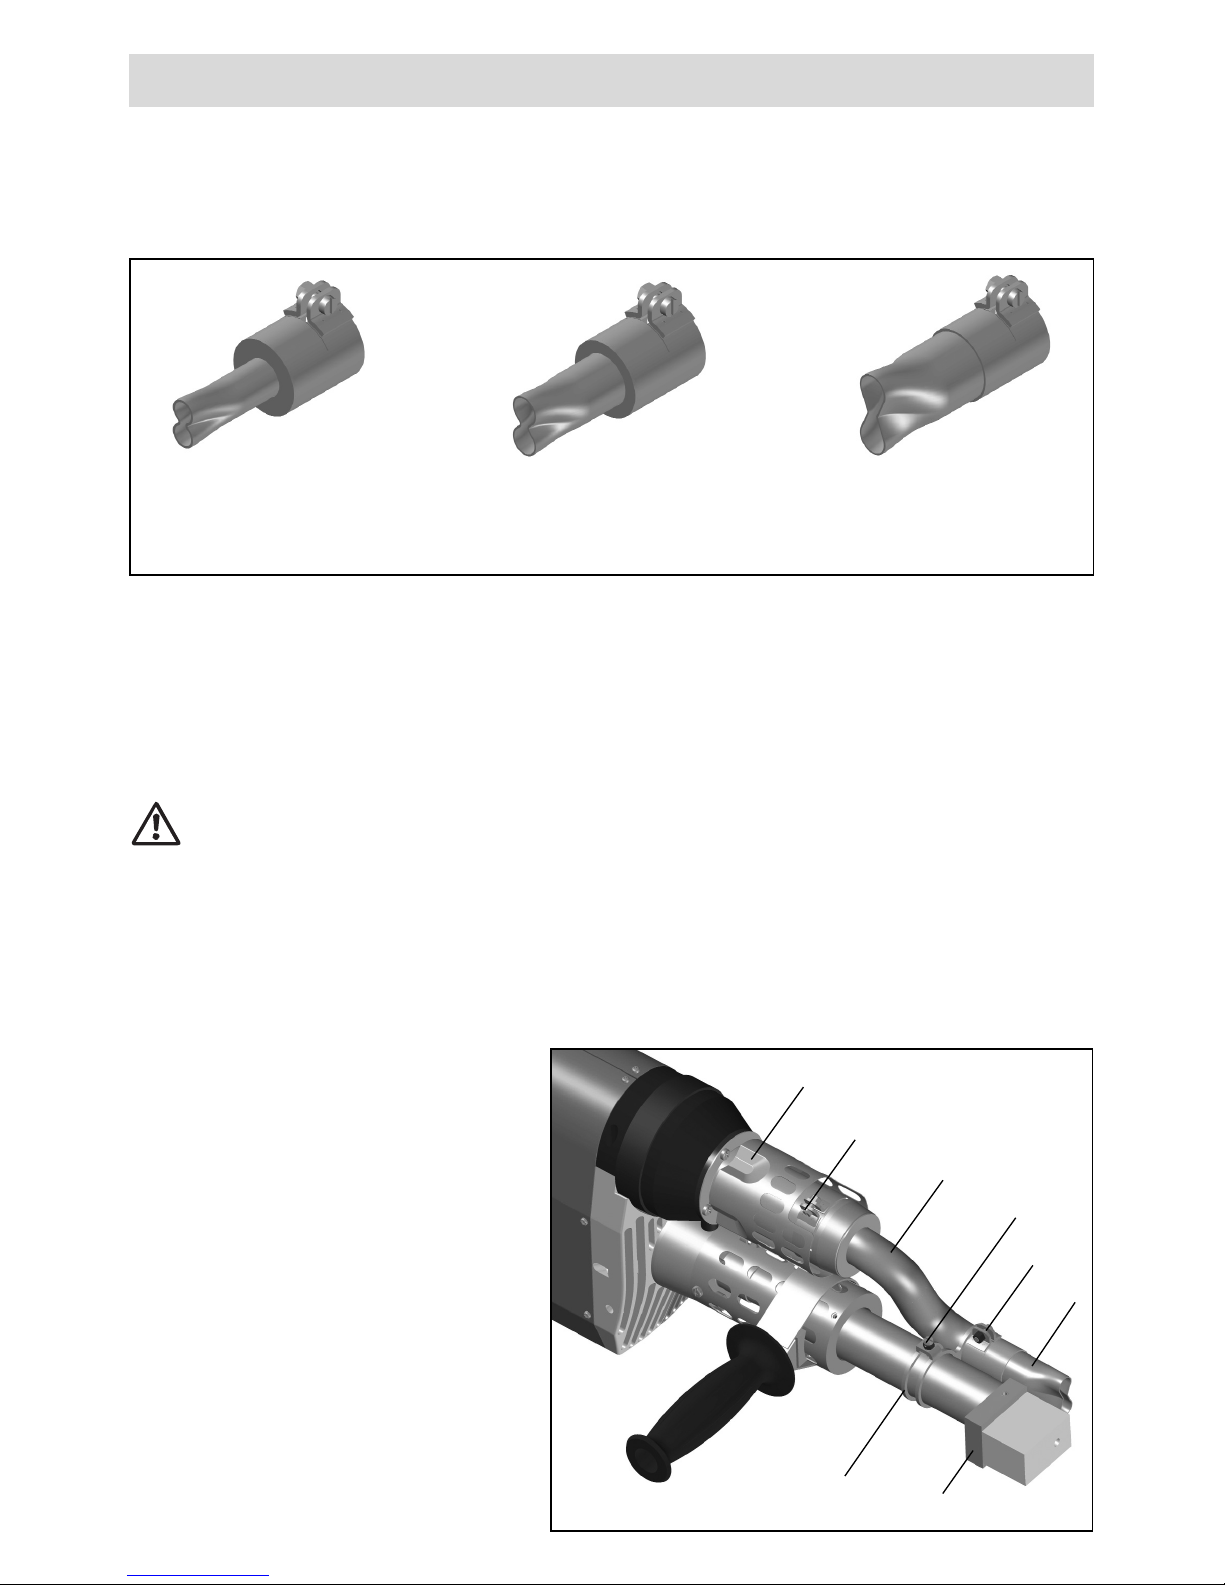
Pre-heating nozzles
There are three different pre-heating nozzles (9) available according to the required welding seam width. The nozzle cross-sections comply with DVS guidelines.
Nozzle 1
Seam widht
up to 15 mm
Nozzle 2
Seam widht
16 to 20 mm
Nozzle 3
Seam widht
21 to 40 mm
16
44
45
10
8
43
9
47
Page 17
False start protection
The drive motor is protected against autonomous starting following faults, overheating. The message “Switch off motor“ appears in the display (5) while the drive motor
remains in the blocked state. After rectifying the fault and switching off the motor, motor
on/off switch (2), the message “Switch off motor“ disappears from the display (5). Work may
then continue.
Err04
ERROR Leister WELDPLAST S4 / EC4 hand extruder
17
Error messages
An error occurring is shown in the status display (29) (e.g Motor is overheated).
Display
When an error occurs, the heating units for AIR and PLAST, as well as the drive motor,
are switched off immediately!
Should this not take place, the tool must be disconnected from the mains supply
immediately!
Further procedure with status display (29)
• Note down the error code
• Release the locking device (4) of the motor on/off switch (2) as applicable and
then let go of the motor on/off switch (2).
• Switch off the tool at the main switch (1).
• Start using the tool again under supervision and ensure that the extruder is not
overheated from the outside.
• Eject the remaining plastic from the screw if possible.
•
Should the error reoccur, the tool should be sent to the Service Centre to be
checked, specifying the error code.
ErrXX
ErrXX
Err04
The following errors are recognised by the tool:
Drive overheating protection
If the drive is overheated by external influences or because the PLAST temperature
is too low, the internal temperature protection of the drive switches off (see )
Err04
Several errors can occur at once
e.g. and Display: !
Further combinations are displayed with the letters A, B, C, D, E and F.
e.g. and Display !
Err0AErr02Err08
Err06Err04Err02
Display Type of fault
Err01
Overheating of the air or defective temperature probe
Err02
Overheating of the plastic welding material or defective temperature probe
Err04
Overheating of the motor winding, motor is overheated
Err08
Overheating of the heating element, AIR or failure of the blower motor
Err10
Overheating of the electronics
Err40
Short circuit of the PLAST temperature probe
Page 18
18
ACCESSORIES Leister WELDPLAST S4 / EC4 hand extruder
37
39
38
41
40
41
Only Leister accessories may be used.
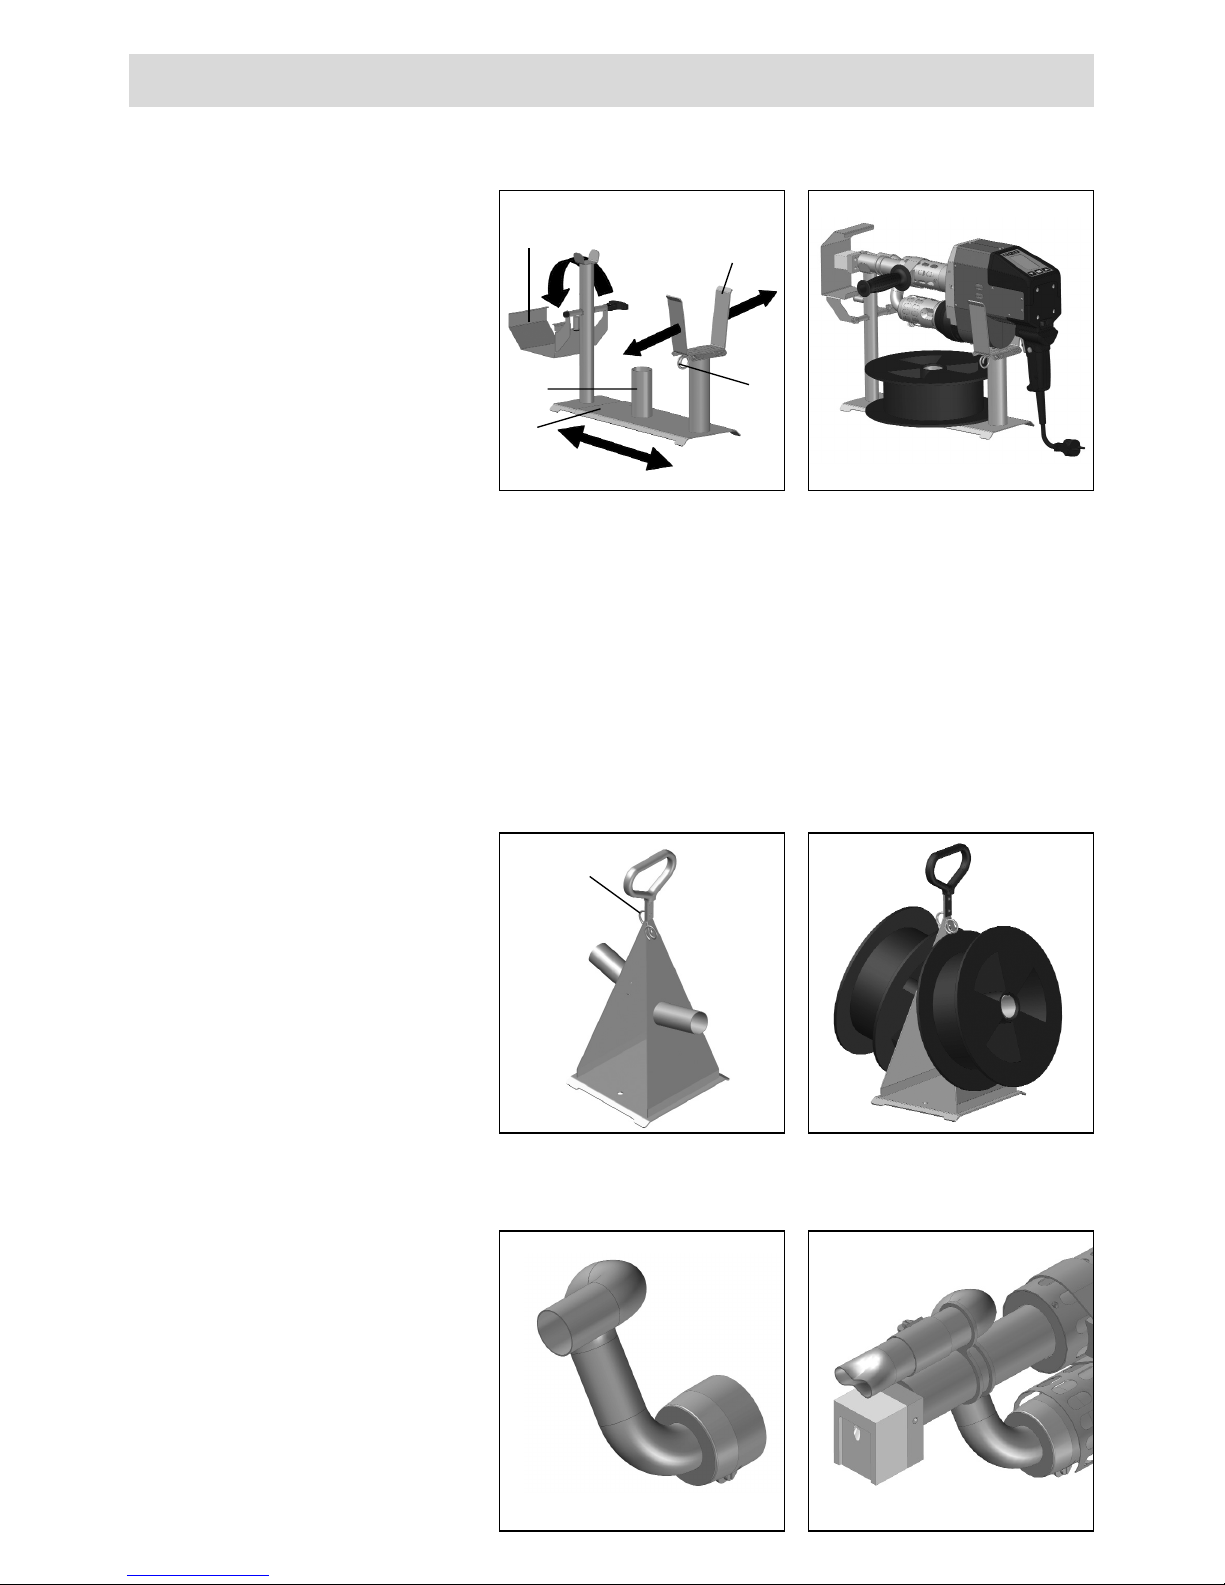
The universal tool stand
can
be used for the following
extruder lines:
– Fusion 3
– Weldplast 4
– Weldplast 6
• The hood (37) is swivelled upwards for pre-heating the welding shoe.
• To adjust the stand, loosen the screws in the base and adjust the base plates (38)
to the tool markings.
• The two sliders (40) allow the width to match the required tool.
• The reel holder (39) serves to hold the reels of welding rod ø 300 mm.
• To ensure optimal rod dispensing, the welding rod should be passed through the
eyelets (41) provided.
Hot - air tube on top
• The hot air tube is especially
suited for landfill sites.
Transportable welding rod
dereel holder
• The holder is designed for
two welding rod reels with
ø 300 mm
• To ensure optimal rod
dispensing, the welding rod
should be passed through
the eyelets (41) provided.
Page 19
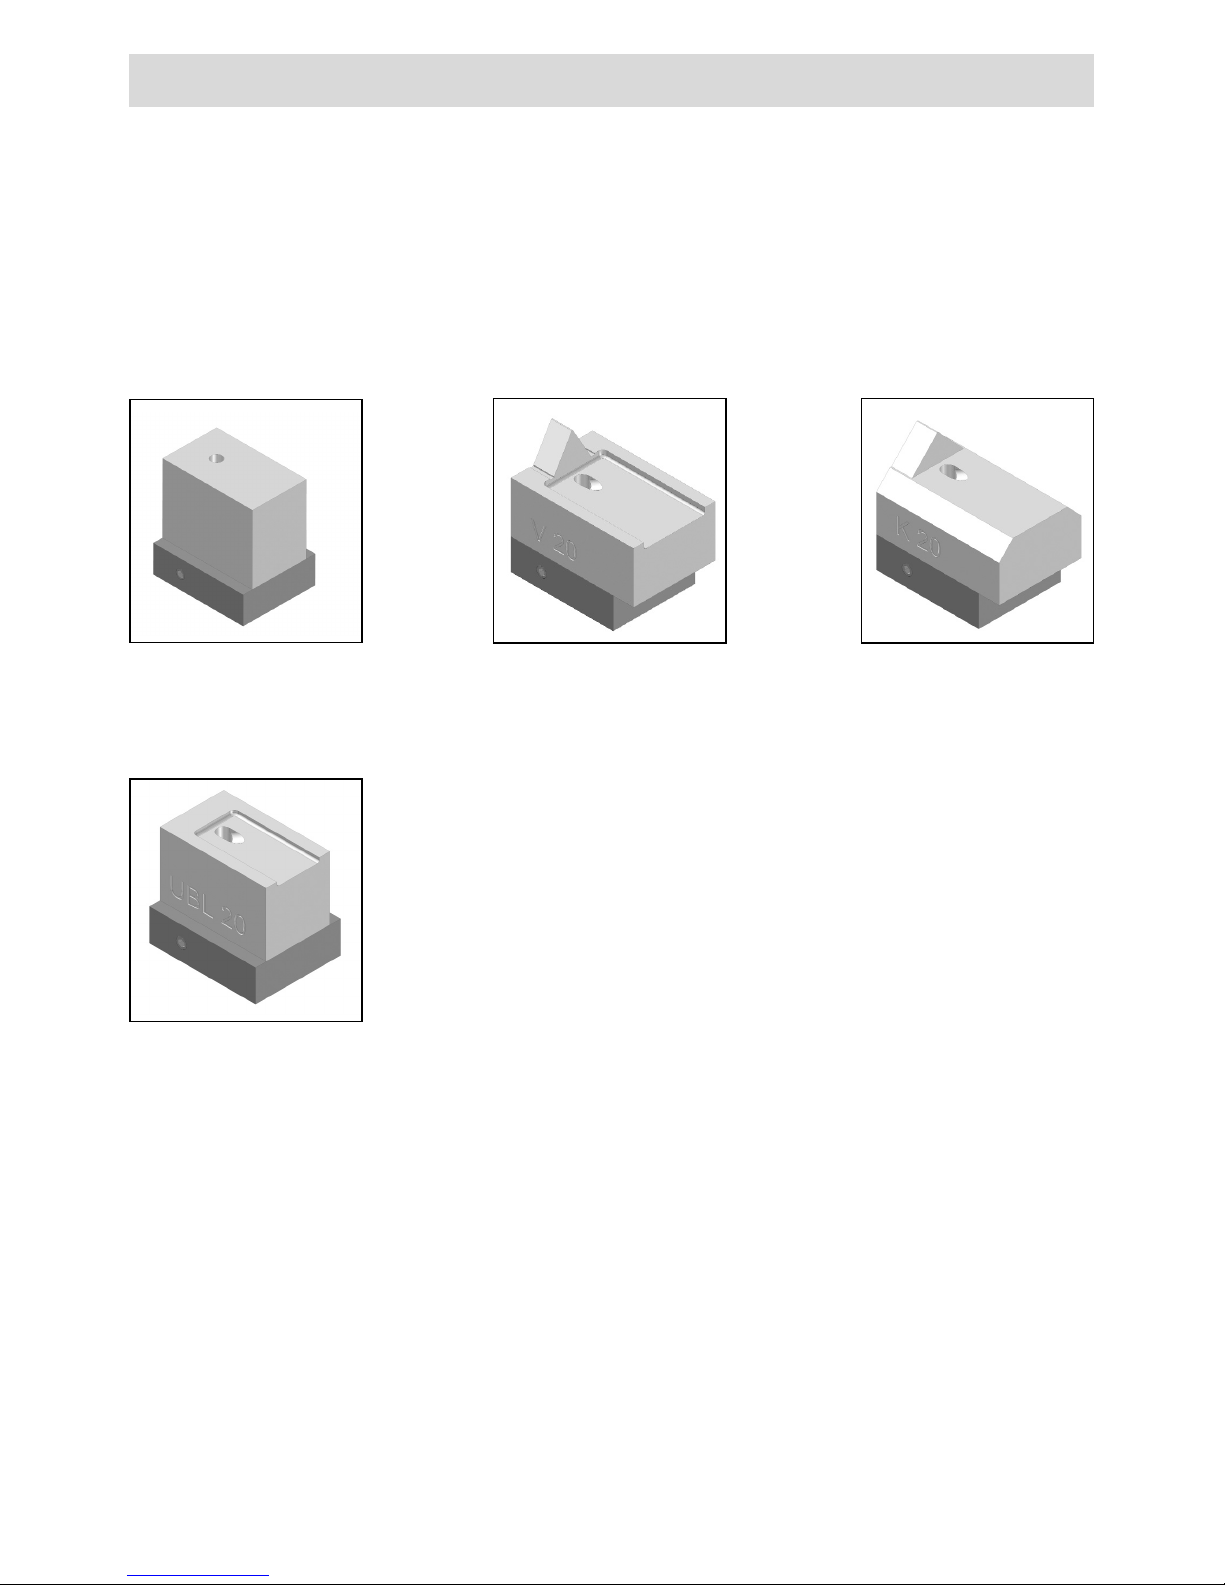
Leister offers welding shoes for all the common seam geometries in various sizes:
WELDING SHOE RANGE Leister WELDPLAST S4 / EC4 hand extruder
19
The Leister range
Blank
V weld Fillet weld
Overlap weld
Page 20
BA WELDPLAST S4 / BA WELDPLAST EC4
12.2005 / 01.2006
•
Check the power supply cord (14) and plug for electrical and mechanical
damage.
•
Clean the extruder nozzle (32) each time the welding shoe is replaced and
remove any welding deposits.
• Repairs should only be carried out by authorized Leister Service Centres. They
guarantee a specialised and reliable Repair Service within 24 hours using original spare parts in accordance with the circuit diagram and spare parts list.
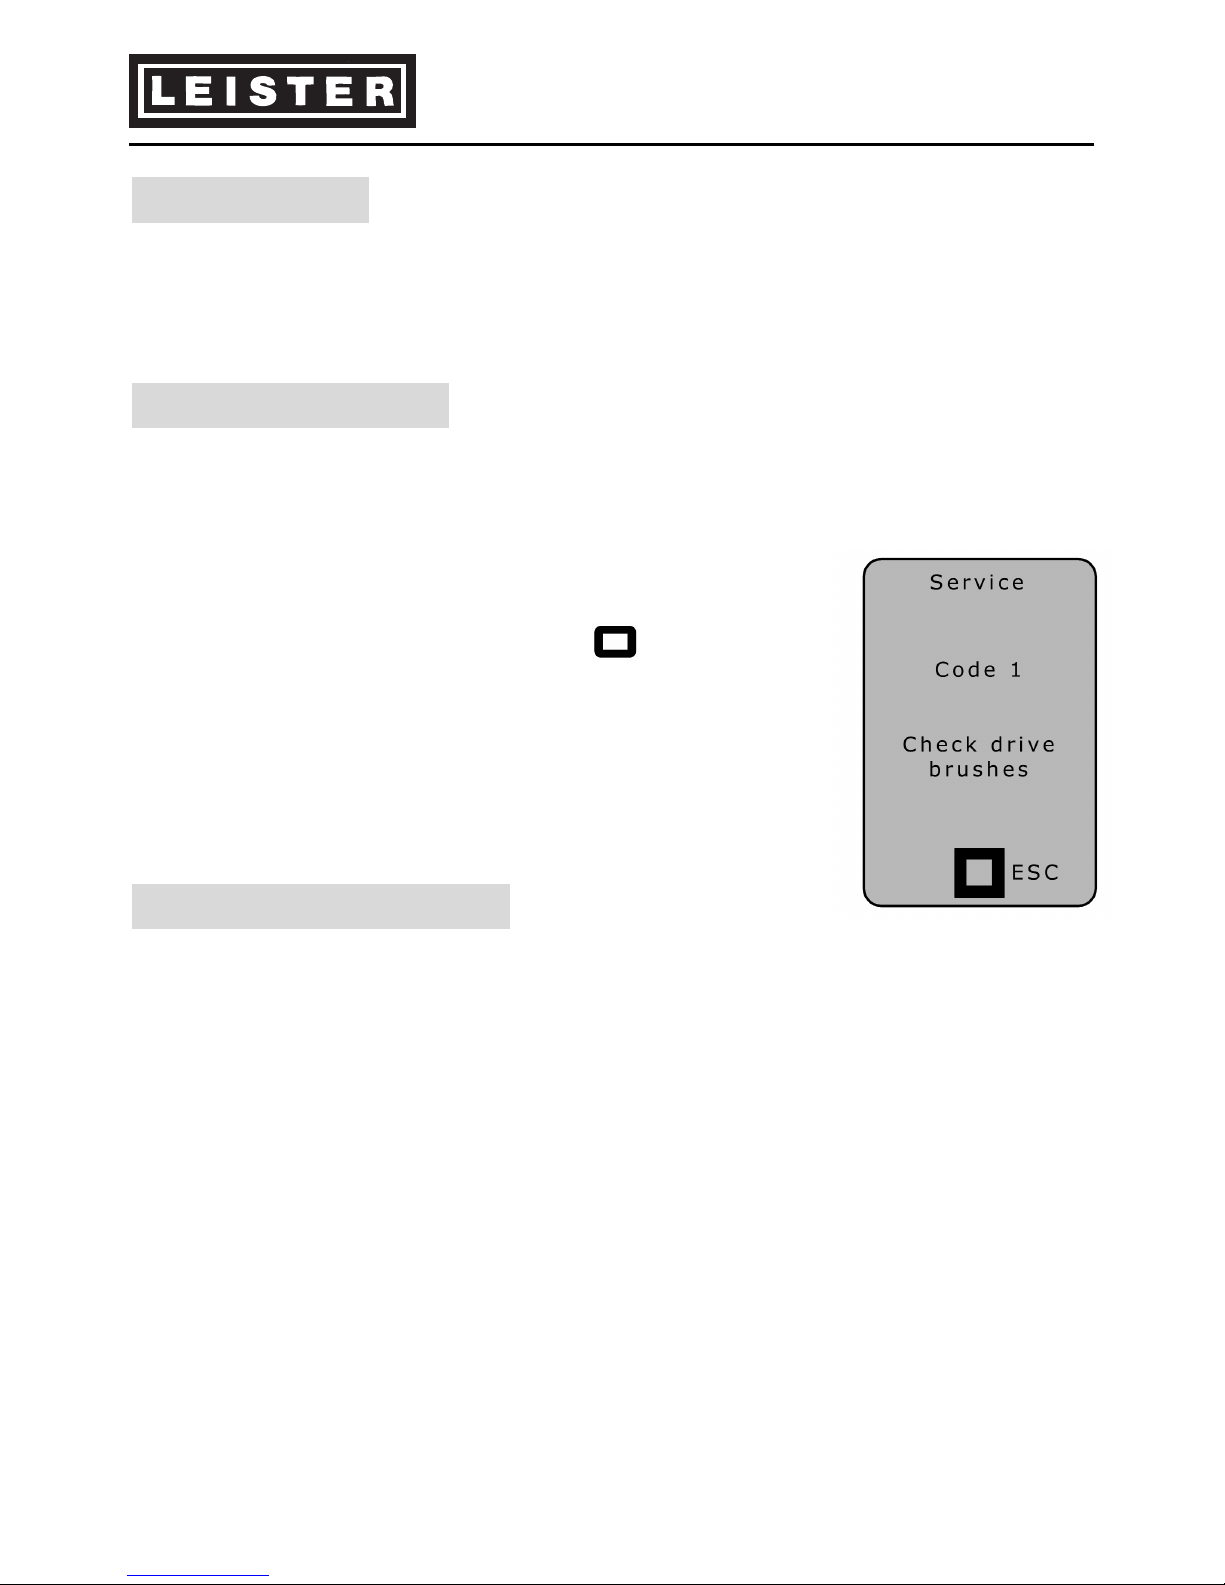
• If the service message appears with the Service Code 1
after swtiching on WELDPLAST S4, the state of the carbon
brushes should be checked by an authorised Leister Servi
ce
Centre and the carbon brushes replaced, if necessary.
• The display can be removed with the key (28).
• The extruder can be used again for a short time.
• If the carbon brushes are not replaced within a short
time, the motor will run until the mechanical brush reaches its limit stop. No more error messages appear on
the display, the motor no longer runs.
•
WELDPLAST EC4 has a brushless drive motor. For this
reason Service Code 1 does not appear.
• Guarantee and liability are in accordance with the guarantee certificate
as well as the currently valid general conditions of business and terms of
delivery.
• Leister Process Technologies rejects any guarantee claims for tools, which are
not in their original condition. Tools must never be altered or changed.
Technical data and specifications are subject to change without prior notice
Your authorized Service Centre is:
GUARANTEE AND LIABILITY
SERVICE AND REPAIR
MAINTENANCE
®
Leister Process Technologies, Riedstrasse, CH-6060 Sarnen/Switzerland
Tel. +41 41 662 74 74 Fax +41 41 662 74 16
www.leister.com [email protected]
 Loading...