

Leister WELDPLAST S2, WELDPLAST S2-PVC, WELDPLAST S2-TPO User Manual
WELDPLAST
S2
S2-PVC
S2-TPO
Leister Process Technologies
Galileo-Strasse 10
CH-6056 Kaegiswil/Switzerland
Tel. +41-41662 74 74
Fax +41-41662 74 16
www.leister.com
sales@leister.com
®
GB
1
2
Leister WELDPLAST S2 / S2-PVC / S2-TPO
Hand extruder
Extrusion welding of the following materials:
WELDPLAST S2 PP / PE-HD / PE-LD
WELDPLAST S2-PVC PP / PE-HD / PE-LD / PVC-U
WELDPLAST S2-TPO PP / PE-HD / PE-LD / TPO
Other materials on enquiry
The welding seam shape of the hand extruder does correspond to norm DVS 2207–4.
DVS : Deutscher Verband für Schweisstechnik
Application
Please read operating instructions carefully before
use and keep for further reference.
Operating instructions
GB
Danger to life!
Danger to life when opening up the tool, as live components and
connections are exposed. Before opening the tool, unplug from the
mains supply. Electrically conducting material (e.g. PE-EL) must not
be welded.
Fire and explosion hazard with incorrect use of the hand extruder
(e.g. overheating of the material), especially near combustible
materials and explosive gases.
The tool must be operated under supervision.
Heat can ignite flammable materials which are not in view.
The machine may only be used by qualified specialists or under
their supervision. Children are not authorized to use this machine.
For personal protection on building sites we strongly recommend
the tool to be connected to a RCCB (Residual Current Circuit
Breaker).
The voltage rating stated on the name plate of the tool must
correspond to the mains voltage.
In case of a power outage, the main switch and the drive must be
switched off (loosen lock).
Danger of getting burned! Do not touch exposed metal parts
and escaping plastizised material. Do not point the hot air flow
and escaping plastizised material in the direction of people or
animals.
Protect tool from dampness and wet.
FI
120
230
Warning
Caution
Connect the tool to a mains socket with protective earth.
Every interruption of the protective earth inside or outside of the
tool is dangerous!
Only use extension cables with protective earth!
1
3
Technical data
Voltage V~ 230
power consumption W 3000
Frequency Hz 50/60
Air flow (20°C) l/min ca. 270
Air temperature °C max. 350
Plastifizer temperature °C max. 260
Welding output (Ø 3 mm) kg/h
PE 0.6 –1.3 PP 0.5 –1.2 *PVC-U 0.9 –1.7 (Average values at 50 Hz)
Welding output (Ø 4 mm) kg/h
PE 1.0 – 2.3 PP 0.9 – 2.0 *PVC-U 1.5 –2.7 (Average values at 50 Hz)
Welding rod mm Ø 3 / Ø 4
Size L × B × Hmm450 × 98 × 260 (without welding shoe)
Weight kg 5.8 (without cable to mains)
Marking of conformity 2
Approval mark
3
Certification scheme CCA
Protection class I 1
* WELDPLAST S2-PVC
Leister Process Technologies, Galileo-Strasse 10, CH-6056 Kaegiswi/Switzerland confirms
that this
product, in the version as brought into circulation through us, fulfils the requirements
of the following EC directives. Directives:
2004/108, 2006/95.
Harmonized Standards:
EN 55014-1, EN 55014-2, EN 61000-3-2, EN 61000-3-3, EN 61000-6-2,
EN 50366, EN 60335-2-45
Kaegiswil, 06.02.2009
Bruno von Wyl Christiane Leister
Technical Director Owner
Power tools, accessories and packaging should be sorted for environmental-friendly
recycling. Only for EC countries: Do not dispose of power tools into household
waste! According to the European Directive 2002/96 on waste electrical and
electronic equipment and its incorporation into national law, power tools
that
are no longer suitable for use must be separately collected and sent for
recovery in an environmental-friendly manner.
Disposal
Conformity
4
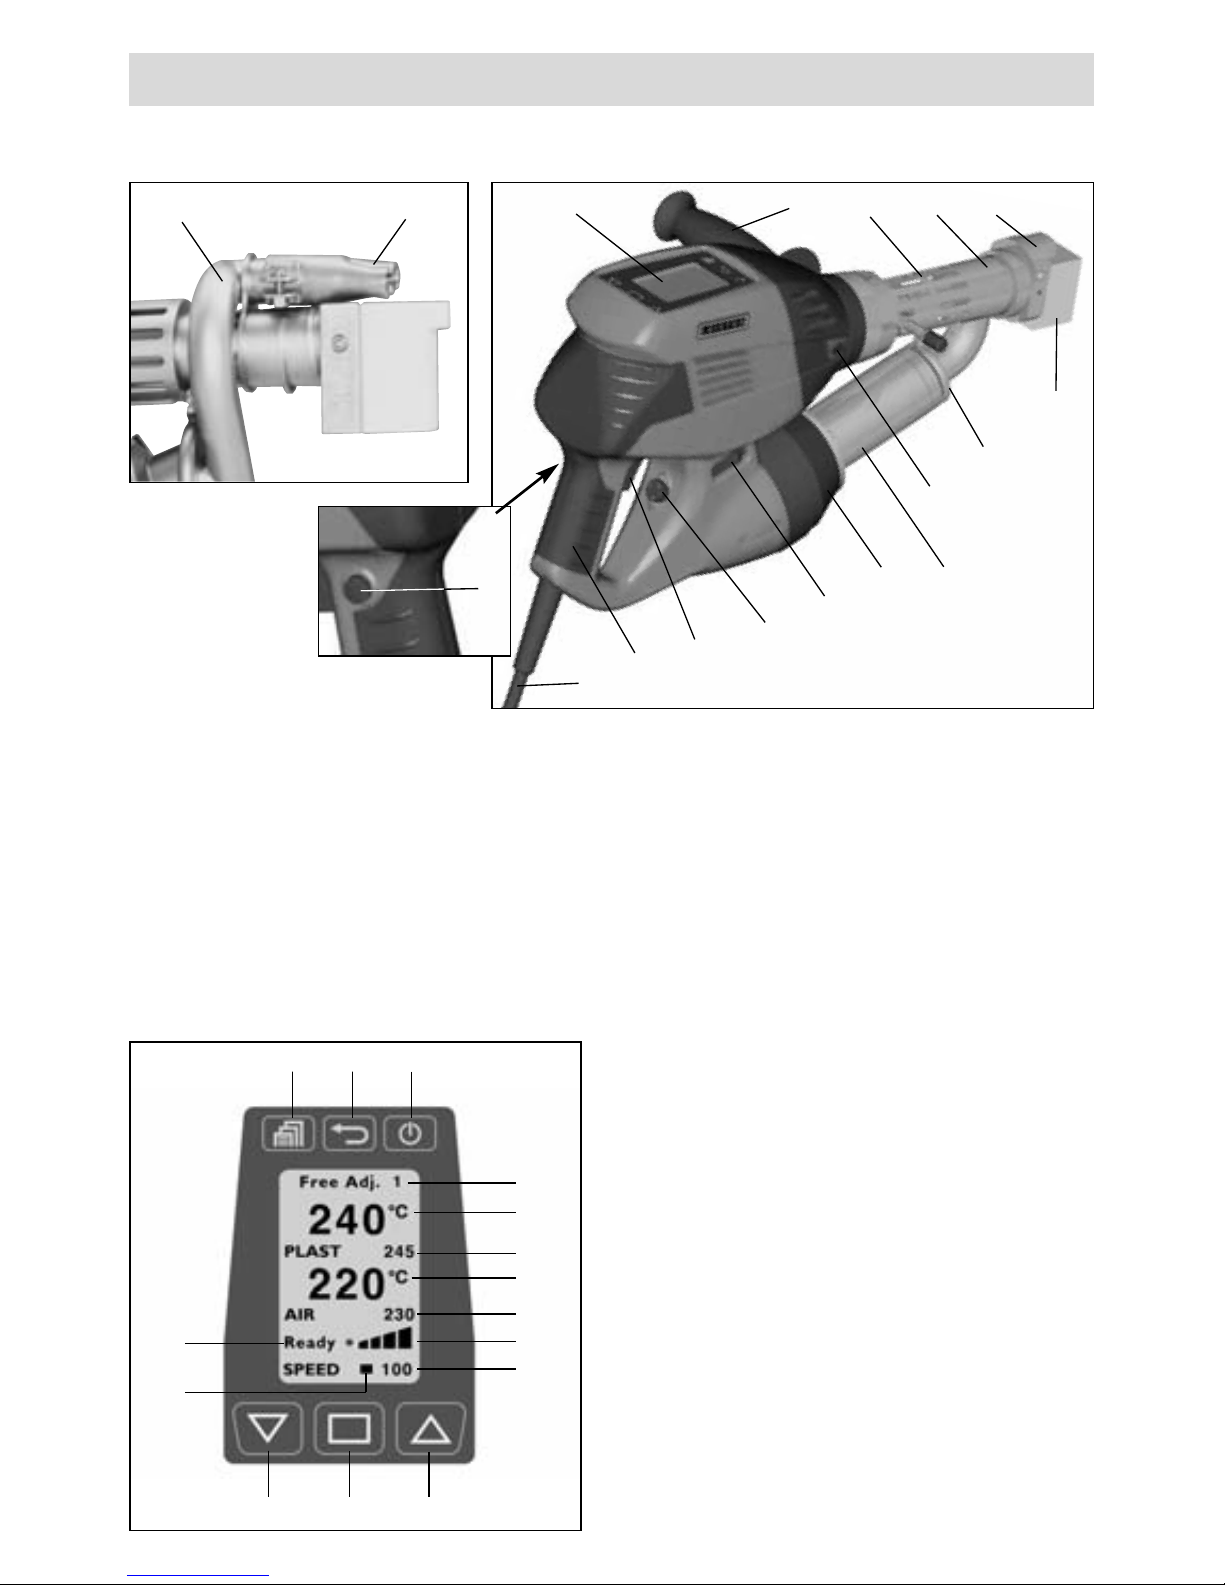
Description of tool
1 Main switch
2 On/off switch drive
3 Potentiometer
4 Drive locking device
5 Display
6 Handle
7 Jacket heating
8 Welding shoe
17 Welding program
18 Actual value plast
19 Set value plast
20 Actual value air
21 Set value air
22 Bar display for drive
23 Welding output display
24 Menu key
25 Back key
26 Stand-by/Enter key
27 Down key
28 Select key
29 Up key
30 Status display for drive
31 Cursor
9 Pre-heating nozzle
10 Tube clamp
11 Protective tube
12 Welding rod opening
13 Tool handle
14 Mains cable
15 Heating element
16 Hot air blower (brush-free)
44 External hot air duct
24
27 28 29
30
31
17
18
19
20
21
22
23
25 26
Multifunctional display
With integrated air ductWith external air duct
1
12
16
8
10
3
2
4
13
5
7
14
11
9
6
15
9
44
5
Operating
Working environment / safety
When interrupting the welding, the drive is to be
switched off with the drive on/off switch (2).
With the handle properly adjusted and firmly tightened,
place down the manual extruder on a stable and
fire-proof surface as shown in the figure.
The hand extruder must not be used in inflammable environments or where
explosion hazards exist. Ensure stable positioning during operation. The
connection cable and the welding rod must remain unimpeded and must not
hinder the user or others during operation.
Rest the hand extruder on a fireproof surface! Hot metal parts and the hot-air jet
must have sufficient clearance from the surface and walls.
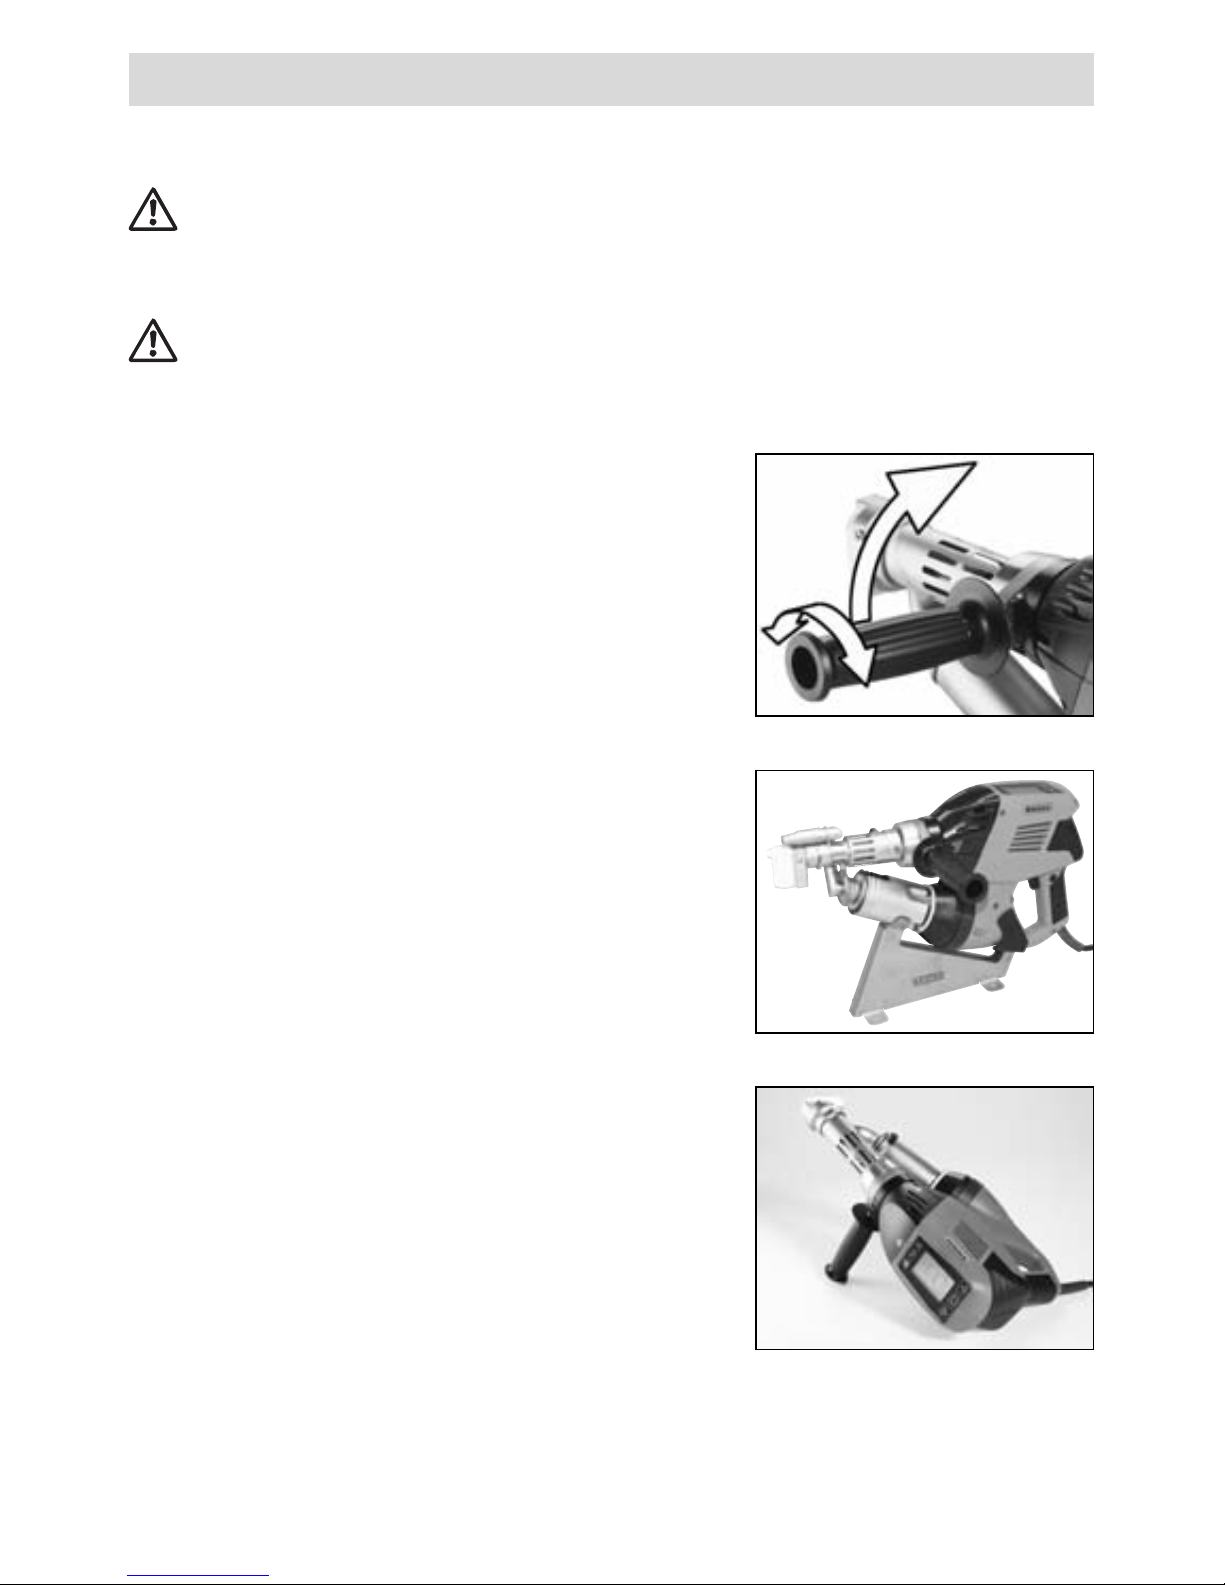
Handle Adjustment
1. Loosen the clamping by turning the handle (6) in
counterclockwise direction.
2. Adjust handle (6) to the requested working position.
3. Tighten handle clamping again by turning handle (6)
in clockwise direction.
Workplace
For starting operation of and placing down the hand
extruder, Leister offers a universal device stand.
1
2
3

6
Operating
Power supply
When using an extension cable, take care to ensure the minimal cable cross-section:
Extension cables must be approved for the working environment (e.g. outdoors) and labelled
accordingly.
If a generator is used to supply electricity, the rated power of the generator must be 2x the
rated power of the hand extruder.
Length
[m]
Minimum cross-section (at ~230V) [mm2]
Up to 19
2.5
20 – 50 4.0
After switching on the main switch (1), the device directly heats up to the last adjusted set
values. When the set values are reached, a counter in the status indication counts back from
220 seconds to zero. Once this starting procedure has elapsed, the device is ready for welding
(status: Ready*). The operating temperature of the manual extruder is reached after approx.
5 minutes.
After a short-term mains break, the starting procedure is not repeated.
motor disabled
WARM-UP LOCK TIME: 220 SEK.
Heat FREE M READY *
Display
Status display
for drive (30)
Heating until target
value is reached
motor release ready to weld
Starting procedure
Temperature monitoring prevents the hand extruder starting up in a cold state.
 Loading...