

Leister Uniplan Wedge Operating Instructions Manual
1
LEISTER Uniplan Wedge
Hot wedge Automatic Welding Tool
Read the operating instructions carefully before use and
keep for future reference.
GB
OPERATING INSTRUCTIONS
LEISTER Uniplan Wedge
Hot Wedge Automatic Welding Tool
•Overlap and tape welding of coated fabric covers, foils and geomembrane
liners made from PVC-P, PE, ECB, CSPE, EPDM, PVDF etc, PE coated tape fabric
for lorries, tents, agricultural covers, building trade, biotopes, swimming pools,
marquees, boat covers, inflatable boats, advertising billboards etc.
Welding seam width 20 or 30 mm
APPLICATION
®
LEISTER Process Technologies, Riedstrasse, CH-6060 Sarnen/Switzerland
Tel. +41 41 662 74 74 Fax + 41 41 662 74 16
www.leister.com sales@leister.com
Voltage
V~
Frequency
Hz
Power consumption
W
Temperature
°C
Noise level
L
pA
(dB)
Drive speed
m/min.
Dimensions
mm
Weight
kg
TECHNICAL DATA
230 ★ 120 ★ 100 ★
50 / 60 50 / 60 50 / 60
900 900 900
max. 420 max. 420 max. 420
70 70 70
1.0 – 7.5 1.0 – 7.5 1.0 – 7.0
420×270×210 420×270×210 420×270 ×210
11.5 11.5 11.5
★ Connection voltage not switchable
CCA certified
Protection Class Ι
Approval Marks
2
Danger! Unplug the tool before opening it, as live components and connections are exposed.
Incorrect use of hot air tools can present a fire and explo-
sion hazard, particularly in the proximity of flammable
materials and explosive gases.
The tool must be operated under supervision.
Heat can ignite flammable materials which are not in view.
For personal protection, we strongly recommend the tool
to be connected to an RCCB (Residual Current Circuit
Breaker) before using it on construction sites.
The rated voltage stated on the tool must correspond with
the mains voltage.
Danger of getting burned! Do not touch the end of the
heater tube and nozzle when they are hot. Let the tool
cool down. Do not point the hot air flow in the direction of
people or animals.
Protect the tool from damp and wet.
FI
230
120
WARNING
CAUTION
Connect tool to a receptacle with protective earth terminal.
Any disconnection of the protective conductor in or outside the tool is dangerous!
Only use extension lead with protective conductor.
Laser radiation! Do not look into the beam, Laser Class 2.
3
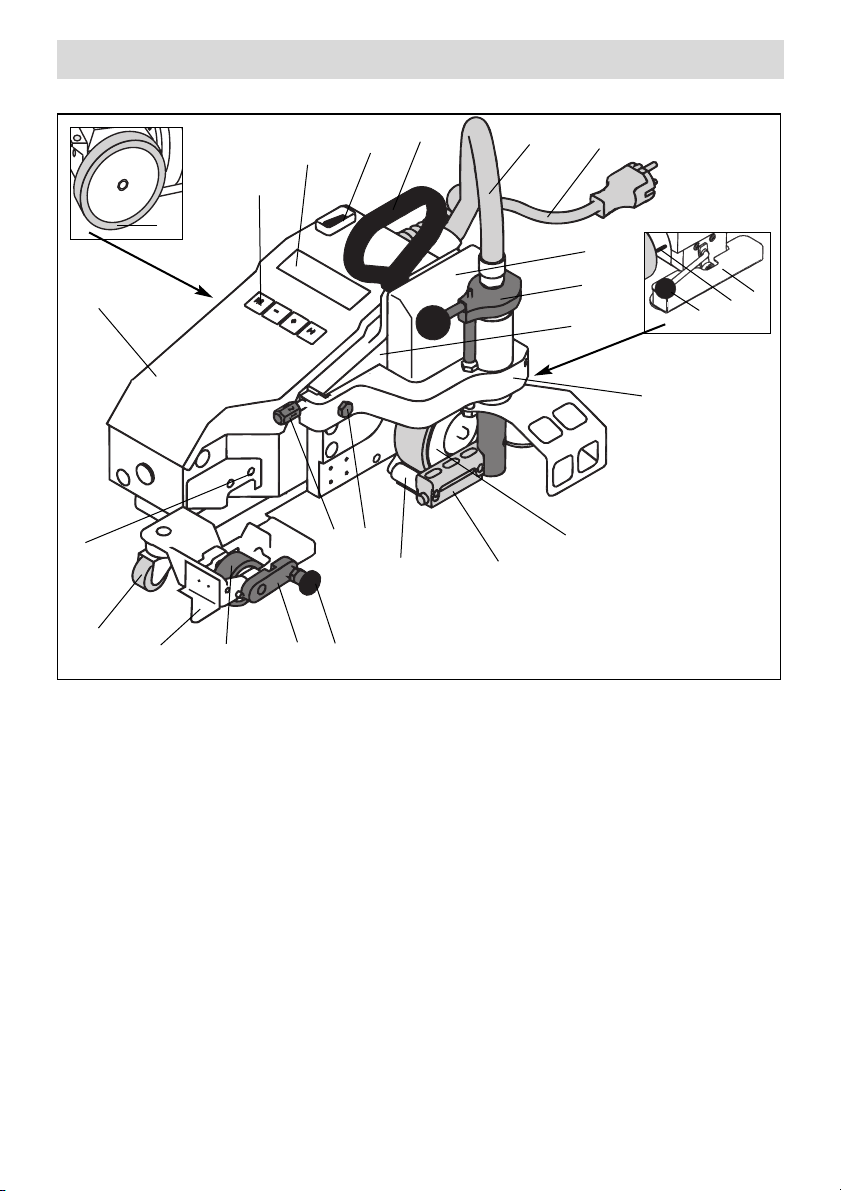
TOOL DESCRIPTION LEISTER Uniplan Wedge
1
6
7
10
Main components
1. Housing
2. Carrying handle
3. Extra weight
4. Base plate
5. Mains cable
6. Hot wedge
7. Connection hose
8. Drive/pressure roller
9. Pinch roller
10. Drive roller
11. Steering roller
12. Lifting device
13. Display
14. Thread for fixing 22 mm tape
dereeling device
15. Holding arm
Operating components
16. Main switch
17. Keyboard
18. Lifting device lever
19. Swivel lever
20. Fixing screw
21. Adjusting screw
22. Track adjustment screw
Steering equipment
23. Guide roller lever
24. Guide roller knob
25. Guide roller
26. Guide cover
12
18
11
14
26
25
23
24
22
15
9
20
21
8
5
19
3
4
13
17
16
2
Figure 1
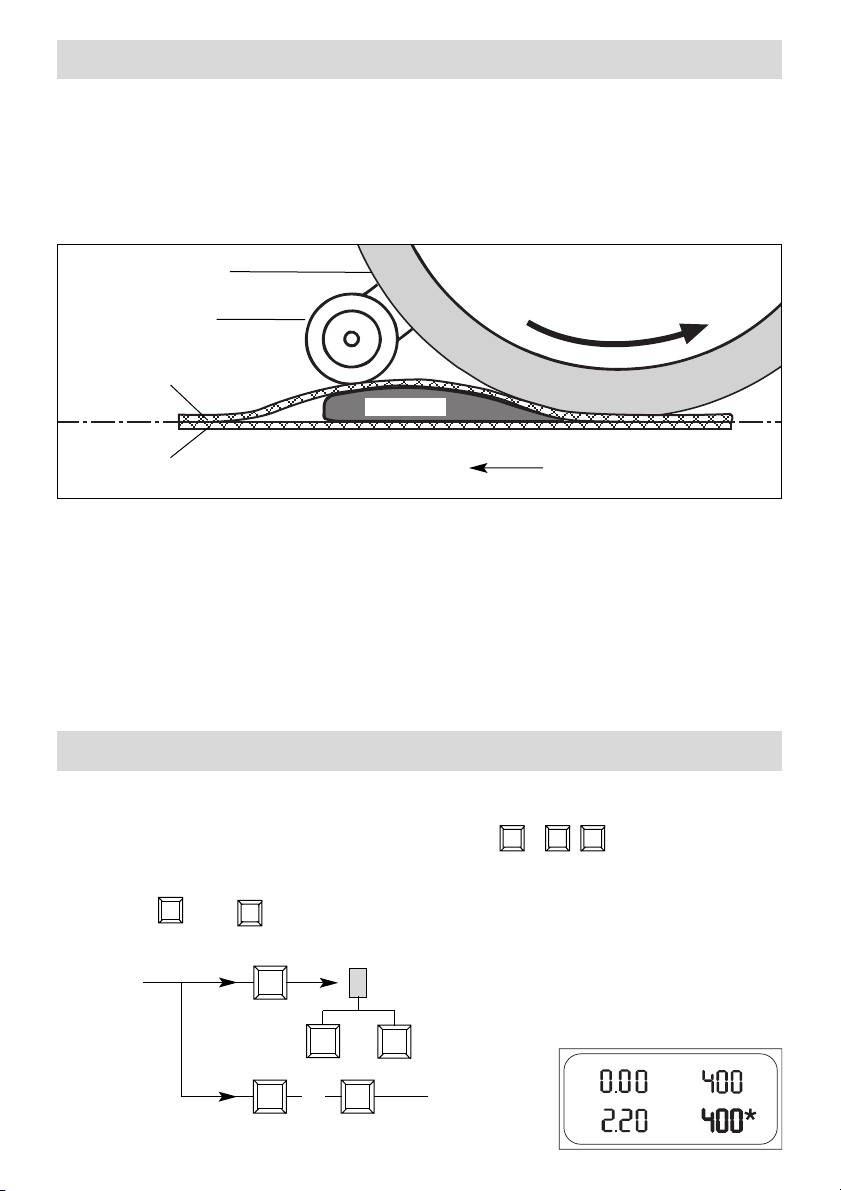
Hot wedge
Direction of weld
Upper membrane
Pinch roller
Lower membrane
Cross-section of hot wedge system
Drive/pressure roller
• Drive speed → continuously adjustable and electronically controlled. The
control circuit is configured such that the desired welding speed remains
constant during any voltage fluctuations. The drive/pressure roller (8) is
configured as a pendulum roller.
• Welding pressure → the welding pressure is brought to bear on the material
by means of the machine’s weight and the extra weight (3) via the
drive/pressure roller (8).
• Heating system → the hot wedge temperature is continuously adjustable and
electronically controlled. Depending on the material, the hot wedge position
can be sent to any required horizontal position.
FUNCTION DESCRIPTION LEISTER Uniplan Wedge
4
Figure 2
Heater
Cursor flashes
on display
H
Welding temperature
Adjust the welding temperature using the keys, , . The temperature
setting depends on the material and ambient temperature. The SET value is
shown on the display.
Press keys and simultaneously to switch heater on.
Heating up time is appr. 5 minutes.
+
–
H
+
H
ON/OFF
SET - value adjustment
–
+
+
&
H
WELDING PARAMETERS LEISTER Uniplan Wedge
 Loading...