

Page 1
PRODUCT MANUAL
Installation, Configuration, and Operation Instructions
SPECIALIZED
Video Solutions
Page 2

Support
At LEIGHTRONIX, every customer of our standard product line
receives technical support at no extra charge. There are no service
contracts, no annual renewals, no allowances, no deductibles, and
no exclusions.
In addition to a 5 year hardware warranty, benets include access to:
• Priority Toll-Free telephone support
• Email Support
• Online support, desktop to desktop via Webex®
• Software updates
• Firmware updates
• Assistance with updates
Phone: (800) 243-5589
Email: [email protected]
©2011-2018 LEIGHTRONIX, INC. All rights reserved.
The information in this manual is subject to change without notice.
NEXUS® and PEG Central® are registered trademarks of LEIGHTRONIX, INC.
LABvault-SD™, PEGcasting™, UltraNEXUS™, UltraNEXUS-SDI™, LGX-SVOD™, and ePRO-BUS™ are
trademarks of LEIGHTRONIX, INC.
LEIGHTRONIX, INC.
1125 N Cedar Rd
Mason, MI 48854
Phone: (800) 243-5589 or (517) 694-8000
Fax: (517) 694-1600
www.leightronix.com
Page 3

TABLE OF CONTENTS
Table of Contents
ABOUT THIS MANUAL ................................................................................................................... 1
PACKING LIST ................................................................................................................................ 1
IMPORTANT SAFETY INSTRUCTIONS .........................................................................................2
FRONT PANEL ................................................................................................................................3
KEYPAD .................................................................................................................................................................... 3
LEDS ......................................................................................................................................................................... 3
DISPLAY ................................................................................................................................................................... 3
BACK PANEL ..................................................................................................................................4
ORIGINAL LABVAULT-SD BACK PANEL ................................................................................................................. 4
VERSION 2 OF THE LABVAULT-SD BACK PANEL ................................................................................................. 4
SYSTEM INSTALLATION ................................................................................................................ 5
INSTALLING THE LABVAULT-SD ............................................................................................................................ 5
ENTERING NETWORK SETTINGS INTO LABVAULT-SD ....................................................................................... 6
WEB INTERFACE ............................................................................................................................ 8
OPENING AND LOGGING IN ................................................................................................................................... 8
UNDERSTANDING STATUS INDICATORS ON “SYSTEM DASHBOARD” SCREEN ............................................. 9
ENTERING LABVAULT-SD SETTINGS .................................................................................................................. 10
Site Name and Location ................................................................................................................................... 10
LABvault-SD System Time ............................................................................................................................... 10
Web Interface Usernames and Passwords .......................................................................................................11
ePRO-BUS Setting ........................................................................................................................................... 12
Serial Port Setting ............................................................................................................................................. 12
SETTING UP FILE TRANSFER DESTINATION(S) ................................................................................................ 13
NEXUS Series Server (NEXUS/UltraNEXUS/UltraNEXUS-SDI) ..................................................................... 13
LEIGHTRONIX Streaming Video-on-Demand Web Site .................................................................................. 14
LGX-SVOD Server ........................................................................................................................................... 15
Server with FTP Capabilities ............................................................................................................................ 15
RECORDING .......................................................................................................................................................... 16
Record Settings ................................................................................................................................................ 16
Recording from the Web Interface .................................................................................................................... 17
PLAYING FILES ...................................................................................................................................................... 18
“MPEG Player” Left Column Controls ............................................................................................................... 18
“MPEG Engine Control” Panel .......................................................................................................................... 19
MANAGING FILES ................................................................................................................................................. 20
Rename Files on Internal Hard Drive ............................................................................................................... 20
Delete Files from Internal Hard Drive/Transfer Queue ..................................................................................... 20
Manually Transfer Recorded Files .................................................................................................................... 21
Change File Transfer Destinations ................................................................................................................... 21
Page 4

CHECKING LOG FILES ......................................................................................................................................... 22
Open a Log File ................................................................................................................................................ 22
Search a Log File ............................................................................................................................................. 22
Delete a Log File .............................................................................................................................................. 23
MAINTAINING THE LABVAULT-SD ........................................................................................................................ 25
Update Firmware .............................................................................................................................................. 25
Check Internal Hard Drive ................................................................................................................................ 25
Reboot/Shut Down ........................................................................................................................................... 25
CONTROL COMMANDS ............................................................................................................... 26
SPECIFICATIONS .......................................................................................................................... 31
PRODUCT WARRANTY ................................................................................................................ 33
DECLARATION OF STANDARDS CONFORMITY .......................................................................33
COPYRIGHT STATEMENTS .........................................................................................................34
Page 5
LABvault-SD
About This Manual
Thank you for purchasing a LABvault-SD digital video player/recorder. With the LABvault-SD, anyone
can easily create and display industry standard MPEG-2 les with very little training. The LABvault-
SD includes a Web interface that can be used to operate the LABvault-SD’s record, playback, and
transfer features from any location while also providing administrative options for setting up le
transfer destinations, changing recording quality presets, managing les on the LABvault’s internal
hard drive, and accessing the system’s log les.
One of the most powerful features of the LABvault-SD is its ability to be controlled by a wide variety
of external sources. The most popular control interfaces include Crestron® and AMX® touch screen
technology, giving users an intuitive and simple way to record a video source, display the resulting
digital le on a connected television monitor, and then transfer the le to one or more destinations.
The LABvault-SD accommodates a variety of playback and storage destinations. For instance, users
may send les to an archive server and then later download the les to view on a PC, burn to a DVD,
or drag into an editing system timeline. Further options include sending each digital le from the
LABvault-SD to a LEIGHTRONIX NEXUS series server/controller (UltraNEXUS-SDI, UltraNEXUS, or
NEXUS) for scheduled or immediate broadcasting. The LABvault-SD can also be integrated with a
LEIGHTRONIX streaming video-on-demand application like the PEG Central Web service, with the
option to host les on the PEG Central web servers or in-house on an LGX-SVOD server.
ABOUT THIS MANUAL
This manual describes how to install your LABvault-SD as well as use the included LABvault-SD
Web interface to set up and control the player/recorder. Instructions on using a touch screen or other
external control system with the LABvault-SD should be obtained from the third party provider. Refer
to the “CONTROL COMMANDS” on page 26 of this manual for a list of the commands needed to
program your external control system.
PACKING LIST
(1) LABvault-SD Digital Player/Recorder
(1) Product Resource Disc, Including LABvault-SD Manual
(1) Part #10-0311, AC Power Cord, 6 ft.
(1) Part #10-4856, CAT 5e Ethernet Cable, 7 ft.
Page 1 2018-06-08
Page 6
LABvault-SD
Important Safety Instructions
IMPORTANT SAFETY INSTRUCTIONS
1. Read these instructions.
2. Keep these instructions.
3. Heed all warnings.
4. Follow all instructions.
5. Do not use this apparatus near water.
6. Clean only with dry cloth.
7. Do not block any ventilation openings. Install in accordance with the manufacturer’s instructions.
8. Do not install near any heat sources such as radiators, heat registers, stoves, or other apparatus (including ampliers) that
produce heat.
9. Do not defeat the safety purpose of the grounding-type plug. A grounding-type plug has two blades and a third grounding
prong. The third prong is provided for your safety. If the provided plug does not t into your outlet, consult an electrician for
replacement of the obsolete outlet.
10. Protect the power cord from being walked on or pinched particularly at the plugs, convenience receptacles, and the point
where they exit from the apparatus.
11. Only use attachments/accessories specied by the manufacturer.
12. Unplug this apparatus during lightning storms or when unused for long periods of time.
13. Refer all servicing to qualied service personnel. Servicing is required when the apparatus has been damaged in any way,
such as power-supply cord or plug is damaged, liquid has been spilled or objects have fallen into the apparatus, the apparatus
has been exposed to rain or moisture, does not operate normally, or has been dropped.
14. When the apparatus is turned off, certain components in the power supply and system board remain energized. In order to
remove all electrical power from the apparatus, unplug the power cord from the MAINS socket outlet.
To reduce the risk of electric shock, do not expose this apparatus to rain or moisture.
This apparatus must be connected to a MAINS socket outlet with a protective earthing
connection.
Page 2 2018-06-08
Page 7
LABvault-SD
Front Panel
FRONT PANEL
KEYPAD
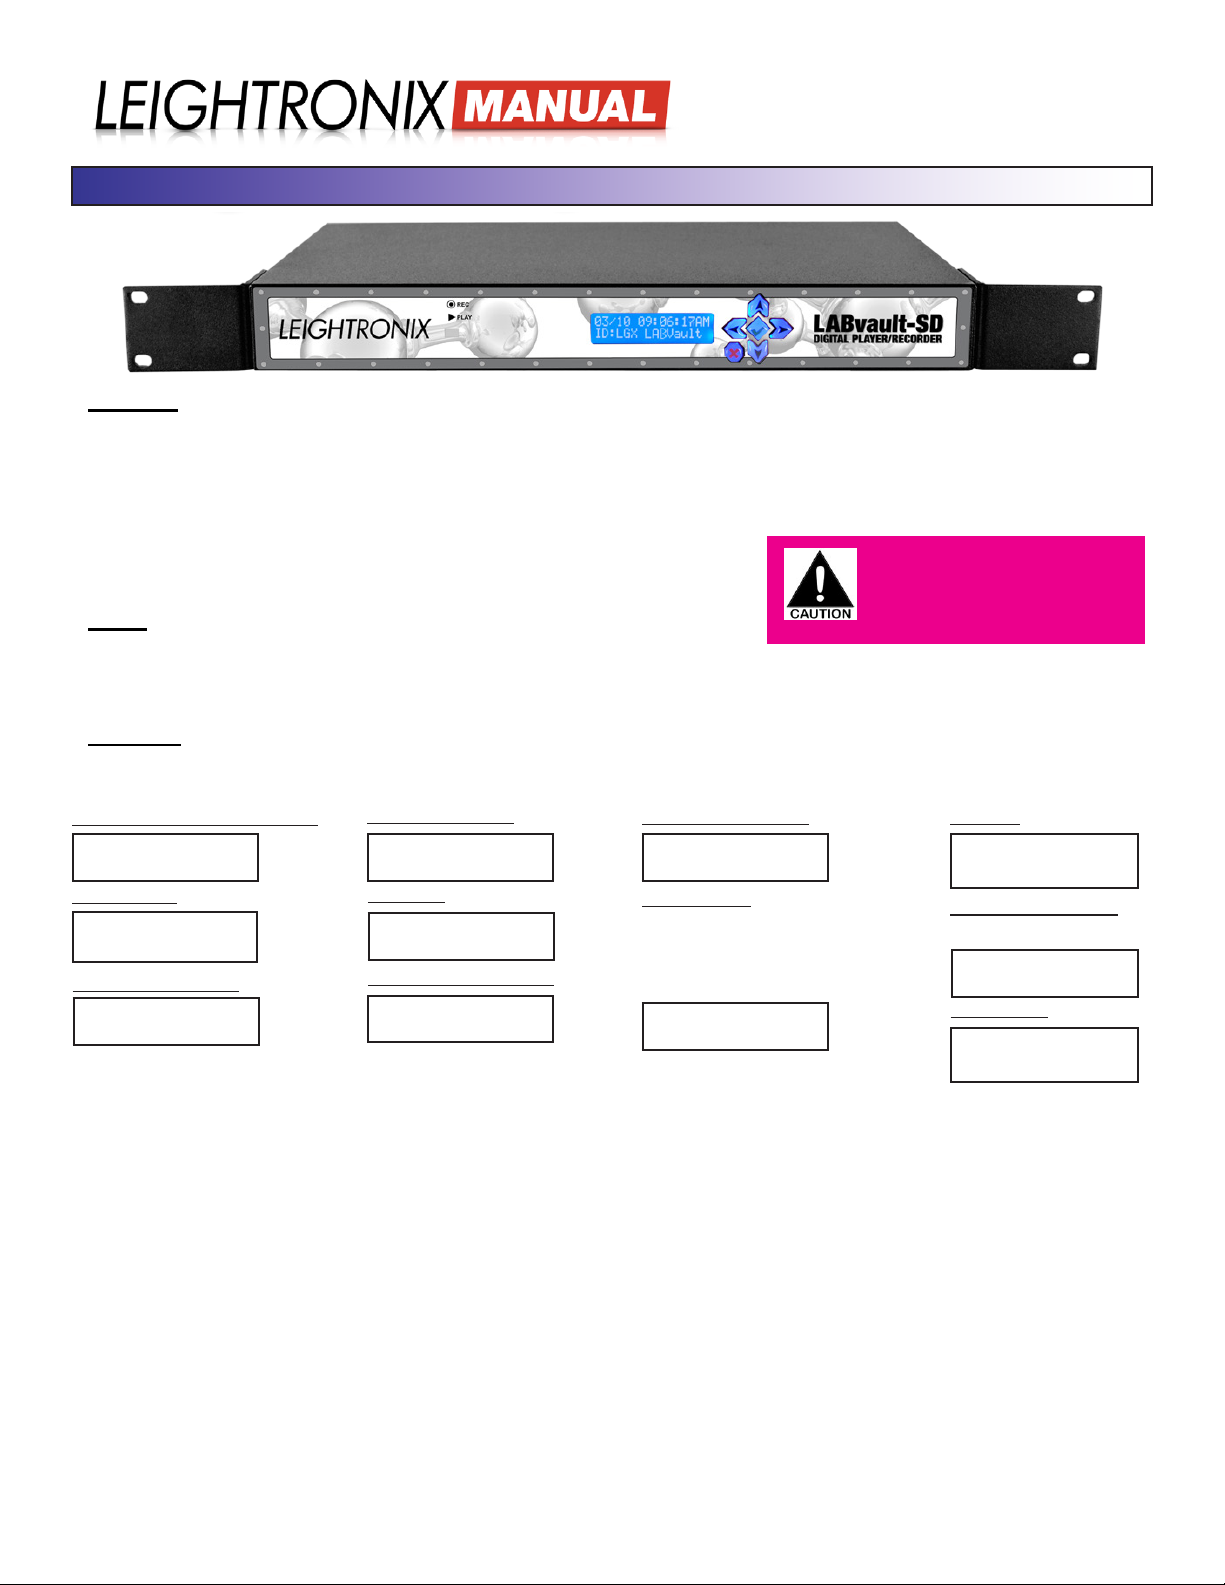
The four LABvault-SD arrow keys are used to display status information as well as for the entry of TCP/IP network
addresses. If you hold down an arrow key for more than one second, it begins to scroll through all of the available
options. Release the key when the desired option is displayed.
The front panel keypad also turns the LABvault-SD on/off. Note that the LABvault-SD automatically turns on when the
unit is plugged in. When held for four seconds, the red “X” button turns off
the LABvault-SD. If the LABvault-SD has been turned off, press the green
check push button for two seconds to turn the unit back on.
LEDS
The LABvault-SD front panel has two status, light-emitting diodes (LEDs)
for at-a-glance feedback. The red “Record” LED lights up when the LABvault-SD is encoding. The blue “Play” LED
lights up when playback on the LABvault is activated.
BEFORE unplugging or
removing power from the
LABvault-SD, shut down the
unit from its front panel.
DISPLAY
The LABvault-SD display shows status and password-protected TCP/IP address entry screens. Once the LABvaultSD has been booted up, press the up or down arrows on the keypad to display the following status screens:
Serial Number & Firmware Version
11/03 12:00:00PM
SN:B923D1 V01.00
Firmware Date
11/03 12:00:00PM
FW Blt:10/31/08
Processor Temperature
11/03 12:00:00PM
Temp: 42°C
MPEG Player Status
11/03 12:00:00PM
MPEG Player Stop
IP Address
11/03 12:00:00PM
IP:10.9.0.1
LABvault-SD Identication
11/03 12:00:00PM
ID:LABvault-SD
MPEG Recorder Status
11/03 12:00:00PM
Recorder Stopped
Transfer Status
Indicates le transfer destination and progress.
If more than one destination is selected for
a transfer, the screen only shows the rst
destination to which the LABvault-SD sends the
le. Changes to “Send Idle” when there are no
active le transfers.
11/03 12:00:00PM
NX: 0.8591GB 2%
Bios Date
11/03 12:00:00PM
Bios:02/14/08
PStat Firmware Version
Displays the rmware version for the
front panel status LEDs.
11/03 12:00:00PM
PStat Ver:66.03
Build Number
11/03 12:00:00PM
Bld Num:427
Page 3 2018-06-08
Page 8
LABvault-SD
Back Panel
BACK PANEL
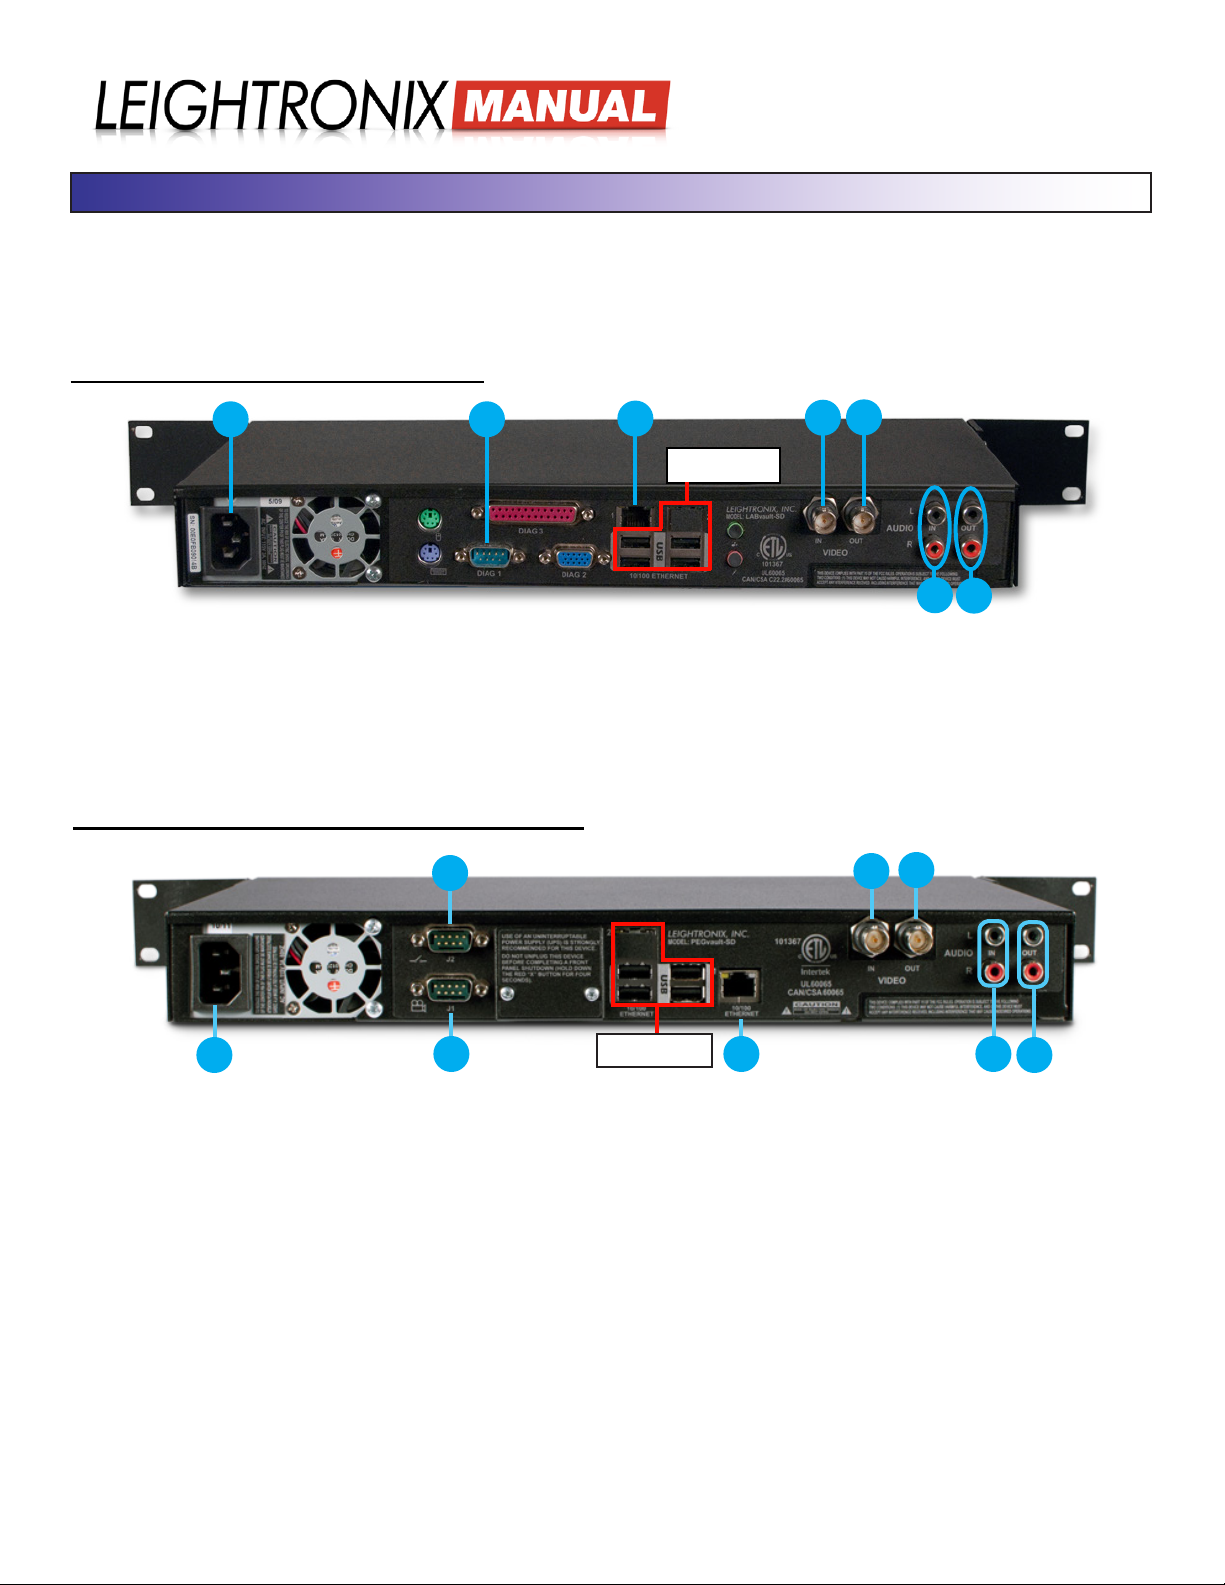
There are two versions of the LABvault-SD, which have different back panels, supported network connectivity speeds,
and internal hard drive sizes. The original LABvault-SD, no longer available, has a back panel matching the rst of the
pictures shown below, supports 10/100 BASE-T Ethernet, and has a 120 GB internal hard drive. The current LABvault-SD
model, version 2, has a back panel matching the second picture below, supports 10/100/1000 or gigabit BASE-T Ethernet,
and has a 250 GB internal hard drive.
ORIGINAL LABVAULT-SD BACK PANEL
E
A
B
C
D
Not Used
F
G
The LABvault-SD back panel, includes, from left to right, top to bottom:
A: Power cord connector
B: 1 RS-232 Serial Port for External Control System
C: 1 RJ-45, 10/100 BASE-T Ethernet port with corre-
sponding LED indicators
D: 1 BNC video input connector
E: 1 BNC video output connector
F: 2 RCA audio input connectors (left & right)
G: 2 RCA audio output connectors (left & right)
VERSION 2 OF THE LABVAULT-SD BACK PANEL
B
A
The LABvault-SD back panel, includes, from left to right, top to bottom:
A: Power cord connector
B: not used
C: 9-pin male RS-232 DTE connector for control by
a compatible third party system, such as a AMX or
Crestron touch screen
D: 1 RJ-45, 10/100/1000 BASE-T Ethernet port with corresponding LED indicators
C D
Not Used
E: 1 BNC video input connector
F: 1 BNC video output connector
G: 2 RCA audio input connectors (left & right)
H: 2 RCA audio output connectors (left & right)
E
F
G
H
Page 4 2018-06-08
Page 9
LABvault-SD
System Installation
SYSTEM INSTALLATION
INSTALLING THE LABVAULT-SD
While installing the LABvault-SD, refer to the labeled back panel on page page 4 that matches your LABvaultSD’s back panel. Perform the following installation steps:
1. The LABvault-SD may be left as a standalone, tabletop unit or mounted into a rack as follows:
Leave empty rack spaces above and below the LABvault-SD. The LABvault-SD should not have
anything stacked on top of it.
a. Insert the LABvault-SD into the rack, aligning the holes of the unit’s mounting bracket with those of the rack.
b. Secure the LABvault-SD to the rack with user-supplied rack screws.
2. Connect the included power cable to the LABvault-SD’s power cord connector and then plug the other end into an
AC power source.
LEIGHTRONIX strongly recommends the use of an Uninterruptible Power Supply (UPS) with
the LABvault-SD. Damage from power loss or spikes is not covered under warranty.
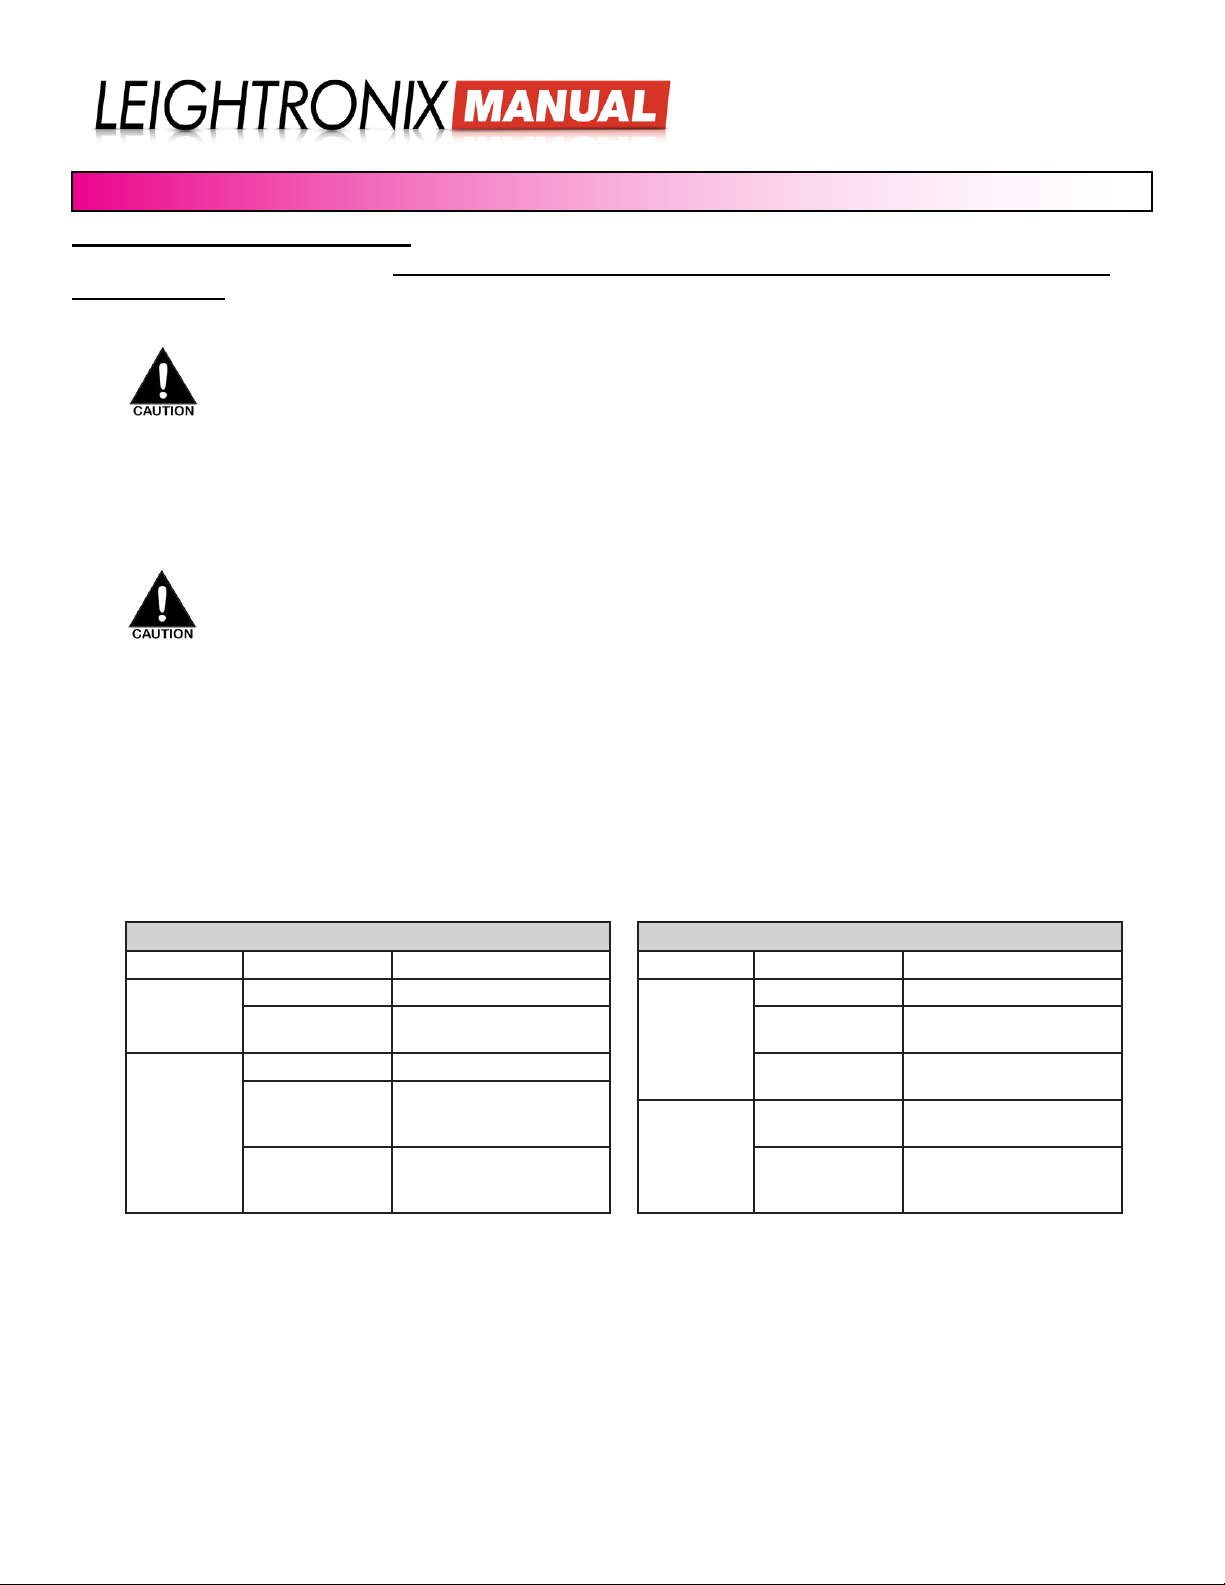
3. Using a straight-through RJ-45 Ethernet cable, connect the LABvault-SD Ethernet port to a hub or switch on your
TCP/IP network. The original LABvault-SD supports 10/100 BASE-T Ethernet, while version 2 of the LABvault-SD
supports 10/100/1000 (gigabit Ethernet). To check your network connection, look at the Ethernet LEDs above the
Ethernet port and compare to the table below that corresponds to your LABvault-SD’s back panel.
NOTE: The LABvault requires the following network ports:
• 23 Telnet
• 21 FTP Control Connection
• 20 FTP Data (if using third party FTP client in passive mode)
• 80 for the LABvault-SD Web interfaces
• 2000 UDP for ePRO-BUS Control
Original LABvault-SD Ethernet LED Indicators
LED Position State Description
Left Off Connection speed is 10Mb/s
Green Connection speed is
100Mb/s
Right Off Ethernet link not established
Steady on yellow Ethernet link established.
PEGvault-SD is not transmitting on the network.
Blinking yellow Ethernet link established.
PEGvault-SD is transmitting
on the network.
Version 2 LABvault-SD Ethernet LED Indicators
LED Position State Description
Right Off Connection speed is 10Mb/s
Green Connection speed is
Orange Connection speed is
Left Slow blinking
yellow
Fast blinking
yellow
100Mb/s
1000Mb/s
Ethernet link not established
Ethernet link established.
LABvault-SD is transmitting
on the network.
4. Connect your video/audio signal wiring to the LABvault-SD as follows:
a. Video/Audio Source: this is the resource or signal the LABvault-SD will record. Connect your video source
wiring to the LABvault-SD’s BNC video input and stereo RCA audio inputs.
b. Video/Audio Destination: connect a television monitor to the LABvault-SD’s BNC video output and stereo RCA
audio outputs to review your recorded digital les. The LABvault-SD supports simultaneous playback and
recording, allowing you to watch other les during recording.
5. If your external control system has not been congured for network connectivity and supports RS-232
communication, connect the control system (such as AMX or Crestron touch screen) directly to the LABvault’s RS232 control port. For LABvault control protocol details, refer to the “CONTROL COMMANDS” on page 26.
Page 5 2018-06-08
Page 10
LABvault-SD
System Installation
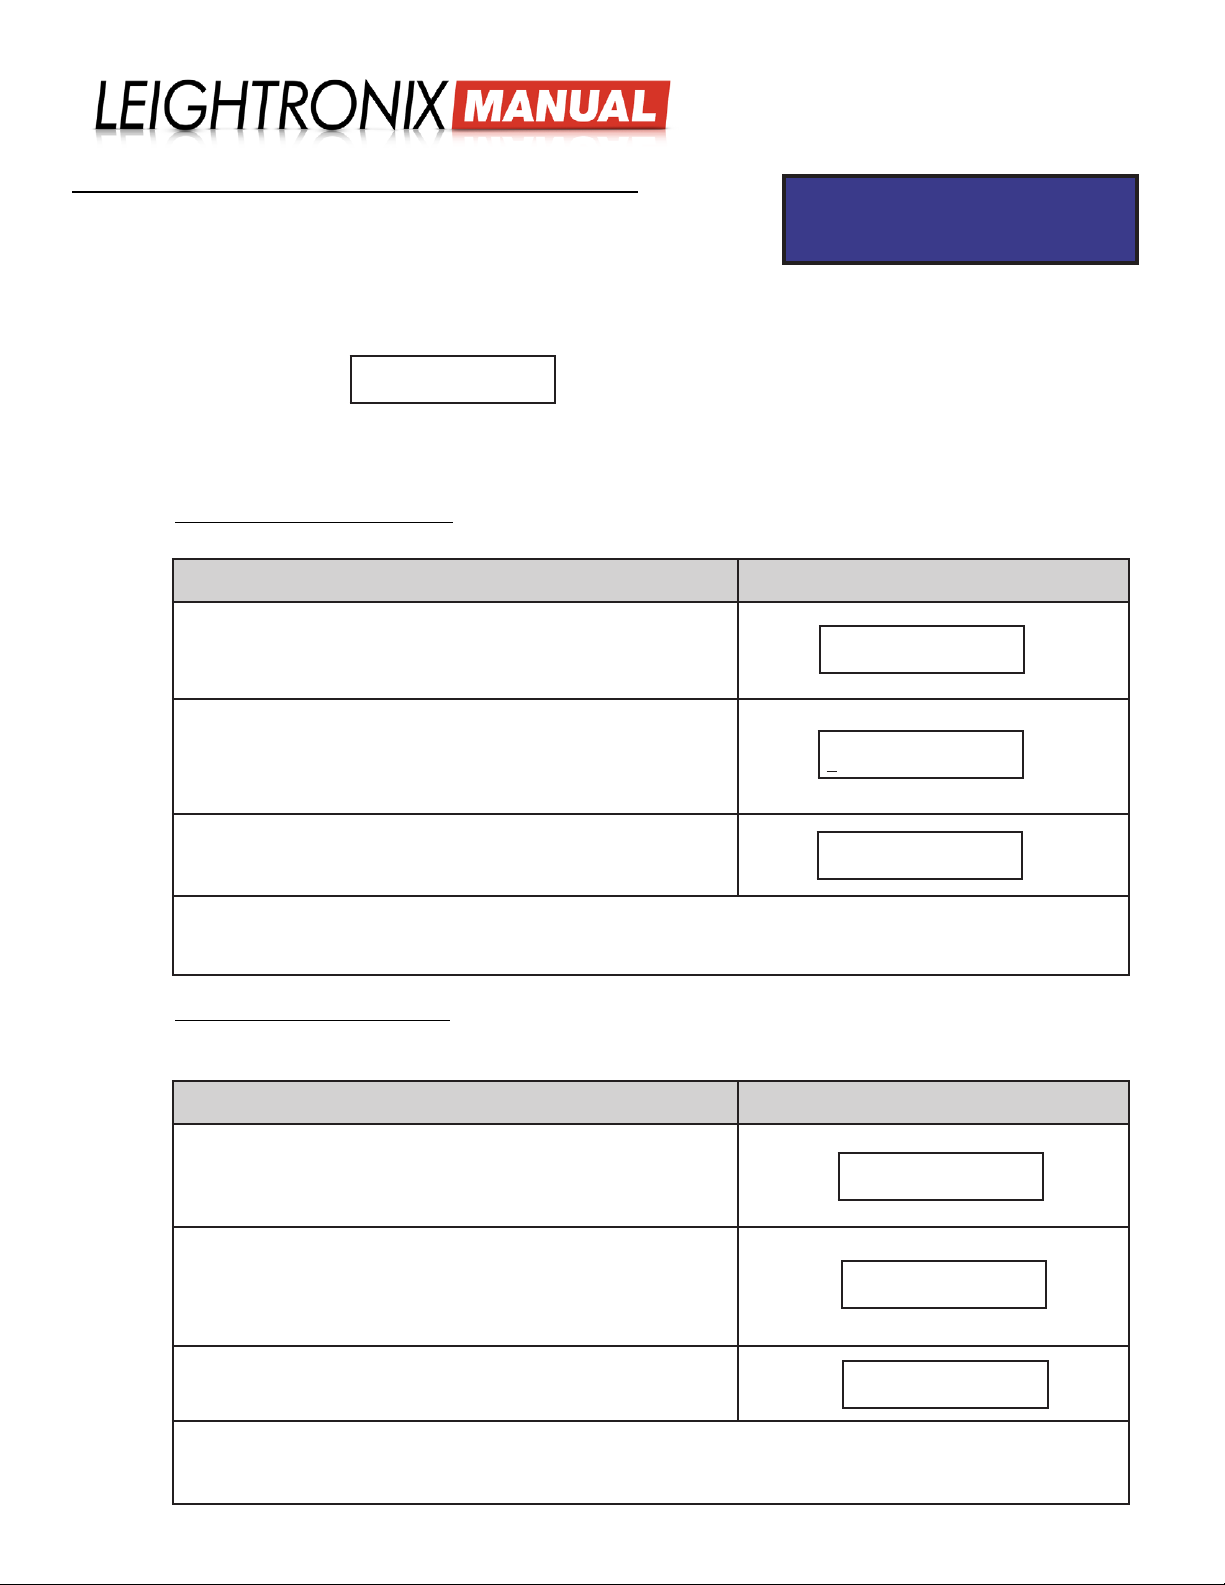
ENTERING NETWORK SETTINGS INTO LABVAULT-SD
Default Front Panel Password:
a. Power up the LABvault-SD by pressing the green check button on
the front panel for at least two seconds.
b. From the front panel, enter your password by pressing the right arrow button to display the password entry
screen and then the right arrow key ve times. If the password is entered correctly, the LABvault-SD’s
conguration menu will be displayed (see below).
CONFIG MENU
Edit unit address
If the password is entered incorrectly, the front panel display returns to the status screens.
c. Either enter your LABvault-SD network addresses manually or use DHCP to automatically congure the addresses
according to the following steps:
• Automatic Network Addressing: enable DHCP on your LABvault-SD according to the table below. When
enabled, DHCP will congure your LABvault with an IP, subnet mask, and gateway network addresses.
DHCP Conguration Steps Corresponding Screen Displays
i. From the “CONFIG MENU” screen, press “↑” or “↓“ to
proceed to the “Edit DHCP” screen.
ii. Press “→“ to select the screen.
ve right arrow keys
CONFIG MENU
Edit DHCP
•
iii. Press “↑ “ or “↓ “ to toggle the eld value from
“DISABLED” to “ENABLED.”
iv. Press “→“ to enter the next screen.
v. Either press “→“ again to save your changes or “←“ to
abort changes.
ENABLE DHCP:
ENABLED
Press ~ to
confirm DHCP
The LABvault-SD must be powered down and then powered back up to apply any DHCP changes
(press the red “X” button for four seconds to turn the unit off and then press the green check
button for two seconds to return power).
• Manual Network Address Entry
Obtain an IP address, subnet mask, and a gateway for your LABvault-SD from your network administrator.
Repeat the network conguration steps below to enter your IP, subnet, and gateway network addresses.
Network Address Conguration Steps Corresponding Screen Displays
i. From the “CONFIG MENU” screen, press “↑” or “↓“ to
proceed to the desired address screen.
ii. Press “→“ to select the screen.
CONFIG MENU
Edit unit address
iii. Press “→“ or “←“ to position the underscore beneath the
editable elds and press “↑“ or “↓“ to edit the values.
iv. Press “→“ past all of the editable elds to enter the next
Enter address
255. 0. 0. 0.
screen.
v. Either press “→“ again to save your changes or “←“ to
abort changes.
Press ~ to
confirm address
The LABvault-SD must be powered down and then powered back up to apply any network address
changes (press the red “X” button for four seconds to turn the unit off and then press the green
check button for two seconds to return power).
Page 6 2018-06-08
Page 11
LABvault-SD
System Installation
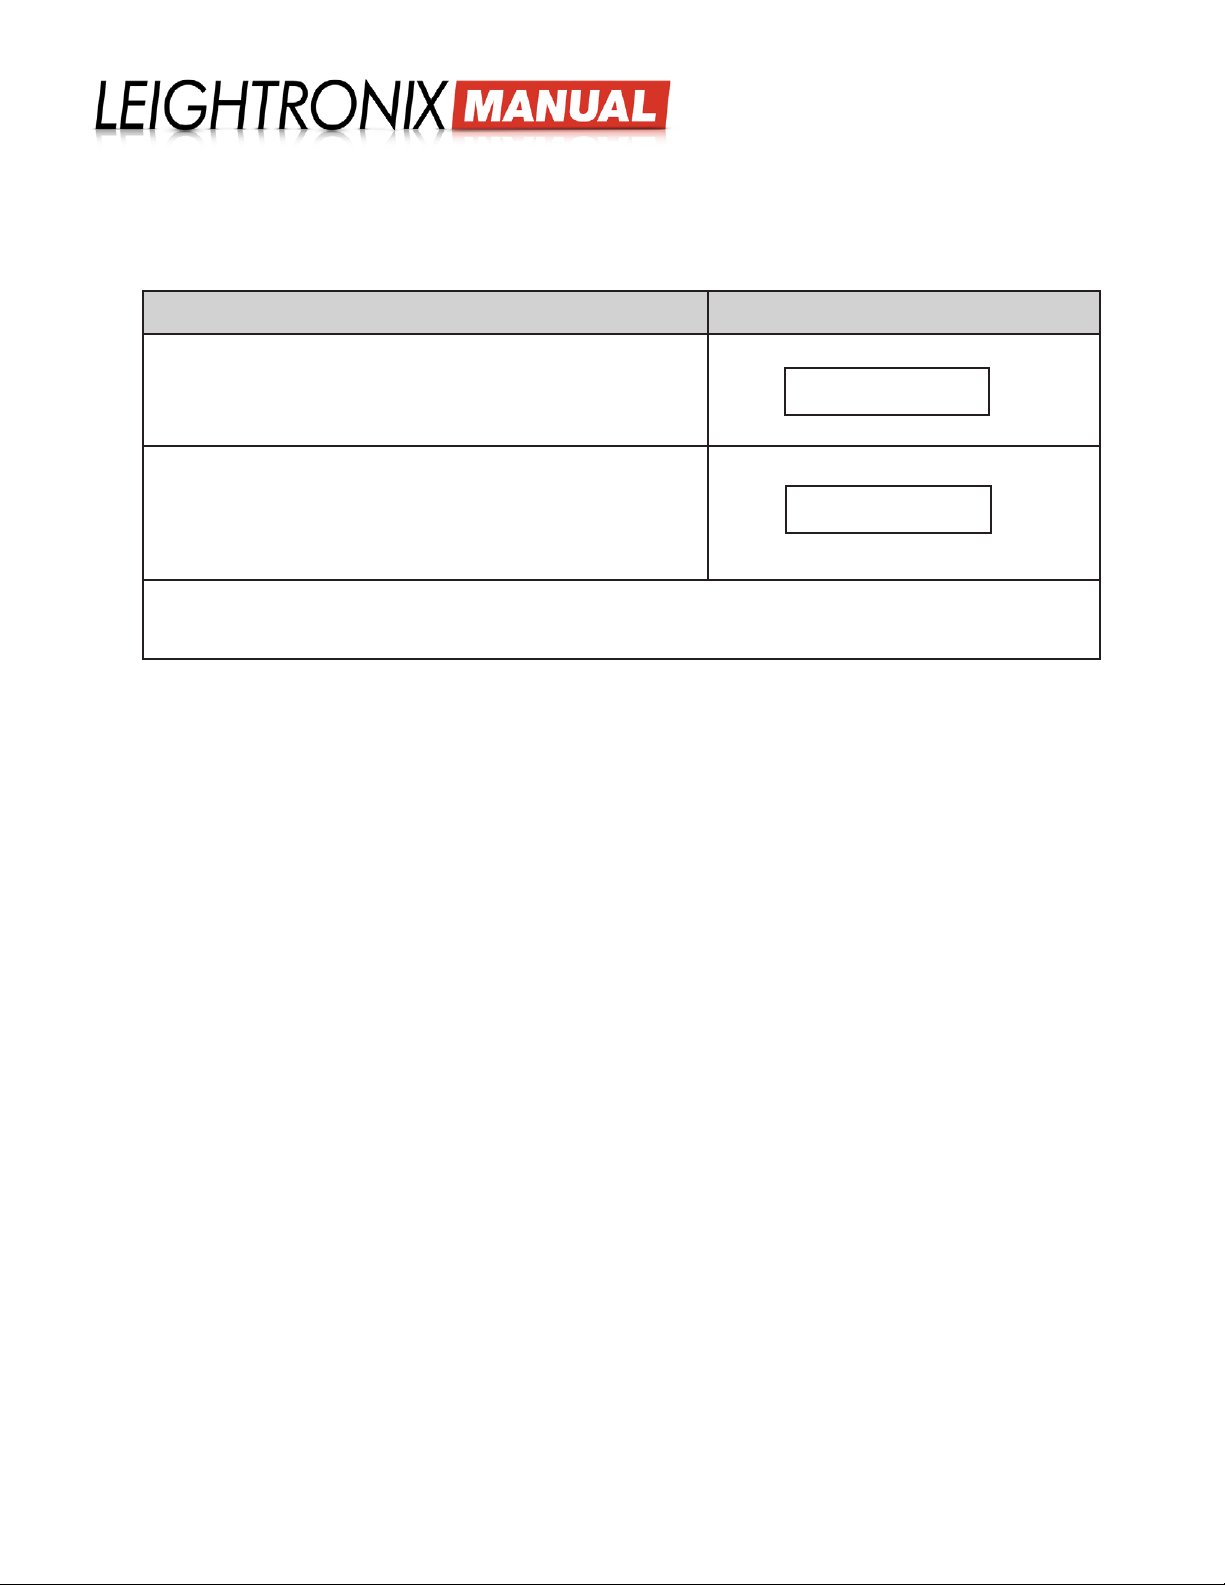
d. Optional: the LABvault-SD FTP buffer size setting helps to control the rate at which data is transferred to and
from the LABvault. The buffer size defaults to 16 kilobytes, but may be adjusted down to 4 KB or up to 64 KB. If
your network equipment can handle a higher rate, edit the setting to 32 or 64 KB for faster transfer times.
To change the FTP buffer size, peform the following:
Network Address Conguration Steps Corresponding Screen Displays
i. From the “CONFIG MENU” screen, press “↑” or “↓“ to
proceed to the “Edit FTP TCP Buf” screen.
ii. Press “→“ to select the screen.
CONFIG MENU
Edit FTP TCP Buf
iii. Press “→“ or “←“ to position the underscore beneath the
editable elds and press “↑“ or “↓“ to edit the values.
iv. Press “→“ again to apply change and enter reboot
TCP Buf size:
64 kbytes
message screen or “←“ to abort changes.
The LABvault-SD must be powered down and then powered back up to apply any FTP buffer size
changes (press the red “X” button for four seconds to turn the unit off and then press the green
check button for two seconds to return power).
Page 7 2018-06-08
Page 12
LABvault-SD
Web Interface
WEB INTERFACE
Your LABvault-SD includes a Web interface, allowing any authorized user to conveniently set up
and check on your LABvault from a local area network connection or the Internet. The LABvault-SD
Web interface is compatible with Internet Explorer, version 8 and higher, Firefox, Safari, and Google
Chrome.
OPENING AND LOGGING IN
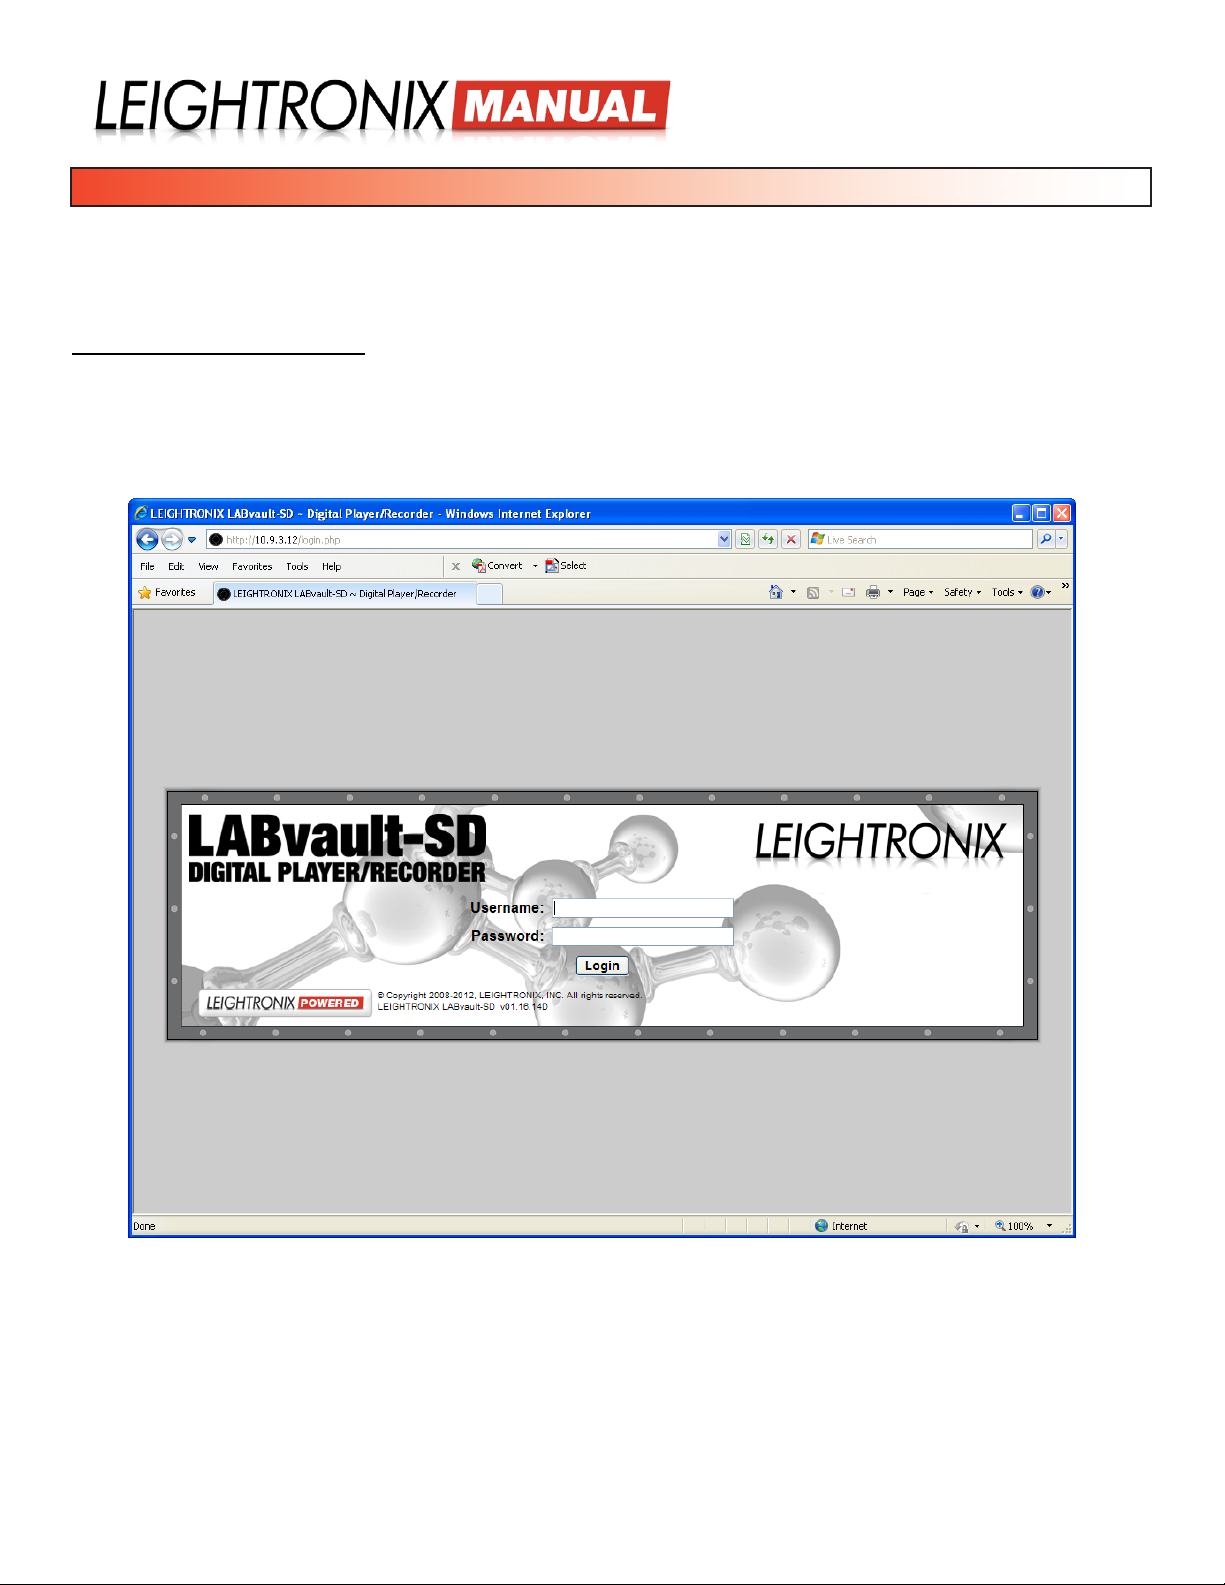
Type your LABvault-SD’s IP address into your Web brower’s address bar (i.e., http://10.255.14.175). Enter the LABvaultSD “admin” username and password into the login prompt and click the “Login” button.
NOTE: The username is always “admin” and the factory-default password is the last six digits of your LABvault’s serial
number.
Login Screen
Page 8 2018-06-08
Page 13
LABvault-SD
Web Interface
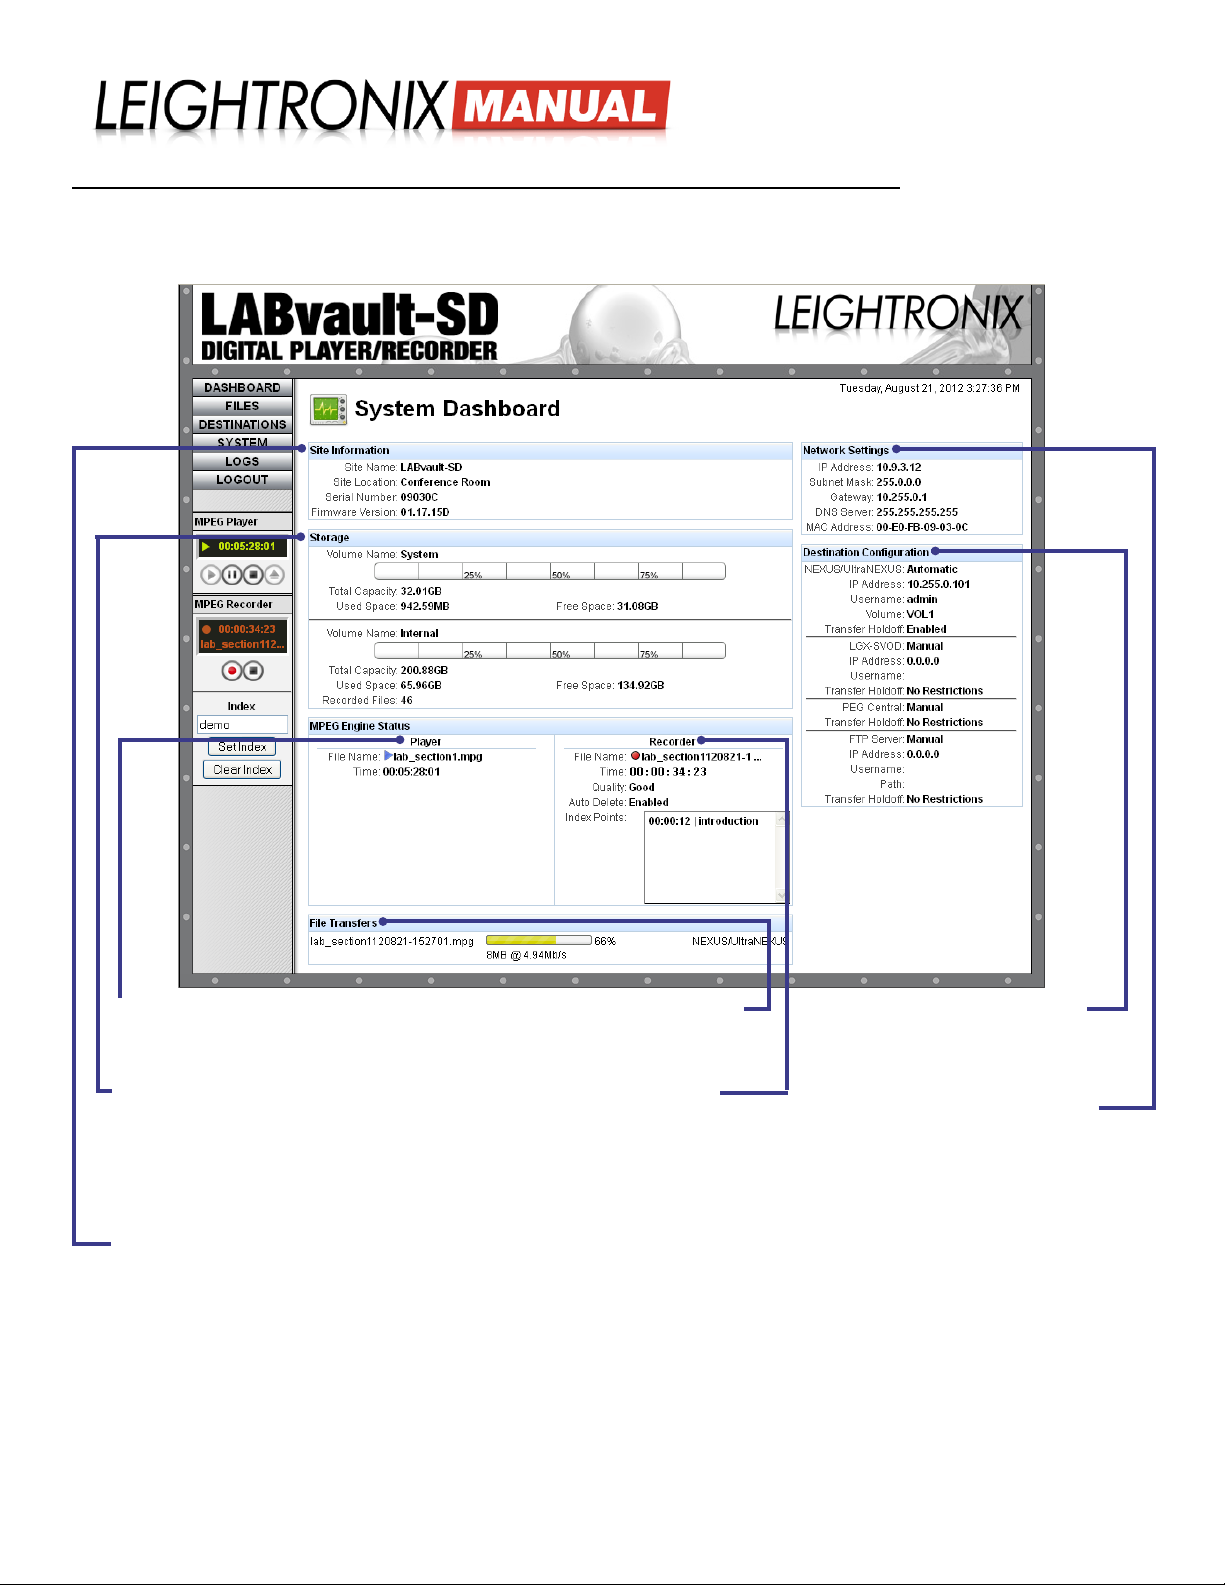
UNDERSTANDING STATUS INDICATORS ON “SYSTEM DASHBOARD” SCREEN
Click the “Dashboard” button to display the “System Dashboard” screen. The Dashboard displays all of the currently
congured settings for your LABvault-SD as well as the unit’s operational and storage status.
“System Dashboard” Web Interface Screen
MPEG Player Status: shows the
lename and playback time of the video
currently being displayed
Storage: indicates the total storage capacity
of your LABvault-SD’s internal hard drive for
the current le record quality preset, as well
as how much storage has been used and is
currently available on the internal hard drive.
This eld also shows how many recorded les
are currently on the hard drive.
Site Information: customize the “Site Name”
and “Site Location” information for your system
from the “Site Information” tab on the “System
Management” screen. Refer to the “Edit
Site Name and Location from the ‘System
Management’ Screen” subsection on the
following page for further information.
File Transfers: shows which les are
currently being transferred, the transfer
destination(s), and the transfer rate.
MPEG Recorder Status:
shows the user-selected lename and
recording quality preset for the current
recording session as well as the record
time in hours:minutes:seconds:frames.
The “Auto Delete” eld indicates
whether or not your LABvault-SD has
been set up to automatically delete
transferred les from its internal
hard drive. The “Index Pointers” box
displays any video index points set for
LEIGHTRONIX streaming video-ondemand applications during the current
LABvault record session.
Destination Conguration:
indicates the le destination(s) set
up for automatic/manual le transfers
and network settings entered for all
destinations.
Network Settings: shows the network
settings entered into your LABvault-SD’s
front panel.
Page 9 2018-06-08
Page 14
LABvault-SD
Web Interface
ENTERING LABVAULT-SD SETTINGS
Congure your LABvault-SD’s site identication, system time and time zone, login username(s) and password(s), and
more from the “System Management” screen as described in the following subsections:
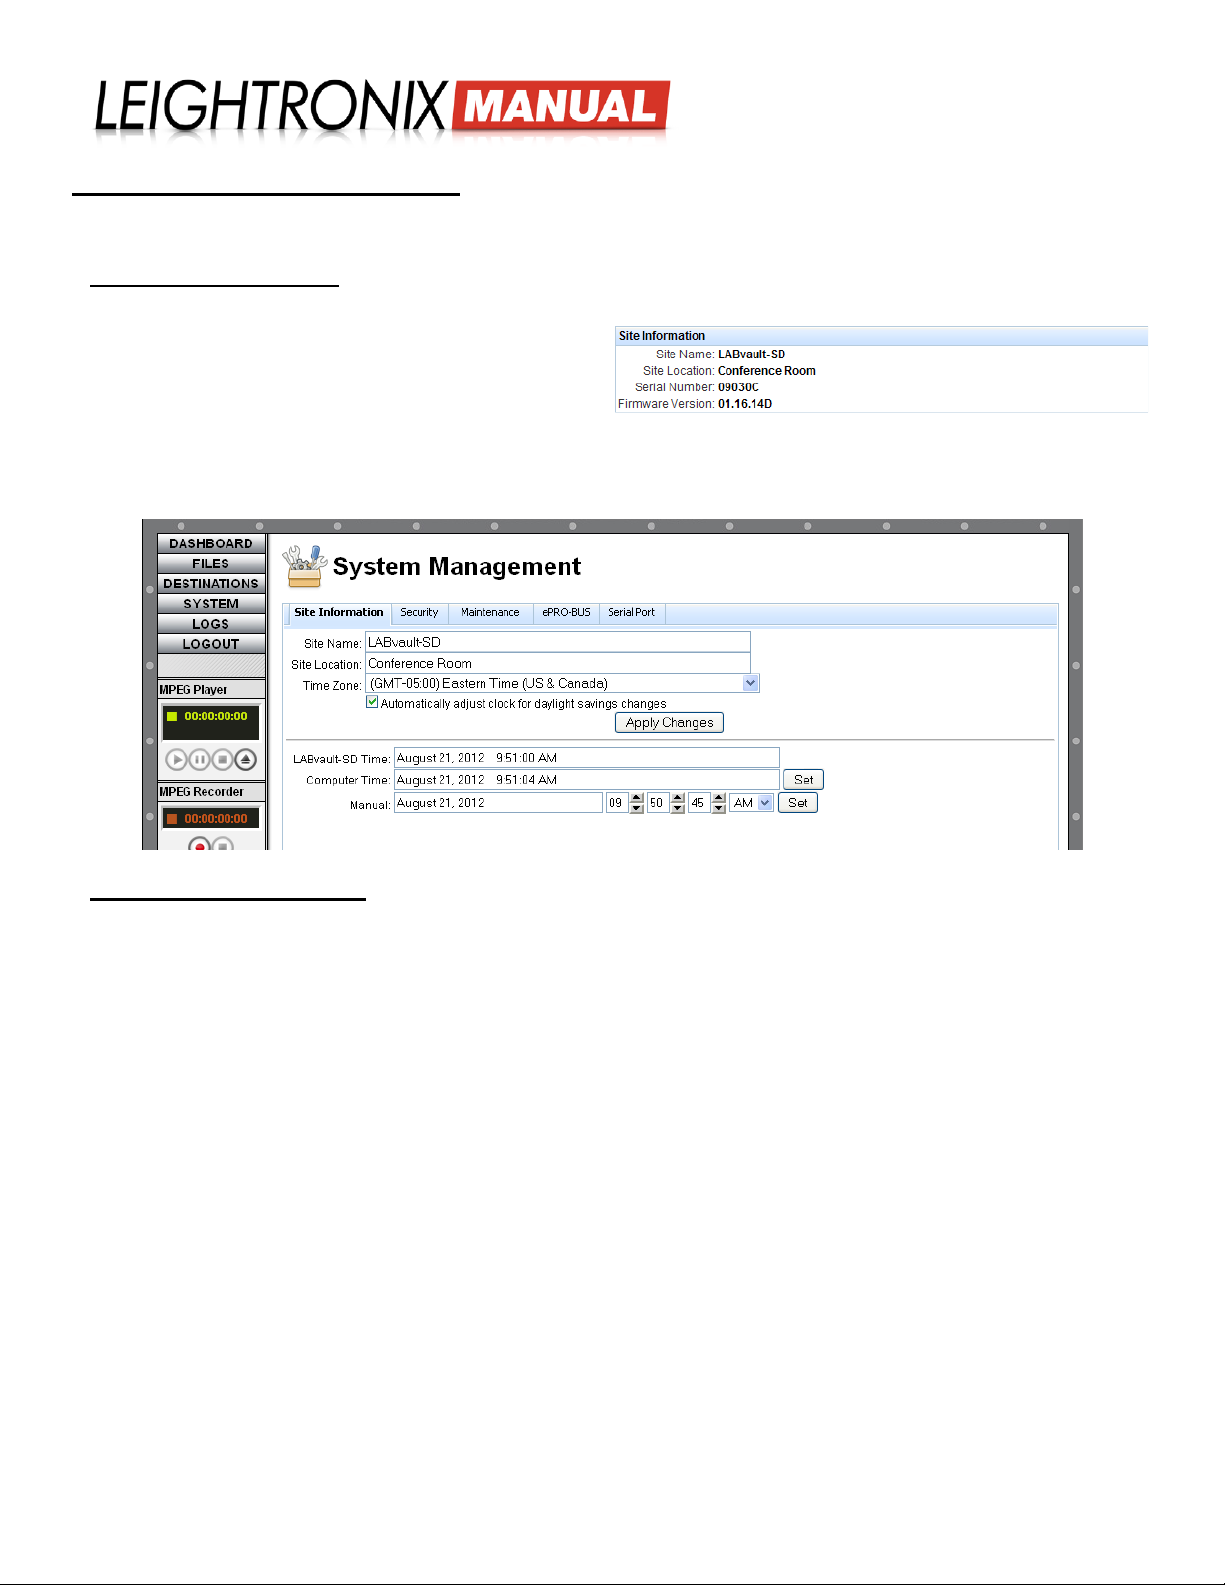
Site Name and Location
Customize the “Site Name” and “Site Location” on your
“System Dashboard” screen for your system. Click the
“SYSTEM” button to display the “System Management”
screen and then click the “Site Information” tab. Enter
a new identication name for your site into the “Site ID”
eld and a location description in the “Site Location” eld.
Click “Apply Changes” to change the information on your
“System Dashboard” screen.
“Site Information” Tab on “System Management” Web Interface Screen
“Site Information” Window on “System Dashboard” Screen
LABvault-SD System Time
Click the “SYSTEM” button to display the “System Management” screen and then click the “Site Information” tab.
“LABvault-SD Time” shows the date and time currently on your LABvault-SD system. To change the LABvault-SD’s
date/time, perform one of the following:
• Sync your LABvault-SD system’s date and time to your computer’s current date and time by clicking the “Set”
button next to the “Computer Time” eld.
• Manually change the LABvault-SD system date and time by editing the “Manual” elds as follows:
1. Use the up/down arrows to adjust the time elds.
2. Click on the date eld and select a new date in the calendar that appears.
3. Click the “Set” button to make the changes.
Page 10 2018-06-08
Page 15
LABvault-SD
Web Interface
Web Interface Usernames and Passwords
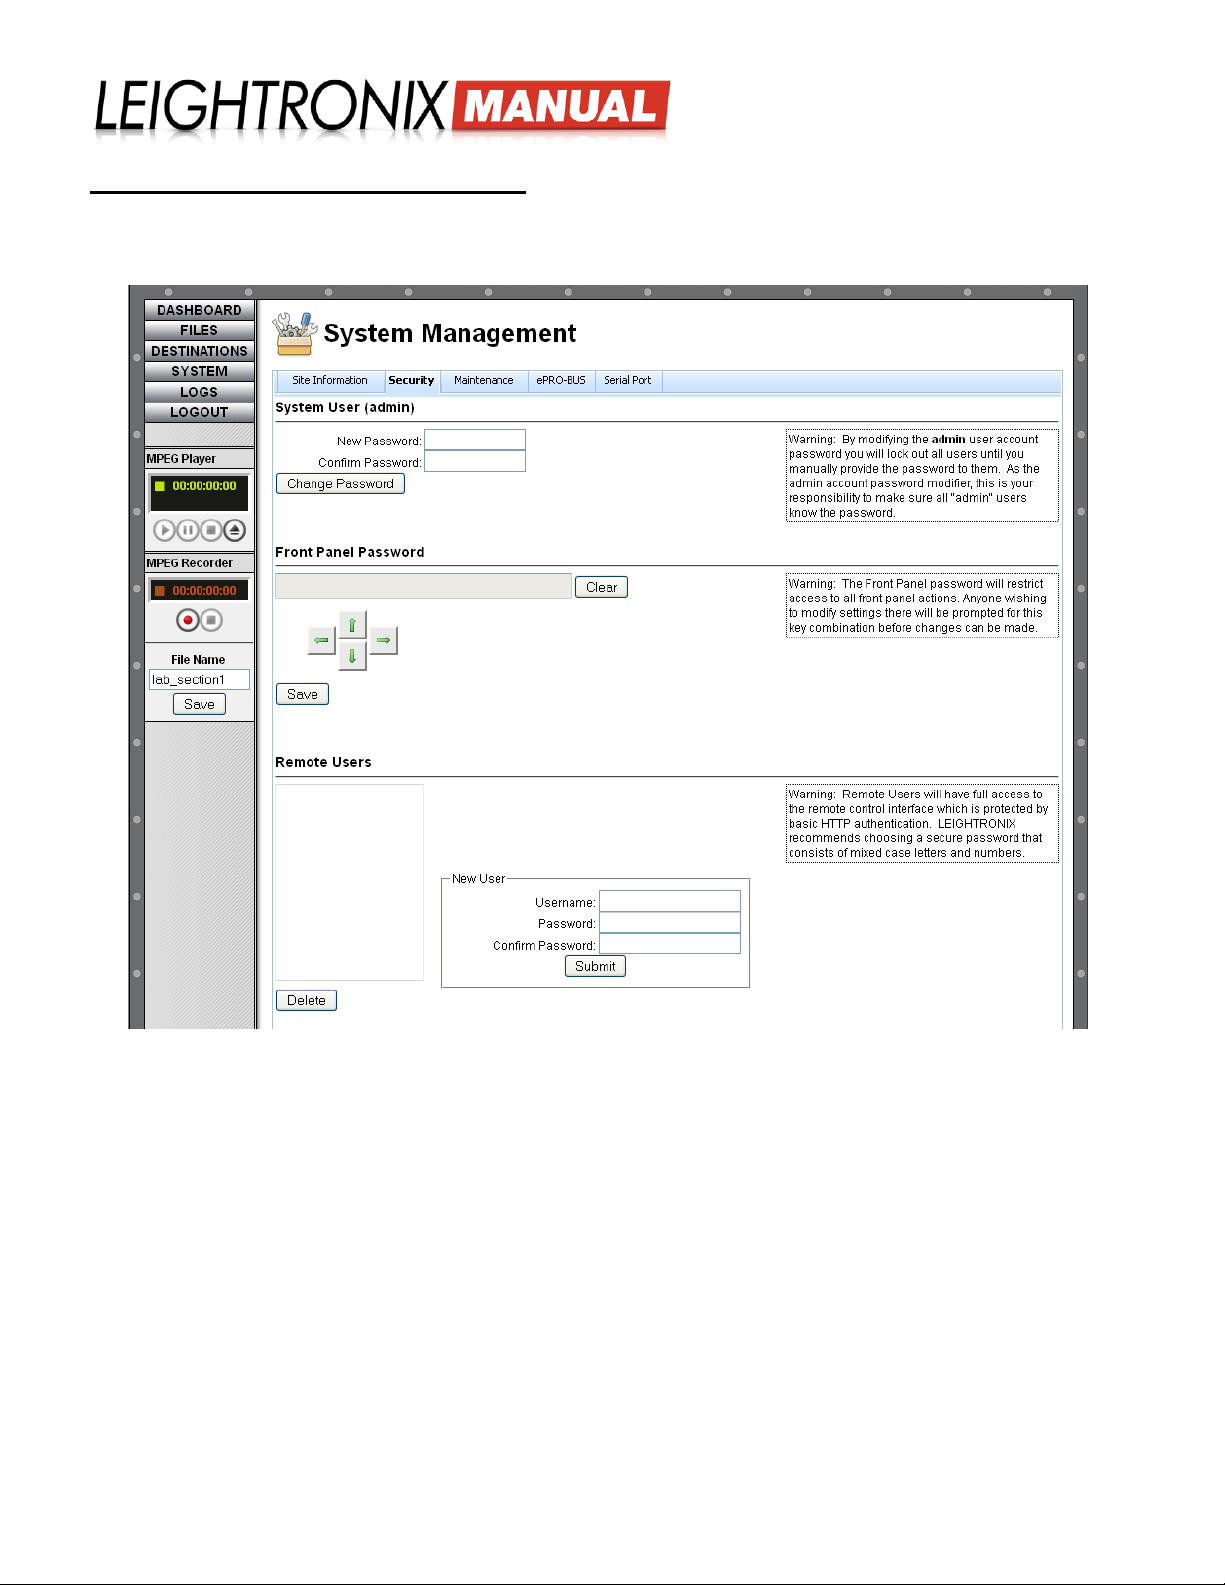
Control access to your LABvault-SD system settings and operation through the browser-based interface. Click the
“SYSTEM” button to display the “System Management” screen and then click the “Security” tab. Perform the following:
“Security” Tab on “System Management” Web Interface Screen
• “System User (admin)” Password: use these elds to change the password for the “admin” user account. The
“admin” user is able to access the main LABvault-SD browser-based interface to change system conguration
settings, activate the LABvault-SD recorder, add index points, modify le transfer settings, and view system log
les. To change the “admin” password, enter up to eight alphanumeric characters in both elds and then click the
“Change Password” button to save.
• “Front Panel Password”: protect access to the network settings entered into the front panel of your LABvault-
SD by clicking a combination of ve arrow buttons and then clicking the “Save” button to change the password or
“Clear” to remove your entry from the eld.
• “Remote Users”: remote user accounts allow users with supported third party systems to initiate, stop, and check
the status of recording on your LABvault-SD. Enter a username and password into the corresponding elds and
then click the “Submit” button to add the account. To delete a remote user account, single click on the user’s name
and then click the “Delete” button.
Page 11 2018-06-08
Page 16
LABvault-SD
Web Interface
ePRO-BUS Setting
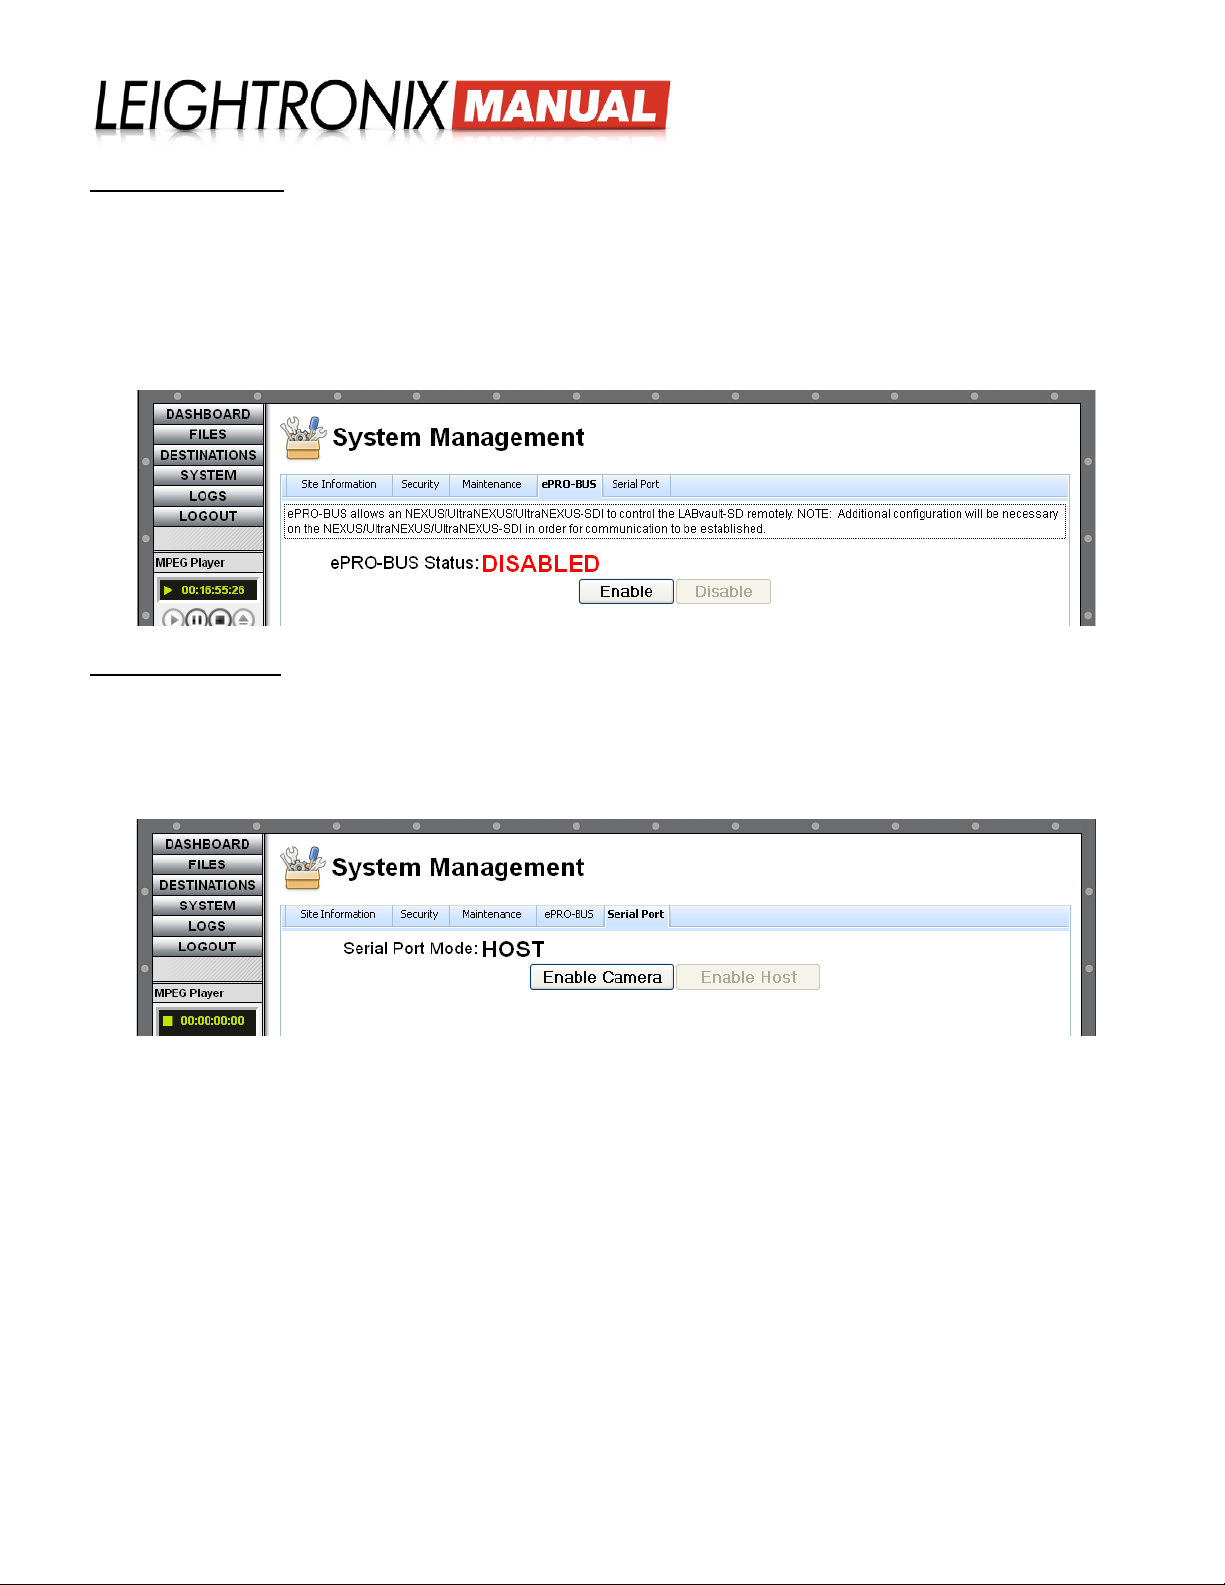
Click the “System” button to display the “System Management” screen and then click the “ePRO-BUS” tab. Click the
“Enable” button to allow the LABvault-SD to receive PRO-BUS control commands over your Ethernet network from
a NEXUS, UltraNEXUS, or UltraNEXUS-SDI server. Clicking “Disable” will prevent the LABvault-SD from receiving
ePRO-BUS commands.
NOTE: Any LABvault-SD and NEXUS series server using the ePRO-BUS feature must be assigned a static IP address
and made available for UDP on Port 2000.
“ePRO-BUS” Tab on “System Management” Web Interface Screen
Serial Port Setting
The serial port mode setting, accessed by clicking the “Serial Port” tab on the “System Management” screen, applies to
the bottom serial port on the back panel of the LABvault-SD chassis. “Host” mode allows the LABvault-SD to receive
serial control commands from supported, external devices connected to the bottom serial port. “Camera” mode is not
currently supported. Currently, the LABvault-SD is automatically congured in the “Host” mode.
“Serial Port” Tab on “System Management” Web Interface Screen
Page 12 2018-06-08
Page 17
LABvault-SD
Web Interface
SETTING UP FILE TRANSFER DESTINATION(S)
Easily control where your recorded les are sent by clicking the “Destinations” button and using the “File
Destinations” screen tabs. Recorded les may be automatically or manually transferred to a NEXUS series
server/controller, LEIGHTRONIX streaming VOD Web site, LGX-SVOD, and/or third party server with FTP
capabilities, as outlined below. The settings apply to each recording session until you change them.
NOTE: If no destinations are enabled, the LABvault-SD will record and store your les on its internal hard
drive. Refer to ““Managing Files” on page 20 for instructions on transferring and deleting les off
the internal hard drive.
NEXUS Series Server (NEXUS/UltraNEXUS/UltraNEXUS-SDI)
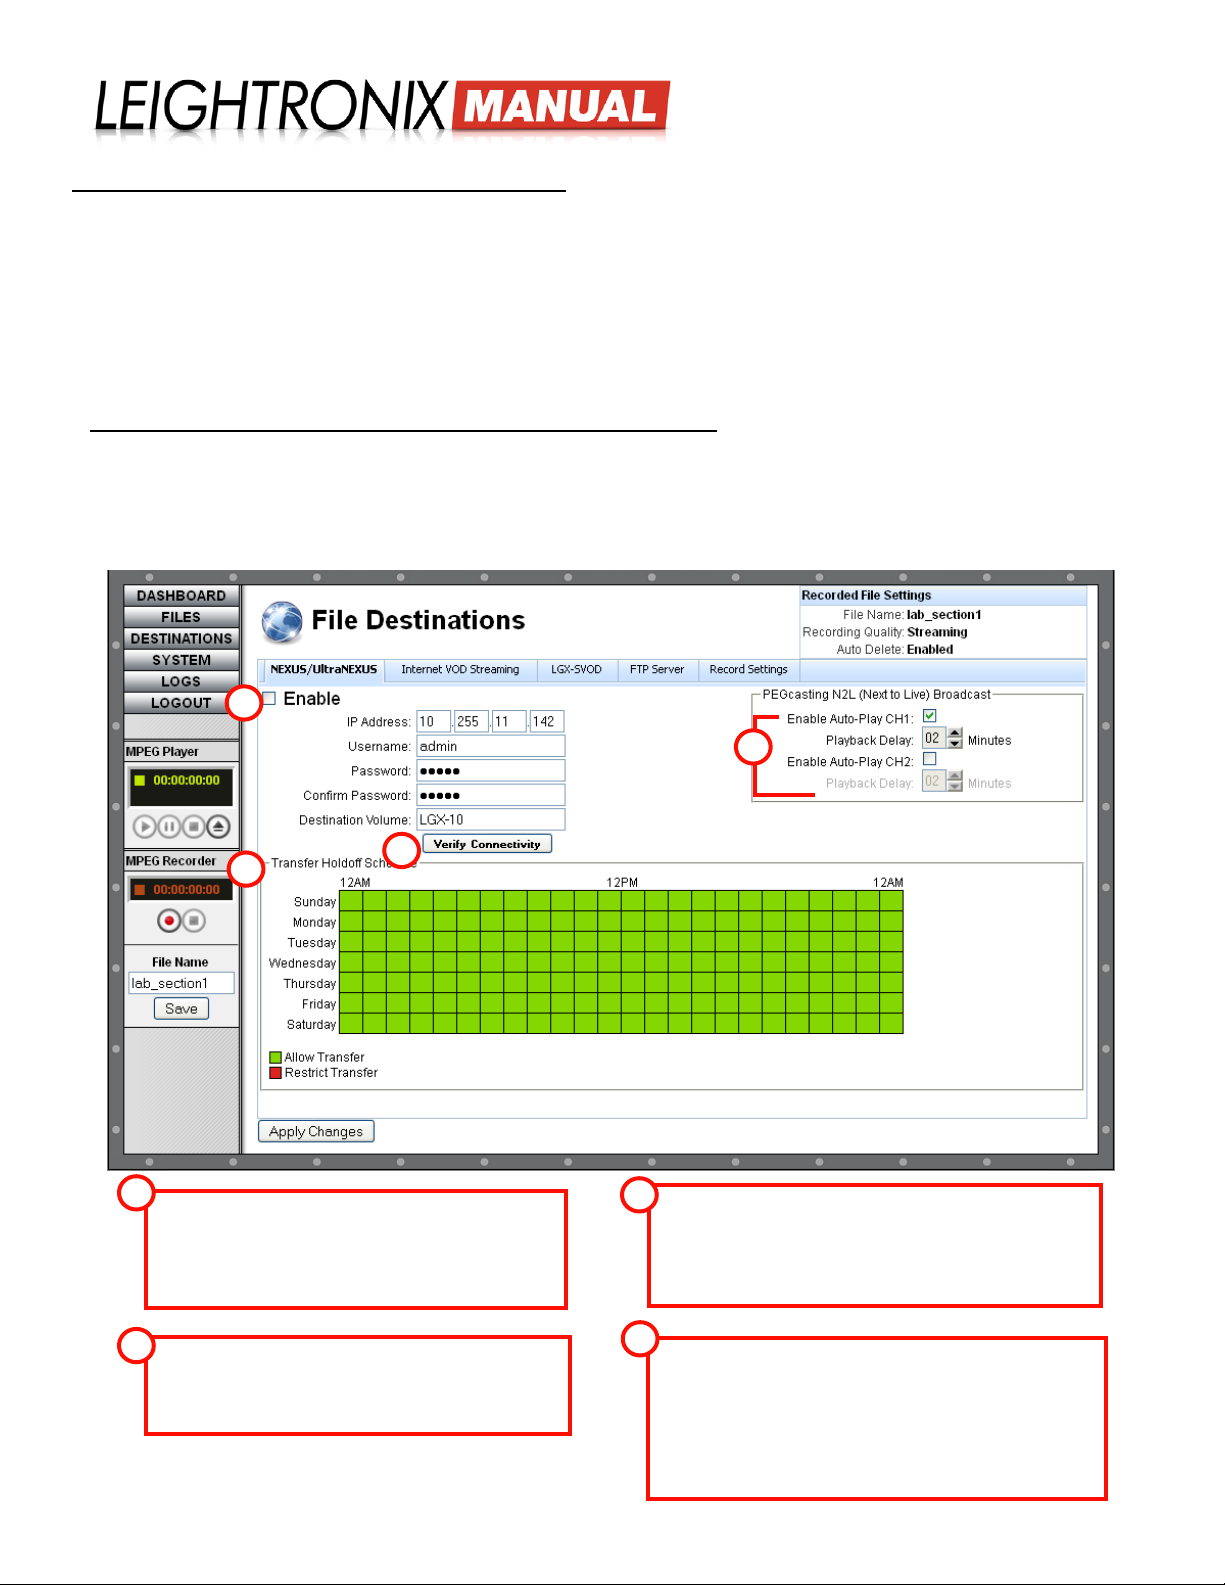
Send your LABvault-SD les to any of the storage volumes attached to your NEXUS series server. Enter your NEXUS
server’s IP address, username, and password along with the name of the volume that you want to store the les. The
names of your storage volumes can be viewed in the WinLGX “Storage Manager” window. Complete the remaining
settings according to the labeled illustration below and click the “Apply Changes” button when you have nished.
“NEXUS/UltraNEXUS” Tab on “File Destinations” Web Interface Screen
1
2
3
1
“Enable”: check to select your NEXUS series system
as an automatic le transfer destination for le
recordings initiated from the LABvault-SD Web interface
as well as the manual le transfer destination for les
recorded from an external control system.
4
3
“Transfer Holdoff Schedule”: 24-hour timeline allows you
to decide which hours of the day your LABvault will transfer
les to your NEXUS series system. Single click each hour
segment on the timeline to toggle transfer capabilities on or
off (green = on, red = off).
2
“Verify Connectivity”: after entering your NEXUS
series unit’s IP address, username, and password, click
the “Verify Connectivity” button to ensure your LABvaultSD can connect to the server.
Page 13 2018-06-08
4
“Enable Auto-Play CH”: if you have selected the
“PEGcasting” option on the “Settings” tab, you may choose to
have the transferring le stream automatically begin playing
on your NEXUS series system’s MPEG Player 1 and/or 2.
Select a “Playback Delay” of 2-60 minutes to specify how
long after the le stream is transferred that it should begin
playing on the selected channel(s).
Page 18
LABvault-SD
Web Interface
LEIGHTRONIX Streaming Video-on-Demand Web Site
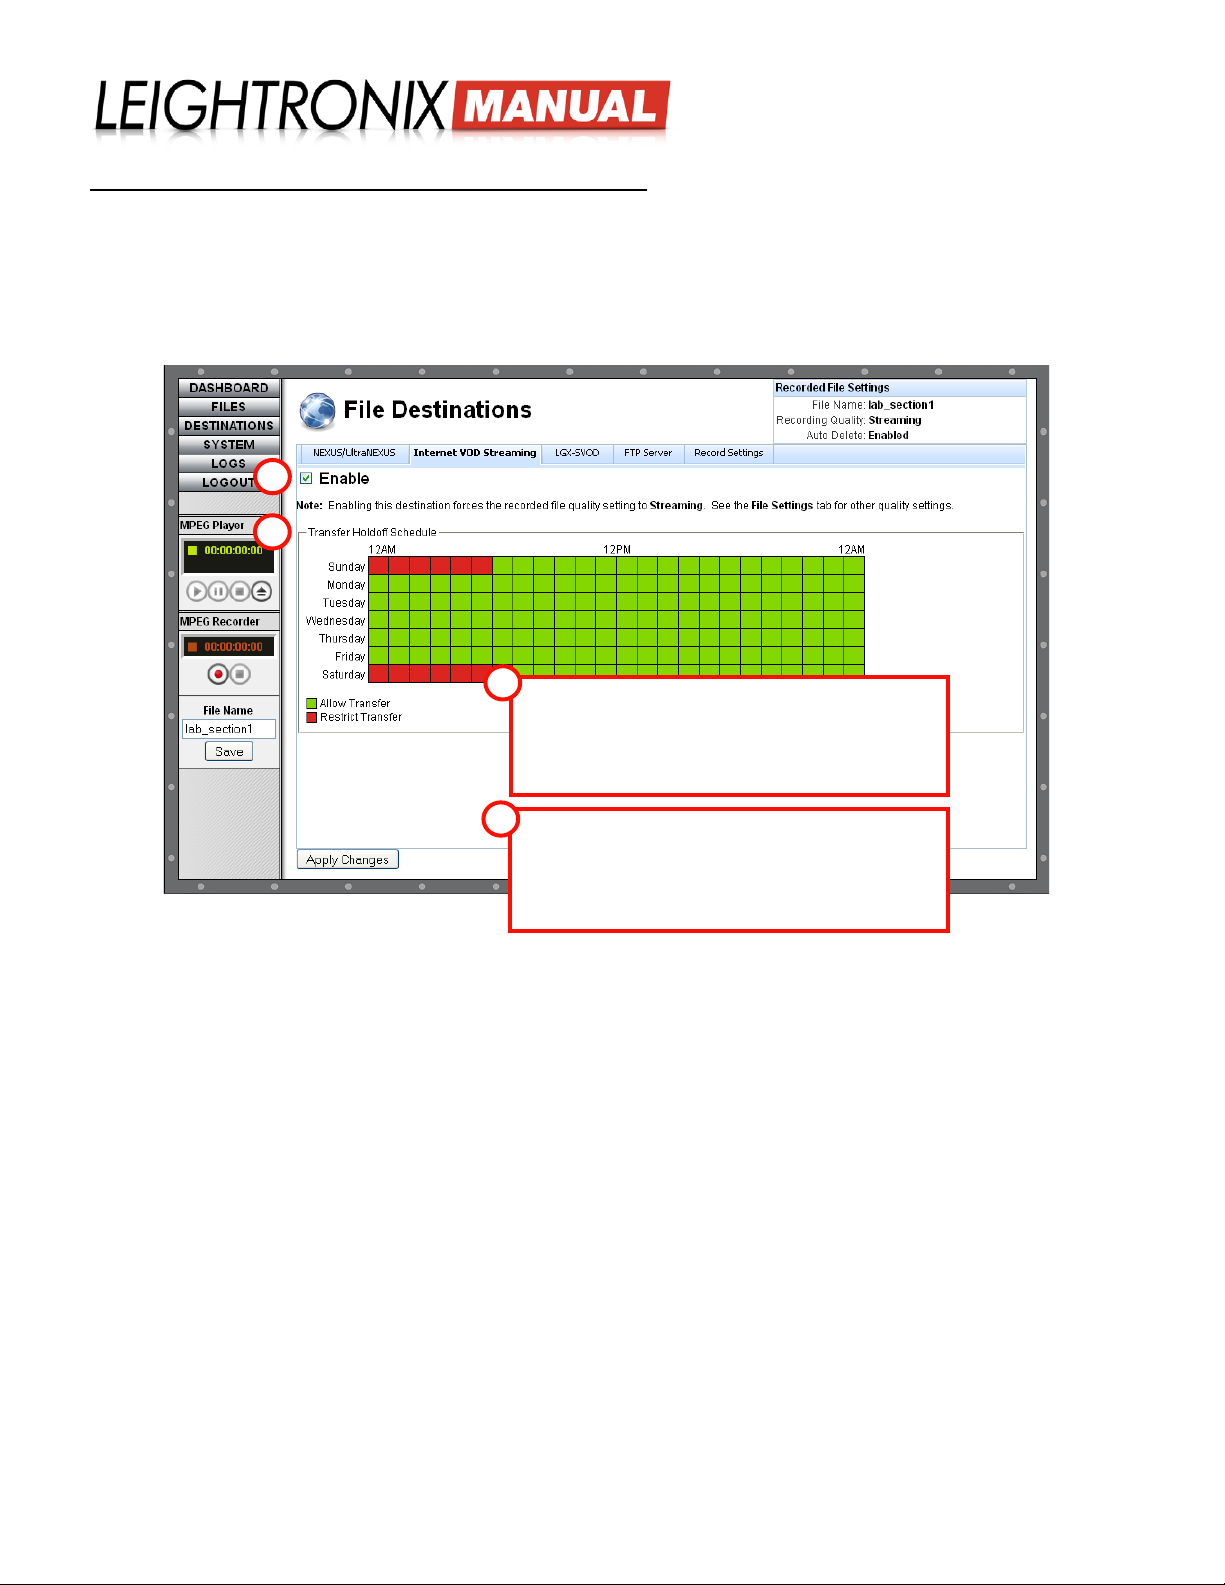
The “Internet VOD Streaming” option transfers les to a LEIGHTRONIX streaming video-on-demand Web site such as
PEG Central. Complete the settings according to the labeled illustration below and click the “Apply Changes” button
when you have nished.
NOTE: If you select “Internet VOD Streaming” as an automatic le transfer destination, your les will be
recorded at a VBR of 1.5-2.5 Mb/s for all enabled le transfer destinations.
“Internet VOD Streaming” Tab on “File Destinations” Web Interface Screen
1
2
1
“Enable”: check to select your LEIGHTRONIX streaming
Web site as an automatic le transfer destination for le
recordings initiated from the LABvault-SD Web interface
as well as the manual le transfer destination for les
recorded from an external control system.
2
“Transfer Holdoff Schedule”: 24-hour timeline allows
you to decide which hours of the day your LABvault will
transfer les to your LEIGHTRONIX streaming Web site.
Single click each hour segment on the timeline to toggle
transfer capabilities on or off (green = on, red = off).
Page 14 2018-06-08
Page 19
LABvault-SD
Web Interface
LGX-SVOD Server
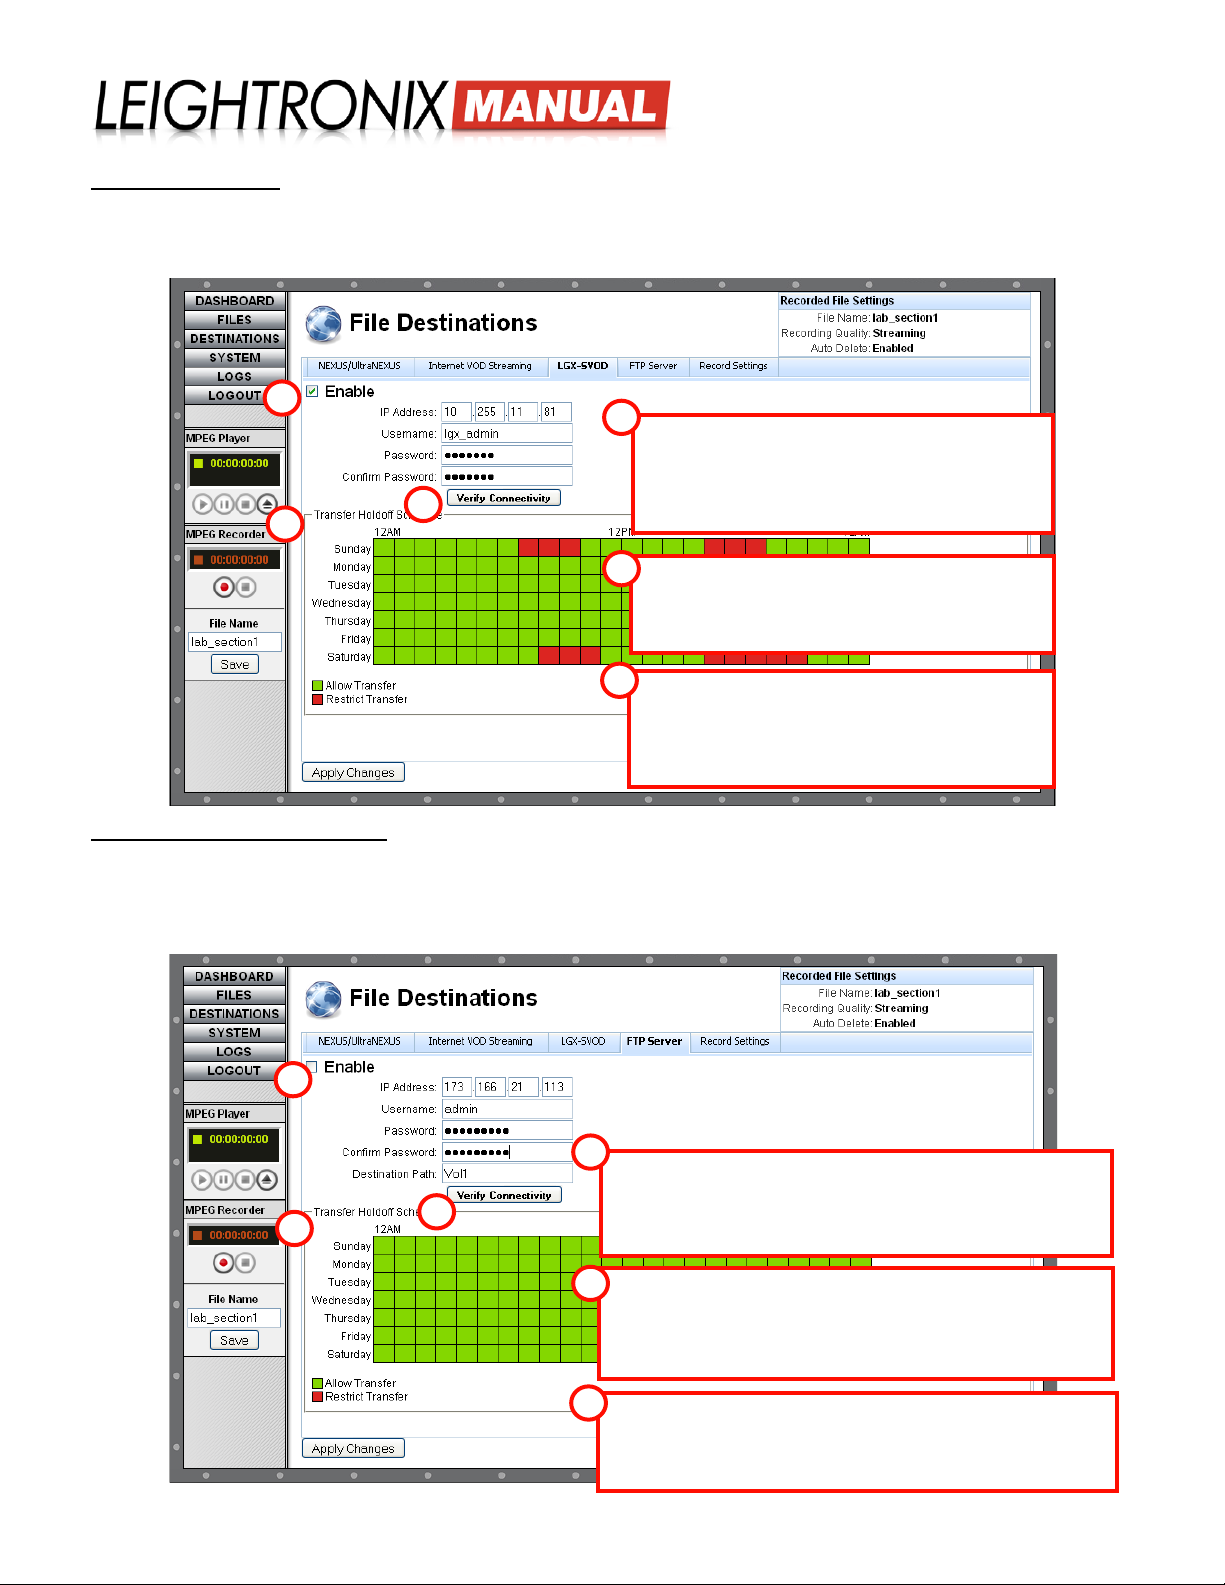
Enter your LGX-SVOD server’s IP address, username, and password and then complete the remaining settings
according to the labeled illustration below and click the “Apply Changes” button when you have nished.
“LGX-SVOD” Tab on “File Destinations” Web Interface Screen
1
1
“Enable”: check to select your LGX-SVOD server as
an automatic le transfer destination for le recordings
initiated from the LABvault-SD Web interface as well
3
2
Server with FTP Capabilities
Push your les to another LEIGHTRONIX or third party video server with FTP capabilities. Enter your server’s IP
address, username, and password along with the name of the destination path. Complete the remaining settings
according to the labeled illustration below.
“FTP Server” Tab on “File Destinations” Web Interface Screen
as the manual le transfer destination for les recorded
from an external control system.
2
“Verify Connectivity”: after entering your LGX-SVOD
server’s IP address, username, and password, click the
“Verify Connectivity” button to ensure your LABvault-SD
can connect to the server.
3
“Transfer Holdoff Schedule”: 24-hour timeline allows
you to decide which hours of the day your LABvault will
transfer les to your LGX-SVOD. Single click each hour
segment on the timeline to toggle transfer capabilities on
or off (green = on, red = off).
1
1
“Enable”: check to select your FTP server as an automatic le
transfer destination for le recordings initiated from the LABvault-SD
3
2
Page 15 2018-06-08
Web interface as well as the manual le transfer destination for les
recorded from an external control system.
“Verify Connectivity”: after entering your FTP server’s IP
2
address, username, password and destination path, click the “Verify
Connectivity” button to ensure your LABvault-SD can connect to the
server.
NOTE: Obtain your destination path from your server’s administrator.
3
“Transfer Holdoff Schedule”: 24-hour timeline allows you to
decidewhich hours of the day your LABvault will transfer les to your
server. Single click each hour segment on the timeline to toggle
transfer capabilities on or off (green = on, red = off).
Page 20
LABvault-SD
Web Interface
RECORDING
Set up your LABvault-SD system for recording with the administrative interface’s record quality and automation settings
and then learn how to use the interface to activate the LABvault-SD’s record and index features through the following
subsections:
NOTE: Record sessions initiated from the external control system will use the le quality setting currently
selected in the Web interface.
Record Settings
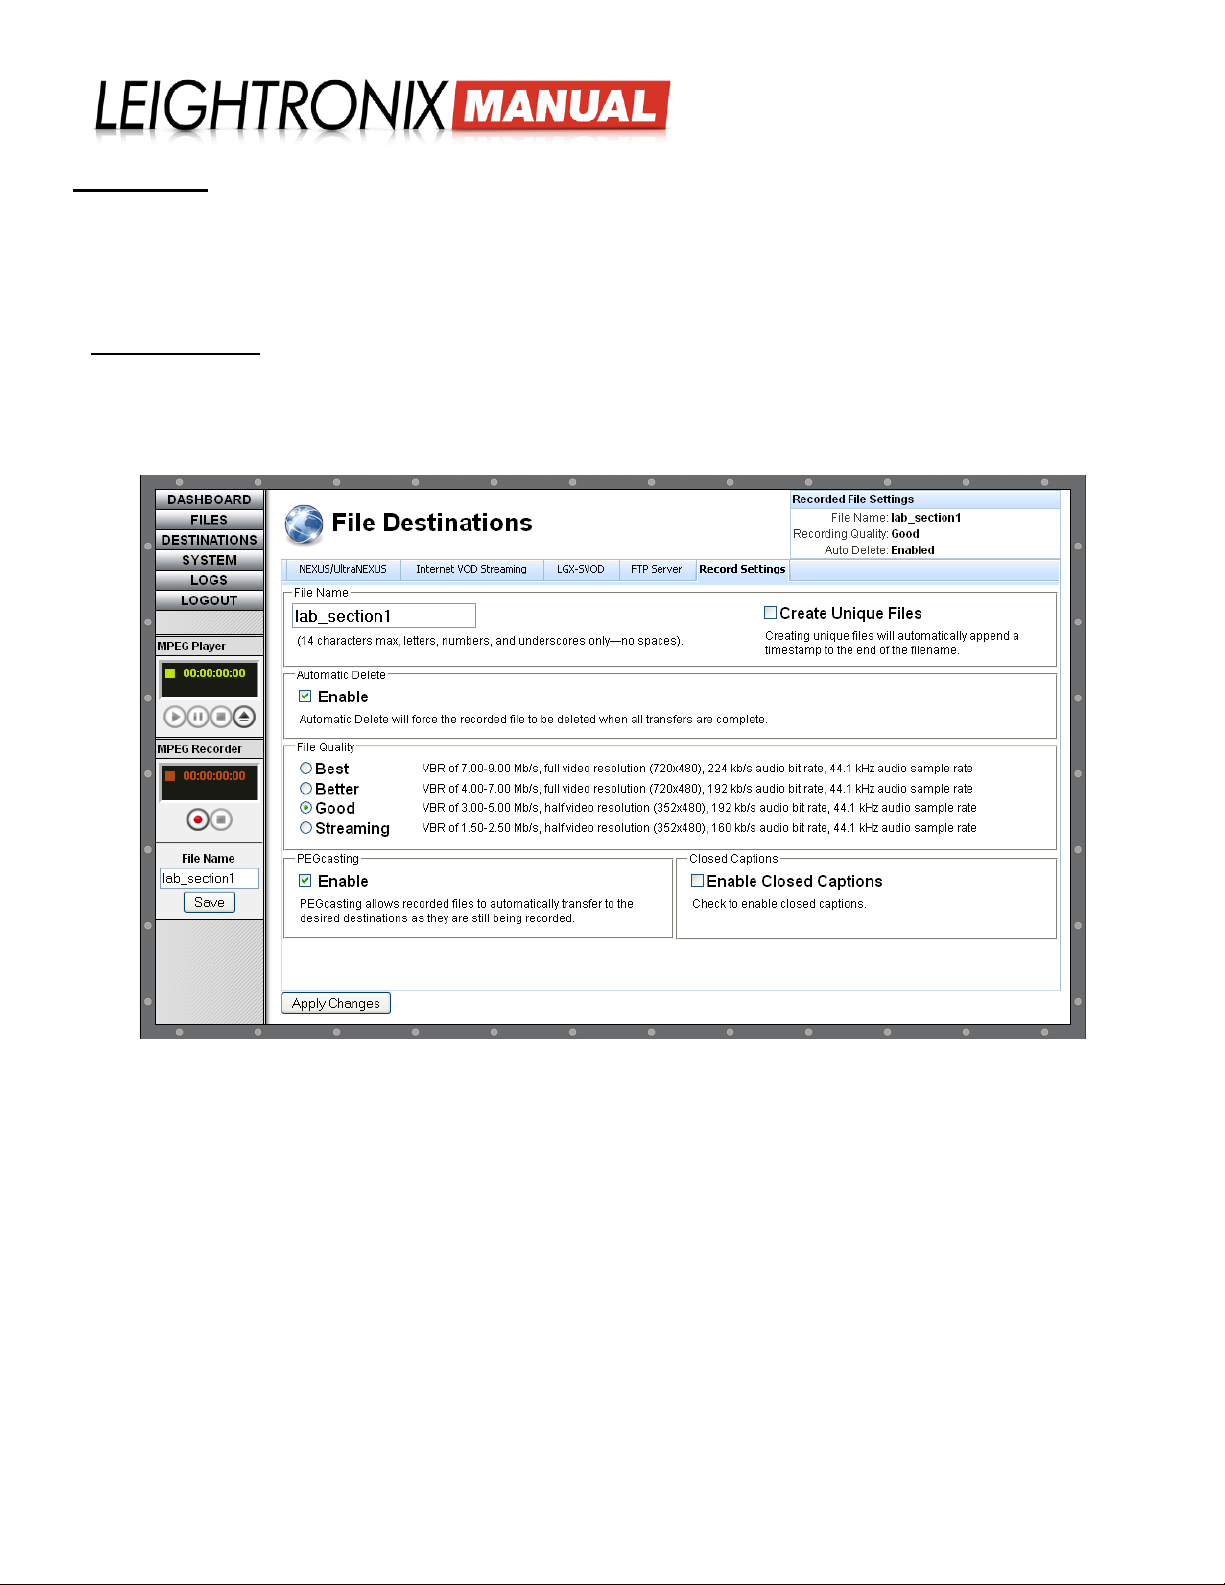
Click the “DESTINATIONS” button and then select the “Record Settings” tab. Enter the following record settings and
then click the “Apply Changes” button to send the changes to your LABvault-SD or “Cancel” to abort. The settings will
be applied to every recording session until they are changed.
“Record Settings” Tab on “File Destinations” Web Interface Screen
• “File Name”: in the “File Name” eld, enter up to 14 characters (letters, numbers, and underscores only—no
spaces). If you use the same lename for more than one recording session, the record date and start time will be
appended to the name of each additional recorded le as “yy/mm/dd-hh/mm/ss” (year/month/day-hours/minutes/
seconds).
NOTE: Alternatively, you may enter the new lename into the “File Name” box in the lefthand column of the
LABvault-SD Web interface. Click the “Save” button to make the change. The new name will appear in
the “File Name” eld on the “File Settings” tab.
• “Create Unique Files”: when this option is selected, the record date and start time will be appended to the lename
of every recorded le as “yy/mm/dd-hh/mm/ss” (year/month/day-hours/minutes/seconds).
• “Automatic Delete”: if you want your recorded les deleted from the LABvault’s internal hard drive after each
transfer, select the “Enable” “Automatic Delete” option. The “Disable” option will cause your recorded les to stay
on the hard drive until you manually delete them from the “File Management” screen (click the “Files” button).
NOTES:
• If no destinations are enabled, the LABvault-SD will record and store your les on its
internal hard drive. Refer to “Managing Files” on page 20 for instructions on transferring
and deleting les off the internal hard drive.
Page 16 2018-06-08
Page 21
LABvault-SD
Web Interface
• Files manually transferred from an external control system will be automatically deleted off
the LABvault-SD’s hard drive, regardless of whether or not the “Automatic Delete” setting
has been selected in the Web interface.
• “File Quality”: select a “File Quality” recording preset for your les. Each recording quality preset represents the
range of bit rates within which the le will be recorded.
NOTE: If you selected a LEIGHTRONIX streaming Web site (“Internet VOD Streaming”) as an automatic
le transfer destination, your les will be recorded at the “Streaming” setting for all selected le
destinations. The “Good,” “Better,” and “Best” le record quality settings will be ignored.
• “PEGcasting”: if you want your LABvault-SD les transferred to your NEXUS series server 15 seconds after the
les begin recording, select the “Enable” “PEGcasting” option. To use the PEGcasting Next to Live autoplay feature
for simulated live broadcasting, you must still complete the “PEGcasting N2L” conguration settings on the “NEXUS/
UltraNEXUS” tab.
• “Closed Captions”: Select the “Enable Closed Captions” option to capture any closed caption data from the source.
Closed captions are hidden in the video signal and decoded for display on televisions with built-in decoders or
televisions connected to external decoders.
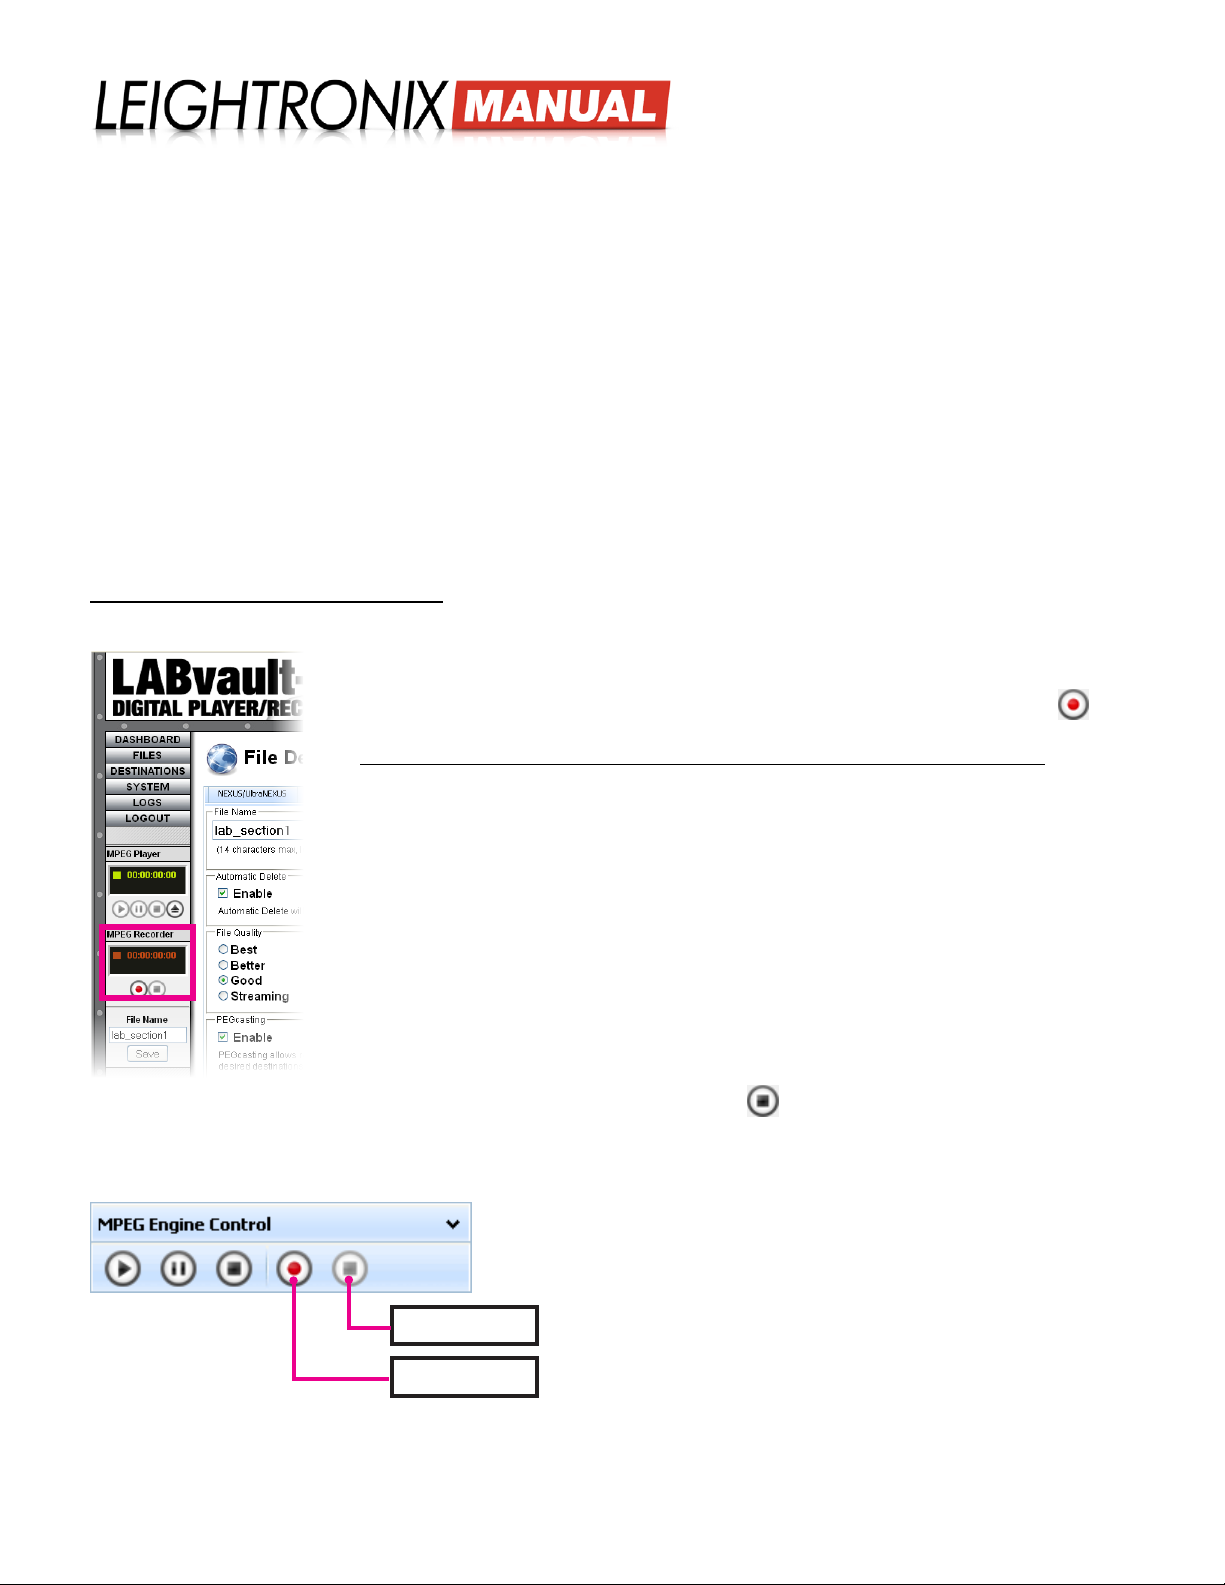
Recording from the Web Interface
Left Column
“MPEG Recorder” Controls
“MPEG Engine Control” Panel
Start/Stop recording and add index points to your les through the LABvault-SD’s Web
interface as follows:
1. From the “MPEG Recorder” panel under the menu buttons or from the “MPEG Engine
Control” panel on the bottom of the “File Management” screen, click the record button
to begin recording.
2. LEIGHTRONIX LGX-SVOD and Internet VOD Streaming Service Users Only: add video
index points for use in PEG Central or other LEIGHTRONIX VOD streaming application.
Index points appear as links next to the published video in the streaming application’s
player window, allowing viewers to quickly move to points of interest within the video.
Either enter a custom name (20 characters maximum) for your index points into
the name eld below the “Stop” record button or leave it blank and the LABvault-
SD will use the current date/time as the name. Each index point also indicates the
hours:minutes:seconds into the video that it marks. When you have chosen your naming
method, click the “Set Index” button to add an index point to the recording le. Create
additional index points at key intervals in the recording with each click of the “Set Index”
button. If a custom name was entered, each additional index point will be assigned the
same custom name until the name eld is reset. To add an index point with a new custom
name, click the “Clear Index” button and then type a new name into the name eld before
clicking the “Set Index” button.
3. To end the recording session, click the stop recording button. If a le destination
was congured and enabled in the Web interface, your recorded le will be automatically
transferred to the destination.
Stop Button
Record Button
Page 17 2018-06-08
Page 22
LABvault-SD
Web Interface
PLAYING FILES
Playback of your recorded les on a connected preview monitor may be initiated from the LABvault-SD web interface as
well as a third party touch screen. To initiate playback of a le from the web interface, use one of the following control
options:
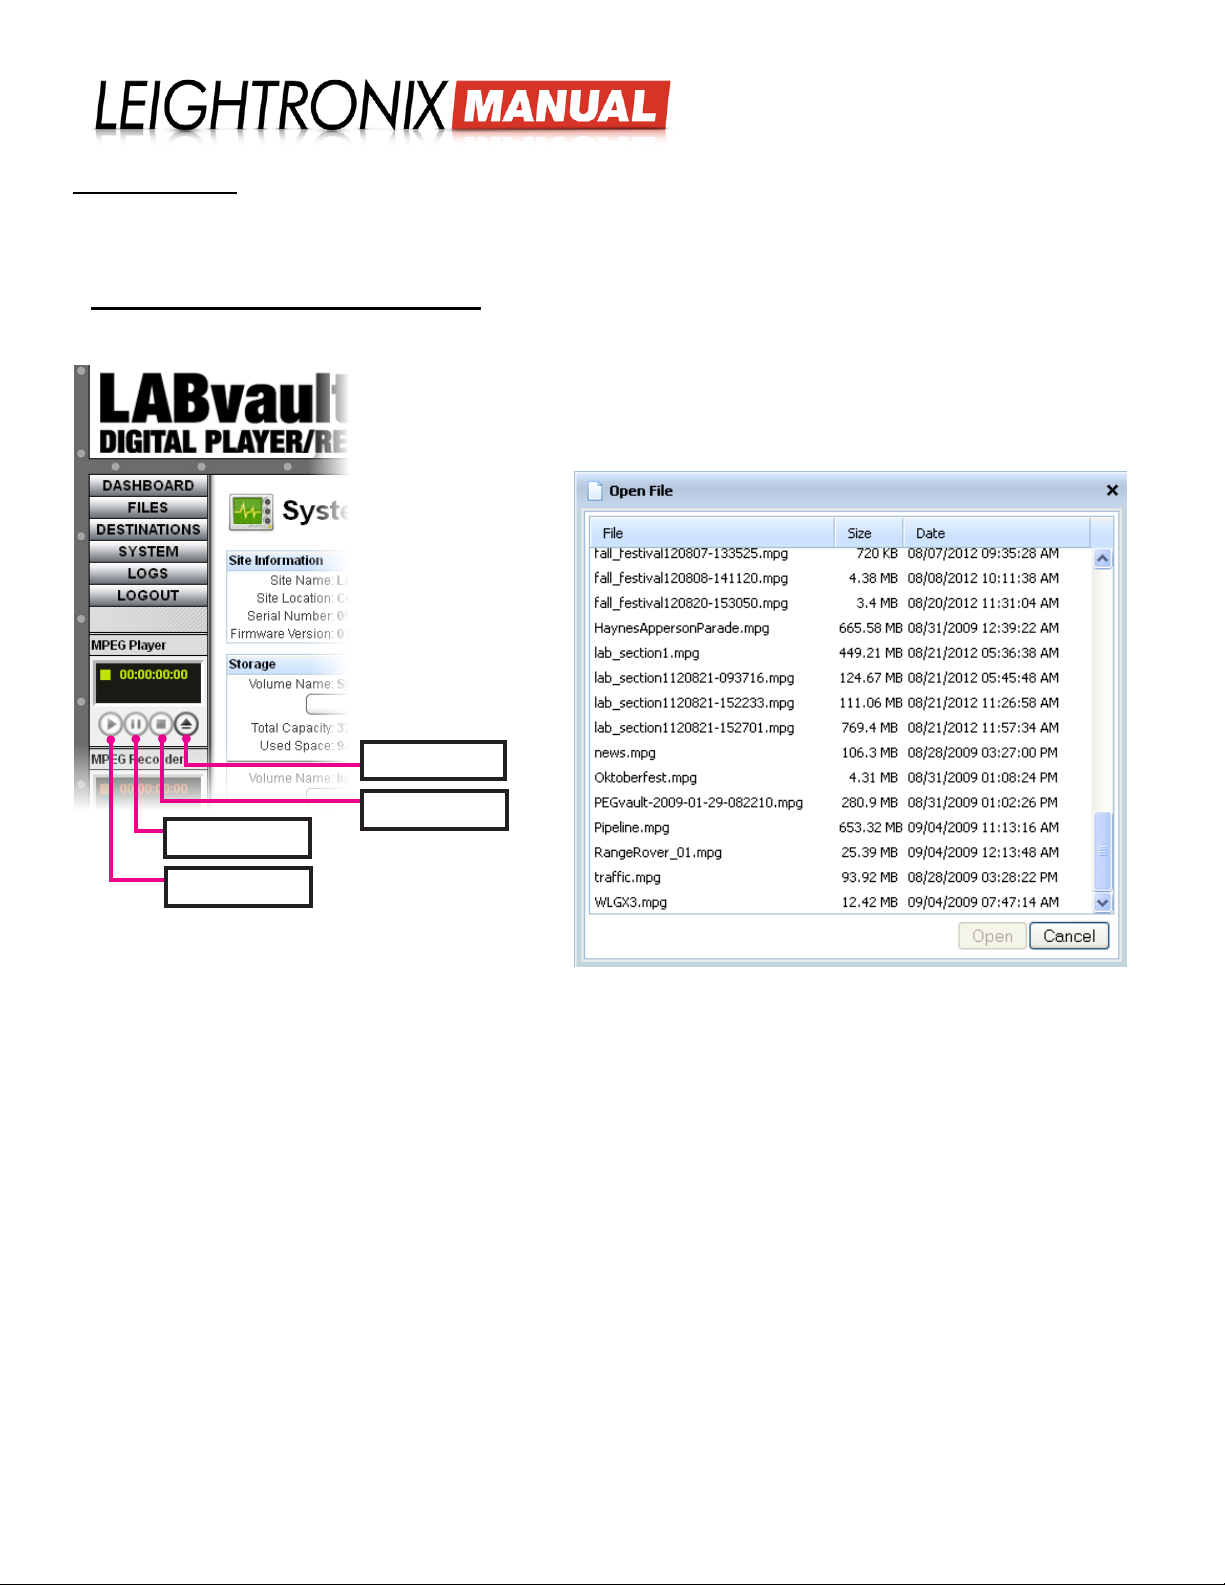
“MPEG Player” Left Column Controls
Left Column
“MPEG Player” Controls
On the left sidebar of the LABvault-SD web interface, you will see the control buttons for
the LABvault-SD’s MPEG player. Perform the following:
1. Click the load button to display the “Open File” popup window. Single click to select
the le you wish to display and click “Open” to load the selection or “Cancel” to
abort.
“Open File” Popup Window
Load Button
Stop Button
Pause Button
Play Button
2. Start playing the le by clicking the play button.
3. You may pause playback by clicking the pause button or stop it completely with the button. The stop button also
unloads the le from the MPEG player.
Page 18 2018-06-08
Page 23
LABvault-SD
Web Interface
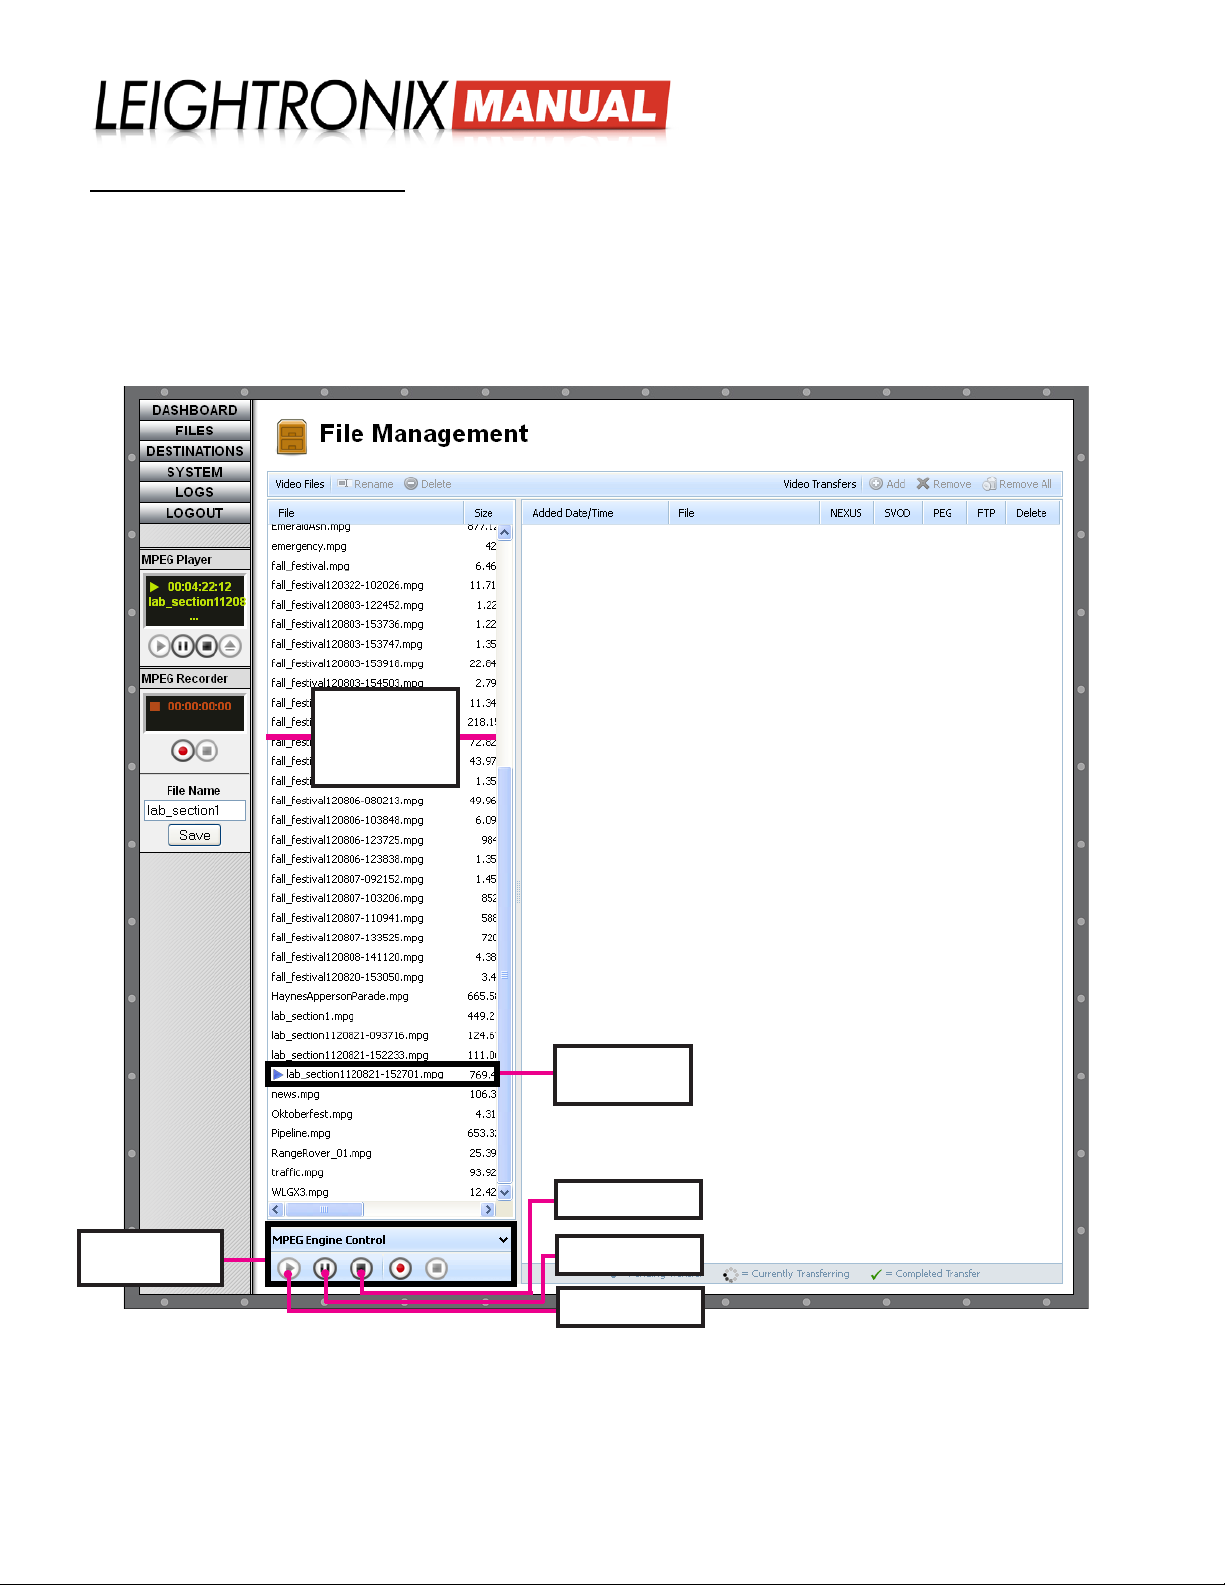
“MPEG Engine Control” Panel
The LABvault-SD’s MPEG player controls are also available on the bottom of the “FILES”/”File Management” screen
in the “MPEG Engine Control” panel. The “MPEG Engine Control” panel playback controls mirror the functionality of
the “MPEG Player” left column controls, so that controls from either panel can be used interchangeably during each
playback session. If a le is playing or paused, its lename will have the corresponding symbol next to it in the lefthand
“File Management” listing. Perform the following:
1. Click the “FILES” menu button to display the “File Management” screen.
“MPEG Engine Control” Panel on “File Management” Screen
“MPEG Engine
Control” Panel
Files on the
LABvault-SD’s
Internal Hard
Drive
Currently
Playing File
Stop Button
Pause Button
Play Button
2. From the lefthand listing of les on the LABvault-SD’s internal hard drive, single click to select the le you wish to
display.
3. From the “MPEG Engine Control” panel, start playing the le by clicking the play button.
4. You may pause playback by clicking the pause button or stop it completely with the stop button. The stop button
also unloads the le from the MPEG player.
Page 19 2018-06-08
Page 24
LABvault-SD
Web Interface
MANAGING FILES
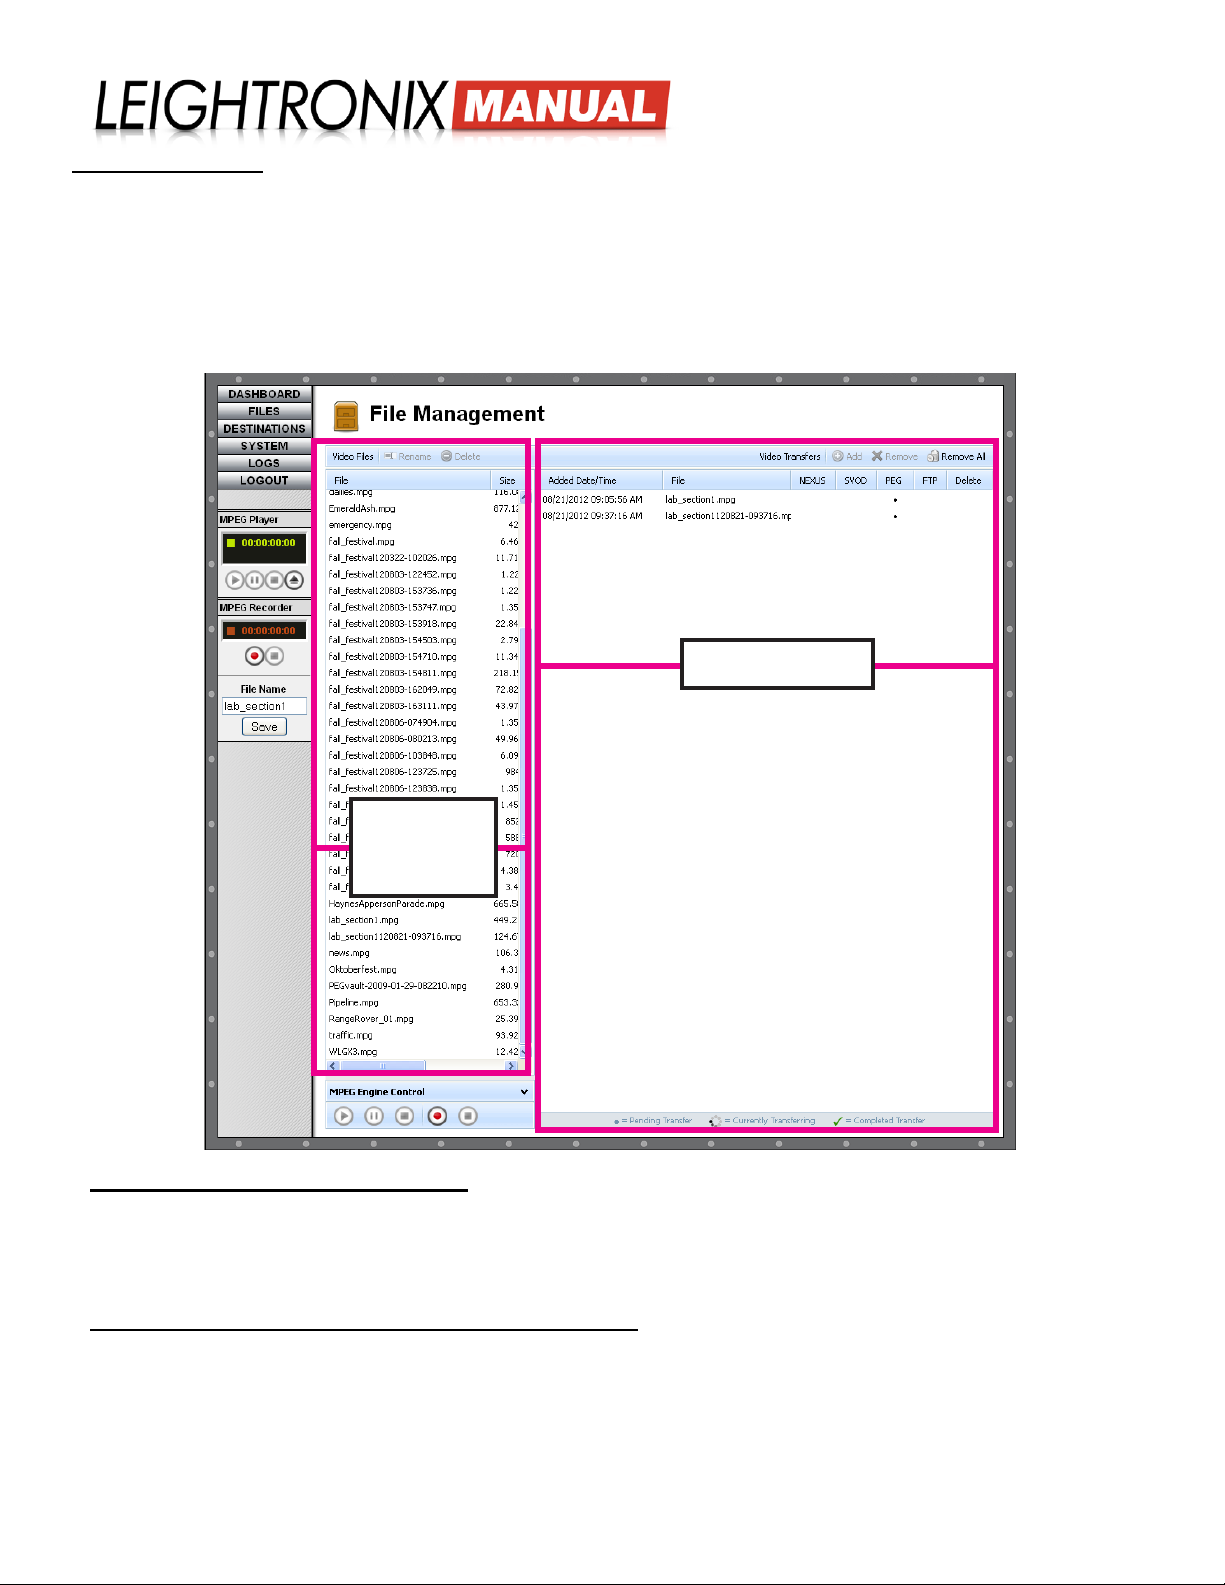
The “File Management” screen displays a recorded le listing and transfer queue, allowing you to
manually transfer les, stop le transfers, and manage any les stored on the LABvault-SD’s internal
hard drive. Recorded les are stored on the LABvault’s internal hard drive if the “Automatic Delete”
record le setting has been disabled, giving you the option to rename, delete, and manually transfer
les from the “File Management” screen. Click the “Files” menu button to display the screen and then
perform any of the following steps, as needed:
“File Management” Web Interface Screen
File Transfer Queue
Files on the
LABvault-SD’s
Internal Hard
Drive
Rename Files on Internal Hard Drive
Under the “Video Files” listing, either single click on the le you would like to rename and then click the “Rename”
button or just right click on the le and select “Rename” from the menu that appears. In the “Rename File” window that
appears, enter a new lename of up to 27 alphanumeric characters, no spaces, and click “Ok” to accept the change or
“Cancel” to abort.
Delete Files from Internal Hard Drive/Transfer Queue
• Hard Drive: under the “Video Files” listing, either single click on the le you would like to delete and then click
the “Delete” button or just right click on the le and select “Delete File” from the pop-up menu. Click “Yes” when
prompted to delete the le or “No” to abort.
• Transfer Queue: to delete a single le under “Video Transfers,” either single click on the le you would like to
delete and then click the “Remove” button or just right click on the le and select “Remove Transfer” from the
pop-up menu. To remove all les from the transfer catalog, either single click on a le and then click the “Remove
Page 20 2018-06-08
Page 25
All” button or just right click on the le and select “Remove All Transfers” from the pop-up menu. Click “Yes” when
prompted to delete the le(s) or “No” to abort.
Manually Transfer Recorded Files
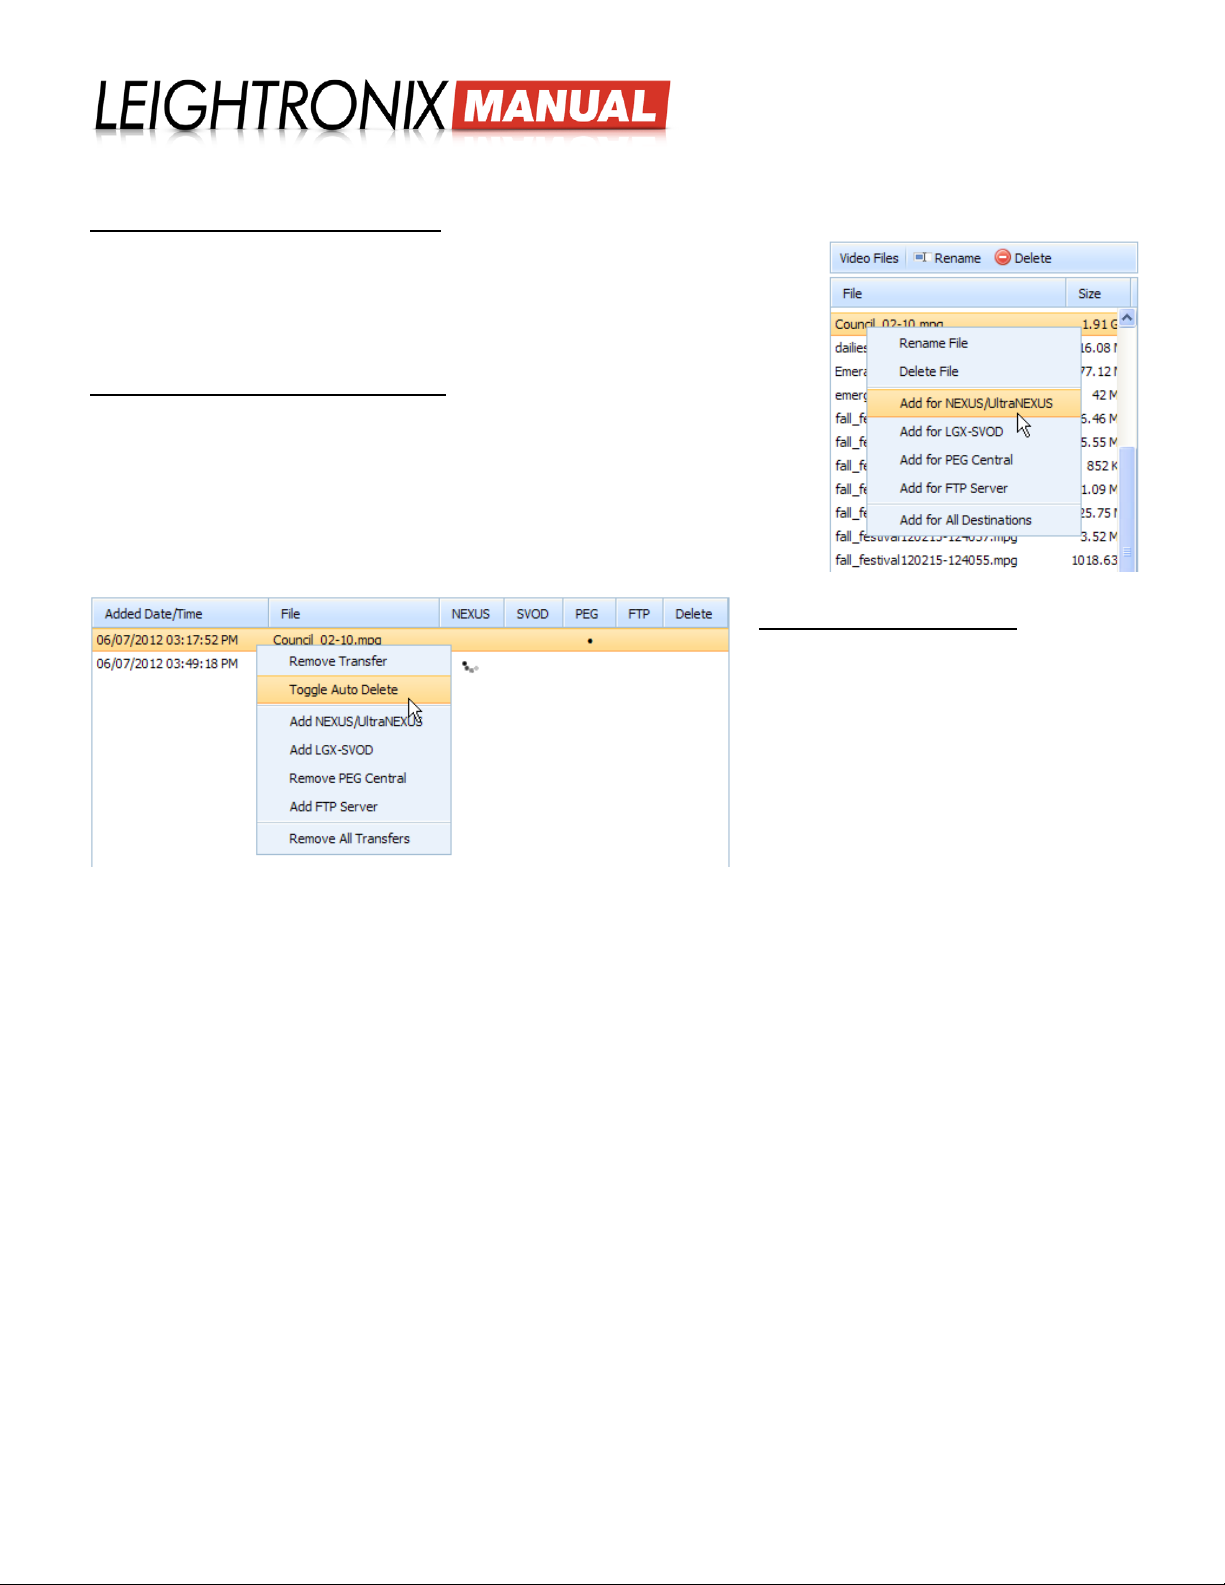
Popup Menu for “Video Files” Listing
on the “File Management” Screen
Under the “Video Files” listing, either single click on the le you would like
to transfer and click the “Add” button to transfer the le to your congured
destination(s) or right click on the le and select a le transfer destination(s) from
the pop-up menu. Ensure you have entered the conguration settings for the
selected destination(s) on the “File Destinations” screen.
Change File Transfer Destinations
Change the destination of any le in the “Video Transfers” queue by right clicking
on the le and selecting one of the add/remove options in the popup menu. The
remove options de-select current le transfer destinations, while the add options
transfer the le to the corresponding destinations. Ensure you have entered the
conguration settings for the selected destination(s) on the “File Destinations”
screen.
Popup Menu for “Video Transfers” Listing on the “File Management” Screen
Enable/Disable Auto Delete
Use the “Toggle Auto Delete” option to turn
“Delete” on and off for the selected le.
LABvault-SD
Web Interface
Page 21 2018-06-08
Page 26
LABvault-SD
Web Interface
CHECKING LOG FILES
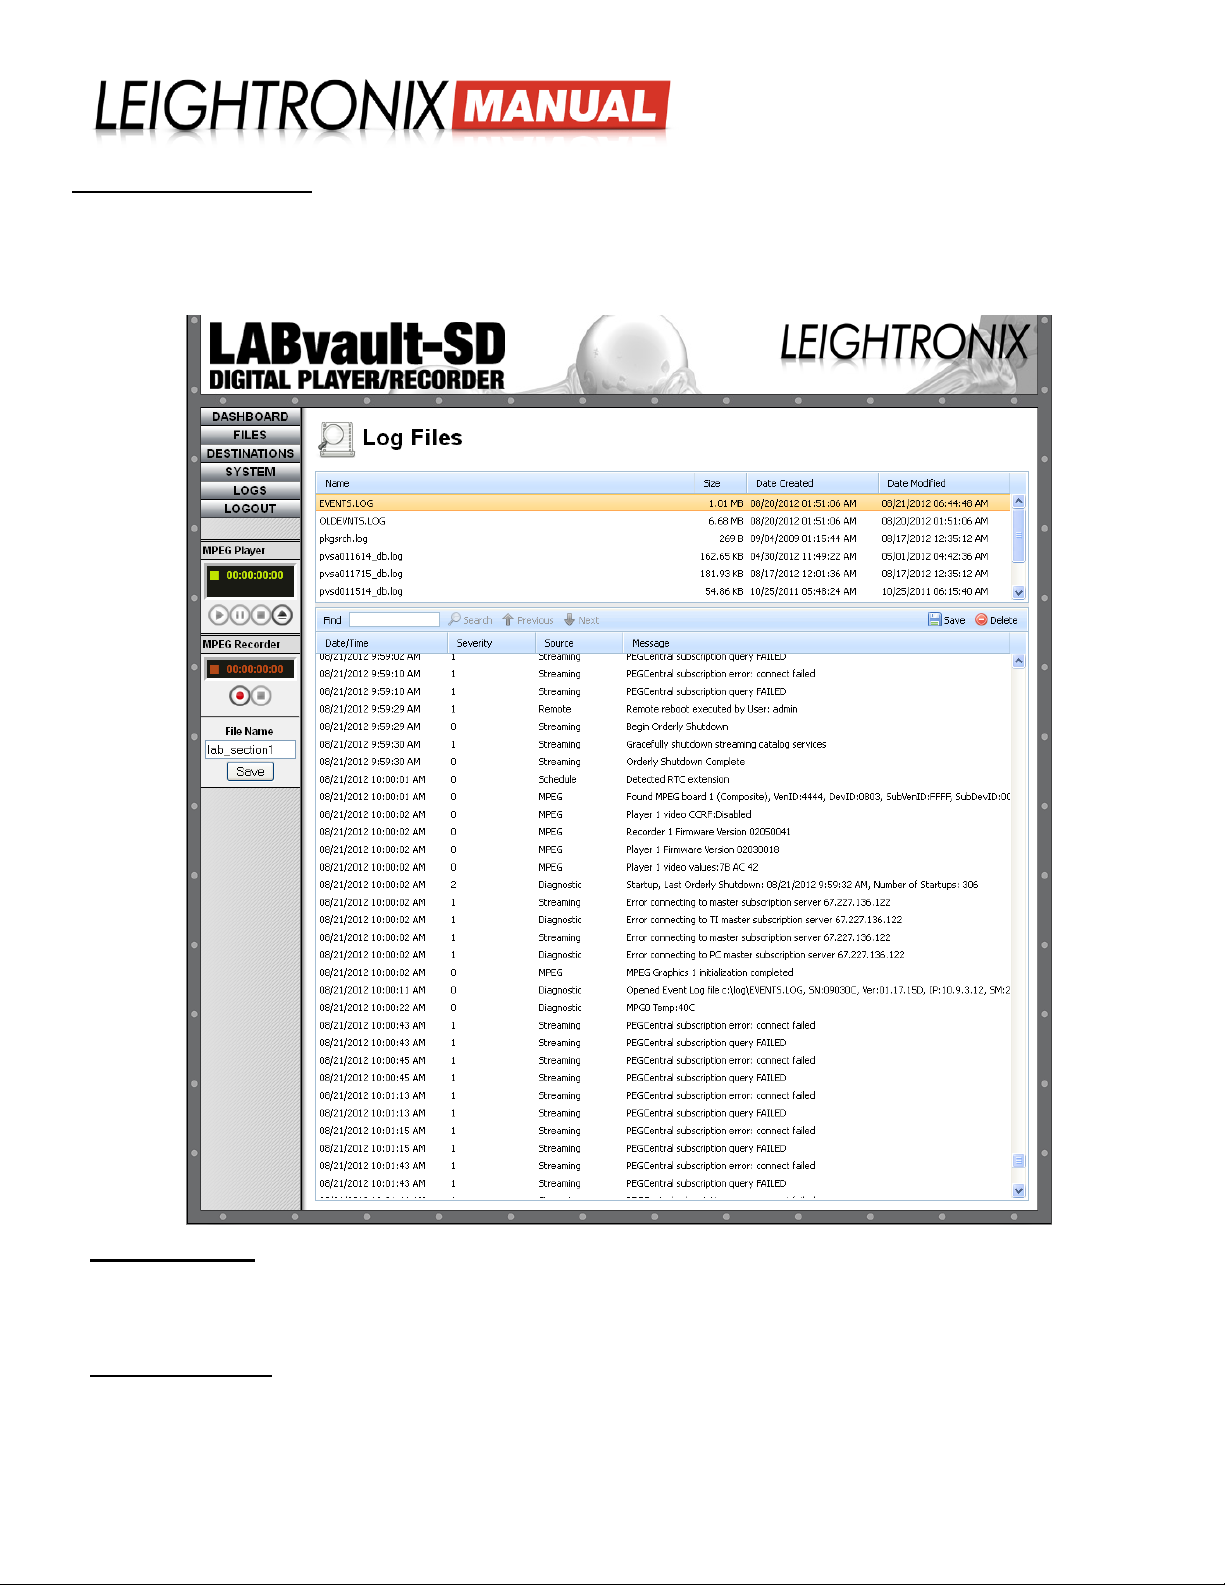
The LABvault-SD keeps track of everything done to or by it in internal log les which are accessible
from the Web interface. Click the “LOGS” menu button to display the list of current LABvault-SD logs
on the “Log Files” screen. Perform any of the following:
“EVENTS.LOG” Selected on “Log Files” Web Interface Screen
Open a Log File
From the top panel on the “Log Files” screen, single click on the desired log le to select it and then click the “Save”
button to display an open/save le dialog box. Either open or save the selected log le on your computer or network as
a .txt or Excel® le.
Search a Log File
Search for specic entries within either of the event or rmware logs. From the top panel on the “Log Files” screen,
single click the desired log le. Enter your search term into the “Find” box and click the “Search” button to lter out any
entries not containing the search term. Use the “Previous” and “Next” buttons to move up and down between entries in
the log le.
Page 22 2018-06-08
Page 27
LABvault-SD
Web Interface
Delete a Log File
From the top panel on the “Log Files” screen, single click the desired log le to select it and then click the “Delete”
button. A popup box will appear, asking whether or not you wish to delete the le. Click “Yes” to delete or “No” to abort.
The types of LABvault-SD log les are as follows:
• Event Logs: the event logs track LABvault-SD operations, including recording sessions, le transfers, and
LABvault-SD status. Single click either “EVENTS.LOG” to select the most current le of LABvault-SD actions or
“OLDEVNTS.LOG” to view archived LABvault actions. When selected, both event logs display the screen shown
in the “EVENTS.LOG” illustration on the previous page. The event logs provide a description of each action under
“Message,” along with the action’s date and time, severity, and type (“Source”).
The LABvault will continually write to the “EVENTS.LOG” le until it reaches 7 MB. Once “EVENTS.LOG” reaches
7 MB, the LABvault-SD will rename it to “OLDEVNTS.LOG” (deleting the previous “OLDEVNTS.LOG”) and then
display a new “EVENTS.LOG” on the “Log Files” screen. This ongoing cycle ensures that recent events are always
logged.
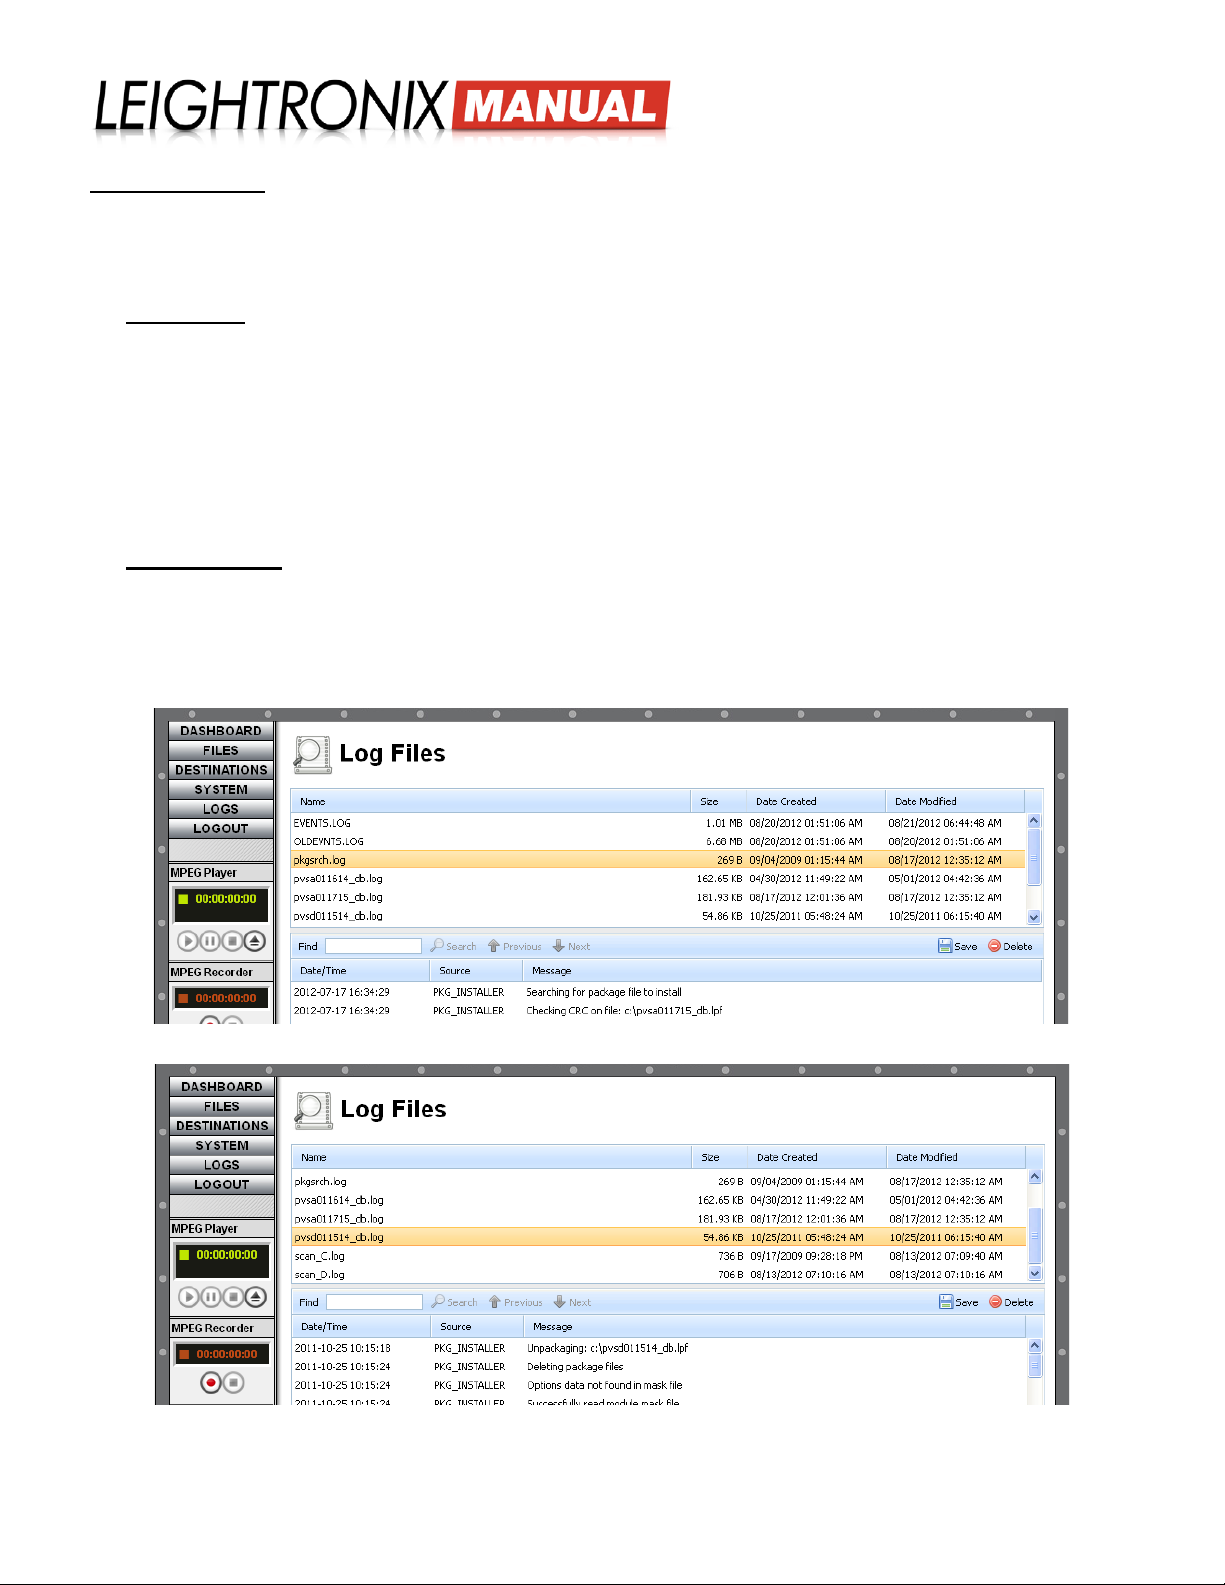
• Firmware Logs: the LABvault-SD creates log les that specically track rmware installations. The “pkgsrch.
log” le veries whether the LABvault-SD rmware le has been uploaded onto your LABvault, while the
“pvsdxxxxxx_full.log” records information about the actual installation of rmware on the LABvault. Separate
“pkgsrch.log” and “pvsdxxxxxx_full.log” rmware log les are created each time you perform a LABvault-SD
rmware update. Previous rmware log les are not overwritten when new rmware updates are performed.
“pkgsrch.log” Selected on “Log Files” Web Interface Screen
“pvsdxxxxxx_full.log” Selected on “Log Files” Web Interface Screen
Page 23 2018-06-08
Page 28
LABvault-SD
Web Interface
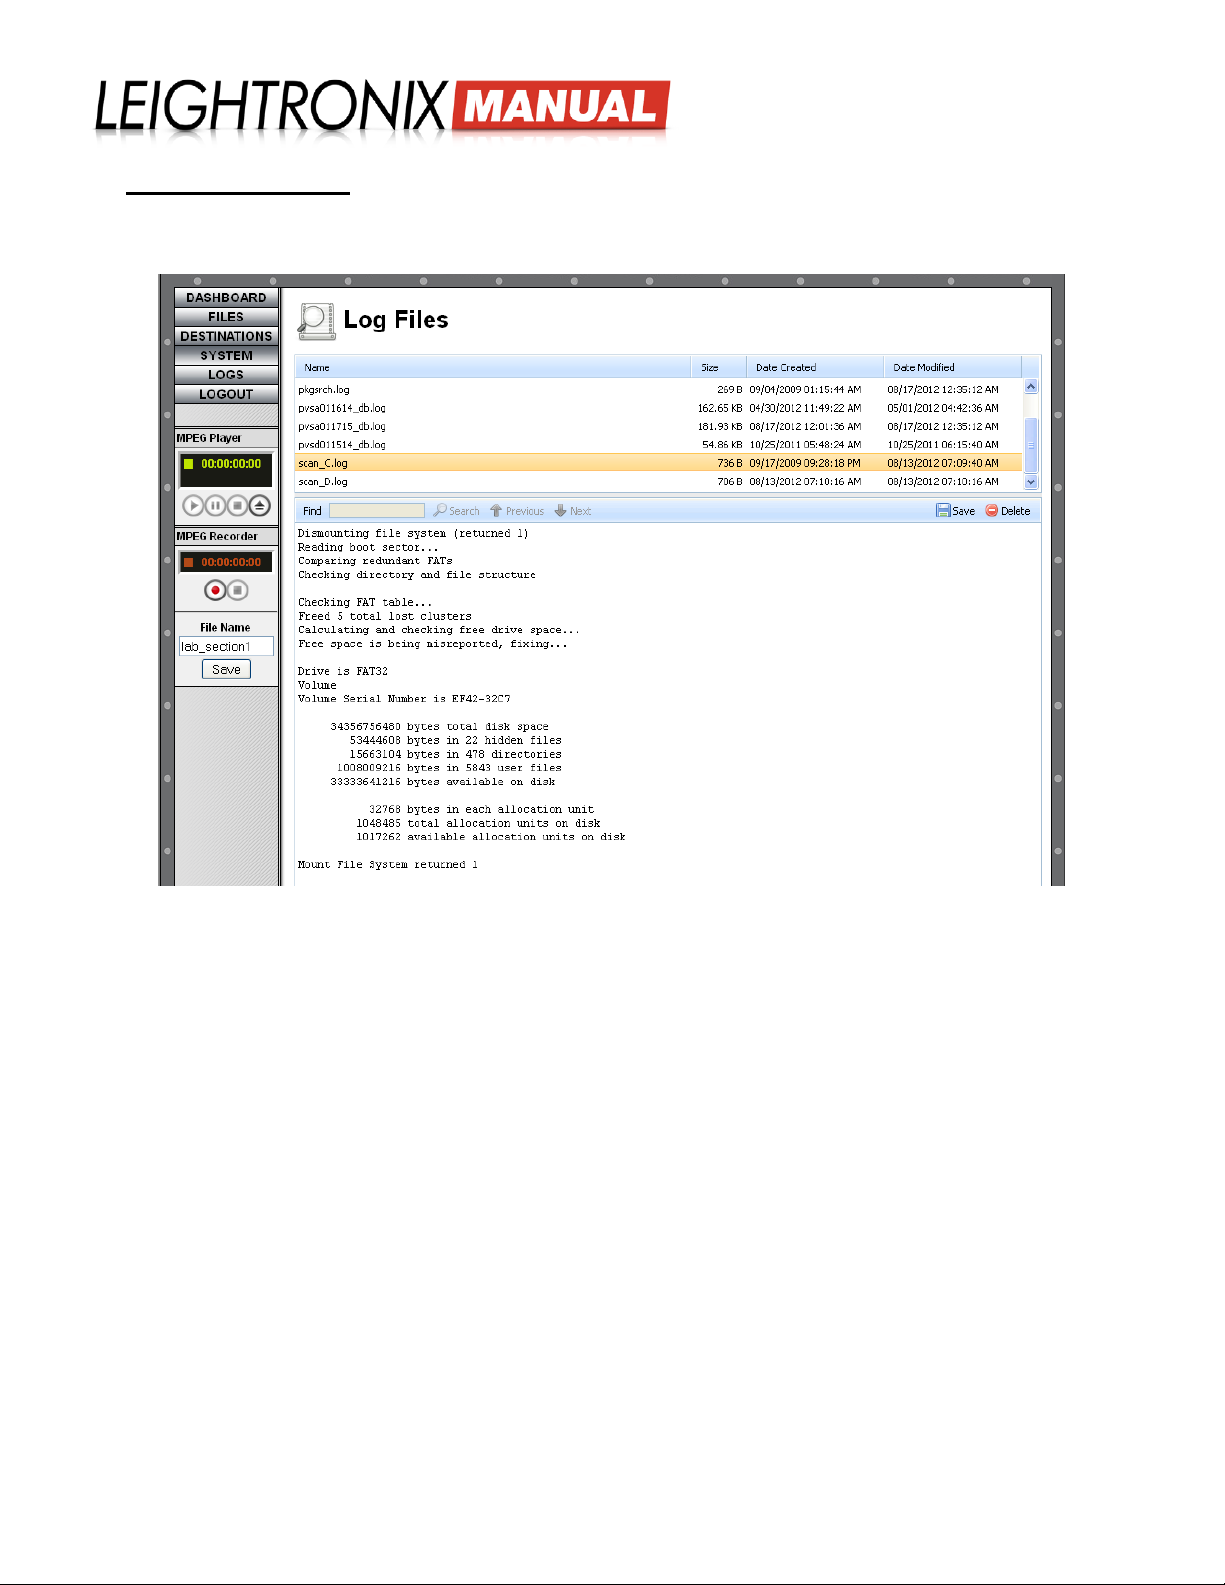
• Disk Diagnostics Log: the “scan_C.log” le displays information from the most recent LABvault-SD hard drive
scan performed with the “Disk Diagnostics” utility. The “scan_C.log” le is automatically overwritten each time you
run a drive scan.
“scan_C.log” Selected on “Log Files” Web Interface Screen
Page 24 2018-06-08
Page 29
LABvault-SD
Web Interface
MAINTAINING THE LABVAULT-SD
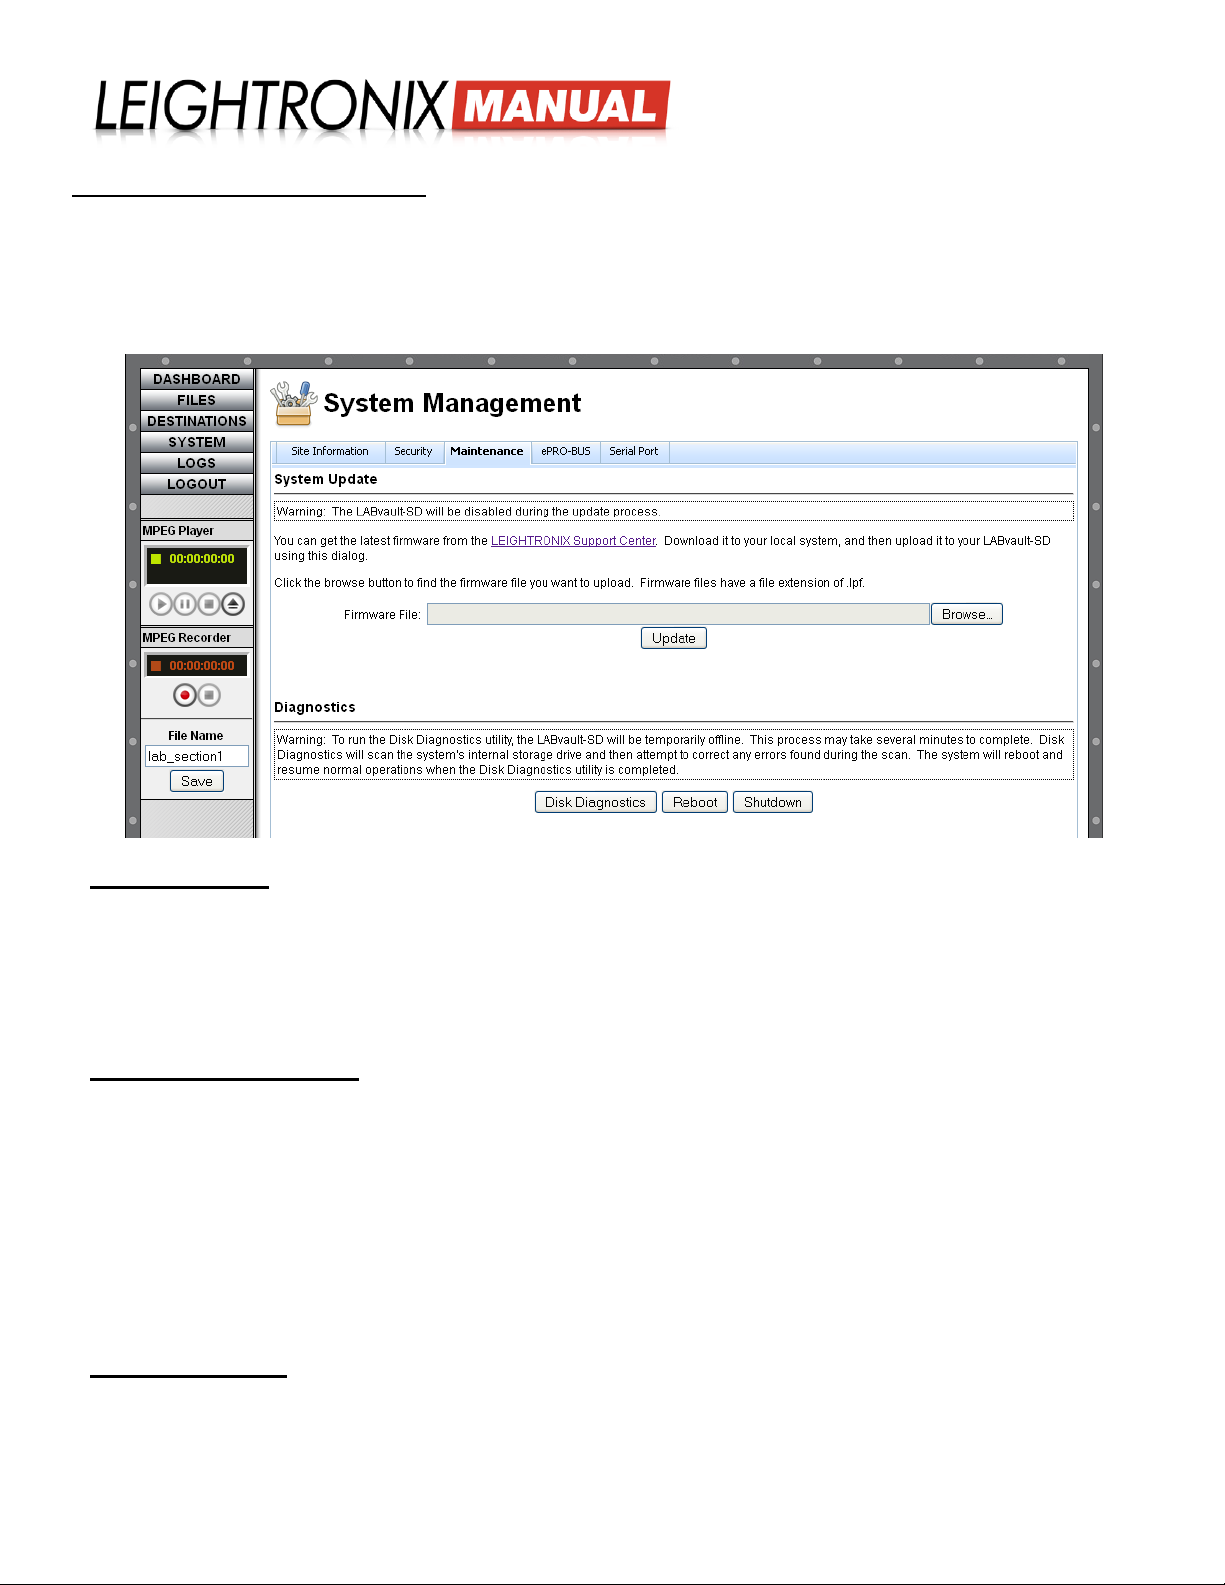
The administrative interface provides a “Maintenance” tab screen under “System Management” to help you easily keep
your LABvault-SD at peak performance. Take advantage of the no-charge rmware le updates to ensure your LABvaultSD system has the latest features and enhancements. Also, safeguard any recorded les and data on your LABvault-
SD’s internal hard drive by regularly running the disk diagnostics utility with the click of a button. Refer to the subsections
below for more details.
“Maintenance” Tab on “System Management” Web Interface Screen
Update Firmware
LEIGHTRONIX places the most current LABvault-SD rmware les on the LEIGHTRONIX Support Center Web
site. Save the update les to an accessible directory on your computer or network.
Once you have downloaded the LABvault-SD rmware update le from the Support Center, open the LABvault’s Web
interface and click the “SYSTEM” menu button. Select the “Maintenance” tab and use the “Browse” button to navigate
to the saved location of the rmware le. Click the “Update” button to download and install the rmware le onto your
LABvault-SD.
Check Internal Hard Drive
The LABvault-SD disk diagnostics feature automatically xes many common File Allocation Table (FAT) errors that may
impair or cause data loss on your LABvault’s internal hard drive. LEIGHTRONIX recommends using the feature on a
monthly basis to ensure optimal drive performance as well as any time you discover le/drive errors in your log les or
notice drive performance issues due to improper system shutdown or rmware changes.
NOTE: The disk diagnostics process does not x physical degradation of the hard drive. Contact LEIGHTRONIX
Technical Support for further information on servicing your LABvault’s internal hard drive.
To run the disk diagnostics feature, click the “SYSTEM” button to display the “System Management” screen and then
click the “Maintenance” tab. Click the “Disk Diagnostics” button and then select the popup menu’s “Yes” option to
perform the disk check process. When the diagnosis has been completed, a log le describing any errors discovered
and actions performed will be added to the “Log Files” page on your LABvault’s Web interface.
Reboot/Shut Down
Click the “SYSTEM” button to display the “System Management” screen and then click the “Maintenance” tab. Click
“Reboot” to power your LABvault-SD off and then back on or click the “Shutdown” button to only power off your
LABvault.
Page 25 2018-06-08
Page 30
LABvault-SD
Control Commands
CONTROL COMMANDS
The LABvault-SD is meant to be locally operated from a compatible, third party control system
connected either directly to the LABvault via an RS-232 serial cable or through your network. This
section provides the control commands needed to program your touch screen to operate your
LABvault-SD. For even greater versatility, your programmer can create a Web interface for Internet
Explorer that duplicates your touch screen interface.
Touch Screen Interface: RS-232 SERIAL OR TELNET
NOTES:
• Serial communication is 115200, N, 8, 1.
• The remote control port is standard RS-232 DTE (connection to a standard PC DB-9 would
be via DB9F to DB9F NULL cable).
• Telnet has a 5 minute session timeout after no activity. Serial connections do not have a
timeout.
• A LABvault-SD with a serially connected external control system will boot logged in. A
LABvault-SD with an external control system connected via Telnet requires the user to log in
again on a reboot.
• The prompt when logged in is: “LABVAULT>.” The prompt when not logged in is: “>.”
• Multiple Telnet sessions and a serial session are independent of each other.
• All commands and responses are terminated with <CR><LF>.
• The destination server for the FINALIZE command is congured via the LABvault-SD Web
interface.
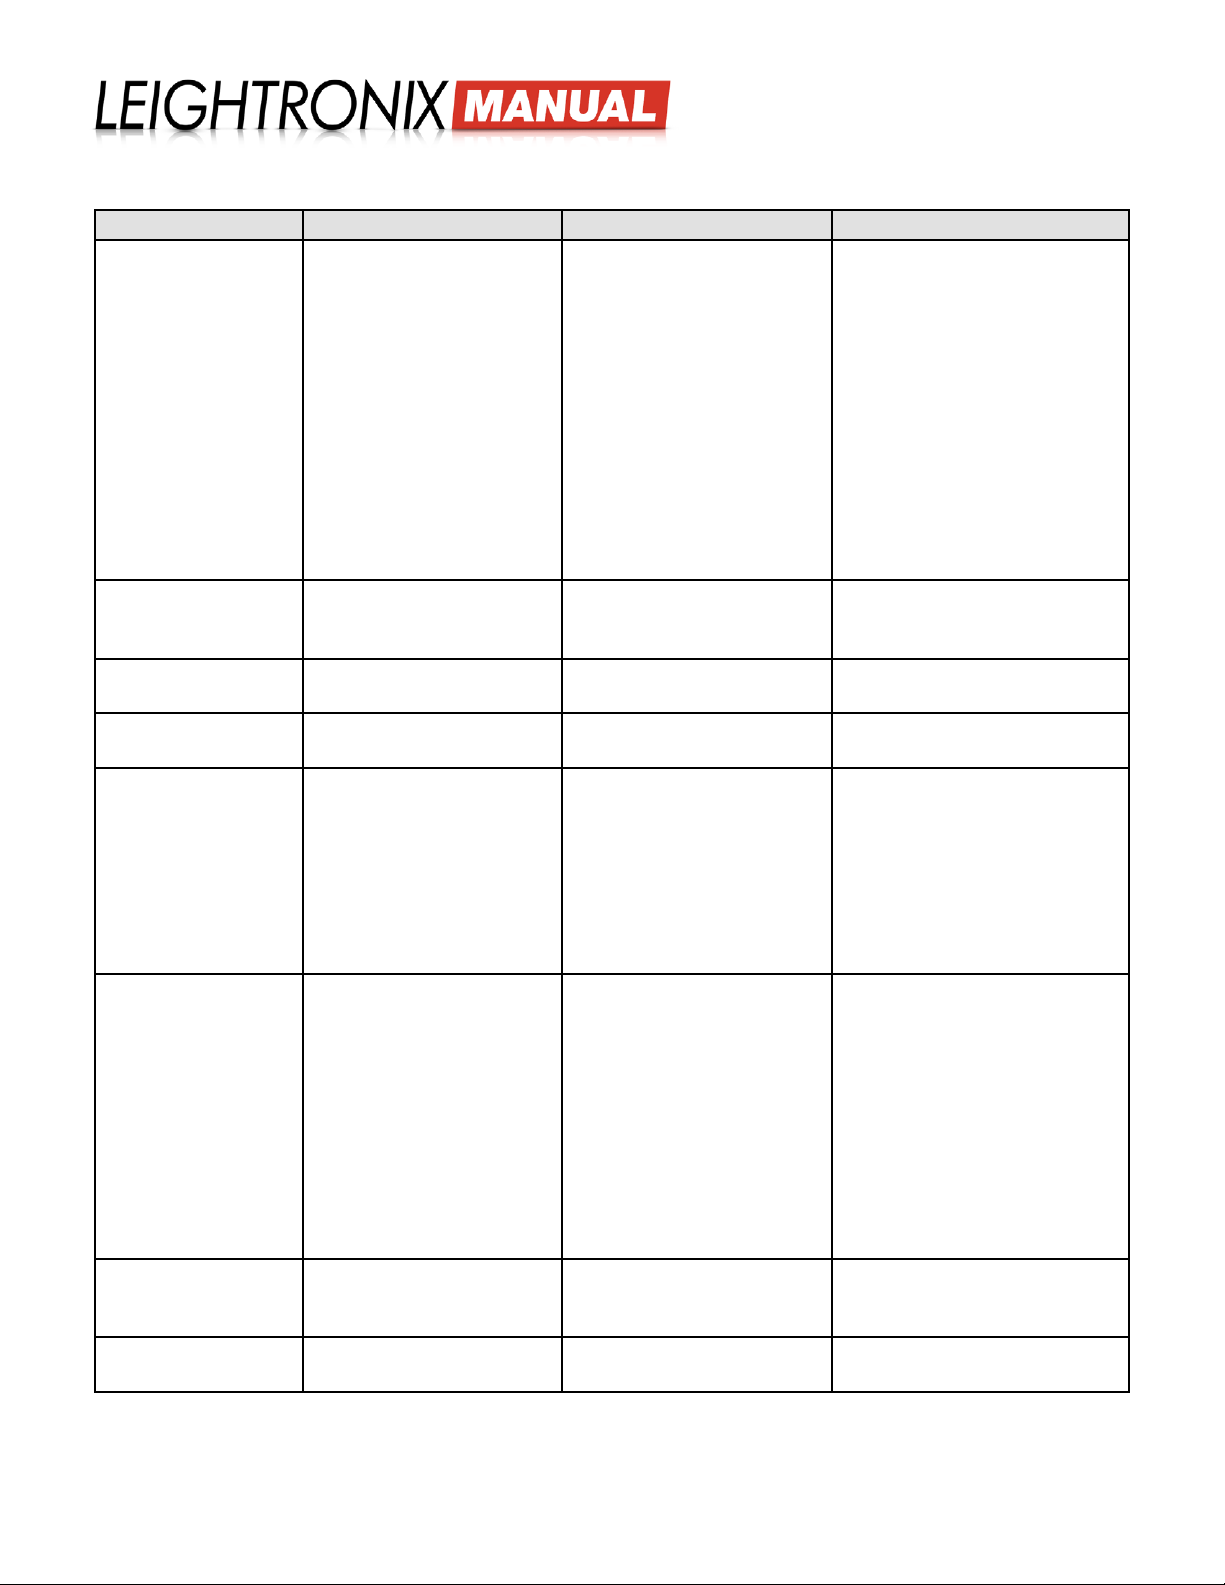
LABvault-SD Control Commands
FUNCTION COMMAND DETAILS ASCII RESPONSE
(Username) Login USER <USERNAME> Logs in username. Allows
access to restricted
function. Followed by
PASS command to
complete login. If followed
by ANY argument, it will
appear to be successful
(as to not give away which
user accounts are and are
not valid).
331 User name ok, need
password
Page 26 2018-06-08
Page 31
Control Commands
FUNCTION COMMAND DETAILS ASCII RESPONSE
(Password) Login PASS <PASSWORD> Species password after
“USER” command has
been completed.
• If successful: 230 User
Logged in, proceed
• If already logged in: 335
Already logged in
• If not preceded by
successful USER attempt:
332 USER account not
specied
• If invalid password or
user entered (user will
be required to re-execute
USER command): 507
Login attempt FAILED
Logout LOGOFF Logs off the user and ends
the session. Restores
336 Session reset, rights
reset to guest privileges
default user guest rights.
Show Prompt PROMPTON Turns on the
200 Command OK
“LABVAULT>” prompt.
Hide Prompt PROMPTOFF Turns off the
200 Command OK
“LABVAULT>” prompt.
Play PLAYFILE <FILENAME> FILENAME is full
200 Command OK
lename/ext of le to
be played. Filename
is case insensitive. \
Internal\mpeg\ directory is
assumed.
Ex.: PLAYFILE BROOKS.
MPG
Record RECFILE <FILENAME> Time/Date stamp will
200 Command OK
be appended if same
lename is used for
multiple records. Do
not include “.mpg” le
extension at the end of
lename. \Internal\mpeg\
directory is assumed.
(Alphanumeric, ‘-’, ‘_’
allowed)
Ex.: RECFILE BROOKS
Pause Play PAUSE Pauses channel if it is in
200 Command OK
play, unpauses it if it is in
pause (toggle).
Stop STOP Stops the current playback
200 Command OK
or record function.
LABvault-SD
Page 27 2018-06-08
Page 32
LABvault-SD
Control Commands
FUNCTION COMMAND DETAILS ASCII RESPONSE
Send File FINALIZE <FILENAME> FILENAME is full
lename/ext of le to be
nalized. Filename is
case insensitive.
\Internal\mpeg\ directory
• If successful: 200
Command OK
• If unsuccessful: 663
Cannot nalize le, no
destinations are enabled
is assumed. File will no
longer be available for
playback.
NOTE: For nalize to
succeed, at least one
destination must be
congured and enabled
via the LABvault-SD Web
interface, otherwise the
result will be fail.
Ex.: FINALIZE BROOKS.
MPG
Get File Dir GETMPEGDIR Gets the directory of the \
Internal\mpeg\ dir.
Ex.: 399 * 20683495
06-16-2009 14:32:30
00:00:30:07 BROOKS.
mpg
For each entry:
399 * <FILESIZE> <MMDD-YYYY> <HH:MM:SS>
<LH:LM:LS:LF>
<FILENAME>
• <FILESIZE>: raw length
of le in bytes
375 * 00003 MPEG Files
Returned
• <MM-DD-YYYY>: last
write time date
• <HH:MM:SS>: last write
time
• <LH:LM:LS:LF>: MPEG
length in hours: minutes:
seconds: frames
• <FILENAME>: lename
of le
After last entry:
375 * nnnnn MPEG Files
Returned
Page 28 2018-06-08
Page 33
Control Commands
FUNCTION COMMAND DETAILS ASCII RESPONSE
Get Status GETSTAT Gets the current player
and recorder status and
timecode.
Record Ex.: GETSTAT
recording le BROOKS.
MPG, current record time
is 7m, 19s, 29 frames
(388 0 NONE 00:00:00:00
00:00:00:00 7 BROOKS.
MPG 00:07:19:29)
388 P <PLAYERFILE>
<PH:PM:PS:PF>
<LH:LM:LS:LF>
R <RECFILE>
<RH:RM:RS:RF>
• P: Player mode (0 =
STOP, 1 = PLAY, 2 =
PAUSE)
• <PLAYERFILE>:
lename of le currently
playing (NONE if none)
Playback Ex.: GETSTAT
playing le BROOKS.
mpg, current playback
position is 4m, 21s, 10
frames. Total le length
is 22m, 10s, 8 frames.
(388 1 BROOKS.MPG
00:04:21:10 00:22:10:08 0
NONE 00:00:00:00)
• <PH:PM:PS:PF>: current
playback timecode
position in HH:MM:SS:FF
• <LH:LM:LS:LF>: total
length of le currently
being played back
• R: recorder mode (0 =
STOP, 7 = RECORD)
• <RECFILE>: lename
of le currently being
recorded (NONE if none)
• <RH:RM:RS:RF>:
current record le length
in HH:MM:SS:FF
Bump FWD MPGBUMPFWD “Bumps” the current
200 Command OK
playback position 10
seconds forward (to
the nearest applicable
I-Frame).
Bump REV MPGBUMPREV “Bumps” the current
200 Command OK
playback position
backwards 10 seconds
or to the beginning of the
le if within the rst 10
seconds (to the nearest
applicable I-Frame).
Jump TC MPGJUMPTC
<HH:MM:SS:FF>
Sets the current playback
position to the nearest
200 Command OK
applicable I-Frame to the
timecode specied.
Get Free Space GETDISKFREE <ROOT
PATH>
Gets the free space from
the specied drive.
232 <VOLSIZE> <FREE
SPACE> bytes free
Ex.: getdiskfree c:\
232 * 120031477760
102305726464 bytes free
Delete File XREMOVE <PATH\
FILENAME>
Delete a le from the hard
drive (most applicable to
the C:\MPEG directory).
Ex.: XREMOVE c:\mpeg\
KOWALSKI.mpg
• If successful: 200
Command OK
• If unsuccessful: 531
Could not remove
requested le
LABvault-SD
Page 29 2018-06-08
Page 34

Control Commands
FUNCTION COMMAND DETAILS ASCII RESPONSE
Rename File XRENAME <ORIG PATH\
FILENAME> <NEW PATH\
FILENAME>
Rename a le on the hard
drive.
Ex.: XRENAME c:\mpeg\
origname.mpg c:\mpeg\
newname.mpg
• If successful: 200
Command OK
• If unsuccessful: 534
Rename failed, (Error:
nn)
LABvault-SD
Page 30 2018-06-08
Page 35
LABvault-SD
Specications
SPECIFICATIONS
In no event shall LEIGHTRONIX be liable for any damages whatsoever resulting from loss of use, data, or prots, whether
or not advised of the possibility of damage, and on any theory of liability, arising out of or in connection with the use or
performance of the LABvault-SD.
Dimensions 1.75”H x 19”W x 9”D
Weight, without carton
or cables
Front Panel Display 2x16 character liquid crystal display
Keypad Six push button keypad
Power Input Three-position IEC power input with removable power cord
Power Supply Internal 200W power supply with active P.F.C., which accepts 90-264VAC @ 47-
Compliance/
Certications
Internal Real Time
Clock
Conguration Storage • Internal battery-backed memory
Audio I/O -10dBV unbalanced line level, dual RCA inputs/outputs
Video I/O NTSC composite video, BNC inputs/outputs
Ethernet Network Host
Management
Firmware • Updateable via Ethernet
Web Interface • Password-protected
5 lbs.
• Four arrow push buttons provide password-protected front panel status and
network conguration
• Green check button powers on the unit
• Red “X” button powers off the unit
63Hz
Certied and listed as:
• Audio, Video, and Similar Electronic Apparatus Safety Requirements ANSI/UL
60065, 7th edition
• Audio, Video, and Similar Electronic Apparatus Safety Requirements CAN/CSA
C22.2 No. 60065:03, 1st edition
Type: microprocessor interfaced
Reference: crystal controlled, temperature compensated
Accuracy: +/- 5 seconds per month
• Data integrity veried
• Elements:
►
IP address
►
Subnet mask
►
Gateway
►
User Information
• Remote Support: Dial-Up Networking
• Network Support Interface:
►
Eight-position, eight-conductor RJ-45 modular jack, 10/100 BASE-T (original
LABvault-SD) or 10/100/1000 BASE-T (version 2 LABvault-SD), unshielded
twisted pair, Ethernet
►
Ethernet_II frame type
►
Protocol: TCP/IP
►
Services: Telnet, FTP, Web
• Cyclical redundancy check (CRC) veried at time of reprogram
• Provides setup for automatic le transfers to one of the following destinations:
►
LEIGHTRONIX UltraNEXUS-SDI/UltraNEXUS/NEXUS
►
Third Party Video Servers
►
LEIGHTRONIX streaming video-on-demand applications
►
Any destination with FTP capabilities
Page 31 2018-06-08
Page 36
Internal Storage • Original LABvault-SD: 120 GB internal hard drive
• Version 2 LABvault-SD: 250 GB internal hard drive provides 200 GB of digital
media storage
Internal MPEG
Recorder (Encoder)
The LABvault-SD creates industry-standard, MPEG-2 video les. The maximum
recorded le length allowed by the LABvault-SD is 23 hours, 59 minutes, and 50
seconds.
Digital video recording results are based on a combination of the selected recording
quality default and the quality of the input source. Video being fed to the encoder
must have stable sync. Input signals with copy protection are not recordable.
The LABvault-SD encoder can capture video at one of the following recording
qualities:
• Good: VBR of 3.00-5.00 Mb/s, half video resolution (352x480), 192 kb/s audio
bit rate, 44.1 kHz audiosample rate
• Better: VBR of 4.00-7.00 Mb/s, full video resolution (720x480), 192 kb/s audio
bit rate, 44.1 kHz audiosample rate
• Best: VBR of 7.00-9.00 Mb/s, full video resolution (720x480), 224 kb/s audio bit
rate, 44.1 kHz audiosample rate
• Streaming: VBR of 1.50-2.50 Mb/s, half video resolution (352x480), 160 kb/s
audio bit rate, 44.1 kHz audio sample rate
NOTE: If you select “Internet VOD Streaming” as an automatic le
transfer destination, your les will be recorded at “Streaming”
quality for all enabled le transfer destinations.
Internal MPEG Player
(Decoder)
• Full D1 MPEG-2 resolution
• 10Mb/s maximum video bit rate
LABvault-SD
Specications
Page 32 2018-06-08
Page 37
LABvault-SD
Product Warranty
PRODUCT WARRANTY
LEIGHTRONIX, INC. warrants this digital video LABvault-SD player/recorder against defective
workmanship or materials for a period of ve (5) years from the original date of purchase.
During this warranty period, any parts found to be defective will be replaced at no charge. Labor to
repair or replace defective parts will also be performed at no charge during the warranty period.
This warranty does not cover abuse, shipping damage, neglect, tampering by unauthorized
personnel, acts of God, damage inadvertently caused by the user, preventive maintenance, or any
product whose serial number is removed or defaced.
The sole responsibility of LEIGHTRONIX shall be to repair or replace in accordance with this
warranty. The seller’s and manufacturer’s only obligation shall be to repair or replace such quantity of
the product proved to be defective.
The customer shall bear the cost of shipping products returned to LEIGHTRONIX for warranty repair.
The cost for return shipment to the customer will be assumed by LEIGHTRONIX and shipped via an
equal priority service shipper prepaid and insured.
Neither seller nor manufacturer shall be liable for any injury, loss or damage, direct or consequential,
arising out of the use of, or the inability to use the product. Before using, the user shall determine the
suitability of the product for his/her intended use, and user assumes all risk and liability whatsoever in
connection therewith.
The warranty and the obligations and liabilities thereunder shall replace all other warranties or
guarantees, express or implied.
DECLARATION OF STANDARDS CONFORMITY
FCC NOTICE
NOTE: This equipment has been tested and found to comply with the limits for a Class A digital
device, pursuant to part 15 of the FCC Rules. These limits are designed to provide
reasonable protection against harmful interference when the equipment is operated in a
commercial environment. This equipment generates, uses, and can radiate radio frequency
energy and, if not installed and used in accordance with the instruction manual, may cause
harmful interference to radio communications. Operation of this equipment in a residential
area is likely to cause harmful interference in which case the user will be required to correct
the interference at his own expense.
Changes or modications to this device not expressly approved by LEIGHTRONIX,
INC. could void the user’s authority to operate this device.
This equipment is intended to be installed in a controlled environment with restricted access.
Page 33 2018-06-08
Page 38

Copyright Statements
COPYRIGHT STATEMENTS
The LABvault-SD rmware contains portions of the software referenced in the following copyright statements.
WHITSOFT SLIMFTPD
Portions of the LEIGHTRONIX FTP Server are derived from WhitSoft SlimFTPd.
Copyright (c) 2006, Matt Whitlock and WhitSoft Development
All rights reserved.
Redistribution and use in source and binary forms, with or without
modication, are permitted provided that the following conditions are met:
* Redistributions of source code must retain the above copyright notice,
this list of conditions and the following disclaimer.
* Redistributions in binary form must reproduce the above copyright notice,
this list of conditions and the following disclaimer in the documentation
and/or other materials provided with the distribution.
* Neither the names of Matt Whitlock and WhitSoft Development nor the names
of their contributors may be used to endorse or promote products derived
from this software without specic prior written permission.
LABvault-SD
THIS SOFTWARE IS PROVIDED BY THE COPYRIGHT HOLDERS AND CONTRIBUTORS “AS IS” AND ANY
EXPRESS OR IMPLIED WARRANTIES, INCLUDING, BUT NOT LIMITED TO, THE IMPLIED WARRANTIES OF
MERCHANTABILITY AND FITNESS FOR A PARTICULAR PURPOSE ARE DISCLAIMED. IN NO EVENT SHALL THE
COPYRIGHT OWNER OR CONTRIBUTORS BE LIABLE FOR ANY DIRECT, INDIRECT, INCIDENTAL, SPECIAL,
EXEMPLARY, OR CONSEQUENTIAL DAMAGES (INCLUDING, BUT NOT LIMITED TO, PROCUREMENT OF
SUBSTITUTE GOODS OR SERVICES; LOSS OF USE, DATA, OR PROFITS; OR BUSINESS INTERRUPTION)
HOWEVER CAUSED AND ON ANY THEORY OF LIABILITY, WHETHER IN CONTRACT, STRICT LIABILITY, OR TORT
(INCLUDING NEGLIGENCE OR OTHERWISE) ARISING IN ANY WAY OUT OF THE USE OF THIS SOFTWARE, EVEN
IF ADVISED OF THE POSSIBILITY OF SUCH DAMAGE.
THE PHP LICENSE, VERSION 3.0
Copyright © 1999–2002 The PHP Group. All rights reserved.
--------------------------------------------------------------------
Redistribution and use in source and binary forms, with or without modication, is permitted provided that the following
conditions are met:
1. Redistributions of source code must retain the above copyright notice, this list of conditions and the following
disclaimer.
2. Redistributions in binary form must reproduce the above copyright notice, this list of conditions and the following
disclaimer in the documentation and/or other materials provided with the distribution.
3. The name “PHP” must not be used to endorse or promote products derived from this software without prior written
permission. For written permission, please contact [email protected].
4. Products derived from this software may not be called “PHP”, nor may “PHP” appear in their name, without prior
written permission from [email protected]. You may indicate that your software works in conjunction with PHP by
saying “Foo for PHP” instead of calling it “PHP Foo” or “phpfoo”
5. The PHP Group may publish revised and/or new versions of the license from time to time. Each version will be given
a distinguishing version number. Once covered code has been published under a particular version of the license,
Page 34 2018-06-08
Page 39

LABvault-SD
Copyright Statements
you may always continue to use it under the terms of that version. You may also choose to use such covered code
under the terms of any subsequent version of the license published by the PHP Group. No one other than the PHP
Group has the right to modify the terms applicable to covered code created under this License.
6. Redistributions of any form whatsoever must retain the following acknowledgment: “This product includes PHP, freely
available from <http://www.php.net/>”.
THIS SOFTWARE IS PROVIDED BY THE PHP DEVELOPMENT TEAM ``AS IS’’ AND ANY EXPRESSED
OR IMPLIED WARRANTIES, INCLUDING, BUT NOT LIMITED TO,THE IMPLIED WARRANTIES OF
MERCHANTABILITY AND FITNESS FOR A PARTICULAR PURPOSE ARE DISCLAIMED. IN NO EVENT
SHALL THE PHPDEVELOPMENT TEAM OR ITS CONTRIBUTORS BE LIABLE FOR ANY DIRECT, INDIRECT,
INCIDENTAL, SPECIAL, EXEMPLARY, OR CONSEQUENTIAL DAMAGES (INCLUDING, BUT NOT LIMITED TO,
PROCUREMENT OF SUBSTITUTE GOODS OR SERVICES; LOSS OF USE, DATA, OR PROFITS; OR BUSINESS
INTERRUPTION) HOWEVER CAUSED AND ON ANY THEORY OF LIABILITY, WHETHER IN CONTRACT, STRICT
LIABILITY, OR TORT (INCLUDING NEGLIGENCE OR OTHERWISE) ARISING IN ANY WAY OUT OF THE USE OF
THIS SOFTWARE, EVEN IF ADVISED OF THE POSSIBILITY OF SUCH DAMAGE.
This software consists of voluntary contributions made by many individuals on behalf of the PHP Group.
The PHP Group can be contacted via Email at [email protected].
For more information on the PHP Group and the PHP project, please see <http://www.php.net>.
This product includes the Zend Engine, freely available at <http://www.zend.com>.
GD STATEMENT
• Portions copyright 1994, 1995, 1996, 1997, 1998, 1999, 2000, 2001, 2002, 2003, 2004 by Cold Spring Harbor
Laboratory. Funded under Grant P41-RR02188 by the National Institutes of Health.
• Portions copyright 1996, 1997, 1998, 1999, 2000, 2001, 2002, 2003, 2004 by Boutell.Com, Inc.
• Portions relating to GD2 format copyright 1999, 2000, 2001, 2002, 2003, 2004 Philip Warner.
• Portions relating to PNG copyright 1999, 2000, 2001, 2002, 2003, 2004 Greg Roelofs.
• Portions relating to gdttf.c copyright 1999, 2000, 2001, 2002, 2003, 2004 John Ellson ([email protected]).
• Portions relating to gdft.c copyright 2001, 2002, 2003, 2004 John Ellson ([email protected]).
• Portions relating to JPEG and to color quantization copyright 2000, 2001, 2002, 2003, 2004, Doug Becker and
copyright © 1994, 1995, 1996, 1997, 1998, 1999, 2000, 2001, 2002, 2003, 2004 Thomas G. Lane. This software is
based in part on the work of the Independent JPEG Group. See the le README-JPEG.TXT for more information.
• Portions relating to GIF compression copyright 1989 by Jef Poskanzer and David Rowley, with modications for
thread safety by Thomas Boutell.
• Portions relating to GIF decompression copyright 1990, 1991, 1993 by David Koblas, with modications for thread
safety by Thomas Boutell.
• Portions relating to WBMP copyright 2000, 2001, 2002, 2003, 2004 Maurice Szmurlo and Johan Van den Brande.
• Portions relating to GIF animations copyright 2004 Jaakko Hyvätti (jaakko.hyvatti@iki.)
IJPEG STATEMENT
“this software is based in part on the work of the Independent JPEG Group”
FREETYPE STATEMENT
“Portions of this software are copyright © 1996-2002 The FreeType Project (www.freetype.org). All rights reserved.”
Page 35 2018-06-08
 Loading...