

Page 1
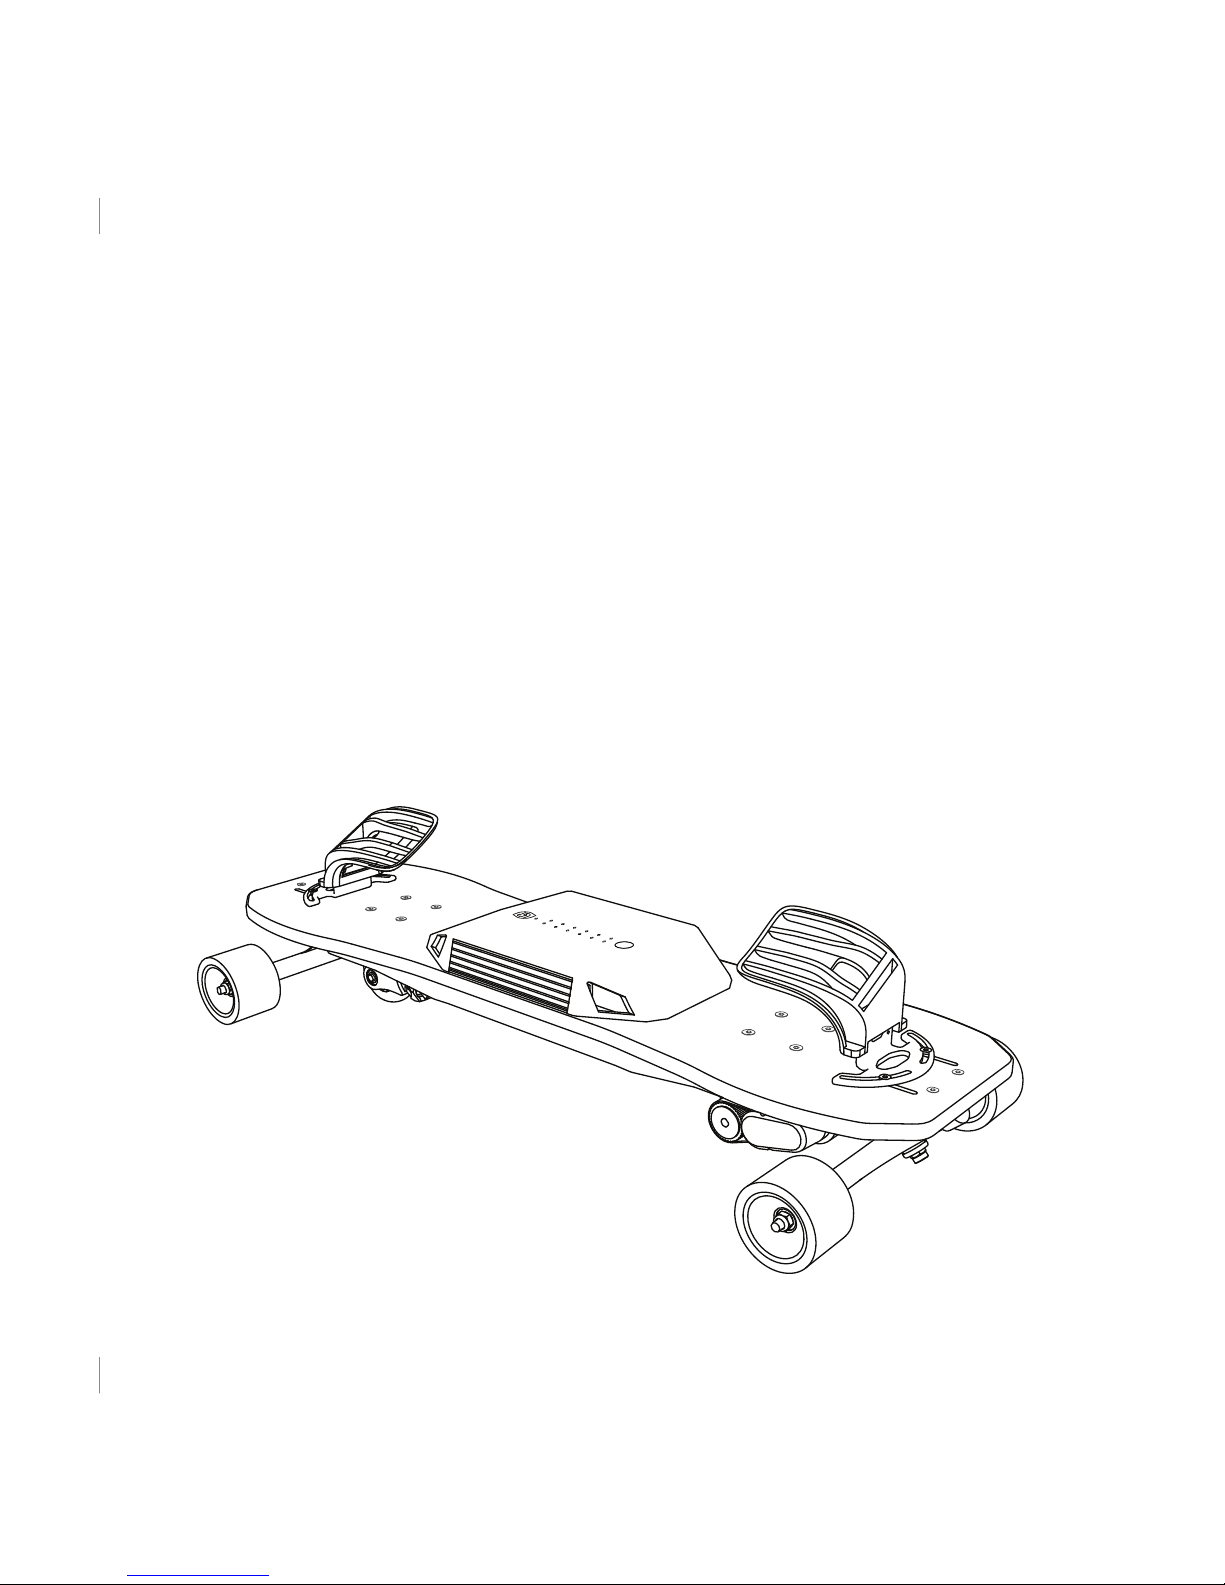
LEIF
Quick-Start
Guide
Original Instruction
© Copyright LEIF Technologies 2016
GUIDE VERSION 1.4
Page 2
LEIF GUIDE | 2
WWW.LEIFTECH.COM/GUIDE
The LEIF is covered by a 6 month manufacturer’s warranty that covers defects
in workmanship and material. This does not cover damage caused by abuse,
misuse, negligence, accident, or riding in water or on wet surfaces.
If the product has a manufacturing defect within 90 days of the ship date,
contact [email protected] before shipping the esnowboard back in order
to get a return authorization.
FOR ALL RETURN and WARRANTY SHIPPING:
Please keep your original LEIF shipping box and packing materials. The
warranty does not include damage from shipping in insufficient packaging.
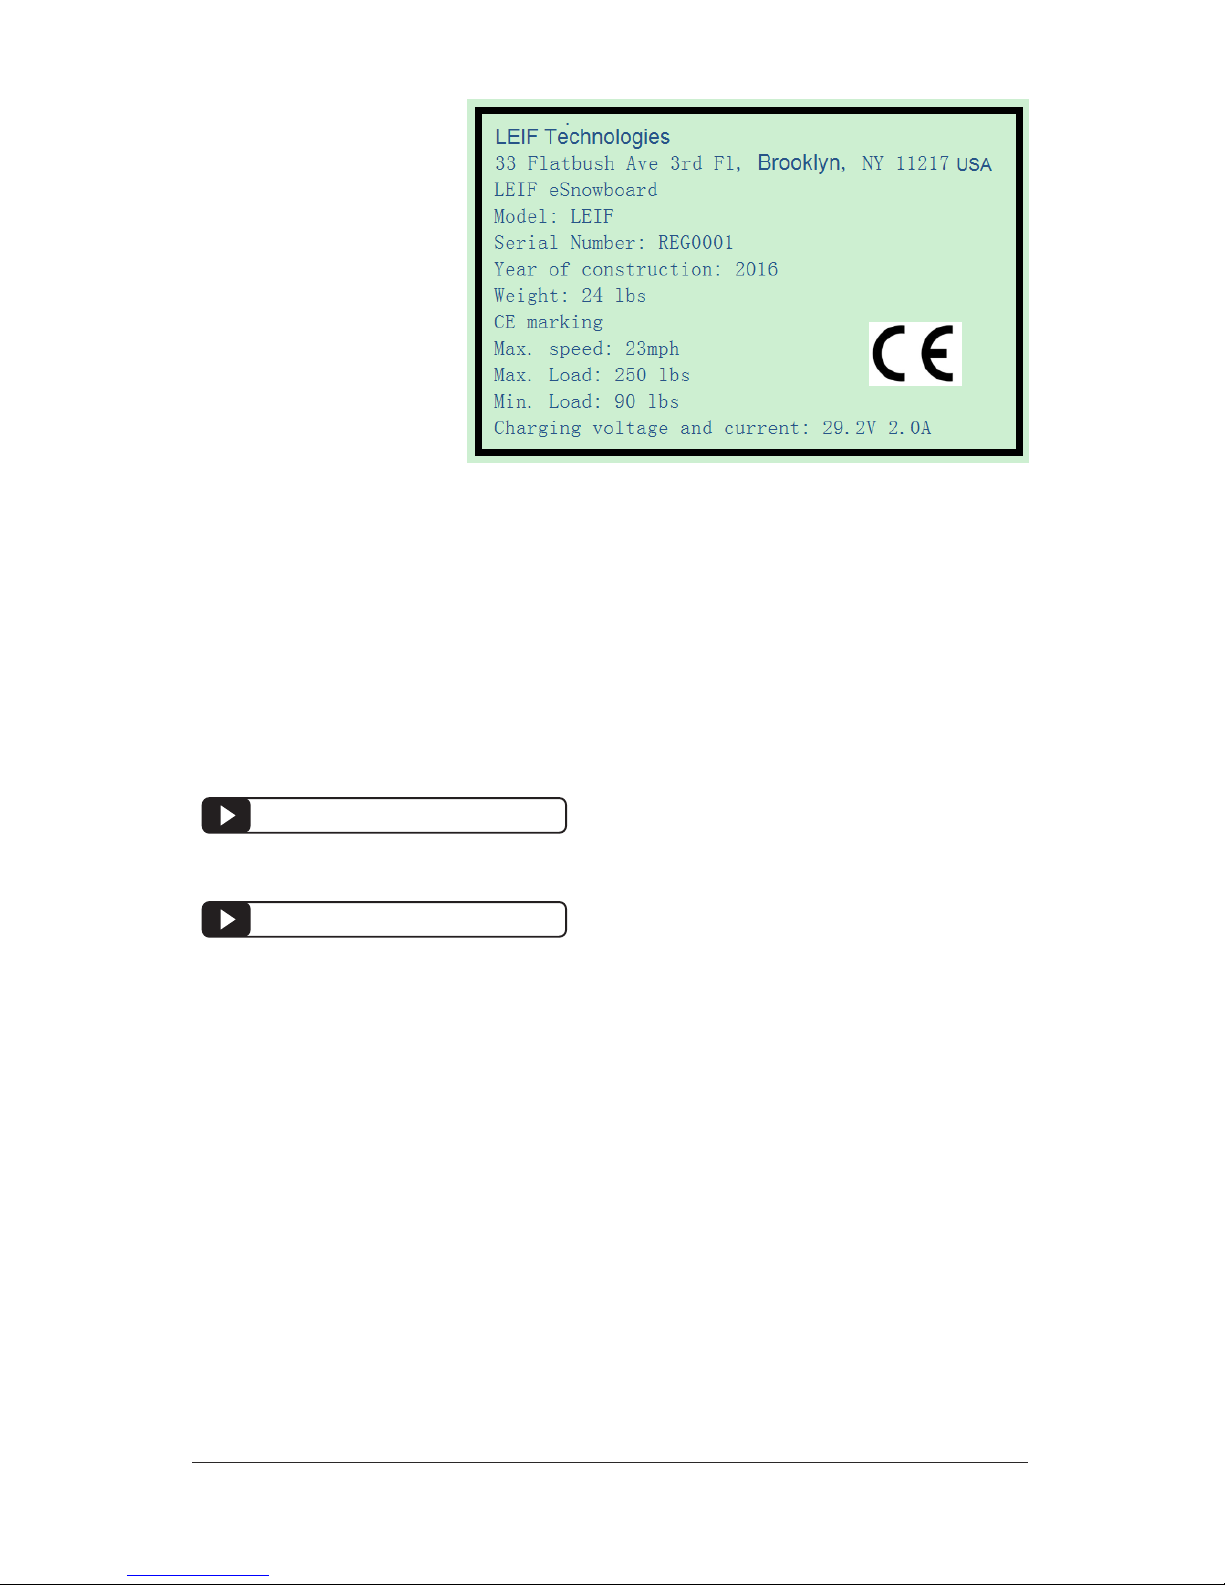
CE WARNING:
If giving to someone for the holidays, leave it in its partially charged
state. Do not take it out of the package to bring it to a full charge
and then wrap it back up. Often, the product comes partially charged.
Leave it in that state until it is ready to be used.
This icon indicates a video explanation on the LEIF TRAINING website.
This icon indicates a video explanation on the LEIF REPAIR website.
LIMITED WARRANTY
VIDEO TUTORIALS
LEIFTECH.COM/TRAINING
LEIFTECH.COM/REPAIR
CONTACT
LEIFTECH
33 Flatbush Ave
3rd Floor
Brooklyn,
NY 11217,
United States.
+1 347 921 3734
Page 3
LEIF GUIDE | 3
WWW.LEIFTECH.COM/GUIDE
RISK OF DEATH OR SERIOUS INJURY
Whenever you ride a LEIF esnowboard, you risk death or serious injury
from loss of control, collision and falls. To ride safely, you must read
and follow all warnings and instructions in the guide and online at
WWW.LEIFTECH.COM
Avoid water, wet surfaces, slippery or uneven surfaces, steep hills,
traffic, cracks, tracks, gravel, rocks, or any obstacles that could cause a
loss of traction and cause a fall.
WARNING: Do not ride LEIF in environments, on inclines, or at speeds
where you would not be safely in control of a traditional skateboard or
snowboard. In the event of wireless interference or battery fault, you
may need to rely on the mechanical braking function and slide to a
stop. For more information, visit the online tutorials
WARNING: Properly exit the foot bindings during a fall. Always jump
backwards to slide your feet out of the bindings and properly exit the
foot bindings during a fall.
WARNING: AVOID SUBMERGING IN WATER! Your LEIF is not water
proof. Electronics, bearings and other components can be damaged.
Water damage is not covered under the warranty.
WARNING: PINCH POINTS! Keep fingers, hair, and clothing away from
belts, motors, wheels, and all moving parts.
WARNING: RISK OF ELECTRIC SHOCK! Do not open or tamper with
electronics housings, which also voids the warranty.
WARNING: AVOID TRAFFIC! Do not ride near vehicular traffic.
Ride with respect, have fun and help promote snowboarding in the
summertime!
WARNING!
LEIFTECH.COM/TRAINING
Page 4
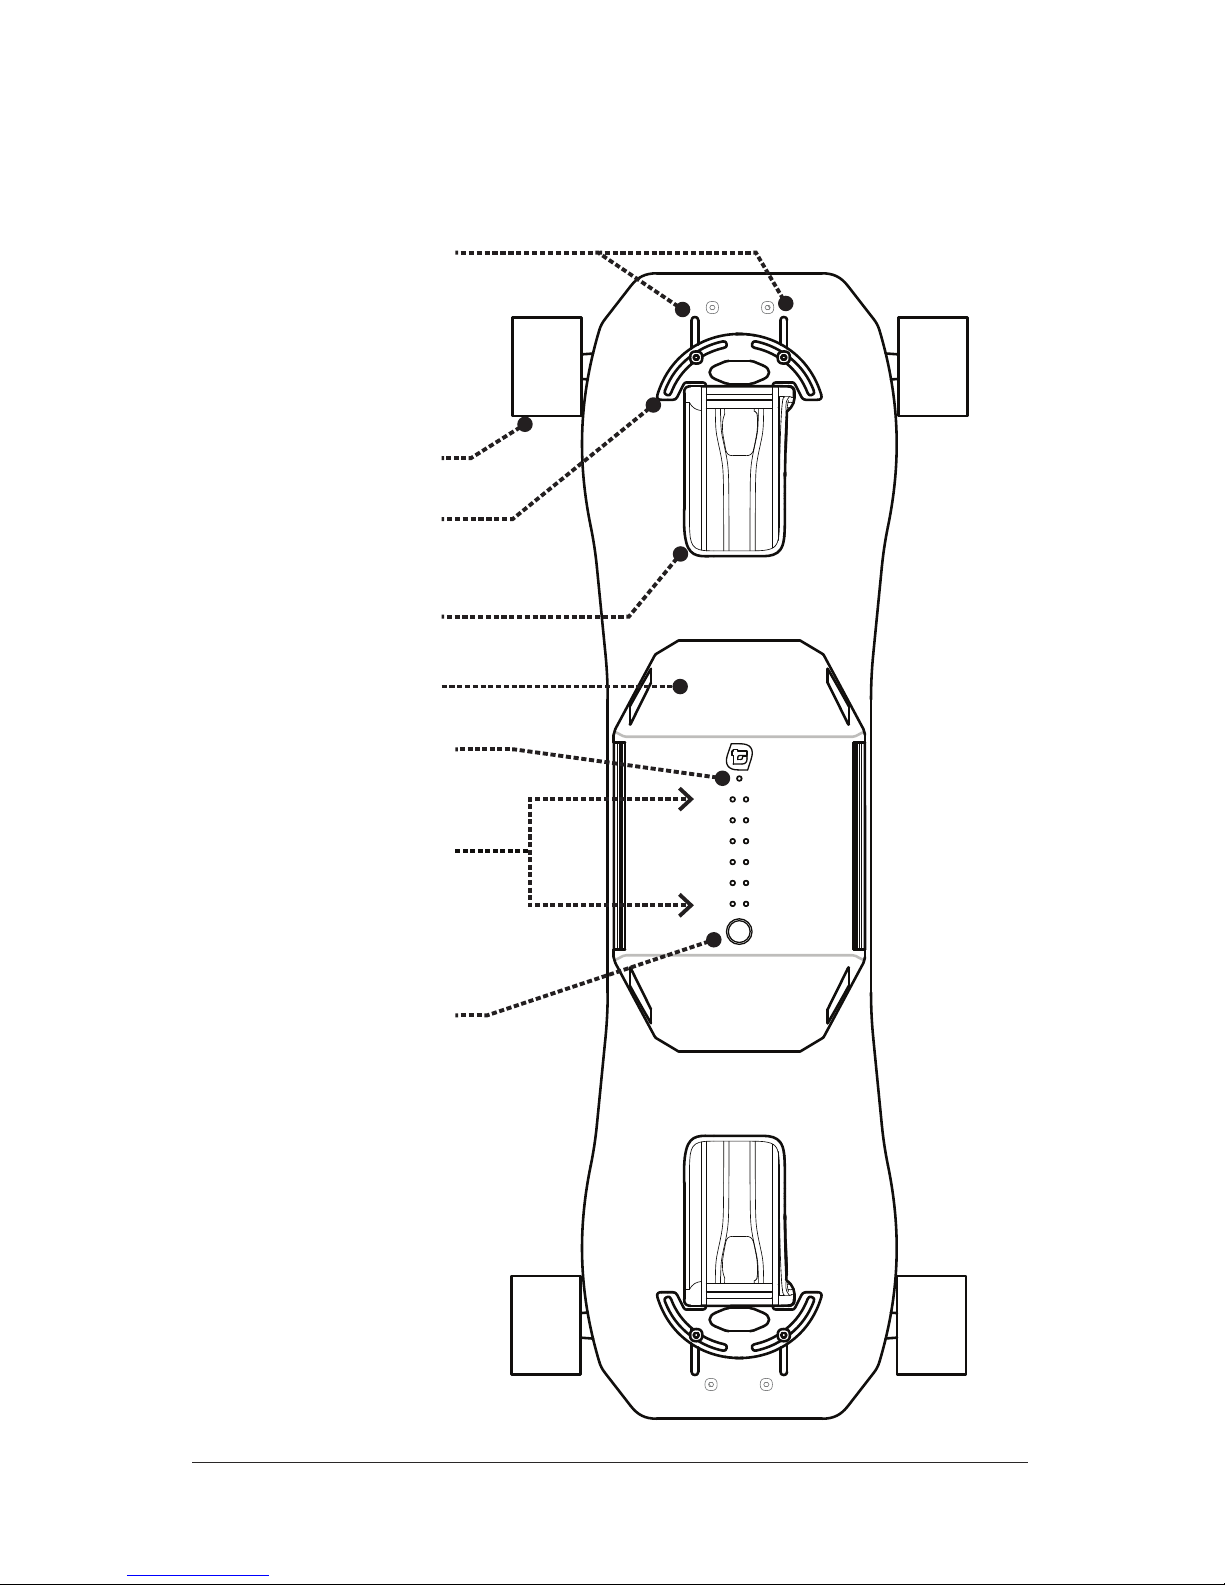
BLUETOOTH LIGHT
(BLUE)
BATTERY LEVEL
LIGHTS
(GREEN)
POWER BUTTON
(SLEEP / WAKE)
BINDING MOUNT
CHANNELS
HIGH
LOW
LEIF GUIDE | 4
WWW.LEIFTECH.COM/GUIDE
DECK TOP VIEW
EDGE WHEELS
BINDING
BINDING
MOUNT
FLIGHT DECK
Page 5
LEIF GUIDE | 5
WWW.LEIFTECH.COM/GUIDE
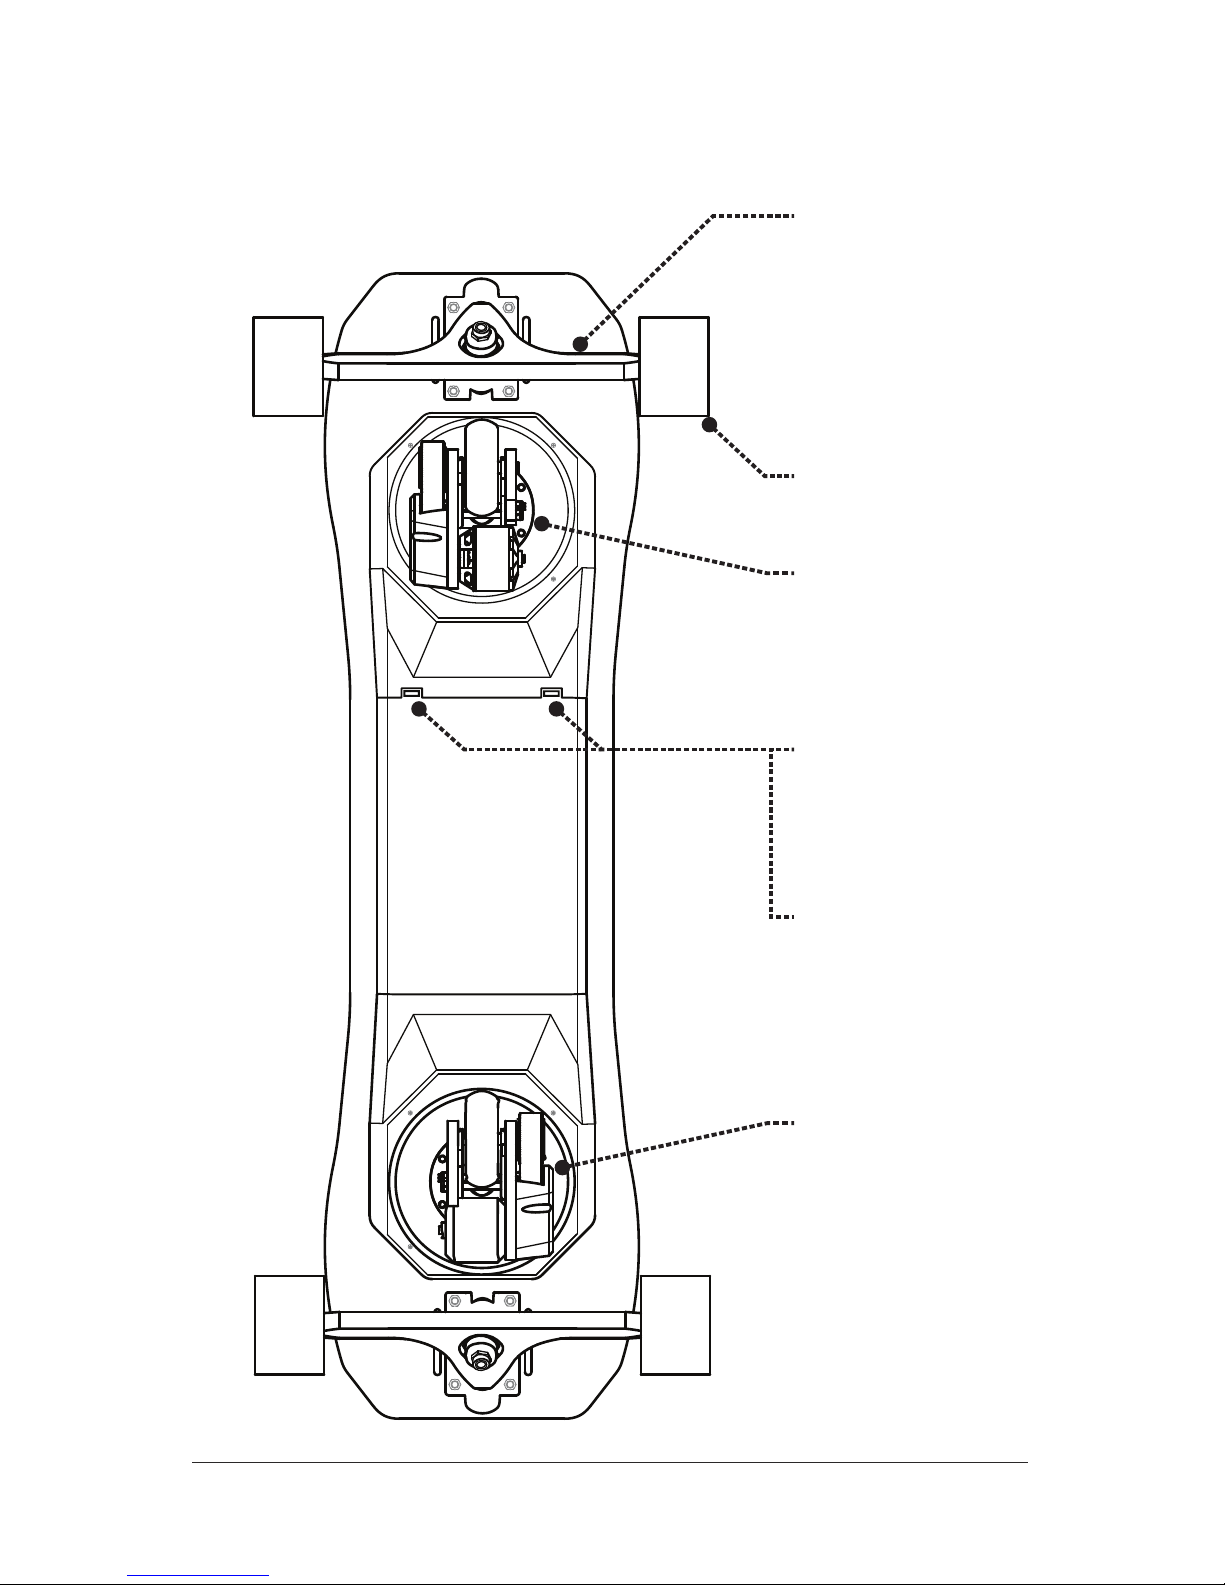
DECK BOTTOM VIEW
EDGE WHEELS
SR360 WHEEL
ASSEMBLY
SR360 WHEEL
ASSEMBLY
OUTER TRUCKS
BATTERY
COVER
RELEASE CLIPS
CHECK BEFORE
EACH RIDE!
Page 6
LEIF GUIDE | 6
WWW.LEIFTECH.COM/GUIDE
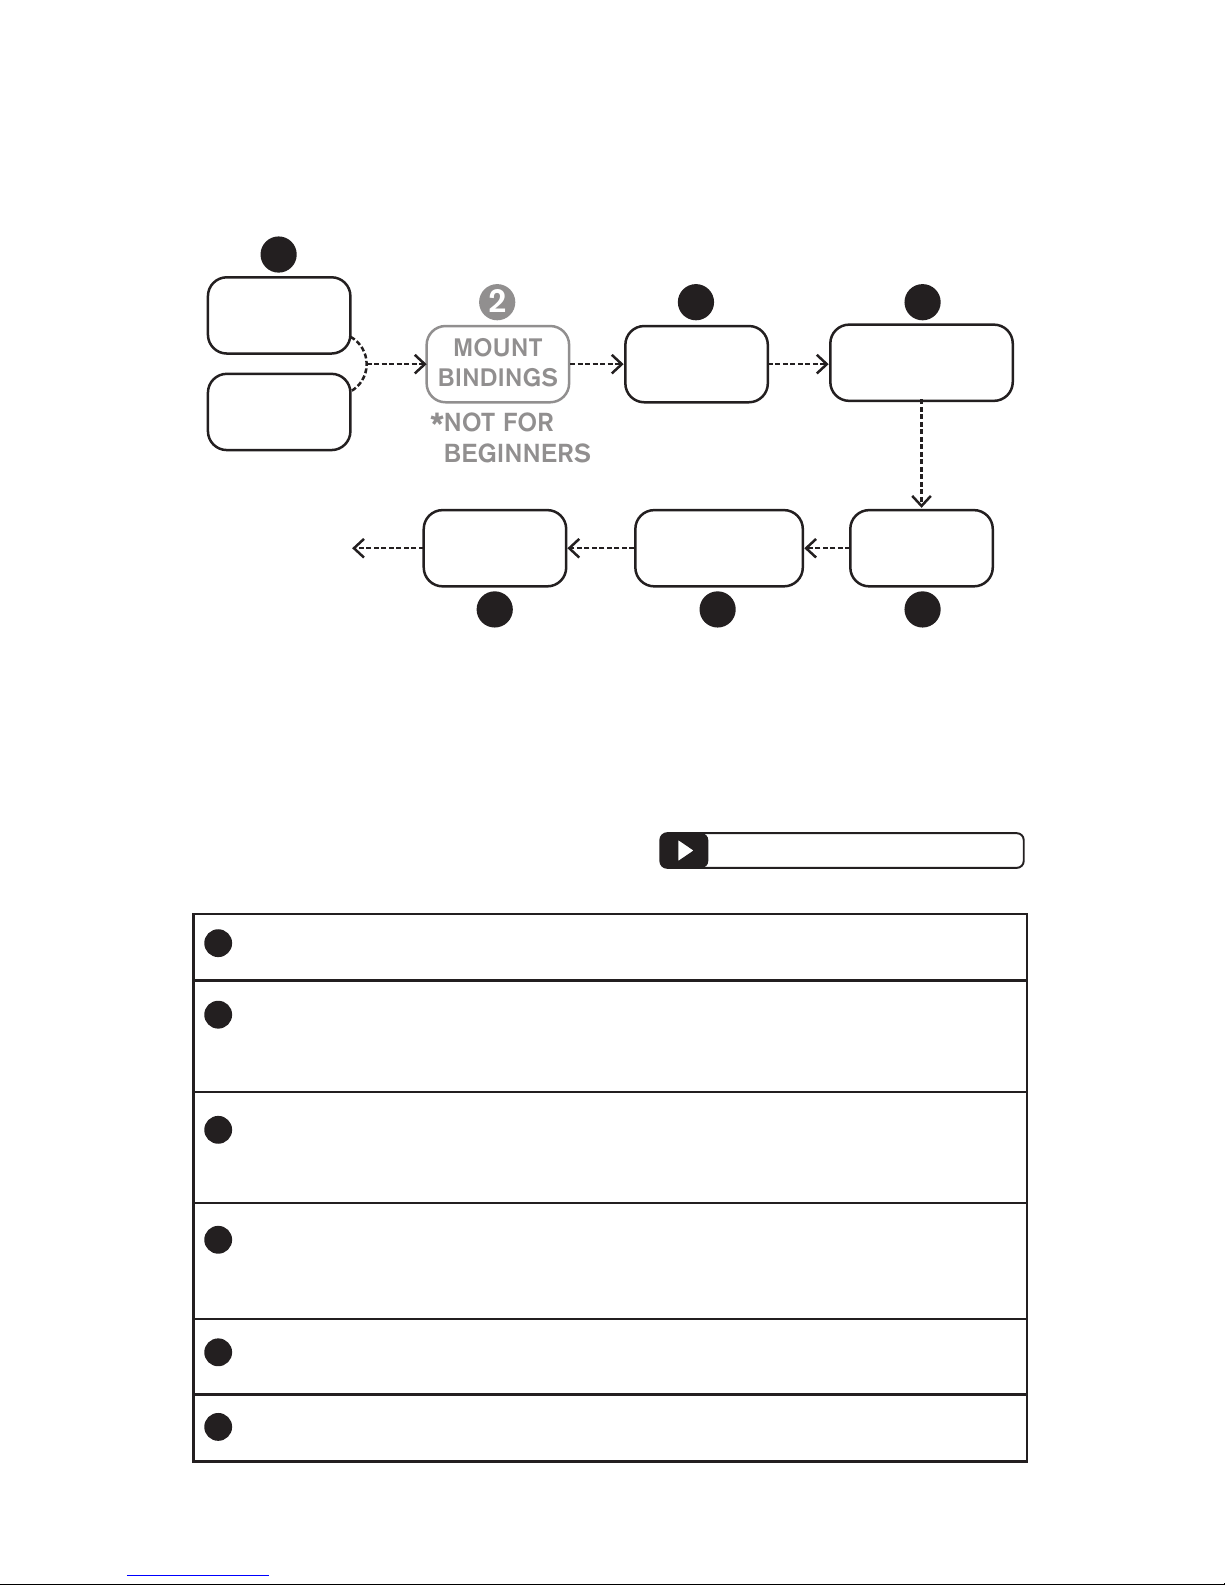
CHARGE
BATTERY
MOUNT
BINDINGS
INSERT
BATTERY
TURN ON
FLIGHT DECK
TURN ON
REMOTE
PAIR
BLUETOOTH
SAFETY
CHECK
RIDE
AWAY!
CHARGE
REMOTE
QUICK-START PROCESS
6-STEP SAFETY CHECK SEQUENCE
BEFORE EVERY RIDE:
Battery straps are locked down
Battery cover lid is locked down and both snaps are
engaged (will hear a *click* when snaps lock into place)
SR360 is free of debris, motorized inner wheels are
spinning with no friction, and timing belts are tight
SR360 is rotating freely and the large outer edge wheels
are spinning freely
Remote control and board batteries are fully charged
You are using a helmet and safety gear
LEIFTECH.COM/TRAINING
1
2
3
4
5
6
READ THE ENTIRE GUIDE BEFORE RIDING!
*
1
2
3 4
567
NOT FOR
BEGINNERS
Page 7
LEIF GUIDE | 7
WWW.LEIFTECH.COM/GUIDE
RIDING TIPS
Find an open, flat area with smooth pavement and no obstacles for your first
ride. Closed basketball courts, tennis courts and parking lots work well for
training areas. Read the warnings on your LEIF and this entire guide.
WARNING: The throttle wheel on the remote is sensitive. Avoid getting
thrown off the back while riding by following these tips:
LEIFTECH.COM/TRAINING
- Try using the board without bindings until you can ride comfortably
- Start by moving as slowly as possible
- Move the throttle wheel in small increments
- Adjust the foot bindings to fit a stance that is comfortable for you
- Keep a low center of gravity, keep your knees bent
- Lean slightly forward while accelerating
- Lean slightly backward while using the electronic brake
- The caster wheels must both be facing with the motor in the forward
direction, otherwise the board will vibrate and not start from a stop
- A push start is the most effective way to start from a stop. This will
ensure a smooth start and also extend battery life
YOUR FIRST DAY - BEFORE YOU RIDE
Visit BEFORE you try riding for
the first time. This is a video/instructional process on learning in the
most efficient way. Your first day will be very difficult without
this instruction and knowledge.
ALWAYS WEAR A HELMET!
It is important to wear safety gear when using this device -- a
skateboard helmet, and knee and elbow pads and wrist guards
for protection from falls.
http://www.leiftech.com/first-day
Page 8
LEIF GUIDE | 8
WWW.LEIFTECH.COM/GUIDE
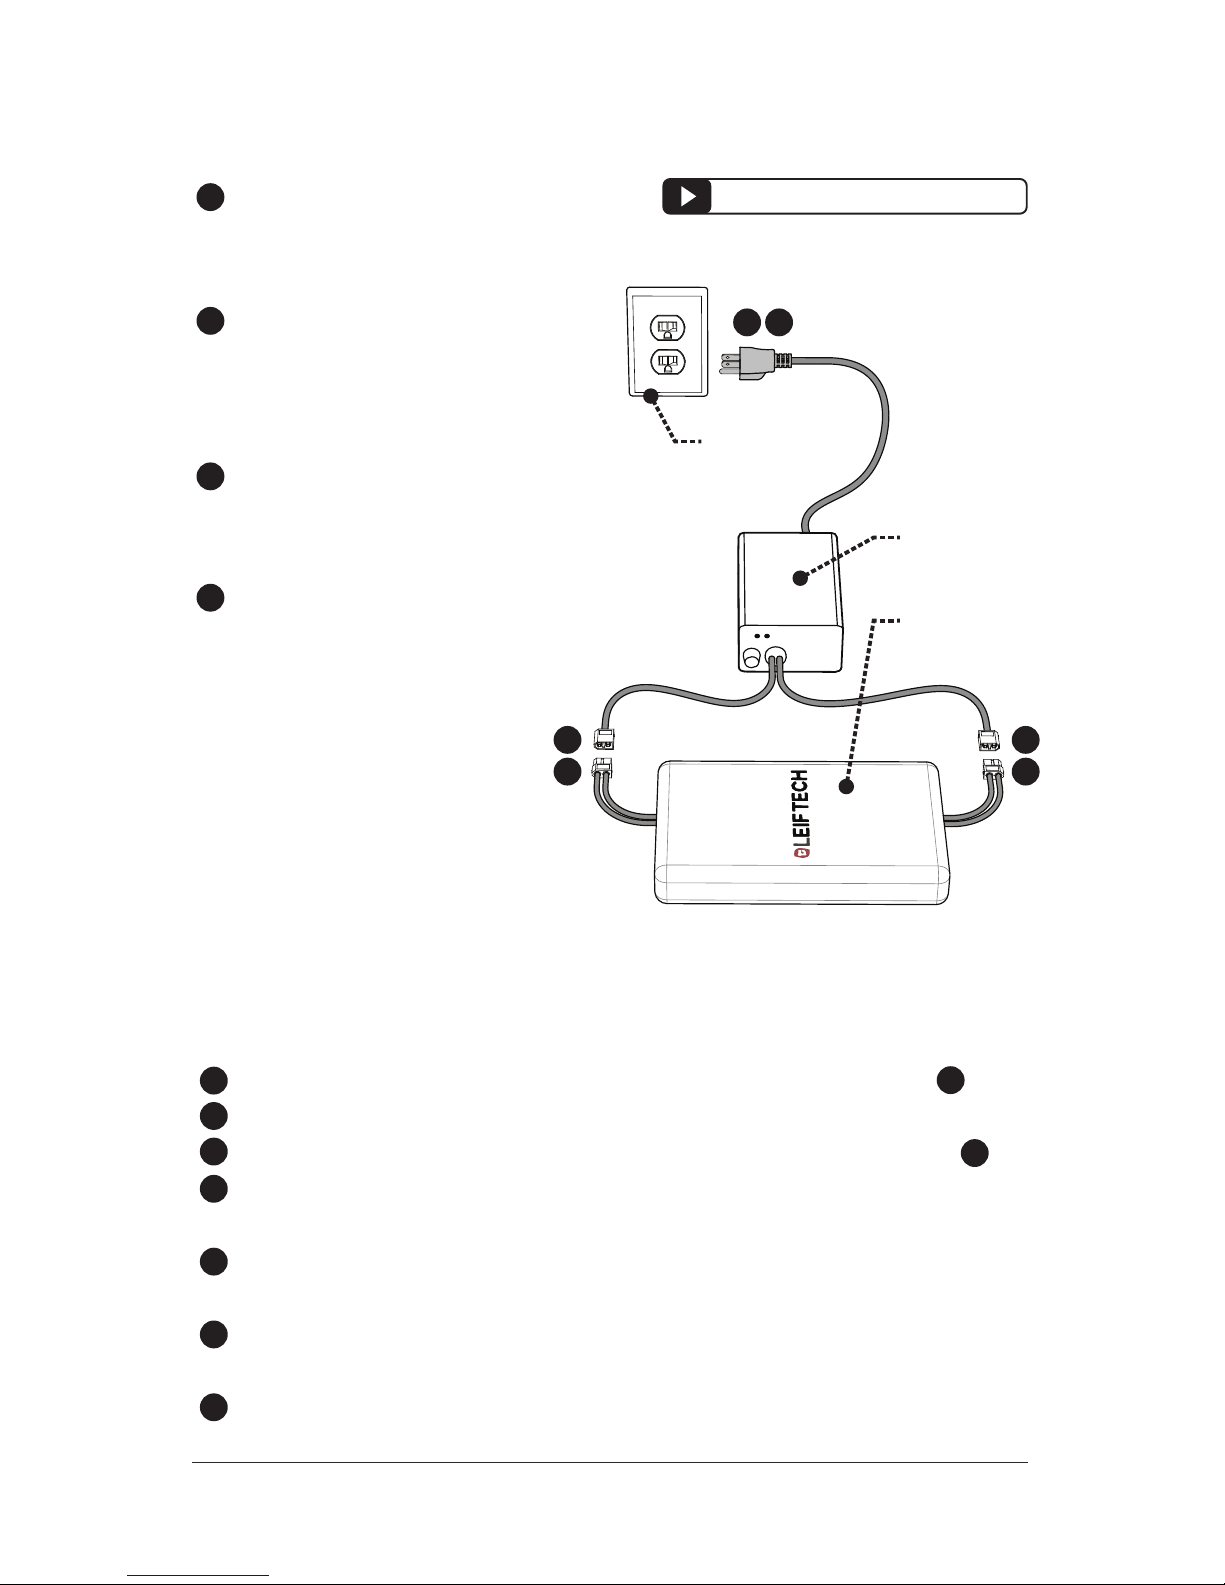
LEIF
CHARGER
120v or 240v
OUTLET
LEIF
BATTERY
CHARGE BATTERIES
CONNECT (2) SETS OF
BATTERY WIRES AND
CHARGER WIRES
PLUG CHARGER INTO 120V
OR 240V WALL OUTLET, UNTIL
CHARGED
(GREEN LIGHT)
DISCONNECT (2) SETS
OF BATTERY WIRES AND
CHARGER WIRES
UNPLUG CHARGER
FROM WALL OUTLET
1
1 1
2
2
3
3 3
4
4
LEIFTECH.COM/TRAINING
THINGS TO KNOW ABOUT THE BATTERY
STORE YOUR LEIF WITH THE BATTERY WIRES UNPLUGGED.
Always use care when removing or placing the BATTERY.
Perform a “Power Cycle” by unplugging the two wires shown above.
Leaving a battery pack plugged into the board for multiple days will drain
the battery.
Do not charge directly after riding. Let the device cool for an hour before
charging.
Charge and store in an open dry area away from combustibles (meaning
items that can catch fire).
Do not charge overnight or when you are not able to observe the board.
3
3
!
!
!
!
!
!
!
Page 9
LEIF GUIDE | 9
WWW.LEIFTECH.COM/GUIDE
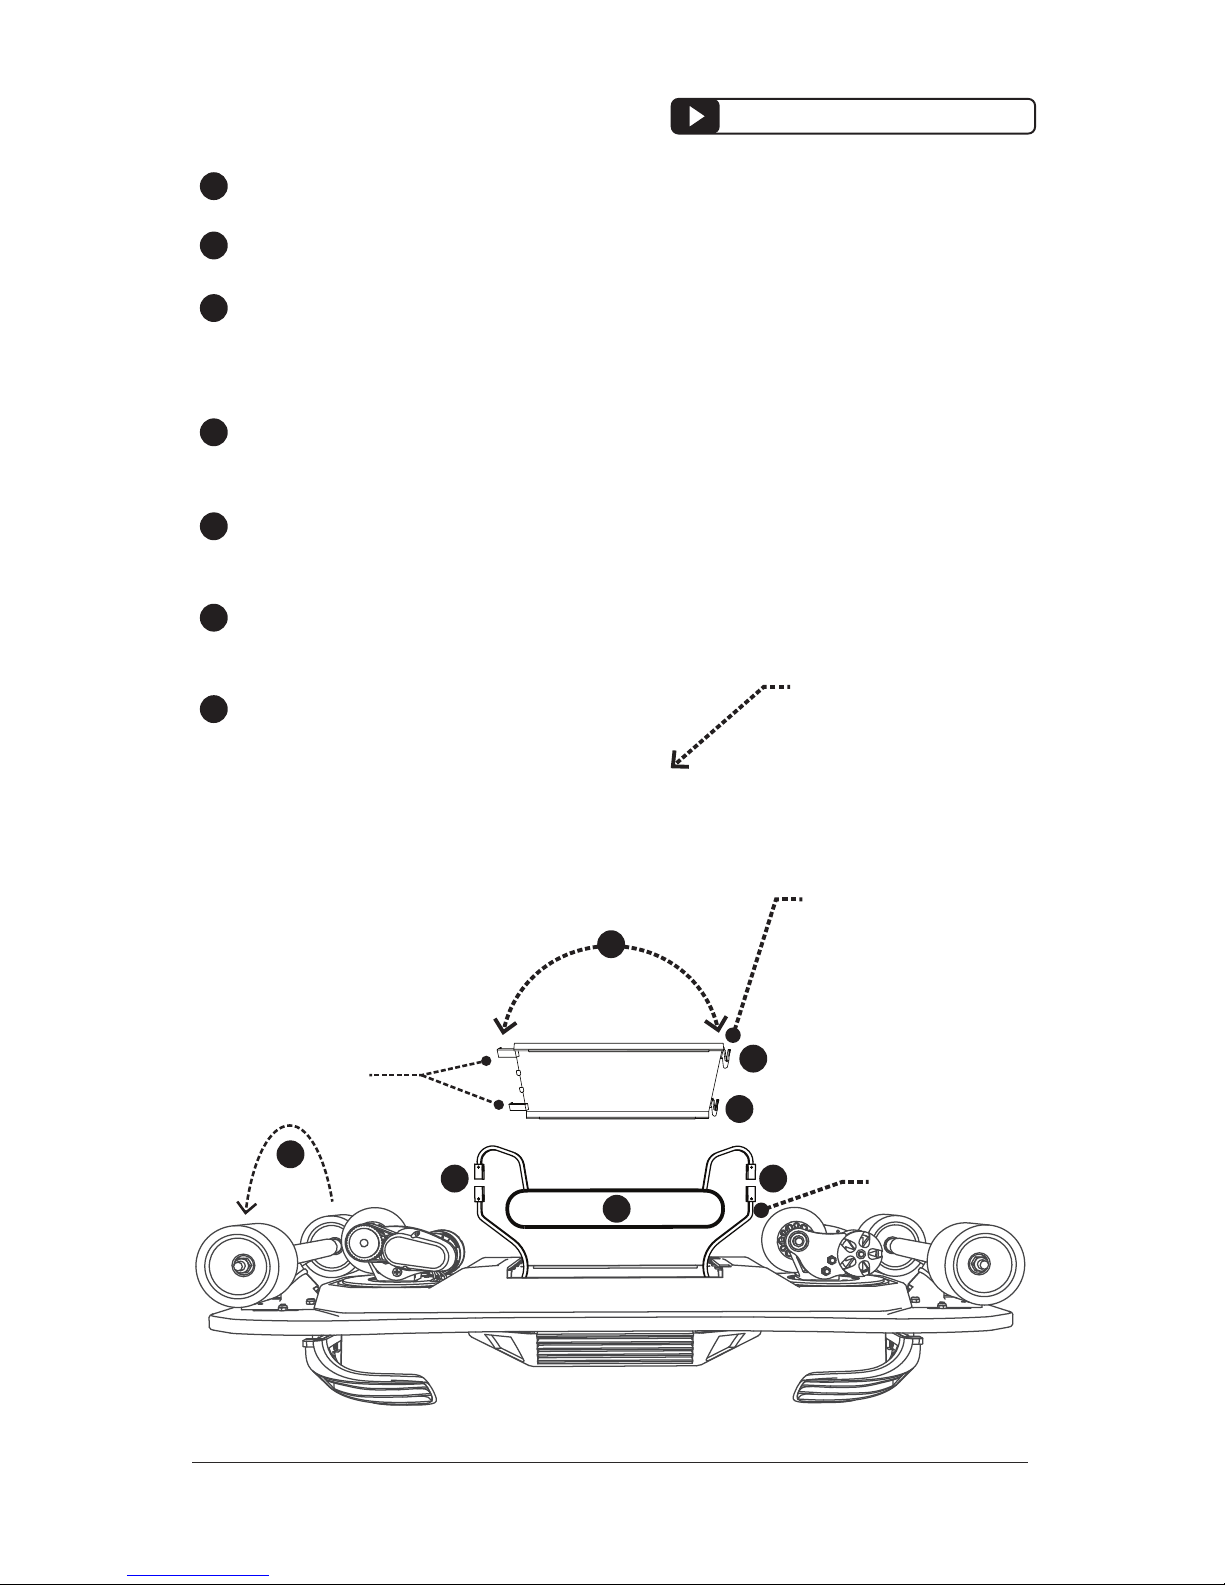
INSERT BATTERIES
TURN LEIF UPSIDE DOWN, WITH WEELS UP
REMOVE BATTERY COVER BY OPENING LOCK TABS
GENTLY PULL OUT 2 BATTERY CONNECTORS AND ENSURE
CONNECTORS AND VELCRO STRAPS ARE OUTSIDE OF THE
BATTERY COMPARTMENT
SLIDE BATTERY IN WITH ONE SIDE FIRST (THE SIDE FACING THE
LONG SIDE OF THE VELCRO STRAPS)
CENTER BATTERY IN COMPARTMENT AND CONNECT THE
VELCRO STRAPS
CONNECT AND HIDE THE POWER CONNECTORS TO THE
BATTERY CONNECTORS
REPLACE BATTERY COVER:
START BY INSERTING SIDE TABS,
FINISH BY PUSHING IN LOCK TABS
UNTIL YOU HEAR A “CLICK”
BATTERY PACK
1
2
2
1
4
55
2
3
4
5
6
5
BATTERY COVER
LOCK TABS
START HERE
FINISH HERE
VERY IMPORTANT!!
DO NOT PULL
BATTERY CABLES
WITH FORCE
SIDE TABS
5
LEIFTECH.COM/TRAINING
Page 10
LEIF GUIDE | 10
WWW.LEIFTECH.COM/GUIDE
If bottom two lights on the flight deck are flashing, the battery is
dead. If you believe you have a charged battery, power cycle the
battery by unplugging and plugging in the battery wires.
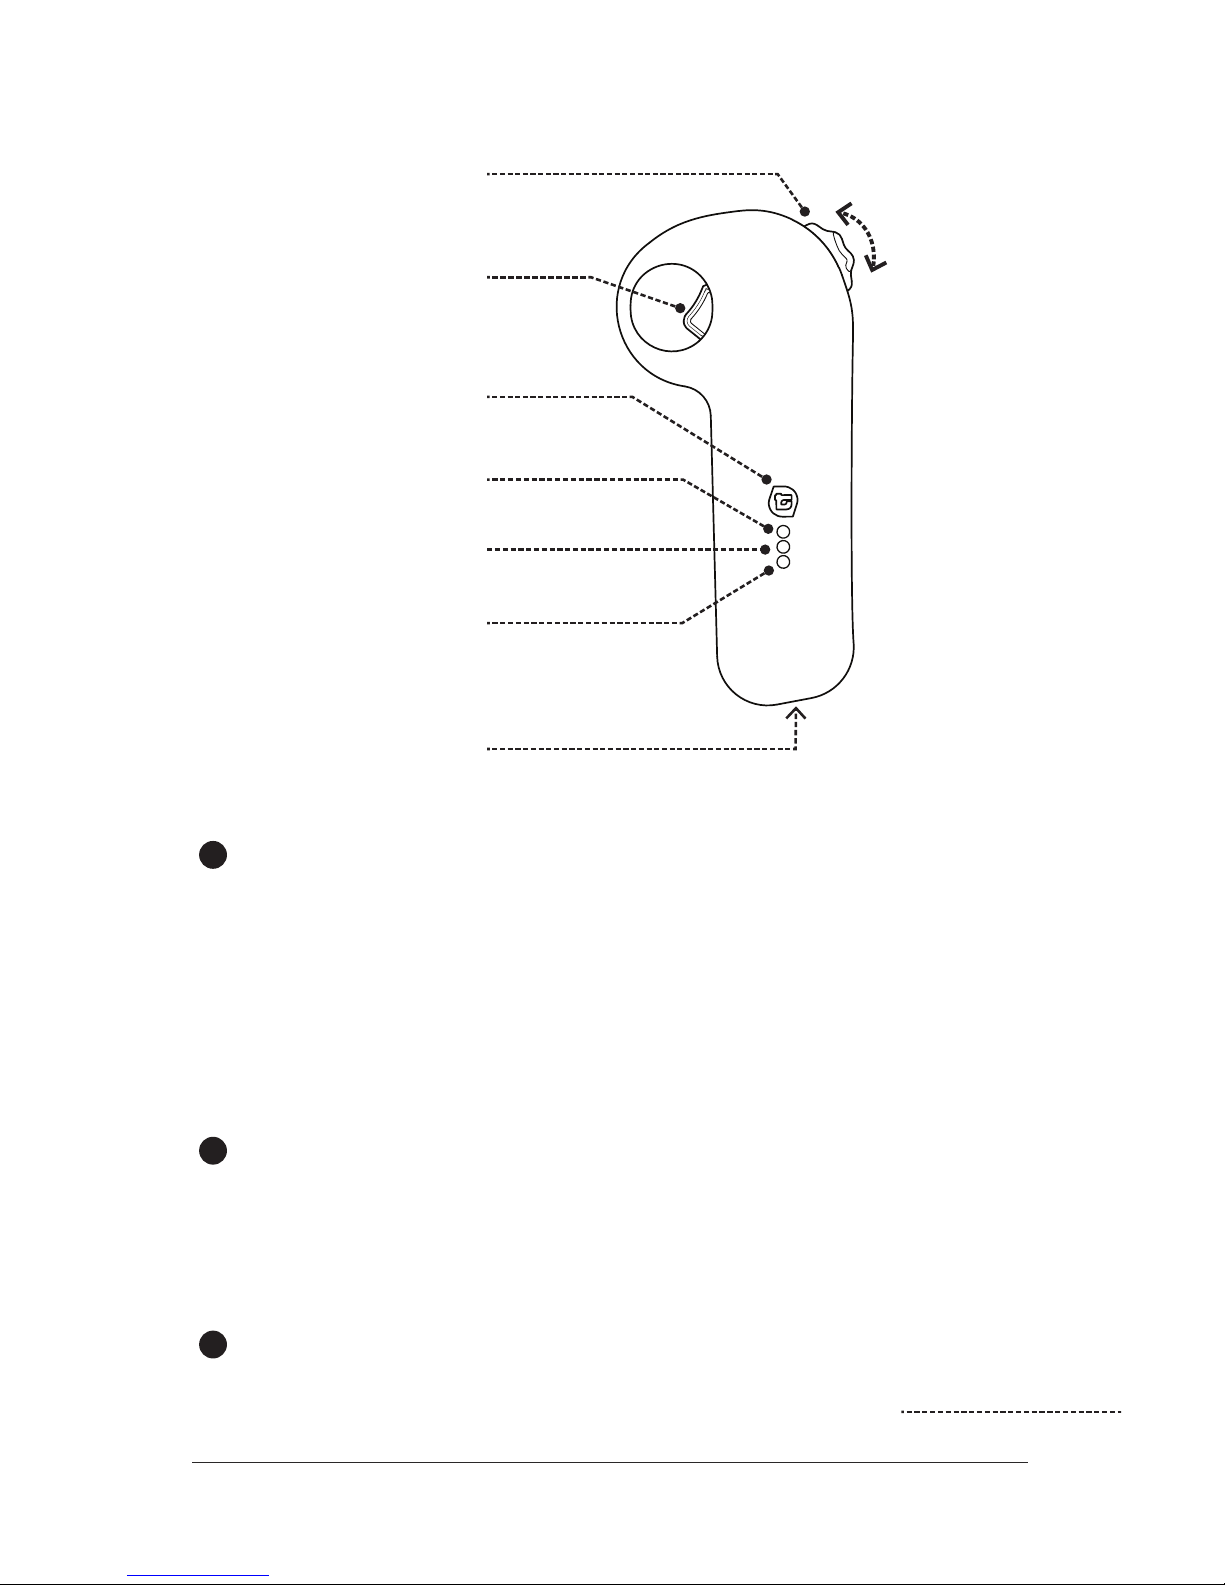
BLUETOOTH LIGHT
(BLUE COLOR)
BATTERY LIGHT
(GREEN COLOR)
CHARGE LIGHT
(GREEN COLOR)
USB CHARGE PORT
LEIF BUTTON
ENGAGE TRIGGER
ACCELERATION WHEEL
FORWARD
BRAKE
+
-
REMOTE
If the board accelerates or continues to roll after releasing the
trigger, then the top screw on the remote control is too tight,
causing the trigger to be sticky and not release. Loosen the top
screw on the remote control (near the thumbwheel) one turn. Test
by turning on the remote and confirming that the middle green light
stops flickering when the trigger is released. You should also hear
a click sound when pressing the trigger and another click sound
when releasing the trigger.
The Remote’s Battery Light is also a trigger button debugging
light. The Battery Light should have a slight flicker when the trigger
is pressed. If you press the trigger and the Battery Light stays
solid, then the trigger may be broken. If this occurs, please email
[email protected].
!
!
!
Page 11
LEIF GUIDE | 11
WWW.LEIFTECH.COM/GUIDE
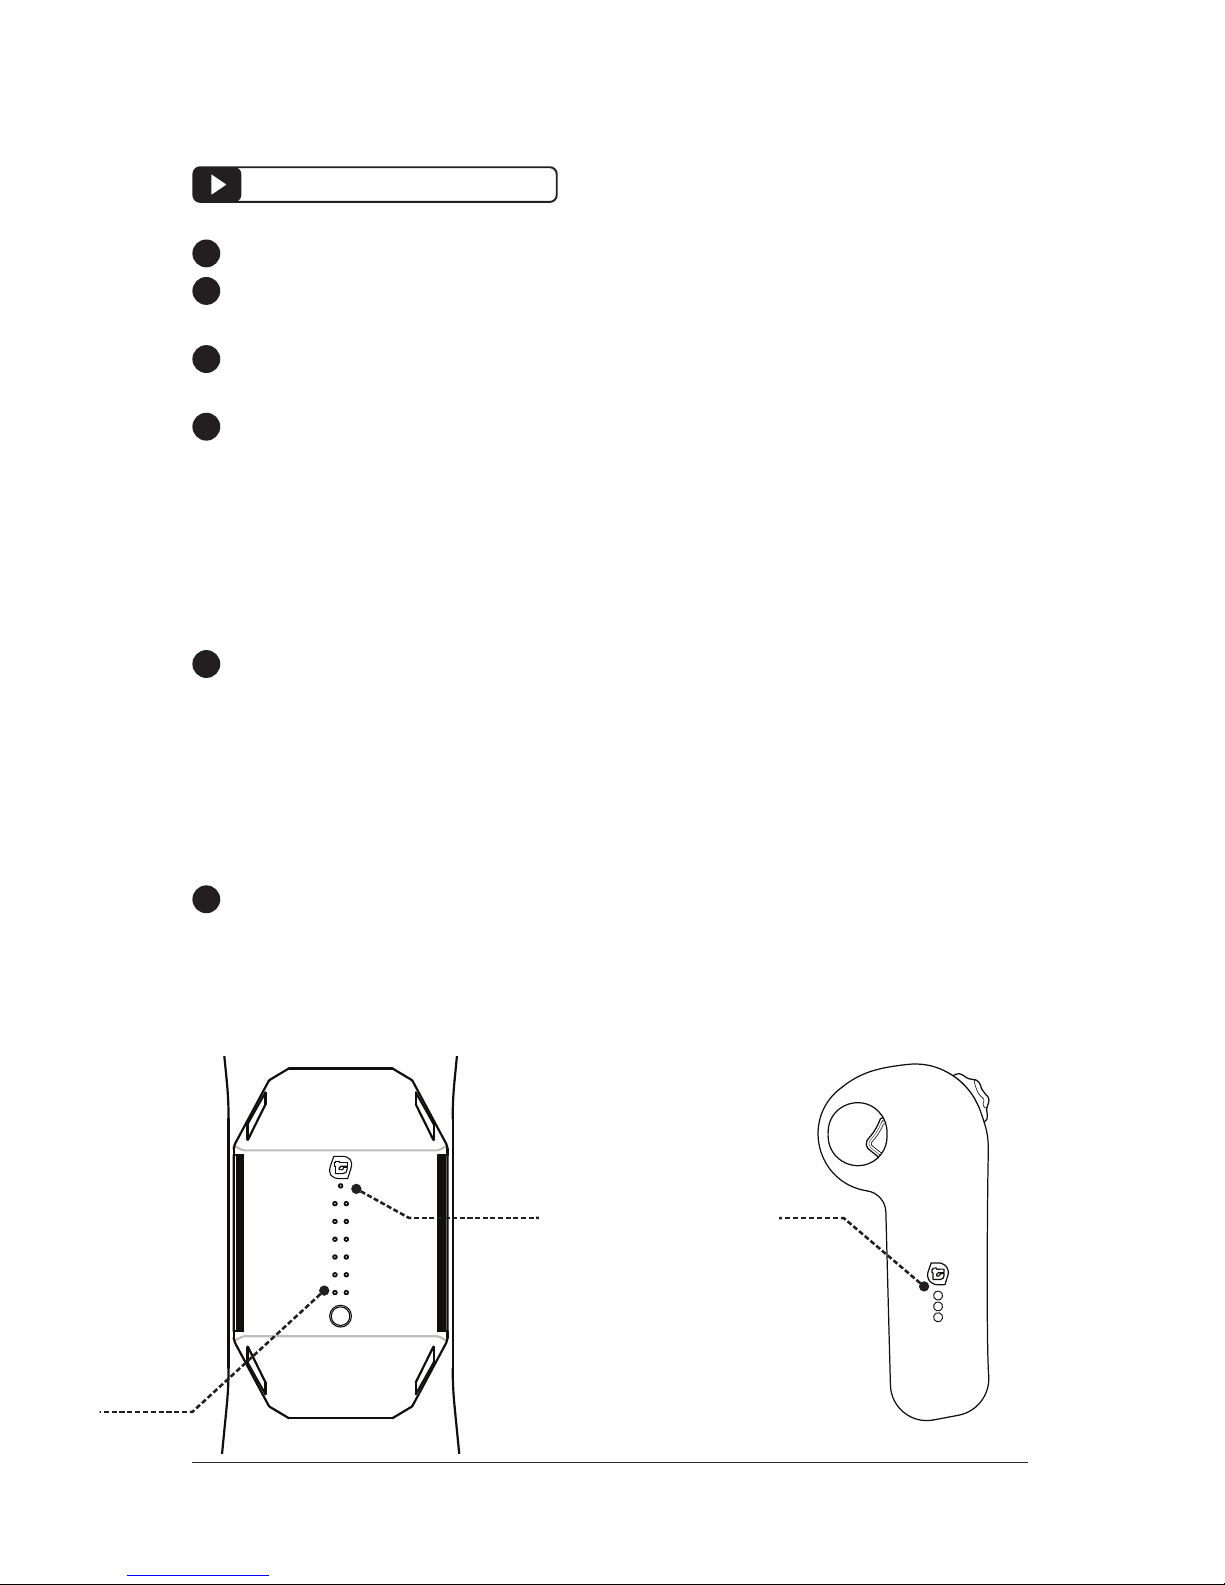
POWER / BLUETOOTH PAIRING
BLUETOOTH LIGHT
(BLUE COLOR WHEN
CONNECTED)
REMOTE
FLIGHT DECK
Power ON the remote by pressing the LEIF BUTTON.
Power OFF by pressing and holding the LEIF BUTTON for one
second.
The remote will automatically turn off after 2 minutes of inactivity.
When powered on, the BATTERY LIGHT will flash to show battery
level
3 FLASH = FULL CHARGE
2 FLASHES = HALF CHARGE
1 FLASHES = LOW BATTERY (Charge with the USB CHARGE
PORT)
To pair the remote with the flight deck, hold down the LEIF BUT-
TON on the remote for 7-10 seconds, while the FLIGHT DECK is
powered ON. A fast three-flashes from the green LED will signal
the syncing sequence has begun. Wait another 10-20 seconds.
If the remote is not synced, hold down the button for 5 seconds to
test again.
Bluetooth connectivity to the FLIGHT DECK is confirmed when
you see a solid blue BLUETOOTH LIGHT on the top surface, under
the leif logo.
!
!
!
!
!
!
LEIFTECH.COM/REPAIR
Page 12
LEIF GUIDE | 12
WWW.LEIFTECH.COM/GUIDE
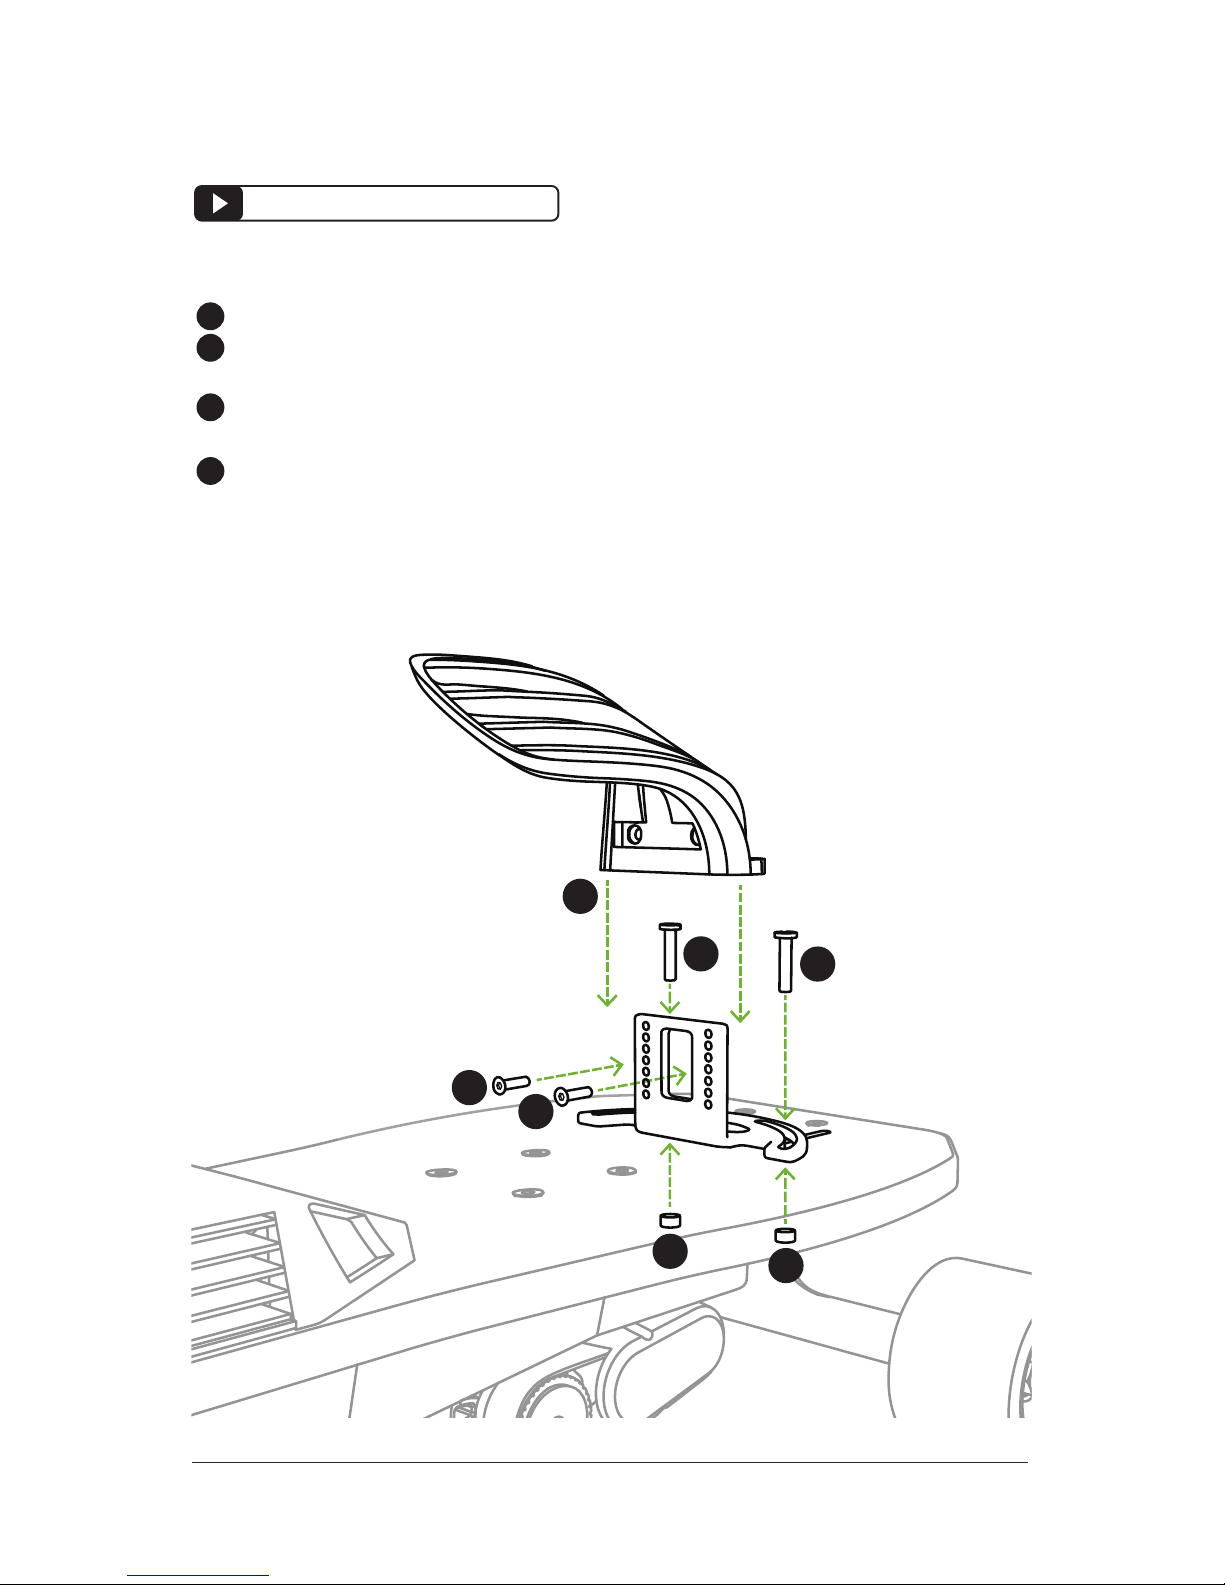
*DECK SCREWS
ON OUTSIDE
OF FOOT
1
2
2
1
3
4
4
MOUNT BINDINGS
INSERT DECK SCREWS (2)
INTO NUTS UNDER DECK
SLIDE ON LEIF BINDING AT PREFERRED HEIGHT
TIGHTEN BINDING SCREWS (2) THRU HOLES IN
BINDING AND BASE
1
2
3
4
LEIFTECH.COM/TRAINING
Page 13
LEIF GUIDE | 13
WWW.LEIFTECH.COM/GUIDE
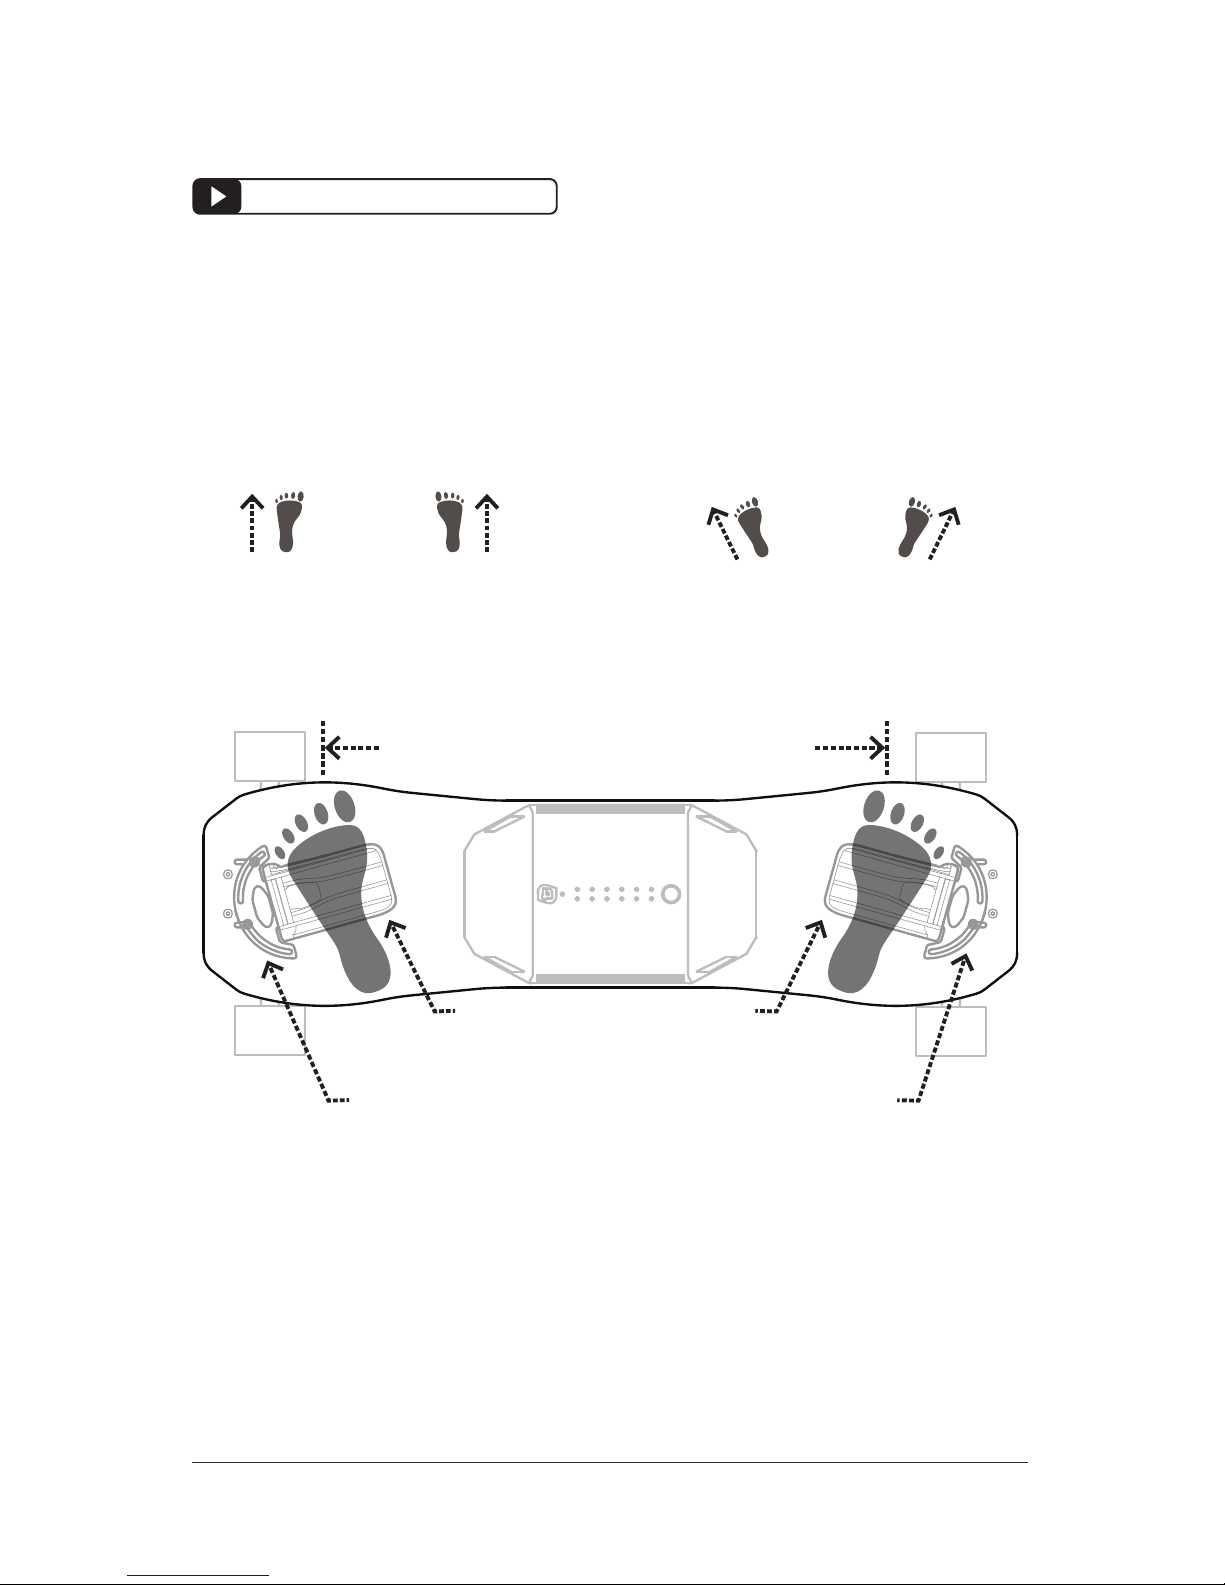
BINDINGS ANGLED OUT
DECK SCREWS ALWAYS ON OUTSIDE OF FOOT
POINTED TOWARD THE TIP OF THE BOARD
SET FEET SHOULDER-WIDTH APART
90 DEGREE
STANCE
“DUCKED”
STANCE
SET YOUR STANCE
We recommend using “duck footed” angles to position your bindings. this
offers maximum stability and binding comfort.
LEIFTECH.COM/TRAINING
Page 14

LEIF GUIDE | 14
WWW.LEIFTECH.COM/GUIDE
RIDING MODES
MODE 1 - Miyagi Mode: Lower acceleration and maximum stability control.
This is great for your first day on the LEIF.
MODE 2 - Shred Mode: Moderate acceleration and stability control. Many
riders will always use this mode, as it most accurately simulates the feel of
snowboarding. THIS IS THE DEFAULT MODE.
MODE 3 - F1 Mode: Maximum acceleration and no stability control. This
mode is very aggressive and responsive to the rider’s control.
THINGS TO KNOW: RIDING MODES
To change or cycle through riding modes
Hold down the POWER BUTTON on the FLIGHT DECK for 5 seconds.
The battery indicator lights will flash.
1 FLASH = MODE 1
2 FLASHES = MODE 2
3 FLASHES = MODE 3
Your chosen mode is stored in the memory when powering the
board ON/OFF with the FLIGHT DECK POWER BUTTON.
The LEIF will return to default MODE 2 when unplugging the
batteries during a battery swap or power cycle.
!
!
!
LEIFTECH.COM/TRAINING
Page 15
LEIF GUIDE | 15
WWW.LEIFTECH.COM/GUIDE
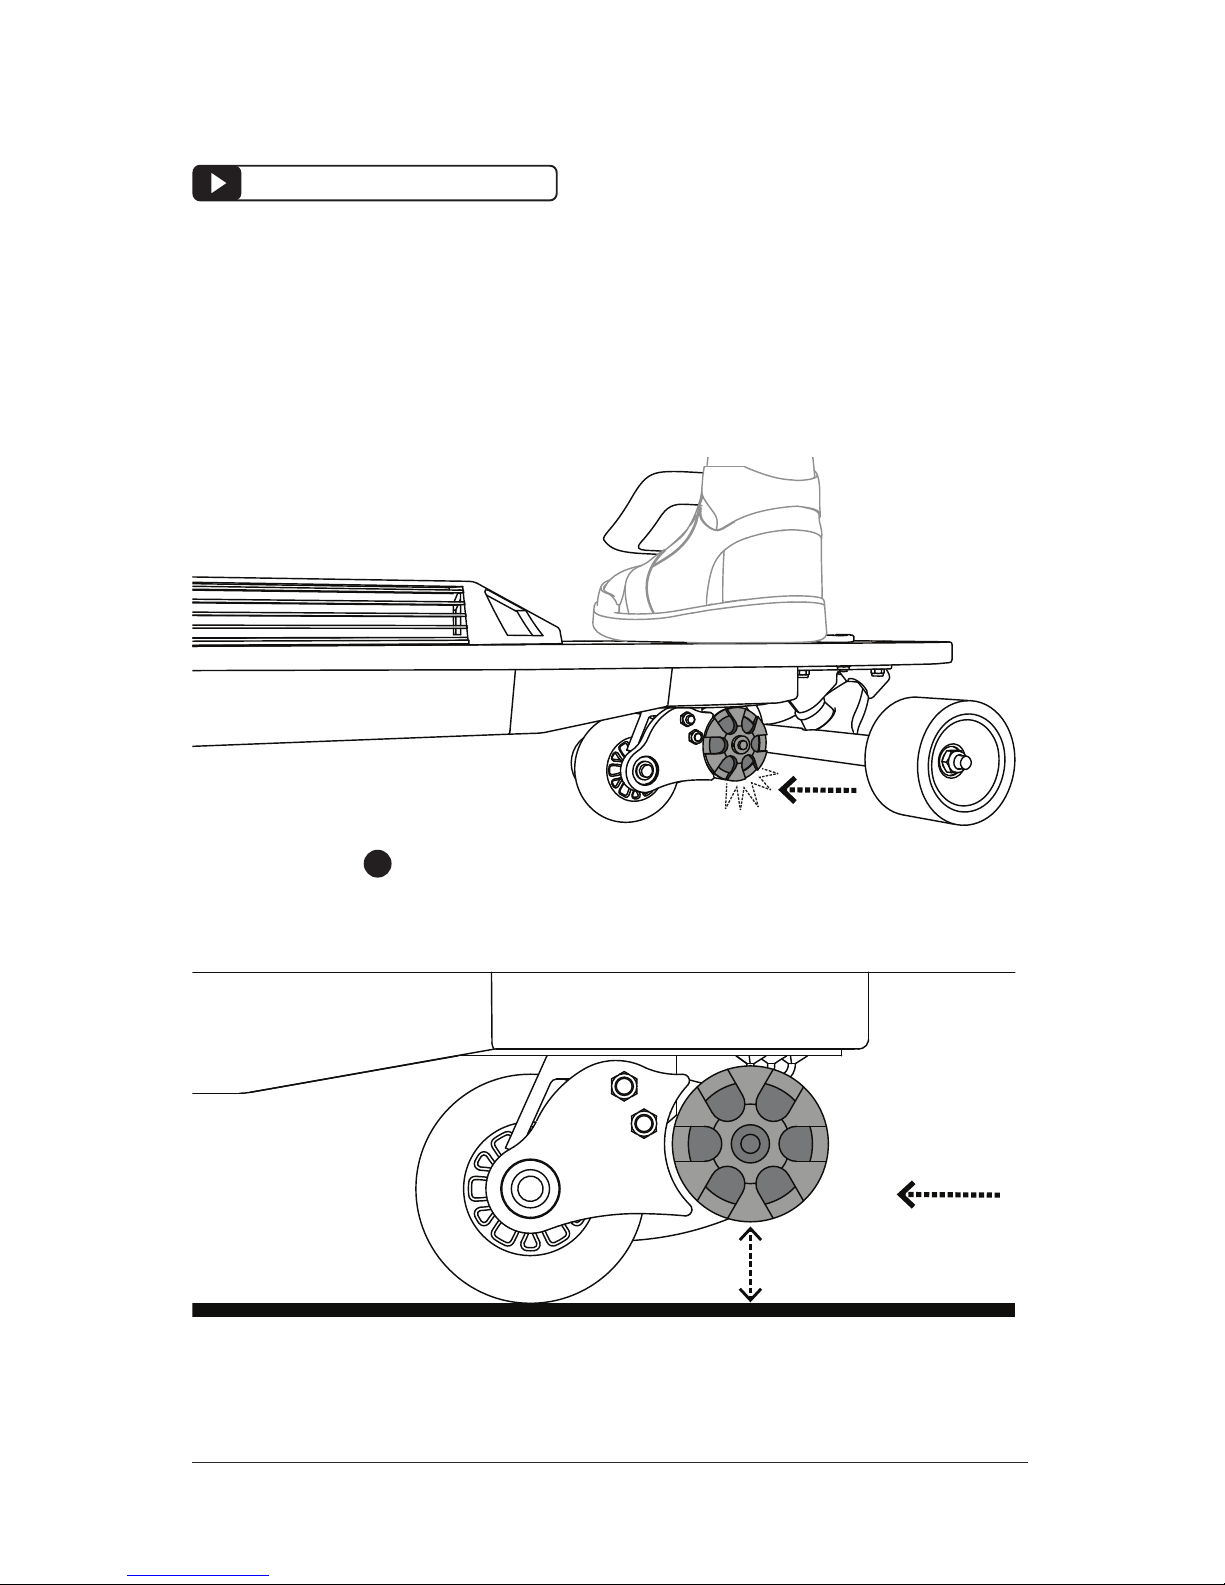
PROTECT THE MOTORS
WARNING: If the motors take physical abuse, they can begin to make
noises when running or stop running altogether.
- The outer trucks help protect the motors, but they can still be vulnerable
- Avoid curbs, especially as a beginner
WARNING: The motors are 2cm (0.78 inches) off of the ground. Any
object or uneven surface that is taller than 2cm will require you to
maneuver around it, or jump over it.
LEIFTECH.COM/TRAINING
AVOID HEAD-ON COLLISIONS WITH CURBS,
SMALL OBJECTS, OR UNEVEN SURFACES.
!
2 CM
Page 16
LEIF GUIDE | 16
WWW.LEIFTECH.COM/GUIDE
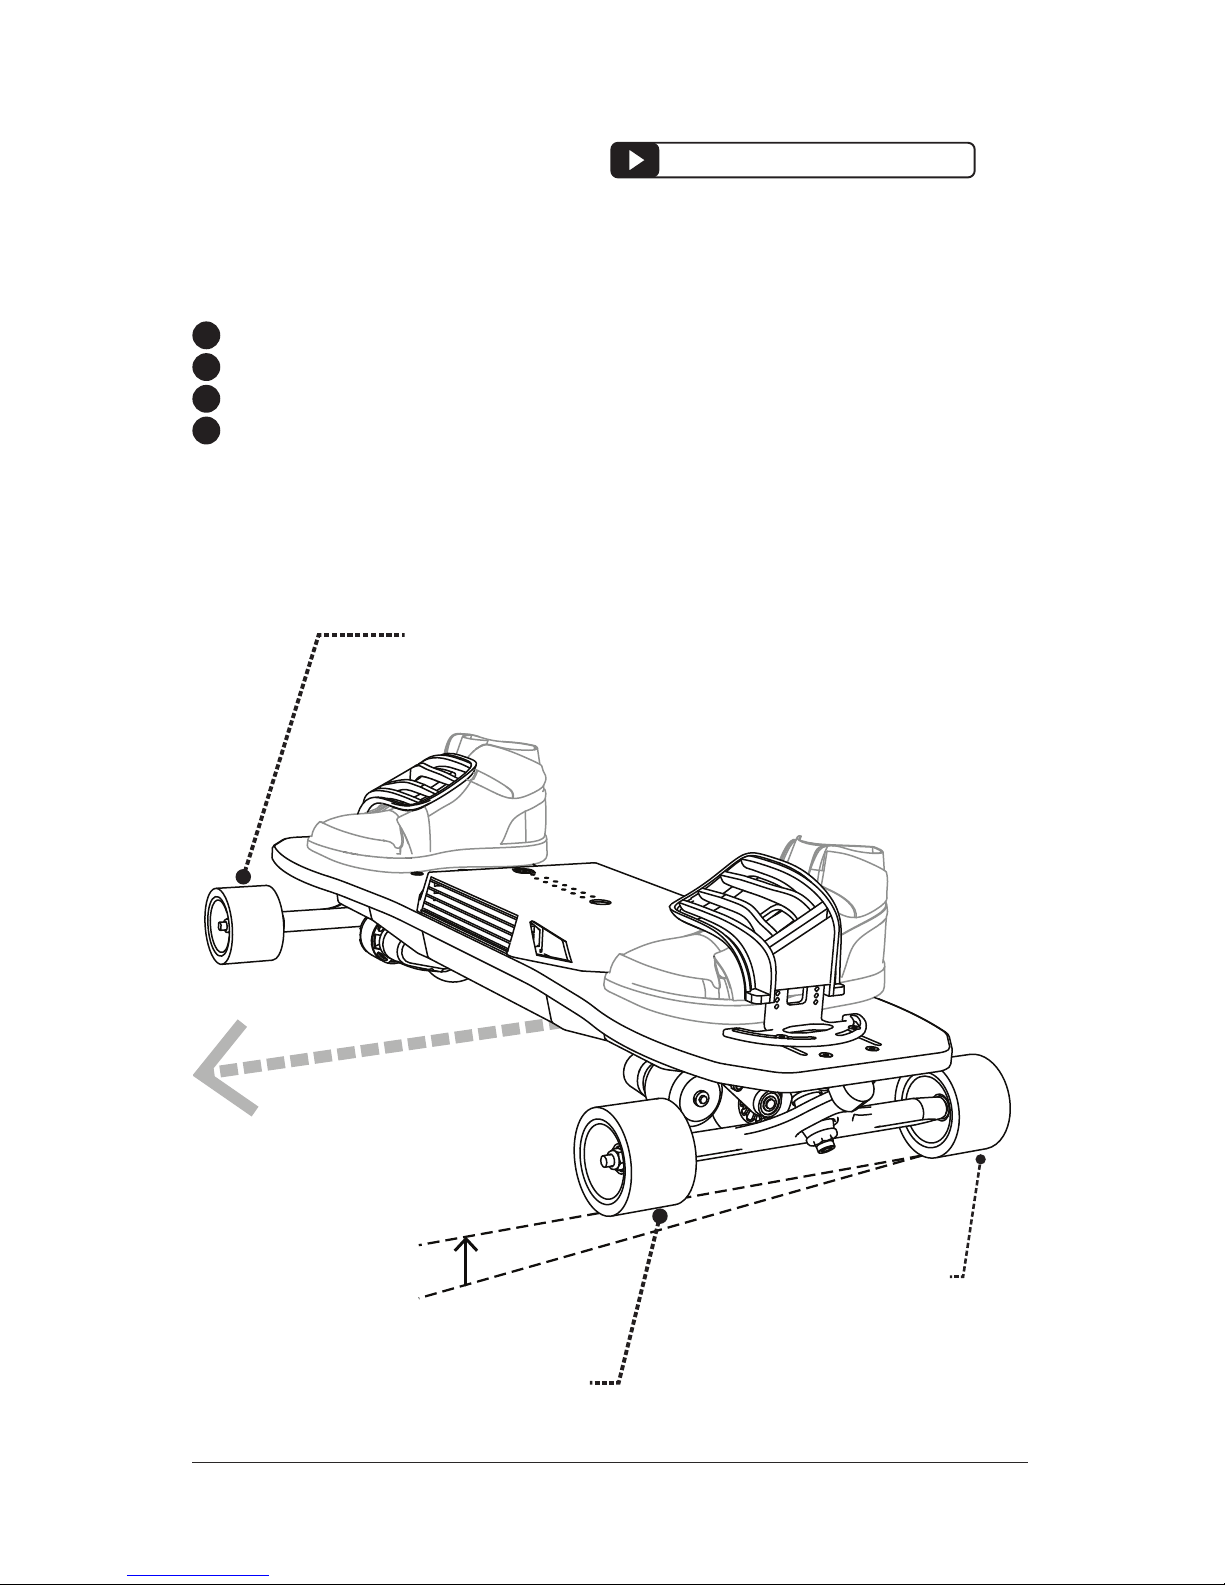
DIRECTION OF SLIDE
LEADING OUTSIDE WHEELS
OFF THE GROUND
*BODY WEIGHT IS
ON THE HEEL SIDE
LEADING OUTSIDE WHEELS
OFF THE GROUND
TRAILING WHEELS
FRONTSIDE SLIDE
EDGE DYNAMICS
WARNING: The LEIF esnowboard uses edge dynamics that function
like a snowboard, so the rider must use the same precautions as
riding a snowboard to avoid “catching an edge”.
Use your outside wheels as an edge balancing mechanism.
Do not attempt slides until you are comfortable riding.
Do not attempt slides at low speed.
Use caution sliding with low battery, as losing motor power during a
slide may cause an unexpected fall.
!
!
!
!
LEIFTECH.COM/TRAINING
Page 17
LEIF GUIDE | 17
WWW.LEIFTECH.COM/GUIDE
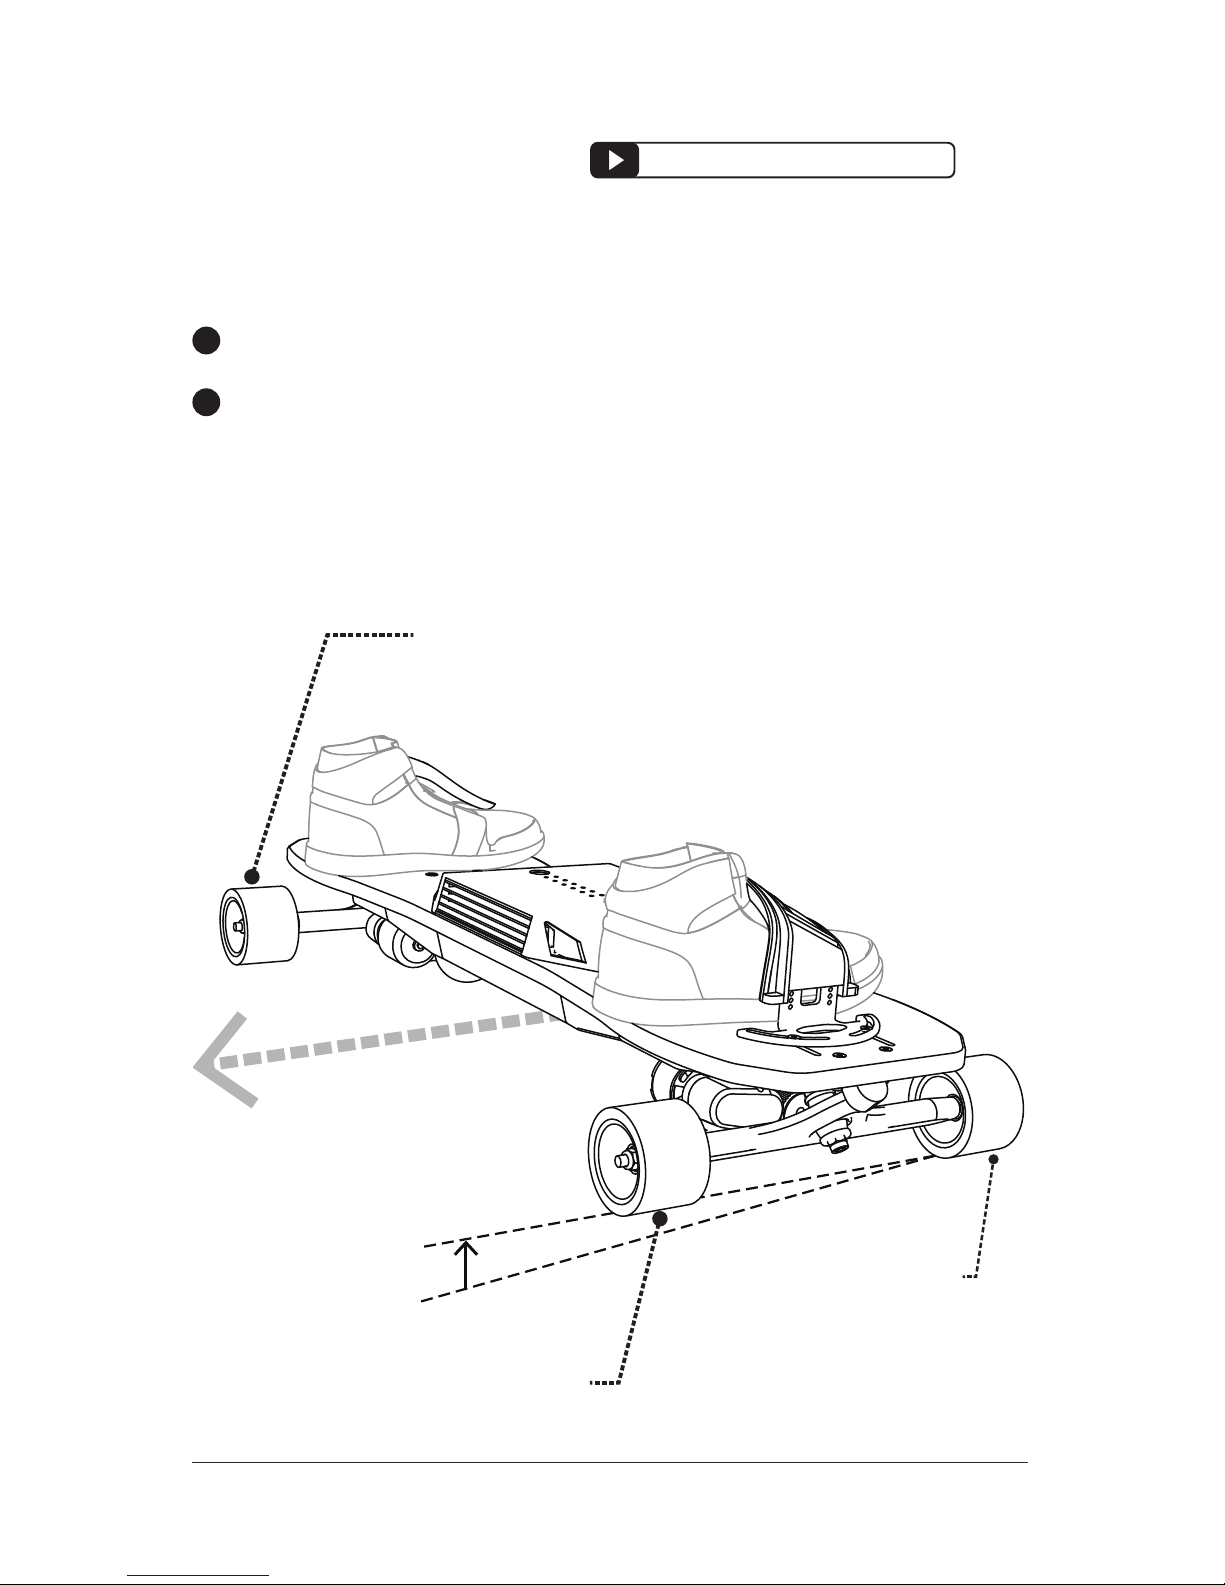
WARNING: Allowing the outside wheels to contact the ground on
the leading edge will cause the esnowboard to “catch an edge”,
which may cause an unexpected fall.
DIRECTION OF SLIDE
LEADING OUTSIDE WHEELS
OFF THE GROUND
*BODY WEIGHT IS
ON THE TOE SIDE
LEADING OUTSIDE WHEELS
OFF THE GROUND
TRAILING WHEELS
EDGE DYNAMICS
BACKSIDE SLIDE
LEIFTECH.COM/TRAINING
While sliding, always keep the leading outside wheels off the ground.
Always keep your body weight tilted back on your trailing edge while
sliding.
!
!
Page 18
LEIF GUIDE | 18
WWW.LEIFTECH.COM/GUIDE
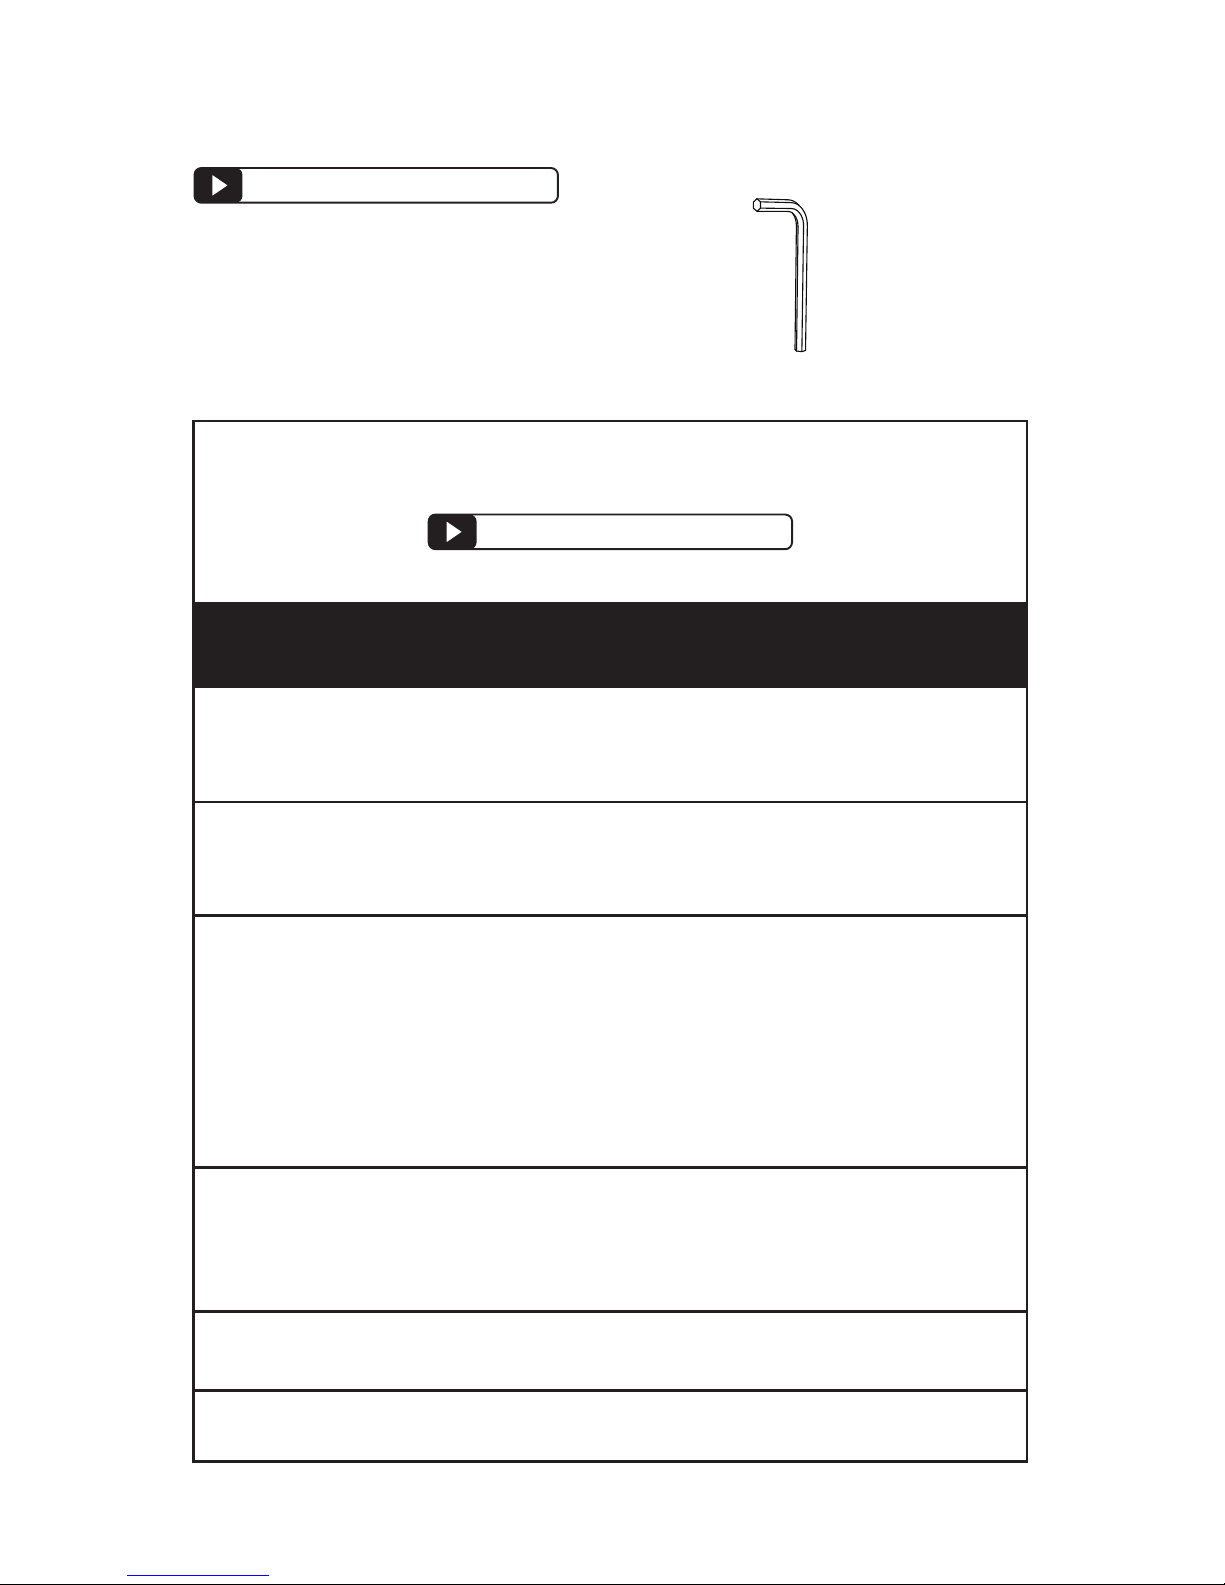
RECOMMENDED REPAIR TOOLS
HEX KEYS
THREAD-LOCKING LIQUID
(LOCTITE OR SIMILAR)
SIZES
1/16 INCH
3/32 INCH
2 MM
2.5 MM
3 MM
4 MM
1.5 MM
Use to secure loose screws
***Always try a power cycle first***
Board doesn’t respond to remote
Motor noise intermittently while sliding
or riding
Motor makes noise all the time
Remote control is not connecting to
the board
Bindings are shifting while riding
Unplug both battery plugs, count to
ten, plug back in. This will fix almost
all problems that occur.
Verify Bluetooth connection.
Be sure to use the ENGAGE TRIGGER on
the remote. See trigger debug instructions
on page 10.
This is normal when electric motors are
slightly out of sequence while riding. This
can happen when going over debris, jumping
or sliding.
To get motors back into sequence, let go
of the trigger momentarily then re-engage
trigger. The noise can stop even with a fast
click of the trigger.
Most likely the motor has received physical
damage. The motor will continue working
despite the noise, but you may also email
[email protected] to purchase a
replacement.
Undergo the remote control sync sequence
(see guide page 10-11).
The binding mounting nuts and bolts need to
be tightened.
CAUSE OF PROBLEM
TROUBLESHOOTING
CORRECTIVE ACTION
LEIFTECH.COM/REPAIR
LEIFTECH.COM/REPAIR
Page 19
LEIF GUIDE | 19
WWW.LEIFTECH.COM/GUIDE
The board is slow or range is
very low
Loud sound from the belts
during riding
Loose screw(s)
Battery has very little range
Bottom row of lights flashing on
Flight Deck
Battery lid repeatedly falls out
Motors are making
“clicking” sounds
Most likely a bearing is causing friction and needs to be
replaced. To confirm the bearing is bad, remove the belts
and see if the wheel spins freely by spinning with your
hand. Replace the bad bearings by undergoing the wheel
replacement procedure.
Most likely, one of the timing belts has lost its grip and
needs to be replaced. Those familiar with timing belts
will know this sound well. Undergo the belt replacement
procedure if the belts are worn.
Use thread locking liquid to keep screws from coming
loose. Use a very small drop of blue liquid on the screw
threads and re-insert screw.
If you have confirmed there is no bearing friction
happening, then most likely the battery was damaged
physically or was damaged from being left plugged into
the board overnight.
Power cycle the battery. If this continues after power
cycling, then you know the battery is dead.
First, try tucking the cords deeper in the inner space next
to the battery, they could be pushing the lock tabs out.
It could be due to physical damage as a result of the
battery not being strapped in tightly.
Contact [email protected] to order a replacement
battery lid.
One of the motor pulley set screws are loose. Please
register in the forum and see videos at
www.leiftech.com/repair.
CAUSE OF PROBLEM
TROUBLESHOOTING
CORRECTIVE ACTION
LEIFTECH.COM/REPAIR
RECOMMENDED REPAIR TOOLS
• #2 PHILLIPS HEAD
SCREWDRIVER
• FLAT HEAD SCREWDRIVER
• ADJUSTABLE WRENCH
• C-CLIP WRENCH
Page 20

LEIF ONLINE RESOURCES
MAIN WEBSITE:
www.leiftech.com
TRAINING:
www.leiftech.com/training
LEIF VIDEOS:
www.leiftech.com/videos
LEIF ONLINE GUIDE:
www.leiftech.com/guide
LEIF INSTAGRAM:
www.instagram.com/leiftech/
 Loading...