

Page 1
www.lei-extras.com
Pub. 988-0147-382
MapCreate 6
Custom Mapping Software for GPS
Installation and Operation
Instructions
Page 2

Copyright © 2003 LEI Extras, Inc., a division of
Lowrance Electronics, Inc. All rights reserved.
MapCreate is a trademark of Lowrance Electronics, Inc.
Points of Interest Data in this unit are by infoUSA,
copyright 2001-2003, All Rights Reserved. infoUSA is a
trademark of infoUSA, Inc.
eXitSource Database, copyright 2001-2003 Zenrin Co.
Ltd. Exit Authority and eXitSource are trademarks of
Zenrin Co. Ltd.
LEI Extras, Lowrance Electronics, or Eagle Electronics may find it
necessary to change or end their policies, regulations and special offers
at any time. They reserve the right to do so without notice. All features
and specifications subject to change without notice. All screens in this
manual are simulated.
For more Lowrance or Eagle accessories,
visit our web site:
www.lei-extras.com
For free owner's manuals and other information,
visit the manufacturers' web sites:
www.lowrance.com www.eaglesonar.com
LEI Extras Inc.
PO BOX 129
Catoosa, OK USA 74015
Printed in USA.
Page 3

Table of Contents
Sec. 1: Introduction................................................................... 1
How Mapcreate Works ................................................................. 3
File Formats & Functions ............................................................ 4
Map Border File ........................................................................ 4
Custom Map File....................................................................... 4
GPS Data File ........................................................................... 5
Ascii Text File ........................................................................... 5
GPS Data Manger (GDM) File ................................................. 5
Atlas File ................................................................................... 6
GPS Unit Compatibility ............................................................... 6
Important Notes About File Size ................................................. 6
Mapping Detail: There's More Here than Meets the Eye. ............ 8
Find Highway Exit Services ..................................................... 9
Find Points of Interest.............................................................. 9
Find an Address ...................................................................... 10
How to Use this Manual: Typographical Conventions.............. 10
Sec. 2: Installing Mapcreate 6.2............................................13
System Requirements............................................................. 13
Installation Types ................................................................... 13
Installing Mapcreate............................................................... 14
Care of your Mapcreate CDs .................................................. 18
Starting Mapcreate (Easy Mode and Advanced Mode) ......... 19
Sec. 3: Working with Mapcreate ..........................................21
Easy Mode Quick Start Reference ........................................ 21
Advanced Mode Quick Start Reference............................... 22
Starting Mapcreate..................................................................... 23
The Mapselect Screen................................................................. 24
The Mapcreate Screen ................................................................ 25
Closing Mapcreate .................................................................. 27
Mapcreate Screen Components.............................................. 27
Master Map Window............................................................... 27
Main Menu .............................................................................. 29
Toolbar..................................................................................... 29
Map Category Options Window ............................................. 30
Waypoint List Window ........................................................... 31
Icon List Window ....................................................................32
Route List Window.................................................................. 32
Route Waypoint List Window................................................. 33
Trail List Window ................................................................... 34
Moving around the Master Map................................................. 34
Pan Arrows.............................................................................. 34
i
Page 4

Center Master Map................................................................. 35
Zoom ........................................................................................ 35
Creating Rectangle Map Borders............................................... 36
Creating Corridor Map Borders ................................................. 37
Saving a Map Border File........................................................... 39
Creating a Custom Map File ...................................................... 40
Creating a Waypoint................................................................... 43
Creating an Icon ......................................................................... 45
Creating a Route ......................................................................... 47
Saving a GPS Data File.............................................................. 50
Creating a Corridor Map from a Route...................................... 51
Creating a Route from a Trail .................................................... 54
Appendix 1: Mapcreate Command List ..............................57
Searching Help............................................................................ 58
Appendix 2: Map Category List............................................ 61
Appendix 3: Mapcreate 6 Symbol Key ................................63
Appendix 4: Considerations When Planning Highway Routes 67
A CAREFUL NAVIGATOR NEVER RELIES ON ONLY ONE METHOD
TO OBTAIN POSITION INFORMATION.
When showing navigation data to a position (waypoint), a GPS unit will show
the shortest, most direct path to the waypoint. It provides navigation data to the
waypoint regardless of obstructions. Therefore, the prudent navigator will not
only take advantage of all available navigation tools when traveling to a waypoint, but will also visually check to make sure a clear, safe path to the waypoint
is always available.
When a GPS unit is used in a vehicle, the vehicle operator is solely responsible for operating the vehicle in a safe manner. Vehicle operators
must maintain full surveillance of all pertinent driving, boating or flying conditions at all times. An accident or collision resulting in damage to property, personal injury or death could occur if the operator of
a GPS-equipped vehicle fails to pay full attention to travel conditions
and vehicle operation while the vehicle is in motion.
WARNING!
CAUTION
WARNING!
ii
Page 5

Section 1: Introduction
How this manual can get you into the field, fast!
Thanks for buying MapCreate 6.2! We know you're anxious to install
the program and make some maps, but we have one more favor to ask.
Before you grab that CD, please give us a moment to explain how our
manual can help you get the best performance from our software.
Our goal is to get you on the road or out to the woods and water fast,
with a minimum of fuss. We won't try to turn you into a computer
expert. Like you, we'd rather spend more time on the water or in the
woods, and less time reading a manual!
For First Time Users
If you are a first-time user, or if your computer skills are a bit rusty, we
strongly recommend you start with the program's easy mode, which
we call MapSelect. It's the quickest and easiest way to make predefined maps with maximum detail for your GPS unit. In MapSelect
mode, all map borders are pre-drawn for you in approximately 8 MB
chunks. Just click the one you want and save it. To use the easy mode,
first install MapCreate 6.2 on your computer (install instructions begin
on page 13). Then, choose the MapSelect option when you start the
program. It's so simple, complete easy mode instructions are on the
one-page yellow insert included in this package. For your convenience,
the same instructions are repeated here in the manual, on page 21. If
you're in a big hurry or just making basic maps, MapSelect is all you
need…you can ignore most of the material in this manual. In fact, you
should stop reading here and just skip on over the Section 2,
Installation!
For Experienced Users
Our program's advanced mode, which we just call the MapCreate
option, is required for managing GPS data such as waypoints, routes,
trails and event marker icons. Unlike the easy mode, MapCreate does
not use pre-defined borders when it generates a custom map. It
includes option settings that allow complete control over a custom
map's file size, the amount and types of detail included, and the specific
area covered by the map.
You don't need to be a computer whiz to use these powerful tools, but
you should be comfortable with basic Microsoft
tasks. This manual contains all the background and tutorial
information you need to use all of the program's advanced features.
1
Windows computing
Page 6

That covers a lot of ground, but, we designed this book so that you don't
have to read the whole thing from front to back for the information you
want. You can skip around, and we've made it easy to look up any tips
you may need from time to time. Here's how:
The manual has three main sections. This first section tells you the
basics you need to know to make MapCreate wake up and get to work.
Section two (on page 13) will help you get the program correctly installed on
your computer.
Section three (on page 21) is the heart of our book, the Quick Start
Reference. It contains easy-to-skim lessons on the program's main
operations. These segments show you how to make highly customized
maps and GPS information and get them into your GPS unit. It's all
you need to get on the road quickly.
After you've gained some experience with the program, you may want
to try some of the really advanced features. That brings us to the
Command Reference, which is available only in the MapCreate 6 Help
file on the CD-ROM. It contains — in alphabetical order — every
command function in MapCreate 6.
Each entry includes a "quick reference" box briefly telling what the
command does and how to run it from the menu, toolbar or keyboard.
Then, we've included more tips and tricks so you can take advantage of
all the extra power and performance MapCreate offers.
You can see an example of the online Command Reference format in
Appendix 1 at the back of this manual, on page 57. Appendix 1 contains
the entry on the Help Command, which explains how to use Help.
In addition to the Command Reference, the online Help includes all the
material from the manual's Quick Start Reference section. Just press
the F1 key to launch Help. You can find facts fast by electronically
searching the Help File for the word or phrase you want.
In our printed manual, we've included other general supplemental
material as appendices in the back of the book. Check out the Table of
Contents to see the topics contained in each appendix.
Once you have the software installed, browse through the quick start
lessons in Section 3 to get you going. Later, when you want to try
something new or you have a question about a particular function, skim
through the manual's table of contents or search the online Command
Reference to read what you need.
2
Page 7

How MapCreate Works
You'll be making maps faster if you understand the hoops MapCreate
must jump through to cram a high detail map into your GPS unit.
First of all, those CDs you just purchased contain a whole bunch of raw
computerized cartography data. There are several hundred files of digital
mapping information containing lake shorelines, navigation aids, roads,
rivers and all the other information that goes into our high-detail maps.
It takes some fancy formatting to fit the whole world onto a couple of
compact discs. Your GPS unit can't read those raw files (called atlas
files). Even if it could, no GPS unit or MultiMedia Card (MMC) has
enough memory to hold that much information.
This is where MapCreate comes in. The program looks at all those raw
atlas files, shuffles the different types of information together, and then
places them onto your computer screen. That's what we call the Master
Map, the main window in the MapCreate interface. By changing
various options in MapCreate, you can control how much geographic
detail is displayed on-screen in the Master Map.
It's a pretty cool electronic map, but your GPS can't read it in this form,
either. This is where you come in. You move around the Master Map
and locate the area or areas you want to make a detailed map of. Then,
you grab the computer mouse and draw a map border around the
region you want. (There are two or three fun ways to do this…we'll
describe 'em in a few minutes.)
Now, this map border isn't really a map yet — it just defines or outlines
the area you want to include in the final GPS-friendly map. You can
save the boundary you have drawn as a Map Border File. MapCreate
uses the Map Border File like an electronic shopping list. The program
looks at your Map Border File, grabs the appropriate raw atlas
information, and then glues it all together as a custom map. Now you
can save this data as a Custom Map File, which you can copy onto an
MMC (or SDC) and load into your GPS unit.
GPS information — such as waypoints, routes or trails — is handled
differently. You can click the mouse to set a waypoint or plan a route,
then save that information as a GPS Data File. This file is ready to
load into your GPS unit. When your unit makes trails or waypoints in
the field, that information is also saved as a GPS Data File, which you
can then load back into your computer, open and save in MapCreate.
Remember, you must use the advanced mode of MapCreate to work
with GPS data.
3
Page 8

File Formats & Functions
Well, now you know what makes MapCreate tick. You may be ready to
skip forward to where we explain how our text formatting makes the
manual easy to skim. If that's the case, move on to "How to Use This
Manual" on page 10. But, if you want to pick up an extra tip or two, look
over this segment describing the file formats MapCreate works with.
Map Border File
This file defines the boundary of the raw cartography data that is
extracted and converted to a GPS custom map. The file information is
displayed on the computer's Master Map screen as either a green
rectangle (rectangle map border) or a magenta polygon shape (corridor
map border.) The file extension is *.lmp, and the file is saved on your
computer hard drive. A Map Border File can contain one or more
different map border sets, and these border sets don't need to be next to
each other on the map.
For example, you can draw a rectangle border around one lake and
then draw a second corridor border around another lake several miles
away, and include both of those border sets into one Map Border File.
There is no limit (other than space on your hard disk, MMC or SDC) on
how many different border sets you can include in a Map Border File.
You can open and edit a Map Border File and then save the file with
the changes you made.
Custom Map File
This is the actual custom map format used by your GPS unit.
MapCreate takes the borders you drew and saved as a Map Border File,
extracts that area's information from the raw atlas data on the CD,
then converts it to a Custom Map File. We call this conversion process
"building the map." The file extension is *.lcm, and the file is saved
either to your hard drive or directly to your MMC or SDC. (Remember,
MMC or SDC cards are what your GPS uses to store information.) If
you save to your hard drive, you can drag and drop the file to your
MMC or SDC at your convenience, just as you handle other Windows
based computer files. (This assumes you are using a USB-compatible
MMC card reader, which acts like an external removable disk drive. If
you are using a parallel port MMC card reader, refer to its manual for
file transfer instructions.)
-
You cannot open and make changes to a Custom Map File once it has
been created. If you want to make changes to a custom map, return to
its original companion Map Border File, make changes there, then
4
Page 9

create a fresh Custom Map File. You can delete the old one, or just save
the new custom map over the old one.
GPS Data File
This file format contains all the GPS navigation information (waypoints,
event marker icons, routes and trails) used by your GPS unit and
MapCreate. The file extension is *.usr (for User file) and the file is saved
either to your hard drive or directly to your MMC or SDC. As with other
Windows-based files, you can drag and drop these files from the hard
drive onto an MMC or SDC, which is then loaded into your GPS unit.
You can open and make changes in a GPS Data File once it has been
created. The contents can include any combination of waypoints, routes,
trails and event marker icons. The information shows up graphically on
the Master Map as symbols with names. The same information is also
available as text in a list window, such as the Waypoint List window.
Your GPS unit saves field-collected GPS information in the same format
so MapCreate can be used to save valuable travel or adventure data for a
later trip. This also makes it easy to exchange GPS data with friends
using Lowrance or Eagle GPS equipment.
ASCII Text File
This is a universal text file format compatible with word processors and
other software programs. MapCreate can exchange routes and
waypoint lists with other mapping programs by importing and
exporting GPS information as comma-delimited ASCII text files. ASCII
(pronounced "ask-ee") uses the *.txt file extension. You don't need to
work with these files, unless you plan to exchange routes and
waypoints between MapCreate and other mapping programs. For more
information on how to use this file type, see the online Command
Reference topics "Export GPS Data" and "Import GPS Data."
GPS Data Manger (GDM) File
This is an older file format used by MapCreate 5 and MapCreate 4 to
hold navigation data (waypoints and such). MapCreate 6 can open
these files, making the program backward compatible with versions 5
and 4. The GDM file extension is *.low. Although MapCreate 6 is
designed to load and read older GPS Data Files in the *.low format,
MapCreate 6.0 also allowed users to choose to save new files in the
older format (though the program could not actually save them). This
has been corrected in version 6.2. You can still open files in either
format, but you can now only save GPS Data Files in the newer *.usr
format. Please note that your MapCreate 6-compatible GPS unit can
only read *.usr files.
5
Page 10

Atlas File
This is the "raw" file format for layer after layer of cartographic and
hydrographic data on our CDs. You never have to work with these files
directly. MapCreate pulls data from these files to display the Master
Map you see in the main window on your computer. The program
combines the information from a Map Border File with the Atlas Files
to make Custom Map Files for your GPS unit.
NOTE: MMC Card Formats
If you have an older MMC that has been formatted by a parallel
port Lowrance MMC Interface card reader, the card format may not
be compatible with your newer USB port MMC card reader. If
that's the case, you can preserve your historic GPS data by copying
it to your hard drive with your older parallel port reader. The older
MMC can then be reformatted so it will work with the newer USB
card reader. To reformat an MMC, refer to the instructions that
came with your USB MMC card reader or your sonar/GPS unit.
If you ever have to format your MMC card, you should know that
MapCreate, as well as Lowrance and Eagle GPS products, will only
read cards that are FAT formatted. MMC cards formatted using
FAT 32 or NTFS will not work with these products.
WARNING:
You should never format an MMC containing a
Navionics
chart. Formatting the MMC will permanently
erase the chart from the card.
GPS Unit Compatibility
MapCreate 6.2 is compatible with these Lowrance products:
iFINDER, GlobalMap
GlobalMap
GlobalMap
LCX-18C, LCX-19C, LCX-104C. If you purchased an LCX-15, LCX-16
or GlobalMap
4000M, GlobalMap 5000C, GlobalMap 6000C,
7000C, LMS-240, LMS-320, LCX-15 series, LCX-16 series,
3000 prior to March 2002, your unit will need a software
2400, GlobalMap 3000, GlobalMap 3200,
upgrade to work with MapCreate 6. The upgrade is available for free
download from the web site, www.lowrance.com. If you have questions,
call Lowrance customer service at 1-800-324-1356, toll free in the USA.
MapCreate 6.2 is compatible with these Eagle products: SeaCharter
320DF, FishElite 320, IntelliMap 320. If you have questions about your
Eagle GPS, call customer service at 1-800-324-1354, toll free in the USA.
Important Notes About File Size
The size of a Custom Map File is important. It must be small enough to
fit on the MMC (MultiMedia Card) that your GPS uses for data storage.
6
Page 11

This solid-state, flash memory device is about the size of a postage
stamp. (SDC [Secure Digital] cards are also compatible with any
Lowrance or Eagle product that uses MMCs.)
The MMCs shipped with Lowrance and Eagle GPS units are 16 MB
size. If you're using a 16 MB MMC, your Custom Map File must be less
than 16 MB in order to fit on the card. (This space issue is the same as
floppy disks; you can't really fit a 1.44 MB file onto a 1.44 MB diskette
because some space is required for the disk's file allocation table. In the
case of a 16 MB MMC, actual maximum useable space is about 15.2
MB.)
MMCs and SDCs are used in a variety of other digital devices. Most
electronics or digital camera stores sell MMCs and SDCs, and at press
time they are available in 8 MB, 16 MB, 32 MB, 64 MB, 128 MB and
256 MB sizes. Cards with larger capacities may be available in the
future. MapCreate is a powerful tool for your GPS, because it allows
you to match your map's file size and detail level to your card's memory
capacity and your travel needs.
Other GPS units use direct serial cable connections to transfer high
detail maps from a computer to the GPS device. Lowrance and Eagle
switched from this traditional method to removable memory cards for
several reasons. A USB card reader can transfer a large custom map to
your unit 30 times faster than a serial cable connection. Removable
media means you don't need to have a computer and cable with you to
load a new map in the field. If the unit is mounted in a vehicle, there is
no need to dismount it and carry it to a computer. The effective
mapping memory capacity of your GPS unit is limited only by the
capacity and number of memory cards you want to carry with you. This
is a handy feature for long journeys or for users who can't lug a laptop
computer along.
Four factors control Custom Map File size: 1. map detail level option
settings, 2. the number of map feature categories turned on, 3. the amount
of developed or naturally occurring features in the area and 4. the amount
of territory, that is, the number of square miles or acres in the area.
Detail Level Options can be set high or medium. The higher the
detail, the bigger the file size.
There are dozens of Map Category Options that you can turn off and
on. They include natural features — such as rivers — and man-made
items such as roads, businesses or other Points of Interest. The more
categories and subcategories turned on, the bigger the file size.
7
Page 12
The amount of development in an area is something you can't
control. For example, one square mile of city streets will make a larger
file than one square mile of wilderness with a few hiking trails.
The amount of territory you include in a map is a major factor. The
more square miles or acres you include, the bigger the file size.
So, what does this all mean in real estate terms? The following table
shows a few examples of high- and medium-detail Custom Map File
sizes, and how long it took the computer to build them. These examples
were prepared on a Pentium
III with 512 MB of memory, using simple
rectangle map borders:
Custom Map File Size and Build Time Examples
Mapped
area
High
Detail
File Size
High Detail
Build Time
Medium
Detail File
Size
Medium
Detail Build
Time
Oklahoma
plus Texas
25.88 MB 4 min., 15 sec. 0.61 MB 4 seconds
Panhandle
Colorado 18.42 MB 3 min., 12 sec. 0.31 MB 4 seconds
Lake
Eufaula,
1.49 MB 16 sec. 0.23 MB 3 seconds
Okla.
Lake
Michigan
26.43 MB 4 min., 2 sec. 0.37 MB 3 seconds
Lake
Okeechobee,
14.12 MB 2 min., 2 sec. 0.54 MB 5 seconds
Fla.
Lake Mead,
Nev.
Atlanta, Ga.
area
San Francisco,
Ca., area
0.90 MB 14 sec. 0.12 MB 2 seconds
7.77 MB 1 min., 5 sec. 0.27 MB 3 seconds
8.63 MB 1 min., 4 sec. 0.21 MB 3 seconds
The lessons in the Quick Reference section were written using
MapCreate's default settings, with high detail and all categories turned
on. If your first maps don't fit your MMC or SDC, refer to the online
Command Reference section for more detailed instructions on
controlling file size.
8
Page 13

Mapping Detail:
There's more here than meets the eye.
The Custom Map Files you make with MapCreate contain more mapping
detail than what is visible on your computer screen. Your MapCreate 6compatible GPS unit takes full advantage of this extra information.
Find Highway Exit Services
For example, move your mouse pointer over a highway exit symbol on
the computer map, and all you'll see is a pop-up tool-tip box listing the
name of the exit. However, in a Lowrance or Eagle GPS unit, the same
exit symbol will show a pop-up box with the exit name and symbols of
all the services available near that exit. The GPS unit can also provide
you a list of those services.
Cursor over
exit symbol
Pop-up
box
At left, an iFINDER GPS screen showing an exit services pop-up icon
box. The iFINDER can then display a text list of those services near
the selected exit, right.
Find Points of Interest
On the computer master map, moving your pointer over a Point of
Interest (POI) symbol triggers a pop-up box with the POI's name. In a
Lowrance or Eagle GPS, you'll be shown the POI's address and phone
number as well.
9
Page 14

Cursor over
POI symbol
Pop-up
box
At left, an iFINDER GPS screen showing a POI pop-up name box. At
right, you can call up a page of information on the POI, and the GPS
unit can lead you to the POI's location.
Find an Address
You won't see addresses on your computer map, either. But when the
MapCreate information is loaded into your GPS, you can search for a
street address or a street intersection. In fact, your GPS unit can
search by name for virtually every category of mapping detail contained
in MapCreate.
All of this information is built into MapCreate's atlas database. As long
as an information category is turned on and included in your Custom
Map File, the data will be available to your GPS unit.
With these and other elements, MapCreate gives you a phenomenal
amount of mapping detail and information. No other consumer GPS
mapping product on the market offers this much information in one
package. For a more detailed list of the map categories available in
MapCreate, see Appendix 2, Map Category List, on page 55.
How to use this manual: typographical conventions
Most Windows-based computer programs offer several ways to perform a
task, and MapCreate 6 is no exception. With mouse and keyboard, you
can access some commands four different ways! We'll show you all of
them, but we save the most detailed information for our online Command
Reference section. There, the entry on each command includes a summary
box showing all the menus and keyboard shortcuts (sometimes that's the
only hint you need to get on with your mapping project.)
In our Quick Start Reference, we will usually focus on one simple way
to get the job done, usually by clicking the mouse pointer on a menu or
toolbar button. In Quick Start, many of the instructions are listed as
numbered steps. This makes it a little easier to follow a series of
instructions when you're skimming the material.
10
Page 15

In the printed Quick Reference and the online Command Reference, the
actual command clicks and keystrokes appear as sans serif, boldface
type. So, if you're in a real hurry (or just need a reminder), you can
usually skim the instructions and pick out where to click by finding the
boldface commands. The paragraphs below explain how to interpret the
text formatting for those commands and other instructions. (If you're
already familiar with Windows or many other software manuals you
can probably skip forward to Section 2: Installation, on page 13.)
Mouse
The mouse controls the movement of a graphic symbol on your screen
called the mouse pointer, sometimes also referred to as a mouse cursor.
The mouse performs an action by moving the pointer over a menu, a
button or the map and then clicking the appropriate mouse button.
When the word "click" is used alone, it means "left-click," or to press and
release the left mouse button. When you need to use the right mouse
button, we will say so explicitly, such as "Right-click on the waypoint."
Sometimes a command requires more than one click. When we say
"double-click," it means to rapidly click the mouse button two times.
Keyboard
The keys on your keyboard may not be labeled exactly as they are in
this manual. All key names are shown in bold, sans serif type. For
example, the "Control" key is shown as
shown as
Enter
.
Keys are sometimes used in combinations. For example,
hold down the
Alt+T|W
indicates a two-step combination: hold down the
pressing the
key while pressing the T key. The hot key sequence
Ctrl
key, release, then press the W key.
T
and the "Enter" key is
Ctrl
Ctrl+T
key while
Alt
means to
"Arrow keys" is the collective name for the up arrow, down arrow, left
arrow and right arrow keys.
To choose a command from a menu, you can use the mouse or press a
key combination.
Instructions
Words in small capital letters, in a bold sans serif type, indicate that
you are to take an action of some kind with a command, menu, box or
other item. For example, "You can use the Create Route command to
plan a path to navigate with your GPS. To begin the route, choose
C
REATE ROUTE
."
When the phrase "choose command" is used in the online Command
Reference section, it means to run or execute the specified command.
11
Page 16

For example, if the manual says "choose
C
REATE WAYPOINT
," it means to
run the Create Waypoint command. You can choose commands by
clicking the mouse pointer on the menus or toolbar buttons, or by
pressing the appropriate hot key or shortcut key on the keyboard.
Commands are sometimes described as menu sequences, to help you
find the command faster. For example, "to open the Trail List window,
click
V
IEW|TRAIL LIST
," means to mouse click on the main menu's View
command and then click the Trail List command on the submenu.
Specific text or numbers you must type are shown in bold, sans serif
type. For example, if the manual says "Enter a Zoom range of
650
miles," you would click in the Zoom Range Window, type the numbers
650, then press the
Enter
key.
Place holders for other items you must supply yourself, such as file
names, are italicized. For example, when the manual says "Enter a
name in the File Name text box," you would click in the text box, type
the name you want to use for the file, then press the
Enter
key.
This manual is written specifically for MapCreate 6.2, but for
simplicity, the program is often referred to as "MapCreate" or
"MapCreate 6."
12
Page 17

Section 2: Installing MapCreate 6.2
System Requirements
MapCreate 6 requires the following minimum system resources:
• IBM
• Pentium
• 32 MB RAM
• 50 MB hard disc space.
• 256 color display.
• Microsoft
• CD-ROM drive.
MapCreate will run on a system with the above specifications, but the
program will work slowly. A faster processor and more RAM will
significantly improve program operation. You can also optimize
performance by installing as much of the program as possible to run
from your hard drive instead of the CD-ROM drive. (Do this by using
the Custom install mode, described below.)
Installation Types
There are three types of installations:
NOTE:
If you already have MapCreate 6.0 or MapCreate 6.1 installed on
your computer, you must uninstall it before installing MapCreate
6.2. Some MapCreate 6.2 functionality will not be included and the
compatible PC.
133 MHz or faster processor.
Windows 98 or later.
Typical - Installs nav aid data, the low detail background map
(Master Map) data and world-wide medium detail
map data. Takes approximately 70 MB of hard drive
space. Requires you to have the CD in the drive only
when working in high detail map mode for the
continental United States and Hawaii.
Compact - Installs the MapCreate program with Help only.
Requires you to have the CD in the drive whenever
you use the program. The compact install allows you
to conserve hard drive space.
Custom - Allows installation of the program and all map data
files on the hard drive. This takes approximately 1
gigabyte of hard disk space. You may run the
program without the CD in the drive. Caution: Be
patient if you choose custom install. It may take
several minutes for all the files to install to the hard
drive. You will also be prompted to remove disc 1 and
insert disc 2 to complete the installation.
13
Page 18

program will not operate correctly if you choose to modify an existing
installation. To uninstall MapCreate, use the standard Windows
ADD/R
EMOVE PROGRAMS
function. (For more information on Windows
uninstall, open your Windows Help file and search for the phrase
"Removing Programs.")
For Typical or Compact installations of version 6: The high detail map
data is organized into two overlapping regions. The western continental
United States and Hawaii are on the USA-West (disc 1) CD; the eastern
continental U.S. is on the USA-East (disc 2) CD. If you are using a
Compact installation and you want to see medium detail world maps,
use the USA-West (disc 1) CD in your drive. To view the high detail
data boundaries, see the figure below.
Data overlap area
USA-West (disc 1)
Continental United States and Hawaii showing approximately where
data is divided on the two CDs. Mapping data overlaps in the middle.
USA-East (disc 2)
Installing MapCreate
To install MapCreate, follow these steps:
1. Insert the USA-West CD-ROM (disc 1) into the computer's drive.
2. Click
S
TART|RUN
.
Click the S
button on the Windows taskbar.
TART
14
Page 19

3. Type
D:\setup.exe
Type the setup command directory path and file name.
(where D: is the drive letter for your CD-ROM)
4. Click OK to begin installation.
NOTE:
If you are using Windows 2000 or Windows XP Professional, you
may receive an error message if you are not logged on with
administrator privileges. If this occurs, you can complete the
MapCreate installation by first logging on as an administrator,
then proceeding with step 1 on page 14.
5. Follow the on-screen instructions:
A. InstallShield will load.
B. InstallShield is ready to prepare for installation.
15
Page 20
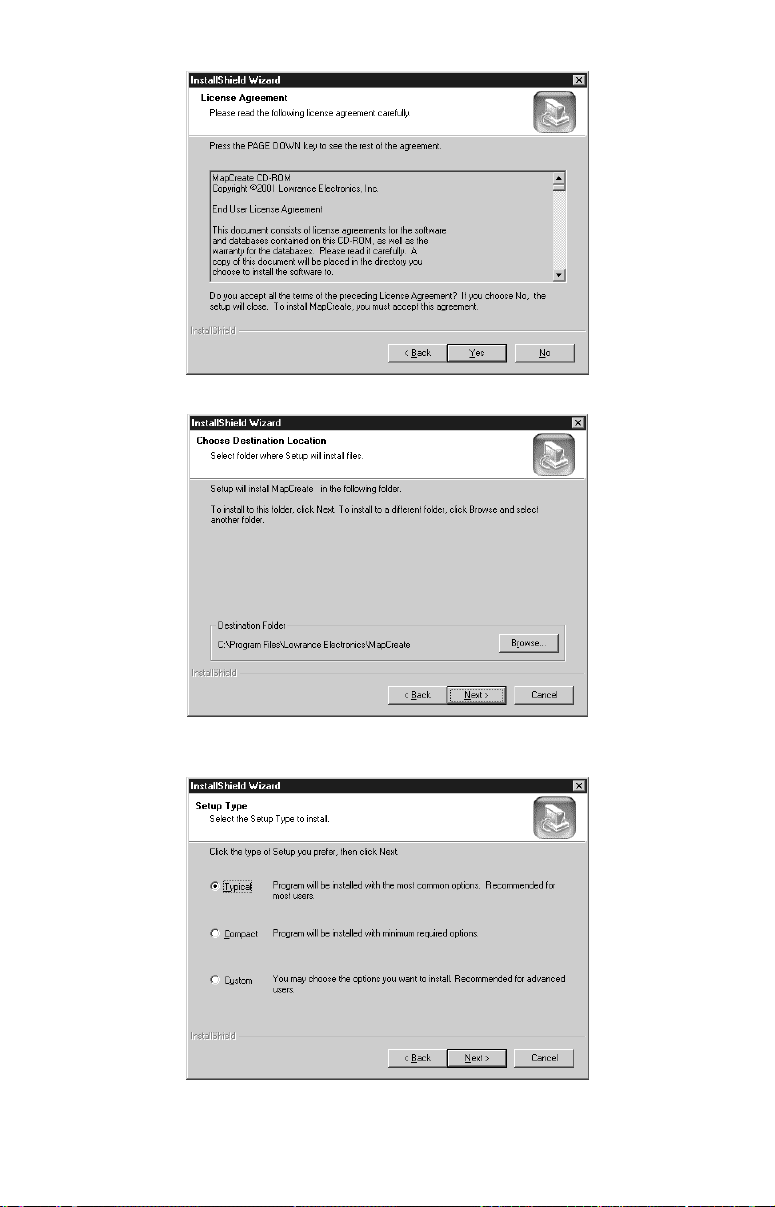
C. Read the License Agreement.
D. Choose a destination folder for the program. You can accept the
default or you can choose another location.
E. Select the type of setup.
16
Page 21

F. If you picked Custom install, select the components to install.
G. Select a program folder. You may accept the
default or choose another folder.
H. With all your preferences determined, InstallShield will
begin copying files. A progress window is shown.
17
Page 22
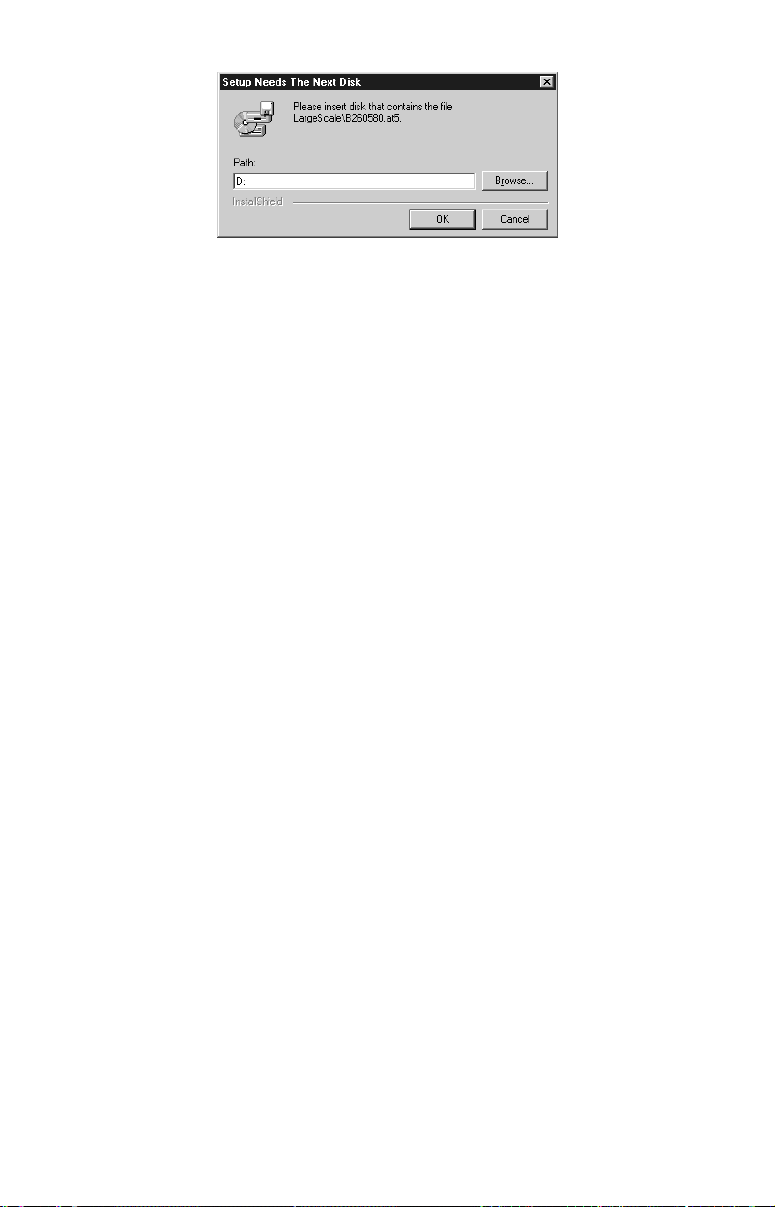
I. If you choose custom setup to install all files to your hard drive, you
will be prompted to insert the second CD. On some computers the
message may ask for "Disk 3." Just ignore the statement, insert the
USA-East CD (disc 2) and click OK to continue the setup.
6. When the installation program is finished, the progress windows
disappear. You can then start MapCreate by double-clicking the
program icon in the MapCreate 6 program group.
NOTES:
• Use the Typical or Compact installation if you are not making maps
of the United States.
• The more map data that you install on the hard drive, the faster
the program will run. It takes less time to read map data from the
hard drive than from the CD-ROM.
• Graphics programs such as MapCreate can run slow on some
computers with older processors or small amounts of memory.
Running multiple applications at the same time can also consume
computer resources and slow down response time. If computer
processing speed is a problem, consider temporarily switching to
the Medium Map Detail setting. (To do this, see View Map Display
Options in the online Command Reference section.) Go ahead and
create a map border, then remember to switch back to the High
Map Detail Setting before creating your custom map file.
• It takes a lot of RAM (Random Access Memory) to create custom
map files. If your system is low on RAM, then make several small
custom map files and copy them one by one to the MMC card. (Note
that MMC cards can hold a maximum of 30 different files. The total
amount of information cannot exceed the MMC size capacity, no
matter what the number of files is. For example, an 8 MB MMC
could hold approximately one 7.66 MB file, or 30 files, so long as the
30 files totaled 7.66 MB or less.)
Care of your MapCreate CDs
Protect the shiny recorded surface of the compact discs from scratches,
fingerprints and dirt. Hold a disc along the outer edge or by the center
hole. Clean a dirty disc with a soft, dry cloth. You can also use a
18
Page 23
commercial CD cleaner or ethyl alcohol to remove fingerprints and dirt.
Do not leave your discs in direct sunlight or in a hot, humid location.
Starting MapCreate (Easy Mode and Advanced Mode)
MapCreate 6.2 includes both an easy mode called MapSelect and an
advanced mode called MapCreate. Both modes are useful at different
times depending on your needs and computer skill level.
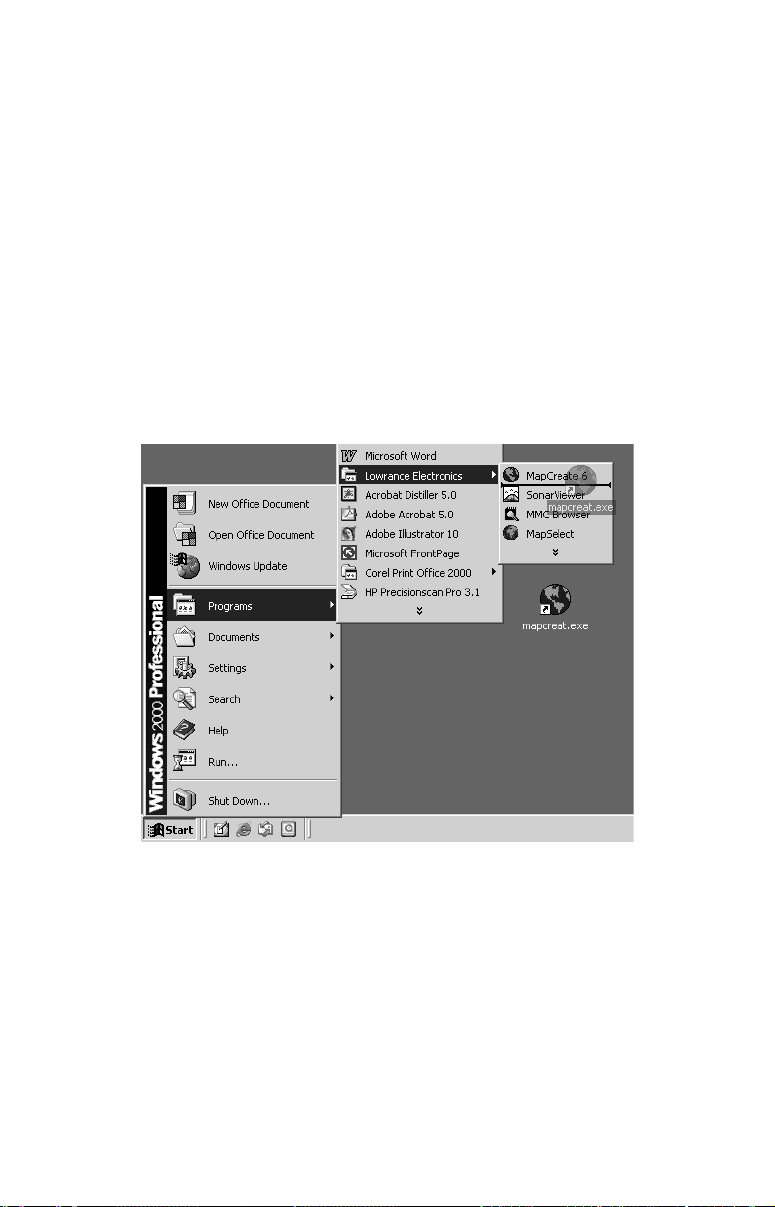
When you install MapCreate 6.2, a MapCreate link appears in the
programs list on your Windows Start Menu. Launching the program
from this link will open up a selection box, asking you to choose which
mode you wish to use. This box opens every time you launch MapCreate
6.2 from the default Start Menu link.
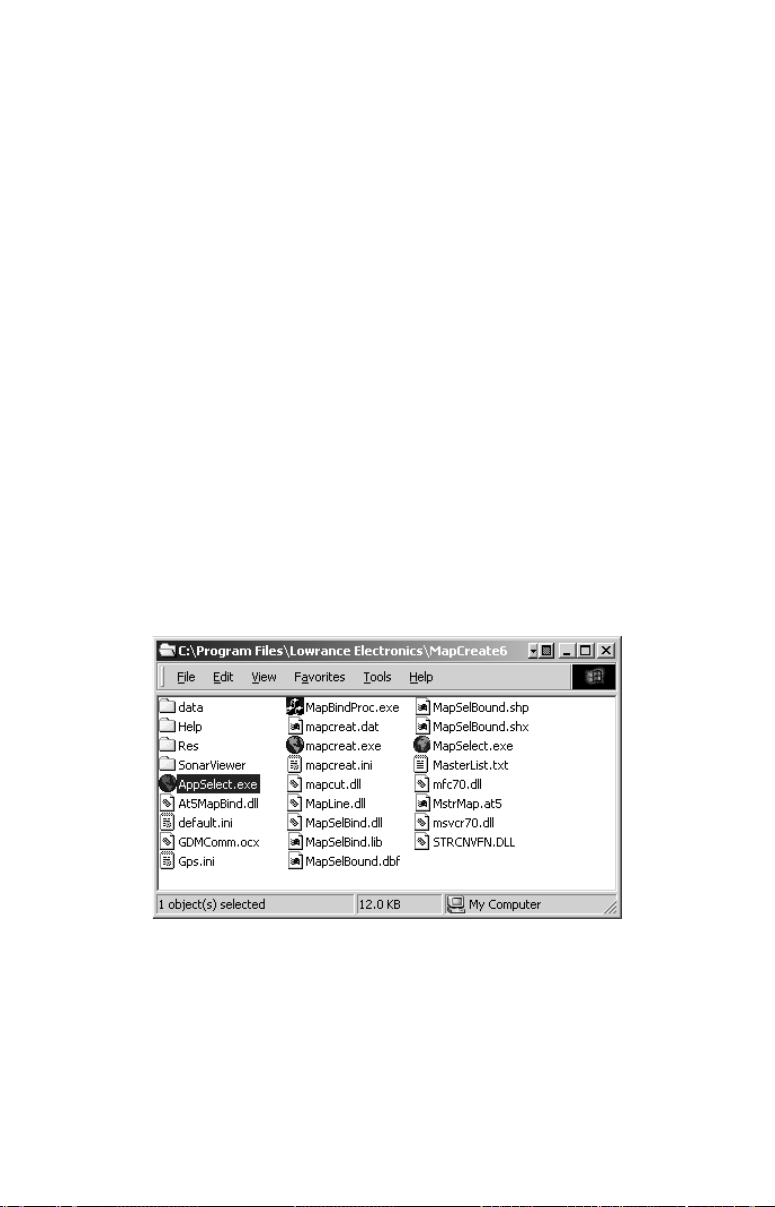
To skip the mode selection screen, open the MapCreate program group
window as shown in the following illustration. Double-click the icon of
the desired program and it will open directly.
NOTE:
MapCreate 6.2 can be launched from any of the three executable
files (*.exe) shown in this program group window. "Appselect.exe"
launches the Mode Selection box, and is the file run from the
Windows Start Menu by default. "MapSelect.exe" launches
MapSelect, also called easy mode. To launch the advanced mode,
choose "mapcreat.exe."
MapCreate 6 program group window, with Appselect selected. Choose
either MapSelect.exe or mapcreat.exe to go directly to the desired mode.
If you generally prefer using only one of these modes, you can create a
shortcut directly to the mode you prefer either on your desktop, or in
your Windows Start Menu. To do so, first open the MapCreate program
group window as shown in the previous illustration.
19
Page 24
To add a direct shortcut to your desktop:
Right-click and drag the desired icon to your desktop, then release the
mouse button. When you do so, a selection list will pop up asking you what
you wish to do. Choose
C
REATE SHORTCUT(S
. A copy of the icon will now
) H
ERE
appear on your desktop, and double-clicking it will launch the program.
To add a direct shortcut to your Start Menu:
Follow the steps above to create a shortcut on your desktop. When you
are done, click and drag the shortcut onto the Start Menu button in the
corner of your screen. Keep holding down the mouse button and wait a
second or two until the Start Menu expands.
Drag the icon up the menu to
to
L
OWRANCE ELECTRONICS
(or whichever program folder you chose during
P
ROGRAMS
, and when it expands, drag over
installation). When you have the icon in the desired location, release
the mouse button and the shortcut will be added to the list.
Click and drag the desktop shortcut up the Start Menu to your desired
program folder. Release the mouse button to add the shortcut.
Whether you add the shortcut to your Start Menu or your desktop, once
it's in place you can right-click on it to change its name – for instance,
you might change "Shortcut to mapcreat" to "MapCreate Advanced
Mode." By right-clicking on these shortcuts you can also launch the
program (with the
command), copy the shortcut to add elsewhere,
O
PEN
or delete it from the list.
For more details on the many other ways to create and manipulate
shortcuts, open your Windows help file and search for the word "shortcut."
20
Page 25

Section 3:
Working With MapCreate
Easy Mode Quick Start Reference
If you're really in a hurry, this summary will tell you how to work
MapCreate's easy mode, MapSelect. (If you haven't installed the
program yet, see those instructions on page 13. Before you start, make
sure your MMC card reader is installed and working, and you know the
card reader's drive letter.)
How to select and save a pre-defined custom map
1. Insert an MMC or SD card in your card reader. Each pre-drawn map
takes about 8 MB of space, so two maps will fit on a 16 MB card, four will
fit on a 32 MB card, and so forth.
2. Begin by clicking the Windows
from the menu. When the mode selection box appears, choose
ELECT
.
MAPS
3. The full map display appears. Red lines represent pre-drawn custom map
borders. Move your mouse pointer over a map segment and it turns gray,
showing it's selected. At the bottom of the screen, a selected map's Map
Name and Map Size are both displayed, as well as disk space available.
4. Locate the area you want to create a map of. Move the mouse pointer
over the area to highlight and select it, then click on the selected map.
5. MapSelect displays a message asking if you want to save the map to
a particular drive. If the drive letter is correct for your MMC card
reader, click
click
, then click the
N
O
drive letter, then click
and go to step 6. NOTE: If the drive letter is incorrect,
Y
ES
S
O
button on the tool bar to select the right
AVE TO
. Now, select and click on your desired map
K
area. When the Save Map Message appears, click
6. Wait while the program builds the map. A progress box shows the
map building and saving process under way. Do not remove the MMC
card from the reader until the completion message appears,
telling you that it's safe to take out the card! After the completion
message appears, click
it in your GPS unit. Click
remove the card from the reader and install
OK,
|
F
E
ILE
XIT
Final Notes: For a map of Hawaii or an area where line congestion
makes it hard to select, you can move the map and zoom in or zoom out
for easier viewing. Click the
C
ENTER MAP
you want. Now repeatedly click the
Click the
S
ELECT MAP
original display, click the
button, then proceed with step 4. To return to the
F
ULL MAP
button and choosing
S
TART
.
Y
ES
to close MapSelect.
button, then click near the area
Z
button to enlarge the view.
OOM IN
button.
MAPC
REATE
S
TART
6
21
Page 26

Advanced Mode Quick Start Reference
If you have some computer experience and want to do more with your
mapping software, this 10-step summary will get you started with
MapCreate's advanced mode. For detailed explanations, read through
the lessons in this section. Before you start, make sure your MMC card
reader is installed and working, and you know the reader's drive letter.
How to make and save a rectangle map
1. Start MapCreate by clicking the Windows
MAPC
from the menu. Choose
6
REATE
S
TART MAPCREATE
2. Maneuver the Master Map so you can see the area you want to
include in your map. Use the
east or west. Use the
Z
OOM-IN
P
AN ARROW
and
buttons to move north, south,
Z
OOM-OUT
needed to close in on or back away from the area you're viewing.
3. Click the
C
REATE MAP BORDERS
button in the toolbar. Move the mouse
pointer above and to the left of the desired area.
4. Click, hold down the mouse button and drag diagonally down and to
the right until the desired area is enclosed with the green border box.
(If you see a magenta corridor box instead, you released the button too
soon. To clear the magenta border and start over, see the Sec. 3 topics:
Creating Rectangle Map Borders, Creating Corridor Map Borders and
in Help's on-line command reference, Create Map Borders.
5. Release the mouse button.
6. Click the
S
AVE MAP BORDERS
name for your Map Border File, then click
button. In the Save As dialog box, type a
S
AVE
saves the Map Border File to the MapCreate data folder, typically:
C:\Program Files\Lowrance Electronics\MapCreate6\data.)
7. With the Map Border File still open, click the
button. After a moment it will tell you your map's file size. If it fits the
card, click
to clear the message and jump to step 8. If the map file is too
O
K
large for the card, redraw your custom map a little smaller and/or turn off
some Map Categories. (Use the estimate button to re-check the size.)
8. When your file is the right size, click the
When the map is built, click
to save the file. In the Save As dialog
OK
box, type a name for your Custom Map File, and select your MMC card
reader's drive letter for the location, then click
map to your hard drive if you wish, but we recommend you first save it
directly to the MMC card.)
9. After the program has saved the map to your MMC card, the save
progress box disappears. You can now close MapCreate.
10. Follow the instructions in your GPS manual for loading the MMC
into your unit.
22
button and choosing
S
TART
from the selection box.
(
Z-I
or
N
) buttons as
Z-O
UT
. (By default, MapCreate
E
STIMATE CUSTOM MAP SIZE
C
REATE CUSTOM MAP
. (You can save the
S
AVE
button.
Page 27

Starting MapCreate
If you installed the Typical or Compact version of MapCreate, make sure
the CD-ROM for the area you intend to use is in the CD-ROM drive.
NOTES:
• For MapCreate 5 owners: If you have both MapCreate 5 and
MapCreate 6 installed on your computer and run the programs
from the CD, be sure you have the correct version of the CD in your
drive when working with the two programs. Running MapCreate 5
with the version 6 CD or running MapCreate 6 with the version 5
CD will generate an error message when you try to build a map.
The data discs are not compatible with each version of the program.
If you made full custom installations of both programs to your hard
drive, this error message will not appear because each version has
its own unique directory on your hard drive.
• For Typical or Compact installations of version 6: The high detail
map data is organized in two overlapping regions. The western
continental United States and Hawaii are on the USA-WEST CD
(disc 1); the eastern continental U.S. is on the USA-EAST CD (disc
2). If you are using a Compact installation and you want to see
medium detail world maps, use the USA-West (disc 1) CD in your
computer's CD drive.
You can start MapCreate by clicking the
MAPC
from the menu, or you can double-click the MapCreate icon
REATE
in the MapCreate program group.
Start MapCreate by clicking the Windows S
choosing MapCreate from the Start menu.
23
button and choosing
S
TART
button and then
TART
Page 28

Or, you can start the program by double-clicking the
AppSelect icon in the MapCreate program group window.
You'll see a screen that looks like this below, asking you to choose
which mode you want to use. Choose MapSelect to quickly and easily
save custom maps of pre-defined areas to your MMC. Choose
MapCreate to make more advanced custom maps of exactly the areas
and sizes you desire, or to manipulate other GPS data such as routes,
waypoints, trails and event marker icons.
MapCreate 6.2 mode selection screen.
NOTE:
To skip the mode selection screen, double-click the icon of the desired
program in the MapCreate program group window (MapSelect or
MapCreate), or create a direct shortcut as described on page 20.
The MapSelect Screen
If you choose to use MapSelect, you'll see a screen that looks like this:
24
Page 29

MapSelect opening screen.
MapSelect is designed for simplicity, and requires little in the way of
directions. The maps are pre-drawn, and you just point, click and save.
For MapSelect operation instructions, see the Easy Mode Quick Start
Reference on page 21 or refer to the separate MapSelect Instruction
Sheet (read me first) packaged with this software.
The MapCreate Screen
If you choose to use MapCreate, the opening splash screen appears
while the program is loading. It will take a moment or two for the
program to load the map detail.
MapCreate 6 splash screen appears while program is loading.
NOTE:
Load time depends heavily on your computer's processing speed
and the amount of RAM (Random Access Memory) available.
Windows requires approximately 20 seconds to recognize the CDROM before starting the MapCreate program.
Once it's finished loading, you'll see a screen that looks like this, with a
map of the world and the Map Categories window open:
25
Page 30

MapCreate 6 opening screen.
MapCreate has several other windows that are used to control mapping
data. If they were all opened or turned on, the program interface would
look like this (labels have been added for illustration):
MapCreate 6 GPS text list windows.
You can drag the borders of these windows to resize them to suit your
viewing preferences. The windows can also be manually arranged
around the screen, or you can just use the default Auto Arrange setting,
26
Page 31

under the Window menu. When you close the program, MapCreate
remembers the windows and map you were using. The next time you
start MapCreate, the program opens the previous map and windows,
just as you left them.
Closing MapCreate
To close or exit MapCreate click
|
F
ILE
or click the X
E
XIT
C
LOSE
button at the top right corner of the screen.
MapCreate Screen Components
If you're pretty familiar with how Windows programs work, you may want
to skip ahead to the segment on Creating Map Borders on page 36. But,
before we actually start mapping, we'd like to describe the different
elements of the MapCreate screen. The next few segments explain what
they are and what they do. You'll also learn how to move around the map.
Master Map Window
The largest window is the Master Map window. It displays the basic
world background map you'll use to prepare Map Border Files and
Custom Maps Files for your GPS. You can close the other list windows
if you're not using them. (You can always open them later when you
need them. Click
and then click the window name.) This allows
V
IEW
you to see as much of the Master Map as possible on your computer
screen. To close the other windows, click the X
C
LOSE WINDOW
button
in the top right corner of each window frame. You cannot close the
Master Map window.
27
Page 32

Event Marker Icon (boat ramp symbol)
Route
Line
Waypoint
Pan
Button
Map
Border
Zoom Buttons
Master Map window shows a rectangle map border around Lake
Eufaula, along with a route, waypoints and event marker icons. The
Zoom Range is 50, which indicates that it's 50 miles across the map.
Zoom Range (miles)
Route
Waypoint
Border
Handle
Box
Tips:
• You can use the Print Master Map command to print what's
displayed in the window. This lets you make a quick, customized,
paper backup map for your travels. (A prudent navigator never
relies on only one source of navigation information.) Due to
variances in monitor size, screen resolution, paper size and printer
drivers, what you see in the Master Map window may not fit your
paper page exactly.
• When your mouse pointer moves over a map feature or landmark
symbol, a Pop-up Tool Tip Box appears listing a name or
description of what the symbol represents.
28
Page 33

Selected
Symbol
Tip Box
Pop-up Tool Tip box. When the cross-hair pointer hovers over the
visible wreck symbol, a red border surrounds the symbol and the tip
box appears. This wrecked vessel is the "Three Brothers."
Main Menu
MapCreate's main menu is similar to that of other Windows programs.
It consists of the File, Edit, Insert, Tools, View, Window and Help
menus. You can click with a mouse or use the hot keys to access the
menus and their submenus. For example, to see all the commands on
or use the keyboard
the File menu, use the mouse pointer to click
and press the hot keys
such as
for the Help command. All the commands — with their hot
F1
. Some commands also have shortcut keys,
Alt+F
F
ILE
keys and shortcut keys — are listed alphabetically in the online
Command Reference section.
Toolbar
The toolbar contains a row of buttons that you can click to execute
various commands. You can move the mouse pointer over a button and
a pop-up tool tip box shows the button name.
29
Page 34

MapCreate 6.2 main menu and toolbar.
The numbering below corresponds to the numbers in the figure above,
and describes the toolbar buttons:
1. Center Master Map: centers the map on the point you click
2. New GPS Data File: opens a new map with no GPS data
3. New Map Border File: opens a new map with no map borders
4. Open GPS Data File: opens an existing GPS Data File
5. Open Map Border File: opens an existing Map Border File
6. Save GPS Data File: saves a GPS Data File
7. Save Map Borders: saves a Map Border File
8. Create Map Borders: draws map borders as rectangles or corridors
9. Create Custom Map: makes a custom map for use in a GPS unit
10. Estimate Custom Map Size: predicts file size from current borders
11. Create Waypoints: sets a waypoint on the Master Map
12. Create Route: forms a path to follow made of waypoints in a sequence
13. Create Icons: sets an event marker icon on the Master Map
14. View Map Categories: opens or closes the Map Category Options window
Map Category Options Window
This window controls how much mapping detail is displayed in the
Master Map. Open and close the window by clicking the
C
ATEGORY OPTIONS
button on the toolbar. You can turn detail categories
V
IEW MAP
off and on by clicking in the check box beside them. A check mark
shows that the category is turned on for display.
Each map category with a + sign to its left consists of a group of
subcategories. Click on the + to display the subcategories. Each
subcategory can be turned on or off individually by clicking the check
mark in the box beside it.
NOTE:
For mapping information to be included in your final Custom Map
File, it must be displayed (turned on) in the Master Map when the
30
Page 35

Custom Map File is created. Turning off unneeded information
categories can help reduce file size if you are trying to fit a very
large map onto an MMC with small amounts of memory.
For example, if you're simply taking a cross-country highway trip
across several states, you can turn off categories such as rural roads
and/or minor city streets. This should give
you the navigation information you need at
a smaller file size. However, when file size
is no problem, most users prefer to include
as much detail as possible. All the examples
in our Quick Reference section use the
original factory default settings, which have
all the categories turned on.
Even though a category is turned on, you
may not see it on the Master Map because
you have zoomed out too far. That's no
problem. As long as the category is turned
on, it will be included when you make your
Custom Map File, no matter what your
zoom range is.
Tip:
Another command that works with category
options to determine detail is the Detail
Level Used option, under the
D
ISPLAY OPTIONS
menus. (You don't need to
make any changes there now, but after a
little practice you'll want to see the entry View Map Display
Options in the online Command Reference for how this works.)
|
V
V
IEW
IEW MAP
Waypoint List Window
This window shows the waypoints on the Master Map in a text list
format. The symbol, name, latitude, longitude, date created and
number are listed. The symbol, name, latitude and longitude can all be
edited either on the Master Map or in the list window. To edit, rightclick the waypoint. To open this window click
|
V
W
IEW
AYPOINT LIST
.
31
Page 36

Waypoint List Window
Icon List Window
This window shows the event marker icons on the Master Map in a text
list format. The symbol, symbol label, latitude and longitude are listed.
Except for the symbol label, these elements can be edited either on the
Master Map or in the list window. To edit, right-click the icon. To open
this window click
|
V
I
IEW
CON LIST
.
Icon List Window
Route List Window
This window shows the routes on the Master Map in a text list format.
The list contains the route name, number, total distance of the route
and the number of waypoints that make up the route. To open this
window click
|
V
R
IEW
OUTE LIST
.
The route name can be edited in the window. To change the name:
1. Click on the name to highlight it.
2. Pause a moment, then click the name again. (This is not a regular
double-click.)
3. Type a new name and press
Enter
.
The waypoints in a route can be edited. Double-click the route name and
you'll open the Route Waypoint List Window, which we describe next.
32
Page 37

Route List Window
Route Waypoint List Window
(This is not shown when the program starts for the first time; a route
must be created first. With the Route List window open, double-click on
the route name to open the Route Waypoint List window.) This window
shows the waypoints that make up a route on the Master Map, in a text
list format. The symbol, name, leg length and position (in latitude and
longitude) are listed. The symbol, name, latitude and longitude can all
be edited either on the Master Map or in the list window. You can also
insert and delete waypoints in a route. To edit, right-click the waypoint.
To relocate a route waypoint on the Master Map by dragging:
1. Click the waypoint to grab it with your mouse pointer.
2. Move the mouse pointer with the waypoint to the new location.
3. Click again to drop the waypoint in the new spot.
For more information on this function, see Edit Route Waypoint in the
online Command Reference.
Route Waypoint List Window
33
Page 38

Trail List Window
This window uses a text list format to show trails (imported from your
GPS) that are displayed on the Master Map. The name, number of
points in the trail, origin (starting point's latitude and longitude) and
trail number are listed. To open this window click
|
V
T
IEW
RAIL LIST
. The
trail name can be edited in the window. To change the name:
1. Click on the name to highlight it.
2. Pause a moment, then click the name again. (This is not a regular
double-click.)
3. Type a new name and press
Trail List Window
Enter
.
Tip:
You can automatically create a route from a trail, and you can edit
the resulting route, if you wish. For more information, see Create
Route From Trail in the online Command Reference. To convert a
trail, right-click the trail name. Then, in the pop-up menu, click
C
REATE ROUTE FROM TRAIL
.
Moving Around the Master Map
Pan Arrows
You can move around the Master Map display by clicking the Pan
Arrow buttons, which appear at the north, south, east and west sides of
the Master Map. For example, click the
R
IGHT PAN ARROW
east side of the window to pan or move the Master Map to the
left. Clicking on the Right Arrow reveals a portion of the map
previously out of sight to the right of the screen. The other three arrows
work in the same way.
on the
NOTE:
You can always use the Pan Arrow buttons to move around the
Master Map, no matter what other commands may be activated.
34
Page 39

Center Master Map
You can instantly move any location on the map to the window's
center with the Center Master Map command. To center the map,
click the
C
ENTER MASTER MAP
cross-hair button at the left end of the
toolbar. The mouse pointer turns into a cross-hair. Now click on
the part of the Master Map you want centered in the map window. This
command's cross-hair pointer is sometimes used with other functions.
It's used to finish some commands, and it's another way to zoom
(described below.)
Tip:
The mouse pointer's location in latitude and longitude is always
shown in the status bar at the bottom of the MapCreate screen.
Zoom
There are many ways to zoom in and zoom out the Master Map display.
All are described in the online Command Reference, but for now we'll
just describe three. One fast and precise method uses the cross-hair
mouse pointer, activated by the Center Master Map button.
1. Click the
C
ENTER MASTER MAP
button, then place the cross-hair
pointer on the map near the location you want to zoom in on.
2. Now click and drag the pointer. A box appears on the map. Drag the
box until it covers the desired zoom area. Release the mouse button.
MapCreate will zoom in so that the selected area fills the Master Map
window.
Zoom Box
Cross-hair
The Zoom Selection Box helps you zoom in quickly. At left, the
cross-hair pointer was used to drag a box around the word
"Chicago," at a 3000-mile zoom range. When the mouse button was
released, the map jumped to the 197-mile range, at right. These
figures show only the center portion of the Master Map.
35
Page 40

The other most common method uses the Zoom-In and Zoom-Out
buttons, which are located at the bottom right corner of the Master
Map. Zooming in lets you see less territory, but more detail. Zooming
out lets you see more territory, but less detail.
Zoom Out, Zoom In buttons, with Zoom Range Window.
1. Click the
2. Click the
button (zoom in) to enlarge the centered area of the map.
Z-I
N
button (zoom out) to shrink the map toward the center.
Z-O
UT
The current zoom range shows in the Zoom Range Window next to the
Zoom-In button. The Zoom Range Window is the third common zoom
tool. You can use this window in at least two ways:
1. Click the down arrow at the right of the box, then click a preset range.
2. Click inside the box, type the desired range number and press
Enter
.
NOTE:
You can always use the Zoom-In or Zoom-Out buttons, no matter
what other commands may be activated.
Creating Rectangle Map Borders
Making a Map Border File is the first step in creating a custom map for
your Lowrance or Eagle GPS unit. Here's how: (Refer as needed to the
Toolbar figure on page 30.)
1. Center the Master Map display on the area you want to include
in your custom map. Click the
C
ENTER MASTER MAP
click the cross-hair mouse pointer on the area you want centered.
2. If needed, click the Zoom In or Zoom Out buttons so you can see the
entire area that you want to draw a map border around.
3. Click the
C
REATE MAP BORDERS
button, and your mouse
pointer becomes a pencil.
button, then
4. Move the mouse pointer above and to the left of the desired area.
5. Click and hold down the mouse button. While holding down the
button, drag the pointer diagonally, down and to the right. A green
border box appears. The size of the border box changes as you move
your mouse.
36
Page 41

Handle Box
Mouse Pointer
Map Border
Click and drag to draw a Map Border around Corpus Christi Bay area.
4. When the green border surrounds the desired area, release the
mouse button.
5. To stop the command, click the
C
ENTER MASTER MAP
button.
If you are satisfied with this map and want to finish processing it for
use in your GPS unit, skip forward to the lesson on "Saving a Map
Border File" on page 39.
MapCreate can also draw a polygon-shaped border useful for following
an irregularly shaped route, lake or other geographic feature. These
corridor maps are also drawn with the Create Map Borders command,
and we tell you how in the next lesson.
Tip:
If you need to start over, you can erase a map border box. Click the
C
REATE MAP BORDERS
button, then move the pencil point over one of
the small handle boxes that appear at each corner of the green box.
Right-click on a handle box to erase the border. Or, you can click
the
N
EW MAP BORDER FILE
button to clear all map borders.
Creating Corridor Map Borders
A corridor map lets you twist and turn your borders to enclose
irregularly shaped geographic features. Here's how: (Refer as needed to
the Toolbar figure on page 30.)
1. Center the Master Map display on the area you want to include
in your custom map. Click the
C
ENTER MASTER MAP
button, then click the cross-hair mouse pointer on the area you
want centered.
37
cross-hair
Page 42

2. If needed, click the Zoom In or Zoom Out buttons so you can see the
entire area that you want to draw a map border around.
3. Click the
C
REATE MAP BORDERS
button, and your mouse
pointer becomes a pencil.
4. Move the mouse pointer to where you want your corridor map to
begin.
5. Click and release the left mouse button to set the first anchor point.
(The anchor point is represented by a handle box, which can also be
grabbed later to relocate the border if you wish.)
6. As you move your mouse, you'll see a magenta border box appear.
Move the mouse pointer in a straight line along your corridor's path
until you need to change direction to follow the terrain. Click to set a
second anchor point.
Point 1
Point 2
Point 3
Corridor with first and second anchor points set, left.
Add a second segment to the corridor with a third point, right.
38
Page 43

7. Now move the mouse pointer off
at an angle, in the new direction
needed to follow the irregular
terrain. You'll see that the active
corridor border box now rotates
around the last anchor point you
set. This lets you move off in any
direction, with the new segment of
the corridor attached to the previous
segments. Click to set your third
anchor point.
8. Continue to click and add
additional segments to your corridor
until you reach your destination or
have enclosed the desired area.
9. Click the right mouse button to
stop drawing the corridor map. To
close the map borders command,
click the
C
ENTER MASTER MAP
button.
Finished corridor map.
Tip:
• If you need to start over, you can erase a corridor border box. Click
the
C
REATE MAP BORDERS
of the small handle boxes that appear along the centerline of the
corridor. Right-click on a handle box to erase that segment's border.
To erase an entire corridor map, click the handle boxes until the
map is gone, or click the
button, then move the pencil point over one
N
EW MAP BORDER FILE
button.
If you're satisfied with this map and want to finish processing it for use
in your GPS unit, go on to the next lesson on "Saving a Map Border
File."
Saving a Map Border File
Before you make your custom map, you must name and save your Map
Border File. Here's how: (Refer as needed to the Toolbar figure on page
30.)
1. Click the
appears.
S
AVE MAP BORDERS
button. The Save As dialog box
39
Page 44

Save Map Border File dialog box.
2. Type a name in the File Name text box and click
.
S
AVE
That's all there is to it. The file was placed in the "data" sub-folder
located within the MapCreate folder on your hard drive. You can now
start another map border (click
N
EW MAP BORDER FILE
button) or you can
close MapCreate and return another day. To open this border file later
on, just click the
O
PEN MAP BORDER FILE
button and select the file name
from the list.
Open Map Border File dialog box.
Now you're ready to process that border file into a map your GPS unit
can use.
Creating a Custom Map File
Once you have created and saved a Map Border File, you can use the
border file to tell MapCreate to make a Custom Map File for your
40
Page 45

Lowrance or Eagle GPS unit. Here's how: (Refer as needed to the
Toolbar figure on page 30.)
1. Open a Map Border File by clicking the
O
PEN MAP BORDER FILE
button.
2. Click the
C
REATE CUSTOM MAP
button. A progress dialog box will
appear while MapCreate extracts the necessary information and
builds the Custom Map File.
Building Map Progress dialog box.
3. When the custom map has been built, a file information box appears
showing the file size. Click
to save the Custom Map File.
OK
Custom Map File information box, showing file size.
Tip:
With the
E
STIMATE CUSTOM MAP SIZE
final size of your map file before you build it. When you have your map
borders in place, click
E
STIMATE CUSTOM MAP SIZE
moment to extract some necessary information. MapCreate will then
display an estimated file size based on the current map borders.
Estimating the map size is faster than a full map build. With this
feature you can test several different map borders to optimize the
space available on your MMC cards. Use this tool to more easily
include as much information as possible in the space you have.
feature, you can quickly estimate the
. The program will take a
41
Page 46

NOTE:
After a map has been "built," the Custom Map File size also
appears in the status bar at the lower left corner of the MapCreate
screen. The status bar also tells you whether or not a custom map
file has been built and saved.
Map not built message, left, and map file size message, right.
4. The Save As dialog box appears.
Save Custom Map File dialog box.
5. Type a name in the
letter in the
text box, and click
S
AVE IN
F
ILE NAME
text box, select your card reader's drive
.
S
AVE
Congratulations, you've made your first Custom Map File! Your
map was placed directly on your MMC or Secure Digital card. If you
wish to keep a copy of the file on your computer, use Windows Explorer
and your MMC card reader to copy the Custom Map File to the "data"
sub-folder located within the MapCreate folder on your hard drive.
Tips:
• If you don't plan to change this custom map later, the Map Border File
that you created it from can now be deleted if you wish.
• If you are having trouble displaying your Custom Map File in your
GPS unit, your MMC may need to be reformatted. For more
information on this, refer to the MMC format note on page 6.
Refer to your GPS unit's manual for instructions on inserting the MMC
and loading your Custom Map File into its memory. Now you're ready
42
Page 47

to hit the road, but if you'd like to add a little GPS navigation
information to your unit, read the following lessons.
Creating a Waypoint
Waypoints are the building blocks of GPS navigation. A waypoint is
simply an electronic "address," based on the latitude and longitude of a
position on the earth. MapCreate lets you set a waypoint and mark it
with a symbol, name or number. This appears on the Master Map and
eventually on the custom map displayed on your GPS unit's screen.
With your GPS, you can navigate to a waypoint. Waypoints can be used
to mark a favored spot or to mark something to avoid such as a deadend road or a boating hazard on a lake. Waypoints linked together in a
sequence allow you to navigate along a pre-planned route. In the field,
your GPS unit can also be used to set waypoints. You can bring these fieldgenerated waypoints into MapCreate for storage and use on later trips.
Creating a waypoint on the Master Map is easy. Here's how: (Refer as
needed to the Toolbar figure on page 30.)
1. Center the Master Map display on the area where you want to
set the waypoint. Click the
C
ENTER MASTER MAP
then click the cross-hair mouse pointer on the area you want
centered.
2. If needed, click the Zoom In or Zoom Out buttons so you can see
enough detail to accurately place the waypoint.
cross-hair button,
3. Click the
C
REATE WAYPOINTS
button, and your mouse pointer
becomes an arrow with a waypoint symbol and the
abbreviation "Wpt."
4. Move the mouse pointer so that the arrow point is where you want
the waypoint. Click to set the waypoint. Move your mouse away, and
you can see the waypoint, with the default name of "Wpt 001."
43
Page 48

Create a waypoint: First, find the location on the Master Map. The
longer arrow shows the location of a public hunting area parking lot.
Move the pointer arrow tip over the location (left) and click to create
the waypoint. The waypoint appears (right) with the default waypoint
symbol and name, both of which can be changed. These figures were
taken from a zoom range of 4.05 miles. It looks as if the waypoint is on
the road, but zooming in closer would show the waypoint is actually
south of the road, just where the pointer tip placed it.
5. Relocate your mouse pointer and click to create additional waypoints
as needed.
6. To close the Create Waypoints command, press
or click the
C
ENTER MASTER MAP
button.
(the Escape key)
Esc
Tips:
• If you need to erase or delete a waypoint, move the cross-hair
pointer over a waypoint and right-click. In the pop-up menu, click
D
ELETE WAYPOINT
• There are other ways to delete waypoints, and you can also change
the symbol, name and location. For instructions on these functions,
along with other tips, see Create Waypoint, Delete Waypoint, Insert
.
44
Page 49

Waypoint and Edit Waypoint in the online Command Reference
section.
If this is all the GPS information you need for now, skip ahead to the
lesson "Saving a GPS Data File" on page 50. But, if you want to add
icons or a route, check out the next two lessons.
Creating an Icon
Icons are graphic symbols used to mark some location, point of interest
or event. These features are also called event markers, or event marker
icons. Event marker icons don't store as much information as
waypoints. You can't use a menu to navigate to them as you can with
waypoints, and you can't change their names. But you can change their
symbols. In fact, waypoints and event marker icons share the same set
of symbols, but they are two different types of GPS data with different
capabilities.
NOTE:
Until you change the default symbol, any icon you create will look
like a blue and white waypoint, but without a name. For this
lesson, we will stick with the default, but if you want to change the
symbol, refer to Edit Icon in the online Command Reference.
Event marker icons are a handy way to mark a spot when you don't
need to save or edit much information about the location or event.
Creating an icon on your map is as easy as setting waypoints. Here's
how: (Refer as needed to the Toolbar figure on page 30.)
1. Center the Master Map display on the area where you want to
set the icon. Click the
C
ENTER MASTER MAP
cross-hair button, then
click the cross-hair mouse pointer on the area you want
centered.
2. If needed, click the Zoom In or Zoom Out buttons so you can see
enough detail to accurately place the icon.
3. Click the
C
REATE ICONS
button, and your mouse pointer
becomes an arrow with a red and yellow icon symbol.
4. Move the mouse pointer so that the arrow point is where you want
the icon. Click to set the icon. Move your mouse away, and you can see
the icon.
45
Page 50

Create an icon: First, find the location on the Master Map. The bottom
arrow shows the location of a public boat ramp on this river.
Move the pointer arrow tip over the location (left) and click to create
the icon. The icon appears (right) with the default waypoint symbol
but no name. To change this symbol to the boat ramp symbol, see Edit
Icon in the online Command Reference.
5. Relocate your mouse pointer and click to create additional icons as
needed.
6. To close the Create Icons command, press
click the
C
ENTER MASTER MAP
button.
(the Escape key) or
Esc
Tip:
If you need to erase or delete an icon, move the cross-hair pointer
over the icon and right-click. In the pop-up menu, click
There are other ways to delete icons, and you can also change the
symbol and location. For instructions on these functions, along with
other tips, see Create Icon, Delete Icon, Insert Icon and Edit Icon in
the online Command Reference section.
46
D
ELETE ICON
.
Page 51

If you don't want to plan a route this trip, skip ahead to the lesson
"Saving a GPS Data File" on page 50. But don't forget, planning a route
is one of MapCreate's coolest capabilities. If you're ready for some real
navigating with routes, read on.
Creating a Route
A route is a series of waypoints, linked together in an ordered sequence,
that's used to mark a course of travel. You can visualize a route as
beads on a string, or, think of it as the mile marker signs posted at
intervals along U.S. interstate highways.
Routes are powerful tools for planning and then navigating your
journeys. With your GPS receiver, you can automatically navigate from
one waypoint to the next along your intended course. You can start at
either end of a route, or even begin navigation in the middle of a route.
You can informally group routes into two broad categories, based on the
terrain and type of travel. On water, in the air or just hiking crosscountry, you can generally travel in a simple, straight line from waypoint
to waypoint (barring obstacles, of course.) The Global Positioning System
was originally developed by the U.S. military for this type of routing. It's
suitable for airplanes, ships and soldiers in the field. MapCreate and
your GPS unit connect all route waypoints with straight lines.
The other route style involves navigating along a road, highway or
other winding pathway. When your vehicle has to follow the twists and
turns of the pavement, you can't really travel in a straight line from
waypoint to waypoint.
Since the legs of all GPS routes are based on straight lines between
waypoints, setting up a curvy highway route takes a little more time and
practice than our Quick Start format allows. We'll save those details for
the Create Route entry in the online Command Reference section.
For this lesson, we'll use an example based on a simple off-shore fishing
route. Just remember: the techniques for making a route are the same,
no matter what sort of travel pattern you're planning. Here's how it
works: (Refer as needed to the Toolbar figure on page 30.)
1. Center the Master Map display on the area where you want to
begin your route. Click the
C
ENTER MASTER MAP
cross-hair button,
then click the cross-hair mouse pointer on the area you want
centered.
2. If needed, click the Zoom In or Zoom Out buttons so you can see
enough detail to accurately place the route waypoints.
47
Page 52

Tip:
As you move along your intended course, you may need to pan the
Master Map and periodically zoom in and out to see where to place
route waypoints, and where you are going next. The pan and zoom
buttons will always work, even when the Create Route command is
active. This way, you don't have to turn off Create Route just to
move the map.
3. Click the
C
REATE ROUTE
button, and your mouse pointer
becomes an arrow with a route symbol, two waypoints
connected by a magenta route line.
4. Move the mouse pointer so that the arrow point is where you want to
start your route. Click to set the first waypoint. Move your mouse away
and you can see the waypoint. A straight magenta route line now runs
from Waypoint 001 to your mouse pointer, showing you a route is under
construction.
Click to set the first waypoint in a route. This example will show the
route of a fishing boat from Port Aransas, Texas, to some oil drilling
platforms and a wreck in the Gulf of Mexico, then back to port.
5. You can move off in any direction and the next waypoint will be
linked in a straight line to waypoint 1. Relocate your mouse pointer
48
Page 53

along your intended route and click to create additional route
waypoints as needed. Basically, you will set a new waypoint every time
you need to change direction.
6. To close the Create Route command, right-click or press
Finished route with six waypoints. Notice the straight line-of-sight line
connecting the waypoints that make up the route. The route segment
from one waypoint to another is called a leg; this route has five legs.
Waypoints 3 and 4 are near oil drilling platforms and waypoint 5 is
near a visible wreck.
Esc
.
Tips:
• Routes can be edited in many ways, but those steps involve several
other commands that we will discuss only in the online Command
Reference section. You can delete an entire route, delete a waypoint
from a route, insert a waypoint into a route or relocate a waypoint
in a route. To read more about it, see these entries in the online
Command Reference: View Route List, View Route Waypoint List,
Edit Route, Edit Route Waypoint, Delete Route, Delete Route
Waypoint, Insert Route and Insert Route Waypoints.
49
Page 54

• In a hurry? You can erase a route by deleting each waypoint, one
after the other. Click the
C
ENTER MASTER MAP
button, then move the
cross-hair pointer over a route waypoint and right-click. In the popup menu, click the
D
ELETE WAYPOINT
command. MapCreate erases the
waypoint and the magenta line linking the waypoint to the route.
Now that you've created all the GPS information you want, you need to
prepare it for use in your GPS unit. We'll do that in the next lesson,
"Saving a GPS Data File."
Saving a GPS Data File
GPS Data Files can contain any combination of GPS information,
including waypoints, event marker icons, routes and trails. MapCreate
and your GPS unit store all their GPS data in the same file format, so
it's easy to move this information back and forth. Here's how: (Refer as
needed to the Toolbar figure on page 30.)
1. Click the
S
AVE
GPS D
ATA FILE
button. The Save As dialog box
appears.
Save GPS Data File dialog box.
2. Type a name in the File Name text box, select your card reader's
drive letter in the
text box, and click
S
AVE IN
S
AVE
.
Congratulations, you've made your first GPS Data File! The file
was placed directly on your MMC or Secure Digital card. If you wish to
keep the file on your hard drive, use Windows Explorer and your MMC
card reader to copy the GPS Data File to the "data" sub-folder located
within the MapCreate folder on your hard drive. You can now start
another GPS Data File (click
N
EW
GPS D
ATA FILE
button) or you can close
50
Page 55

MapCreate and return another day. To open this GPS Data File later
on, just click the
O
PEN
GPS D
ATA FILE
button and select the file name (and
it's location) from the list.
Open GPS Data File dialog box.
Now you're ready to load that GPS Data File into your GPS unit. Refer
to your GPS unit's manual for instructions on inserting the MMC and
loading your GPS Data File into its memory.
Now you know all the basics for getting custom maps and GPS data
into your GPS unit — you're ready to travel!
You don't need them at this moment, but there are two more optional
operations you ought to hear about. One is making a corridor map from
a route. You can use that method instead of drawing corridor border
boxes manually with the mouse.
The other operation is creating a route from a trail. You can't even
practice that one yet; you need to get out there with your GPS and
bring back a trail to play with. Just follow the instructions in your GPS
manual to save a trail from your travels, then refer to the lesson
"Creating a Route From a Trail" on page 54.
Creating a Corridor Map From A Route
MapCreate can use a route you've made to automatically create a corridor
map border. Using the Create Borders Around Route command is fast,
and it helps control the size of your Custom Map. Here's how it works:
1. Create a route or open a GPS Data file containing a route. (To open a
GPS Data File, click
|
F
O
PEN
GPS D
ATA FILE
ILE
.)
51
Page 56

2. Open the Route List Window: click
3. Right-click on the route name. In the pop-up menu, click the
B
ORDERS AROUND ROUTE
The Create Borders Around Route pop-up menu appears when you
right-click a route name in the Route List Window. In this example, we
are creating a corridor map border for a route from Dallas to Corpus
Christi, Texas. Route name is "Dallas-Corpus."
command.
|
V
R
IEW
OUTE LIST
.
C
REATE
MapCreate draws a corridor map border following the route. See the
illustrations below, showing the route before and after the command is
performed.
Route from Dallas to Corpus Christi, Texas (left) and the corridor map
created automatically from the route (right).
52
Page 57

You can save this as a Map Border File and then create a Custom Map
File. (Click the
button.)
M
AP
S
AVE MAP BORDERS
button…then click the
C
REATE CUSTOM
Tip:
You can control the width of any corridor map. Click
D
ISPLAY OPTIONS
Click on the
, and the Map Display Options dialog box appears.
Map Display Options menu.
M
AP BORDERS
tab. Near the bottom of the box, drag the
Corridor Width slider bar back and forth along the scale to increase or
decrease the width of your corridor. This allows you to make very
narrow corridors, which in turn results in conveniently small Custom
Map file sizes.
V
IEW
|
M
AP
Corridor Width
slider bar
Map Borders tab in the Map Display Options dialog box. Drag the
Corridor Width slider bar to the left to narrow corridor width. Drag
the slider bar to the right to widen corridor width.
53
Page 58

Creating a Route From a Trail
A trail is a line drawn on the map by your GPS unit as you travel. It's a
record of the path you've taken, showing where you've been. This
feature is also called a plot trail. In the field, the trail will extend from
your present position back to where you began recording the trail. Your
GPS unit records thousands of position points to show every twist and
turn you've taken on your journey.
MapCreate can use a GPS plot trail to create a route for use on a repeat
trip. Your GPS unit can automatically navigate the new route, making
it easy to retrace the path you took. You can even share the information
with friends. Using the Create Route From Trail command is a snap.
Here's how you do it:
1. Open a GPS Data file containing a trail.
NOTE:
GPS Data Files with relatively long trails take a few moments to
open. Please be patient when you open a data file containing a long
trail. Once the trail information has been processed, the remainder
of the data file will open very quickly.
GPS Data File open progress box.
54
Page 59

This example shows a portion of Trail 2, recorded during a business
trip from Afton, Oklahoma to Kansas City, Missouri. The trail appears
as a green line on the Master Map. It follows Interstate 44 to Carthage,
Missouri, then Highway 71 north toward Kansas City. For easier
viewing, roads, highways and other features have been turned off.
2. Open the Trail List Window: click
3. Open the Route List Window: click
4. Right-click on the trail name. In the pop-up menu, click the
R
OUTE FROM TRAIL
command.
|
V
T
IEW
RAIL LIST
|
V
R
IEW
.
OUTE LIST
.
C
REATE
Plot Trail shown in green
The Create Route From Trail pop-up menu appears when you right-
click a trail name in the Trail List Window. Notice the absence of
waypoints along the trail.
55
Page 60

MapCreate converts the green trail line into a magenta route line with
red waypoints. It does this by transforming thousands of position points
in the trail to 25 route waypoints. See the illustration below, showing
the trail and route before and after the command is performed.
Trail segment through Joplin before conversion to a route (left) and
the route created automatically from the trail (right). In the right
image, the green trail and the magenta route are both visible. Note the
numbered waypoints appearing along the route.
You can save this as a GPS Data File. (Click the
button.)
56
S
AVE
GPS D
ATA FILE
Page 61

Appendix 1: MapCreate Command List
Complete documentation on all MapCreate commands is available in
the program's online Help File. To access Help and its Command
Refe rence section, press F1. An example entry from the Command
Reference (for the Help Command) appears at the end of this command list.
About MapCreate
Arrange Icons
Arrange Windows
Auto Arrange Windows
Cascade Windows
Center Master Map
Close All Windows
Copy
Create Borders Around Route
Create Custom Map File
Create Icons
Create Map Borders
Create Route
Create Route From Trail
Create Waypoints
Cut
Delete
Delete Icon
Delete Route
Delete Route Waypoint
Delete Trail
Delete Waypoint
Edit Icon
Edit Route
Edit Route Waypoint
Edit Waypoint
Exit
Export GPS Data
Help Topics
Import GPS Data
Import Map Borders From File
Import Route
Import Waypoint List
Insert Icon
Insert Route
Insert Route Waypoints
Insert Waypoint
New GPS Data File
New Map Border File
Open GPS Data File
Open Map Border File
Paste
Print GPS Data
Print Master Map
Print Setup
Redo / Can’t Redo
Restore Original Settings
Save All
Save GPS Data File
Save GPS Data File As
Save Map Border File
Save Map Border File As
Select All GPS Data
Tile Windows Horizontally
Tile Windows Vertically
Undo / Can’t Undo
View Icon List
View Map Category Options
View Map Display Options
Data Display Options
Default Symbol
Detail Level Used
Map Borders
Map Zoom Change
Position Format
Zoom Range Units
View Route List
View Route Waypoint List
View Status bar
View Toolbar
View Trail List
View Waypoint List
Zoom In / Zoom Out
57
Page 62

Help Topics Command
Menu:
ELP
H
Submenu: n/a
Menu Command:
Menu Command Sequence:
Hot Key Sequence:
Shortcut Key(s):
ELP TOPICS
H
Alt+H|H
F1
ELP|HELP TOPICS
H
Toolbar button: n/a
The Help Topics command opens the on-line Help system in your
default web browser. Our help information is in HTML format, but it
runs from the CD or your hard drive, not from the Internet.
Using the Command
The Help system contains the Quick Reference tutorial material (from
the instruction manual) and a Command Reference, which documents
every command in MapCreate.
To open the Help system, choose the
You navigate through the help information just as you would any other
web site, using the clickable hyperlinks to move around.
Searching Help
Once you have opened a help document, you can search it for the
information you need.
Internet Explorer browser:
1. Click somewhere on the help page you intend to search. This makes
sure your browser will search the correct page.
2. Click
your search.
DIT|FIND (ON THIS PAGE
E
or use the shortcut keys
)
ELP TOPICS
H
command.
Ctrl+F
to begin
Use Internet Explorer's Find command to search Help documents.
58
Page 63

3. In the
looking for, adjust any options such as up or down, then click
IND WHAT
F
Search a Help document for the term "map border."
box, type the term, phrase or command you are
:
IND NEXT
F
.
Netscape 6 browser:
1. Click somewhere on the help page you intend to search. This makes
sure your browser will search the correct page.
2. Click
EARCH|FIND IN THIS PAGE
S
or use the shortcut keys
Ctrl+F
to begin
your search.
Use Netscape's Find command to search Help documents.
3. In the
IND TEXT
F
box, type the term, phrase or command you are
:
looking for, adjust any options such as search backwards, then click
Search a Help document for the term "map border."
59
IND
.
F
Page 64

Notes
60
Page 65

Appendix 2: Map Category List
This list contains the different categories of mapping information
available in MapCreate 6. These categories and their subcategories can
be turned off or on. Only those categories turned on (displayed in the
Master Map) will be included in Custom Map Files for your GPS unit.
See Appendix 3 for symbols used to represent these items. POI stands
for Point of Interest.
Airports
Runways
Symbols
Cities
Community Names
City Names
Subdivision Names
Urban Areas
Countries
Boundaries
Names
County/Parish
Boundaries
Highway Exits
Exits
Information Centers
Parking Areas
Picnic Areas
Rest Areas
Scenic Areas
Service Areas
Toll Plazas
Weigh Stations
Welcome Centers
Highways
Interstate
Interstate Symbols
International Major
International Minor
State
State Symbols
US
US Symbols
Landmarks
Buildings
Cemeteries
Fire Stations
Land Features
Libraries
Mines
Other
Schools
Shopping Centers
Summits
Towers
Trail Names
Marine Navaids
Major
Minor
POI-Attractions
Auditoriums
Colleges
Historical
Museums/Zoos
Other
Tourist
POI-Emergency/Government
Hospitals
Medical Service
Post Offices
POI-Entertainment
Movie Theaters
Other
POI-Fishing
Bait/Tackle
Hatcheries/Lakes
POI-Lodging
Cabins
Camps/Campgrounds
Hotels/Motels
61
Page 66

RV Parks
Resorts
POI-Marine
Boat Dealers
Equipment
Marinas
Other Services
Rental/Charter
Repair
POI-Restaurants
Asian
Banquet Rooms
Barbecue
Coffee Shops
Delis
Fast Food Chains
Ice Cream
Italian
Mexican
Miscellaneous
Pizza
Sandwiches
Seafood
Steak Houses
POI-Services
Gas Stations
RV Services
Road Service/Wrecker
Truck Stops
POI-Shopping
Auto Parts
Convenience
General Merchandise
Groceries
Hardware
Pharmacies/Chemists
Shopping Centers
Sporting Goods/Wear
POI-Sports
Golf
Stadiums/Arenas
POI-Transportation
Airports
Public Lands
National Forests
National Park Service
Park Symbols
Railroads
Roads
Major City
Major City Names
Minor City
Minor City Names
Rural
Rural Names
State/Province
Boundaries
Names
Water
Canal/Stream Names
Canals/Streams
Lake/River Names
Lake/Rivers
Ocean/Sea Names
Ocean/Seas
Other/Names
Wrecks & Obstructions
62
Page 67

Appendix 3:
MapCreate 6 Symbol Key
MapCreate 6 contains hundreds of mapping symbols used to represent
items ranging from geographic features to commercial Points of
Interest (POI). The following list displays these symbols and the name
of the item the symbol represents.
Interstate Highway
U.S. Highway
State Highway
Trans-Canada Highway
Quebec Autoroute Highway
Mexican Federal Highway
Highway Exit
Highway Exit with Info Center
Highway Exit with Scenic Area
Highway Exit with Service Area
Highway Exit with Toll Plaza
Highway Exit with Weigh Station
Airport
Building
Cemetery
Fire Station
Library
Highway Exit with Parking Area
Highway Exit with Picnic Area
Highway Exit with Rest Area
Mine
Park
School
63
Page 68

Shopping Center
Summit
Tower
Trail Name
City, Community, or Subdivision
Name
Land Feature Name
Water Feature Name
Miscellaneous Landmark Name
Square Green Daybeacon
(Navaid)
White or Unidentified Lighted
Buoy (Navaid)
Green Unlighted Buoy (Navaid)
Red Unlighted Buoy (Navaid)
White or Unidentified Unlighted
Buoy (Navaid)
Light (Navaid)
Nautical Chart Note
Platform (Navaid)
Radiobeacon (Navaid)
Awash or Visible Obstruction
Square White or Unidentified
Daybeacon (Navaid)
Red Triangle Daybeacon (Navaid)
White Triangle Daybeacon
(Navaid)
Green Lighted Buoy (Navaid)
Red Lighted Buoy (Navaid)
Awash Rock
Covered Rock
Dangerous Submerged Wreck
Non-Dangerous Submerged
Wreck
Visible Wreck
Airport (POI)
64
Page 69

Amusement Place, Billiards or
Casino (POI)
College or University (POI)
Hall or Auditorium (POI)
Hospital (POI)
Medical Service (POI)
Miscellaneous Attraction (POI)
Museum or Historical Place (POI)
Post Office
Ice Cream Parlor (POI)
Pizza (POI)
Fishing-Related (POI)
Lodging (POI)
Camp or Campground (POI)
RV Park or RV Service (POI)
Marina (POI)
Boating Dealer or Service (POI)
Tourist Attraction or Tour (POI)
Zoo (POI)
Movie Theater (POI)
Restaurant (POI)
Coffee Shop (POI)
Boat Equipment & Supplies (POI)
Gas Station (POI)
Auto Parts or Road Service(POI)
Truck Stop (POI)
Grocery or Retail Store (POI)
Pharmacy (POI)
65
Page 70

Hardware Store (POI)
Sporting Goods or Sportswear
(POI)
Golf Course (POI)
Stadium, Arena or Athletic
Field (POI)
Airport (POI)
66
Page 71

Appendix 4: Considerations When
Planning Highway Routes
Tips on Making Better Routes for Highway Navigation
How you make a highway route depends on your type of travel and
whether you prefer to use the GPS unit's compass rose screen, the map
screen or both for navigation. These factors determine how many route
waypoints to use, and where you place them.
A simple, straight-legged route by water or by air is easy to make, as is
a route following a square grid of city streets. Obstructions are usually
few in number, and you're traveling in a more or less straight line from
waypoint to waypoint.
Following a highway's twists and turns is different because all GPS
units link route waypoints in straight lines.
Some navigators prefer to follow a route visually on the map. They
glance at the route and the position indication arrow as the Custom Map
moves across their GPS screen. With one look, they can see the route
symbols and the highway they are following together, at the same time.
Other travelers prefer the simpler display provided by the compass rose
screen. The compass rose can literally point the direction to steer
toward the next waypoint in a route.
You may fall in yet another group of navigators who use both
navigation techniques, switching back and forth between the map and
compass rose screens during a journey.
"High Resolution" vs. "Low Resolution" Routes
MapCreate and your Lowrance or Eagle GPS unit are capable of
remarkably precise "high resolution" routes that can follow every Scurve of a mountain highway. This type of route — with a relatively
large number of waypoints per mile — is well-suited to compass rose
navigation. With it, you can virtually ignore the map screen and arrive
at your destination using only the compass rose.
Your GPS has a course deviation (or off course) alarm which will alert
you when you drift too far to the right or left of your route's center line.
There is also an arrival alarm, which alerts you when you get within a
certain distance of a route waypoint. With a "high resolution" route, you
can set the off course alarm and the arrival alarm to small distances
somewhere between 0.1 and 0.5 miles. (You can turn the alarms off or
on, and you have the option of turning the alarms' sound feature on or
off as well.)
67
Page 72

The amazing capabilities of GPS navigation can tempt first-time users
to build highly detailed highway routes. These "high res" routes are fun
to use, but they have some drawbacks. They require placing a route
waypoint at practically every curve in the road. This takes a relatively
large number of waypoints for the distance traveled. A large set of
waypoints close together can give your Custom Map a cluttered look. If
the route is very long, it takes more time for you to make it in
MapCreate. And, finally, GPS units compatible with MapCreate
versions 5 and 6 can hold 100 routes, but each route can contain only
100 waypoints.
So, take a long cross-country trip on winding roads and you can use up
100 waypoints before you reach your journey's end. This means you will
need to break up the trip into multiple routes. That's usually not a
problem, since most travelers don't prefer to run all day and night
without stopping for food, fuel or rest.
On the other hand, "low res" routes take less time to prepare and are
plenty accurate to get you there. This type of route — with a relatively
small number of waypoints per mile — is well-suited to map screen
navigation. You can cover a longer distance for the amount of
waypoints you use. "Low res" routes also tend to reduce the clutter on
your Custom Map.
A good technique for "low res" routes is to set most of your waypoints
where you make major direction changes, or where the destination is
important for one reason or another. Here are two examples:
Let's say you are heading straight north on a state highway, but need
to turn right onto a county road to reach a recreation area. Set a route
waypoint at or just a little before the highway intersection. Setting the
waypoint a short distance before your turn is useful (especially at
highway speeds) if you need some warning to change lanes or slow
down for the turn. (You can even rename that route waypoint "turn" or
"turn right.")
Now let's say you are traveling in a generally straight line. You don't
need to set a waypoint for a turn, but you want to stop in a certain city
along the way for food or fuel. Set a route waypoint at the city limits or
downtown, and your Lowrance or Eagle GPS can tell you how many
miles to town and how long it will take to get there.
If you limit the number of waypoints you make, your compass rose will
still work fine for those major changes in direction, but it won't match
the twists and curves of the pavement as closely as a "high resolution"
route would.
68
Page 73

For example, you could be traveling toward a destination to the south,
but following a highway curve around a mountain. As you take the
curve to your right, your car will actually be pointing west as you follow
the pavement. However, the compass rose is accurately pointing to that
next southern waypoint, now 90 degrees off to your left. If you were
depending only on the compass rose at that moment, it might look like
you were off course. As you come around the mountain and the
pavement turns back south, the compass rose, the route and the
pavement will all line up together once again.
The off course alarm also requires some adjustment when using low res
routes. In our mountain curve example, if the alarm was set at 0.1 mile,
it would go off as we rounded the curve and "deviated" more than 0.1
mile from the route center line.
Some navigators avoid this by turning the course deviation alarm off.
With the alarm off, however, you may take a wrong turn and it could be
some time before you catch the error. You can leave the alarm on if you
simply expand the distance setting that triggers the alarm. In our
mountain highway example, setting the course alarm to 1.5 miles
would keep the alarm from going off as we rounded the mountain.
Highway route "resolution" is ultimately a matter of personal taste.
Experiment with these techniques to see which one suits you best. Most
users strike some sort of balance between them. Just remember: the
more precise you are in following the turns of the pavement, the more
waypoints you will use. That, in turn, affects how your GPS features
work with your route.
69
Page 74

Notes
70
Page 75

LEI DATABASES LICENSE AGREEMENT
THIS IS A LEGAL AGREEMENT BETWEEN THE END-USER WHO FIRST
PURCHASES THIS PRODUCT AS A CONSUMER ITEM FOR PERSONAL,
FAMILY, OR HOUSEHOLD USE ("YOU") AND LEI EXTRAS, A DIVISION
OF LOWRANCE ELECTRONICS, INC., THE MANUFACTURER OF THIS
PRODUCT ("WE", "OUR", OR "US"). USING THE PRODUCT
ACCOMPANIED BY THIS LICENSE AGREEMENT CONSTITUTES
ACCEPTANCE OF THESE TERMS AND CONDITIONS. IF YOU DO NOT
ACCEPT ALL TERMS AND CONDITIONS, PROMPTLY RETURN THE
PRODUCT WITHIN 30 DAYS OF PURCHASE. PLEASE RETURN USING
THE ENCLOSED UPS SHIPPING LABEL AND INCLUDE: PROOF OF
PURCHASE, NAME, ADDRESS, AND PHONE NUMBER. YOUR PURCHASE
PRICE AND ANY APPLICABLE TAXES WILL BE REFUNDED. PLEASE
ALLOW 4-6 WEEKS TO PROCESS YOUR REFUND.
1. This License Agreement applies to the one or more databases that
your product may contain. We refer to these singly as a "Database"
and together as the "Databases." Your product may thus include the
"WBS Database" which contains worldwide background surface
mapping data, the "SmartMap Database" which contains inland
mapping data, or other Databases.
2. The Databases that your product may contain are licensed, not sold.
We grant to you the nonexclusive, nonassignable right to use these
Databases for supplemental navigation reference purposes, but only as
long as you comply with the terms and conditions of this License
Agreement. We reserve the right to terminate this license if you violate
any aspect of this License Agreement. You are responsible for using
official government charts and prudent navigation for safe travel.
3. The Databases housed in your product are protected by the
copyright notices appearing on the product or its screen(s). You may
NOT modify, adapt, translate, reverse engineer, decompile,
disassemble, rent, lease, or resell any Database, and you may NOT
create derivative works based upon any Database or its contents..
Any unauthorized reproduction, use, or transfer of a Database may
be a crime and may subject you to damages and attorney fees.
4. This License Agreement will terminate immediately without prior
notice from us if you fail to comply with or violate any of the
provisions of this Agreement. Upon termination, you will promptly
return all products containing one or more Databases to us.
5. Prices and programs are subject to change without notice.
6. This License Agreement shall be governed by the laws of the State of
Oklahoma and comprises the complete and exclusive understanding
between you and us concerning the above subject matter.
71
Page 76

DATABASES LIMITED WARRANTY
"We", "our", or "us" refers to LEI Extras, a division of Lowrance Electronics,
Inc., the manufacturer of this product. "You" or "your" refers to the first person
who purchases the product as a consumer item for personal, family, or
household use. The Databases Limited Warranty applies to the one or more
databases that your product may contain. We refer to each of these as a
"Database" or together as the "Databases." Your product may thus include the
"WBS Database" which contains worldwide background surface mapping data,
the "SmartMap Database" which contains inland mapping data, or other
Databases.
We warrant to you that we have accurately compiled, processed, and
reproduced the portions of the source material on which the Databases are
based. However, we are under no obligation to provide updates to the
Databases, and the data contained in the Databases may be incomplete when
compared to the source material. WE MAKE NO EXPRESS OR IMPLIED
WARRANTY OF ANY KIND ABOUT THE ACCURACY OF THE SOURCE
MATERIAL ITSELF, INCLUDING BUT NOT LIMITED TO IMPLIED
WARRANTIES OF MERCHANTABILITY OR FITNESS FOR A PARTICULAR
PURPOSE.
If there is a defect in any Database, your exclusive remedy shall be, at our
option, either a refund of the price you paid for the product containing the
defective Database or a replacement of such product. WE WILL NOT UNDER
ANY CIRCUMSTANCES BE LIABLE TO ANYONE FOR ANY SPECIAL,
CONSEQUENTIAL, INCIDENTAL, OR OTHER INDIRECT DAMAGE OF
ANY KIND.
Some states do not allow the exclusion or limitation of incidental or consequential
damages, so the above limitations or exclusions may not apply to you.
This warranty does NOT apply in the following circumstances: (1) when the
product has been serviced or repaired by anyone other than us, (2) when the
product has been connected, installed, combined, altered, adjusted, or handled
in a manner other than according to the instructions furnished with the
product, (3) when any serial number has been effaced, altered, or removed, or
(4) when any defect, problem, loss, or damage has resulted from any accident,
misuse, negligence, or carelessness, or from any failure to provide reasonable
and necessary maintenance in accordance with the instructions of the owner’s
manual for the product.
We reserve the right to make changes or improvements in our products from
time to time without incurring the obligation to install such improvements or
changes on equipment or items previously manufactured.
This warranty gives you specific legal rights and you may also have other
rights which may vary from state to state.
Your remedies under this warranty will be available so long as you can show in
a reasonable manner that the defect occurred within one (1) year from the date
of your original purchase, and we must receive your warranty claim no later
than 30 days after such 1-year period expires. Your claim must be
substantiated by a dated sales receipt or sales slip.
72
Page 77

LEI SOFTWARE LICENSE AGREEMENT
AND ONE-YEAR MEDIA WARRANTY
NOTICE TO USER: THIS IS A CONTRACT. BY INSTALLING THIS SOFTWARE,
YOU ACCEPT ALL THE TERMS AND CONDITIONS OF THIS AGREEMENT.
This LEI Extras* ("LEI") End User License Agreement accompanies the software contained
on the CD-ROMs ("Software"). Upon your acceptance of this Agreement, LEI grants you a
nonexclusive license to use the Software, provided that you agree to the following:
1) USE OF THE SOFTWARE
You may install and use the Software on a hard disk or other storage device. You may
not use this software on more than one computer at the same time.
2) COPYRIGHT AND TRADEMARK RIGHTS
The Software is owned by LEI or its suppliers, and its structure, organization, and code
are trade secrets. The Software is protected by United States copyright law and
international treaty provisions.
3) RESTRICTIONS
You agree not to modify, adapt, translate, reverse engineer, decompile, disassemble, or
otherwise attempt to discover the source code of the Software.
4) SOFTWARE WARRANTY
The Software is being delivered to you AS IS, and LEI makes no warranty as to its use or
performance. LEI MAKES NO WARRANTIES, EXPRESS OR IMPLIED, AS TO THE
MERCHANTABILITY OR FITNESS OF THE SOFTWARE FOR ANY PURPOSE. IN NO
EVENT WILL LEI BE LIABLE TO YOU FOR ANY CONSEQUENTIAL OR INCIDENTAL
DAMAGES. Some states or jurisdictions do not allow the exclusion or limitation of
consequential or incidental damages, so the above limitations may not apply to you.
5) MEDIA WARRANTY
LEI warrants that the media on which the Software is distributed is free from defects in
materials and workmanship for one year from the date of the original purchase by you. Your
remedies under this warranty will be available so long as you can show in a reasonable
manner that any defect or malfunction in materials or workmanship occurred within one
year from the date of your original purchase, which must be substantiated by a dated sales
receipt or sales slip. Any such defect or malfunction which occurs within one year from your
original purchase date will either be repaired without charge or be replaced with a new
product identical or reasonably equivalent to this product, at our option, within a reasonable
time after our receipt of the product. If such defect or malfunction remains after a reasonable
number of attempts to repair by us, you may elect to obtain without charge a replacement of
the product or a refund for the product. THIS REPAIR, OR REPLACEMENT OR REFUND
(AS JUST DESCRIBED) IS THE EXCLUSIVE REMEDY AVAILABLE TO YOU AGAINST
US FOR ANY DEFECT OR MALFUNCTION CONCERNING THE PRODUCT'S MEDIA.
This media warranty does not apply in the following circumstances: (1) when any serial
number has been effaced, altered or removed or (2) when any defect is caused by accident,
misuse, improper storage or normal wear and tear.
6) GOVERNING LAW AND GENERAL PROVISIONS
This Agreement will be governed by the laws of the State of Oklahoma, USA. If any part
of this Agreement is found void and unenforceable, it will not affect the validity of the
remainder of the Agreement. This agreement shall automatically terminate upon failure
by you to comply with its terms.
* LEI Extras is a division of Lowrance Electronics, Inc.
LEI EXTRAS, INC. PO BOX 129 CATOOSA, OK 74015
73
Page 78

How to Obtain Service…
…in the USA:
We back your investment in quality products with quick, expert service.
If you're in the United States and you have technical, return or repair
questions, please contact the Factory Customer Service Department.
Before any product can be returned, you must call customer service to
determine if a return is necessary. Many times, customer service can
resolve your problem over the phone without sending your product to
the factory. To call us, use the following toll-free number:
For Lowrance:
Your software's media is covered by a full one-year warranty. (See
elsewhere inside this manual for complete warranty details.)
LEI Extras, Lowrance Electronics, or Eagle may find it necessary to
change or end our shipping policies, regulations, and special offers at
any time. We reserve the right to do so without notice.
800-324-1356.
8 a.m. to 5 p.m. Central Standard Time, M-F
For Eagle:
800-324-1354
…in Canada:
If you're in Canada and you have technical, return or repair questions,
please contact the Factory Customer Service Department. Before any
product can be returned, you must call customer service to determine if
a return is necessary. Many times, customer service can resolve your
problem over the phone without sending your product to the factory. To
call us, use the following toll-free number:
800-661-3983
905-629-1614 (not toll-free)
8 a.m. to 5 p.m. Eastern Standard Time, M-F
…outside Canada and the USA:
If you have technical, return or repair questions, contact the dealer in
the country where you purchased your unit. To locate a dealer near
you, visit the manufacturer's web site, www.lowrance.com or
www.eaglesonar.com and look for the Dealer Locator.
74
Page 79

Accessory Ordering Information
for all countries
LEI Extras, Inc. is the accessory source for sonar and GPS products
manufactured by Lowrance Electronics and Eagle Electronics. To order
MapCreate and GPS accessories such as computer cables, MMC cards
or MMC card readers, please contact:
1) Your local marine dealer or consumer electronics store. Most quality
dealers that handle marine electronic equipment or other consumer
electronics should be able to assist you with these items.
To locate a Lowrance dealer, visit the web site, www.lowrance.com, and
look for the Dealer Locator. To locate an Eagle dealer, visit the web
site, www.eaglesonar.com, and look for the Dealer Locator. Or, consult
your telephone directory for listings.
2) U.S. customers: LEI Extras Inc., PO Box 129, Catoosa, OK 74015-0129
Call 1-800-324-0045 or visit our web site www.lei-extras.com.
3) Canadian customers can write:
Lowrance/Eagle Canada, 919 Matheson Blvd. E. Mississauga, Ontario
L4W2R7 or fax 905-629-3118.
Shipping Information
If it becomes necessary to send a product for repair or replacement, you
must first receive a return authorization number from Customer
Service. Products shipped without a return authorization will not be
accepted. When shipping, we recommend you do the following:
1. Always use the original shipping container and filler material the
product was packed in.
2. Always insure the parcel against damage or loss during shipment.
LEI Extras does not assume responsibility for goods lost or damaged in
transit.
3. For proper testing, include a brief note with the product describing
the problem. Be sure to include your name, return shipping address
and a daytime telephone number.
Page 80

Visit our web site:
www.lei-extras.com
For Lowrance and Eagle Products
Lowrance Pub. 988-0147-382 © Copyright 2003
All Rights Reserved
Printed in USA 011703 LEI Extras, Inc.
 Loading...