

Leica EZ4 User Manual
Lorem Ipsum
Leica ES2
Leica EZ4
Leica EZ4 HD
Manual

Congratulations!
You have just purchased a Leica E Series stereomicroscope - an excellent choice! The Leica E
series is perfectly suited for practical instruction in schools and universities as well as for
routine tasks in the laboratory and industrial
production and testing. Viewing entire objects
under magnication imparts perspectives and
discoveries that would not be possible with the
naked eye.
In developing our stereomicroscopes, we have
placed great emphasis on simple, self-explanatory operation. However, please take the time
to read the instruction manual and the notes on
operating safety, to learn about all the features
and capabilities of your instrument so that
you can use it safely and to its best advantage.
Should you have any questions, please consult
your local Leica representative. We are gladly at
your service!
Leica E Series Manual 2

Chapter Overview
Safety and Use 6
Leica ES2 10
Leica EZ4 and Leica EZ4 HD 18
Eyepieces (only for Leica EZ4) 29
Photography Using the Leica EZ4 HD 37
The Camera Menu 51
Care and Transport 62
Specications 64
Dimensions 67
Leica E Series Manual 3

Table of Contents
Leica ES2
Overview: Leica ES2 11
Transport, Placement and Storage 12
The Correct Interpupillary Distance 13
Using the LED illuminator 14
Focusing 15
Magnication Display 16
Adjusting the Resistance of the Focus Drive 17
Leica EZ4 and Leica EZ4 HD
Overview: Leica EZ4 19
Instrument variant: Leica EZ4 HD 20
Transport, Placement and Storage 21
The Correct Interpupillary Distance 22
Switching on the LED Illuminator 23
Controlling the Automatic Shuto 24
Illumination types 25
Focusing 26
Magnication Display 27
Adjusting the Resistance of the Focus Drive 28
Eyepieces (only for Leica EZ4)
Changing Eyepieces (Only for Leica EZ4, Open Version) 30
Eyepieces and Eyecups (Only for Leica EZ4, Open Version) 31
Dioptric Correction (Only for Leica EZ4, Open Version) 32
Graticules (Only for Leica EZ4, Open Version) 34
Graticules: Preparation 35
Inserting the Graticules 36
Photography Using the Leica EZ4 HD
Leica EZ4 HD: Overview of the instrument 38
General Instructions 39
Introduction 40
Standard delivery 41
HD mode and PC mode 42
Capturing Images without a Computer in HD Mode 43
High-resolution Video Display without a Computer (HD mode) 45
PC Mode: Use with a Computer 46
PC Mode: Limitations 47
PC Mode: Additional Use of a HDMI Device 48
Conguring the White Balance 49
Restoring Factory Settings 50
Leica E Series Manual 4

Contents (Continued)
The Camera Menu
Optional Remote Control 52
Viewing Images and Movies with the Optional Remote Control 53
Calling up the Camera Menu 54
COLOR (Automatic White Balance) 55
COLOR (Manual White Balance) 56
EXPOSURE 57
RESOLUTION 58
SETUP CAMERA (Camera Settings) 59
SETUP USER (User-dened Settings) 60
Predened Illumination Scenarios 61
Care and Transport
Care and Transport 63
Specications
Camera Module 65
Dimensions
Leica ES2 68
Leica EZ4 HD 70
Leica EZ4, 10× Eyepieces 72
Leica EZ4 without Eyepieces 74
Leica E Series Manual 5

Safety and Use
Leica E Series Manual 6

Safety Notes
Before installing, operating or using the
instrument, it is mandatory to read this
user manual. In particular, please observe all
safety instructions.
The "Safety Concept" brochure contains additional safety information regarding service work,
requirements and the handling of the microscope, accessories as well as general safety instructions.
You can combine individual system articles with
articles from external suppliers. Please read the
user manual and the safety requirements of the
supplier.
To maintain the unit in its original condition
and to ensure safe operation, the user must
follow the instructions and warnings contained
in these user manuals.
Warning of a danger
This symbol indicates especially impor-
tant information that is mandatory to
read and observe. Failure to follow these instructions may pose hazards to personnel, cause
instrument malfunctions or damage the instrument.
Hazardous electrical voltage
This symbol indicates especially impor-
tant information that is mandatory to
read and observe. Failure to follow these instructions may pose hazards to personnel, cause
instrument malfunctions or damage the instrument.
Important information
This symbol indicates additional infor-
mation or explanations that intend to
provide clarity.
EC Declaration of Conformity
Electrically operated accessories are constructed based on the state of the art of technology
and are provided with an EC Declaration of
Conformity.
Contact address
Leica Microsystems (Switzerland) Ltd.
Industry Division
Max Schmidheiny Strasse 201
CH-9435 Heerbrugg (Switzerland)
Leica E Series Manual 7

Instructions for Use
Intended use
The E Series microscopes are optical instruments for improving the visibility of objects
through magnication and illumination. It is
used for observing and documenting.
Place of use
Use the instrument in enclosed,
dust-free rooms at +10 °C to
+40 °C only. Protect it from oil, chemicals and
extreme humidity. It must be at least 10 cm
from the wall and away from ammable substances.
Interference
Avoid large temperature uctuations, direct
sunlight and vibrations. These conditions
can distort measurements and micrographic
images.
In warm and warm-damp climatic zones,
the individual components require
special care in order to prevent the build-up of
fungus.
Use in clean rooms
Leica E Series microscopes can be used in clean
rooms without any problems.
Handling electrical components
Never install any other plug (NEMA
5-15P) or unscrew any mechanical
components unless expressly instructed to do
so in the instructions.
The microscope must be connected to a
grounded outlet.
Always position the microscope so that
you can disconnect it from the power
supply at any time. The power cable is provided
as the power disconnect device.
Leica E Series Manual 8

Instructions for Use (Continued)
Intervention from the user
The microscopes of the E Series contain
no components that can be maintained
or repaired by the user. Exceptions are mentioned specically in this manual.
Unless otherwise specied in this
manual, repair and service work may
be carried out by authorized Leica technicians
only.
Unauthorized alterations to the instru-
ment or noncompliant use shall void all
rights to any warranty claims.
Maintenance
Leica E Series microscopes are basically
maintenance-free. To ensure that it
always operates safely and reliably, we recommend that you take the precaution of contac-
ting the responsible service organization. Here
you can arrange for periodic inspections and
conclude a maintenance contract (recommended).
Accessories
Only those accessories may be used that are
listed in this user manual or for which safe use
has been conrmed by Leica Microsystems.
Danger of infection
Direct contact with eyepieces is a poten-
tial transmission method for bacterial
and viral infections of the eye. The risk can be
kept to a minimum by using personal eyepieces
for each individual or detachable eyecups.
Leica E Series Manual 9

Leica ES2
Leica E Series Manual 10
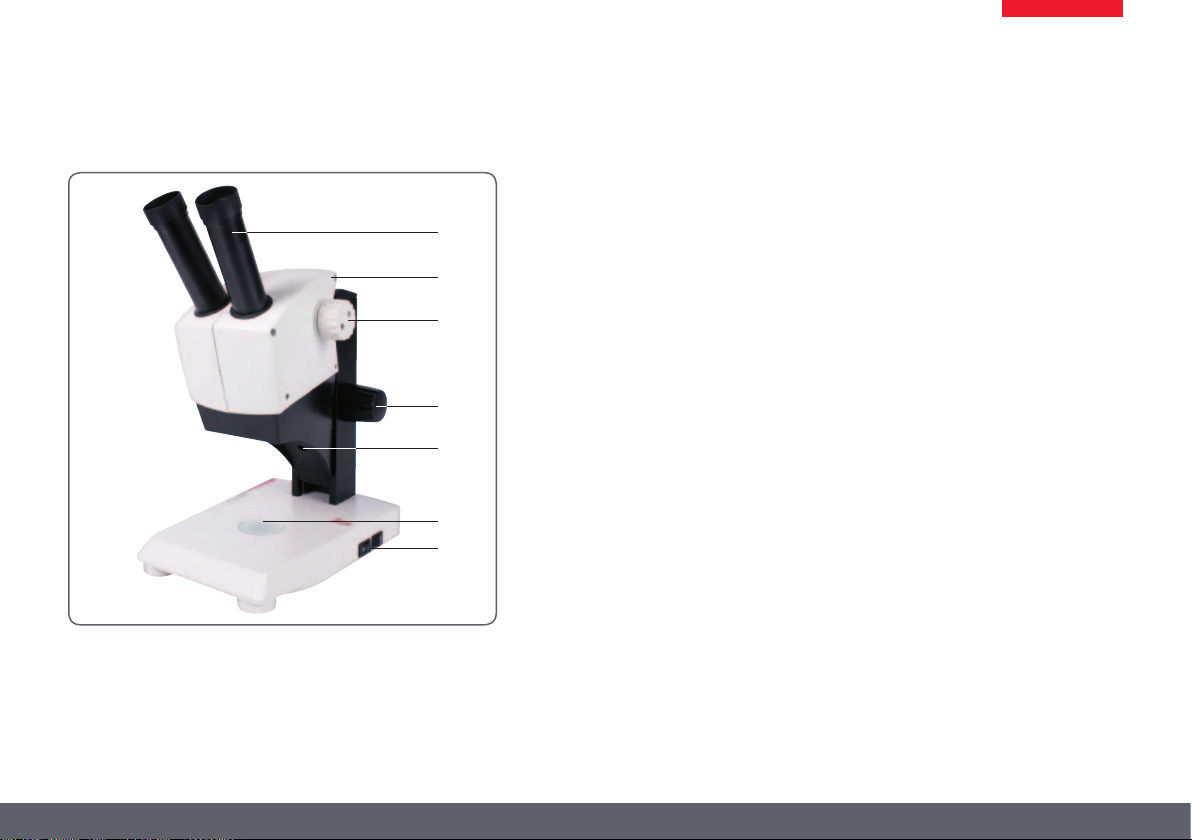
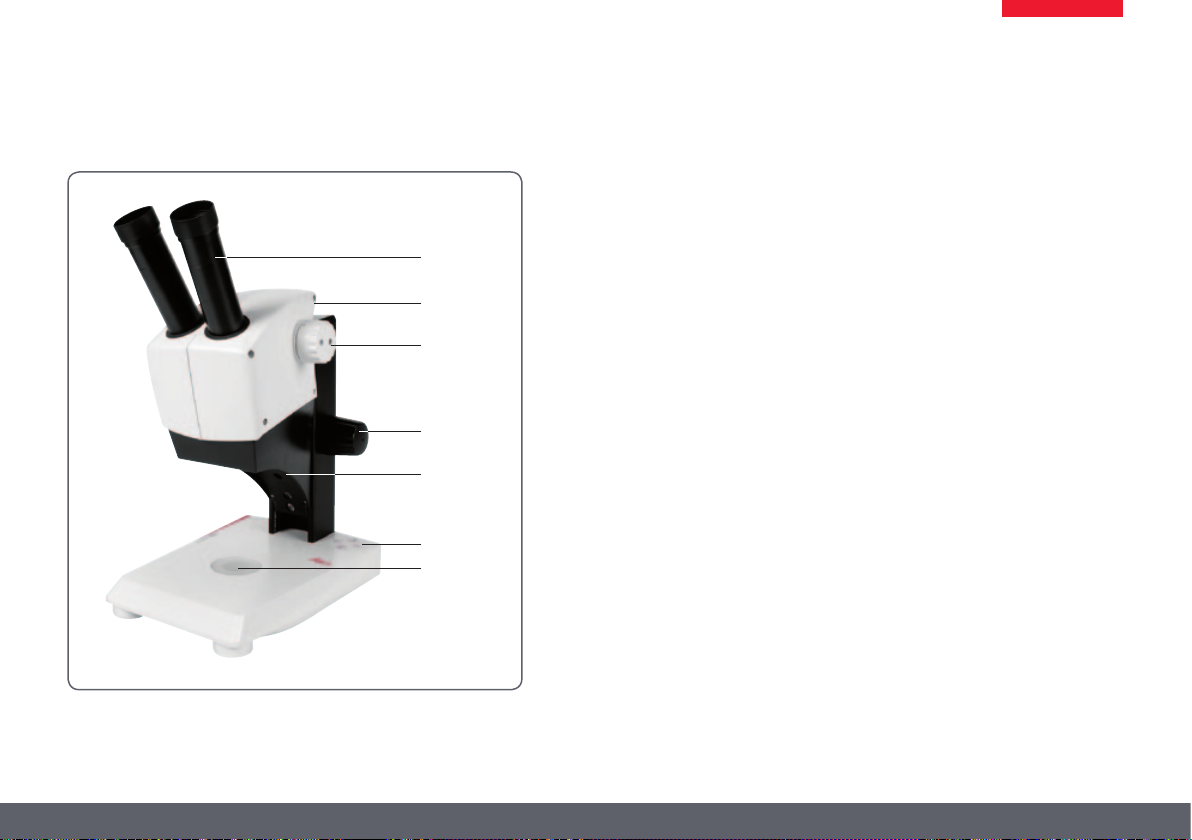
Overview: Leica ES2
1
2
3
4
5
6
7
1 10× xed eyepieces for eyeglass wearers
2 Carrying handle
3 Two-level magnication changer 10× and 30×
4 Focusing drive
5 Integrated LED incident light illumination
6 Integrated LED transmitted illumination
7 Switch for incident and transmitted light
Leica E Series Manual 11

Transport, Placement and Storage
Built-in carrying device
All Leica E Series microscopes are equip-
ped with a carrying handle for conveni-
ent and safe transport.
Setting up the microscope
1. Place the microscope on a at tabletop.
2. Connect the power supply to a grounded
socket.
Packing the device away
1. After use, wind up the cable as shown
in the illustration.
2. Store the instrument so that it is protected
against dust.
Leica E Series Manual 12

The Correct Interpupillary Distance
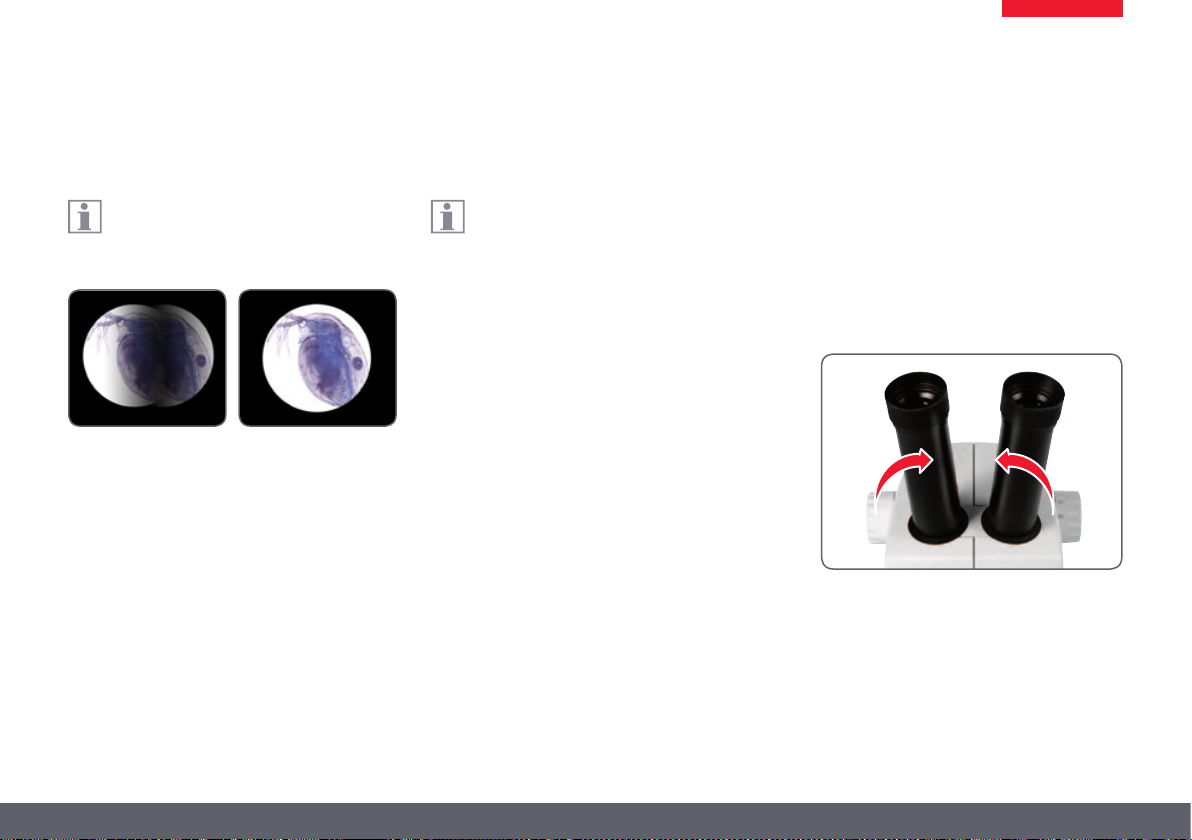
The Ideal Image
The interpupillary distance is correctly
set if you see a single circular image eld
when looking at a specimen.
✗
You may need a short time to become familiar
with using the instrument. Not to worry—after
a little while, it will become automatic.
✓
Note for eyeglass wearers
If you wear glasses, fold the eyecups back
– otherwise, fold the eyecups forwards.
Setting the eye distance
1. Look into the eyepieces.
2. Hold the eyepieces with both hands. Push
the eyepieces together or separate them
until you see a circular image.
Leica E Series Manual 13
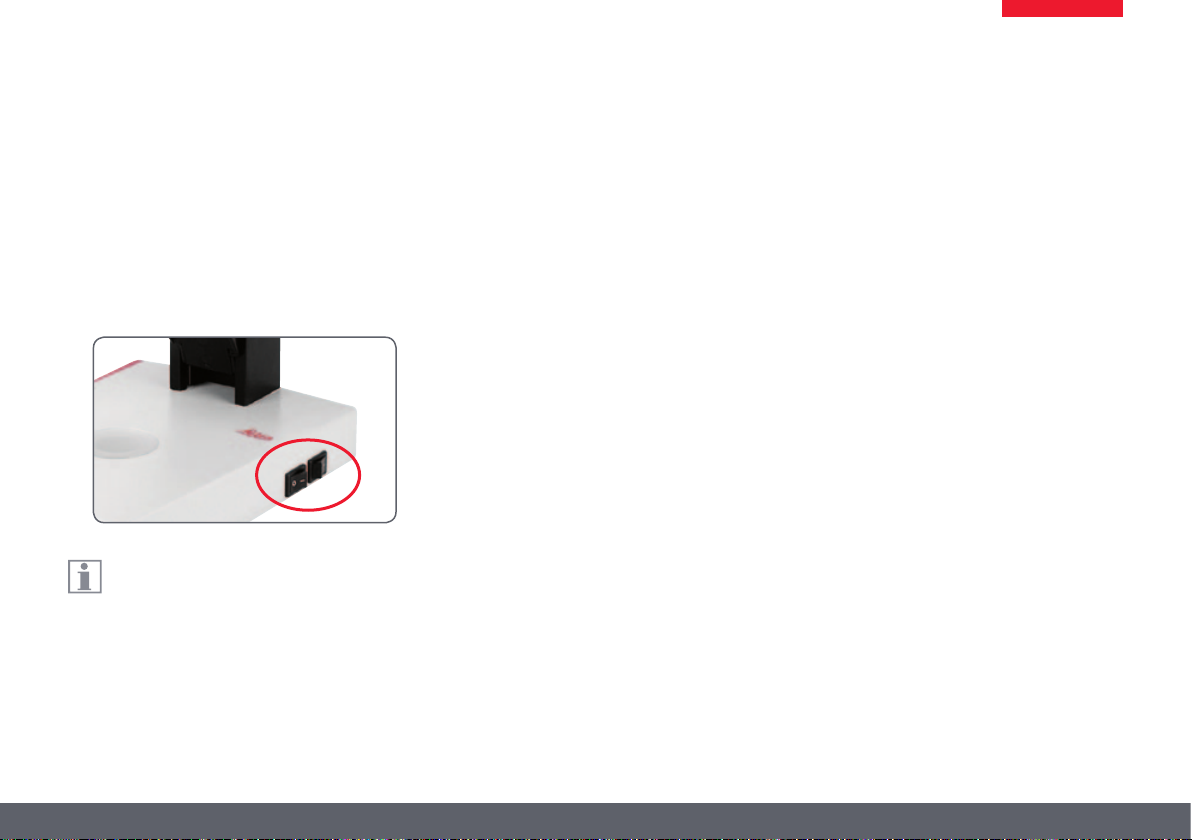
Using the LED illuminator
Iluminating the specimen
1. Position a specimen in the middle of the
baseplate.
2. Switch the two LED illuminators on or o as
desired.
After switching o, the LEDs remain lit for
about another 4 seconds.
Tips on use
Ϙ Use incident light for plastic, opaque
objects.
Ϙ Use transmitted light for transmitted light
specimens or transparent objects.
Ϙ Use the combination of both LED illumina-
tors for partially transparent objects.
Leica E Series Manual 14
Focusing
Focusing raises and lowers the stereomi-
croscope using the focusing drive. The
specimen is brought into sharp focus as soon as
it is in the focal point of the objective.
The focusing drive can be operated either leftor right-handed.
Focusing drive torque
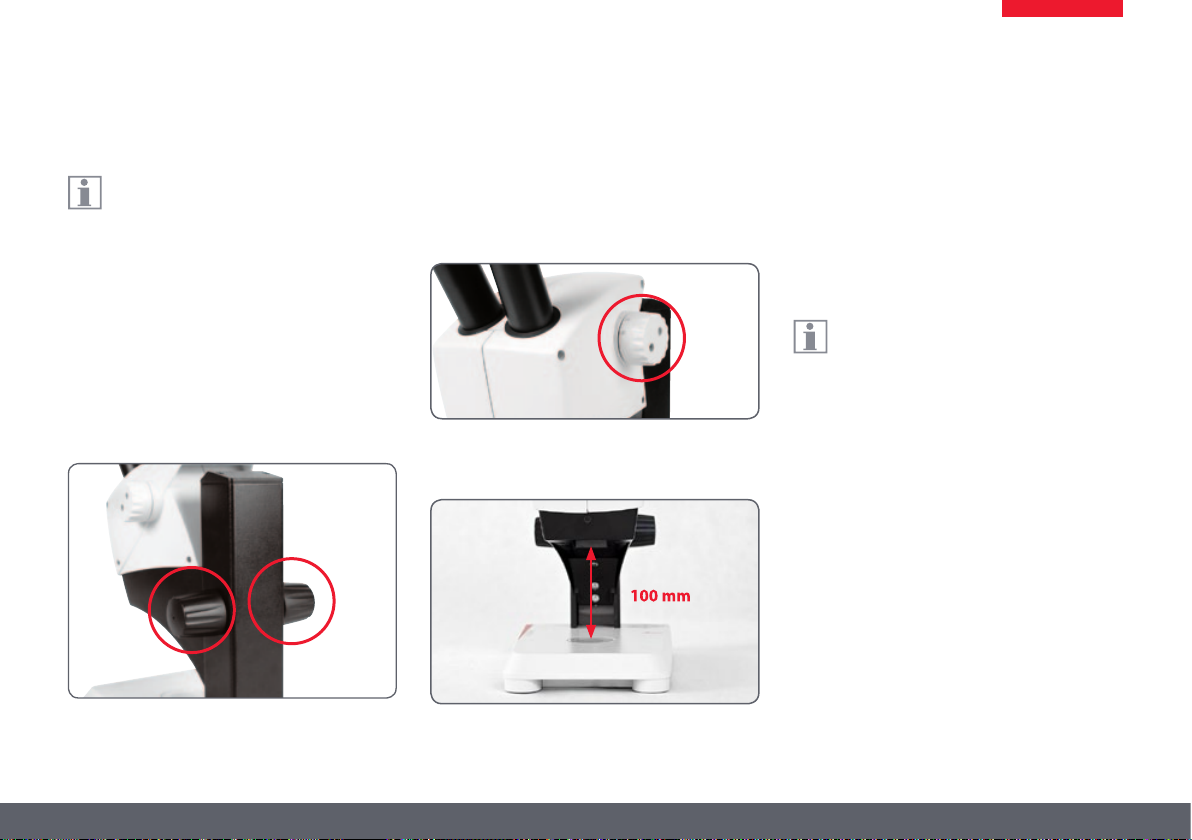
Focusing
1. Set the magnication changer to the lowest
level (10).
2. Set the working distance to approx.
100mm for coarse focusing.
3. Set the magnication changer to the
second level (30).
4. Use the focusing drive once again for ne
focus.
After you have adjusted the image sharp-
ness at high magnication, it is maintained even if you switch to a lower magnication
(parfocal).
Leica E Series Manual 15
Magnication Display
You can read the congured magnica-
tion on the right-hand rotary knob of the
Leica ES2. The additional magnication provided by the eyepieces is already incorporated in
the scale.
Leica E Series Manual 16

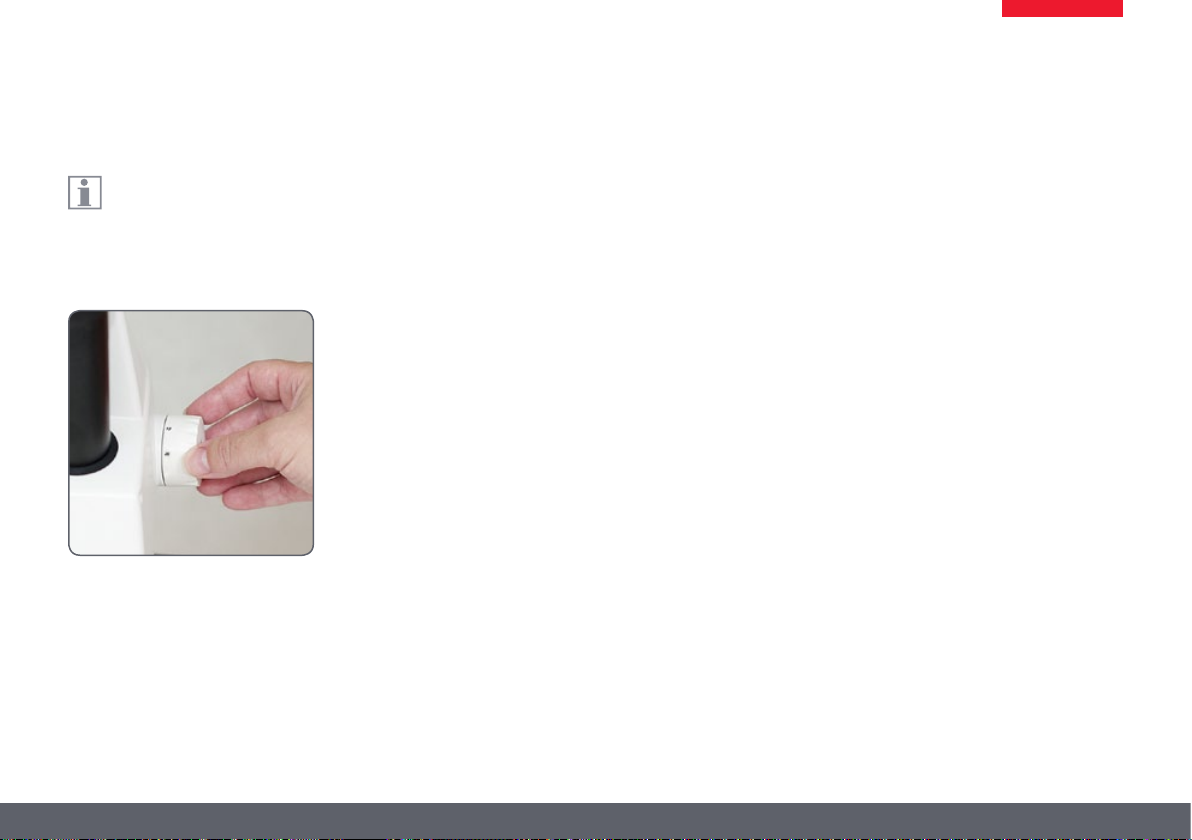
Adjusting the Resistance of the Focus Drive
Adjusting the resistance
Is the focusing drive too easy or too dicult
to adjust? No problem - the resistance can be
adjusted individually depending on your personal preferences:
1. Grip the drive knobs with both hands and
turn them towards each other until the
desired resistance is reached during focusing.
Leica E Series Manual 17

Leica EZ4 and Leica EZ4 HD
Leica E Series Manual 18
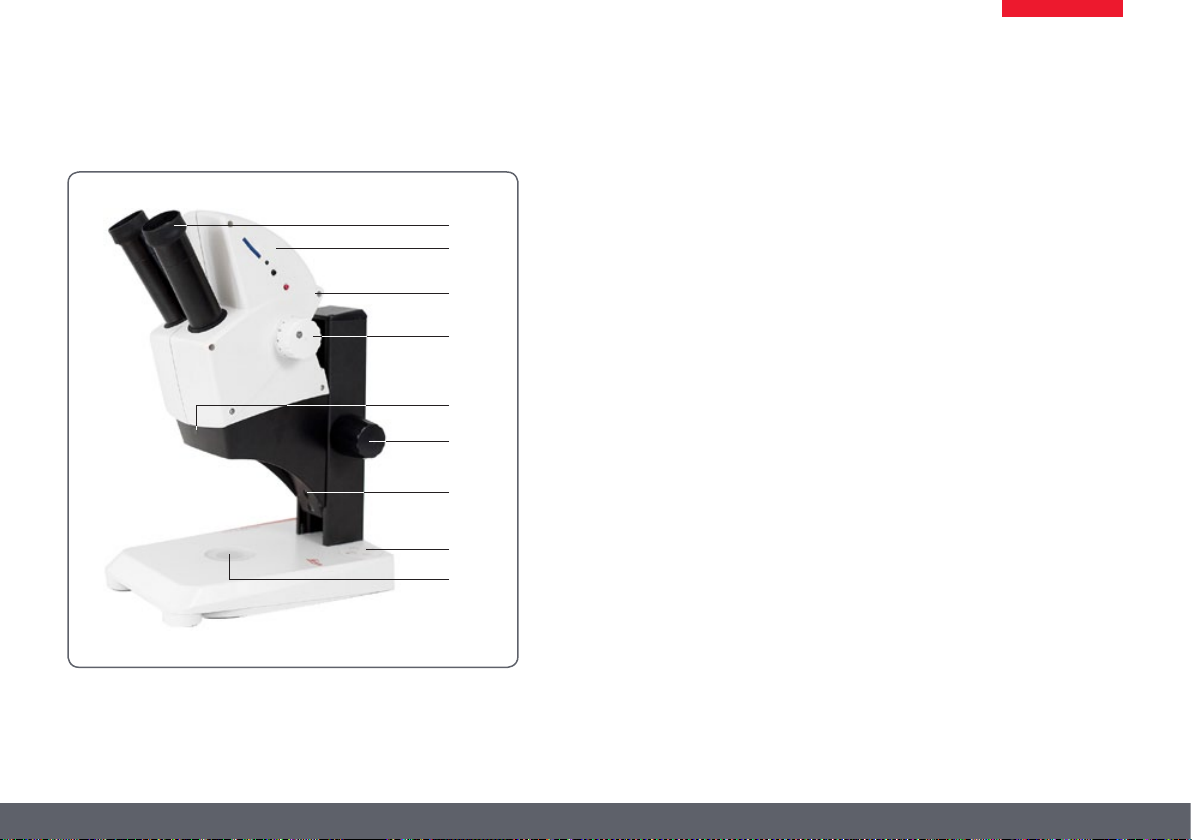
Overview: Leica EZ4
1
2
3
4
5
6
7
Leica E Series Manual 19
1 10x xed eyepieces for eyeglass wearers
2 Carrying handle
3 Magnication changer
4 Focusing drive
5 Integrated LED incident light illumination
6 Illumination control
7 Integrated LED transmitted illumination
Instrument variant: Leica EZ4 HD
1
2
3
4
5
6
7
8
9
1 10x xed eyepieces for eyeglass wearers
2 Integrated digital camera with SD card slot
3 Carrying handle
4 Magnication changer
5 IR receiver for optional remote control
6 Focusing drive
7 Integrated LED incident light illumination
8 Illumination control
9 Integrated LED transmitted illumination
Leica E Series Manual 20
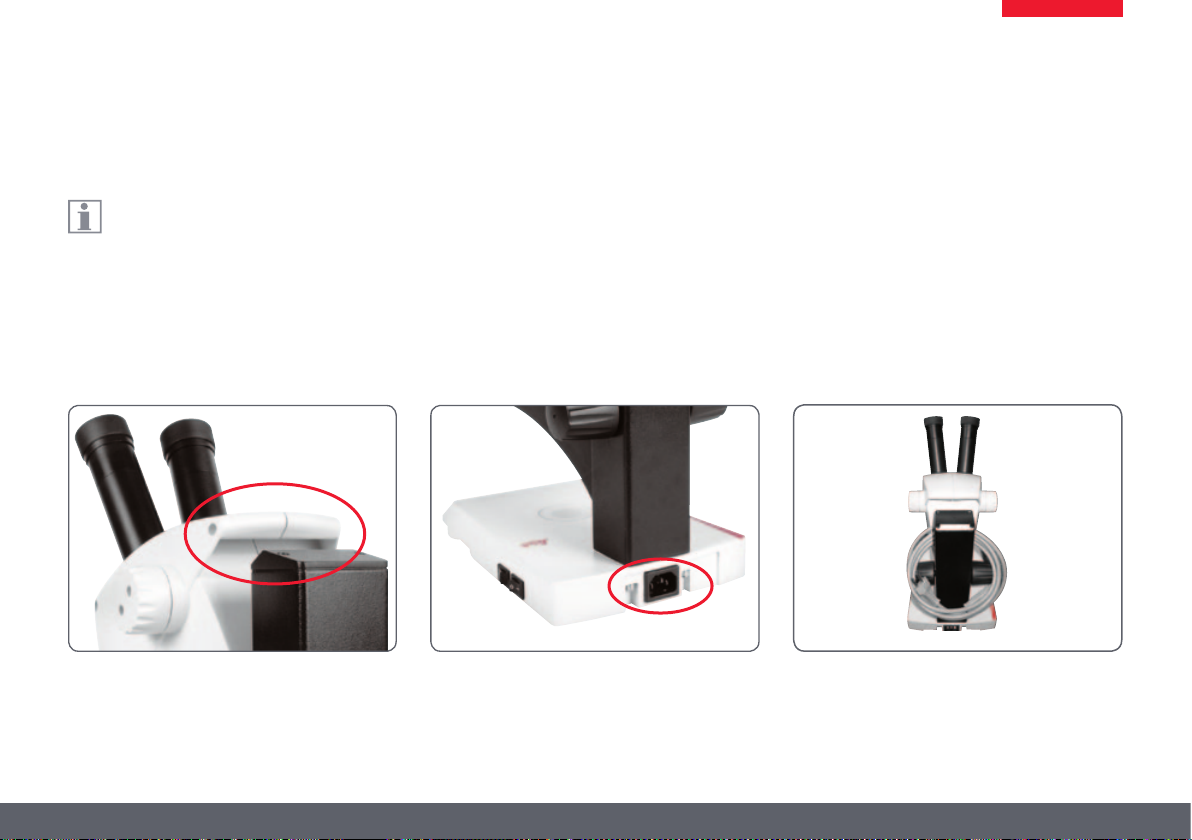
Transport, Placement and Storage
Built-in carrying device
All Leica E Series microscopes are equip-
ped with a holder for convenient and
safe transport.
Setting up the microscope
1. Place the microscope on a at tabletop.
2. Connect the power supply to a grounded
socket.
Packing the device away
1. After use, wind up the cable as shown
in the illustration.
2. Store the instrument so that it is protected
against dust.
Leica E Series Manual 21
The Correct Interpupillary Distance
The Ideal Image
The interpupillary distance is correctly
set if you see a single circular image eld
when looking at a specimen.
✗
You may need a short time to become familiar
with using the instrument. Not to worry—after
a little while, it will become automatic.
✓
Note for eyeglass wearers
If you wear glasses, fold the eyecups back
– otherwise, fold the eyecups forwards.
Setting the eye distance
1. Look into the eyepieces.
2. Hold the eyepieces with both hands. Push
the eyepieces together or separate them
until you see a circular image.
Leica E Series Manual 22
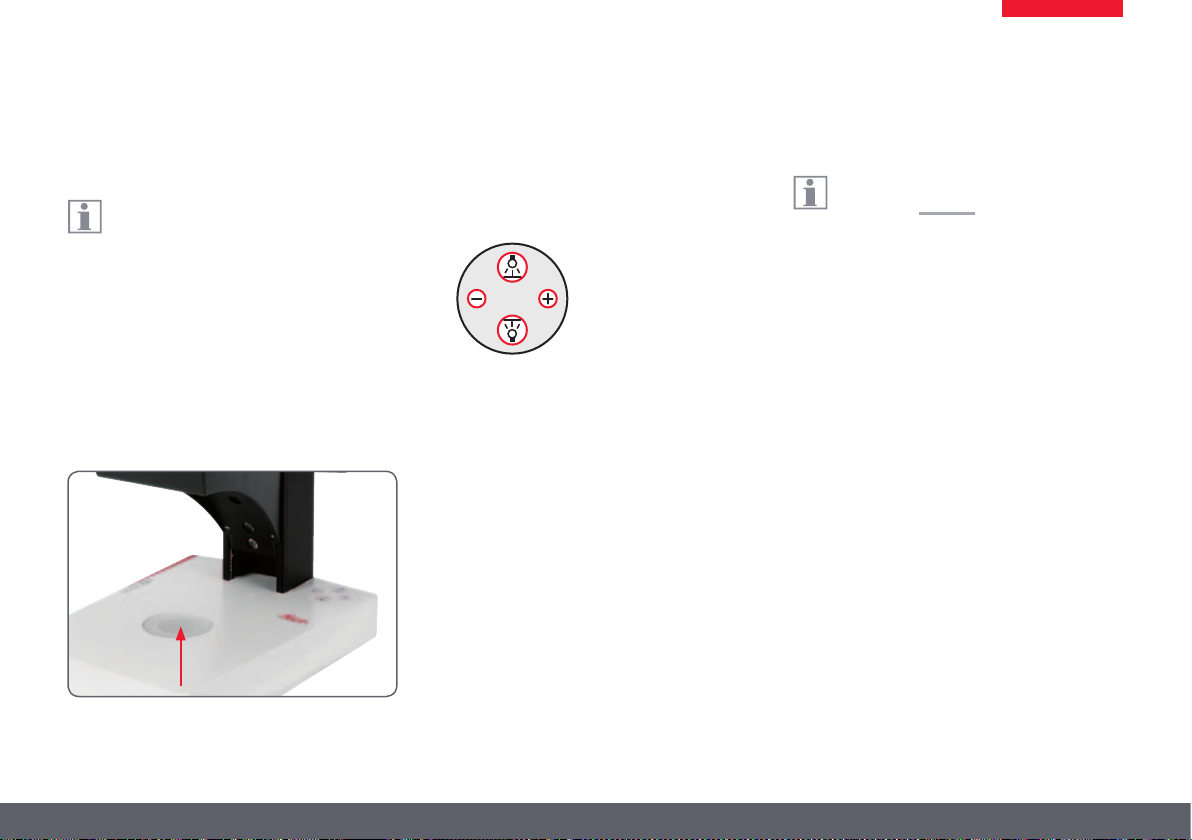
Switching on the LED Illuminator
Automatic shuto
If the illumination is not operated for 60
minutes, it switches o automatically.
The illumination can be reactivated by pressing
a button on the membrane keypad.
LED illumination
1. Position a specimen in the middle of the
baseplate.
2. Switch the two LED illuminators on or o as
desired:
Ϙ Use incident light for plastic, opaque
objects
Ϙ Use transmitted light for transmitted light
specimens or transparent objects.
Ϙ Use the combination of both LED illumina-
tors for partially transparent objects.
For a detailed description of the illumina-
tor, refer to page 25.
Leica E Series Manual 23
 Loading...