

Page 1

Lehle Parallel M
Operating instructions
Lehle Gitarrentechnik • Im Hundsbusch 11 • D-46562 Voerde • Tel +49 (0) 2855 850070
www.lehle.com
Page 2

Dear Musician!
Thank you for purchasing the Lehle Parallel M!
I have been building units that switch, split and route signals with
no technical compromises and with maximum musical fidelity since
1999. Your new Lehle Parallel M comprises only the very best
components. Every assembly of your Lehle Parallel M has been
made and tested in Germany.
Your Lehle Parallel M is of extremely robust design and construction, to make sure that you get absolutely years and years of enjoyment from it. If you should nonetheless have a problem, or simply a
question, just mail me or a member of the Lehle team at:
support@lehle.com
I wish you the very greatest pleasure and success using your Lehle
Parallel M!
Burkhard Georg Lehle
Page 3

1
Contents
Introduction ...............................................................................................................................2
Technical data ...........................................................................................................................3
General description ...................................................................................................................4
Typical uses
- Lehle Parallel M for parallel effect loops ........................................................................9
- Using the Lehle Parallel M to insert effects into the effects loop of an amplifier................11
- Using the Lehle Parallel M to mix two input signals .......................................................13
- Using the Lehle Parallel M to mix two pick-ups from one instrument ............................... 15
- Using the Lehle Parallel M as a active DI box ................................................................17
Signal flow chart of the Lehle Parallel M ................................................................................ 18
Page 4

2
The Lehle Parallel M is a compact and versatile
line mixer to meet demanding tonal standards.
The Lehle Parallel M mixes the signals from
effect units into the original signal, either before
the amp or inserted into its effects loop. Send
and return levels, as well as the mix ratio to the
original signal can be adjusted separately using
the respective controller. The send and return
paths can, of course, be operated both balanced
and unbalanced. The great dynamic range of
the Lehle Parallel M makes it possible to mix
into the guitar signal a 19” studio effect with its
low-impedance line level, for example, or to insert
effects pedals level-adjusted via the amp’s effects
loop.
Thanks to their JFET technology, the Lehle Par-
allel M’s inputs can handle both high-impedance
signals from electric guitars and basses or acoustic
instruments, and low-impedance signals from
keyboards and active electric guitars and basses
with a broad output range extending from 20 to
100,000 Hz.
To exploit the dynamics of tube amplifiers to the
full, the input voltage is rectified from the power
supply socket, then filtered, stabilized and doubled
to 18V.
The Lehle Parallel is available in two versions,
the Parallel L, featuring a True-Bypass switch
with gold-plated contacts, and the Parallel M, a
straight mixer.
Page 5

3
Technical data
Weight: 521 g (without battery)
Length: 10 cm (3.9”)
Width: 12,2 cm (4.8”)
Overall height: 3,9 cm (1.5”)
Voltage range: 9 - 20 V AC or DC, or 9V PP3 battery
Max. power take-up: 37 mA with battery, 63 mA with an extern. power supply
Frequency response: 20 Hz - 100 kHz
Distortion: 0,003 % at 1kHz, 0 dBU
Impedance, Input: 1 MOhm
Impedance, Return: 1 MOhm
Impedance, Output: 100 Ohm
Impedance, Send: 100 Ohm
Signal-to-noise ratio: -91dB at 1kHz, 0 dBU (A-weighted)
Max. level: 5,3 V RMS (approx. 16 dBU)
Max. gain/ loss Send and Return: +/- 15 dB
Page 6

4
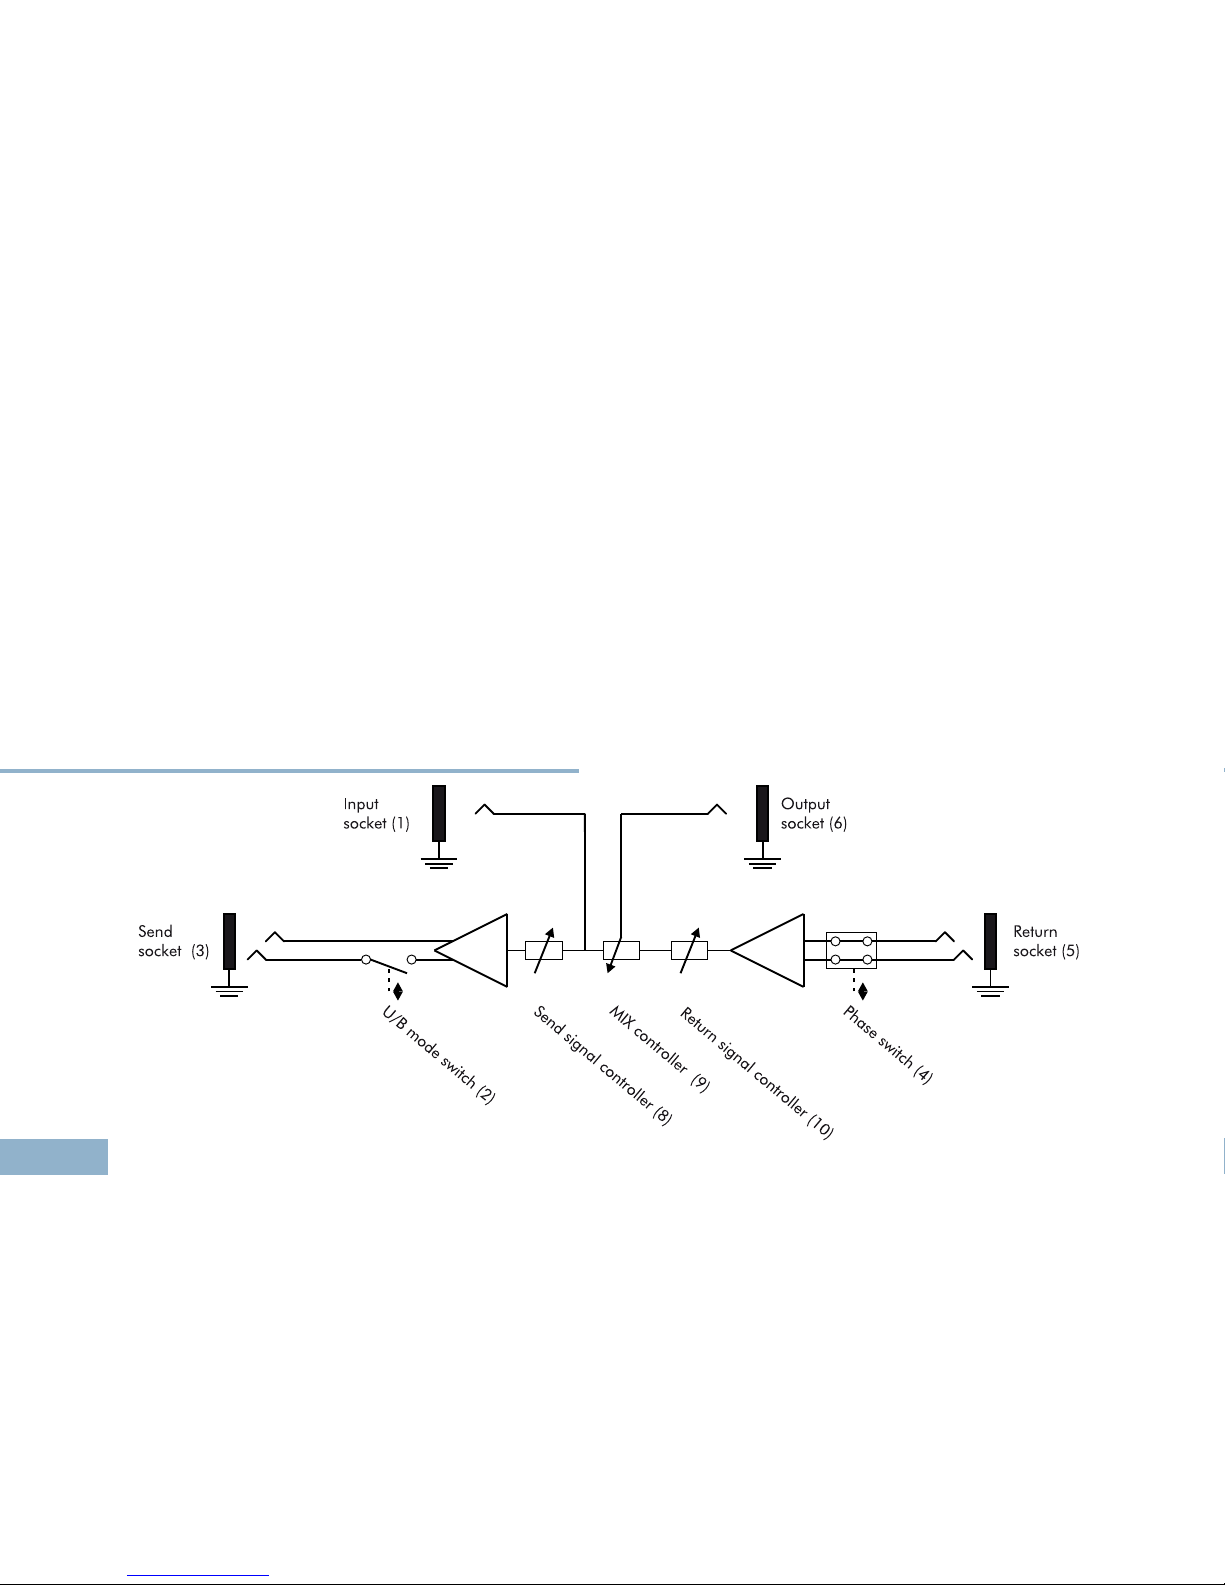
General Description
1234567
8
9
11
10
Page 7

5
1. Input socket
Connect your instrument or the Send output of
your amplifier to this socket.
The Lehle Parallel M has a high-impedance input and can therefore accept both low-impedance
and high-impedance signals of all types, so that
you can plug in virtually any instrument you like:
electrical and acoustic stringed instruments, such
as electric guitars and basses, acoustic guitars and
all types of stringed instruments, and also the lowimpedance signals from computers, keyboards
and mixers.
If you want to use your Lehle Parallel M to
inject an external effect into the serial effects loop
of your amplifier, connect the Send output of the
amplifier to this input socket.
Note: In battery mode, the battery circuit is automatically activated when a cable is connected to
the input socket so always „pull the plug” when
you’ve finished your session, or are taking a
longer break!
2. U/B-mode switch
Set this switch correspondingly, depending on
whether you want a balanced or an unbalanced
signal at the Send output (3).
For an unbalanced signal on the Send socket (3),
set the gold-contact switch to the „U” (for „unbalanced”) position, and to the „B” (for „balanced”)
position for a balanced signal.
The mode switch should be set to „U” if normal
(pedal-type) effect units are connected to the Send
socket (3), since these devices generally have an
unbalanced input. Mixers, stage boxes and A/D
converters generally have balanced inputs, so you
should then set the mode switch to „B”.
3. Send socket
Connect the input of your effect unit or the input
of your target device (e.g. mixer, computer, etc.) to
this socket.
If you’re using the Lehle Parallel M for parallel
effect loops, connect the Send socket to the input
of the effect unit. The Send socket can also be
used as a DI output in order to route the signal to
the input of a mixer or an A/D converter or sound
card. The intensity of the signal available on the
Send socket can be controlled using the appartenant controller (8).
Page 8

6
4. Phase switch
The phase of the return signal can be reversed
here, if necessary.
Phase cancellations can occur if you are mixing
the original signal with the return signal - this
sound is usually felt to be too „thin”. Reversing the
phase using the gold contacted phase switch
solves this problem. Simply move the switch to the
position at which the sound is best - this is, of
course, ultimately a question of individual taste.
5. Return socket
Connect the output of your effect unit or the output of your second device (e.g. mixer, computer,
second pick-up on a guitar, etc.) to this socket.
If you’re using the Lehle Parallel M for parallel
effect loops, connect the output of your effect unit
to the Return socket. The Return socket can also be
used as an input for other signal sources - the
output from a computer sound card, for example,
or from a signal processor.
If the Lehle Parallel M is being used to mix two
pick-ups from one instrument, the Return socket
can also be used as the input for the second pickup.
The Return socket has a 1 MOhm input impedance. This means that even very weak signals,
such as those generated by piezo and magnetic
pickups can be transmitted without loss of sound.
The Return input can handle both balanced and
unbalanced signals, and switches automatically to
corresponding to the signal type, depending on
whether a stereo jack-plug (TRS) for balanced or
a mono jack-plug (TS) for unbalanced signals is
connected. The Return input’s sensitivity can be
adjusted using the controller (10).
6. Output socket
Connect your amplifier or the Return input from
the serial effects loop of your amplifier to this
socket.
The device connected here will mostly be an amplifier, but can also be a mixer, a stage box or a
sound card. The signal mixed from the input and
the return signal is available here. The mixing ratio can be controlled using the MIX controller (9).
Connect the output socket to the Return input
of your amplifier if you want to use the Lehle
Parallel M to inject an external effect into your
amplifier’s serial effects loop.
Page 9

7
7. External power supply
Connect a power suppy with a voltage of 9 to
20 V here, when needed.
The Lehle Parallel M can be operated optionally with a 9 V PP3 battery or from an external
power supply, which should provide not less than
9 and not more than 20 Volts. Polarity is not
important here, and both AC and DC sources can
be used. The supply voltage is internally rectified,
filtered, stabilized and then doubled to 18 V. A
connector for the
Lehle Parallel M
’s power-supply socket is included in the pack; if desired, this
connector can also be soldered on to your powerpack mains cable.
The cover must be unscrewed and removed to
permit installation of a 9V (PP3) battery. To do this,
simply unscrew the four screws holding the cover,
and draw the cover off.
Note: The Lehle Parallel M automatically
switches via a gold-plated relay to battery operation if power supply voltage drops below 9 Volt.
So always make sure that your
Lehle Parallel
M has a charged battery if you want the extra
security of knowing that it will continue to operate
trouble-free even if the power supply fails.
8. Send signal controller (S)
You can set the level of the Send signal here.
The input signal is available 1:1 on the Send input
when this controller is set to its center position,
Turn the controller to the left to decrease the signal
by up to 15 dB, or to the right, to boost the signal
by up to 15 dB.
9. MIX controller
Here you can set the mixing ratio for mixing of
the Input and Return signals.
The two signals have equal strength when this
controller is in its center position. Turn the MIX
controller to the left to increase the Return signal
and decrease the Input signal. The Input signal is
increased, and the Return signal decreased when
you turn the controller to the right.
10. Return signal controller (R)
Set the level of the Return signal here.
The signal on the Return input is transmitted 1:1
when this controller is in its center position. Turn
the controller to the left to decrease the signal by
up to 15 dB, or to the right, to boost the signal by
up to 15 dB.
Page 10

8
11. Base and fixing
You can use the fixing screws supplied with the
Lehle Parallel M to fix it to a base plate (or to a
pedal board, for example).
Thanks to its ready-to-go fixing system, the Lehle
Parallel M can be mounted without difficulty on
a base plate. To do this, undo the four housing
screws and detach the cover. Then fix the device
base to a base plate using the two screws, the
washers and the spacers supplied. Replace the
cover and tighten the four housing screws - done!
Page 11

9
Typical uses
The Lehle Parallel M’s universal properties make it equally suitable for live use on stage and in the
concert hall, and for studio recording sessions. The following few pages show a number of typical applications in which the Lehle Parallel M is a rational addition to your gear!
Device connection
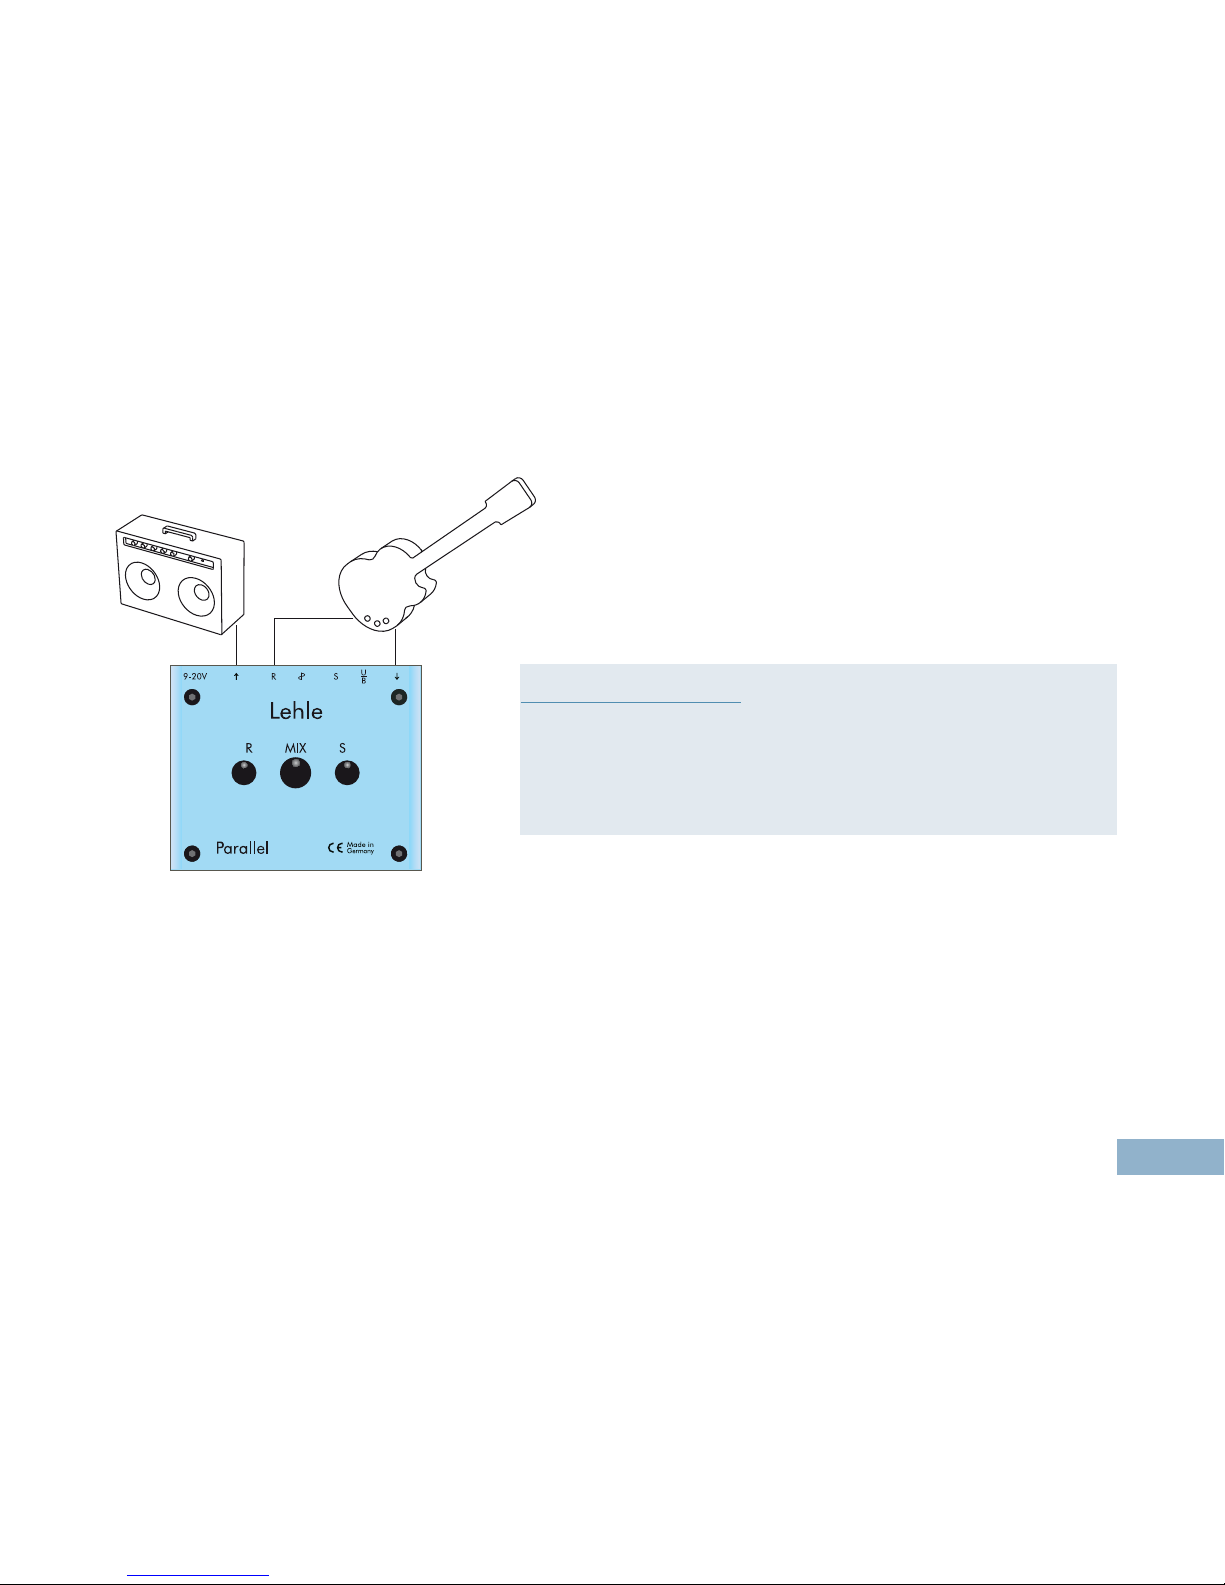
Input socket (1) Instrument
Send socket (3) Input effect unit(s)
Return socket (5) Output effect unit(s)
Output socket (6) Amplifier
Lehle Parallel M for parallel effect loops
Page 12

10
Without a Lehle Parallel M, injecting effects into
the signal path can cause all kinds of problems,
especially if you’re using older, so-called „vintage”
effects which, as every player knows, produce a
unique sound, but generally falsify the original
signal very noticeably. The Lehle Parallel M will
help you here in several ways:
Optimum effect level: Because you can select an
optimum mix ratio between the original and the
effect by using the MIX controller (9), you can
mix exactly the amount of effect you want into the
original signal.
Minimum noise: The ability to adjust the level
of the effect device connected using the Send and
Return controllers means that noise is reduced to
the absolute minimum. It can be a good idea to
increase the Send level when using effect units that
generate powerful background noise, since this
enables you to get more signal and less noise in
the effect sound.
What to do:
1. Connect your instrument to the Input socket (1) of the Lehle Parallel M.
2. Connect your amplifier to the Output socket (6) of the Lehle Parallel M.
3. Connect the Send socket (3) of the Lehle Parallel M to the input of your effect unit.
4. Connect the output of your effect unit to the Return socket (5) of the Lehle Parallel M.
5. Use the Send (8) and Return (10) controllers on the Lehle Parallel M to adjust the level of the effect
unit connected optimally.
6. Use the MIX controller (9) on the Lehle Parallel M to select the desired effect level.
7. Done!
Page 13

11
Using the Lehle Parallel M to insert effects into the effects loop of an amplifier
Many amplifiers feature only one serial effects
loop, which means that the signal is routed entirely
via this loop between the preamp and the power
amplifier. In many cases, the level on the serial
effects loop will be too high for any effects pedals
which you might try to connect at this point. The
Lehle Parallel M enables you to adjust the level
for these effects optimally by turning the Send con-
Device connection
Input socket (1) Send of the serial effects loop of an amplifier
Send socket (3) Input effect unit(s)
Return socket (5) Output effect unit(s)
Output socket (6) Return from the serial effects loop of an amplifier
SEND
RETURN
SEND
RETURN
Page 14

12
troller (8) down slightly. Turn the Return controller
(10) up again, to increase the level back to that of
the amplifier’s effects loop.
The signal will often lose warmth, intensity and
depth - everything, that makes up the unique
sound of a good tube amplifier! - when digital
effect processors are used in a serial effects loop.
With the Lehle Parallel M, however, you can
add the effect signal to the original sound - with
the pleasing result that you lose none of your amplifier’s excellent sound characteristics and don’t
have to do without the effect sounds you love.
What to do:
1. Connect the Send output from the serial effects loop of your amplifier to the Input socket (1) of the
Lehle Parallel M.
2. Connect the Output socket (6) of the Lehle Parallel M to the Return input of your amplifier’s serial
effects loop.
3. Connect the Send socket (3) of the Lehle Parallel M to the input of your effect unit.
4. Connect the output of your effect unit to the Return socket (5) of the Lehle Parallel M.
5. Use the Send (8) and Return (10) controllers of the Lehle Parallel M to adjust the level of the effect
unit connected optimally.
6. Select the desired effect level using the MIX controller (9) on the Lehle Parallel M.
7. Done!
Page 15

13
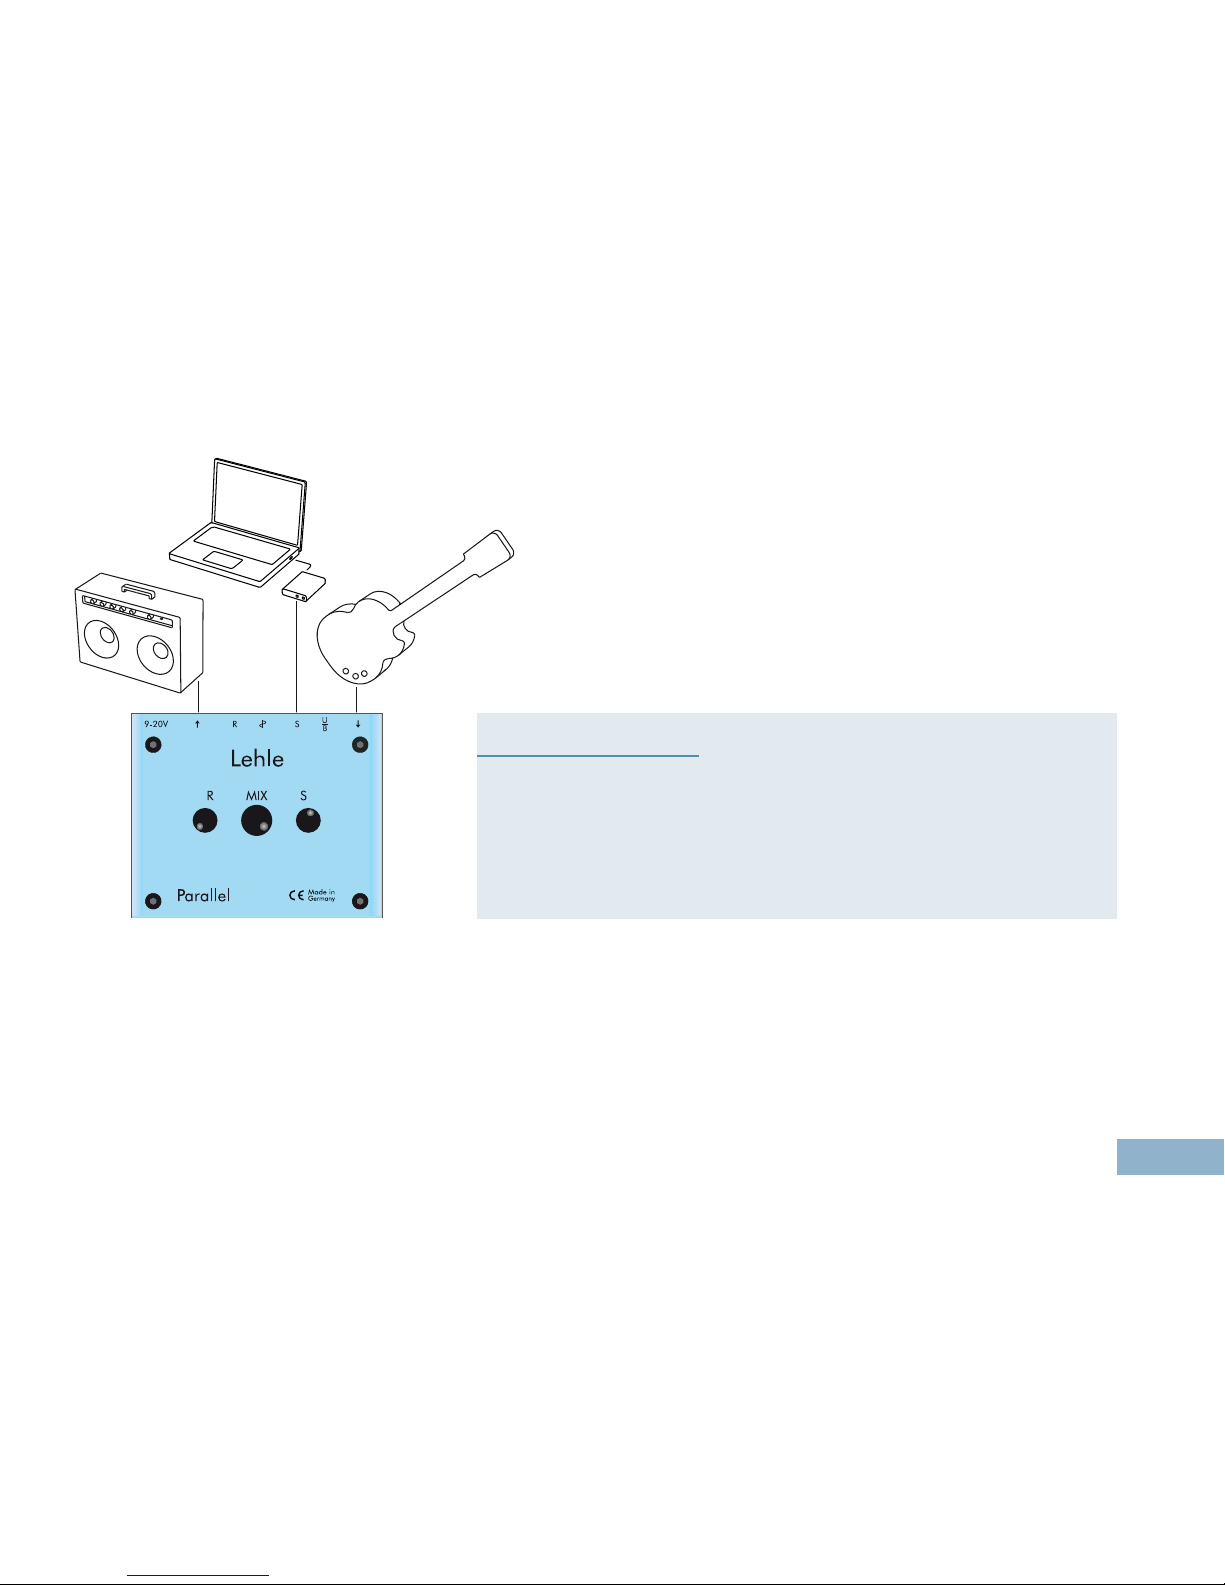
Using the Lehle Parallel M to mix two input signals
Device connection
Input socket (1) Output from first device (effect unit, PC, keyboard, mixer, instrument, etc.)
Send socket (3) –
Return socket (5) Output from second device (PC, keyboard, mixer, instrument, etc. – balanced
signal if required)
Output socket (6) Amplifier, input for PC or mixer
Page 16

14
The Lehle Parallel M can also be used to mix
two different signals. Since the regular Input (1)
and the Return (5) input are both high-impedance,
all conceivable signals can be processed and
mixed, including signals that are otherwise difficult
to process. It doesn’t matter whether the signal is a
low-impedance signal from a computer, keyboard
or mixer, or a high-impedance signal from passive
pick-ups.
The Lehle Parallel M is frequently used in this
context for mixing of two preamps or effect units
- it optimally combines these signals into one
overall signal.
What to do:
1. Connect the output from your first device to the Input socket (1) of the Lehle Parallel M.
2. Connect the output from your second device to the Return input (5) of the Lehle Parallel M.
3. Set the sensitivity for the second unit using the Return controller (10) on the Lehle Parallel M.
4. Set the required mixing ratio for the two units using the MIX controller (9) on the Lehle Parallel M.
5. Connect your amplifier or another target device to the Output socket (6) of the Lehle Parallel M.
6. Done!
Page 17
15
Using the Lehle Parallel M to mix two pick-ups from one instrument
Many instruments have two different types of pickup, such as one magnetic and one piezo pick-up,
for example. The Lehle Parallel M is excellent
at mixing these signals.
Mixing of signals from two different pick-ups can
cause problems with phase cancellations, with the
mixed sound then being thin and weak. This problem can be quickly eliminated using the phase
reverse switch (4). Press this switch and the phase
on the Return input is reversed, and the mixed
sound from the two pick-ups becomes full and rich
again.
Device connection
Input socket (1) Instrument’s first pick-up
Send socket (3) –
Return socket (5) Instrument’s second pick-up
Output socket (6) Amplifier
Page 18

16
What to do:
1. Connect your instrument’s first pick-up to the Input socket (1) of the Lehle Parallel M.
2. Connect your instrument’s second pick-up to the Return input (5) of the Lehle Parallel M.
3. Use the Return controller (10) on the Lehle Parallel M to set the sensitivity for your second pick-up.
4. Use the MIX controller (9) on the Lehle Parallel M to set the required mixing ratio for the two pick-
ups.
5. Connect your amplifier to the Output socket (6) of the Lehle Parallel M.
6. Check the overall sound for any phase cancellations and, if necessary, press the phase reverse switch
(4) on the Lehle Parallel M.
7. Done!
Page 19
17
Using the Lehle Parallel M as a active DI box
A further, entirely practicable use of the Lehle
Parallel M is as an active DI box. The unfalsified
signal is then routed via the Send socket (3) to the
input of a mixer, stage box or an A/D converter or
sound card, while the accustomed sound can be
heard simultaneously from the amplifier.
What to do:
1. Connect your instrument to the Input socket (1) of the Lehle Parallel M.
2. Connect your amplifier to the Output socket (6) of the Lehle Parallel M.
3. Use the U/B mode switch (2) on the Lehle Parallel M to select whether the Send output (3) will sup-
ply a balanced or an unbalanced signal (see the instructions for the U/B mode switch above).
4. Connect the Send socket (3) of the Lehle Parallel M to the input of your target device.
Device connection
Input socket (1) Instrument
Send socket (3) Mixer, PC, stage box, etc., input
(balanced signal if required)
Return socket (5) –
Output socket (6) Amplifier
Page 20
18
Note:
5. Turn the MIX controller (9) on the Lehle Parallel M all the way to the right, so that you have 100 %
of the original signal on the output.
6. Use the Send controller (8) on the Lehle Parallel M to set the optimum output level.
7. Done!
Signal flow chart of the Lehle Parallel M
The signal present on the Send socket (3) is not
electrically isolated from the output. Ground loops
may thus occur and cause undesirable background noise. In this case, a Lehle P-Split II,
which electrically isolates the signals via its built-in
LTHZ-transformer, and thus eliminates all
background noise, can be connected between the
units.
 Loading...