

Page 1

User’s Manual 2008
Power Commander IQ
Network Controlled
SPDU8-1U, SPDU16-2U, SPDU20-0U
Wiremold/Legrand®electrical systems conform to and should be properly grounded in compliance with requirements of the current National
Electrical Code or codes administered by local authorities. All electrical products may present a possible shock or fire hazard if improperly
installed or used. Wiremold/Legrand electrical products may bear the mark as UL Listed and/or Classified and should be installed in
conformance with current local and/or the National Electrical Code.
1 007 627 0408
© Copyright 2008 Wiremold / Legrand All Rights Reserved
Page 2

Copyright Notice
Copyright
©
2008 by Wiremold/Legrand. The material discussed
in this manual is the proprietary property of Wiremold/Legrand.
AII retains all rights to reproduction and distribution of this
document.
FCC Warning
The Federal Communications Commission has set limits for
emitted radio interference. The Wiremold / Legrand. systems
are constructed with this electromagnetic interference (EMI)
limitation in mind. The systems are classified under FCC
Regulations as a Class A and Class B device. A Class A device
may be used in commercial environments and not in residential
areas, while a Class B device may be used in commercial
environments residential areas. The Power Commender IQ
series devices has been tested and shown to comply with
the following FCC rule: Part 15 Subpart J and ICES-003.
UL Safety Standards Compliance
Power Commender IQ Series products have been tested and
found to be accordance with the following listed test
requirements:
UL-60950-1: 2003, R7.06
CAN/CSA-C22.2 No. 60950-1-03
Warranty Information:
The warranty period on this product (parts and labor) is one
(2) year from the date of purchase. Please contact Wiremold /
Legrand at 1-800-621-0049 or visit our website at
www.wiremold.com for information regarding repairs and/or
returns. A return authorization number is required for all
repairs/returns. See Appendix A for more information.
Changes:
The material in this guide is for information only and is subject to
change without notice. Wiremold / Legrand
reserves the rights to make changes in the product design
without reservation and without notification to its users.
Wiremold / Legrand
U.S. and International:
60 Woodlawn Street • West Hartford, CT 06110
1-800-621-0049 • FAX 860-232-2062 •
Outside U.S. 860-233-6251
Canada:
570 Applewood Crescent • Vaughan, Ontario L4K 4B4
1-800-723-5175 • FAX 905-738-9721
Page 3

1 SYSTEM DESCRIPTION . . . . . . . . . . . . . . . . . . . . . . . . . . . . . . . . . . . . . . . . . . . . . . . . . . . . . . . . . . . . . . . . . . . . . . . . . . . . . . . . . . .1
1.1 Products comparison chart: . . . . . . . . . . . . . . . . . . . . . . . . . . . . . . . . . . . . . . . . . . . . . . . . . . . . . . . . . . . . . . . . . . . . . . . . . . . .1
1.2 What you can do with the system: . . . . . . . . . . . . . . . . . . . . . . . . . . . . . . . . . . . . . . . . . . . . . . . . . . . . . . . . . . . . . . . . . . . . . . .1
1.3 Front and back panel: . . . . . . . . . . . . . . . . . . . . . . . . . . . . . . . . . . . . . . . . . . . . . . . . . . . . . . . . . . . . . . . . . . . . . . . . . . . . . . . . .2
2 IMPORTANT SAFETY PRECAUTIONS FOR HARDWARE INSTALLATION . . . . . . . . . . . . . . . . . . . . . . . . . . . . . . . . . . . . . . . . . .3
2.1 Safety precautions . . . . . . . . . . . . . . . . . . . . . . . . . . . . . . . . . . . . . . . . . . . . . . . . . . . . . . . . . . . . . . . . . . . . . . . . . . . . . . . . . . . .3
2.2 Battery replacement . . . . . . . . . . . . . . . . . . . . . . . . . . . . . . . . . . . . . . . . . . . . . . . . . . . . . . . . . . . . . . . . . . . . . . . . . . . . . . . . . .3
3 ACCESS TO THE SYSTEM . . . . . . . . . . . . . . . . . . . . . . . . . . . . . . . . . . . . . . . . . . . . . . . . . . . . . . . . . . . . . . . . . . . . . . . . . . . . . . . . .3
3.1 Factory default settings: . . . . . . . . . . . . . . . . . . . . . . . . . . . . . . . . . . . . . . . . . . . . . . . . . . . . . . . . . . . . . . . . . . . . . . . . . . . . . . .3
3.2 User privileges and port reservations: . . . . . . . . . . . . . . . . . . . . . . . . . . . . . . . . . . . . . . . . . . . . . . . . . . . . . . . . . . . . . . . . . . . .4
3.3 Local master port access: . . . . . . . . . . . . . . . . . . . . . . . . . . . . . . . . . . . . . . . . . . . . . . . . . . . . . . . . . . . . . . . . . . . . . . . . . . . . . .4
3.4 External modem access: . . . . . . . . . . . . . . . . . . . . . . . . . . . . . . . . . . . . . . . . . . . . . . . . . . . . . . . . . . . . . . . . . . . . . . . . . . . . . . .4
3.5 Telnet access: . . . . . . . . . . . . . . . . . . . . . . . . . . . . . . . . . . . . . . . . . . . . . . . . . . . . . . . . . . . . . . . . . . . . . . . . . . . . . . . . . . . . . . .4
3.6 Web access: . . . . . . . . . . . . . . . . . . . . . . . . . . . . . . . . . . . . . . . . . . . . . . . . . . . . . . . . . . . . . . . . . . . . . . . . . . . . . . . . . . . . . . . .5
3.7 Email access: . . . . . . . . . . . . . . . . . . . . . . . . . . . . . . . . . . . . . . . . . . . . . . . . . . . . . . . . . . . . . . . . . . . . . . . . . . . . . . . . . . . . . . . .5
3.8 SNMP information: . . . . . . . . . . . . . . . . . . . . . . . . . . . . . . . . . . . . . . . . . . . . . . . . . . . . . . . . . . . . . . . . . . . . . . . . . . . . . . . . . . .5
3.9 AutoPing and power reboot: . . . . . . . . . . . . . . . . . . . . . . . . . . . . . . . . . . . . . . . . . . . . . . . . . . . . . . . . . . . . . . . . . . . . . . . . . . . .7
4 USING CONTROL COMMAND . . . . . . . . . . . . . . . . . . . . . . . . . . . . . . . . . . . . . . . . . . . . . . . . . . . . . . . . . . . . . . . . . . . . . . . . . . . . . .7
5 USING CONFIGURATION MENU . . . . . . . . . . . . . . . . . . . . . . . . . . . . . . . . . . . . . . . . . . . . . . . . . . . . . . . . . . . . . . . . . . . . . . . . . . . .8
5.1 Starting configuration menu: . . . . . . . . . . . . . . . . . . . . . . . . . . . . . . . . . . . . . . . . . . . . . . . . . . . . . . . . . . . . . . . . . . . . . . . . . . . .8
5.2 System main menu: . . . . . . . . . . . . . . . . . . . . . . . . . . . . . . . . . . . . . . . . . . . . . . . . . . . . . . . . . . . . . . . . . . . . . . . . . . . . . . . . . . .8
5.3 System access setup menu: . . . . . . . . . . . . . . . . . . . . . . . . . . . . . . . . . . . . . . . . . . . . . . . . . . . . . . . . . . . . . . . . . . . . . . . . . . .10
5.4 TCP/IP network configuration menu: . . . . . . . . . . . . . . . . . . . . . . . . . . . . . . . . . . . . . . . . . . . . . . . . . . . . . . . . . . . . . . . . . . . .12
5.5 More about emailing access: . . . . . . . . . . . . . . . . . . . . . . . . . . . . . . . . . . . . . . . . . . . . . . . . . . . . . . . . . . . . . . . . . . . . . . . . . .12
5.5.1 Sending Control command to the system: . . . . . . . . . . . . . . . . . . . . . . . . . . . . . . . . . . . . . . . . . . . . . . . . . . . . . . . . . . . . . . .12
5.6 Serial console port configuration menu: . . . . . . . . . . . . . . . . . . . . . . . . . . . . . . . . . . . . . . . . . . . . . . . . . . . . . . . . . . . . . . . . . .12
5.7 Power outlet setup menu: . . . . . . . . . . . . . . . . . . . . . . . . . . . . . . . . . . . . . . . . . . . . . . . . . . . . . . . . . . . . . . . . . . . . . . . . . . . . .13
5.8 User account management menu: . . . . . . . . . . . . . . . . . . . . . . . . . . . . . . . . . . . . . . . . . . . . . . . . . . . . . . . . . . . . . . . . . . . . . .16
5.9 Viewing and changing operation status with a web page: . . . . . . . . . . . . . . . . . . . . . . . . . . . . . . . . . . . . . . . . . . . . . . . . . . .16
APPENDIX A WARRANTY INFORMATION . . . . . . . . . . . . . . . . . . . . . . . . . . . . . . . . . . . . . . . . . . . . . . . . . . . . . . . . . . . . . . . . . . . .17
APPENDIX B SERIAL CONSOLE PORT INTERFACES . . . . . . . . . . . . . . . . . . . . . . . . . . . . . . . . . . . . . . . . . . . . . . . . . . . . . . . . . .18
APPENDIX C RS-232 TO RJ45 CONVERSION CABLES . . . . . . . . . . . . . . . . . . . . . . . . . . . . . . . . . . . . . . . . . . . . . . . . . . . . . . . . .18
TABLE OF CONTENTS
Page 4

1
1.1 Products Comparison Chart:
1 SYSTEM DESCRIPTION
The above listed systems provide secure and versatile power
reboot management access for communication equipment such
as routers, switches, and network devices. They are also the
ideal assistant devices for engineering development and test
applications. Key features include:
• Local Master Port access: offers data rates from 2400 to
115200 bits/second and optional hardware handshaking
(CTS/RTS). There are two operation modes for the port:
Console Transparent Mode and System Control Mode.
• Three user privilege login levels: The Administration level
manages system configuration and unconditional access to
all power outlets and all serial ports. The User level allows
each user to reserve and manage his/her own ports, as well as
to change most of system configuration settings. Anonymous
users are able to view all settings and operate unreserved
power outlets and serial console ports.
• User name and password for each port: Each port is user
name and password protected.
• Line commands or menu configuration controls: Menu
table operation offers user-friendly operation methods that are
used for changing system configurations, viewing run time
statuses, and issuing controls. Line commands provide quick
and easy operations.
• Telnet access: Remote access the system over a TCP/IP
network for configuration and control of the systems.
• Out of band Modem access interfacing: Control and
configure the system via a telephone line. Optional custom
Modem AT command string to the Modem.
• HTTP web access: Embedded web server provides secured
user name and password authentication. The operations are
easy and friendly, utilizing tables and graphical icons.
Download SNMP MIB files for convenience, or view an online
help manual.
• SNMP MIB capability: An SNMP (Simple Network
Management Protocol) agent is integrated in the system for
an exchange of management information between the system
and network devices.
• POP/SMTP Emailing with SMTP Authentication capability:
A user can send control commands such as reboot power
outlet via emails. Command execution reports are replied for
each command email received. SMTP user name and
password are protected through authentication process.
• SNMP Trap for sending logging message: The Trap is used
to asynchronously report events to the NMS. It forwards
power reboot command execution information to the remote
Trap logging receiver.
1.2 What you can do with the system:
• Remote equipment power source management over
TCP/IP networks, including rebooting user equipment, and
permanently turning on/off user power source. Schedule
power reboots or power source on/off events monthly, weekly,
daily or at any time an application requires. Reboot power
source to equipment when a network connection is lost.
• Monitoring AC Power Consumptions and sending warning
messages when the aggregated AC draw from a system is
crossed predefined threshold.
• Remote control anywhere by emailing. Via emails, you are
able to manage the systems or user communication
equipment power sources when LAN access is impossible. Via
emails, you can send user data to the NP control commands
such as rebooting user power source. Reply emails are sent
after the system intercepts incoming emails so that you are
informed with the operation status.
• AutoPing and reboot user equipment. Connect your
system to a power outlet and assign the system network
IP address or URL. The NP system will ping the user
equipment periodically (in every 15 seconds). If the user
Figure 1 - Product Comparison Chart
POWER COMMANDER IQ
Model Chassis # of # of Input Total AC Input Power AC Current Network Regulatory
Outlets Power Current Cord Plug Monotoring Port ULSafety
Cords Output Type (Ethernet) & EMI
(Inlet) Amps
SPDU8 1-U 8 1 15 NEMA 5-15P Y Y UL60950-1/FCC
Class A
SPDU16 2-U 16 2 30 NEMA 5-15P Y Y UL/FCC Class A
SPDU20 0-U 20 1 20 NEMA L5-20P Y Y UL/FCC Class A
Vertical
Page 5
2
equipment stops responding the ping request, the equipment
will be power rebooted.
• Scheduling AC outlet power cycling periodically or per
weekly planner. Each outlet can be programmed with it’s
own timer.
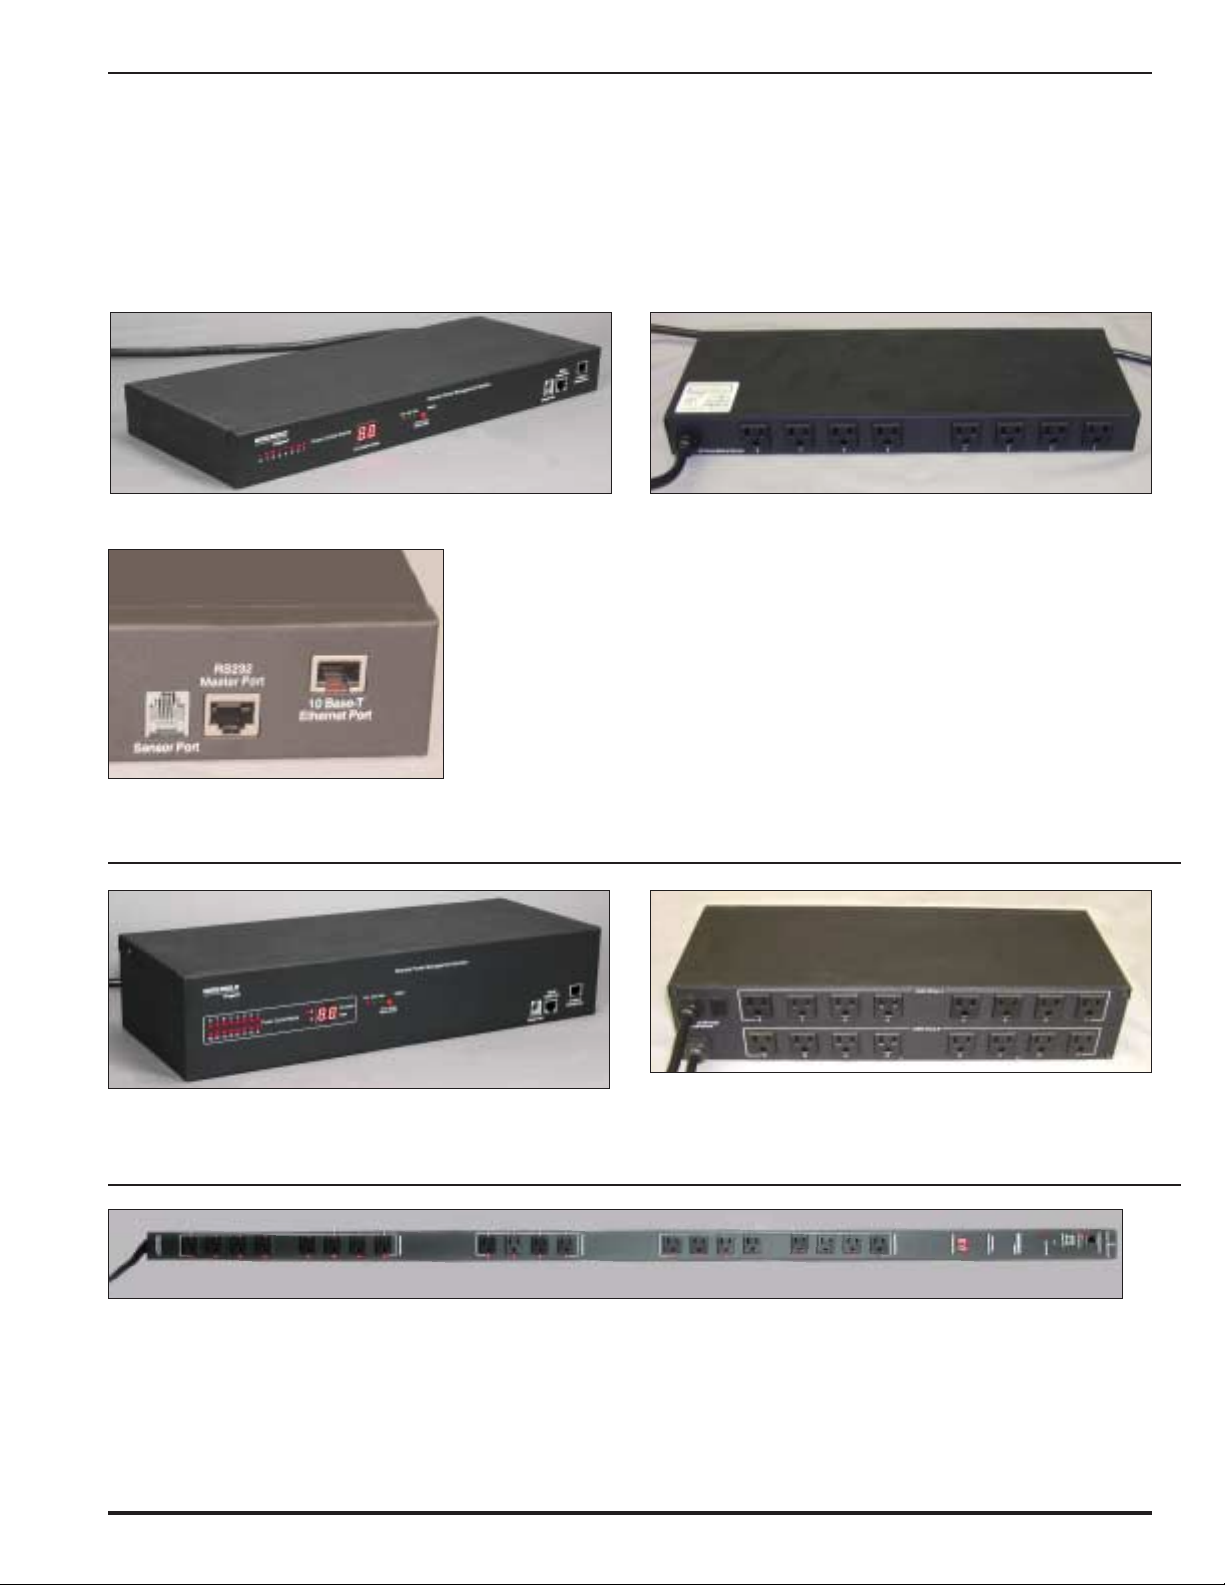
1.3 Front and Back Panel:
Figure 3 - SPDU8-1U Front and Back Panel Illustration
Figure 4 - SPDU8-1U Detail of
Connections
Figure 5 - SPDU16-2U Front and Back Panel Illustration
Figure 5A - SPDU20-0U Front and Back Panel Illustration
Page 6

3
1. Power Outlet status LEDs: Visual indication of user power
outlet On/Off status.
2. NP system power On/Off status LED: Indication of
system power On/Off status.
3. Ethernet Link status LED: When the LED is illuminated,
Ethernet port and a LAN connection are established.
4. Ethernet Active data status LED: When there is data traffic
on the LAN, the LED is illuminated.
5. Factory Default Reset switch: Allow a user to reset the
system to factory default settings. The switch is located
behind the small front panel opening.
6. Power Outlet sockets: Power outlets for user
applications.
7. Local Master Port (DCE, 9 pin DB, female, or RJ-45 socket):
This is also a service port for the user to
configure and change system operation settings.
8. Ethernet Port (RJ45, 10 base-T): 10 based-T Ethernet port
for connection to LAN.
9. Manual Switch: Outlet power output switch. Momentarily
pressing down the button to index to the desired outlet.
Pressing down for 3 seconds to toggle the outlet power state.
This switch is equipped on NP08 and NP-16 systems.
10. Audio Alarm Off Switch: To temporarily turn off the audio
alarm when aggregated AC current draw crosses over the
defined threshold. This control switch is equipped on NPB20 system.
2.1 Safety Precautions
It is important that you read this section before attempting any
of the hardware installation and maintenance procedures in
this guide.
The following instructions are important for your safety and for
the functioning of the unit. Read the instructions carefully before
attempting the installation
WARNING! To reduce the risk of fire or electrical shock,
never remove the cover of the unit. No user serviceable
parts inside. Repair should be done by authorized service
personnel only.
The unit should be installed in indoor with ambient temperature
and sufficient airflow.
WARNING! Ensure that the hardware you are working with
is disconnected from the power supply during installation.
This means that the unit’s power cable and network cables
must remain disconnected until you are instructed to make
the connections. Follow the instructions in the procedures
carefully.
This equipment is disconnected from the power supply
by removing the power cord(s) from the power outlet. It is
therefore important to locate the unit close to a power outlet
that is easily accessible.
WARNING! When connecting a hardware unit to a power
supply, for your safety you must always connect it to a
grounded wall outlet.
2.2 Battery Replacement
A 3.0V Lithium battery is installed in the unit for internal RealTime Clock and system data retention. The battery should last
at least 10 years. If the battery needs to be replaced, please ask
qualified personnel for the service. Here is the instruction for the
replacement:
A) Use CR2032 type, 3.0V Lithium battery.
B) Remove the old battery from the battery holder,
C) Insert the new replacement to the holder with “+” facing up.
3.1 Factory Default Settings:
The system is shipped with Factory Default settings. The default
settings for the Local Master serial port are: 9600, 8 data bits,
no parity, 1 stop bit, and no hardware handshaking (Flow
Control). The default Administrator’s login name “admin” and
the default password is “admin”. All existing user accounts are
erased if the system is recovered to the default settings. The
default SNMP Community string for public, private and Trap
access is “public”.
There are two ways to restore the system to the Factory Default
settings. The first method is to press a push-button switch
located on the front panel for 1 second. The second method
is to select "Reload Factory Defaults" from the Main Menu. The
Main Menu can be viewed by running a terminal emulation
program such as Window’s Hyper Terminal or Telnet.
Upon the system startup, the terminal screen displays the
following screen, as shown in the Figure 6.
If you do not see the screen as shown in the Figure 6, it is
likely that the system is not in the default state. Otherwise,
your connection to the Local Master port is established.
2 IMPORTANT SAFETY PRECAUTIONS FOR HARDWARE INSTALLATION
3 ACCESS TO THE SYSTEM
Page 7

4
3.2 User Privileges and Port Reservations:
All user levels, including anonymous (visitor), are able to access
the system via a serial connection from your work station to the
Local Master port, or via a Telnet session from your work
station.
• Administration Login: There is only one Administration
account on the system. The default name is “admin” and
default password is also “admin”. The default name and
password may be changed. If you login at Administration level,
you are able to remove or change existing user accounts, take
over power outlets or user serial console ports and change
system settings.
• User Login: At user login level, you are able to reserve power
or console ports for your applications if they are “open”, as
well as make system configuration changes. At this login level,
you are not able to change power outlet operation status for
other reserved power outlets.
• Anonymous(Visitor) Access: If you have no account
established on the system (as an anonymous user), you are
only able to view the system configuration settings and
operate unreserved power outlets.
3.3 Local Master Port Access:
To access and configure the system from the master port, you
need to connect a RS232 port from your work station to the
Local Master Serial Port. Then run a terminal emulation program
(such as Window’s Hyper Terminal) on your computer.
1) Connect the system’s Local Master Port (DCE) with a straight
DB-9 type cable, if your work station is equipped with a DTE
part.
2) Connect the system’s Ethernet port to your LAN, if you intend
to use the network port.
3) Turn the system power on.
4) At the terminal emulation program, type the “setup”
command to start the system setup process. Type “help” for
help information.
5) The system has DHCP enabled, as a default setting. Network
connectivity parameters are displayed at the startup screen. If
the system does not get a DHCP offer, the system falls back
to default static network settings. You can alter the default
network settings to fit your need.
6) Use the command “ping” to verify your connection. If a
network connection is established, you are able to use Telnet,
Web Browsing, Emailing and SMNP.
3.4 External Modem Access:
With this access method, an RS232 port on an external Modem
device is connected to the Local Master Port. Typically, a
Modem device is equipped with a DCE (Data Communication
Equipment) terminal connector. Since the system’s Local Master
Port and Modem device ports are not complementary (both are
DCE ports); you need to use a NULL Modem cable with both
male connectors.
3.5 Telnet Access:
Operation of on a Telnet terminal is almost identical to the
access method via Local Master Serial Port. You need to make
sure that Telnet access is enabled, as a default setting. If the
access is not enabled, please refer to Section “Using
Configuration Menu” to change the setting.
Before you start the Telnet application, you need to obtain the
actual IP address for the system. The system displays network
connectivity information at system startup terminal when your
workstation is connected to the system’s Local Master Serial
Port. Please refer to “TCP/IP Network Configuration” section of
this document for information on how to setup the network
parameters.
Once the network connection is established, at your workstation
prompt, you need to enter:
telnet ip_addr
You need to set a Telnet session on your workstation to Local
Echo Off mode.
Telnet session permits an anonymous user who may only to
view the system settings and operate unreserved power outlets
and user serial console ports. Please refer to section 2.2 “User
privileges and Port Reservations” for further information.
• Only one Telnet session may be active at the time. Telnet
sessions will be refused by the system if it already has a Telnet
session active.
• A Telnet session remains active for 10 minutes if it is in idle
state.
• Telnet access methods can be enabled or disabled using the
System Access Setup Menu.
• To terminate an active Telnet session, use the command
“logout” at the terminal. If you are at a serial port terminal and
notice that the terminal is disabled because it is taken over by
a remote Telnet session, use the command “telnetend” at the
serial console terminal to terminate the Telnet if you need to
do so.
Page 8

5
3.6 Web Access:
You need to obtain the system IP address before starting web
access to the system. Please refer to the Telnet Access section
for methods to get the system IP address. You also need to
make sure that web access is enabled, as a default setting. If
the access is not enabled, please refer to Section “Using
Configuration Menu” to change the setting. Start a Web
browsing application program such as Window’s Explorer and
enter “http://ip_address“in the address field.
You must have an account on the system in order to access the
system via this method. Without a valid account, you are only
able to view the following web page and get a copy of the Help
text message.
Upon clicking the Login button, a secured login table is
displayed at your work station, shown as in the Figure 10.
Factory default setting for user name is “admin”. The default
pasword is “admin”.
3.7 Email Access:
To establish this access method, the system’s network
connection is already established. With the email access
method, you are able to execute the NP system controlling
commands. The NP system periodically checks incoming mails
from a designated POP mail server. The system sends a reply
email with command process status if an email is intercepted.
See Section 4.4 for more information about how to setup email
accounts.
3.8 SNMP Information:
Applications such as an NMS (Network Management System) or
an SNMP browser can exchange information with the NP
systems. SNMP is disabled with the default setting.
The information managed by an SNMP daemon on the system
can be obtained using SNMP requests from a remote work
station. An SNMP Get/Get Next request fetches the value of
a single variable or a set of variables. An SNMP Set request
modifies the value of a variable.
You need to know the name of a variable before your can
fetch or modify a variable’s value. A variable’s symbolic
name is mapped to a numeric name, which is referred as OID.
The MIB (Management Information Base) is a text file
describing the internal objects the SNMP agent can
display, monitor, and/or modify. Each MIB object is the system
variable that has name and an OID, as shown in Figure 12. You
need the MIB file to properly configure the SNMP client
("manager") for server monitoring. To get a copy of the MIB file,
please use a web browser to access the NP systems. Open the
TCP/IP Network Configuration Menu and then click the button
“Get SNMP MIB File” to download the MIB file that is stored in
the system’s memory.
Figure 10 - Web Access Login Entry Table
Figure 9 - Web Access Startup Page (NP-08)
Page 9

6
Figure 12 - Implemented MIB Description, List of MIB object
DEFINITION OID RETURNED MESSAGE
systemModel .1.1 System Model number. Read only.
systemName .1.2 The system name or site name. Read only.
powerOutletNum .1.3 Number of power outlets on the system. Read only.
serialPortNum .1.4 Number of console ports on the system. Read only.
systemUpTime .1.5 Seconds since the system in operation.
swVersion .1.6 Firmware version
Outlet Sequence
outletIndex .2.1 Index for the outlet table
outletName .2.2 Outlet socket name. Read/Write.
outletStatus .2.3 Outlet socket ON/OFF status. Read only.
outletAction .3.4 Change outlet state to ON, OFF or Reboot.
Write only.
powerOutlet4OpStatus .3.2.5.0 Read/Write. Applicable to NPC/NP systems.
Envro/Current Sequence
enviroIndex .3.1 Index for the table
currentAlarmThreshold .3.2 Aggregated AC current draw threshold for each power inlet (or power cord).
currentDrawStatus1 .3.3 First AC current monitoring reading. For a system equipped with single power
cord, this the valid current reading. For dual power corded system, this is the
first part of the AC current reading.
CurrentDrawStatus2 .3.4 For dual power corded system, this is the AC current reading for the second
power inlet (or power cord).
currentDrawMax1 .3.5 Maximum aggregated AC current draw value was captured for the first power
inlet (or power cord). For a system equipped with single power cord, this is
the valid current reading. For dual power corded system, this is the first part
of the AC current reading.
CurrentDrawMax2 .3.5 Maximum aggregated AC current draw value was captured for the 2nd power
inlet (or power cord).
temperatureThreshold .3.6 Environment temperature threshold in F.
temperatureReading .3.7 Temperature reading in F. Value is zero when the temperature probe is not
installed.
Event Notifications
opEvents .100.1 Explicit operation events. Last TRAP/Notification sent. The messages include
outlet power status changes, AutoPing/Reboot events, system power on
event, user login/logout event,
CurrentThresholdCross-Event .100.2 Current draw (Amps) crosses the defined threshold for inlet 1 or 2."
temperatureThresholdCrossEvent .100.3 Environment temperature reading (in F) crosses predefined threshold.
ENTERPRISE OID: 1.3.6.1.4.1.21728.2.4.1
Page 10

7
3.9 AutoPing and Power Reboot:
Each power outlet has optional settings that a NP system uses
to ping network equipment. The pinged equipment is attached
to a specific power outlet. It reboots user equipment power
source if a network connection is not detected any more.
However, user equipment never gets power reboot if the
equipment never replies ping reply to a NP system.
A power outlet has the optional settings (Power Outlet Setup
Menu) that specify the destination IP address that the system
will ping periodically, and maximum network downtime allowed.
In addition, to avoid unwanted reboots, a NP system also pings
the gateway IP address (as default) to make sure a NP system
has a network connection that is still active. Otherwise,
AutoPing will be in off mode if a NP system lost network
connection. To change the default gateway IP address as ping
destination, use TCP/IP Configuration Menu to enter your
desired destination address.
A NP system provides command line options for viewing
or changing system configuration and operation status. In
addition, by using the control command option, users are
able to create script files for automation of equipment test
and control.
Control commands are applicable to the connections between
your work station and Local Master Serial Port or a Telnet
session.
Some of the control commands are also applicable to emails.
See related sections for more detailed information about how to
setup email accounts.
Once the system starts or a Telnet session is open, you
are ready to send control command to the system. Type
command “help” to have a complete list of available
commands, as shown in Figure 13.
All login levels including anonymous users are able to use
the command line option. However, the actual command
executions are based on your login level. For example, if
you are an anonymous user, you are not able to reserve or
un-reserve serial console ports or power outlets. If you login
at Administration level, you are able to operate any serial ports
and power outlets, reserve or unreserved any ports or outlets
even if they are reserved by other users. See Section 2.2 for
a complete description of user privileges.
4 USING CONTROL COMMAND
************************************************************
* *
*
*
* Help Menu *
* *
*
*
************************************************************
>
>
apVbs n Displays AutoPing ru n -time info(0 -disabl e, 1 - enable)
cs n Displays AC current draw Status(1 -display, 0 -erase max value).
date Displays
current date
emailvbs n Displays emailing run time info(0 -disable,1 - basic,2 - detailed)
emailget Starts email reading immediately
emails end Sends a test email message immediately
ecmd Sets email command delimitor(Select: &, - ,+,~,$,*,>,|,<, or ?)
ftpget ip id pwd fileName - Get system data file from a FTP server.
ftpput ip id pwd fileName - Put system data file to a FTP serve r.
login *Enters user login
logout
*Exits current login
datalog Executes data logging(0 -logging off; 1- on; 2 - read; 3 - clear)
mac Displays Ethernet port Mac address
nwset Restarts Ethernet network interface
nwshow Displays network Status
ping *Pings a host. E.g.: ping 192.168.0.1, or ping yahoo.com
prsv n *Reserves power outlet #n for current login user
pset n v
*Sets power outlet #n to v(value 1 -on, 0 -off)
psetd n v s *Sets power outlet n to v(value 1 -on, 0 - off) with delay s sec.
ps v Sets all power outlets to v(value 1 -on, 0 -off)
pshow *Displays power outlet status
pTmshow Displays power outlet timer information
punrsv n *Unreserves power outlet n from current l ogin user
rb n *Reboots power outlet n
rbd n s *Reboots power outlet n with delay s seconds.
rbt s *Sets reboot duration to s seconds (s > 0).
setup Starts system configuration menu
sshow Displays console ports config uration status
sysshow Displays system information
time Displays current time
usershow Displays all users
whoami
Displays current login user
ver Displays hardware and software versions
! Repeats previous com mand
***Note - if Restricted Access Mode is on, non -Admin users are limited
to use commands marked with "*"
.
>
Figure 13 - Control Command Help Menu
Page 11

8
5.1 Starting Configuration Menu:
There are four ways to start the Configuration Menu:
1) Local Master Port access method. Run a terminal program
from a work station via serial connections between a serial
port from your work station and the Local Master Port of
the system.
2) External Modem device access method. Run a terminal
program from a remote work state and establish the
connection via a telephone line.
3) Telnet access method. Your workstation and the system are
connected to LAN.
4) Web access method. Your workstation and the system are
connected to LAN.
If you have already logged on to the system, enter the
command “setup” and you will see “Main Menu” table as shown
in Figure 15. Without login to the system, if you enter command
“setup” you will see the following screen:
Menu selection 1: When you enter the system as an
anonymous user, you can start operate serial console ports or
power outlets as far as they are not reserved by other users.
However, you can only view system configuration parameters
and are not able to make system configuration changes.
Menu selection 2: If you already have accounts established
and want to start configuring the system or to change serial
console port and power outlet operation status, choose this
menu option.
Menu selection 3: If you do not have an account on the system
or if you have an account already and want to modify your
account or delete an account, select option 3.
Menu selection 4: Lists help information.
Menu selection 5: Exit menu operation.
5.2 System Main Menu:
This is a top level system main configuration menu, as shown in
Figure 15 and 16.
5 USING CONFIGURATION MENU
************************************************************
* *
*
*
* Login Menu *
*
*
* *
***************** *******************************************
>
> 1) Anonymous (Visitor) login
2)
Login
3) Help
4) Quit
>Enter your selection:
Figure 14 – Menu Configuration – Login Menu
************************************************************
* *
* *
* Main Menu
*
* *
* *
************************************************************
>
> 1) Reboot Power Outlet
2) Setup System
3) Setup TCP/IP Network
4) Configure Serial Console Port
5) Configure Power Outlet
6) Setup New or Existing Accounts
7) Reload Factory Defaults
8) Save Settings
9) Quit
>Please enter your selection
:
Figure 15 - System Main Menu (Terminal Program Screen)
Page 12

9
From Figure 15, System Main Menu (Terminal Screen):
Option 1 - Reboot a power outlet: Reboots a power outlet.
Rebooting executes if the outlet is unreserved
(“open”) or it is reserved under your account.
However, if you logged in at Administration level; you
are able to operate any power outlets even if they
are reserved by other users.
Helpful info: control command “rb n” executes the same function
as the option 1.
Option 2 – Setup System: Enters System Access Setup
submenu.
Helpful info: control command “sysshow” displays system
access configuration settings.
Option 3 – Setup TCP/IP Network: Enters TCP/IP Network
Configuration submenu.
Helpful info: control command “nwshow” displays network
connectivity information.
Option 4 – Configure Serial Console Port: Enters Serial
Console Port Configuration submenu.
Helpful info: control command “sshow” displays all serial
console port settings.
Option 5 – Configure Power Outlet: Enters Power Outlet Setup
submenu.
Helpful info: control command “pshow” displays all power
outlet current status.
control command “ptmshow” displays all power outlet
timer settings.
Option 6 – Setup new or existing accounts: Enters User
Account Setup submenu. Select this option if you
need to create new account, change existing
account, and delete existing account and reserve
power outlets and serial
console ports.
Helpful info: control command “userlist” displays all account
names.
Option 7 – Reload Factory Defaults: Reloads to factory default
settings. You must login at Administration level.
Option 8 – Save Settings: Save current system configuration
parameters.
Option 9 – Quit: Returns to previous menu.
Figure 16 - System Main Menu (Web Page)
Page 13

10
5.3 System Access Setup Menu
• System(Device) name: Assign a system name, sometimes
referred as site or device name.
• Date and Time: Enter calendar date and real-time clock.
• Serial Port Mode: Configure the Local Master Port to
interface type: either to a serial RS-232 port on your work
station or an external Modem device. An external Modem
device is typically equipped with a DCE (Data Communication
Equipment) terminal connector. Since the system's Local
Master Port and Modem device ports are not complementary,
you need to use a NULL Modem cable with both male
connectors. For information about connecter pin assignment,
please see Appendix A.
• Modem Startup String: Define an external Modem control
command string that is sent from the system to an external
modem device periodically (in every 15 minutes). If you do not
need to define the control string, leave the entry field empty.
• Web Access: Enable or disable web access to the system.
Default to enable.
• Telnet Access: Enable or disable Telnet access to the system.
Default to enable. Only one active Telnet session is
permissible.
• Enable Telnet Anonymous User: Enable or disable an
anonymous user's access to Telnet port.
• Control command via Emails: Enable or disable this access
method. When it is enabled, you need to make sure you also
have completed POP/SMTP server and email receiving and
sending addresses. See “TCP/IP Network Configuration”
setup menu for detailed information how to setup email
accounts. Default to disable.
• SNMP Agent Enabling: Enable or disable SNMP agent
on the system. If the system SNMP Agent is enabled, it
collects and stores management information and makes
this information available to NMS using SNMP. Please see
Section 2.5 for a list available MIB objects that the system
supports. Default to disable.
• SNMP Trap Enabling: Enable or disable Trap sending. If this
option is enabled, Traps are sent if there is a power reboot
command execution on the system. Default to disable.
Note: You must enable the above SNMP Agent setting.
Otherwise, enabling Trap setting will not take effect.
• SNMP Trap Receiver IP Address: Enter Trap Monitoring
receiver IP address.
• SNMP Community String: To specify SNMP MIB/Trap
community string. The default string is “public”. This
string is used for public, private and Trap.
• Current Alarm Threshold: To defined AC current draw
alarm threshold. The unit is Amps.
• Alarm Email Notification: Enable or disable Email alarm
sending method.
• Alarm Notification Interval (Minute): Define alarm notification
sending interval.
• Save and Quit: Save current configuration data and return to
previous configuration menu.
************************************************************
* *
*
*
* System Access Setup *
*
*
* *
**************** ********************************************
>
> 1) System(Device) name...............Undefined
2) Date(mm/dd/yyyy)..................03/07/2007
4) Serial port mode............. .....Console
5) MODEM startup string..............ATE0M0Q1&C0&D0S0=1
6) Non - Admin user restriction*(Y/N)..N
7) Web access (Y/N)..................Y
8) TELNET enable (Y/N)...............Y
9) TELNET timeout(max 655 35 minutes).10
10) TELNET anonymous user (Y/N).......Y
11) Command control via email(Y/N)....N
12) SNMP agent enable(Y/N)............N
13) SNMP Community String ............******
14) SNMP Trap (1 - on 0 -off).......... ..0
15) SNMP Trap Receiver IP Address.....
s) Save.
q) Quit.
***Note for 6): for controlling non -Admin user's access to system
data.
>Please enter your selection:
Figure 17 - System Access Setup Menu (Terminal Screen)
Figure 18 - System Access Control Menu (Web Page)
Page 14

11
5.4 TCP/IP Network Configuration Menu:
This is a submenu of System Main Menu.
• Obtain IP using DHCP: Enable or disable DHCP. The
purpose of using DHCP (Dynamic Host Configuration Protocol)
is to assign dynamic IP addresses to a computer or a network
device on a network. There must be a DHCP server on a
network running and the server must permit an assigned
computer or network device to be on the LAN. If
this option is disabled on the NP systems, the system will not
send DHCP requests to a network.
• Fallback to static IP (if DHCP server no offer): Define a
static IP address. If DHCP is disabled on the system, there
is no DHCP server running on a network, or a DHCP server
refuses IP offering, you have the option to whether either allow
the system to use a static IP address or not.
• Static IP Address: A static IP Address is an IP address
that never changes. This IP address will be used if a DHCP
server IP has no IP offered or DHCP automatic IP address
is disabled.
• Subnet Mask: Defines a static subnet mask that is a part of
your static network address settings. This entry is for your IP
network class, which is distinguished by using a subnet mask.
• Gateway IP address: Specifies a gateway IP address that is a
part of your static network address settings. This is your
router's IP address.
• HTTP Port Number: Specifies a HTTP port number. Default
value is 80.
• Telnet Port Number: Specifies a Telnet port number. Default
value is 23.
• POP3 Email Server: Specifies POP (incoming Email)
server address. The system supports POP3 Internet Email
Protocols, not web based Email services. “mail.wiremold.com”
and “pop.tom.com” are examples of POP Email servers. Make
sure that the POP server you use does not require log on
secure password authentication.
• SMTP Email Server: Specifies SMTP (outgoing Email)
server address. This server will be used for you to send
outgoing (reply) Emails. “mail.wiremold.com” and
“smtp.tom.com” are examples of SMTP Email servers. NP
supports SMTP log on secure password authentication option.
Helpful Info: Use the command “emailget” to immediately
check incoming emails.
• Incoming Email Account Name: Specifies email address that
the system receives. This email account name is also used for
outgoing (replying) emails.
• Incoming Email Account Password: The Email account
password is specified in this entry. This password is also used
for outgoing (replying) emails.
• 2nd Outgoing (Replying) Email Address: This is an
additional outgoing reply email address. The system always
send replying email to the sender. There is no limitation of
types of destination email servers, whether a web based
emailing system or SMTP. Examples of destination addresses
are myMail@hotmail.com
and yourMail@aol.com.
Helpful Info: Use the command “emailsend” to immediately
send an outgoing test email.
• Reply (Outgoing) Email Authentication: If an SMTP
(outgoing) email requires a user name and password
authentication, enter “Y” for this entry.
Helpful Info: Use command “emailget” to immediately
check incoming emails.
• Check Email Interval: This entry specifies how often the
system checks incoming emails. The minimum interval is one
minute.
• Access Control List (ACL) Enable: Enable or disable for
controlling client IP addresses to access the system.
• Network Connection Check Using This IP: This entry
specifies an IP address or a URL site that the NP system will
ping periodically for verification of network connectivity. If the
network connection is down or inactive, AutoPing is in off
mode. If this entry leaves blank, network gateway IP address
will be used.
Figure 20 - TCP/IP Network Configuration Menu (Web Page)
************************************************************
* *
* Network Configuration Menu *
*
*
************************************************************
>1) Obtain IP using DHCP...................Y
2) Fallback to static IP(if DHCP failed)..Y
3) Static IP Address......................192.168.1.100
4) Subnet Mask............................255.255.255.0
5) Gateway IP Address.....................192.168.1.1
6) Set DNS Server IP Manually (Y/N).......N
7) Primary DNS IP Address.................0.0.0.0
8) Secondary DNS IP Address...............0.0.0.0
9) HTTP Port number(default 80, see note).80
10) Telnet Port Number(default 23).........23
11) POP3 Port
Number(default 110)..........110
12) SMTP Port Number(default 25)...........25
13) POP3 Email Server......................Undefined
14) SMTP Email S er ver......................Undefined
15) Incoming Email Account Name............Undefined
16) Incoming Email Password................******
17) 2nd outgoing(replying) Email Address...
18) Outgoing Email Authentication..........Y
19) Checking Email Interval(M inute)........2
20) Access Control List(ACL) Enable (Y/N)..N
21) Network Connection Check Using This IP..
[Leave 21) blank if Gateway IP is used. Applicable to AutoPing Mode.]
s) Save.
q) Quit.
Note - Requires system reboot, if the parameter changes .
Please enter your selection:
Figure 19 - Network Configuration Menu (Terminal Screen)
Page 15

12
5.5 More about Emailing Access:
5.5.1 Sending Control command to the system:
A control command is placed in the email subject field. It has
the following format:
&SysName&userName&password&Command&,
where “&” is a command delimiter; “SystemName” is a user
defined system or device name; “username” and “password”
are valid user account name and password; and “command” is
the actual system control command.
Command delimiters are special characters or spaces that
identify the beginning or end of a group of characters in a
command. Delimiters are used to separate a character string
into the individual parts that form a command: command label,
command name, parameter keywords, and parameter values.
The default delimiter character is “&” symbol. To change it, use
command “eCmd X” at terminal program or telnet session. Use
command “/Help” is view available command delimiter symbols.
For example, sending email subject
“&mySite3&johnW&123456&rb 2&” will reboot power outlet 2 on
the NP system, named as “mySite3”. The user name is “johnW”
and password is “123456”.
Before a command is executed, a confirmation reply email is
sent. The destination of the replying email address is already
defined in the Network Configuration Table. Figure 22 shows
a reply email is received and displayed at “hotmail” web site.
A control command is not executed if the system name does
not match, user name does not exists, or the name does not
have the privilege to operate the designated serial console port
or power outlet port, or if there is a command syntax error. If this
happens, a reply email is sent to indicate the problem of the
command, as shown in the Figure 23.
Helpful Info:
• Use the command “emailvbs x” to set to mail verbose mode.
In verbose mode, the system displays detailed information
while sending and receiving emails. It is helpful while you are
setting up your email accounts.
“emailvbs 0” turns the verbose mode off.
“emailvbs 1” sets the system to level 1 verbose mode, in which
high level emailing activities are displayed.
“emailvbs 2” sets to the system to level 2 verbose mode, in
which detailed emailing activities are displayed.
• Use command “emailget” to check incoming emails
immediately.
• Use command “emailsend” to send a test mail immediately.
5.6 Serial Console Port Configuration Menu:
This section describes serial console port configuration and
operating settings.
Serial Console Port configuration starts with the following menu:
************************************************************
* *
*
*
* "Master" Port Configuration Menu *
*
*
* *
************* ***********************************************
>
> aud rate..................................9600
Data bits:(7 or 8).........................8
Stop bits(1 or 2)..........................1
4) Parity(1 - Even,2 -Odd,3- None)................3
5) Flow control(1 -hardware,2 -None)............2
rt name..................................Master
7) Save:
8) Quit:
>Please select a parameter to change:
Figure 24 - Serial Port Parameter Entry Table
Figure 25 - Serial Port Setup Menu (Web Page)
Page 16

• Baud Rate: The system supports the following baud rates:
2400, 4800, 9600, 19200, 38400, 57600 and 115200. It is
strongly recommended that Master port and a user serial port
have the same data rate while exchanging data between
them so that data loss is eliminated. If you must run both
ports using different baud rates, Flow Control (hardware
handshaking) should be enabled on all connected serial
console ports.
Please also note that when Telnet access is used for
exchanging data between the system’s Ethernet interface
port and user communication equipment, without enabling
flow control, you might experience data loss when data
exchange rate is high. This is because data flow from the
system’s Ethernet port is subject to the congestion condition
of LAN traffic.
• Data Bit: Supports 7 or 8 bits.
• Stop Bits: Supports 1 or 2 bits.
• Parity Bits: Supports Even, Odd or None.
• Flow Control: Flow Control is hardware handshaking using
CTS/RTS signals on the connectors. Please see Appendix A
for information about RS232 connector pin assignments.
• Port Name: Assign a name for the port. Always assigned to
the name “Master”.
5.7 Power Outlet Setup Menu:
This section describes:
1) Manual Power Outlet Set Swith Operation.
2) Power Outlet Configuration
3) AutoPing Functions
4) Timer Usages.
Manual Power Outlet Set Switch Operation:
1) Press the switch for more than 0.5 seconds (but less than
3 seconds) and then release the switch. You will see a LED
on the front panel blinking. Continue the procedure until the
desired LED/power outlet number is selected.
2) Once the desired LED (power outlet number) is blinking,
holding down the switch for 3 seconds. Then you will
observe the LED is changed to solid On or Off state. The
power outlet power status is changed accordingly.
3) Repeat the procedure 1) and 2) for change the next power
outlet state.
If you run a terminal program, power outlet setup starts with the
following menu:
• Change Power Port Parameters: Enter power outlet
configuration submenu.
• Change Power Reboot Duration: Enter power reboot
duration value. When the reboot process starts, the system
flips current power outlet status from On to Off, or Off to On
for the number of seconds that this parameter defines. The
default value is 5 seconds. This is parameter applies to all
power outlets.
• List of All Power Port Status: Display all power ports
current statuses, as shown in Figure 30.
Helpful Info: Use command “pshow” to display all power
outlet status.
Figure 28 and 29 show the power outlet entry table. This is an
example of the power outlet in Timer off mode. In Figure 29, to
enable the Timer, select option 3. Once a timer is enabled, the
entry table is extended including all timer parameters as shown
in Figure 33.
13
Figure 26 - Power Outlet Setup Menu (Terminal Screen)
Figure 27 - List of Power Outlet Status (Terminal Screen)
Page 17

14
• Power Outlet Name: Define a name for the power outlet.
• Power Outlet: Set the power outlet to power on or off state.
• Power Outlet Timer: Enable or disable the Timer for
the port.
• Enable AutoPing (Power reboot If user equipment’s
network is down): Disable or enable AutoPing power reboot
function. If it is enabled, the system schedules auto pings to
the communication equipment that is connected to the
power outlet. If no response is received in a period of time
(user defined, see below) from the communication
equipment, the system starts the power reboot process for
the power outlet.
Helpful Info: Use the command “/apVbs 1” to displays AutoPing
run-time information.
• Max Network Downtime allowed: Set a value of maximum
network down time, in seconds. If probed communication
equipment does not send ping response messages back to
the system for this period of time, the system will start reboot
processes for the power outlet.
Note: AutoPing starts power reboot process if and only if the fol-
lowing two conditions are met:
1) NPC system is active on the network interface. This enables
AutoPing mode at system operation level.
The active network connection is verified periodically by
pinging a network target IP address (default to network
gateways IP address). If there is no response from the
network target address, AutoPing mode is in off mode.
2) Once AutoPing mode is on, if user communication equipment
stops sending responses back to the NPC system for a
period of time (Max Network Downtime allowed), power
rebooting process begins . If the user equipment has never
sent a ping response back to the system after AutoPing
mode turns on, AutoPing will never trigger the power reboot
process for the power outlet.
• AutoPing (Ping) destination IP address (or URL): Enter an
IP address of the probed communication equipment IP. This
IP address is associated to the power outlet.
Figure 28 - Power Outlet Setup Menu (Web Page)
Figure 29 - Power Outlet Parameter Menu (Timer Off Mode)
Figure 30 - Power Outlet Parameter Menu (Timer On Mode)
Page 18

• Timer Start Time: Specify starting time for the timer. The
starting time is the actual calendar date and real-time clock.
Once a timer reaches this specified Start Time, the power
outlet on/off state will flip. It is in the format of
“month:day:hour:minute:second”. For example, to start
changing the power outlet on/off state at 6:31:2pm, on June
20th, the entry data is 6:20:18:31:02.
• Timer Period: Specify the timer period. It is in the format of
“days:hours:minutes:seconds”, which is not a calendar and
real-time clock entry type. The period setting is used for
applications that require the power outlet to continuously
change on/off in a specific interval. For example, you need to
schedule power reboot for the outlet daily, the period is 24
hours. Your entry will be 00:24:00:00.
• Timer Loop Count: The number of Periods for the Timer is
defined as Loop Count. For example, you schedule the timer
to flip the power outlet states in every 20 seconds and want
to repeat 300 times, your entry will be 300.
Enter “0” for this setting, if you schedule the power outlet
simply change power state from on to off, or from off to on a
specific time and date.
Enter “1” for the setting, if you schedule the power outlet
to be on-off-on, or off-on-off once. For example, the system
executes one power reboot cycle on a specific date and
time.
• Toggle Duration: Specify the duration of the power outlet
state that toggles when a new Timer Period starts. This
parameter is meaningful if the Timer Loop Count is > 0. The
unit for the duration is in seconds. The concept of the
specification can also be viewed as Duty Cycle. The value of
this parameter should be 0 < Toggle Duration < Timer Period.
There are a few examples of applications using the Power Outlet
Timers:
1) Reboot daily: Current Calendar date and time are:
Aug. 10th, 10:00 am.
Requires daily power Reboot at 1:00am.
Reboot duration is 10 seconds.
Timer Start Timer = 8:11:1:0:0
Reboot starts on Aug. 11th, 1:00 am.
Timer Period = 1:0:0:0
Period is 1 day, 0 hour, 0 minute, and 0 second.
Timer Toggle Duration = 10
Power outlet will toggle on/off state for 10 seconds.
Timer Loop Count = 1000
1000 days
2) Toggle Power Outlets for 300 times: Toggling Power outlet
on/off state 300 times in a period of 10 seconds starts
immediately.
Current Calendar date and time are:
Aug. 10th, 10:00 am.
Timer Start Time = 8:10:10:00:20
Start toggling on Aug. 10th, at 10:00:20 am.
Timer Period = 20
Choose 20 seconds and duty cycle 50%.
Note: the period setting is not 10.
Timer Toggle Duration = 10
This results in 10 seconds on and 10 seconds off.
Timer Loop Count = 300
300 periods.
3) Reboot once on a specific date and time:
Current Calendar date and time are:
Aug. 10th, 10:00 am.
To schedule a reboot on Feb 12th, 1:00 am.
Timer Start Time = 2:12:1:00:00
Start the event at 1:00am, on Feb. 12th
Timer Period = 6
6 seconds
Timer Toggle Duration = 5
5 seconds.
Reboot duration is 5 seconds.
Timer Loop Count = 1
Reboot once.
15
Figure 30 - Power Outlet Parameter Menu (Timer On Mode)
Page 19

16
5.8 User Account Management Menu:
User account management includes reserving or un-reserving
each serial console ports and power outlets to a current login
user, as well as adding new user accounts, modifying and
deleting user accounts.
Helpful Info: Use the command “userlist” to view all existing
account
5.9 Viewing and Changing Operation Status
with a Web Page:
Figure 34 shows a web page that lets you to view and change
serial console port and power outlet operation status.
With this web page, you are able to:
• View on/off status for each power outlet. As shown in the
table, Power outlet 1 is power on (illuminated in red) and
outlet 2 is power off (not illuminated, in grey).
• Change power outlet on/off status by clicking “on/off” push
switch button icon.
• Reboot a power outlet by clicking “Reboot” push switch
button icon.
• Get current all ports status by pressing “Refresh View”
button.
Figure 32 - User Account Management Menu (Terminal)
Figure 33 - User Account Management Menu (Web Page)
Figure 34 - Viewing and Changing System Operation Status
Page 20

Wiremold/Legrand warrants, to the original purchaser or owner
only, that any product manufactured and sold by
Wiremold/Legrand will be substantially free from defects in
material and workmanship under normal use and service,
for a period of one year from the date of original installation or
two years from the date of purchase, whichever is sooner. This
limited warranty applies only to products, which have been
installed properly in accordance with Installation Instructions
supplied by Wiremold/Legrand and any applicable codes and
standards.
This limited warranty is void and Wiremold/Legrand shall not be
liable for any damages or held responsible for the quality,
performance or safety of products that have been repaired,
altered or tampered with outside of Wiremold/Legrand facilities
or which have been intermixed (used within a system) with
products or materials not approved by Wiremold/Legrand or
have been subjected to accident, negligence, misuse or abuse.
Wiremold/Legrand’s sole obligation (and the sole and exclusive
remedy of the purchaser or owner of the product) with respect
to any products which are proven to be defective, shall be the
repair or replacement of the defective products, at the sole
option of Wiremold/Legrand. Returned products will not be
accepted unless The Wiremold Company is notified and
authorizes the return, prior to shipment.
Wiremold/Legrand shall not be liable for any damages in excess
of the purchase price of the defective products, and under no
circumstances shall Wiremold/Legrand be liable for incidental,
consequential, special or punitive damages.
Certain products of Wiremold/Legrand may have a specific
limited warranty or limitation of liability which is included with
such products and which differs from that set forth in this
Statement. The terms of any such specific limited warranty or
limitation of liability will supersede that set forth in this
Statement.
Except as set forth in the preceding paragraph, THIS LIMITED
WARRANTY IS EXCLUSIVE AND Wiremold/Legrand MAKES
NO OTHER WARRANTIES WITH RESPECT OF ITS
PRODUCTS, EXPRESSED OR IMPLIED, INCLUDING NO
WARRANTY OF MERCHANTABILITY OR OF FITNESS FOR A
PARTICULAR PURPOSE.
17
APPENDIX A LIMITED WARRANTY & LIABILITY STATEMENT
Page 21

RS-232 — DB9 FEMALE RJ45 (8-PIN)
RJ45 (8-PIN)RS-232 — DB9 MALE
18
APPENDIX B SERIAL CONSOLE PORT INTERFACES
PIN # NAME LONG NAME DIRECTION DESCRIPTION
1 DCD Data Carrier Detect <<< Raised when an carrier communication is established.
2 TD Transmitting Data >>> Serial data stream sent to the DTE device.
Same note as above apply.
3 RD Receive Data <<< Receives serial data stream.
4 DSR Open <<< Not connected.
5 GND Signal Ground
6 DTR Terminal Ready >>> Indication of serial port activated.
7 CTS Clear To Send <<< When hardware flow control is enabled, if this signal is
raised, an external device can send data to Local
Master Port.
8 RTS Request To Send >>> When hardware flow control is enabled, this signal is
raised by the Local Master Port when it is ready to
receive new data from an external device.
9 Open Open
6 Open <<< Not connected.
8 CTS Clear To Send <<< When hardware flow control is enabled, if this signal is
raised, an external device can send data to Local
Master Port.
7 RTS Request To Send >>> When hardware flow control is enabled, this signal is
raised by the Local Master Port when it is ready to
receive new data from an external device.
9 Open Open
APPENDIX C RS-232 TO RJ45 CONVERSION CABLES
PIN # SIGNAL
1 DCD
2 TxD
3 RxD
4 DSR
5 GND
6 DTR
7 CTS
8RTS
9–
PIN # SIGNAL
1 DSR
2RTS
3 GND
4 TxD
5 RxD
6 DCD
7 CTS
8 DTR
DB-9 F
RS-232 — RJ45 (8-PIN)
C-RJ45-DB9F-4, RJ-45 to RS232 (Female, DCE) cable, 4’
PIN # SIGNAL
1 DCD
2 RxD
3 TxD
4 DTR
5 GND
6 DSR
7RTS
8 CTS
9–
PIN # SIGNAL
1 DSR
2RTS
3 GND
4 TxD
5 RxD
6 DCD
7 CTS
8 DTR
RS-232 — RJ45 (8-PIN)
C-RJ45-DB9M-4, RJ-45 to RS232 (Male, DTE) cable, 4’
8
8
DB-9 M
 Loading...