

Page 1
Wiremold / Legrand electrical systems conform to and should be
properly grounded in compliance with requirements of the current
National Electrical Code or codes administered by local authorities.
All electrical products may present a possible shock or fire
hazard if improperly installed or used. Wiremold / Legrand electrical
products may bear the mark as UL Listed and/or Classified and should
be installed in conformance with current local and/or the National
Electrical Code.
Power Commander®IQ
QUICK STARTUP REFERENCE
Installation Instruction No.: 1 007 594 – April 2008
IMPORTANT: Please read all instructions
before beginning.
Option 2. Use a crossover Ethernet cable that connects to
your PC directly: The static IP address for the unit
is 192.168.1.100. Use WEB or Telnet program to
configure the unit.
Option 1. Use a straight Ethernet cable connect the unit to
your network: By default, DHCP is enabled. Fall
back static IP address is 192.168.1.100. Use
WEB or Telnet program to configure the unit.
Option 3. Use a serial cable (included in the package) to
connect the unit and a PC. Run a Terminal
Program on the PC to configure the unit.
Power Commander IQ
CHOOSE ONE OF THE FOLLOWING OPTIONS TO START:
Step 1 An FTP server (on a remote PC) must be up
and running.
SAVING AND RELOADING CONFIGURATION DATA:
Step 2 To save the data file, at a terminal program
(Telnet or local serial port terminal program),
type command “ftpput ftpIpAddr userID
password fileName”.
Step 3 To retrieve a data file, type command “ftpget
ftpIpAddr userID password fileName”.
The system is shipped with Factory Default settings.
The default settings for the Local Master serial port are:
9600, 8 data bits, no parity, 1 stop bit, and
no hardware handshaking (Flow Control). For the
Ethernet port, IP address 192.168.1.100, Submask
255.255.255.0, Gateway 192.168.1.1. The default
Administrator’s login name is “admin” and password is
“admin”. All existing user accounts are erased if the
system is recovered to the default settings.
Control via Email, SNMP and Trap, AutoPing
and Reboot are disabled as default settings. Use
configuration menu (Terminal program or Web) to
change the default settings if you need to.
There are two ways to restore the system to the Factory
Default settings. The first method is to press
a push-button switch located on the front panel for
1 second. The second method is to select “Reload
Factory Defaults” from the Main Menu. The Main Menu
can be viewed by running a terminal emulation program
such as Windows “hyperTerm”.
Please visit www.wiremold.com/www/commercial/products/inst_ins_search.asp
to download a full instruction manual.
Products Covered: SPDU20-0U, SPDU16-2U, SPDU8-1U,
DEFAULT SETTINGS:
Page 2

USER PRIVILEGE LEVELS
Administration Login: There is only one Administration
account on the system. The default name is “admin” and
default password is also “admin”. The default name and
password may be changed. If you login at Administration
level, you are able to remove or change existing user
accounts, take over power outlets or user serial console
ports and change system settings.
User Login: At the user login level, you are able
to reserve power ports for your applications if they
are “open”, as well as make system configuration
changes. At this login level, you are not able to access
other user reserved console ports or change operation
status for other reserved power outlets.
Anonymous (Visitor) Access: If you have no account
established on the system (as an anonymous user), you
are only able to view the system configuration settings
and operate power outlets.
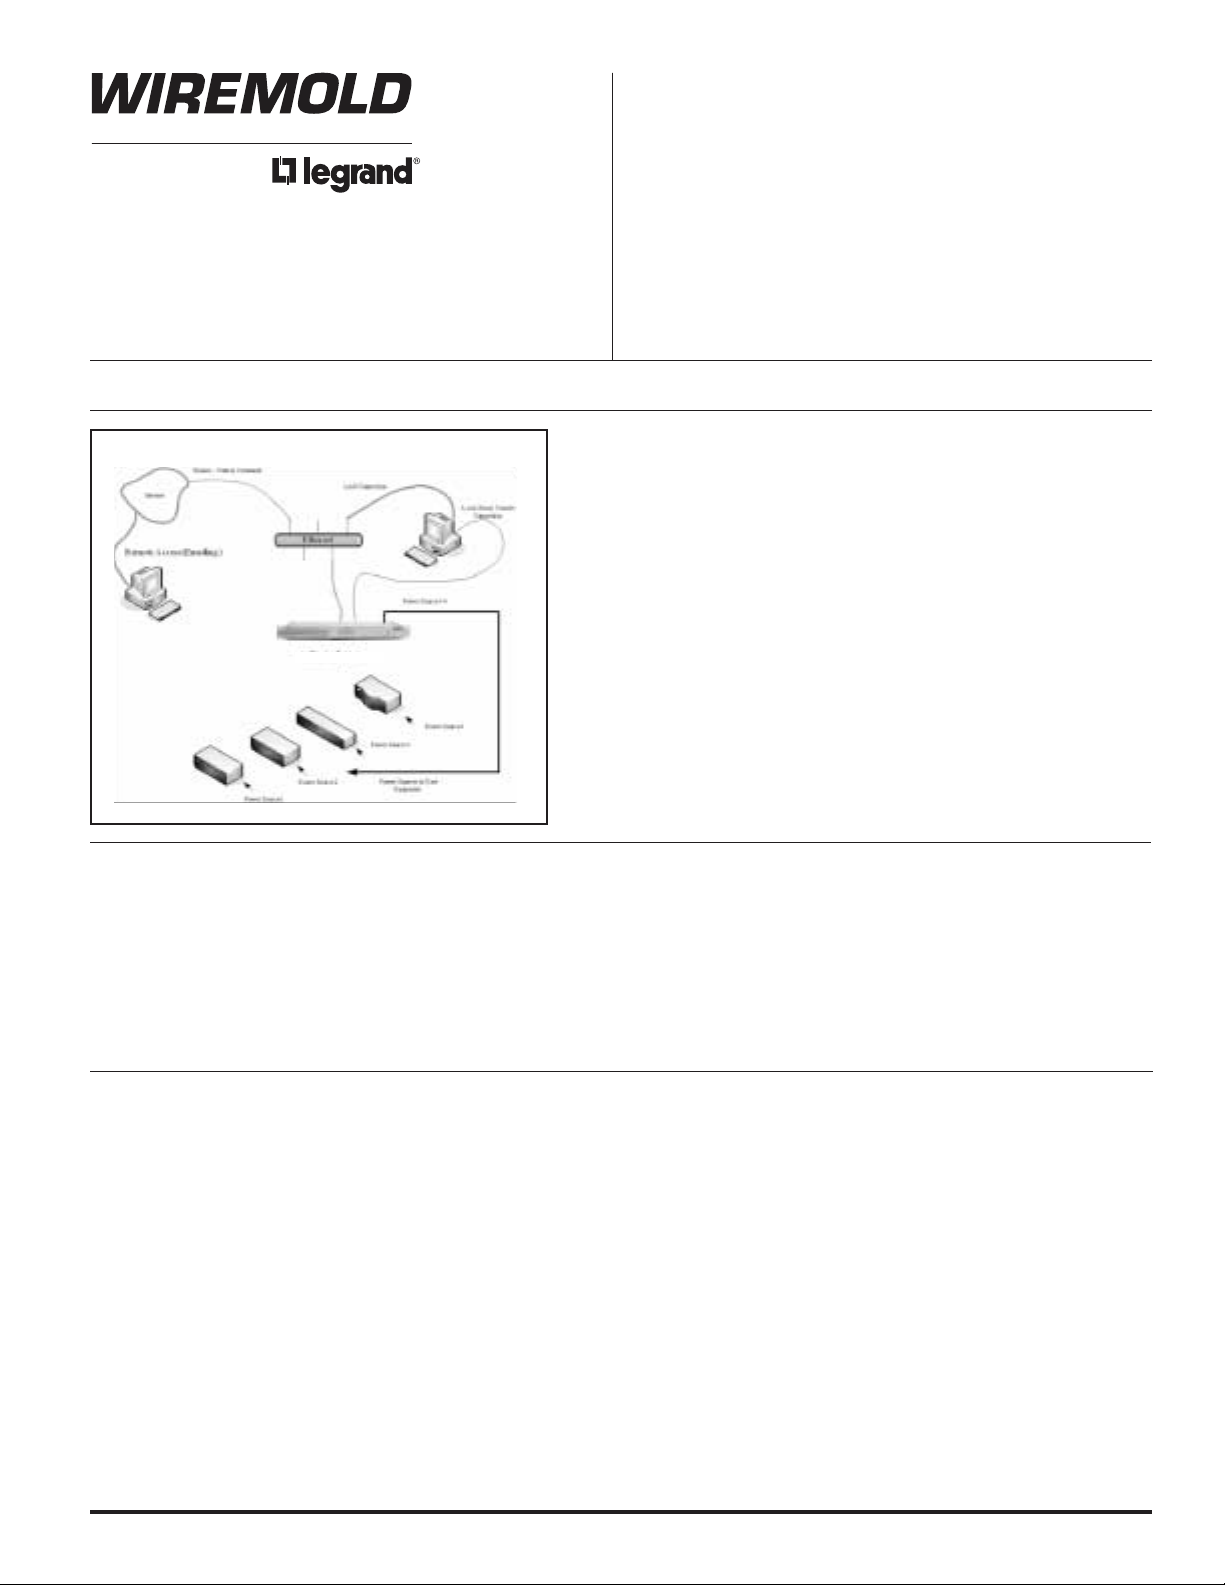
START CONFIGURATION
To access and configure the system from the master
port, you need to connect a RS232 port from your work
station to the Local Master Serial Port. Then,
run a terminal emulation program (such as Window’s
Hyper Terminal) on your computer.
1. Connect the system’s Local Master Port (DCE) with
a straight DB-9 type cable if your work station is
equipped with a DTE port.
2. Connect the system’s Ethernet port to your LAN,
if you intend to use the network port.
3. Turn the system power on.
4. At terminal emulation program, type “setup”
command to start system setup process. Type
“help” for help information.
5. The system has DHCP enabled, as a default
setting. Network connectivity parameters are
displayed at the startup screen. If the system
does not get a DHCP offer, the system falls back
to default static network settings. You can alter
the default network settings to fit your need.
6. Use the command “ping” to verify your connection.
If network connection is established, you are able to
use Telnet, Web Browsing, Emailing and SMNP.
POWER OUTLET CONTROL
Use Configuration menus (terminal or web) to setup
power port outlet or use the following commands:
pset n x – turns power outlet on/off. Where “n” is
outlet #; “x” is either “0” (off) or “1” (on).
rb n – executes power reboot for outlet n.
ps 1 – turns all power outlet on.
ps 0 – turns all power outlet off.
AUTOPING & POWER REBOOT
Each power outlet has option to enable or disable this
function. Use Configuration menus (from terminals or
web) to define user equipment IP addresses and other
parameters.
AC CURRENT DRAW/ AND
TEMPERATURE READING
Use web access to change current/temperature
alarm threshold, notification methods and notification
interval. Use the commands below to read the current
and temperature status:
cs 1 – reads current status
cs 0 – reads current status and clear max
detected value.
Temperature Sensor is optional. Please order
Cat. No. PDU-TS1
ACCESS VIA EMAILS
Use the configuration menus to enable access via email
function and then define email servers (POP3 and SMTP),
incoming addresses and 2nd optional outgoing (reply)
email addresses. Using the following format to send your
emails:
Send control command only: Email Subject Field –
&sysName&username&password&command& where
“sysName” is the user defined system (device) name;
“username&password” is an existing user account name
and password on the system.
Example: &sysSite2&johnW&myPass&rb 2&
Note. Command Delimiter “&” may be altered.
Use command “help” to see details
SYSTEM OPERATION LOG
Use “help” to obtain information on how to use the
operation event logging feature.
datalog 0 – disable the logging feature (default).
datalog 1 – enable the logging feature.
datalog 2 – view logging message.
datalog 3 – clear logging message.
SNMP CONTROLS
Use web access method to view the “TCPIP Network
Setup Menu” from the system, then click “Down Load
MIB File” button to download a copy of MIB object file.
Compile the object file to your network
management software for using the feature.
POWER OUTLET MANUAL SWITCH (IF EQUIPPED)
Press the “Power Outlet Manual Switch” button
located on the front panel. Keep press and release the
button until desired outlet LED is blinking. Then hold the
switch down for 3 seconds. The selected outlet will
change the On/Off state.
Note: A user reserved power outlet can’t be
manually controlled.
Page 3

1 DCD
2 TxD
3 RxD
4 DSR
5 GND
6 DTR
7 CTS
8 RTS
9 ---
1 DSR
2 RTS
3 GND
4 TxD
5 RxD
6 DCD
7 CTS
8 DTR
RS-232 - RJ45 (8-pin)
C-RJ45-DB9F-4, RJ-45 to RS232 (Female, DCE) cable, 4'.
RS232 DB9 Female
RJ45 (8-pin)
Pin #
Signal
Pin #
Signal
1 DCD
2 RxD
3 TxD
4 DTR
5 GND
6 DSR
7 RTS
8 CTS
9 ---
1 DSR
2 RTS
3 GND
4 TxD
5 RxD
6 DCD
7 CTS
8 DTR
RS-232 - RJ45 (8-pin)
C-RJ45-DB9M-4, RJ-45 to RS232 (Male, DTE) cable, 4'.
RS232 DB9 Male
RJ45 (8-pin)
Pin #
Signal
Pin #
Signal
Local Master Port Signals supported:
RXD/TXD, CTS/RTS, DTR, DSR.
User Serial Port Signal Supported:
RXD/TXD, CTS/RTS.
Typical Connections:
1. PC (DTE, Male) fg Local Master Port (DCE, Female)
2. Local Master Port (DTE, Male) fg External Modem
(DCE, Female)
Note: The system sends external Modem Command string in
every a few minutes. The manufacture pre-set default
Modem command string configures the external Modem
with proper signal handshaking and call-answer mode.
1
8
Page 4

Wiremold / Legrand
U.S. and International:
60 Woodlawn Street • West Hartford, CT 06110
1-800-621-0049 • FAX 860-232-2062 • Outside U.S.: 860-233-6251
Canada:
570 Applewood Crescent • Vaughan, Ontario L4K 4B4
1-800-723-5175 • FAX 905-738-9721
1 007 594 0408
© Copyright 2008 Wiremold / Legrand All Rights Reserved
The “L” Bracket mounting
option provides a simple and
secure mounting solution for
the SPDU20-OU.
The Power Commander
®
IQ offers three convenient hardware options to mount the SPDU20-0U into racks and
cabinets available from most major manufacturers.
“L” BRACKET MOUNT (INCLUDED) BUTTON BRACKET MOUNT (INCLUDED)
UNI-BRACKET MOUNT –
PDU-MK1 KIT ORDERED SEPARATELY
The button bracket mounting option
offers a fast solution for mounting the
SPDU20-OU using standard 49"
[1.245m] spacing keyholes.
The PDU-MK1 Kit will allow you
to mount the SPDU20-OU into
racks and cabinets available
from most major manufactuers.
PDU-MK1 Kit Includes
Two buttons
Two screws
Two washers
Detail A
A
 Loading...