

Page 1
TOUCHSCREEN SCENARIO CONTROLLER
Touchscreen
scenario controller
User manual
Page 2
Congratulations
go to
contents
TOUCHSCREEN SCENARIO CONTROLLER
CONGRATULATIONS
You have just acquired a Touchscreen Scenario Controller.
This device lets you:
programme commands
control your In One by Legrand products
using the touchscreen
display customized commands
access information
2
This guide is intended to help explain the system so that you
can set and use any command you may need.
Touchscreen scenario controller.
(LE00282AC)
Page 3
Contents
TOUCHSCREEN SCENARIO CONTROLLER
CONTENTS
I / PRESENTATION OF THE TOUCHSCREEN SCENARIO CONTROLLER ............6
II / GLOSSARY AND HELP................................................... 7
1
DEFINITIONS OF THE MAIN TERMS USED .......................................7
2
NAVIGATION KEYS ...........................................................7
3
ACTION KEYS ...............................................................8
4
CONTROL KEYS .............................................................9
III / CONFIGURING THE CONTROLLER .......................................12
1
MANAGING AREAS ..........................................................12
2
MANAGING COMMANDS .....................................................14
3
3
MANAGING SHORTCUTS .....................................................19
4
SCHEDULED PROGRAMMING.................................................20
5
AUTOMATING COMMANDS . . . . . . . . . . . . . . . . . . . . . . . . . . . . . . . . . . . . . . . . . . . . . . . . . . . 31
6
MANAGING SUPERVISORS ...................................................35
7
MANAGING SOURCES .......................................................38
8
MANAGING PLAYERS........................................................39
9
MANAGING PLAYLIST COMMANDS ............................................40
10
MANAGING MEDIASCENES ...................................................43
Page 4

go back to
contents
TOUCHSCREEN SCENARIO CONTROLLER
CONTENTS
IV / CONTROL FUNCTIONS .................................................47
1
CONTROLLING COMMANDS . . . . . . . . . . . . . . . . . . . . . . . . . . . . . . . . . . . . . . . . . . . . . . . . . . 47
2
DISPLAYING SUPERVISOR STATUS ...........................................48
3
DISABLING AN ALERT .......................................................48
V / RAPID OVERVIEW .....................................................49
1
EXAMPLE 1: CREATING A ‘LEAVING’ SCENE COMMAND ..........................49
2
EXAMPLE 2: PROGRAMMING A HEATING COMMAND
ACCORDING TO TIME CONSTRAINTS ...............................50
3
EXAMPLE 3: AUTOMATING AN ‘EVENING’ SCENE COMMAND
ACCORDING TO OUTDOOR LIGHT..................................52
4
4
EXAMPLE 4: CREATING A ‘WAKE UP’ MEDIASCENE ..............................54
VI / SETTING FUNCTIONS ..................................................56
1
LANGUAGE ................................................................56
2
DATE AND TIME ............................................................57
3
STANDBY ..................................................................58
4
NETWORK CONFIGURATION .................................................58
5
UPDATING .................................................................59
6
INFORMATION..............................................................60
Page 5
go back to
contents
TOUCHSCREEN SCENARIO CONTROLLER
CONTENTS
7
CALIBRATING THE TOUCHSCREEN............................................60
8
BRIGHTNESS...............................................................61
9
UNITS .....................................................................61
VII / MULTIMEDIA CONTROL ...............................................63
1
SELECTING A PLAYLIST .....................................................63
2
SELECTING A PLAYER.......................................................65
5
Page 6
I / Presentation
of the touchscreen
scenario controller
go back to
contents
TOUCHSCREEN SCENARIO CONTROLLER
PRÉSENTATION
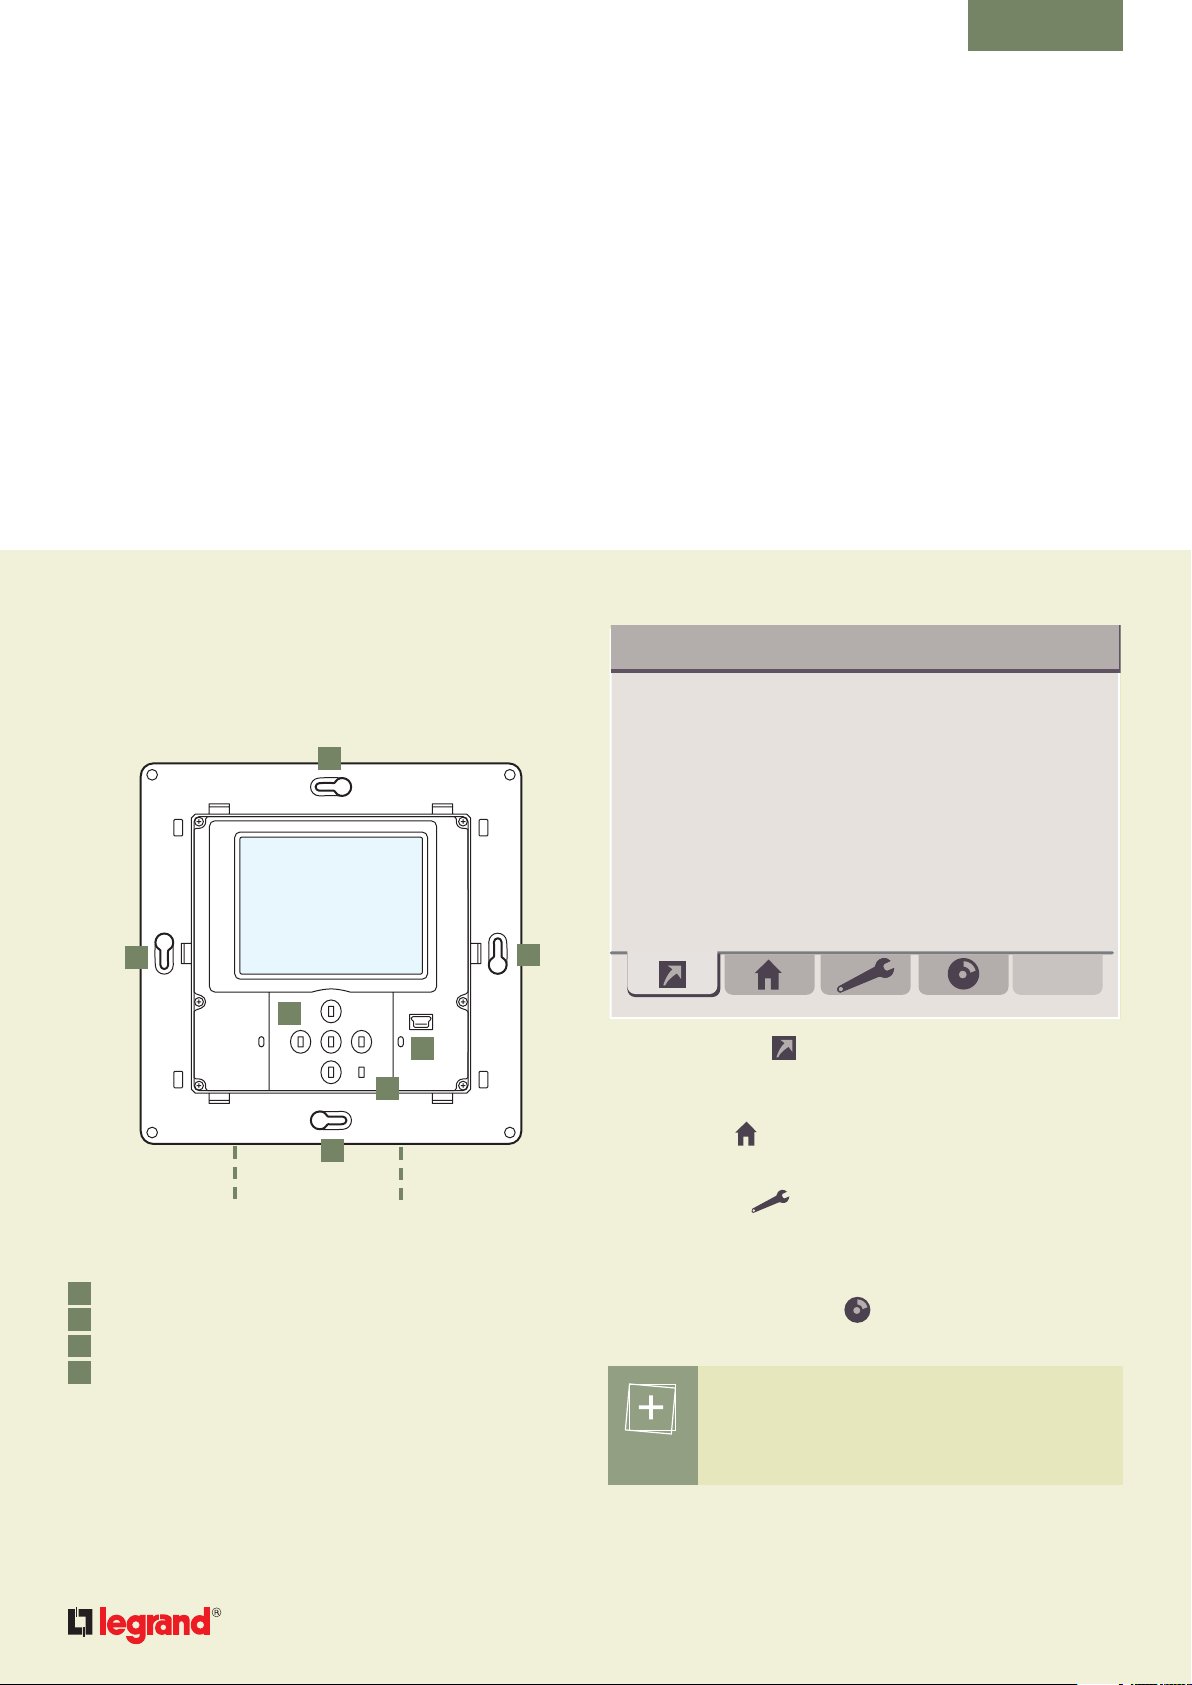
The Touchscreen Scenario Controller is a flush-mounted
product that is connected to the L+N and LAN networks.
It is operated via a 3˝5 colour touchscreen and associated
navigation keys.
1
3”5 touchscreen
1
2
4
3
6
monday january 1
1
The Homepage tab displays your favourite scene
commands thus enabling simple use of the most frequently
used commands.
st
My favourite scenes
00:00
1
LN
100-240 V
1
Wall fixings
2
Navigation keys
3
Reset button
4
Communication port (mini USB), for Legrand technical
support only
Once the controller has been powered up, the homepage opens
after just a few seconds.
LAN
100 base T
The House tab
and lets you activate them.
The Settings tab
programmed commands, automations and supervisors as well
as your preferred language, network, date and time, standby
and update settings for the device.
The Multimedia Control tab
video playlists.
displays all existing commands and areas
lets you configure areas, commands,
lets you read photo, music or
You are advised to start by setting the device’s
date and time.
See Section VI SETTING FUNCTIONS.
Page 7
II / Glossary
and help
go back to
contents
TOUCHSCREEN SCENARIO CONTROLLER
GLOSSARY AND HELP
1 DEFINITIONS OF THE MAIN
TERMS USED
Automation
Command actuated by a trigger (sensor) and, where
relevant, a condition.
Condition
Specific state that authorises or refuses the actuation
of a command. There are 2 types of condition:
time and In One by Legrand
scheduled programmes and automations.
Trigger
In One by Legrand
radio, infrared).
command (power line carrier,
. These are used for
Supervisor
A supervisor provides information on the current status of
an In One by Legrand
Mediascene
A mediascene is a multimedia command combining a
scene command with the reading of a playlist.
Playlist
A playlist is a selection of music, photo or video files
that can be read in sequence or randomly by a
multimedia player.
product (i.e. a sensor, etc.).
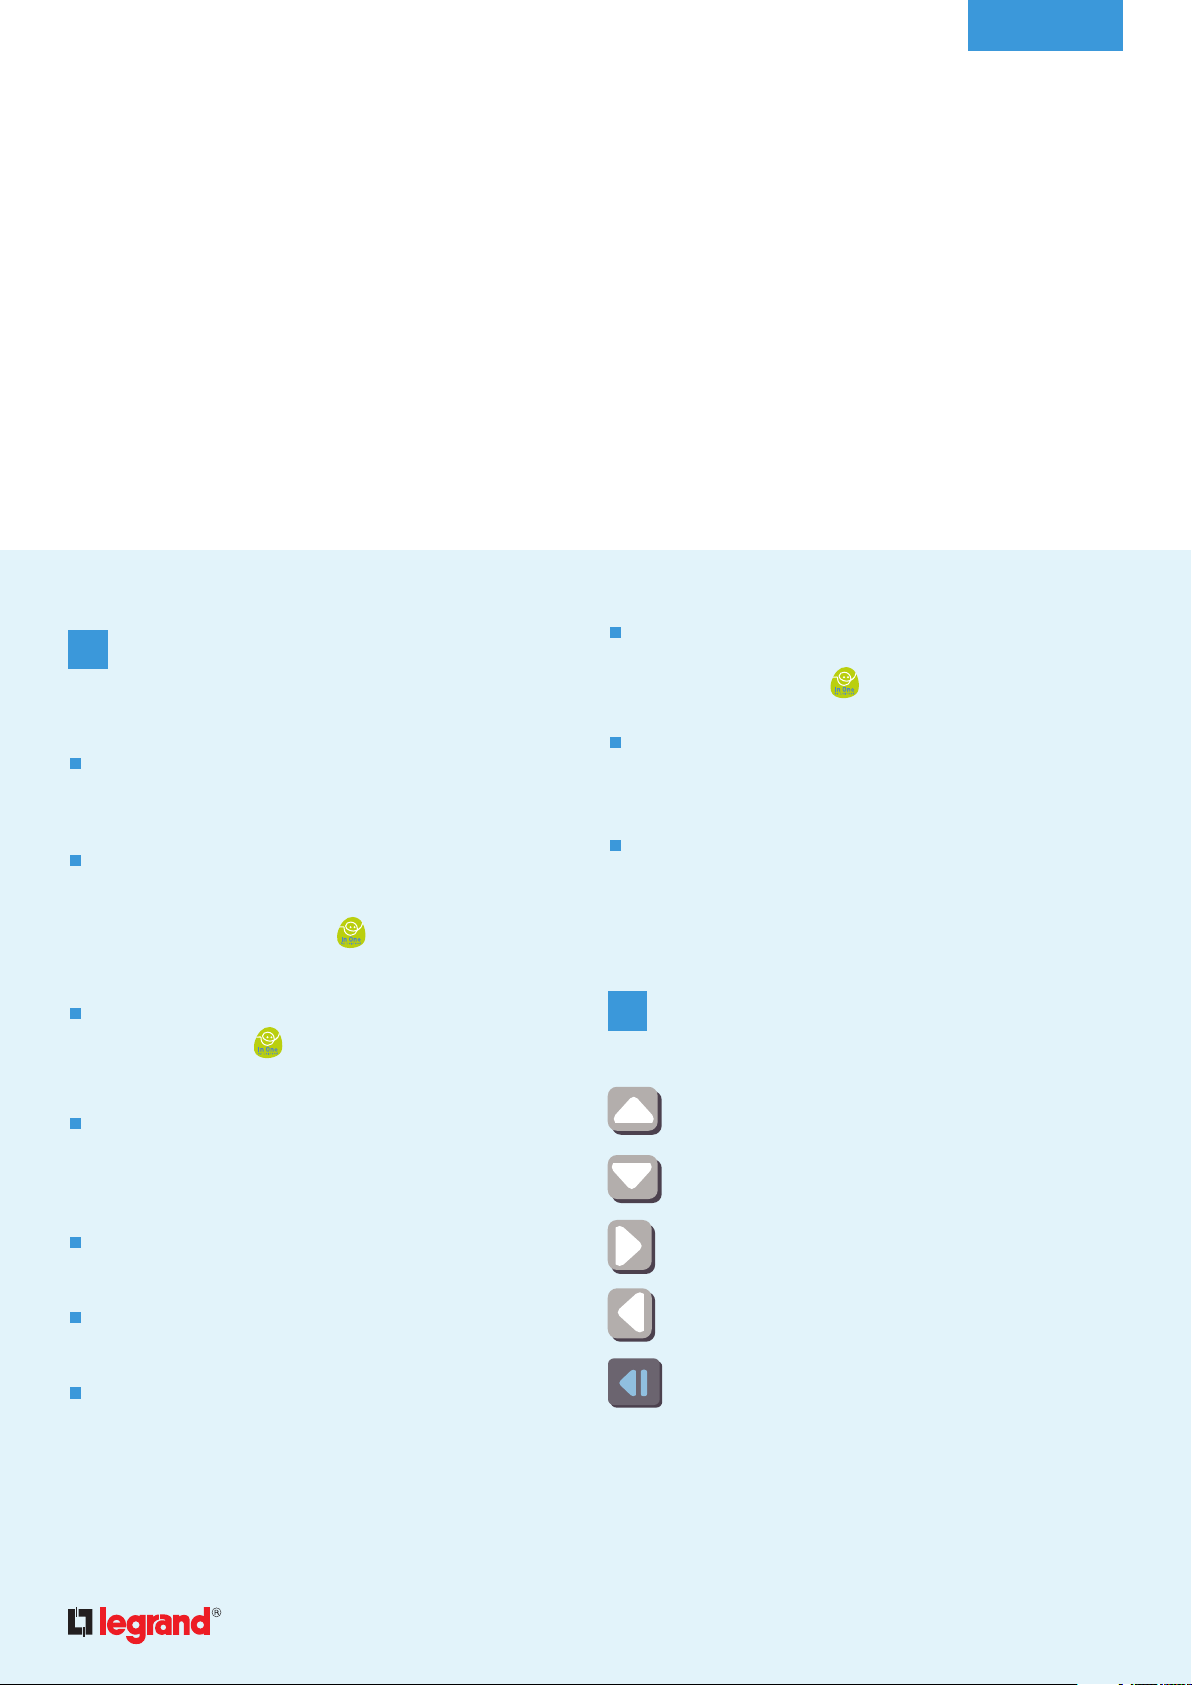
2 NAVIGATION KEYS
7
Area
Virtual location in which the commands are placed.
An area may represent a room, a set of rooms or a
specific area in the house.
Time flag
A time flag is a time/date command.
Scheduled program
Set of time flags.
Scene
Set of commands executed simultaneously on the
various receivers that have been linked to the
Touchscreen Scenario Controller during the
learning procedure.
Up
Down
Right
Left
Back (for returning to the parent page).
Page 8
go back to
ABC
contents
presentation glossary configuration control overview setting multimedia
8
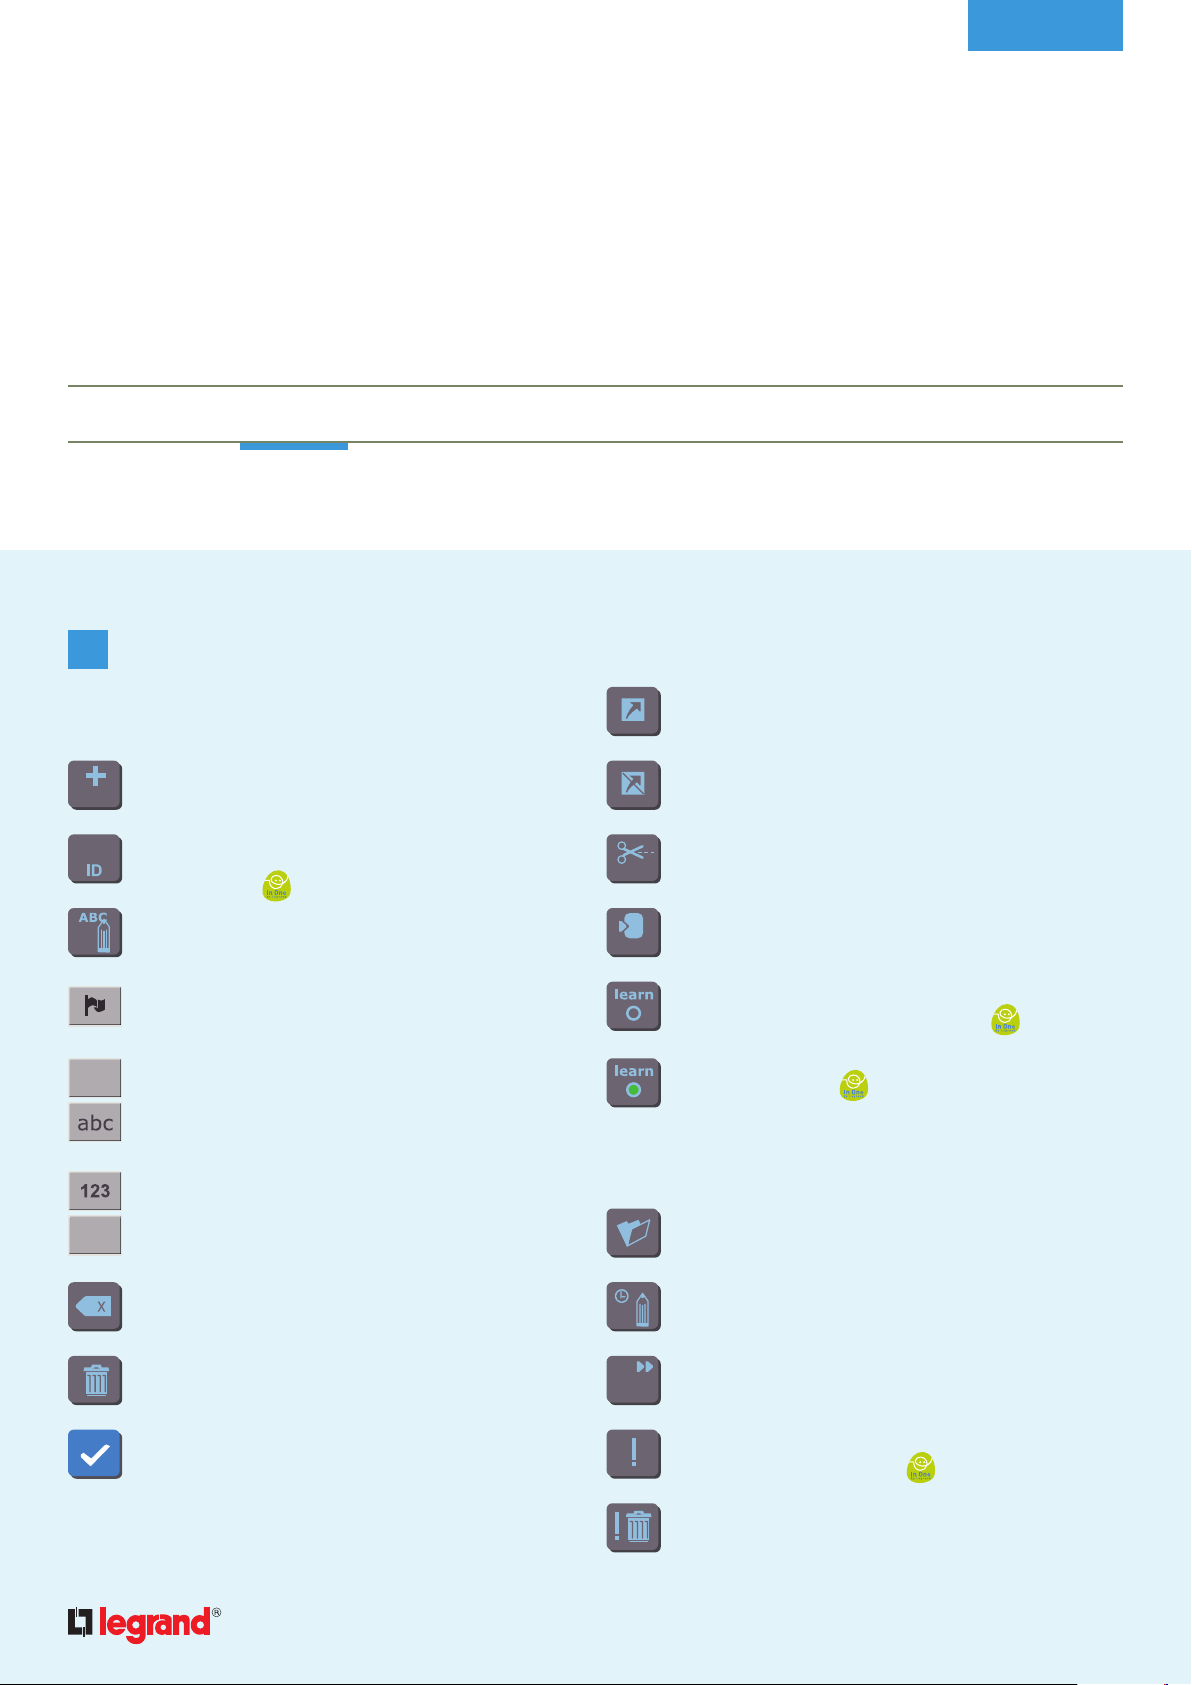
3 ACTION KEYS
3.1 - Recurring action keys
Add
add
Enter an ID
For programmes, automations and supervisors.
For entering the
Rename
Lets you access the virtual keypad.
Change alphabet (latin, cyrillic, greek, turkish)
Upper case / Lower case
product ID.
3.2 - Command configuration keys
Add a shortcut
Lets you create a scene type command favourite on the
homepage tab.
Delete a shortcut
Delete a scene type command favourite on the homepage tab.
Cut
cut
Copy
copy
Learn
Launch the product learning procedure
Learn (active)
In One by Legrand product learning procedure
in process.
3.3 - Configuring a scheduled programme
.,éà?
Numeric keypad / Special types
Erase
Delete
Confirm
Lets you confirm any action.
Open the selected week
Change a time flag
Repeat a time flag or a programme
repeat
Add a condition
Time or In One by Legrand condition.
Delete a condition
Page 9
go back to
contents
presentation glossary configuration control overview setting multimedia
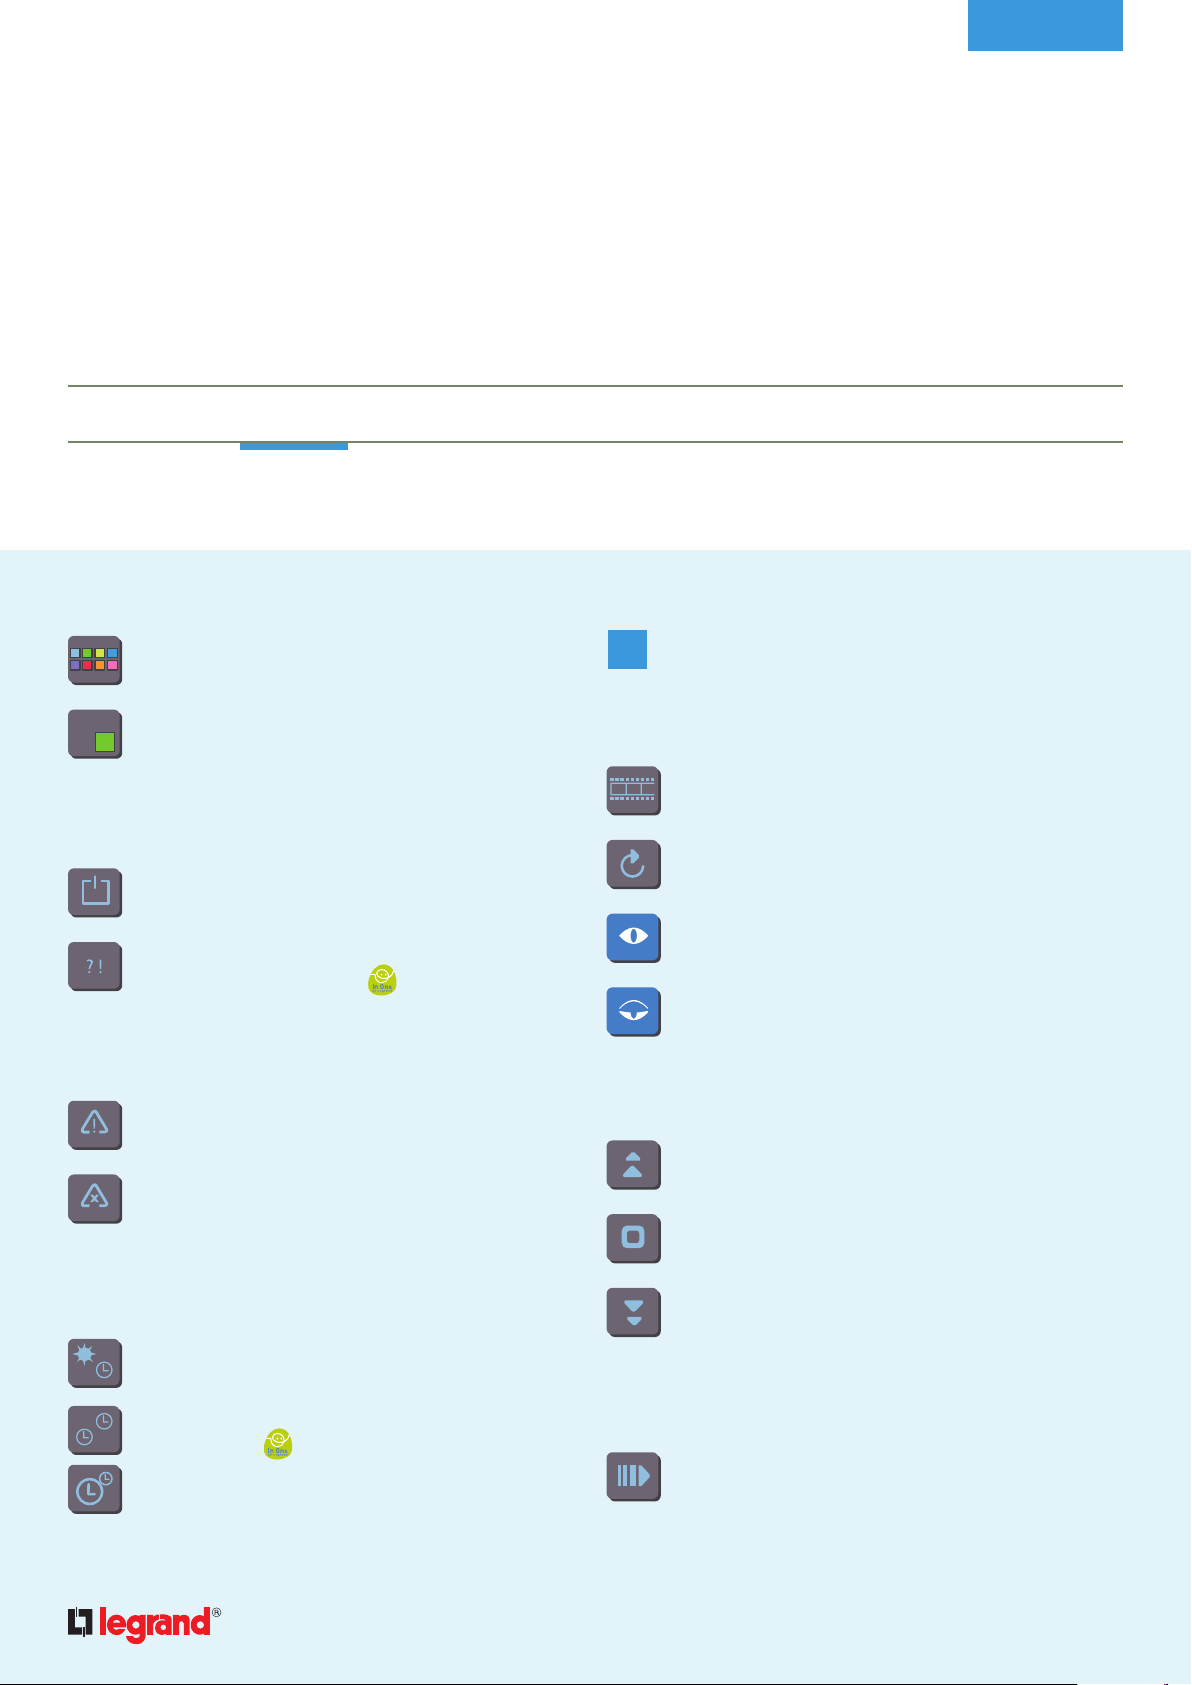
9
Colourway
Lets you access the various labels.
Colour label
Lets you change the colour of a programme.
3.4 - Configuring an automation
Add a trigger
Add a condition
Time or In One by Legrand condition.
3.5 - Configuring a supervisor
Change a supervisor into an alert trigger
Delete an alert trigger
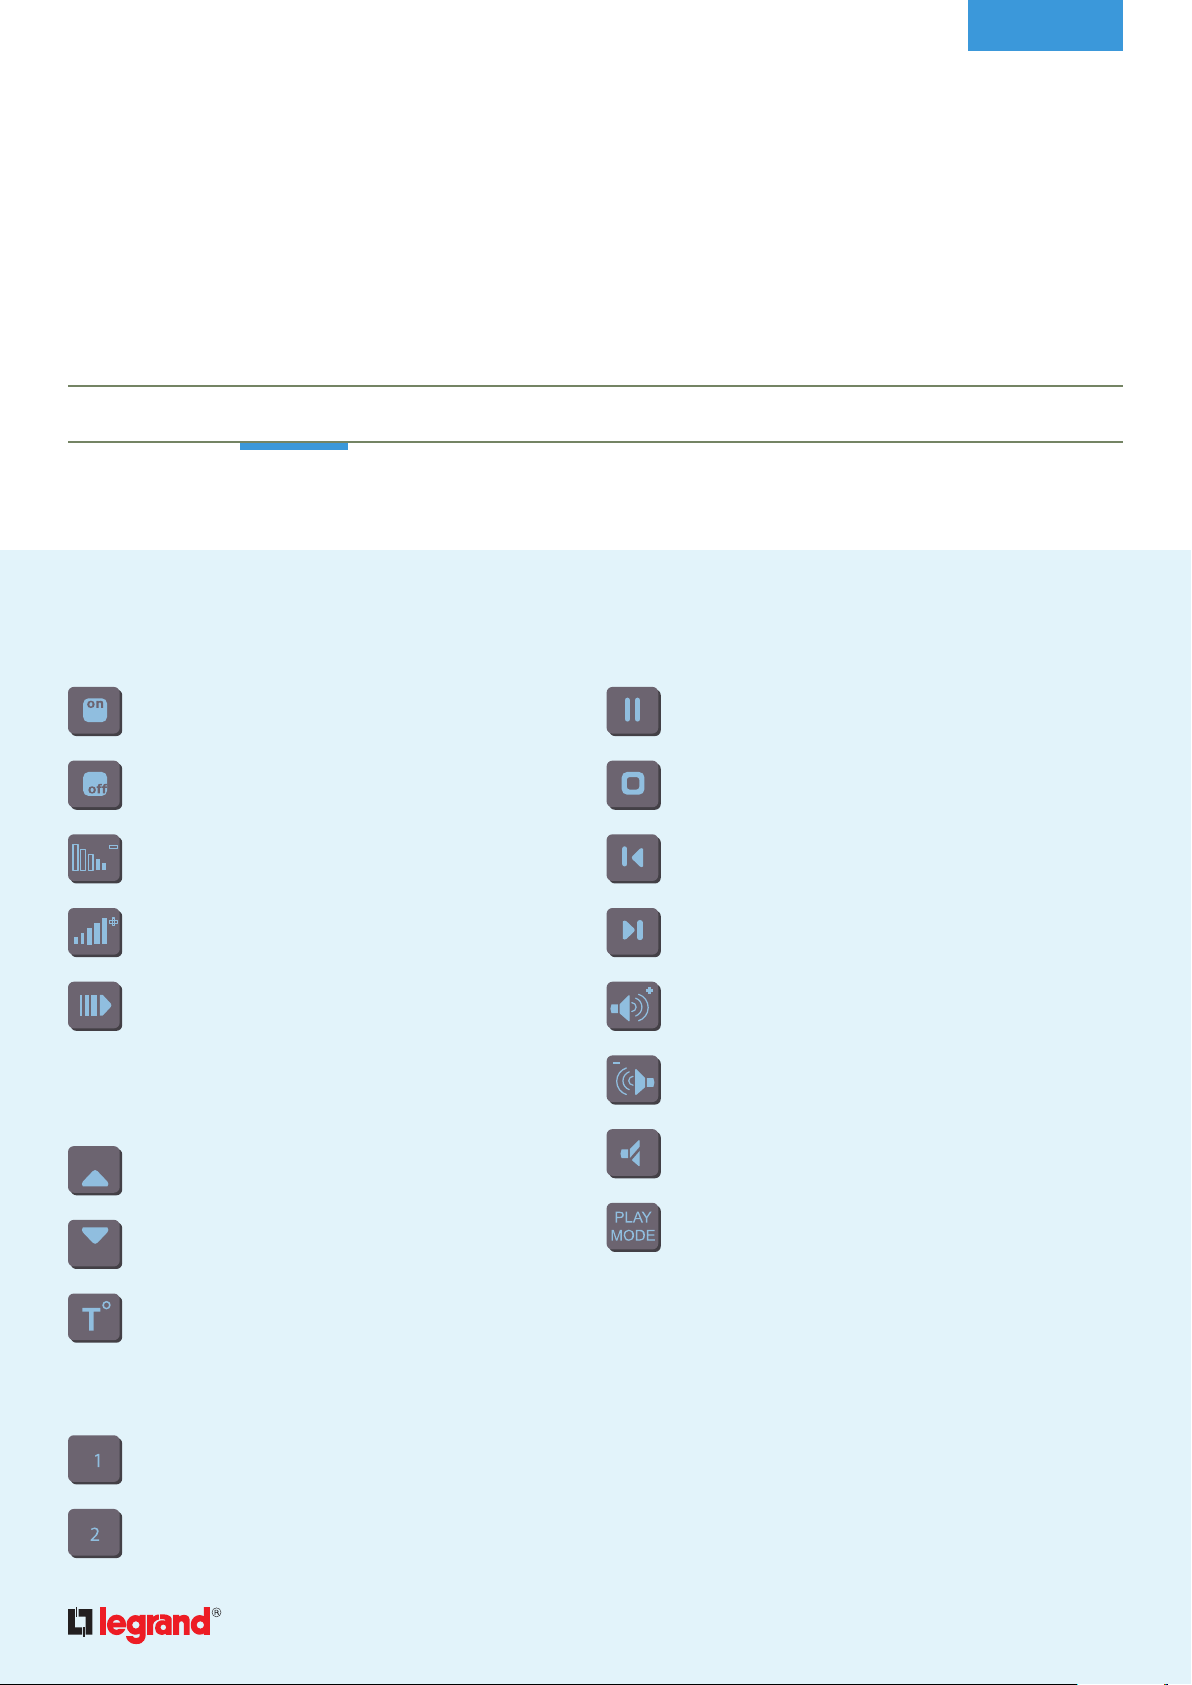
4 CONTROL KEYS
4.1 - Recurring keys
View command detail
Update
Supervision mode
Command mode
4.2 - Shutters
up
3.6 - Configuring the date and time
Activate automatic time change
Synchronise product clocks:
Enabled/Disabled
Stop
Down
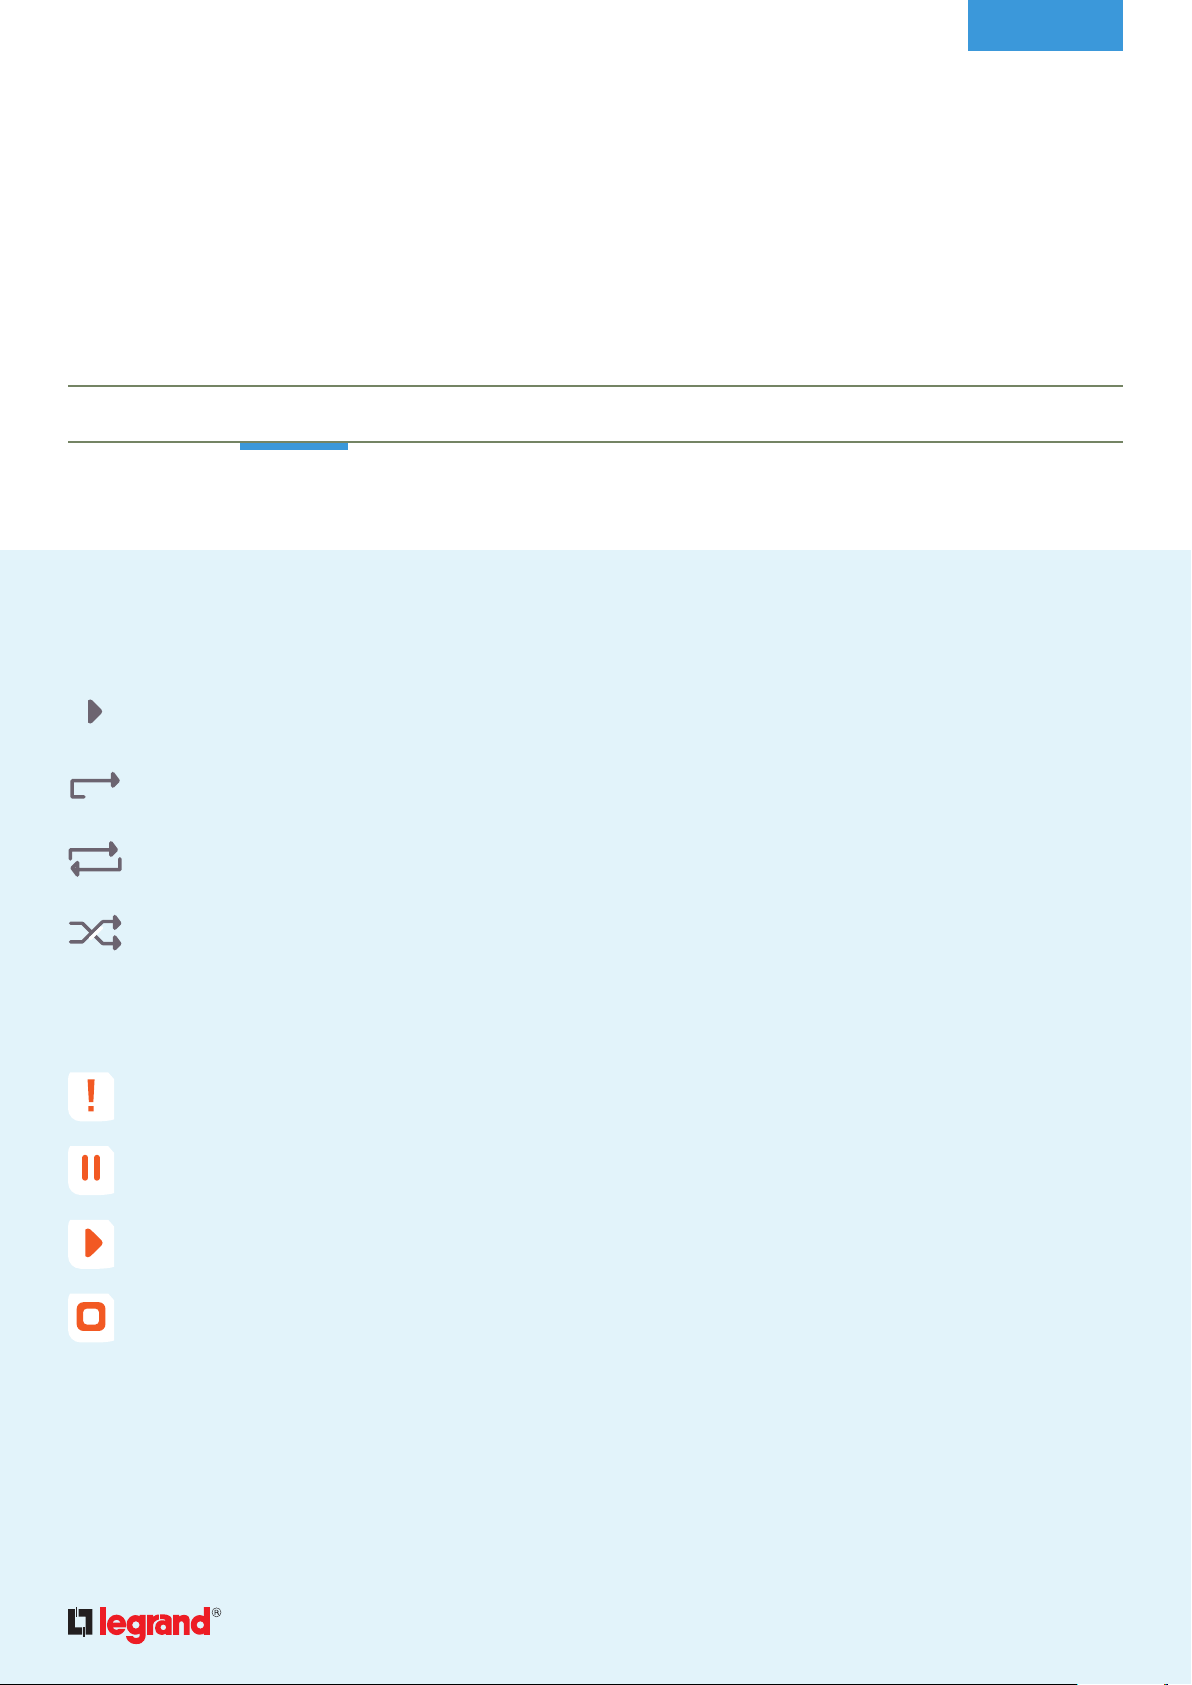
4.3 - Scene
Run a scene
Page 10
go back to
contents
presentation glossary configuration control overview setting multimedia
10
4.4 - Lighting and dimming
On
Off
Dimming -
Dimming +
Activate a gradual lighting command
4.5 - Heating
Up (change the mode).
4.7 - Playlists and mediascenes
Pause
Stop
Previous
Next
Volume +
Volume -
Mute
Down (change the mode).
Adjust preset temperatures
(comfort / reduced)
4.6 - CMV
Speed 1 (low speed)
Speed 2 (high speed)
Play mode
Page 11
go back to
contents
presentation glossary configuration control overview setting multimedia
11
4.8 - Play modes
Normal
Repeat
Loop
Shuffle
4.9 - Statuses
Error in process
Pause in process
Play in process
Stop in process
Page 12
III / Configuring
the controller
go back to
contents
TOUCHSCREEN SCENARIO CONTROLLER
CONFIGURING THE CONTROLLER
Select the Settings tab to access the touchscreen
scenario controller configuration panel.
monday january 1
The first available settings are displayed on the configuration
panel. The
second screen.
st
Areas
Automations
Create your house areas
key lets you access the other settings on a
Commands
Supervision
Time
Preference
00:00
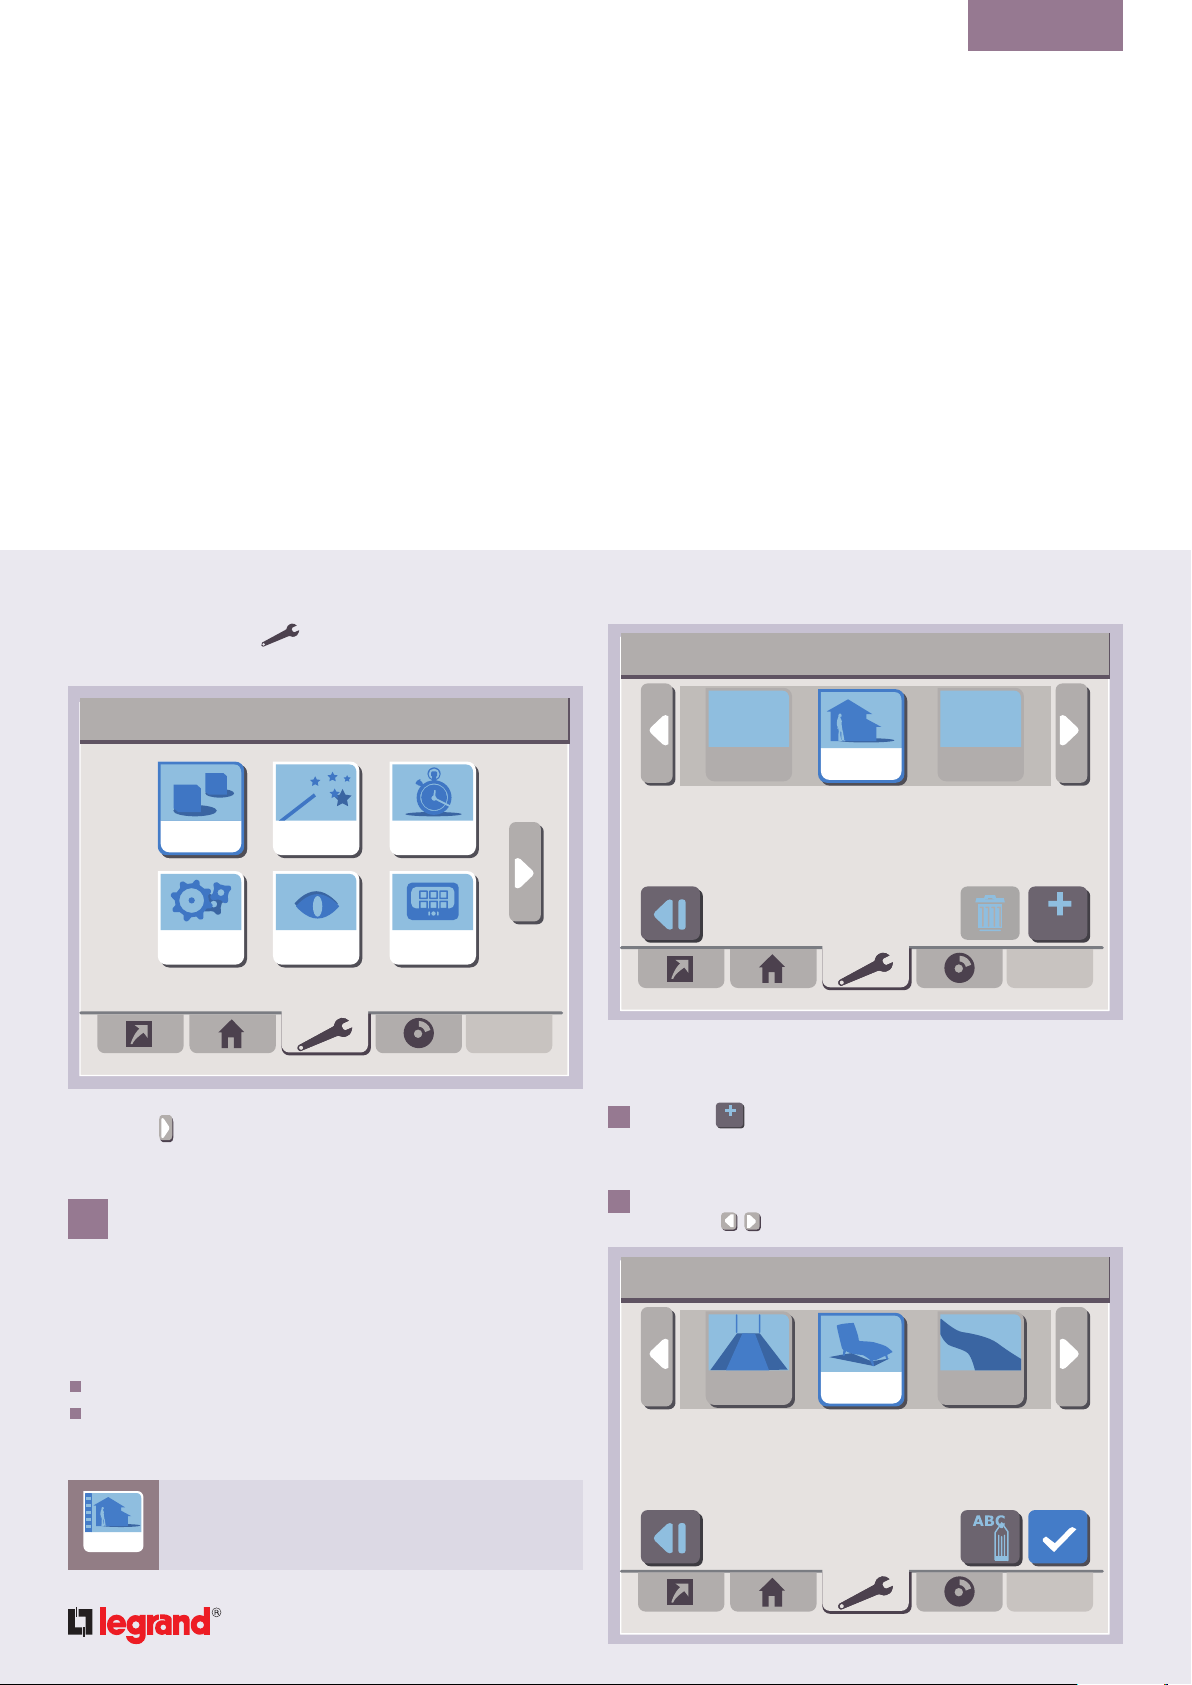
1 MANAGING AREAS
My areas
House
Select an area to modify it
or press (+) to add an area
1.1 - Adding an area
To add an area:
press the
1
The area creation screen proposes a list of available
area icons.
select an icon by placing it at the centre of the screen
2
(using the
key
add
keys)
12
00:00
add
To customize your interface, you can define your own areas in
which you wish to create your commands.
To do this, press on the Areas icon.
The displayed screen lets you:
create new areas
modify or delete existing areas
The House area is configured by default.
It cannot be deleted.
House
My areas
00:00
Hallway Terrace Path
Select an icon for your area
and press (ABC) to rename it.
Page 13
go back to
ABC
contents
presentation glossary configuration control overview setting multimedia
13
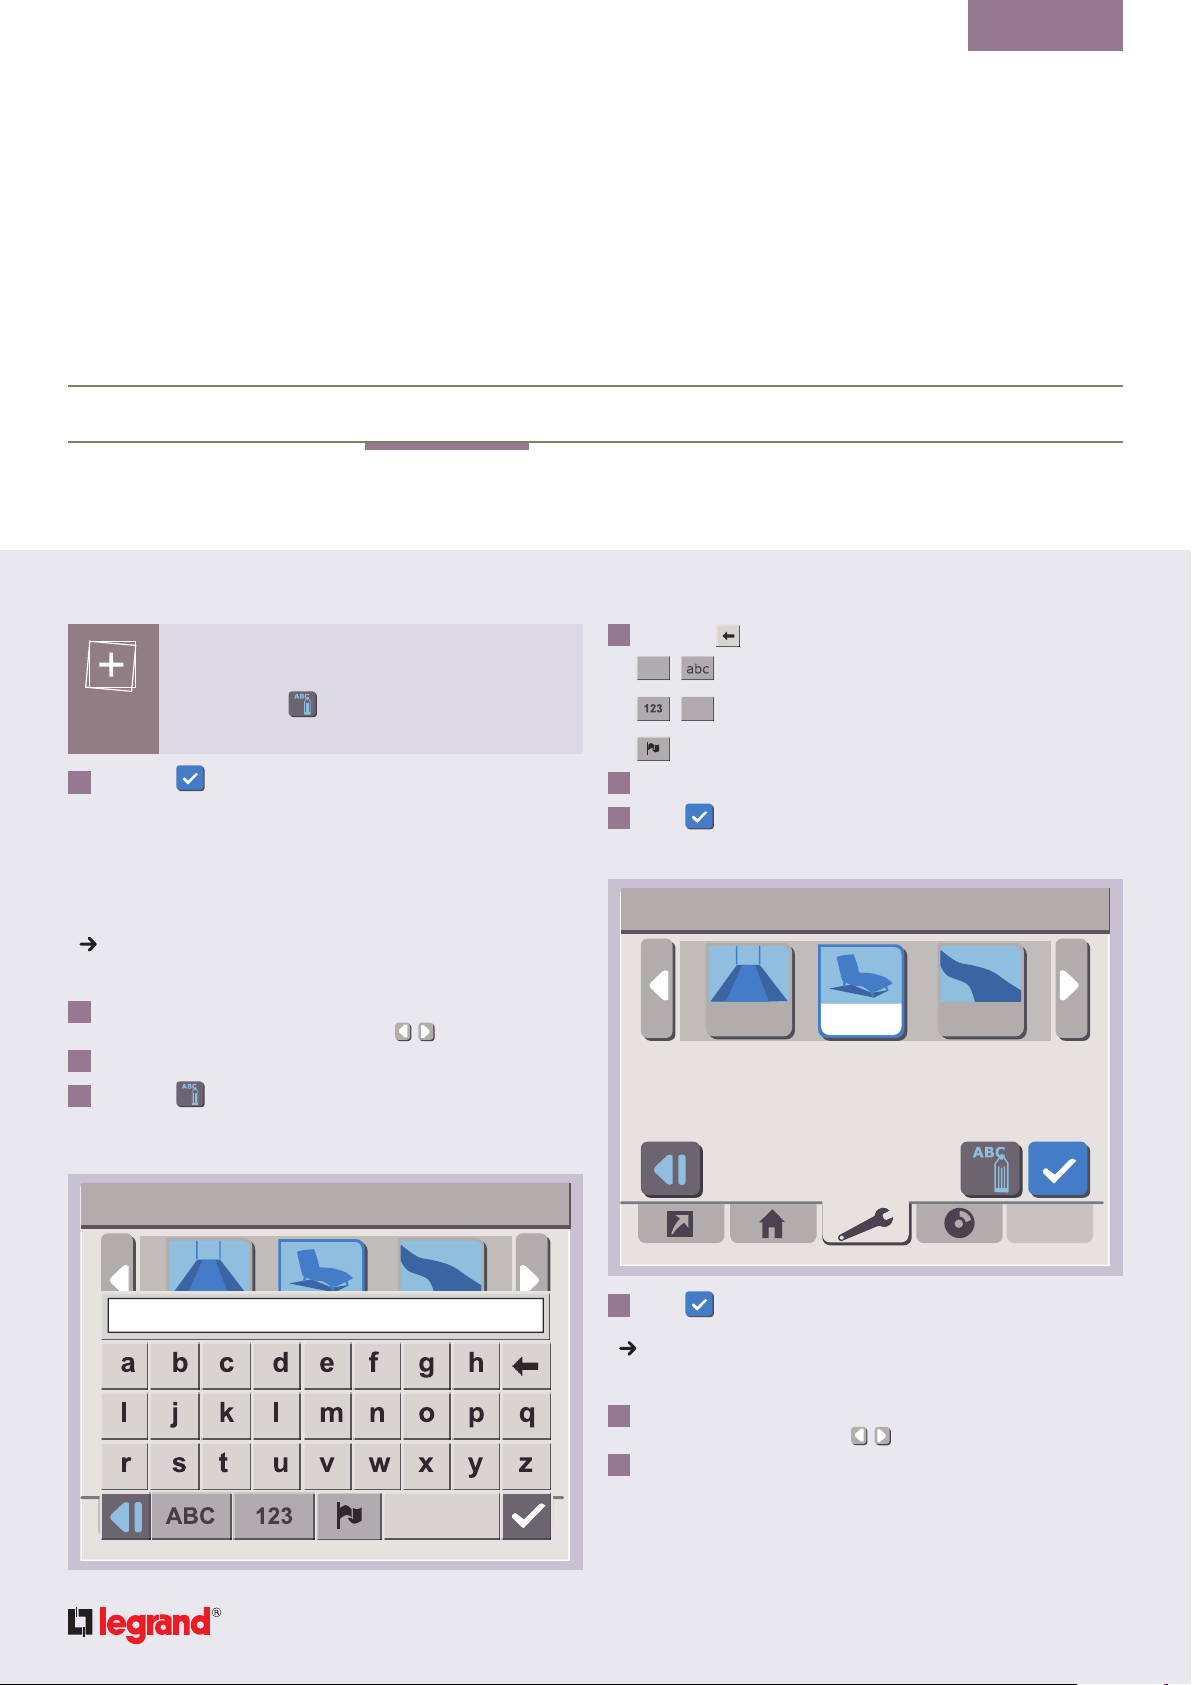
You can rename an area icon if the name of the
selected icon has already been used.
Just press the
key (see: 1.2 - Modifying an
area).
press the
3
key to confirm the changes
This area is now defined.
You can now assign commands to this area
(see Section 2 - Managing commands).
1.2 - Modifying an area
Renaming an area
If you wish to modify the name of an area:
select an icon by placing it at the centre of the screen
1
(using the horizontal navigation keys
press the selected icon
2
press the
3
key
A virtual keypad is displayed; this lets you enter the name
you wish to give to the new area.
My areas
)
00:00
press the
4
key to erase the current name
, allow you to move to upper or lower case mode.
.,éà?
,
allow you to move to numeric or special type mode.
allows to change alphabet.
enter the new name
5
press
6
to confirm
The new area appears in the area selection screen.
My areas
Hallway Patio Path
Select a new icon or press (ABC)
to rename your area.
00:00
Terrace
press
7
Modifying an area icon
to confirm the changes
To modify an area icon:
select the area by placing it at the centre of the screen
1
(using the navigation keys
press the selected icon
2
)
Page 14
go back to
contents
presentation glossary configuration control overview setting multimedia
14
My areas
Hallway Patio Path
Select an icon for your area
and press (ABC) to rename it.
select a new icon
3
press the
4
key to confirm
1.3 - Deleting an area
To delete an area:
select an icon by placing it at the centre of the screen
1
(using the
press
2
A message invites you to confirm the deletion.
keys)
00:00
2 MANAGING COMMANDS
In this section we will see how to:
create commands
modify existing commands
delete commands
move commands from one area to another
The commands let you control your In One by Legrand
products.
Press the Commands icon to access the menu.
The screen displays the existing commands for each
created area.
My commands 00:00
House
press the
3
The house area and areas linked to commands
cannot be deleted.
cut add
To delete a command, see section
2.4 - Deleting a command.
key
Page 15
go back to
contents
presentation glossary configuration control overview setting multimedia
15
2.1 - Adding a command to an area
To add a new command to an area:
select an area (using the
1
press the
2
add
keys
The screen displays the available command types.
My commands
shutters
heating
Select a command type
press a command type to select it
3
The homepage displays the available icon types.
keys)
scenes
misc.
lighting
CMV
00:00
My commands
Storm
Arrival
Select a new icon or press (ABC)
to rename your area.
select the icon to be assigned to the command
4
if you wish to rename the icon, press the
5
press
6
to confirm
The product recognition screen is displayed.
My commands
00:00
Alarm
key
00:00
The command type is determined according to
the type of the In One by Legrand products to be
controlled:
- if the products are all of the same kind,
the command type could be SHUTTERS,
LIGHTING, HEATING, MISC, CMV,
- if several different types of In One by Legrand
product are to be controlled, select the SCENES
command type.
Enables control (e.g. presence, absence
with frost protection, absence in eco
Presence
mode, etc.) of the lighting scene manager
and heating programmer.
House Arrival
Page 16

go back to
contents
presentation glossary configuration control overview setting multimedia
16
For an off-site configuration, press the key.
The learning step (Push and Learn) can be
executed in situ at a later date.
press the
7
key
The key goes green.
To initialise the In One by Legrand product
recognition procedure, press the LEARN button
on each product together with the relevant action
button (preset).
Each time a product is recognised, its ID is displayed.
My commands
645321
245869
House
Arrival
254235
00:00
My commands
645321
245869
House
Arrival
254235
Press the socket(s)
that you wish to activate.
press
9
to confirm
2.2 - Modifying a command
To modify a command:
select an area
1
My commands
00:00
00:00
Press the socket(s)
that you wish to activate
When every In One by Legrand
product to be added is
displayed:
press the
8
key to terminate the learning procedure
The key switches off and the status of each product is
displayed alongside its ID.
Arrival
House
cut add
Page 17
go back to
contents
presentation glossary configuration control overview setting multimedia
17
press the icon of the command to be modified
2
My commands
Storm Arrival Alarm
Select a new icon or press (ABC)
to rename your area.
Press the key to rename the command.
To modify the icon, select it by placing it at the
centre of the screen (using the
keys).
00:00
My commands 00:00
645321
245869
House Arrival
254235
Press the socket(s)
that you wish to activate.
The recognised products are displayed.
press the
4
The
key
key goes green.
To initialise the In One by Legrand product
recognition procedure, press the LEARN button
for each product together with the relevant action
button (preset).
press
3
to access the command modification screen
Each time a product is recognised, its ID is
displayed.
When every new In One by Legrand
is displayed:
press
5
The
key to terminate the learning procedure
key switches off and the status of each product is
displayed alongside its ID.
press
6
product to be added
Page 18

go back to
contents
presentation glossary configuration control overview setting multimedia
18
To delete a product from the command, press the
key (except for heating-type commands).
Press the
Make the selection using the
key to rename a product ID.
keys.
2.3 - Moving a command from one area to
another
You can move a command from one area to another.
select the command to be cut using the navigation keypad
1
My commands 00:00
Arrival
House
My commands
press the
4
My commands
Patio
00:00
copy
key
copy
add
00:00
cut add
press the
2
select the area to which you want to switch the command
3
using the vertical navigation keys
cut
key
Patio
Arrival
cut
add
Page 19
go back to
contents
presentation glossary configuration control overview setting multimedia
19
2.4 - Deleting a command
To delete a command:
select the command using the navigation keypad
1
press
2
3 MANAGING SHORTCUTS
Giving a command a shortcut lets you run the command directly
from the Homepage tab
Only 8 scene and mediascene type commands
can be placed in shortcuts.
3.1 - Creating a shortcut for a command
In the Settings tab
select the area containing the command for which you want
1
to make a shortcut
select the command using the navigation keypad
2
My commands
:
00:00
press the
3
The command icon is displayed with an
My commands
key
icon.
Arrival
Patio
cut
3.2 - Deleting a Homepage shortcut
To delete a shortcut, open the Settings tab and:
select the area containing the command
1
select the command to be deleted
2
press the
3
key
00:00
add
Patio
Arrival
cut
add
Page 20

go back to
contents
presentation glossary configuration control overview setting multimedia
20
4 SCHEDULED
PROGRAMMING
Once the commands have been defined, you can configure
scheduled programmes. These let you run commands for
managing your
Press the Time icon to access the menu.
The calendar for the current month is displayed.
My time
MMTTW
products automatically according to time.
00:00
january 2009
T
S
F
S
4.1 - Creating a programme and its time flags
To create a programme, you must create at least one time flag.
Creating a programme
select the desired week using the navigation keypad
1
press the
2
The screen displays the selected week.
Week of 01/01/09
key
T
W
Select a day using the browser
and validate to view the programme
S
F
repeat
00:00
S
You can then use this screen to:
create programmes
delete the programmes for a given week
disable the calendar
A programme is a set of commands, each of which is actuated
automatically at a given time on a given day.
Each programmed command thus constitutes one programme
time flag.
press the day to be linked with the programme
3
The programme creation screen is displayed; you can now
create a time flag.
Page 21

go back to
contents
presentation glossary configuration control overview setting multimedia
21
Creating a time flag
Programmes for 01/01/09 00:00
add
press the
1
Add a time flag
key to add a time flag
add
time flag schedule:
repeat
00:00
press
3
Add a time flag
to access the command selection screen
House
home
cinema
80s Rock
shutters
wake up
Select a command
select the area containing the command
4
press the icon of the command to be programmed
5
The screen describing the command is displayed.
Add a time flag
00:00
00:00
Select a time for your command
select the time flag programming schedule using the
2
navigation keypad
(left and right keys to switch between
hours and minutes, up and down keys to increase
or decrease)
House
UP
shutters
Page 22

go back to
contents
presentation glossary configuration control overview setting multimedia
22
If this does not involve a scene:
determine the command’s end status by pressing the
6
corresponding action button
press
7
to confirm
The time flag is added to the programme.
Programmes for 01/01/09
07 : 00
House : shutters : UP
add
00:00
repeat
Once all the time flags have been added, press
The new programme is identified by a colour code for the
relevant day.
Week of 01/01/09
T SM T W F S
Select a day using the browser
and validate to view the programme
Changing a time flag
To change a time flag:
Select the flag using the browsing keypad
1
Press
2
Deleting a time flag
To delete a time flag:
00:00
repeat
select the time flag using the navigation keypad
1
press
2
Page 23

go back to
contents
presentation glossary configuration control overview setting multimedia
23
Deleting a programme
select the highlighted day using the horizontal navigation
1
keys
Week of 01/01/09
T SM T W F S
Select a day using the browser
and validate to view the programme
repeat
press the
2
key
A message invites you to confirm the deletion.
00:00
Add a condition
No condition
press the
3
key to create a new condition
ajouter
The displayed screen lets you select the type of condition.
The SCHEDULE and In One by Legrand
conditions applied to a time flag let you postpone
or cancel the triggering of the time flag.
00:00
add
4.2 - Adding a condition
You can add conditions to the time flags, and also to triggers
when creating automations.
If you wish to add a condition to a time flag:
select a time flag using the vertical navigation keys
1
press the add condition key
2
To add a condition to a trigger (when automating),
just press the
key.
The existing conditions are displayed.
Add a condition
Type of condition
00:00
Schedule
In One by Legrand
Page 24

go back to
contents
presentation glossary configuration control overview setting multimedia
24
Adding a schedule condition
select the SCHEDULE type for the condition
1
press
2
enter the name of the condition
3
press
4
Winter condition
to confirm
to confirm
Start
End
Select a time slot
00:00
Winter condition
On: monday
tuesday
wednesday
thursday
friday
saturday
sunday
Select a day or days
No day is selected by default.
Press the days you wish to select.
press
8
select the period during which the condition is to apply using
9
the navigation keypad
to confirm
00:00
To programme an entire day, you must enter
00:00 to 23:59.
select the condition’s time slot using the navigation keypad
5
press
6
determine which days the condition is to apply to.
7
to confirm
Winter condition
Start date :
01/01/09 17/01/09
00:00
End date :
Select a periode
Page 25

go back to
contents
presentation glossary configuration control overview setting multimedia
25
10
press
to confirm
The condition is added. The screen then displays the new
condition in the list of existing conditions.
press the condition to add it to the time flag
11
Add a condition
No condition
Winter
Once the condition has been selected, you can:
12
press
- rename it by pressing the
- delete it by pressing the
to confirm
key,
key.
00:00
add
Add a condition
Delay
0h1
Cancel
select the action to be executed: delay using the arrows
13
or cancel
14
press
to confirm
The schedule condition is added to the time flag.
Programmes for 01/01/09
07 : 00 Postpone by 0h20 during Winter
House : shutters : UP
00:00
00:00
repeat
If the new condition is linked to a time flag, you
can then postpone or cancel the time flag.
add
Page 26

go back to
contents
presentation glossary configuration control overview setting multimedia
26
Adding an In One by Legrand condition
select the In One by Legrand type for the condition
1
press
2
The virtual keypad is displayed.
enter the name of the condition
3
press
4
The controller now asks you to start the learning procedure.
Day condition
to confirm
Press the LPB of the product
containing the sensor
or
enter the product ID
(engraved under the product cover)
00:00
Day condition
Dual switch
ID: 301401
Reference: 67204
Version: 1
select the desired unit using the vertical navigation keys
6
press
7
Day condition
to confirm your selection
Output 1
Status
Output 1 > Status
Output 2 > Status
OFF
00:00
00:00
press the product’s LEARN button or press the
5
and enter the product ID directly.
The product’s characteristics are displayed as soon as it has
been identified.
button
You can then select the value the product must reach to
trigger the command.
Page 27

go back to
contents
presentation glossary configuration control overview setting multimedia
27
select the product’s threshold value
8
press
9
The In One by Legrand condition is displayed.
Add a condition
No condition
00:00
Winter
day
add
select the condition to be added using the vertical navigation
10
keys
11
press
to confirm
Add a condition
Delay
0h1
Cancel
Select the action to be executed: delay using the arrows
12
or cancel
press
13
The In One by Legrand
to confirm
condition is added to
the time flag.
Programmes for
00:00
00:00
If the new condition is linked to a time flag, you
can then delay or cancel the time flag.
07 : 00 Delay by 0h20 during day
House : shutters : UP
repeat
add
Page 28

go back to
contents
presentation glossary configuration control overview setting multimedia
28
Deleting a condition from a time flag
select the time flag from which the condition is to be deleted
1
press
2
A message invites you to confirm the deletion.
4.3 - Repeating time flags
To repeat a time flag:
select the time flag
1
press the
2
Week of 01/01/09 > repeat the time flag(s)
repeat
key
00:00
Repetition:
Day
Week
Month
Year
Creating a DAY repetition
If you press DAY, you can repeat a programme for a certain
number of days. Just:
select how often the programme is to be repeated using the
1
navigation keypad
Week of 01/01/09 > repeat the time flag(s)
Repetition frequency:
Every day(s)
00:00
press
2
Page 29

go back to
contents
presentation glossary configuration control overview setting multimedia
29
Week of 01/01/09 > repeat the time flag(s)
00:00
End of repetition:
Never
On 01/01/09
After 1 repetition
select the desired repetition end
3
If the end date or the number of repetitions has to be
changed, press the
using the virtual keypad.
press
4
The programme repetition is shown in blue on the calendar
for the relevant days.
Creating a WEEK repetition
If you press WEEK, you can repeat a programme for a certain
number of days per week. Just:
select how often the programme is to be repeated using the
1
navigation keypad
press
2
The days of the week for which the programme is to be
repeated will be displayed.
to confirm
key and enter the repetition end
Week of 01/01/09 > repeat the time flag(s)
On: monday
tuesday
wednesday
thursday
friday
saturday
sunday
No day is selected by default.
If you wish to repeat the programme on certain
days, press the days you wish to select.
press
3
select the desired repetition end
4
If the end date or the number of repetitions has to be
changed, press the
using the virtual keypad.
press
5
The programme repetition is shown in blue on the calendar
for the relevant days.
key and enter the repetition end
00:00
Page 30

go back to
contents
presentation glossary configuration control overview setting multimedia
30
Creating a MONTH repetition
If you press MONTH, you can repeat a programme for a certain
number of days per month. Just:
select how often the programme is to be repeated using the
1
navigation keypad
press
2
Programmes for 01/01/09 00:00
repeat
add
press on the desired date(s) in the month or press on the
3
row and then the day of the week for which the programme
is to be repeated
Creating a YEAR repetition
If you press YEAR, you can repeat a programme for a certain
number of days per year.
select how often the programme is to be repeated using the
1
navigation keypad
press
2
select the desired repetition end
3
If the end date or the number of repetitions has to be
changed, press the
key and enter the repetition end
using the virtual keypad.
press
4
to confirm
A new repetition on a time flag that has already
been repeated will result in the previous repetition
being erased.
You can also repeat a programme.
The procedures are identical to those for
repeating time flags.
To repeat a programme:
select the week
1
select the day
2
press the
3
repeat
key
The repeated time flags are identified
by an icon
R
press
4
select the desired repetition end
5
If the end date or the number of repetitions has to be
changed, press the
key and enter the repetition end
using the virtual keypad.
press
6
The programme repetition is shown in blue on the calendar
for the relevant days.
4.4 - Assigning a new colour to a programme
In the display screen for the selected week,
select the desired day using the horizontal navigation keys
1
press the
2
The screen displays the available colourways.
key
Page 31

go back to
contents
presentation glossary configuration control overview setting multimedia
31
Day of 01/01/09 > change the colour 00:00
press the desired colour key
3
press
4
to confirm
The selected day has changed colour.
Week of 01/01/09
T SM T W F S
00:00
4.5 - Disable all the programmes
In the screen displaying the current month, press the key.
The calendar is disabled. Press the
key to reactivate it.
5 AUTOMATING COMMANDS
Commands can be automated.
Their operation depends on a trigger which can be linked to a
condition.
To automate a command, press on the Automations icon.
Areas
Automations
st
Commands
Supervision
Time
Preferences
00:00
monday january 1
Select a day using the browser
and validate to view the programme
repeat
Define your automations
The existing automations for each area are displayed.
Page 32

go back to
contents
presentation glossary configuration control overview setting multimedia
32
5.1 - Creating an automation
My automations 00:00
House
add
Adding an automation
select the area to which the automation is to be added using
1
the vertical navigation keys
press the
2
key
add
The virtual keypad is displayed.
enter the name of the automation
3
press
4
to confirm
Wake up automation 00:00
house
home
cinema
80s Rock
shutters
wake up
Select a command
press the icon of the desired command
5
The command’s status is displayed.
Wake up automation 00:00
UP
House shutters
select the command’s end status by pressing the
6
corresponding button
Page 33

go back to
contents
presentation glossary configuration control overview setting multimedia
33
This step does not appear for scene-type
commands.
press
7
Adding a trigger
Wake up automation 00:00
to confirm
UP
shutters
Trigger:
None
Condition:
None
Add a trigger 00:00
press
2
add
The virtual keypad is displayed.
enter the name of the trigger
3
press
4
Add a trigger
to confirm
add
00:00
press
1
You can rename the automation by pressing
the
key.
Press the LPB of the product
containing the sensor
or
enter the product ID
(engraved under the product cover)
Page 34

go back to
contents
presentation glossary configuration control overview setting multimedia
34
press the product’s LEARN button or press the
5
button
and enter the product ID directly
The product’s characteristics are displayed as soon as it has
been identified.
Add a trigger
Scenario switch
Action
00:00
Pushbutton 1
Pushbutton 2
Pushbutton 3
Pushbutton 4
select the values the trigger has to reach
6
press
7
Add a trigger
Sun
select the trigger
8
press
9
Once the trigger has been selected, you can:
- rename it by pressing the
- delete it by pressing the
00:00
add
key,
key.
The trigger is now linked to a command.
Page 35

go back to
contents
presentation glossary configuration control overview setting multimedia
35
Wake up automation 00:00
UP
shutters
If you don’t want to add a condition to the command, press
The automation is displayed in the area in which it has been
created.
My automations 00:00
Trigger:
Sun
Condition:
None
Selecting a trigger condition
The SCHEDULE and In One by Legrand
conditions applied to a automation let you trigger
the automation according to a specified value.
If you wish to add a condition to an automation,
press
Next, go to Section 4.2 Adding a condition.
5.2 - Deleting an automation
select the area in which the automation is located using the
1
navigation keys
select the automation using the navigation keypad
2
press
3
6 MANAGING SUPERVISORS
The supervisors keep you informed of the status of your
installation’s various sensors. These supervisors can also
trigger alerts.
House
wake up
To create supervisors, press the Supervision icon.
add
Page 36

go back to
contents
presentation glossary configuration control overview setting multimedia
36
Areas
Automation
st
Commands
Supervision
monday january 1
Define your supervised equipment
The displayed screen lets you:
create new supervisors
declare your supervisors as alert triggers
delete existing supervisors
My supervisors
Time
Preferences
00:00
00:00
6.1 - Adding a supervisor
select the area in which the supervisor is to be located using
1
the navigation keys
press
2
add
The screen used to select sensor types is displayed.
My supervisors
Select a sensor type for your supervisor
and press (ABC) to rename it.
select an icon to be assigned to the command using the
3
horizontal navigation keys
00:00
temperaturefreezer water
House
You can rename the icon by pressing the
key.
The product recognition screen is displayed.
add
Page 37

go back to
contents
presentation glossary configuration control overview setting multimedia
37
My supervisors
Press the LPB of the product
containing the sensor
or
enter the product ID
(engraved under the product cover)
press the product’s LEARN button or press the
4
and enter the product ID directly
My supervisors
Heating
selector
thermostat
ID: 64
Reference: 67442
Version: 11
No variable
Input > Preset
Input > Temperature preset
Input > Ambient temperature
00:00
button
00:00
select the input variable
5
press
6
The supervisor’s characteristics are displayed as soon as it
has been identified.
My supervisors 00:00
20°C
temperature
house
add
6.2 - Deleting a supervisor
select the area in which the supervisor is located using the
1
navigation keys
select the supervisor using the navigation keypad
2
press
3
6.3 - Managing alert triggers
Add a supervisor as an alert trigger
select the area in which the supervisor is located using the
1
navigation keys
select the supervisor using the navigation keypad
2
press
3
The icon identifies the supervisor as an alert trigger.
Page 38

go back to
contents
presentation glossary configuration control overview setting multimedia
38
My supervisors
RF detector
Detector
select the detector
4
select the desired action
5
press
6
The alert trigger is added.
Action
00:00
My supervisors 00:00
20°C
temperature
House
add
Delete an alert trigger
select the area in which the alert trigger is located using the
1
navigation keys
select the alert trigger using the navigation keypad
2
press
3
7 MANAGING SOURCES
To list the sources present on the Touchscreen Scenario
Controller:
press the
1
The second configuration screen is displayed.
key of the Settings tab
Page 39

go back to
contents
presentation glossary configuration control overview setting multimedia
39
Monday january 1
st
PlayersSources
Mediascene
Manage your sources
press the Sources icon
2
The list of declared sources is displayed.
My media sources
Dell 722
Playlists
00:00
00:00
press the
3
key to force the refresh action
If a source is no longer available, the name of
icon.
press the
4
this source is linked to the
The
icon is also linked to the settings tab.
key to quit this screen
8 MANAGING PLAYERS
To list the players present on the Touchscreen Scenario
Controller:
press the
1
The second configuration screen is displayed.
Monday january 1
key of the Settings tab
st
PlayersSources
Playlists
00:00
To refresh
your list
of sources,
press the arrow.
This list is usually refreshed automatically.
Mediascene
Manage your sources
press the Players icon
2
The list of players is displayed.
Page 40

go back to
contents
presentation glossary configuration control overview setting multimedia
40
My media players
To refresh
your list
of players,
press the arrow.
press the
3
players
press the
4
00:00
Sony DVD Player
key to force the refreshment of the list of
If a source is no longer available, the name of
this source is linked to the
The
icon is also linked to the settings tab.
icon.
key to quit this screen
9 MANAGING PLAYLIST
COMMANDS
Playlist commands are media commands that let you use media
players to relay playlists (sound, image, video) selected from a
source.
To access the menu from the Settings tab
press the
1
key of the Settings tab
The second configuration screen is displayed.
Monday january 1
st
playersSources
Mediascene
Manage your sources
:
00:00
Playlists
press the Playlists icon
2
The existing commands for each created area are displayed.
Page 41

go back to
contents
presentation glossary configuration control overview setting multimedia
41
My playlists commands 00:00
House
9.1 - Adding a playlist command to an area
To add a new playlist command to an area, just:
select an area using the
1
press the
2
key
add
The screen displays the available types of playlist.
keys
Monday january 1
addcut
press a playlist type to select it
3
st
SoundImage Video
Select a playlist type
00:00
A virtual keypad is displayed; this lets you enter the name
you wish to give to the playlist.
My playlist commands 00:00
Playlist 1
press
4
enter a new name
5
key to erase the current name
Page 42

go back to
contents
presentation glossary configuration control overview setting multimedia
42
press
6
to confirm
The source selection screen is displayed.
Holiday Playlist
Dell 722
House
holidays
Select a source
select your desired source
7
If the source is not available, the name of this
source is linked to the
icon.
00:00
Holiday Playlist
Videos summer 2008
House
holidays
Select a directory
to build your playlist
select a directory using the navigation keypad
9
(right and left keys)
10
press
to confirm
The destination player selection screen is displayed.
Holiday Playlist
00:00
00:00
press
8
to confirm
The directory selection screen is displayed.
House
Living room TV
Kitchen TV
holidays
Bedroom plasma TV
Select the destination
player
Page 43

go back to
contents
presentation glossary configuration control overview setting multimedia
43
select your desired destination player
11
If a player is not available, the icon is
linked to the Settings tab
12
press
to confirm
The playlist command is added.
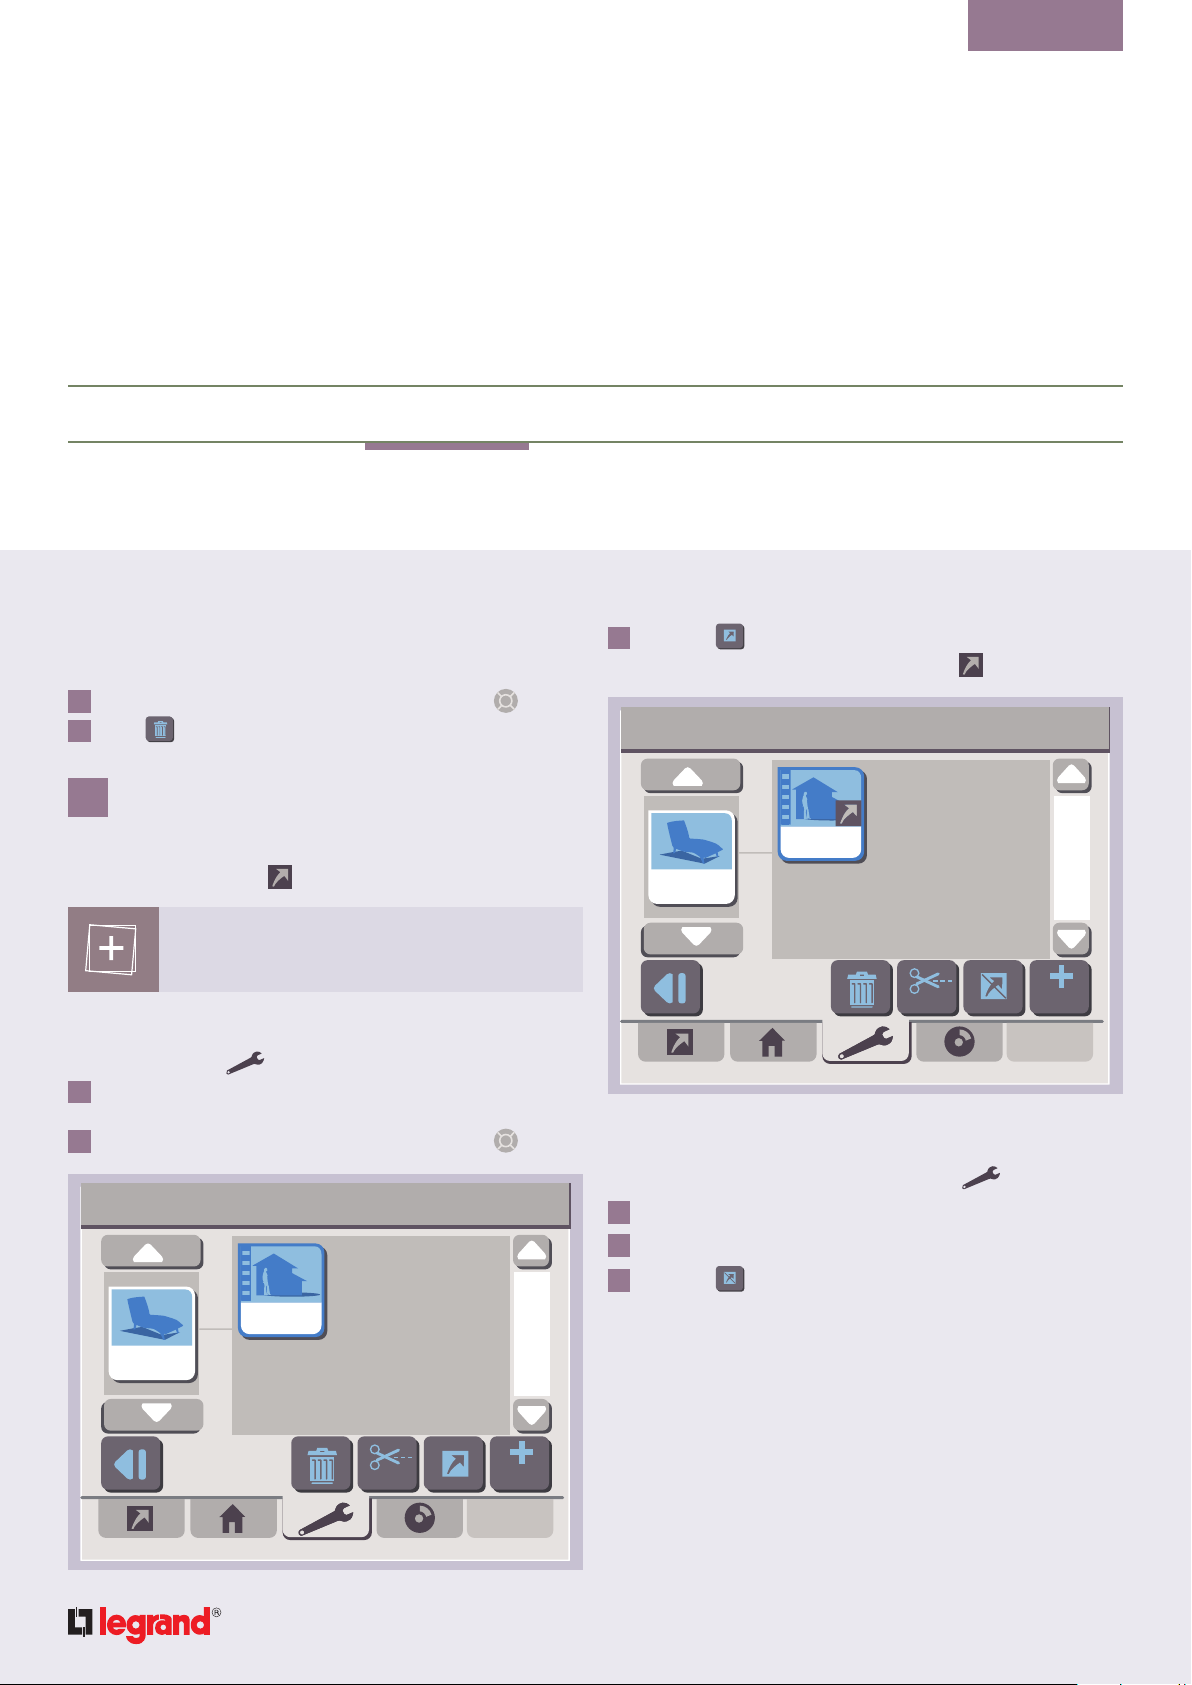
To move a command from one area to another,
refer to Section 2.3 - Moving a command from
one area to another.
A playlist command can be programmed
according to a schedule or automated.
Refer respectively to Section
4 - Scheduled programming and
5 - Automating commands.
If a playlist source or player is not available,
icon is linked to the playlist icon.
the
10 MANAGING MEDIASCENES
Mediascenes let you link a scene command to a playlist
command.
To access the menu from the Settings tab
press the
1
key of the Settings tab
The second configuration screen is displayed.
Monday january 1
st
PlayersSources
Mediascene
Manage your sources
:
00:00
Playlists
9.2 - Deleting a playlist command
To delete a playlist command, just:
select the command using the navigation keypad
1
press the
2
key
press the Mediascene icon
2
The existing mediascenes for each created area are
displayed.
Page 44

go back to
contents
presentation glossary configuration control overview setting multimedia
44
My mediascenes 00:00
House
cut add
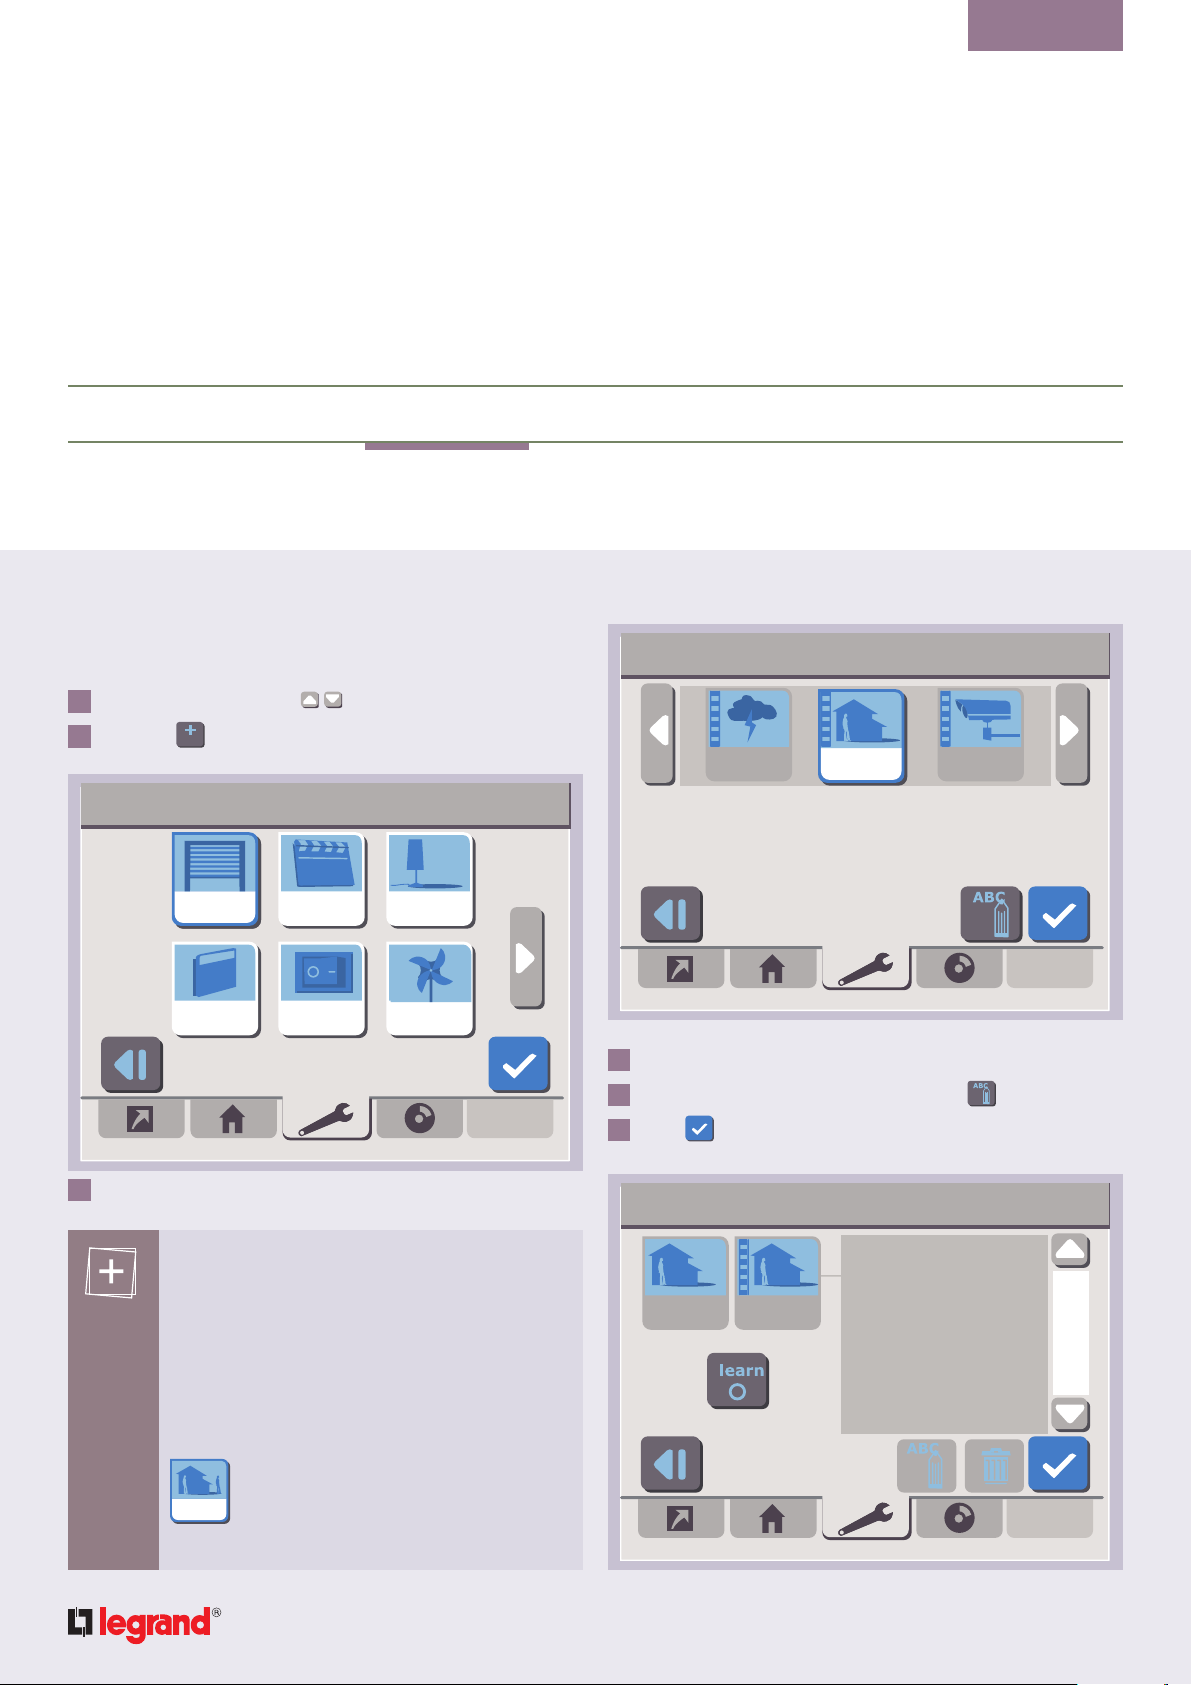
10.1 - Adding a mediascene to an area
To add a mediascene to an area, just:
select an area using the
1
press the
2
key
add
A virtual keypad is displayed; this lets you enter the name
you wish to give to a mediascene.
key
My mediascenes 00:00
mediascene 1
press the
3
enter the new name
4
press
5
key to erase the current name
to confirm
The mediascene configuration screen is displayed.
Wake up Mediascene 00:00
House Wake up
Scene:
None
Playlist:
None
Page 45

go back to
contents
presentation glossary configuration control overview setting multimedia
45
You can rename the mediascene by pressing the
key.
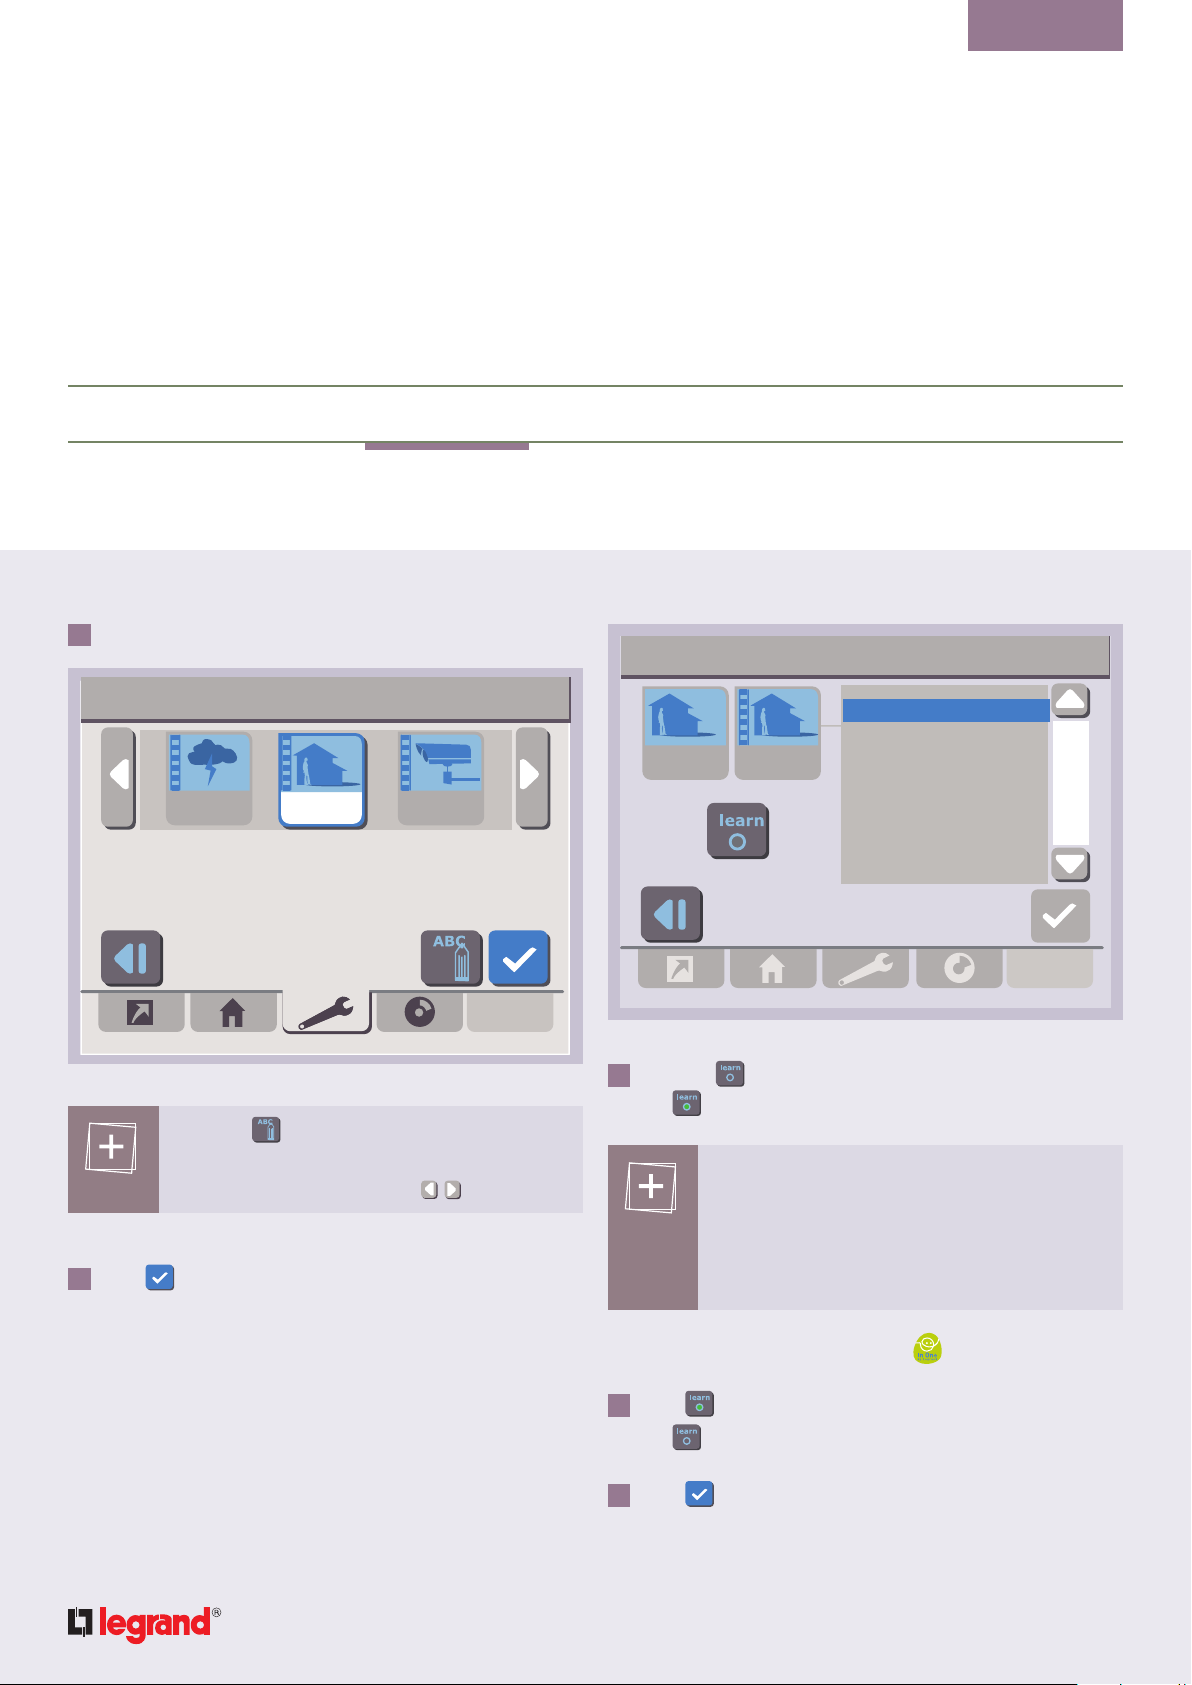
If no scene and/or playlist is available in the area
selected for the mediascene, the
inactivated.
Add a scene
press the
1
key
The list of scene commands available for this area is
displayed.
Select a command
Storm Wake up Alarm
Select a scene command
keys are
00:00
Wake up Mediascene 00:00
House Wake up
Add a playlist
press the
1
Scene:
Wake up
key
Playlist:
None
The list of playlists available for this area is displayed.
Select a playlist
00:00
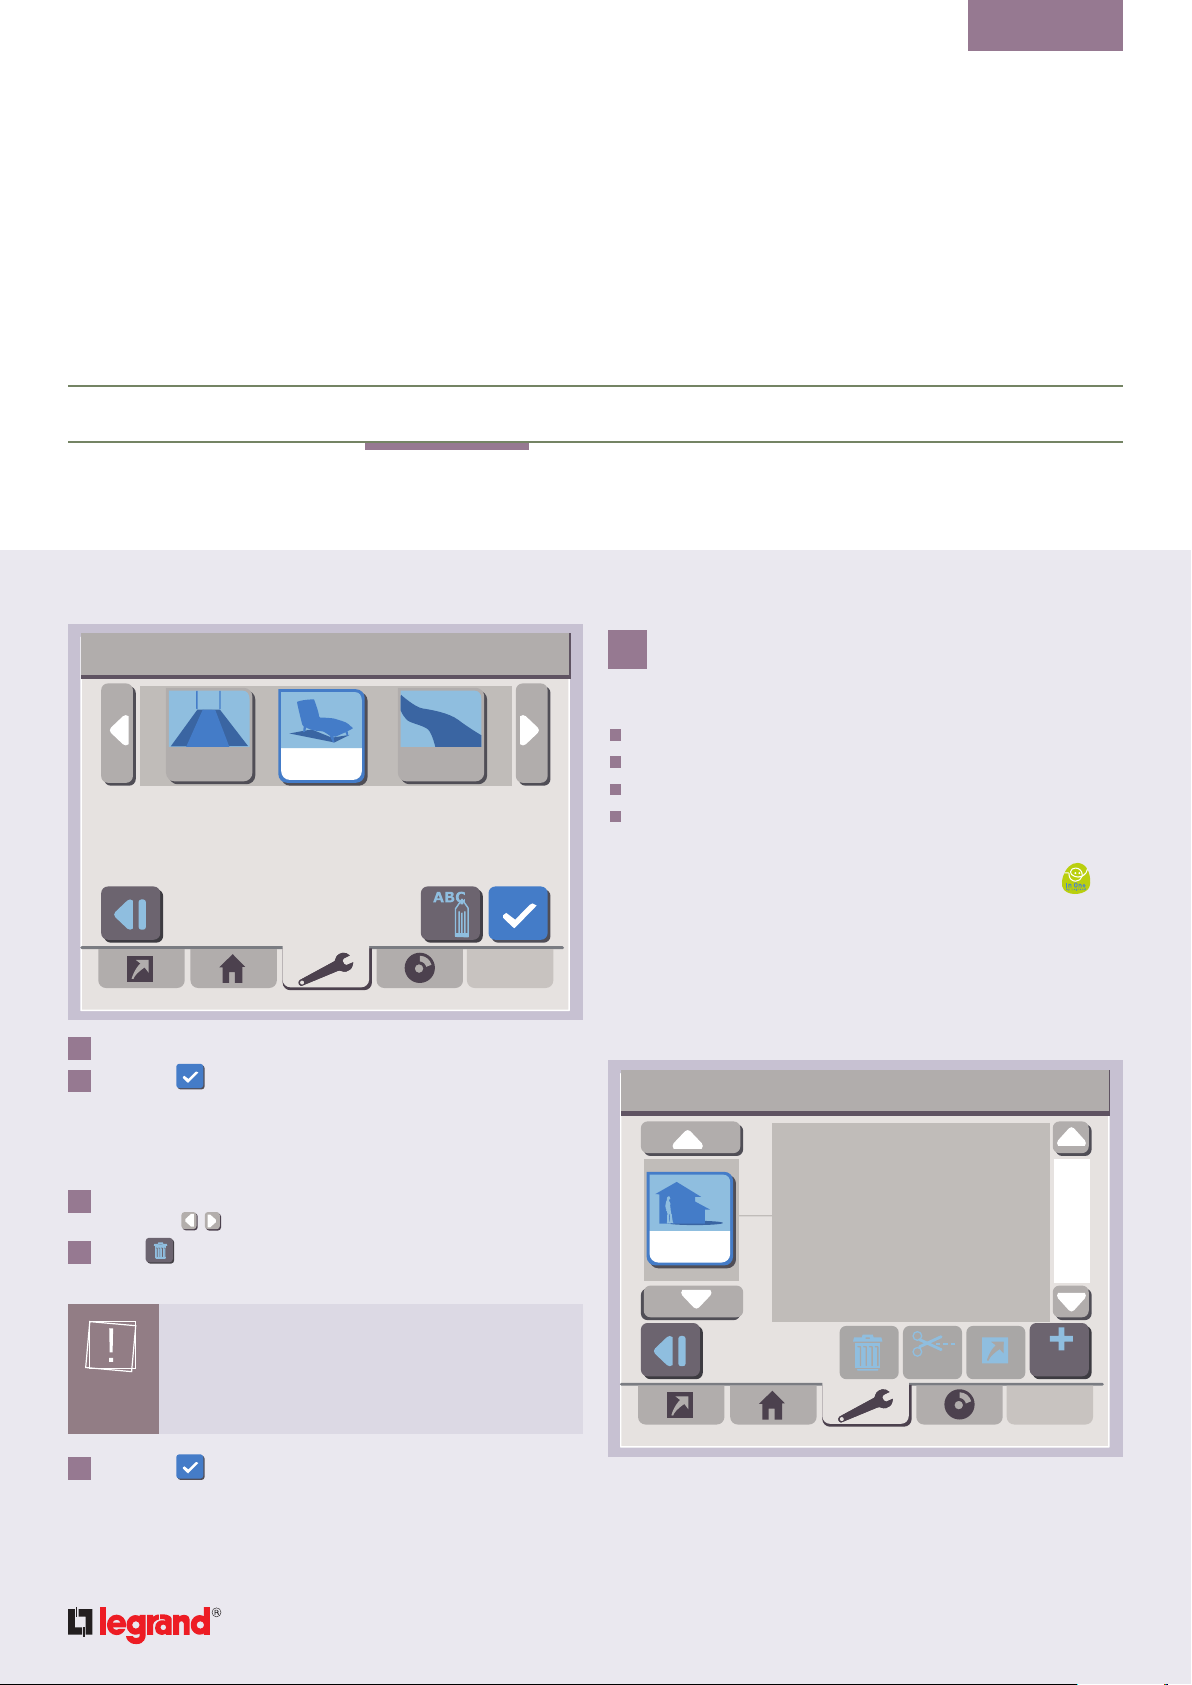
select the scene by placing it at the centre of the screen
2
using the
press the
3
keys
key to confirm
The scene is now linked to the mediascene.
Summer
album
80s Rock
Best off
Select a playlist
select the playlist by placing it at the centre of the screen
2
using the
keys
Page 46

go back to
contents
presentation glossary configuration control overview setting multimedia
46
press the
3
to confirm
The playlist is now linked to the mediascene.
Wake up Mediascene
Scene:
Wake up
press
4
House
Wake up
to confirm the creation of the mediascene
The play mode selection screen is displayed.
My mediascenes
Normal
Loop
House
Wake up
Shuffle
Repeat
Playlist:
80s rock
00:00
00:00
select the play mode using the navigation keypad
5
press
6
To move a command from one area to another,
refer to Section 2.3 - Moving a command from
one area to another.
You can also make a shortcut for a mediascene
on the home page.
Refer to Section 3 - Managing shortcuts.
A mediascene can be programmed according to
a schedule or automated.
Refer respectively to
Section 4 - Scheduled programming and
Section 5 - Automating commands.
If a playlist source or player linked to the
mediascene is not available, the
to the mediascene icon.
10.2 - Deleting a mediascene
To delete a mediascene, just:
select the command using the navigation keypad
1
press the
2
key
icon is linked
Choose your play mode
Page 47

IV / Control
functions
go back to
contents
TOUCHSCREEN SCENARIO CONTROLLER
CONTROL FUNCTIONS
Select the House tab to access the control functions of your
touchscreen scenario controller.
Scene-type commands can be added and
actuated directly from the Homepage tab
(see III.3 - Managing shortcuts).
monday january 1
House
Select an area and a command
st
home
cinema
80s Rock
shutters
wake up
00:00
monday january 1
Current status :
Press the key to display the command detail.
The status of each In One by Legrand product
making up the command is displayed.
47
st
shuttersHouse
00:00
1 CONTROLLING COMMANDS
To control a command:
if the command is not located in the house area, select an
1
area using the vertical navigation keys
The commands of the selected area are displayed.
press the icon of the desired command
2
The current status of the commanded product is displayed
(UP); you can use the action keys to change this status.
monday january 1
Shutters 1 - up
123456 - up
665544 - up
st
00:00
Page 48

go back to
contents
presentation glossary configuration control overview setting multimedia
48
2 DISPLAYING
SUPERVISOR STATUS
To display the supervisors for an area:
select an area
1
press the
2
The status of the supervisors is displayed.
monday january 1
key
st
temperature
House
smoke
20°C
00:00
3 DISABLING AN ALERT
When an alert is detected by an alert trigger, the controller
signals it by displaying a message that disables all the tabs.
monday january 1
House
Press this button to erase the alert
To erase the alert message, press the
st
00:00
natural gas
key.
To return to control mode, press the
key.
Page 49

V / Rapid
overview
go back to
contents
TOUCHSCREEN SCENARIO CONTROLLER
RAPID OVERVIEW
1 EXAMPLE 1: CREATING A ‘LEAVING’ SCENE COMMAND
Your problem
You are leaving your house for a prolonged period (i.e. a
week-end, holidays, etc.). You want to be able to leave your
house quickly, with the certainty of not forgetting anything:
shut the roller shutters
retract the awning
switch off all your light sources
put the CMV on low speed
STEP 1: creating a scene command
press the Settings tab
1
select
2
press the
3
press
4
Commands
add
scenes
key
The Legrand solution
You can create a ‘We’re leaving’ scene command.
You record all the products in the state you would like them
to be in when you leave your house.
When you leave, press
activate everything at once!
For each outdoor shutter
3
press the LEARN button of each command box
press the up button
For each of your light sources
4
press the LEARN button of each switch
press the switch off button
For the CMV
5
press the LEARN button of the command box
press the low speed button
When all the products have been recognised, their IDs and
statuses are displayed on the controller screen.
we go out
to launch this scene and
49
select the icon
5
we go out
STEP 2: recording the products
press the
1
For each roller shutter
2
press the LEARN button of each command box
press the down button
key on your controller
press the
6
The learning procedure is completed.
press
7
key on the controller
STEP 3: creating a scene shortcut
we go out
select the
1
press the
2
icon using the navigation keypad
key
Page 50

go back to
contents
presentation glossary configuration control overview setting multimedia
50
2 EXAMPLE 2: PROGRAMMING A HEATING COMMAND
ACCORDING TO TIME CONSTRAINTS
Your problem
During the week, you get up at 07:00 every morning.
You leave for work at 08:30 and get back at 19:00, but your
children stay at home on Wednesdays.
Your central heating installation consists of electric radiators
connected to power line carrier cable outputs.
You want the heating to switch on only when someone is in
the house and to switch off between 22:00 and the time you
get up in the morning.
STEP 1: creating a heating command
press the Settings tab
1
select
2
press the
3
press
4
Select the icon corresponding
5
to your central heating installation
Commands
add
heating
key
radiators
The Legrand solution
You can create a heating command and programme it
according to your time constraints:
every Monday, Tuesday, Thursday and Friday:
COMFORT from 06:45; switch to ECO at 08:30;
switch to COMFORT at 18:45; switch to ECO at 22:00.
every Wednesday, Saturday and Sunday:
COMFORT from 06:45; switch to ECO at 22:00.
When the programme is created, it takes over the
management of your central heating system.
STEP 2: recording the products
press the
1
For each cable output connected to the convectors:
press twice on the LEARN button
2
When all the products have been recognised, their IDs and
statuses are displayed on the controller screen.
press the
3
Follow the instructions displayed on the screen and wait for
the end of the learning procedure.
press
4
key on the controller
key on the controller
Page 51

go back to
contents
presentation glossary configuration control overview setting multimedia
51
STEP 3: programming the command for Mondays
select
1
press the desired week
2
press the day to be programmed (Monday)
3
press the
4
indicate 06:45 for the time of the first time flag,
5
then press the
press the icon
6
select the COMFORT mode and press
7
For the other schedules, proceed in the same way with:
08:30 for the second time flag (selecting the ECO mode)
18:45 for the third time flag (selecting the COMFORT mode)
22:00 for the fourth time flag (selecting the ECO mode)
Time
key to add a time flag
add
key to confirm
radiators
STEP 4: repeating the time flags
select the first time flag to be repeated (which starts at 06:45)
1
press
2
press WEEK
3
select a repetition frequency: every 1 week(s)
4
press
5
press
6
select NEVER for the repetition end and press
7
For the other schedules, proceed in the same way with:
for the 08:30 time flag: deselect Wednesday, Saturday,
Sunday
for the 18:45 time flag, deselect Wednesday, Saturday,
Sunday
for the 22:00 time flag, maintain all the selected days
repeat
Maintain the selected days.
Page 52

go back to
contents
presentation glossary configuration control overview setting multimedia
52
3 EXAMPLE 3: AUTOMATING AN ‘EVENING’ SCENE COMMAND
ACCORDING TO OUTDOOR LIGHT
Your problem
During the winter months, to ensure your peace of mind
when you get back in the evening you would like the blinds
to close and the lights to come on as soon as it gets dark.
You would like:
to close the roller blinds in the living room and the kitchen
switch on the ceiling lights in the living room and the
kitchen
Your presence is detected when you enter the house.
STEP 1: creating an ‘Evening’ scene command
press the Settings tab
1
select
2
press the
3
press
4
Commands
add
scenes
key
The Legrand solution
You can create a scene command to automatically close
the shutters and switch on the lights as soon as it gets dark
outside.
Define the In One by Legrand condition so that the
command is actuated if you are at home.
The scene is started when all the indicated conditions have
been fulfilled.
STEP 2: recording the products
press the
1
For each roller shutter in the living room and the kitchen:
press the LEARN button of the controlled products
press the down button
For each ceiling light in the living room and the kitchen:
press the LEARN button of each switch
press the ON button
When all the products have been recognised, their IDs and
statuses are displayed on the controller screen.
key on the controller
select the icon
5
evening
press the
2
The learning procedure is completed.
press
3
key on the controller
Page 53

go back to
contents
presentation glossary configuration control overview setting multimedia
53
STEP 3: creating the automation
press
1
press
2
name the automation ‘Evening’
3
select the command by pressing
4
Automations
add
evening
STEP 4: selecting the trigger
press
1
press
2
name the trigger: ‘Darkness’ and press
3
press twice on the LEARN button of the multifunction switch
4
connected to the light-sensitive switch
add
STEP 5: selecting the condition
press
1
press
2
select In One by Legrand and press
3
name the condition: ‘presence’ and press
4
press twice on the LEARN button of the automatic switch
5
Once this has been recognised:
select Detection and the value Action
6
press
7
select the created condition: presence and press
8
press the
9
add
key to confirm the creation of the automation
Once this has been recognised:
select input 1 and the value ON
5
press the
6
key to confirm
Page 54

go back to
contents
presentation glossary configuration control overview setting multimedia
54
4 EXAMPLE 4: CREATING A ‘WAKE UP’ MEDIASCENE
Your problem
During the week, you get up at 7.30 a.m. every morning.
On waking up, you would like:
the CMV in the bathroom to switch to high speed,
the roller shutters in the kitchen and living room to open.
You would also like to wake up to the sound of music.
STEP 1: Creating a ‘Wake up’ scene
press the Settings tab
1
select
2
press the
3
Commands
add
key
The Legrand solution
You can create a ‘Wake up’ scene command that lets you
control all the desired products.
You can create a ‘Wake up’ playlist.
Once these 2 commands have been created, you can link
them via a ‘Wake up’ mediascene that you programme to fit
in with your time constraints.
Once the programme has been created, the mediascene
runs automatically at the desired times.
For the CMV
press the LEARN button of the remote control box
1
press the high-speed button
2
Once all the products have been recognised, their identifiers
and statuses are displayed on the controller’s touchscreen.
press
3
The learning procedure is completed.
key on the controller
press
4
select the
5
press
6
press the
7
press the LEARN button of the command box
8
scenes
wake up
icon
key on your controller
for each roller shutter
press the
9
button
press
4
Page 55

go back to
contents
presentation glossary configuration control overview setting multimedia
55
STEP 2: Creating a ‘Wake up’ playlist command
select
1
press the
2
press
3
name the ‘Wake up’ playlist
4
press
5
select a Source then press
6
select a Directory then press
7
select Player then press
8
Playlists
add
sound
key
STEP 3: Creating a ‘Wake up’ mediascene
select
1
press the
2
name the ‘Wake up’ playlist
3
press
4
key
add
to select a scene
STEP 4: Programming the command
select
1
press the desired week
2
press the day to be programmed (Monday)
3
press the
4
indicate 07:30 as time flag and press
5
press the
6
press
7
select a Week
8
select a repeat frequency every week and press
9
deselect Saturday and Sunday
10
press
11
select ‘NEVER’ for the repetition end and press
12
Time
key to add a time flag
add
wake up
icon
key to repeat the time flag
repeat
select the scene
5
press
6
select a playlist
7
press
8
select the Normal play mode, then press
9
to select a Playlist
wake up
wake up
Page 56

VI / Setting
functions
go back to
contents
TOUCHSCREEN SCENARIO CONTROLLER
SETTING FUNCTIONS
This section presents the possibilities for changing the following
settings:
language
date and time
standby
network configuration
updating
information
screen calibration
brightness
To access these setting functions, select the Settings tab
and press the Preferences icon.
monday january 1
st
00:00
1 LANGUAGE
To modify the language of the interface:
place the Language icon at the centre of the screen using
1
keys to select it
the
My preferences
units language date/time
Select your language
56
00:00
Areas
Automations
Define your preferences
Commands
Supervision
Time
Preferences
press
2
press the desired language to select it
3
French (France)
English (United States)
press
4
Page 57

go back to
contents
presentation glossary configuration control overview setting multimedia
57
2 DATE AND TIME
2.1 - Changing the date and time
To change the device’s date:
place the Date/time icon at the centre of the screen using
1
the
keys to select it
press
2
The input screen is displayed.
My preferences > set the date and time
Date : Time :
01/01/09 15:30
(GMT-08:00) Pacific Time
The automatic time change is inactive
00:00
2.2 - Activating/disabling the automatic time
change
The automatic time change from summer time to
winter time is activated by default.
To disable the automatic time change, press the button.
The controller will have to be restarted to take account of the
change.
2.3 - Synchronise product clocks
press
1
create the link with the products to synchronise
2
choose time of synchronisation using the navigation keypad
3
Validate
4
to select the products to synchronise
Press to disable synchronisation.
indicate the date and current time using the navigation
3
keypad
press
4
Page 58

go back to
contents
presentation glossary configuration control overview setting multimedia
58
3 STANDBY
To change the device’s standby setting:
select the Standby icon by placing it at the centre of the
1
screen using the
press
2
The input screen is displayed.
My preferences > standby My preferences > network connection
keys
00:00 00:00
4 NETWORK CONFIGURATION
To change the device’s network configuration:
select the Network icon by placing it at the centre of the
1
screen using the
press
2
keys
10.2.46.42
00:30
IP address allocated by DHCP
Fixed IP address
Set screen standby
Select a connection type
select the standby time using the navigation keypad
3
press
4
Page 59

go back to
contents
presentation glossary configuration control overview setting multimedia
59
5 UPDATING
To modify the update settings:
select the Update icon by placing it at the centre of the
1
screen using the
press
2
My preferences > update
Via Ethernet
Via USB (technical assistance)
keys
Select an update type
00:00
My preferences > FTP update
New version available,
proceed with update?
press
6
My preferences > update
00:00
00:00
Downloading...
confirm the selection Via Ethernet
3
The virtual keypad is displayed.
enter the password: XWQRZE
4
press
5
Page 60

go back to
contents
presentation glossary configuration control overview setting multimedia
60
6 INFORMATION
To display general information about the controller:
select the Information icon by placing it at the centre of the
1
screen using the
press
2
The information screen is displayed.
My preferences > In One Controller 00:00
keys
ID:
Product version:
Firmware version:
Catalog version:
555555
11
3.0
1.28
7 CALIBRATING
THE TOUCHSCREEN
To calibrate the controller’s touchscreen, and re-establish a
proper display, just select the Calibration command.
My preferences > calibrating the touchscreen 00:00
Press the square displayed on the
screen to start the setting procedure
To validate calibration, press the cross-mark
New calibration settings have been mesured.
30 seconds to cancel saved data and keep the current settings.
To validate, press the touchscreen.
Tap the creen to register saved data.
Time limit : 30 sec.
Page 61

go back to
contents
presentation glossary configuration control overview setting multimedia
61
8 BRIGHTNESS
To adjust the backlighting level of the Scenario Controller, just
select the Brightness command.
My preferences > adjust the brightness My preferences > units
Set the touchscreen’s
brightness level
Press
to confirm the brightness setting.
00:00 00:00
9 UNITS
To reassign a unit:
Unit 1
Unit 2
Unit 3
Unit 4
Unit 5
Select unit
1
Choose the new command with the
2
CommandUnits List
scenes
keys
Page 62

go back to
contents
presentation glossary configuration control overview setting multimedia
62
My preferences > units
00:00
CommandUnits List
Unit 1
Unit 2
Unit 3
Unit 4
Unit 5
Select by pressing the icon
3
dimming
Proceed in the same way for all units you wish to reassign.
Press
4
to validate
unit 1: a command is using this unit,
reassignment impossible
By default, units are assigned as follows:
- 1 to 20: scenes
- 21 to 35: switch
- 36 to 50: shutters
- 51 to 65: departure
- 66 to 80: dimming
- 82: Occupancy
- 83 to 85: ambient
- 86 and 87: CMV
Reassignment allows to modulate units as
required.
E.g.: 5 light switches and 25 scenes.
Page 63

VII / Multimedia
control
go back to
contents
TOUCHSCREEN SCENARIO CONTROLLER
MULTIMEDIA CONTROL
This tab lets you play playlists on multimedia players on an ad
hoc basis. These playlists are not recorded as commands.
To access this functionality,
press the Multimedia control tab
Play:
st
Select a playlist
00:00
monday january 1
Playlists Players
1 SELECT A PLAYLIST
press the Playlists icon
1
My playlist commands
SoundImage Video
Select a playlist type
63
00:00
select a playlist type by pressing on the relevant icon
2
The list of available sources is displayed.
Page 64

go back to
contents
presentation glossary configuration control overview setting multimedia
64
monday january 1
st
Dell 722
Playlists
Players
Select a source
select a server
3
press
4
to confirm
The directory selection screen is displayed.
monday january 1
st
Holidays
Jean
Playlists
Players
Trip to Paris
00:00
00:00
To view sub-directories, just press on the ‘right’
key of the navigation keypad
you go back to the directories).
press
6
to confirm
The following screen is displayed.
monday january 1
Playlists
st
Players
Play:
Select a player
You can now select a destination player.
(the left key lets
00:00
select a directory
5
Select a directory
to build your playlist
Page 65

go back to
contents
presentation glossary configuration control overview setting multimedia
65
2 SELECTING A PLAYER
press the Players icon
1
The screen displays the available players.
monday january 1
Playlists Players
select the desired player
2
press
3
The playlist is now ready to run.
st
Living room TV
Bedroom plasma TV
Select the destination player
to confirm
00:00
monday january 1
Playlists Players
Play:
normal
st
00:00
Page 66

www.legrandgroup.com
128, av. du Maréchal-de-lattre de Tassigny
87045 Limoges Cedex - France
Tél. 33 555 068 787
Fax : 33 555 061 341
LE00282AC
 Loading...