

Page 1
Keypad connector with display
Part. U3289A - 11/08-01 PC
User manual
5739 46
5739 47
Page 2

Page 3

Contents
UK
Introduction 1. 5
The Keypad connector with display ■ 6
■ 7
The keypad
Navigation keys ✔ 7
The display
■ 7
✔ 7
Main screen
In case of an alarm ✔ 7
Settings menu ✔ 7
What is the display showing? ■ 8
Operation 12. 1
Accessing the functions with concealment enabled 1 ■ 2
Enabling - disabling the burglar alarm 1 ■ 2
With user code 1 ✔ 2
With transponder key 1 ✔ 3
Activation scenarios 1 ■ 3
Activating - deactivating the zones 1 ■ 4
With user code 1 ✔ 4
With transponder key 1 ✔ 5
■ 6
Stopping the siren sound 1
With user code 1 ✔ 6
With transponder key 1 ✔ 6
Activating the robbery alarm 1 ■ 7
What type of alarm occurred? 1 ■ 8
Editing 13. 9
The connector menu 2 ■ 0
■ 0
Accessing the settings menu 2
Setting the date and hour 2
■ 1
Adjusting the contrast 2
■ 2
Disabling the buzzer 2
■ 3
■ 4
Activating concealment mode 2
Page 4

Page 5

Introduction
The Keypad connector with displa ■ y
■ d
The keypa
Navigation key ✔ s
The displa ■ y
Main scree ✔ n
In case of an alar ✔ m
Settings men ✔ u
What is the display showing ■ ?
1
Page 6
1 - Introduction
The keypa d connector with d isplay can be used to ar m and disarm the
burglar al arm system, t o activate the v arious zone s based on the cur rent
needs, or to activate one of the division scenarios programmed on
the burgla r alarm control unit. I t is also possible to obt ain information
on the status of the sys tem and to disp lay the alarm events saved by
the Control unit.
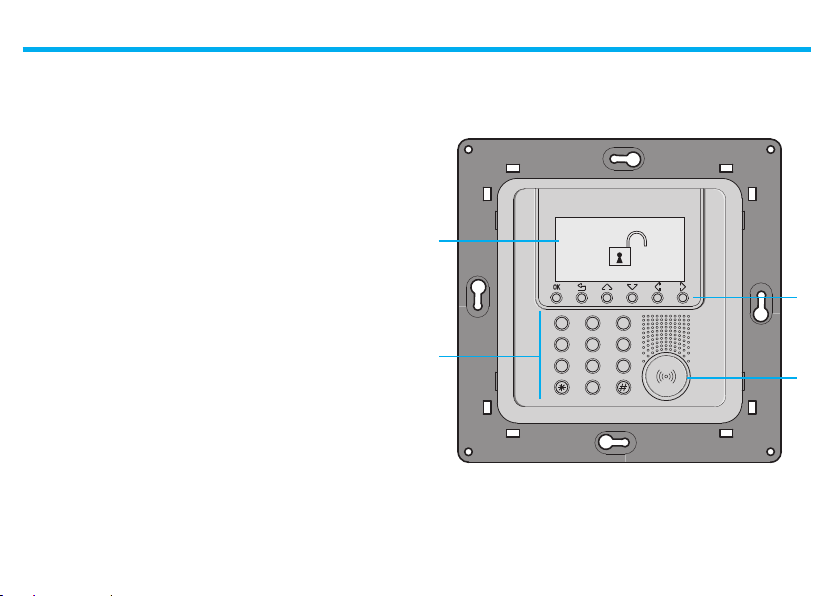
The Keypad connector with display ■
1
4
1 - Graphic display
2 - Numeric keypad
6
OK
123
56
4
987
0
3 - Transponder keys reader
4 - Numeric keypad
2
3
Page 7
1 - Introduction
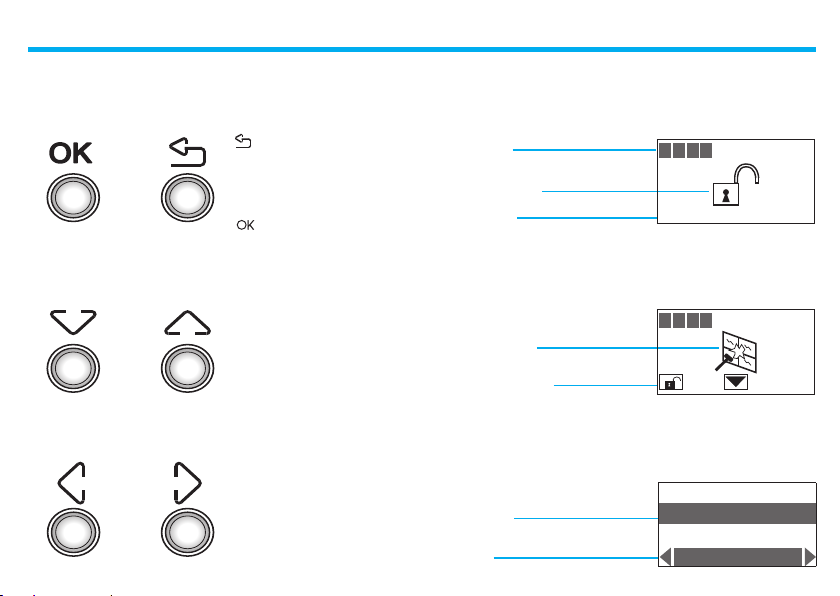
The keypad ■
Navigation keys ✔
- Key for cancelling the
selection and for returning to
the previous page – if it is held
down, you can escape from the
programming menu
- Tasto di conferma della
selezione o dei dati i nseriti
The display ■
Main screen ✔
System zones
ON/OFF indication
Date and hour
1 2 3 4
In case of an alarm ✔
Scroll keys
allow you to scroll the list of items
in the menu
Alarm signal zone
Technical indications
1 2 3 4
Settings menu ✔
Selection keys
allow you to select the functions,
which in some menus, may appear in the last line
Selected item
Functions
7
Language
Address
Concealment
English
Page 8
1 - Introduction
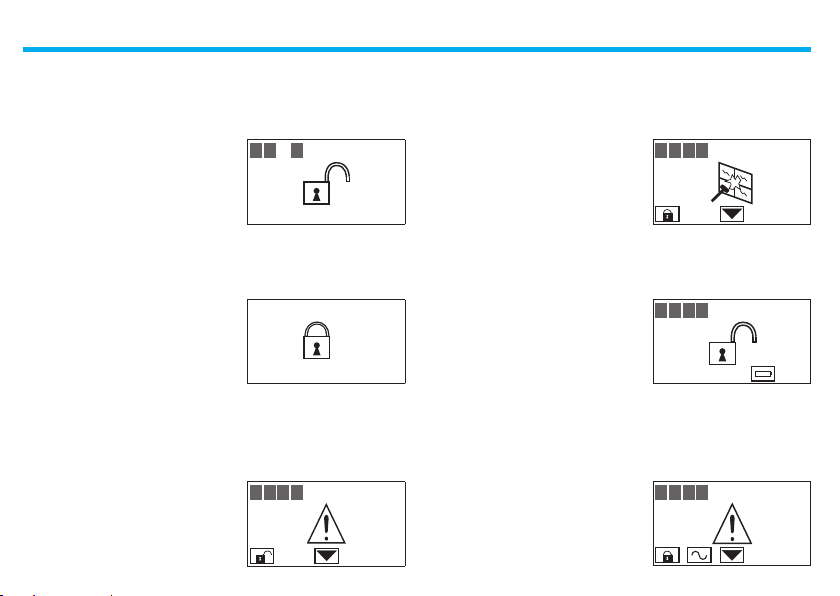
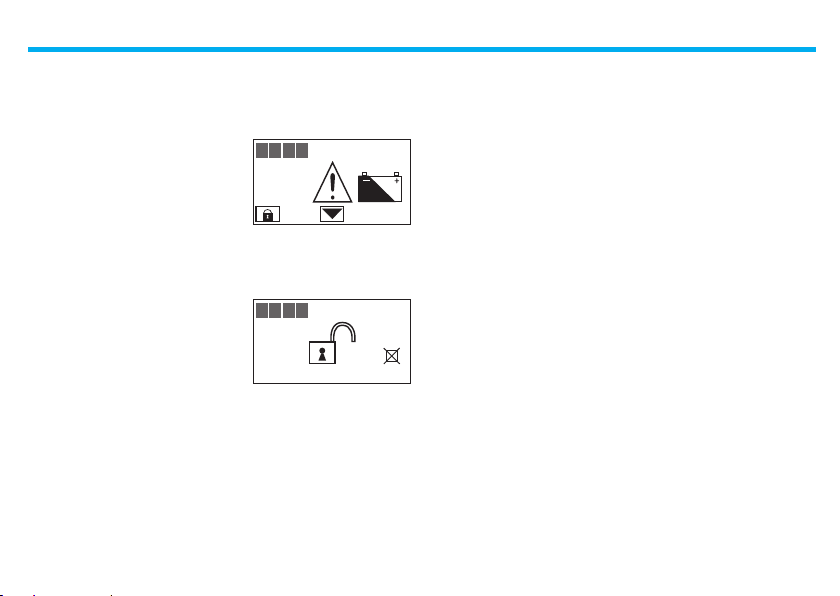
What is the display showing? ■
System o , e.g.: zones 1, 2, 4 active
System on, e.g.: zone activation as
in scenario 2
System o , general alarm signal,
tamptest with system switched
OFF or a dead radio device battery
1 2 3 4
15/11/08 14:23
scenario 2
15/11/08 14:23
1 2 3 4
System on, intrusion alarm signal
System o , Unit battery dead or
damaged
System o , no power
8
1 2 3 4
1 2 3 4
1 2 3 4
Page 9
1 - Introduction
System o , Burglar-alarm
(antitheft) battery dead or
damaged and technical alarm
signal
System o , one or more sensors
disabled (Important Unit functions
are disabled; disable only if
extremely necessary)
1 2 3 4
1 2 3 4
15/11/08 14:25
9
Page 10

1 - Introduction
10
Page 11

Operation
Accessing the functions with ✔
concealment enabled
Enabling - disabling the burglar ■
alarm
With user cod ✔ e
With transponder ke ✔ y
Activation scenario ■ s
■
Activating - deactivating the
zones
With user cod ✔ e
With transponder ke ✔ y
Stopping the siren soun ■ d
With user cod ✔ e
With transponder ke
✔ y
Activating the robbery alar ■ m
■ ?
What type of alarm occurred
2
Page 12

2 - Operation
Accessing the functions with concealment ■
enabled
The Concealment function can be used to prevent displaying of the system status to anyone without a user code or an enabled transponder.
When the Concealment function is
active, the display shows the Logo
To access the connector menu
press
Code/Key
*
Enter the user code (default 00000), or
an enabled numeric code, or place an
enabled transponder near the reader
for four seconds
If the code is correct, it will be possible
to access the start page. If no keys
are pressed for 10 seconds, the
concealment screen will reappear
Code/Key
* * * * *
1 2 3 4 –– –– –– ––
15/11/08 15:01
Enabling - disabling the burglar alarm ■
With user code ✔
When the burglar alarm (antitheft) is
disabled, an open lock appears in the
middle of the display
Press the key
Type in the user code (basic 00000) or
an enabled numeric code; typing an
incorrect code, after the third attempt the
keypad blocks for about 1 minute
The display will show a closed lock;
if the sound system is enabled, you
will hear an “enabled” vocal message;
execute the same operation to disable
the burglar alarm
12
1 2 3 4
15/11/08 15:02
123
56
4
987
0
1 2 3 4
15/11/08 15:02
Page 13

With transponder key ✔
When the burglar alarm (antitheft) is
disabled, an open lock appears in the
middle of the display
1 2 3 4
15/11/08 15:03
2 - Operation
Activation scenarios ■
It is possible to activate one of the zone division scenarios saved on the
Burglar Alarm Control Unit
1 2 3 4
15/11/08 15:04
To activate the alarm press
on the connector, and place the key at
a distance of less than one centimetre
from the reader for two seconds
The display will show a closed lock;
if the sound system is enabled, you
will hear an “enabled” vocal message;
execute the same operation to disable
the burglar alarm
or
123
56
4
987
0
1 2 3 4
15/11/08 15:03
Use the keys to select the scenario
you want
After con rmation, on ly the zones
include d in the selecte d scenario will
be activated
Con rm the selection using the user
code, a transponder key or a numeric
code
13
Night
15/11/08 15:05
123
4
56
987
0
Page 14

2 - Operation
Activating - deactivating the zones ■
You can deactivate (reactivate) one or more zones at any time. This
will allow you to personalise the burglar-alarm operation according to
your needs.
For instance, if you want to have protection even if you’re not at home,
you can deactivate the infrared detector zones, leaving the outer zones
(entrance door and windows) active. This will allow you to move around
freely inside your house without making any alarms go on and without
giving up safety.
The zones in which your burglar alarm is split into appear in the rst
line of the display.
The active zones are shown in a dark box.
The following example shows the system made up of 4 zones, all active;
zone 3 is deactivated.
With user code ✔
The zones (max. 4) of the system are all
active (e.g. 1-2-3-4)
Press the corresponding key on the Unit
keypad to deactivate zone 3
Press the key
Type in the user code (basic 00000) or
an enabled numeric code
1 2 3 4
15/11/08 15:05
3
123
56
4
987
0
The display shows zone 3 without the
dark box (deactivated)
14
1 2 3 4
15/11/08 15:05
Page 15

With transponder key ✔
The zones (max 4) of the system are all
active (e.g. 1-2-3-4)
2 - Operation
1 2 3 4
15/11/08 15:06
Press the corresponding key on the Unit
keypad to deactivate zone 3
Con rm the operation by bringing a
transponder near the reader within 5
seconds
The display shows zone 3 without the
dark box (deactivated)
3
123
56
4
987
0
1 2 3 4
15/11/08 15:06
15
Page 16

2 - Operation
Stopping the siren sound ■
If the alarm goes on while you’re there, you can stop the siren as
follows:
With user code ✔ With transponder key ✔
Make sure there are no trespassers in
the house
1 2 3 4
Make sure there are no trespassers in
the house
1 2 3 4
Press the key
Type in the user code (basic 00000) or
an enabled numeric code
The siren stops; the Unit answers with
the vocal message “disabled”
123
56
4
0
1 2 3 4
Press the or key on the Unit
keypad and then bring the key (less
than one centimeter) near the reader
for 2 seconds
987
The siren stops and the burglar alarm
system is deactivated
16
1 2 3 4
123
56
4
987
0
Page 17

Activating the robbery alarm ■
In case of robbery, it is possible to deactivate the burglar alarm system,
while at the same time sending the emergency calls to the numbers
saved in the Control Unit
1 2 3 4
15/11/08 15:09
followed by
Press
2 - Operation
Enter the user code (default 00000)
or another enabled numeric code
The burglar alarm is disarmed, the
Control Unit starts making the
emergency calls in a totally silent way
123
56
4
987
0
1 2 3 4
15/11/08 15:09
17
Page 18

2 - Operation
What type of alarm occurred? ■
When an alarm signal is displayed, you can nd out what type it is (intrusion, technical, etc.) and which detector has detected it; a name has been
given to each detector (kitchen window, entrance, etc.) by the installer for
easier identi cation. Press just one key to get this information.
1 2 3 4 1 2 3 4
The Unit has detected an alarm...
In case of a technical alarm (its symbol appears), you can nd out which
device has produced the alarm and reset it as well.
The Unit has detected a technical alarm
To learn more, press the
The display provides the following information:
- detector and its name (living room window)
- type of alarm (intrusion)
- burglar-alarm (antitheft) status when
the alarm goes on (ON-inserted)
The alarm noti cation is cancelled from
the display when the burglar alarm
system is rearmed. It is however saved
in the “Event Memory” of the Burglar
Alarm Control Unit
key
32: IR sensor
Living room window
Intrusion Alarm
Inserted
123
56
4
987
0
To learn more, press the
The display provides the following
information:
- device name (remote assistance)
- type of alarm (technical start)
- burglar-alarm (antitheft) status when
the alarm goes on (OFF-disconnected)
By pressing the key, a page appears, which lets you reset a single alarm
or execute a total reset
18
42: riceiver
Remote Assistance
Start Technical
Disconnected
Press:
reset single
reset total
Page 19

Editing
The connector men ■ u
■ u
Accessing the settings men
■ r
Setting the date and hou
■ t
Adjusting the contras
■ r
Disabling the buzze
■
Activating concealment mode
3
Page 20

3 - Editing
The connector menu ■
In this manual we felt it would be appropriate to explain all the customisation functions that may be useful when using the connector. These
functions can be easily accessed without any risks of compromising the
correct operation of the Control Unit, and therefore without jeopardising
home security.
We recommend that one always seeks advice from the system installer
before changing in any way the con guration of any of the functions of
the Control Unit not included in this manual.
Accessing the settings menu ■
This procedure is necessary to access the settings menu:
Ensure that the system is disarmed
Press
Enter the user code, or use the
transponder key in the same way as if
arming the burglar alarm system
It is now possible to start customising
the connector
To exit the settings menu wait for 30 seconds without pressing
any keys or press .
20
1 2 3 4
15/11/08 15:13
123
4
56
987
0
Language
Address
Concealment
English
Page 21

Setting the date and hour ■
In order for the system to constantly keep all memorised events under
control, it is important to set the correct date and hour.
The new Date and Hour settings will also be sent to the Control Unit.
3 - Editing
Access the settings menu
Select Date and hour with the
key
to enter
Press
Code/Key
Language
Concealment
Concealment
Date and hour
*
Address
English
Address
Modify
next
Type in the current hour and date on
the keypad; you can move the cursor
from the hour line to the date line with
the
key
When all data has been entered, press
to con rm
0 0 : 0 0
0 1 / 0 1 / 0 8
01/01/00 00:00
1 2 : 3 7
2 8 / 1 1 / 0
01/01/00 00:00
Address
Concealment
Date and hour
Modify
8
21
Page 22

3 - Editing
Adjusting the contrast ■
This function can be used to adjust the contrast of the display screen
for optimum view.
Accessing the settings menu
Use the
Use the
Press
keys to select Contrast
keys to adjust Contrast
to con rm
The display will show “in execution” for
Code/Key
* in progress...
Language
Address
Concealment
English
Concealment
Date and hour
Contrast
––– LCD +++
next
a few second, after which the previous
page is displayed
The new contrast settings have now
been saved
22
Concealment
Date and hour
Contrast
––– LCD +++
Page 23

Disabling the buzzer ■
The operations performed using the connector (pressing the keys,
arming the system etc.) are con rmed acoustically by the built in
buzzer.
The following procedure can be used ot disable the buzzer.
3 - Editing
Go to the settings menu
Using the
If the function is enabled, the last row of
the display shows Disable
Press
keys to select Buzzer.
to con rm
Code/Key
Language
Concealment
Date and hour
Contrast
*
Address
English
Buzzer
Disable
next
The display will show “in execution” for
a few second, after which the previous
page is displayed
The buzzer is disabled.
The last row of the display shows
Enable
23
in progress...
Date and hour
Contrast
Buzzer
Enable
Page 24

3 - Editing
Activating concealment mode ■
This function can be used to prevent displaying of the system status to
anyone without a user code or an enabled transponder.
Go to the settings menu
Use the
Concealment
Press
keys to select
to con rm
Concealment
Concealment
Code/Key
*
Language
Address
English
Language
Address
Enable
next
The display will show “in execution” for
a few second, after which the previous
page is displayed
The Concealment function is now
enabled
24
in progress...
Language
Address
Concealment
Disable
Page 25

Notes
25
Page 26

Notes
26
Page 27

Page 28

World Headquarters and
International Department
87045 LIMOGES CEDEX FRANCE
: 33 5 55 06 87 87
Fax : 33 5 55 06 74 55
www.legrandelectric.com
Installer stamp
reserves at any time the right to modify the contents of this booklet and to communicate, in any form
Legrand
and modality, the changes brought to the same.
 Loading...