

Page 1
Page 2
2
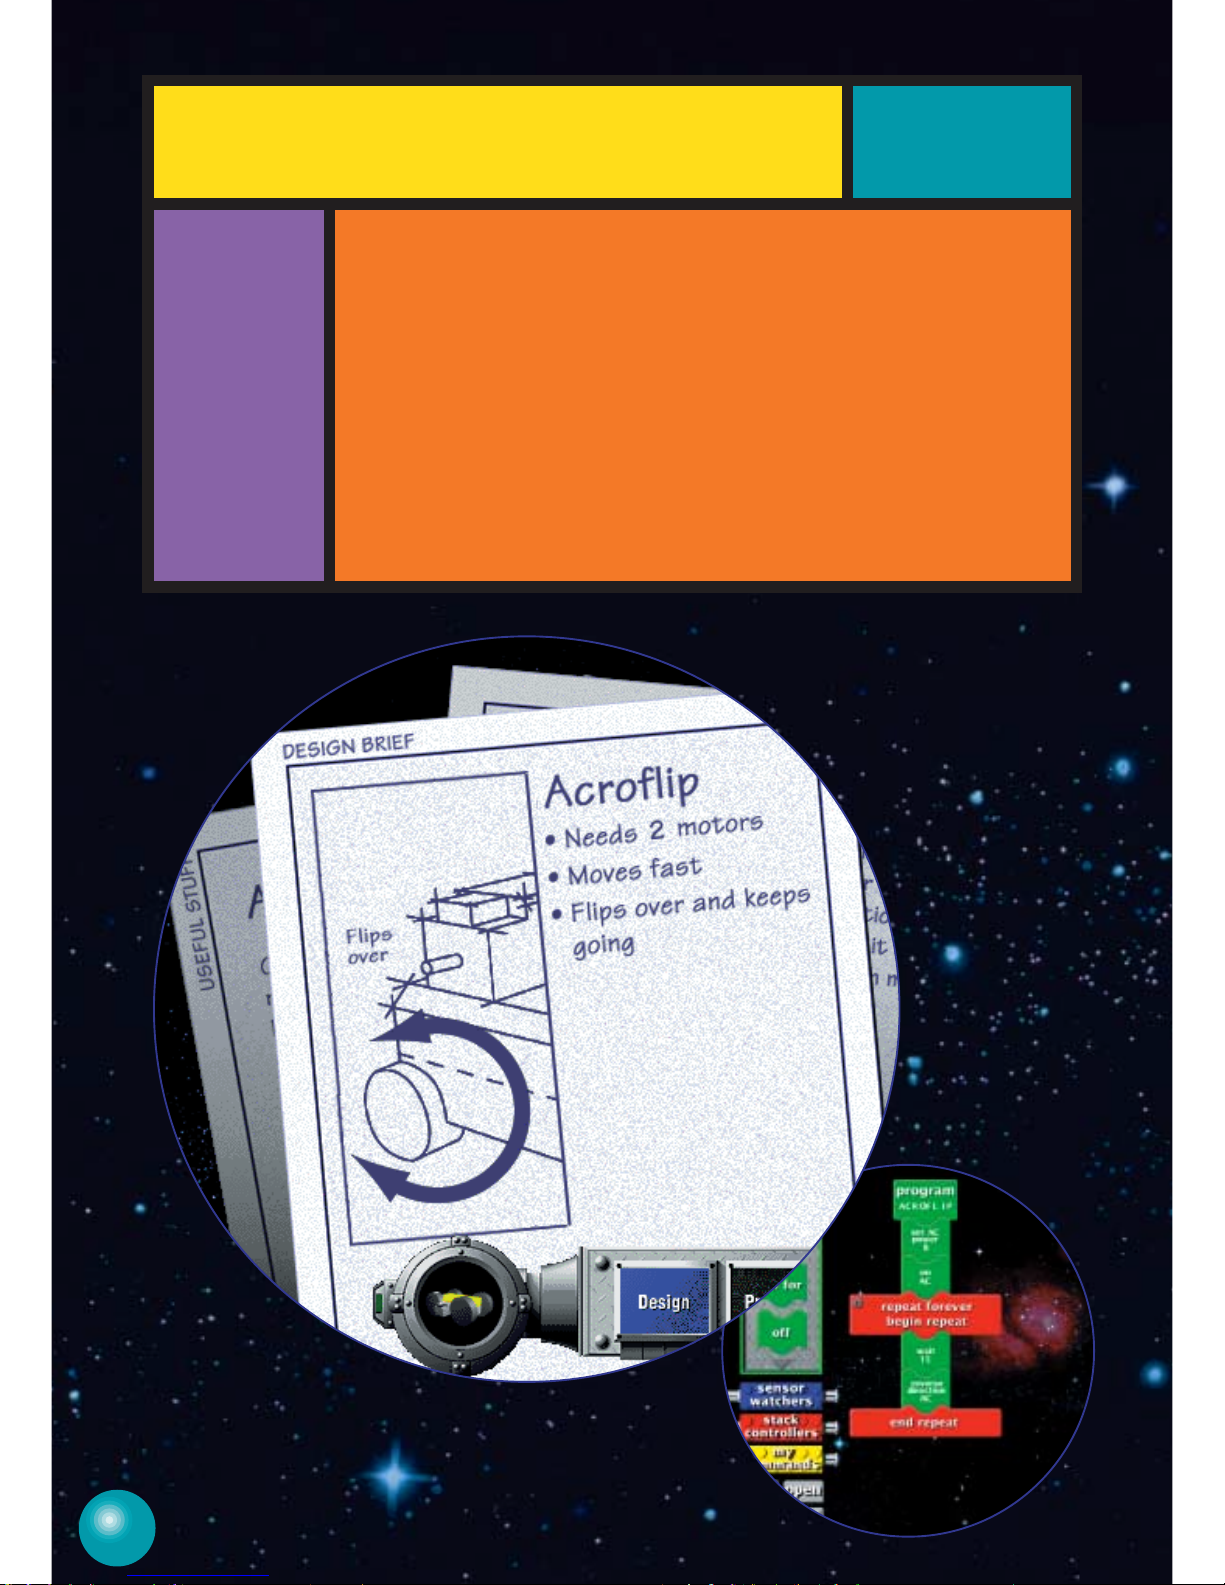
To master a Challenge, you must follow three basic steps:
1. Construct – To start, review the Design Brief. Then gather the pieces
you need to meet the Challenge and start building. (Don’t hesitate to
customize your robot with additional parts and pieces.)
2. Program – Once your robot is built, you can program it using the
simple, but powerful, programming language included on the CD-ROM.
Your program will determine how your model reacts to its environment.
3. Test – Now it’s time to test your program and design. Once you have
downloaded your program from your PC to your RCX using the infrared
transmitter, your robot can run independent of your computer. Now let it
loose and watch what happens!
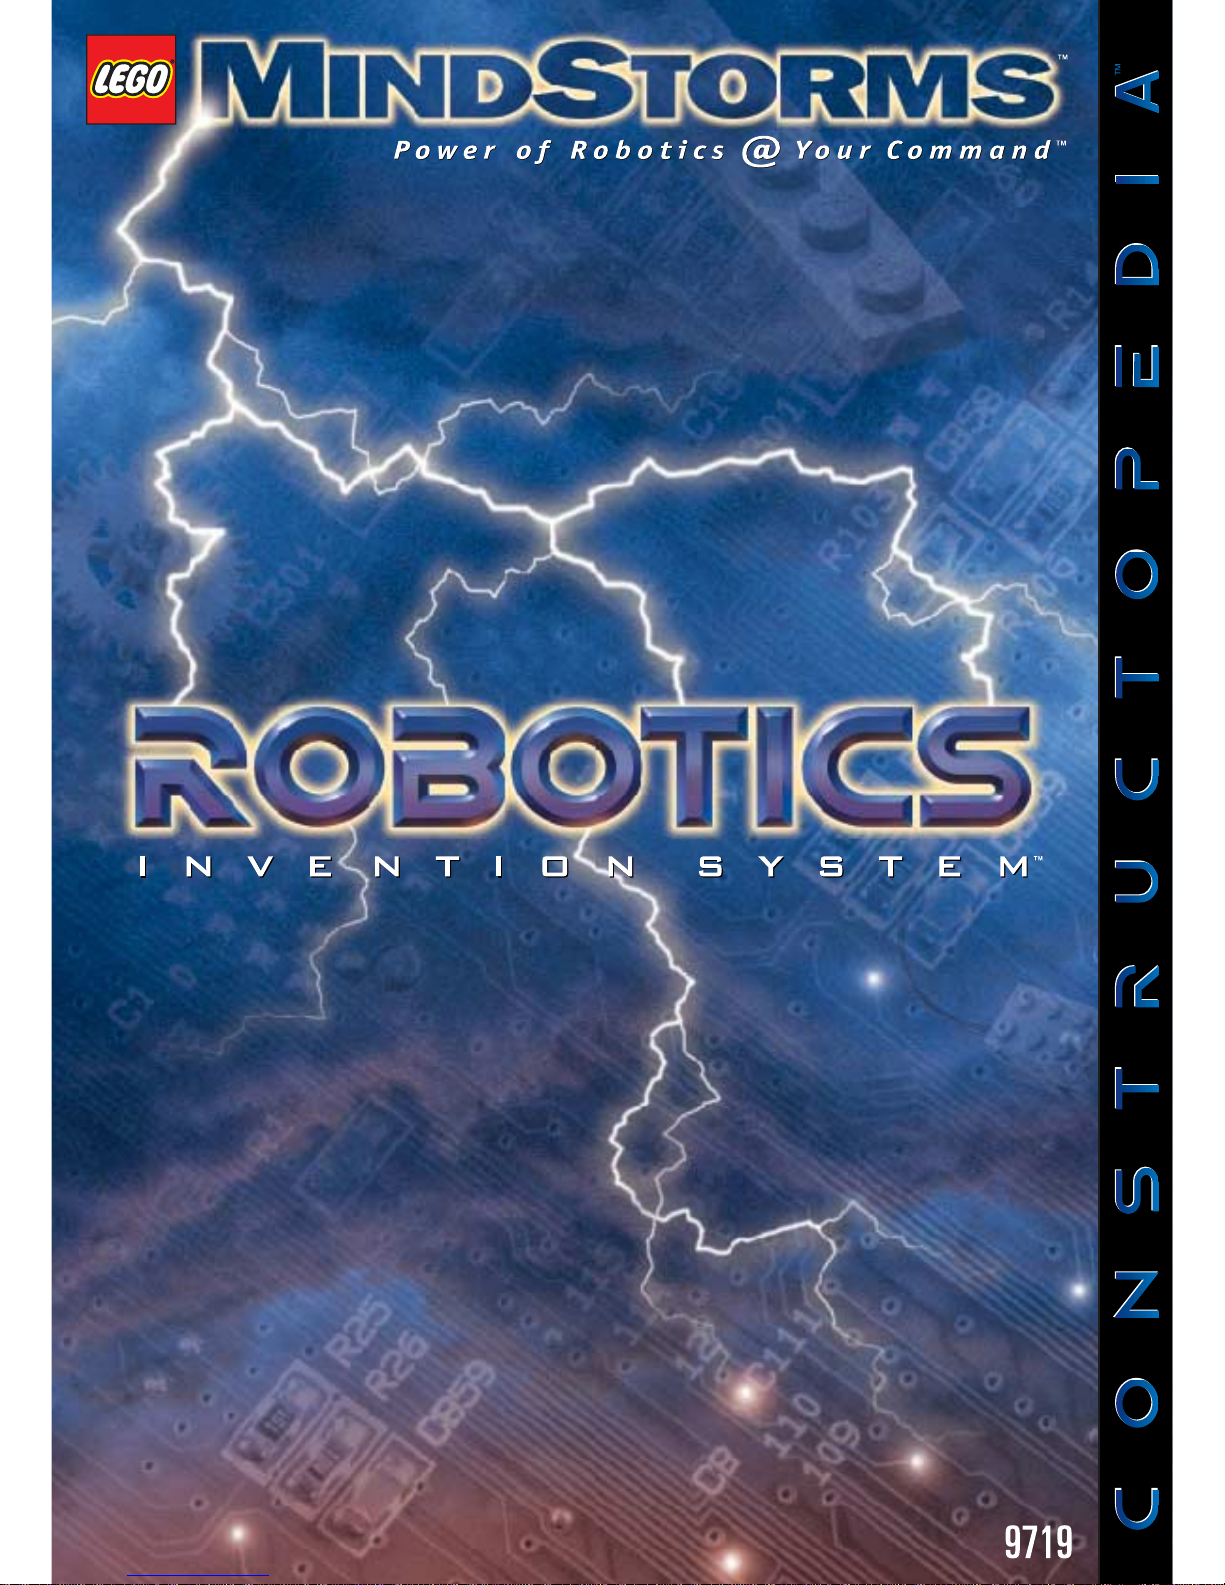
The Constructopedia™ is a building guide for the Robotics Invention
System™ that offers suggestions, hints, and tips to get you started on
the CD-ROM Challenges and robotic inventions of your own design.
Page 3

PROJECT IDEAS 4
ROBO 1 6
ROBO 2 9
PATHFINDER 1 13
PATHFINDER 2 15
ACROBOT 1 17
ACROBOT 2 20
SPECIAL FEATURES
Movement 26
Sensors 28
TIPS & TRICKS 32
TOP SECRET PLANS 39
PARTS IDENTIFICATION 47
CONTENTS
PAGE
3
©
1998 The LEGO Group.
®
, ™, LEGO, MINDSTORMS, Constructopedia, RCX and the LEGO and MINDSTORMS
logos are exclusive trademarks of the LEGO Group.
ISBN 1-57056-050-1
Page 4
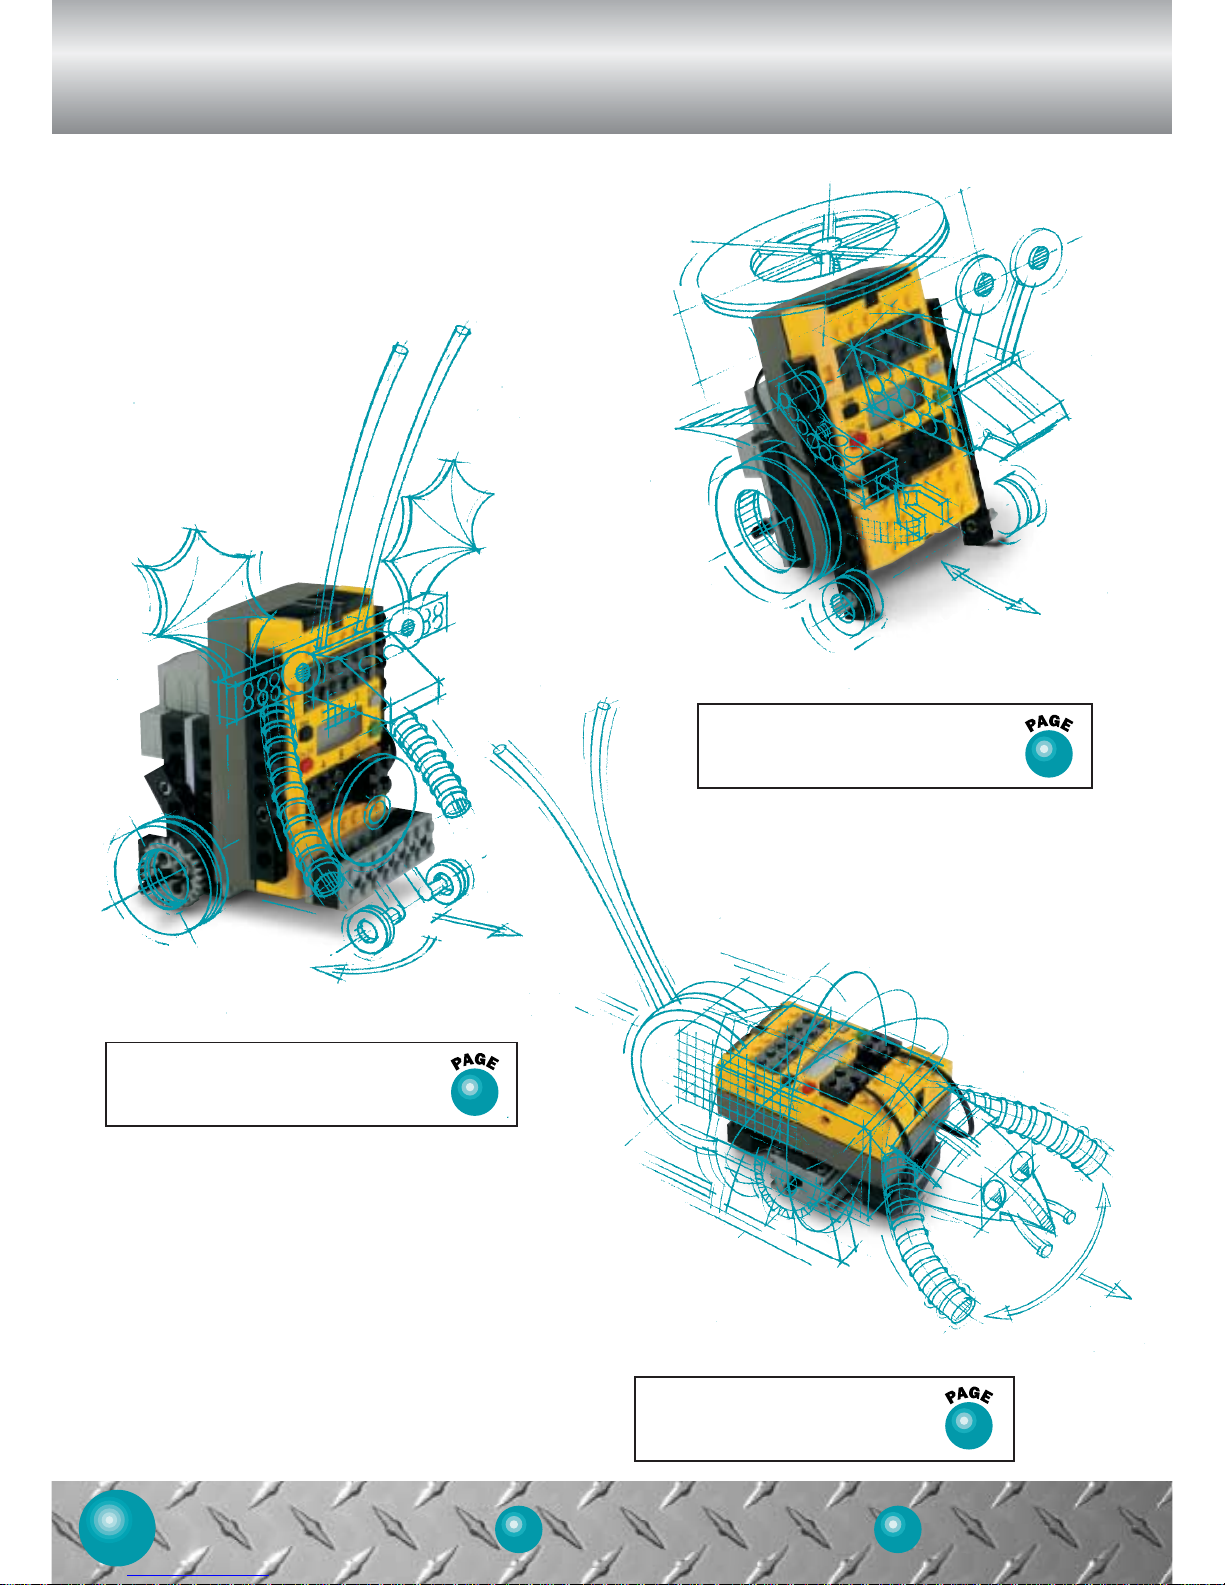
ROBO 2
Project Ideas
PROJECT IDEAS SPECIAL FEATURES
4
4 26
ROBO 1
PATHFINDER 1
6
9
13
• Slowly moves back and forth.
• Requires one motor.
• Slowly rotates in one direction.
• Requires one motor.
• Quickly turns left and right.
• Requires two motors.
What follows are basic instructions for
building the six subassemblies associated
with the CD-ROM Challenges. The same
instructions can be used for building your
own robotic inventions.
Page 5

TIPS & TRICKS TOP SECRET PLANS32 39
5
PATHFINDER 2
ACROBOT 1
15
17
• Slowly turns left and right.
• Requires two motors.
• Quickly turns left and right.
Even does “wheelies.”
• Requires two motors.
ACROBOT 2
20
• Moves fast and flips
upside down.
• Requires two motors.
Page 6
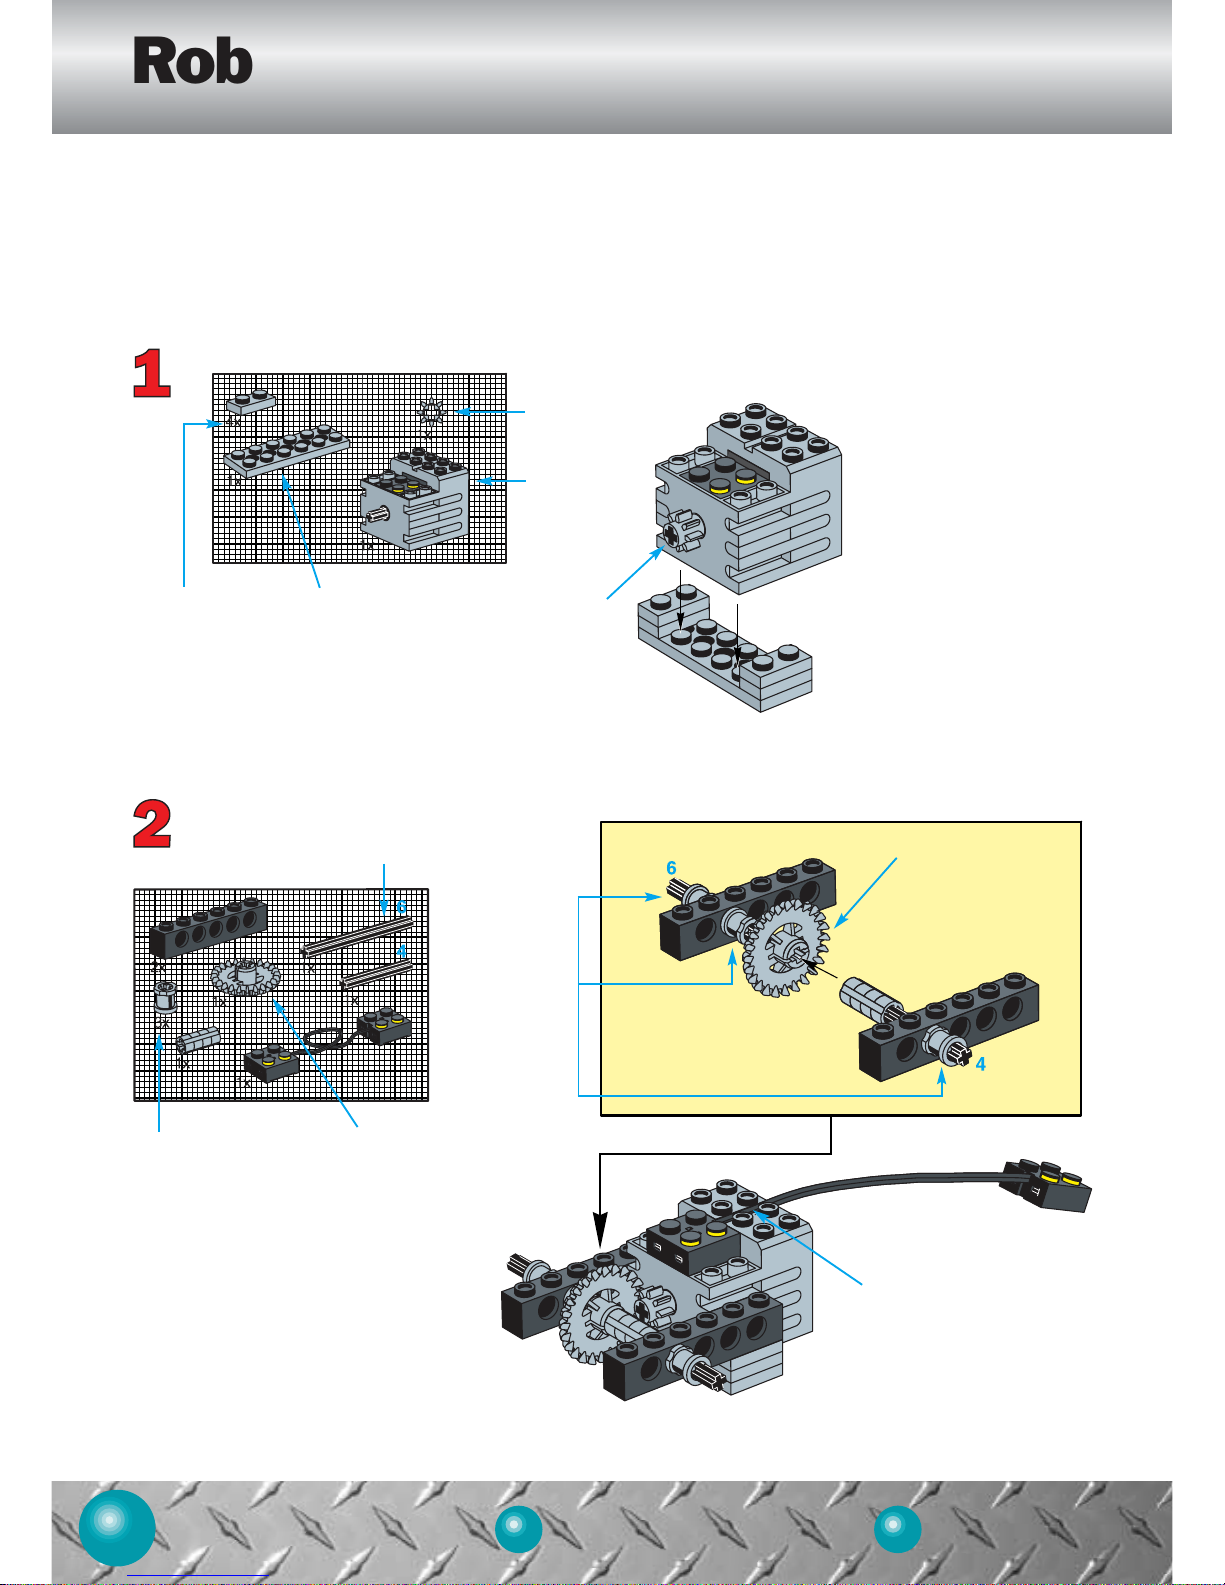
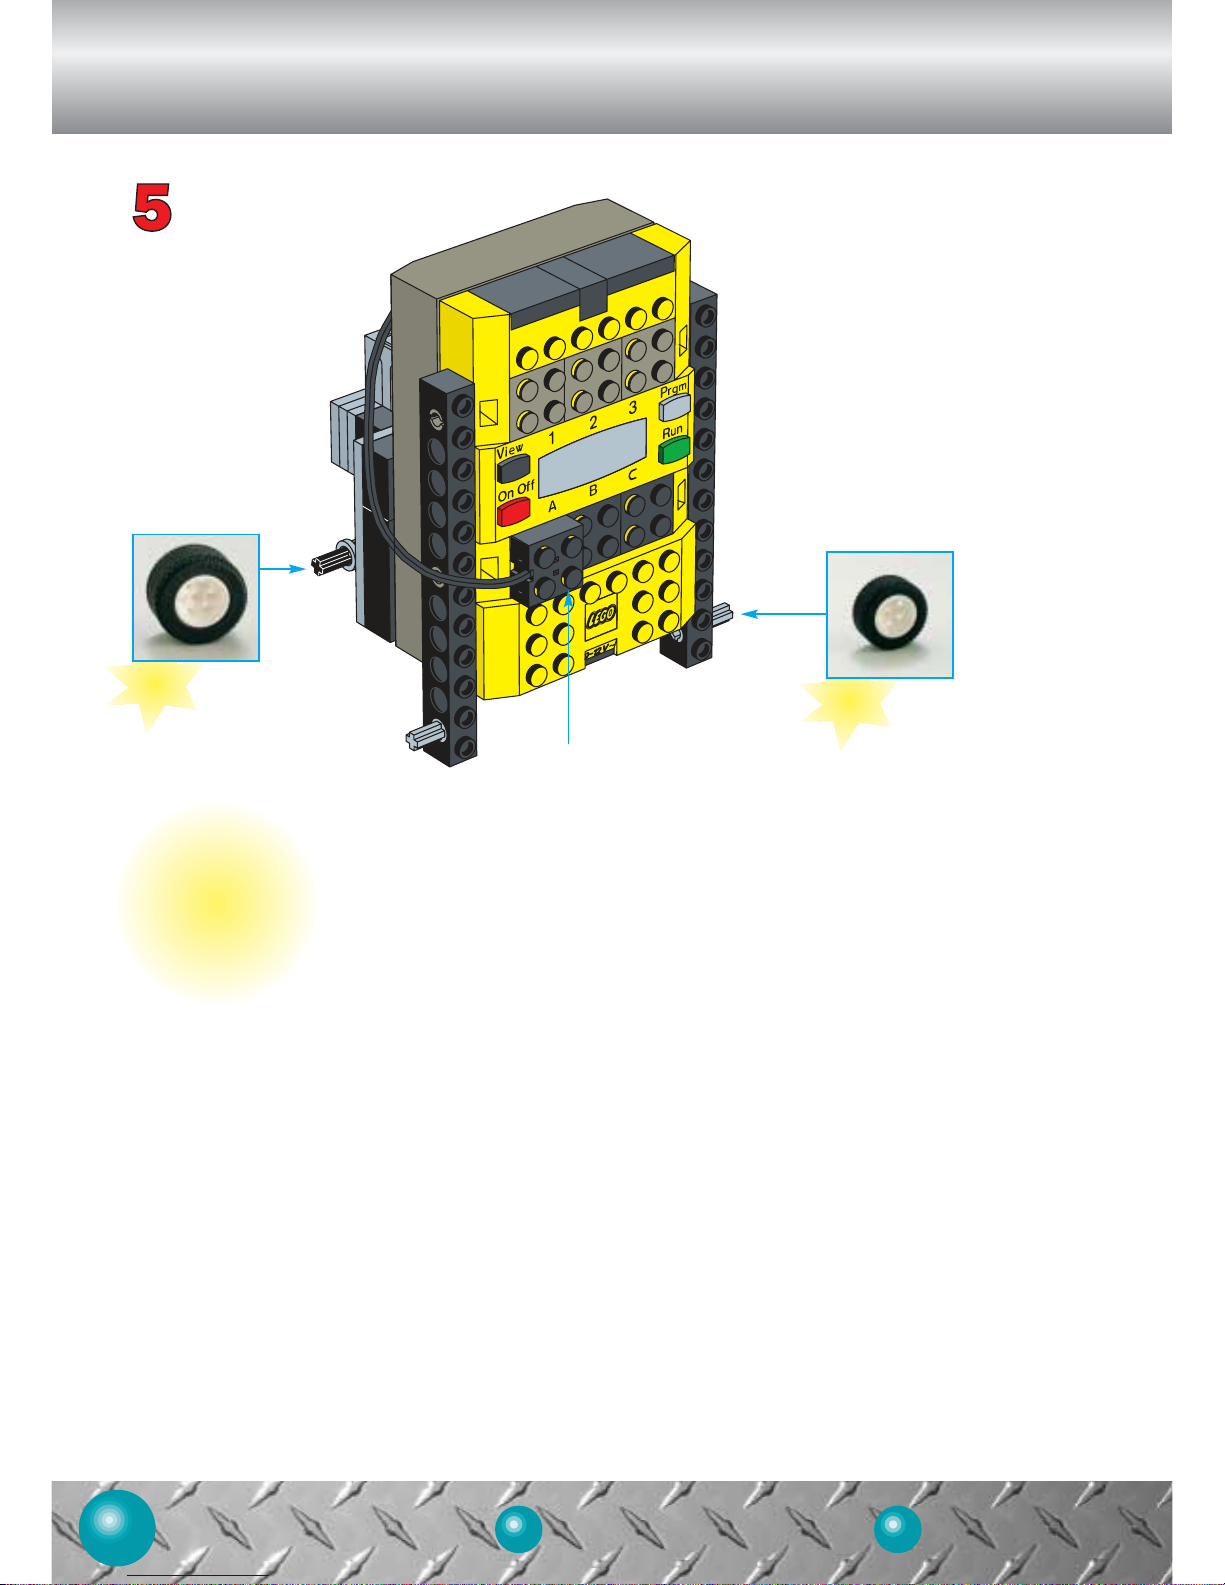
Robo 1
PROJECT IDEAS SPECIAL FEATURES
6
4 26
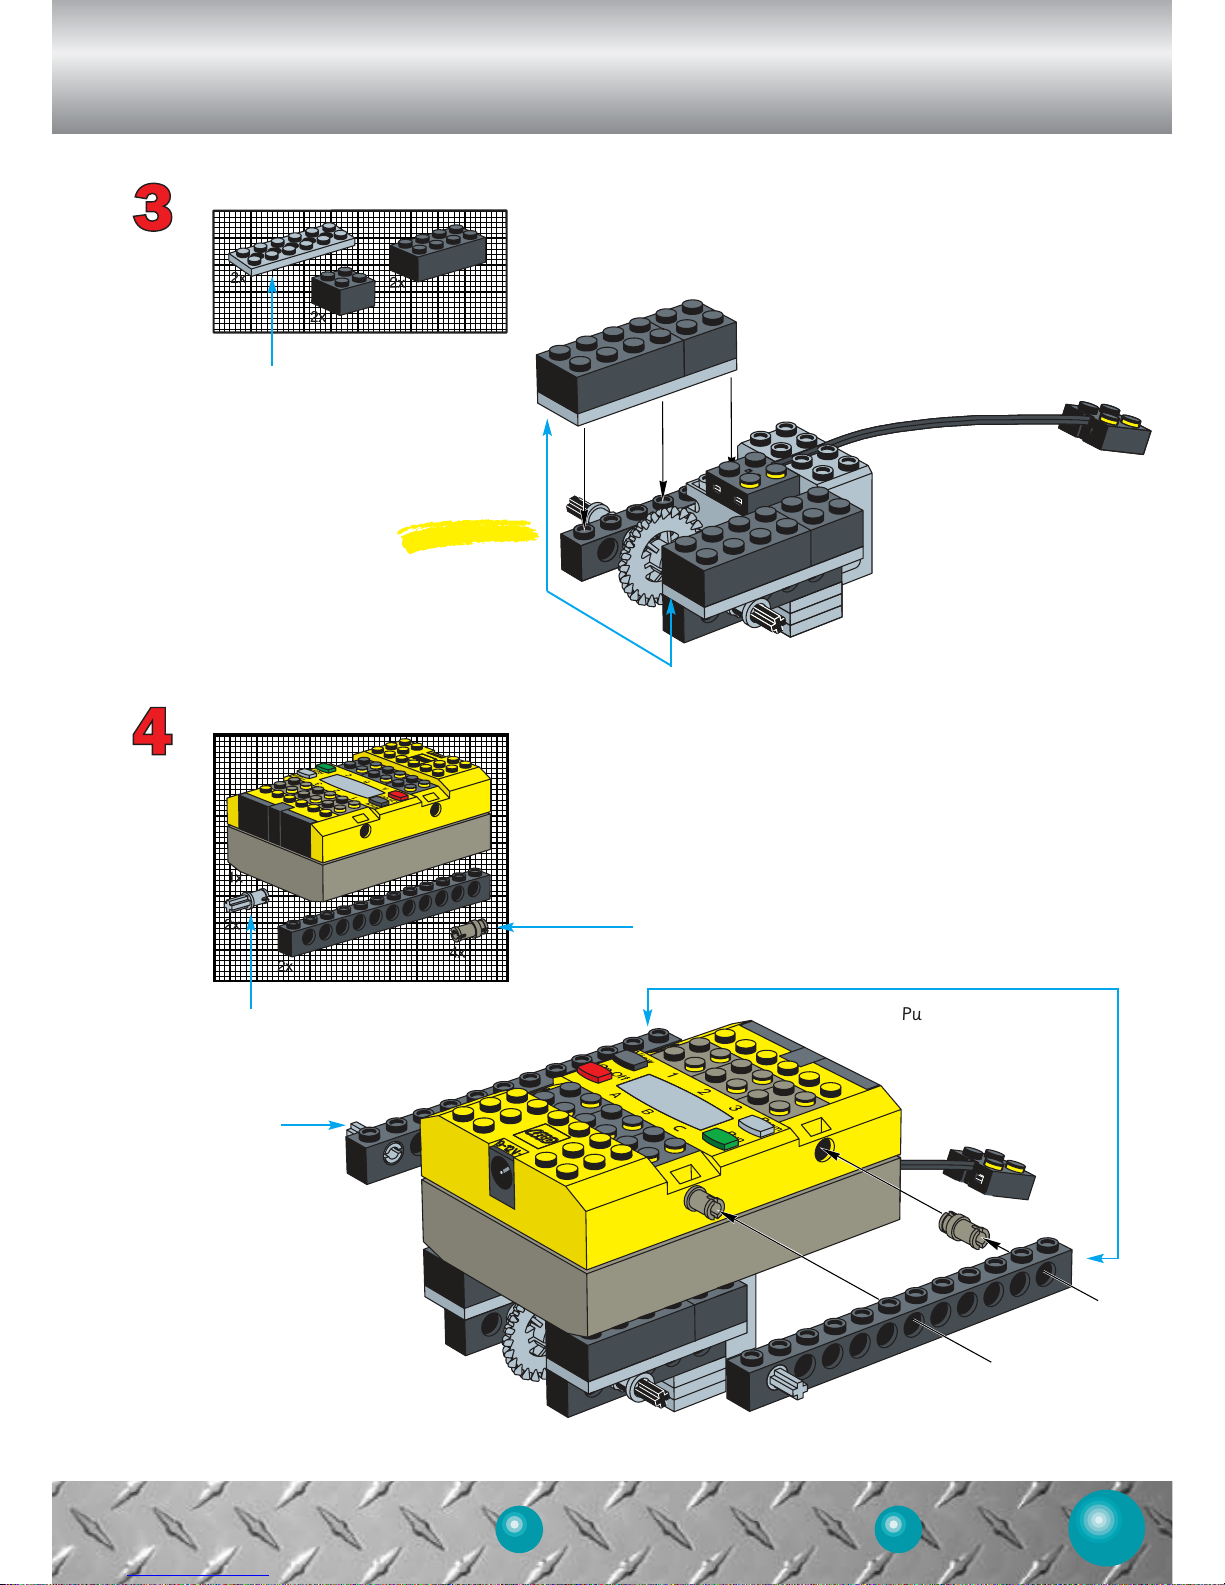
To get started on Robo 1, follow these five steps.
For this step, you need:
Put the
8-tooth gear
on the motor.
Put the
bushings
here.
For this step, you need:
To measure an axle,
see page 37.
Bushing
24-tooth crown gear
Push the 24-tooth
crown gear onto
the axle.
8-tooth gear
Motor
2 x 6 plate
with holes
Put the motor on
the 2 x 6 plate
with holes.
Attach this to the previous step.
Push the wire into
the groove.
4x means you
need 4 of these.
!
BEFORE YOU GET STARTED...
Make sure there are batteries in your RCX. For help installing batteries, turn to page 38.
Page 7
TIPS & TRICKS TOP SECRET PLANS32 39
7
For this step, you need:
For this step, you need:
Dark gray connector peg
Put the beams on the
RCX using the dark gray
connector pegs.
Do this first!
Put the 2 x 6 plate
with holes here.
Connector peg with axle
Put the
connector peg
with axle here.
2 x 6 plate
with holes
Page 8
PROJECT IDEAS SPECIAL FEATURES
8
4 26
Attach the end of the
wire to port “A”.
HINT: Try
this wheel.
HINT: Try
this wheel.
IF YOU NEED HELP COMPLETING YOUR ROBOT...
• Check out “Special Features” on page 26.
• Turn to “Tips and Tricks” on page 32.
TO PROGRAM YOUR INVENTION...
• Go to the MoboRobo challenge or the Robo Bumper
challenge on the CD-ROM.
Page 9
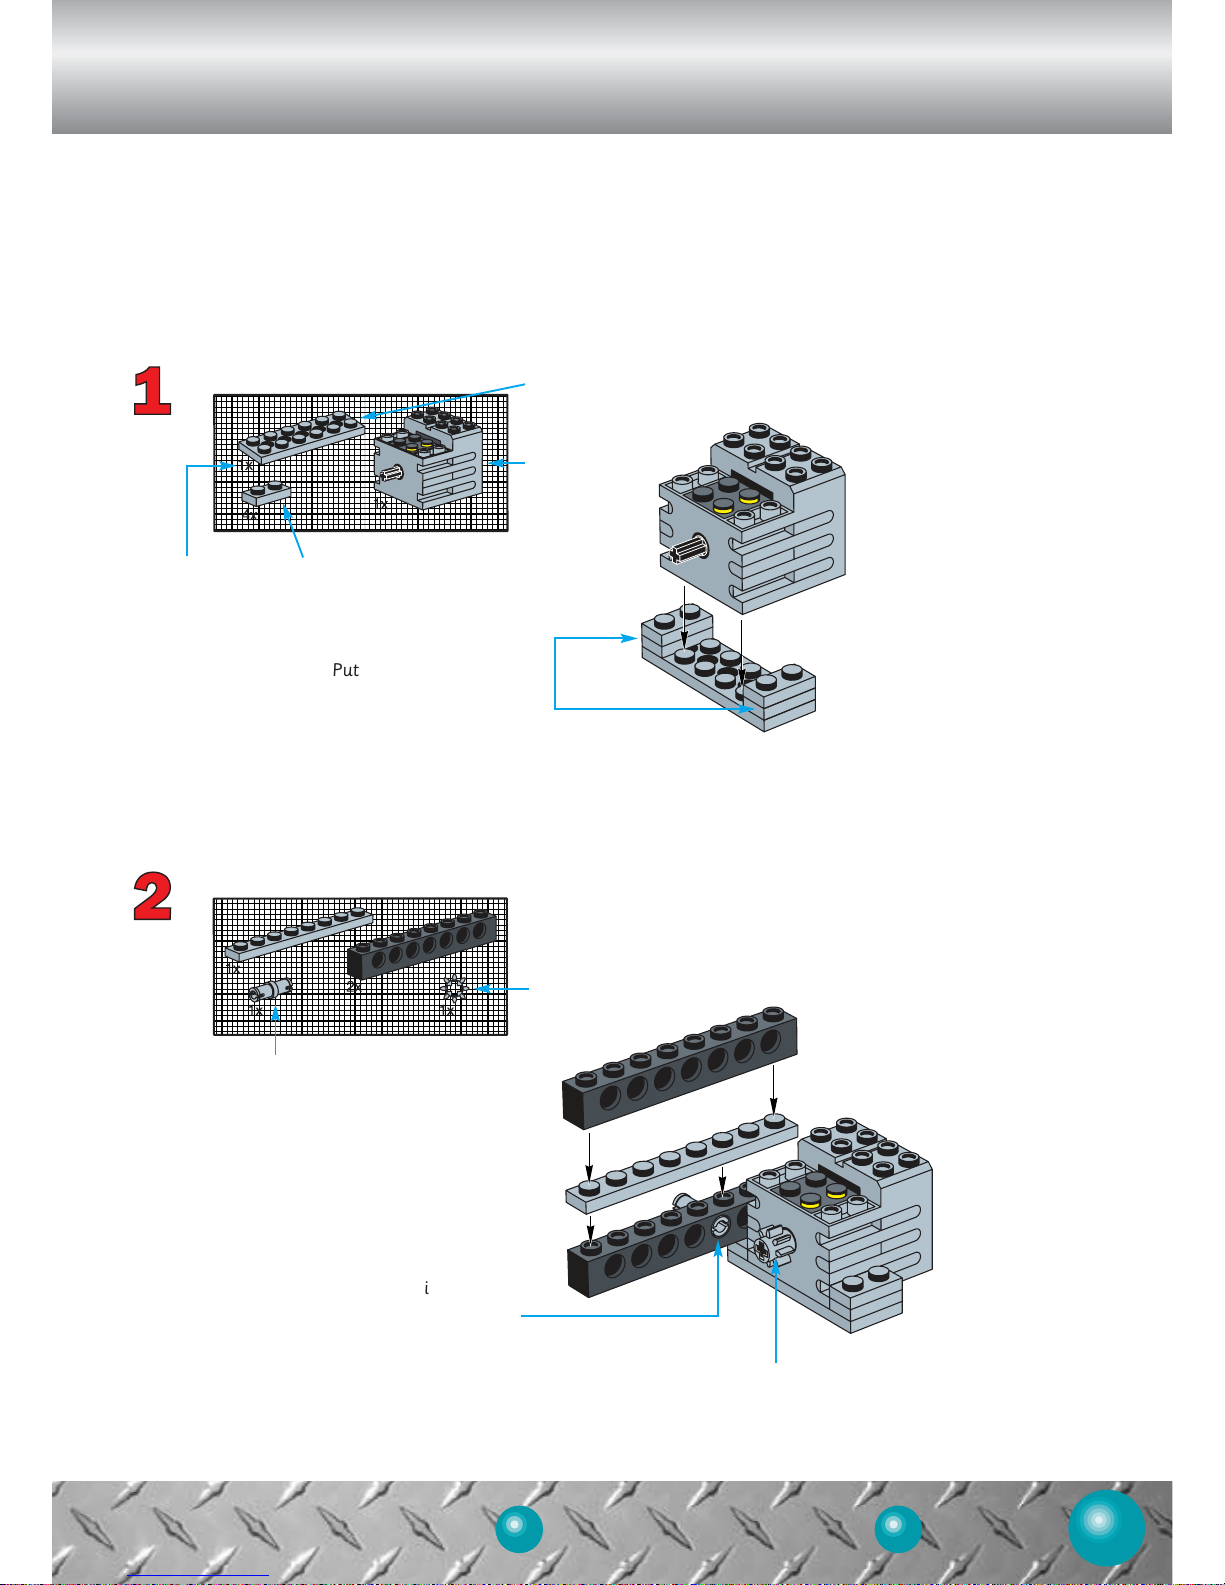
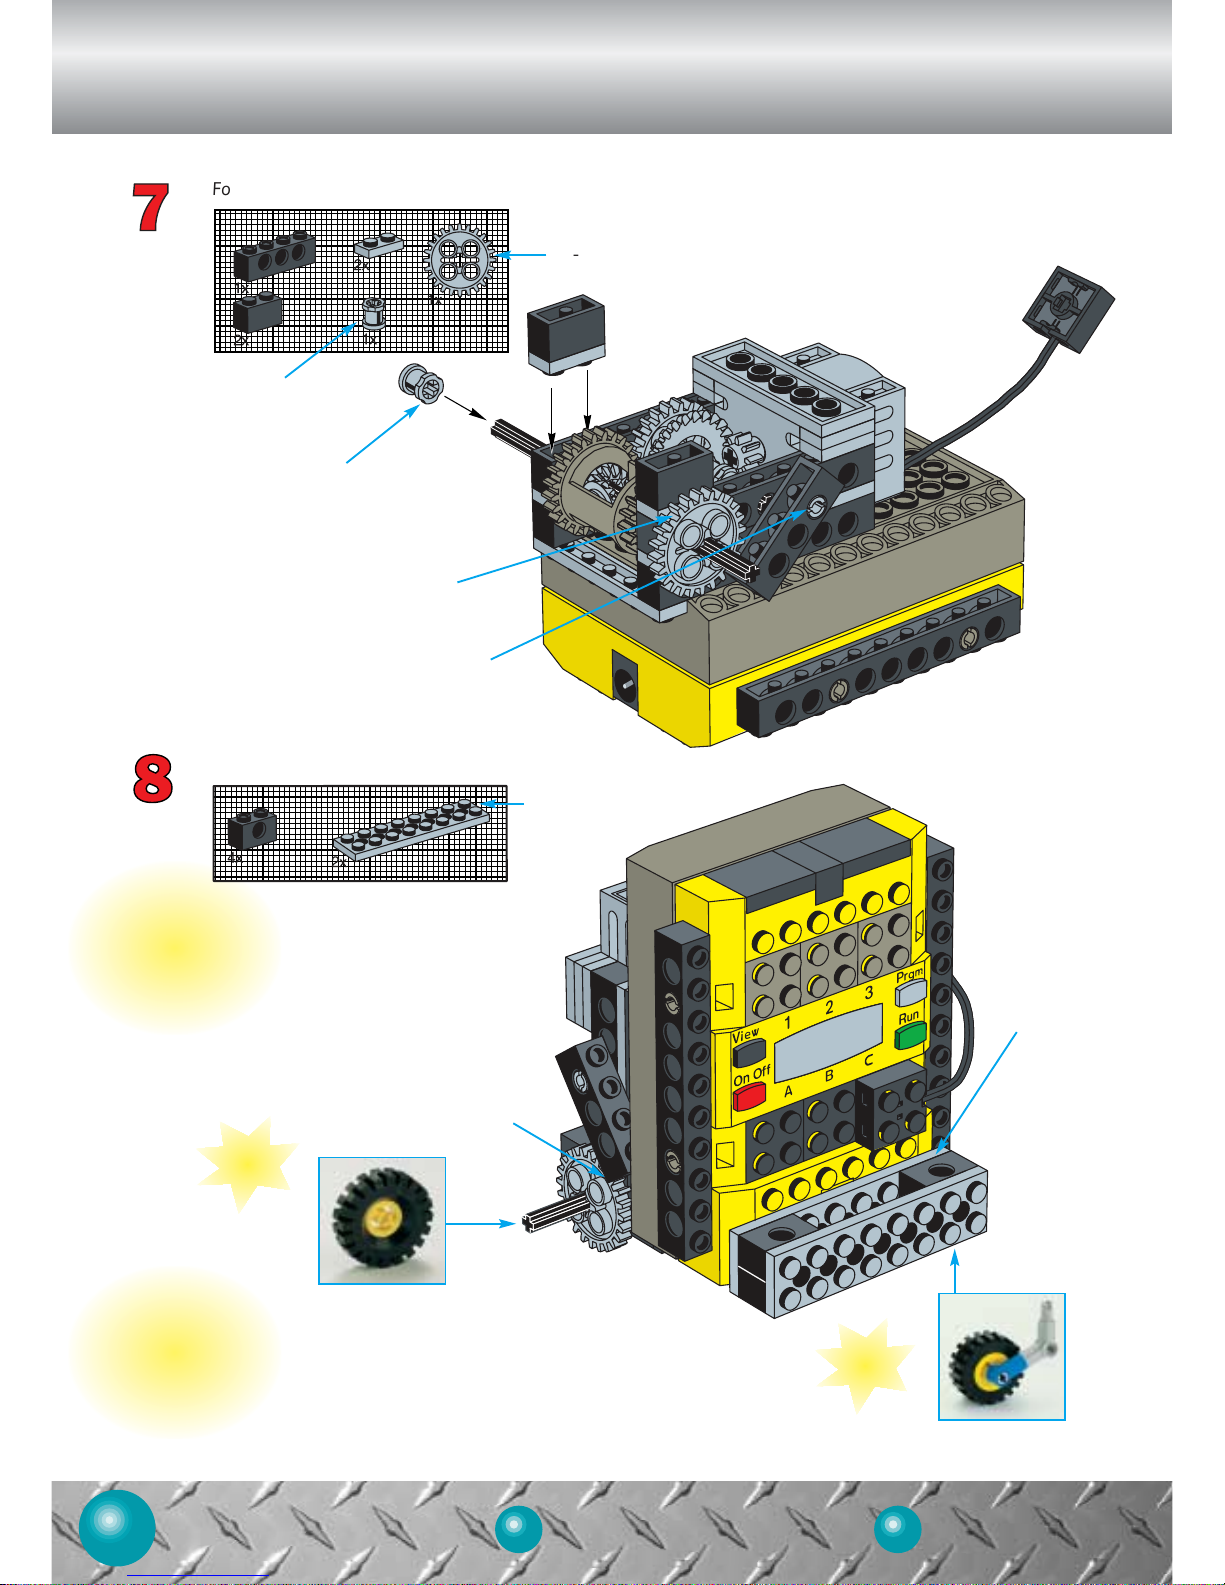
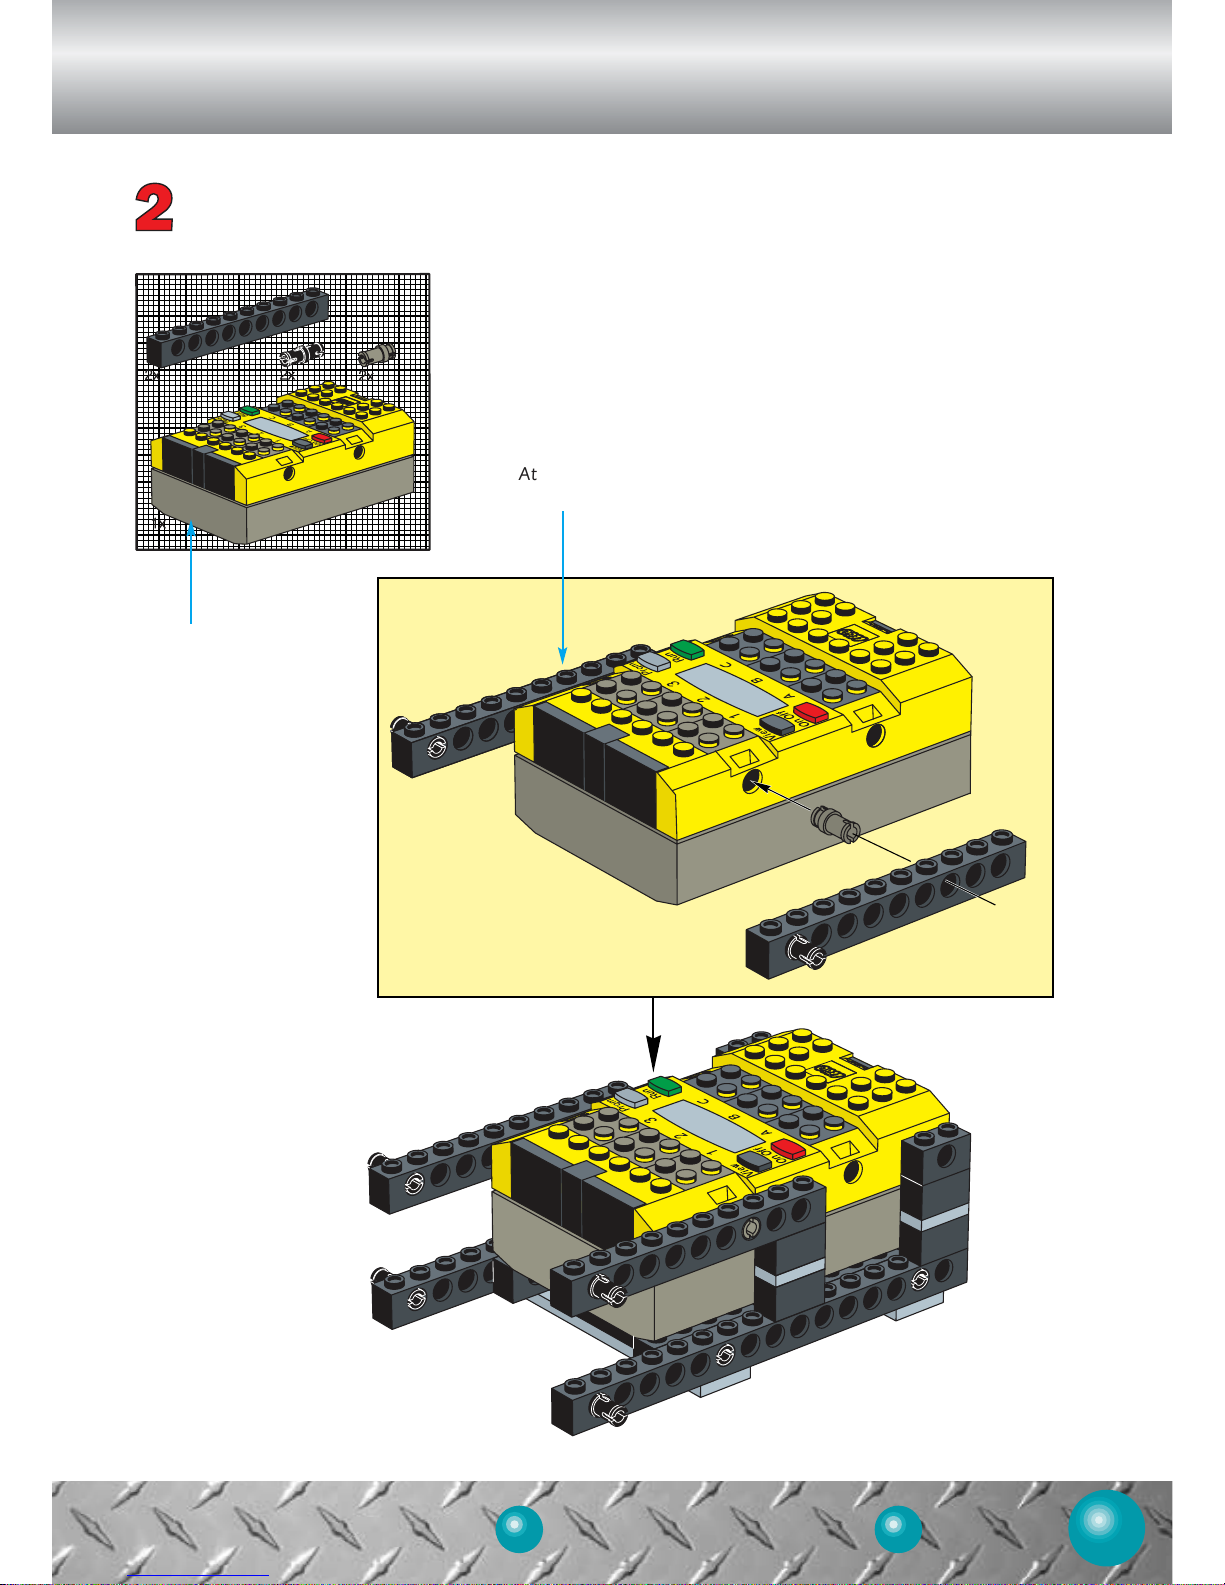
Robo 2
TIPS & TRICKS TOP SECRET PLANS32 39
9
B
uild the foundation for Robo 2 by following these eight steps.
For this step, you need:
For this step, you need:
Put the 1 x 2 plates here.
1 x 2 plate
2 x 6 plate
with holes
This is the gray
connector peg.
Gray connector peg
Motor
Put the motor
onto the 2 x 6
plate with holes.
8-tooth gear
Put the 8-tooth gear
on the motor.
1x means you
need 1 of these.
!
BEFORE YOU GET STARTED...
Make sure there are batteries in your RCX. For help installing batteries, turn to page 38.
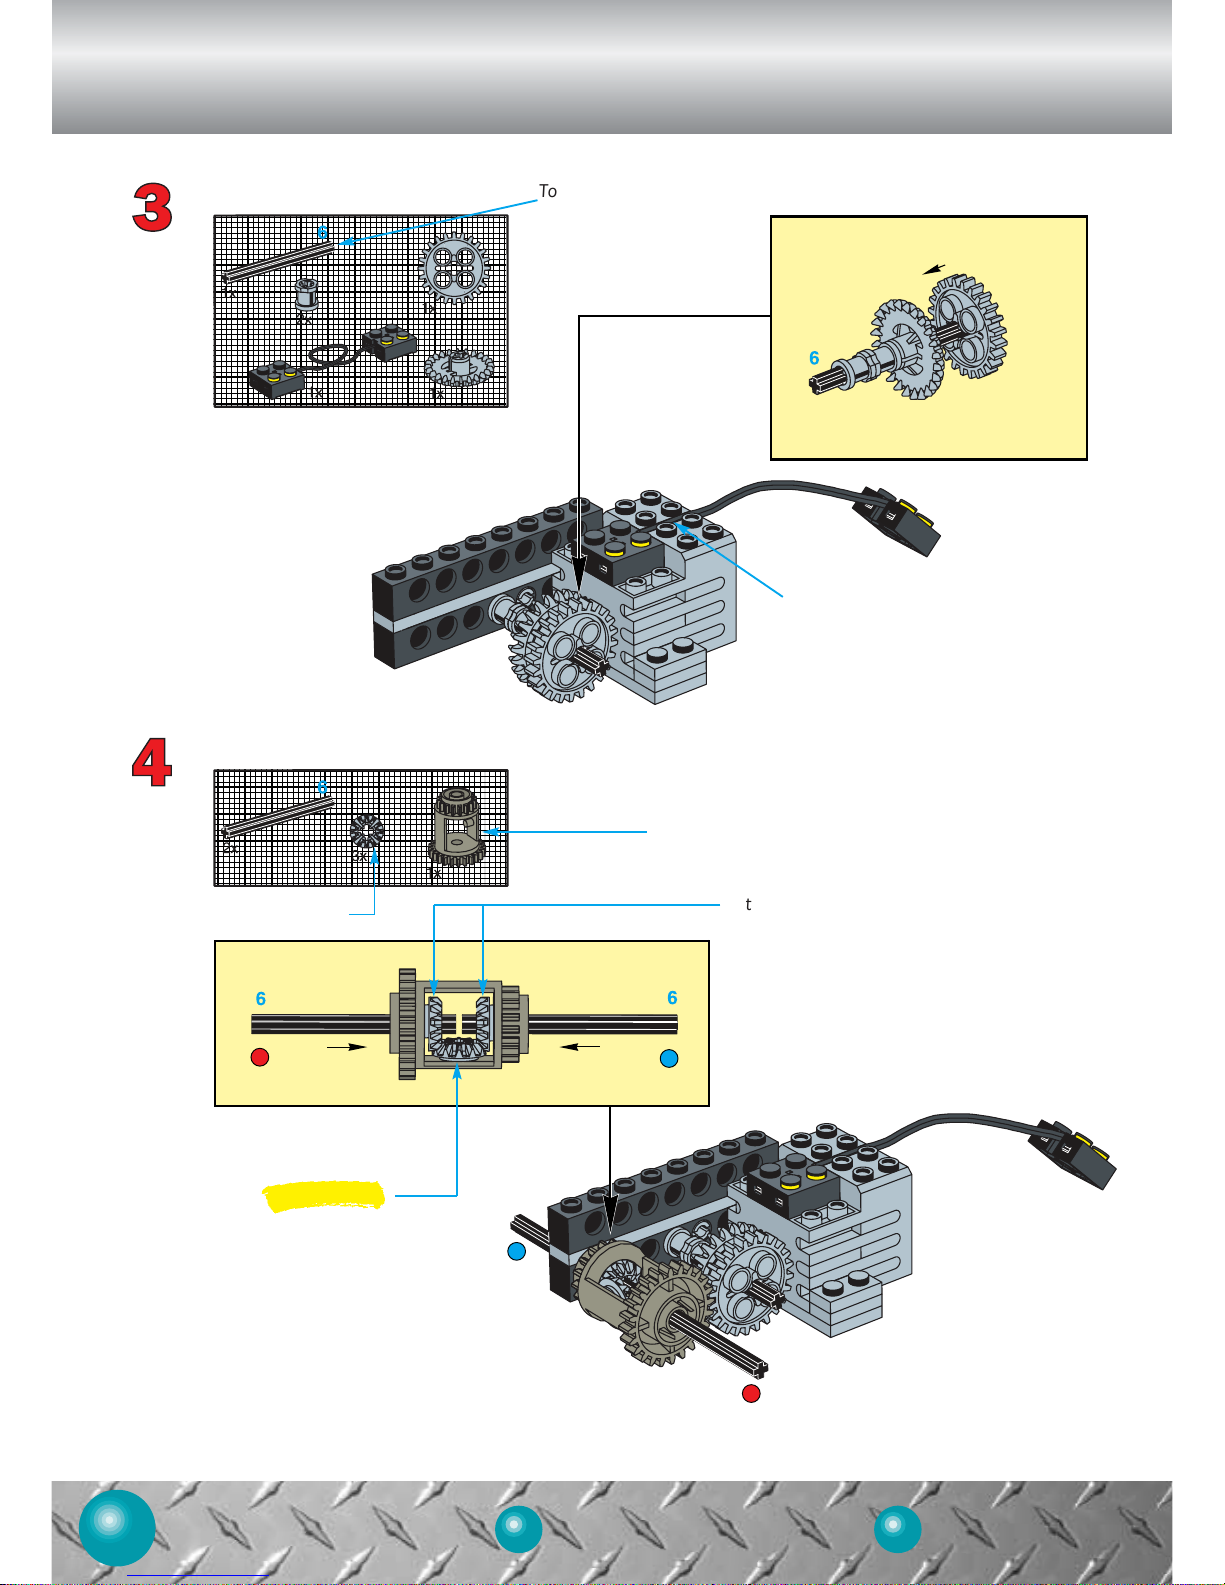
Page 10
PROJECT IDEAS SPECIAL FEATURES
10
4 26
For this step, you need:
For this step, you need:
To measure an
axle, see page 37.
Push the wire into
the groove.
Put the bevel gear in place
and push the axle into it.
Do this first!
Put the bevel gear
on the differential.
Differential
Bevel gear
Page 11

TIPS & TRICKS TOP SECRET PLANS32 39
11
For this step, you need:
Put the beams on the RCX using
the dark gray connector pegs.
Dark gray
connector peg
For this step, you need:
Do this first!
Put the beam here.
1 x 6 plate
Put the 1 x 6
plate here.
Page 12
PROJECT IDEAS SPECIAL FEATURES
12
4 26
For this step, you need:
2 x 8 plate
with holes
Put the 2 x 8
plate with
holes here.
Make sure the
beam touches
the gear.
For this step, you need:
Bushing
Put the bushing
on the axle.
Put the beam onto the
gray connector peg.
24-tooth gear
Put the 24-tooth gear here.
HINT: Try
this wheel.
HINT: Try
this wheel.
IF YOU NEED HELP COMPLETING
YOUR ROBOT...
• Check out “Special Features” on page 26.
• Turn to “Tips and Tricks” on page 32.
TO PROGRAM YOUR INVENTION...
• Go to the Robobeeper challenge or the Robioptic challenge on the CD-ROM.
Page 13
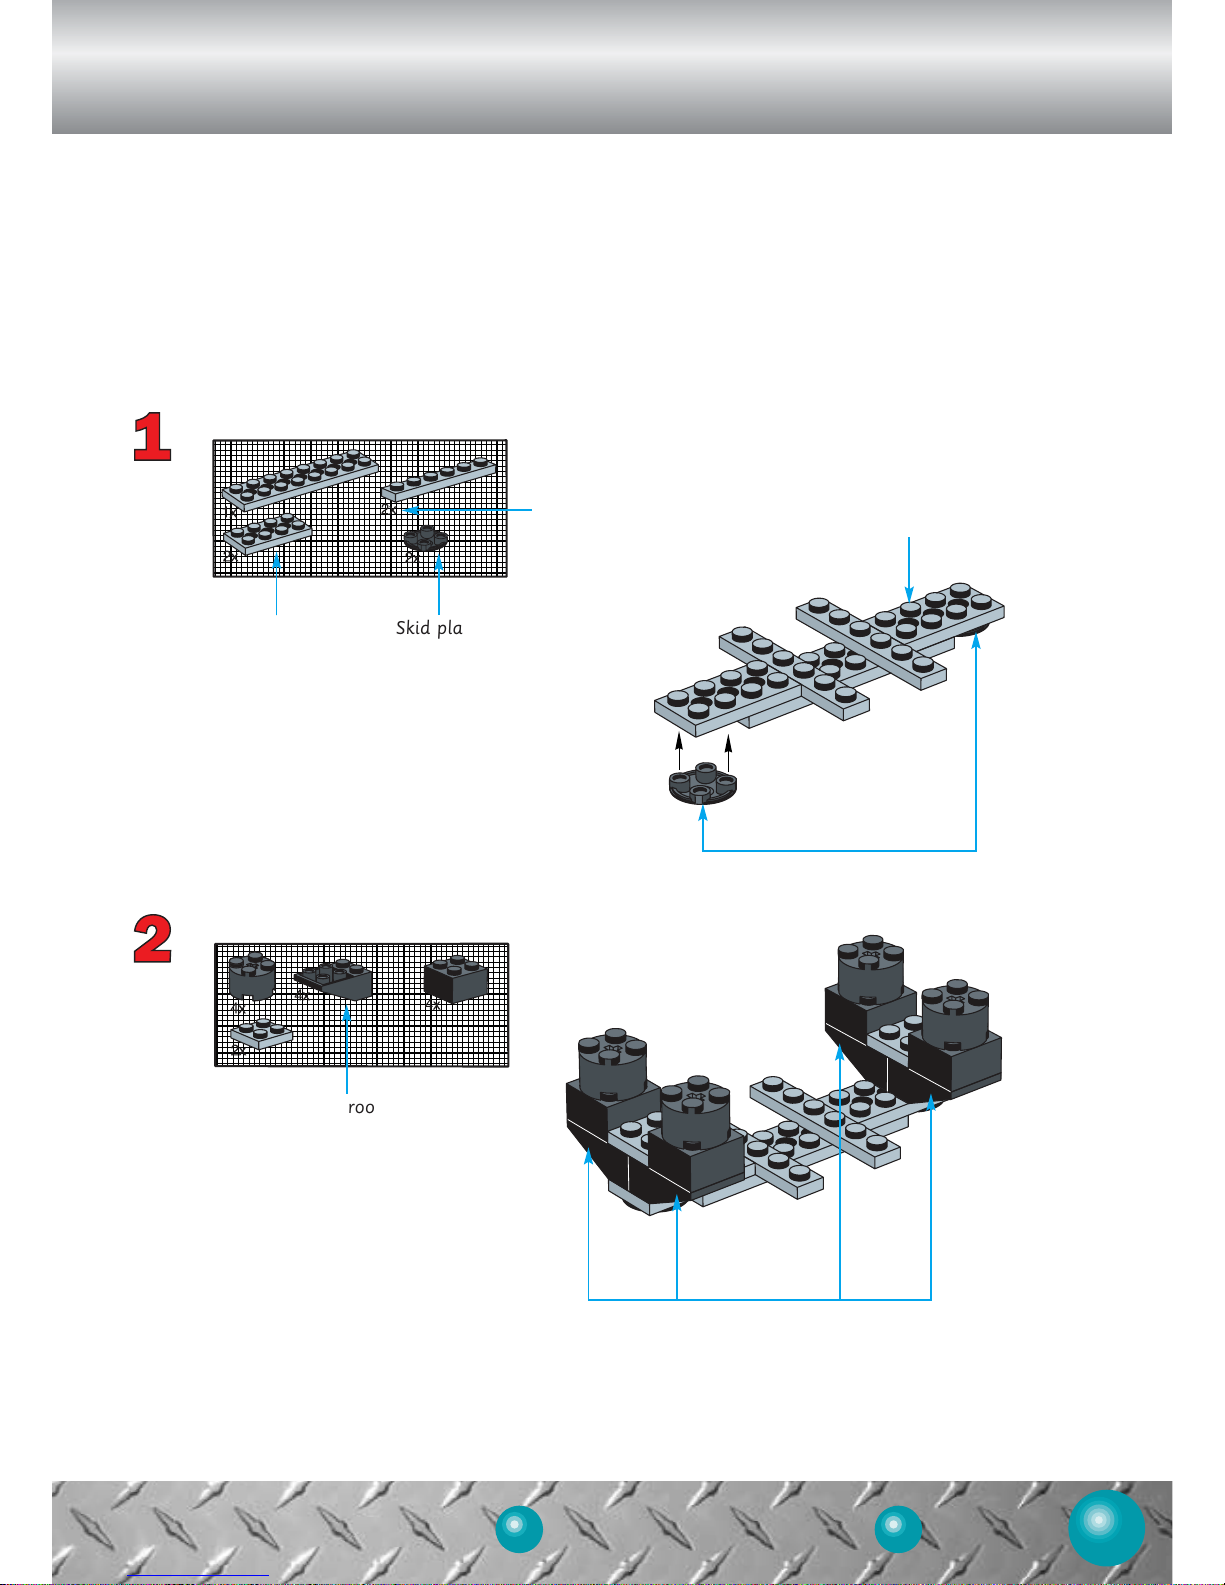
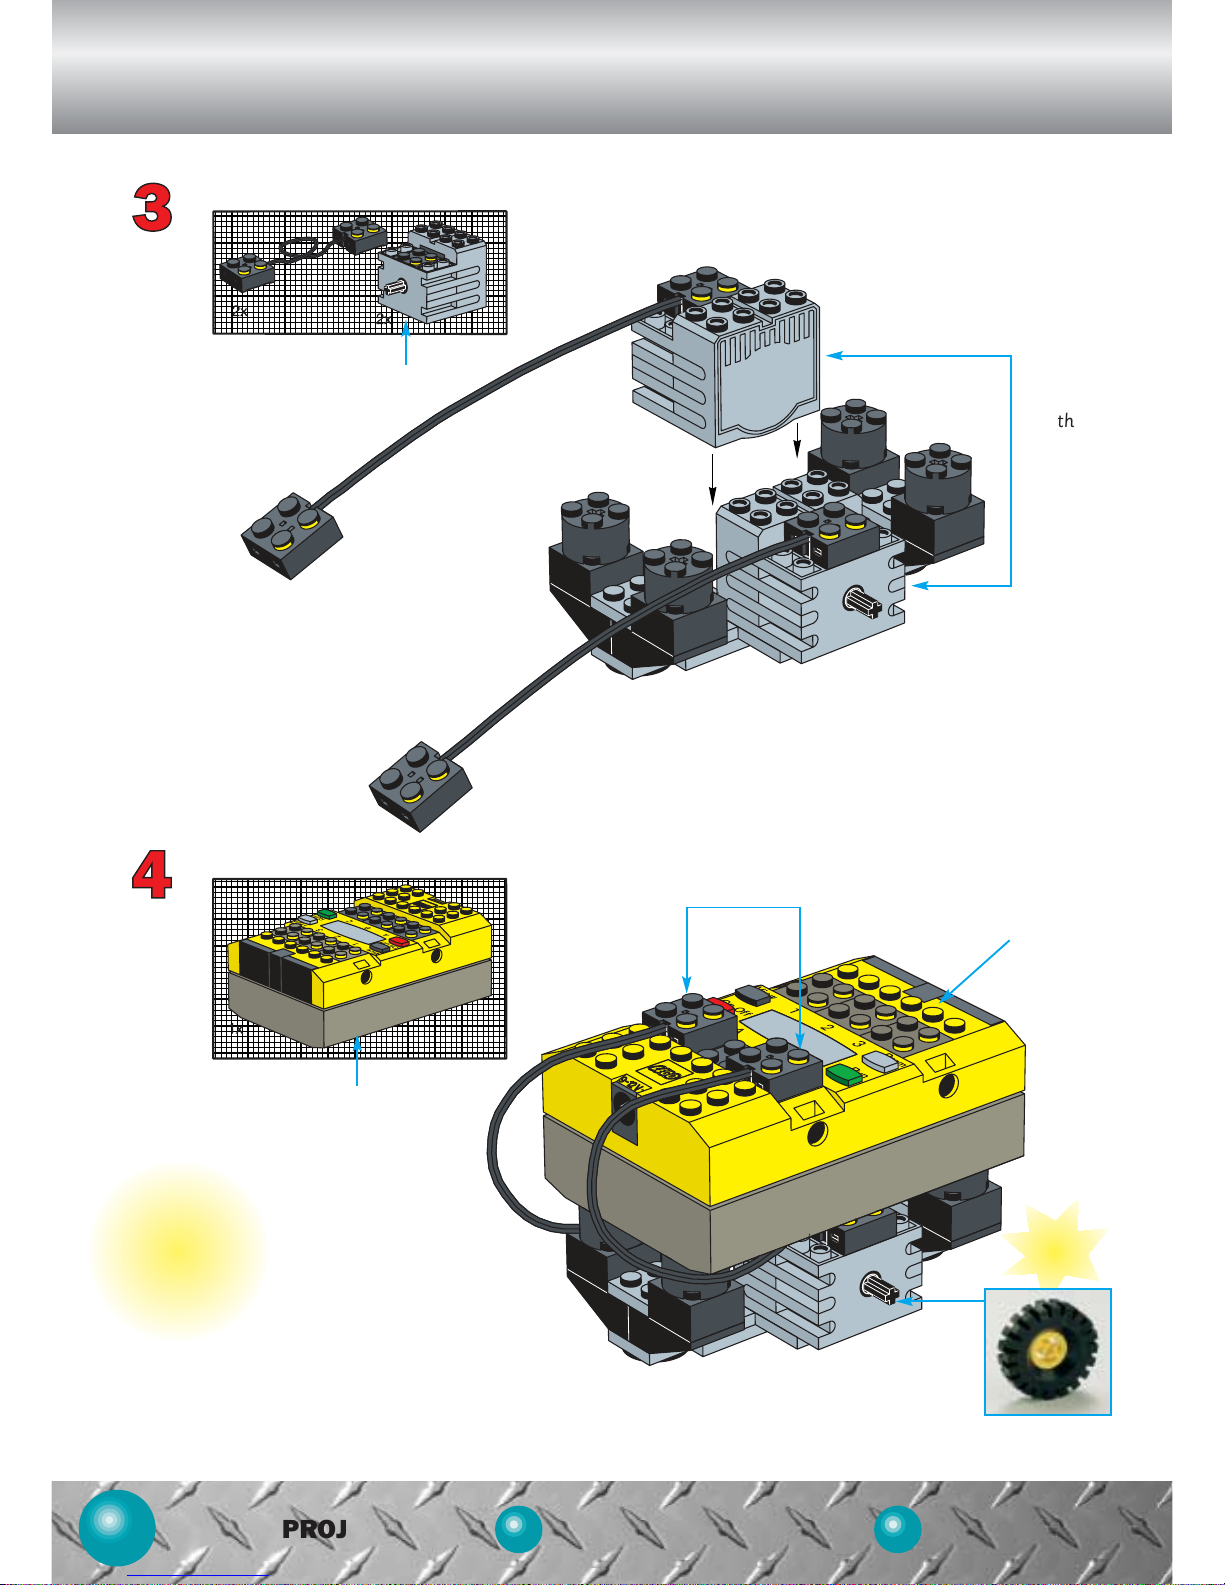
Pathfinder 1
TIPS & TRICKS TOP SECRET PLANS32 39
13
T
o start building Pathfinder 1, follow these four steps.
For this step, you need:
For this step, you need:
Skid plate
Put the skid plates here.
Inverted roof brick
Put the inverted roof bricks here.
2 x 4 plate with holes
Put the 2 x 4
plate with
holes here.
2x means
you need
2 of these.
!
BEFORE YOU GET STARTED...
Make sure there are batteries in your RCX. For help installing batteries, turn to page 38.
Page 14
PROJECT IDEAS SPECIAL FEATURES
14
4 26
For this step, you need:
For this step, you need:
Put the
motor
on here.
Put the ends of
the wires here.
Motor
Put the RCX
on top.
HINT: Try
this wheel.
RCX
IF YOU NEED HELP COMPLETING
YOUR ROBOT...
• Check out “Special Features” on page 26.
• Turn to “Tips and Tricks” on page 32.
TO PROGRAM YOUR INVENTION...
• Go to the Outback Tracker challenge or the
Light Tracker challenge on the CD-ROM.
Page 15
Pathfinder 2
TIPS & TRICKS TOP SECRET PLANS32 39
15
For this step, you need:
For this step, you need:
To measure
an axle, see
page 37.
Put the 1 x 2 bricks here.
1 x 2 brick
Bushing
Put the
bushings here.
4x means
you need
4 of these.
To get started on Pathfinder 2, follow these four steps.
!
BEFORE YOU GET STARTED...
Make sure there are batteries in your RCX. For help installing batteries, turn to page 38.
Page 16

PROJECT IDEAS SPECIAL FEATURES
16
4 26
For this step, you need:
Put the 1 x 16 beams on the RCX
using the dark gray connector pegs.
Large pulley
Put the
large pulleys
onto the axles.
For this step, you need:
Dark gray
connector peg
1 x 16 beam
Attach this to theprevious step.
Motor
Attach one end to the motor,
the other to port A.
Attach one end to the motor,
the other to port C.
HINT: Try
this wheel.
HINT: Try
this skid
plate.
IF YOU NEED HELP COMPLETING YOUR ROBOT...
• Check out “Special Features” on page 26.
• Turn to “Tips and Tricks” on page 32.
TO PROGRAM YOUR INVENTION...
• Go to the Trail Tracker challenge or the Track Talker
challenge on the CD-ROM.
Page 17

Acrobot 1
TIPS & TRICKS TOP SECRET PLANS32 39
17
For this step, you need:
For this step, you need:
Black
connector peg
Put the black
connector pegs here.
To measure an axle,
see page 37.
Put the axles
through the holes.
Put the 1 x 8 beams here.
2x means you
need 2 of these.
1 x 8 beam
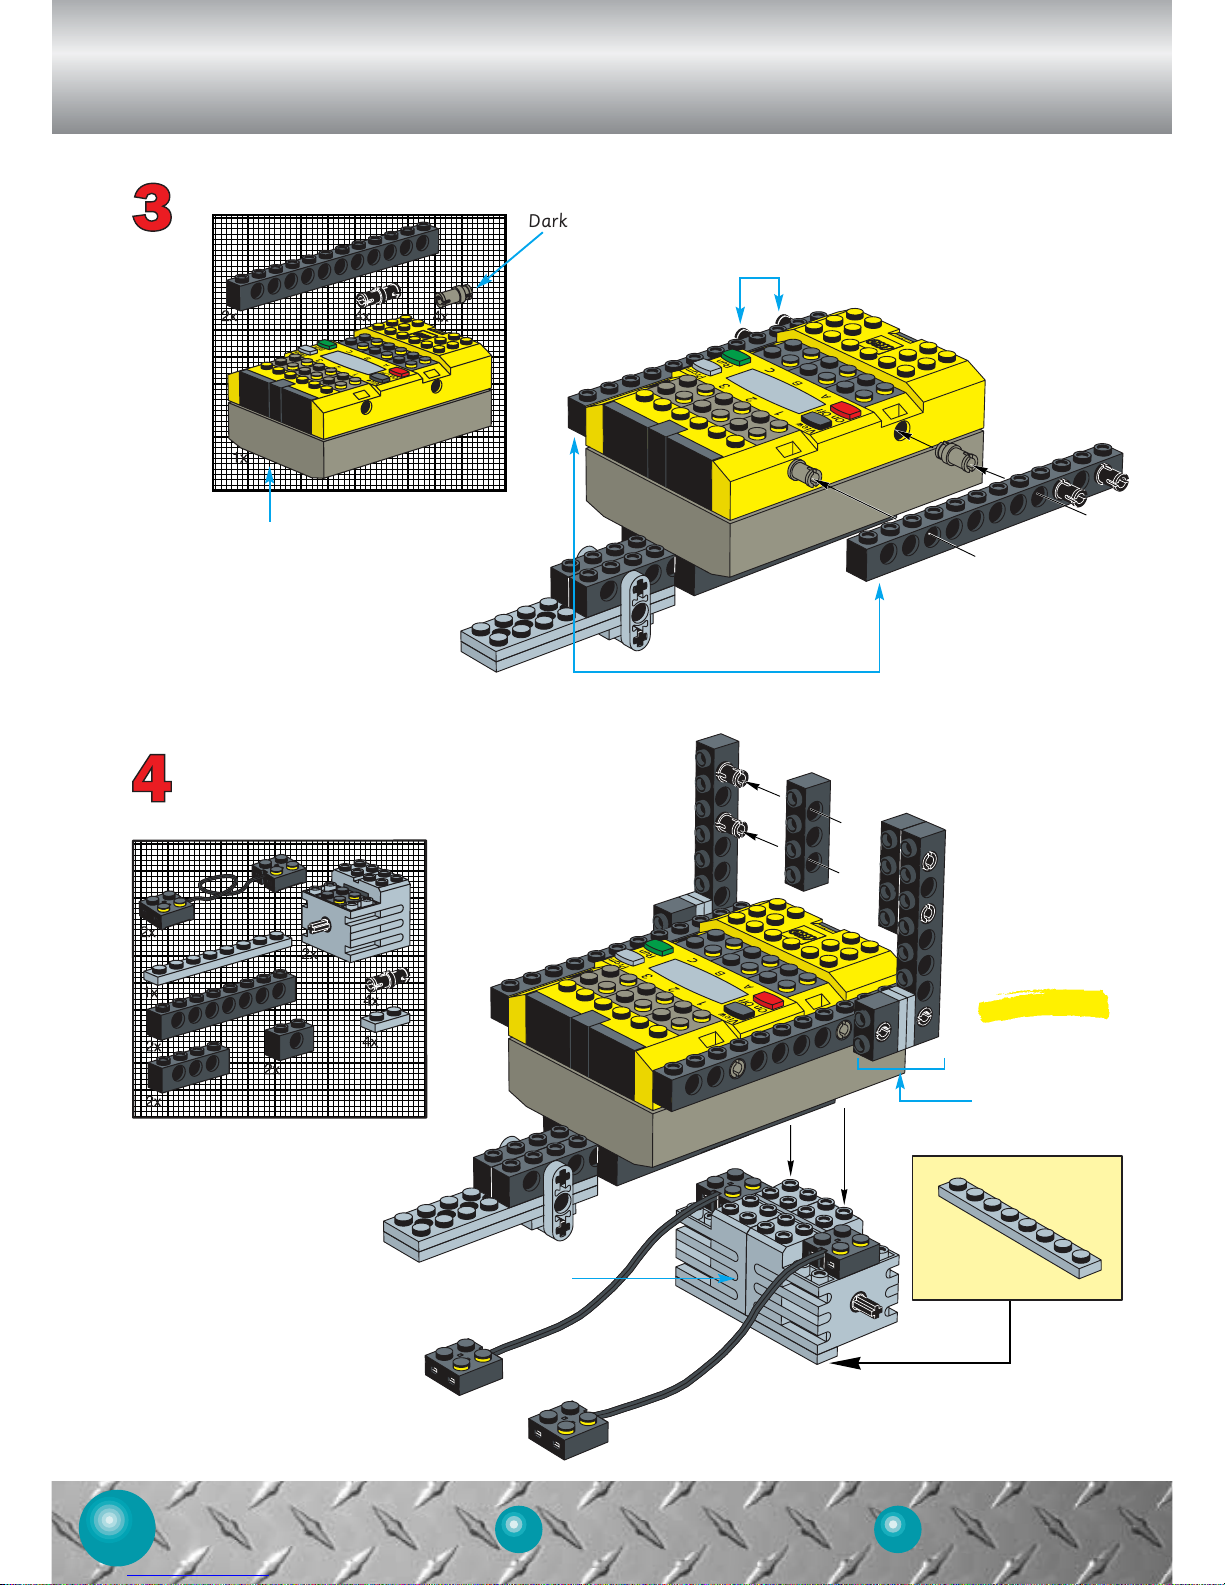
To get started on Acrobot 1, follow these five steps.
!
BEFORE YOU GET STARTED...
Make sure there are batteries in your RCX. For help installing batteries, turn to page 38.
Page 18
PROJECT IDEAS SPECIAL FEATURES
18
4 26
For this step, you need:
For this step, you need:
Dark gray connector peg
Put the black connector pegs here.
Put the beams on the RCX using the dark gray connector pegs.
Put this on the
bottom of the RCX.
Do this first!
Make this piece
for each side
and attach
to the black
connector pegs.
RCX
Page 19

TIPS & TRICKS TOP SECRET PLANS32 39
19
For this step, you need:
2 x 8 plate
with holes
Do this first!
Put the
2 x 8 plates
with holes here.
Use this to make sure
your motors are in the
correct location.
HINT: Try
this wheel
HINT: Try
this wheel
IF YOU NEED HELP COMPLETING YOUR ROBOT...
• Check out “Special Features” on page 26.
• Turn to “Tips and Tricks” on page 32.
TO PROGRAM YOUR INVENTION...
• Go to one of the Robo challenges on the CD-ROM.
Page 20

Acrobot 2
PROJECT IDEAS SPECIAL FEATURES
20
4 26
Do this first!
Attach the beams using
the black connector pegs.
For this step, you need:
Black connector peg
6x means you
need 6 of these.
For a jump start on Acrobot 2, follow these six steps.
!
BEFORE YOU GET STARTED...
Make sure there are batteries in your RCX. For help installing batteries, turn to page 38.
Page 21
Attach the beam
to the RCX.
Attach this to the previous step.
For this step, you need:
RCX
TIPS & TRICKS TOP SECRET PLANS32 39
21
Page 22

For this step, you need:
1 x 6 beam
Put the 1 x 6
beams here.
PROJECT IDEAS SPECIAL FEATURES
22
4 26
Page 23

For this step, you need:
TIPS & TRICKS TOP SECRET PLANS32 39
23
Axle with stop
1/2 bushing
Long black
connector peg
Put the axle with stop
through the beam. Then
add the 1/2 bushings.
Slide the piece
in along side
the motor.
The long black connector
peg must be put in like this.
Make two of these.
Page 24

PROJECT IDEAS SPECIAL FEATURES
24
4 26
For this step, you need:
The long black connector
peg must be put in like this.
Make two of these.
Slide the piece
in along side
the motor.
Page 25

TIPS & TRICKS TOP SECRET PLANS32 39
25
For this step, you need:
2 x 10 plate
Put the 2 x 10 plate here.
HINT: Try
this wheel
IF YOU NEED HELP COMPLETING YOUR ROBOT...
• Check out “Special Features” on page 26.
• Turn to “Tips and Tricks” on page 32.
TO PROGRAM YOUR INVENTION...
• Go to one of the Robo challenges on the CD-ROM.
Page 26

Special Features
MOVEMENT
There’s more than one way to get things
moving. Here are a few ideas to get
your mind in gear.
PROJECT IDEAS SPECIAL FEATURES
26
4 26
Push the hub into the tire. Large and small tires can be
used on the same model.
Even gears can be used as wheels!For more details on how to build this,
see Tips & Tricks on page 34.
12
3
4
56
Put a 16-tooth gear here.
There are two ways to make your wheels swivel.
Big wheels lift your robot higher off the
ground. (This is especially useful on
Acrobot 2. See page 25).
Page 27

NATURAL
TIPS & TRICKS TOP SECRET PLANS32 39
27
MECHANICAL
Front view
Back view
7
8
910
This wheel can be attached
directly to the motor.
This wheel requires some building
before you attach it to the motor.
A Walking Mechanism
Look closely at the
photograph to make sure
you build it correctly.
For help, turn to Tips &
Tricks on page 36.
Put an 8-tooth
gear onto the
motor.
Page 28

Special Features
SENSORS
PROJECT IDEAS SPECIAL FEATURES
28
4 26
Touch Sensor
Use a light sensor “facing” down
to locate a line.
Make a bumper with a touch sensor.
Light Sensor
Connect this end
to the gray ports
on the RCX.
12
34
Connect this end
to one of the gray
ports on the RCX.
The sensor “reads”
the light here.
Push the touch
sensor here.
Sensors make it possible for a robotic invention to
respond to its environment. Here are a few ideas on
how to use light sensors and touch sensors.
Page 29

NATURAL
MECHANICAL
TIPS & TRICKS TOP SECRET PLANS32 39
29
Here is how you can build
a hand-held controller
using two touch sensors.
Attach the two wires from the hand-held
controller to the RCX on ports 1 and 3.
When you turn the steering
wheel it will press the touch
sensor, causing the motor to
stop and your robot to turn.
6
5
Hand-Held Controller
1 x 2 beam
Step 1
Step 2
Step 3
Steering wheel
Page 30

Special Features
Here are more examples of how you can use sensors.
There are also ideas for decorations such as
“eyes” and “noses.”
PROJECT IDEAS SPECIAL FEATURES
30
4 26
SENSORS
1
4
7
2
5
3
6
8
A light sensor that looks down
A bumper that uses
two touch sensors
A light sensor that looks upA light sensor that looks down
A bumper that uses
one touch sensor
A face for decorationEyes for decoration
A bumper that uses
one touch sensor
Page 31

NATURAL
TIPS & TRICKS TOP SECRET PLANS32 39
31
MECHANICAL
These eyes are just
for decoration.
A touch sensor in the
middle of a hand
This eye is the one
that really “sees.”
9
11
13
10
12
14
Arms for decoration
A light sensor
facing down
An eye for decoration
A touch sensor added
to the end of an arm
Page 32

PROJECT IDEAS SPECIAL FEATURES
32
4 26
Tips & Tricks
If you want to make your invention bigger, stronger, faster, or work even
better, try using these tips and tricks.
Don’t forget... you can always
add pieces to the bottom of
your RCX.
Attach pieces using
the angle piece.
To attach one or more pieces,
place a dark gray connector
peg into the hole.
Attach a beam by
using two dark gray
connector pegs.
1
2
Attaching different pieces
When you add a turntable,
the items you put on top
of it will rotate.
Add bricks or special features
directly to the top of your RCX.
Adding features to your RCX
Page 33

TIPS & TRICKS TOP SECRET PLANS32 39
33
Making angles
This one spins.
This one doesn’t spin.
345
6
7
89
Adding height
Extending an axle
Adding length using a beam
and connector pegs
Adding length using plates
Adding plates
to a beam
Adding axles
Page 34

PROJECT IDEAS SPECIAL FEATURES
34
4 26
Push these four
pieces together to
make a hand.
Push the cone into
the hole of the beam.
10
11
12
Adding hubs for caterpillar treads
Adding pieces to a beam
Making a hand
Tips & Tricks
Page 35

TIPS & TRICKS TOP SECRET PLANS32 39
35
Use a special connector to
lengthen the motor shaft.
The black connector pegs
hold pieces more tightly than
the gray connector pegs.
A tire can be added.
13
14
15
Lengthening the motor shaft
Building a frame around a motor
Using connector pegs
Page 36

PROJECT IDEAS SPECIAL FEATURES
36
4 26
16 17
18
Tips & Tricks
You can use this set-up to
make a walking mechanism.
See page 27, #7.
Use this gear combination
to make the axle spin faster.
Using one motor
to drive two gears
Using gears to speed
things up
You can use this set-up
to make Pathfinder 2.
See page 15.
Creating a more powerful
motor using a belt drive
A tire can be added.
Page 37

TIPS & TRICKS TOP SECRET PLANS32 39
37
19
This gear combination will
move slowly but provide a lot
of power. This makes it possible for your robot to do things
that require greater strength.
Changing speed using different-sized gears
How to measure
an axle
Use this chart to
measure the length
of an axle.
A tire can be added.
Page 38

Remove the
bottom of the RCX.
Insert 6 AA (LR6) batteries. Put the bottom
back on the RCX.
Slide the cover back.
Insert the 9V battery. Close the cover.
Battery installation
for the RCX
Battery installation for
the Infrared Transmitter
PROJECT IDEAS SPECIAL FEATURES
38
4 26
6x
1x
AA batteries
Tips & Tricks
9V battery
Instructions for use of battery box
Never mix different types of batteries or old and new
batteries in one battery box. Always remove the batteries
from the battery box for long-term storage or if they have
reached the end of their life. Liquid leaking from dead
batteries will damage the battery box. Rechargeable
batteries can be used but power may be reduced. Do not
recharge the batteries in the battery box. Rechargeable
batteries are only to be charged under adult supervision.
Page 39

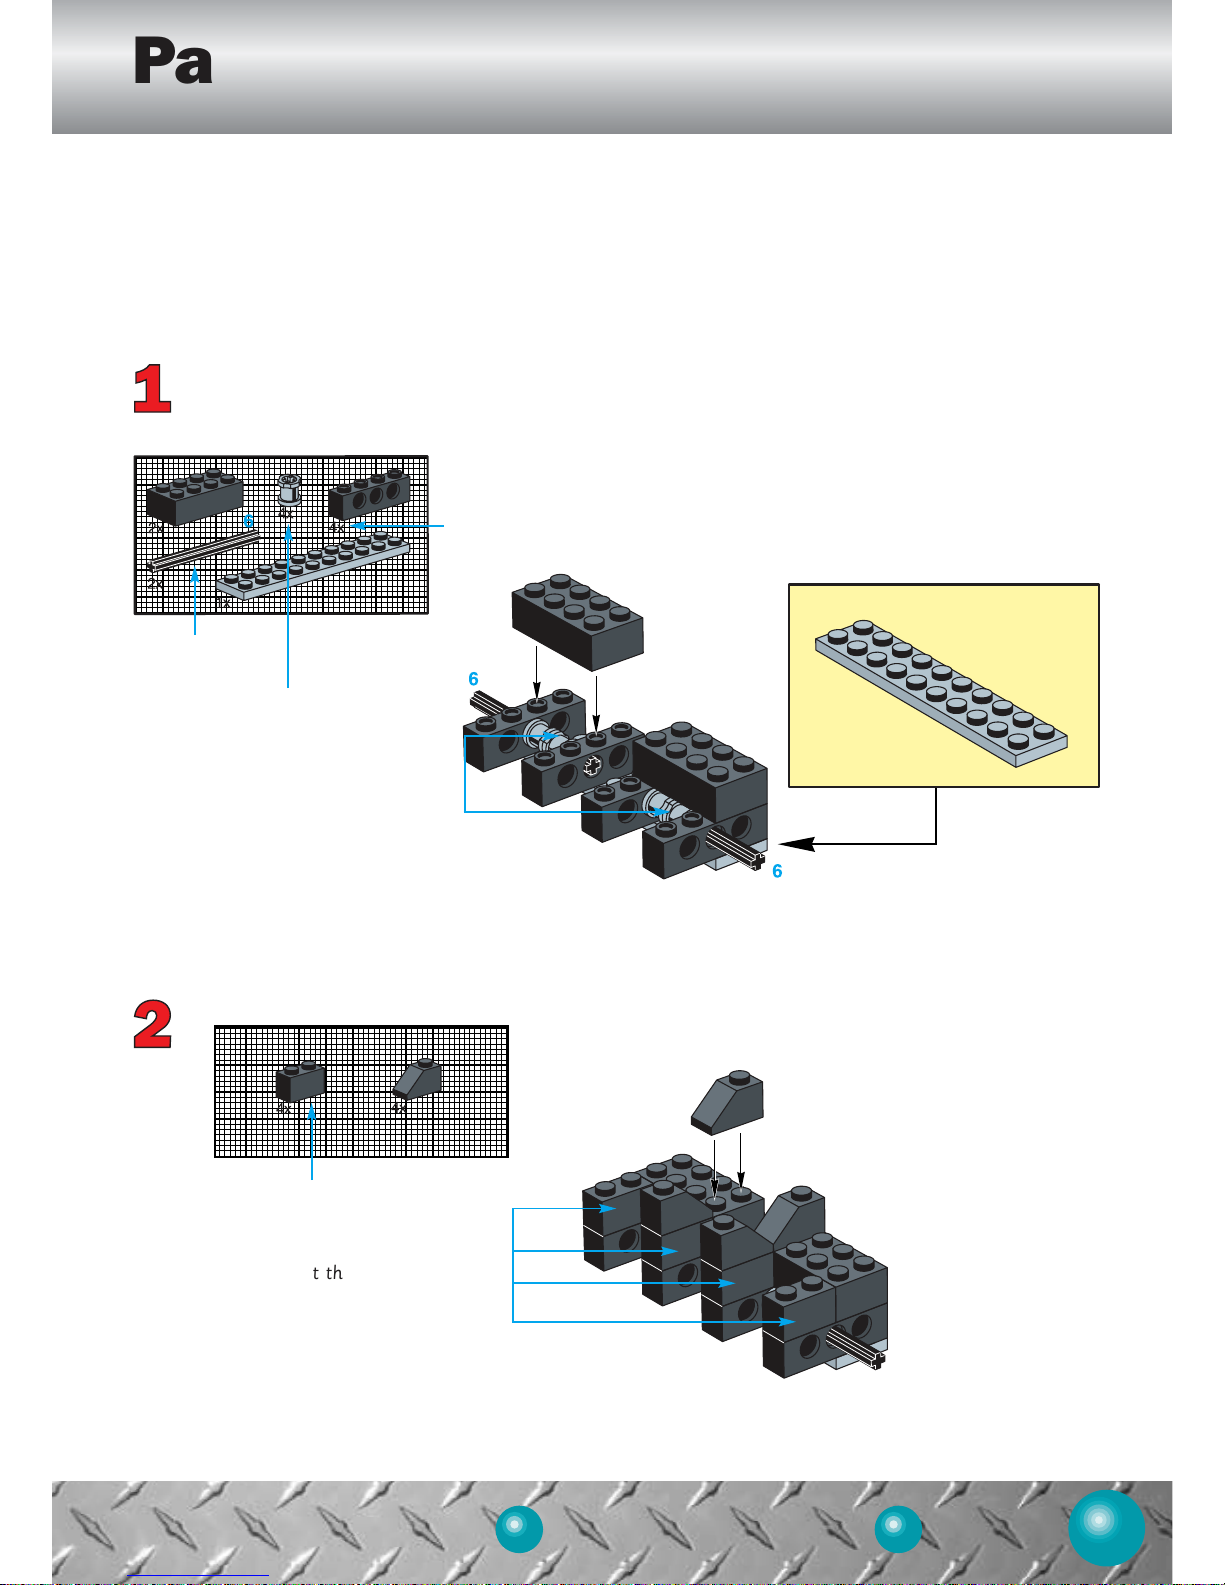
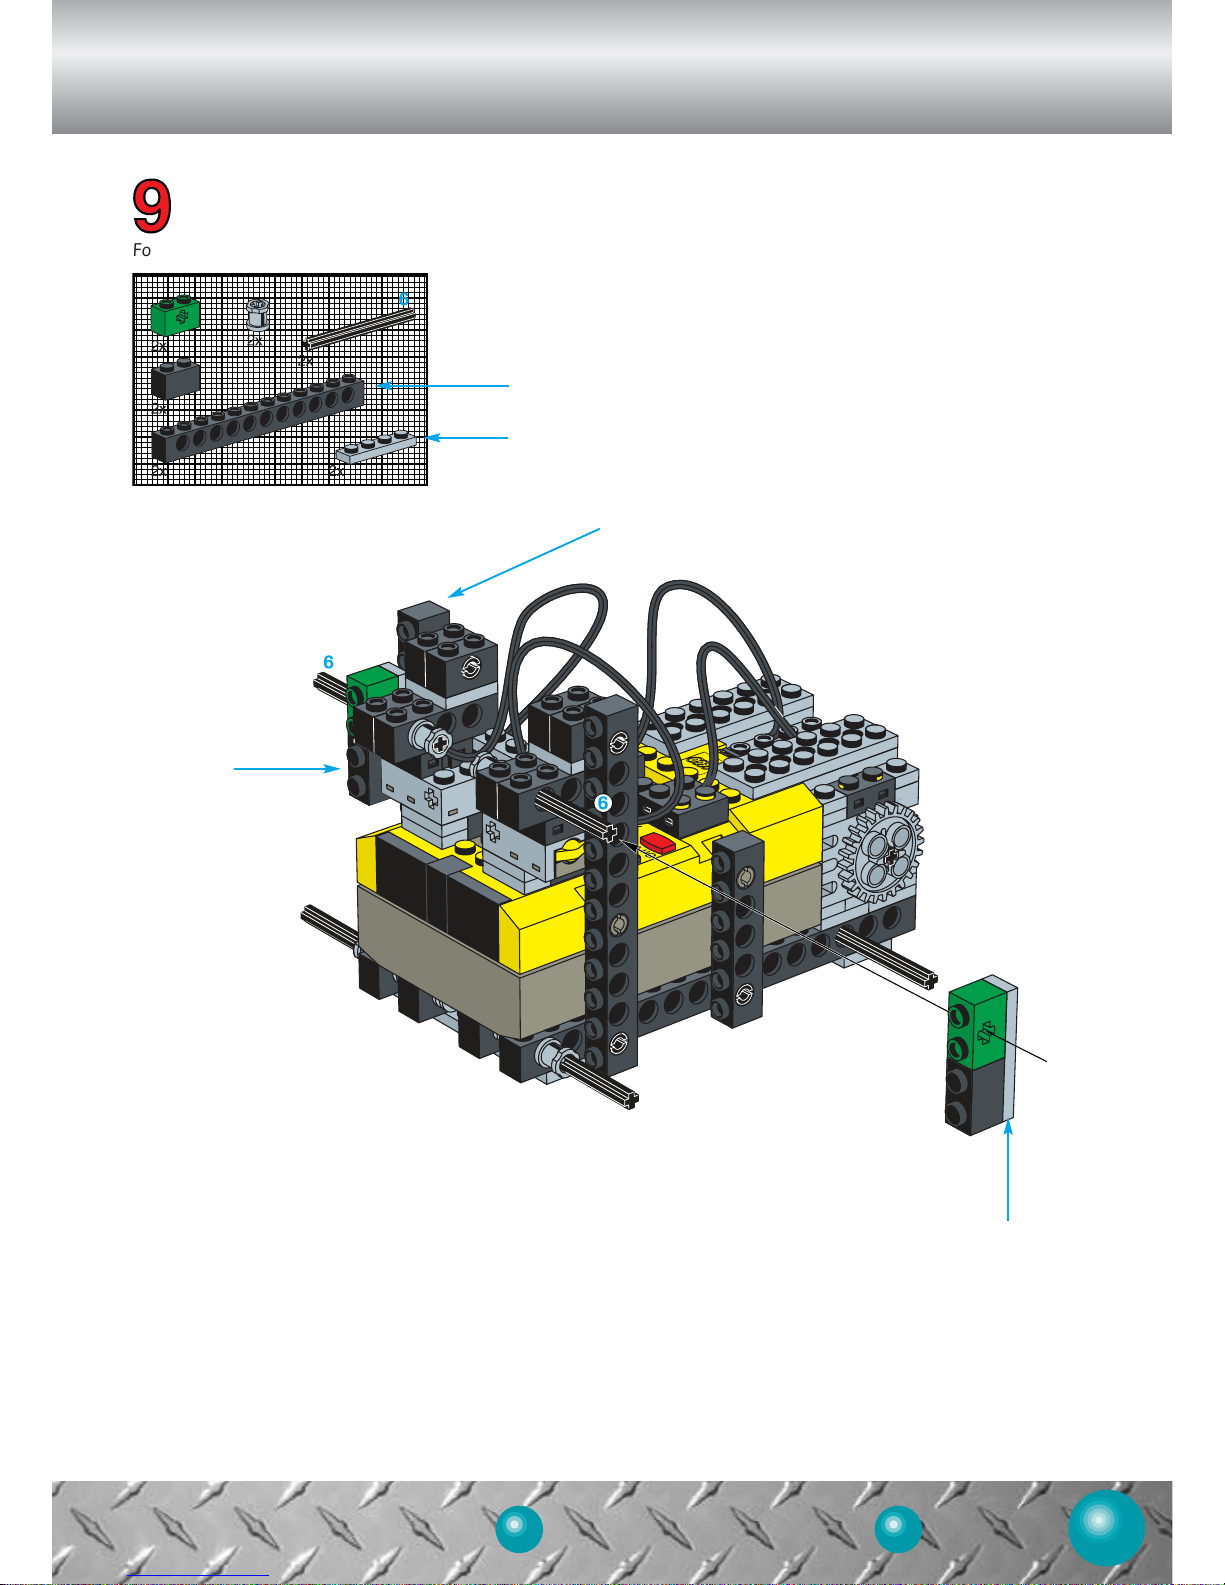
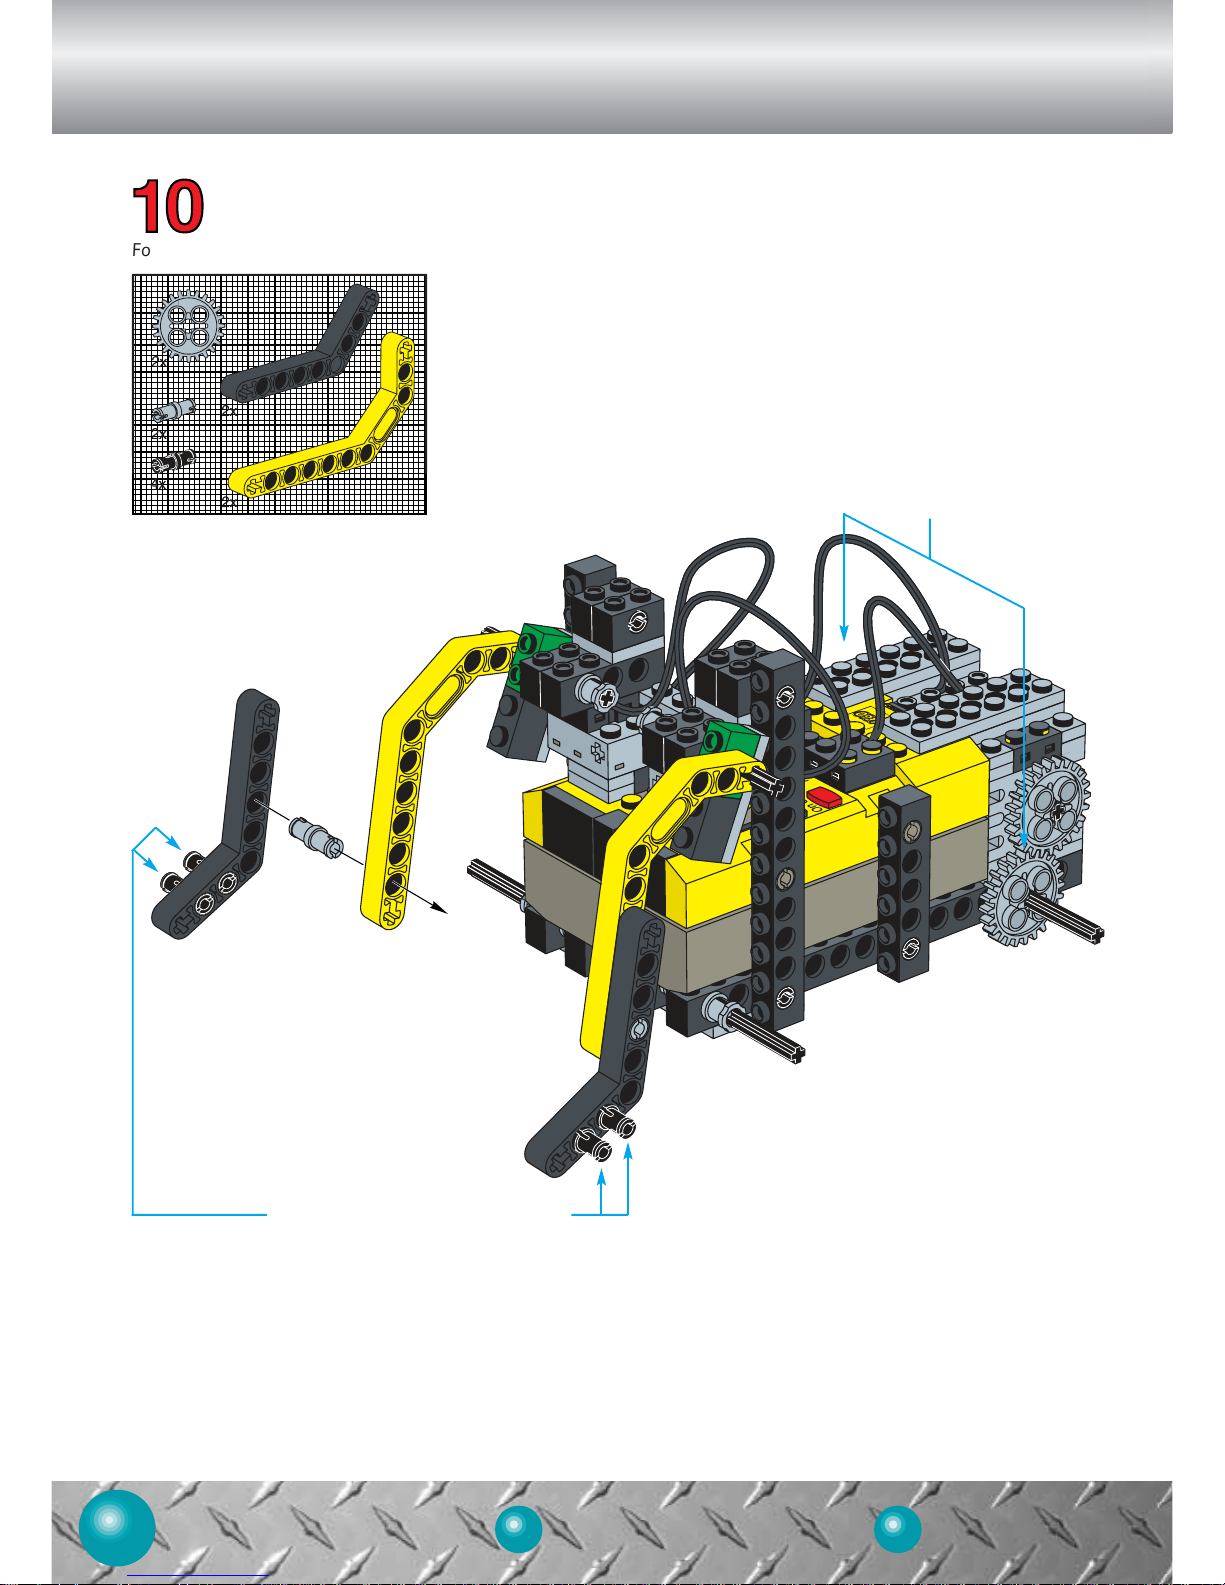
Top Secret Plans
TIPS & TRICKS TOP SECRET PLANS32 33
39
39
The Torbot is a robot that gets around on caterpillar treads and is able to
travel on top of a table with no risk of falling. Its secret lies in the strategic
placement of its touch sensors. To build the Torbot, follow these 12 steps.
For this step, you need:
For this step, you need:
Black connector peg.
Put the black
connector pegs here.
To measure an axle see page 37
2 x 8 plate with holes
Put the 2 x 8 plates
with holes here.
Put the
2 x 8 plates
with holes here.
4x means you
need 4 of these.
Page 40

Top Secret Plans
PROJECT IDEAS SPECIAL FEATURES
40
4 22
For this step, you need:
For this step, you need:
Dark gray
connector peg.
Put the dark gray
connector pegs here.
24-tooth gear
Put the 24-tooth gear
onto the motor.
motor
Page 41

TIPS & TRICKS TOP SECRET PLANS32 33
41
39
For this step, you need:
For this step, you need:
2 x 4 plate with holes
1 x 2 plate
1 x 8 plate
Put the 2 x 4 plates
with holes here.
Put the 1 x 2 plates here.
Put the 1 x 8 plate here.
Page 42

Top Secret Plans
PROJECT IDEAS SPECIAL FEATURES
42
4 22
For this step, you need:
For this step, you need:
Touch Sensor
Put the touch sensor here.
Long black connector peg
Put the long black
connector peg here.
Be sure to put your long
connector peg in this way.
Page 43
TIPS & TRICKS TOP SECRET PLANS32 39
43
For this step, you need:
Put the 1 x 12 beam here.
Attach the pieces
over here.
1 x 12 beam
1 x 4 plate
1 x 4 plate
Page 44
Top Secret Plans
PROJECT IDEAS SPECIAL FEATURES
44
4 22
For this step, you need:
Put the 24-tooth
gears here.
Put the black connector pegs here.
Page 45

For this step, you need:
Put a bushing here.
Put another bushing
on the axle over here.
TIPS & TRICKS TOP SECRET PLANS32 39
45
Page 46

32 40
Caterpillar tread
For this step, you need:
Rubber band
Put the rubber
bands here.
Put the 16-tooth gear here.
Assemble the caterpillar
tread the same way on
this side.
16-tooth gear
Top Secret Plans
PROJECT IDEAS SPECIAL FEATURES
46
4 22
Page 47

TIPS & TRICKS 32 39
47
Parts Identification
TOP SECRET PLANS
Page 48

4122118
 Loading...