

Page 1
2016/2017 Robot Game
Field Setup
Page 2
Material
Quantity
Challenge Set (Mission Model LEGO elements, Mat, Dual Lock™)
1
Sanded plywood (or other very smooth board) 96” X 48” X at least 3/8” (2438mm X 1219mm X 10mm)
1
*two-by-three, 8” (2438mm) [actual cross-section = 1-1/2” X 2-1/2” (38mm X 64mm)]
6
Flat black paint
1 pt. (1/2 L)
Coarse drywall screws, 2-1/2” (64mm)
½ lb. (1/4 kg)
Saw horses, about 24” (610mm high and 36” (914mm) wide
2
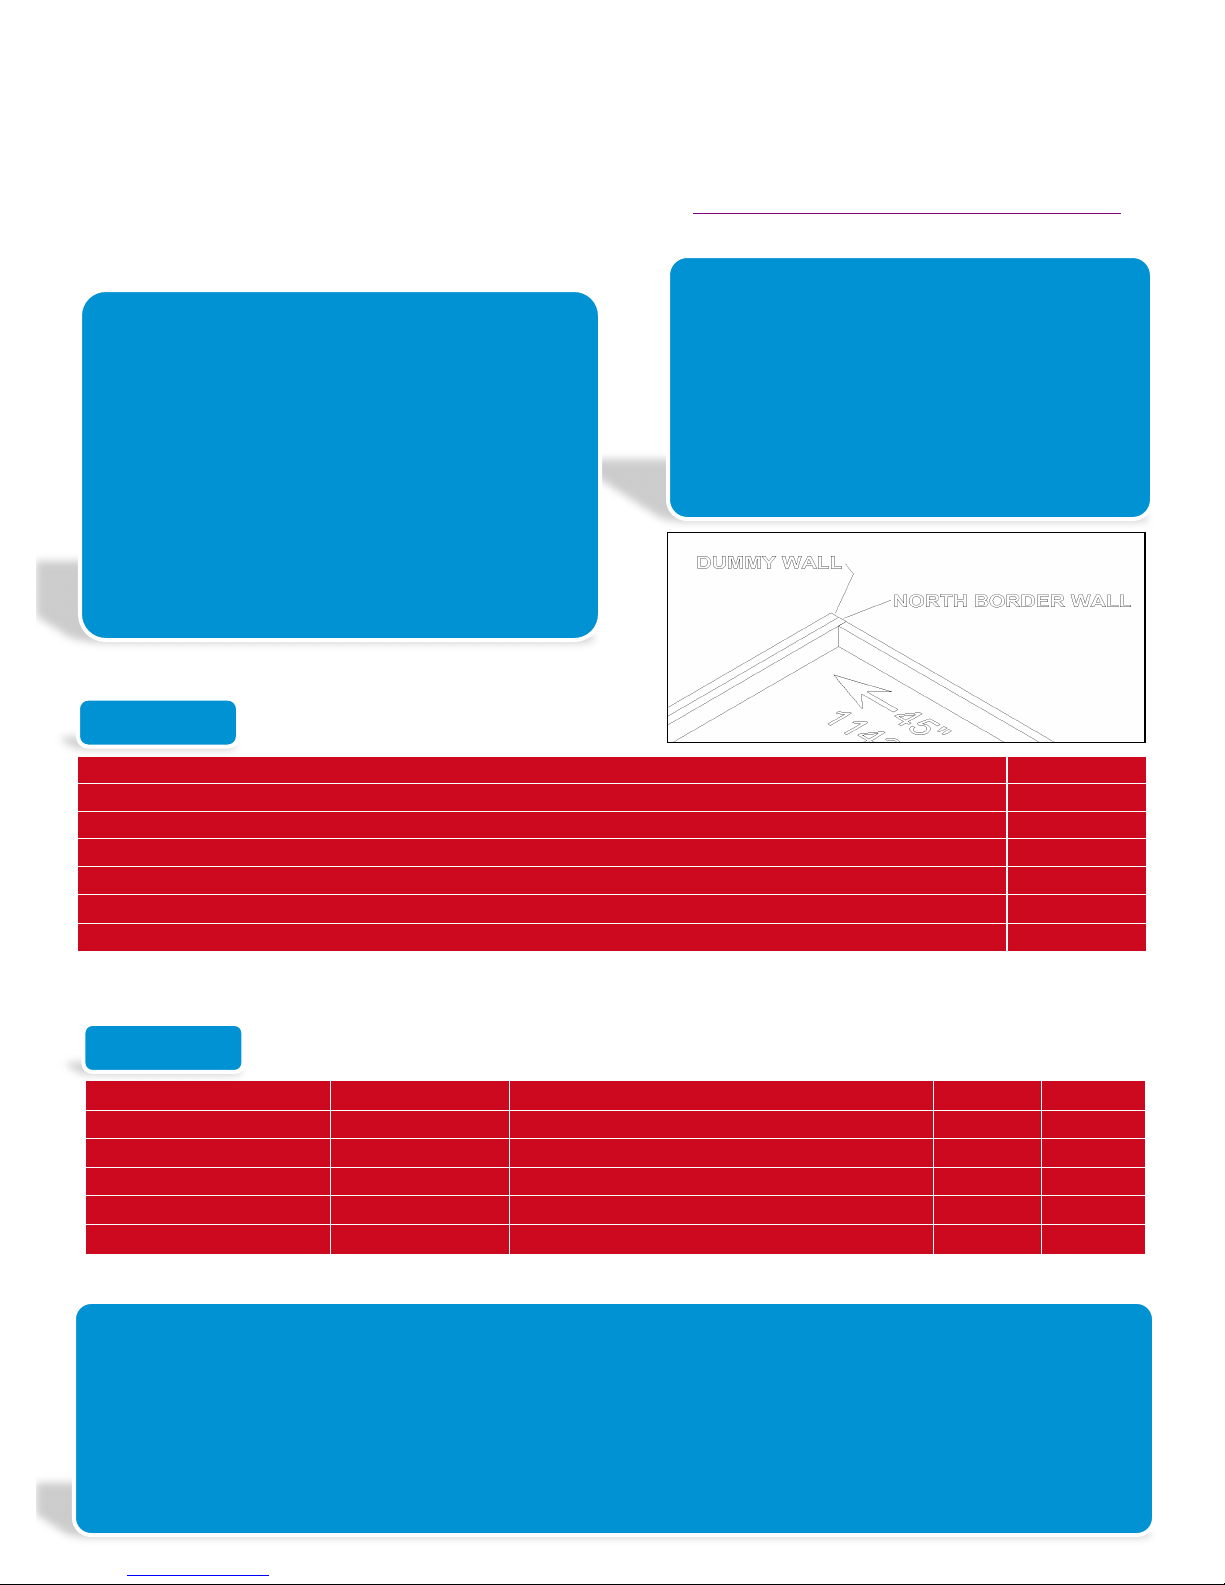
Dummy Wall: All Robot Games have a “shared”
Mission, whose Mission Model(s) rest partly on
your Table, and partly on the other team’s Table,
which is connected to your Table’s north side.
You don’t need to build a second table, but you
do need to build the necessary part of the other
team’s Table, so the shared Mission Model(s)
can be positioned correctly. Here are the
instructions for building one Practice Table,
including its Dummy Wall:
ASSEMBLY
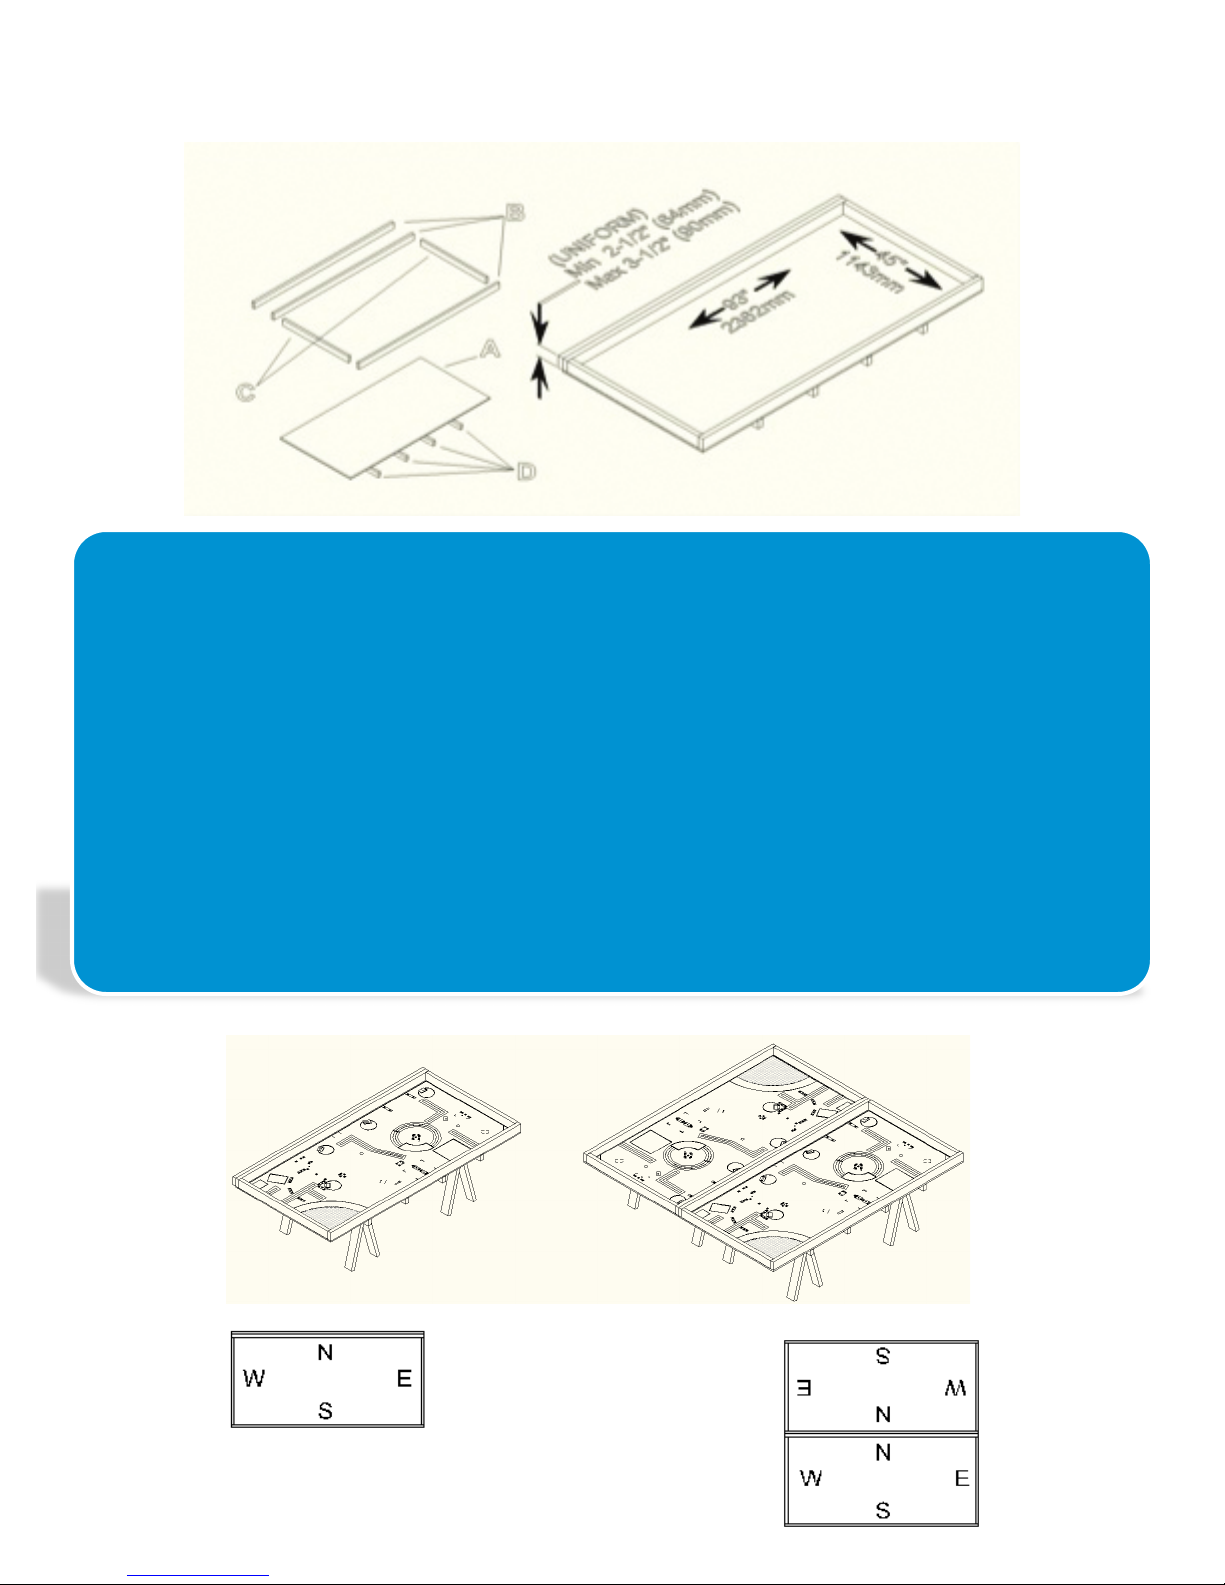
STEP 1: See which face of the plywood (A) is least smooth, and consider that the bottom face. On the bottom face,
clamp, then screw on the stiffeners (D) about every 18” (457mm). Be sure screw heads and splinters don’t protrude.
STEP 2: On the top face of the plywood, locate, clamp, and screw on the Border Walls (B,C) around the top
perimeter.
•The inside wall-to-wall dimensions must measure 93±1/8” by 45±1/8” (2362±3mm by 1143±3mm).
•The height of B and C must measure between 2-1/2” (64mm) and 3-1/2” (90mm).
•Ball order Walls must be the same height as each other on all Tables at a tournament. Border heights at a
tournament may be different than those on your practice Table.
TABLE CONSTRUCTION
The Robot Game takes place on a Table with
specific features, so you’ll need to build one to
practice on if you don’t already have access to one.
With weight, height, simplicity and cost in mind, a
simple design is offered here, but as long as as your
surface is smooth, and your Border Walls are sized
and located properly, how you build the
understructure is up to you. The construction is
simple, but does require some wood-working skill.
At a tournament, two Tables are placed back to
back, but you only operate on one Table, so you only
need to build one Table to practice on.
2016/2017 Robot Game Field Setup
The Field is where the Robot Game takes place.
• It consists of a Field Mat on a Table with Border Walls, with Mission Models arranged on top.
• The Field Mat and the LEGO® elements for building the Mission Models are part of your Challenge Set.
• The instructions for building the Mission Models can be found at: http://firstlegoleague.org/challenge#animal-allies
• The instructions for how to build the Table and how to arrange everything on it are below…
*NOTE: Tables with “two-by-four” walls are legal and common, but we’re slowly phasing them out at tournaments. You may make your Practice Tables
with two-by-four walls, but you must be prepared to play on tables whose walls could range in height anywhere between 2-1/2” (64mm) and
3-1/2” (90mm), as shown in the diagram below.
MATERIALS
Part
Make From
Dimensions
Paint
Quantity
Table surface (A)
plywood
96” X 48” (2438mm X 1219mm)
no
1
long Border Wall (B)
two-by-three
96” (2438mm)
yes
3
Short Border Wall (C)
two-by-three
45” (1143mm)
yes
2
*stiffener (D)
two-by-three
48” (1219mm)
no
4
saw horse
purchase
H ≈ 24” (610mm) W ≈ 36” (914mm)
no
2
PARTS
* If you are using a table surface thicker than ½” (13mm) check for warpage/distortion – you may not need stiffeners.
Page 3
FIELD MAT PLACEMENT
STEP 1: Vacuum the table top. Even the tiniest particle under the Mat can give the Robot trouble. After vacuuming,
carefully run your hand over the surface and sand or file down any protruding imperfections you find. Then vacuum
again.
STEP 2: On the vacuumed surface (never unroll the Mat in an area where it could pick up particles), unroll the Mat
so the image is up and its north edge is near the north/double Border Wall (note the location of the double wall in
each Table sketch below.) Be very careful to not let the Mat kink from bending in two directions at once.
STEP 3: The Mat is smaller than the playing surface by design. Slide and align it so that there is no gap between
the south edge of the Mat and the south Border Wall, then center the mat east-west, with equal gaps at left and
right.
STEP 4: With help from others, pull the Mat at opposite ends and massage out any waviness away from the center
and re-check the requirement of Step 3. It is expected that some waviness will persist, but that should relax over
time. Some teams use a hair dryer to speed the relaxation of the waviness.
STEP 5: [OPTIONAL] To hold the Mat in place, you may use a thin strip of black tape at the east and west ends.
Where the tape sticks to the Mat, it may cover the Mat’s black border only. Where the tape sticks to the Table, it
may stick to the horizontal surface only, and not the Border Walls.
STEP 6: For a competition setup, Dummy Walls are not needed. Secure two Tables north-to-north. The total span
of Border between two Tables must measure between 3” (76mm) and 4” (100mm)
STEP 3: Place this table top on short saw horses (or milk crates, or anything else short and
solid.)
TABLE
TOURNAMENT
PRACTICE TABLE
Page 4

MISSION MODEL CONSTRUCTION
BUILD THE MISSION MODELS: Use the LEGO elements from your Challenge Set, and instructions from
http://firstlegoleague.org/challenge#animal-allies. It will take a single person four to five hours to do this, so it’s best
done in a team construction party. For any team members with little or no experience building with LEGO elements,
Mission Model construction is a great way to learn. This step is also a nice time for new team members to get to
know each other.
QUALITY: The models must be built PERFECTLY. “Almost perfect” is not good enough. Many teams make several
building errors and practice all season with incorrect Models… When these teams later compete on Fields with
correct Models, the Robot fails. The team incorrectly blames the Robot, the tournament organizers, or bad luck for
the failure. Best practice is to have several people check for correctness. Please!
MISSION MODEL ARRANGEMENT AND SETUP
DUAL LOCK: Some Models are “secured” to the Mat, while others are simply “placed” on the Mat. Each place on
the Mat where a Model needs to be secured has a box with an “X” in it. The connection is made using the re-usable
fastening material from 3M called “Dual Lock,” which comes with the LEGO elements in your Challenge Set. Dual
Lock is designed to “lock” to itself when two faces of it are pressed together, but you can unlock it too. The
application process for the Dual Lock is only needed once. Afterward, the Models can simply be locked onto the Mat
or unlocked. To apply Dual Lock, proceed one Model at a time...
STEP 1: Stick one square, adhesive side down, on each box you see on the Mat with an “X” in it.
STEP 2: Press a second square on top of each of those, “locking” them on, adhesive side up. TIP: Instead of using
your finger, use a bit of the wax paper the squares came on.
STEP 3: Align the Model exactly over its mark, and lower/press it onto the squares.
Service Dog and Man Service Dog Cane Warning Fence Barriers
Note: End of cane is on black dot. Man’s arm is down. Dog’s head is down. Warning Fence is up.
MISSION MODELS (Any details not shown or mentioned are left to chance and officially don’t matter.)
These Mission Models are secured on their marks with Dual Lock as shown…
CAUTION:
1. Pay attention… Some Models which seem symmetrical in fact have a directional feature somewhere.
2. Be sure to place each square precisely on its box, and each Model precisely over its marks.
3. When pressing a Model down, press down on its lowest solid structure instead of crushing the whole Model. Pull
on that same structure if later you need to separate the Model from the Mat.
TIP: For large and/or flexible Models, apply only one or two pairs at a time. There’s no need to do it all at once.
STEP 1 STEP 2 STEP 3
Page 5

Pet (Our Little Friend) Frogs Zoologist Bee
These models are placed LOOSE on their marks as shown…(continued on next page)
BIOMIMICRY WALL AND GREEN GECKO: The Biomimicry Wall’s
feet are spaced slightly wide. Center them as close to their marks as
possible, and keep them parallel. Press the Green Gecko onto its
holder at the center of its belly as shown.
PANDA OBSERVATION
AND RETURN: Starts with sliding
section closed (counter-clockwise).
ANIMAL CONSERVATION: This Model is secured with Dual Lock, but not on “X” marks. Instead, you find the correct
north-south location. Place the model between its red marks on the mat. Then center it over your Table’s north border
wall and a selection of “Dummy” wall. Next, make small pencil marks to show exactly where the model’s feet are.
After these location steps, apply Dual Lock – two pair under each foot. When loading an animal in your tray, push the
animal north, and center it east/west. Finally, rest the red axle on its stopper.
MILKING AUTOMATION: Red lever is aligned over its mark. Release-cow is
pulled all the way out. Dispenser ramps are loaded with Milk and Manure (a
type of feces) as shown.
RAMP: Tilt is all the way down at
BEEHIVE: Honey is loaded.
REFRIGERATOR AND FOOD: Refrigerator is loaded with all 8 Food
inside, in random order. Door is closed.
*(Reindeer shown.
You might load a
different animal.
See MISSIONS
for full details.)
Page 6

FIELD MAINTENANCE
• Border Walls: Remove any obvious splinters, and cover obvious holes.
• Field Mat: Make sure the Mat touches the south Border Wall, and is centered east to west.
Avoid cleaning the Mat with anything that will leave a residue. Any residue, sticky or slippery,
will affect the Robot’s performance compared to a new Mat (many tournaments use new
Mats). Use a vacuum and/or damp cloth for dust and debris above and below the Mat. To get
marks off, try a white-plastic pencil eraser. When moving the Mat for transport and storage,
be sure not to let it bend into a sharp kink point, which could affect the Robot’s movement.
Tournaments using new Mats should unroll the Mats as far in advance of the tournament day
as possible. For control of extreme curl at the east or west edges of the Mat, black tape is
allowed, with a maximum of ¼” (6 mm) overlap. Foam tape is not allowed. Do not put Dual
Lock under the Mat, or use it for anything other than securing Mission Models as described.
• Mission Models: Keep the Mission Models in original condition by straightening and
tightening solid connections often. Ensure that spinning axles spin freely by checking for
end-to-end play and replacing any that are bent.
REINDEER: The Reindeer may be placed completely in BASE, OR it may
be placed by hand into the south tray of the Animal Conservation Mission
Model, OR it may take the place of another animal…See the MISSIONS for
full details!
West East Seal Gorilla Flamingo Bat
Manure Manure & Camera
Sample Sample
Shark & Tank Prosthesis Ten More White Gecko Dog & Trainer
Manure Samples
These models are placed loose completely in BASE as you please (the pictures are just for show)
Page 7

Game board – West
Game board – Center
Page 8

FIRST®, and the FIRST® logo are registered trademarks of the Foundation for Inspiration
and Recognition of Science and Technology (FIRST®). LEGO® and the LEGO logo are
registered trademarks of the LEGO Group. FIRST® LEGO® League and ANIMAL ALLIES
are jointly held trademarks of FIRST and the LEGO Group. All other trademarks are the
property of their respective owners.
©2016 FIRST. All rights reserved.
FL002
www.firstlegoleague.org
http://www.firstinspires.org
200 BEDFORD STREET • MANCHESTER, NH 03101 USA
(800) 871-8326
Game board – East
Game board – Full view
 Loading...