


Bike assembly
guide & tips
for adjusting
the bike height
and size

1
Checklist
for ensuring
the best
possible ride

32
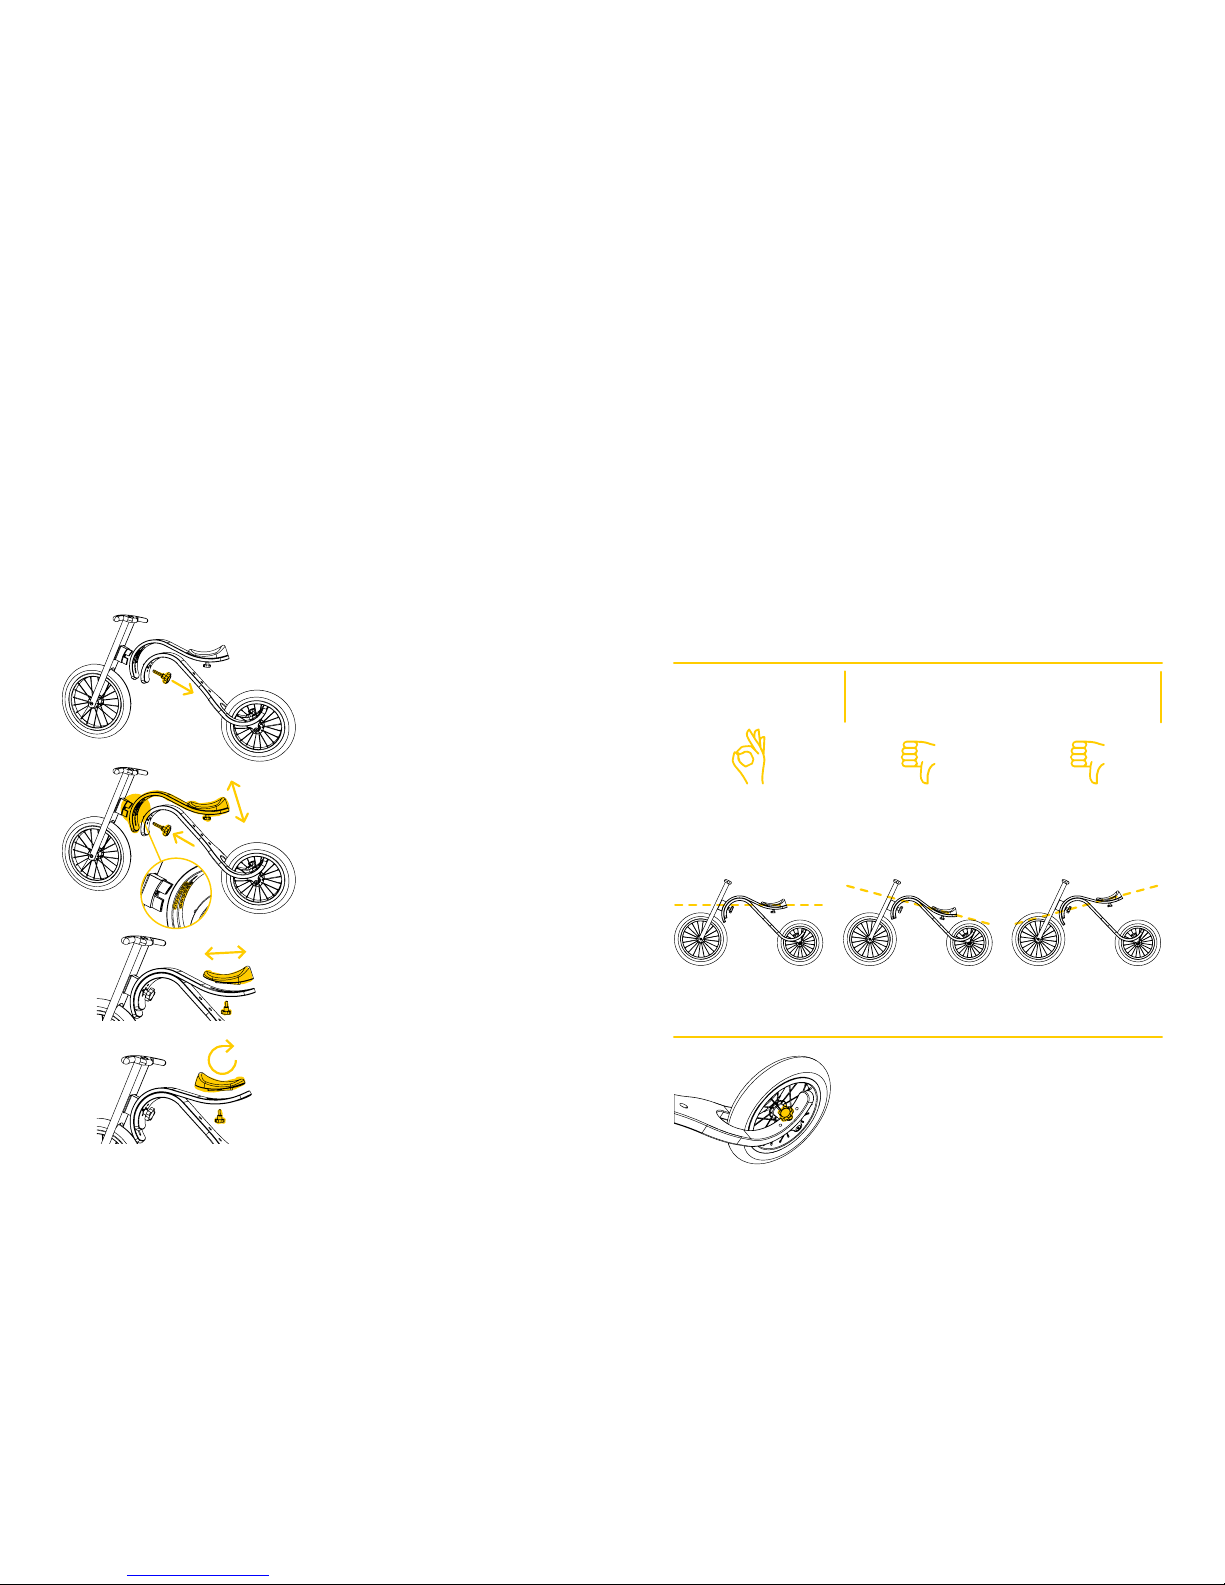
For riding with confidence, CHECK
THE WAY YOUR CHILD’S FEET TOUCH THE GROUND
For comfortable & ergonomic riding,
CHECK IF THE SEAT IS IN A HORIZONTAL POSITION:
For better control over the bike,
CHECK THE FRONT FORK ANGLE:
RIGHT FIT IDEAL POSITIONWRONG F IT BAD POSITIO NWRONG F IT BAD POSITIO N
For most excitement, CHECK YOUR
BACK POCKET FOR AN ADVENTUROUS MOOD
AND LET THE FUN BEGIN!
PLEASE NOTE! Although your new, trusty friend loves
rides through puddles and on the beach, remember
to take good care of him — do not leave your bike
in the rain or snow when the adventure is over.
For more information, see page 22. For more information, see page 20.
For more information, see page 18.
15°
THE IDEAL
FRONT FORK ANGLE
FRONT FORK ANGLE
TOO STEEP
FRONT FORK ANGLE
TOO WIDE
For smooth & easy cruising,
CHECK THE TYRE PRESSURE!
OPTIMUM 1.4 bar. Make sure to check routinely!
1.4 bar

54
CONTENTS
7 1. BALANCE BIKE 3I N1
8 1.1. Technical specification
8 1.2. Conten ts of the box
10 1.3. Which version of the Balance Bike 3in1 is the best for me?
12 1.4. H ow to assemble the Balance Bike
13 1 .5. How to assemble the Bouncy Bike
14 1.6. How to assemble the Baby Bike
17 2. ADJ USTING THE HEIGHT & SIZE
18 2 .1. How to change the front fork an gle
20 2.2 . How to change the height and/or position of the s eat
22 2.3. Tips f or making the most suitable
height & size adjustments
25 3 . DOWNHILL BIKE
26 3.1. Technical sp ecification
27 3.2 . Contents of the box
28 3 .3. How to transf orm your Balance Bike 3in1
into Downhill Bike
31 4 . ROCKING ELEPHA NT
32 4.1. Technical specification
32 4.2. Con tents of the box
34 4.3. H ow to transform your Balance Bike 3in1
into Rocking Elephant
37 5. PEDAL BIK E
38 5.1 . Technical specification
39 5.2 . Contents of the box
40 5.3. How to trans form your Balance Bike 3in1 into Pedal Bike
45 6. TR ICYCLE
46 6.1. Technical speci fication
47 6.2. Co ntents of the box
48 6. 3. How to transform your B alance Bike 3in1 into Tricycle
51 7. MAINT ENANCE & U SE OF LEG&GO BI KE
54 8. READ ME TIPS ON SAF E RIDING

76
Balance Bike
3in1
7

98
1 Main frame
2 Rear wheel
3 Lobe knobs (x2),
thread length: 3 0 mm
4 Handlebar
5 Seat mount
6 Seat
7 Lobe knob,
thread length: 2 0 mm
8 Front fork with wheel
9 Lobe knob, thread length: 50 mm
WHEELS metal hub, wire tension-spokes
with metal rim, pneum atic rubber tyres
WHEEL DIAMETER front 14”, rear 12”
FRAM E AND FRONT FORK lacquered birch plywood
FRONT FO RK JOINT A ND SEAT PUR (polyurethane)
SEAT HEIGHT 25– 47 cm / 9.8”–18 .5”
BIKE LENGTH 95.4 –99 cm / 37.6”– 39”
WEIGHT 3.3 kg / 7 lb
SUITABLE FOR AG ES 10 months to 5 years
ACCESSORIES
10 Allen key (4 m m)
11 Furniture screws (x2) with
hexagon socket cap, length : 25 mm
12 Valve caps (x2)
13 Easy as ABC: leg&go assembly guide
14 Get to know us! leg&go brochure
15 Equally important goodies
for the proud lit tle owner of the bike,
with love from leg&go
1. BALANCE BIKE 3IN1
1.1. Technical
specification
1.2. Contents of the box:
11
12
9
1
2
8
13 14
7
10
6
5
4
15
3

1110
1.3. Which version of the
Balance Bike 3in1
is the best for me?
BALANCE BIKE
1.5 — 5 years
This is the classic versio n of leg&go.
It is particularly adaptable in size
which means that this f riendship
will last until the age of 5 !
BOUNCY BI KE
2 — 3 years
This version is up to the litt le rider’s
taste. Some like it boun cy, some don’t.
The frame const ruction of this version
provides increased natural suspension,
turning the cruising into bouncy fun.
Most suitable for chill rides on flat
terrain. If the roa d is too bumpy or
your child is older than 3 (which also
means heavier), the lit tle one will have
to focus more on con trolling the bike.
BABY BIKE
10 months — 2 years
Featuring an upside-down
frame, this is the lowes t variant
of them all — it is suitable for the
youngest riders , whose leg inside
height measures as lit tle as 25 cm.

1312
FOR THE VI DEO MANUAL, GO TO
www.legandgo.com/manual1
1.4. How to assemble
the Balance Bike
1 Remove the big lobe kno b
from the front f ork by turning
it counter-clockwise.
2 Place the handlebar atop the front
fork and faste n it with 2 furniture
screws using the Allen key (provide d
in the Accessories b ag).
3 Pl ace the front fork , seat mount and
frame as shown. Th e default setting:
seat mount: 3 rd/4th bore from the
bottom, main frame: 2nd bore fro m the
bottom.
If this set ting is not suitable for your
child, see pages 18-22 for tips on h ow to
adjust the proper bike height and size.
4 IMPO RTANT! Both rear wheel lobe
knobs have to be in the mid dle bores.
1
2
3
4
1.5. How to assemble
the Bouncy Bike
FOR THE VI DEO MANUAL, GO TO
www.legandgo.com/manual2
1 Disassemble your Balance Bike
by removing the big lobe kno b.
2 Rotate the main fr ame by turning
it upside-down (see image).
3 Fasten the seat moun t and frame
back to the front f ork with the
previously removed lobe knob. The
default setting: seat mount: 3r d/4th
bore from the bo ttom, main frame:
3rd bore from th e bottom.
If this set ting is not suitable for your
child, see pages 18-22 for tips on h ow to
adjust the proper bike height and size.
4 I MP OR TAN T! Both rear wheel lob e
knobs have to be in the mid dle bores.
1
2
3
4

1514
FOR THE VI DEO MANUAL, GO TO
www.legandgo.com/manual3
1.6. How to assemble
the Baby Bike
1 Disassemble your Balance Bike
by removing the big lobe kno b.
2 Remove the seat fro m the
seat mount by removing the
lobe knob underneath it.
3 R otate the main frame by turning
it upside-down (see image).
4 Fas ten the seat to the main
frame with the previously
removed lobe knob.
1
7
5
6
4
2
3
5 Switch the rear wheel lobe knobs to
the lowest bores o n the main frame.
6 Rotate the seat mount by turning
it upside-down (see image).
7 Re- assemble the bike by faste ning
the seat mount an d main frame
to the front fork wi th the big lobe
knob. The default setting: seat
mount: 2nd b ore from the top, main
frame: 3rd bore from the bottom.

1716
ADJUSTING
THE
HEIGHT
&
SIZE
17

1918
2. ADJUSTING
THE HEIGHT & SIZE
2.1. How to change
the front fork angle
FOR THE VI DEO MANUAL, GO TO
www.legandgo.com/manual4
The height and size of your
bike can be adjusted
by changing:
the angle of th e front fork,
the position of the seat mount ,
the position of the seat.
1
2
1 Remove the big lobe kno b and
detach the fron t fork from
the seat mount an d frame.
2 Find the most s uitable front fork
position for your lit tle rider by
selecting one of t he four bores of the
main frame. Faste n all parts back
together with th e big lobe knob.
What does it change?
The angle of the f ront fork. A steep er angle makes
the steering shar per, but harder to control at a higher
speed (suitable for more experienced riders).
The distanc e between the whee ls. A steeper angle of
the fork shor tens the distance bet ween the wheels,
which makes the bike more agile but harder to control
at a higher speed (suitabl e for more experienced rider s).
The height of the seat. A steeper front fork
angle brings the sea t position higher, whereas
a wider angle brings the s eat position lower.
The ideal front fo rk
angle for ensuring
comfortabl e, safe and
ergonomic riding is at
15° angle to the ground .
An angle that is too
steep makes the bike
harder to control.
An angle that is too
wide makes the bike
harder to control.
THE IDEAL
FRONT FORK
ANGLE
FRONT FORK
ANGLE
TOO STEEP
FRONT FORK
ANGLE
TOO WIDE
15°
2120
2.2. How to change
the height and/or
position of the seat
1 Disassemble your Balance Bike
by removing the big lobe kno b.
2 Find the most s uitable seat mount
position for your lit tle rider by
selecting one of t he six bores of the
seat mount . Fasten all parts b ack
together with th e big lobe knob.
3 To adjust the seat position, loo sen
the lobe knob of th e seat and
slide the seat up or down the
groove of the seat moun t.
When the se at is in the desired
position, tighten t he lobe knob
to fasten the se at in place.
IM PO RTA NT ! The se at must be
fastened firmly in order to prevent
it from moving while riding.
4 At the seat mount’s highes t
position, the s eat must be
flipped front-to-back to ensure a
horizontal position of the seat.
1
2
3
4
What does it change?
Properly adjus ted height and angle of the seat mount ensures
that the littl e rider is in a comfortable p osition.
Properly adjus ted distance between the han dlebar and the seat ensures that
the little rider h as the most ergonomic s eat position with any frame a djustment.
IM PO RTA NT ! When ever adjusting the height and/or position of your seat
mount, always make sure that the seat is positioned perfect ly horizontally.
The seat position must
always be horizontal!
The child will slide
backwards.
The child will
slide forward.
THE IDEAL
SEAT POSITION
BAD
SEAT POSITION
BAD
SEAT POSITION
PLEASE NOTE! The lobe knobs of the rear wheel
DO NOT adjust the heigh t of the bike. These knobs
are moved for certain m odifications only (i.e. f rom
Balance Bike to Baby Bike, Ped al Bike, etc.).
This can be corrected by repositioning
the seat and/or flipping it front-to-back
(see steps 3 and 4 on page 20).

2322
2.3. Tips for making the
most suitable height
& size adjustments
If your child can
touch the ground wit h
tippy-toes only, the height
adjustment is wrong f or
the first bike experience.
The little one will n ot feel
safe and confident.
Having your child’s feet
touching the groun d
fully is the correct height
adjustment for th e Balance
Bike. The little explorer
will be able to ride with
confidence, ge tting the
best first riding experience.
If your child’s legs are too
bent in knees, t he little one
will not feel comfortable.
Such height adjustm ent
is not ergonomic.
WRONG
HEIGHT
CORRECT
HEIGHT
WRONG
HEIGHT
FOR PEDAL B IKE While learning to pedal, make sure th at the feet touch the
ground fully. When the lit tle adventurer gets more experienced, you can adjust
the seat mount to a high er position so only the tippy-toes touch the ground.

2524
Downhill Bike
The footrest of t he
add-on item is de signed
strong enough for riding
in a standing position . It
also works as a brake.
When the feet are
placed on the pa d, the
attachment functions
as a footrest ; to use the
brake, just push down on
the tip of the footb oard.
25

2726
BRAKE MOUNT lacquered birch ply wood
BRAKE FOOTBOARD lacquered birch ply wood
BRAKE powder-coated aluminium
PAD polyamide
SEAT HEIGHT 36.2 – 4 6 cm / 14.3” – 18 ”
BIKE LENGTH 99 cm / 39”
WEIGHT 4 kg / 8 lb (complete Downhill Bike)
SUITABLE FOR AG ES 2 to 5 years
3. DOWNHILL BIKE
3.1. Technical
specification
1 Brake mount with
brake footboard
ACCESSORIES
2 Allen key (4 mm)
3 Furniture screws (x3)
with hexagon socket cap,
length: 30 mm
4 Easy as ABC:
leg&go assembly guide
5 Get to know us!
leg&go brochure
6 Equally important
goodies for the proud
little owner of the bike,
with love from leg&go
3.2. Contents of the box:
1
2
3
4 5
6

2928
3.3. How to transform
your Balance Bike 3in1
into Downhill Bike
1 Disassemble your
Balance Bike by
removing the
big lobe knob.
2 Using the 3 screws and
the Allen key provided
in the Accessories
bag, attach t he
add-on item to
the main frame.
1
2
FOR THE VI DEO MANUAL, GO TO
www.legandgo.com/manual5
3
4
5
3 Place the front fork, seat mount and
frame as shown. Th e default setting:
seat mount: 3 rd/4th bore from the
bottom, main frame: 2nd bore fro m
the bottom . Tightly fasten with the
previously removed lobe knob.
If this set ting is not suitable
for your child, see pages 18-22
for tips on how to adjust th e
proper bike height and size.
4 Both rear wheel lobe kno bs
must be in the middle bores.
IM PO RTA NT ! The brake does not
function in othe r rear wheel positions.
5 As the brake wears down over time,
you can easily adjust it . Just loosen
the screw on the bot tom of the
brake footboard (using the A llen
key), slightly reposition it along the
small groove, then tightly f asten it.

3130
Rocking
Elephant
The Rocking Elephant
will teach your child
a sense of balance a s
soon as the litt le darling
has learned to sit up.
31

3332
3
2
ROCKE R AND FRA ME lacquered birc h plywood
HEAD AND HANDLES painted birch plywood
SE AT PUR (polyurethane)
HEIGHT 47 cm / 19”
SEAT HEIGHT 29.4 cm / 11 .6”
LENGTH 79 cm / 31”
WIDTH 28 cm / 11”
WEIG HT 3.7 kg / 8 lb (complete Rocking Elephant)
SUITABLE FOR AG ES 6 to 18 months
4. ROCK ING E LEPHANT
4.1. Technical
specification
4.2. Contents of the box:
1 Rocker
2 Rocker
fixtures
(x2)
3 Handles
4 Head
1
4
6
ACCESSORIES
5 All en key (4 mm/5mm)
6 Furniture screws (x3)
with hexagon socket cap,
length: 30 mm
7 Easy as A BC:
leg&go assembly guide
8 Get to know us! leg&go broch ure
9 Equally important goodies for
the proud littl e owner of the bike,
with love from leg&go
! To assemble the Rocking Elephant,
you will need the Balance Bike 3in1
parts liste d below. If you have
purchased the Rocking Elephant as a
complete item (no t as Add-on Items),
these part s will be included in the box.
10 Seat mount
11 Seat
12 Lobe knob,
thread length: 2 0 mm
13 Main frame
(rear wheel removed
if transforming Balance Bike 3in1)
14 Lobe knobs (x2),
thread length: 3 0 mm
15 Big lobe knob,
thread length: 5 0 mm
(removed from front fork
if transforming Balance Bike 3in1)
The base material & c oating (lacquer
on the plywood, paint on the head
& handles) is tested in acc ordance
with “European S tandard EN 71-3
Safety of toys” and confirmed to be
harmless to children wh en coming
into contact with the mouth.
5
7 8
9
12
15
11
10
13
14

3534
4.3. How to transform
your Balance Bike 3in1
into Rocking Elephant
BEFOR E YOU BEGIN I f you are
transforming your B alance Bike 3in1
into Rocking Elephant, disassemble
your bike and prepare the ne cessary
Balance Bike par ts listed on page 33 .
1 Take the seat mount, remove the
lobe knob under the seat and flip
the seat front-to -back. Fasten the
seat with the lob e knob tightly.
2 Attach the 2 rocker fixtures to the
main frame with the 2 lo be knobs,
fastening them in th e lowest bores.
IM PO RTA NT ! Leave the lobe
knobs a little lo ose for now.
3 At tach the seat mount to the head.
FOR THE VI DEO MANUAL, GO TO
www.legandgo.com/manual6
1
2
3
4 Attach the main frame to the s eat
mount and the head. Make sure to align
the metal fixtures of t he main frame
with the lowest holes of the seat mount .
5 As semble the 3 part s by placing the
big lobe knob in the second hole
from the top. Tightly fasten it.
6 Attach the assembled Elephant frame
to the rocker with the 3 f urniture
screws provided in the Acc essories bag.
PLEAS E NOTE the screws come in
2 different sizes. The narrow screws
(2pcs) are for fas tening the rocker to
the hind legs (use the 4 -mm-end of
the Allen key). The bigger screw (1pc)
is for fastening th e rocker to the head
(use the 5-mm- end of the Allen key).
IM PO RTA NT ! Start by loos ely
fastening all 3 screws by han d. When
the 3 screws are in place, f asten
them tightly with the A llen key.
7 Once t he Elephant frame is tightl y
fastened to the rocker, remember
to tighten the rear lo be knobs!
8 Se parate the handles . Place the
handles on either side of the head
and join them through th e hole,
fastening them tightly together.
May the happy ro cking begin!
DO NOT LE AVE THE CHILD
UNATTENDED.
4
6
7
5
8

3736
Pedal Bike
By attaching pe dals to the Balance Bike,
learning how to pedal will b e very fast
and easy, since your child has already
learned how to balance on a bike — all it
takes is to develop the pedalling reflex.
37

3938
5. PEDAL BIKE
5.1. Technical
specification
WHEELS metal hub, wire tension-spokes
with metal rim, pneum atic rubber tyres
WHEEL DIAMETER 14”
PEDAL M OUNT lacquered birch plywood
PEDAL S lacquered birch plywood, polyamide
BE LT durable rubber
BRAKE coaster
QFAC TOR: 15.8 cm / 6 .2”
GAIN RATIO 3.7
SEAT HEIGHT 42 – 51 cm / 16. 5” – 20”
BIKE LENGTH 99 cm / 39”
WEIGHT 4.9 kg / 10. 8 (complete Pedal Bike)
SUITABLE FOR AG ES 3 to 6 years
2
5.2. Contents of the box:
1 Pedal mount with p edals
2 Durable belt
3 1 4” rear wheel
ACCESSORIES
4 Allen key (4 mm)
5 Furniture screws (x3)
with hexagon socket cap,
length: 30 mm
6 Easy as ABC:
leg&go assembly guide
7 Get to know us!
leg&go brochure
8 Equally important
goodies for the proud
little owner of the bike,
with love from leg&go
1
4
5
3
6 7
8

4140
5.3. How to transform
your Balance Bike 3in1
into Pedal Bike
A) You already have an assembled Balance Bike 3in1
Disassemble your Balance Bike by removing th e big lobe knob
holding the main frame, seat mount and front f ork together. Remove
the 12” rear wheel from the main frame (hold on to the lobe knob s!).
B) Your Balance Bike 3in1 is still in the box
Locate the main frame in the Balance Bike 3in1 box. Re move
the 12” rear wheel from the main frame (hold on to the lobe knob s!).
A
B
FOR THE VI DEO MANUAL, GO TO
www.legandgo.com/manual7
1 Use the Allen key to loosely attach
the pedal mount to the main
frame with the 3 furniture s crews
(provided in the Access ories bag).
I MP ORTA NT! Do not tighten the
screws yet — the pedal a ttachment
should slide fre ely up to 1.5 cm.
2 Take the 14” rear wheel and belt from
the Add-on Items for Pedal Bike box.
Place the belt on the rear wheel gear.
3 B efore fastening the rear wheel to
the main frame, make sure t hat
the rear wheel ge ar and pedal
gear are on the same s ide.
1
2
3
1.5 cm

4342
4 Attach the rear wheel to th e main
frame with the 2 lobe kn obs that were
used previously for t he Balance Bike
rear wheel. Fas ten the lobe knobs
in the bores closest to the pedals.
5 Place the belt on both gears.
If you cannot ge t the belt in its place,
loosen the 3 screws a ttaching the
pedal mount to the m ain frame
until the pedal at tachment slides
freely (see step 1 , page 41).
6 Gently pull the pedal atta chment
away from the rear wheel until the
belt is taut (do not strain it!). Hold
it in place until you have tightly
fastened the 3 fix ture screws of the
main frame with the All en key.
Check if the wheel and belt are
spinning freely and smoothly.
I MP ORTA NT! If th e belt is not taut
enough, it will skip sprockets while
pedalling fast or pedalling in standing
position. Appropriate belt tension
ensures comfortable riding.
7 Place t he front fork, seat mount and
frame as shown. Th e default setting:
seat mount: 3 rd/4th bore from the
bottom, main frame: 2nd bore fro m
the bottom . Tightly fasten with the
previously removed lobe knob.
If this set ting is not suitable for your
child, see pages 18-22 for tips on h ow to
adjust the proper bike height and size.
4
5
6
7
!

4544 45
Tricycle
This version of leg&go
bike is best suited for
stability lovers and
flatland cruising.

4746
6. TRICYCLE
6.1. Technical
specification
WHEELS metal hub, wire tension-spokes
with metal rim, pneum atic rubber tyres
WHEEL DIAMETER front 14”, rear 12”
PEDAL MOUNT AND CARG O BOX lacq uered birch plywood
PEDAL S lacquered birch plywood, polyamide
BE LT durable rubber
BIKE LENGTH 99 cm / 39”
BIKE WI DTH 47 cm / 18 .5”
SEAT HEIGHT 39.7 – 49.2 cm / 15.6” – 19.4 ”
WEIGHT 6 kg / 13 lb (complete Tricycle)
SUITABLE FOR AG ES 2 to 4 years
1
2
6.2. Contents of the box:
1 Pedal mount with p edals
2 Rear cargo box with
2 rear wheels and
durable belt
ACCESSORIES
3 A llen key (4 m m)
4 Furniture screws ( x3)
with hexagon socket cap,
length: 30 mm
5 Easy as ABC:
leg&go assembly guide
6 Get to know us!
leg&go brochure
7 Equally important
goodies for the proud
little owner of the bike,
with love from leg&go
IM POR TANT !
The Tricycle is not equipped with a brake and is suitable for flatland cruising only.
Example of a safe riding are a:
3
4
5 6
7
FLATLAND
CRUISING
CONQUERING
HILLS

4948
6.3. How to transform
your Balance Bike 3in1
into Tricycle
A) You already have an assembled Balance Bike 3in1
Disassemble your Balance Bike by removing th e big lobe knob
holding the main frame, seat mount and front f ork together. Remove the
12” rear whe el from the main frame (hold on to the lobe knobs!).
B) Your Balance Bike 3in1 is still in the box
Locate the main frame in the Balance Bike 3in1 box.
Remove the 12” re ar wheel from the main frame (hold on to th e lobe knobs!).
A
B
1 Use the Allen key to loosely attach
the pedal mount to the main
frame with the 3 furniture s crews
(provided in the Access ories bag).
I MP ORTA NT! Do not tighten the
screws yet — the pedal a ttachment
should slide fre ely up to 1.5 cm.
2 For easier assembly, place
the rear cargo box and m ain
frame upside down.
3 At tach the rear cargo box to the
main frame with the 2 lo be knobs
that were used previously for the
Balance Bike rear whe el. Make
sure to place the lobe k nobs in the
middle bores of the m ain frame.
1
2
3
1.5 cm
FOR THE VI DEO MANUAL, GO TO
www.legandgo.com/manual8

5150
4 Place the belt on both gears.
If you cannot get the belt in its place,
loosen the 3 screws a ttaching the
pedal mount to the m ain frame
until the pedal at tachment slides
freely (see step 1 , page 49).
5 Gently pull the pedal at tachment
away from the rear wheels until the
belt is taut (do not strain it!). Hold the
pedal mount in place until you have
tightly fastene d the 3 fixture screws
of the main frame with th e Allen key.
Check if the wheels and belt are
spinning freely and smoothly.
I MP ORTA NT! If th e belt is not taut
enough, it will skip sprockets while
pedalling fast or pedalling in standing
position. Appropriate belt tension
ensures comfortable riding.
6 Place th e front fork, seat mount and
frame as shown. Th e default setting:
seat mount: 3 rd/4th bore from the
bottom, main frame: 2nd bore fro m
the bottom . Tightly fasten with the
previously removed lobe knob.
If this set ting is not suitable for your
child, see pages 18-22 for tips on h ow to
adjust the proper bike height and size.
4
5
6
!
MAINTENANCE
&
USE OF
LEG&GO
BIKE
51

535252
7. MAINTENANCE &
USE OF LEG&GO BIKE
Leg&go bikes are made to be easy to ride, but the
assembly of the bike, as simp le as it is, must be done
by an adult. When assembling your chosen versio n
of the bike, make sure that all the k nobs and screws
are properly tighte ned and the seat is fixed firmly.
We care for your child’s comfor t and joy when riding
the bike. Please see pages 18–22 for t ips on adjusting
bike height & size. These tips are ver y important
for ensuring the be st biking experience possibl e.
All two-whe el modifications of leg&go ar e not
intended to be stab le on their own and have to
be balanced by the little rider under the dire ct
supervision of an adult. The child has to use his/her
feet to provide stabilit y. Each modifica tion of the
bike is intended for a specific age group — adjust
the height of the seat accordingly so the child c an
reach the ground with both feet fully wh en seated.
Every leg&go bike has a ste ering limiter that prevents
sharp turning angles . It is the black rubber part wher e
the front fork is joine d to the frame. The limiter can b e
removed, but the le g&go team does not sugges t doing
so for safety reasons. The limited s teering angle may
seem too tiny for an adult , but, in reality, for a kid, it is
not tiny at all. The limiter no t only helps to control the
bike but also protects t he rider in a case of a
fall, ensuring that the handlebar will not hit th e
little rider’s stomach.
For smooth & easy ridin g, check the tyre pressure!
It has to be 1. 4 bar. Make sure to check routinely!
Storing the bike in a dry place will ensure that
it serves many years . Never leave it in the
rain or snow when the adventure is over.
The bike is suitable for cle aning with water and
soap. Wipe with a dr y cloth afterwards.
Make sure to teach your child h ow to
stop the bike when nec essary.
• When riding the B alance Bike, Bouncy Bike
or Baby Bike, the child has to us e his/her
feet to stop the bike.
• The Downhill Bike has a s pecial footrest whic h
works also as a brake. When the feet are placed
on the pad, it fun ctions as a footres t; to use the
brake, just push down on th e tip of the footrest .
Please note! The brake of the footrest is an extra
function that is n ot intended for stopping the bike fully.
The little rider will h ave to use his/her feet for stopping.
• The Pedal Bike has a c oaster brake — to stop
the bike, the child has to pedal backwards.
• Please note that the Tricycle is not equipped with
a brake and is suitable for flatland cruising only.
1.4 bar

5554
8. READ ME
TIPS ON SAFE RIDING
MAX 30 kg
The bike is suitable for children
weighing up to 30 kg.
Not to be used in tr affic.
Protective equipment
should be worn.
The assembly of th e bike must
be done by an adult .
Accessories ba g contains small
parts. Ch oking hazard!
To be used under the direct
supervision of an a dult.
The bike shall be used with caution since skill is requir ed to avoid
falls or collisions c ausing injury to the user or third parties.
Warranty valid only with a receipt
on condition that the bike has
been used in compliance with the
manufacture r’s terms of use.
The products m eet high safety,
health and environmental protection
requirements for CE marking
(Balance Bike 3in1 , Rocking
Elephant, Downhill Bike, Tricycle).
WARNING
READ ME
TIPS ON
SAFE
RIDING
54

Shaman Inventions, SIA
Kaļķu iela 12
Cēsis, LV- 41 0 1
Latvia
Did you study the chapter
on adjusting the bike height & size?
It is very important that you do!
If you skipped over it, please
see pages 18–22.
We care about your child’s comf ort, safety
and joy when riding the bike.
Feel free to send us a personal messa ge
with a photo* of your child riding to
info@legandgo.com
leggobike
and we will provide you with fee dback
whether the front fork angle and seat ar e
properly adjusted for your little one.
* The photo will never be used for publicity
without your written consent. The ph oto serves as a
reference poin t for ensuring that all the little
leg&go riders get th e best biking experience possible.
56

4
leg&go bike
Phone: +371 27 558 833
E-mail: info@legandgo.com
www.legandgo.com
leggobike
 Loading...