

Leggett & Platt G-SMR-2 CUSTOM Operation Manual

99300822-e EDR12009 8/12
[
adjustable bases
]
G-SMR-2 CUSTOM
remote control
operation guide
n English / Spanish


CONTENTS
G-SMR-2 Custom Function ........................................................................................... 4
Receiver Unit Programming .......................................................................................... 5
G-SMR-2 Custom Programming (1 remote control - 1 base) ............................................. 6
G-SMR-2 Custom Programming (2 remote controls - 1 base) ............................................ 7
G-SMR-2 Custom Programming (1 remote control - 2 bases) ............................................ 8
G-SMR-2 Custom Programming (2 remote controls - 2 bases) .......................................... 9
G-SMR-2 Custom Programming (separating 2 bases) ..................................................... 10
Spanish translation begins on page 12.
La traducción en español inicia en la página 12.
G-SMR-2 Custom Remote Control Operation Guide 99300822-e
4
important information
G-SMR-2 CUSTOM FUNCTION
READ ADVISORY INFORMATION IN THE OWNERS MANUAL CAREFULLY BEFORE USING THIS
PRODUCT. THE POTENTIAL FOR ELECTRICAL SHOCK EXISTS IF ELECTRICAL COMPONENTS ARE
NOT INSTALLED OR OPERATED PROPERLY.
NOTE
REMOTE CONTROL REQUIRES FOUR (4) AAA SIZE BATTERIES. TO CONSERVE
BATTERY LIFE, THE TRANSMITTER TURNS OFF ALL FUNCTIONS WHEN ANY BUTTON
IS PRESSED FOR MORE THAN 50 SECONDS.
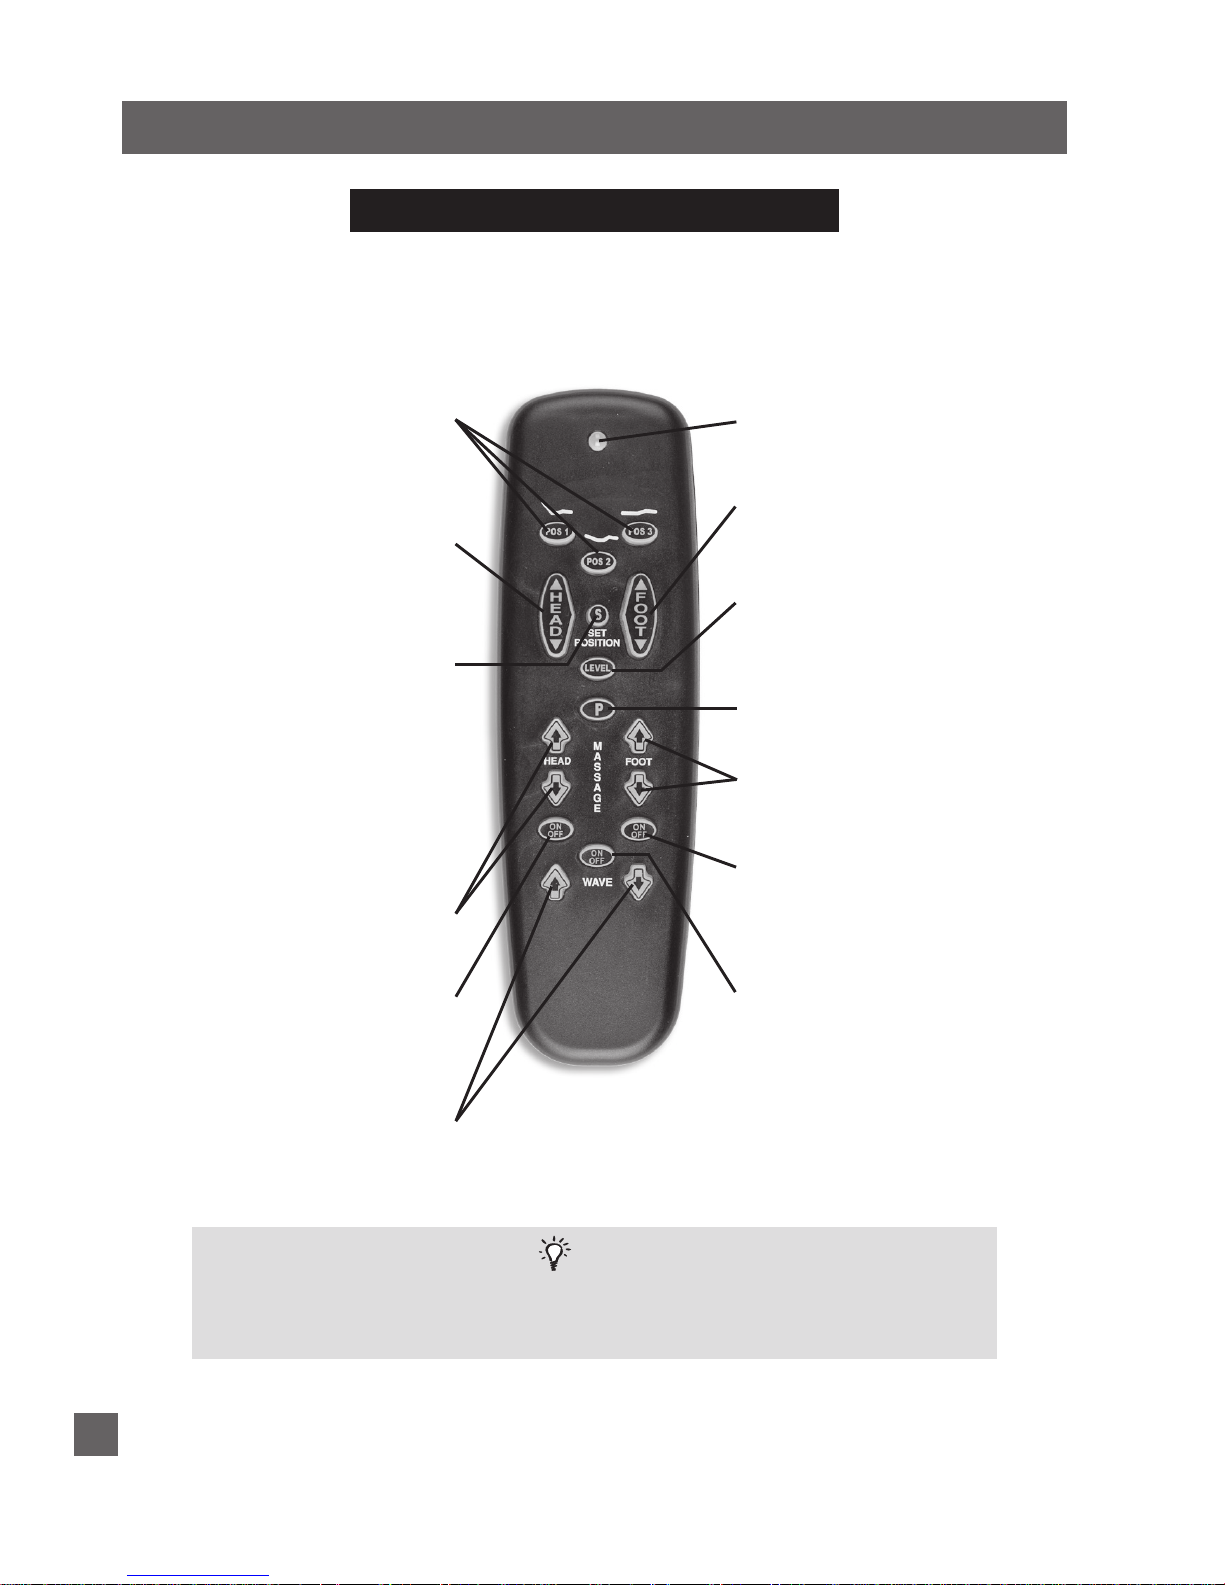
TRANSMISSION
INDICATOR LIGHT
Verifies a button is being pressed and
data is being sent to the base.
FOOT UP/DOWN BUTTON
Press and hold to raise or lower the foot
section.
FOOT MASSAGE BUTTONS
Press and hold to increase or decrease
foot massage intensity.
HEAD UP/DOWN BUTTON
Press and hold to raise or lower the head
section.
HEAD MASSAGE BUTTONS
Press and hold to increase or decrease
head massage intensity.
LEVEL BUTTON
Press to adjust the base to the flat
position. This button will also turn off the
massagers.
POSITION BUTTONS
Press and release a button and the base
will automatically move to the selected
position. To stop the base while in
motion, press and hold any button until
the base stops.
CUSTOM POSITION SET BUTTON
Press to capture any position and/or
function (massage and/or wave) of the
base as a programmed position.
To Program Custom Position:
1. Set the position (head and/or
foot) and/or function (massage
and/or wave) of the base to
the desired level.
2. Press and release the custom
position set button.
3. Press and release the custom
position recall button.
CUSTOM POSITION RECALL BUTTON
Press to adjust the base to the custom
programmed position.
FOOT MASSAGE ON/OFF BUTTON
Switches the foot massage on or off.
When switched on, the massage feature
will automatically shut off after 30
minutes.
HEAD MASSAGE ON/OFF BUTTON
Switches the head massage on or off.
When switched on, the massage feature
will automatically shut off after 30
minutes.
WAVE ON/OFF BUTTON
Press—once one or both massagers are
activated—to activate or deactivate the
wave vibration system.
WAVE SPEED BUTTONS
Press and hold—after the head and/or
foot massage, and the wave system have
been activated—to increase or decrease
the wave speed.
G-SMR-2 Custom Remote Control Operation Guide 99300822-e
5
AC J BOX / DC MOTOR without power down box PROGRAMMING PROCEDURE
When programming the remote control, unplug
the adjustable base electrical power cord. Wait
30 seconds, then plug the cord back into the
power source. This process automatically sets
the bed to the program mode for 90 seconds.
For convenience, use this procedure in lieu of
pressing the learn button (located on the AC
J Box, mounted to the underside of the base
frame).
Note that this programming feature is only
applicable to bases without a power down box.
Power down equipped adjustable bases require
use of the learn button on the power down box
when programming the remote control.
In case of a power outage, press and hold the
learn button on the power down box to lower
the base to the flat position (FIGURE 1).
This function is only for lowering the base and
will not operate the base to any other position.
The two (2) 9 volt batteries should be replaced
after this function is used.
In the event the power down feature does not
work, check to make sure the two (2) 9 volt
batteries are good.
The power down box is factory wired to the motor,
but the box itself is mobile and can be placed
anywhere under the adjustable base on the floor.
Position the power down box near your remote
control when programming for best results.
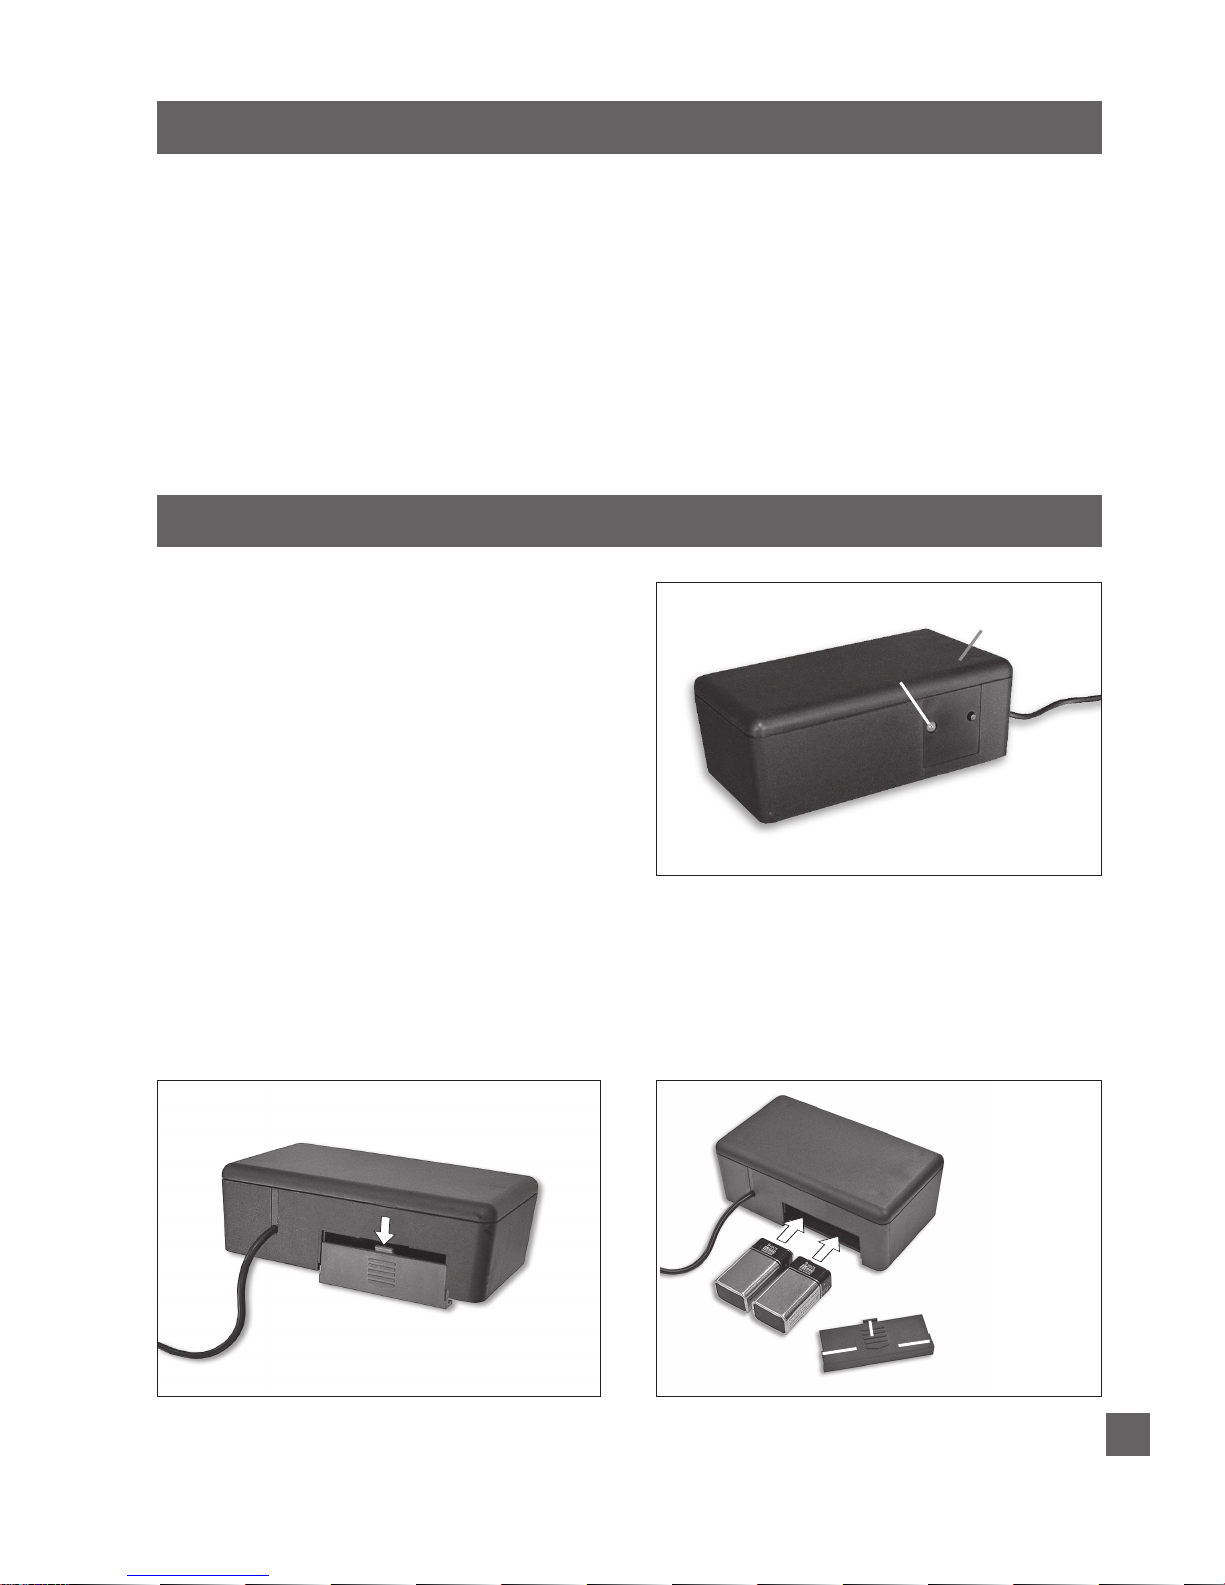
POWER DOWN BOX OPERATION
POWER
DOWN BOX
LEARN
BUTTON
FIGURE 1: Power down box learn button.
For adjustable bases equipped with AC J box or DC motor only—no power down box.
POWER DOWN BOX BATTERY INSTALLATION
PRESS IN (SLIGHTLY) AND
PUSH DOWN TO REMOVE
BATTERY COMPARTMENT
DOOR
BATTERY ORIENTATION IS
INDICATED INSIDE BATTERY
COMPARTMENT
DOOR INSTALLATION:
PRESS COMPARTMENT
DOOR AGAINST THE
BATTERY ENDS, SLIDE
DOOR UP AND IN TO
ENGAGE THE DOOR
TABS
TABS
STEP 1
STEP 2
G-SMR-2 Custom Remote Control Operation Guide 99300822-e
6
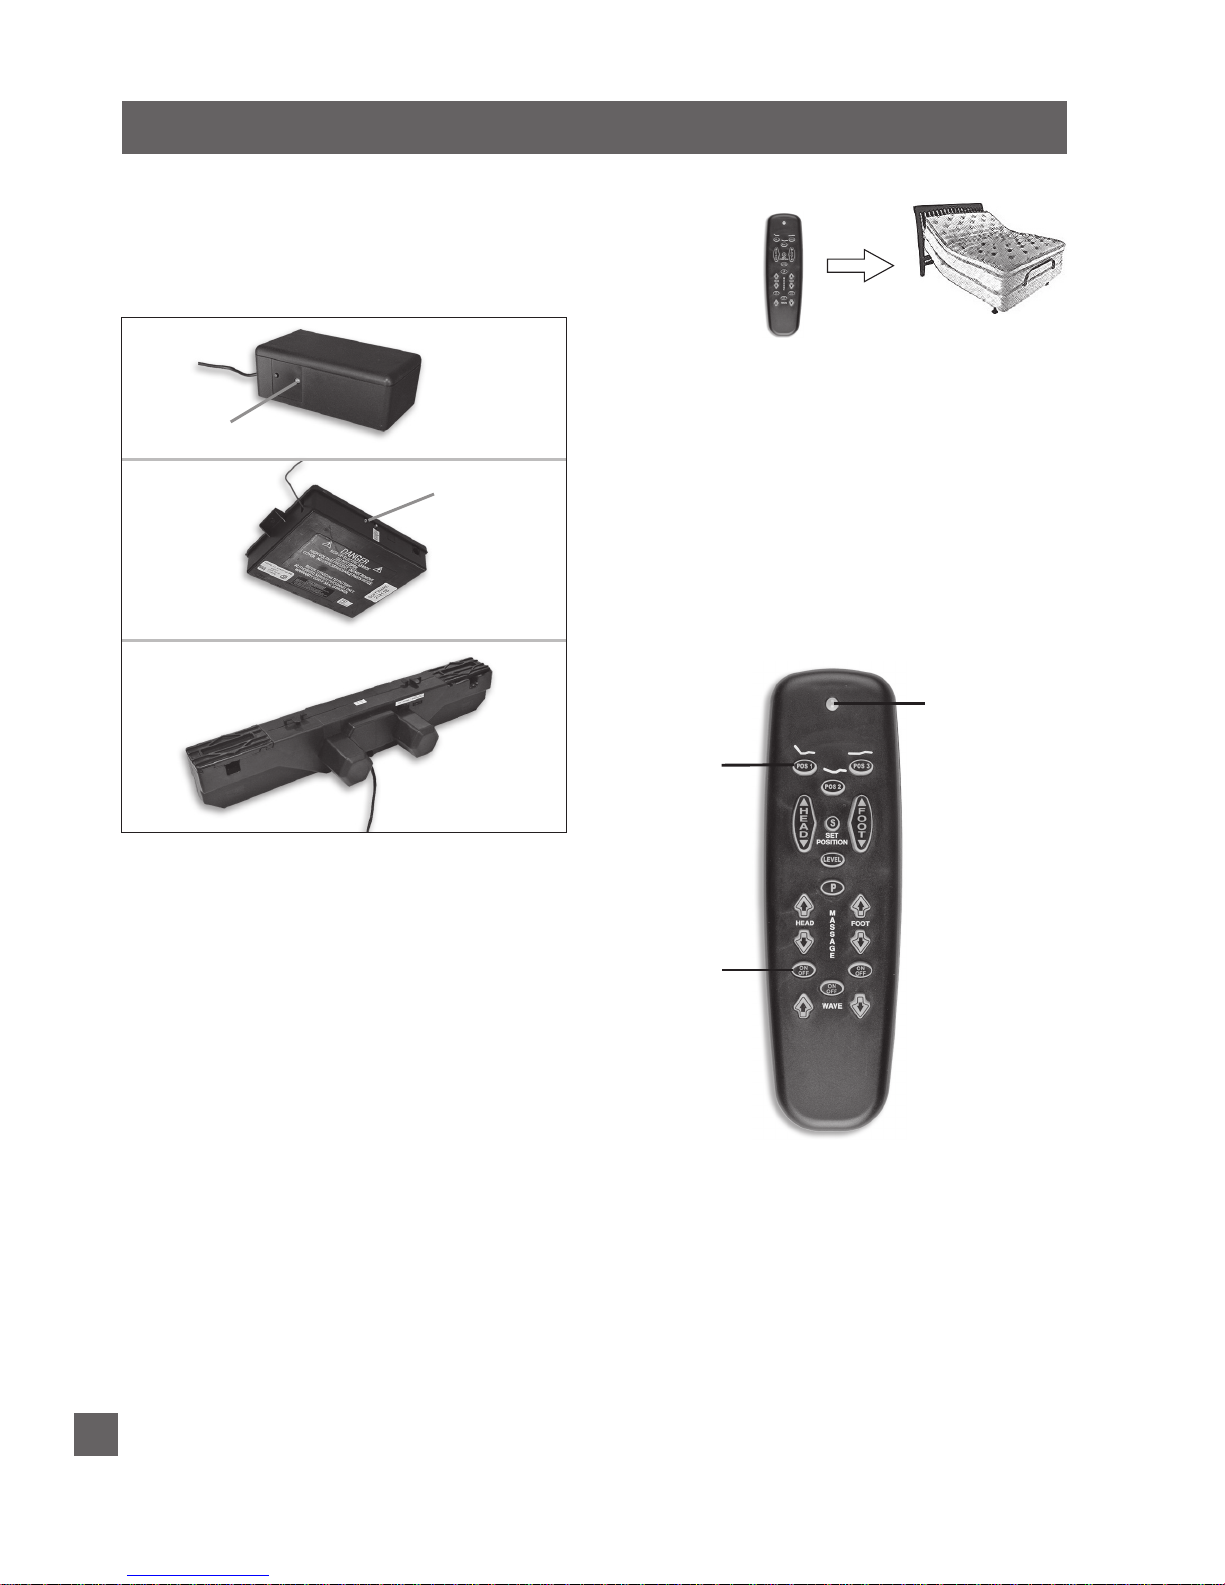
G-SMR-2 CUSTOM REMOTE CONTROL PROGRAMMING
(
1 remote control - 1 base)
POS 1
BUTTON
HEAD
MASSAGE
ON/OFF
BUTTON
TRANSMISSION
INDICATOR LIGHT
FIGURE 3
Program One Remote to Operate One Base - your adjustable
base will be equipped with one of the following: (A) a DC motor
with a power down box, (B) an AC J box, (C) a DC motor without
a power down box (FIGURE 2).
STEP 1
(A) DC motor with a power down box: press
the learn button on the power down box for 1
second.
(B or C) AC Jbox or DC motor without power
down box: unplug the adjustable base electrical
power cord. Wait 30 seconds, then plug the
cord back into the power source.
STEP 2
On the remote control, simultaneously press
and hold the POS 1 and head massage on/off
buttons (FIGURE 3). The transmission indicator
light will flash slowly and then flash rapidly to
indicate programming mode. Continue to hold
for 5 seconds and then release the buttons.
One remote control is now programmed to
operate one base.
FIGURE 2: Power down box, AC J box and DC motor.
LEARN
BUTTON
POWER
DOWN BOX
AC J BOX
POWER DOWN
BOX (NOT
MOUNTED TO
BASE FRAME)
AC J BOX
(MOUNTED
TO BOTTOM
SIDE OF BASE
FRAME)
LEARN
BUTTON
DC MOTOR-NO
POWER DOWN
BOX
DC MOTOR
(MOUNTED TO
BOTTOM SIDE OF
BASE FRAME)
A
B
C
 Loading...